#alumilite
Photo


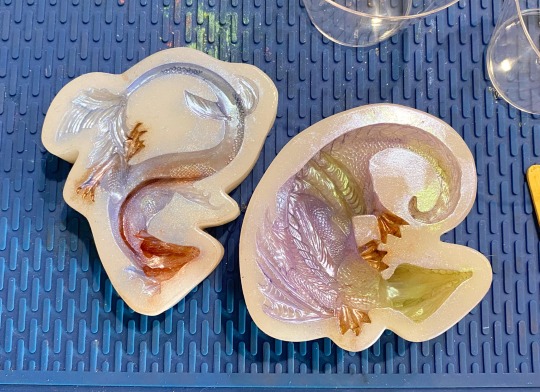


Resin casting with dragon molds. I brushed dust onto the mold first, then filled with a white pearl Alumilite resin
2 notes
·
View notes
Photo
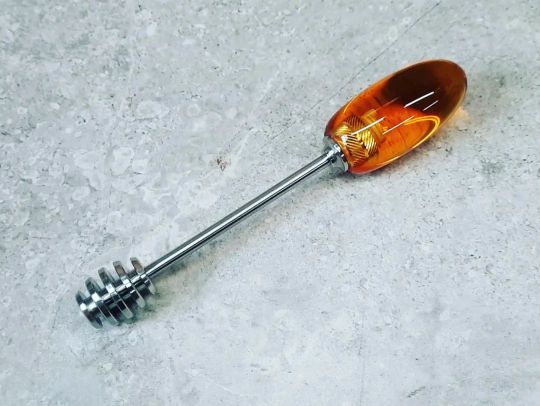
Honey Dipper, the part I made (The clear part) was almost twice the diameter it is now.... I need a smaller mold... #honey #dipper #stainlesssteel #alumilite #resin #makestuff #imadethis #gift #giftmaking https://www.instagram.com/p/ChNF8TwO603/?igshid=NGJjMDIxMWI=
0 notes
Photo
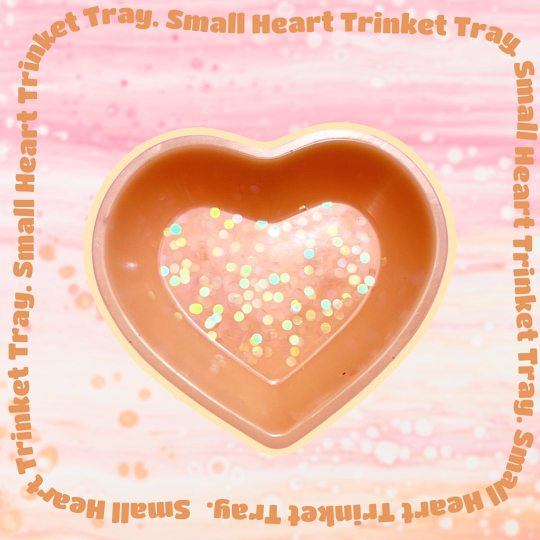
Dropped off multiple heart trinket trays at @eastdallasvintageshop! There are other colors to choose from, so go grab yourself one or two! Also save the date for next Thursday to sip and shop at @eastdallasvintageshop! You won’t want to miss out. 💗 ✨ 🫶🏼 #mspattycakemakes #mspattycake #maker #dallasmaker #resin #trinkettray #shelltray #kawaii #cute @alumiliteco #alumilite #eastdallasvintageshop #eastdallasvintage #eastdallas #heart #sparkle #stashtray (at Deep Ellum) https://www.instagram.com/p/CgUdJgouX8u/?igshid=NGJjMDIxMWI=
#mspattycakemakes#mspattycake#maker#dallasmaker#resin#trinkettray#shelltray#kawaii#cute#alumilite#eastdallasvintageshop#eastdallasvintage#eastdallas#heart#sparkle#stashtray
0 notes
Photo
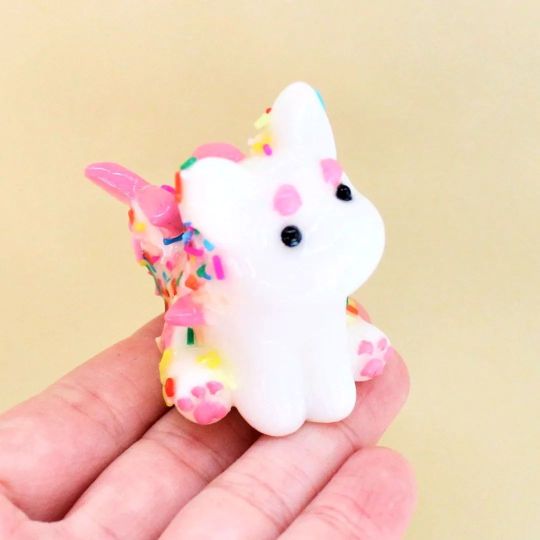
Available Saturday May 14th for the Live Stream Event! I know what you're thinking. "But Nicole you already made a post for the ice cream dinocats" Well take a second look because these are not dinocats, they're CATSHARKS! They still have those super cute brows but instead of looking grumpy, they look more curious or maybe they're just trying to give you the ol puppy dog eyes in hopes that you will share your snack with them. Either way, I'm not sharing. 😜 . . #sharkcat #darlinghomebody #minifigure #resinart #resinfigure #icecream #sundae #catdecor #sprinkles #cuteshark #arttoy #handmademini #resin #alumilite #sweettreat #fisharefriends #catshark #resintoy #resinmini #chicagoartist #makersgottamake https://www.instagram.com/p/CdZcqatM2oR/?igshid=NGJjMDIxMWI=
#sharkcat#darlinghomebody#minifigure#resinart#resinfigure#icecream#sundae#catdecor#sprinkles#cuteshark#arttoy#handmademini#resin#alumilite#sweettreat#fisharefriends#catshark#resintoy#resinmini#chicagoartist#makersgottamake
1 note
·
View note
Text
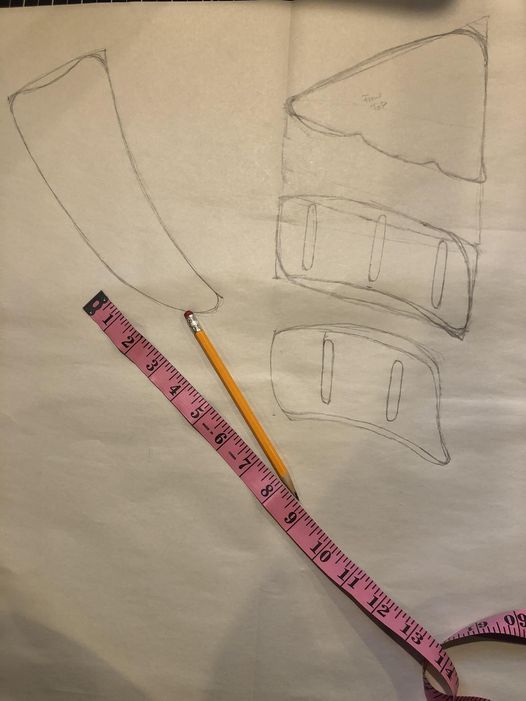
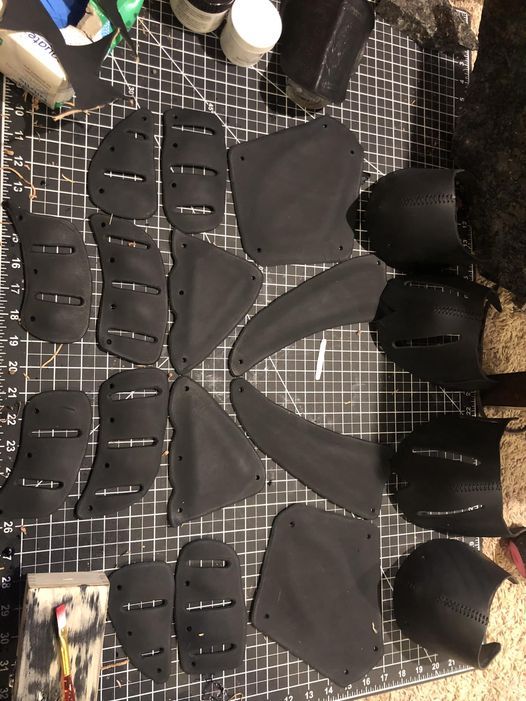
NOW! For the main event! The armor!
First you will need to draw out and pattern your pieces.

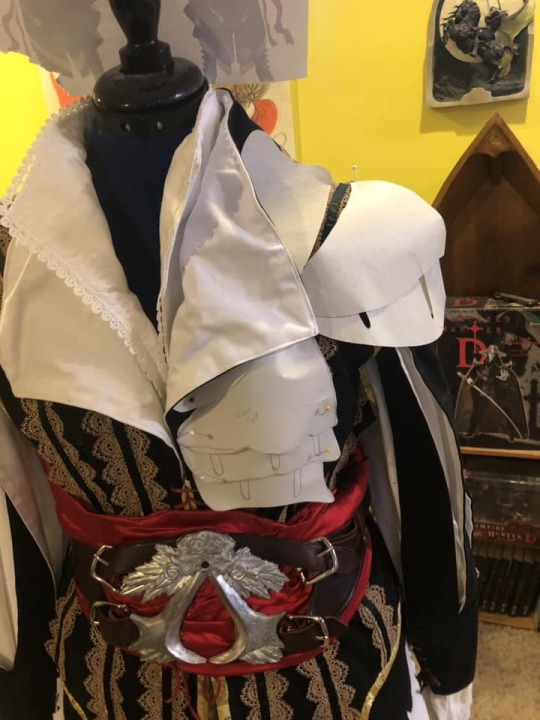
Pin your pattern pieces to your doublet and make any adjustments.

Cut out your armor from the thicker veg tan leather (7-9 oz)
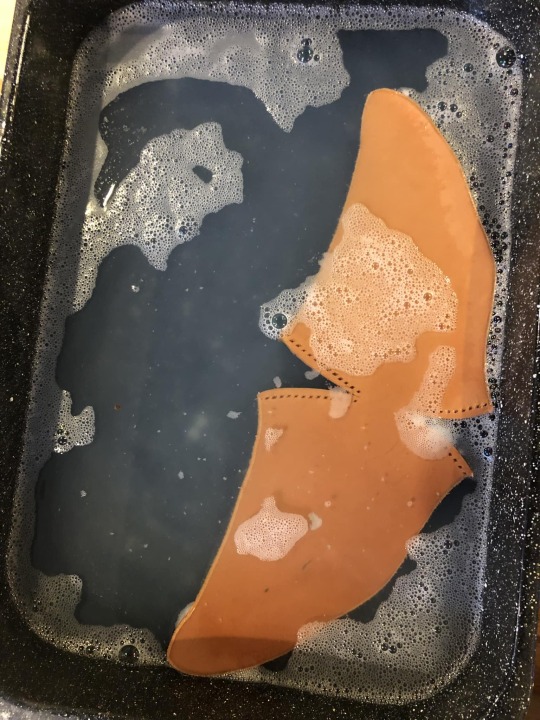
After beveling the edges and poking and punching any holes needed, each piece was placed in a bath of water with a bit of vinegar and dish soap. Soaked until nice and soft and floppy.

Stitch your pauldrons together while moist then form as they should be.
Form your armor while damp and moist.

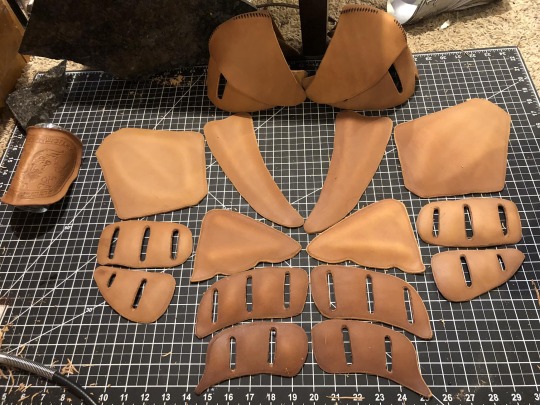
Now dye your pieces. You may need a couple coats.
Punch riveting holes.
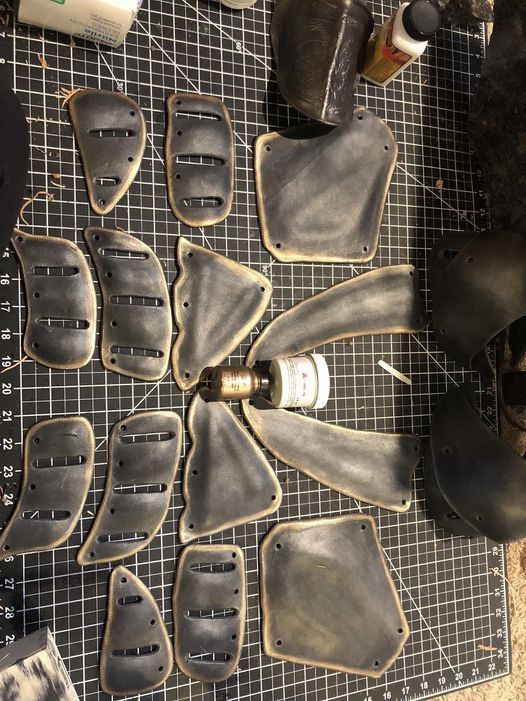
After dying, I lightly brushed Alumilite silver powder over the black and then wiped it off to give it that metallic shine followed by dusting the edges with a gold powder.

Don't forget to burnish your edges. This is a finishing touch that will round your edges and take out the roughness and tool marks.
Instead of wax, I used a burnishing gum called Tokonole
https://www.amazon.com/gp/product/B017X8GL9A/ref=ppx_yo_dt_b_asin_title_o00_s00?ie=UTF8&psc=1
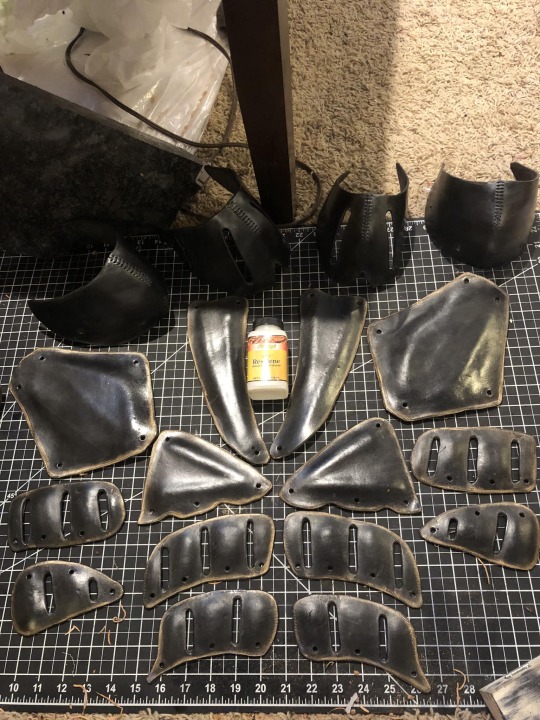
I finished the leather with Resolene to give it a nice shine.
But wait! We're not done!
We need to harden the leather!

To harden my pieces I did a few coats of UV resin. Hitting each coat with the UV light.

The top parts of the pauldrons you are going to cover in the same fabric as your doublet with the trim/bias also. The triangles cut out with a heat tool to seal the edges.
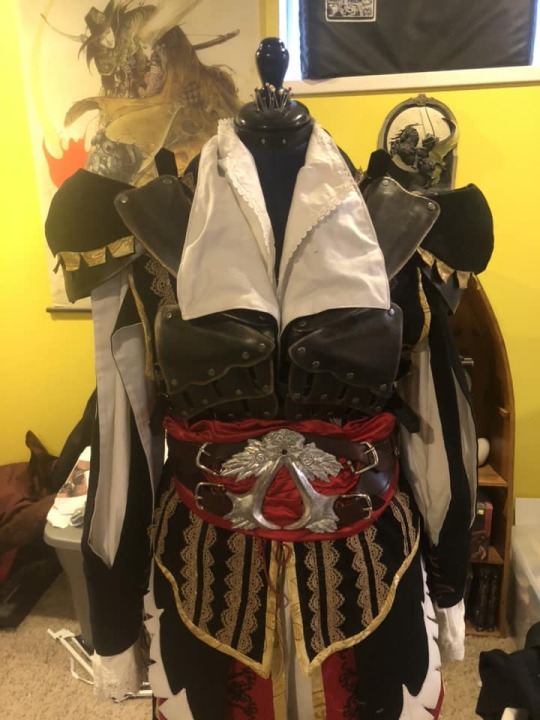

Rivet your armor together and you are now complete!
#cosplay#armor making#leather#assassins creed cosplay#assassin's creed#ezio assassins creed#ezio auditore
53 notes
·
View notes
Text

This B Part resin gets crusty and the lid sticks. That’s why I keep this old wrench handy. But, I’ve been using up my Smooth-On and this Alumilite resin sat for awhile. The wrench didn’t cut it this time. The lid stayed, and cracked! Now I have a convenient pour spout.
#always look on the bright side#mef#memgician#art toy#capsule toy#designer toy#capsuletoy#designer toys#handmade#resin#process#casting
3 notes
·
View notes
Photo

:t.h:e.n:d.1:4.2: :t.r:e.s:c.o:l.o:r.s: :t.h:e.f:l.a:m.e: File Name: Hexagon Coaster File From: Hexa100 Project Design by: :t.h:e.n:d.1:4.2: Scale: 132% Nozzle Size: 0.4mm Layer Height: 0.22mm Infill Density: 0% Print Speed: 30mm/s Supports: None Nozzle Temp: 230 Bed Temp: 60 Filament(s): Various PLAs Print Time: 2 hours & 3 minutes Printer(s): Anycubic Vyper (Standard stock) Additional Materials: Alumilite High Gloss Resin Additional Time: Splicing, cutting, trimming and resin - 6 to 8 hours. 24 for resin dry. https://www.instagram.com/p/CjJ_b1PrC2A/?igshid=NGJjMDIxMWI=
2 notes
·
View notes
Photo

¡Experimenta la versatilidad de la resina epoxi Alumilite Amazing Clear Cast! Este kit de 2 galones (1 galón A + 1 galón B) te ofrece un acabado plástico brillante para tus proyectos de fundición y revestimiento de encimeras, madera, manualidades y arte de encapsulación. Esta resina multiusos es perfecta para crear piezas únicas y duraderas. ¡Haz que tus creaciones brillen con Alumilite Amazing Clear Cast!
0 notes
Text
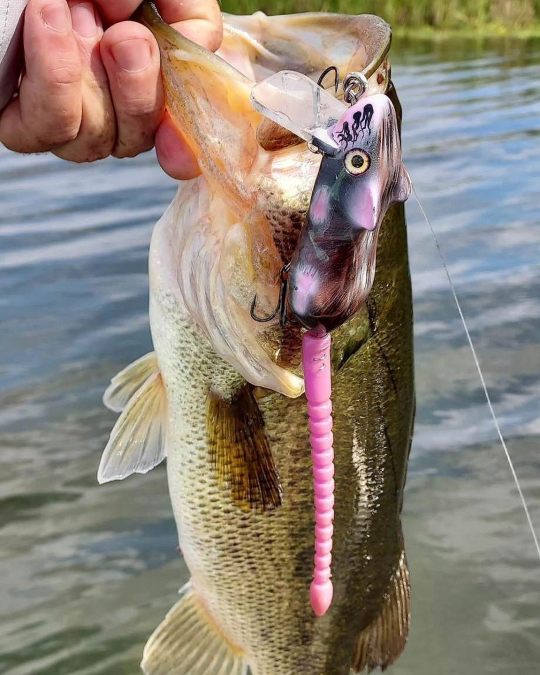
Jeremy hooking up with the @sacpigbaitco Mischief Travel. As the weather warms up, there’s no better fun than throwing a topwater lure and experiencing an incredible blow-up! Tight lines and go get’m 💪
#shakethatbooty #bootyshaker #rats #rats4life #mischief #wakebait #topwater #crankdown #rattify #ratty #fur #iwata #airbrush #alumilite #smoothon #silicone #resin #uvresin #kvd #assistcord #ownershooks#shakethatbooty #bootyshaker #rats #rats4life #mischief #wakebait #topwater #crankdown #rattify #ratty #fur #iwata #airbrush #alumilite #smoothon #silicone #resin #uvresin #kvd #assistcord #ownershooks https://www.instagram.com/p/CtRQfK9LOzJ/ https://tackle.net
0 notes
Photo

I've been home for about a year now, but had made a deliberate decision to not do any woodworking and to focus on fixing the problems with this house. However I also have a supply of Alumilite resins that I'm afraid are close to expiring, so I'm taking a moment to cast a few items. #resin #resinart #resincraft #woodworking #woodturning #christmas #pinecone https://www.instagram.com/p/Cm2CgGVrUc3/?igshid=NGJjMDIxMWI=
0 notes
Link
Check out this listing I just added to my Poshmark closet: Handmade resin black, silver and gold earrings.
0 notes
Note
Another light based botbot! She's a metal wireless table lamp! She always brag and praise herself... Thinking she's so much better than everyone... She's also a rivaling host to Shaney and Cheffi... She's basically the Katie Killjoy to the bots...

Alumilit(aluminum, one of the most commonly used metals in lamps)
1 note
·
View note
Text
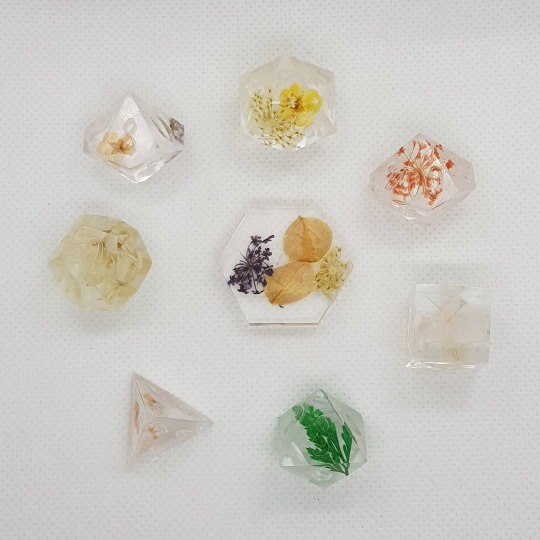
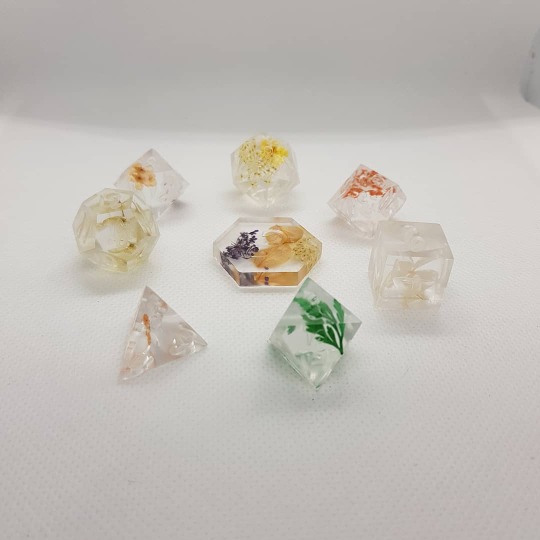
#dnd#dice#dice set#dnd dice#d20#polyhedral dice#dice palette#handmade dice#flower dice#alumilite resin#alumilite#DiusDice
39 notes
·
View notes
Photo
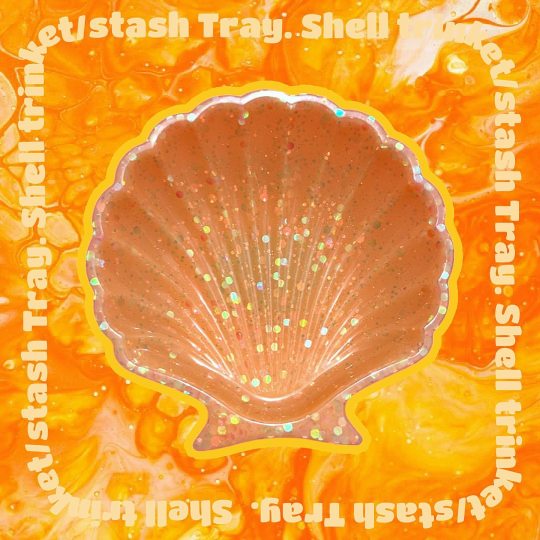
Dropped off all of the shell trinket trays off at @eastdallasvintageshop! There are different colors to choose from, so go grab yourself one before they’re gone! 🐚 🌊 ✨ #mspattycakemakes #mspattycake #maker #dallasmaker #resin #trinkettray #shelltray #kawaii #cute @alumiliteco #alumilite #eastdallasvintageshop #stashtray #tray #shell #glitter #pearl (at Lochwood, Dallas) https://www.instagram.com/p/CgR9w6rObw9/?igshid=NGJjMDIxMWI=
#mspattycakemakes#mspattycake#maker#dallasmaker#resin#trinkettray#shelltray#kawaii#cute#alumilite#eastdallasvintageshop#stashtray#tray#shell#glitter#pearl
1 note
·
View note
Photo

Available Saturday May 14th, for the Darling Homebody Shopping Network shop update. Along with a bunch more! So what are you waiting for? Go join the event page and mark it as "going" so that I don't have to break it to these adorable Ice Cream beebs that no one is interested in adopting them. They will melt your heart as if it is made out of your favorite flavor of ice cream. Let me guess....Moose Tracks? Wait, no that's my favorite... . . #dhsn #darlinghomebody #icecream #sundae #sprinkles #rainbowsprinkles #jimmies #arttoy #resinfigure #minifigure #resinmini #handmadetoy #resinarttoy #minifig #resinart #dinosaur #cat #dinocat #artmini #minisculpt #strawberryicecream #icecreamsundae #alumilite #uvresin #whiteresin #customarttoy #customminifigure https://www.instagram.com/p/CdTwxK9u5g0/?igshid=NGJjMDIxMWI=
#dhsn#darlinghomebody#icecream#sundae#sprinkles#rainbowsprinkles#jimmies#arttoy#resinfigure#minifigure#resinmini#handmadetoy#resinarttoy#minifig#resinart#dinosaur#cat#dinocat#artmini#minisculpt#strawberryicecream#icecreamsundae#alumilite#uvresin#whiteresin#customarttoy#customminifigure
1 note
·
View note
Text
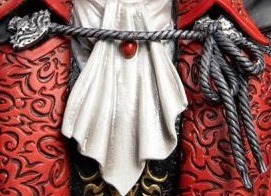
Cape pt. 2
Now onto the clasps!
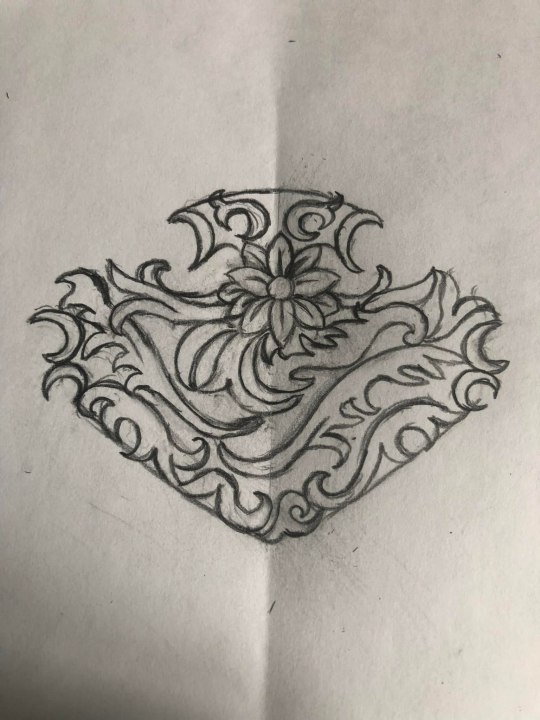
I studied and looked at every single angle I could find online of the cape clasps and this is what I came up with.
The flower most likely representing his late wife, Lisa, who loved lilies. I dunno. But it was pretty!

Seeing as the clasps were opposite/mirror of eachother, that meant I would need to make 2.
Out comes the Monster Clay.
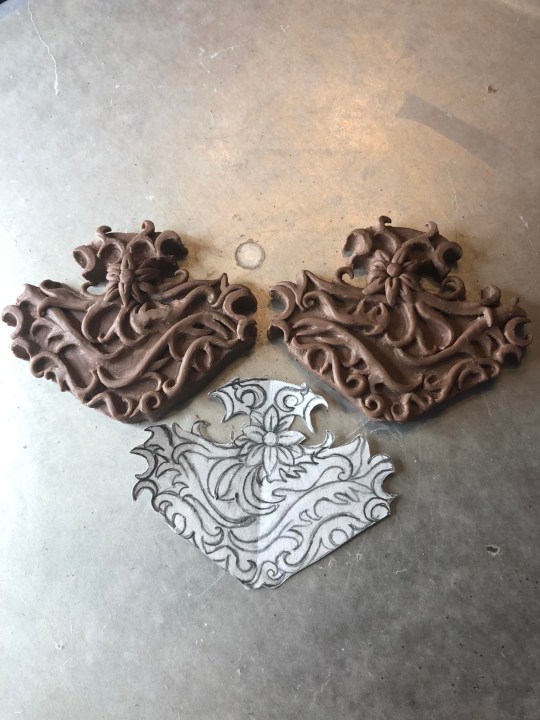
Now, when sculpting, you are going to want to make sure there's no space under your shapes for the silicone to sneak into..
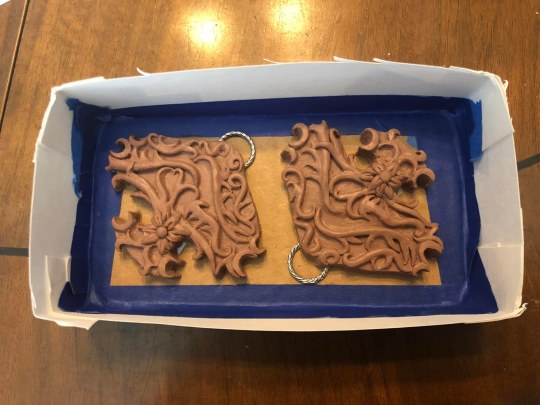
Place in your metal o-rings, set in a box that is sealed. Remember not to leave any space between the box bottom and the sculpted piece.
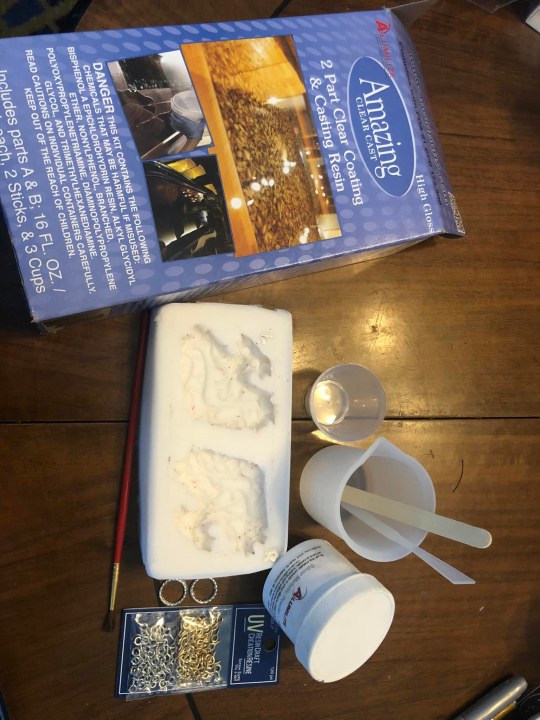
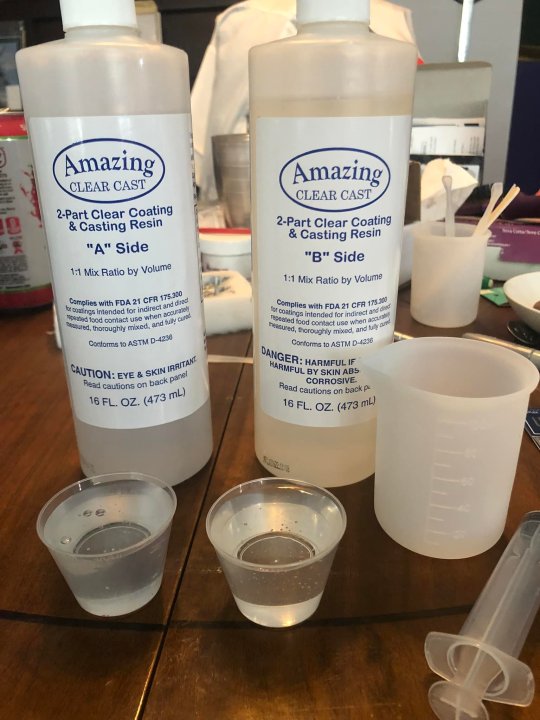
Now you are going to want to mix your 2 part silicone resin and pour. Make sure you get enough over the top of your molds (1/4'').
I have recently discovered the best silicone molding next to Oomoo.
https://letsresin.com/collections/silicone-rubber
This stuff is great!
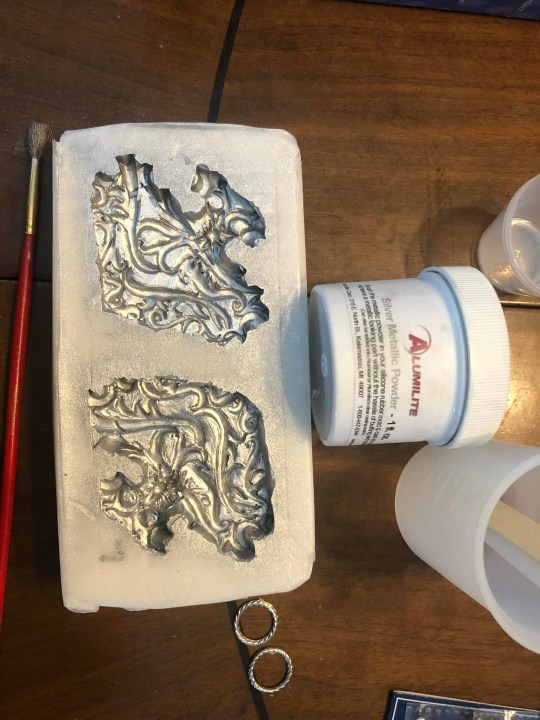
Once your mold has cured, remove the clay and o-rings. Remove the o-rings from your clay and prep your mold with a fine silver powder. https://www.alumilite.com/dyes-colors/alumilite-metallic-powder/
You can now mix your resin and pour in.
When pouring, pour from a height of 1 ft or so from the mold. This will help airbubbles to escape.
Once your mold is filled, return your o-rings into the resin.

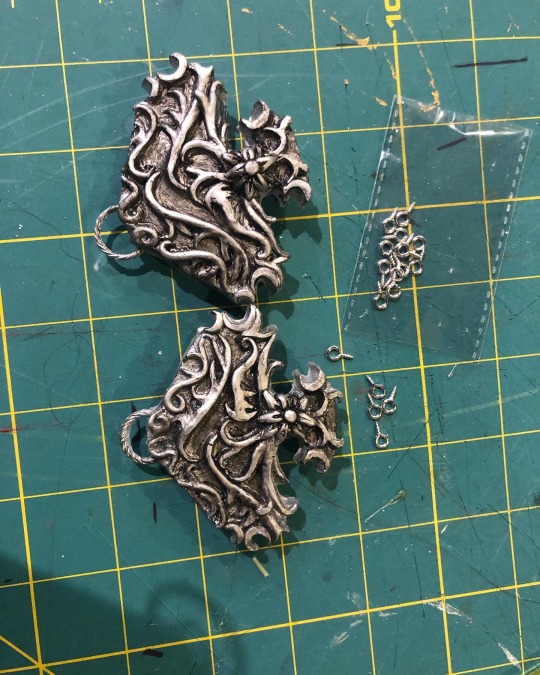
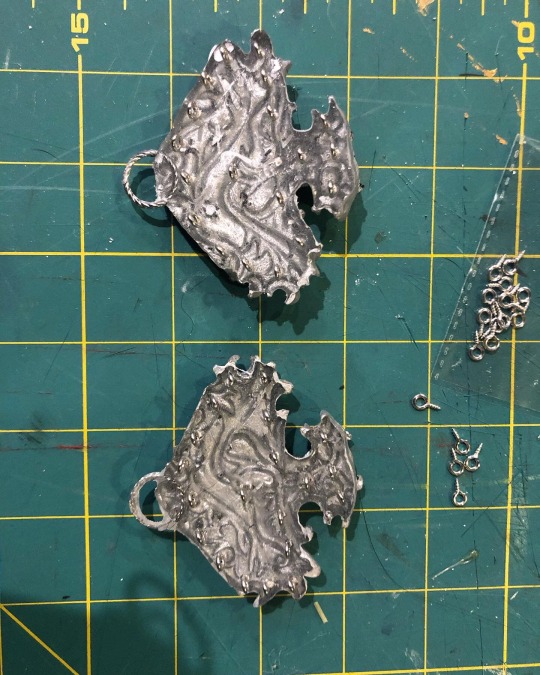
Resin set over night. Remove and you now have nice silver clasps. But you're not done yet!
Get some black paint. Paint over your clasps then rub off to leave black in the nooks and crannies. This will make a nice antiqued look and bring out more of your details.
With the finest bit you can get, drill about 20 holes into the backs. Making sure your holes are evenly spaced and not going all the way through.
You will then insert 4mm screw eyes
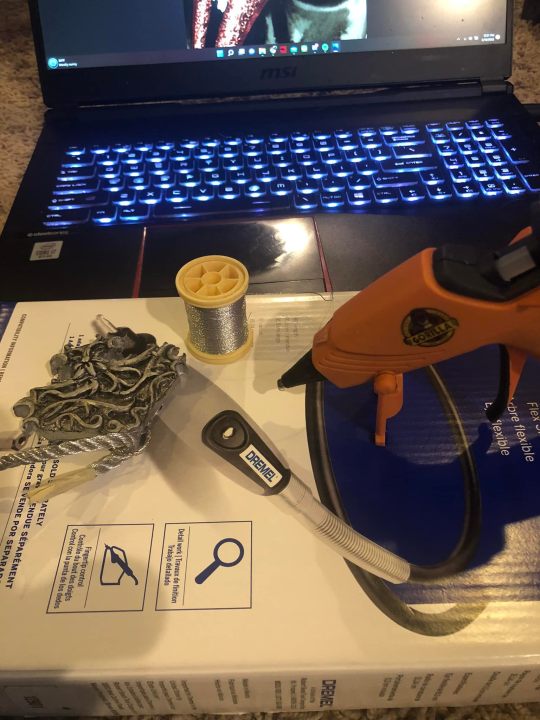
For the silver roping you will need some silver thread, hotglue, silver roping trim.

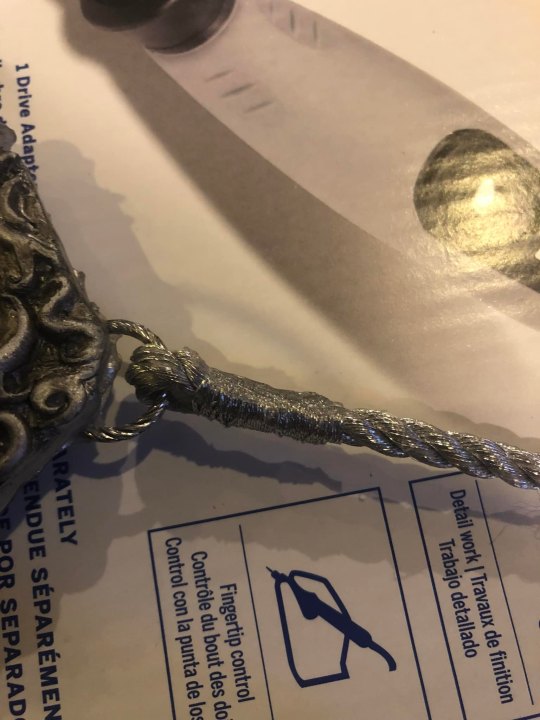
Bring your silver rope through the o-ring of your clasp, Glue in place.
Next, wrap with your silver thread until you no longer see glue or the end of the trim.

Cut a separate piece of trim and glue that about foot away from your finshed/clasped end. Wrap with thread.

Finish the ends with a little bit of glue and more thread wrapping.
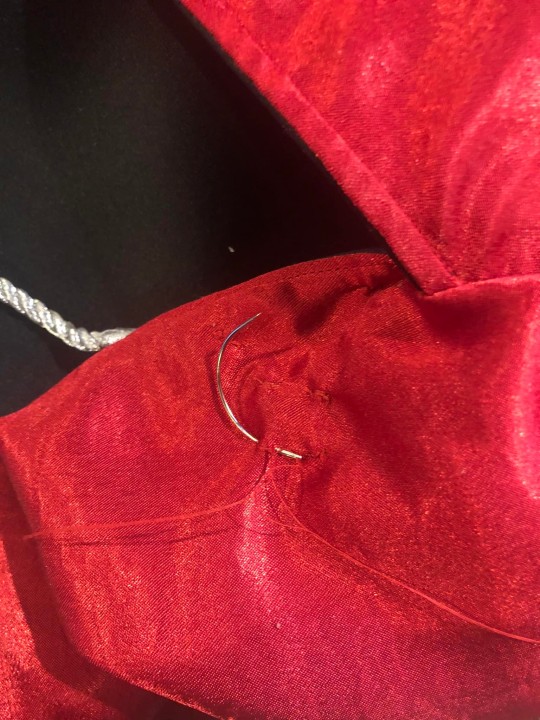
Place your clasps onto the cape.
Using a curve needle, stitch into each of those screw eyes.
The reason you have so many screw eyes is to help evenly distribute the weight of the cape and prevent tearing.
Later you will want to install snaps under these to attach to the coat just above the lapels to REALLY hold your cape in place.
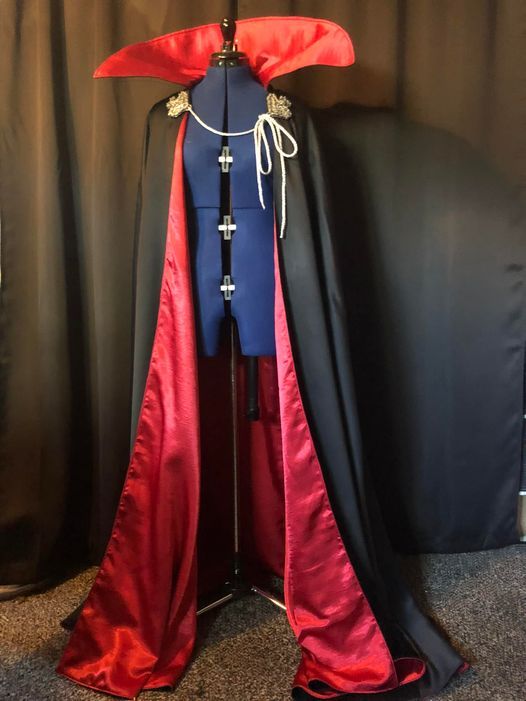
Cape complete!
30 notes
·
View notes
Last Seen Blogs

bby-pet
pretty pout, gonna run amuck.

xinyu93
★彡

wingzie
Wingzie

msbcreations-blog
MSB Creations

ysgsvsve
Bez tytułu