#at least the typography is visible this time lmao
Note
Hi first of all I’m in love with your gifs and your coloring 💖 , may I ask how you did the typography on your Peter Parker set with the red coloring? Thank you so much in advance! 🧡
hiiiiiiii you've made my entire week, just so you know 🥺🥺❤️ and yes! bear with me because it's my first ever walk-through/tutorial/whatever you wanna call it lmao SO pardon the screenshots if they're wack 💀 i'll put it all under the cut, hope it makes sense & if it doesn't don't hesitate to send me an ask like tf was that you rambled and made zero sense, i'd probably agree with you lol i’m basing this off of these two gifs i’ve done where the text is “revealed” by movement of a subject in the foreground.

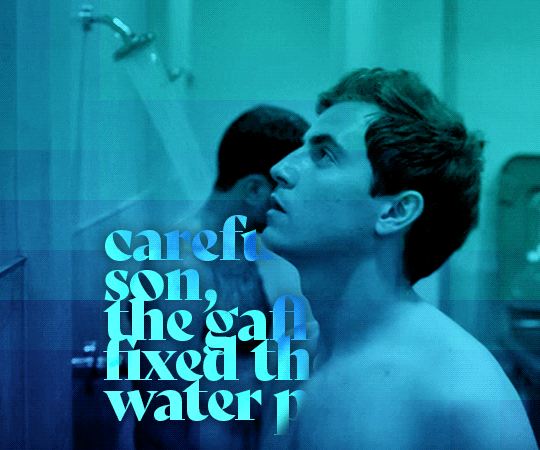
text reveal in a gif!
so first off, i use video timeline in PS as opposed to frame animation timeline; hence, if you use frame animation to make your gifs i'm not sure if this will translate over exactly the same and i do apologize if that's the case!
i've done this twice now & love it because it's actually way easier than i ever imagined it to be 😂 what it boils down to is creating a layer mask that is not locked to your text layer & changing said position of that mask at various time points/keyframes of your gif!
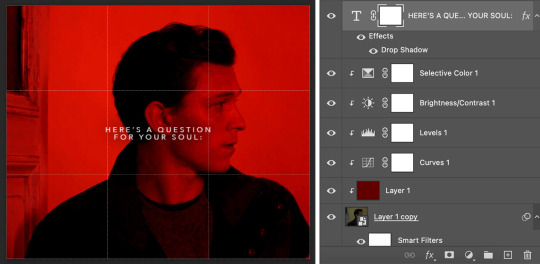
first, create your text layer with whatever font, drop shadow, gradient overlay, blending setting, etc. that you prefer. it should be your top layer of the psd & you'll start with something like the image on the left. then you'll add a layer mask while selecting your text layer (the white rectangle with a cut-out circle in the middle at the bottom), your layer panel should now look like the image on the right.
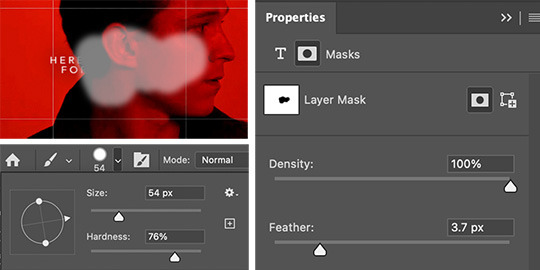
now it's time to paint your layer mask! depending on the intricacy of the mask, i'll mess with the diameter/size of the brush but otherwise i typically use around 70% hardness as my settings. using the black brush (while selecting the layer mask as shown above) you'll want to "erase" aka mask the part of the text that is on top of peter's face since we're having his head movement "reveal" the text. if you need to see what you're painting the shortcut to make the layer mask visible to you is "shift+\" (for mac at least lmao). i included my mask settings as well - granted this is just for text layers. i use ~30px for the feathering when i’m masking for any kind of overlays/coloring/etc.
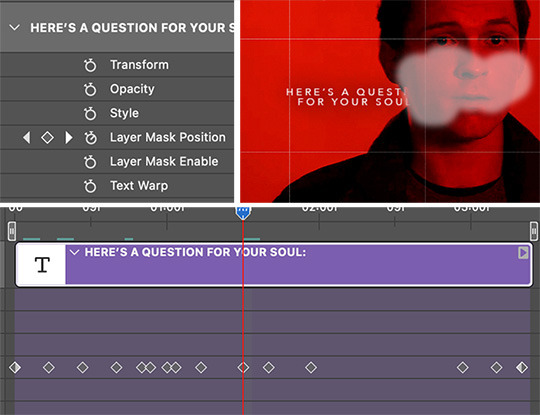
once you've got your layer mask painted & primed you're ready to get to the fun (read: more time-intensive) part. the next step will be crucial to the process, if you don't do it or forget to, it'll quite literally never work & instead just frustrate the hell out of you. you've got to unlock the layer mask from the layer itself. as in, see that little chain link in between T and the layer mask box? yeah? click it!!! unlock that bitch!!! hit the jackpot!!! discover things you've always dreamed of!!! (this works for any layer mask on any layer btw, it is my secret weapon i'm obsessed i will forever unlock that bitch anyways moving on). so now you should have a painted layer mask (i chose to make it visible for the screenshot) & an unlocked layer mask (i chose to show a before & after for this), in the end your layer panel (not your timeline panel) should look like the following.

the next thing is to make that mask move with purpose. we’re going to essentially tell it where we want it to be at specific time points. when you mark those keyframes, the mask will move itself as fast or as slow as it needs to in order to get from its previous location at whatever keyframe to its new location at the next keyframe. so now we’ll be working in the timeline panel - like i said, i use video timeline, not frame animation, it’s what i taught myself ps with so outside of very very specific things, i always stick to video timeline.
you’ll want to scroll to your text layer and hit the down carrot on the far left in order to bring up a dropdown list of customizations (you’ll notice there’s a lot of others things you can make text do - like change the warp aka wiggle or change the style aka seamlessly morph to a different color). we’re focusing on the “layer mask position” (which folks if you’re following along, is also how you you can make your coloring stay in the background even if your subject moves significantly in the foreground!). i typically start at the beginning of my timeline and work my way through the gif. i’ll want the layer mask to be “visible” so i can see where it’s moving as i go.
since everything should be prepped correctly and in the right spot, you’ll start by hitting that little diamond to the left of “layer mask position” and a new point should pop up on your timeline to the right - that indicates where the layer mask is on the overall canvas. now, take your time cursor bar thing and move it along the timeline to see your gif (and peter’s head position) progress. depending on the amount of movement you may only have a few keyframe points needed or you may have a lot (similar to this particular gif). anytime there is significant movement, you will need to move your layer mask which will automatically create a new keyframe. this means you need to have your move tool (shift+v) on and layer mask square selected. placing of keyframes does take some practice, you’ll get the hang of how fast it takes the mask to move to a certain place & not necessarily need a keyframe at every. single. frame. that would be exhausting. sometimes for jerkier movements you’ll need to be more exact, and other times you can let the gif do the work and have the mask glide into position in time with peter’s head (or whatever is revealing/hiding your text layer).
essentially the point is this: scroll to the next pertinent position on your gif. ensure your layer mask is selected & you’re using the move tool. move just the layer mask to where it needs to go. a new diamond point should appear on the timeline signaling a new keyframe for the layer mask’s position. rinse, repeat until you’ve made it through the entire gif. then you get to “hide” the layer mask again with shift+\ and play your gif through to see how you did lol. see if the text reveal is smooth or if there’s parts that go too fast, too slow, or are off in terms of what it hides where.
you can click and drag your diamond points if need be as well! they aren’t set in stone if it’s easiest to adjust that way. typically ps will also “show” how the mask is moving if you slowly drag your timeline cursor along and have the mask visible, sometimes that can be helpful when fine-tuning your mask position.
i think that’s that! hopefully this made enough sense & wasn’t too rambly or like just plain nonsense. i wasn’t sure your ps level anon so i tried to explain every step, please do not take offense if you knew half of this already!! feel free to send follow-up questions, or if you see something else you’re curious about (not that i think i’m like. the shit at ps & gif-making lmao. i’m not. but i’m happy to help if i can!)
#ask#anonymous#ps asks#this was actually kinda fun???#and maybe way more in depth than the anon meant but listen#i went all in#can't stop me now#photoshop tutorial
173 notes
·
View notes
Last Seen Blogs

ihusak-blog
ILLIA HUSAK

sessenaa
An unorganized mess

goocomics
Goo Comics
midbus8
Midbus8
camilishpilish
Questionable Affinity For Mushrooms