#bilinear
Text
Tight tranny gf Khloe Kay anal ride cock
Hardcore lesbian action with three black sluts Lola Lane, Xxxplicit, Skyy and their sex toys
Redhead teen pussy licking I always knew that the ordinances
Older professor invites his younger student for gay sex
Teen pstar gets rimmed
Blonde teens share cock
blonde and redhead threesome on stage
Cardi B desnuda tocado su concha en instagram
Desi show off for boyfriend
camara secreta mi hermana desnuda
#Crocodilidae#Gwelo#reforestation#ungloomed#pinch-run#balsamitic#abra#supercomputers#swam#Ladiesburg#sorrow-seasoned#self-martyrdom#glaga#regimented#bilinear#Muncerian#hydrocolloid#Zeuzera#underbeing#yellow-skirted
0 notes
Text
HOW TO FIND A TRENDING A PROFITABLE NICH FOR AFFILIATE MARKETING
HOW TO FIND A TRENDING A PROFITABLE NICH FOR AFFILIATE MARKETING
NICH FINGIND PROGRAMM: WATCH THE VIDEO
#Affiliate marketing#makemoneyonlie#Passiveincome#Milliner#Bilinear#clickbank Affiliate#jvzoo Affiliate#dgstore24 affiliate#digital marketing#work from home#online income#smart money#digital currency#overnight bilinear
0 notes
Text


happy INWED to all my fellow engineering girlies 🥰
#we kick ass we are so cool#we do Not sob over bilinear algebra and lab reports!!!!!#stemblr#stem#academia#studyblr#women in stem#women in science
25 notes
·
View notes
Text
they said it couldn't be done but i jpegged that png
#never considered it but that nearest neighbour and bicubic and bilinear resampling bullshit when you save a drawing matters sometimes#esp when your drawing looks a lil crispy#the mor u know
25 notes
·
View notes
Text
Studying for my linear algebra exam right after I took analysis, which went pretty well. But I have to admit that I'm finding linear algebra much more amusing. The stuff is pretty hard, and the exam is even harder. Wish me luck
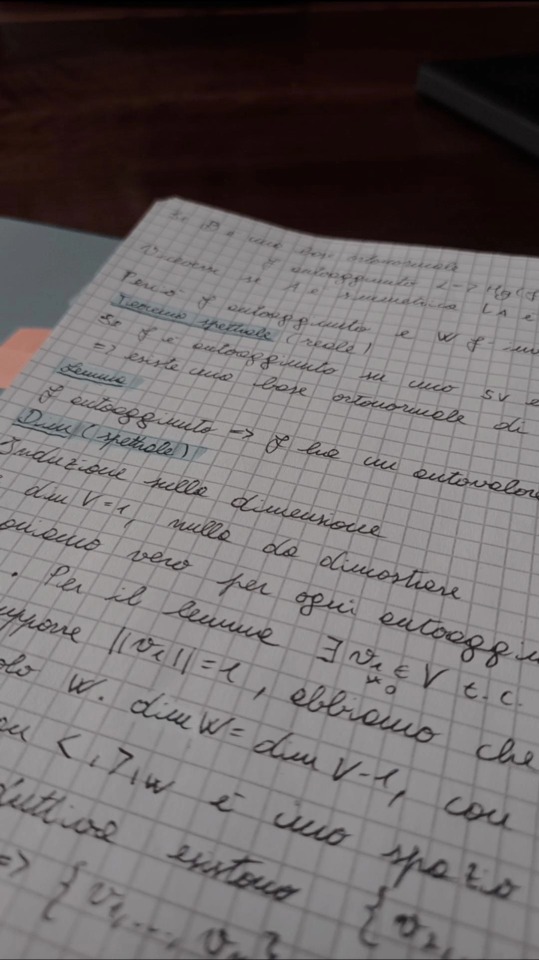

#mathematics#linear algebra#Euclidean vector spaces#vector space#spectral theorem#studyblr#dark acamedia#piano#math major#bilinear form#orthogonal groups#group theory
9 notes
·
View notes
Text
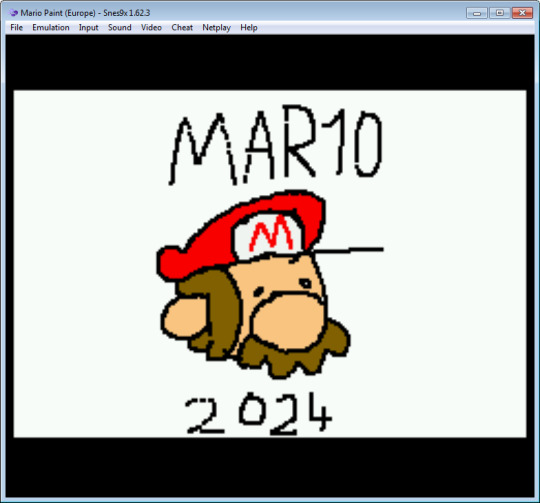
happy mar10, guys.
1 note
·
View note
Text
been using a browser plugin that disables bilinear filtering on pictures and videos & uses nearest neighbor instead and sometimes things look NASTY but im happy because at least its a nasty of my own choosing
#my gripe is moreso with srgb color spaces than bilinear interpolation#im out here converting images to oklab before doing any scaling operations
1 note
·
View note
Text
THAT BLOG HAS MORE TRANSPARENT BACKGROUND SPRITES THAT ARE ALL NON-INTEGER NEAREST NEIGHBOR UPSCALED.
AHHHHHHHH!!!!!
Nearest neighbor is the best at upscaling 8-, 16-, and 32-bit sprites, but only if you use an integer scalar!!!! It looks like shit if you don’t!
1 note
·
View note
Text

[Since the dawn of time, human beings have asked some fundamental questions: who are we? why are we here? is there life after death? Unable to answer any of these, in this paper we will consider cohomology classes on a complex projective manifold that have a property analogous to the Hard-Lefschetz Theorem and Hodge-Riemann bilinear relations.]
Ross & Toma (2023)
2K notes
·
View notes
Note
Tofu I'm sorry for bothering you, I just want to ask how you export stuff. I can't export stuff from Aesprite without it having blur. What can I do?
before saving your image you can scale it up like this (ctrl + alt + i), but make sure you are using nearest neighbour interpolation.
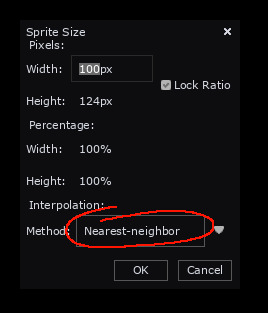
if you dont increase the size of your image before saving, some websites will just scale it the default way to fill the space, which uses bilinear interpolation (blurry). nearest neigbour should fix everything. if its still blurry when you post, your image might just still be too small
!! always make sure you scale your art by multiples 100% at a time: 200%, 300% etc. !!
if you do something like 155% then the pixels will all be different sizes, this is a noob trap
185 notes
·
View notes
Photo


The Nintendo 64 was able to cover large areas with very low-resolution textures due to its built-in bilinear texture filtering which blended the pixels to such a degree that the surface appeared to be made out of smooth gradients. This is particularly heavily utilized in Shifting Sand Land in Super Mario 64.
Top: the way the ground appears when viewed normally, with the texture filtering used by the hardware. Note the smoothness of the sand.
Bottom: the way the ground appears when the filtering is turned off. Note the extremely large size of each individual pixel.
Main Blog | Twitter | Patreon | Source: twitter.com user “BrochachoTB40″
1K notes
·
View notes
Note
Hi! I saw a post where you had a game made in godot with old school rendering, do you maybe have any tips on how to make godot render a game like that instead of its normal rendering method?
I'd be right happy to!
I'll try to make this concise lol, I always end up overexplaining and then getting lost in the weeds. Buckle up, it's a loooooot of little little things that all add up.
First off, you should decide which look you're going for. N64 and PS1, the two consoles I'm emulating, both had drastically different specs. (plus, there's plenty of other early 3D systems I've not even touched!)
The N64 had texture filtering (textures were interpolated aka "blurry"), it had floating point vertex precision (points moved correctly), it had perspective correction on its textures (no warping)
The PS1 had no texture filtering, no floating point vertex precision (vertices snap and pop around), affine texture mapping (textures warp weird). I also think the color space they operate in is different? Don't quote me
So you can go hard one way or another or pick and choose what you think looks good! We don't have anywhere near the hardware restrictions they did in the 90s so go nuts.
RESOLUTION
To get a low resolution window, I set the window size of the game and the window override size to different amounts

In green is actually how big the window is on my screen (4k monitor) and in red is the retro resolution I want. If you set the stretch mode correctly (an option a little further down the Window tab) then it'll make the pixels big

COLORS
Now the PS1 had the capability of showing you over 16 million different colors, but it could only display 50,000-150,000 at a time, so in order to get more fidelity out of it, the engineers implemented a dithering effect to better blend the otherwise sharp edges between colors.
I used this shader to achieve the dithering effect. If you don't understand shader languages, that's fine. There are a few different pre-built ones for looking like the PlayStation 1 out there.
TEXTURES
Textures for the PS1 could be as big as 256x256, but they were typically 128x128. And they would squish everything a model needed into there usually, at least with like player models and objects and such.
As mentioned, if you're not good with shader language don't worry. There are countless resources out there that people will either let you use or teach you how it works. But I'm gonna touch on it a little bit here.
PS1 textures had no pixel filtering, so you could see individual pixels.
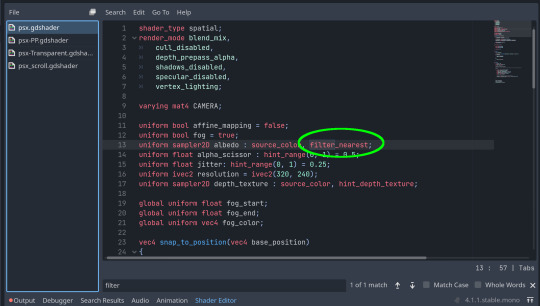
This is what determines that in the shader code. If you want it to look like the N64 (blurry lol), the proper hint is "filter_linear". Note that it won't be 1:1 with N64, cuz they used bilinear filtering (which kinda sucks and causes weird quirks) whereas now you'll only find linear or trilinear filtering. It's a negligible difference imo.
PS1 textures also were only saved using 15 bit color. I'm told that Photoshop's "Posterize" filter set to 32 can achieve this, but don't use photoshop if you can help it. I use GIMP, and while a newer version might have a posterize filter, or there may be a plugin out there, my version doesn't so I cluge it a little.
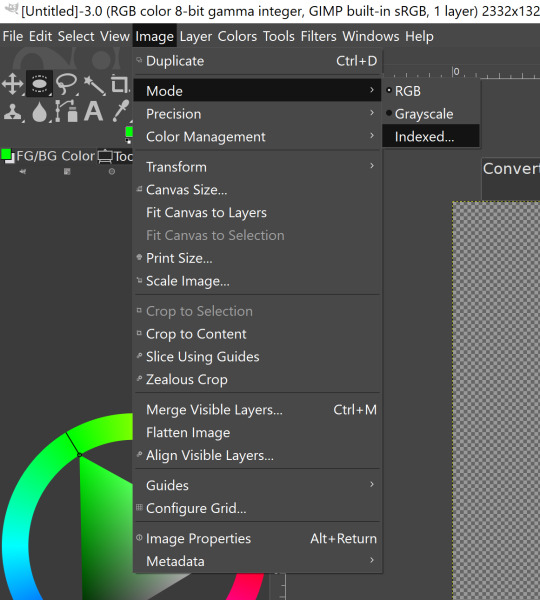

Change your color mode to "indexed", set color dithering to how you like it, and the number of colors in the palette to a number to get a good result. Usually I'll do 16, 8, 32, but occasionally I'll cheat and do a non-multiple-of-8 teehee >:3c
You can change it back to RGB after to make further editing easier.
LIGHTING
N64 and PS1 both implemented vertex lighting, as opposed to the more modern and (now) ubiquitous per-pixel lighting. Godot as it is right now (4.2 i think?) claims it has vertex lighting that you can set as a shader property but they're lying and it doesn't work yet.
The old consoles could only handle like, 2 lights though so it doesn't matter much.
The real star of the show, and in my opinion the one thing that makes a game most look like the 90s is the inclusion of vertex colors.
By multiplying the color of your texture by its stored vertex color, you can do all the shading yourself!
Plus you can reuse textures like crazy just by coloring them differently. The N64 also made heavy use of vertex colors by forgoing a texture on models entirely and just painting them using verticies. The only textures on SM64 Mario are his eyes, stache, hat emblem, buttons, and sideburns. Everything else is done with vertex colors.


Here you can see this level from my Crock Land with no vertex coloring, with some of the vertex colors only, and then with the two combined.
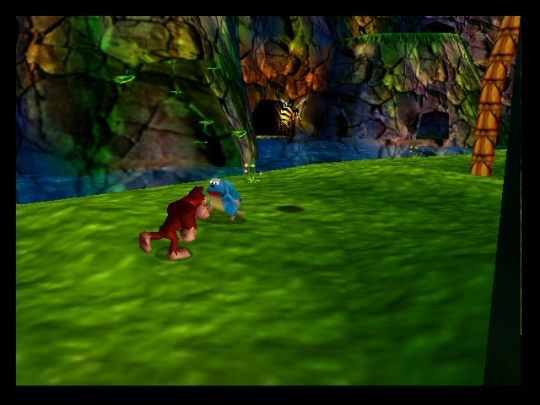
Rare loved this. Look at how colorful that cliffside is in Jungle Japes. It makes it so much more interesting than just a brown cliff face. Plus you can see the vertex coloration instead of textures at work on DK and the Gnawty.

My go-to example for PS1 is always Spyro, what a gorgeous game. All of those colors there are not made by a light or an environment. They're hand painted babey! Also! With spyro! The skyboxes are actually just huge domes made up of vertices that are colored in different ways! That's how they can look so colorful and "hi-res".
There's plenty more you can do, like adding a CRT filter or a little bit of chromatic aberration which I haven't gotten into yet.
The way I've learned all this is just by being curious as to how the old consoles did their thing, and slowly accruing the knowledge over time. There's still infinite stuff I don't know too.
I hope that helped! And wasn't too longwinded or confusing! Like I said, it's all about piling up tons and tons of little things, small details, weird graphical quirks that really bring out the retro 3D feel for me.
And I didn't even get into the modeling side of things! That's an entirely different "color-of-the-sky"-sized post though.
I'd be happy to re-explain or explain more about any of this!
135 notes
·
View notes
Text
PROTECT SOCIAL MEDIA ACCOUNTS DRING AFFILIATE MARKETING

YOUR WRONG ACTIN WILL PERMANENTLY TERMINATE SOCIAL MEDIA ACCOUNTS AND NEVER BE RE-ACTIVATED.
HOW TO PROTECT SOCIAL MEDIA ACCOUNTS: WATCH THE VIDEO AND ACCESS A WORLD CALSS FREE TRAINING ON AFFILIATE AND DIGITAL MARKETING: ACCESS NOW
#Affiliate marketing#makemoneyonlie#Passiveincome#Milliner#Bilinear#clickbank Affiliate#jvzoo Affiliate#dgstore24 affiliate#digital marketing#work from home#online income#smart money#digital currency#overnight bilinear
0 notes
Photo


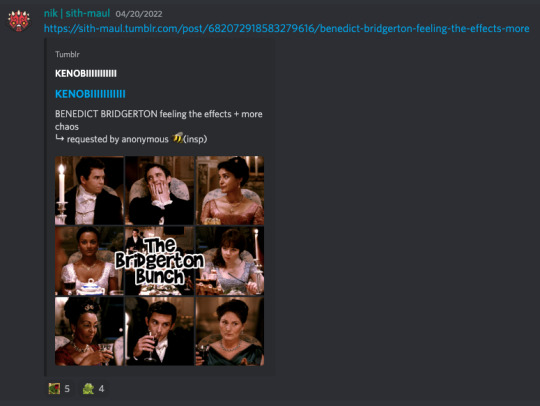
HOW TO: MAKE HIGH-QUALITY GIFS
Hi! A few people have asked me about my gif-making process and an anon asked about my coloring on a specific Bridgerton set. So, I decided to make a tutorial combining both! This is a very in-depth tutorial but there’s also nothing groundbreaking here. If you enjoy seeing how other people work like I do, this is for you <3 very long tutorial under the cut!
tech:
★ laptop: macbook pro (13-inch, M1, 2020)
★ external hard drive: seagate one touch ssd 1TB*
tools:
★ adobe photoshop 2022
★ mpv 0.29.1**
★ windscribe (vpn)
★ qBitt⚆rrent (for tv & film)
★ 4k video downloader (for music videos, trailers, interviews, etc.)
★ rizz’s action pack by @anyataylorjoy (highly recommend!)
resources:
★ resource directory by @usergif (a source blog I created for gif effects!)
* I have 2 externals, one dedicated just to storing all my 4k Star Wars files and another for Bridgerton and everything else
** I use this version of MPV bc the other ones weren’t compatible with my laptop for some reason. This one works well for me and doesn’t create duplicate screencaps which I’ve heard is a problem with other versions
PHASE 1: Prepare Your Base Gif
1.1 – Download video files.
I personally like not having to do this regularly for 2 reasons: (1) I t*rrent (I use r@rbg — make sure to use a VPN if you t*rrent!) and (2) I mainly work with 4k files which can take forever to download, especially old media, and I’m not trying to waste my life away. That’s why I keep my files on an external hard drive, so I only need to download when new content drops.
TIP A: Footage Type & File Size
As you saw in the header gifs, I work with HDR footage. You may have heard some gif-makers talk about HDR or 4K screencaps looking like the colors are faded or washed out. They are:
(I don’t have examples of the Mandalorian because I only have that in 4K which is always HDR — so I’m going to stick to using this Bridgerton clip for examples. Also, I made the Mando header gif a long time ago and I’m not letting it go to waste now lol.)
Some people don’t like working with HDR as a base, which is understandable! There are ways you can make your screencap software fix the coloring automatically. But my mentality is: I’m lazy, I’m used to it, I’m already coloring it anyway, and the muted coloring gives me a sense of control over the entire palette — instead of fighting with the existing colors from the original color grading. (I also talked to a videographer at work about this and he mentioned he prefers to color grade with this faded/washed-out look as a base too!)
For the sake of the demo, I tried to color these two scenes as equally as possible in black and white so you can decide if there’s a difference:

Ultimately, the file type you use is up to you! Hopefully this demo helps you make that choice easier. This tutorial is going to focus on HDR footage though.
The size of your file matters too! 4k (2160p) isn’t always better than 1080p (but it typically is for me which is why I prefer to use 4k footage when it’s available). But the main thing is to look at the GB size of your file.
1.2 – Make screencaps.
I use MPV which works great with 4k .mkv files (PS can’t read .mkv files if you try to Import Video Frames to Layers). Check out this tutorial for the basics on getting MPV set up and how to make screencaps.
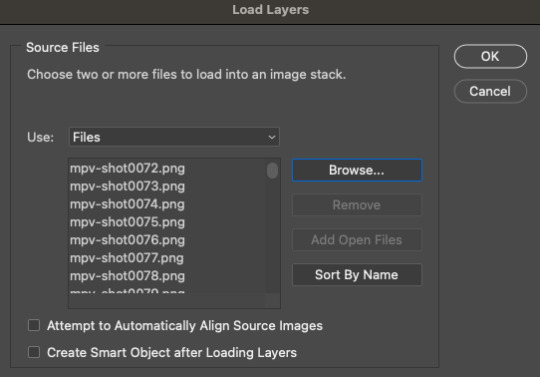
1.3 – Import screencaps.
Load your caps into PS by going to File > Scripts > Load Files Into Stack. Some people upload using Image Sequence because it loads faster, but idk. I don’t really care because I’m never uploading that many caps at a time that I need it to go any faster. This is what the Load Layers window looks like:
1.4 – Make Frames from Layers.
Recently, I’ve been using the Script Action in Rizz’s Action Pack (linked at the top of this tutorial — if you use it, be sure to like and reblog Rizz’s post!) with some actions of my own added to make it perfect for my process. Actions are huge timesavers because all you do is press play!
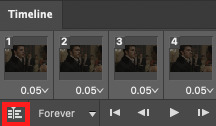
But to do this manually, you can simply select all the layers, click Create Frame Animation, click the menu in the Timeline tab (upper right), and click Make Frames from Layers. Click Reverse Frames in the same menu so your caps are in the correct sequential order and set your frame delay to 0.05 seconds.
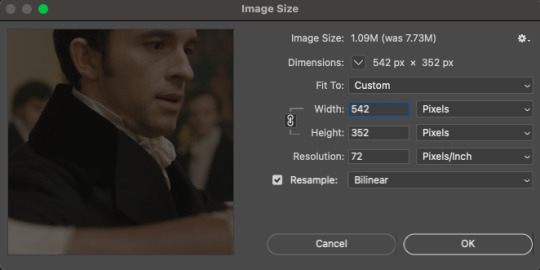
1.5 – Crop and Resize.
For this gif, I want my dimensions to be 540px wide x 350px tall. Do this to your liking but remember, Tumblr’s max width is 540px (here’s a guide for other dimensions). Any width smaller will be stretched and look bad. Any width larger will be compressed, make your gif file huge, and look bad.
P.S. RESAMPLE SETTINGS MATTER! Check out this resample experiment to figure out which one you prefer. I tend to stick to “Bilinear”
TIP B: Preserving Cropped Pixels
Have you ever cropped something, done all your coloring, then wished you could nudge your image just 5 pixels over only to realize you can’t because you’ll have 5 pixels of transparent space on the side? Uncheck “Delete Cropped Pixels” so you can change your image positioning later if needed!

TIP C: 2-Pixel “Buffer”
Something I do (and some gif-makers I know do) is resize with a 2-pixel “buffer.” Gifs sometimes have a slightly transparent border or “halo” effect. You can see it a lot when viewing Tumblr in dark mode. To get rid of it, I resize a tad bigger and then crop out the extra pixels. So, for example, since I’m making a 540x350 (w x h) gif, I’ll resize it to 542px width first. After I’ve converted to a smart object (Step 1.6), I’ll crop out those extra pixels so it’s a perfect 540x350.
(Btw, you can also do this in the export window by setting “Matte” to none. I guess I’m old school for doing this? Idk I haven’t properly tested and compared both methods.)
1.6 – Convert from Frame Animation to Video Timeline.
The sharpening action in Rizz’s Action Pack does everything in one go: converts from Frame Animation to Video Timeline, converts frames into a smart object, and sharpens your gif.
If you’d rather do this step manually, just select all your frames and click “Convert to Video Timeline” in the Timeline menu panel OR click this button:
Then, select all your layers in the right panel, right-click, click “Convert to Smart Object,” and add your sharpening filters.
Again, I’m a huge fan of actions, so I’d rather just hit play on Rizz’s action. It includes two sharpening presets and is super easy to tinker with if you want to add more sharpening or put other filters like Gaussian Blur, Reduce Noise, or Noise on top.
I’ve been using Rizz’s “Sharper” Action and occasionally throw a Gaussian Blur filter set to a radius of 1.0 pixels at 20-40% opacity (or sometimes a Reduce Noise filter), depending on the gif. Here are my usual Reduce Noise settings which I typically set to around 40% opacity:

In this gif, I used Reduce Noise at 40% and Gaussian Blur at 20% lol.
If you prefer using your own sharpening settings but want to use this action for the converting steps, just right-click the Smart Filters under the smart object and click Clear Smart Filters. Then, apply your own sharpening settings.
If you followed TIP C, my 2-pixel “buffer” trick, from Step 1.5, go ahead and delete those extra pixels now! I go to Image > Canvas Size and type in the gif dimensions I want there, 540x350 in this case:

If you had “Delete Cropped Pixels” unchecked, you can move your gif around until you like how your gif is positioned. Your gif should be looking sharp and perfectly sized now, with no weird borders hanging around the edges.
Let’s move on to the fun part!

PHASE 2: Coloring
Disclaimer: this is MY process for coloring, not the be-all and end-all. Everyone has their personal favorite adjustment layers and unique styles, and it’s all preference! The only wrong way to color is by whitewashing, redwashing, etc.
These steps are also just my typical steps, but I always color from scratch and my adjustments always depend on the scene. A dark, yellow-tinted scene from Narcos will be a completely different process from a bright, outdoor scene in Star Wars.
Because an anon asked for it, I’ll be demonstrating my coloring on the gif above from this Bridgerton set. It’ll be a little hard to explain because it’s like a method-to-my-madness, lives-in-my-mind-untranslated thing — but I’ll try my best and mostly use screenshots to demo!
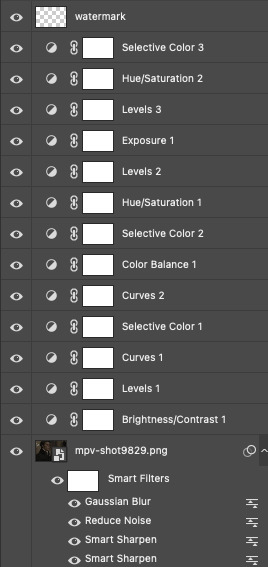
MY LAYERS PANEL OVERVIEW:
2.1 – Brighten + Color Correct
My go-to adjustment layers: Curves, Levels, and Brightness/Contrast (set to screen).
So, like I said, I use 4K/HDR footage which gives me a pretty washed out starting point coloring wise, but I actually love this as a base for coloring! I’m repeating myself but a videographer I work with said he films low-contrast because it provides the best base for natural-looking color grading. And I trust him and myself because I’ve been coloring like this for a long time lol.
ADJUSTMENT 1: Brightness/Contrast 1
When it comes to brightening, I’ve found myself starting to do this neat trick someone from usergif taught me! Literally just slap a Brightness/Contrast layer down, don’t move the sliders, set the blending mode to “Screen,” and lower the opacity to your liking so you don’t start out with a blindingly bright and pixelated gif.

Then, I pretty much always go in with a Curves and Levels adjustment. And I actually do a hint of color-correcting with them too!
ADJUSTMENT 2: Levels 1
In the RGB channel, I don’t add too much darkness just yet but I definitely bump up the highlights (right slider) a lot. I lift the reds in the Red channel a bit, especially when I’m working on a gif with people. It helps bring back some life to the otherwise washed-out coloring of HDR footage. In this one, I also lifted the greens and blues a bit too! When I say “lift,” I just mean I’m bringing those colors forward or emphasizing them.
ADJUSTMENT 3: Curves 1
I only tinkered with the RGB and Red channels this time — and no fancy S-curves here. But sometimes, I’ll also go into the Green and Blue channels if I didn’t do enough in my first Levels layer. You can see here that I barely even nudged that Red curve up lol. Why do I make such minor adjustments? My brain can’t explain. I just move things, decide if I like it, and stick with it. 🤷🏻♀️

2.2 – Basic Colors + Extra Brightness
My go-to adjustment layers: Selective Color, Curves, and Color Balance.
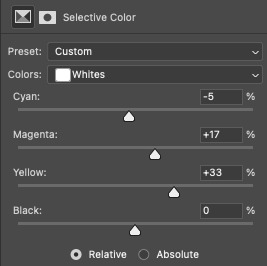
ADJUSTMENT 4: Selective Color 1
Since my gif didn’t have any true green, cyan, blue, or magenta colors, I didn’t play with those channels at all. But there’s a lot of yellow in the background and a variety of reds and yellows in the people’s skin tones which is why I adjusted those two color channels.
You might notice that I increase the blacks in my Red and Yellow channels. I actually do this almost all the time. I kind of think of coloring like makeup?? Idk if that sounds weird. But the blacks kind of add some dimension the way contour would, and my HDR footage naturally lacks this.
Something else I almost always do is bump up the whites in the White channel. I love really bright whites and, with an ideally lit scene, it acts as the highlight makeup lol. It gives me some good dimension on nose bridges, cheekbones, and high planes of the face
I do some overall adjustments in the Neutrals and Blacks channels, but very minor since I have more coloring to do!

ADJUSTMENT 5: Curves 2
Just a teeny tiny curves layer with an itty bitty S-curve (for contrast and so I can see what I’m doing lol)

ADJUSTMENT 6: Color Balance 1
I never really know what I’m doing with color balance. There’s no formula I follow or pattern of adjustments I always do. This step is literally the epitome of push the buttons and hope it does something good.
2.3 – Adjust Skin Tones and Other Colors
My go-to adjustment layers: Selective Color and Hue/Saturation.
ADJUSTMENT 7: Selective Color 2
Again, I’m only focusing on the Red and Yellow color channels, adding more blacks to each again. Then, bumping up Whites and doing super minor adjustments in Blacks.
ADJUSTMENT 8: Hue/Saturation 1
Here’s where I do a lot of my skin tone correction. I try to be hyperaware of representing skin tones accurately and naturally, while still having that HQ-looking dimension. By no means am I saying I’m perfect at coloring skin tones, but I do my best using this adjustment.
Again, there aren’t other colors in this scene besides Reds and Yellows, so that’s what I’m tweaking. I do sort of follow a pattern here which is:
Reds Channel: slide down the hue slider a *tad* and I’ll sometimes lower the lightness (I didn’t do that here but I do in the next Hue/Saturation layer)
Yellows Channel: slide down the hue slider so any overly yellow hues move closer to a neutral-magenta hue AND lower the saturation so the skin doesn’t look sallow.
2.4 – Shadows & Light
My go-to adjustment layers: Levels and Exposure.
ADJUSTMENT 9: Levels 2
This is super simple. I’m just adding back some contrast. That’s kind of my trick for HQ-looking gifs. I bumped up the highlights (right slider) a lot again and darkened the shadows (left slider).

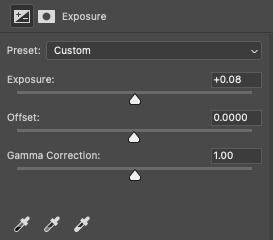
ADJUSTMENT 10: Exposure 1
I only do this sometimes when I want the light parts of my gif to be extra bright, and even then, I barely push the exposure up (I’ve only increased it by 0.08 here lol). Exposure can totally mess up your gif, so be sparing with this if you decide to use it.
2.5 – Repeat as Needed
These are my go-to adjustment layers for basic coloring (i.e. no fancy color palettes or major color manipulation — if you want a tutorial on color manipulation, I made one on usergif right here!). And I tend to add several (but not too many) layers until I get it where I want. Usually, the only additional step I’d do for a color-focused set is add a few Gradient Map layers!
Here are my remaining layers and their settings:

ADJUSTMENT 11: Levels 3
Some final contrast gets added here and some last-minute color correction. For example, if I find I’ve made my subjects’ skin tones too red or yellow, I’ll pull down the left slider in the Red channel to bring back some cyan or bump up the Blues.

ADJUSTMENT 12: Hue/Saturation 2
Only in Reds and Yellows again, I pretty much follow the same principles of my first Hue/Saturation layer. This time, I did lower the lightness in Reds. Their skin was looking a bit too saturated with Red, so this helped me bring it back to a slightly more natural-looking but still high-contrast state and I reduced saturation.

ADJUSTMENT 13: Selective Color 3
Idk why I did this originally... I didn’t bump up the whites and I didn’t touch any other color channels. But I guess my highlights were looking a bit too green-blue, so I bumped up the yellows and magentas a lot and pulled down the cyans.
And here are all the adjustments in action, step by step:

You can see how the middle adjustments were making them look quite red, but the final coloring is more neutral imo.
Now, time to save your gif!
PHASE 3: Exporting the Final Gif
3.1 – Convert Back to Frame Animation + Fix Frame Rate
If you can avoid it, DO NOT export your gif then reopen it to adjust the frame rate. Reopening your gif adds an extra, unnecessary compression step when you already have to go through the unavoidable steps of PS optimizing your gif for web and Tumblr compressing gifs over 3MB.
I love Rizz’s Action Pack mainly for the “Save” action which takes all the guesswork out of this step! Just hit play and your gif will be ready to export in seconds. If you prefer to convert back to frames manually, I’ve written all the steps out here!
Remember to set your looping option to “Forever” and then fix your frame delay aka frame rate (the speed at which your frames play). The generally preferred frame delay among gif-makers is 0.05 seconds (in fact, I’ve heard some blogs won’t reblog your gifs if they don’t appear to be set to this speed!).

But the speed also depends on the FPS of your original file! For example, when I gif video games (like Jedi: Fallen Order) which I believe are at 60 FPS, I tend to make my speed 0.04 (or sometimes faster).

I know that seems like such a minor difference, but as you make more gifs, you’ll be able to tell which speed looks the most natural!
Before exporting, just always be sure to play your gif back, check that you like the speed, and delete any accidental duplicate frames! (Duplicate frames can happen if you animate using keyframes.) They may seem minor, but it’s something I personally can notice even if it’s just one duplicate frame... and it can throw off the entire smooth flow of your gif.
TIP D: MARKETING FOR DISCORD USERS (lol) 🤡
If you share your gifs in a creator server, here’s a fun tip that totally exposes me as a marketer. While you’re in Frame Animation, move your frames around before saving it so that your best-looking frame is Number 1. THIS is the frame people see in your embedded preview link when you share your gifs on Discord. (If your selected frame is in the middle of your gif, just be sure to move all the frames after it too so your gif still loops properly. Like, if you have 10 frames but want frame 5 to be featured in the Discord preview, move frames 5-10 before frames 1-4. Now, your frame sequence is 5, 6, 7, 8, 9, 10, 1, 2, 3, 4 — #5 being the featured frame.)
Your gifs loop anyway, so your first frame doesn’t have to be the first part of your scene :) By being purposeful with your “first” frame, you have control over the still image people see in the server. And if you choose a really good frame, who knows? Maybe more people who aren’t in that fandom will be curious enough to click it because it looks so good and enticing lol
See this preview? That’s actually the end of my gif, but it’s the best part:
(also, not me just realizing I posted this set on 4/20 lmao that was so unplanned a;lsdjk)
3.2 – Save For Web
Go to File > Export > Save for Web (Legacy) to get your gif ready to export!
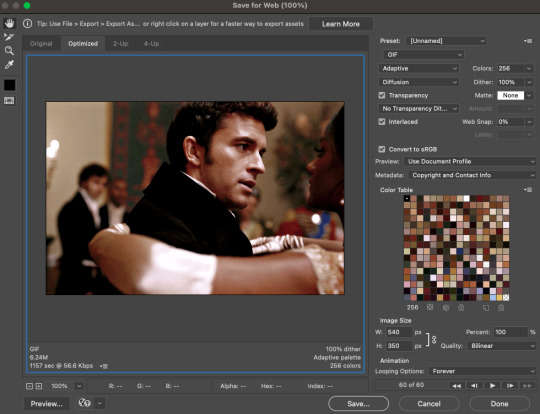
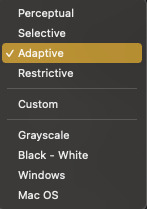
There are still some extra settings to play with here, mainly the Color Reduction Algorithm:
And the Dither Algorithm:

Typically, gif-makers only use Selective or Adaptive and Diffusion or Pattern.
Again, these settings are going to be up to your personal preference. My usual is Adaptive-Diffusion.
On occasion, I’ll go for Selective-Diffusion. And I don’t usually prefer the Pattern dither because I hate seeing the grid lines it produces. But there have been some gifs (like the first one in this set) where I have a solid background color and Pattern yields the best-looking gif. So, I’ll always toggle through the options to see which one I think looks best!
Check out this guide that shows all the setting side by side!
TIP E: How to Keep Your Gif Under 10MB (Tumblr’s current max gif size)
Try to to keep your number of frames as low as possible. I think my average is 60 frames or so. Sometimes I can get away with more depending on the scene.
Make your gif smaller. Obviously, if you’re making a full-width gif, you can’t make it smaller than 540px wide. But you can shorten the height of your gif if your composition allows it!
Add more blacks to your coloring. Idk why this works but it usually does for me. More contrast or something
Try not to use too many adjustment layers (I say this but I don’t usually do this a;slkdjf)
This isn’t my personal preference and I’ll avoid it when possible, but you can add Lossy which is a compression setting that’s available when you do Selective color reduction. It helps reduce the file size, but I’d never go over 10 on Lossy:

3.3 – Upload to Tumblr
Use the Photo Post option not Text Post. Gifs uploaded in a Text Post may look okay on the dash, but they can get very wonky on different themes, create size inconsistencies, and make the gutter wider than the 4-pixel default. (Plus, if you share your gifs in a Discord server — your embedded preview will be all tiny!)

Contrary to some beliefs, uploading to drafts does not mess with the quality of your gif anymore than publishing it instantly. So, go ahead and put your gifs in the drafts so you can see how it’ll all look before posting!
I tend to leave my gifsets in drafts for at least a day so I can criticize myself more 🤡 kidding... a little... but I’ve also heard that keeping your sets in drafts helps them appear in the search/tags faster. I’ve never had problems with my stuff showing up in tags, so maybe that’s true!
And that’s it!
Thanks for reading my dissertation on Tumblr gifs lmao. I hope it was clearer than it was long and ramble-y... and I hope it’s helpful for some beginner gif-makers out there! If not, here are some of the best basic giffing/coloring tutorials I know:
giffing and coloring tutorial by sashafierce
giffing 101 by msmarvel
gif tutorial by kylos
gifmaking for beginners by hayaosmiyazaki
coloring tutorial by magnusedom
and check out usergif’s resource directory here for more help!
[You can also find my other tutorials/resources here]
Before I go, let me just say a few TUMBLR/GIF ETIQUETTE things:
Clearly gif-making is a process. And it is art, whether you use fancy effects or not. So DON’T STEAL GIFS, don’t even use them as a base for your own adjustments. Use this tutorial if you need help making your own gifs from scratch!
Another thing: give credit when credit is due! Trends come and go in gif-making, but you absolutely should link “insp” in the caption of your post (not in the source link and not in the tags). The caption is the most visible and intentional spot, which means it’s the most deliberate acknowledgement of your source of inspiration. If you didn’t come up with a concept yourself (be honest with yourself), just link it! It doesn’t make your post ugly or cluttered. It helps spread awareness to other talented creators that some of your followers otherwise may not encounter in their fandom. And doesn’t it feel good when more people see what you’ve made and celebrate it with you? Give that same feeling to the source of your inspo!
Lastly, remember: don’t let anyone tell you that the gif styles you like aren’t right or aren’t beautiful. Gif-making is about having fun and creating art! As long as you like what you’ve made and it doesn’t harm any person/community or perpetuate problematic behaviors (i.e. whitewashing), then do what you want! It’s your blog!!
Have fun! <3
#photoshop tutorial#gif tutorial#completeresources#dailyresources#userkosmos#usershreyu#uservalentina#useralison#usernums#tuserkay#usercim#userk8#tuserrex#userannalise#useryoshi#userelio#tuserabbie#uservivaldi#resource*#myedit*
2K notes
·
View notes
Text
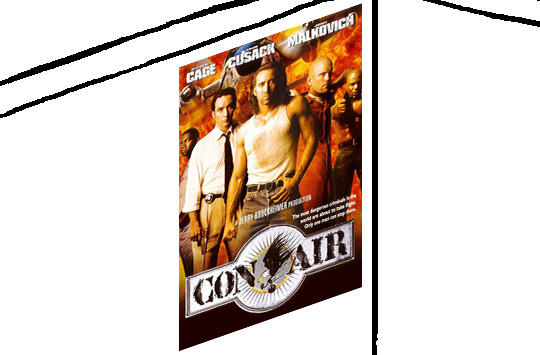
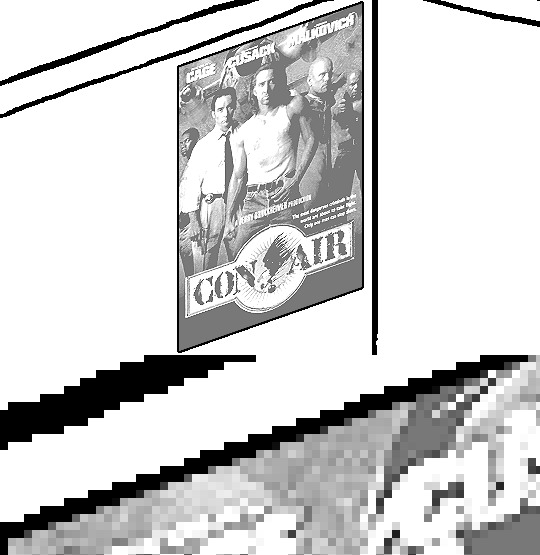
Tidbit: Persnickety About Posters
If you want to avoid overly dark or blurry posters in your fan adventures, then follow my lead:
1) Download JPEG off of Google Images.
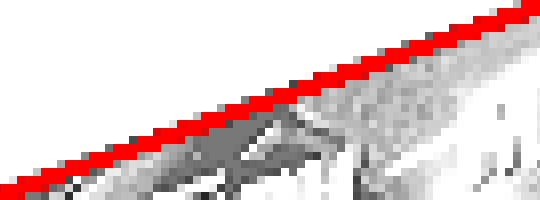
2) Import, scale down, and skew/shear it. Use an interpolation method such as Bilinear or Bicubic Sharper. Doing both transformations at once is better than repeatedly transforming the image (i.e. resizing it, applying the transform, and then skewing it), as it helps prevent the image and edges from becoming too blurry. This will be important later.
You can hold down Ctrl + Shift to constrain the Move tool along a single axis so it won't go out of alignment as you're skewing it. If you don't see the Transform Controls by default, enable it in the tool options bar at the top, or go to Edit>Free Transform.
3) Desaturate it. Desaturate means to turn color grayer, until it becomes black and white.

4) Adjust the brightness and contrast using the Levels adjustment tool. It's much too dark as it is! In Photoshop, it is located under Image>Adjustments>Levels..., but I recommend creating an adjustment layer from the bottom of the layers tab instead. Doing so will allow you to make edits non-destructively, meaning you can go back and change any parameters until it looks right.

You could use a Brightness/Contrast adjustment with "Use Legacy" enabled instead to achieve a similar effect, but it won't clip the shadows and highlights as easily. You would have to create an additional duplicate adjustment and turn the brightness and contrast way down on the first one to do so. It's somewhat easier to use but less efficient than Levels in this case.
5) Apply a simple sharpen to the image as it is still too blurry for our purposes. In Photoshop, it is located under Filter>Sharpen>Sharpen... Do not use any other filter, such as Unsharp Mask, unless you absolutely have to in lieu of a basic one. If you must, turn down the radius a bit and the threshold all the way to 0.

6) Make a selection around the image. Ctrl + left click on the layer's thumbnail to make a selection around it. Doing it this way makes it inherit the level of transparency any pixels have. If you can't, use the Magic Wand tool with "Anti-alias" enabled to select the transparent area outside, then invert it using Shift + Ctrl + I, or go to Select>Inverse.
Create a new layer above the image, then go to Edit>Stroke... and add a black stroke with a width of 2px located Outside. Leave everything else at the default. Doing it this way will create a stroke with anti-aliasing based on the selection you made. This should generally turn out pretty sharp if you follow my advice from Step 2. If you had used the Stroke Effect available from the Blending Options' layer styles, it will always result in a very smooth outline instead. You do not want this.
Voila, and Bob's your uncle, you're done!

The instructions above are Photoshop specific, but it should still be pretty software-agnostic. Here is the recreation PSD, and below the read-more link are additional notes, such as transferring the steps to something like GIMP.
ADDENDUM
You may be questioning why I deliberately made the stroke anti-aliased. "Isn't that an MSPArt cardinal sin??", I hear you clamoring. Well, my dear readers, let me briefly elucidate you on why your ass is wrong. Exhibit A:
The clearly semi-opaque pixels that can be found in every poster outline, which is especially pronounced here in the Little Monsters poster. I can also see that Hussie actually created a stroke on the same layer as the poster and merged it down into the white background like a dumbass. I omitted this in step 6 for the sake of convenience (and also the fact that you can't add a stroke to a smart object in Photoshop without rasterizing it first).
He had to use the magic wand tool in order to extract it from the layer for this panel, and then fill it in with the paint bucket tool. I can even tell he had the color tolerance set up very high on the magic wand to grab all those near-black and very light gray pixels, AND he had anti-alias enabled and the tolerance on the bucket tool set to be at least higher than 0 to tint similar colors. Exhibit B:

I also didn't address exactly how to desaturate something in Photoshop. Honestly it was because I was feeling pretty lazy. I would have had to rewrite step 4 to not include redundant information about adjustment layers. You can add either a Black & White adjustment layer or a Hue/Saturation one and turn the saturation all the way down to 0. The resulting tones will be slightly different from each other but I'll explain why that is in another tutorial.
Speaking of another tutorial, read this one if you believe this post is missing the step of using a posterize filter.
Now onto applying some steps to GIMP.
RE: step 2) In GIMP, there is a dedicated Unified Transform tool separate from the Move tool, unlike in Photoshop where both features are combined into one. This is how you scale and skew (AKA shear in GIMP) both at the same time, among other things such as rotating.
You'll also find that instead of any interpolation methods labeled "Bilinear" or "Bicubic", there are only ones named "Linear", "Cubic", "NoHalo", and "LoHalo". Basically, Linear and Bilinear are the same, so are Cubic and Bicubic, naturally. I guess NoHalo would be similar to Bicubic Smoother and LoHalo would be kind of similar to Bicubic Sharper as well. It's not an exact 1:1, though.
Honestly it doesn't really matter what you use to reduce the size as long as it isn't None/Nearest-Neighbor. You're going to have to sharpen it no matter what. This applies to Photoshop as well.
RE: step 3) Go to Colors>Hue-Saturation... and repeat turning the saturation down to 0, or go to Colors>Desaturate>Desaturate... and select the Lightness (HSL) method.
RE: step 4) Go to Colors>Levels... or Colors>Brightness-Contrast... The Brightness-Contrast adjustment tool already functions almost exactly like in Photoshop with "Use Legacy" enabled.
RE: step 5) In GIMP 2.10, the developers squirreled away the basic Sharpen filter, making it inaccessible from the Filters menu. To use it, hit the forward-slash (/) key or go to Help>Search and Run a Command... to bring up the Search Actions window and type in "sharpen". Select the option that just reads "Sharpen..." and has a description of "Make image sharper (less powerful than Unsharp Mask)". I find that using a sharpness value of around 40 to be similar to Photoshop's sharpen filter.
RE: step 6) Instead of holding down Ctrl, you hold down Alt and click on the layer thumbnail to make a selection around it. Make a layer underneath the image this time since there isn't an option to place the stroke outside the selection rather than the middle. Go to Edit>Stroke Selection... and create a stroke using these settings:

I recommend keeping anti-aliasing disabled however, as GIMP produces lines that are a little too smooth for my taste.

With "Antialiasing" enabled
Without
If you're using a program that doesn't have a stroke feature available, you could draw a straight 1px thick line across the top of your poster, duplicate it, and move it down 1px. Merge them together, duplicate it again, and move it all the way down to the bottom of the poster. Then repeat the exact same process for the sides. I used to do this before I even knew of the stroke feature, haha.
Another reason I had to do it this way was because my dumb ass did the thing I said not to in step 2, scaling down the image with the scale tool, and then shearing it separately with the shear tool. This caused the edges to become too blurry to be used for a stroke automatically. Oh well, live and learn.
131 notes
·
View notes
Note
hello! I use procreate too, I saw your Timelapse for your art you posted recently and I noticed that you resized things and moved them around. Does that not make the lines blurry? do you re draw them or does that not bother you that it’s not clear anymore? Or is there a way to select an area and resize without compressing the lines? Thanks! love your work :)
When it comes to resizing and transforming, keeping the quality all depends on two things:
1. the canvas size. I always use larger canvases. My go to is 4000x5000px because this allows you place for errors and a little loss of detail.
2. these settings:
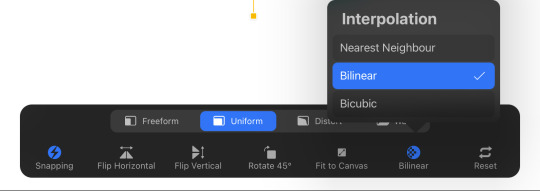
Your setting is probably in the default Bilinear, making your resized art look like this:
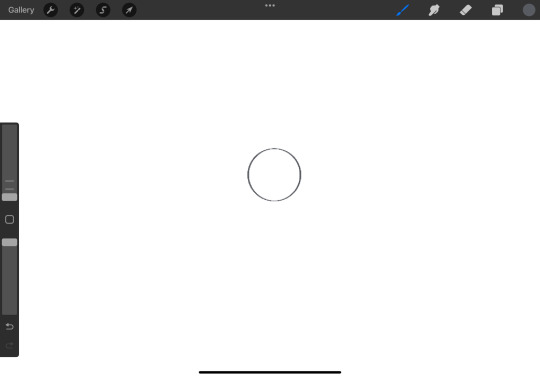
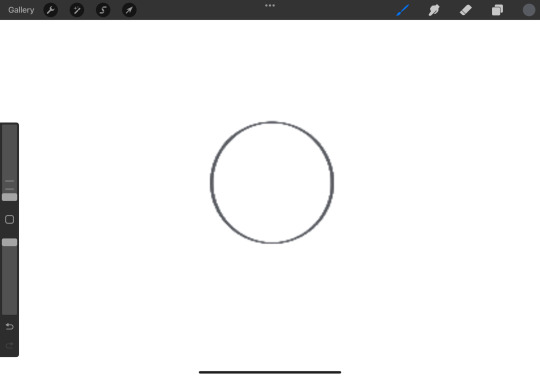
If you were to switch it to Nearest Neighbor instead it would provide results like this:
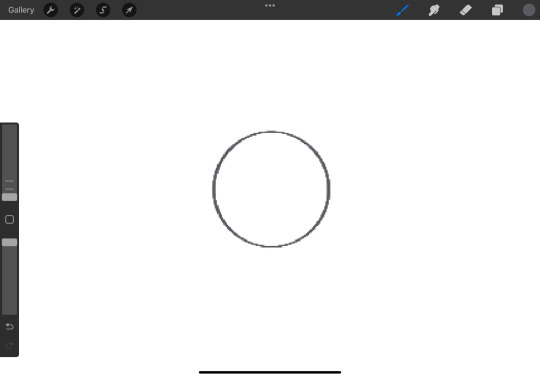
Of course it’s not always the perfect solution and sometimes I just prefer to draw over it if I think that it’s beyond repair, but this might help you!
#the liquify tool on the other hand just reduces quality and that’s a sacrifice I’m usually willing to make#again: large canvases#anonymous#tutorial
77 notes
·
View notes
Last Seen Blogs
ohh-reality
Little Gongjunim 👑
snmarve
Meek's Landing
omonoia
⃰ ﹙ πνεύμα ﹚ 𝒐𝒇 ᵀ̲ᴿ̲ᵁ̲ᵀ̲ᴴ̲.
ggaav
shrumbler
dogbodysmithers-blog
"Wait for me sir! Woof!"