#but then i saw other projects and they look x10 better
Text
registering myself for the district science fair makes me feel smart 😩😩
#but then again my project is acc pretty bad 😭😭#idk how they let me in pls#listen we were in quarantine and i literally had no choice#i say that as if i knew which subject area im supposed to be in#LMAO I J PUT ENVIROMENTAL SCIENCE#but then i saw other projects and they look x10 better#:((#and apparently they’re doing a special award system this year??#they made me choose 2 awards to qualify for and im like ???#enough ranting
1 note
·
View note
Text
I am following a Coursera course on modern art which has just been discussing Barnett Newman’s (1905-1970) ‘zip’ paintings. According to the MoMA site:
His zips streak through fields of color in spare compositions that prompted critics to dub him a Color Field painter and Minimalists to look to his work for inspiration. But call him what they would, Newman maintained his own view of his abstractions. Claiming that he sought “to start from scratch, to paint as if painting never existed before,” he saw his compositions as forms of thought, as expressions of the universal experience of being alive and individual.2
Museum of Modern Arts https://www.moma.org/artists/4285?locale=en
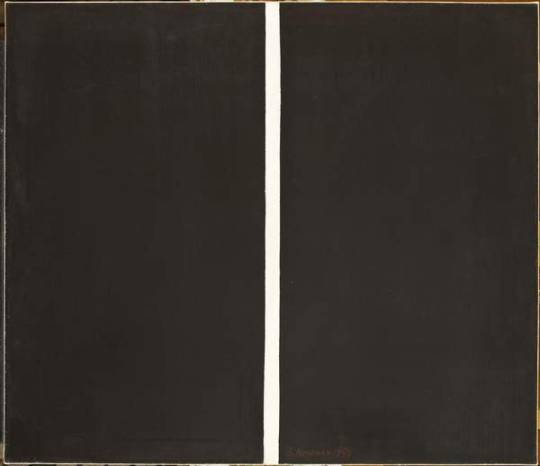
Onement IV, Barnett Newman 1949. Bridgeman Education.
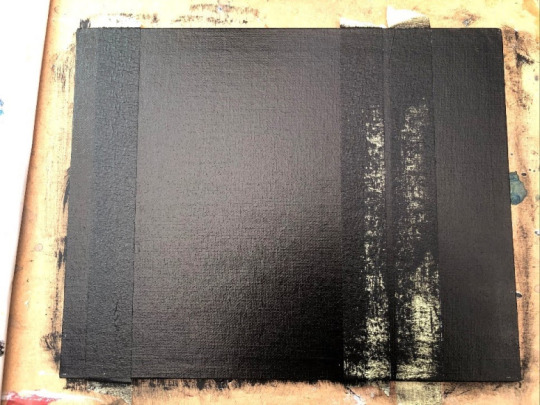
The next part of this section is to produce our own ‘zip’ paintings and so I have begun by preparing an 8″x10″ canvas board – a solid surface is recommended because this better accommodates the first stage which is to apply masking tape to a prepared surface – and prepped it with black gesso over a number of masked strips. Some of these will be zips in their own right, others will create zips of the gesso.
I have a plan (but not a design as yet) to use colours and painting style similar to those of Jasper Johns’ (b 1930) Flag (1960-66).

Flag 1960-66, Jasper Johns. Bridgeman Education. Accessed 27 June 2020.
Fist pass with dilute phthalo blue washed over the entire board to deepen the black gesso and add colour depth to it, and to make transparent zips.
Next, I taped for another colour layer – Alizarin crimson – as a solid layer in the black strip on the right and as a wash for that whole section. Then I went for a narrow white zip on the left, next to the blue strip but messed that up trying to be clever-clever and drag some pigment out into the centre area. I’ve re-gessoed that area and washed the whole again with phthalo blue. Now it’s taped with the titanium white added quite thickly.

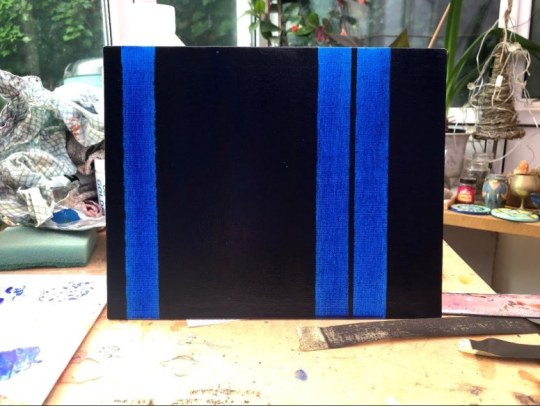
I’m not sure how valid this is as practice but, in painting the final layers I turned it upside down and I think I like it better!
Dark colours don’t fare well in digital photography because it tends to average out the darks and lights, taking out the extremes (so I’m informed by a photographer friend), and so I’ve taken some detail shots which minimise the amount of available light differences the algorithm can work on. The first shows not just the red strip to better advantage but the ‘shadow’ strip to the left of the blue where I’d masked the blue wash layer and added a phthalo blu/Payne’s grey wash to darken the edge without losing the hint of colour. The detail on the right I think shows up the crimson wash a little better.
So what did I learn from this? First off, a five year old could not do it! This is a challenge of intent, balance, off-setting, accuracy, and brush/paint technique. The video (Cory D’Augustine – Coursera Week 2) prior to this exercise on making that first layer smooth and being sparing with medium was invaluable. Paint handling has to be more precise than is necessary in my blocky, impressionistic style – water makes bubbles if a brush is used energetically, and it runs and pools so the position of the support is important along with softer, more controlled brushwork. I set mine vertically with some paper towel at the bottom to wick away run-off. It’s also a challenge of message – Newman seemed to have something to say in his work even though it might have been inaccessible to many and while I had, it wasn’t obvious to me how I might do that never mind how a viewer might ‘get’ what I was saying. Does it matter? I’m not sure. Reversal didn’t, in this instance at least, so maybe everything is in the title – a cue as to how to view it and where to start on thinking about it. Or it would be if it were going anywhere.
Another thing I’ve learned is that trying to replicate a style (as opposed to copying a picture although that is a valid practice activity too) engenders a new respect for the way a given artist might work and the product of that effort.
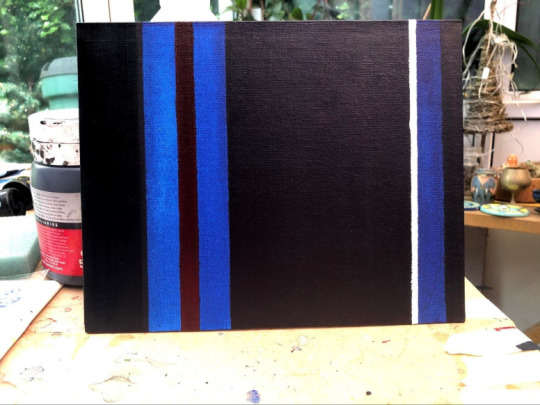
So what was my theme, and why these colours? This is very topical. The pandemic has put strains on all our public services, not least the National Health Service. Blue and white are the colours of the NHS logo while red symbolises the lives it saves without charge. White is the thin line of resources it has to do this, and the shades of dark are the hidden properties of COVID-19 and the unknown numbers still infected. Very immediate and not at all philosophical but in Maslow’s hierarchy survival comes much nearer the base than esoteric thinking.
Cropped (Microsoft Paint) and straightened (PaintshopPro 2020).

I’m seeing after images of zips and I hadn’t expected that; something to capitalise on when making paintings like this, perhaps.
Barnett Newman, Museum of Modern Art. [online] Available at https://www.moma.org/artists/4285?locale=en. Accessed 27 June 2020.
The Barnett Newman Foundation [online] Available at http://www.barnettnewman.org/. Accessed 27 June 2020.
Abstract Expressionism. MoMA Learning.(undated) [online] Available at https://www.moma.org/learn/moma_learning/themes/abstract-expressionism/the-sublime-and-the-spiritual/
McLeod, S. 2020. Maslow’s Hierarchy of Needs. Simply Psychology. [online] Available at https://www.simplypsychology.org/maslow.html Accessed 27 June 2020.
Side project – paint a zip I am following a Coursera course on modern art which has just been discussing Barnett Newman's (1905-1970) 'zip' paintings.
0 notes
Text
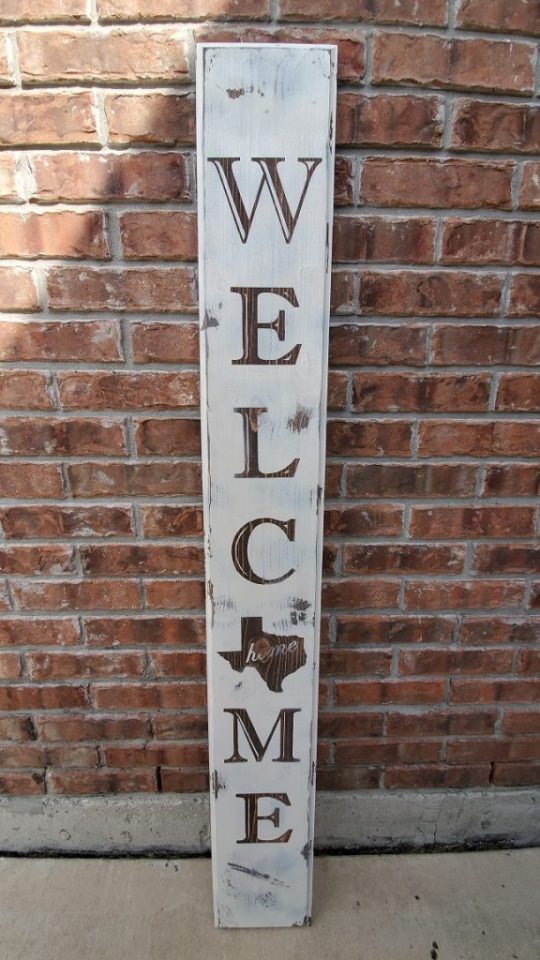
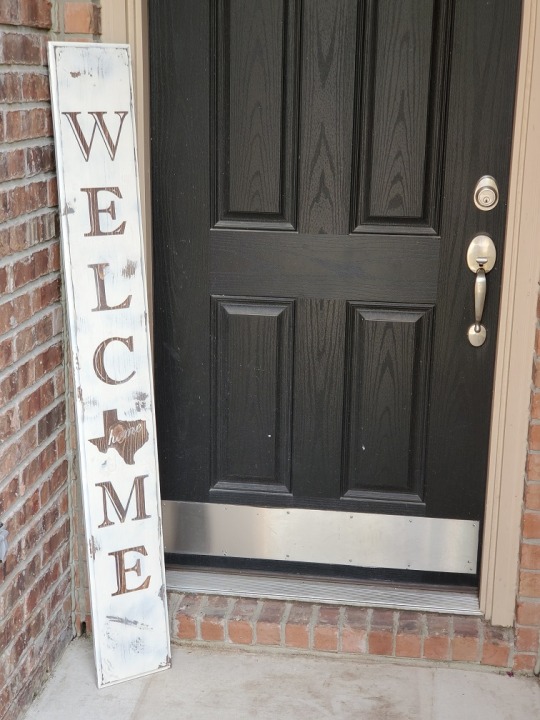
DIY Antique Style Welcome Sign
Welcome signs for your doorstep are such a great way to make people feel invited into your home! It sets the tone for your style to anyone passing by, and in general just gives your house a more neighborly feel. This project allows you to make one in no time at all (and at minimal cost) that perfectly fits your style! The other bonus factor to this sign is that it’s made from one complete piece of wood unlike most welcome signs that are made from two thin boards that will warp in the elements in no time! This means you’ll have a beautiful board for years to come!
Now if you are anything like me you are thinking “Great, but my handwriting is awful!”, because trust me, my handwriting is not something you want plastered at the front of your home. To make this truly, uniquely you, I have found a way to make homemade “stickers” in place of stencils. What’s the point? It gives you the same effect as stencils, but you get to completely customize the font and size of your letters instead of being confined to pre-made stencils or be blessed with amazing handwriting. Then when you paint is dry, you just peel them off and have an absolutely amazing sign! It also allows you to have a sign where your letters are stain and your board is painted, instead of the traditional stained sign with painted letters!
So let’s get started:
Materials:
1″x10″x6′ Pine Board
Painter’s Tape
Vaseline
Craft Sponge (Optional)
Wood Filler (Optional)
Rags
Tack Cloth
3M Super 77 Spray Adhesive
Rust-Oleum Ultra Cover Paint
Minwax Walnut Stain
Thompson’s WaterSeal Clear Waterproofer
Tools:
Table Saw (Optional)
Measuring Tape
Router
1/2″ Cove Router Bit
Sandpaper
Sander
Metal Ruler
Razor Blade/X-Acto Knife
Painter’s Pyramid
Computer Printer/Paper
Applicable Safety Equipment
Affiliate Disclosure: This page contains affiliate links for products that can be purchased to complete this project. As an Amazon Associate I earn from qualifying purchases. I get commissions for purchases made through links in this post at no additional cost to you. Your purchase helps support this website.
The first thing you are going to have to decide is the size, font, stain color, and paint color for your sign. This is going to be completely dependent on your personal taste. For this project we are using walnut stain on a 5′ board with Heirloom white paint. We decided on using Imprint MT Shadow for our font to give it an antiqued farmhouse look. Feel free to adjust your sign based on your personal preferences with these instructions.
The first step to this super simple welcome sign is to cut down your board. This is an optional step but I did it for a couple reasons; my board has a few unpleasant imperfections on the sides, 6′ just felt too big for my doorway since it’s pretty narrow, and I wanted to remove a slight warp in my board without dealing with a planer. I used a table saw and cut down 1″ on each side lengthwise, then cut 6″ on the top and bottom. This gave me a 5′ x 8″ board to work with.
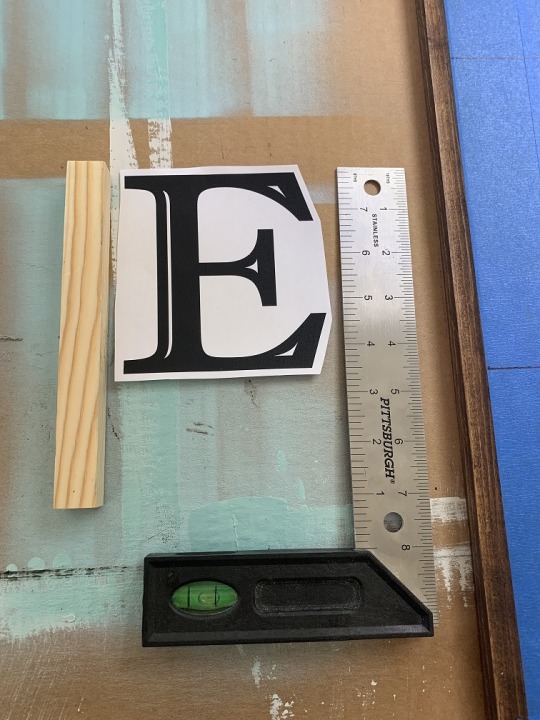
Next I wanted to add a little decoration to the board without taking away from an aged, antique feel. To achieve this I used a 1/2″ cove router bit. I set it so the bearing was 3/4″ above the router table and cut the board all the way around on the edge (side that will have the writing). This gave me a little visual appeal without being too flashy!
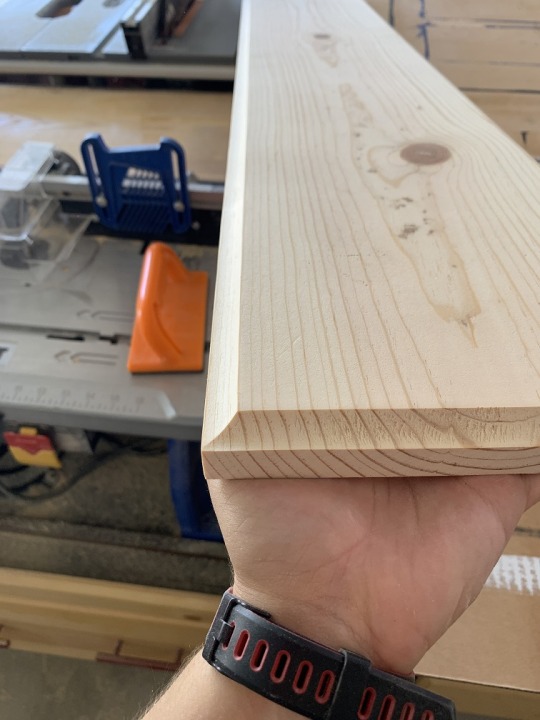
1/2″ Cove Router Bit
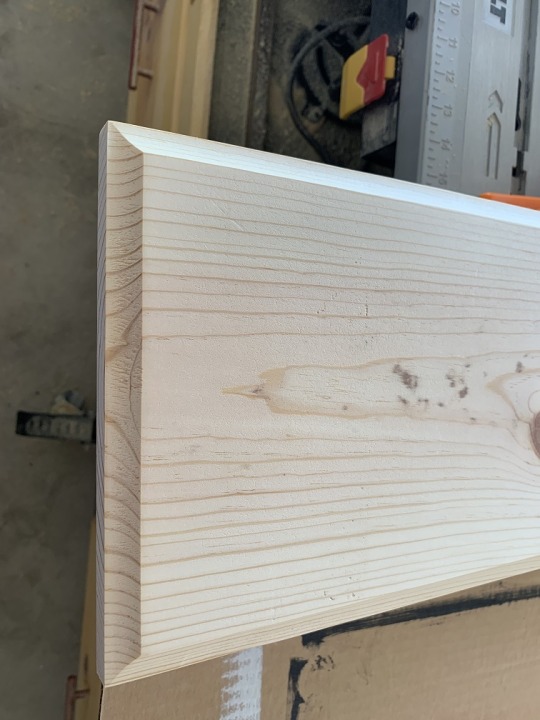
Simple Finished Look
I then filled in any wood knots with wood filler where needed. This made sure when I applied the stain there wouldn’t be visible cracks in the board, especially where I would have the letters. I just let it dry for a few minutes then sanded it down to be flush with the board.

Cracks In The Knots

Filled In With Wood Filler

Sand Down Flush
Now you want to give the whole board a good sanding to remove any imperfections that don’t help with the aged look like marker or dirt stains. I started with 60 grit sand paper then did a real quick sanding at 120 grit. For the cove edging I used a piece of sand paper wrapped around my finger to get in the grove. Once this is done, wipe down the whole board with a tack cloth to get any sawdust off of it and get ready to stain.
I used Minwax Walnut Stain for the base of my welcome sign because it was a nice dark rich color that would pop against the white paint. I would recommend sticking with a contrasting color from what your paint color is to make the lettering more visible from a distance. Once you stain the whole board according to the manufacturer’s directions, I put my sign on painter’s pyramids to allow it to dry completely.
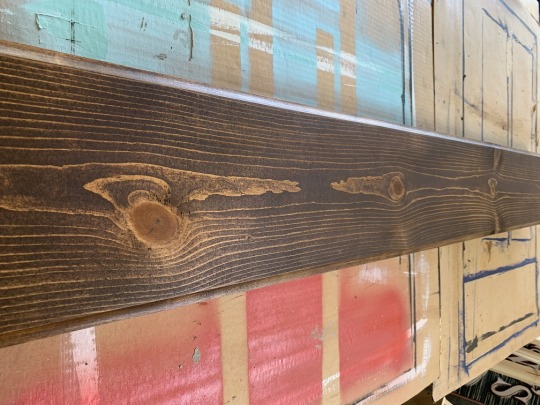
Stain Your Board & Let Dry Completely
While that’s drying, it’s time to work on the letters. We used Imprint MT Shadow font for our board but it’s really up to you. You want to keep a few things in mind while picking your font:
Will it be easy to read from a distance?
How difficult will it be to cut out the letters?
Does it match the style you are looking for?
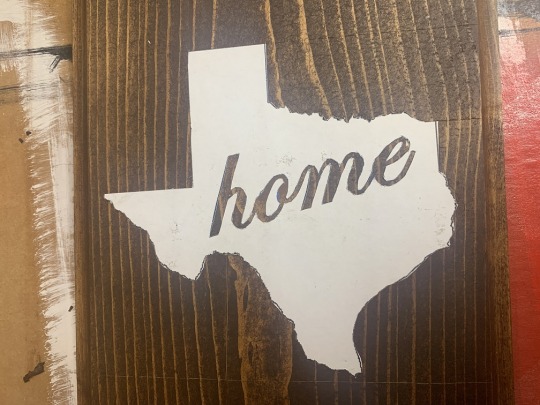
It is very important to remember you will be cutting out these letters with a razor blade of some sort (I prefer an X-Acto knife) so you probably don’t want to do something that is extremely detailed. I like the Imprint MT Shadow font because it had personality but also a lot of straight lines that I could use a ruler as a guide to cut. Depending on what kind of font you use the font size will vary, but I would keep your letters about 4-5″ tall. This will give you room on the top and bottom of your sign for any seasonal decoration you may want to add, while still giving you a little spacing between the letters. We decided instead of the “O” in Welcome, that we wanted to put our Texas state on the sign. We just simple did a search for Texas and picked an image. We then put it in paint and added the word “home” in the center where it would look nice. This step is completely optional, but we liked the homey, personalized feel this would give our sign.
Roughly Cut Out The Letters
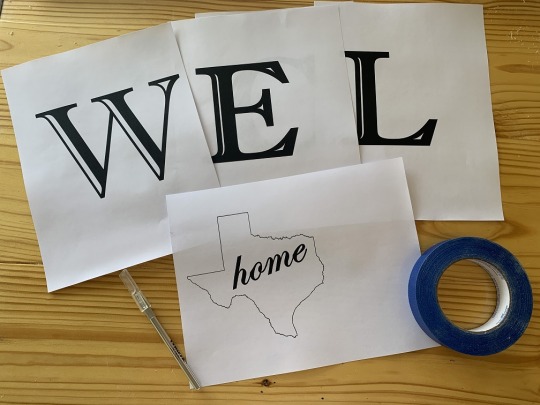
Pick Your Font & State
Next just loosely cut out the letters so you are getting rid of all the extra paper. Don’t cut closer than a 1/4″ from the letters or you will be making the next step a little more difficult for yourself. I would just copy the picture above. Lay out all your letters on your board to make sure you like the look and spacing. We ended up doing 5 1/2″ of space on the top and bottom of the sign, then 2 1/2″ in between the letters. Once you are happy with the look, it’s time to start making “stickers” with them.
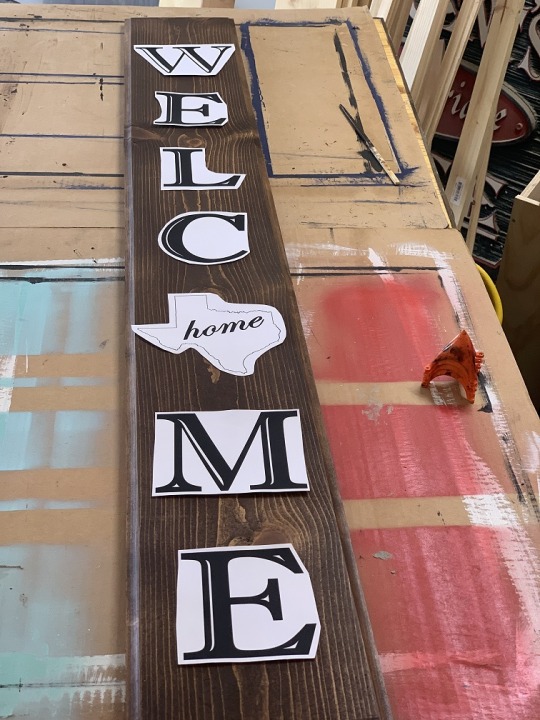
Make Sure To Play With Spacing To Get Your Favorite Look
Next you want to take painter’s tape (wide if you have it) and tape your board from about an inch above the first letter to an inch below the last letter. This is going to give you the adhesive of the sticker. I used a small piece of scrap would to press down the tape from top to bottom to make sure it was well secured. You then want to use a sharpie and mark the sections each letter is going to fall into. This is a little boring and time consuming, but it will make your sign look amazing when it’s all done. Then do one last check by laying out your letters before adhering them to the board.
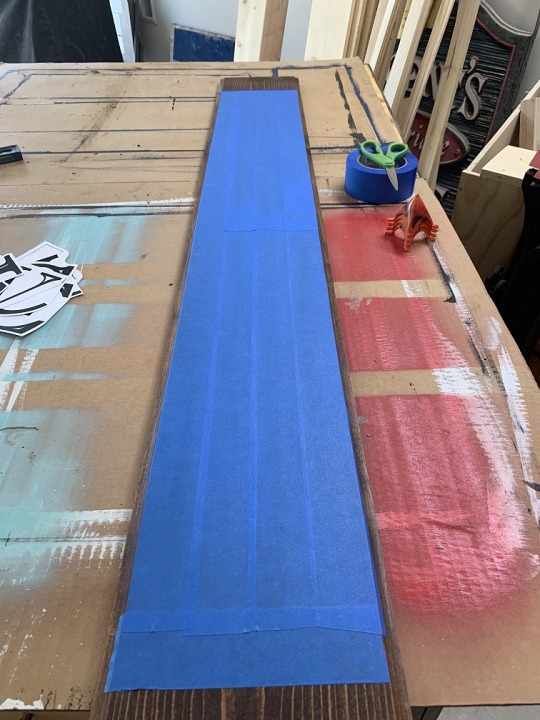
Use Painter’s Tape
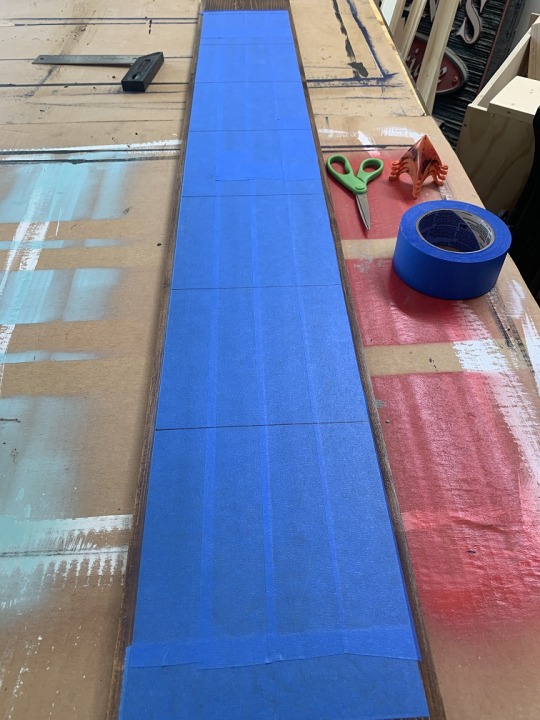
Mark Where Letters Go

One Final Check…
Now I used Super 77 Spray Adhesive to adhere the letters to the board. I sprayed the back of the letters, then using that same piece of scrap wood, I would place the letter in it’s designated spot then run the wood over it to make sure it was well placed and no air bubbles got into it. I also marked the halfway point on each section line and the letter so I could easily line up the letters in a straight line (that spray adhesive dries amazingly quickly so you don’t have time to adjust once you place the letter on the board). Once that’s done let it dry for a few minutes. This is a good time to walk around the block or have a cup of coffee because the next part is not the most exciting task in the DIY world (but I promise it’s totally worth it)!

Now you want to take your X-Acto knife and a metal ruler and start cutting out the letters. You are cutting out any of the white, leaving the black lettering in place. This will mean when you paint your sign, the letters will be the stain and the sign will be “aged” paint. The only exception to this is if you did a state like I did, where you keep the outline of the state but cut out the lettering. This part is time consuming but it’s worth taking your time. I honestly got a little bored with it so I did this part in my dining room table so I could watch TV while I plugged away at it. Be careful to try to only cut around the letters with the razor because the spray paint will not fill in these lines (as I learned the hard way). The lines were driving me nuts (though my fiance was sure no one would see them once the sign was in place) but I knew they were there so I had to fix it. I’ll explain how to fix it if you make a mistake later in this post.

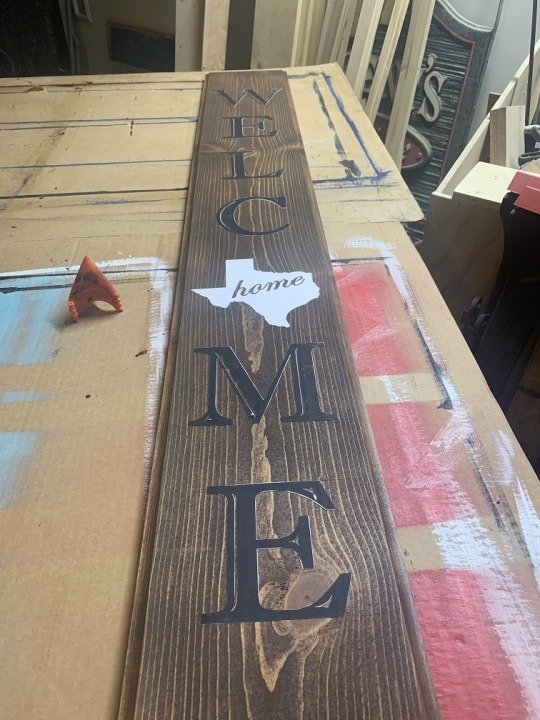

This is the only spot that the letters are cut out and removed
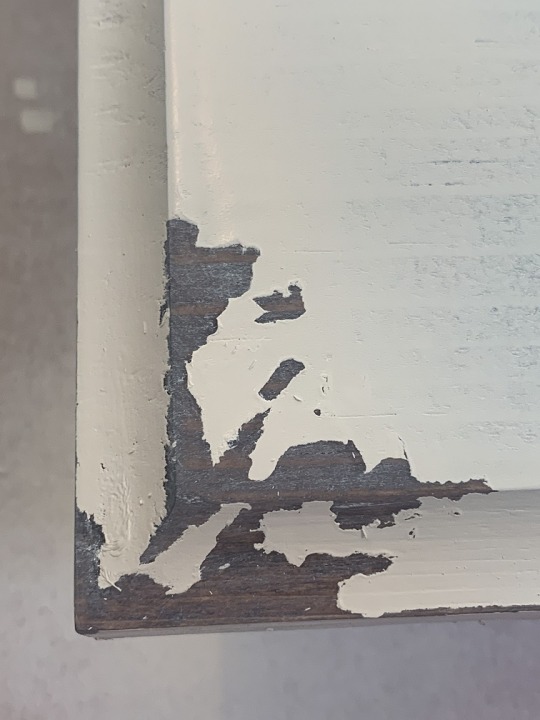
Once that is done you are almost done. To antique the paint, I used Vaseline and a piece of sponge, placing a little Vaseline on it and patting it around the board where I thought it would naturally wear. I focused on the edges, corners, in the cove edging, and in the blank spaces on the top and bottom of the board. I also did some spots on the back of the board so it would match. I like using a sponge because it will give a randomness to the pattern, but I’ve used crumpled up paper towels, q-tips, paint brushes, and even my fingers for this in other projects so feel free to experiment. Ultimately you are just trying to achieve an aged look with whatever tools you decide to use.
Now you want to take your spray paint and paint the sign, front and back. I used Rust-Oleum Ultra Cover Paint + Primer in Heirloom White. Now, you can brush on your paint but this is why I chose spray paint:
Easy Application
Easy Clean Up
Paint Would Be Less Uniform, Giving A Better “Antiqued” Feel
Reduced Risk Of Paint Sealing Stickers In Place
I simply sprayed the paint on all sides of the board, then went back and did a little touch up where it was necessary. Once your paint is dry to the touch (mine only took 20 minutes), take a clean paper towel or rag and wipe down your board, making sure to get all the spots where you put the Vaseline.

Completely Paint Your Board
Rub Paint Where Vaseline Was

Wear On Edging Adds Authenticity
Now, let’s address my mistake with the razor lines. I didn’t think twice while I was making this because I figured such thin lines would easily be hidden by the paint but I was so so wrong. To fix this just take a little wood filler and rub it into the groove, making sure to wipe off any excess. Lightly repaint those areas. Don’t worry, while I was upset when I saw the lines, I liked the end result of this because it added a more layered, authentic feel to the board.
We are so close to being done! Now you want to remove all the letters from your board. Lightly sand (very lightly) with 120 grit or finer sand paper. This will take any new feel to the paint away and add a little wear to the letters, so it matches the rest of the board. Make sure to do this to the back of the board too.

Light Sanding Gives The Whole Board A Worn Look
Seriously, how much do you love this sign so far? You could stop here and start waterproofing it but I did one last 3 minute step that I think really put it over the top. After I wiped down the whole board to get rid of any dust, I mixed about a teaspoon of black paint (I just used some leftover acrylic black paint I had from a previous project) with an ounce of water. When I say I mixed it, I literally swished around the bowl the paint and water was in, so that when I applied it then I would have darker and lighter areas. I then dunked a rag in the mixture and rubbed down the whole board with it. I think this really gave it the right antiqued look I was going for, especially since this is an outdoors piece so the aging would naturally darken the wood.
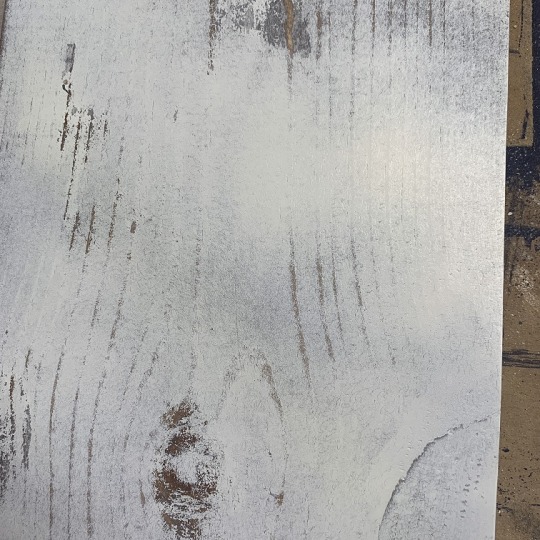
Before Paint Wash

After Paint Wash
Now the difference is subtle but it took that new paint feel away from the piece. The last and final step is to waterproof your sign so it lasts for years to come. I used Thompson’s WaterSeal Clear Waterproofer. I’ve used this for my outdoor planters and it’s amazing at how well it protects the wood. My only complaint with this product is that it takes 24 hours to dry and you want to do at least 2 coats to make sure you have completely protected your Welcome Sign.
That’s it! I know it was a lot of reading, but the actual project is simple to complete and extremely inexpensive. This is a great project to do with friends or kids, and you can easily modify this to fit your unique tastes! I hope you enjoyed this project and please if you try this, leave a picture of your final product in the comments to inspire others!
Disclaimer: Please make sure with all your projects that you have read your equipment’s safety manual and are following the recommended safety precautions. We are not responsible for the results of your DIY projects as results can vary based on your skill level, quality of materials, and age of your equipment.
source https://wickedhandy.net/diy-antique-style-welcome-sign/
0 notes
Text
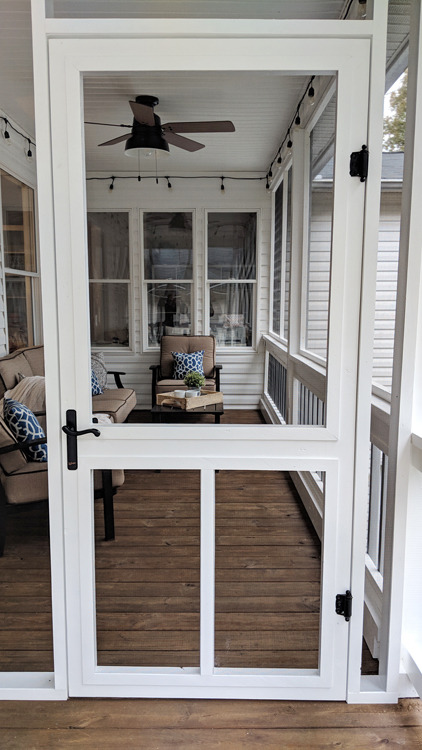
DIY Screen Door Project
Mike Poorman from Woodshop Mike walks through how to build a screen door from scratch. Read more to find out how to do it yourself.
DIY Screen Door Project
Have you ever needed a new screen door and wondered if you could just make it yourself? I built this farmhouse style door for our back porch overhaul using simple pocket hole joinery for a quick and sturdy assembly. Follow along to see how you can tackle this easy weekend project!
Tools and items I used for the project can be found at the end of the article.
Milling Lumber for a Screen Door
When working with dimensional lumber for anything other than framing, I typically buy the next widest board. So if I need a 2×4, I’ll buy a 2×6. This allows me to build my pieces from the straightest sections of the board. I also have much better luck overall finding straight boards from 2×6’s than 2×4’s.
My DIY screen door will be 80 x 36. This way I have plenty of room to get furniture through the doorway. If you’re building a door to match an existing doorway, just build your door to fit that space. To optimize my material, I used two 10′ 2×6’s and one 8′ 2×6.
My first step is to cut my stock to rough length on the miter saw.
I used my two 10′ 2×6’s and ripped them down to 3-1/2″ wide. These will make the outer frame of the door. I then took the straightest offcut and ripped it to 1-1/2×1-1/2. This will be the vertical piece at the bottom of the door.
The trim for this door is made from offcuts of ripping the 2×6’s down to size. Simply cut strips 1/4″ wide and then break the edges with some 120 grit sand paper.
Cut to Length
It’s now time to cut the door components to length before assembly. I head over to the miter saw with my boards that have been ripped down and cut two pieces of the 3-1/2″ wide lumber to 80″. I then cut the drop from those boards to 29″. Once assembled, this will make my door 80″x 36″.
While at the miter saw, I grab my 8′ 2×6 and also cut it to 29″ long. This will be the horizontal board that’s about 1/3 from the bottom.
The last item to cross cut is the 1-1/2×1-1/2 piece that will vertically divide the lower portion. I cut this piece to 27″ long.
Pocket Holes
I grab all of my boards that are 29″ long along with the 1-1/2″ x 1-1/2″ piece and set up my Kreg K5 for 1-1/2″ material and 2-1/2″ pocket hole screws.
I put one hole in each end of the 1-1/2″ wide board, two holes (A & C on jig) into each end of the 3-1/2″ wide boards, and three holes into each end of the 5-1/2″ wide board.
Assemble the Screen Door
Assembling the DIY screen door is a piece of cake. Lay out your boards on a flat surface per the design with the pocket holes facing up. Then using the Kreg Face Clamp, hold the pieces in position while driving in the 2-1/2″ screws. Repeat this process until the entire door is assembled.
Now grab your 3/8″ dowel and cut it into a million plugs about 2″ long. Place a little glue into each of the pocket holes and then insert a plug. With the dead blow hammer, drive it into the hole until the plug is fully seated.
A word of caution: If you use too much glue, it can cause the wood around the pocket hole to split while you’re hammering in the plug.
The last step here is to flush cut the plugs once the glue is cured. You can use many methods for this step, but I personally prefer using my multi-tool with a flush cut blade attached.
I add an 1/8″ round over on all the edges with a palm router. This makes the door “softer” to the touch, easier to paint, and will reduce the likelihood of damaging the screen while securing it to the door.
Before moving on to painting, I hit the entire door with 120 grit sandpaper.
Prime and Paint
For protecting all that hard work I’ve done, I chose to first prime with Gripper primer and then follow up with PPG Timeless paint. The results look fantastic and the coverage is very consistent!
Install Screen
If you are looking for screening that is practically invisible, then Phifer Ultravue Screen is what you need. This screening is very easy to work with. All you need is a stapler and scissors/utility knife!
Start by measuring your opening and then cut your screen to be about 6″ longer. One thing to keep in mind is the width of the trim is 1-1/2″ wide, so make sure that you staple in the area that will be covered by the trim.
Center the screen on the opening and staple about every 6″ starting from the middle. Then gently stretch the material on the opposite side and staple every 3″ starting from the middle and work your way out. Now return to the original side and gently stretch the screening between your first staples and add additional staples as needed.
Simply repeat this process on the other two sides and remaining openings.
Add Trim to Screen Door
Adding trim to the door is completely for aesthetics, but if you’re like me, it’s just not something you can leave out.
Set your miter saw for 45° and cut your trim to fit each of the openings.
With all your pieces cut, grab the brad nailer and get to work! A brad about 1/2″ from the miters and every 8″ after that will secure your trim pieces well.
Hey congrats! That’s a pretty killer looking DIY screen door isn’t it?!
I know you’re just dying to know more about what this DIY screen door looks like installed, so head over to Back Porch Overhaul and check out the entire back porch renovation!
Materials
2″x6″x10′
2″x6″x8′
2-1/2″ pocket hole screws
3/8 dowel
Phifer Ultravue screen
Gripper primer
PPG Timeless paint
Sanding disks (80-120 grit)
1″ brad nails
Tools Used
IsoTunes
table saw
miter saw
Kreg K5
Kreg Jig clamp
drill
impact driver
dead blow hammer
multi-tool
palm router
1/8″ round over bit
Shortcut brush
roller
paint bucket
stapler
staples
scissors (my favorite shop scissors!)
brad nailer
For more DIY home projects, head over to The Home Depot Blog.
The post DIY Screen Door Project appeared first on The Home Depot Blog.
from Home https://blog.homedepot.com/diy-screen-door-project/
via http://www.rssmix.com/
0 notes
Photo
DIY Screen Door Project https://ift.tt/2DmQFyj
Mike Poorman from Woodshop Mike walks through how to build a screen door from scratch. Read more to find out how to do it yourself.
DIY Screen Door Project
Have you ever needed a new screen door and wondered if you could just make it yourself? I built this farmhouse style door for our back porch overhaul using simple pocket hole joinery for a quick and sturdy assembly. Follow along to see how you can tackle this easy weekend project!
Tools and items I used for the project can be found at the end of the article.
Milling Lumber for a Screen Door
When working with dimensional lumber for anything other than framing, I typically buy the next widest board. So if I need a 2×4, I’ll buy a 2×6. This allows me to build my pieces from the straightest sections of the board. I also have much better luck overall finding straight boards from 2×6’s than 2×4’s.
My DIY screen door will be 80 x 36. This way I have plenty of room to get furniture through the doorway. If you’re building a door to match an existing doorway, just build your door to fit that space. To optimize my material, I used two 10′ 2×6’s and one 8′ 2×6.
My first step is to cut my stock to rough length on the miter saw.
I used my two 10′ 2×6’s and ripped them down to 3-1/2″ wide. These will make the outer frame of the door. I then took the straightest offcut and ripped it to 1-1/2×1-1/2. This will be the vertical piece at the bottom of the door.
The trim for this door is made from offcuts of ripping the 2×6’s down to size. Simply cut strips 1/4″ wide and then break the edges with some 120 grit sand paper.
Cut to Length
It’s now time to cut the door components to length before assembly. I head over to the miter saw with my boards that have been ripped down and cut two pieces of the 3-1/2″ wide lumber to 80″. I then cut the drop from those boards to 29″. Once assembled, this will make my door 80″x 36″.
While at the miter saw, I grab my 8′ 2×6 and also cut it to 29″ long. This will be the horizontal board that’s about 1/3 from the bottom.
The last item to cross cut is the 1-1/2×1-1/2 piece that will vertically divide the lower portion. I cut this piece to 27″ long.
Pocket Holes
I grab all of my boards that are 29″ long along with the 1-1/2″ x 1-1/2″ piece and set up my Kreg K5 for 1-1/2″ material and 2-1/2″ pocket hole screws.
I put one hole in each end of the 1-1/2″ wide board, two holes (A & C on jig) into each end of the 3-1/2″ wide boards, and three holes into each end of the 5-1/2″ wide board.
Assemble the Screen Door
Assembling the DIY screen door is a piece of cake. Lay out your boards on a flat surface per the design with the pocket holes facing up. Then using the Kreg Face Clamp, hold the pieces in position while driving in the 2-1/2″ screws. Repeat this process until the entire door is assembled.
Now grab your 3/8″ dowel and cut it into a million plugs about 2″ long. Place a little glue into each of the pocket holes and then insert a plug. With the dead blow hammer, drive it into the hole until the plug is fully seated.
A word of caution: If you use too much glue, it can cause the wood around the pocket hole to split while you’re hammering in the plug.
The last step here is to flush cut the plugs once the glue is cured. You can use many methods for this step, but I personally prefer using my multi-tool with a flush cut blade attached.
I add an 1/8″ round over on all the edges with a palm router. This makes the door “softer” to the touch, easier to paint, and will reduce the likelihood of damaging the screen while securing it to the door.
Before moving on to painting, I hit the entire door with 120 grit sandpaper.
Prime and Paint
For protecting all that hard work I’ve done, I chose to first prime with Gripper primer and then follow up with PPG Timeless paint. The results look fantastic and the coverage is very consistent!
Install Screen
If you are looking for screening that is practically invisible, then Phifer Ultravue Screen is what you need. This screening is very easy to work with. All you need is a stapler and scissors/utility knife!
Start by measuring your opening and then cut your screen to be about 6″ longer. One thing to keep in mind is the width of the trim is 1-1/2″ wide, so make sure that you staple in the area that will be covered by the trim.
Center the screen on the opening and staple about every 6″ starting from the middle. Then gently stretch the material on the opposite side and staple every 3″ starting from the middle and work your way out. Now return to the original side and gently stretch the screening between your first staples and add additional staples as needed.
Simply repeat this process on the other two sides and remaining openings.
Add Trim to Screen Door
Adding trim to the door is completely for aesthetics, but if you’re like me, it’s just not something you can leave out.
Set your miter saw for 45° and cut your trim to fit each of the openings.
With all your pieces cut, grab the brad nailer and get to work! A brad about 1/2″ from the miters and every 8″ after that will secure your trim pieces well.
Hey congrats! That’s a pretty killer looking DIY screen door isn’t it?!
I know you’re just dying to know more about what this DIY screen door looks like installed, so head over to Back Porch Overhaul and check out the entire back porch renovation!
Materials
2″x6″x10′
2″x6″x8′
2-1/2″ pocket hole screws
3/8 dowel
Phifer Ultravue screen
Gripper primer
PPG Timeless paint
Sanding disks (80-120 grit)
1″ brad nails
Tools Used
IsoTunes
table saw
miter saw
Kreg K5
Kreg Jig clamp
drill
impact driver
dead blow hammer
multi-tool
palm router
1/8″ round over bit
Shortcut brush
roller
paint bucket
stapler
staples
scissors (my favorite shop scissors!)
brad nailer
For more DIY home projects, head over to The Home Depot Blog.
The post DIY Screen Door Project appeared first on The Home Depot Blog.
Mike Poorman
0 notes
Last Seen Blogs