#clean ui
Text
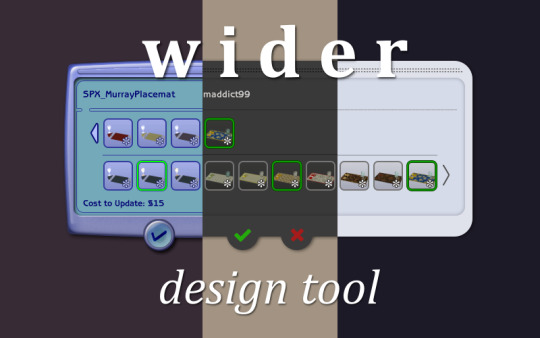
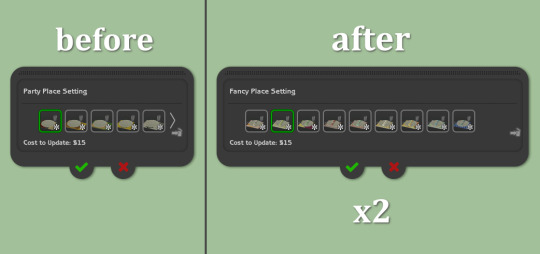
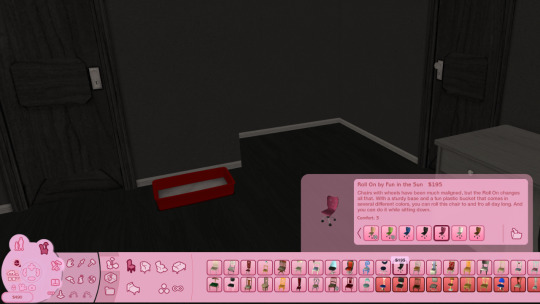
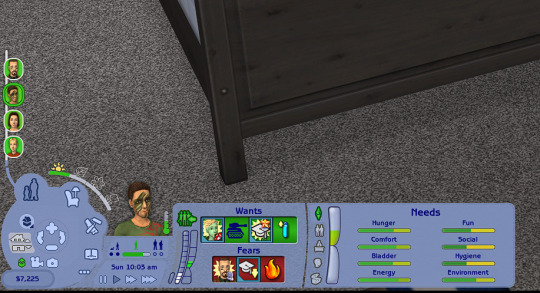
Wider Design Tool
You know how it is with tons of recolors. With this UI mod, Design Mode window is a bit wider and fits a row of 10 recolors, instead of 5.
Choose a version for your UI: maxis / clean / pink / starship 🖤
Credits to maxis, @greatcheesecakepersona, and @simstate for the images I edited to make this mod, and to @tvickiesims for recoloring one rug a million times :) this doesn't even begin to address the issue, but I did what I could.
1K notes
·
View notes
Text
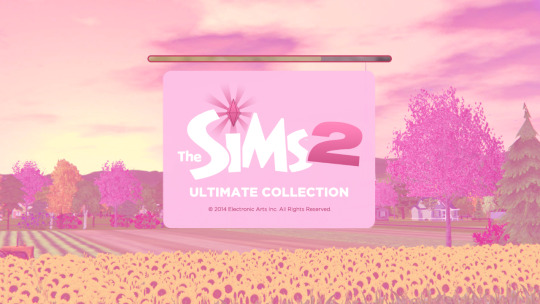
Pink UI: Download (v1.0)
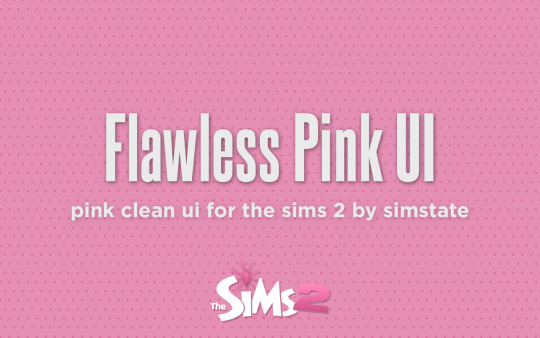
Surprise, b*tch. 😉 Welcome to Pink UI~!
After a year since its initial reveal, it’s now here!


Please note that as this uses Clean UI & Starship UI as a base, it will require all expansion packs and Mansion & Garden stuff to work as fully intended.
Features:
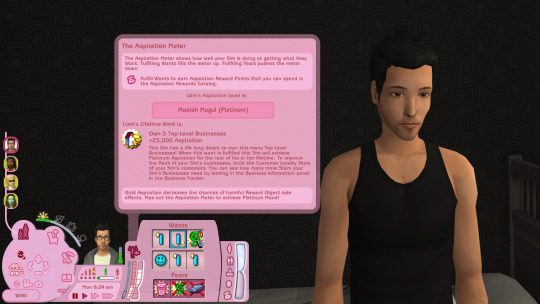
completely overhauled pink ui based on clean ui
six new pink aesthetic loading screens
custom pink cursors !!
integrated improvements from starship ui (thank you @ethanmcgregor)
Installation process is the same as Clean UI and Starship UI.
Credits:
Once again, huge shoutout and props to @greatcheesecakepersona. They really paved the way for Sims 2 UI modding, and the original Clean UI and its corresponding DIY kit make all of this possible. GCKP is a modern-day TS2 hero.
Thank you to @neosimi for allowing her beautiful loading screen pic from Starship UI to be reused in Flawless Pink UI!
The loading screen images that use real life Tokyo photographs are from Wikimedia Commons, released under a Creative Commons License.
And lastly, thank you to all of my Patreons for tipping and supporting me throughout this very long and tedious development process:`
Angelll • AnnaDelRey • AstroX14242 • Bifford • Bob aka Lapis • bouse • braeji • @brattyful • Bri B • bribrichan • criisolate • Daimond • deiffol • demonho • dva • Eenalya • eini • Elan • Elio. • FatalQueen • fabrizio • felixw / @fwaldorf • Fraankky • gamingwithdoublea • garrettgivre • ghoulspice • great kness and powerful brain • Jocava • LeighPlays • Lemurphs • littlevalkyrie • MAGLX • Meat • @misspats3 • Motion Sims • mrscee • neosimi • Noodle • PaintTheCityPink • pollybygolly • poplol • Ri2xe • @ryanaiss • simspaghetti • SimulationBabe • staz • SuperLegal • Taliaaaaa • TenDema • THybrid21 • Tonni • toy042 • wbell • xenrces • zan
DOWNLOAD (SFS)
Thank you guys so much for the continued support over the past few months. I’m so glad I was able to finish this UI for one last hurrah. I hope this surprise post is the start of a nice weekend for you. ^w^
<3, -simstate
#the sims 2#sims 2#ts2cc#s2cc#starship ui#clean ui#pink ui#sims 2 ui#sims 2 mod#sims 2 mods#sims 2 custom content#simstate#ui mod#sims 2 ui mod#sims 2 pink#sims 2 pink ui#sims 2 aesthetic#sims aesthetic
1K notes
·
View notes
Text
Custom Fonts for The Sims 2
Hey People! Here is the Tutorial!!
Step 1) Download any Font you like on the Internet (ttf or otf)
Step 2) Go to: ''Your\GamePath\The Sims 2 Ultimate Collection\The Sims 2\TSData\Res\UI\Fonts'' and delete all .mxf files from there. *Keep the .ini File*
Step 3) Copy the Font you downloaded into: ''Your\GamePath\The Sims 2 Ultimate Collection\The Sims 2\TSData\Res\UI\Fonts''
Step 4) Enjoy!
One Thing: You can rename your font to .mxf, if the font dont work with .ttf or .otf
Disclaimer: Many Fonts are Zip Files and they contain Bold,Italic,Thin and etc ttf or otf files. Be sure to copy only one to the path! if you copy more then 1 it can cause corruption!
I'm not responsible for any Corruption in your Sims 2 Game!
sorry for my bad english!
353 notes
·
View notes
Text
Loading Screen for Clean UI

This is a loading screen alternative for the Greatcheesecakepersona Clean UI. It's inspired by the redesign of The Sims 4. Alternatively, this loading screen can also be used in combination with Simstate's Starship UI. It can also be used without a UI mod, but then it would not match the design of The Sims 2.
There are 2 versions for 2 different resolutions. Choose one of them (mostly 1920x1080)
How to install
You need to put the package file in the UI folder.
Folder path:
TS2 Ultimate Collection:
C:\Program Files (x86)\Origin Games\The Sims 2 Ultimate Collection\Double Deluxe\Base\TSData\Res\UI
Normal (if you don't have the Ultimate Collection):
C:\Program Files (x86)\EA GAMES\The Sims 2\TSData\Res\UI
Get it now
17 notes
·
View notes
Text

ISO / WCIF this wallpaper as a UI mod for the TS2 loading screen?
I found it recently and had been using it but it was lost with my pc reset :( I know someone on simblr created/posted it but I can’t remember who and I thought I saved it to my likes but I didn’t.. I miss this screen and would be grateful if someone knows where I can redownload it!
#help#ts2#the sims 2#ts2 simblr#sims 2#sims 2 simblr#ts2 mod#sims 2 ui#ui mod#ts2 ui#ts2 loading screen#sims 2 loading screen#clean ui
11 notes
·
View notes
Photo

About Us UI design
The web design for the About US page UI Design
2 notes
·
View notes
Text

The quantity and skills of the workers in a service slot influence the protection against injuries.
#gamedev#indiegame#drawing#illustration#gameart#indiedev#indiegamedev#gaming#artist#clean ui#game ui#uiux#ui ux design#ux#interface#design
2 notes
·
View notes
Text
Spotify's UI
I woke up today morning and realized that Spotify changed its UI! Not sure how i feel about it...
1 note
·
View note
Text

Daily UI Design Challenge 💪
Day 05:- APP icon 😊
Feedback is always welcome...
#design #ui #appicon #icon #icondesign #day5 #dailyui #dailyuichallenge #dailyupdates #dailyux #dailyupdates #figma #figmadesign #figmacommunity #adobexd #adobe #userexperience #userinterface #figmacommunity
0 notes
Text
Never succeed in startups: An Ultimate Guide.
Have you ever come across or even had a thought to know how to not succeed as a start-up?
No? Never had any thought, as such?
Then, let us introduce you to certain methodologies which will escort you through this ultimate guide.
Learning from your mistakes and knowing why you failed in the first place is important. And that’s where “Design Thinking” and “Lean Methodology” play a major part. Even after incorporating them in your early or later stages of failure you get to know your weak points and work through them!
So, what exactly are we going to encounter here?
PART- 1: A Basic understanding of Design Thinking and its different stages.
PART- 2: A Basic understanding of Lean Methodology and its different principles.
3. Conclusion: Are they really the same methodologies?
Let’s start with,
PART- I: A BASIC UNDERSTANDING OF DESIGN THINKING AND ITS 5 DIFFERENT STAGES.
The term “Design” is often associated with the quality and aesthetic appearance of a product. But as a discipline, it deals with innovation that draws attention not only to the technological and marketing factors- but also to the importance of presenting new connotations to products, services, and relationships.
Design Thinking is not a concrete approach to design. In the process, you have to go through different stages that might be conducted concurrently and repeated several times to discover the best possible solution.
Therefore, Design Thinking is a non-linear, iterative process that designers use to understand human needs, by redefining problems, challenging assumptions by creating many ideas through brainstorming sessions, and adopting the approaches of prototyping and testing.
As they say,
“Things must have a form in order to be seen, but they must make sense in order to be understood and used.”
And this brings us to the “5 stages of Design Thinking”.
The Hasso Plattner Institute of Design at Stanford described design thinking as a “five-stage” process.
Stage 1: “Empathize”- Do the research on your users’ needs.
Through user research, you should gain an empathetic understanding of the problem you are trying to get through. It allows you to set aside your assumptions about the world and gain real insights into users and their particular needs.
For an easy understanding, here are a few methods to gain empathy with the users:
Observe the user’s perspective without disturbing or questioning the process.
Have detailed conversations about the topic with other designers.
Assume a beginner’s mindset.
Conduct direct interviews with your users with empathy.
Ask the 5 whys.
From a purely business profit-driven perspective, empathy is an essential component of any sound business solution. If we develop solutions in isolation, without essential insights about our users, we may create solutions that completely miss the mark and thus be ignored by the market.
As one of the Marketingeek’s report states that only 30% of marketers and advertisers demonstrate a high level of empathy in their marketing communications.
But now, many brands have accepted the challenge of building a bridge of empathy between themselves and their customers (and their employees) and are nailing it!
For example, eBay: Up & Running
In the wake of the coronavirus outbreak, more than 100,000 small businesses had to permanently close their doors; they simply could not survive two or three months of lockdown. Ever the e-commerce advocate, eBay launched an accelerator program for small businesses called “Up & Running,” which gives small businesses a free e-commerce platform to do business. Up & Running even arms these retailers with marketing and advertising tools and shipping discounts to help keep them afloat.
Active, helpful customer service across all channels (in-store, live chat, social media, over the phone) is one of the most effective empathy channels available to you.
As Frank Chimero, illustrator and author of The Shape of Design, says
“People ignore design that ignores people”.
Stage 2: “Define”- Emphasize your users’ needs and problems.
Here, accumulate the information gathered from the Empathize stage. And then analyze your observations and synthesize them to solve the main challenges you and your team have acknowledged.
Design thinkers often analyze a situation before synthesizing new insights and then analyze their synthesized findings once more to create more detailed syntheses. (To know more)
Here is how to analyze and synthesize the observations,
The analysis is about breaking down complex concepts and problems into smaller, easier-to-understand constituents. For instance, during the first stage of the Design Thinking process, the Empathize stage, you observe and document details that relate to your users.
Synthesis, on the other hand, involves creatively piecing the puzzle together to form whole ideas. This happens during the Define stage when you organize, interpret, and make sense of the data you have gathered to create a problem statement.
Begin a problem statement with a verb, such as “Create”, “Define”, and “Adapt”. It will guide you to focus on the specific needs that you have uncovered. Also, creates a sense of possibility and optimism that allows team members to spark off ideas in the Ideation stage, which is the third stage.
Creating Personas is another way to acknowledge your users’ needs.
Personas are fictional representations and generalizations of a cluster of your target users who exhibit similar attitudes, goals, and behaviors concerning your product and are based on user research.
So, create personas before proceeding to ideation!
Stage 3: “Ideate”- Create ideas by challenging the assumptions.
You are all set to generate ideas. Once you get a solid background knowledge from the first two stages, you can start thinking “outside the box”, find alternative ways to view the problem and bring out innovative solutions to your problem statement.
To this end, we use synthesis tools to stimulate creativity and generate solutions in line with the context of the subject in question.
For example,
Airbnb is an interesting example of how it works.
When Airbnb realized that people were skeptical about booking listings, they visited all the listings in New York, spoke to the hosts, and realized that it was the poor quality of photographs that had decreased bookings. They took better pictures of the listings, the bookings went up and the hosts and guests were both satisfied. In doing this Airbnb kept users at the crux of problem-solving.
It stepped into the user’s shoes to figure out their pain points, ideated along the lines of the identified problem and came up with a solution. They empathized with what the users actually do and want.
Design thinking keeps at the core of tapping into user sentiment.
Stage 4: “Prototype”- It’s about the time when you create actual solutions.
“Prototyping means making an idea tangible; it is the passage from the abstract to the physical to represent reality — even if simplified — and promote validations,” explains the authors of Design Thinking — Innovation in Business.
The goal is to start with a low-fidelity version of the intended solution and improve it over time based on feedback. Prototyping will usually involve the creation of small-scale, inexpensive versions of the product
Prototypes can be sketches, models, or digital renders of an idea. It helps to learn quickly with minimal effort. Prototypes can include specific features to target individual problem-solution scenarios, and set the stage for decision-making conversations around what works and what doesn’t.
And this is how it looks,
Stage 5: “Test”- All you have to do is, try out your solutions!
As this is the final phase, design thinking is iterative: Teams often use the results to redefine one or more further problems. Subsequently, you can go back to the previous stages to make further iterations, alterations, and refinements- to rule out different solutions.
It is necessary to understand that these stages are different modes that contribute to the entire design project, rather than sequential steps. Your goal throughout is to gain the deepest understanding of the users and what their ideal solution/product would be.
To wrap things up, Design Thinking is a flexible process that is solution-focused to help solve problems that everyday people have issues with.
Design Thinking is a methodology that provides a solution-based approach to solving problems. A design mindset can be applied to any life situation, and it aids in considering the bigger picture and informatively acting accordingly.
Indeed, if the strategy is about taking the right risks, then some initiatives will surely be failures. But it is from failure that we learn the most and advance organizational strategy the fastest.
Being UX professionals, we believe it is important to advocate for the user and cater to their needs while solving any problem or building a product. Nonetheless, to do that, there’s a huge distinction in the understanding of what a good design is and the users’ needs in startups as well as in businesses. And our studio challenges us to comprehend the dialects from different perspectives and use the right methodologies to solve this dilemma.
Stayed till here?
Then consider sticking around for a little while, we’ll back with the Second PART (soon before you know). ;)
#web ui#uidesign#ux#design#clean ui#uxinspiration#uxuidesign#user experience#developers & startups#ui#uxbridge#uxtrends#design thinking#startup#webdevelopment#webdesign#web developing company
1 note
·
View note
Text

what in the fuck is this? if I wanted to be on the edgy ex-bird app I'd be there. This design is fucking atrocious.
241 notes
·
View notes
Text
Random UI Experiments [ALPHA]
I’ve gotten a handful of requests to upload some of the other TS2 Clean UI recolors that I’ve showcased on Tumblr and Discord. These were recolors that I whipped up in a week- so I haven’t taken the time to polish them. They were last modified in summer 2021, hope that gives you an idea of how long ago these have been.
I’m really swamped up and busy with school at the moment, so I’m sorry but I can’t dedicate time to finish these. Just to clarify- these are all experimental, and I haven’t finished them. I don’t intend to any time soon- these aren’t public betas, I’m just releasing them so y’all will be satisfied :b
Credit as always to greatcheesecakepersona for being the best modder ever and reverse engineering these files so anyone can make recolors. All I did was recolor the UIs in Photoshop. Again, all thanks to him and EAxis.
Final note: This is an ALPHA mod and therefore won’t be finished. Expect text bugs, visual glitches, and general unfinished stuff. Don’t spam my ask box, you have been warned.
Green UI
Retro Blue UI

Cream UI (Medieval)
Thanks and goodbye 💕
263 notes
·
View notes
Text

big fan of pretty light
#messing around reshade#hex lens flare shader has my heart#i updated my mods and cleaned up some cc#but i still need to figure out why my counter ui is broken#but we're gonna keep tweaking this preset#and maybe see how it does with relight
69 notes
·
View notes
Text

@dilfosaur @drawfee
#drawfee#I am not an artist#IDK why one screenshot was clean and the other has UI stuff#but I needed to see what this would be like.
61 notes
·
View notes
Text
Masterpost: All the UIs & Extras for Bodyshop ✨
I'm making this post both because I like to group things under one post and because I need it as a link to add to my tracker, but still I think it will be useful for many!
Look here for other masterposts!
Special mention to this guide made by @celestialspritz ! - This guide explains how to install the various Bodyshop stuff (Default Rooms, Lighting Mods, Poses, Background etch) + there is a guide on how to install ReShade on BS, there are links for other poses, UI and Lighting mods and more things that aren't linked here!
UI (User Interface) + BKG
Bodyshop Starship UI (Dark Mode) + Widescreen + bkg
Bodyshop Clean UI (White Mode) + Widescreen + bkg
LIGHTING MODS
Better Lighting for Bodyshop
Blue and Red Lighting Mod + a replacement pose!
A lighting mod!
Replacement Poses
Arms at sides Bodyshop Replacement Pose
More Replacement Poses
Moooore Replacement Poses
Mooooooore Replacement Poses
Mooooooooooore Replacement Poses
Default Rooms
Bodyshop Default Room
More Bodyshop Default Rooms!
Moore Bodyshop Default Rooms!
Mooore Bodyshop Default Rooms!
Moooore Bodyshop Default Rooms!
2009 Room
Sanrio CAS Rooms
Sliders
More bodyshop rooms!
More Custom Sliders!
42 notes
·
View notes
Text
okay i KNOW i saw someone make ed n stede in ts2 around here, but i cannot remember who it was !!!! does anyone remember? i want to ask if they'd upload their creations because guess who is spending the afternoon getting ts2 set up??? me!!!!!!!!!!!!
and guess who cannot bear to play without her sim blorbos in some way??? me 😞
i mean i guess i'll eventually try to make my own if all else fails, but i am so bad at doing sims that are supposed to look like someone 😂
i just need to be able to continue putting them in domestic situations across all games, you know?
#xoxod#but YESSSSSSSSSSS i got my clean templates installed today#gotta get my cheat shortcuts set up#pink ui.....#hmmmm what else?
23 notes
·
View notes
Last Seen Blogs

readblog100
Read Blog
mutechild
Gay and Depressed
pardon-madam
Pardon Madam

bones912
抹茶

thx-mxlty-two-fxced
Two Faced