#cosplay making
Text
Today marks the one year anniversary that I started planning this crazy Cosplay, might as well share the journey here
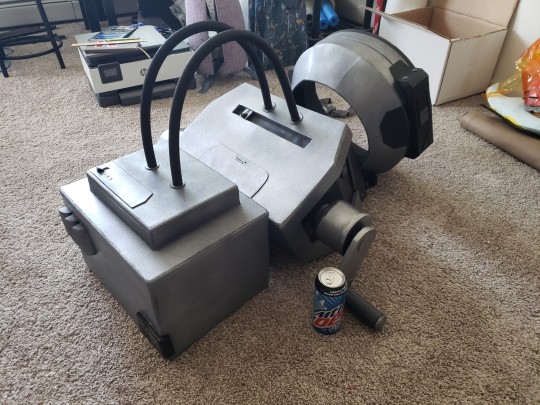
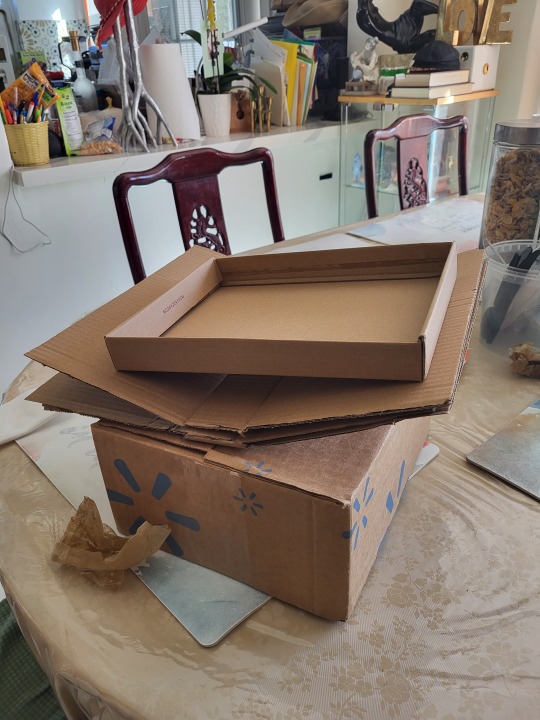
After the wild ride that was the game Inscryption, the brain worms took over thinking how could I make a Cosplay with a working screen for a face, no legs, and a crank for a left arm..


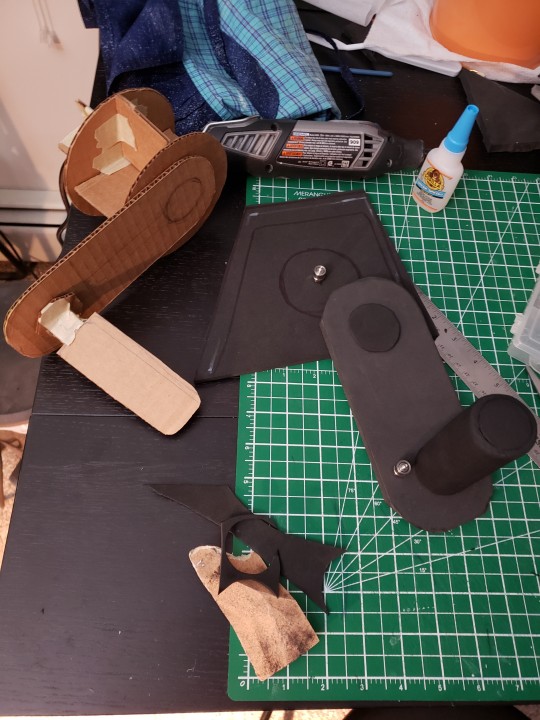
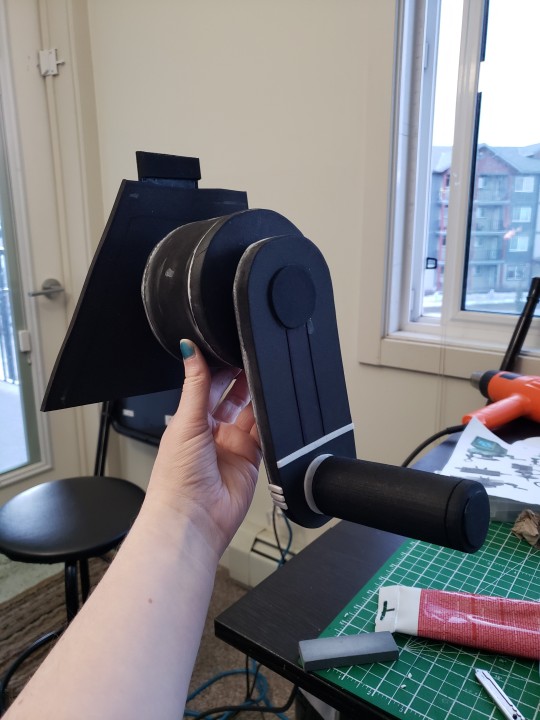

Luckily I work in a warehouse and cardboard is of no short supply to mock up potential cosplays, it did help that P03 is very boxy to begin with.
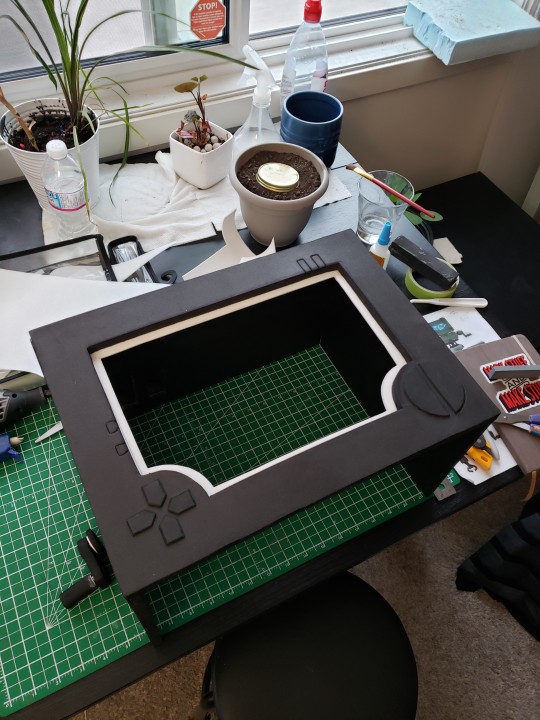

The face and animated light skirt were a whole other nightmare as I've never done anything like it before. I used an old iPad for the face and recreated almost all of P03's facial expressions as loaded gifs. For the led skirt, I used an arduino uno and followed a few tutorial online on how to colour and animate them.

Hope you enjoyed my silly big project and hopefully get inspired to make crazy things of your own this year!!
#inscryption#inscryption p03#p03#cosplay#costume#p03 cosplay#cosplay progress#cosplay making#robot#I will be fixing him up and wearing him again at Calgary comic con
5K notes
·
View notes
Text
Being a cosplayer is so neat
I spend my time sewing and giggling
"Look at that pathetic little man, he is gonna look so great and sad and he is gonna cry a lot" as I make the clothes
Adding a collar? "Look at that little pathetic sad collar, perfect to match my pathetic little man"
Y'all, I'm having a lot of fun

70 notes
·
View notes
Text
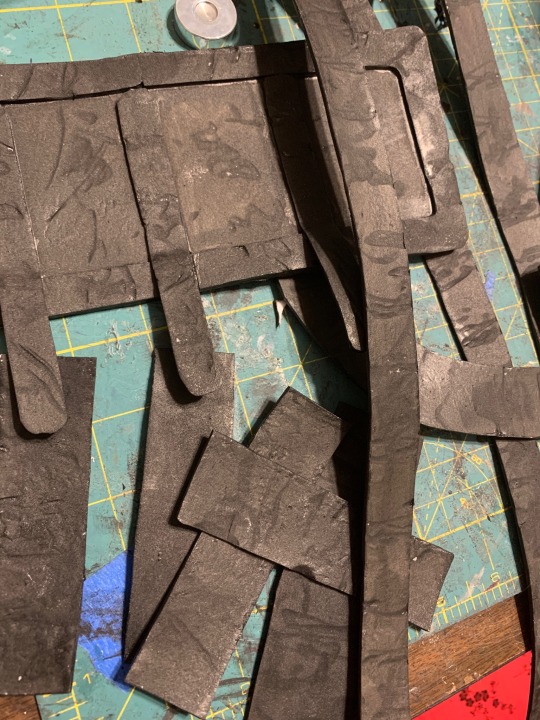
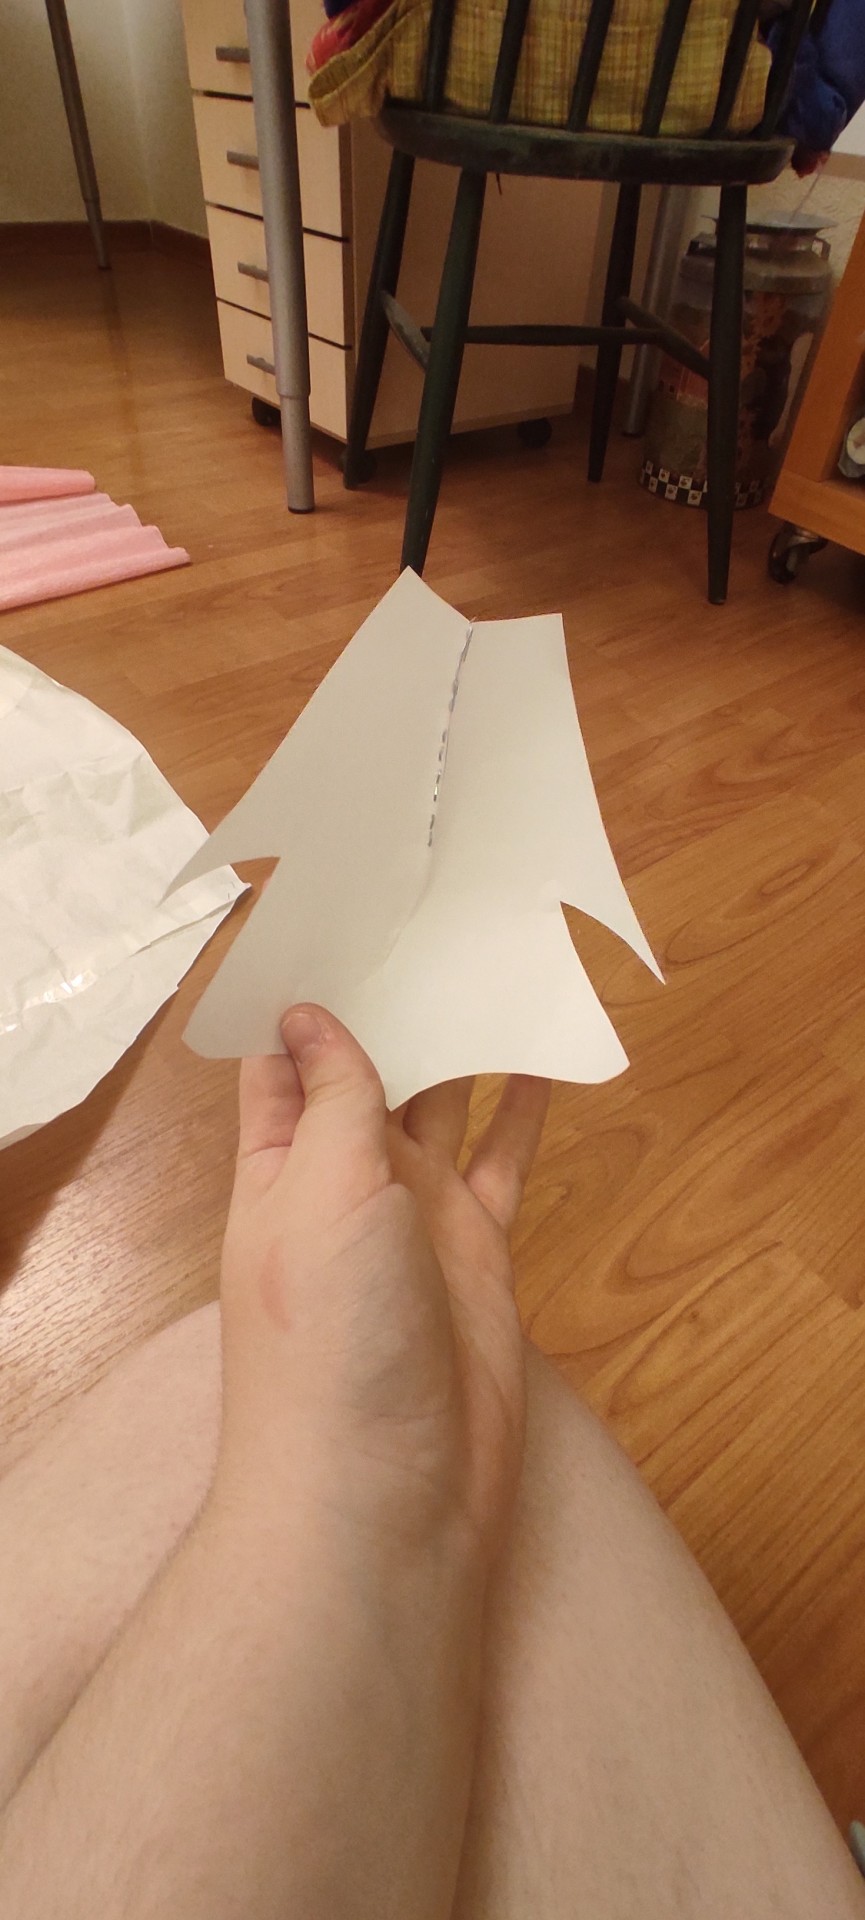
remember how i made gillions old sword?
WE DOING HIS ARMOR TO PREPARE FOR MY NEXT COSPLAY CHANC, AND YOUR JOINING ME!
its still the old armor cause i cant make his redesign for shit, but we doing smth at least!
we have acquired cardboard, now for some straps
btw heres ref images ill be using for this:


ill update when i get the straps
#i always thought the armor was yellow#where tf did i get that#jrwishow#jrwi podcast#jrwi#jrwi show#jrwi riptide#just roll with it#jrwi gillion#cosplay making#gillion tidestrider#gillion jrwi
64 notes
·
View notes
Text
YEP.. GONNA DEFINITELY HAVE A BLAST AT GALAXYCON RALEIGH 2024
( bringing out my ruined Roxy cosplay again for that! Especially cause a friend of mine is gonna go as Cassie!, we’ll be doing a cosplay panel & the masquerade contest together ^^ )
#fnaf#fnaf glamrock animatronics#fnaf security breach#fnaf fandom#cosplayer#cosplay#fnaf cosplay#glamrock roxy#roxanne wolf#fnaf roxy#security breach ruin#fnaf sb ruin#roxy wolf#fnaf movie#fnaf william afton#fnaf yellow rabbit#five nights at freddy's#fnaf glamrock freddy#fnaf moon#fnaf sun#fnaf eclipse#fnaf sb#galaxycon raleigh#gaming#indie game#horror gaming#galaxycon#cosplay making
22 notes
·
View notes
Text
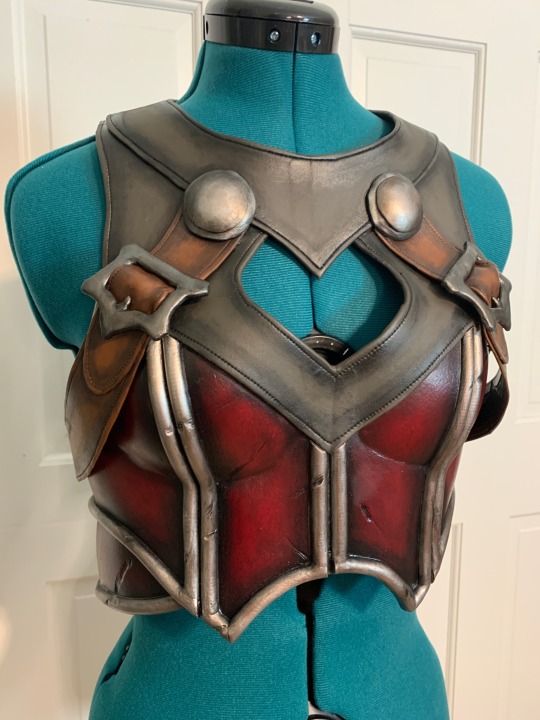
EVA Foam Detailing
Since I’m currently working on a new panel for EVA foam detailing, sharing an abbreviated version of this so that I actually have some posts on my account. This is definitely not a complete list of every technique that could work, but these are ones that I have used before and found to be quite useful.
Sanding
This is probably the most well-known technique for detailing. A rotary tool is a must-have for working with EVA foam since it’s such a versatile tool. A basic sanding drum is great for beveling edges or carving in battle-damage and weathering. Grinding stone tips can smooth and even out sanding. Depending on how the tips are angled on the surface, you can create a hammered metal look, soft leather-like crinkles, or circles that look like screws or bolts. Sanding is also the single best way to clean up rough seams. Be sure to wear a respirator and eye protection when sanding since the foam will generate a LOT of dust. You will your workspace will get covered with dust.
Burning
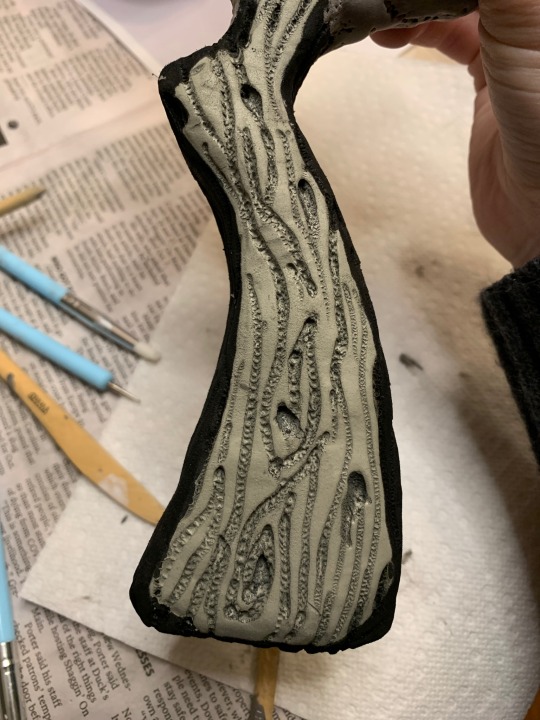
A soldering iron or wood burning iron can be used for detailing. These hot tools can be used to engrave precise or geometric lines or can be used to create a feather texture. These can also be used to make more organic textures like wood grain. Very much like a rotary tool, a wood burning or soldering iron has endless possibilities only limited by creativity. The foam can be easily burned through, especially when it is a thinner sheet (1-3 mm). Burning foam creates very nasty fumes so be sure to work outside with a respirator on.
Heat stamping
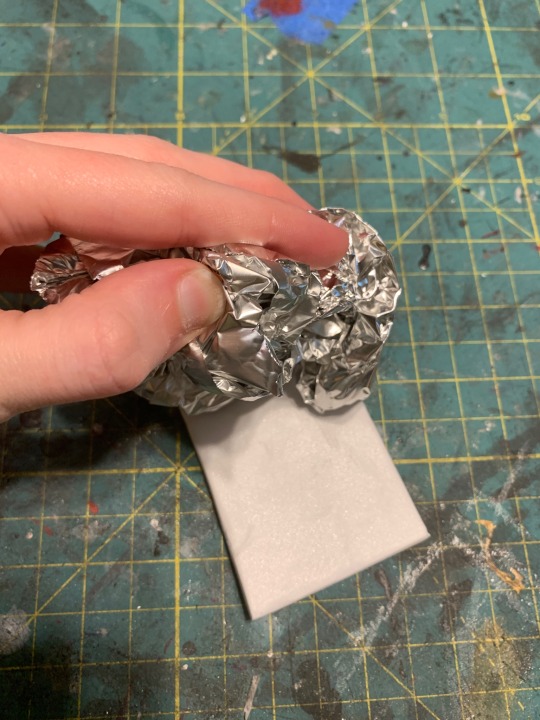
This is a more subtle technique but can still be very useful. The most common application is using crumpled tin foil to make a leather texture. Once foam has been heated up evenly (using a heat gun), it can pick up the texture of anything pressed against it.
Google eyes
For a cheap and easy way to get rivets or bolts, try using googly eyes. Once these are painted over, they can blend in perfectly (just don’t shake the armor or prop because they will rattle). Though real rivets can be used (that is my next point), googly eyes are easy to install and are very easy to find in a variety of sizes. These can be glued down with pretty much any type of glue.

Metal hardware
If authenticity is the goal, eyelets and rivets can be installed into EVA foam. The key to these is leather hole punches. You can buy these either as a pack of hole punchers or as a single tool that operates a lot like a paper hole puncher. For real leather or fabric, these are normally hammered into the material to generate a hole. Because EVA foam is so soft, a twisting motion works better for cutting a hole without crushing the surface. Eyelets will require a bit of glue but rivets have two separate ends that snap together nicely without any adhesive. O rings and metal buckles can also help with making realistic-looking armor.

Foam clay
Foam clay is an obsession of mine, but I have to admit that it is a detailing material and only works for specific tasks. Foam clay is great for adding organic textures like bone, monster skin, etc. It can be free sculpted some, but is limited due to being such a soft clay. It sticks to EVA foam without any glue required. It can be sanded or burned once it is completely dry to add more texture. It can be used to fill deep gaps in seams. It can also be pressed into molds.

Pre-cut bevels and scales
With cosplay becoming more common and mainstream, specialty products are readily available. Bevels are pre-cut strips of foam that can be used as trim. They most often come as half-round or triangular though some shops may carry less common shapes like low profile triangles or trapezoids. Scales are another great pre-fabricated material that can be bought from cosplay supply shops. They are sometimes sold as individual scales in packs of 50-100 or as scales attached to a strip.
Primer manipulation
I just recently discovered this technique while making Gyurato’s blood sickles. When using a brush on primer that has a slower drying time, it can be manipulated while still wet. Pressing something like upholstery foam or a sponge into the primer can add additional rough texture. I also used plastic wrap to add creases and wrinkles to the surface of the dried foam clay. Another thing to keep in mind with primers is that the finish (satin, matte, gloss) can change out a paint looks. Picking the right sheen, like gloss when painting a metallic, can help with achieving the right effect.

Hopefully these tips give you some ideas for future projects.
238 notes
·
View notes
Text


I did it. I crafted together my own Terzo suit. I learned so much while also throwing in what I already know.
Next will be making his show covers (called spats btw!) hopefully be doing a test cosplay soon. 💜🖤
#ghost cosplay#papa emeritus iii#Terzo#the band ghost#ghost band#papa emeritus cosplay#Terzo cosplay#sewing#handmade#machine sewing#cosplay making#cosplay in progress
66 notes
·
View notes
Text

In honor of Erza's birthday being yesterday, here's the first barely edited pic from the little shoot I did with her Fire Empress armour. As my favorite of all her armour, this had to be the first one I made. I have planned to make most of the others too, but for now, I'm still perfecting this one.
#anime cosplay#cosplay#anime costume#anime and manga#erza scarlet#fairy tail#handmade#cosplay making#cosplaying
10 notes
·
View notes
Text
Not looking for ordinary, but extraordinary connections only.

#Justine Dupont#biust#cocaine lorraine#blonde#clone wars#jjba#cosplay making#lgbt art#physique#lyrical#haha
20 notes
·
View notes
Text
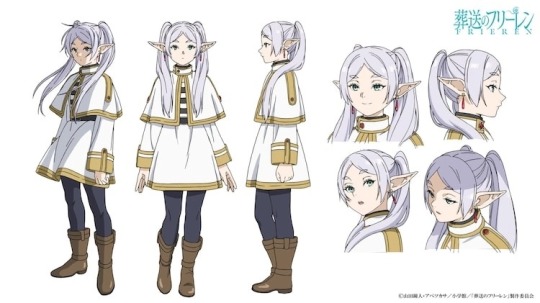
frieren dress mock up update! <3
old -> new
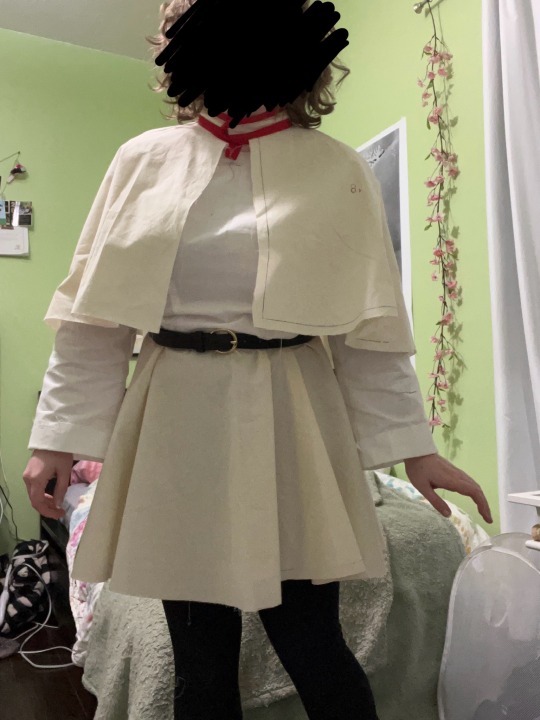
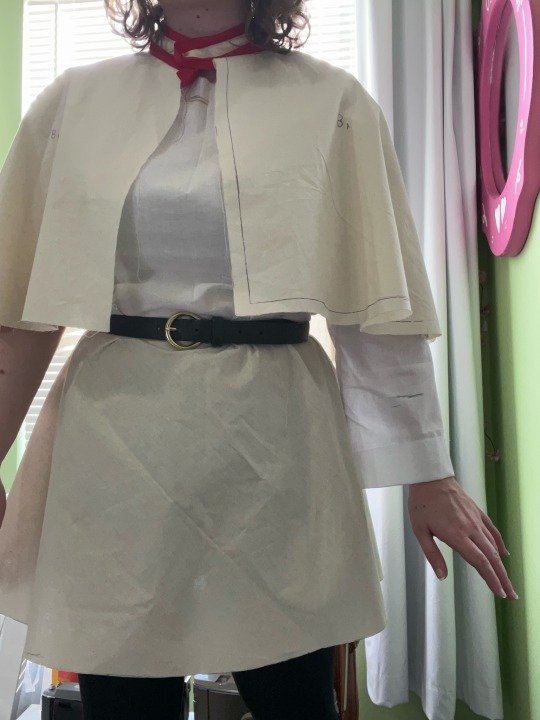
(ignore the missing sleeve, i forgot to make a full length pattern for them so i had to harvest one)
on the original mock up i used a full circle skirt but it was soooo full that i just couldn't bring myself to love it. this new version is a 1/4 circle skirt which looks so much more accurate to frieren's design that im just soooo in love!
prepped my fabric today too so i'm nearly ready to start sewing the actual cosplay soon!
#cosplay#cosplayer#cosplay wip#metrocon#frieren cosplay#frieren#frieren anime#frieren: beyond journey's end#sousou no frieren#frieren fanart#cosplay making#cosplayers of tumblr
11 notes
·
View notes
Text
Does anyone here know anything about making fursuits/mascot head? I'm planning for a cosplay of Liliana from My Friendly Neighborhood ( I've attached a photo of her below) and making her head to wear like a mascot/fursuit head but I've never done something like this before so any advice is appreciated. A few of my questions are:
1) What are the best types of material (foam, fabric ((that still gives the illusion of felt or fleece)), mesh, etc) to use so I don't overheat? I live in Australia and the con is in our spring.
2) is there anyway to give the eyes the illusion of pingpong balls that stick out of the head?
3) Where would be the best places to provide air circulation?
4) how would I make the neck?
5) would it be possible for me to make the mouth open and close without making it looking too weird?
6) what is the best way to make her hair?
I may have more soon. Thank you all kindly in advance!
#sealzstuff#sealzspeakz#fursuit#fursuit making#cosplay making#cosplay#fursuit help#cosplay help#mascot#mascot making#pls help#mfn#liliana mfn#mfn cosplay#my friendly Neighborhood#furry#cosplay community#any help or advice is appreciated thsnk you so much!!!
21 notes
·
View notes
Text
Making a winter king cosplay pt.1 (warning: there’s going to be a lot of swearing and a few slurs(I can reclaim))
This is only my second time making a cosplay completely from scratch so let’s hope this doesn’t become a complete disaster.
For those who aren’t on my side of the internet this is the bastard

My favorite little fag rn
I’m starting off with the sweater vest since it’s probably going to be the most time consuming bc I’m crocheting the bitch. And a warning to all my professional crocheters: I have no idea what the fuck I’m doing.
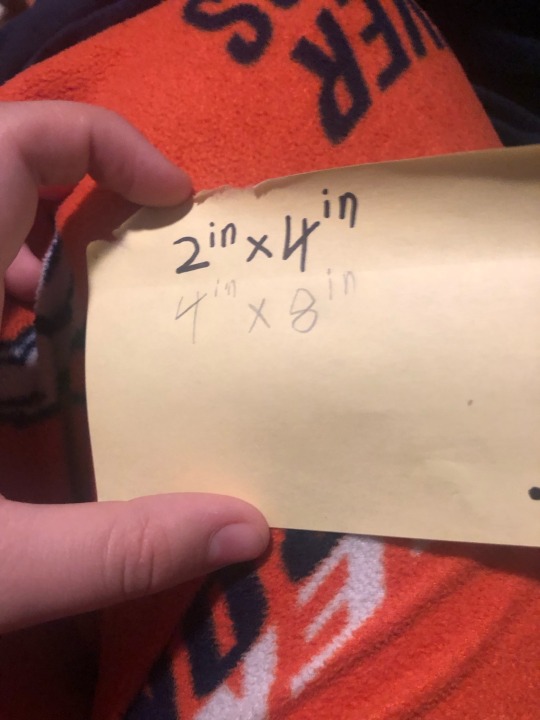
After doing some pixel measurements(and actual people measurements) I figured I’m gonna need 16 rectangles for the back panel and only god knows how many for the front.
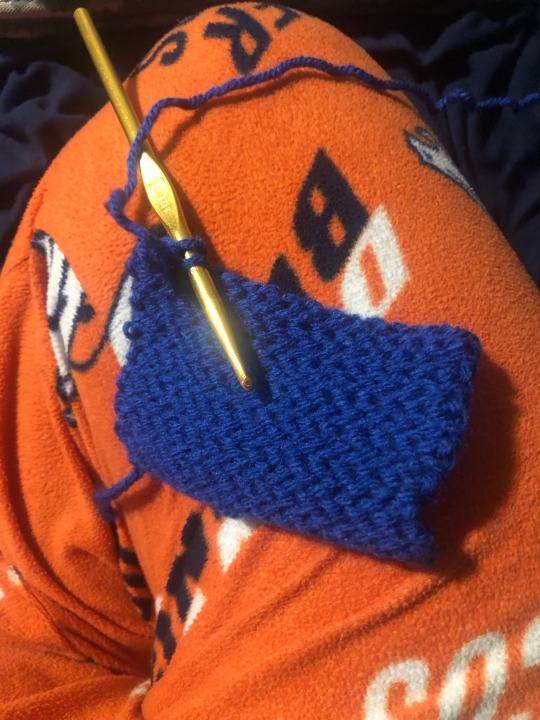
Again not a professional so these are going to look goofy as hell probably.
#fionna and cake#fionna and cake winter king#the winter king#fionna and cake cosplay#winter king cosplay#cosplay#cosplay making#crochet
16 notes
·
View notes
Text


Time to create a runaway!Nightmare cosplay for a murder mystery thing my friend's doing
Runaway!Nightmare by @mcnotok
#cosplay making#what have i gotten myself into#why am i doing this to myself#runaway nightmare sans#cosplay progress#it's my first time creating a cosplay#i hope it goes well
32 notes
·
View notes
Text
I am back from my leave for Top surgery. This week was my first time back to work and back to normal, but I cannot overstate how life changing this was ~ both physically and physically
It took a while for me to be able to put a cosplay on as your mobility is quite limited for weeks, but when I put it on, it finally fitted properly. I have been sewing for a long time with sizing that fitted my binders, but the freedom I felt when I put my shirt on without spending an hour taping my quite large breasts and trying to figure the logistics of making it look like it's supposed to look is hard to describe.
The clothes have the person cut, the perfect fit and I don't feel restrained or uncomfortable anymore.
Regardless of everyone's opinion, at work or in my family, this was the right thing to do and I can live and dress up as my silly little pathetic men in peace.
It will take a while for me to feel completely comfortable cosplaying shirtless, but it will happen eventually, but I will certainly be teasing and getting used to my scars.
It took a while but my new life begins at 36 ~
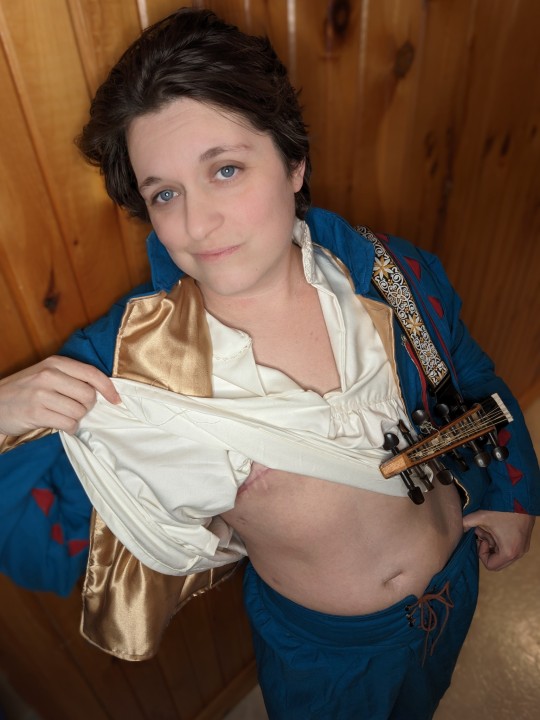
#cosplayer#cosplay#cosplay making#the witcher#the witcher cosplay#jaskier#jaskier the witcher#top surgery#surgery#trans cosplayer
61 notes
·
View notes
Text
I finished Monty’s Guitar the other day! Almost ready for Galaxycon Raleigh 2023!!
(The strings are Real Guitar strings btw!, and the whole thing was hand Painted by me!)
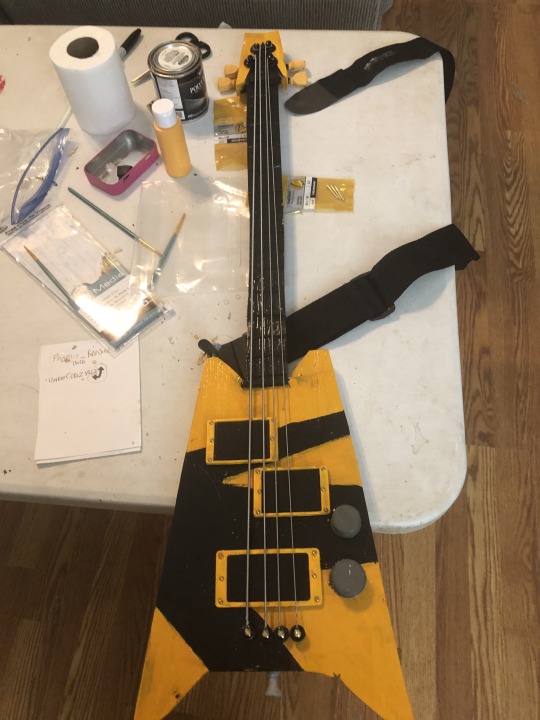

#fnaf#fnaf glamrock animatronics#fnaf security breach#fnaf fandom#cosplay#cosplayer#fnaf cosplay#fnaf glamrock monty#montgomery gator#security breach#monty gator#fnaf monty#fnaf montgomery#fnaf monty gator#fnaf montgomery gator#five nights at freddy's#fnaf sb#cosplay making#cosplay props#fnaf Security breach cosplay#galaxycon#galaxycon Raleigh#galaxycon 2023
48 notes
·
View notes
Text
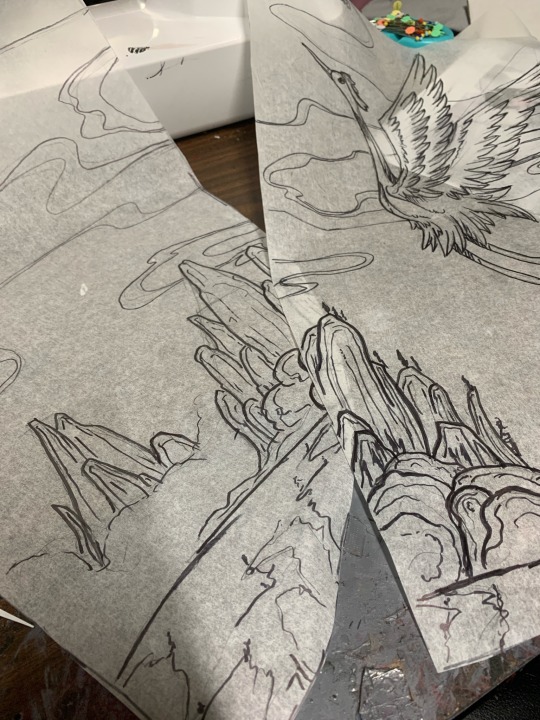
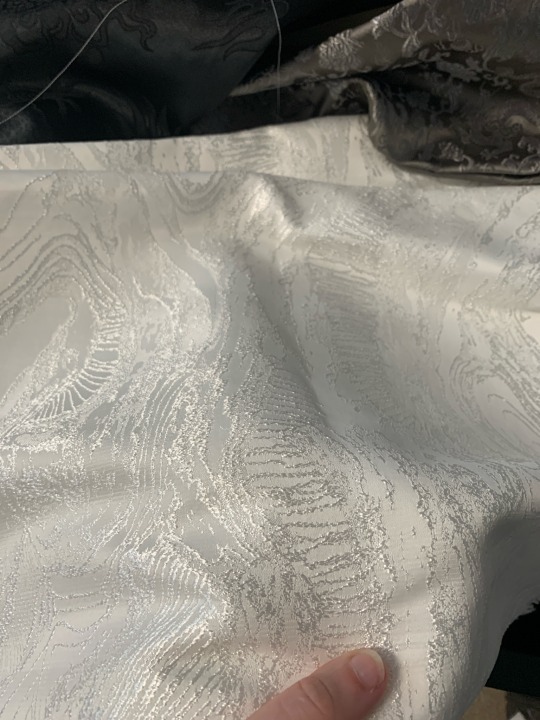
Next Project: Dan Feng (Honkai: Star Rail)
I decided to indulge my HSR brainrot (god, this game has me in such a chokehold) and make a “simple” character design. However, Mihoyo wouldn’t know what simple is even if it slapped them in the face so of course this pretty boy is still very complicated.
Another level of complexity that I added just because I like to overthink everything is that I want to make my first YouTube video while crafting the pretty dragon man. So, currently we are at the patterning and planning stage.
I’ve picked out a ton of gorgeous brocades with prints that match up with Dan Feng’s lore, I finally get to play with genuine dupioni silk from Silk Baron, and I’ll also be hand-painting a stupidly complicated design onto the sleeves.
My goal is to debut the pretty dragon boi + Cloud Piercer (his spear) at Momocon in May. Wish me luck because I already have my 2024 schedule filling up and I don’t know if I’ll have enough time.

22 notes
·
View notes
Text
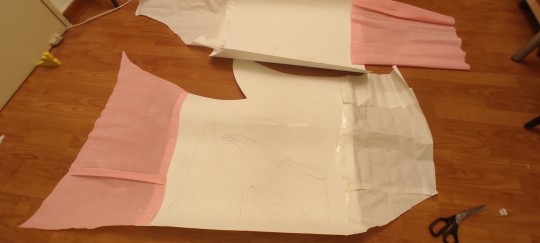
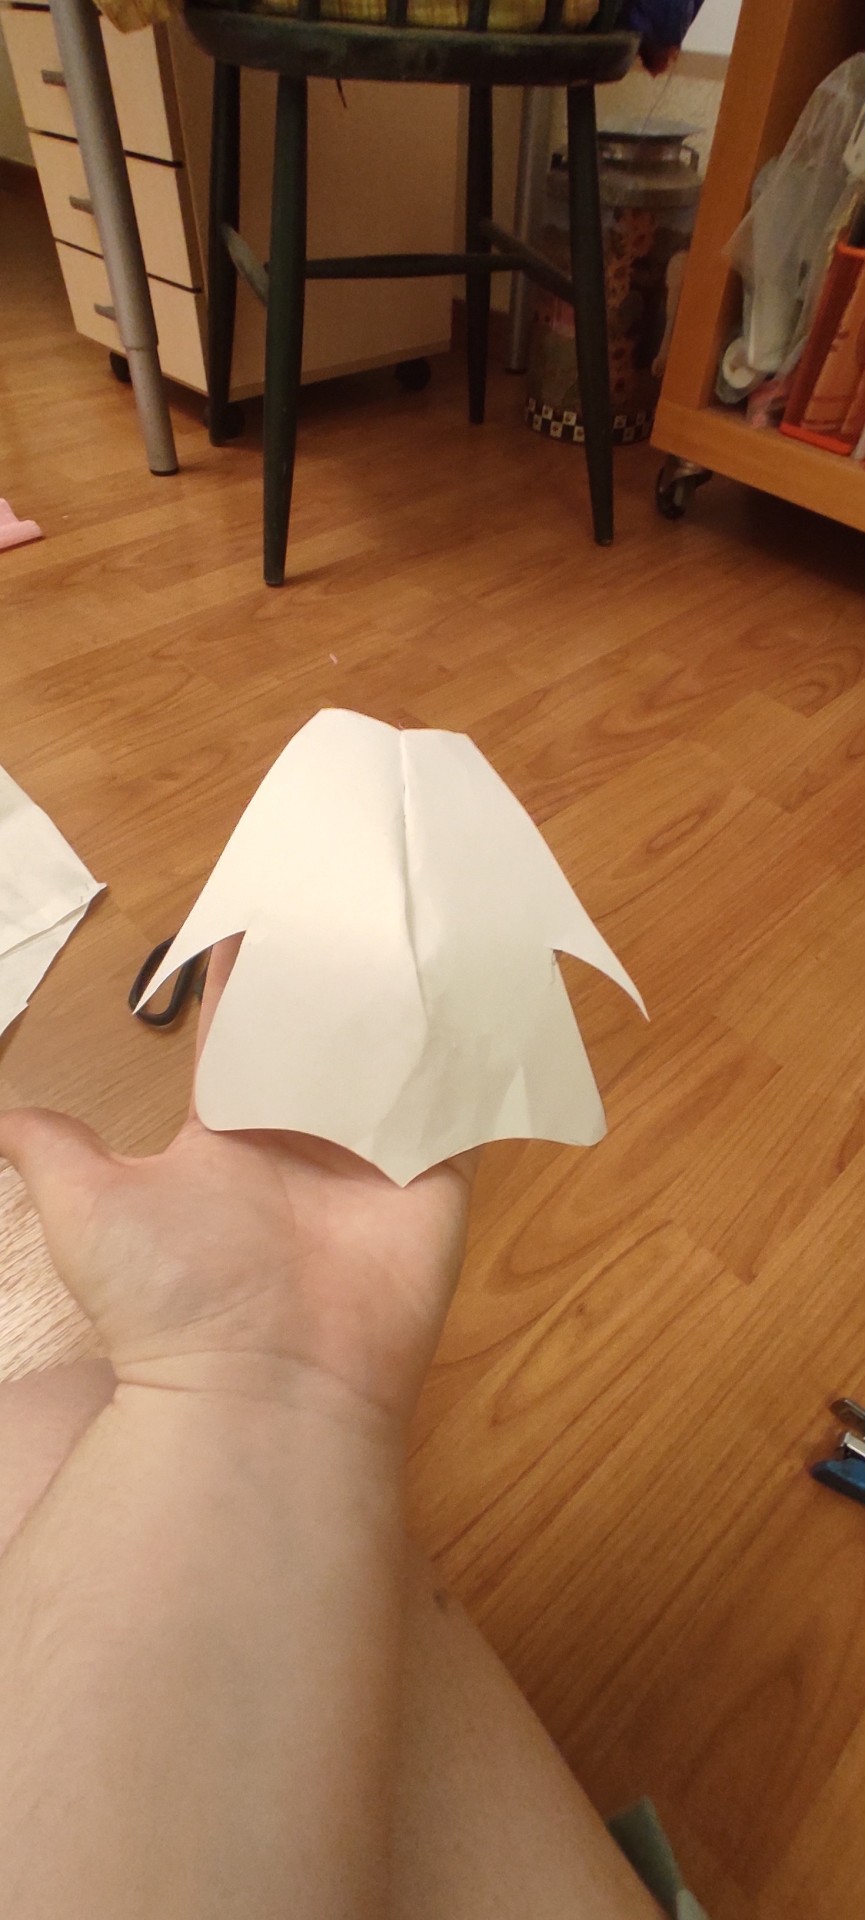
Working on a short cape&hood for Yennefer. I ordered some white flowers to add at the front opening, everything else is already done.
Initially I wanted the same decorative stitch to go along the front opening, but my machine couldn't handle making this stitch through two layers of wool. Making it around the hood (one layer of wool and one layers of linen) was awful enough.
Can't wait to see the flowers. I ordered white ones for the black cape, but also black ones to add, I don't know yet - perhaps as sth I could fasten to shirt cuffs when the shirt is part of the cosplay and not sth I'm going to wear at work? I'll see when I get them.
Did I need to evolve my Yennefer cosplay or perhaps make another one from scratch? Hell no. Do I enjoy it? Hell yes.
#cosplay making#Yennefer cosplay#Working on a cosplay#Book Yennefer cosplay#The witcher cosplay#Work in progress
14 notes
·
View notes
Last Seen Blogs
xinghy
Xinghy_OWO
ushiryuu
🌸

ourflagmeansdykes
moved to fucklestat

fragmentofyou-blog
WOLFIE'S HOWLING

vgselvam
Untitled