#cosplay tutorial
Text
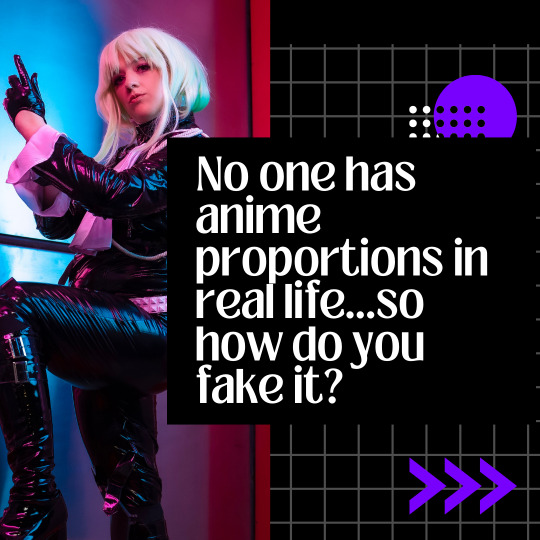
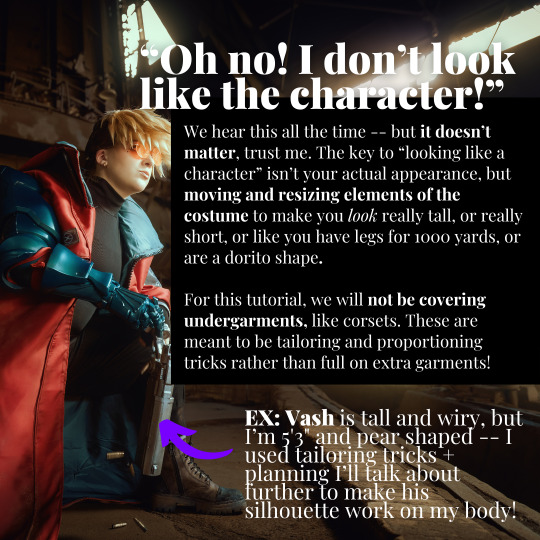
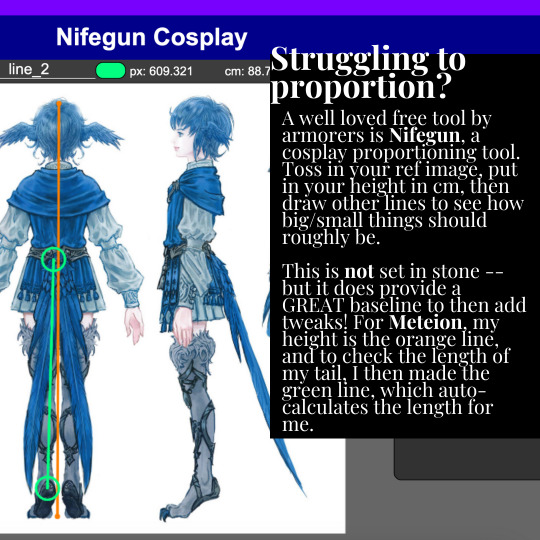

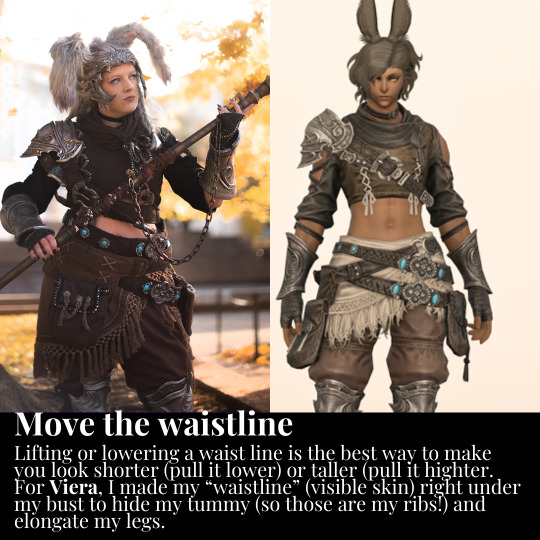


Tutorial on how I proportion cosplays on my very short body!
867 notes
·
View notes
Text
Ema Skye Cosplay VIDEO - The Opal Empress
#ema skye#ace attorney ema skye#apollo justice#the opal empress#game cosplay#ace attorney cosplay#ace attorney art#ace attorney#ace attorney fanart#ace attorney apollo justice#cosplay video#cosplay tutorial#cosplay
685 notes
·
View notes
Text
hello to the two people following me :) I haven't shared any patterns I've created before for sewing, but in making some period c-drama and danmei inspired cosplays and my resurging Hanfu fixation realized there aren't many good English resources for sewing cross-collar tops for zhongyi and other pieces so I made my own!
there are three pages but I tried to pack a bunch of information into it and you can download it via Gumroad for free :) I'm also entirely down to help out with patterning for anyone (if any lol) who might want to use this little pattern tutorial.
✨download link✨
219 notes
·
View notes
Text
hi I’m a very long time cosplayer (20+ years experience) who has chronic headache and migraine problems and this is a post about how to prevent your cosplay wigs from giving you painful headaches! Nobody likes wandering around the con in blinding pain and so hopefully this post will help you reduce the chances of this happening.
1. If your wig is way too tight, don’t use it. Get something with a bigger cap. tbh I often wear slightly too big wigs to reduce the pressure! Find out what brands and sellers sell wigs that are comfy on your head and prioritize buying wigs from them! I made a big master list of cosplay wig sellers a while back so here’s a few you might not have known about. Arda (and its Canadian and European sites) sells by far the biggest wigs, but I personally find Classe the most comfortable for my specific head. It’s all very YMMV and it’s totally possible for a wig to not actually be too small but fit your head in an uncomfortable way (Blue Beard on taobao does this to me every time), so just don’t buy from suppliers that do that. Also consider resizing wigs to be larger! For wig clients with extra large heads I like to nip the edge of the wig right behind the ear where your ear and hair from above will cover it and add in a little godet of elastic.
2. Reduce weight! A heavy wig will make head pain much more likely, so here’s a few tips on wig weight reduction!
A) if your wig doesn’t need a ton of volume and is already very dense, rip out some wefts in the bottom half. Anything on the part of your head from the ridge where your head starts going in towards your neck won’t really show unless your wig is very short and it’ll obviously reduce weight instantly! You can replace any missing volume with light crimping or light heat and tease, or leave the wig as is for a natural and silky look without the unnatural volume of a cosplay wig.
B) if you need more volume in your wig, instead of going straight to adding wefts for more volume, see first if combining crimping with heat and tease at the roots will give you the extra volume you need! Crimping or heat and tease adds volume and if you straight up destroy the fiber in the first two inches from the scalp by doing both repeatedly, it’ll add huge volume without you needing to add extra hair! When I do this I like to heat the fiber near the roots, tease it, let it cool, crimp the teased part, let THAT cool, and then brush it out. You can flat out double the perceived volume in the back of the wig this way!
C) if your character has a high ponytail or high pigtails, consider using clip on ponytails that you can easily remove if you need the weight off your head right the fuck now. here’s two tutorials I swear by for making a short wig + clip on combination look more natural! They’re in Japanese but easily comprehensible if you use machine translation thanks to the clear photography. They also help with spreading out the weight on the wig itself, and if your hair is long enough, using a clip on with a fishnet wig cap and clipping through the wig and into your real hair will also he lp make it more secure and distribute weight more evenly.
if your character has high pigtails
if your character has a high ponytail
D) when you need extra wefts, opt for sewing in wefts rather than gluing whenever possible. Glue doesn’t seem heavy but enough of it can make a wig get real heavy REAL fast.
E) redirecting the weight to your entire head and not just the front hairline will feel lighter and give you less forehead tension, which is one of the biggest causes of wig headache. Toupee clips sewn evenly around the edges and a Wig Fix https://therenatural.com (the name brand one, the knockoffs genuinely don’t work half as well) can help with doing this. A Wig Fix will also let you use fewer pins to keep your wig on, which is another cause of wig headache. Can’t suggest trying those enough. There are also some velvet wig grips out there but I find those don’t work quite as well, but they’re by far better than nothing.
3) make sure your wig is easy to remove. A lot of characters have horns or veils or other head things on top of the wig so make sure those can easily come off if you need a wig break! I’m a big proponent of using wig glue or double stick tape to glue strands (face framing layers etc) to your face for a more natural and more flattering look, but if you get headaches from wigs, keep that glue or tape in your bag so if you have to de-wig for a bit, you can get it back on!
4) take the ibuprofen or whatever BEFORE you put the wig on, and not when your wig is already making your head miserable! It’s like taking the ibuprofen before you wear the horrible shoes for a special event; it’s more effective in advance.
5) what are your normal headache triggers? Make sure you’re doing the work to EXTRA avoid them before wearing a cosplay wig. Stay hydrated. Keep up with your electrolytes. If you have any food triggers, make sure you’re managing them properly.
6) try multiple types of wig cap before deciding which ones to use! I’m a big fan of the fishnet kind because I’m in agony every time I try to use the stocking kind. Some people find relief in doing pin curls under their cap, and @/battleangelgif on twitter suggested doing this with damp hair the night before you wear the wig. There are tons of methods! Stretching out fishnet caps can be done more effectively when they’re slightly damp and that’ll make them pinch less. Experiment with what you like best to keep your irl hair in place and once you find a method you like, go for it! Make that your go-to!
7) always remember: wearing a short wig is less miserable than wearing a wig to your ankles. consider very carefully whether or not you can actually handle that wig that’s as long as you are tall. sometimes you just can’t and that’s okay! reduce the length of any super long haired character to hip length and it’ll be FINE. I swear. It’ll still read as super long and it won’t be as terrible.
8) always remember you can just. take the entire wig and cosplay off if you’re in agony. it’s not worth it. don’t do that to yourself. If the migraine hits anyway, just take it off.

Hope some of this might help you out! Focusing on reducing and redistributing weight is what helps me out the most 😌 feel free to reply or reblog or message with questions and I’ll try and get back to you ASAP!
#cosplay#cosplay tutorial#wigs#wig tutorial#cosplay tips#reducing wig weight#I just want to save everyone from blinding cosplay wig induced migraine#nobody likes head pain at the con#hope I was clear enough hhhhhh#yes this is an expansion of a twitter thread I wrote#y’all get the better version
567 notes
·
View notes
Text
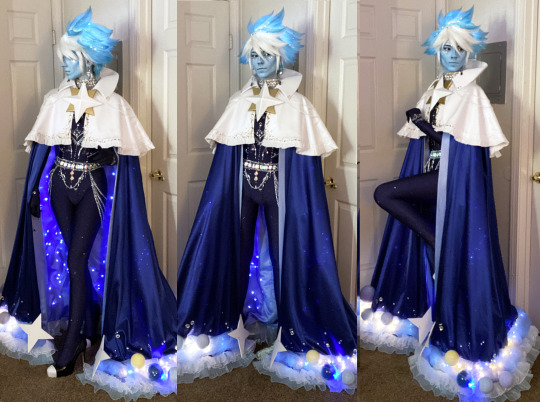
How I made my glowing stardust cookie wig with translucent spray paint and button battery LEDs
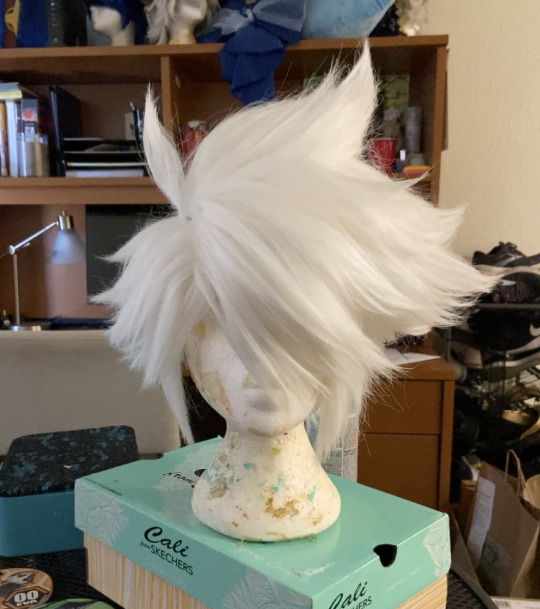
I started with a pure white arda wigs jaguar that was already fully styled since you will need all the shapes to be set before adding color. To style it, I did the classic "heat the fibers upside down, tease via backcombing, brush them out, heat and tease again, brush out...again" method that is formally outlined in my karna tutorial. You dont have to have your shapes perfectly locked in before adding in color since you will be brushing it out once more, but you will need all of your teasing and heat training to be done before adding color.
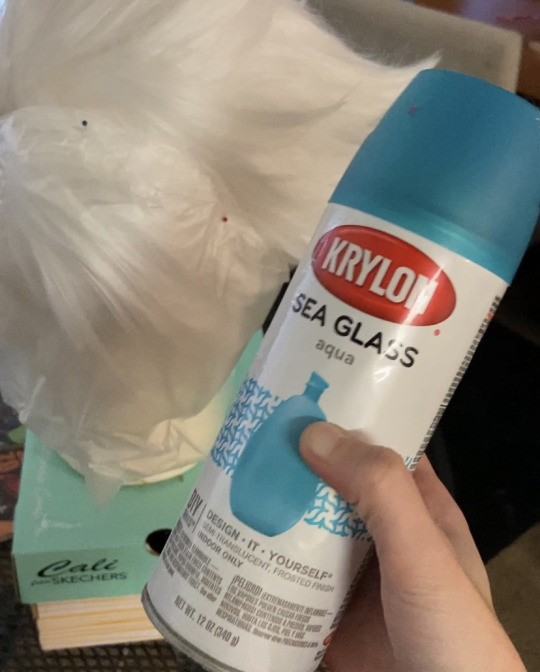
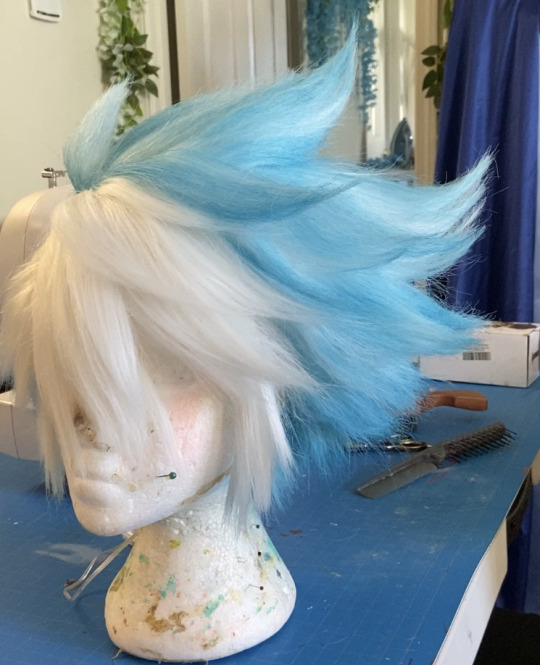
Stardust Cookie's wig involves leaving the bangs pure white and the back sections blue. There are a million ways to do this (start with a blue wig and add a white bang front, airbrush color, dye wefts and sew them together, etc) but the method that was the most economical for me involved using krylon translucent spray paint. I know using spray paint on a wig sounds scary and i would not use an enamel or fully opaque spray paint on a wig, but the krylon translucent spray paint is shockingly soft, flexible, and goes on in light coats.
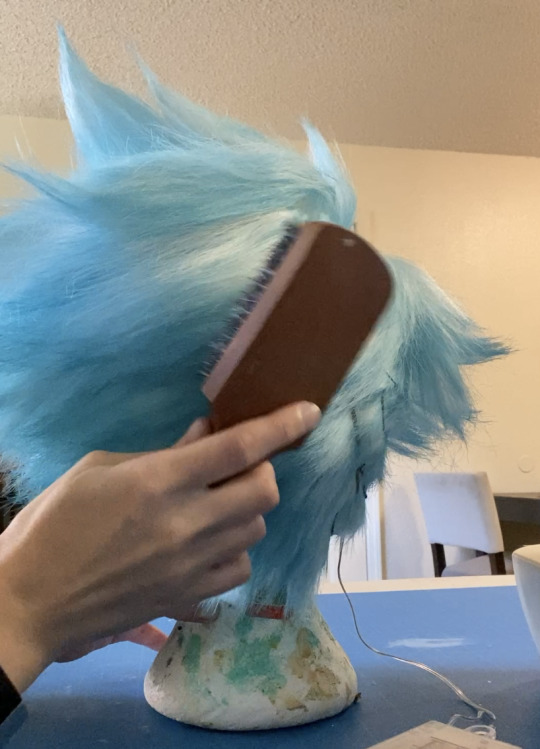
To keep the bangs white, I pinned down some cling wrap all around the bangs and made sure the line was snug. at this point I very gingerly began applying spray paint to the back sections of the wig. I did this in very light coats at a distance of about 18 inches from the wig. Honestly right after spraying, the fibers were still soft and the coverage was as good as i was expecting to get, but i did take a hog bristle brush and thoroughly combed out the fibers after this stage. This helps break up any strings and more evenly distributed the color.
This method works well if you want a soft color that does not need to be perfectly uniform. And I knew since I was adding lights below, that the color coverage itself didn't matter a whole lot, so long as it was translucent, didn't have any major streaks or clumps, and light could get out smoothly.
To add lights to the wig, there are 4 button-battery 30-LED fairy light packs glued into the underside netting of the wig. Always be sure to check if your LED wires can withstand hot glue heat before application (but most standard LED packs can withstand a low heat setting.) I did not have any problems with the heat of the wig + my body heat causing problems with the LEDs after being worn for several hours. These lights provide a diffuse, background glow throughout the wig and can be seen through the blue color. the below image of the wig only has lights underneath the netting (only one pack on for that image).
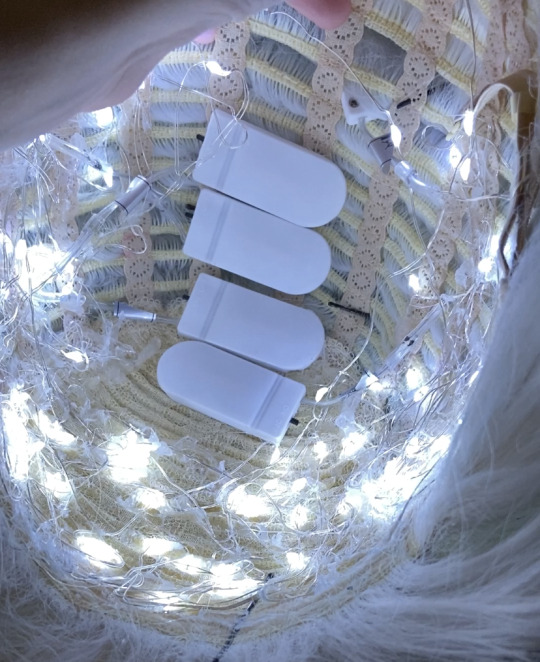
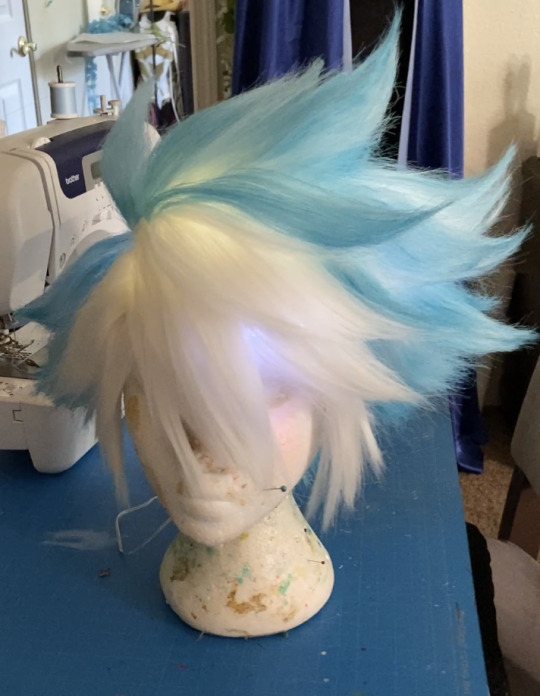
To light up the upper parts of the wig, there is one pack of LEDs threaded through the teased, textured bases of the spikes. Because these lights are on top of the netting and going through the textured sections, they scatter off of the teased hair and provide illumination to the higher parts of the wig. below is an image of the wig with only the single "top" lights lit.

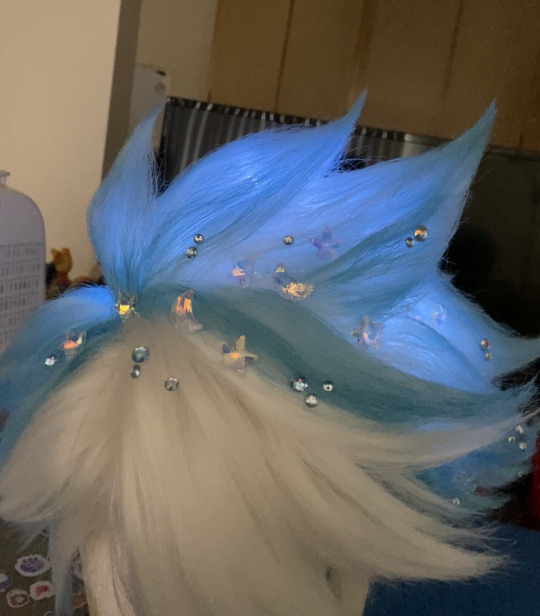
and that's how I made this wig! Other than that the rhinestones and other accessories were just glued on w/ hot glue. This wig looks nice in person and on camera and is stable. Granted its a little uncomfortable since you can feel the wires and the battery packs ngl but i've certainly worn worse. You can use hairspray on top of the translucent spray paint in small amounts, but in general i would proceed with caution since if nothing else, it may make the fibers look particularly stringy (which is why i highly recommend heat-set styles for this application over hairspray-set ones)
Believe me you can go pretty far with a "let me just slap some LEDs in there with a bit of glue" attitude when it comes to adding lights to stuff.
253 notes
·
View notes
Text
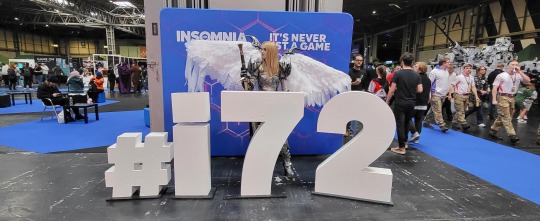
How to Make: Electronic Wings for Cosplay
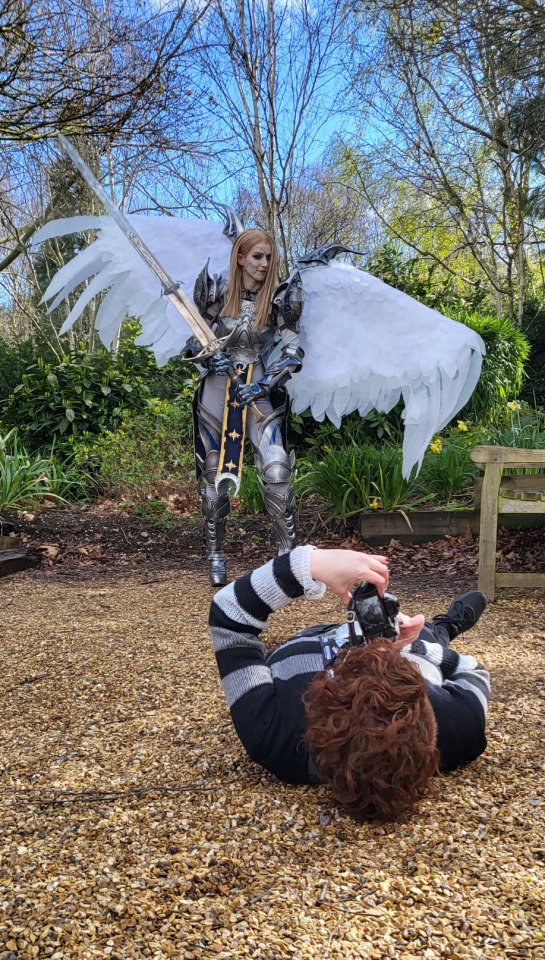
Hello Everyone! It's been a while since I last uploaded a written tutorial on here and since I just finished and wore my Dame Aylin cosplay this last weekend it seemed appropriate to jump back in with a tutorial on one of the costume pieces!
Her wings were the star of the show this weekend and I know a lot of people were curious about how I made them! A huge source of knowledge and inspiration behind these wings was this video by Axceleration, I made a few changes to the frame shape and electrical circuitry for mine but her tutorial was a huge stepping stone to give me the confidence to tackle them myself!
Health and Safety:
When working with Sintraboard (as well as other thermoplastics) it is incredibly important you wear a respirator as well as goggles when heating, moulding and cutting it. The fumes this plastic will give off when heated up are no joke! Make sure you're in a well-ventilated space!
Basic tool safety knowledge is also really important! wearing gloves when using power tools can be more dangerous in most situations, so always be aware of where your hands are vs where the tools are. Always cut away from yourself and take things slowly, don't panic.
Electrical safety! You're working with live wires and circuitry! make sure your hands are dry, you aren't touching the bare wires at any point when they are connected to a power source, and if you choose to solder anything, make sure you're wearing heat-proof gloves and a mask in a ventilated space!
Tools
Wire stripper
Screwdriver and wrench
Dremel - I recommend the Dremel 3000 rotary tool personally! Some essential Dremel bits you'll need for this include, a sanding bit, drill bit (smaller or same size as your screws/bolts), and a small/narrow cutting bit. These will usually come with the Dremel!
Heat Gun (A hairdryer will not get hot enough to heat the Sintraboard!!)
Pipe cutter (alternatively you can use a hacksaw for this!)
Hacksaw
Ruler
Scissors (for cutting fabric straps)
Materials
Heat shrink Tubing
2 core electrical wire
switch (you want a three position, six pin switch, like this one, even better if it has the Screws on the pins! otherwise you'll need a soldering kits to solder the wires to the pins.
2x 8AA 12v Battery Holders
2x 12v Linear Actuators (Mine had a stroke length of 100mm)
21.5mm PVC Pipes (I got 2x 3m Lengths)
2x 21.5mm PVC Pipe straight couplers
6mm 8"x12" Sintraboard
Nuts/Bolts/Screws (I used M5 bolts for the base & Actuator connectors and M6 screws to attach the hinges to the pipes! You'll need Washers for every Nut & Bolt!)
Hinges (I used 2.5cm wide hinges that were skinny but long so they would just about fit along the PVC pipe! 3" gate hinges would work!)
50 metre Polythene Jiffy foam roll (in retrospect this was ALOT of foam, you could definitely get away with maybe a 20-30 metre roll! I now have a load leftover XD)
16 AA Batteries (I used 16 and had enough for the whole day with them on, I think They'd probably be enough for another half a day-full day too! but have spares just in case!)
Webbing strap ( I went for grey to match my base suit colour!)
Buckle - as wide as the webbing strap you use!
3 metres of white cotton fabric (or whatever colour wings youre going for!)
Optional
Zipties (for cleaning up the wires)
Lets Go!
Sintraboard is this wonderfully stable thermoplastic that is relatively easy to cut into (with the right tools) and when heated allows you to mould its shape! I started by using a mannequin and heating the Sintraboard with a heat gun for a few minutes to make it pliable, I recommend using gloves for this part as the materials gets VERY HOT! Press the board into the shape of the mannequin's back, taking note of the edges especially! you want this board to sit as comfortably to your body shape as possible as it makes a huge difference to how long you can wearing the wings for in this backplate is comfy!
Once shaped, I placed it against my back to make sure it was a good fit, heating again and making any alterations I needed (again don't place bright hot plastic to your bare skin! wear protective clothes and wait till its slightly cooler to do this, with the help of a friend!). I then took a hacksaw and rounded the corners, before sanding the edges with my Dremel! Try to avoid cutting off loads, just enough to make things less likely to snag.
3. I then cut in four holes, wide enough to feed my webbing strap through, two at the top and one on either side below where my arms would sit! I measured the webbing strap by firstly feeding them through the top holes and pinning them, and then bring the strap over my should to everything sits where it should and seeing where the strap hits the side hole and cutting the length there! you'll also want a strap that attaches across the chest, meeting in the centre with a buckle!
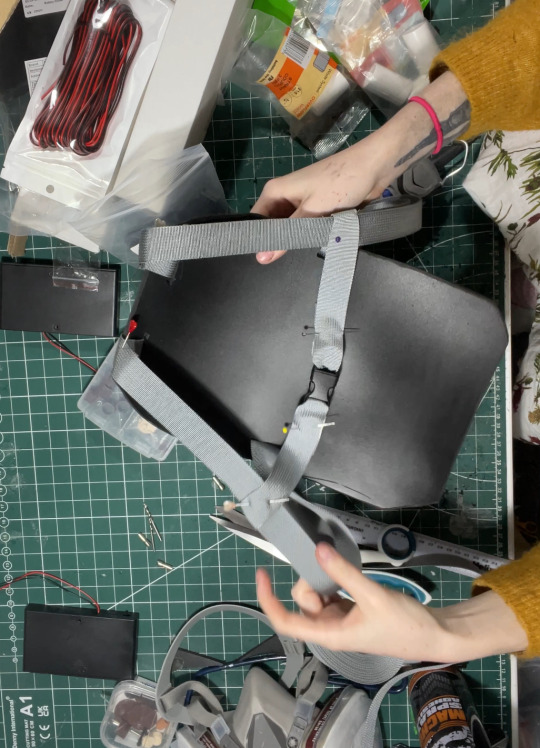
4. After sewing the straps closed I was able to move onto the PVC pipe structure! This may change slightly depending on the finished shape you want but I needed the PVC pipes to come out from inside a breastplate so had a particularly angle as well as character references to work with! I began by heating the pipe over my heat gun and flattening a portion of it under a heavy object so it would sit much more flush against the backboard and sit better underneath my breastplate before moving onto securing the first portion of the structure to the backplate. This mainly involved lots of try-ons and measuring to make sure the angles were correct and symmetrical and was quite fiddly but well-worth the effort! I'll include a diagram of the general shape I went with below:
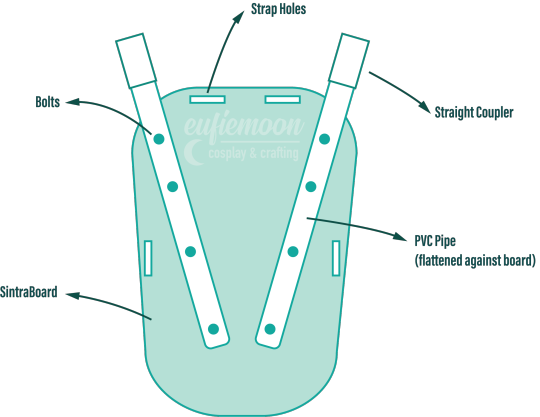
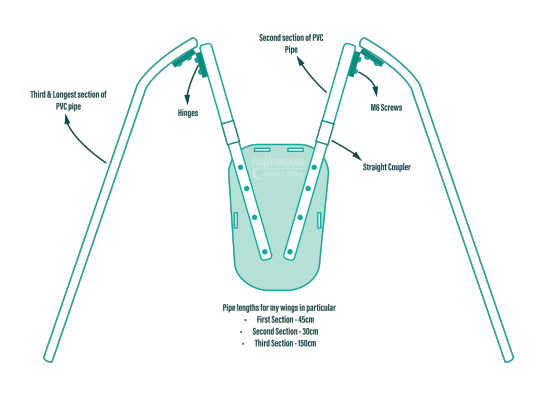
5. I wanted my wings to be relatively modular for ease of travel so I needed to make sure certain portions of them could come away from other parts easily, so I popped a straight coupler on the top of the pipes that were attach to the breastplate, this also meant I could slot the breastplate over these shorter pipes and wear everything correctly! Then these second pipes slot on and at the other end they are attached via hinges to the longest portion of the pipe 'skeleton', Diagram below:
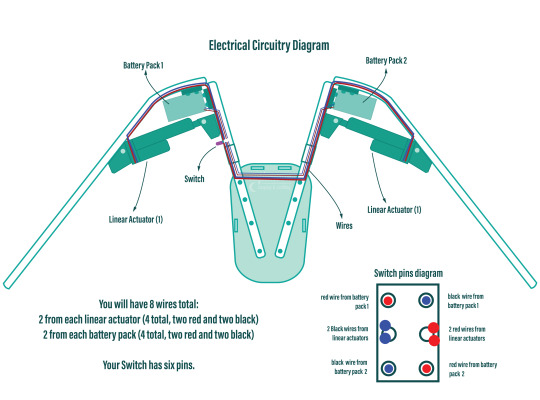
6. Now that the skeleton was put together, it's time for the electrical stuff! It's a good idea to figure out where your circuit is going to lay on the skeleton - consider if you want the battery packs mounted the the backplate or, like me, put them inside the actual wings in removeable pockets for easy access and removal for battery changes. all your wires will go through the switch so deciding where you want to place that is very important! Mine was placed just over my shoulder on the front side, mounted to the PVC pipe with a metal cover I drilled a hole into to slip the switch through and then drill through the pipe.
I've included another diagram below that explains all the electrical circuitry, including which wires go on which pins on the switch!
Important to note: The linear actuators need to be placed and bolted into the PVC pipes at *exactly* the same angle on each side, any slight deviation will lead to the wings going up wonkily! So take your time and make as many adjustments as necessary.
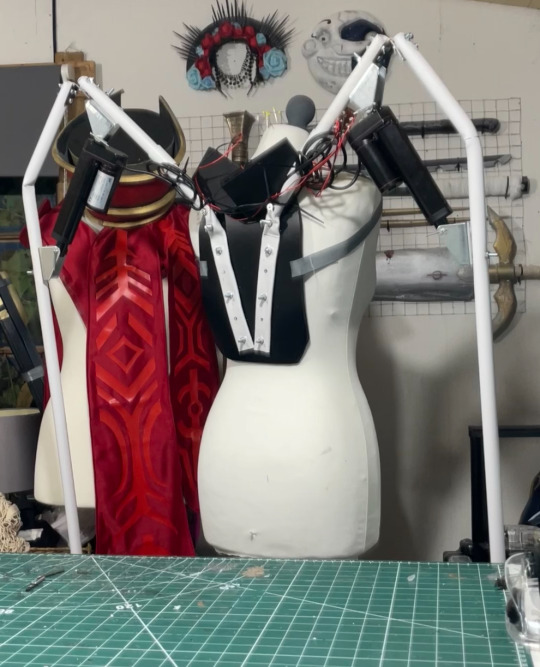
7. You can extend your wires by adding on the electrical wire, just match the colours, and put heat shrink tubing over the connections to hide the live wires! I ended up zip-tying the wires into organised bundles once the wings were done to help keep everything safe from snags.
8. Now its time for the Wings themselves! I drafted my base pattern by just draping the white cotton fabric I had over the wing when it was fully extended. I then pinned the wings to the shape I wanted them to be along the bottom before cutting along the pins. I ran the fabric through my sewing machine to close the bottom edge, leaving a gap wide enough by the wing base so I could slip the wing on and off, closing it with velcro. I also added little fabric pockets inside of these to hold my battery packs, which also connected via velcro for easy removal!
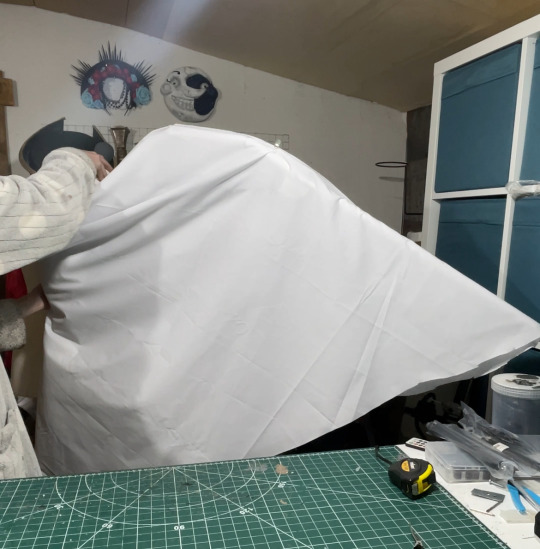
9. Now that I had a wing base I was able to begin making feathers! I cut out a total of 800 feathers out of polythene jiffy roll for these wings, in 6 different styles and using real life bird wings to dictate the shapes I used and where I placed them. I ended up hot gluing every individual feather onto the white fabric base, going row by row until every side was covered, the wing covers themselves are super light because of the foam feathers and they shine light through them in a really magical way!
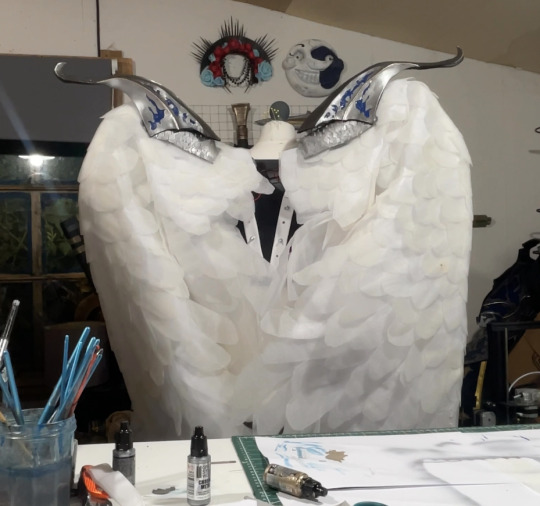
Optional: I also ended up going over these feathers with my airbrush and some super light beige paint to help darken the shadows, this is entirely optional and may change depending on the wings you're looking to make!
When in neutral position and in extended position the wings looks like this:

Mine had a wingspan of about 7ft total when fully extended but when in neutral position they were fairly close to my own proportions! mainly staying behind me and weren't much of a problem in a packed con hall!
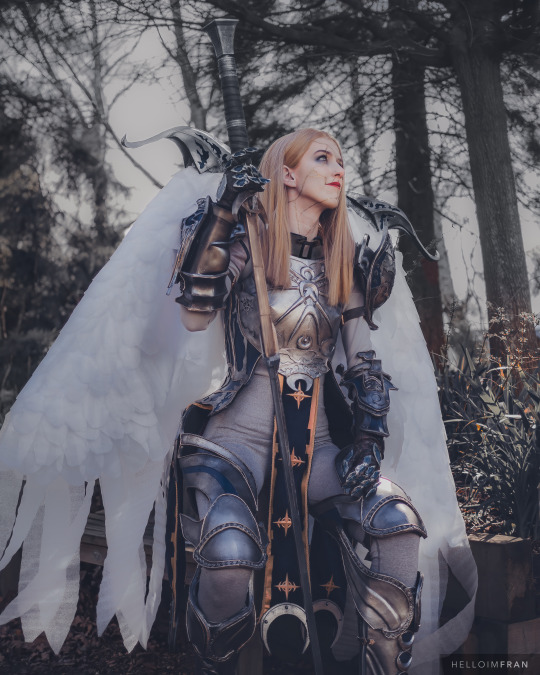
Photo by: Helloimfran (on Instagram and Twitter)
I hope this tutorial helped and if there are any questions about anything in specific don't hesitate to reach out at [email protected] or on my instagram or twitter (@eufiemoon)
Happy Crafting!

#cosplay#cosplayer#cosplaying#baldurs gate iii#baldur’s gate 3#baldurs gate 3#bg3#dame aylin#aylin x isobel#bg3 aylin#cosplay tutorial#Wings#fantasy#tutorial#cosplay help#cosplay tips
97 notes
·
View notes
Text
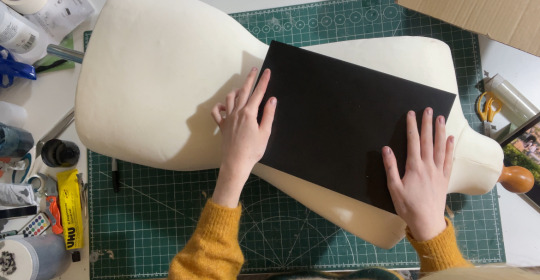
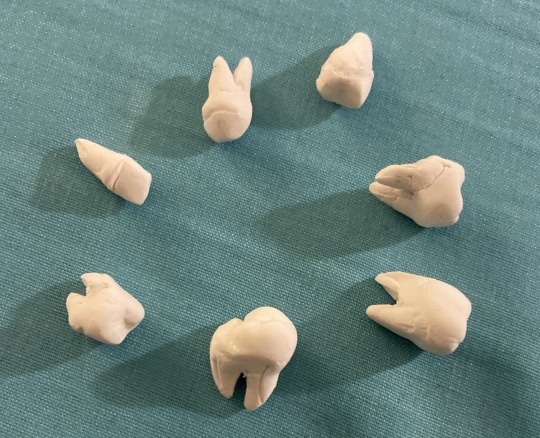
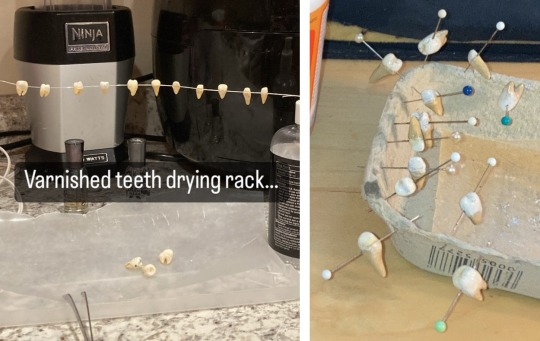
How to Make Replicas of Your Own Teeth:
A Cosplay Toothtorial
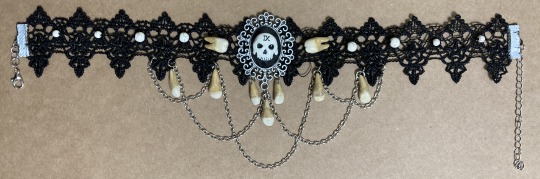
This is a method to safely use a molded mouth guard to make duplicates of your own teeth without destroying a potentially expensive piece of dental equipment. Everything that goes into the mold—clay and mold release aid—must be nontoxic/edible so you can wash your mouth guard at the end of the process and continue to use it as normal.
Benefits: No mold-making or casting experience required
Lightweight end result
Adds a truly personal touch to your project :)
Downsides: Must own a molded mouth guard/retainer
End result can be fragile and needs proper sealing for durability
Supplies
Molded mouth guard/retainer (referred to as “mold” from here on)
Cornstarch
Soft/fluffy brush
Non-toxic white air dry clay (I used Crayola Model Magic)
Craft knife
Jewelry wire (I used 20 or 22 gauge)
Pins/yarn needle/any various household implements you can sculpt or smooth small details with
Acrylic paints and a variety paint brushes
Clear glossy top coat (I used Mod Podge (satin) and UV Resin)
Prep
Brush or otherwise clean your mouth guard if you haven’t already, especially if there’s build-up.
If you’re using your container of cornstarch for cooking, set aside a small container specifically for crafting. No accidental cross-contamination here!
Dip your fluffy brush into cornstarch and brush into your DRY mouth guard. Lightly coat the entire mold and distribute any clumps. This coat of cornstarch will make it easier to remove your teeth from the mold.
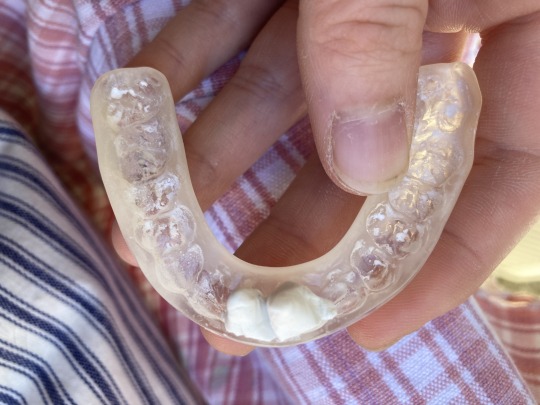
Molding
Firmly press clay into the mold so that approximately half is in the mold, half is sticking out for root sculpting. Make sure there are no air pockets or you won’t pick up the details.
Use detail scissors/craft knife to cut away excess material and indent to mark out the divisions between teeth as visible on the gum lines (see above)
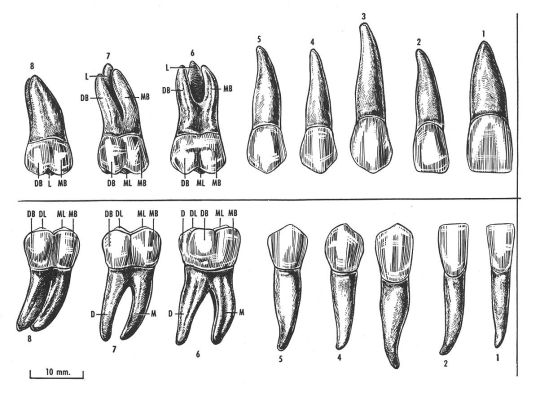
Reference a tooth diagram like the one below and separate out the roots for each tooth. Front teeth tend to have 1 leg, middle teeth have 2 legs, and some molars have 3+. I personally found that my limit was 2 roots. Sculpting 3+ roots on a single tooth was more difficult and more fragile than anatomical accuracy was worth.
Demolding
You can demold immediately after sculpting or wait up to an hour. The faster you remove the teeth, the easier they are to reshape. The longer you wait, the more they resist unintentional denting BUT the more touch-ups you'll have to do to clean the edges between teeth.
Gently lift the full row of teeth from the mold. If it won't release when you tip the mold or or push at it, try using a pin to stab one of the end teeth and use that to pry up the teeth. The rest of the row should follow. If they don't, try repeating for the other side. If they're still not lifting, set aside to dry and try again ~15-30min later.
Gently cut apart the u-shape into individual teeth.
Press raw cut edges in and smooth with various tools, like a yarn needle. Use a craft knife to help trim off any excess clay.

Touch-ups
In the case of air pockets or if you accidentally remove a root, wet some clay and use a very small amount to fill in gaps or add on roots. Don't forget the water! It makes the clay stickier and smooth out better. This is where tools come in handy, wet clay sticks less to smooth objects than your fingertips!
Once repaired, set aside any wet pieces to dry for at least 15min before doing any more sculpting work.
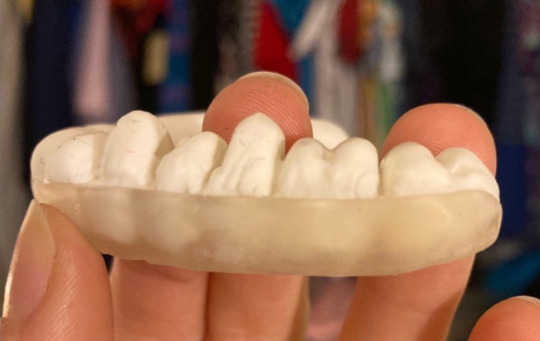
Set all teeth aside to dry for several hours on a wax paper or other non-stick surface. Make sure it's not textured or it will leave an imprint on your teeth!
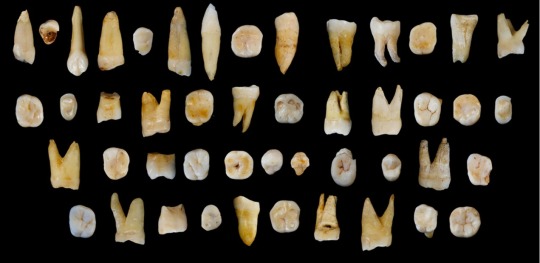
Flaws like the chip on the top left tooth and the cracks on the middle bottom teeth are great candidates for smoothing out with a little extra clay.
**PAUSE HERE AND CLEAN YOUR MOUTH GUARD**
I personally like to rinse it out with water and clean it with a dissolving denture cleaning tablet to make sure it’s fully sanitized. It also doesn’t hurt to properly brush the mouth guard to make sure there’s no clay or cornstarch residue stuck in the crevices.
Holes
Test a tooth to check if it’s dry to the touch and doesn’t immediately deform to your touch. If it’s holding shape, you can move on.
Bore a hole into the tooth with a pin or jewelry wire. Consider how you want them to hang.
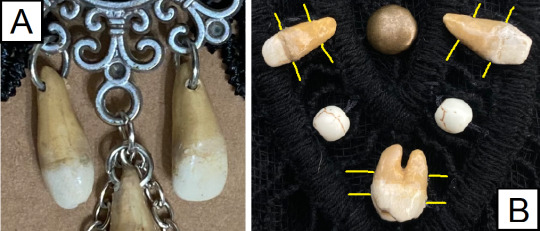
A) For the central dangling teeth on Harrowhark’s choker, I punched holes as close to the tip of the root as possible without tears, perpendicular to the teeth so I could hang them on jump rings directly from the center brooch.
B) For the teeth intended for Harrow’s tabard, I punched two sets of holes parallel to the jaw to prevent teeth from flipping around. One set just under the tooth cap, approx. 1/8in down, and one set about the same distance from the roots.
Once a hole has been punched with a pin, wiggle it around a little to open the hole or thread it on a piece of jewelry wire.
Leave teeth on a piece of wax paper or strung on a thread/wire to dry for ~48hr (or as recommended for your clay).
Painting/Weathering
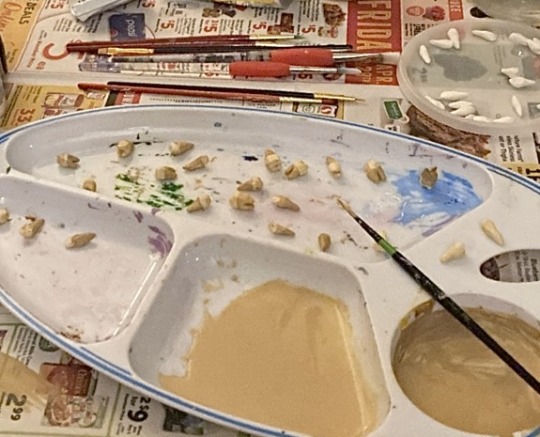
Mix a small amount of yellow-brown paint with water to create a wash (middle palette above). Paint all of your teeth with this first to establish a base color and help define any hairline cracks.
Paint with less diluted yellows and browns (right palette above).
Refer to photos like the below for reference (try searching "teeth" and "archaeology"). NOTE: The root tends to be darker and more weathered than the main tooth because it isn't protected by enamel.
Dry brush ivory or white mixed with some yellow/brown onto the tooth cap to bring out highlights.
Finishing
Your air dry clay teeth and paint job will need a top coat for protection. I highly recommend a glossy clear top coat to give the look of enamel. Below is a comparison of the two sealants I used, but there's many more options out there!

UV Resin (Left)
Pros: Harder/more durable
Cures faster
Cons: Need to work during daylight or use a UV light
Harder to get a thin even layer
Requires more set up and safety precautions
Satin Mod Podge (Right)
Pros: Can be applied with a brush
Air dries
Cons: Takes longer to dry
Teeth tend to stick together unless kept below room temp or kept from touching each other
(I solve this by storing unused beads in an old pill bottle in the fridge. Yes it's cursed and Yes I've had comments from my housemates.)
As mentioned earlier, thread teeth on a wire or pin down to dry.
This method also works well to set up for spray painting a clear coat.
Now, go forth and enjoy everyone's reactions when you tell them that you're wearing your own teeth! :D
#cosplay#cosplay tutorial#crafting tutorial#cosplay ref#harrowhark cosplay#the locked tomb#harrowhark nonagesimus#the locked tomb cosplay#locked tomb cosplay#craftblr#tutorials#tutorial#Nymph rambles#the scraps of NoN#I'm accepting my fate to potentially be know as the Tooth Harrow to a swath of people slkdfskljfsdlf#teeth#cw teeth#juuuuuust in case
109 notes
·
View notes
Text
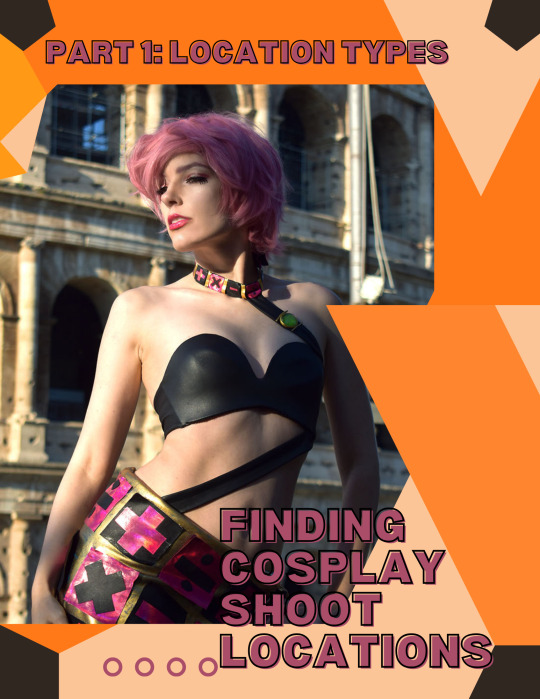
Finding Cosplay Photoshoot Locations: Part 1


📸Want to do cosplay photoshoots but don't know how to find that perfect place to shoot? This tutorial covers how to brainstorm a location for your shoot, logistical and cost concerns with shoot locations, and how to actually find your dream location.
📸This tutorial can be applied to shoots of all types, including but not limited to self shoots, shoots with friends, and shoots with hired photographers. Self shooting or shooting with friends only requires a camera (a phone works!) and possibly a tripod.
Part 1: Location Types
Coming up with the general type of location you want requires some brainstorming about what you want from the shoot. Think about your specific goals and types of photos you want and how certain types of locations would work for your goal. Remember you can always do multiple shoots for the same costume with different concepts!
For example, if you want big, sweeping shots, you will need a location that allows for wider framing and still looks good, while if you are primarily after shots with closer framing, you can go with a location with only a small usable portion. If you are looking to primarily showcase the costume itself or your posing, a flatter and simpler background works better than a busy background, but if you want cinematic shots or shots where you are existing in the environment as the character, somewhere that can show off the location itself as well as how you exist in it would work better.
Types of Locations
There are three main types of locations for cosplay shoots in relation to the cosplay itself. Of course, you can combine these types and there is a lot of overlap, but thinking of these three location types will help you conceptualize your shoot.
The first type is locations that are similar to something in the series, or an exact location from the series. My cover image is an example of this, where I took photos at the location of the climactic battle of the manga. Most fictional locations don't exist in real life so exactly, however, so think of locations that look similar to where this character might be found. The example on this slide shows a cosplay at a nature preserve with grassy fields and oak trees, which is similar to the locations the character traverses several times throughout the game she is from. This category can also include locations with similar vibes, such as a studio made up to look like a fancy European castle for a character from a series about European royalty, or a shoji screen backdrop for a character who lives in a Japanese-style house.
The second location type is locations with symbolic meaning. These locations showcase something about the themes or character arcs present in the series, and this can be accomplished with anything from specific props and setpieces to the entire background. One shoot I'd love to do with this concept is of Lady Blackpearl staring into a mirror -- this would symbolize her dual personality nature -- or of Lady Oscar wrapped in thorns, with the rose thorns symbolizing her glorious but fragile life. I chose to represent this location type with Ultimecia, a sorceress who wants to compress time so she is the only one who can live in the combined past/present/future, set among ruins. The ruins aren't accurate to the game, but show her crumbling reign marked by the passage of time.
The third location type is locations chosen for pure aesthetics. Obviously all locations are chosen for aesthetics, but these are locations with no deeper meaning and may not represent anything from the series at all. These can range from a simple colored wall backdrop to a sweeping landscape that simply looks good with the colors of the costume. Some examples are the Yasuho Hirose ocean shoot on the slide, where it doesn't represent a particular scene or location in the series but simply looks good with the cut and colors of the costume and the sailor theming, or my Princess White Rose milk bath photoshoot, where again the character never takes a milk bath, but a bathtub full of milk and roses shows off the detail of her floral hat and showcases the opulent nature of a rose-themed princess.
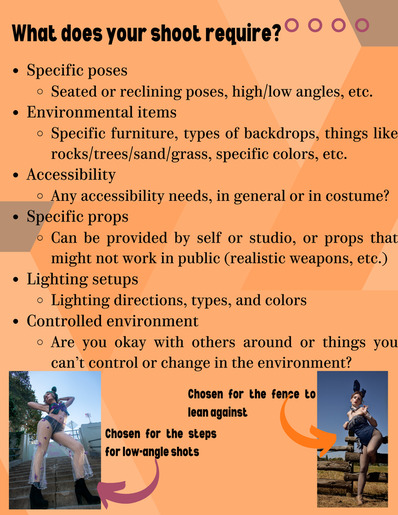
Requirements of your Shoot
Once you have a general concept, think of what is required to fit that concept. This can be as general as specific backgrounds or types of backgrounds to as specific as particular items at the location or particular lighting setups. Some shoots might need specific props, such as furniture to sit or lounge on, and props that won't work in a public location, such as realistic weapons that may cause panic or worse. Also keep in mind any accessibility needs, whether it is an accessible location in general to accommodate a disability or a need that is caused by the costume itself. Check not just the specific area you want to shoot, but how to get there from the parking lot or transit stop. Finally, keep in mind that unsecured outdoor locations, such as a park or beach, are locations where you can't change things about the location and you may encounter other people. Discussion of how to be respectful of such locations is in part 5.
Stay tuned for the rest of the parts~!
Links to other parts: 1 Location Types, 2 Discovering Locations, 3 Indoor vs Outdoor Locations, 4 Location Permissions, 5 Location Logistics
85 notes
·
View notes
Text
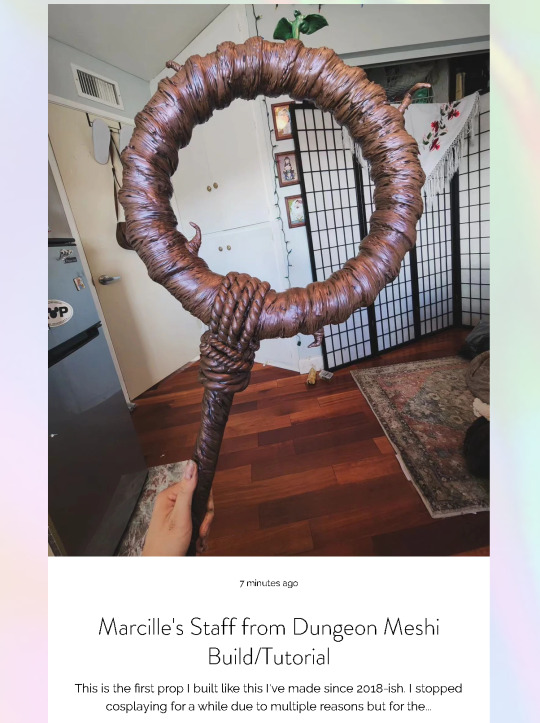
I made a tutorial/build log for how I made Marcille's staff from Dungeon Meshi!
#cosplay#personal#props#propmaking#dungeon meshi#delicious in dungeon#marcille donato#marcille dunmeshi#dunmeshi#dungeon meshi cosplay#cosplay props#tutorial#cosplay tutorial#cosplay wip#my cosplay#prop build#cosplay prop#delicious in dungeon marcille#marcille dungeon meshi
107 notes
·
View notes
Text
let's make fearne horns!
a step-by-step tutorial for making foam horns for cosplay
this was originally posted to twitter last year, but since twitter’s decided to ram itself through a brick wall repeatedly for some reason, i’m reposting here.
materials/supplies:
wire (the hardware store kind, not the flimsy jewelry kind. you want it bendable but sturdy enough to hold whatever size horns you’re making.)
craft foam/eva foam (thickness depends on project needs)
triangular foam dowel
tape or paper for patterning
barge cement (or other brand contact cement)
foam clay
plastidip spray
acrylic paints
gloss spray
heat gun
scissors
paint brushes
something to wrap horns around depending on curl needs
headband or something else to attach the horns to for wearing
the process:
1️⃣ pattern horn curl using tape or paper. mine is going to be a long triangle shape along it’s top face.
2️⃣ cut out of craft foam & trim/taper triangular foam dowel to match. cut wire to match this length plus a couple extra inches for attaching to a headband later on.
3️⃣ carve valley into dowel & glue wire into it using barge cement. tape is helpful for holding the wire down while it dries. be sure to follow glue instructions for use which usually requires good airflow/ventilation in the space! for me, that means opening the window, turning on a fan, and wearing a mask to avoid fumes.

4️⃣ glue foam dowels to craft foam.

5️⃣ spiral horns carefully around a cylinder, heat forming tips where wire can’t reach. the hardest part here is to get both sides even. (i think i used a wooden dowel or a curtain rod for my spirals??)

6️⃣ fill gaps between dowel & craft foam with foam clay, using finger + water to smooth it out. if you want to add any ridges or scars to your horns, do it once this part is dry and before the next step—but i wanted mine to be smooooth.

7️⃣ once dry (give it a couple days just in case), heat seal with a heat gun & spray with plastidip. do multiple coats to get all the angles because spirals are WEIRD!
8️⃣ paint with acrylics.
9️⃣ gloss spray!
🔟 using the bit of wires sticking out, attach to a headband or wig to wear! mine actually poke through my wig and attach to a headband that sits inside the wig which fearne’s ears also attach to.

i hemmed and hawed over how to approach these originally because i know most folks would either 3d print them or do a proper full craft-foam pattern, but i’m crap at cutting craft foam and i hate sculpting digitally and ALSO don’t have a 3d printer. so i did it my way! and it was fun!! plus, the final horns are super lightweight which makes them great for wearing all day! the flexibility of the wire also allows them to have some pose-ability which can be nice for photos to make sure they’re visible.
185 notes
·
View notes
Text
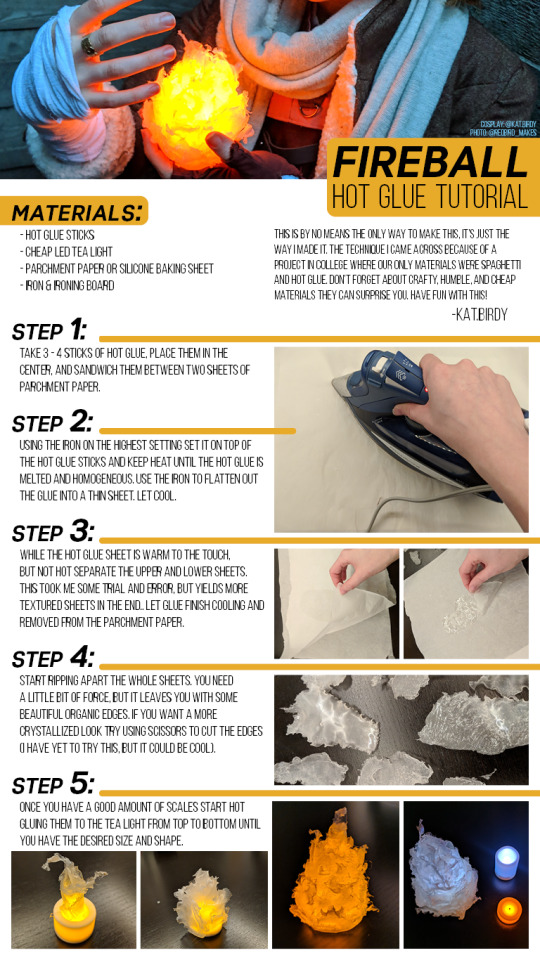
I made this tutorial a few years ago on how I made a fireball prop for my Caleb cosplay. This tutorial has gone really far and I'm super proud of it. I love seeing these out in the wild and it's by far not the only way to do this, it's just the way that worked for me and I wanted to share it. Enjoy and happy making.
Text from above under the cut.
Materials:
Hot glue sticks
LED tea light
Parchment paper or Silicone baking sheet
Iron and Ironing board
Step 1:
Take 3-4 sticks of hot glue, place them in the center, and sandwich them between two sheets of parchment paper.
Step 2:
Using the iron on the highest setting, set it on top of the hot glue sticks and keep heat until the hot glue is melted and homogeneous. Use the iron to flatten out the glue into a thin sheet. Let cool.
Step 3:
While the hot glue sheet is warm to the touch, but not hot, separate the upper and lower sheets. This took me some trial and error, but yields more textured sheets in the end. Let the glue finish cooling and remove from the parchment paper.
Step 4:
Start ripping apart the whole sheets. You need a little bit of force, but it leaves you with some beautiful organic edges. If you want a more crystallized look try using scissors to cut the edges (I have yet to try this, but it could be cool).
ENJOY!
Step 5:
Once you have a good amount of scales, start hot gluing them to the tea light from top to bottom until you have the desired size and shape.
#cosplay#cosplay tutorial#fireball tutorial#hot glue#honestly this tutorial is the reason I have my current job#Its never not funny to me that entire story and series of events#art#tutorial#crafting#craft tutorial#my cosplay
405 notes
·
View notes
Text
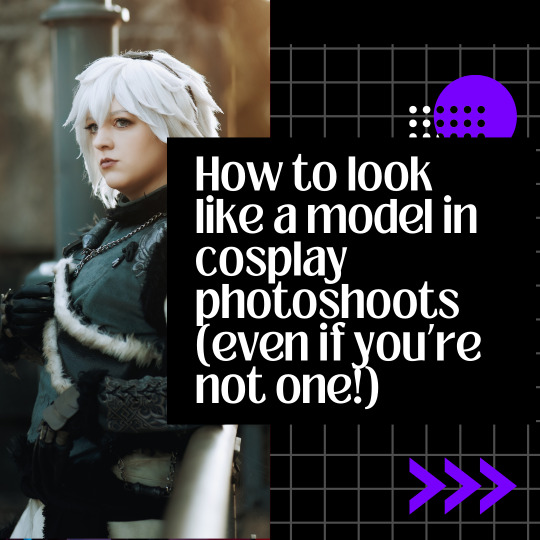
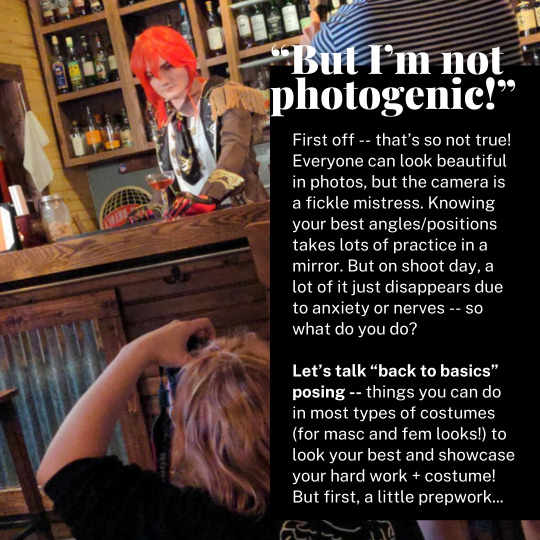
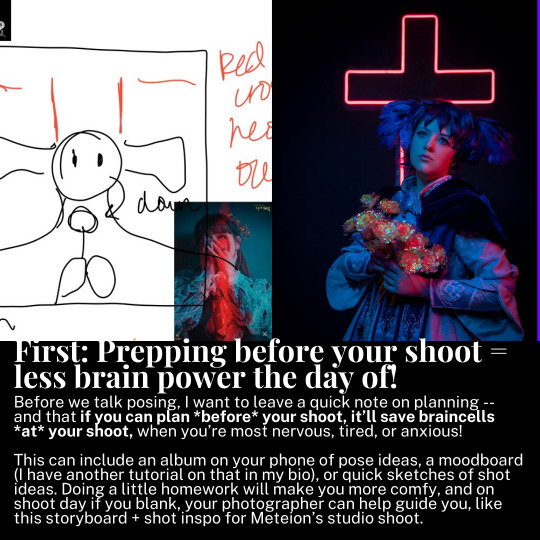
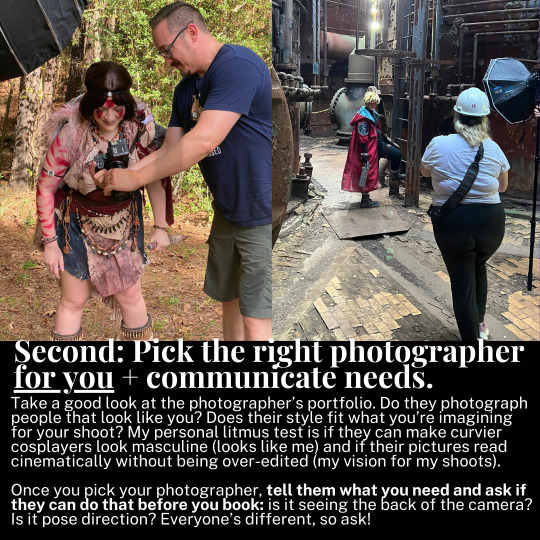

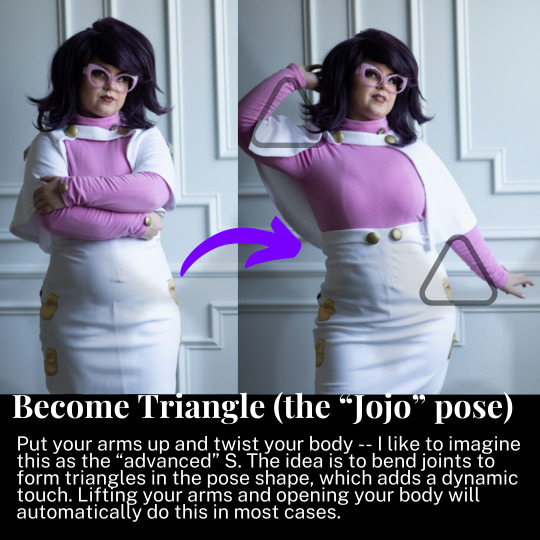

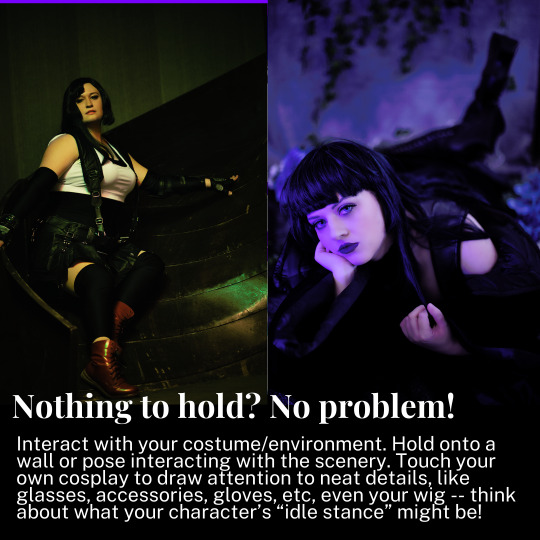
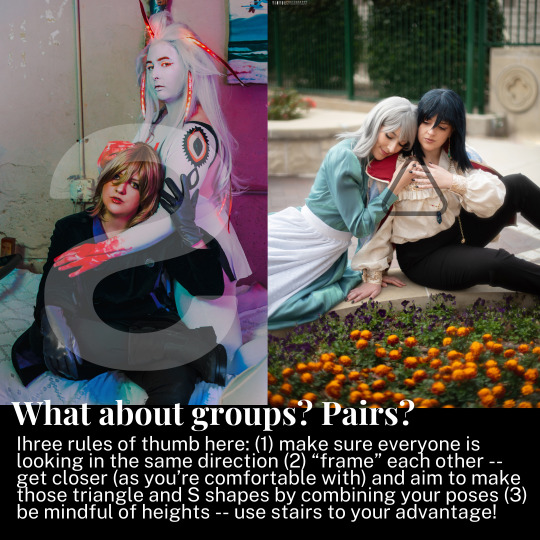
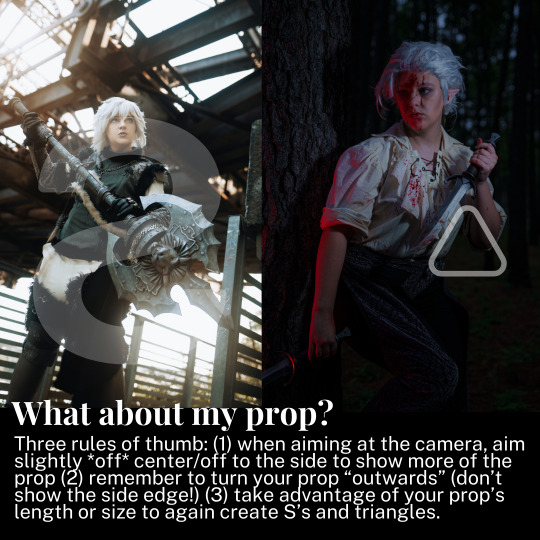
A cosplay tutorial on how to pose for photoshoots, no matter what you look like and what you're wearing -- with example shots to help guide you along.
209 notes
·
View notes
Text
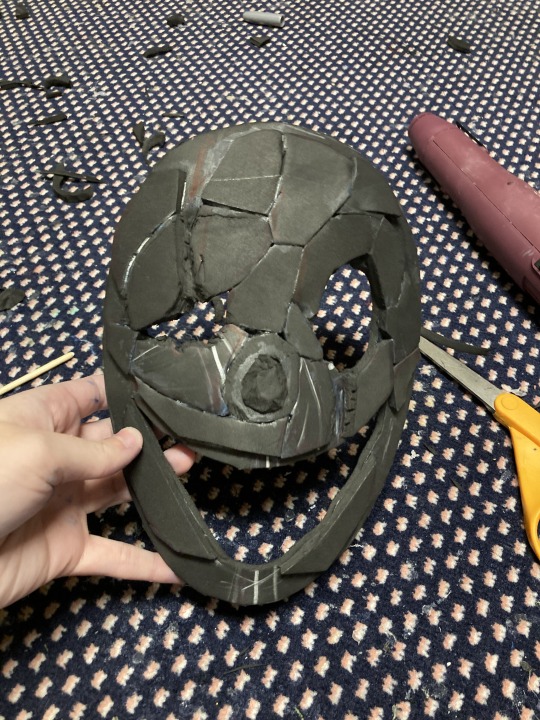
@kanrix too many pictures to put in a reply or anything so i'm just gonna make a post FHLDSKJFHDLSKf this also goes out to anyone else who could benefit from my little gaster cosplay tutorial fhjkghkfg
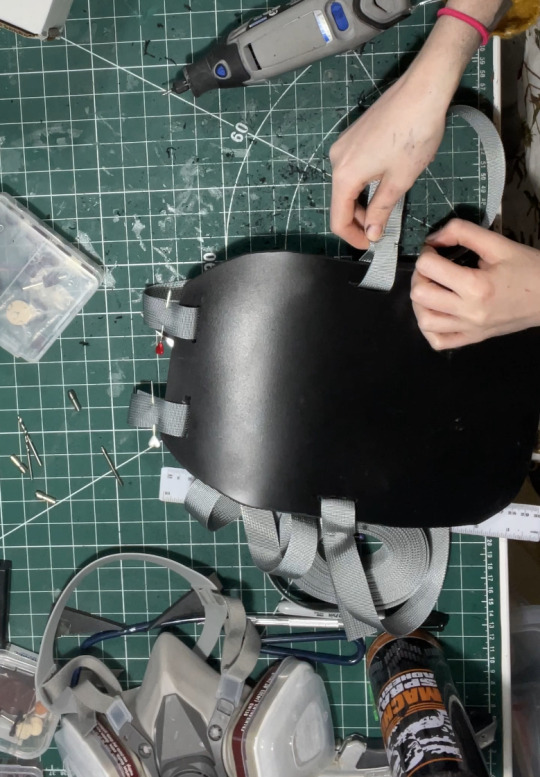
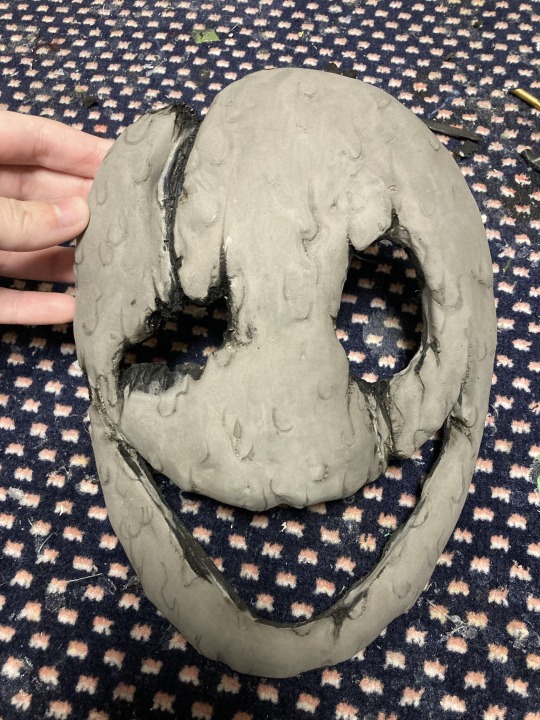
aight this is the earliest picture i have but basically I cut an oval out of 4mm foam, and used scrap pieces of the same size foam that i just had laying around to do another layer on top for added support and thickness. after that i did my best to roughly mark where my eyes, nose and mouse were and cut the eyes out so that they would line up with my own, and used the markings for the mouth and nose to cut a hole into the inside of the mask for my nose to fit into. the mask has a higher layer of foam only on the very tip of the nose because i had to keep my nose from sticking out or pushing the mask too far off my face lol.
anyway after all of that i used a heat gun to heat the foam (WITHOUT melting it and preferably in a well-ventilated area) on both sides and then held it to my face in position to help it mold better to the shape of my head. it looked like this when i was done (i also cut into the upper layer of foam to make the eye scars)
after that I covered the entire thing with this amazing thing called foam-mo, it's basically like foam in a water-based binder that behaves like craft clay. it's easy to work with and SUPER lightweight when it dries and it's absolutely perfect for making organic textures
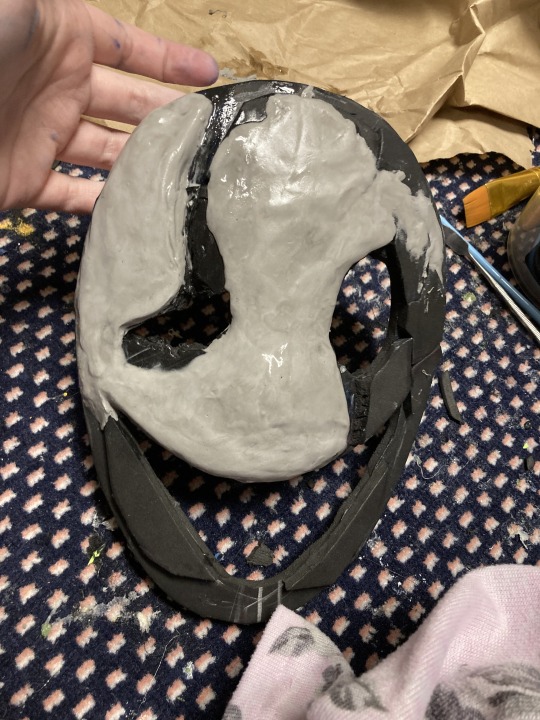
it lost a bit of the dimensionality in the drips after it dried, but I just went over it with another layer where I wanted more texture, and used a dremel tool with a sanding bit to sand down parts that I wanted more depressed.
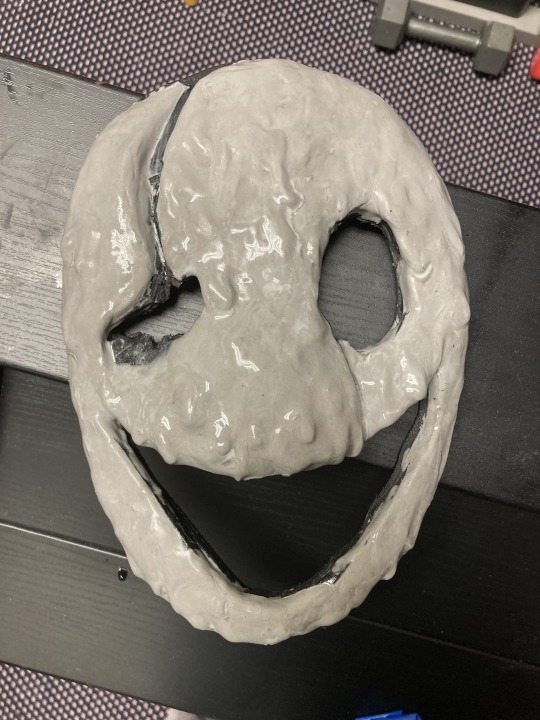
then after that were the first and second paint jobs. this included using an ultra dark carbon nanotube ink in the scars to get them as black as possible (and matte). after the second paint job I used a type of fabric called "speaker cloth" to cover up the eye and mouth holes. I hot glued the speaker cloth down from the inside and then painted over the fabric on both sides with fabric stiffener on the mouth hole ONLY (it can make it harder to see through the eye holes) since the mouth hole is so wide and is most subject to the shape distortion from how the mask was heat-shaped.
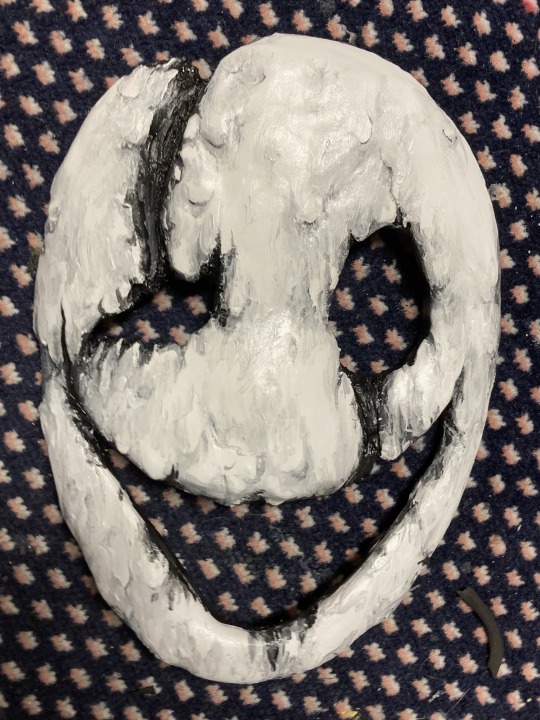

then finally the last paint job which included final shading touchups AND some extra work with white puffy paint, which I used to give the effect of the face dripping down.
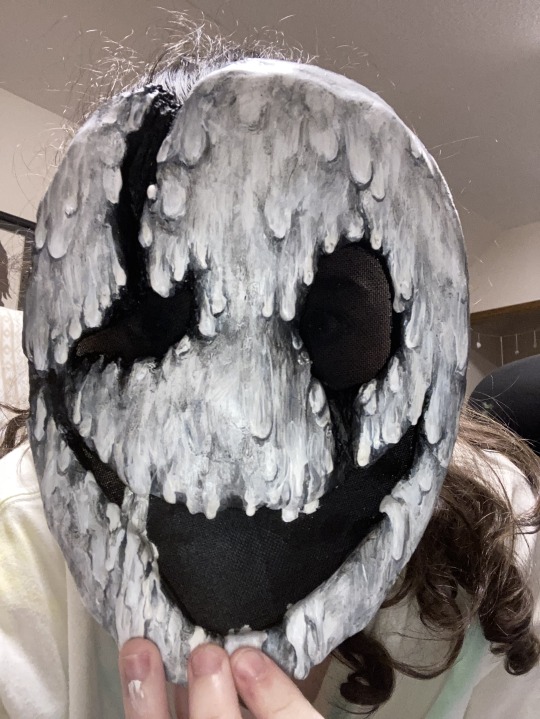
the very last step was adding the pupils as a dot of intense blue glow in the dark paint. it took a few coats to get it thick enough, and then on top of the bead of glow in the dark paint i added a tiny dot of plain white paint to make them pop even more. add a 1/2 inch elastic strap around the back of the mask glued down on the inside and you're done!
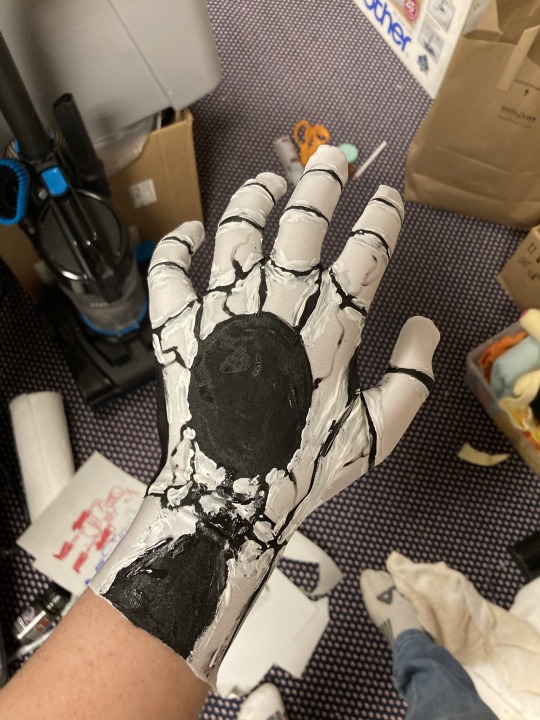
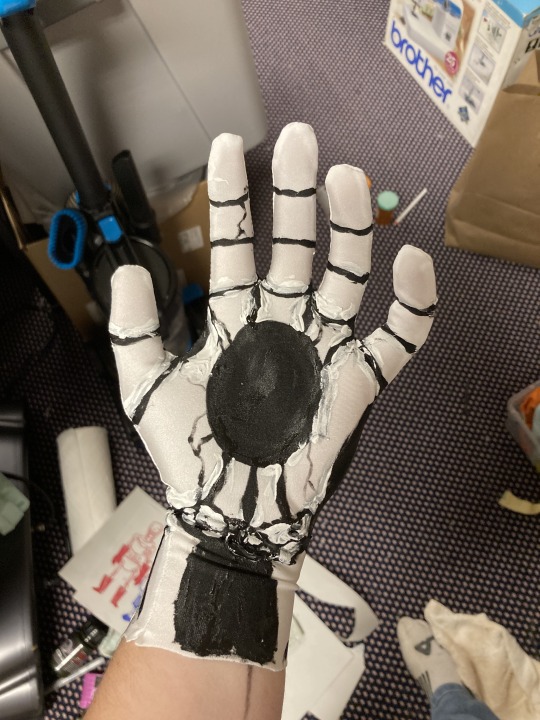
also, here's some pictures of the first glove I painted, if the reference would be helpful. The gloves were sewn using a self-made "hand turkey" pattern from tracing the shape of my hand onto paper. it's not a perfect pattern, but it's serviceable enough for stretchy fabrics. and I did use a stretchy fabric: white moisture-wicking athletic wear fabric, because I was worried my hands would sweat a lot. and I was right! but this choice of fabric makes that much less of a problem. and also makes you feel like your hands are freezing off (being in the void simulator ig)
the painting job was done with just plain black and white acrylics mixed with a fabric paint medium. i traced the finger joints where my fingers actually creased, and just kind of... did my best to make the palm holes match up lmfao
As for the cloak and robe, I did sew those both myself, so I can't point you to a seller. BUT what I CAN do is tell you what patterns and fabrics I used and whether or not it was worth the intense labor of love! (short answer, for the cloak? yes! for the robe? NO.) I'd have to go dig up the patterns though, so let me know if that's of interest to anybody
but yeah, hope this post is informative and potentially helpful!
#mine#my art#art#cosplay#gaster#undertale#deltarune#utdr#w.d. gaster#cosplay tutorial#gaster cosplay#long post
610 notes
·
View notes
Text

Athena Cykes COSPLAY Tutorial - The Opal Empress
#athena cykes#athena cykes cosplay#ace attorney cosplay#ace attorney#ace attorney dual destinies#phoenix wright ace attorney#apollo justice ace attorney#ace attorney fanart#希月心音#希月心音コスプレ#コスプレ#逆転裁判#逆転裁判5#逆転裁判コスプレ#the opal empress#cosplay tutorial
71 notes
·
View notes
Text
One of my favorite things in the whole wide world is an ultra-accurate cosplay. I’m talking exact name brands. Obviously, this can be tough, because media in question will very rarely go out of their way to tell you what the character is wearing. Shoes, in particular, are very difficult.
I really like shoes. More so, I really like good leather shoes. The kind that last you your whole life. Currently, I’ve been hyperfixated on Metalocalypse, and today, we’re talkin boots.
Welcome to:
Bog’s Boot Basics: Metalocalypse Edition
I think people are scared of leather. I’m here to tell you that leather will not hurt you. You will not save the planet by buying a pleather boot. Actually, not only is pleather horrible for the planet, it’s also gonna cost you more in the long run because pleather isn’t built to last.
Say it with me: Leather is more sustainable than pleather.
I’m serious. Stop buying pleather boots off amazon for your cosplays. Stop buying pleather, period.
Most of the boots (and sneakers) I’m showing you today will not only elevate your cosplay, but also last you for the rest of your natural days. If you buy them secondhand, they have probably lived longer lives than you. Leather fucking rocks if you take care of it.
This all being said: These are not super budget-friendly options. Good new boots are an investment, and sometimes you have to pay a little more. If you’re not able to do that, these can often be found on ebay at lower prices, and very often at second-hand stores.
Ok, that aside, we can jump in.

I’m stealing a pic from the comic because it shows all their shoes. Although Skwis and Toki’s boot colors are actually reversed here - Skwis wears black boots, Toki wears brown in the show. Blah blah, anyway.
Nathan Explosion
Nathan wears some sort of single buckle, black tall boot. For our sake, we’re calling them biker boots.
Single buckle, slightly slouchy at the ankle, low heel. No laces or visible zippers.
Nathan does, in fact, ride motorcycles. Because of this, I’m going on a limb and saying these are actual biker boots. Nathan also, in fact, has money, and Harley Davidson boots are a fantastic choice for this.
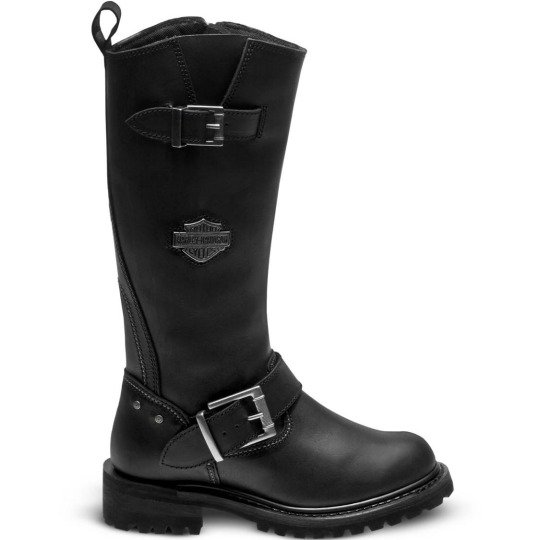
Here’s a pair of Harley Chalmers with an extra buckle - no foul there, these are cunty as hell and I’d totally wear them anyway.
Pro: Fucking brutal
Con: Brutal fucking price tag at $200 new.
Honestly, if you’ve got the money and you want a sick pair of boots… buy em. Harley’s last forever.
The Harley double-zip riding boot is a slightly cheaper option, sitting around $100-$120.
Honestly, these are gonna be easy to find. Your keywords here are “Tall biker boot with buckle” or something along those lines. That’s doable. I also see a lot of secondhand Harley’s going for really reasonable asking prices, so always check all your thrift stores and ebay (depop and mercari are kinda a crapshoot, but always worth looking.)
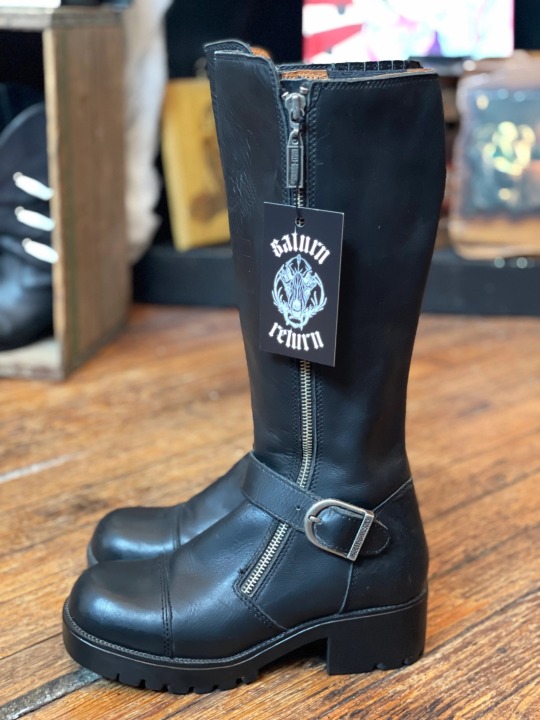
Skwisgaar Skwigelf/Toki Wartooth
These are the boots that made me make this post, because I saw them and immediately thought “there’s no fucking way they’re walking around in those 24/7,” because those are old school field boots.
Ask any person who’s ever ridden a horse over the age of 30 if they can take a look in the backs of their closets, because they most definitely still have a pair of these boots. Every equestrian had at least one pair of these torture devices, and they will outlive you.
Here’s an example of a black pair and a brown pair:
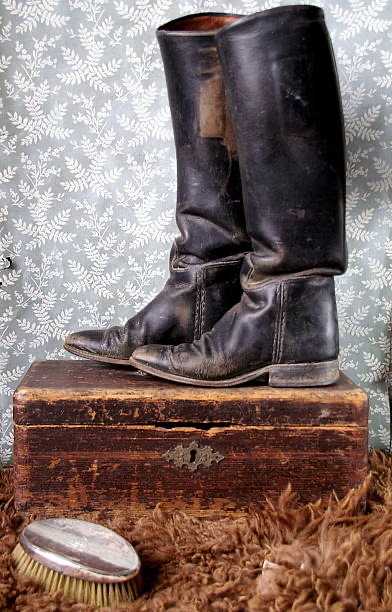

Pros: You can get these on ebay for anywhere between $20-$100. Facebook market place is full of them too.
Cons: These were made for you to wear while sitting on a horse all day, heels down. When you walk in them, they will pinch the everloving fuck out of your heels, and this leather is too thick and stiff to soften. If you’re gonna walk around in these on a convention floor, please bring a change of shoes because you will fucking need them.
But these are so easy to find and they usually shine up really well. If you don’t have leather conditioner (which you should if you own leather shoes) olive oil works in a pinch.
You also usually have a couple different calf options here, so you can tack on “wide calf” or “tall calf” or “slim calf” etc etc depending on your needs.
Your keywords here are “Old school equestrian riding/field/hunt boots.” So fuckin easy.
William Murderface
It pains me to say this. But that dildo fuckhead is wearing Demonias.

Look at him. He knows what he’s doing. I use the term Dildo Fuckhead affectionately btw, please don’t mistake me for a Murderface hater. I love him.
Honestly, I think you could get away with calling these mid-calf’s, but they’re probably technically tall boots.
Obviously I hate Demonias. These plastic fucking emo Barbie boots are worth approximately $8 and a cup of Kraft mac n cheese. They will cost you well over $100. Fuck that.
I’ve heard that older New Rocks are good alternatives? I have a friend that backs that claim up, but I don’t have a pair to confirm that. I’m sure there’s some Doc Martens you could sub in but I couldn’t find any matches under $400.

These are a pair of New Rocks. They’re… that I guess. Kinda cool. He’s probably not even really wearing Demonias but like, that’s what they are. To me. In my heart.

Here’s a pair of Demonia Riot-18BK. I guess. They’re about $133.
Murderface somehow has the most difficult boots for me to find. Plenty of cheapo Temu options, but I’m not here to show you those. Please let me know if you buy a pair of Temu boots so I can come to your house and break every fucking lamp you own.
Your keywords are “Tall boot with buckles” or “tall biker boots with buckles” or anything along those lines.
I feel like you’ve got a little more room for interpretation on Murderface’s boots, so long as their tall boots and they’ve got the buckles, you’re golden.
Wild Card Round: Pickles the Drummer
Man is wearing adidas!!! Pickles cosplayers are the comfiest motherfuckers in the convention hall.
Campus 00s, Samba OGs, Handball Spezial, Superstars, and Racer V 2.0 are all going to get you extremely close renditions of his shoes. The racer’s are my everyday shoe when I don’t wanna wear boots and those fuckers are. So comfy. Wear em without socks, who fuckin cares. I bet Pickles doesn’t even own socks.
If you’re going for Snakes N Barrels Pickles, try looking up “red Justin cowboy boots.” Justin’s are my go to brand because they last forever (I have a pair from the 70s) and they’re pretty comfy. They’re work boots, so they’re made to be worn/worked in all day.
If you’re made of money, buy yourself a pair of Tecovas. Those are the nicest cowboy boot you’ll ever own.

Blam! Bootboard moodboard! I probably should have done this with all of them.
Anyway. Have fun, remember that inaccurate pieces don’t make or break a cosplay, this is just for fun and to elevate whatever you’ve got going on. Wear your shoes until they fall apart (that’s what i do. get your moneys worth), be kind to your feet, be kind to your shoes (actually you can be pretty harsh to leather so long as you do a little aftercare. this is an innuendo, but also please clean and condition your leather pieces.) and be kind to the planet. Leather is better than pleather. You are paying a premium for plastic. Don’t do that.
(Lemme know if this is cool/useful btw. I would be so happy to find boots/brands of clothing for your cosplays. I think my inbox is open.)
#metalocalypse#metalocalypse cosplay#cosplay tutorial#cosplay help#bog blab#nathan explosion#william murderface#skwisgaar skwigelf#toki wartooth#pickles the drummer#dethklok#dethklok cosplay
91 notes
·
View notes
Text
eeeeeeey whadda know I got Pupet's tutorial/buildlog out today!
its a 31-page pdf with lots of pictures about how I made this costume plus a lot of my design and concept process. Its free to download (but of course tips are appreciated) so please check it out if you get the chance!
#my cosplay#cosplay#cosplay tutorial#fiber crafts#fiber arts#craft tutorial#this is mostly me just roasting myself for a second here#with teaching pay cycles theres always 2 months where we have to go without pay#i knew it was coming and tried to plan ahead by scheming to put out 3-4 cosplay tutorials for popular characters this summer#with the hopes that the side hustle revenue would help me out#but as luck would have it i got sick and hit a massive creative burnout and only produced one (1) tutorial for an OC haha#to my credit this type of thing is exactly why i dont take commissions bc my creative output is insanely finicky and hard to predict
91 notes
·
View notes
Last Seen Blogs
kronize
green blog

kamapon
Kamapon's little Place

epenvs3000w24
Emily Pokou - Nature Interpretation

foryouwereinmysong
The Space Between Us