#dailypsd
Text
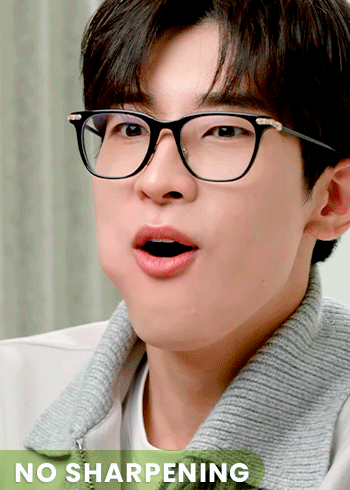
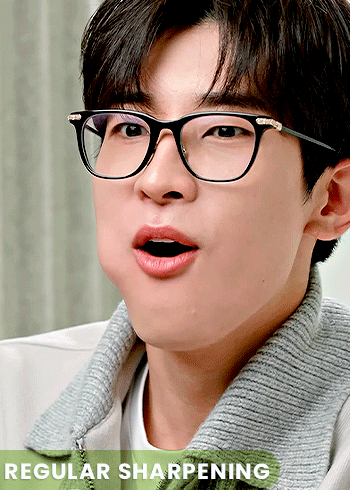

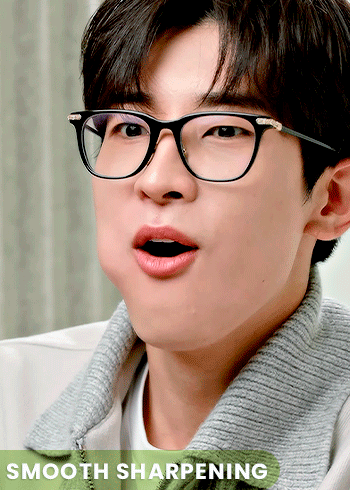
WNJUNHUI'S SHARPENING ACTION PACK
i thought that some people might benefit from these actions so i'm sharing them here. these are pretty generic sharpening settings, but i hope you find them useful.
action 01 | regular sharpening: works well with most gifs, pretty much the default sharpening settings
action 02 | noise sharpening: i use it mostly for kpop music videos, it gives the gifs a nice style, while helping the quality look better.
action 03 | smooth sharpening: if you want to go for a dreamy feeling, this is a great way to do it. i also find it useful when the quality of the footage is not great.
download here
#dailypsd#psdresources#allresources#sharpening action#dailyresources#psd resources#psd action#mery.creations#userzaynab#heymax#userbloomingwarrior#niniblr#usershreyu
419 notes
·
View notes
Text

ETERNAL PSD COLORING by @loviestudio
This coloring was made in Photoshop CC, and it will work better on it!
CONTENT
1 Photoshop file (PSD) with the coloring.
TERMS
Like and/or reblog to help a creator.
Don’t repost, re-upload or put it on packs and/or google drive. Don’t claim my resources as your own.
Don’t use my resources as a base or copy them.
Credits are not mandatory, although I’d love to see your edits!
My resources are free for personal/non-commercial use only. For commercial use, you must pay for the download. If you paid for the download, you are authorized to use it commercially. Reach out to me for more info or if you have questions about my resources license.
Follow me for more resources! ♡
This is a free resource, but you can buy it with points on DeviantArt to help out a creator or download it for free on Ko-Fi. Thank you!
I don’t own any of the pictures used to make the preview and I have no intention to violate the copyright rules. If any picture in the preview belongs to you and you want me to remove it, please, contact me!
#dailypsd#supportcontentcreators#dailyresources#allresources#completeresources#dearindies#psd coloring#psd download#psd for icons#photoshop resources#photoshop psd#resources#for icons#psds#psd#coloring psd#icon psd#psd: vibrant#psd: dark#psd: brown#free resources#free
217 notes
·
View notes
Text

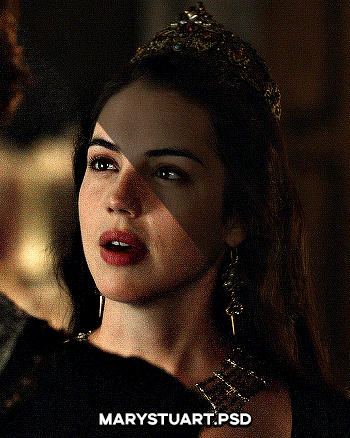

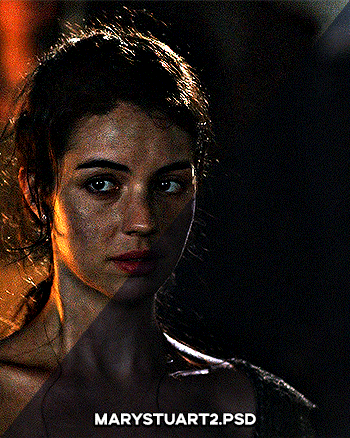
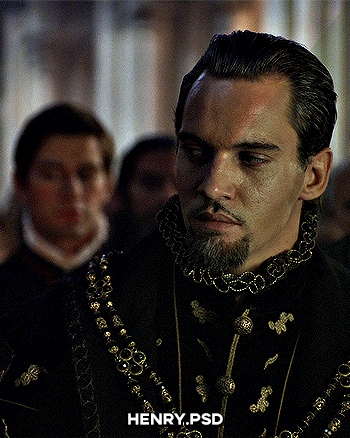
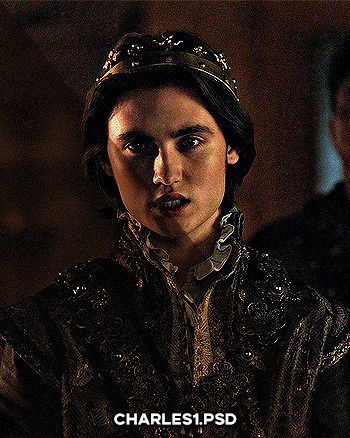


PSD PACK #1 — period dramas
in this folder, there's ten psds created for the shows: reign and the tudors but they should work across any period drama with dark or yellow/green lighting <3 just remember to always adjust the curves (and channel mixer if necessary) to suit the lighting of the scene
a lot of these are pretty basic colourings, and some are pretty similar but these are the ones that i use the most often!
#dailypsd#psdresources#completeresources#allresources#psd pack#psd colouring#photoshop resource#gif psd#01#ps help#useratz#usershreyu#userzil#usershri#usermery#userbloomingwarrior#niniblr#usercats#userfaiths#usermare#userbess
287 notes
·
View notes
Photo
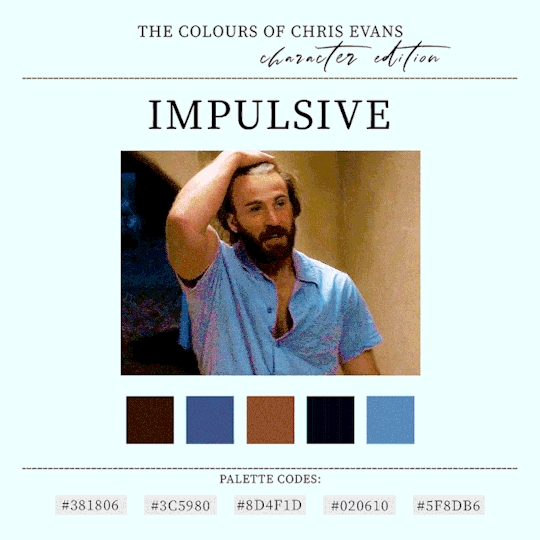


CHRIS EVANS
➔ A CHARACTER STUDY THROUGH COLOURS
(insp)
#chris evans#ari levinson#steve rogers#ransom drysdale#lloyd hansen#userbecka#userfinn#userlila#tuserliliana#cevansedit#dailypsd#my gifs
2K notes
·
View notes
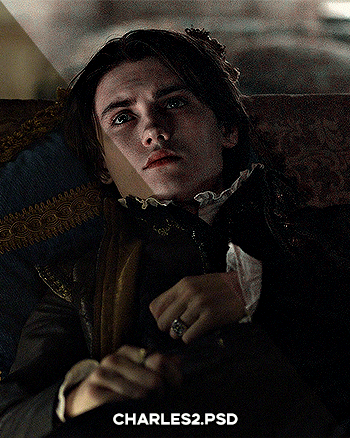
Text

SUBURBIA.PSD *
╰ * clicking on the source link you will find the “ SUBURBIA ” psd . you might need to edit basic layers like brightness and levels . this psd was made by me from scratch , you can edit this as you like but only for personal use , so don’t claim as your own or redistribute . if you found this helpful consider giving this a like / reblog and follow me for more of my resources .
151 notes
·
View notes
Text
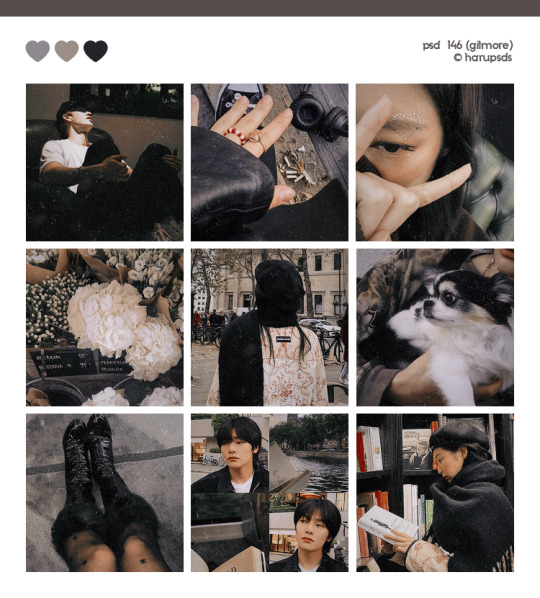
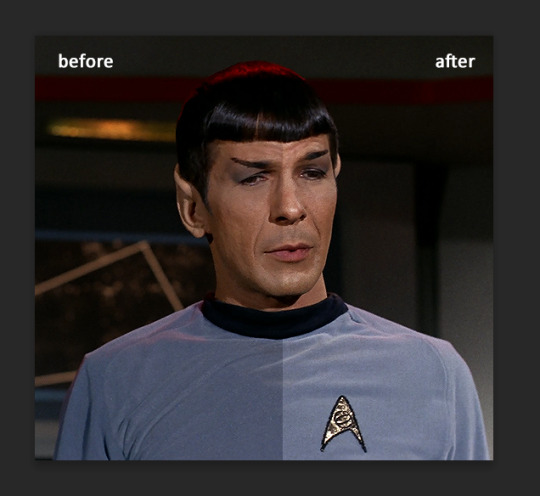
(146. gilmore).psd coloring made by harupsds ©
This effect was made by me in photoshop cc and it works better on it. Before downloading read all the rules and follow them, be honest. Don't forget to leave your feedback or suggestion.
Like or reblog if you download and follow me for more content.
Don’t repost, reupload or put on pack/google drive.
Don’t claim as your own.
Don’t recreate, use as base or steal layers.
Adjust the layers or add new ones if needed.
Give me credit if you use it.
Free for personal/non-commercial use. For commercial use pay the download.
Before/After.
▸ Download: Follow me + like or reblog + ask (logged) “psd 146. gilmore, please?” UNTIL October 20, 2023 or pay the download on deviantart.
Thank you @miniepsds for amazing template. || This is our work done with effort and time spent. Please do not copy do not violate, and do not sell it as if it were yours. The Preview was made by me, being my own. Please, if your photo is here, talk to me. It is not my intention to violate the copyright rules.
#dailypsd#dailyresources#allresources#hisources#makersleague#psd*#psds*#psd#psds#psd coloring#coloring#image psd#psd download#psd for icon#for icon#photoshop resouces#harupsds#black#brown#analog#analog film#analog filter#analog film psd
147 notes
·
View notes
Text
ꗃ ╰ 𝐔𝐍𝐋𝐎𝐂𝐊𝐄𝐃 ⸻ PSD COLORINGS #01


# jovovich psd pack — by calie (gwldcnz) !
by clicking the source link (deviantart) you’ll find a pack with #04 colorings psds which basically corrects the blue, yellow and green tone of scenes / images. it is very likely that they will require adjustment when used. all of these psds were made by me from scratch. please, like & reblog this post if you find this useful in any way !
#psd#gif psd#free psd#coloring#psd coloring#rph#rpc#rpt#userdevon#usermina#dailypsd#* colorings#* others#* m#* m: colorings
147 notes
·
View notes
Text
harmonic.psd (by miniepsds)
rules: don’t copy or use as a base, don't modify or share and don't claim as yours. give credits, use #miniepsds in your posts or tag the blog. If you adjust or use with another psd or if you use on other social media, still give credits!
download: follow me + like or reblog and ask me (public): harmonic.psd, please. be an active editing blog to get it.
#miniepsds#psd#psd coloring#miniepsds new#psd: blue#psd: beige#hisources#dailypsd#psd download#psd for icons#psd: green
208 notes
·
View notes
Text
♡ PSD - LOKI :
→ please credit if using.
→ don’t repost or claim as your own.
→ you can adjust the layers if you need to.
#psd#rp resources#psd download#coloring#rp psd#coloring psd#psd coloring#roleplay#dailypsd#dearindies#photoshop resources#comic rp#free resources#rp#rpc#loki laufeyson#loki season 2#loki#loki series#marvel#aestehtic#daily psd#graphic design#free psd#icons com psd#psd for icons#icons
140 notes
·
View notes
Text
gradient text tutorial
This tutorial is for @ladynephthyss but y’all can have it too xD
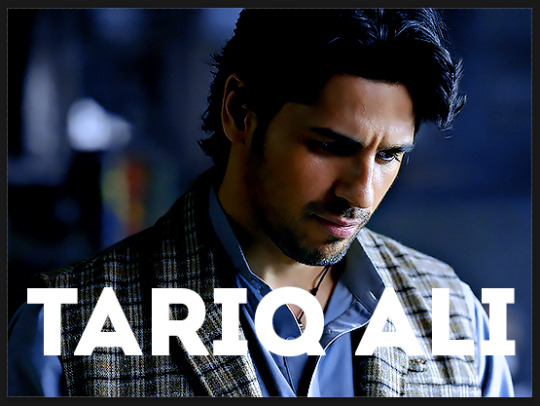
We’ll be adding text so the final gif looks like this:
This tutorial assumes basic knowledge of gif-making, Photoshop, and coloring. I’ve only described the text tutorial in this.
Tutorial under the cut:
Couple things to note beforehand:
There is a lot of trial and error involved when doing any sort of text, and this is no exception! You might have to play around with the colors and the settings before you find something that looks good and readable!
This tutorial is inspired by the difference text effect in these tutorials: one and two by @anya-chalotra (highly recommend checking those out!), just done a different way.
This text effect works better on big gifs (540px width) that have quite a bit of movement below the text so you get that effect.
Find fonts that have bold shapes or some width to them, so you can see the movement.
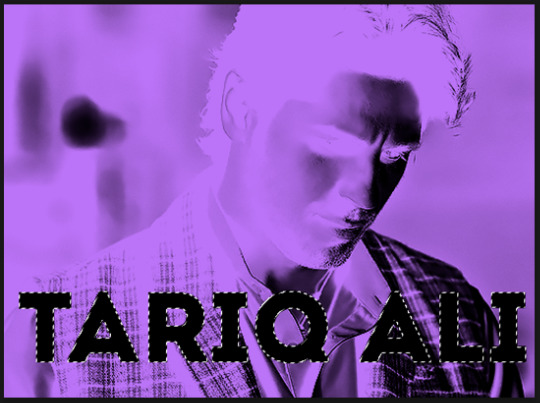
This is my starting gif, after sharpening and coloring.

First, I position my text where I want it. (this can be moved around later, I just like to get an idea). Remember what I said about fonts? Try to use ones that are thick for this effect so you can see the gradient/movement underneath the letters. I’m using Intro.
It doesn’t matter what color the text is at this stage, I just do white text so I can see it:
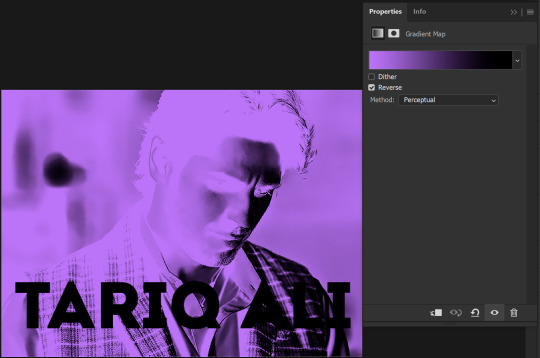
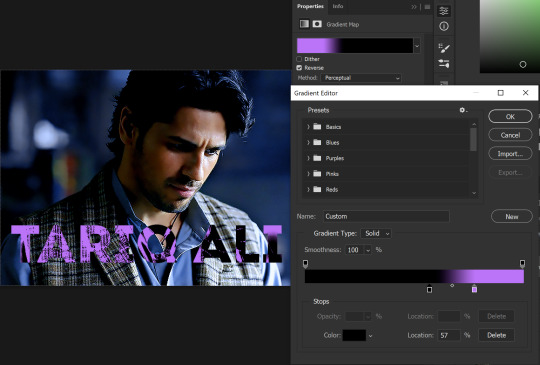
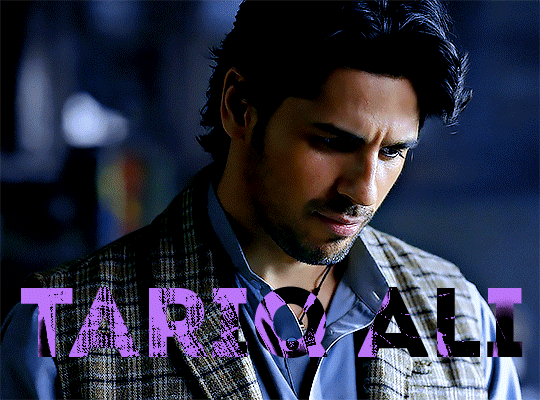
Then, add a gradient map in the color you want your text to be. For this one, I chose black and purple. The more contrast there is in your colors, the better it looks. You’ll be able to change this later though, if you don’t like the way it looks.
This is how it looks with the gradient map:
Now, we’re going to go over into our layers panel, and where we have the white box (the layer box), we’re going to select and delete that...
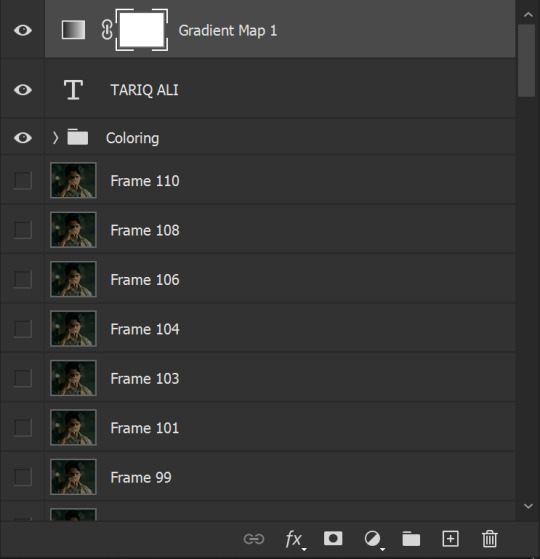
...so it looks like this:
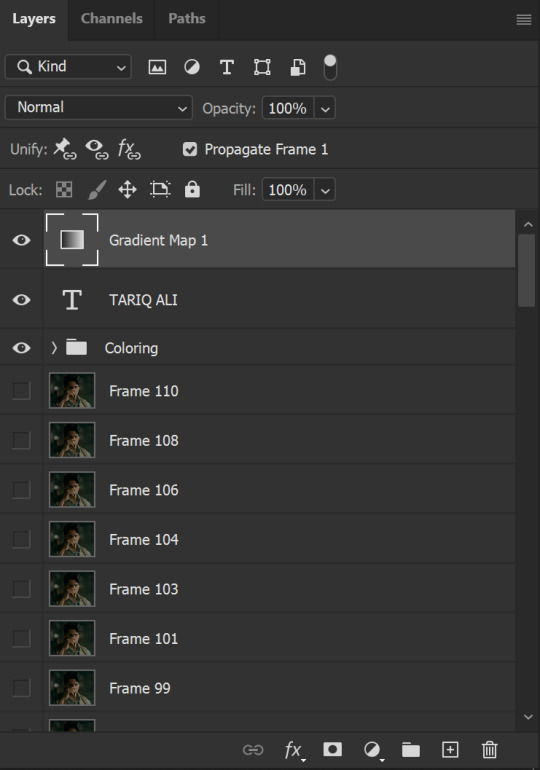
Then, while pressing Ctrl, we’re going to hover our mouse over the T in our text layer. Your cursor should show a white box with a dotted border. Press the T in the text with the specialized cursor, and you should get a dotted line all around the letters, like so:
(I’m not able to get a screenshot of the cursor for some reason but I hope the instruction made it clear!)
Then, make sure you have your gradient map layer selected, and press the layer mask button (shown by a white arrow in the below image - it looks like a white rectangle with a black circle in the middle.)
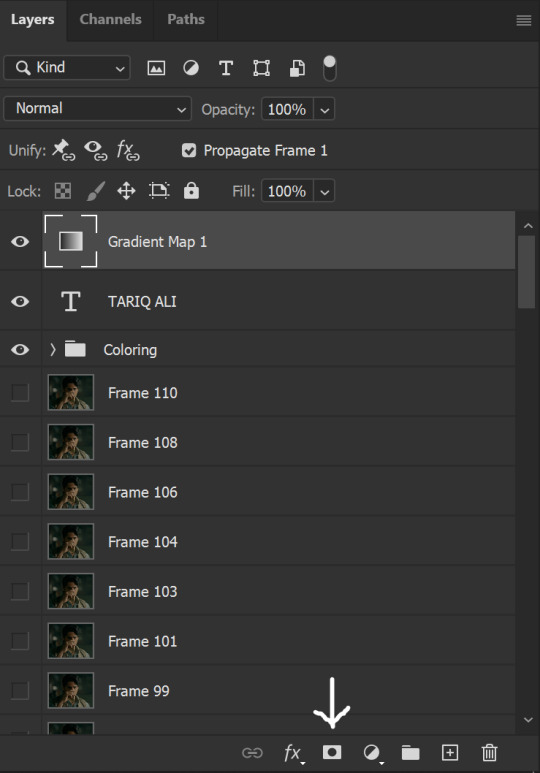
This is what it should look like:
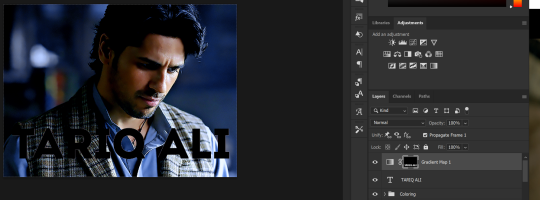
Right now, it’ll look like some solid color (which depends on your gradient). This is because we still have the text layer visible. Once we press the eye icon next to the actual text layer to hide it, you can see that this is what it looks like:

(You can also delete the text layer, but I don’t, just because if I decide to put these two words on two lines, or change their spacing or whatever, I don’t want to have to make a new layer. I can just edit that one before re-masking.)
As you play your gif, you’ll see that this is what the whole movement looks like:

You can see that the movement of him lifting the glass to drink his tea shows through the text, too. Almost like a weird color X-ray type thing, where the lighter color shows on darker shades of the gif, and the darker color shows on the lighter part of the gif.
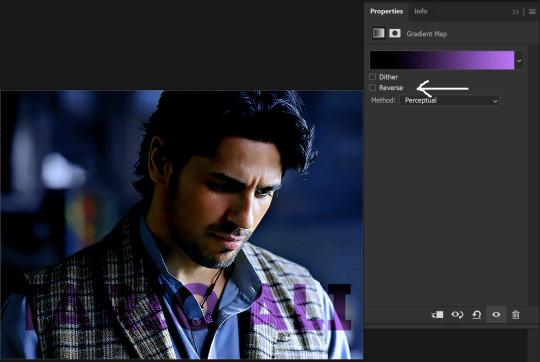
Note: sometimes, depending on the way your gradient is made, you might get text that looks like the picture below. Just hit the reverse button (shown with a white arrow), and you should get the text looking like it does above.
This is the basic way to do it. Now, we can easily edit this, if we feel like there’s too much purple and not enough black. To do that, we go into the gradient, and change the slider positions of the colors. This is purely an aesthetic preference, but I’ll show you how to do it below:
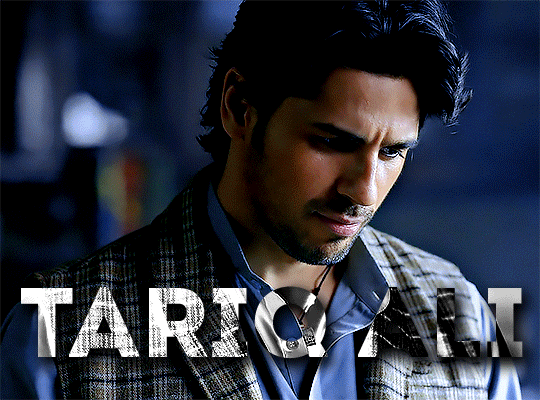
For example, I moved those sliders so there’s more black and less purple, and the gradient feels more like two colors only, instead of all the various hues of dark purple/gray-purple.
This is what the gif looks like:
In the gif before this one, the black was more of a muted gray. In the one directly above, you can see that it looks much more striking. So play around with that until you find something you like.
It still doesn’t look very visible to me, so I’m going to add a drop shadow underneath (again, this is a preference thing). You’d do it just like you would with a regular text layer. Right click the Gradient Map layer and select Blending Options. Add a drop shadow.
This is what mine looks like:
And that’s it! You can keep playing around with the whole thing until you’re happy with it. You can even keep changing the color, and the great thing about that is you’ll be able to preview it as you change it to see what works with your scene. For example, I tried white and black text here:
And that’s it! Feel free to drop me an ask if anything’s confusing! Happy giffing!
#zee's tutorials#tutorials#gif tutorial#typography#gradient text#photoshop tutorial#resources#ps help#dailyresources#completeresources#itsphotoshop#allresources#dailypsd#userisha#userdahlias#alielook
415 notes
·
View notes
Text
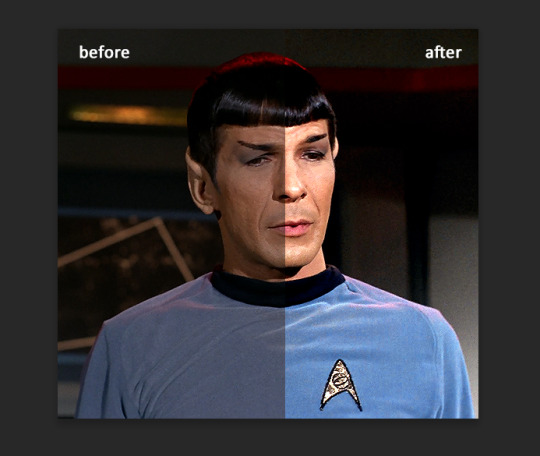
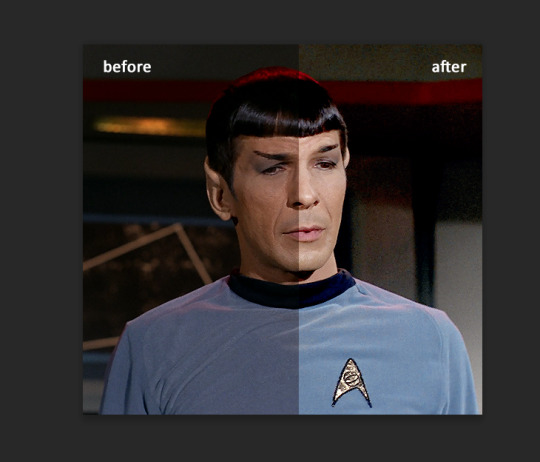
a very foking detailed GIF tutorial you asked for and how I color my gifs
However, I color them individually, so there will be explanation of tools I choose instead of showing what settings I used for this specific gif in this tutorial.
I will go through entire process of how I create gifs, the process of gifmaking can be different for others and there is no obligation of how to create a gif. Basically, do it however you like and enjoy the process.
this is part I, part II is here\in reblogs.
First, you will need to prepare everything, you choose the moment you want to gif and make screencaps. I use mpv player to create them, here is a great tutorial on how to install it. So I won't go over it, just follow it and or use another player which allows to make screencaps, such as kmplayer.
Once you make screencaps go to photoshop - file - scripts - load files into stack - browse - select screencaps and upload them.
At this point I will also add that I use keyboard shortcuts a lot, you can set them up to your preference, that is much easier for me and might be for you too, and I am so used to them that I forget where are some settings. You can do it from edit - keyboard shortcuts, you may set up anything there.
You will have all screencaps uploaded into one file. Once I have it I change canvas/image size, I also remove 10 pixels from each side, because I hate that some files have that weird black line which looks awful on gifs. But that's up to you. Use proper dimensions for tumblr, that is important since your gifs will look 'not good' when you upload them. I will go with 540x500px this time. (correct dimensions for tumblr are 540px for big gifs, 268px for two gifs along each other and 177-178-177px for the three gifs together)
Go to images - image size (crtl+alt+i) and change the size.
After that I make animation, because without it we would not be able to convert all the screencaps into smart filters. Go to windows - timeline
you will have something like this by default

click on create frame animation - then on 4 horizontal lines which will open menu - make frames from layers

click on convert to video timeline (that 3 horizontal lines and 1 vertical line or whatever it is, right under the first layer) you will get something like this.
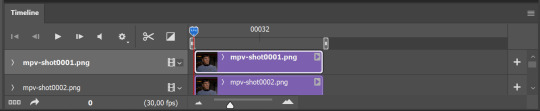
now, this will be animated. If you choose convert to video timeline right away it will not be animated.
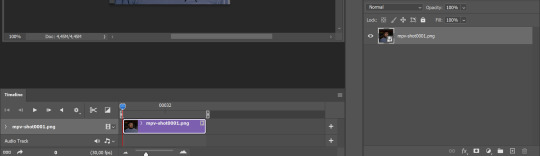
Now, select all the layers - filters - convert to smart filters
You will have something like this, and if you play it - it will be animated anyway. That way you can edit ALL the screencaps at once.
I usually start with sharpening, settings may change according to the files I have, for some you will need more sharpening, for some less. I go with filters - sharpen - smart sharpen and usually that's enough
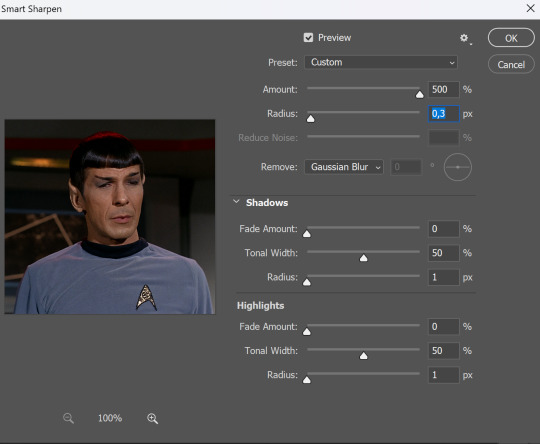
but I sometimes add more sharpening, just change radius to 0,2. So, repeat the action.
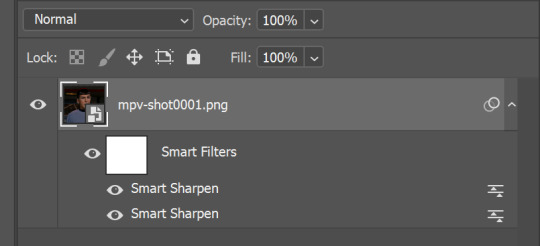
You will have it like this
and at any point of making gif you will be able to change settings for it, if after coloring it will look not as good as you wanted to.
I will not go into a lot of details about coloring for this gif, because does not matter how good the coloring on this gif will be, it won't work as good on another gif.
There is no right way to start coloring, you may start with curves, levels or selective colors depending on the screencaps you want to edit.
Well, this time I did start with layer - new adjustment layer - curves. (yeah, i guess by the end of the day we all do lmao)
(Always use 'layer - new adjustment layer'. That's the only thing I suggest to remember when you color. )
Just to brighten gif a little bit, but you also can change colors with it.
those are not settings I used for this gif!
Curves have option to edit colors, just press RGB and you will see options for RED, GREEN, BLUE. Upper slider adds the said color, the slider at the bottom removes it. That's a great tool if you have a very red\yellow\blue\green scene, with those settings and moving sliders here and there you will be able to add the color you want, for red scene I suggest to use more green and blue, as well as for yellows but with less green. Just move them to see what fits your gif better.


there are also eyedrop tools which will help you to edit picture, with the first one you need to find the darkest part of your gif and click, it will adjust your picture according to it. If there's too much red, it will make it bluer, etc. The middle one is the one I use the most out of them, cos it changes the midtones, it's great if you have very yellow picture, just press the yellow part and it will make it bluer\greenish, depends on the picture, and then you can adjust it to make it look better. And the last one you can use to lighten picture as well, just find the brightest part of the picture and press it. It will adjust other colors accordingly.
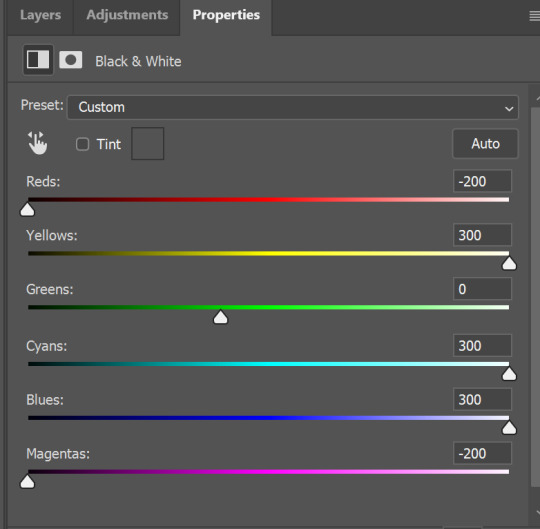
I like to play with settings, I could add more darkness to the gif by levels, by selective colors making dark colors even darker, but sometimes I just use layer - new adjustment layer - black & white. Putting it on soft light blending mode and changing opacity. Idk, I like the effect :D Also, by using these, you will be able to darken part or lighten specific colors

so yeah, play around and figure out what is the best way for you.
after that I used layer - new adjustment layer - selective colors. I think this is one of my favorite tools out there, I love it, I usually end up with 30 selective color layers if I make a super complex gif :D
You can change colors with it, make them more vibrant, or less.

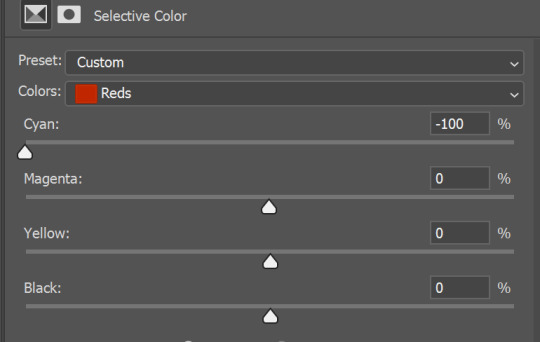
for each color you will have 'cyan, magenta, yellow and black' and by dragging sliders you can change colors, make them darker or lighter for the lovers of those paster gifs :D
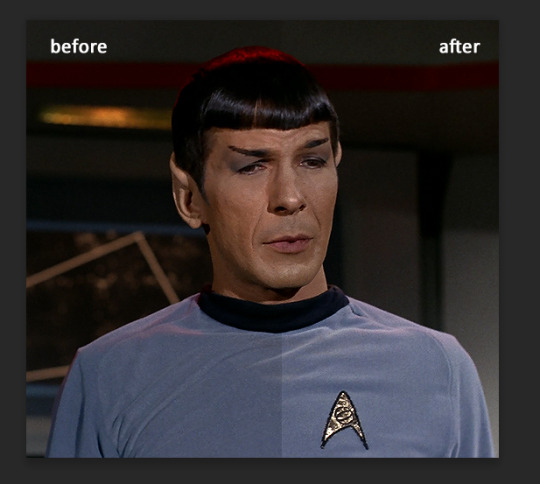
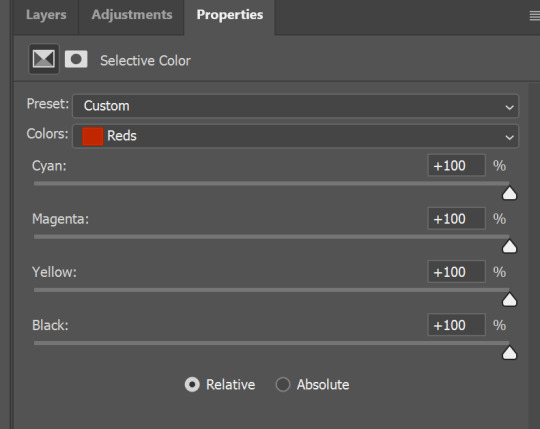
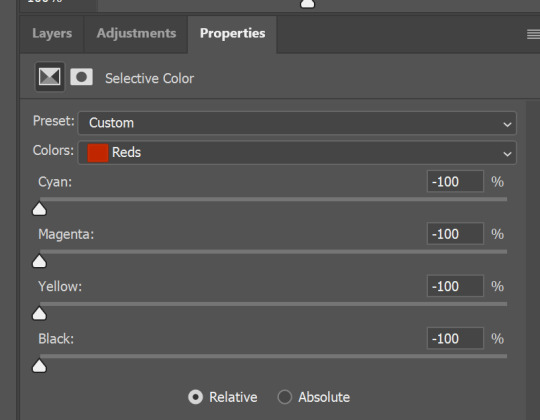

But don't worry, that's not where I will go with the gif, so it will look better, i promise.
You know how much I love making blue even more blue. So I go with more selective color layers to enhance it.
You do not have to use just one, and you won't be able to make it with just one sometimes. So add as many as you like to get the result you want.
next is one of my favorites - layers - adjustment layers - levels
with it you can darken colors or lighten them, there's also auto, as well as on curves, which will find the most suitable settings for your picture.
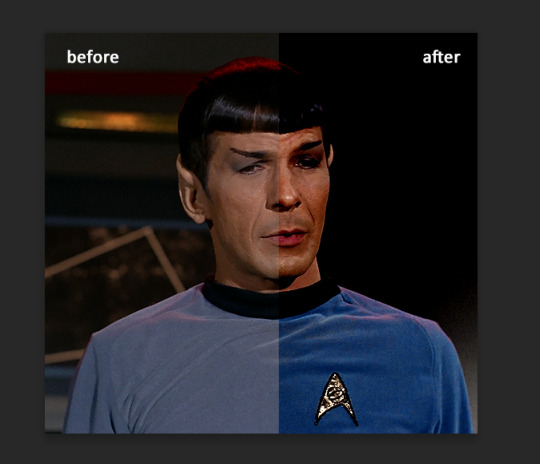
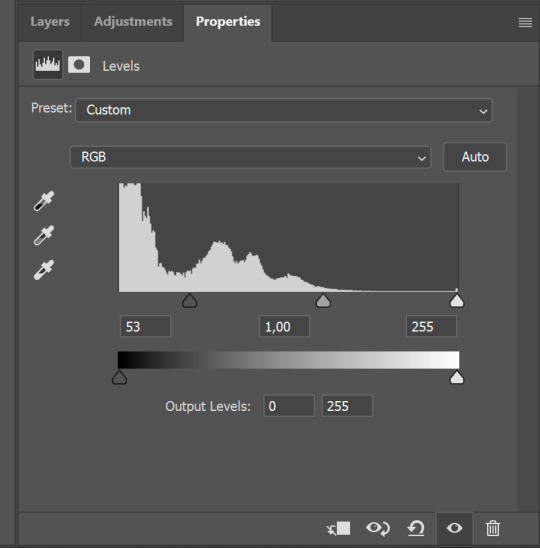

I hardly ever change the middle slider, cos
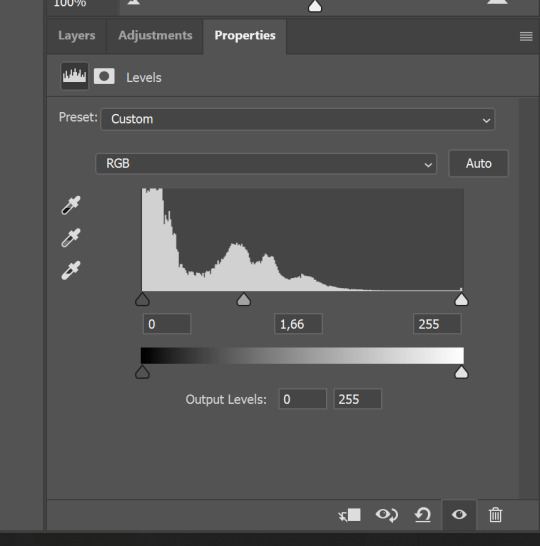
nope.
so, we are at this part of the gif by dragging sliders.
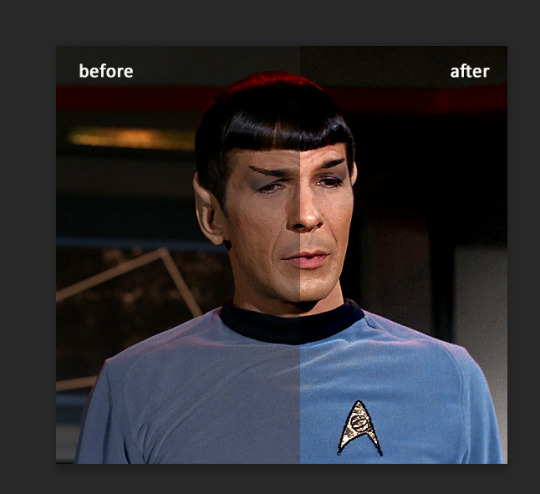
next one I used is layers - adjustment layers - color balance.
right now I will stop adding directory, this tutorial is already long enough, so most of the things are there in layers - adjustment layers.
Absolutely love it, most of settings do the same things but a little differently, this one changes colors but also entire picture, not just part of it. You have shadows, midtones and highlights
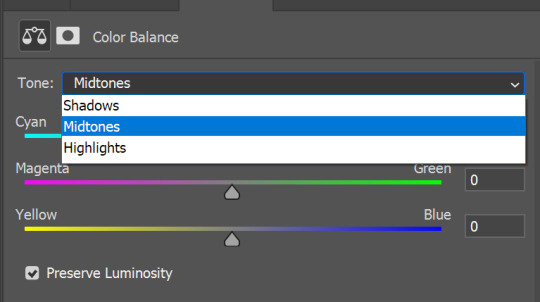
Each of them is really great when you have a yellow\red\blue\green picture to edit. And each of them has 3 sliders cyan\magenta\yellow.
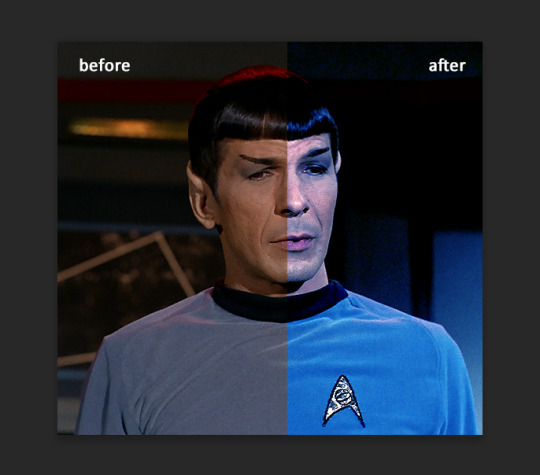
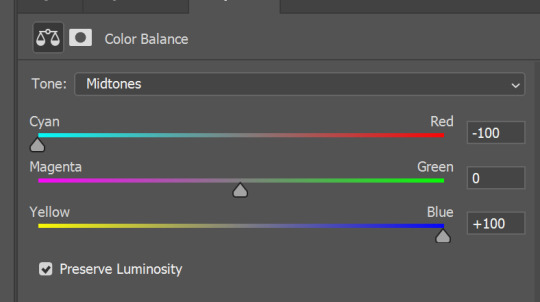
You see, if you drags sliders the other way it will make picture more yellow.
END OF PART I
since tumblr

100 notes
·
View notes
Text
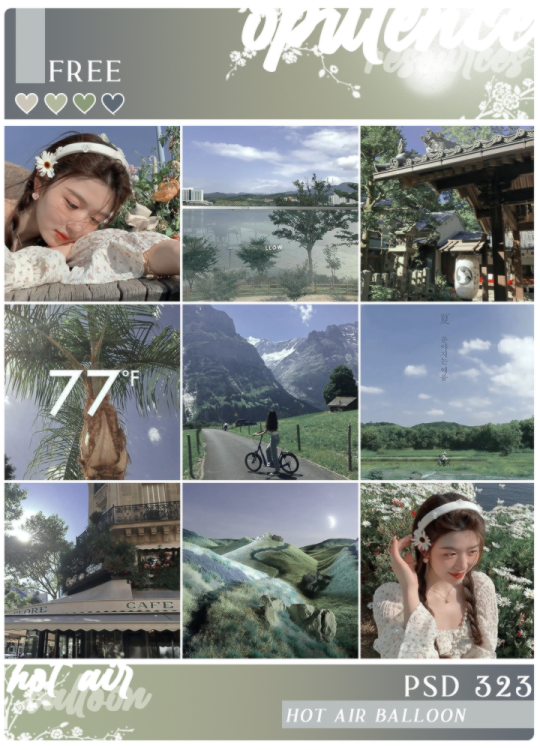
{.psd 323: Hot Air Balloon} by opulenceps // • download •
That’s made by me, what means… don’t copy dude. You can change the layers if you want to. I’m not taking requests, cause I like to keep my creativity and do what I want to do. I do not reproduce any effect. Like or share if you download it. (before/after)
#psd#psds#coloring#colorings#psd coloring#psd colorings#soft psd#soft psds#filter#filters#dailypsd#hisources#demis#323
51 notes
·
View notes
Text

AMSTERDAM PSD COLORING by @loviestudio
This coloring was made in Photoshop CC, and it will work better on it!
CONTENT
1 Photoshop file (PSD) with the coloring.
TERMS
Like and/or reblog to help a creator.
Don’t repost, re-upload or put it on packs and/or google drive. Don’t claim my resources as your own.
Don’t use my resources as a base or copy them.
Credits are not mandatory, although I’d love to see your edits!
My resources are free for personal/non-commercial use only. For commercial use, you must pay for the download. If you paid for the download, you are authorized to use it commercially. Reach out to me for more info or if you have questions about my resources license.
Follow me for more resources! ♡
This is a free resource, but you can buy it with points on DeviantArt to help out a creator or download it for free on Ko-Fi. Thank you!
I don’t own any of the pictures used to make the preview and I have no intention to violate the copyright rules. If any picture in the preview belongs to you and you want me to remove it, please, contact me!
#dailypsd#supportcontentcreators#dailyresources#allresources#completeresources#chaoticresources#dearindies#psd coloring#psd download#psd for icons#photoshop resources#photoshop psd#resources#for icons#psds#psd#coloring psd#icon psd#psd: vibrant#psd: bright#psd: warm#free resources#free#free psds
75 notes
·
View notes
Photo


͟͟͞͞➳❥ APPRECIATION POST FOR ARI'S PINK BUTTON-UP
#ari levinson#chris evans#my gifs#the red sea diving resort#chris evans gifs#steve rogers#mcu#cevans#cevansedit#unearthlydust#userbecka#userfinn#lilacevans#dailypsd#tuserliliana#dilfgifs#dilfsource
2K notes
·
View notes
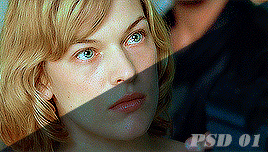
Photo

NO_SE_VE.PSD *
╰ * clicking on the source link you will find the “ NO_SE_VE ” psd . you might need to edit basic layers like brightness and levels . this psd was made by me from scratch , you can edit this as you like but only for personal use , so don’t claim as your own or redistribute . if you found this helpful consider giving this a like / reblog and follow me for more of my resources .
219 notes
·
View notes
Text

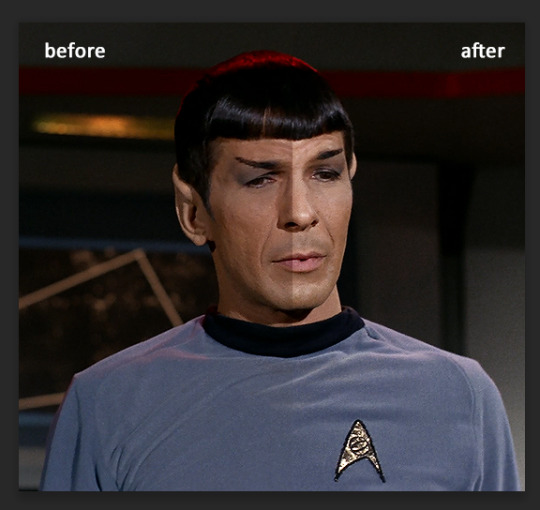
(138. raisel).psd coloring made by harupsds ©
This effect was made by me in photoshop cc and it works better on it. Before downloading read all the rules and follow them, be honest. Don't forget to leave your feedback or suggestion.
Like or reblog if you download and follow me for more content.
Don’t repost, reupload or put on pack/google drive.
Don’t claim as your own.
Don’t recreate, use as base or steal layers.
Adjust the layers or add new ones if needed.
Give me credit if you use it.
Free for personal/non-commercial use. For commercial use pay the download.
Before/After.
▸ Download: Follow me + like or reblog + ask (logged) “psd 138. raisel, please?” UNTIL September 15, 2023 or pay the download on deviantart.
Thank you @miniepsds for amazing template. || This is our work done with effort and time spent. Please do not copy do not violate, and do not sell it as if it were yours. The Preview was made by me, being my own. Please, if your photo is here, talk to me. It is not my intention to violate the copyright rules.
#dailypsd#dailyresources#allresources#hisources#makersleague#psd*#psds*#psd#psds#psd coloring#coloring#image psd#psd download#psd for icon#for icon#photoshop resouces#harupsds#pink#red#natural#colorful#vibrant#fave
102 notes
·
View notes
Last Seen Blogs
skepticalarrie
It’s a beautiful war 🌈
akashi-tetsuki
Tetsuki | Request:Closed |
steampunkarmadillo
Steampunkarmadillo
greater-than-the-sword
Stubborn Idealism

westsideminibusesandwestside
Westside Mini Buses and Westside Airport Shuttle.