#dslr photography tutorial
Text
Digital Photography Terms Every Aspiring Photographer Should Know
Digital Photography Terms Every Aspiring Photographer Should Know
As an amateur photographer, it is essential that you understand common photography terms so that you can further develop your photography skills.
From A to Z, here’s the digital photography terms glossary to help you dive more deeply into the creative field of photography.
How DSLR Cameras Work
Aperture
Aperture is the opening between the lenses (similar to the pupil of our eye) that lets the…
View On WordPress
#a photographer#digital photography tutorials#dslr tutorial for beginners#free online photography tutorials#free photography tutorials#glossary of digital photography terms#learn photography#Photography#photography for beginners#photography lessons#photography tutorials#photography tutorials for beginners#photography tutorials online#photography website
3 notes
·
View notes
Text
#Photography#cameras#lenses#gear reviews#tutorials#discussions#community#techniques#equipment#photography tips#Camera reviews#Photography gear#Camera equipment#DSLR cameras#Mirrorless cameras#Photography accessories#Camera lenses#Photography techniques#Photo editing#Photography tips and tricks#Photography tutorials#Creative photography#Landscape photography#Portrait photography#Street photography#Wildlife photography#Travel photography#Product photography#Macro photography#Low light photography
1 note
·
View note
Text
≡;- ꒰ °getting into photography ꒱

if you've ever felt drawn to the magic of capturing moments through the lens of a camera, you're in for an exciting adventure. getting into photography is a journey of exploration, creativity, and self-expression. here are some tips to help you get started, all in lowercase for a relaxed read:
start with what you have: you don't need fancy equipment to begin your photography journey. whether you're using a smartphone, a point-and-shoot camera, or a basic DSLR, focus on mastering the tools you have at your disposal before considering an upgrade.
learn the basics: familiarize yourself with the fundamental concepts of photography, including composition, lighting, exposure, and focus. there are plenty of online resources, tutorials, and books available to help you understand the basics and hone your skills.
practice, practice, practice: the key to improving your photography skills is practice. take your camera with you wherever you go and experiment with different subjects, angles, and settings. don't be afraid to make mistakes—every photo you take is an opportunity to learn and grow.
study the work of others: immerse yourself in the world of photography by studying the work of renowned photographers, both past and present. pay attention to their composition, lighting techniques, and creative vision. draw inspiration from their work while finding your own unique style and perspective.
join a community: connect with other photographers and enthusiasts by joining online forums, social media groups, or local photography clubs. seek feedback on your work, share tips and tricks, and learn from the experiences of others. a supportive community can provide valuable encouragement and motivation on your photography journey.
experiment with different genres: explore a variety of photography genres, from landscapes and portraits to street photography and macro photography. try stepping out of your comfort zone and experimenting with new techniques and styles. you never know what you might discover along the way.
embrace post-processing: don't underestimate the power of post-processing in enhancing your photos. learn how to use editing software like Adobe Lightroom or Photoshop to fine-tune your images, and adjust colors, contrast, and clarity.
remember, photography is not just about capturing images—it's about storytelling, emotion, and connection.
- love, pastel
3 notes
·
View notes
Text
Capture Stunning Photos: The Ultimate Guide to Buying a Nikon DSLR in the UK
For photography enthusiasts in the UK, Nikon DSLRs (Digital Single-Lens Reflex) have long been a trusted companion. Renowned for their exceptional image quality, durability, and vast lens selection, these cameras empower you to take your creativity to the next level. But with so many models and online retailers, navigating the world of Nikon DSLRs can feel overwhelming.
Worry not! This comprehensive guide will equip you with the knowledge to confidently buy a Nikon DSLR in the UK, whether you're a seasoned photographer or just starting your journey.
Why a Nikon DSLR?
While mirrorless cameras are gaining traction, Nikon DSLRs remain a fantastic choice for several reasons:
Superb Image Quality: Nikon's advanced sensor technology delivers sharp, detailed photos, even in low-light conditions.
Optical Viewfinder: Unlike mirrorless cameras, DSLRs offer a true optical viewfinder, giving you a natural, uninterrupted view of the scene.
Extensive Lens System: Nikon boasts a comprehensive lens system, allowing you to explore various photographic styles, from wide-angle landscapes to detailed portraits.
Ergonomics and Battery Life: DSLRs are known for their comfortable grip and extended battery life, ideal for long shooting sessions.
Choosing the Right Nikon DSLR for You:
Nikon offers a range of DSLRs catering to different skill levels and budgets. Here's a breakdown of some popular options:
Entry-Level: Ideal for beginners, the Nikon D3500 or D5600 are budget-friendly options with user-friendly features and helpful shooting modes.
Mid-Range: For aspiring enthusiasts, the Nikon D7500 is a sweet spot, offering excellent image quality, fast autofocus, and tilting touchscreen displays.
Full-Frame: Professional photographers or enthusiasts seeking the best image quality may consider full-frame models like the Nikon D850 or D780. These cameras excel in low-light situations and produce stunningly detailed photographs.
Finding the Best Online Price:
Once you've chosen your ideal model, it's time to explore online retailers. Here are some reputable UK stores offering competitive prices on Nikon DSLRs:
Nikon Official UK Store: Offers Nikon warranties and potential bundle deals
Amazon UK: Wide selection, but be wary of third-party sellers
Jessops: Established camera store with frequent promotions
Grandy's Camera: Specializes in camera equipment and often has clearance sales
Beyond the Camera Body:
Remember, a camera body is just part of the equation. Consider these additional factors:
Lenses: Start with a versatile zoom lens like the Nikon AF-S DX NIKKOR 18-55mm f/3.5-5.6G VR for beginners. Later, explore prime lenses for specific applications or wider zoom ranges for greater versatility.
Accessories: Invest in a camera bag, spare batteries, and a memory card with sufficient storage capacity.
Learning Resources: Take advantage of Nikon's online tutorials or photography courses to maximize your camera's potential.
Final Tips:
Read Reviews: Before purchasing, research user reviews and professional critiques to understand the camera's strengths and weaknesses.
Consider Used Gear: Reputable stores often offer used DSLRs. This is a fantastic way to save money on quality equipment.
Try Before You Buy: If possible, visit a physical store to hold the camera and test its ergonomics.
By following these steps and considering your needs and budget, you'll be well on your way to capturing stunning photos with your new Nikon DSLR in the UK. Happy shooting!
#photography#follow the blog i reblogged this from#nikon dslr camera#online camera store#nikon dslr in uk#buy nikon dslr camera in uk#nature photography#nikon dslr
0 notes
Text
From Beginner to Pro: Developing Your Photography Skills
Photography is an art form that captivates the soul and freezes moments in time. Whether you're a novice snapping away with your smartphone or a seasoned pro with a DSLR in hand, there's always room to enhance your skills.
In this article, we'll delve into the journey from amateur to expert, offering valuable photography tips to elevate your photography game. So, grab your camera and let's embark on this enlightening voyage together.
Understanding the Basics
Before diving into the intricacies of portrait photography or experimenting with advanced techniques, it's crucial to grasp the fundamentals. Mastering concepts such as composition, lighting, and exposure lays the groundwork for creating compelling images.
As a beginner, focus on familiarizing yourself with your camera settings and honing your eye for composition. Experiment with different lighting conditions and learn how they influence the mood and atmosphere of your photographs. Remember, Rome wasn't built in a day, and neither are exceptional photography skills.
Photography Tips for Beginners
Now that you've dipped your toes into the vast ocean of photography, it's time to refine your craft further. Start by exploring online tutorials, photography forums, and workshops to expand your knowledge base.
Embrace the power of practice by dedicating time to shoot regularly and experiment with different subjects and styles. Don't be afraid to make mistakes; they're an integral part of the learning process. Additionally, seek feedback from fellow photographers or join critique groups to gain valuable insights into your work.
Portrait Photography Tips for Aspiring Artists
While all forms of photography offer unique challenges and rewards, portrait photography holds a special allure for many enthusiasts. Whether you're capturing the soulful gaze of a loved one or immortalizing the essence of a stranger on the street, portraits allow you to delve into the human experience.
To excel in this genre, focus on building rapport with your subjects and creating a comfortable environment for them to express themselves. Experiment with different poses, angles, and lighting setups to evoke emotion and tell compelling stories through your images.
Mastering Advanced Techniques
As you progress on your photographic journey, don't shy away from pushing the boundaries of your creativity. Dive deeper into advanced techniques such as long exposure photography, HDR imaging, and post-processing to elevate your work to new heights.
Invest in quality gear and accessories that complement your shooting style and allow you to unleash your full potential. Remember, becoming a pro isn't just about technical prowess; it's also about developing a unique artistic vision that sets you apart from the crowd.
Conclusion
In conclusion, the path from beginner to pro photographer is paved with dedication, perseverance, and a relentless passion for the craft. Whether you're capturing breathtaking landscapes, candid moments, or timeless portraits, remember to stay true to your artistic vision and never stop learning and growing. So, pick up your camera, embrace the journey, and let your creativity soar. The world is waiting to see it through your lens.
1 note
·
View note
Text
Best Cameras for Food Photography in 2024
In this epic saga, I wrestle with the age-old conundrum: DSLR or Mirrorless, akin to choosing between a decadent chocolate lava cake and a zesty lemon tart—both delicious, but oh, so different. From the heavyweight champions like the Canon EOS 5DS to the nimble ninja, Sony Alpha A7R IV, discover which camera will make your food photography sing (or at least not sound like a dying microwave). Plus, get the scoop on how not to break the bank while chasing your Michelin-star-worthy shot, because let's face it, we'd rather splurge on truffles than on gear. 🌟📸
Dive in, as I reveal the secret sauce behind mouth-watering food shots that could seduce even a salad into looking sexy. Ready to elevate your food snaps from mere 'meh' to 'more, please'? Click through to embark on a flavourful journey that promises to be as entertaining as it is informative. Your Instagram feed will never look the same again. Let the feast begin!
#foodphotography#delicious#foodie#yum#foodporn#Photography#PhotoOfTheDay#InstaPhoto#PicOfTheDay#Camera#LandscapePhotography#WildlifePhotography#Astrophotography#streetphotography#agameoftones#ig_masterpiece#creative#vegan#glutenfree#keto#BreakfastClub#LunchIdeas#DinnerTime#Helloseptember#Fallvibes#Nature#Trending#Viral#PhotographyGear#PhotographyEveryda
0 notes
Text
Buy Mobile Phones, Online Cameras, And Lenses - AD Photo Video

AD Photo Video is leading online tech store and brings world’s top brands gadgets to your doorstep. We sell cameras, camera lenses, smartphones, tablets, and accessories across Canada, UK, USA, Australia and New Zealand.
What we provides,
• Top-tier cameras: From DSLRs and mirrorless marvels to iconic brands like Canon, Nikon, Sony, and more, we unleash your photographic potential.
• Beyond the camera: Dive into a world of lenses, lighting, drones, and accessories to craft your perfect storytelling kit.
• Smartphones: Stay connected and captures life on the go with the latest smartphones, tablets, and stylish accessories.
Why choose us?
• Shop from anywhere, we will ship everywhere: We bring the world's newest tech to your doorstep, whether you're in Canada, USA, UK, New Zealand, or Australia.
• Competitive edge, unbeatable value: Get the gear you crave at prices that make you smile.• Expert guidance, seamless service: Our friendly team is your tech Sherpa, ready to answer questions, recommend the perfect gear, and ensure a smooth shopping experience.
More than just tech, it's a community:
• Join the conversation: Share your passion, swap tips, and get inspired by fellow photography and tech enthusiasts in our vibrant online community.
• Learn and grow: Discover expert insights, tutorials, and reviews to refine your skills and push your creative boundaries.• Be part of the movement: We're passionate about empowering creators and storytellers worldwide. Join us and let your vision take flight.
Ad Photo Video is more than just an online store – the way to capturing the world, one breathtaking shot at a time. Visit Ad Photo Video today and unlock your global storytelling potential!
#buy smartphone#buy mobile phones#buy digital camera#buy dslr camera#buy camera lens#buy mirrorless camera#buy online gadgets in usa#buy camera in canada#buy mobile phones in uk#photographic lens#zoom lens in uk#best camera lens in canada#online camera lens in usa#online camera store in australia#best camera store in new zealand#original camera
1 note
·
View note
Text
Photography Masterclass
Photography Masterclass
New! From Creator Of #1 Photography Product On CB - Video Tutorials For Beginner And Hobbyist Photographers. Anyone With A Dslr Camera Will Want To Get Their Hands On This! Earn 60% Per Sale! Extremely Low Refund Rate! See /affiliates.html Page. http://dlvr.it/T0qTfb
0 notes
Text
The Power of Visuals: YouTube Photography Tutorial for Engaging Content
YouTube has become an invaluable resource for photographers looking to improve their skills and learn new techniques. In this section, I will explore the best YouTube channels that offer comprehensive photography tutorials, covering camera settings for YouTube videos and lighting techniques for photography tutorials. These tutorials are designed to help you master your camera skills and elevate your photography prowess.
Whether you're a beginner or an experienced photographer, these tutorials provide valuable insights and practical tips to enhance your photography. From understanding camera settings for YouTube videos to mastering lighting techniques, these tutorials will empower you to create professional-quality images and captivating tutorial videos.
Best YouTube Photography Tutorials
When it comes to photography tutorials, YouTube serves as a goldmine of knowledge and inspiration. With countless channels dedicated to teaching the art of photography, it can be overwhelming to find the best ones. To help you navigate through the vast sea of content, I have curated a list of the top YouTube tutorial channels that are a must-watch for photography enthusiasts.
1. PHLEARN: With over 2.44 million subscribers, PHLEARN offers an extensive library of photography tutorials. From beginner-friendly content to advanced techniques, this channel covers a wide range of topics such as photo editing, retouching, and composition. The step-by-step approach of their tutorials makes it easy for viewers to follow along and implement the techniques in their own work.
2. PiXimperfect: With over 1.82 million subscribers, PiXimperfect is a go-to channel for learning advanced editing techniques. Unmesh Dinda, the host of the channel, breaks down complex editing processes into simple and easy-to-understand steps. Whether you want to learn how to create stunning composites or master retouching, PiXimperfect has got you covered.
Top YouTube Photography Tutorial Channels
Channel
Subscribers
PHLEARN
2.44 million
PiXimperfect
1.82 million
3. The Photoshop Training Channel: As the name suggests, this channel focuses primarily on teaching Photoshop techniques for photographers. With over 508k subscribers, the channel covers a wide range of topics, including photo editing, retouching, and manipulation. Whether you are a beginner or an advanced user, you will find valuable tips and tricks to enhance your Photoshop skills.
4. Mango Street: Known for its visually stunning content, Mango Street provides photography tutorials that are both informative and aesthetically pleasing. With over 1.72 million subscribers, Rachel and Daniel, the hosts of the channel, share their expertise on various topics, including composition, lighting, and storytelling. Their engaging and cinematic style of videography makes learning a delightful experience.
These YouTube tutorial channels offer a wealth of knowledge and inspiration for photographers of all levels. Whether you are looking to improve your editing skills, learn new techniques, or gain insights into the art of photography, these channels are a treasure trove of valuable content. Dive into their tutorials, practice your skills, and watch your photography soar to new heights.
Learn Camera Settings for YouTube Videos
When it comes to creating high-quality YouTube videos, having the right camera settings is essential. Whether you're shooting vlogs, tutorials, or other types of content, understanding how to optimize your camera settings can significantly impact the quality of your videos. In this section, I will explore the key camera settings for YouTube videos, including shooting in manual mode, DSLR photography tips, and techniques for achieving professional-looking videos.
Shooting in Manual Mode for YouTube Tutorials
Shooting in manual mode gives you full control over your camera settings, allowing you to customize the exposure, focus, and other important parameters. This level of control is crucial for achieving consistent and high-quality footage for your YouTube tutorials. By shooting in manual mode, you can adjust the aperture, shutter speed, and ISO to suit the lighting conditions and create the desired visual effects. Additionally, shooting in manual mode ensures that your videos have a consistent exposure level throughout, resulting in a more professional and polished look.
DSLR Photography Tips for YouTube Videos
If you're using a DSLR camera for your YouTube videos, there are several tips that can help you optimize the image quality. Firstly, make sure to choose the appropriate lens for your shooting style and subject matter. Wide-angle lenses are great for capturing landscapes or showcasing your surroundings, while telephoto lenses are ideal for portraits or detailed shots. Secondly, consider using a tripod to stabilize your camera and minimize any shaky footage. This is especially important when shooting tutorials that require steady and smooth camera movements. Lastly, don't forget to clean your camera sensor regularly to avoid dust spots or smudges that could affect the overall image quality.
By implementing these camera settings and tips, you will be able to create visually appealing YouTube videos that captivate your audience and showcase your photography skills. Experiment with different settings, techniques, and camera gear to find the optimal configuration for your unique style and content. Remember, practice makes perfect, so don't be afraid to try new things and learn from your experiences.
Camera Setting
Description
Aperture
The aperture determines the depth of field, controlling how much of the image is in focus. A wider aperture (lower f-stop value) creates a shallow depth of field, blurring the background and emphasizing the subject.
Shutter Speed
The shutter speed controls the duration of the exposure, affecting how motion is captured in the video. Faster shutter speeds freeze the action, while slower shutter speeds create motion blur.
ISO
The ISO setting determines the sensitivity of the camera's image sensor to light. Lower ISO values result in less noise but require more light, while higher ISO values increase sensitivity but may introduce graininess to the footage.
White Balance
White balance adjusts the color temperature of the video to accurately represent the colors in the scene. It ensures that white objects appear white and that the overall color balance is correct.
Exposure Compensation
Exposure compensation allows you to adjust the overall exposure of the video, compensating for overly bright or dark scenes. It helps to avoid overexposure or underexposure and maintain optimal brightness.
https://www.youtube.com/watch?v=ixRUpmmjmRo
Lighting Techniques for Photography Tutorials
Lighting is a fundamental aspect of photography that greatly impacts the outcome of tutorial videos. By understanding and implementing various lighting techniques, you can enhance the quality and visual appeal of your photography tutorials. In this section, we will explore different lighting methods that are commonly used in photography tutorials, including natural light, artificial lighting, and smartphone photography tips.
Natural Light
Natural light is one of the most accessible and versatile lighting sources for photography tutorials. It can create a soft and flattering illumination that beautifully highlights the subject. When shooting outdoors, utilize the golden hours, which are the hour after sunrise and the hour before sunset, for warm and golden tones. Avoid harsh midday sunlight, as it can create unflattering shadows. Experiment with different angles and positions in relation to the light source to achieve the desired effect.
Artificial Lighting
Artificial lighting is commonly used in indoor photography tutorials, where controlling the light becomes essential. Studio lights, such as strobes or continuous lights, provide consistent and customizable illumination. Use softboxes, umbrellas, or diffusers to soften the light and reduce harsh shadows. Additionally, consider using reflectors or bounce boards to redirect and manipulate light. Experiment with different lighting setups to achieve the desired mood and effect for your tutorials.
Smartphone Photography Tips
With the advancement of smartphone technology, capturing high-quality images and videos for tutorials has become more accessible than ever. When shooting with a smartphone, make use of the available light sources, such as natural light or indoor lighting. Avoid using the phone's built-in flash, as it can create harsh and unnatural lighting. Instead, try using third-party smartphone lighting accessories, such as clip-on LED lights or portable ring lights, to enhance the lighting in your tutorial videos. Experiment with different lighting techniques to find the most suitable and visually appealing approach for your smartphone photography tutorials.
By incorporating these lighting techniques into your photography tutorials, you can create visually stunning and engaging content that effectively conveys your message and captures the attention of your audience.
Composition Tips for YouTube Tutorials
When creating tutorial videos for YouTube, composition is a key aspect that can greatly enhance the visual appeal and effectiveness of your content. Composition refers to how elements are arranged within the frame of your video, and it plays a crucial role in capturing the viewer's attention and conveying your message effectively. In this section, I will share some composition tips for YouTube tutorials that will help you create engaging and visually pleasing videos.
1. Rule of Thirds: The rule of thirds is a fundamental principle in photography and videography. It involves dividing the frame into nine equal sections using two horizontal and two vertical lines. By placing your subject or key elements along these lines or at the intersections, you can create a visually balanced and interesting composition.
2. Leading Lines: Leading lines are lines within your frame that guide the viewer's eye towards the subject or focal point of your video. These lines can be actual lines such as roads or paths, or they can be implied lines created by elements in the scene. Utilizing leading lines can add depth and visual interest to your videos.
3. Framing: Framing involves using objects or elements within the scene to frame your subject. This technique can draw attention to the subject and create a sense of context and depth. Experiment with natural frames such as archways, windows, or trees, or use objects within your environment to create interesting framing elements.
Composition Techniques
Technique
Description
Rule of Thirds
Divide your frame into nine equal sections and place your subject along the lines or intersections for a balanced composition.
Leading Lines
Use lines within your frame to guide the viewer's eye towards the subject or focal point.
Framing
Employ objects or elements within the scene to frame your subject and add depth and context.
By applying these composition techniques in your YouTube tutorials, you can create visually appealing and engaging videos that effectively convey your message. Remember to experiment and have fun with composition, as it can greatly enhance the overall quality of your tutorial content.
https://www.youtube.com/watch?v=N-HyTRGtdSA
Editing Software for YouTube Photography Tutorials
When it comes to creating captivating and professional YouTube photography tutorials, having the right editing software can make all the difference. In this section, we will explore some of the top editing software options that will help you enhance your tutorial videos and showcase your photography skills.
Adobe Lightroom
Adobe Lightroom is a popular choice among photographers for its robust editing capabilities and user-friendly interface. With Lightroom, you can easily organize and edit your photos, apply presets, adjust exposure and white balance, and fine-tune colors. It also offers powerful features like non-destructive editing and batch processing, making it a valuable tool for editing multiple images efficiently.
Photoshop
Adobe Photoshop is a versatile editing software that provides photographers with endless possibilities for creating stunning imagery. With Photoshop, you can retouch photos, remove unwanted objects, and apply sophisticated adjustments and effects. It also offers advanced features like layers and masks, allowing for precise control over every aspect of your image.
GIMP
GIMP, which stands for GNU Image Manipulation Program, is a free and open-source editing software that provides users with a wide range of editing tools and features. While it may not have all the bells and whistles of commercial software, GIMP is a powerful alternative that can help you achieve professional-looking results. It offers tools for image retouching, color correction, and photo manipulation, making it a great option for photographers on a budget.
Whether you choose Adobe Lightroom, Photoshop, or GIMP, having a reliable editing software is essential for creating polished and visually appealing YouTube photography tutorials. Each of these programs offers unique features and capabilities, so it's worth exploring and experimenting to find the one that best suits your needs and style.
Feature
Adobe Lightroom
Photoshop
GIMP
Organize and manage photos
✔️
✔️
✔️
Non-destructive editing
✔️
✔️
-
Batch processing
✔️
✔️
-
Advanced retouching
-
✔️
✔️
Layers and masks
-
✔️
✔️
Free and open-source
-
-
✔️
Conclusion
Throughout this article, I have discussed the importance of YouTube as a platform for photographers to enhance their skills and learn new techniques. Whether you are a beginner or an experienced photographer, there are valuable resources available on YouTube to help you improve your photography prowess.
By following the advice and techniques presented in beginner photography tutorials, you can develop a solid foundation of photography techniques. These tutorials cover a range of topics, including camera settings, lighting techniques, composition tips, and editing software.
Moreover, YouTube is home to a variety of photography tutorial channels that cater to different levels of expertise. Whether you are just starting out or looking to refine your techniques, these channels offer a wealth of knowledge and inspiration.
So, if you're looking to expand your photography skills and techniques, I highly recommend exploring the photography tutorial channels on YouTube. With their guidance and your dedication, you can elevate your photography to new heights and create stunning images to share with the world. Happy shooting!
FAQ
Are these YouTube photography tutorials suitable for all levels of photographers?
Yes, these tutorials cater to both beginners and experienced photographers, offering valuable resources for all skill levels.
What topics do these YouTube photography tutorials cover?
These tutorials cover a wide range of topics, including photo editing, composition, camera settings, lighting techniques, and more.
Which YouTube channels are recommended for photography tutorials?
Some recommended YouTube channels include PHLEARN, PiXimperfect, The Photoshop Training Channel, and Mango Street.
Can I learn about camera settings for YouTube videos from these tutorials?
Absolutely, these tutorials provide insights into shooting in manual mode, DSLR photography tips, and techniques for achieving professional-looking videos.
How can I improve the lighting in my photography tutorials?
The tutorials explore various lighting techniques, including natural light, artificial lighting, and smartphone photography tips.
What composition tips are covered in the YouTube tutorials?
The tutorials discuss composition techniques such as the rule of thirds, leading lines, and framing to help you create visually appealing tutorial videos.
Which editing software is recommended for YouTube photography tutorials?
Adobe Lightroom, Photoshop, and GIMP are among the recommended editing software programs covered in these tutorials.
Read the full article
0 notes
Text
The 90-Minute Food Video Crash Course Information
READY TO ADD VIDEO TO YOUR CONTENT ARSENAL?
IF YOU’RE READY TO BOOST YOUR CONTENT SHAREABILITY, ATTRACT MORE (AND HIGHER PAYING) CLIENTS, AND WANT REAL ACTION STEPS THAT CAN GET YOU UP AND RUNNING TODAY, YOU’RE IN THE RIGHT PLACE.
The 90-Minute Crash Course For Food Video Is A Fast-Paced Video Course That Walks You Through Everything You Need To Know To Start Creating Ultra-Shareable Tasty-Style Food Videos --From Set-Up To Shooting To A Complete Look At My Editing Tricks --So You Can Take Your Food Video Skills From Zero To Viral...In Just 90-Minutes!
WONDERING HOW TO GET STARTED WITH VIDEO?
THAT'S WHY I CREATED THE90-MINUTE CRASH COURSE FOR FOOD VIDEO.
Designed For Food Bloggers And Content Creators, In This Course I Bring You Into My Private Studio And Show You Exactly How I Create, Shoot, And Edit A Video From Start To Finish. It’s A Cut-To-The-Chase, All-Killer-No-Filler, Just-The-Facts-Ma’am How-To, Designed To To Get You Off And Running Toward That Pile Of Cash, Sitting On The Other Side Of The Knowledge Gap.
Other Food Video courses require huge time commitments, get in the weeds and cost as much as $699. Not this course. In the 90-Minute Food Video Crash Course, I remove all the weeds and give you exactly what you need to know to be off and running in 90 minutes or less.
Last year, JUST by adding video to my services, I added nearly $60,000 to my annual income! If you're anxious to offer video, you don't have weeks to waste. You need to learn this skill, and you need to learn it stat.
That's where the 90-Minute Food Video Crash Course comes in.
In The Time It Takes To Watch A Bad Netflix Movie You Could Be Equipped With A New Skill That Will Give You The Ability To Boost Your Income Like Mad. It’s Almost Doubled Mine.
BUT WAIT, THERE'S MORE! (I’VE ALWAYS WANTED TO SAY THAT.)
Once The Video Is Over, I’m Not Sending You Out Into The World To Figure This Out By Yourself. Not My Style.
You’ll be given ongoing, direct access to me (and thousands of top-notch foodies) in my exclusive Food Blogging, Photography & Videography Facebook Group. Get the support you need with answers to your questions from me as well as other seasoned pros and foodie insiders. PLUS! Ongoing tips, tricks, and tutorials uploaded weekly.
COME & CONNECT!
Even if you don't purchase the video course, please come join my community of over 3,000 passionate, creative and often hilarious food bloggers and content creators on Facebook. Here you will find constant tips, trick and support. We'd love to have you join us.
IT’S REALLY NEVER BEEN EASIER TO START SHOOTING TASTY-STYLE FOOD VIDEOS
Sure, there are other food video tutorials. But many are highly priced in-person workshops, requiring travel and additional expenses. OR you'll pay for hours of tutorial, only to come away with too-much-too-soon detail overload, left feeling paralyzed because you're not a pro.
But With The 90-Minute Food Video Crash Course,
You'll Come Away Feeling Capable, Prepared, And Ready To Shoot.
GIVE ME 2 HOURS & I'LL GIVE YOU EVERYTHING YOU NEED TO KNOW TO START SHOOTING FOOD VIDEO!
What You’ll Learn In This Course?
how to tackle your fear and start creating Tasty-Style food videos
how to shoot screen-worthy video using your dSLR camera
how to arrange your set, even if your set is only your kitchen counter
how to master beauty shots, transitions, and making the light your bitch
how to edit in Adobe Premiere Pro
About Author
Professional food photographer and videographer, Brooke Lark demystifies the food photography video-making process. Whether you're starting from scratch or trying to figure out how to make better, sharper, crisper video, with final edits in Adobe Premiere Pro, this crash course has got you covered.
With approachable language and entertaining light-hearted explanations, Brooke will walk you through the basics of setting up, shooting and editing video. In less than 2 hours from now, you will be 100% ready to start shooting viral videos.
Sound like exactly what you've been looking for? Let's do this thing!
More courses from the same author: Brooke Lark
0 notes
Text
Cat Photography: Pet Photography Tips and Camera Settings for Better Cat Portraits
‘Until one has loved an animal, a part of one’s soul remains unawakened’ ~ Anatole France
They say, the experience of loving and caring for an animal awakens a deep and essential part of our being, enriching our lives in ways that are difficult to describe. I didn’t realise this until I met my friend’s pet, the cute kitten ‘Cheeku’!
Pets are great companions with whom we can converse and share…

View On WordPress
#cat photography#DSLR photography for beginners#DSLR photography tutorials#learn photography#pet photography#pet photography camera settings#pet photography tips#Photography#photography for beginners#photography tutorials
1 note
·
View note
Text
4 Proven Ways To Take Amazing Photos
There is a sea of professional photographers on the internet and there’s also a population of inexperienced photographers that would just point and capture. If you belong to the former, then you already know how to take nice photos either using your phone camera or your DSLR. Now if you categorize yourself as the latter, then this article is for you.
As a content creator, you need to know at least the basics of how to capture appealing photos so your audience would want more of your content. Taking a photo is not simple, from choosing the right subject to locating a well-lit space, it takes a lot of factors to consider a certain photo a great one.
In addition, learning these basic ways not only leads to new opportunities but as a content creator, the more professional-looking your photos are, the more appealing your creator profile will be.
Now let’s try to determine some vital aspects of taking a great photo so you can apply it for your next photo session.
1. Learn the Essentials of Composition
Pick the Best Focal Point
If you have no idea what a focal point is, it’s the main point of interest in a photo. It could be anything from a building, a vast ocean, to a bird. Locating a strong principal focus is one of the essential steps of how to create professional photos. When you determine what the center of attention will be, you can try to adjust and make it as solid as it can be. The information below will guide you in taking that amazing photo that anyone would want.
Rule of Thirds
In photography, the rule of thirds is very important because you can make a more interesting composition using this instead of just positioning the attention at the center. The rule of thirds is when you place the most important elements in your photo off-center.
It’s like a tic tac toe on your screen, there are two lines dividing the frame into thirds vertically, and two more lines dividing it into thirds horizontally. Place the subject along these grid and other vital elements in your shot. It’s one of the simplest steps in learning professional photography. In this way, you can find a better balance between the main subject and its background.
2. Good Lighting
Nothing beats good lighting in a photo, it’s something that people always overlook. You have to ensure that your subject is visible and has enough light. If there’s none or the lighting is poor, your camera will wrestle to capture the details in the shot.
If your camera is on automatic settings, it will utilize a high ISO setting and you’ll end up with a grainy/blurry photo. Even if you enhance it using Photoshop, you’ll find it difficult and may take massive adjustments which will result in a low-quality image.
On the contrary, if the shot has too much light, it can also ruin the photo with unwanted shadows. So you really have to assess the location and which angle you will shoot to ensure good lighting.
3. Use Lighting Equipment
We can’t always depend on natural light when taking photos. If you want a good photo session for your next content, then you must consider spending time to plan out the lighting and use a range of lighting equipment.
Furthermore, you can use a light reflector. There are affordable light reflectors that come with reversible covers made from different types of reflective materials. One other light source is your camera’s flash. If the light may be too harsh for you, you can invest in an external flash. It will let you aim the light rather than have it point straight to your subject.
4. Edit Photos Like A Pro
Since we have hip technology, editing photos must be up in your arsenal too. Photoshop is our bestie when it comes to professional photo editing. Every image you post must have touch-ups, may it be adjusting the brightness, color corrections, or adding your personal preset. There are a lot of tutorials online that you can browse. If you don’t have access to Photoshop, there’s a ton of free alternatives that you can choose from.
Be The Next Hotshot Content Creator!
Join the newest platform on the web, OnlyGirlsAsia, and earn up to 80% of your daily exclusive content. You can promote your account and get your subscribers to engage with you via messages, live streams, or pay-to-view content. Get verified in just 15 minutes or less if you sign up now!

#OGA#OnlyGirlsAsia#AsianWomen#Subscribe#SubscribeAsianWomen#AsianGamingCommunity#AsianWomenGaming#AsianPlayer#AsianStreamer
0 notes
Text
Film Camera Store

Phone: 020 8050 4549
Email: [email protected]
Website: https://filmcamerastore.co.uk/
Description: Film Camera Store, headquartered in Sheffield, UK, stands out as a digital haven for photography and cinematography aficionados. Operating exclusively online, this e-commerce platform curates a wide range of professional-grade cameras and accessories, serving both the seasoned cinematographer and the budding photographer.
In an era dominated by digital visuals, Film Camera Store pays homage to the art of traditional film while also embracing modern digital advancements. From vintage film cameras that hark back to the golden era of cinema to state-of-the-art DSLRs and mirrorless systems, their inventory caters to diverse preferences and needs.
Beyond just cameras, the store boasts an impressive array of lenses, tripods, lighting equipment, and other essential accessories. Every product on offer is meticulously vetted to ensure it meets the high standards that their discerning clientele expects.
One of Film Camera Store's distinguishing features is its dedication to educating its customer base. The website not only serves as a marketplace but also as a resource hub, offering tutorials, product reviews, and insights into the ever-evolving world of photography and film.
Rooted in a passion for visual storytelling and a commitment to quality, Film Camera Store has rapidly established itself as a trusted name in the industry, making professional-grade equipment accessible to all in Sheffield and beyond.
Keywords: olympus mju ii, 35mm film cameras, best vintage film cameras, best vintage cameras, best vintage 35mm camera, best film camera for vintage look, best film cameras for vintage look, best vintage 35mm cameras, new 35mm film cameras, underwater film camera, best retro film camera, best travel film camer, best old film camera, best vintage camera, olympus zoom 80 mju ii, olympus om-10 manual adapter, entax 35 mm cameras, best retro film cameras, flash for film camera
Hour: Monday - Saturday 9am - 5pm
1 note
·
View note
Text
guys guys guys I DISCOVERED A THING!!!!!
so I was in Israel taking photos (as you do) with my dad's DSLR (basically Fancy Digital Camera™️ for ye non-photography nerds or those without a current photography hyperfixation) and since phone cameras are generally forgiving, you don't have to worry about things like long exposure times and standing as still as a Weeping Angel in a town square during the middle of the day when you're taking a photo at night. So, when you don't, things blur and you have to finagle with editing software to fix it.
Yes, I know that second-to-last sentence was long and oddly specific, but bear with me for a ✨TRIPPY LIGHT BLUR PICTURE TUTORIAL! :D✨ It works marginally better if you sing that part to the tune of Doofenschmirtz Evil Incorporated!
The point here is to use the fact that you need more light to see at night to your advantage. Especially with Fancy Digital Cameras™️.
So, for ye Fancy Digital Camera™️ users:
go outside at night to place with lights
press shutter
move camera a noticeable amount (does not have to be straight)
done!
AND STICK AROUND BELOW THE BREAK FOR MORE, MY PHONE USERS!
So, if you're using a phone because a) you don't own a Fancy Digital Camera™️ or ii) you own a Fancy Digital Camera™️ but don't take it everywhere you go because those things are really fcking expensive y'all, do not fear! I, Reza, shall teach you things you never knew about your phone!
So, I personally have an iPhone, but from what I can tell, Android is the same principle, but different names. If you need someone who actually knows what they're talking about, I'll direct you to this video here: https://www.youtube.com/watch?v=CfC2Paezp8k (may have to copypasta the link)
But for iPhone:
open your camera app (I know there's a few non-default ones that'll do this, but I haven't played around with them enough)
tap the screen where you want the camera to focus
there should be a little slidey thing next to that focus square (it has a sun) and slide it up or down to increase or decrease the exposure time (no idea how it works or which way to go for what, again, I only know Fancy Digital Camera™️ well. Go talk to PhotoTok, they probably have this covered).
Android actually has a setting for this under "advanced settings" (aka COOL TIPS THEY REFUSE TO TELL YOU). It's literally called "shutter time". Slide it to about the longest setting you want. Take photos.
I have no idea if this works with film. I think it does, but I don't own a film camera.
Point-and-shoot people: I have no idea how to help you. Use other photography methods or do a ton of research.
I'm going to post some of the photos I took once I get back (because I don't have to deal with the .heic setting on iPhone which is the bane of my photographic existence). It'll be in a reblog or separate post, so until then, happy photo-taking!
1 note
·
View note
Text
Adobe Firefly AI - Prompts Tutorial
Adobe Firefly VersionBETAAuthorAI Tools ArenaPrompt
Modern interior design living room with a lot of plants
Isolated tiny island at the middle of the ocean with an extremely luxurious villa surrounding a creepy jungle at night
Highly detailed cute chic in the jungle
Colorful butterfly on the side of a lake, macro photography shallow depth of field dslr vivid Muted misty
Fuzzy psychedelic cat…

View On WordPress
0 notes
Text
OBS CAMERA TUTORIAL
Wondered how you can go from THIS?

TO THIS?!

with literally two lamps, some trial and error and OBS? I got you!
For the record I am using the Logitech Brio in both photos, I've made adjustments with my lighting set up and while it's still not PERFECT it's a lot nicer to look at (in my opinion)
Now for this you will need:
-A webcam
-two-three light sources (lamp, ringlight, softbox, etc)
-OBS
-Splitcam (optional, but I find it give me better control of my colour correction needs)
-LUTs (once again, optional!)
Onward to the tutorial!!
When I say lighting is important, I MEAN IT. I learned a lot from lighting when a friend who was in photography taught me the 3 point lighting system. Basically to avoid "dorito shadows" as I like to call them on your face you need to have at least two light sources pointing on you at once. My set up looks like this:
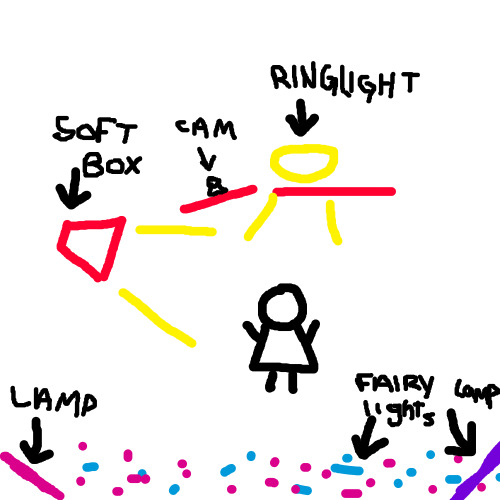
I know, what on earth am I doing streaming when I should be making ART.
Anyways, I have two main source lights (three would be ideal)
I have a soft box that is placed slightly to my left and pointing DOWN at me and a ringlight that is directly in front of me with my webcam pointed slightly angled at me (does that make sense?!) behind me are my 'mood' lighting, the fancy coloured lights that give my room the neon-spacey-retrowave kinda vibe I like. You can use whatever lights you want depending on your own personal style! I literally use a $10 ringlight, a soft box lamp, some LED colour changing bulbs in random lamps and some fairy lights I got off amazon. NOTHING FANCY!
Option 1. OBS
These are settings that I ALWAYS deselect and play with as leaving it to the webcam software to auto-adjust leads to yellowy, dull or over exposed visuals.
After adding your webcam source select it, right click and select PROPERTIES

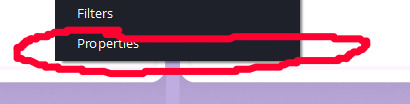
then select "Configure Video"

you will get a pop up that looks like this. Now to avoid your camera looking super WARM or COLD or risking a blow out from high exposure DESELECT the following:
- White Balance
- Exposure (found in 'Camera Control' Tab)
- Focus
- Low Light Compensation
Then adjust accordingly to how you'd like your camera to look.
Don't forget to play with brightness, contrast & saturation!
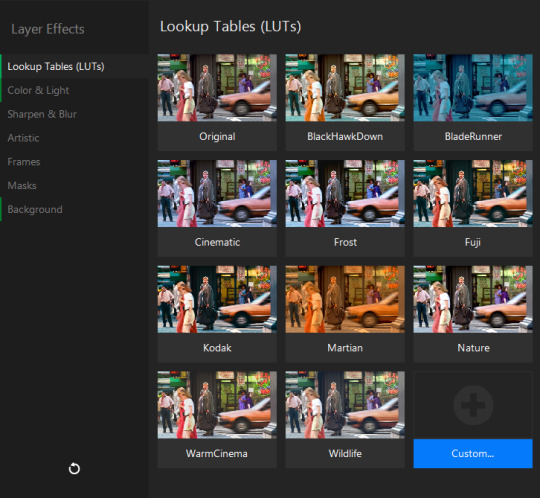
Next up are LUTs
Luts stand for Look Up Tables and are meant for colour correcting photos/video. You can find a lot for FREE however, I make my own based on the specific colour correcting I require.
To use LUTs in OBS right click your camera source and select FILTERS
Here you will see a section for audio/video filters and one for effect filters. We are using effect filters!
Hit the '+' at the bottom and select "Apply Lut"
Now you need to locate your file folder you keep your Luts you've either made or downloaded in, you can also adjust the amount on your lut filter to appear nicer and not so harsh.
For further adjusting hit the '+' again in the effect filter area and select "colour correction" here you can adjust brightness or contrast further as well as Gamma and Hue!
Option 2. Splitcam Video Driver
Download Splitcam! https://splitcam.com/
Splitcam offers dual streaming but with how I run my stream (alerts, graphics, scene switching) I use it as a webcam source.
Splitcam offers a LOT of adjustments that can make your webcam feel more like a DSLR (if your computer is capable of handling it)
Once you've added your webcam via Media Layers +
Click the three dots '...' next to your camera source and select Driver Properties and deselect the same settings I listed in the OBS tutorial
Now Splitcam offers SO MUCH so I will only tell you the settings I mostly use.
Quick adjust, essentially adjusts the colours of your entire "canvas" it also offers a skin smoothing tool (however you need a stronger PC for this to work otherwise it will look all stuttery)

In before a viewer sees this and goes all "OMG FAKE!! U USE FILTERS OMG!!!!111" shut the FUCK UP, no one ASKED YOU, and you are probably the same lame ass who drools over someone who ABUSED the liquify tool in photoshop to the point their background is warped because she looks like a cartoon mom from the 90s. PUH-LEEZE (no offence to those ladies, you do you boo, just poking fun at the people who actually think it's real lmao)
Next up are EFFECTS!
Click the three dots next to your camera source
Here you will see where you can adjust colour and light, LUTs, backgrounds, frames, masks (I DO NOT recommend using any of these, some adjust eye colour/slim your face and look WEIRD AF)
Go around and play with what is there and see what you like!
I personally use LUTs in here as well as the Highlight/Shadow effect to adjust for what looks best for me. As well as in 'Background' I use Blur to give my webcam that depth that DSLRs have!
Now from here I then go into OBS to select my finished colour corrected source and select "Splitcam Video Driver" as a 'Video Capture Device' then add all my cool overlays as I'd like!
I hope this tutorial is alright, and my bad if it's kinda rushed!
1 note
·
View note
Last Seen Blogs

hellomarcas
Y POR QUE NO!!!

aleynaatb
Aleyna

jaggidart
That Geek Redhead

missgrr
Sans titre

indiaxrayne
guns for hands.