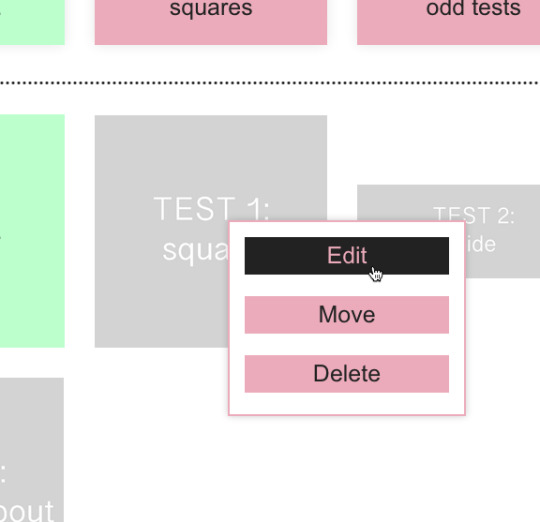
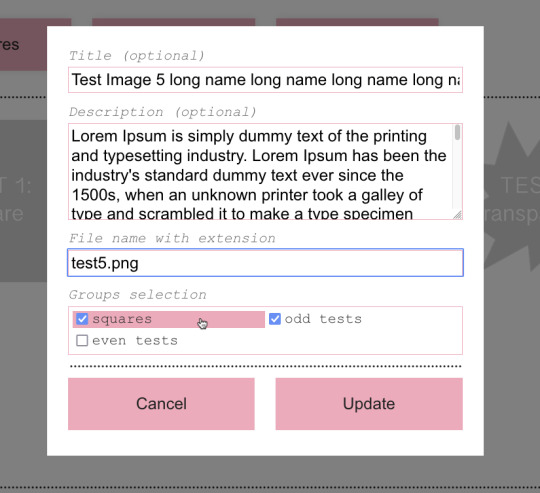
#easy marker tutorial
Text
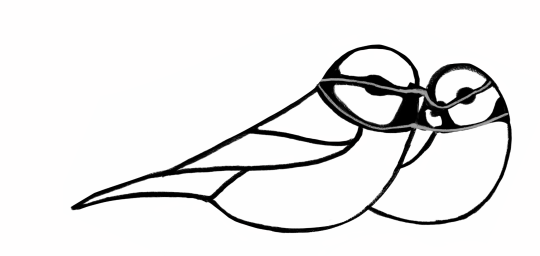
#sketchbook#drawing#alcoholmarkers#sketchbook drawing#sketchbook drawing anime#sketchbook drawing tutorial#sketchbook drawing ideas#sketchbook drawing easy#copic markes#alcohol markers#prismacolor markers#prismacolour markers#markers#fine-liners#fine liners#fineliners#prismacolor markers art#fineliner pen art#copic markers drawing#posca markers#fineliner sketching#copic markers for beginners#copic markers#drawing ideas#drawing easy#drawing tutorial#drawing anime#markers drawing
3 notes
·
View notes
Text
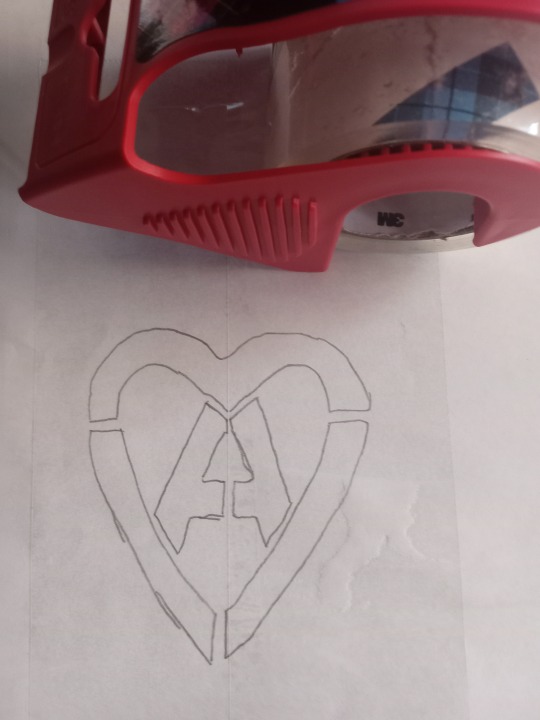
Easy Paper and Tape Stencil Tutorial
made one for reddit so I might as well post it here as well
Materials
writing utensil (pen, pencil, marker, etc)
paper (i usually use plain printer paper but most other scrap paper works fine as well, just be aware that thicker paper makes it harder to trace existing designs/logos)
clear packing tape
scissors and/or exacto knife (those little scissors you can get in cheap nail care kits work great
Optional Materials: Device w/ screen of your choice, printer

Step 1:
Draw out your design, trace from device, or print out design
(in example image I am tracing from a screen)
r/AnarchoStencilism (Deviantart link if you prefer) is great for free stencil designs

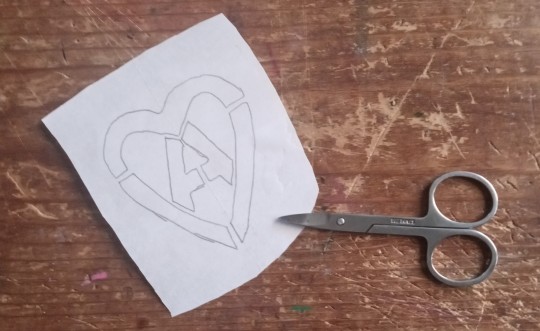
Step 2:
Cover both sides (front and back) of the design in packing tape
Step 3:
Cut it out
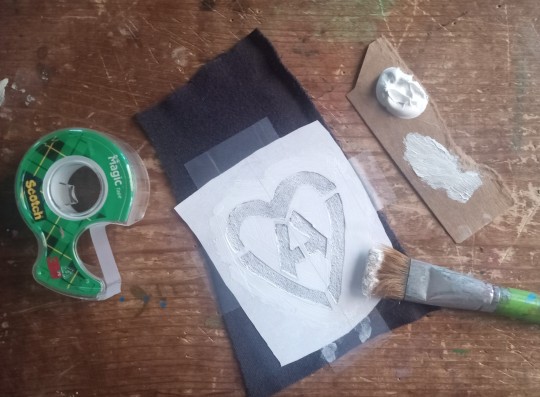
Step 4:
Use your exacto knife/scissors to cut out the design

Step 4:
Apply to whatever you want!
Happy DIYing!

#kahvi draws#patches#stencil#diy stencils#diy tutorial#punk diy tutorial#stencil tutorial#punk diy#folk punk#diy patches#pat the bunny
239 notes
·
View notes
Text
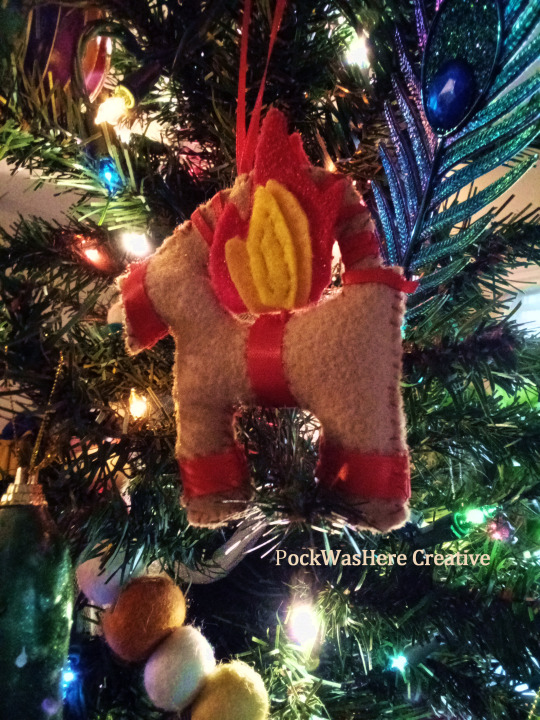
Flaming Gavle Goat Ornament Tutorial
You Will Need:
Craft felt in light brown or 'straw' color of choice, red, yellow and orange
Red ribbon in 2 widths
Thread- I used red and yellow; brown, orange or white would give different effects
scissors
Needle for hand sewing
pins or quilter's clips
polyfill stuffing or fabric scraps
a poking implement
a lighter or Fray check glue
paper and pencil
patience / approx 2 hours to waste making a meme for the holidays
To start, I drew a rectangle approx 3.25 in wide by 4 in high and sketched out a geometric goat shape. You could go a bit larger, but if you go much smaller it will be difficult to stuff. Remember that the sewing and stuffing will eat up some of your edges.
Cut out your goat template and trace it on your light brown felt. I used chalk, marker may work depending on how neatly you cut.
(I'll add a nice vectored template to this tutorial later, but I'll have to fight with the scanner first. )
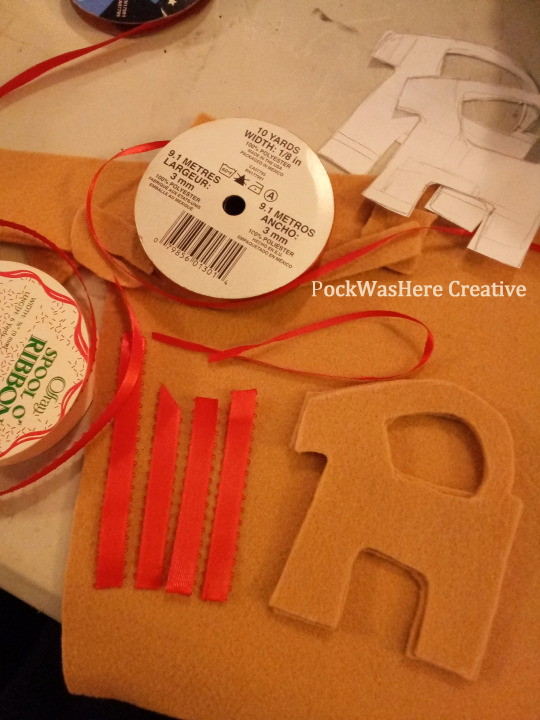
Cut 2 of your goat. It doesn't matter if they're not exactly the same, as you can fudge the edges a little when you sew. If your felt has a front and back you can tell apart, you'll need to pick a "right" side of the fabric and mirror one of the goat base pieces.
I cut my ribbon decorations in advance, wrapping it around the stacked bases to check the length - remember you'll be stuffing this later so you may need to add a tiny bit more to accomodate.
Out of the wider ribbon, you'll need one for each leg, one for the tummy and one for the bridle. The thin ribbon will be to hang the ornament with and to wrap the horns- I did not pre-measure the horn wrapping because I wasn't sure how long it would need to be. Finish the cut edges of the ribbon as you like- I used a lighter to heat seal them but fray check or white glue will work. Glue will be more difficult to sew through.
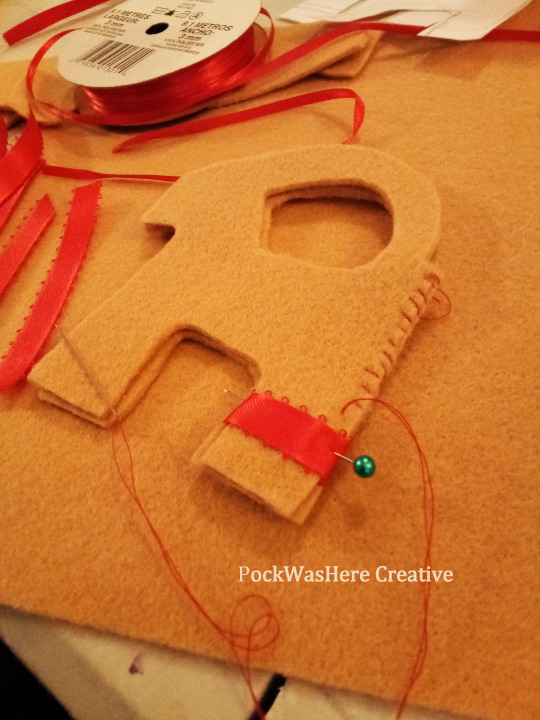
Start sewing the goat bases together. I used red thread and a basic whip stitch, but you could get a couple different effects by using white or brown thread, or by sewing a blanket stitch.
Here's where I made life difficult for myself- stop when you get to the legs and wrap the ribbon in place, tucking the ends in between the layers. This secures them and hides the edges but is fiddly to pin and sew. You can also wait until you have sewn most of the way around and tack or glue the ribbons on top if you're less fussy about the ends showing.
Continue sewing around the legs and body, catching the ribbons in your stitches and repeating for the bridle ribbon. Stop at the base of the horns so you have room to stuff.
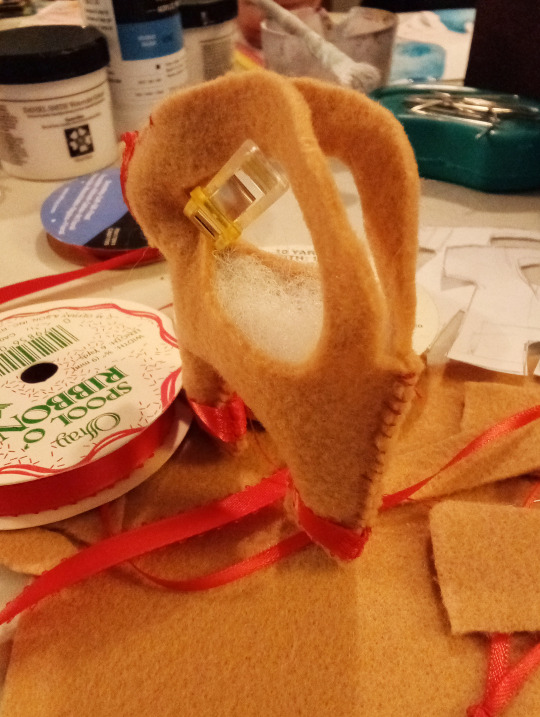
I'm working with modern plastic materials, so sadly (or not) this goat isn't terribly flammable, just meltable. If you want to be eco friendly you can stuff him with scrap fabrics. I'm using polyfill.
Use a chopstick, paintbrush handle or empty mechanical pencil to poke your stuffing into place. Smaller lumps of fluff are better and more maneuverable.
For firmer limbs stuff chopped up bits of your felt into the legs and head and follow it up with the polyfill.
My original plan for the removable flame was to do clever things with magnets, so if you want to give that a try this would be the point to toss one in before you close up the body. I was on a roll and didn't remember until I was working on the horns. ¯\_(ツ)_/¯

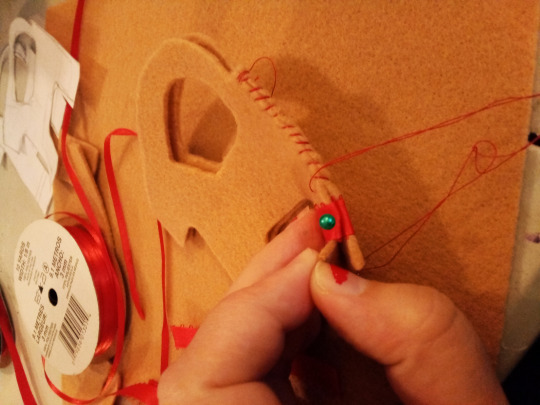
Remember you still need to put the tummy ribbon on and curse your clumsy giant fingers!! Getting everything situated and laying nicely may take a couple attempts. Once you've stabbed yourself with the pins a couple times, sew up the inner curve from the base of the horns on the neck to where the horns meet up again on the butt.
Be careful of where your thread tail goes and the direction of your stitches, it's easy to accidentally loop around the whole body or catch the horns.
There should still be a bitty opening at the base of the horns and at the butt (giggle here), if you flattened your stuffing during the last step and need to poke a teensy bit more in.
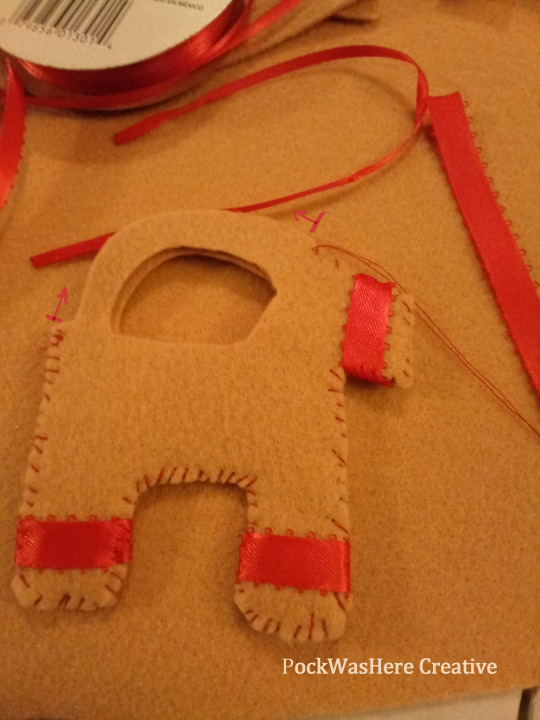
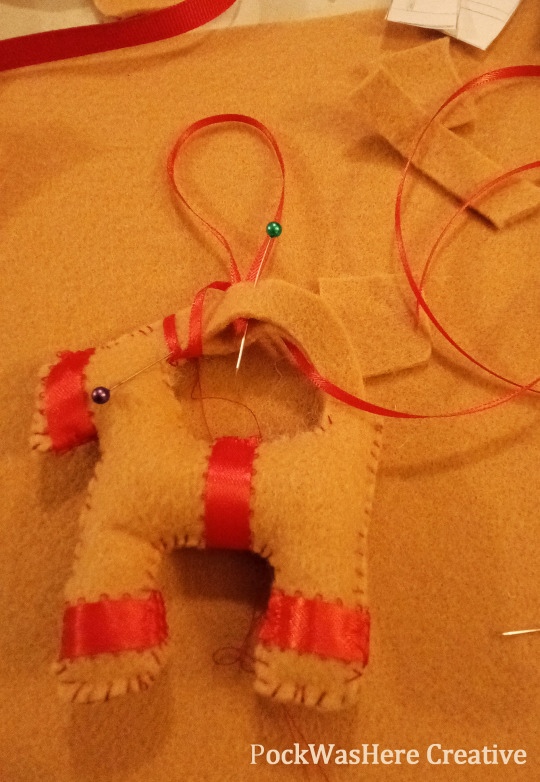
Tie your length of hanging ribbon into a loop and set aside.
This is another step where my need to hide the edges made life stupid and fiddly. Tuck the edge of a length of the thin ribbon between the layers on the bottom of the horns and wrap it around, and tack in place with a couple stitches. Loop it a couple of times until you get to the point you want to hang the ornament: I chose dead center, you may want him at a jaunty angle.
Fiddle with bendy felt, slippery ribbon and pins until your hanging ribbon's knot is sandwiched between the 2 layers of the horns and continue wrapping with the loose long piece, securing with pins or clips as needed and hopefully not making a big tangled mess of ribbon.

When you get to the end wrap it around a couple times and cut off any extra length, seal your ribbon and pin or clip into place.
Sew along remaining curves of the horn, making sure not to yank the hanging ribbon out of place and to catch the wrapping ribbon as you go. Accept there's no good way to tuck in this !$@!%%^$ slippery 1/8th BS ribbon and tack the butt end down with a few extra stitches.
Alternately, tack the hanging ribbon in place between the layers, sew the edges and then wrap and secure the horn ribbon with stitches or glue at either end. You could also skip sewing the edges of the horns together before wrapping them, but it will be more sturdy and secure with them sewn.

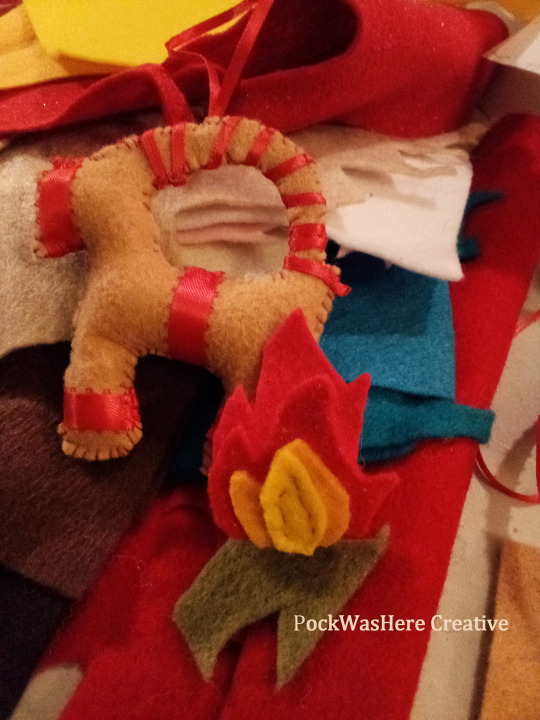
The fun part! fold some paper in half and draw your flames on the fold. Mine were a little over 2 in tall, and they should be a little smaller than the back of your goat at the base in order to fit in place. Cut out your fire and use it as a template for your felt.
The base layer will need to be on cut on the fold but the rest can be separate. Use as many or as few layers and colors as you like, it doesn't have to match exactly on both sides. You'll be folding this up so that you have 2 decorative sides facing out and a plain inside, so you'll be making two mirrored flames while it's still flat: one pointing up and one pointing down. Sew or glue the layers together.
I used a hidden stitch about a third of the way up from the bottom on the inside of the flame to pinch the sides together and pull it up into a V shape. This can be tucked up into the gap between the body and the horns and will hold itself in place pretty well if you have thick felt.
For more security/ shaping you could sew a loop of craft wire or an opened paperclip to the back side of the flame, or as previously mentioned do clever things with magnets.

Hang him on the tree with or without flames and enjoy!
Options for enjoying your handcrafted goat:
Pin the Flame on the Goat: Hide goat ornament on tree and give your participant (s) the flame (s), first to put them together wins.
Art Imitates Goat: Keep the flames to the side until/ if the real goat burns, and then apply to ornament. Celebrate with hot cocoa or warm winter drink of choice.
Voodoo Goat: Real Gavlebocken hasn't burned yet? Summon the flames by setting your ornament on felt fire! Celebrate with hot cocoa or warm winter drink of choice.
#holiday craft#gavle goat#gavlebocken#christmas ornament#tutorial#hand sewing#also please show me your goats if you make one!
1K notes
·
View notes
Text
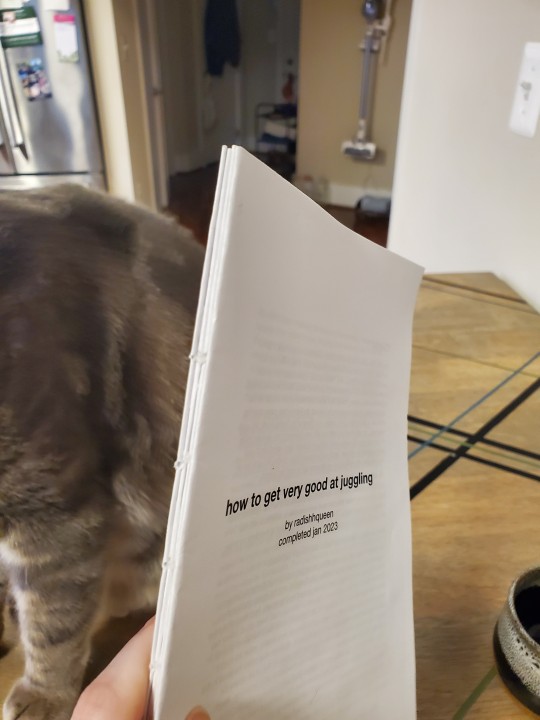
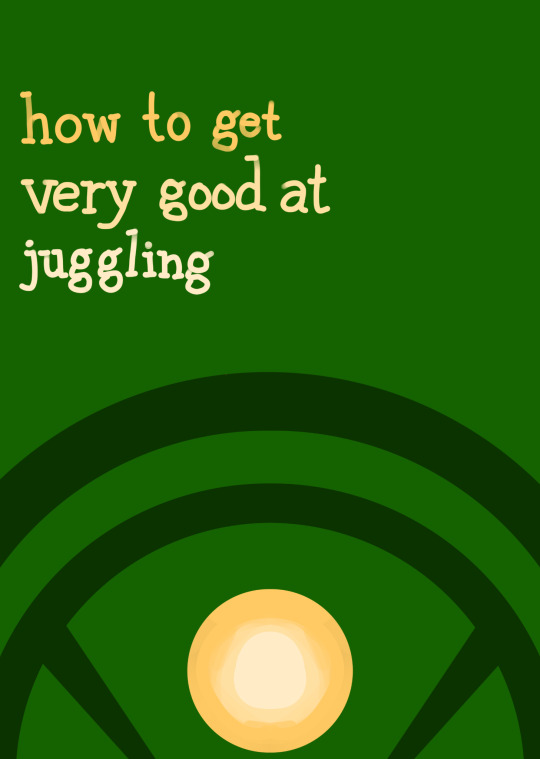
so my project over the summer was making a hard copy of my rottmnt april-centric fic, how to get very good at juggling! shameless plug, it occupies a very special place in my heart.

and a video flip through <3 yes it's a bad video but this has been rotting in my drafts I need it out
step by step-ish process pics under the cut! + a link to the tutorial i used.
I largely used this tutorial by Sea Lemon for the actual construction of the book. For the text block, I just copied it into a word document, formatted it to my liking, and printed it out in 24 page signatures. (This makes it sound easier than it was. I trial and error-ed this step so hard, since all the tutorials I saw were for blank notebooks, and not text. If there's demand for a step-by-step on how to do this process with god's jankiest printer, lmk and i'll write it out)
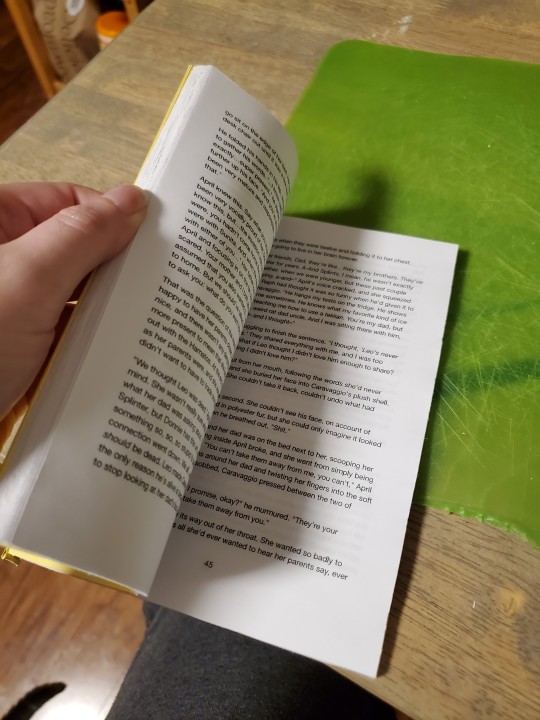
In the end, I had a bunch of signatures that looked similar to this image below. i actually reprinted them (for the third time) after i took this picture bc some pages disappeared and i took the opportunity to center the page numbers. someday i'll learn how to get them on alternating corners.

...that i then sewed and glued into a text block! (ft. my cat)
because i was using a public printer, and also because i couldn't figure out how to adjust the margins, i had to do some trimming to make the margins more normal. you can kinda see in the image above that the top margin is like. two inches. (i'm currently in the process on typesetting another fic, i'm gonna figure out the margins this time i swear)

once i trimmed it (very slowly, with an exacto blade) (god i wish i had a paper guillotine), i sewed on some paper headbands and an extra piece of support cardstock (not pictured, whoops), and then it was finally time to start the cover!
okay, admission. when i started this project, my intention was to do a vinyl cover, do the title in stickers, and be done with it. unfortunately the sticky backing of vinyl? very sticky. not easy to adjust things when you have shaky hands and can't get the cover pieces immediately lined up. so i quickly burned through the whole roll of vinyl i had, which meant it was time for plan B, fabric.
also unfortunately, my local chain craft store never fails to let me down, and the only green fabric they had was god's brightest shade of green. regardless, we persevere.
because of who i am as a person, i know how to embroider! more or less! so that meant instead of futzing around with fabric markers and attempting to make a passable cover that way, i just decided to embroider a cover.
first came the mock up
and then i got started with the embroidery! i measured out the dimensions of the cover on the back of the fabric, and made a grid for where i wanted all my pieces to go

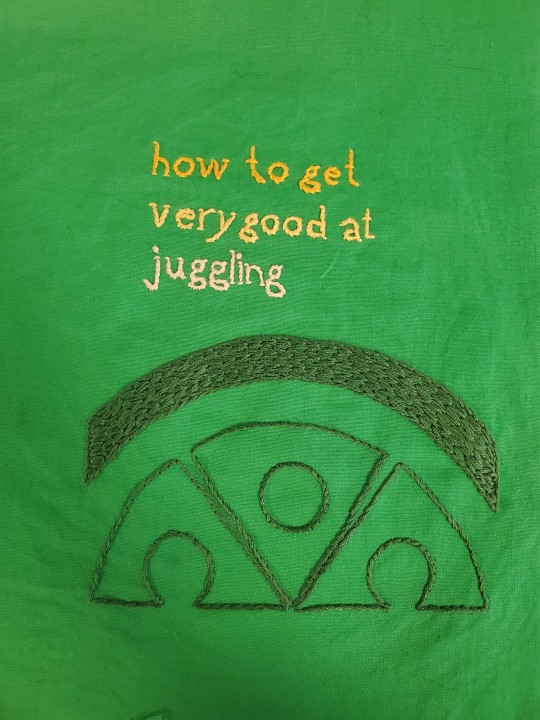
once the cover was finally done, i glued and assembled it a la Sea Lemon's tutorial. and!! now i have a book!!
119 notes
·
View notes
Note
I want to hear your thoughts on fandom and the recent influx of the term content creation!
Well, anon, you are in luck! (Or not, depending on your definition of luck. 😉) I just so happen to have many Thoughts & Opinions™ about this. I will get wordy, this will get lengthy, and I will be social and put most of my thoughts under a readmore cut.
I personally try to avoid the terms ‘content’ and ‘content creation’ when talking about fandom works and a fandom’s creative pursuits nowadays. Occasionally, sure, it happens that it slips out anyway – it’s a term we’re all really used to using! – but I want to be as mindful about its use as possible. This is a personal decision on my account and I won’t get uppity about other people’s use of these terms, though.
But, Killy, you might say... why would you avoid using these terms? For me, here’s why:
Content is not synonymous with art;
Content creation indicates something different than art creation;
Fandom should not be subject to consumerism;
Fandom is about connection.
If all a fandom puts out is classified as content, that fandom is going to die.
Yeah. I know. Melodramatic much? I’m on my fainting couch here, folks. 😂 But let’s dig in, shall we?
You know, maybe it’s just the archivist in me that balks at the term ‘content’. Content is a data entry field in the archival system we use at my real-life job: literally speaking, this data entry field is where we put a brief summary of the document attached to that specific archival file. It contains information that tells you the key takeaways of what the document is about, but it will not contain the full text of the document itself. Content is one of the points of access for our archival search: I know what I’m looking for, so I put a few keywords into our search and it pulls up the relevant file. But what do I need, really need, in my line of work? It’s the document itself, not the data entry field. The document tells me the whole story that I need to be able to truly do my job well. The content-field is a cliffnotes edition of that story.
It’s the same way with the art we create in fandom. I’m gonna take myself as an example here, because I create a fair bit! (Shocking, I know. Local Tumblr cryptid sighting, more at 11. 😎) I spend hours writing fic. I spend hours sorting through screencaps before screeching at Photoshop for a lengthy amount of time. I spend days pouring over quotes, books, documents, photographs, tutorials, and other things that will help me create something cool. I apply color theory, art framing/perspective, narrative focus, and many other theories and techniques to my writing and my giffing. If I were to put my finished work or any of my WIPs in that same archive system, it would be the document within the archival file. The tags I use on my posts? Those are markers similar to the content-field. They tell you who my gifset depicts and from which show it is. They tell you which OC of mine my fic is about. My work contains these things I tagged.
But my creative work is not content itself.
Content is marketable, easy access, blurb-y stuff. Content is something you absorb within one minute flat. Content is the highlight reel. It’s what fills a page, something you’ll scroll past in a heartbeat, something that barely stands out in a long long long list of stuff. Content is what you consume on a lazy Sunday afternoon without ever being forced to read lengthy pieces, take in the details of what you see, pause mid-scroll to ponder the meaning of life, whatever else have you. Create content and you create a flash in the pan, a quick laugh maybe, before it fizzles back out again. Create content and it’s here today and gone tomorrow without anyone mourning its absence for too long.
Art should last longer than that, don’t you think? 😉
So when I see people put a fic request in an askbox and it’s phrased like “Speirs x spy!reader fluff” and that very same request makes its way into about ten more askboxes before the fandom starts comparing asks? I might be inclined to classify us all as slot machines. Put an ask in and out rolls a fic. Who cares which slot machine it came from? As long as you’ve got your painstakingly crafted fics that you consume the same way you do actual content, right? We, its writers, are just lucky if we get a pat of acknowledgement on our little slot machine head for our troubles, aren’t we?
When I see an overly detailed summary of what sounds like a full-fledged fic in an askbox and the demand is “write this for me”, I recoil from the screen and go “child, who the hell birthed you, were you raised in a barn?” out loud. If you can tell a story in the space of an askbox, consider asking for help to let that story – a story you own, a story that is more yours that it could ever be mine – grow into what it has the potential to be.
When I see fics and gifsets and other creations get likes but not reblogs, I mutter something about the state of fandom economy these days. We exist in a little fandom bubble. Our bubble can’t expand or blow from place to place without a little help from our friends. And you’re my friends, right? I know the follow-button says follow, guys, believe me, I’m not that far gone, but for me ‘follow’ means ‘friend’. 💚 You’re my buddy now. Suck it up. We’ll share a can of peaches. 🍑
When I see fics and other creations get reblogged without tags or comments attached, I die a little on the inside. I feel like a little Victorian orphan child going “please, reblogger, a little penny of thought for its creator, if it pleases?”. I feel like commentless and/or tagless reblogging is giving me nothing, nothing at all, about who you are.
And I want to get to know you! I want to know who’s in my notes. I want to know who’s scrambling through my MotA gifsets like a fat little raccoon inhaling its third helping of a box of jelly-filled donuts. I want to know who is adopting which character and why. I want to know that it’s your birthday, or that you had a bad day and needed a pick-me-up, or that you are locked in an Ikea at three in the morning reading my blog by the bright lights of countless Solhetta bulbs. I want to know that you love my OC Darlene but that you ain’t sure what the hell my OC Lottie’s got to do with anything. I want to know what tickles you – a turn of phrase I used, a color in a gifset, a little detail I captured that made me go !!!!!! on the inside while I was creating too – and I want to know what moves you.
What reaches into the soil of your being and nourishes you enough to blossom into whichever lovely self you can grow to be? What is precious to you? What comforts you in the dark nights of your soul, when all light feels like it’s faded out? What do you love, truly love? What feeling and thought and idea and love love LOVE do you consume – truly consume, head to tail, no takebacks – and what are you consumed by in turn?
Let me connect with you. Let me know the little internet scraps of you that tell me you’re a DeMarco girlie, or that you’re here for Hoosier only, or that you’re as feral and batty about Speirs as I am, or that you actually really can’t stand the one dude everyone else raves about. Let me know that you like angsty quotes on gifsets – feel free to yell at me for making you schedule an impromptu therapy session – or let me know you saw what I did in my fic there and you’ll be demanding compensation from me while you lie down and wail about it. Let me know you’re very into those lovely blues on a gifset (I know, SO good, right??) or that you are side-eyeing me because that close-up of your fave turned you into a little puddle.
Let me know what moves you, because I created these things with love. I created them because they moved me, too. I created them because I have a story to tell, somehow. I created them because the whole world is a string of stories and I want to pass the heart of them on to you. I created them not because I want to jump on a hypetrain that races past all the episodes and all the alternate universes and all the stories without stopping, but because I want to soak up the sun and point at something and tell you “look, isn’t this beautiful?”. I created them not because I am looking for a quick fix or a distraction or an escape, but because I want to give you something that nourishes you as it has nourished me.
That’s so much more than that quick flash in the pan, yeah? That’s so much more than what content could ever hope to be. That’s something that lasts beyond the clicks and gives you an ever-expanding horizon that leaves you wondering just what in the world is next.
Let me repeat point five: if all a fandom puts out is classified as content, that fandom is going to die. Because content doesn’t sustain you. Connection does. And connection? That happens with meaningful interaction. That happens when you stop getting followers and start getting friends. That happens when you treat all forms of art as something unique that can be precious to someone, rather than something to like today and forget about tomorrow.
Can I do a lil mic drop? Yeah. I think I’m gonna. Just this once. 🎤
#fandom things#yeah so this got long but in my defense I have never pontificated about this in public much before#sometimes I reveal myself as the crochety little fandom old I am#creative asks
61 notes
·
View notes
Text
Tutorial for @mimssides
How I draw with alcohol markers. Beginner edition
First off all I want to specify: this is based on my experience only, so take it with caution. This is also my first tutorial ever.
1) Have an underpaper.
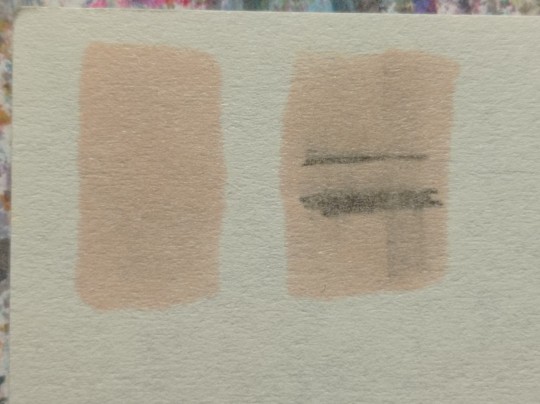
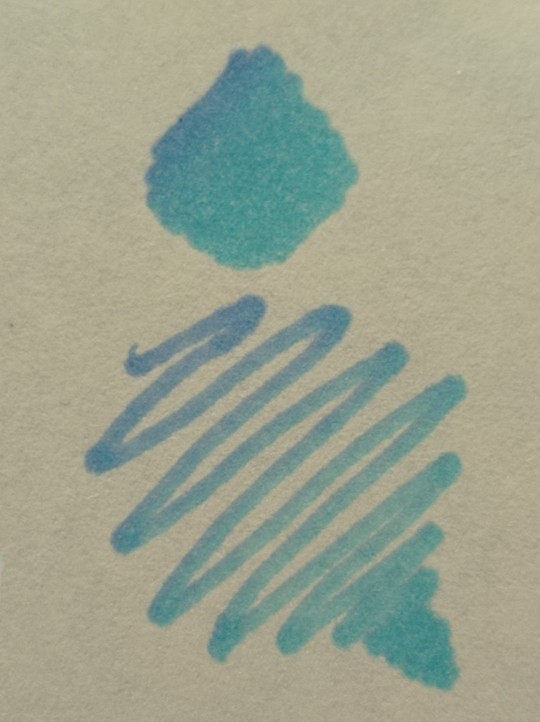
Unless you use some really thick paper, markers will bleed on your next page or table ( depending if you're drawing in a sketchbook or not). I recommend to have one list of some decent paper under the page you're drawing on. Decent means thicker than office paper, can be watercolor paper, it usually perfect for it. It's reusable and over the years mine two look like this:
( you can see there's a lot of stuff going on there)
2) Always, and I mean ALWAYS erase your sketch.
If you're doing a quick try out of color combinations you can skip this step, because you don't need the aesthetic or anything. I'm not sure how useful this tip is for colored pencils ( cuz I never sketch with those), but with regular graphite pencil it's very much important. Graphite smudges your markers, and not only that. It also gets trapped if you go over it with a marker, meaning you wouldn't be able to erase it and it's going to leave you with gray smudges all over. Truly awful.
3) Have your pallets on the same paper you draw on. Or simply - have pallets!
Colors can show differently on different paper, that's why it's important to do color swatches once you buy your markers. They are designed for specific paper, and on your paper they can look a lot darker or really pale. I recommend testing colors before you buy them, it's usually an option in the most craft stores. If you're buying a set just take 30 minutes to do all the swatches and naming them. It also helps visually to see what colors you have.
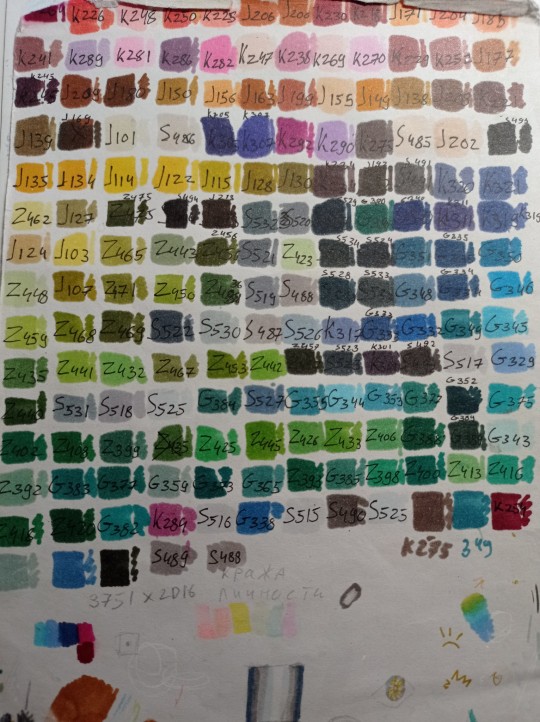
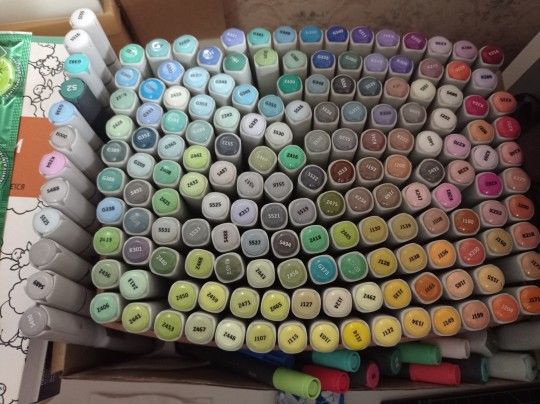
(I have a lot, but you don't need as much, there's like 60 colors I use usually and the rest are on rare occasions. Build a set you're comfortable with)
4) Make sure your materials all work together.
We already talked about graphite swatches, not the worst thing that can happen to you. Mainly you need to make sure how your materials work together, how they lay on top of each other. Make sure your lineart won't react to your markers, there's special waterproof liners and those are the best for markers ( mine are Pigma Micron from Sakura). See how your pens and liners act before and after you apply markers.
Decide which is better to use before and which after markers
5) No black.
I don't use black in any of my drawings. All you see is different shades of gray. It looks much more pleasant with the rest of the colors and it allows for my lineart to be visible underneath. Sometimes even those grays are too dark and I need to add more shades or white lineart to fix it

6) How to shade.
This is a very subjective thing to talk about. You can shade how you want. I will talk about two ways I shade.
1. Same marker. Markers dry. And when they do you can go over them another time. Usually that makes a darker shade of the same color and it's a pretty safe way to do the shading if you don't know which colors can go together. It doesn't work as well on the light colors and difference can be barely noticeable. It's a nice way to get soft shading
2. The pure chaos. Just kidding... Different color marker. It's hard to explain, and yo always need to test what works for you. If you want sharper shade you need to grab a different color, can be from the same hue ( for yellow - orange, for red - burgundy) or something a little more spicy. You can add different hues to your colors with different shades ( your black with red shades is suddenly looks burgundy, or purple, or blue). Experiment! Fail! Find out which combinations work and which don't!
If color seems a little darker than you expect you can go over it with original color, which might lighten it up. This tip doesn't always work

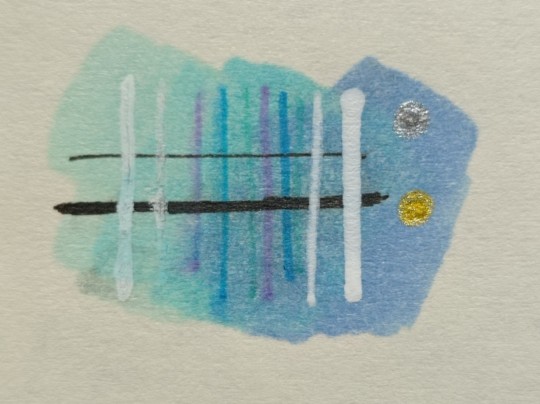
7) How to do gradients.
1. Choose your colors beforehand, see how well they work together. It's easy to do a gradient from red to pink, but not so much from orange to blue. You might need to choose lighter colors, because if you want smooth transition from one color to another you will need to go over them a couple of times and that will darken them.
2. Add a middle color. Not every gradient needs a middle color, but with it you can make your gradient much smoother, it will be more noticeable the bigger aria you cover. The more middle colors you have the more harder gradients you can do

( without and with a middle color)
3. Act quickly. Markers dry relatively quickly so you need to add colors one after the other, you can't go away before you're done.
4. Blend with the lighter color. You can also start with this color as a base but that doesn't work for all color combinations. Lighter color will go in top a darker and flow into it making it lighter and transition smoother. ( example: you go from red to purple to cyan, you will need to start with red, then purple going over red to soften it, and finally the lightest cyan going over purple and maybe even a little red). You always put darkest first and go over it.
There's other methods of doing the gradients. They are very similar actually, but for second one you will need a blender. For the first one grab two markers you want to use ( more if you're feeling risky) turn one of the markers upside down and touch their tips. Now use your understanding of gravity. Color from the top marker will go into the bottom one. The longer you wait the longer the gradient will be. Usually I don't need to wait longer than 3 seconds.
And you can do the same with a blender
8) How to use a blender.
Blender is a marker with no color. Usually it's named B000 (I recommend buying a blender with brush tip). There are many ways to use it.
Gradients: you can use two markers technique with a blender making gradient fade on one end, or you can mix colors inside the blender.
Fixing mistakes: blender will make a white show through your color, you can use it to get rid of the wrong color. But it doesn't work without some problems. Of course darker colors will likely stay, even if much lighter, and your previous color will try to flee ( likely to other sides, if you're lucky it will go on your underpaper)

That's all I have for you today. Experiment and learn something new. Hope that helps
99 notes
·
View notes
Photo

Saturn’s Free CSP Brush Recommendations, CS Asset Store Edition
I may sell brushes now, but I still love me some free brushes & love to share them with people. These are a bunch of cool brushes made by other people that you can use to build up a nice library of tools without having to spend any cash on, perfect if you’re new to CSP or are on a budget. If you do download these, be sure to like them & give some love to the artist if you enjoy them. :D
How to find: type in the Content ID or Ctrl/Command + C & P (copy and paste shortcuts) into the Clip Studio asset store on the Clip Studio application. I’ll add a link as a preview but copying & pasting the content ID is easiest. I have automatic translation ON, so sorry if you read some weird names.
Feel free to reblog this with your own suggestions, there’s many brushes out there I missed. :D Check defsiarte’s suggestions too, and if you want to see my recommendations for stuff on Gumroad/DA & other places, check this tag.
Large Packs

“An analogue art supply" - 1813808
Huge pack of everything, including acrylic, oil, watercolor, marker, pen, & pencil. I like the markers and sometimes use the acrylics too.
Crm's Toolbox, Watercolors, Markers, & other treasures
Fantastic use of texture and some cute effects pens. The artist has posted everything from quality painting & drawing pens to quality glitter pens for writing.
The Old Default Assets - 1842027 & 1841759
These aren’t pictured, but if you ever see an older tutorial or video showcasing some default brushes you never had, it’s because CSP reworked its default tools around version 1.9. Fortunately they rerelased them so anyone can redownload them. The old ones are still good to use, they’re just not included.
Painters - With Texture
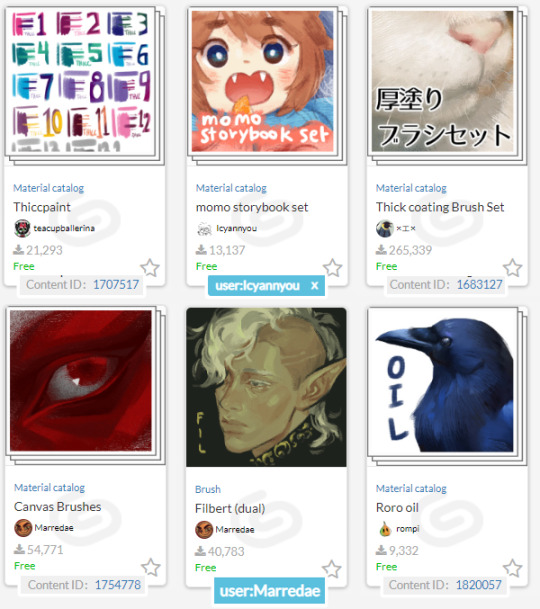
Thiccpaint - 1707517
Never leave home without it. I riot if I don’t have them on my computer.. They have the right combination of texture, shape, & blend with great handling and great variety.
Icyannyou's Momo Sets - user:Icyannyou
Super cute packs that give a lovely painterly look. The Storybook pack is fantastic, and even if you don't draw cute you can still use these painters & blenders to give your artwork character. :)
Thick Coating Brush Set - 1683127
I like these for background work, but it's a big pack of thick textured painters with good handling & neat effects.
Marredae's Brushes - user:Marredae
This artist has a knack for textured brushes. Very high rec, fantastic library of wet & dry painting/rendering tools.
Roro Oil - 1820057
Rompi is another user I enjoy the stuff of, and I'll recommend a few more brushes from them in other categories by the time this post is done. Check 'em out!
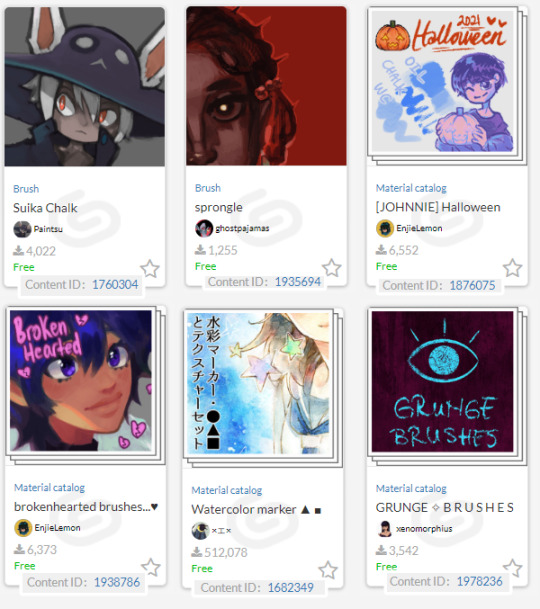

Suika chalk - 1760304
Very useful rough chalk. Sometimes, that’s all you need!
Sprongle - 1935694
A simple round brush with a nice rough tip. Slightly rough without being too rough, great for quick paintings.
Johnnie halloween pack & Brokenhearted brushes... - 1876075 & 1938786, user:EnjieLemon
EnjieLemon has some nice brushes in general, but some are paid for. Still worth checking out due to their cheap clippy price (and clippy can be obtained for free). The Brokenhearted brushes have a nice texture. The Halloween pack includes a cute pumpkin stamp along with some easy to use chalk, oil, & watercolor brushes. Compact and easy to use!
“Watercolor marker and texture set” - 1682349
There's a reason this set is one of the most downloaded on the asset store. It's one of the best looking watercolor replicas out there, and even if you don't use the brushes, you can likely still find a use for the textures. Great for soft coloring.
Grunge Brushes, Soft | Heavy | Complex Brushes & Xenomorphius' stuff in general - user:xenomorphius
Xeno drops some cool natural looking brushes out every so often for painting, inking, and dry media. Please check 'em out! The grunge brushes create a fun, grungy look like it says on the pack, & the soft/heavy/complex set can be used for painting as well as lining.
Oil-h5 trial - 1976418
These brushes are hard to explain. They work with the dual brush setting, & push around a layer of paint on top of your regular paint, creating a cool, streaky look. They're a hidden gem.
MYNQZO brushes - 1993875
A pretty darn good set for painting. I really love rough brush 2, it's great for sketching & rendering.
Painting, non-textured
(basic rounds & other shapes for smooth rendering)
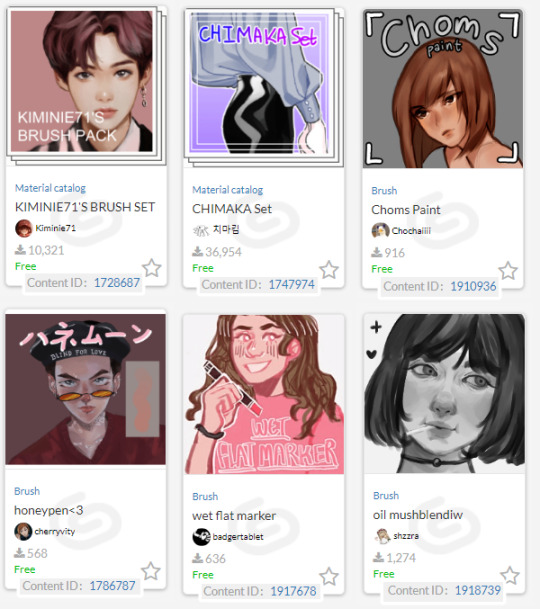
Kiminie71's Brush Set - 1728687
4 simple rounds that are great for rendering!
https://assets.clip-studio.com/en-us/detail?id=1728687
CHIMAKA Set - 1747974
Heavy drag paint that highlights well & applies thickly. Great for bold shading.
Choms Paint - 1910936
It just gets me. No further elaboration.
Honeypen<3 - 1786787
Fits great in my paint hand. Very slidey & blends like intended!
Wet flat marker - 1917678
Super blending brush, gives super soft edges to paint. Blends great.
oil mushblendiw - 1918739
Another simple & easy to use roundbrush.

Paint - 1760641
This plainly named brush is a triangle brush that goes between heavy & light with pressure. The creator, Puppsicle, also sells some neat brushes on Ko-Fi if you enjoy this brush.
"The Scarlet Knot Brush Set 2" - 1916125
I use the watercolor of thought out of this set, but they're all pretty good & easy to use.
https://assets.clip-studio.com/en-us/detail?id=1916125
Sunday - 1825825
A round brush with a watercolor border that gives a nice, sketchy feeling.
https://assets.clip-studio.com/en-us/detail?id=1825825
Marker Brushes
Marker Texture Brush -1809506
A very nice subtly textured brush. Has a nice instructional guide on how to get the best results with it. :D
Mirre's Marker set - 1749822
Another good brush with a subtle texture. Comes with its own blender!
Woody Marker & Pencil set - 1772987
I also love the pencil in this pack. Nice woody feel, feel free to turn off multiply.
Pencils & Sketchers
SU-Cream Pencil - 1761353
no wonder its popular. Can be used for lineart, sketching, and coloring, this versatile brush delivers a great smooth look with a gentle textured end finish on pressure.
Write BoruPenP - 1753435
Probably the best ballpoint pen on Clip. Please check out Pharan's things, I love them.😊
“Pencil-like Brush for Lineart” - 1692270
Ok this is kind of a weird way to recommend something. It's SUPPOSED to be a pencil but I use it like a paintbrush with the opacity & density on pressure control, & another copy with blending turned on. Whatever you use it for, you're sure to get a good result!
Grease pencil/china marker - 1774978
Chunky brush for chunky sketching needs.
Muda muda muda - 1715496
A pretty darn good dark pencil.
REDSketch soft - 1907313
just a nice sketcher! Good for shading too.
MUGZ BRUSH - 1861032
A set of dry chalk & brushes. Gives a fun messy look when used!
T Spade Pencil - 1769208
A pencil that looks great for lineart as well as sketches. Good taper.
Magipencil 2 - 1755940
Utterly good for textured and smooth lineart. These pens get me. Can’t recommend them enough. :)
Pens & Inkers
G-pen 6 - 1767809
A generic name but a good Gpen with character. Organic without sacrificing too much smoothness.
"Flat thick pen" - 1826131
I call it the card games pen. I think you can see why. Solid at high pressure, a little bit of texture at low pressure, and pretty great for sharp angles.
Haggiben_Lineart_Color - 1770988
A nice triangle liner.
Gabu Pen - 1894713
Very slightly rough pen on one side, another nice triangle-like liner.
Aeridus - user:Aeridis
All 3 of their pens give a nice result.
Pilot Pen - 1895049
A great IRL brush now a digital one!
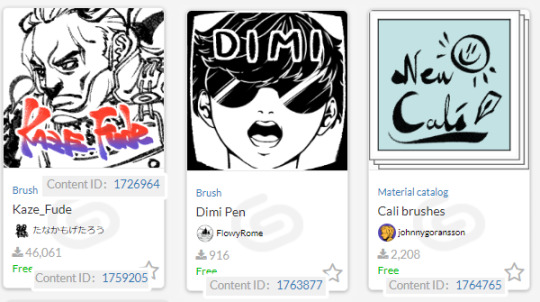
Fude set - 1726964 & 1759205
Heavy, beautiful ink! The creator has some more good ink pens too, take a look. :D
Dimi - 1763877
It's a ga,l with a knife and a nice calligraphy pen. Can't ask for more. Turn on >particles "change with brush size" in settings to keep the shape without chaning.
New Cali
A nice set of Calligraphy brushes. They have smooth transitions between big and small.
Blend, Fill, & Erase

Noise and texture blur - 1842730
If you want a more painterly look to your blur, get these! They said they're supposed to be turned from free to paid, but the artist hasn't come back and done it yet. Will they do it? I'm not sure. :0
Textured Blending & Blurs - 1904941 & 1971444
They're actually made by me, my apologies, but it's hard to find textured blenders by themselves. Most are included in a set or are something you have to pay for, so I released a few free stand alone ones due to it. Normal solid round blenders & blurs are easier to find & even easier to create yourself!
https://assets.clip-studio.com/en-us/detail?id=1904941
https://assets.clip-studio.com/en-us/detail?id=1971444
Unhelpful Eraser - 1798605
The terrible hard eraser that you had in school becomes digital. Download it as a tribute.
Quick Lasso Fill - 1978471
Fills up a lasso'ed area.
Random Color Fill - 1707873
Picks random spaces to fill. The picture in the demonstration shows it better than I can describe.
Scratchy Coloring - 1845677
A fun scratchy brush that can fill areas up.

Quick Lasso Eraser - 1875033
This and the next brush are both @pharan ‘s again. This does the same as the lasso fill, but erases as you can tell.
Erase along Edge - 1800143
An eraser that takes advantage of reference layers. The description explains it in detail.
"Create Solid-irregularity set" aka adding texture to black solid ink patches - 1768052
These distress the paper, making it look more textured. Easier to look at than to explain, click the link for more!
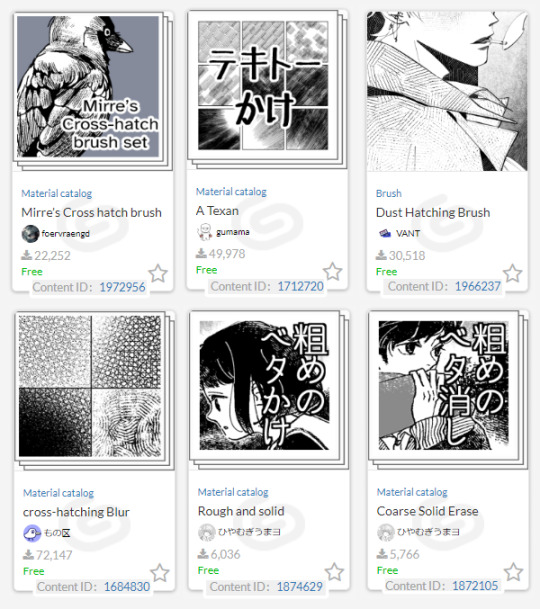
Mirre Cross Hatch Brush Set - 1972956
I love the look the spaced lines give. Fantastic set.
Overlap Hatching (…"a texan"???) - 1712720
One of the most popular Clip Studio Hatchers for a reason, easy to apply hatchers that you can just keep adding to for a sparse or dense look.
Dust hatching brush - 1966237
Simple light hatcher with dust particles around it for a dusty feeling.
Cross-hatching Blur - 1684830
I actually recommend all of user:もの区 ‘s stuff they have posted for crosshatching. There’s a whole bunch of great free brushes there for anyone who enjoy hatching!
“Rough and Solid” - 1874629
A ribbon brush that makes good borders.
“Coarse Solid Erase” - 1872105
For those who like to fill an area, then erase the light parts away.
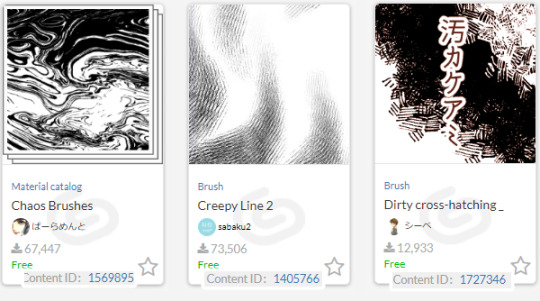
chaos brushes - 1569895
A great marbler.
"Dirty cross hatching_monochrome" - 1727346
A nice, thick, analogue hatch. SB has some great material in general, but most needs clippy.
Creepy Lines 1 & 2 - 1405766 & 1707236
Get some spooky lines into your art!

Simple Retro Halftone - 1802041
A small set that's easy to use to add some halftone texture.
retro halftone brushes - 1852027
A larger yet still easy to use set with more specific brushes to use for each color.
Mar's Halftones - 1949506
A set with a lot of fun patterns! Check out SpiralPuzzle's stuff in general, they post some unique brushes.
Pixel Art
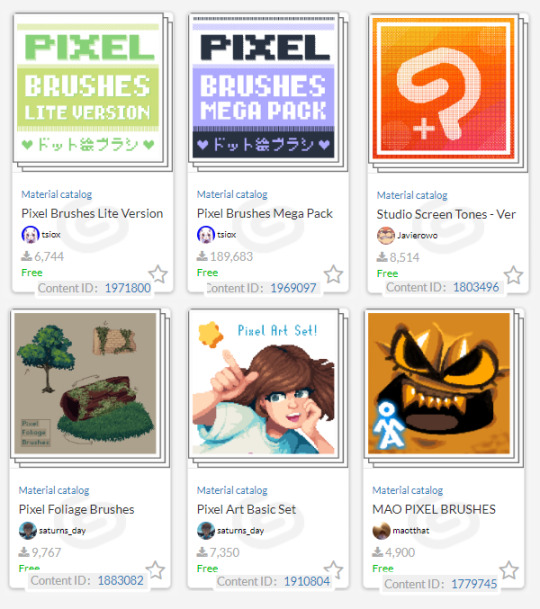
Pixel Brushes by tsiox - (small) 1971800 & (large) 1969097
THE Clip Studio pixel set. Has a ton of tools & textures to use. The small set is better for slower internet connections & if you don't want all the patterns.
Studio Screen Tones - 1803496
If you like Flipnote studios or need more dithers, get this!
Pixel Foliage Brushes - 1883082
I apologize for promoting my own assets again, but I promise they're useful if you're doing anything with grass, trees, or bushes! ;w;
My basic set - 1910804
Another lighter set with a few noise brushes that are useful at tiny size. Did my best not to overlap with tsiox’s set while covering the basics.
Bonus: two blending pixel brush sets.
Mao Pixel (1779745) & Scummy Pixel(1782455). They’re not for exact pixel art, they’re more for playing around with & painting. :)
#clip studio paint#csp#clip studio#clip studio paint brushes#clip studio paint brush#recommended brushes for csp
104 notes
·
View notes
Text
Ok, this is long and annoying, but it was a valuable lesson, and I want to share and maybe save someone some cash if something like this ever comes up.


I’m still very heated about this whole car situation. They tried to really screw me over, I said “no thank you, I’m not that kind of girl, I’ll do it myself.”
A) they charged me $195.56 for “diagnostics.” Which was apparently just “looking with eyeballs” because I already said they were out. I wanted to know the reason. They did what I already did (actually less because I already checked the fuses) and came back and said I had five bulbs out. They were wrong and I will be letting them know.
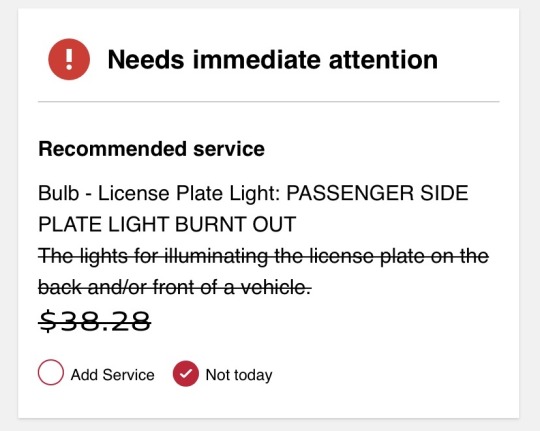
B) $38.28 to replace the license plate bulb that was “burnt out.” I nudged the cover for the bulb to open it up, and the bulb came back on. Not burnt out. Just a lose wire or something. I didn’t even open it. Literally just touched the cover with a screwdriver.
C) $192.50 for rear side marker light replacement. These were the two lights I knew were out, and it wasn’t just the “side markers,” it was my tail lights. I replaced the bulbs myself. Looked up what kind of bulb i needed and watched videos on how to do it. Took the entire tail light housing off, popped new bulbs in, bingo bango, easy peasy.
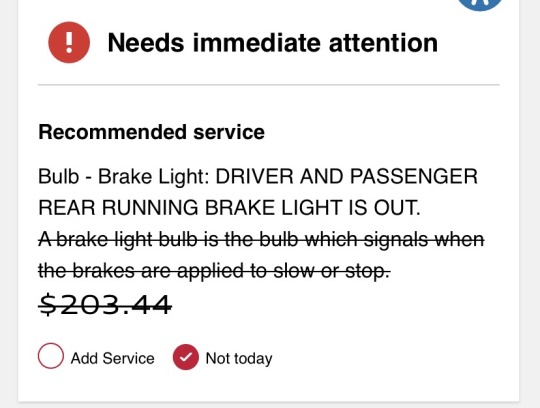
D) $203.44 for brake lights. These have always worked. They worked before I took my car in, and they work right now. No work needed. Not at all.
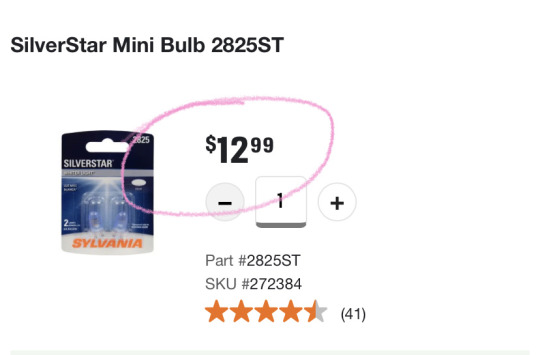
I paid the diagnostics. But I’m even going to call them this week and fight that. They wanted over $600 for a task that cost me $12.99.
So this is my PSA if you’re still reading. ESPECIALLY if you’re a woman and they think you’re some dumb broad that needs a big strong mechanic to do everything for you. I’m on record for hating the internet, but one good thing humanity has done is create tutorials on YouTube. There are so many people who show everyone else how to do simple to complicated tasks. You can teach yourself anything. Do some research. Learn something new. And save a SHIT LOAD of money.
#my dealership is full of scam artists and I will NOT be returning#shopping for a regular mechanic now
57 notes
·
View notes
Text
pattern tester call!
long shot, but I'm gonna try my luck on here too anyway
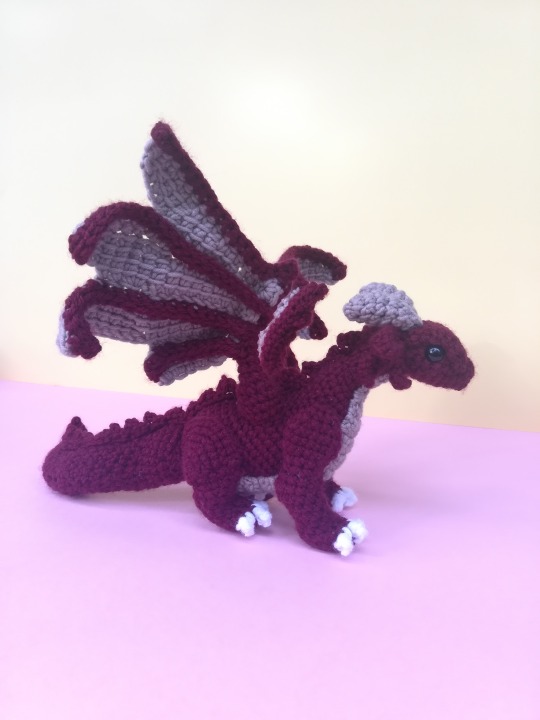
Hi, I’m looking for people willing to test my pattern for a semi-realistic dragon plushie. I don’t have a set number of testers in mind, but any help is appreciated!
I’m looking for feedback on whether or not the pattern is easy to follow, and if there’s any areas that require more clear explanations. There might also be stitch count mistakes in some rounds/rows, so I’d appreciate feedback on that as well. I’m attaching links for pictures of the finished plushie.
Requirements and info under a cut:
Being able to complete the project within the next three weeks (deadline: May 5). I can be flexible with the deadline if that doesn’t work for anyone, but ideally I’d want to post this pattern sometime in May).
Providing feedback.
being an intermediate level crocheter. This project has several areas that would prove difficult for a beginner.
Ideally, not being familiar with tunisian crochet. The majority of the pattern uses normal crochet stitches, but the wings are made with a mix of regular crochet and tunisian simple stitches. I included detailed photo tutorials for them, but I want to test if the pattern is understandable for someone who never used tunisian crochet stitches before.
not sharing or redistributing the pattern
willingness to give me an email address for us to communicate
What you’ll need:
a 3 mm and a 4 mm hook.
stuffing
your preferred stitch markers
a yarn needle (better if curved)
one pair of 10 mm safety eyes
fabric pins
DK acrylic yarn in 2 main colors (I used red and light brown) + scraps of a third (I used white) for the claws. No need for a specific brand of yarn. I used almost an entire 50gr skein of red with 140m/153yds of mileage. You need less than half of that in brown.
about 20 cm of sturdy wire. Anything between 1.8mm and 2mm should work.
Notes:
This pattern uses the yarn under method of crocheting for the majority of the piece except the wings, which are worked with the yarn over method. The 4mm hook listed is only for the wings, belly patch and the spine frills. The rest of the pattern uses a 3mm hook.
Using DK yarn, the dragon measures roughly 26 cm long and 14 cm tall, and has a wingspan of about 24 cm.
Please let me know if anyone is willing to help! Participants will receive a copy of the pattern by email. I can’t offer monetary compensation but I will email you a copy of the revised pattern once it’s done.
#crochet#crochet pattern#dragon#dragon plushie#dragon amigurumi#crochetblr#pattern testers#thyandra's crocheting adventures
16 notes
·
View notes
Text
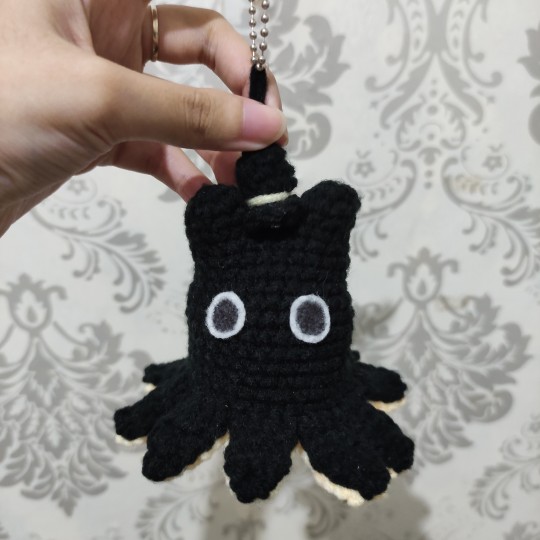
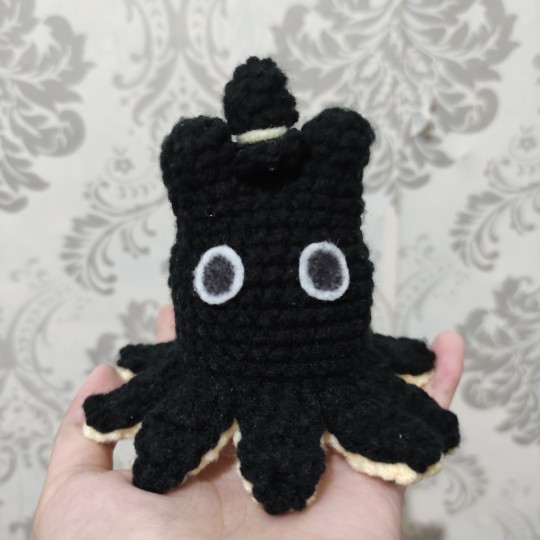
Cat Klein "The Fool" Crochet Pattern
I create this pattern for personal use only! I don't permit commercialization of the pattern.
Tools
Hook 4.0 mm
Black yarn 5 ply
Yellow yarn 5 ply
Terminology
MR = magic ring
SC = single crochet
HDC = half double crochet
Ch = chain
BLO = back loop only
FLO = front loop only
inc = increase
dec = decrease
Top Hat
R1: MR 4SC (4)
R2: inc * 4 (8)
R3: BLO 8SC (8)
R4: 8SC (8)
R5: FLO 8SC (8)
R6: 8SC (8)
For the yellow ribbon, sew the ribbon part between R4 and R5 (sew it after the top hat is done for easy viewing). Loop it twice (or more depending how thick you want the ribbon to be). Sew it back to inner top hat and then tie it up.
Notes: I make this pattern after done crocheting so I might misremember the top hat pattern and it's hard to re-check because the top hat is very small and the black yarn I use is very dark and I cannot see the stitch. It should be fine though (I think)
Reference for top hat: How to Crochet A Top Hat for Amigurumi
Ear 1
R1: MR 6SC (6)
R2: 2SC, inc * 2 (8)
R3: 8SC (8), cut off the yarn
Ear 2
Repeat Ear 1, but don't cut off the yarn at the end because we will continue directly to the body
Body
R1: on Ear 2, 4SC, ch3, continue to Ear 1, 8SC, SC in all 3 ch, continue to Ear 2, 4SC (22)
R2-3: 22SC (22)
R4: 10SC, inc * 2 (24)
R5: 3SC, inc * 6 (30)
R6-9: 30SC (30)
R10: 4SC, inc * 6 (36)
R11: 4SC, dec * 6 (30), don't cut off the yarn yet because this will continue to the black tentacles
Reference for ear and body can be found here: How to crochet - easy Cat Amigurumi keychain tutorial
Make a loop with black yarn for the keychain loop. Make sure the loop is long enough because it will pierce through the top hat as well. Insert it through the body and exit the yarn between the ears. Insert the loop again through the top hat.
Black Tentacles
There is a new stitch type here, check the video here at minute 17:04 for HDC in 2 stitches tutorial: How to Crochet Octopus Squish (Right Handed)
R1: 3HDC (3)
R2: turn around, ch1, 3HDC (3)
R3: turn around, ch1, 3HDC (3)
R4: turn around, ch1, HDC, HDC in 2 stitches (2)
R5: turn around, HDC in 2 stitches (1), cut off the yarn but leave out enough yarn to sew together with the yellow part undernearg later
Repeat R1-R5 for the rest of 9 tentacles. For the new R1, do a slip knot and leave enough yarn for sewing later. After that, do a slip stitch and continue R1 as stated above.
Stuff in the foam in this step. We make the yellow part underneath next.
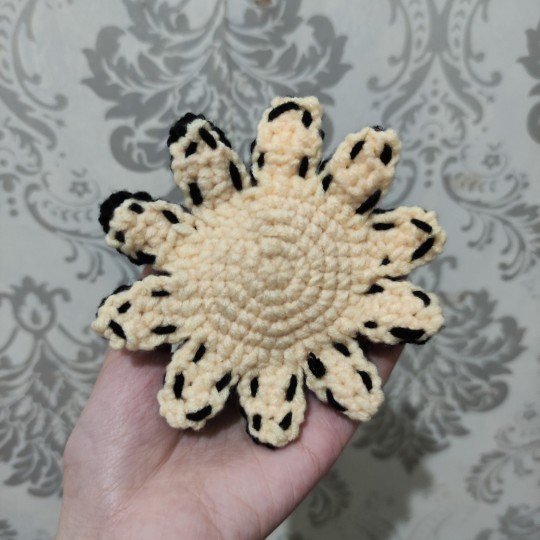
Yellow Tentacles
R1: MR 6SC (6)
R2: inc * 6 (12)
R3: SC, inc * 6 (18)
R4: 2SC, inc * 6 (24)
R5: 3SC, inc * 6 (30)
R6: 30SC (30)
R7-R12: the same as the black tentacles R1-R5
Sew together the black and yellow tentacles using the black yarn leftover. Stuff in the yellow yarn leftover inside the body.
I use white felt clothes for the eyes and use black marker for the black part of the eyes.
And you're done!
38 notes
·
View notes
Text
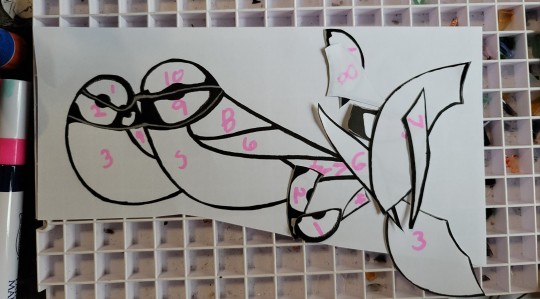
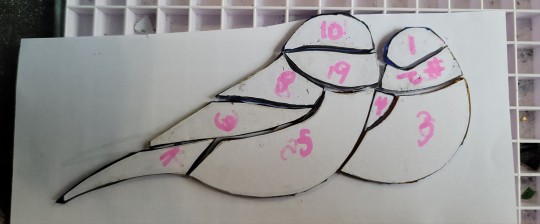
Stained glass tutorial bc the birds are good for it.
The tldr with more resources and a few video tutorial links is here (link)
this is our target and this is our pattern:

if you're wondering why I'm just handing out the pattern to a piece i plan on selling, the answer is because all stained glass pieces are their own pattern. By posting the image of the piece i already gave you the pattern to it.
What you need:
1 sheet of printer paper,
scissors,
glue stick or a washable marker that works on glass,
grozier pliers,
curved jaw pliers,
glass cutter,
flux and something to apply it with,
60/40 acid free solder,
copper tape,
gloves,
eye protection,
soldering iron with stand and rheostat,
water proof sand paper or waterproof nail file,
black patina or black acrylic paint,
some kind of heat proof surface to work on. I use asphalt coated compressed fiber board because it was cheap and easy to get at the hardware store
a well ventilated area to work in. or a table set up outside, which is the most well ventilated area you probably can access without a key card to a chemistry lab.
finally: 1+ panes of translucent/cathedral glass.
if something is not pictured in the below image it's because getting it meant fighting my cord management or standing up to go get it. The white waffle grid thing is not necessary. It just makes clean up easier so I'm using it and also i was too lazy to move it. a box of nails is pictured, they are also helpful but also not necessary. especially if you are not using something you can easily push them into as a work surface

I'm just using my normal glasses for eye protection, you don't need anything super fancy but you do need something to stop any flying shards.
Anyways. Soldering and finishing is in a reblog of this. i needed more pictures than you can put in a single Tumblr post
Step 1 Pattern Prep
print your pattern out. once if you are just going to use a marker to copy it onto your glass, twice if you are going to glue it down to use that way.
you may notice my pattern is backwards. That's because i printed it out wrong and can't be fucked to go fix it. Anyways.
Number your pieces in the same order on both copies if you are using the glue method, for such a simple pattern it's not uber necessary but it's a good habit to get into. Larger and more complicated pieces rapidly become broken glass jigsaw puzzles if you don't.
Step 2 putting the pattern on the glass
the way you make the glass the right shape is by using a glass cutter, that bronzy thing with all the tape around the barrel to make it easier for me to grip. the way it works is it holds a very thin metal disk that you press into the glass to introduce a fault line the glass will hopefully want to break along. I said hopefully for a reason.
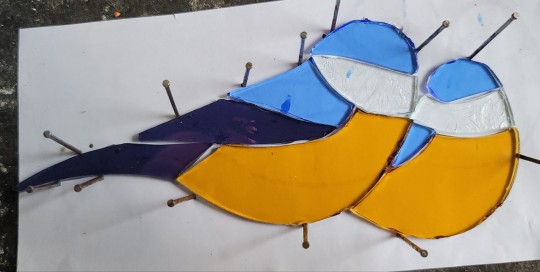
All cuts have to go from one edge of the glass to the other because that's what the crack will do when you break it. Keep that in mind while you lay down your pieces. I've used a marker to show how i plan to cut this pane but unless you're doing a tricky cut order you don't really have to do that
I'm using what i have on hand so how you lay your pieces out will probably be different if you've bought whole panes to work with. This is a much more wasteful way of doing it than i normally would, but the goal with this one was to produce a piece that doesn't require a glass grinder as those are an expensive thing to get when you're just starting out.
Also plan to cut on the Less textured side of the glass, the texture can get in the way. if you would like the texture to be on the front of your finished piece simply glue your pieces upside down onto the smoother side. also know that less textures glass is easier to use
I didn't have any more of that darker grey blue so I'm using a light bluish lavender piece instead. it looks brown because of the the yellow underneath it
step 3 cut the glass
take a piece of preferably translucent glass and practice this step a few times before doing it on your project.
Press the wheel at the end of the stylus firmly against the glass at one edge, the keep pressure as you push or pull your line. you will know if you're using enough force because clear glass makes a very specific noise when it's being scored. I can't describe it but you'll know it when you hear it. you'll also be able to see the score line from some angles, it should look like a very fine crack in the glass. I've also heard it described as "like a white hair has been set on top of the glass". do not stop, lift your cutter, or go backwards over the scorline you have already made. The crack is a Lot more likely to go off course and destroy your piece if you do.
do only one line at a time before using the grozier pliers to break the glass.
there should be a line on the silicone protector things on the edge of you pliers, hold them so that that mark lines up with your score line and apply pressure , start light and slowly increase until it begins to crack. If the crack immediately runs the whole length of the pane then your done, if it doesn't, rotate the pane and do the same thing on the other edge of the glass until it starts cracking from there too. if it Still doesn't meet in the middle help it along by tapping along the uncracked part of the score line with the tip of your pliers handle until the crack finishes the job. If it's a very long straight one you can also use the edge of a table to encourage the crack to form in the right place.
if the crack decides to go off your scorline just finish breaking that score line and then peel off your pattern piece and reposition it to try again. if you used something like an Elmer's glue stick you can reactivate the glue with a Small amount of water dabbed over the pattern piece with your finger.
Once you have most of the glass broken off use your curved jaw pliers to very carefully nip away at any extra bumps. like half a millimeter at a time, don't just bite into a big chunk, itll shatter the piece. The flat side of the jaws is used to leverage the piece against to break it that way. it's helpful to pick an orientation for your pliers and just commit to always holding them like that. with the flat jaw either up or down. It'll help you build the muscle memory and learn to use them faster.
enjoy your pile of broken glass and dream about the grinder that wouldve made this easier.
Step 4 grinding deburing.
use your water proof file or sand paper to to knock any little bits of broken glass off. it is Vitally important that you do this with the file Wet. glass dust likes to float on any little draft and it's Super not good for your eyes lungs throat or nose.
You can also take the time now to refine the shapes and sand off any little nubbins that are in the way.
once you're done use a little dish soap to remove the pattern and any grease or glue left on the piece. if you need to re number the pieces.
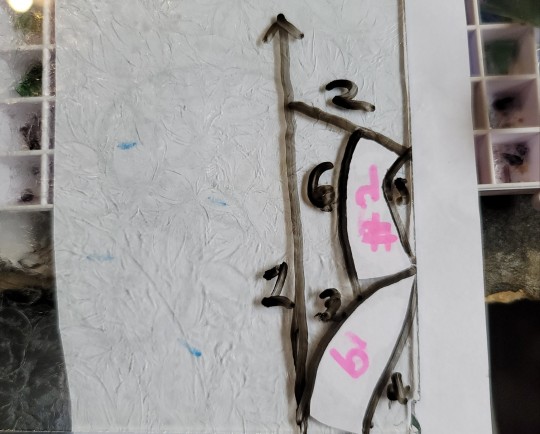
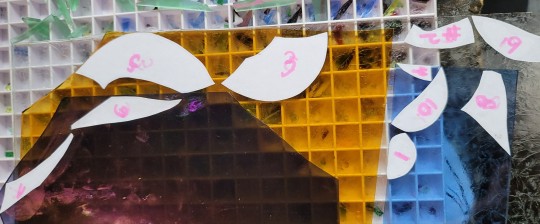
Step 5 Foil
foil comes in a handful of sizes, and in silver, black, and copper backed. The sizes determine how thick your leading will be, thinner foil, thinner lines. With art glass or very textured glass you may need to go up a few sizes to make it fit. The color on the back will be visible through clear glass so you might want to pick one that vibes with your colors. I'm using what i had, so i don't actually know the thickness. It is copper backed tho.
take your piece and your roll of foil and place the edge of the piece in the center of the tape so that there's an equal amount of hangover on either side. then carefully roll your piece to wrap the edges in tape. being sure to keep it centered the entire way around. when you get back to where you started let the tape overlap itself by at least a quarter of a centimeter or like 1/8th of an inch. then cut the foil.
use your fingers to smooth the foil down over either side of the glass. and then the handle of your scissors or any hard plastic object to firmly press out any creases in the foil. The smoother you can get it the better. because that will make the solder sit flatter.
use the second/primary copy of your pattern for reference and lay out your pieces on top of it. If you're using nails and and a softer work surface you can press them into it around the edges of your pattern to keep the pieces from shifting. for a piece as simple as this it's not necessary but it still might help.
Soldering is next up but I'm posting from mobile and have an image limit to keep in mind. so that will be posted as a reblog in a bit.

117 notes
·
View notes
Text
Guides and Resources for New Mlp Collectors
A collection of resources I wanted to compile for fun and for easy access, in case there’s any new collectors who are interested
UPDATE: Since this post is so long and has been a little difficult to manage due to tumblrs editing tools, I am moving this "Resource Masterlist" to my Website Here, and will no longer be updating this post on tumblr. Thank you guys for sharing and supporting this post!
Disclaimer: i am still probably considered a relatively new collector, so im not an absolute fountain of information and there are probably tons of resources I have missed, feel free to add more in the comments and reblogs. I update this post when I can to add resources and give you the most accurate information, so please click on my blog to look at the most up to date version (it is my pinned post ^^)
Identifying Ponies/ Databases and Lists of Ponies
Mlp Merch Database- Visual list with pictures of pretty much every single release of Pony Dolls/merch for every single generation, in release order. Useful for if you want to scroll through a particular generation’s releases with pictures, very thorough and complete. If you make an account you can make checklists or wishlists for yourself.
Strawberry Reef- Visual list with Pictures of Pony Doll Releases. I feel like the pictures are slightly bigger (and thus easier to look at) than mlp merch database but that might just be my computer. G1-5, though I feel like the g4-5 sections are a little incomplete. For g1 and g2 you can sort by release date pretty effectively. This website is ESPECIALLY useful for quickly identifying ponies because you can sort by color, pose, or characteristics! However it’s not as complete a list as mlp merch database or my little wiki.
My little wiki- One of my favorite wikipedias ever (It’s an actual wiki, NOT A fandom wikia). Has lists of every release for every generation (Though the more recent gens might not have photos for every single release yet). The lists are NOT visual lists like the previous two resources so I use it less for identification, more for finding out more specific information about a certain toy. It will list pretty much every single variation/regional variant of every toy, as well as more information about their releases, which accessories they came with, backstories from the back of the box, ect.
Toy Sisters- I use this website less for identification and more for getting really good close up photos at every single pony and their accessories if you want to get some close up, detailed looks before you buy for example. You can sort generally by type, pose and year. As of writing this they do not have g5 info. If you collect other dolls or toys this website may be useful to you because they have more than just ponies.
Ponyland Press- Has photos and information on g1 releases in order, as well as country exclusive releases. Also has some information on certain accessories, ponywear or other merch. Also has some information on cleaning and some restorative information.
Restoration and Cleaning
(IMMEDIATE PSA IF ANYONE IS LOOKING AT THIS LIST TO RESTORE A PONY WITH MARKER OR HIGHLIGHTER ON HER: do NOT use acne cream like removezit or any other creams on her! This can lead to awful, permanent discoloration and staining! Instead I would look at what the mlp preservation project (linked below) says about sunfading!)
How to clean- Very basic guide on thoroughly cleaning toys, plus some styling tips
Hair Styling Tips
More Hair Styling Tips
Hair Styling: How to make twists and buns! This guide is intended for customs and talks about pushing pins into the pony and trimming the hair once you’re done but im sure it can be adjusted for non customs in a way where you don’t actually cause harm to the pony
MLP Preservation Project- One of the most useful guides for restoration, has sections on pretty much every major restoration need you might have. Links to so many different sources, tutorials and guides for fixing your ponies if something is badly wrong with them. godsend.
The Lavender Lagoon- A resource specifically for G2! Has identification and checklist materials but also has guides for hair matching and color matching eye crystals if your g2 pony's eyes have fallen out
Hair Matching Guide- A guide for closest hair color matches using dollyhair colors. Has g1, but it is a wip site. Looks like it will have other generations eventually too
Hair Length Guide- By no means complete, but has a bunch of the exact hair lengths for certain ponies g1-g3 written out, useful for looking for exact hair length measurements for rehairing. (Side note: If you can’t find how long a certain pony’s should be, ask around the community! I don’t bite and would be happy to measure a pony’s hair for you if I have the same pony, and I’m sure there are many other collectors who would be willing to do the same ^^)
Rehairing Youtube Tutorial: Using the main method most commonly used, in my opinion the easiest hairing method
Rehairing Youtube Tutorial: Loop And Lock Method: For if you struggle with gluing hair into the head
Alternate rehairing Method Tutorial
Rehairing with Yarn Youtube Tutorial
Little tutorial I made once about retailing (rehairing the tail)
Youtube tutorial for restoring g1 glitter symbols (Restoring non glitter symbols would be similar, just without the use of glitter)
Aikarin’s Custom Tutorials: A ton of tutorials related to creating custom ponies, also has some stuff that could be used with restoration
More Custom Tutorials: Intended for customs but techniques could also be used for restorations
Reflocking Youtube Tutorial - This video in particular shows reflocking small patches of missing fur. Be sure to look at the guide linked on the mlp preservation project as well
Materials for Restoration
Oxiclean- Good for cleaning ponies
Magic Eraser- Good for cleaning Stubborn marks on dirty ponies. Please be careful of cutiemarks, eyes or other painted symbols. For less stubborn marks or if you dont have a magic eraser you can use a toothbrush with dish soap on it :>
Baking Soda- I have heard that using this can help get rid of bad smells on toys, if your pony has a dirty odor! Have not tried this myself. Cover the pony in baking soda in a baggie for a few days. Similarly if you want to restore smells by scenting a pony you can use fragrances, though be careful because certain chemicals may damage your ponies!
Shampoo and Conditioner- Essential for washing and styling manes and tails. NOTE: If you have a pony with UV based color changing hair (like a g1 Sunshine Pony or something similar) Its recommended Not to wash it with soap or shampoo as it can damage the hairs ability to change color! be very gentle, water should wash it fine
Shimmerlocks- My personal favorite place to buy hair. They have close color matches for pretty much every single g1 (And have it set up for if you just search the pony’s name it will show you the closest hair matches for them!). Each (normal nylon) hair color is about 5 dollars, and they also have affordable rehairing tools and needles for only a dollar each. I’ve emailed them for color matching help before and they respond quickly and are very nice and helpful. They also have (slightly more expensive) color changing hair, glow in the dark hair, and textured hair (that are probably for other, non mlp dolls since i assume you need different hair plugs for them, but super useful if you’re a general doll collector, not just mlp)
RestoreDoll- I haven’t used this one personally but have heard people recommend it ^^
Dollyhair- A little controversial since the previous owner has had links to racist, antisemitic, and white supremacist sites, but the website is now under new ownership and is women and poc owned now! Wanted to get that out of the way since I was originally misinformed about the site and thought it was bad to use, it’s important to know about it’s past but also important to note the new ownership. They offer a lot of different hair colors, textured hair, Rehairing tools, Doll paint and even hair fragrances, with their (normal nylon) hairs being about 4 dollars each
My Little Customs- UK based nylon hair distributor, has a lot of nylon hairs but also other special hairs. They also have flocking and other materials useful for restoring dolls.
RIT Dye- The dye I use for pony hair (I have heard people also can use it for dying pony bodies for customs, but you have to be careful storing them because it could stain other ponies over time!). Good, high quality, long lasting and not fading. If you are repinking a pony with faded pink hair, I always use Petal Pink
Forceps- If you can find some online, wonderful tool for removing hair, rusty tails, or any object that might be inside your pony. Godsend, I use it all the time when rehairing. Tweezers can also work if you dont have.
Fabritac- Glue of choice for Rehairing and gluing heads back on
Fun Flock Cottonball white- Can be use to reflock or flock a pony. Visually looks similar to a g1 so soft, though the texture and look is slightly different. This is what I’ve used to restore a so soft in the past
Mod Podge- Glue of choice for flocking
Apoxie Sculpt- This is what many people use to restore broken or chewed off body parts. Durable, though may be a little more difficult to use and expensive than other basic air dry clays.
Model Magic- Personal choice for air dry clay to use to fix broken/chewed off body parts. You specifically need an air dry clay (as you cant really bake a pony body without it melting) and Model Magic doesn’t crumble and has a soft (? dunno how to describe it) toylike, texture when it dries. Just note you should avoid getting it wet. You could also use your own personal choice of air dry clay.
Rust Removers- I typically just use white vinegar to clean rusty bodys/tails/beddy bye eyes. Letting the rusty pony/hair sit in a white vinegar bath and scrubbing gently with a tooth brush will remove most rust. For harder to remove rust I’ve heard Rit Rust Remover works well, though this is more expensive and I haven’t tried it myself.
EcoStardust Glitter- I specifically sought out a biodegradable glitter for my restorations, and this is the one I’ve used. Has basic colors of glitter in various sizes. (Choosing the finest option they had) It isn’t exactly the same fineness as the original g1 glitters, but it was fine enough to work and look good on a complete cutiemark restoration. Here’s an example of what it looks like on an actual pony if you wanna see how it looks compared to the original glitter. Please note you can use whichever glitter you want, there are definitely better/closer matches to the look (And I’m sure normal glitter is cheaper/easier to get). If you don’t mind using a non biodegradable one look for “ultra fine”, I just specifically felt better using a biodegradable one ^^
Acrylic Paint- Good for custom work but also for restoring Cutiemarks!
Paintbrushes- You’ll need different kinds depending on what you’re doing. Get high quality nice ones if you wanna paint a custom or do detailed cutiemark work. If you have any of those cheapo, bendy, shitty dollarstore paintbrushes: those are great for gluing hair into heads because they’re bendy and can reach hard to reach areas, and you wont destroy an actual good brush with glue.
Hydrogen Peroxide: Can be used with sunfading to safely remove certain stains, read more here
Accessories
HQG1C- This is actually a huge, fan project creating a ton of “high quality g1 customs” they’re very cool. I’m putting them here not only for their customs but they also have cool stuff for customizers and collectors: Blank Pony Bases, Hair/rehairing tools, replacement shells for sea ponies, replacement cowboy hats for a big brother pony like Tex, ect. Here is Clipper’s website (Ships in USA) And here is a UK distributor and also another UK distributor
Sweetheart Sister Earring Replacements- (Sometimes I see these going out of stock, I’m linking someone who’s selling them as of writing this on july 28, 2023)
Flutter Wing Replacements and Windy and Summer Wing Replacements- (Sometimes I see these going out of stock, I’m linking someone who’s selling them as of writing this on july 28, 2023). Also worth noting the pony preservation project has a few tutorials on how to make some wings, these are just links for if you want to buy some.
Custom Flutter Wing Tutorial- This specific one is a custom look a little different from the original flutter wings, but looks gorgeous
Dress Ponywear Tutorial- A pattern I made myself of a basic ponywear dress, free to use. Works for g1 and g3 (have not tried to adjust it for other generations yet)
Pony nightcap sewing tutorial- idk thought I’d throw this in too, very simple sleepy nightcap sewing tutorial that fits ponies, free to use (I made it for a bbe)
Pony Blankets, Bandanas, diapers and other accessories patterns- To replace missing accessories if you wanted to sew them yourself
Community (Forums or Areas you may want to go to ask questions from others!)
My Little Pony Trading Post- A dedicated MLP forum, with sections dedicated to discussions (I often see people asking or answering questions about restorative measures for example), art, customs, or other topics. No profanity is allowed and you have to be over 16
My Little Pony Arena- I know this forum exists and that a lot of people discussed restorative topics on there and used it as a resource for stuff like that, and so I felt the need to mention it: but the site is quite literally unusable if you don’t have an account, you can’t access any pages, and to make an account you have to wait for it to be approved. I tried signing up but it has been awhile and I’ve heard nothing back, so I’m assuming this is one of those sites that are largely inactive in the modern day 😔
My MLP Discord Server- Figured I’d throw this in there: An MLP server I made for fans of all/any generation, not necessarily toy specific either. If you wanna ask me or anyone else a question or advice about toys or restoration or something or you just wanna say hi feel free to pop in :) Very Very causal
MLP Collectors Discord Server- Not mine but very fun, for fans of all gens, some nice people there :) Is a lot larger and more structured than my own server
97 notes
·
View notes
Text
There are other tutorials for this out there but I just wanted to have somewhere specific to point peoples of asked how I made my pins and I like to have things laid out in as simple a fashion as possible so here ya go
You will need;
- one bottlecap
- one can tab
- one safety pin
- pliers
- pokey thing (optional)
Instructions; (transcribed from captions)
Step 0 (optional, just lessens safety pin shifting)
Use something rigid (I have a pokey thing, I don't know it's actual name) to lift the middle of your can tab
Step 1
Open safety pin and put it through your can tab, open side out
Step 2 (this is a bit fiddly and may be difficult if you struggle with pain in your hands)
Bend in the edges of your bottlecap just enough to slip the can tab under
Step 3, final assembly
Place the can tab with pin under the edge of the bottletop and press edges flat
I goofed this a bit but it's an easy fix
With the can tab secured you can reposition the safety pin if necessary
The grooves in the edge of the bottlecap will keep it in place
I will make some more with different materials and accommodations in mind
But this is the basic method I'll be working from
As for decoration; go nuts fam
I've been painting mine but you can do whatever
Cover them with stickers, fabric or paper
Add rhinestones, glitter or sequins and make them 3d
Paint, permanent marker, resin
Do whatever you want forever
And don't worry if it's a little dodgy
52 notes
·
View notes
Text
MyArtGallery 20230623 BIG UPDATE!
Hi everyone! I made a cool big update to MyAG - a free, fast-rollout gallery package for your personal neocities.org website. It is aimed at artists who value and curate their online presence and want their art to exist for more than while it's on someone's dashboard. MyAG is my contribution to the decorporativisation of the online space. And today, i made it a whole ton more usable, too - managing your online art gallery is almost as easy as tumblr now!
Meet the brand-new editor page! Before this, it used to be a neverending stream of html forms with crap layout.. now, it's almost state-of-the art web app shit! Essentially, it takes the form of what you see when you access your actual art gallery as a visitor, but with simplified design and neutral colours, and managing tools. To edit your artworks or groups - simply click on them and select "edit" in the popup menu! A nice lil' window appears, and you can change everything about your artwork or group in it. Adding new stuff is as easy as pressing "Add new..." and filling out a couple fields, too!
But wait.. there's more! Not only can you now delete your stuff easily (yeah, there were troubles with that) - but also, i implemented moving stuff around in a turbo-simple way! Click "move" and hover over any of the insert markers that pop up, click - and the artwork (or the group button) is moved to the desired location.

Pretty cool, huh? Sure is, and also sure as hell feels nice to have over 1K lines of code working neatly together for the sake of art without companies! I hope someone goes ahead and cooperates with me by running this at their neocities page and reporting any issues that emerge. Want to see it live? Here's a fresh stock deployment left untouched. And my own kandi museum runs on MyAG, too!
Grab MyAG and read the manual/tutorial at project's github page! Use this shit dammit!
If you want to contact me, DM here or use one of these!
Smaller updates:
Added a settings file checker. Since some keys will be coming and some will be going, the settingsChecker.html tool-page will check your current settings.js file for missing and deprecated setting keys, and point you to a quick-fix example!
Since i finally sorted out the XML entry order, some users may end up with their gallery groups or artworks displaying backwards after they update... i added "macro tools" to the gallery editor page, and the two available tools are to reverse all images and reverse all groups. If you run into such problem while updating, simply use the needed macro tool.
Figured out a bunch of small CSS bugs - stuff is laid out a bit neater now. Pretty sure there's more to come.. *cdi mario voice* and you've gotta help us!
54 notes
·
View notes
Text
Okay I know I just went over this earlier and a did make a tutorial on TikTok but I feel like saying it here,
burning CDS is easy as FUCK
Or, a little explanation on how I make custom CDs
disclaimer: I use windows so if you use anything else I’m so sorry
I’ll add pictures to go along with this later!!!
things you absolutely NEED
a computer/laptop
(If said computer/laptop doesn’t have a built in disc drive) an external disc drive (there are pretty good ones for like 20-25 dollars!!)
CDs/DVDs obviously (either R or RW, the only difference is that you can rewrite RW CDs and DVDs)
also! DVDs obviously hold picture and video as well as audio, so do what you want with those
Technically step one
if you thrifted CDs like I did, or found really old ones in a box in your home somewhere, MAKE SURE THEY ARE EMPTY!!! If you want to keep the stuff on them, there’s an option to rip them in windows media player legacy (which is what I use to burn them as well)
then to erase it, open file explorer, click on the CD/DVD in your disc drive, click the three dots on the toolbar and select “Erase this disc” (this usually doesn’t take too long)
Actual Step One
if you want to make a mixtape, make a Spotify playlist of all the songs you want and copy the link to it (or any other platform, I just find it easier to make a Spotify playlist because I can download it), if you’re just doing an album then get the link of that album instead (make sure both of them can actually fit on the CD you have! Mine can hold like…74 minutes of music)
then use this handy little Spotify downloader to download a zip file of all the songs (sometimes it messes up and will exclude some, make sure to double check they’re all in there…if not you can download them individually too)
Step Two
in your files, open up the zip file of all the music, select them all, and copy them to music (there’s a whole section for it that media player uses, trust me you’ll see it)
then open windows media player legacy and double check it’s in there—usually it’s gathered by artist
step two and a half
Okay so most of the time I go to organize -> settings -> privacy -> and uncheck all the top boxes. You don’t have to, I just do that…idk why I just have.
Step Three (the easy part)
first make sure the CD is set as an audio CD (and also that it’s actually in the disc drive), and click the burn tab
drag all the songs you want on the CD into the burn list, and reorder them however you’d like! There are options to shuffle them and organize them specific ways if you’d like. Once you have everything all set you can click start burn and all you have to do is wait! It’ll eject once it’s done
Step 4 (optional)
If you have a jewel case, you can print or draw your own custom covers and backs!!!! You can also draw on CDs with a sharpie marker if you’d like. Just remember that slim cases have different sizing than standard cases. There’s also stickers for CDs that cover the fronts of them(? Or so I’ve been told…)
Step 5
make sure the CD actually works, try playing it on a different device if you can, and enjoy!!!
Step “what if I don’t have a CD player?”
well I’m gonna tell you you probably do and just don’t know it!
do you have a DVD player laying around your house? That’s a CD player!
do you have an old ass computer that would suck with burning the CDs itself but still has a disc drive an everything? That’s a CD Player!
do you have a shitty old karaoke machine? Chances are it has a spot for CDs! THATS A CD PLAYER!
Of course you can get a new one if none of these are functional devices for you or you just don’t have them, but I just wanted to point out that a lot of things can be used to play CDs
or you can help me bring back Walkmans and discmans….if you’re listening to music on the go…./silly
Also! Some cars have spots to play CDs in them!! Your CD doesn’t have to be limited to your home!!!
also also, I’m 70% sure that a lot of game consoles can play DVDs but not CDs. Saying thing incase the information is valuable for someone who wants to watch a good movie on DVD or something….
16 notes
·
View notes
Note
HI UR ART STYLE IS SO CUTE!! especially your wof stuff, im terrible at drawing dragons i have no clue how you do it so well lol
I'm so glad you like it!!!! :) As for how I draw them, I only really figured out how to draw dragons recently, but the process is actually fairly streamlined, so I whipped up a makeshift tutorial to put here. I might make a more in depth one later, so keep an eye out for that if you're interested.

I start with a circle for the head and a line where I want the middle of the neck to be. I then add two more lines for the thickness of the line, doing my best to keep them even all the way through. The next step is to add the contours of the face and the snout, which is a bit tricky because you have to more or less freehand it. It's kinda like a rectangle that points up a bit at the ends attached to the face. You then add a tiny triangle above it for the eyebrow ridge, and something to define the jawline (it doesn't have to be a spike, but it is over here.) For the most part, the head is just a circle with a weird shape grafted onto it.


The horns are kinda tricky, and I'd have to make a separate tutorial to prevent this one from getting too long. The thing to note is that dragons are quite angular, and the horns should have more than one angle to them. (in this example, they form a curve.) If you do want horns with a straight edge, like canon!Night and IceWings, be sure to keep it at a low angle. It's a similar story for the face--it's a lot to explain here--but it also varies a lot with art style, especially the eyes.


Once you get to that point, you can do the line art from there-- most scale patterns are easy enough to freehand. I like to colour only the insides of my line art, but again, it depends on style. I have both the finished product here and a version with the sketch on top for reference. Lots of the time, I end up doing a messier sketch before doing a second, cleaner one.
Relating to art style, I use the marker brush in ibis paint to sketch and a modified, opaque and pressure sensitive version for line art.
Hopefully somebody can get some use out of this little tutorial, I just kinda had the motivation spring into my veins after receiving this ask so thanks for that! <3
22 notes
·
View notes
Last Seen Blogs

undercovercannibal
It's fine to be weird.
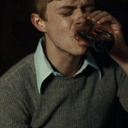
augustwhiskey
stranger on a bus
marsh-witch
marsh witch
lighterftma3-blog
Fatma
futurefind
D R I F T I N G