#f1 as wikihow
Text
The surprising match
(Max Verstappen x Korean actress reader)
SOULMATE AU
N.B: this is just an idea that came to mind cause I am a hoe for soulmate aus, so if you know any f1 soulmate aus please tell me! WARNINGS: ONLINE HATE, THE WORDS WHORE, SLUT AND DICK ARE USED. SWEAR WORDS LIKE FUCK AND ASSHOLE ARE ALSO USED, if I missed anything please let me know! And obviously some spelling mistakes.... might do a part 2 idk yet
Faceclaim: Han so hee


SKENTNEWS.COM


Liked by doO_nct, realstraykids, maxverstappen1 and 4.8M others
YN99LN: had too much fun this week, thank you everyone for showing my new drama this much love
username: BOY IF YOU DON'T STOP
username: Max really has no idea what being slick is huh.
username: I hate you
username: slut
username: I really hope this fun didn't involve the vroom vroom boy
username: vroom vroom boy 💀😂
username: ikr, can't believe we might lose our queen
username: I'm in Spain without the s
username: low quality picture, high quality woman
username: show off
username: when you're YN LN but still take 144p pictures
username: the struggle is real


Liked by agustd, saythename_17, danielricciardo and 6.8M others
YN99LN: Canada, you are so kind to me. I want to stay with you
username: so who is Canada?
username: you know who else is in Canada? MAX FUCKING VERSTAPPEN
username: this is definitely about Max
username: DANNY WHAT ARE YOU DOING HERE
username: no because if this is about max and she's happy about the fact that he's nice it's too sad cause wtf has she been through
username: you really don't wanna know
username: all my homies hate what people in SK did to her
username: oh my god, stop showing off you bitch
username: I hope you die
username: I feel like a victorian man seeing collar bones for the first time
username: IKR!! something about her collar bones!
username: as an f1 fan this community is so weird
username: collar bones? Really?
username: I feel like I entered another universe
username: is she drunk in the first pic?
username: yes, this whore just gets drunk and has tattoos and smokes, she's the worst
username: I was gonna say that it's so hot of her to post a pic like that
username: stay pressed you asshole
username: the second and last pictures tho
username: I am just a hole yn
username: bend me over your knee and slapp my cheeks ma'am
username: the leather pants and glasses are so 🔥
username: it gave me a boner and I don't even have a dick
username: I have a dick and now I am in the shower
username: everyone horny for yn
username: good for nothing pampered slut
username: I hope max leaves you
username: I hope he hates her
username: I read that she smokes as well and while I am against the action and stand by the fact that it's not cool to smoke seeing a South Korean famous person do that shit is so wild for me and turns me on
username: I want to chock on her boot's heel
username: yn please spit in my throat
username: wikihow please tell me how to give head
username: the 2nd picture makes me want to give her hickeys all over her back and shoulder
username: step on me
username: you f1 fans are wild
username: this comment section passed the vibe check
~this post has been removed~


#f1 imagine#f1 x reader#f1 social media au#charles leclerc#f1 instagram au#f1 smau#f1#max verstappen x reader#max verstappen#max verstappen smau#max verstappen social media au#max verstappen soulmate au#f1 soulmate au#f1 social media#f1 twitter au#max verstappen fic#max verstappen x you
962 notes
·
View notes
Note
heyoheyo quick question i just started getting into f1. this race is the first i watched live while lurking on the tag here and is it always like this? the amount of hateful posts and anti this anti that stuff I've seen is crazy. i know it's sport and everythings competitive but im in other sport fandoms here and the atmosphere is much nicer when cheering for and respecting all athletes with the mutuals.
so yeah i guess i just wanna know if this is always the vibe before getting involved further. which would be sad cause the athletes and racing is very fun
hi anon <3 first of all, i'm so fucking sorry that this was ur first experience live blogging during a race. yest was a toxic whirlwind and i, despite having been part of f1blr for a bit, was quite downtrodden and mad about it.
i will say this. i personally believe it's not as bad as it was yesterday.
there are many reasons for this i think. to begin with, it was the first race of the season effect. everyone's been waiting n dying to see their fav on track and to have a good result and we also didn't really know how the teams would perform. so a lot of expectation -> a lot of disappointment -> mean things on tumblr.
people often find it easier to blame another driver than a whole ass team cause it's easier to direct the anger at a person than a concept which i think is what happened yesterday with multiple drivers.
it's not usually this bad.
but.
it is often quite bad. definitely worse than other fandoms.
i do think the racing makes up for it and that's why i've still stuck around.
ella and i were talking about it and the takes are definitely at its worse during the race and two hours after it.
once we pass that wave, things tend to calm down and we enter the funny text posts territory.
but if you do want to live post/scroll through it, i would stick to my own dash and avoid the main tags.
tumblr gives us the privilege of careful curation and i use that shit everyday. like i will check the bio and do a quick scroll thru each blog i follow.
i also have multiple tags (n blogs) blocked.
there are several people on f1blr who post amazing content and are so on top of updates. but they can be really mean in their phrasing. i don't follow them or block them cause i know that their content will reach my dash through my mutuals but their hot takes won't (especially the text posts where people rant in their tags, those tend to be the meanest).
despite all this, yesterday i spent a good amount of time unfollowing some mutuals. but as i said, i really do believe that f1blr was at its worst then.
there are definitely some blogs that are neutral/nice about the drivers/teams they don't support. these are some of my favourites;
@epylonia @cooali @liamlawsonlesbian @jussst-lurking
i know i have answered ur simple yes/no question with a WikiHow article but i really do hope that bits of it can be helpful to u and that if ur online n scrolling thru jeddah, u see more fun takes than hurtful ones
#ask#they're in their masters in english mood today apparently#no really though it felt wrong to be like yes it's bad#and dip#so#yeah
24 notes
·
View notes
Note
not f1 related at all but how badly did your septum piercing hurt? i really wanna get one but im soooo nervous about the pain
hi! ok so honestly i lucked out because apparently (according to the girl who pierced me) my facial anatomy is perfect for a septum ring. my 'sweet spot,' aka nasal columella (which is located near the tip of the nose) was really easy to find, so there was no risk of going through cartilage.
the pain was like 2/10, i didn't even notice they'd put the needle all the way through until my eyes started to water as a reflex. it was just a very subtle pinch with virtually no burning.
with that being said, my best friend's experience was way different (8/10 pain) so it really comes down to your own tolerance and anatomy. i'd recommend trying to find your columella prior to booking an appointment, since if you can't there's a high chance your technician will flat-out refuse to perform the piercing on you, or accidently push the needle through cartilage.
there's lots of good resources on YouTube, or even wikiHow (lol)
#reminder: if you do not have the correct anatomy for a piercing and your piercer does it anyway that is IRRESPONSIBLE#asks#misc asks
2 notes
·
View notes
Text
F1 AS WIKIHOW ARTICLES 2022 (PART 1 OF ??)
New year, new season of this chaos :))


#f1 as wikihow#f1#f1blr#formula one#charles leclerc#daniel ricciardo#lewis hamilton#carlos sainz jr#Esteban ocon#toto Wolff#George Russel#valtteri bottas#yuki tsunoda
227 notes
·
View notes
Text
you all want to be a part of the merc debrief but i'm over here willing to sell my left lung to see mick fist fight mazepin in the haas debrief
831 notes
·
View notes
Text
hope you're all having fun with your wc draw mwah
#personally i saw talk of monza gp tickets on my dash#and now it's all i can think about AGAIN#wikihow to go to monza without giving money to the f*a#i'm so#it's been my dream since i started watching f1 i'm overwhelmed just thinking about it 😭😭😭😭😭😭😭#i don't wanna go alone tho 😢#we talked a while ago in the football discord server about going to monza together but i don't think it'll still happen#😔😔😔😔#i don't wanna go with my family lmaoooo#nico.txt
2 notes
·
View notes
Text
De qué forma arreglar un colchón de aire: trece pasos (con imágenes) - WikiHow
Este artículo ha sido visto 14915 veces.
No hay nadie peor que ver cómo se desinfla su jergón de aire cuando más lo precisa. Felizmente, la mayor parte de los jergones se pueden salvar reparando goteras y roturas. Para hacer esto, localice las fugas y limpie el comarca circundante para que el parche se adhiera. Se pueden usar medidas temporales, como cinta adhesiva, para sellar el abandono hasta el momento en que pueda pegar un parche más fuerte. Después de arreglar los agujeros, su colchón de aire volverá a ser seguro y cómodo de utilizar.
Hallar la fuga
"smallUrl ":" https: \ / \ /www.wikihow.com \ / images \ / thumb \ / 2 \ / 2e \ /Repair-an-Air-colchon Walmart-Step-1.jpg \ / v4-460px-Repair-an-Air-colchon Walmart-Step-1.jpg", "bigUrl ":" \ / images \ / thumb \ / 2 \ / 2e \ /Repair-an-Air-colchon Walmart-Step-1.jpg \ / aid9528741-v4-728px-Repair-an-Air-colchon Walmart- Step-1.jpg "," smallWidth ": 460," smallHeight ": 345," bigWidth ":" 728 "," bigHeight ":" 546 "," Licensing ":" Licencia: Creative Commons
\ n
\ n "
1
Escuche y busque el abandono en el jergón de aire. Si no sabe dónde se encuentra la entrada, sostenga el colchón inflado mientras que mira. Los orificios aparecen con mayor frecuencia en la parte inferior o en las costuras, así que coloque el jergón contra una dique para verificarlo. Escuche la onomatopeya del aire corriendo para localizar pequeñas fugas. [1] X Fuente de investigación
" smallUrl ":" https: \ /\/www.wikihow.com\/images\/thumb\/a\/a5\/Repair-an-Air-colchon Walmart-Step-2.jpg\/v4-460px-Repair-an-Air -colchon Walmart-Step-2.jpg "," bigUrl ":" \ / images \ / thumb \ / a \ / a5 \ / Repair-an-Air-colchon Walmart-Step-2.jpg \ / aid9528741-v4-728px-Repair-an-Air-colchon Walmart -Step-2.jpg "," smallWidth ": 460," smallHeight ": 345," bigWidth ":" 728 "," bigHeight ":" 546 "," Licensing ":" Licencia: Creative Commons
\ n
\ n "
2
Use agua y jabón si no puede localizar la fuga. Intente mezclar una cucharadita de desinfectante para platos líquido en un recipiente con agua. Use una esponja para esparcir el linfa con jabón sobre el jergón. Aparecerán burbujas en el área de el abandono.
" smallUrl ":" https: \ / \ / www.wikihow.com \ / images \ / thumb \ / 2 \ / 29 \ / Repair-an-Air-colchon Walmart-Step-3.jpg \ / v4-460px-Repair-an-Air-colchon Walmart-Step-3.jpg", "bigUrl" : " \ / images \ / thumb \ / 2 \ / 29 \ / Reparar-un-aire- colchon Walmart-Step-3.jpg \ /aid9528741-v4-728px-Repair-an-Air-colchon Walmart-Step-3.jpg "," smallWidth ": 460," smallHeight ": 345," bigWidth ": "728", "bigHeight": "546", "jubilación": "Licencia: Creative Commons
\ n
\ n "
3
Marque la fuga con un marcador permanente. Encierra en un círculo la fuga con el marcador para que puedas encontrarla fácilmente después. Esto es útil para pequeños agujeros y rupturas. También puede beneficiarse un fragmento de cinta para marcar la fuga.
" smallUrl ":" https: \ / \ / www.wikihow.com \ / images \ / thumb \ / 0 \ / 04 \ / Repair-an-Air-colchon Walmart-Step-4.jpg \ / v4-460px-Repair- an-Air-colchon Walmart-Step-4.jpg "," bigUrl ":" \ / images \ / thumb \ / 0 \ / 04 \ / Repair-an-Air-colchon Walmart-Step-4.jpg \ / aid9528741-v4-728px-Repair-an- Air-colchon Walmart-Step-4.jpg "," smallWidth ": 460," smallHeight ": 345," bigWidth ":" 728 "," bigHeight " : "546", "dimisión": "Licencia: Creative Commons
\ n
\ n "
1
Desinfle el jergón de aire. Finta los tapones y dejo salir el aire. Use sus manos para expulsar el aire que aún toque atrapado dentro del jergón. Pone el colchoneta en el suelo. [3] X Fuente de encuesta
" smallUrl ":" https: \ /\/www.wikihow.com\/images\/thumb\/f\/f4\ / Repair-an-Air-colchon Walmart-Step-5.jpg \ / v4-460px-Repair-an-Air-colchon Walmart-Step-5. jpg "," bigUrl ":" \ / images \ / thumb \ / f \ / f4 \ / Repair-an-Air-colchon Walmart-Step-5.jpg \ /aid9528741-v4-728px-Repair-an-Air-colchon Walmart-Step-5.jpg" , "smallWidth": 460, "smallHeight": 345, "bigWidth": "728", "bigHeight": "546", "licensing": "Licencia: Crea tive Commons
\ n
\ n "
2
Limpie el circunscripción de el abandono con alcohol isopropílico. Extienda un poco de alcohol isopropílico sobre una toalla o bien una bola de bala. Limpie a fondo la fuga y el trapo que la rodea para quitar cualquier resto. En el momento que hayas completar, deja que el colchoneta se seque por completo. - Si no tiene alcohol isopropílico, mezcle una cucharadita de cualquiera jabón líquido para platos en una taza de linfa y utilícelo para asear el circunscripción.
" smallUrl ":" https: \ /\/www.wikihow.com\/images\/thumb\/f\/f1\/Repair-an-Air-colchon Walmart-Step-6.jpg\ / v4-460px-Repair-an-Air-colchon Walmart-Step-6.jpg", " bigUrl ":" \ / images \ / thumb \ / f \ / f1 \ /Repair-an-Air-colchon Walmart-Step-6.jpg \ / aid9528741-v4-728px-Repair-an-Air-colchon Walmart -Step-6.jpg "," smallWidth ": 460," smallHeight ": 345," bigWidth ":" 728 "," bigHeight ":" 546 "," Licensing ":" Licencia: Creative Commons
\ n
\ n "
3
Lije el abandono si su colchón está flocado. Lije suavemente alrededor de el abandono con papel de lima de grano 120. Esto solo es necesario para las superficies flocadas, que son elevadas y suaves como el terciopelo, o superficies semejantes como el trapo. [4] X Fuente de averiguación: la caja del colchón o el manual del propietario le señalarán qué género de jergón tiene. Si aún no está seguro, omita este paso.
" smallUrl ":" https: \ / \ / www.wikihow.com \ / images \ / thumb \ / 4 \ / 4e \ / Repair-an-Air-colchon Walmart-Step-7.jpg \ / v4-460px-Repair-an-Air-colchon Walmart-Step -7.jpg "," bigUrl ":" \ / images \ / thumb \ / 4 \ / 4e \ /Repair-an-Air-colchon Walmart-Step-7.jpg \ /aid9528741-v4-728px-Repair-an-Air-colchon Walmart-Step-7.jpg "," smallWidth ": 460," smallHeight ": 345," bigWidth ":" 728 "," bigHeight ":" 546 "," exención ":" Licencia: Creative Commons
\ n
\ n "
1
Crea un parche con el atuendo cuando no tengas plástico. Primero, asegúrese de adecentar el área rasgada con alcohol isopropílico. Tala un parche de una camisa vieja u otra lona. Use superpegamento y pese el parche durante por lo menos 6 horas, si es posible. - Este parche no es tan eterno como los de plástico o bien de goma, mas resistirá hasta que pueda hacer más reparaciones.
" smallUrl ":" https: \ /\/www.wikihow.com\/images\/thumb\/a\/a8\ / Repair-an-Air-colchon Walmart-Step-8.jpg \ / v4-460px-Repair-an-Air-colchon Walmart-Step-8.jpg", "bigUrl": " \ / images \ / thumb \ / a \ / a8 \ / Repair-an-Air-colchon Walmart-Step-8.jpg \ / aid9528741 -v4-728px-Repair-an-Air-colchon Walmart-Step-8.jpg "," smallWidth ": 460," smallHeight ": 345," bigWidth ":" 728 "," bigHeight ":" 546 "," exención ":" Licencia: Creative Commons
\ n
\ n "
2
Selle transitoriamente los orificios con cinta adhesiva. Limpie el comarca dañada, luego coloque la cinta sobre el agujero. Podrá emplear el jergón a la noche, mas la cinta se aflojará con el duración. Reemplácelo con un parche más fuerte en el momento que tenga la oportunidad. [5] X Fuente de averiguación: si utiliza cinta, asegúrese de limpiar los residuos de cinta que quedan en el colchón cuando intente parchearlo después.
" smallUrl ":" https: \ / \ / www.wikihow.com \ / images \ / thumb \ / 4 \ / 4e \ / Repair-an-Air-colchon Walmart-Step-9.jpg \ / v4-460px-Repair-an-Air-colchon Walmart-Step-9.jpg", " bigUrl ":" \ / images \ / thumb \ / 4 \ / 4e \ / Repair-an-Air-colchon Walmart-Step-9.jpg \ / aid 9528741-v4-728px-Repair-an-Air-colchon Walmart-Step-9.jpg "," smallWidth ": 460," smallHeight ": 345," bigWidth ":" 728 "," bigHeight ":" 546 "," jubilación ":" Licencia: Creative Commons
\ n
\ n "
3
Use una revolver de pegamento caliente para sellar pequeños orificios y rasgaduras. Una pistola de pegamento puede tapar pequeñas fugas, pero tenga cuidado de no permitir que la revolver toque el colchoneta. Caliente la pistola, luego mantenga la punta por encima del boquete. Mueva despaciosamente la pistolete sobre la entrada hasta que esté lleno. [6] X Fuente de investigación: la revolver de adhesivo puede fundir el colchón, así que mantén la punta distanciada de .
" smallUrl ":" https: \ / \ / www.wikihow.com \ / images \ / thumb \ / a \ / a0 \ / Repair-an-Air-colchon Walmart-Step-10 .jpg \ / v4-460px -Arreglar-un-colchón-de-aire-Paso-10.jpg "," bigUrl ":" \ / images \ / thumb \ / a \ / a0 \ / Arreglar-un-colchoneta-de-aire-Paso-10 .jpg \ /aid9528741-v4-728px-Repair-an-Air-colchon Walmart-Step-10.jpg "," smallW idth ": 460," smallHeight ": 345," bigWidth ":" 728 "," bigHeight ":" 546 "," licensing ":" Licencia: Creative Commons
\ n
\ n "
1
Corta un parche de una cortina de afusión de vinilo. Si tiene un kit de reparación, tendrá el material que precisa para crear un parche. En caso contrario, una cortinaje de afusión vieja o bien un revestimiento de estanque son geniales sustitutos. Use unas tenacillas para recortar un parche que sea un poco más grande que el circunscripción que quiere cubrir. Esto asegurará que el parche continúe apretado y en su lugar sobre el agujero. [7] X Fuente de búsqueda: los kits de reparación vienen con algunos jergones y además se pueden adquirir en que se vendan jergones de aire.
- Los kits de parche para llantas de bicicleta también funcionan bien para reparar jergones de aire. Encuéntrelos en tiendas de bicicletas y generales.
" smallUrl ":" https: \ / \ / www.wikihow.com \ / images \ / thumb \ / c \ / c3 \ / Repair-an-Air-colchon Walmart-Step-11.jpg \ / v4-460px-Repair-an-Air-colchon Walmart-Step-11.jpg", "bigUrl" : " \ / images \ / thumb \ / c \ / c3 \ /Repair-an-Air-colchon Walmart-Step-11.jpg \ / aid9528741-v4-728px-Repair-an-Air-colchon Walmart-Step -11.jpg "," smallWidth ": 460," smallHeight ": 345," bigWidth ":" 728 "," bigHeight ":" 546 "," l icensing ":" Licencia: Creative Commons
\ n
\ n "
2
Extienda cemento de goma sobre el parche. Cepille el cemento de goma sobre la parte posterior del parche. Además extienda una capa sobre el área de el abandono. Puedes emplear un manguito de goma para suavizar la goma y cerciorarte de que el parche se sostenga plano contra el jergón. [8] X Fuente de averiguación: asimismo pueden actuar otros pegamentos fuertes, como superpegamento, cemento de contacto o bien epoxi.
- También puede hallar pegamento abocetar particularmente para superficies como colchones de aire, flotadores para piscinas o bien balsas de aguas bravas. Este pegamento se puede localizar en donde se venden estos artículos.
" smallUrl ":" https: \ / \ / www.wikihow.com \ / images \ / thumb \ / 9 \ / 9e \ /Repair-an-Air-colchon Walmart-Step-12.jpg \ / v4-460px-Repair-an-Air-colchon Walmart- Paso-12.jpg "," bigUrl ":" \ / images \ / thumb \ / 9 \ / 9e \ /Repair-an-Air-colchon Walmart-Step-12.jpg \ / aid9528741-v4-728px -Repair-an-Air-colchon Walmart-Step-12.jpg "," smallWidth ": 460," smallHeight ": 345," bigWidth ":" 728 "," bigHeight ":" 546 "," Licensing ":" Licencia : Creative Commons
\ n
\ n "
3
Ponga el parche en su sitio y déjelo por 6 horas. Coloque el parche sobre el demarcación de el abandono y presione hacia abajo hasta que quede plano. Pese el parche con un objeto pesado, como un libro. Acento el parche entonces por inclusive 12 horas si es posible. - Si no tiene ciclo para esperar a que se seque la goma, posiblemente el parche se desprenda. Intente utilizar cinta adhesiva u diferente material de cobertor hasta que pueda cubrir el abandono adecuadamente.
" smallUrl ":" https: \ / \ / www.wikihow.com \ / images \ / thumb \ / 6 \ / 6c \ /Repair-an-Air-colchon Walmart-Step-13.jpg \ / v4-460px -Repair-an-Air-colchon Walmart-Step-13.jpg "," bigUrl ":" \ / images \ / thumb \ / 6 \ / 6c \ / Repair-an-Air-colchon Walmart-Step-13.jpg \ / aid9528741-v4-728px-Repair -an-Air-colchon Walmart-Step-13.jpg "," smallWidth ": 460," smallHeight ": 345," bigWidth ":" 728 "," bigHeight ":" 546 "," Licensing ":" Licencia: Creative Comunes
\ n
\ n "
4
Infle el jergón para probarlo. Enganche el jergón a la bomba y llénelo de aire. Escuche si hay fugas. Para probar esto, puede poner espejuelo alrededor del parche. Si el colchón sigue goteando entonces, el aire soplará el polvo.
-
Marcador o bien cinta
-
Alcohol isopropílico
-
Papel de lima para colchones
-
Kit de parche o bien revestimiento de plástico
-
Cemento de caucho
-
Manual o bien diferente objeto pesado
↑ https://www.sleepa went.org/fix-air-colchon Walmart-leak/
↑ https://www.sleepridiculouslywell.com/patch-hole-air-colchon Walmart/
↑ https://goneoutdoors.com/repair-coleman-air-colchon Walmart-5501927.html
↑ http://www.choosecolchon Walmart.com/repairing-an-air-colchon Walmart/
↑ http://www.bestaircolchon Walmartguide.com/repair-kit/air-colchon Walmart-repair-kit-ultimate-guide/
↑ https://www.sleepa went.org/fix-air-colchon Walmart-leak/
↑ https://www.sleepa went.org/fix-air-colchon Walmart-leak/
↑ https://www.sleepridiculouslywell.com/patch-hole-air-colchon Walmart/
↑ http://www.choosecolchon Walmart.com/repairing-an-air-colchon Walmart/
Para reparar transitoriamente un colchoneta de aire, limpie la fanfarronería y cúbralo con cinta adhesiva o rellénelo con adhesivo caliente. Igualmente, puede crear un parche con una camiseta cortando una pieza para que quepa sobre la desvergüenza y pegándola al colchón con superpegamento. Para hacer un parche más eterno, corte un pequeño trozo de una colgadura de lluvia de vinilo o bien un revestimiento de piscina y péguelo sobre el agujero con un adhesivo fuerte, como cemento de goma. Pese el parche con pellizco pesado, como un manual, y déjelo secar durante 6 horas antes de emplearlo. Para conocer más formas de arreglar un jergón de aire, como cómo adecentar tu colchoneta walmart a fin de que los parches se peguen, ¡prosigue leyendo! ¿Le asistió este extracto?
1 note
·
View note
Text
Fix sticky keyboard problem - wikiHow
Fix sticky keyboard problem - wikiHow Dust in the fan is tackled with a brush. Or you can suck it out very carefully. The same applies to a notebook where the fan is dusty. Before you start cleaning, make sure the laptop is turned off. Then you can also use a vacuum cleaner and a soft, damp cloth to clean the keyboard.
What to do if the laptop keyboard stops working?
On most laptops there is a function for this with a key combination. Find the "Fn key" on the keyboard and a "keyboard symbol" (often crossed out) on the F1-F12 keys. Press both keys at the same time and then check whether the keyboard works again.
As smooth as the surface looks with the naked eye, it is not quite flat and is not free of scratches. Due to the air-filled "cavities" between the contact surfaces, heat transfer could take place rather poorly. The thermal paste fills these "cavities", which increases the contact area of the heat sink on the CPU. However, it is clean, the keys are as shiny as on the first day, handy and without any grease film, no crumbs trickle out of the case. Only now is it noticeable that the housing has discolored over the years, but the buttons have not - the best washing program cannot do anything about it. There is currently a problem filtering reviews. Please try again later. Comes after Christmas. Do you need a gift quickly?
Many people work on computers every day, but cleaning is often neglected.
A damp microfiber cloth is usually sufficient to clean the surfaces of a notebook or the frame of the monitor.
the heat sink or which could damage it.
Then it's back.
Then it is urgent to clean the input device.
The display and surfaces also get dirty quickly if you hold the device in your hands often. Not visible at first glance, but all the more treacherous are soiling inside the mobile computer. Due to the compact design of laptops, fans and cooling fins collect dust very quickly and the performance of the computer decreases. COMPUTER BILD shows how you can clean your notebook properly without damaging it. Once you have cleared the keyboard of all keys, you can start cleaning. A cotton swab soaked with detergent is suitable for corners. dust cleaning mud review a> As the last step press the Buttons again. This also applies to the nesting boxes for birds. The PC or laptop keyboard has been badly affected over the years - with some home remedies it looks like it did on the first day. To thoroughly clean your desktop PC keyboard it is necessary to remove all keys.
1 note
·
View note
Text
Mac Shortcut Keys For Excel

Table of contents
Worksheets and WorkbooksViewRow and Column SelectionRibbon ControlPivot TablesOperating within a CellNavigating and Selecting CellsHelp and MenusGroup Selection General ExcelGeneral Cell ControlFormulas and FunctionsFormatting Text and NumbersDialog BoxesBordersAdvanced Selection Adding Content to Cells
Worksheets and Workbooks
Within Excel you can conduct calculations on multiple worksheets and workbooks open at the same time. Each workbook acts as its own separate window on your PC or Mac, while each worksheet acts as a tab within a workbook with separate cells. This section of the Excel Guide offers all shortcuts you need to open, navigate between, and control all of these options.
Excel PC and Mac Keyboard Shortcuts - This page lists PC and Mac shortcuts side by side; A Macintosh Keyboard is available showing general Macintosh keyboard shortcuts Search Internet4Classrooms. Custom Search Internet4classrooms is a collaborative effort. This article describes the keyboard shortcuts, function keys, and some other common shortcut keys in Excel for Mac. Notes: The settings in some versions of the Mac operating system (OS) and some utility applications might conflict with keyboard shortcuts and function key operations in Office for Mac.
Cubase pro 8 for macbook air. The powerful music production unit is increasing to be famous to record and create a piece of outstanding music as you love to create.Cubase Pro 10.5.3 Keygen is suitable for MAC, Win to utilize the power comprehensively.
Aug 30, 2019 This wikiHow teaches you how to insert rows in Excel using shortcuts on a Windows or Mac computer. There are keyboard shortcuts as well as custom shortcuts that you can use in Excel spreadsheets. Open an excel spreadsheet.
Keyboard shortcuts help save time and increase productivity. Unfortunately, most people only know the holy trinity of shortcuts — COPY, PASTE, and UNDO. In Excel, there are more than 500 keyboard shortcuts.
Windows keys
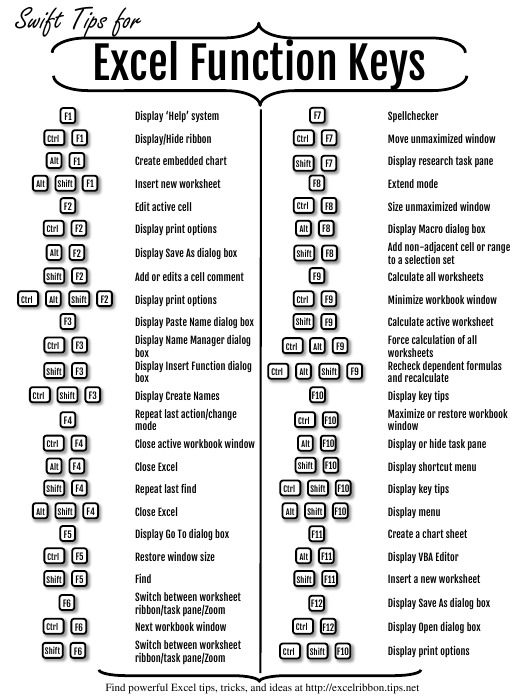
Keyboard Shortcut Keys For Excel
ShiftF11
CtrlPgDn
CtrlPgUp
F6
CtrlTab
Mac Shortcut Keys For Excel Spreadsheet
CtrlShiftTab
CtrlF9
CtrlF10
Worksheets and Workbooks
Excel Keyboard Shortcuts Pdf
Within Excel you can conduct calculations on multiple worksheets and workbooks open at the same time. Each workbook acts as its own separate window on your PC or Mac, while each worksheet acts as a tab within a workbook with separate cells. This section of the Excel Guide offers all shortcuts you need to open, navigate between, and control all of these options.
View
Row and Column Selection
Ribbon Control
Pivot Tables
Operating within a Cell
Navigating and Selecting Cells
Help and Menus
Group Selection
General Excel
General Cell Control
Formulas and Functions
Formatting Text and Numbers
Dialog Boxes
Borders
Advanced Selection
Adding Content to Cells
Get more Reference tips and tricks
All video downloader for mac free software. Subscribe to our email updates and get Reference tips direct to your inbox.
To use a keyboard shortcut, press and hold one or more modifier keys and then press the last key of the shortcut. For example, to use Command-C (copy), press and hold the Command key, then the C key, then release both keys. Mac menus and keyboards often use symbols for certain keys, including modifier keys:
On keyboards made for Windows PCs, use the Alt key instead of Option and the Windows logo key instead of Command.
Some keys on some Apple keyboards have special symbols and functions, such as for display brightness , keyboard brightness , Mission Control and more. If these functions aren't available on your keyboard, you may be able to reproduce some of them by creating your own keyboard shortcuts. To use these keys as F1, F2, F3 or other standard function keys, combine them with the Fn key.
Cut, copy, paste and other common shortcuts
Command-X: Cut the selected item and copy it to the Clipboard.
Command-C: Copy the selected item to the Clipboard. This also works for files in the Finder.
Command-V: Paste the contents of the Clipboard into the current document or app. This also works for files in the Finder.
Command-Z: Undo the previous command. You can then press Shift-Command-Z to Redo, reversing the undo command. In some apps, you can undo and redo multiple commands.
Command-A: Select All items.
Command-F: Find items in a document or open a Find window.
Command-G: Find Again: Find the next occurrence of the item previously found. To find the previous occurrence, press Shift-Command-G.
Command-H: Hide the windows of the front app. To view the front app but hide all other apps, press Option-Command-H.
Command-M: Minimise the front window to the Dock. To minimise all windows of the front app, press Option-Command-M.
Command-O: Open the selected item or open a dialogue to select a file to open.
Command-P: Print the current document.
Command-S: Save the current document.
Command-T: Open a new tab.
Command-W: Close the front window. To close all windows of the app, press Option-Command-W.
Option-Command-Esc: Force quit an app.
Command-Space bar: Show or hide the Spotlight search field. To perform a Spotlight search from a Finder window, press Command-Option-Space bar. (If you use multiple input sources to type in different languages, these shortcuts will change input sources instead of showing Spotlight. Find out how to change a conflicting keyboard shortcut.)
Control-Command-Space bar: Show the Character Viewer, from which you can choose emoji and other symbols.
Control-Command-F: Use the app in full screen, if supported by the app.
Space bar: Use Quick Look to preview the selected item.
Command-Tab: Switch to the next most recently used app amongst your open apps.
Shift-Command-5: In macOS Mojave or later, take a screenshot or make a screen recording. Or use Shift-Command-3 or Shift-Command-4 for screenshots. Find out more about screenshots.
Shift-Command-N: Create a new folder in the Finder.
Command-Comma (,): Open preferences for the front app.
Sleep, log out and shut down shortcuts
You may need to press and hold some of these shortcuts for slightly longer than other shortcuts. This helps you to avoid using them unintentionally.
Power button: Press to turn on your Mac or wake it from sleep. Press and hold for 1.5 seconds to put your Mac to sleep.* Continue holding to force your Mac to turn off.
Option-Command-Power button* or Option-Command-Media Eject : Put your Mac to sleep.
Control-Shift-Power button* or Control-Shift-Media Eject : Put your displays to sleep.
Control-Power button* or Control-Media Eject : Display a dialogue asking whether you want to restart, sleep or shut down.
Control-Command-Power button:* Force your Mac to restart, without prompting to save any open and unsaved documents.
Control-Command-Media Eject : Quit all apps, then restart your Mac. If any open documents have unsaved changes, you will be asked whether you want to save them.
Control-Option-Command-Power button* or Control-Option-Command-Media Eject : Quit all apps, then shut down your Mac. If any open documents have unsaved changes, you will be asked whether you want to save them.
Control-Command-Q: Lock your screen immediately.
Shift-Command-Q: Log out of your macOS user account. You will be asked to confirm. To log out immediately without confirming, press Option-Shift-Command-Q.
* Does not apply to the Touch ID sensor.
Finder and system shortcuts
Command-D: Duplicate the selected files.
Command-E: Eject the selected disk or volume.
Command-F: Start a Spotlight search in the Finder window.
Command-I: Show the Get Info window for a selected file.
Command-R: (1) When an alias is selected in the Finder: Show the original file for the selected alias. (2) In some apps, such as Calendar or Safari, refresh or reload the page. (3) In Software Update preferences, check for software updates again.
Shift-Command-C: Open the Computer window.
Shift-Command-D: Open the desktop folder.
Shift-Command-F: Open the Recents window, showing all of the files you have viewed or changed recently.
Shift-Command-G: Open a Go to Folder window.
Shift-Command-H: Open the Home folder of the current macOS user account.
Shift-Command-I: Open iCloud Drive.
Shift-Command-K: Open the Network window.
Option-Command-L: Open the Downloads folder.
Shift-Command-N: Create a new folder.
Shift-Command-O: Open the Documents folder.
Shift-Command-P: Show or hide the Preview pane in Finder windows.
Shift-Command-R: Open the AirDrop window.
Shift-Command-T: Show or hide the tab bar in Finder windows.
Control-Shift-Command-T: Add selected Finder item to the Dock (OS X Mavericks or later)
Shift-Command-U: Open the Utilities folder.
Option-Command-D: Show or hide the Dock.
Control-Command-T: Add the selected item to the sidebar (OS X Mavericks or later).
Option-Command-P: Hide or show the path bar in Finder windows.
Option-Command-S: Hide or show the Sidebar in Finder windows.
Command-Slash (/): Hide or show the status bar in Finder windows.
Command-J: Show View Options.
Command-K: Open the Connect to Server window.
Control-Command-A: Make an alias of the selected item.
Command-N: Open a new Finder window.
Option-Command-N: Create a new Smart Folder.
Command-T: Show or hide the tab bar when a single tab is open in the current Finder window.
Option-Command-T: Show or hide the toolbar when a single tab is open in the current Finder window.
Option-Command-V: Move the files in the Clipboard from their original location to the current location.
Command-Y: Use Quick Look to preview the selected files.
Option-Command-Y: View a Quick Look slideshow of the selected files.
Command-1: View the items in the Finder window as icons.
Command-2: View the items in a Finder window as a list.
Command-3: View the items in a Finder window in columns.
Command-4: View the items in a Finder window in a gallery.
Command-Left Bracket ((): Go to the previous folder.
Command-Right Bracket ()): Go to the next folder.
Command-Up Arrow: Open the folder that contains the current folder.
Command-Control-Up Arrow: Open the folder that contains the current folder in a new window.
Command-Down Arrow: Open the selected item.
Right Arrow: Open the selected folder. This only works when in list view.
Left Arrow: Close the selected folder. This only works when in list view.
Command-Delete: Move the selected item to the Bin.
Shift-Command-Delete: Empty the Bin.
Option-Shift-Command-Delete: Empty the Bin without a confirmation dialogue.
Command-Brightness Down: Turn video mirroring on or off when your Mac is connected to more than one display.
Option-Brightness Up: Open Displays preferences. This works with either Brightness key.
Control-Brightness Up or Control-Brightness Down: Change the brightness of your external display, if supported by your display.
Option-Shift-Brightness Up or Option-Shift-Brightness Down: Adjust the display brightness in smaller steps. Add the Control key to this shortcut to make the adjustment on your external display, if supported by your display.
Option-Mission Control: Open Mission Control preferences.
Command-Mission Control: Show the desktop.
Control-Down Arrow: Show all windows of the front app.
Option-Volume Up: Open Sound preferences. This works with any of the volume keys.
Option-Shift-Volume Up or Option-Shift-Volume Down: Adjust the sound volume in smaller steps.
Option-Keyboard Brightness Up: Open Keyboard preferences. This works with either Keyboard Brightness key.
Option-Shift-Keyboard Brightness Up or Option-Shift-Keyboard Brightness Down: Adjust the keyboard brightness in smaller steps.
Option key while double-clicking: Open the item in a separate window, then close the original window.
Command key while double-clicking: Open a folder in a separate tab or window.
Command key while dragging to another volume: Move the dragged item to the other volume, instead of copying it.
Option key while dragging: Copy the dragged item. The pointer changes while you drag the item.
Option-Command while dragging: Make an alias of the dragged item. The pointer changes while you drag the item.
Option-click a disclosure triangle: Open all folders within the selected folder. This only works when in list view.
Command-click a window title: See the folders that contain the current folder.
Find out how to use Command or Shift to select multiple items in the Finder.
Click the Go menu in the Finder menu bar to see shortcuts for opening many commonly used folders, such as Applications, Documents, Downloads, Utilities and iCloud Drive.
Document shortcuts
The behaviour of these shortcuts may vary, depending on the app you're using.
Command-B: Boldface the selected text, or turn boldfacing on or off.
Command-I: Italicise the selected text, or turn italics on or off.
Command-K: Add a web link.
Command-U: Underline the selected text or turn underlining on or off.
Command-T: Show or hide the Fonts window.
Command-D: Select the Desktop folder from within an Open dialogue or Save dialogue.
Control-Command-D: Show or hide the definition of the selected word.
Shift-Command-Colon (:): Display the Spelling and Grammar window.
Command-Semicolon (;): Find misspelled words in the document.
Option-Delete: Delete the word to the left of the insertion point.
Control-H: Delete the character to the left of the insertion point. Or use Delete.
Control-D: Delete the character to the right of the insertion point. Or use Fn-Delete.
Fn-Delete: Forward delete on keyboards that don't have a Forward Delete key. Or use Control-D.
Control-K: Delete the text between the insertion point and the end of the line or paragraph.
Fn-Up Arrow: Page Up: Scroll up one page.
Fn-Down Arrow: Page Down: Scroll down one page.
Fn-Left Arrow: Home: Scroll to the beginning of a document.
Fn-Right Arrow: End: Scroll to the end of a document.
Command-Up Arrow: Move the insertion point to the beginning of the document.
Command-Down Arrow: Move the insertion point to the end of the document.
Command-Left Arrow: Move the insertion point to the beginning of the current line.
Command-Right Arrow: Move the insertion point to the end of the current line.
Option-Left Arrow: Move the insertion point to the beginning of the previous word.
Option-Right Arrow: Move the insertion point to the end of the next word.
Shift-Command-Up Arrow: Select the text between the insertion point and the beginning of the document.
Shift-Command-Down Arrow: Select the text between the insertion point and the end of the document.
Shift-Command-Left Arrow: Select the text between the insertion point and the beginning of the current line.
Shift-Command-Right Arrow: Select the text between the insertion point and the end of the current line.
Shift-Up Arrow: Extend text selection to the nearest character at the same horizontal location on the line above.
Shift-Down Arrow: Extend text selection to the nearest character at the same horizontal location on the line below.
Shift-Left Arrow: Extend text selection one character to the left.
Shift-Right Arrow: Extend text selection one character to the right.
Option-Shift-Up Arrow: Extend text selection to the beginning of the current paragraph, then to the beginning of the following paragraph if pressed again.
Option-Shift-Down Arrow: Extend text selection to the end of the current paragraph, then to the end of the following paragraph if pressed again.
Option-Shift-Left Arrow: Extend text selection to the beginning of the current word, then to the beginning of the following word if pressed again.
Option-Shift-Right Arrow: Extend text selection to the end of the current word, then to the end of the following word if pressed again.
Control-A: Move to the beginning of the line or paragraph.
Control-E: Move to the end of a line or paragraph.
Control-F: Move one character forwards.
Control-B: Move one character backwards.
Control-L: Centre the cursor or selection in the visible area.
Control-P: Move up one line.
Control-N: Move down one line.
Control-O: Insert a new line after the insertion point.
Control-T: Swap the character behind the insertion point with the character in front of the insertion point.
Command-Left Curly Bracket ((): Left align.
Command-Right Curly Bracket ()): Right align.
Shift-Command-Vertical bar (|): Centre align.
Option-Command-F: Go to the search field.
Option-Command-T: Show or hide a toolbar in the app.
Option-Command-C: Copy Style: Copy the formatting settings of the selected item to the Clipboard.
Option-Command-V: Paste Style: Apply the copied style to the selected item.
Option-Shift-Command-V: Paste and Match Style: Apply the style of the surrounding content to the item pasted within that content.
Option-Command-I: Show or hide the inspector window.
Shift-Command-P: Page setup: Display a window for selecting document settings.
Shift-Command-S: Display the Save As dialogue or duplicate the current document.
Shift-Command-Minus sign (-): Decrease the size of the selected item.
Shift-Command-Plus sign (+): Increase the size of the selected item. Command-Equal sign (=) performs the same function.
Shift-Command-Question mark (?): Open the Help menu.
Other shortcuts
For more shortcuts, check the shortcut abbreviations shown in the menus of your apps. Every app can have its own shortcuts, and shortcuts that work in one app might not work in another.
Apple Music shortcuts: Choose Help > Keyboard shortcuts from the menu bar in the Music app.
Other shortcuts: Choose Apple menu > System Preferences, click Keyboard, then click Shortcuts.
Learn more
Create your own shortcuts and resolve conflicts between shortcuts
Change the behaviour of the function keys or modifier keys
0 notes
Text
How to Record Instagram Live on iPhone or iPad
function mfTempOpenSection(id){var block=document.getElementById(“mf-section-“+id);block.className+=” open-block”;block.previousSibling.className+=” open-block”;}
This wikiHow teaches you how to record someone’s Instagram Live broadcast on an iPhone or iPad.
WH.ads.addBodyAd(‘intro_ad_1’)WH.performance.mark(‘intro_rendered’);
WH.ads.addBodyAd(‘scrollto_ad_1’)
Steps
WH.shared.addScrollLoadItem(‘d9a578c5041c25c969933d73e6924f97’)
WH.performance.clearMarks(‘image1_rendered’); WH.performance.mark(‘image1_rendered’);
{“smallUrl”:”https://www.wikihow.com/images/thumb/b/bd/Record-Instagram-Live-on-iPhone-or-iPad-Step-1.jpg/v4-460px-Record-Instagram-Live-on-iPhone-or-iPad-Step-1.jpg”,”bigUrl”:”https://www.wikihow.com/images/thumb/b/bd/Record-Instagram-Live-on-iPhone-or-iPad-Step-1.jpg/v4-760px-Record-Instagram-Live-on-iPhone-or-iPad-Step-1.jpg”,”smallWidth”:460,”smallHeight”:345,”bigWidth”:760,”bigHeight”:570,”licensing”:”
License: Fair Use (screenshot)
n
“}
1
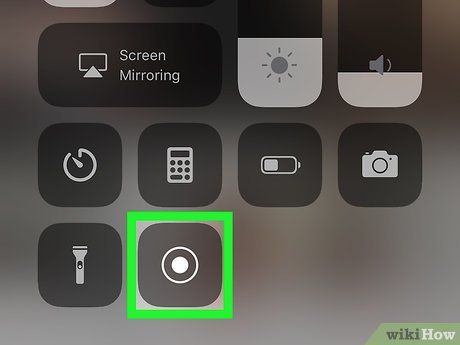
Enable screen recording in the Control Center. You can use your iPhone or iPad’s built-in screen recording tool to record someone’s Instagram Live broadcast. You’ll just need to enable it in the Control Center and make sure you can access the Control Center when you have an app open. Here’s how:
Open your iPhone’s Settings (the gear icon on the home screen).
Tap Control Center.
Tap Customize Controls.
Tap + next to “Screen Recording.”
Tap the back button to return to the “Control Center” screen.
Make sure “Access Within Apps” is set to the On (green) position.
Press the Home button to return to the home screen.
WH.performance.mark(‘step1_rendered’);
WH.ads.addBodyAd(‘toc_ad_1’)WH.ads.addBodyAd(‘step_ad_1’)

WH.shared.addScrollLoadItem(‘e15f7ed05e5164be52c803f92c0ae1cf’)
{“smallUrl”:”https://www.wikihow.com/images/thumb/8/8e/Record-Instagram-Live-on-iPhone-or-iPad-Step-2.jpg/v4-460px-Record-Instagram-Live-on-iPhone-or-iPad-Step-2.jpg”,”bigUrl”:”https://www.wikihow.com/images/thumb/8/8e/Record-Instagram-Live-on-iPhone-or-iPad-Step-2.jpg/v4-760px-Record-Instagram-Live-on-iPhone-or-iPad-Step-2.jpg”,”smallWidth”:460,”smallHeight”:345,”bigWidth”:760,”bigHeight”:570,”licensing”:”
License: Fair Use (screenshot)
n
“}
2
Open Instagram. It’s the purple, pink, and yellow camera icon that’s typically on the home screen.

WH.shared.addScrollLoadItem(’19f029bc96fd0eb402e20816e1af2155′)
{“smallUrl”:”https://www.wikihow.com/images/thumb/f/f1/Record-Instagram-Live-on-iPhone-or-iPad-Step-3.jpg/v4-460px-Record-Instagram-Live-on-iPhone-or-iPad-Step-3.jpg”,”bigUrl”:”https://www.wikihow.com/images/thumb/f/f1/Record-Instagram-Live-on-iPhone-or-iPad-Step-3.jpg/v4-760px-Record-Instagram-Live-on-iPhone-or-iPad-Step-3.jpg”,”smallWidth”:460,”smallHeight”:345,”bigWidth”:760,”bigHeight”:570,”licensing”:”
License: Fair Use (screenshot)
n
“}
3
Find a live stream to record. Don’t start watching it yet, just find it so it’s ready.
To find a friend’s live stream, scroll across the stories at the top of the screen until you find one that says “LIVE.”
To find other recommended streams, tap the magnifying glass, then swipe across the stories at the (or search for a stream to follow).
WH.shared.addScrollLoadItem(‘e18cfcd61ecfa702ee22fce260cf69d4’)
{“smallUrl”:”https://www.wikihow.com/images/thumb/1/1b/Record-Instagram-Live-on-iPhone-or-iPad-Step-4.jpg/v4-460px-Record-Instagram-Live-on-iPhone-or-iPad-Step-4.jpg”,”bigUrl”:”https://www.wikihow.com/images/thumb/1/1b/Record-Instagram-Live-on-iPhone-or-iPad-Step-4.jpg/v4-760px-Record-Instagram-Live-on-iPhone-or-iPad-Step-4.jpg”,”smallWidth”:460,”smallHeight”:345,”bigWidth”:760,”bigHeight”:570,”licensing”:”
License: Fair Use (screenshot)
n
“}
4
Swipe up from the bottom of the screen. This opens the Control Center.
WH.shared.addScrollLoadItem(’52aa8b076424400d1fb1a1245bcaa0ba’)
{“smallUrl”:”https://www.wikihow.com/images/thumb/f/fd/Record-Instagram-Live-on-iPhone-or-iPad-Step-5.jpg/v4-460px-Record-Instagram-Live-on-iPhone-or-iPad-Step-5.jpg”,”bigUrl”:”https://www.wikihow.com/images/thumb/f/fd/Record-Instagram-Live-on-iPhone-or-iPad-Step-5.jpg/v4-760px-Record-Instagram-Live-on-iPhone-or-iPad-Step-5.jpg”,”smallWidth”:460,”smallHeight”:345,”bigWidth”:760,”bigHeight”:570,”licensing”:”
License: Fair Use (screenshot)
n
“}
5
Swipe up on the Control Center. This displays additional options.

WH.shared.addScrollLoadItem(‘190d76716df4c436c6cb764ebbf71cb9’)
{“smallUrl”:”https://www.wikihow.com/images/thumb/6/69/Record-Instagram-Live-on-iPhone-or-iPad-Step-6.jpg/v4-460px-Record-Instagram-Live-on-iPhone-or-iPad-Step-6.jpg”,”bigUrl”:”https://www.wikihow.com/images/thumb/6/69/Record-Instagram-Live-on-iPhone-or-iPad-Step-6.jpg/v4-760px-Record-Instagram-Live-on-iPhone-or-iPad-Step-6.jpg”,”smallWidth”:460,”smallHeight”:345,”bigWidth”:760,”bigHeight”:570,”licensing”:”
License: Fair Use (screenshot)
n
“}
6
Tap the screen recording icon. It’s the button with a white circle inside. A countdown will appear inside the circle—when it’s finished, you’ll know your iPhone or iPad is recording the screen.

WH.shared.addScrollLoadItem(‘c6786a6abac695f0dfef264216ddb2c3’)
{“smallUrl”:”https://www.wikihow.com/images/thumb/6/60/Record-Instagram-Live-on-iPhone-or-iPad-Step-7.jpg/v4-460px-Record-Instagram-Live-on-iPhone-or-iPad-Step-7.jpg”,”bigUrl”:”https://www.wikihow.com/images/thumb/6/60/Record-Instagram-Live-on-iPhone-or-iPad-Step-7.jpg/v4-760px-Record-Instagram-Live-on-iPhone-or-iPad-Step-7.jpg”,”smallWidth”:460,”smallHeight”:345,”bigWidth”:760,”bigHeight”:570,”licensing”:”
License: Fair Use (screenshot)
n
“}
7
Tap the Instagram Live stream to join. Your iPhone or iPad will record everything that happens on the screen as well as the sound.

WH.shared.addScrollLoadItem(‘f971260cd3b90ebba244319143181a83’)
{“smallUrl”:”https://www.wikihow.com/images/thumb/3/34/Record-Instagram-Live-on-iPhone-or-iPad-Step-8.jpg/v4-460px-Record-Instagram-Live-on-iPhone-or-iPad-Step-8.jpg”,”bigUrl”:”https://www.wikihow.com/images/thumb/3/34/Record-Instagram-Live-on-iPhone-or-iPad-Step-8.jpg/v4-760px-Record-Instagram-Live-on-iPhone-or-iPad-Step-8.jpg”,”smallWidth”:460,”smallHeight”:345,”bigWidth”:760,”bigHeight”:570,”licensing”:”
License: Fair Use (screenshot)
n
“}
8
Stop the recording when you’re finished. To do this, open the Control Center, swipe up on it, then tap the screen recording icon.
WH.ads.addBodyAd(‘method_ad_1’)WH.ads.addBodyAd(‘mobilemethod_ad_1’)
Tips
Submit a Tip
All tip submissions are carefully reviewed before being published
Submit
Thanks for submitting a tip for review!
https://growinsta.xyz/how-to-record-instagram-live-on-iphone-or-ipad/
#free instagram followers#free followers#free instagram followers instantly#get free instagram followers#free instagram followers trial#1000 free instagram followers trial#free instagram likes trial#100 free instagram followers#famoid free likes#followers gratis#famoid free followers#instagram followers generator#100 free instagram followers trial#free ig followers#free ig likes#instagram auto liker free#20 free instagram followers trial#free instagram followers no#verification#20 free instagram likes trial#1000 free instagram likes trial#followers instagram gratis#50 free instagram followers instantly#free instagram followers app#followers generator#free instagram followers instantly trial#free instagram followers no survey#insta 4liker#free followers me#free instagram followers bot
0 notes
Photo

Cómo cambiar el directorio por defecto de GNOME Screenshot en Ubuntu
Lo de hacer capturas de pantalla es una actividad que no requiere de darle muchas vueltas, pero cuando se repite y se repite puede llegar a cansar si la aplicación no se adapta a lo que el usuario espera. Es el caso de GNOME Screenshot , la opción predeterminada en prácticamente cualquier escritorio basado en GNOME, como el Unity de Ubuntu. Por supuesto, existen alternativas más potentes para realizar capturas de pantalla que GNOME Screenshot y el ejemplo más popular es Shutter , disponible en los repositorios de cualquier distribución. Pero es una pena desaprovechar la integración de la aplicación propia de GNOME, cuando lo único que quieres es capturar y quizás editar en una segunda aplicación, pongámosle GIMP. Personalmente hay dos cosas de GNOME Screenshot que me sacan de quicio: no poder elegir el directorio por defecto donde se guardan las capturas y que una vez que las guarda la aplicación se cierre. Pero sí, lo primero tiene solución y lo segundo un apaño cuando menos interesante. Veamos antes cómo funciona de manera predeterminada. Estas son las opciones para realizar capturas : Y estas son las opciones de guardado : Como se ve, el directorio por defecto es Imágenes y es muy razonable, pero yo por ejemplo no hago capturas para coleccionarlas, sino para usarlas, normalmente de inmediato, y me viene mucho más cómodo que me las guarde en el escritorio. Y si hago muchas capturas y me puedo ahorrar un par de clics, lo prefiero. Además, cuando le das al botón de guardar la aplicación se cierra y la tarea se hace aún más pesada, ya que tienes que volver a abrirla cada vez. Para cambiar el directorio por defecto de GNOME Screenshot basta con lanzar un comando por terminal (se puede hacer “gráficamente” instalando el editor de dconf, pero no merece la pena): gsettings set org.gnome.gnome-screenshot auto-save-directory ‘/home/usuario/Escritorio’ Se trata simplemente de editar la ruta por la que se quiera y punto. A partir de entonces con darle al botón de guardar está todo hecho. ¿Cómo evitar que GNOME Screenshot se cierre al guardar la captura? No he encontrado forma humana de hacerlo (si alguien la conoce, por favor, un comentario al respecto), pero sí de agilizar el proceso. En lugar de lanzar la aplicación como tal, es mejor usar la tradicional tecla de imprimir pantalla que se suele situar a la derecha de las de función (F1-F12) y que dependiendo del teclado aparecerá como “Print Screen”, “Impr Pant”, “Prt Scr” o nombres similares según el teclado. Sin embargo, los atajos de teclado se hacen imprescindibles para sacarle todo el partido a esta herramienta, según las opciones que se pueden ver en la primera imagen de GNOME Screenshot. Para los siguientes ejemplos “Print” será la tecla de imprimir pantalla: Print : captura todo el escritorio. Alt + Print : captura la ventana actual. Mayúsculas + Print : seleccionar área a capturar. No hay más. Solo un apunte: este tutorial se dirige a Ubuntu y Unity, pero también funcionará en Linux Mint Cinnamon y puede que en otros escritorios basados en GNOME, excepto en GNOME Shell, que desde hace unas versiones guarda las capturas realizadas con la tecla de imprimir pantalla directamente y sin mostrar nada (aun así, depende de cada distribución y su implementación de GNOME). Fuentes: Ask Ubuntu , GNOME | Imagen: WikiHow
Orlando Computer Systems
2420 North John Young Parkway
Kissimmee, FL 34741
Phones: (407) 259-1553 – (407) 536-1266
Website: www.orlandocomputersystems.com
0 notes
Text
Cómo cambiar el directorio por defecto de GNOME Screenshot en Ubuntu
Lo de hacer capturas de pantalla es una actividad que no requiere de darle muchas vueltas, pero cuando se repite y se repite puede llegar a cansar si la aplicación no se adapta a lo que el usuario espera. Es el caso de GNOME Screenshot, la opción predeterminada en prácticamente cualquier escritorio basado en GNOME, como el Unity de Ubuntu.
Por supuesto, existen alternativas más potentes para realizar capturas de pantalla que GNOME Screenshot y el ejemplo más popular es Shutter, disponible en los repositorios de cualquier distribución. Pero es una pena desaprovechar la integración de la aplicación propia de GNOME, cuando lo único que quieres es capturar y quizás editar en una segunda aplicación, pongámosle GIMP.
Personalmente hay dos cosas de GNOME Screenshot que me sacan de quicio: no poder elegir el directorio por defecto donde se guardan las capturas y que una vez que las guarda la aplicación se cierre. Pero sí, lo primero tiene solución y lo segundo un apaño cuando menos interesante. Veamos antes cómo funciona de manera predeterminada.
Estas son las opciones para realizar capturas:
Y estas son las opciones de guardado:
Como se ve, el directorio por defecto es Imágenes y es muy razonable, pero yo por ejemplo no hago capturas para coleccionarlas, sino para usarlas, normalmente de inmediato, y me viene mucho más cómodo que me las guarde en el escritorio. Y si hago muchas capturas y me puedo ahorrar un par de clics, lo prefiero. Además, cuando le das al botón de guardar la aplicación se cierra y la tarea se hace aún más pesada, ya que tienes que volver a abrirla cada vez.
Para cambiar el directorio por defecto de GNOME Screenshot basta con lanzar un comando por terminal (se puede hacer “gráficamente” instalando el editor de dconf, pero no merece la pena):
gsettings set org.gnome.gnome-screenshot auto-save-directory '/home/usuario/Escritorio'
Se trata simplemente de editar la ruta por la que se quiera y punto. A partir de entonces con darle al botón de guardar está todo hecho.
¿Cómo evitar que GNOME Screenshot se cierre al guardar la captura? No he encontrado forma humana de hacerlo (si alguien la conoce, por favor, un comentario al respecto), pero sí de agilizar el proceso. En lugar de lanzar la aplicación como tal, es mejor usar la tradicional tecla de imprimir pantalla que se suele situar a la derecha de las de función (F1-F12) y que dependiendo del teclado aparecerá como “Print Screen”, “Impr Pant”, “Prt Scr” o nombres similares según el teclado.
Sin embargo, los atajos de teclado se hacen imprescindibles para sacarle todo el partido a esta herramienta, según las opciones que se pueden ver en la primera imagen de GNOME Screenshot. Para los siguientes ejemplos “Print” será la tecla de imprimir pantalla:
Print: captura todo el escritorio.
Alt + Print: captura la ventana actual.
Mayúsculas + Print: seleccionar área a capturar.
No hay más. Solo un apunte: este tutorial se dirige a Ubuntu y Unity, pero también funcionará en Linux Mint Cinnamon y puede que en otros escritorios basados en GNOME, excepto en GNOME Shell, que desde hace unas versiones guarda las capturas realizadas con la tecla de imprimir pantalla directamente y sin mostrar nada (aun así, depende de cada distribución y su implementación de GNOME).
Fuentes: Ask Ubuntu, GNOME | Imagen: WikiHow
Fuente: MuyLinux
0 notes
Text
F1 DRIVERS AS WIKIHOW PAGES (PART 1 OF ??)


I have so many many of these so I really hope you guys like it 😂
#f1 as wikihow articles#Esteban ocon#Lance stroll#Lewis Hamilton#charles leclerc#Pierre Gasly#toto wolff#Christian Horner#Alex Albon#f1#f1 meme#f1blr#formula one
730 notes
·
View notes
Text
F1 DRIVERS AS WIKIHOW ARTICLES (PART 13 OF ??)


#f1 as wikihow articles#f1#f1blr#formula one#charles leclerc#daniel ricciardo#lando norris#max verstappen#pierre gasly#Sebastian Vettel#George Russel
256 notes
·
View notes
Text
F1 DRIVERS AS WIKIHOW ARTICLES (PART 9 OF ??)


#f1 as wikihow articles#nicholas lafiti#f1#formula one#f1blr#daniel ricciardo#max verstappen#lewis hamilton#Nico rosberg#toto wolff
200 notes
·
View notes
Text
F1 DRIVERS AS WIKIHOW PAGES (PART 7 OF ??)


#f1 as wikihow articles#f1blr#charles leclerc#daniel ricciardo#lando norris#toto wolff#Pierre Gasly#antonio giovinazzi#f1#formula one
272 notes
·
View notes
Last Seen Blogs

iamtheinternblog
I am the Intern

anouchka-ruth
Anouchka-Ruth

gypsylove813
gypsylove813

faizpaan1234
Untitled

selvyyr
✧Mitu!