#for links font color etc.
Text
USEFUL SITES FOR ROLEPLAYERS
Thought I'd make a list of some useful websites for those of us who enjoy roleplaying and what have you here on Tumblr and whatnot.
roleplay formatter: Made by the awesome @rpclefairy. I honestly can't recommend this one enough. Great for adding color, changing the font size, and the whole shebang with bold + italics + underline + strikethrough. 10/10 always use
fsymbols + emojipedia: These are both great for making your tags fancy and whatnot.
alt codes: This is genuinely great for teaching you how to make the symbols with your keyboard for everyday use so there's that. It's especially useful if you and/or your muses speak a second language so that's a bonus.
text color fader: *marge vc* I just think gradient effects on text is neat. *end marge vc*
list of colors (wikipedia): Has a list of an infinite number of colors and their hex codes. Very useful if I do say so, myself. But that's just me.
screencapped.net: Great for getting all sorts of screenshots for making icons, GFXs, promos, and whatnot.
fancaps.net: Also great for getting all sort of screencaps for making icons, GFXs, promos, and whatnot. My only complaint is that it's a little annoying to navigate so here's the proper links to movies, tv shows, and anime.
photopea: Great if you can't afford Photoshop and/or don't like using GIMP.
hakuneko: It's not so much a website as much as it is a program. You can download manga, comics, webtoons, doujinshi, etc. for making your icons, GFXs, promos, and whatnot. It's also just a great way to read stuff and catch up on everything.
Feel free to reblog and add more. <333
#roleplay resource#roleplay help#roleplay community#roleplay#roleplaying#rpc#rpc help#rp help#rp resources#rp resource#roleplay resources#rp
3K notes
·
View notes
Text

In celebration of reaching 900 followers!
Ever since I started playing the Globetrotter challenge by @moonfi; I've been creating a collection of UI Widget style templates. This collection includes 20(ish) different templates for you to use in your gameplay screenshots. I'm hoping I did my best to make this as user-friendly as possible; but if you have any questions or notice something off - don't hesitate to message me or send an ask!
[Terms of Use]
Do: Use & edit as much as you want and/or know how to.
Don't: Reupload & claim as your own.
Do: Link back to this post if asked where they're from.
[You Need]
Fonts: April | Lemonmilk | Kids Handmade
TS4 Icons: deathbypufferfish | w-sims | TheSimKid
(I've had L'Universims' icons before they were hacked but as far as I know they've moved to a new website so download from there at your own risk.)
DOWNLOAD (SFS) 66.3mb **FIXED** (Missing moodlet)
[Tips & Hints]
Open the awkwardwhims psd collection file in Photoshop, then drag & drop the folder or group of templates onto your image.
The photo album template was inspired by @folkbreeze (definitely check out their resources, they're all so nice!) & other various examples I saw online.
Resize the template by selecting the folder as a whole; resizing individual layers may makes things unaligned.
Feel free to change background colors/fonts/etc as much as you want.
The text message template has 3 styles: sender, green receiver & blue receiver. There are also reaction icons & a separate reaction bar.
For the to-do list template I didn't include every aspiration icon (I was trying to keep this file as small as possible) but you can download this pack by @deathbypufferfish that has all the aspiration icons you'll need. However, it may be missing some of the newer aspiratons.
When adding photos (album cover/recent photos/etc) use a clipping mask.
The weather template includes all the different weather icons, so be sure to hide/unhide the one that applies.
For the new transaction template, make sure to only change the number of the price otherwise the Simoleon symbol will get changed to Times New Roman.
The notification message template is for life events, bad events & default game notifications (ie: legacy player, etc).
DOWNLOAD (SFS) 66.3mb **FIXED** (Missing moodlet)
@alwaysfreecc @maxismatchccworld
979 notes
·
View notes
Text

Beanie theme by Mochizuki Hajime
Previews: 1, 2, 3
Installation: Github
Notes: Preview 2 by @alpawca ♥
A theme meant to loosely resemble the old Beanie Baby website, this is a gift for @alansweep ! The theme comes built in with two sidebars, a header image and 4 links (one custom). Everything else is entirely customizable so you can put whatever you want into the sidebars including text, links, and images.
Features
7 images
39 colors
8 fonts
~31 options
3 built in links, 1 custom
Built in header image
Options
custom cursor
scrolling title
3 post sizes
redirect tag
link decorations (glow/border+etc)
cursor sparkles/hearts/stars/music notes
+etc
#Going to gut this for a Neocities theme later!#my themes#tumblr theme#theme#tumblr themes#beanie babies#old web
1K notes
·
View notes
Text
create a personalized ao3 site skin without knowing CSS
If you want to customize AO3's user interface but you don't know CSS, you can still do it by using the Wizard
Login to your AO3 account and tap on Hi, username! at the top of the page
Select Dashboard from the dropdown menu
Select the link for Skins from your Dashboard. If you're on mobile, it will be just below the header bar. If you're on desktop, it will be in the left-hand sidebar.
Tap on the button labelled Create Site Skin (at the top right of the page)
Tap on the button labelled Use Wizard (at the top of the page)
Give your site skin a name. The name needs to be unique or else you can't save it. No one but you will see it.
The Wizard has many options, and you can use as many or as few of them as you like.
Fonts - change the font used by the Archive. If you want Arial, type Arial into that textbox. If you want Century Gothic, type in "Century Gothic". The reason why you need quotes around Century Gothic is because it's a two-word name. The device you're using needs to have the font installed, otherwise it won't work, but you can list as many fonts as you like, separating them with a comma. If the first font isn't installed, it'll try the second, then the third and so on.
Percent of browser font size: To enlarge the font, enter a number higher than 100. To decrease the font size, enter a number lower than 100.
Work margin width: This sets how wide the margins are for a fic (decreasing or increasing the white space on either side of the text). Use number between 1 and 100 for what percentage of the page you want the margin to take up.
Vertical gap between paragraphs: The default is 1.1286em, so if you want more white space between paragraphs then enter a larger number like 2em. For a smaller space, enter a smaller number like 0.5em.
Background color: sets the background for the entire site. Use a hex colour code, which you can find by using a colour picking tool like this one. Make sure you include the # at the start of the hex colour, otherwise it won't change!
Text colour: changes the colour of all text that isn't a link
Header colour: changes the red header and footers to another colour of your choice
Accent colour: changes the light grey colour of forms etc. to another colour of your choosing.
After making whatever changes you want:
Hit the Submit button to save your site skin. This will take you to a new page where you can see the changes you've made in a list.
On that page, hit the Use button to start using the skin.
Go back to your Skins page any time to edit your skin or create a new one.
You can add CSS codes to this kind of skin as well. Just save it first and then edit to apply the CSS.
403 notes
·
View notes
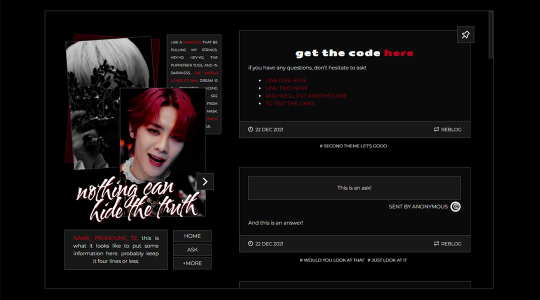
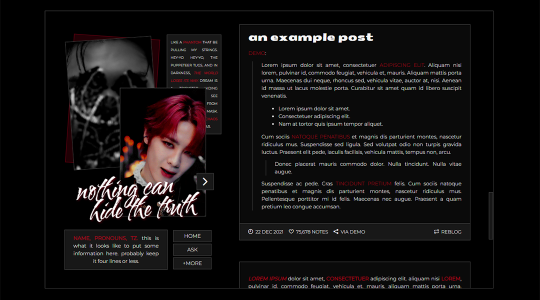
Photo
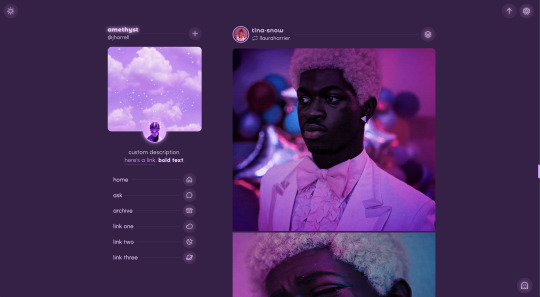
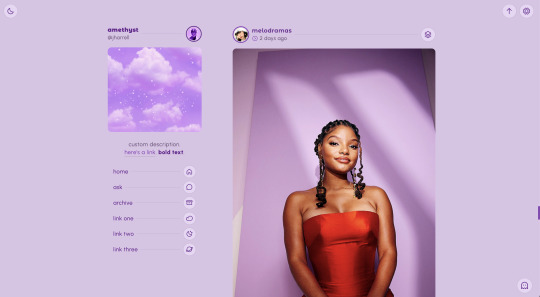
amethyst | theme by sage
get the code: static preview / version 2
this is a revamp of my theme amethyst!
features (more info below the cut):
uploadable sidebar image (250px x 225px), up to 3 extra sidebar links, scroll to top, day/night, & tumblr controls buttons
toggle: reblog via info, tags on click, explore menu with an image, bio, info stats, updates, blogs, & links
customizable: description, colors, body & title fonts, font size, & blog title
responsive design, 4 corner options, 3 post margin options, phosphor icons
nothing needs to be changed in the code, everything can be changed in the customize panel!
terms:
reblog if using
do not touch the credit
view all terms
credits listed in the code / credits page
please consider supporting me ♡
some updates from the old version:
general improvements, cleaner look, bug fixes, etc.
updated & more accessible dark mode toggle
updated top post info to include date and bottom post info to include note count
new tags on click option
responsive design (now includes a sidebar toggle like my other recent themes)
added tumblr controls button
added post type icons
updated explore menu (see below)
please note i am not offering support for the old version
explore menu
uploadable explore image (width will adjust, 265px height)
bio/description section will scroll if it gets too long
up to 5 info stats & updates
up to 5 blogs (optional - leave the first blog blank)
up to 8 links (optional - leave the first explore link blank)
#themehunter#theme hunter#code hunter#tumblr themes#tumblr codes#tumblr resources#phantom code#amethyst#completeresources#allresources#userbru#usernik#userbrina#userdre#tuserlucie#useraashna#phantom revamp#phantom theme
2K notes
·
View notes
Text
NOTION TUTORIAL୭ 🧷 ✧ ˚. ᵎᵎ 🎀
this is to serve as some little notion tips that i use to make my notion the way that it is. cute and efficient. this is very surface level and i'll get more in depth the more the post goes on. im working on dropping a notion template soon <3
first off pick a color scheme, for me, my color scheme is pastel pinks and whites and soft shades of green as an accent.
u can import photos from pinterest by copying the photo (not the link address, the actual photo) and pasting it into ur notion
take advantage of the columns, when u make a new space click "turn into" and use columns, it'll neatly divide the page
experiment with fonts, i use serif. u can also do large or small text, AND full width pages
making toggle lists saves space and keeps ur page looking super neat and organized
calendars and tables will keep u organized
to add a page ur gonna wanna go to the top left corner and click "new page"
u can import custom icons by going on pinterest and looking up app icons with the color scheme that u want, download that and add it for cute icons, u can also do the same with GIFS
for links and things of the sort embedding the video and adding the link are two different things, embedding the video means that u can access it on ur page (i do this for youtube videos/spotify etc) and when its a link i'll do this for documents and things of the sort
to add titles to ur columns click the "+" button, i use heading 3 bcuz that's the size i prefer but there are other sizes to choose from
a cool feature that notion has is that u can change the background color OR the text color, when u change the background color its more pastel-like if that's what ur going for
to make section dividers click (-) three times to create a divider
#it girl#becoming that girl#self care#notion#dream girl#it girl energy#that girl#notion template#organization#self improvement#self management#productivity#femininity
531 notes
·
View notes
Note
Hi I really love all the writing tips you give! I'm a fanfic writer myself and your tips have helped me out so much with writing <3 I was wondering if you had any tips on how to write any kind of flashback scenes? Like ways to lead up to it or where a character is like having a headache and then BOOM they get a glimpse of a flashback or something. I struggle so much with this ;-;
Ideas for Flashback Scenes
Hey there! Thanks for the question! Since flashbacks are about reminding a character of a memory they haven't been thinking about, here are some ideas for triggering a memory!
Hinge on an Object/Person
Coming across an object or person from the past can call a dusty memory to the forefront.
Maybe your character is going through the attic or clearing out an unused shelf. It can be a friend returning an item that they’d lost.
Dreaming/Semi-Dreaming
A dream is a product of taking snippets from our actual life and putting them together in weird ways. A character may dream about something in the past, wake up, then recall the memory more clearly, using the dream snippet as the starting point.
Similarly, they may dream briefly as they doze off, then wake up to have a “fuller” flashback.
Deja-Vu
A deja-vu would be most natural if the memory being recalled is set somewhere the character goes to on a day-to-day basis (like the supermarket or the cobbled walkway in front of their house, etc.)
A repeated action (cashier checking out items), a familiar scenery, or a familiar sound will trigger a similar memory, maybe even set in the same location.
Mid-Conversation/Trigger Words
Certain words or voices can be triggers of memory. You can have a moment where the character pauses for a moment to think, “wait, I think I’ve heard that phrase somewhere…”
The other character asking them a question can also trigger a memory in the process of trying to come up with an answer.
Trigger words can appear on road signs or on book covers, etc. You can try describing the font/color of the word and link it to a snapshot of the memory being recalled.
The "Aha!" Moment
This is where the character is doing essentially nothing (like standing in the shower, staring off into the ceiling, etc). It can even be when they’ve lied down trying to sleep, when something suddenly just jumps into mind.
Provide some context through internal dialogue, where the character is either thinking about something that they’re worried about or an event that left an impression on them that day, etc.
Being in Danger/Near-Death Moments
This is similar to how a character’s life plays out before their eyes right before they die.
When a character is in danger, their brains will start firing in ways that it usually wouldn’t, triggering a flashback.
A flashback can be induced by shock, a loud bang, explosion, etc. when the character goes momentarily numb.
Flashback Under Intoxication
If your character is drunk, on drugs, or taking medication that impacts their cognitive abilities, they may start triggering memories that have long been buried.
However, the flashback scene in this case will have some unusual aspects, and will be prone to being warped or even fabricated in some parts.
#writers block#writing#creative writing#helping writers#let's write#writeblr#creative writers#writers on tumblr#resources for writers#writers and poets#writerscommunity#writer#writer community#writblr#poets and writers#writing practice#writing prompt#writing community#writing advice#writing inspiration#writing tips#on writing#writer on tumblr#writer things#writer stuff#writer problems
123 notes
·
View notes
Text


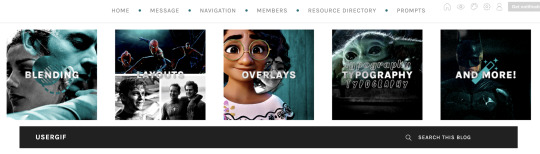
RESOURCE DIRECTORY 2.0 + HOW TO NAVIGATE USERGIF
Hello! We hit 10k followers! I want to take this moment to thank all our wonderful followers and the talented members of usergif! We created this blog less than 2 years ago and are constantly blown away by your support and beautiful creations. As a thank-you, we're proud to announce our new and improved resource directory!!! Shout out to arithemes' custom page which allowed us to create a more streamlined and organized directory for everyone to use. Under the cut, you'll find a guide to help you find exactly the resource you're looking for on our blog. Happy gifmaking! :)

THE UPDATED DIRECTORY
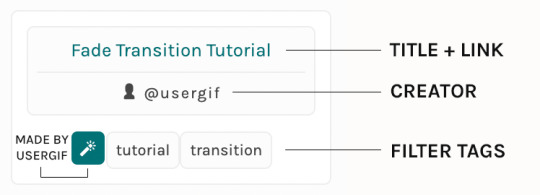
All resources are in alphabetical order first by the creator's URL (at the time of entry), then by the resource's title. Each title is a clickable link that'll redirect you to the original post. Beneath that, you'll find the creator's URL and the resource's relevant filter tags:
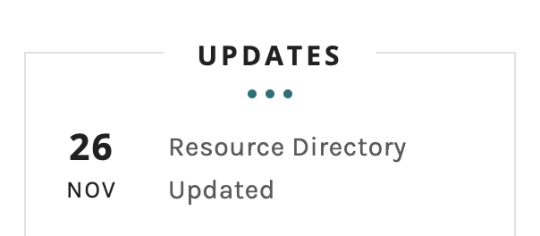
As always, whenever I add new entries to the directory, you'll see the last date listed on the right side of the blog here:
If you don't see one of your recent tutorials listed there, please be patient. I update the directory on a monthly basis, but only add resources that have already exited our queue.
THE FILTERS

Please note: the Source section has exclusive filters, meaning you can only select one at a time. In the Type and Effects sections, you can select as many filters as you want. However, if you select 2 filters in one section, like "animated" and "blending," it'll show results for any resource with either of those tags, not necessarily resources that include both of those tags.
Here's a breakdown of how we categorize our resources:
Source:
↳ all: posted by any creator
↳ usergif: posted by usergif
Type:
↳ all: click this to reset filter selections
↳ action: pre-recorded photoshop functions that can be replayed
↳ basics: non-effects-related resources to help new gifmakers get their feet off the ground (please remember usergif is not a resource for beginner-level gifs and focuses on intermediate to advanced gif effects. however, we thought it would be helpful to keep some basic resources available)
↳ brush: various brush shapes like ripped paper edges or intricate textures
↳ fonts: names and links to fonts or font packs
↳ template: pre-made, downloadable layouts and designs
↳ texture: overlays that add a different finish to a gif such as Ben Day dots (retro comic dots) or glitter
↳ tutorial: any post that provides an explanation for a gif effects process
↳ other
Effect:
↳ all: click this to reset filter selections
↳ animated: an effect that applies movement to an element such as rotating text or wiggling shapes
↳ blending: aka double exposure, this effect combines two or more gifs layered on top of each other
↳ color: specifically for color manipulation, an effect in which the original colors are completely different (e.g. a blue sky colored to look pink)
↳ glitch: an effect where color channels are toggled and layered over the original gif to give a flickering effect
↳ layout: multiple gifs on one canvas like a collage (e.g. hexagon layout) or poster-style templates
↳ overlay: an added element layered above a gif (excluding text) such as a shape, another gif confined to a shape, a texture, etc.
↳ transition: an effect that stylizes the passage from one scene/clip into another, such as a fade, glitch, linear wipe, or motion blur transition
↳ typography: any kind of stylized text added over a gif (does not include basic captions)
You can find examples of all these gif effects via their respective tags on our Nav!
THE SEARCH BAR

This search bar functions the same way as the search bar in the upper right corner of our main blog and the search function on Tumblr's mobile app.
Tumblr search allows you to generate results using keywords found in the body of the post or the tags. So, if you're looking for a post but can only remember it having the word "rotoscoping," you can type that in either in the directory's search or blog's search and find any post on our blog that mentions the exact keyword "rotoscoping."
THE NAV & TAGS
Tags function differently from search keywords as these relate to exact words and phrases found only in the tags, not the body of the post. Our members use tags to categorize original posts and reblogs. Some of our most frequently used tags are listed on our Navigation Page and saved in the mobile search function pictured below:
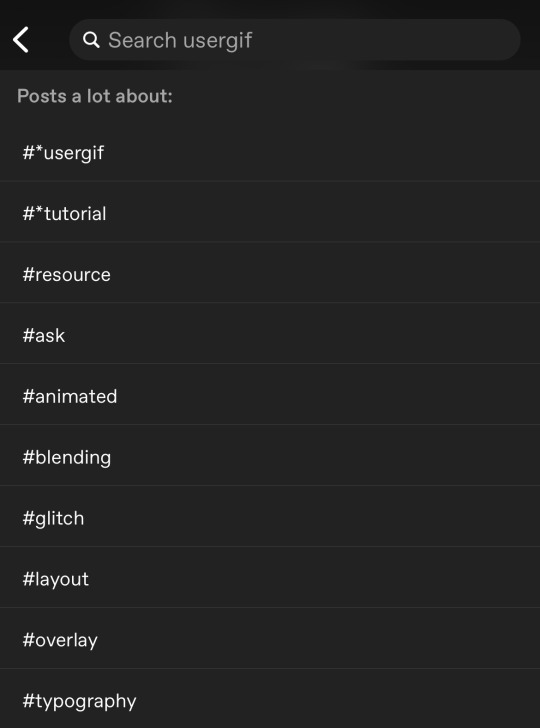
But if you ever want to quickly navigate a tag, simply add /tagged/word to the end of our url to find that tag! For example, if you want to see all the posts we've tagged as a #tutorial, just go to usergif.tumblr.com/tagged/tutorial.
BROKEN LINKS
Whether it's due to a creator frequently changing their url, the absence of an automatic blog redirect, or my own mistakes when coding the directory — you may stumble upon a broken link. Here's what to do:
If a creator has changed their username but their blog doesn't automatically redirect you to the new blog, check if they listed their new user name in the title of their old blog like I did:
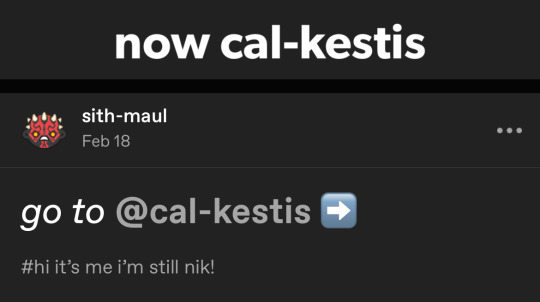
In this case, simply replace the url you landed on with this new url. For example,
https://sith-maul.tumblr.com/post/692130400398704640/how-to-make-an-animated-google-search-overlay-a
→ would become →
https://cal-kestis.tumblr.com/post/692130400398704640/how-to-make-an-animated-google-search-overlay-a
However, if you can't figure out the creator's new url or in the case that I messed up the link due to human error, feel free to send us a message so I can help find the source or correct the mistake!
WHERE TO FIND THIS INFO AGAIN
If you ever need to access this guide while using the directory, simply click the "i" button here:

And that's it! We hope this revamped directory is a lot more efficient and helpful. Thank you again for all your support and for helping us reach this follower milestone!
#*usergif#*usergifdirectory#completeresources#usershreyu#userace#uservivaldi#userbecca#usertreena#userzaynab#alielook#usernanda#userhella#userelio#useraish#userabs#tuserabbie#tusermona#usersmia#tuserlucie#usercats
236 notes
·
View notes
Text


04 : canine. a paid single muse carrd template. $5 + pay what you can.
canine is a multi - page single muse ( and base account friendly !!! ) carrd template, that includes a graphic pack optimized for the carrd !! canine includes pages for guidelines, bio, and connections ; the pack includes all graphics seen in the carrd. the graphics are very easy to edit PSD files that include my own PSD coloring. carrd demo is in the source. this is a pay what you can template and operates through ko-fi !!! you can pick up the carrd template here and the graphics pack here. important info under the cut — read before editing.
THE CARRD :
the graphics pack is not at all required for the template, but i highly recommend using the gradient header at the least.
the carrd is base account friendly ; you do not need an account upgrade to use it.
if you want to buy the template directly from my carrd storefront without going through ko-fi, you can do that here.
keep my credit in the navigation or DIE at my sword.
THE GRAPHIX :
the graphics pack is only available through ko-fi.
the pack is also pay what you can btw, and includes one of my PSD colorings.
once you enter an amount you'd like to pay ( or nothing at all ), you will receive a link to a google drive folder. from there, you can download all the assets, or pick and choose. again, i recommend using the header template at the very least.
BE SURE TO DOWNLOAD THESE FONTS : zamruds + aurora. you will not be able to edit the graphics without these, but you can also replace the fonts if you'd like.
RULES :
please keep my credit on the carrd.
if you choose to use any of the graphics from the pack elsewhere ( mobile header, pfp, a diff carrd, etc ) please still mf credit me.
don't steal, try to pass off as your own, or resell any of this content.
please give this a helpful like or reblog if you find this useful.
#A DOOZY THIS ONE#carrd template#carrd templates#rp graphics#rp template#character template#psd template#icon psd#rp resources#free carrd template#free rp resources#*
302 notes
·
View notes
Text
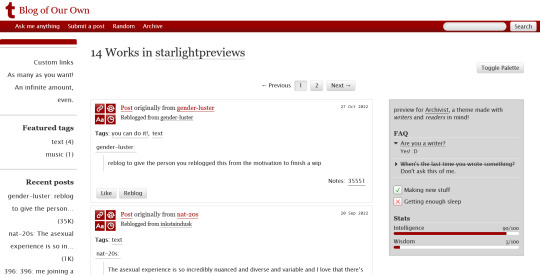
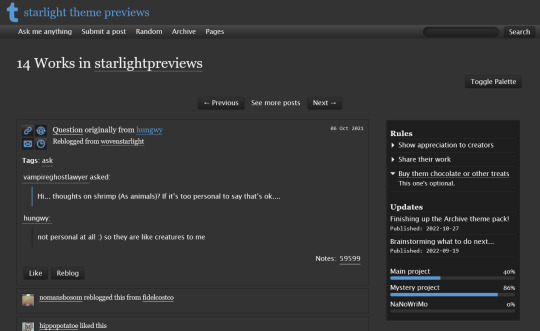


THEME PACK: THE ARCHIVE
Styled after AO3, this pack includes a theme and matching pages, and was designed for writers and readers alike.
🖋️ Theme 11: Archive Of Your Own
Live preview | Static previews: index page, permalink | Code
Full-width posts in an AO3 work index page format
Sidebars with optional sections such as featured tags, updates, rules, progress bars, and more
Unlimited custom links (display on sidebar or in top navbar), plus several social links in the footer
Add a custom logo beside/replacing your avatar
Inbuilt tag filtering plugin by glenthemes
All fields editable directly in the Customize menu, no HTML required. See below the cut for a full guide
🖋️ Page 3: Archive Records
Preview | Code
A WIP page designed to resemble an AO3 work page
Add tags for ratings, warnings, fandoms, characters, and more, as well as statistics like start dates, word counts etc.
Spaces for summary, start and end notes, and the 'work' itself
🖋️ Page 4: Archivist
Preview | Code
A combined about/navigation page based on the AO3 profile page
Include user statistics or any data you'd like, plus a longer bio
Sidebar navigation with link sections - unlimited links and link groups
The theme and pages all include options for multiple color palettes (initially set to Default and Reversi), text styling (choice of Tumblr/Google fonts and casing options), and more. -
Each page includes instructions on how to edit it, and color/image variables have been gathered together to make customization easier. While not necessary, basic knowledge of HTML is helpful.
For help, check my codes guide, or feel free to send me an ask. Theme 11 customization guide and credits are under the cut.
Theme 11 customization
Regarding the simpler fields:
"Secondary title" refers to the title just above the posts, under the header and navigation. This defaults to "[Total posts] Works in [Username]" when the field is left empty.
"Filtered tags" takes a comma-separated list of tags, entered exactly as they'd be written in the Tumblr post editor but without the hashtag. E.g. the tags #politics, #red and blue, and #green would be entered as "politics, red and blue, green" (make sure there's spaces, and no comma after the last item!). The filtering plugin will then put a warning message over any posts with those tags, along with a button letting you show the post.
"[Section] title" act as the headers for the corresponding section, if provided. "Custom links title" defaults to "Pages" if nothing is entered, and is used when the custom links are displayed on the navbar.
"Featured tags" takes a comma-separated list of tags, in the same format as Filtered tags. This field will display links to those tags, along with the number of posts in that tag on your blog, in the left sidebar.
The Recent posts section displays the 5 most recently posted/reblogged posts on your entire blog, displaying in the left sidebar. If you enter a tag under "Recent posts tag", it'll instead display the 5 most recent posts in that tag on your blog. Only 1 tag is allowed.
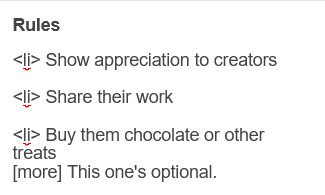
Rules and FAQ
Both these sections work the same way. Each new item, a rule or a question, consists either of one statement, or a statement and some more text, usually as an answer or additional note. E.g. the screenshot below shows three rules, where the last one has more text in the dropdown.
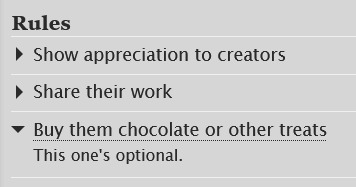
To create an item, prefix it with <li> . To add more text, create a <li> item and add a [more] label underneath, then write your extra text after that. To illustrate, here's the Customize page code for the above:
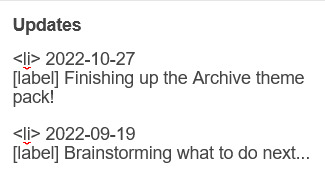
Updates
This section is similar to Rules/FAQ, though it flips the order around. After each <li>, first list the date, then add the [label] marker, then add your actual update. Again, here's an example:
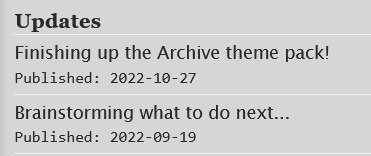
And here's the Customize page code that created that:
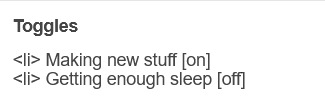
Toggles
This section displays checked/crossed-out items, and uses a simpler version of the formatting for the above sections. Use <li> for each new item, then add [on] or [off] at the end, depending on whether you want it checked or crossed off. Here's an example:
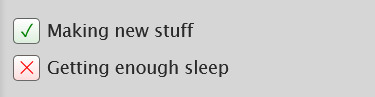
And here's the corresponding Customize code:
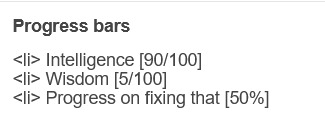
Progress bars
This section also uses <li> items, where each item has two parts: the text label, and the number(s) for the progress percentages, put inside square brackets like with the other sections. Here's an example (note how the top two use fraction values while the bottom one uses a percentage):
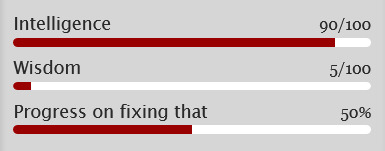
And here's the code that made these. In short, the format is <li> Text here [##/##], or <li> Text here [##%], where ## refers to any number.
Social links in footer
The footer links, aside from the email and personal website fields, take usernames or user IDs for various websites. Be sure to check you're not entering a username in a user ID field!
The Email address field takes a standard email in the format [email protected] and adds a link to let people mail that address.
The Personal website fields will generate a link in the footer's Follow section. Personal website name is the human-readable text label for the generated link, and Personal website URL is the URL that will open when the generated link is clicked. Make sure to add https:// to the start of the personal website URL so the generated link doesn't just redirect you to a different part of your blog.
Credits
Layout and design by Archive of Our Own
Style My Tooltips by malihu
Phosphor Icons
Expanded Tumblr localization and NPF photosets plugin by codematurgy
Custom audio posts by annasthms
Tag filtering by glenthemes
Palette toggle by eggdesign
Scroll to top by Fabian Lins
#code#theme#theme 11#page#page 3#page 4#coding cabin#theme hunter#free#full width#sidebar#topbar#nav text#pagination#unlimited links#header img#custom font size#tfont#gfont#unnested#responsive#npf#color mode#search#rblk buttons#timestamps#tags#group
1K notes
·
View notes
Text
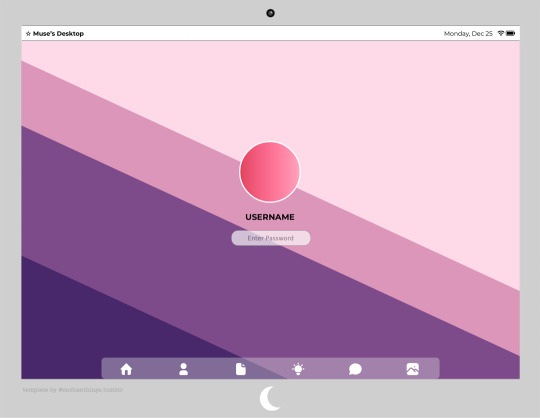


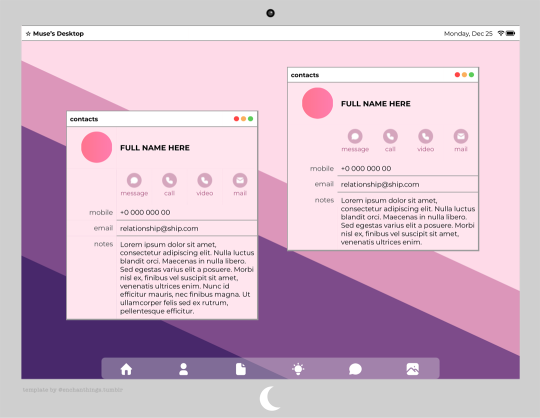

◦˚~ ADELINE'S DESKTOP by enchanthings ~˚◦ [PREMIUM]
Info:
A desktop themed google docs template
Page size: Letter (8.5" x 11")
Font: Montserrat
Number of pages: 10 (for full preview please see link in the source code)
Navigation icons are all linked to the corresponding pages.
Edit the images using "replace image".
Change the background color of the icons on the contacts page by double clicking and changing the shape color.
To change the desktop background for all pages, use "insert → watermark".
Additional content: 9 logo shapes for the monitor.
Terms of Use:
You may edit all editable parts as you wish (colors, images, elements, add, replace, or remove, etc).
Do not remove my credit from the templates.
Do not copy, sell, redistribute my templates in any way.
My ask box is open if you have any questions/problems!
◦˚~ [ download access through ko-fi ] ~˚◦
*For the free demo version version click here!
Credits:
Navigation icons from tabler.io
All other elements are created by me from scratch.
#google docs#docs template#google docs template#rp template#gdocs template#supportcontentcreators#dailyresources#.m
84 notes
·
View notes
Photo

PHANTOM — THEME 002
I’m back with another attempt! (Much improved from a year ago, love that for me!) Once again, I tried to make everything as customizable and accessible as possible. Some of the colors, etc. may need to be changed through the theme coding itself, though. (They should be marked!) Please be kind and give a like/reblog if you use or find it to be useful. If you find any errors or if you have any questions, please don’t hesitate to message me!
FEATURES
contained theme with 500px posts.
navigation tab. you can have up to six customizable links. and there’s a text box that can be utilized for updates, whether you have a personal blog, an indie, or you’re a creator. there’s also a space for muses or works in progress — whatever you find more useful!
accessible source link and scrollbars.
pinned post marker.
GUIDELINES
do not claim as your own.
do not touch or remove any credits.
do not use as a base code or take parts of this code.
feel free to edit and have fun!
CREDITS
base code is made by octomoosey
text font is from google fonts
icons are cappuccicons by suiomi
tabs styling base & script is by valcntines
Click the SOURCE LINK to preview and get the code!
#indie rp theme#rp theme#free rp theme#indie theme#contained theme#rph#rpt#rpc#indie rp#supportcontentcreators#dearindies#theme#pls I'm actually really happy with this one
595 notes
·
View notes
Text


Cloudy aka Hi Harvey theme by Mochizuki Hajime
Previews: 1, 2, 3, 4
Installation: Github
Special thanks:
@alpawca (2nd preview and naming)
@valentinesweetheartspecial (5th preview)
Been struggling with life and my mental health, and unfortunately fell out of my hobby of coding ... This theme is my first finished work since the beginning of this year ... It's very simple but I tried to take my time and tried to create something pretty and clean ♡ Yay
Features
7 images
26 colors
6 fonts
~30 options
Header image
three links (text/pixel)
Title (optional)
This is my first theme to use tooltips. Huzzah
Options
3 post sizes
heart shaped icon
link glow and borders
2 rainbow text descriptions
2 rainbow links
2 rainbow post borders
scrolling website tab title
etc
#my themes#tumblr themes#theme#tumblr theme#got to let this one go before i stop liking it. Go. be free#The theme is nice I'm just not good at making previews after like the first one I make to be entirely candid
316 notes
·
View notes
Text

Winter Storm: Page Pack #02
A page pack to match my theme, Lowlife! Each page has additional instructions on how to customize them in the code.
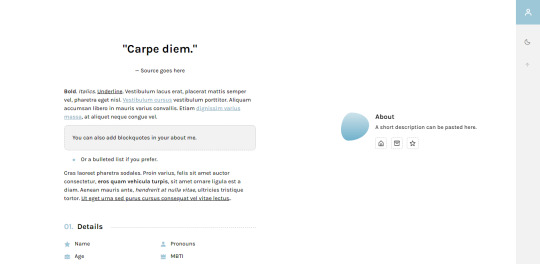
[ About Page #02: Frostbite ]
Preview + Install
Frostbite is an about page with 7 sections: a quote, a biography, details about you, likes & dislikes, current projects or hobbies, skills, and social media.
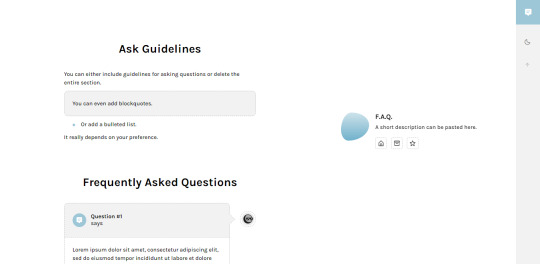
[ F.A.Q. Page #01: Ice Cap ]
Preview + Install
Ice Cap is my first F.A.Q. page! It matches the ask posts in Lowlife and comes with an optional ask guidelines. The askbox is also provided.
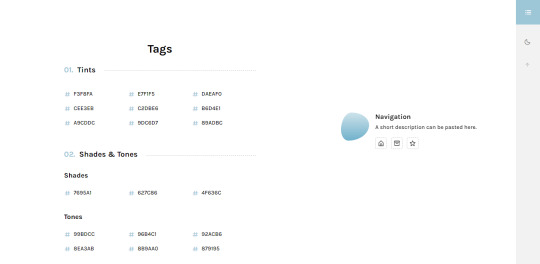
[ Navigation Page #02: Below Zero ]
Preview + Install
Below Zero is a navigation page. There are sections divided into tags and links, and each section provides sub categories if needed.
[ Blogroll Page #02: Hail ]
Preview + Install
Hail is a blogroll page. This page can only be used on main blogs and only if you have enabled the option to share your following with others.
Notes:
Each page is responsive and comes with a day and night toggle button that will stay in the selected mode until it is turned off. A dark mode option is available for those who prefer a dark color scheme on their pages instead of the default light colors. The day and night mode buttons will also change according to the scheme you are using.
You can customize the colors, font size, etc. with variables on each page! This essentially means that most of what you’ll have to edit is in the HTML.
Like Lowlife, you can also choose between a left or right sidebar. Instructions are provided in the code!
#rice:codes#ricepgs#codingcabin#theme hunter#pg: frostbite#pg: below zero#pg: ice cap#pg: hail#it's going to be cold this weekend#hence the name of the page pack LOL#about page#navigation page#faq page#blogroll page#blog
518 notes
·
View notes
Text
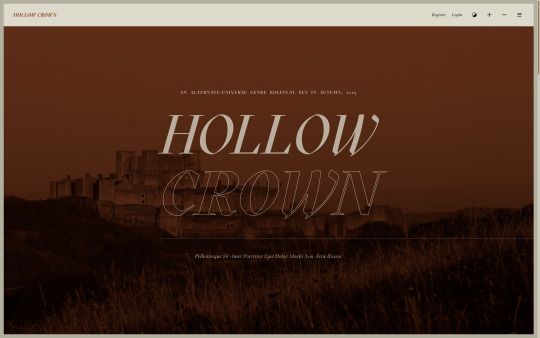
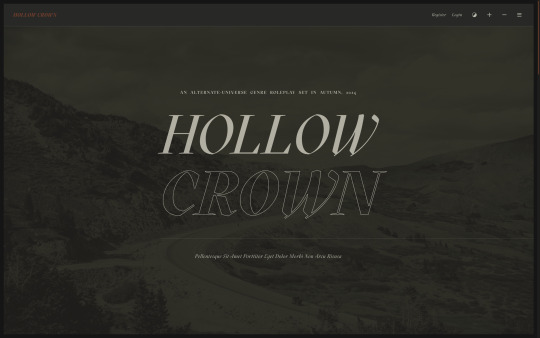
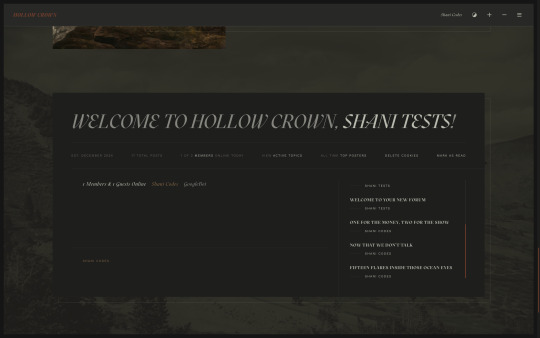
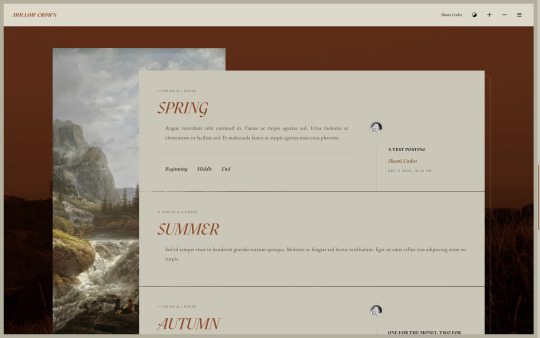
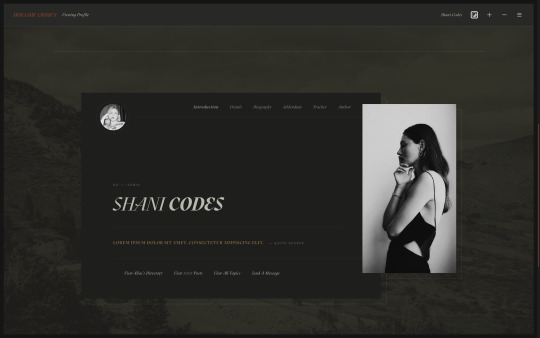
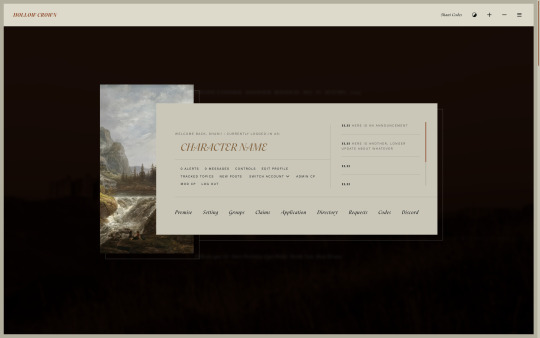

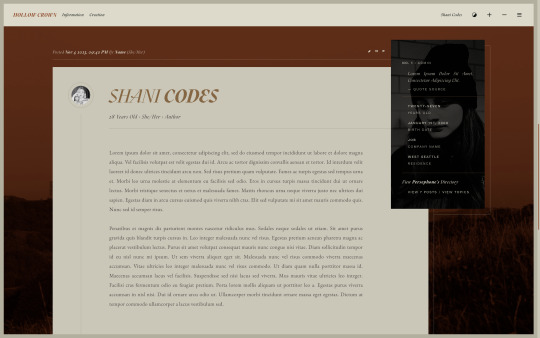
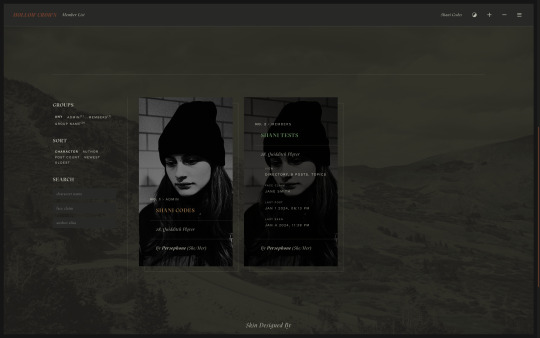
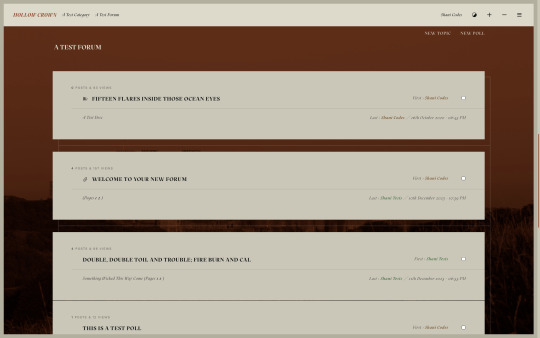
Hollow Crown Skin ($65, Unlimited) by Shani Codes
HOLLOW CROWN is a responsive skin for JCINK forums and is optimized for Google Chrome. If you have questions about the skin, or seeing a full preview, feel free to join my support discord: discord[DOT]gg/G9zb4sQxdp
SKIN INCLUDES:
A light/dark mode toggle,
A font size toggle,
Custom forum layouts and category images,
Pop-out with navigation, updates, about section, and user links,
Full responsiveness for various screen resolutions, supporting both mobile and smaller screens,
Easy to edit member group variables,
CSS variables for fonts, colors, images, sizes, etc. for easy customization,
Post row with a sticky, hover mini profile,
A tabbed, main profile with sections for freestyle and shipper, and FizzyElf's automatic thread tracker,
A filterable, searchable, and sortable isotope member list with counts,
And an included installation guide PDF with comprehensive instructions.
PURCHASE LINK: ko-fi[DOT]com/s/e65d3a5664
62 notes
·
View notes
Text
Another thing for new Tumblr users: Read Mores
We don't use excess spaces or ROT13 or anything to avoid spoilers here! We use a Read More cut. This is also handy for shortening long posts.
As of July 2 2023 (it can and does change over time, but mostly in where to find things) on desktop when making a hard return space in your post it pulls up the formatting menu for selecting images, gifs, links, etc. The last icon on the list--the straight line, squiggly line, straight line--is your Read More cut

On my iOS tablet app, the menu's found at the bottom of the post editor.

This lets you hide spoiler content and/or trim down longer posts, like long lists or longer fanfiction or character info or lore or whatever.
Now, this is also where your blog's customization comes in; someone clicking on a Read More cut will be taken from the dashboard to your blog post, to read it with your font and color choices. Please make sure they're actually readable and accessible. Even with only a minor astigmatism correctable by glasses, I've run into a LOT of unreadable blogs.
For readers, a way around this on Desktop is the XKIT REWRITTEN browser extension. Handy for a lot of ways to tweak your Tumblr browser experience in general, one of the options also lets you open Read More cuts directly on the Dashboard, which can be a lifesaver if avoiding badly formatted or inaccessible blogs.
Another strong word of warning: Read Mores link back to the original post. Handy if you want to Edit what came under the cut. But also--if you delete the post, or change your blog name/URL, it breaks the Read More link. The information is either gone or unable to be found, due to how Tumblr structures posting and reblogs. This is often why you'll see people advocate not putting image or video descriptions under a Read More, even if they get long. Other vital information on a post can be lost this way as well.
So go forth without stretching your mutuals' dashboards or worrying about spoiling folks who haven't filtered their tags/words properly!
(Speaking of: please use filtered words and tags for things you don't want to see or interact with!)
If you want to make static Tumblr pages (like all the ones I have on my blog), or have questions about how and why to Customize your blog (don't be mistaken for a spambot and also gain access to your full blog features!), I have other tutorials for that!
#Tumblr#Blogging#Social Media#How To#Tutorial#Read More#Cuts#Haven't used LJ in like 15 years and still say 'under the cut'
157 notes
·
View notes
Last Seen Blogs
the-next-sublime-beastar
Local shishigumi enthusiast

famouspeachking
Sans titre
god-of-hunger
Most Delicious Nums
gibz-n-things
gibz-n-things