#free sewing pattern
Text
Here are some sharks I made out of felt. They were mostly sewn during my Psychology and English classes
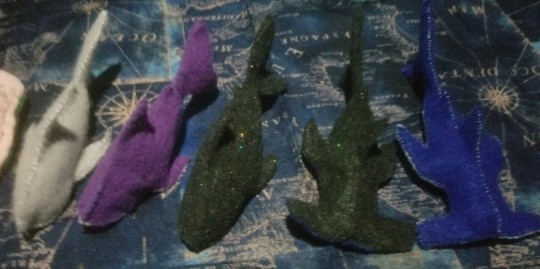
[Image ID: felt sharks lined up on a nautical themed tablecloth. Right to left: grey great white, purple great white, sparkly black great white,sparkly black hammerhead, blue hammerhead. End ID]
And heres the pattern

[Image ID: sewing patterns for sharks cut out of graph paper. One for a great white shark, the other for a hammerhead. End ID]
#sharks#shark toys#sewing#sewing patterns#hammerhead shark#sea creatures#artist described#image id#art#free sewing pattern#shark sewing pattern#marine life#marine biology
1K notes
·
View notes
Text
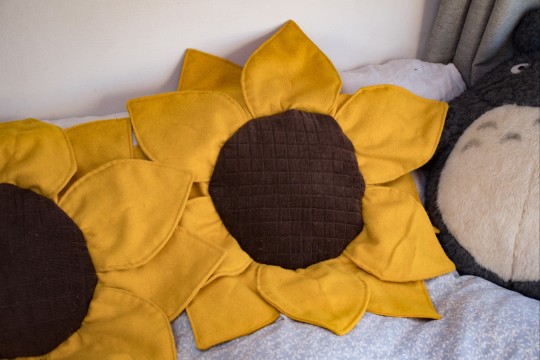
I made some cute sunflower pillows out of scrap fabrics I had been saving from the dump. I couldn't find the right buttons so I made some out of polymer clay I had in my stash 🌻

Here's some instructions if you also want to make some 😊
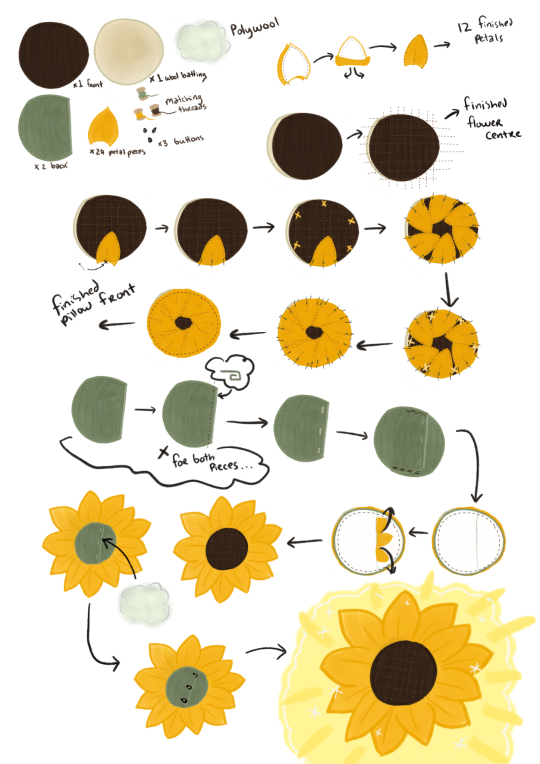
I still need to draw up a sized petal template but I've also made a youtube video (my first one, it's horrible 😂) if you are more of a visual learner.
youtube
1. Cut 1 brown corduroy circle 1 wool batting circle and 2 green 2/3 circles (for the back)
2. Cut 12 pairs of petals (24 pieces total)
3. Sew petal pieces right sides together 1cm away from edges. Turn right sides out and top stitch along the edge. Stitch centre petal seam. Repeat for all petals
4. Quilt your brown centre to the wool. I made lines about 1.5cm apart making a grid.
5 Pin 6 of your petals centre first evenly spaced around the edge. Pin the last 6 over the gaps. Sew 1 cm from the edge
6 Roll hem the straight edge of the 2/3 circle pieces (a rol hem to folding and then folding again)
7 make 3 button holes evenly spaced on one back piece
8 secure the pieces to eachother both having right sides up, creating a pocket
9 fold on your petals and pin your back piece right sides together to your flower front. Sew 1.5cm around the edge and turn out through the pocket.
10 stuff your pillow then add buttons to fit the holes you made earlier. I do the buttons last to make sure they fit nicely when fully puffed.
11 yayyyy pillow!
#cottagecore#slow living#cottagecore aesthetic#hobbitcore#sewityourself#diy#sewing tutorial#free sewing pattern#cottage life#Youtube
299 notes
·
View notes
Text
Sooo unrelated but would you guys be interested in a free Goldfish cracker plush sewing pattern?
Cuz uhhh
Look at him!
#plushies#plush#plush pattern#sewing#plush toy#free sewing pattern#this was the only place i though would be good to post lol
369 notes
·
View notes
Text
Blorbo pattern is below the read more! Based on this post by @thewiglesswonder
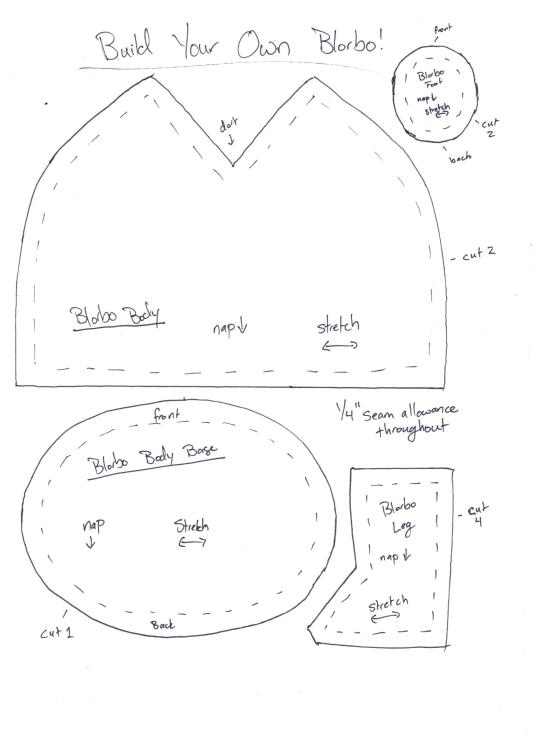
Sew the darts on the two Blorbo body pieces
Sew the two Blorbo body pieces to each other, right sides together (sew the curved edge, and leave the straight line at the bottom unsewn)
Sew the Blorbo body base to the bottom of the Blorbo body pieces (pin it well, with the front roughly in line with the dart on the front half of the body; this does not have to be precise, Blorbo can be a little irregularly shaped, it’s fine). Leave an opening for turning of a few inches left unsewn, turn the body right side out
Put two leg pieces right sides together and sew the side seams (leave the top, where it attaches to the body, and the bottom, where it will attach to the foot, unsewn). Repeat with the second leg.
Pin a foot piece to the bottom of a leg, with the front of the foot roughly lined up with the seam at the front of the foot. Sew around (this can be a little tricky, it might be easier to hand sew than to machine sew this part). Repeat with second leg and foot. Turn legs right side out through the opening at the top of the leg
Finishing:
Embroider the face, either before step 2 or after step 3
Stuff the body at any point after step 3, after embroidering the face
Sew the opening for turning in the body closed
Stuff the legs after step 5. Tuck the seam allowance at the top inside the leg; I ended up tucking about ½” of fabric in instead of ¼” to make the leg a bit shorter, but if you are using an extra fluffy fabric you might want it closer to the ¼”
Pin the legs in place on the front of Blorbo and ladder stitch around the base of the leg
You’re done!!! Enjoy your new blorbo, and if you post it on tumblr I’d love to be tagged @tj-crochets (that’s not a requirement for using the pattern, you do not have to do it, I just love seeing things people make from patterns I wrote)
#free sewing pattern#blorbo sewing pattern#build your own blorbo#plushie sewing pattern#this is a pretty simple pattern but I also forget about some plushie instructions sometimes#like that xkcd comic about the chemical composition of feldspar lol#so if you have any questions let me know! I will be happy to clarify#I had to fight my scanner to get this done#because I hadn't set it up since I moved#and after many many tries I ended up pushing a bunch of buttons randomly after I hit scan and it worked!#well. it worked the second time I hit a bunch of random buttons
321 notes
·
View notes
Photo

tutorial
#sew#sewing#diy sewing#diy shorts#modern sewing#shorts#highwaisted#high waisted shorts#wide leg shorts#free sewing pattern#sewing pattern
232 notes
·
View notes
Text

Would you join his cult? 😈
Free sewing pattern with video tutorial on my ko-fi!!
71 notes
·
View notes
Photo
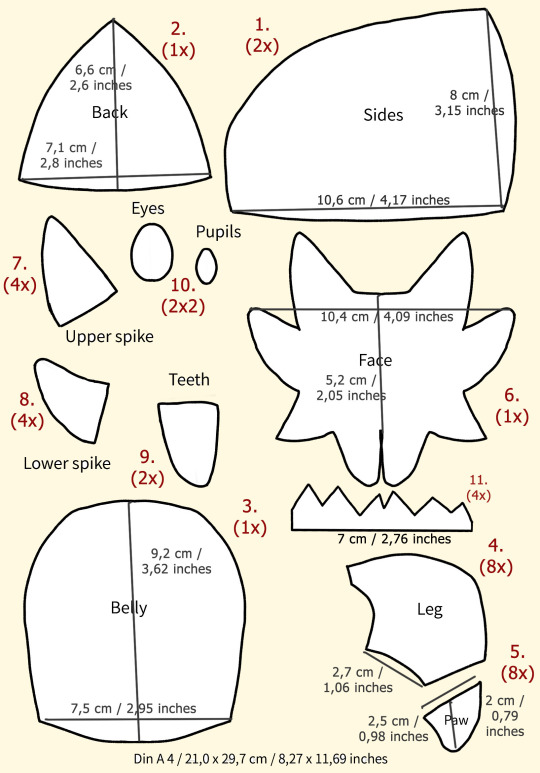

As per folks asking, have the Joltik plush pattern on a DIN A 4 sheet!
First I sewed everything together from 1. - 3. and stuffed it. Next up come the 4 legs (I like to sew paw and leg parts together (4. + 5.) first before sewing both mirrored parts).
Joltik love to crawl all around your room, preferably in high places , so adding small magnets inside the paws gives the Joltik a lot of potential hiding places! A round magnet with 10 mm x 1 - 2 mm might work best. A short furred Joltik might also need fringes like in 11. to stay warm... (The longer furred Joltik is able to hide any edges and weird proportions more efficiently as I noticed! Though both are nice to touch, so go with whatever you prefer or have on hand.)
They love th play with you, so help them out by only sewing the tips of the legs to the lowest part of the body. That way the Joltik has as much mobility as possible! More spidery that way, too!
Sewing the face is the most fickle part. I sewed extra backsides for the larger spikes and plan to add small ones on the short furred Joltik. (Small spikes didn’t really work with the long fur unfortunately...) Add a bit of wadding and a few stitches to get them into shape as well!
The eyes are done with cutting out felt! Cut a hole for the pupil and press the smaller felt inside. (I love to add a small gradient with a copic marker). The white hightlights can be glued on top and the whole eye can be glued and sewed on the face.
For the finishing touches I trimmed some of the long hair on the long furred Joltik and glued the fur on the teeth together since that’s no place for long fur and pulled out any fur caught in between the seams.
For the short furred Joltik I plan to add more custom small spikes to the face and back (a feature the long haired Joltik doesn’t need).
That’s all! And without further ado:
Feeding time~!

#joltik#joltik plush#plush#sewing patter#joltik sewing patter#joltik pattern#spider pattern#spider#pokemon#pokemon plush#pokemon sewing pattern#plush pattern#free sewing pattern#sewing template#may I even add#submas#in case some folks want to see this
797 notes
·
View notes
Text
On the one hand, I have no practical use for an early 19th century American women's bonnet.
On the other, the pattern is free and I have plenty of materials in my stash to make it.
But just because something is free shouldn't mean you have to get it or make it. My time and space have value.
Then again... I've got some florals...
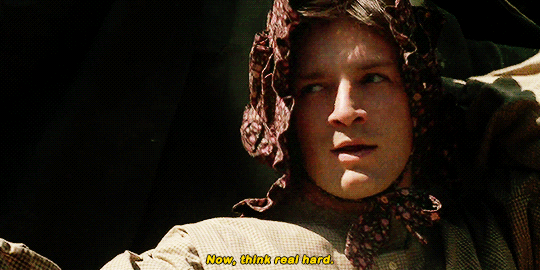
#bonnet#sewing#historybounding#Sun hat#Firefly#pretty floral bonnet#free sewing pattern#sewing from stash#treat yourself
43 notes
·
View notes
Note
is the vintage horse pattern available anywhere online?
sadly it doesn’t seem to be available online anymore as the website I downloaded it from has vanished into the aether.
As such, I’ve made my modified version (with hoofs) available over here for free: https://ko-fi.com/s/ad98e35459
36 notes
·
View notes
Text
FREE SEWING PATTERNS
https://blog.pattern-vault.com/free-designer-patterns/
https://www.moodfabrics.com/blog/category/free-sewing-patterns/
https://blog.megannielsen.com/2017/12/acacia-underwear/
https://ureshiidesign.ca/blog/binder-free-sewing-pattern-download/
25 notes
·
View notes
Text
youtube
Easy DIY 🌱Nature🌿 Overalls for Summer (vintage inspired and CUTE)
28 notes
·
View notes
Text

[Image ID: felt nudibranches. One is yellow with black spots, one is blue with orange stripes, and one is pink with black spots on top and green on bottom with green antennae. End ID]
The pattern for this was just an oval cut out twice but on the top oval, I cut diamonds out of the "corners" and sewed them back together. The antennae were just from scraps.
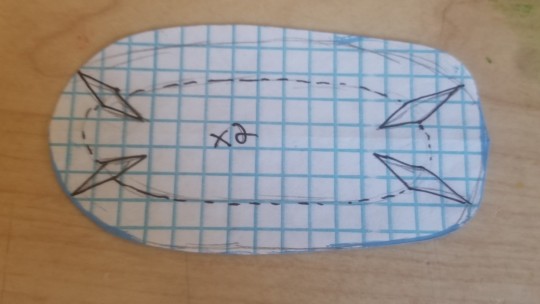
[Image ID: nudibranch sewing pattern. It's an oval cut out of graph paper. End ID]
#nudibranch#sewing#sewing pattern#free sewing pattern#artist described#image id#art#sea creatures#ocean#marine life#marine biology
119 notes
·
View notes
Text
HIYA!! Guess what I finished!!?

This is my first ever public pattern so I hope you guys will enjoy it as much as I do!
#im so nervous posting this cuz ive never made a proper sewing pattern before so i dont know what the hell im doing#AHHH#but some of you guys really wanted to use it so 😤✊️#sewing#free sewing pattern#sewing patterns#plush pattern#plushie#free plush pattern#crafts
138 notes
·
View notes
Text

Yeah uh, internet? Im not mad im just disappointed
#literally wtf#when did this happen#moodfabrics#sewing#psa#costume design#fabric#sewing patterns#free sewing pattern#theyre freaking cute too!
64 notes
·
View notes
Text
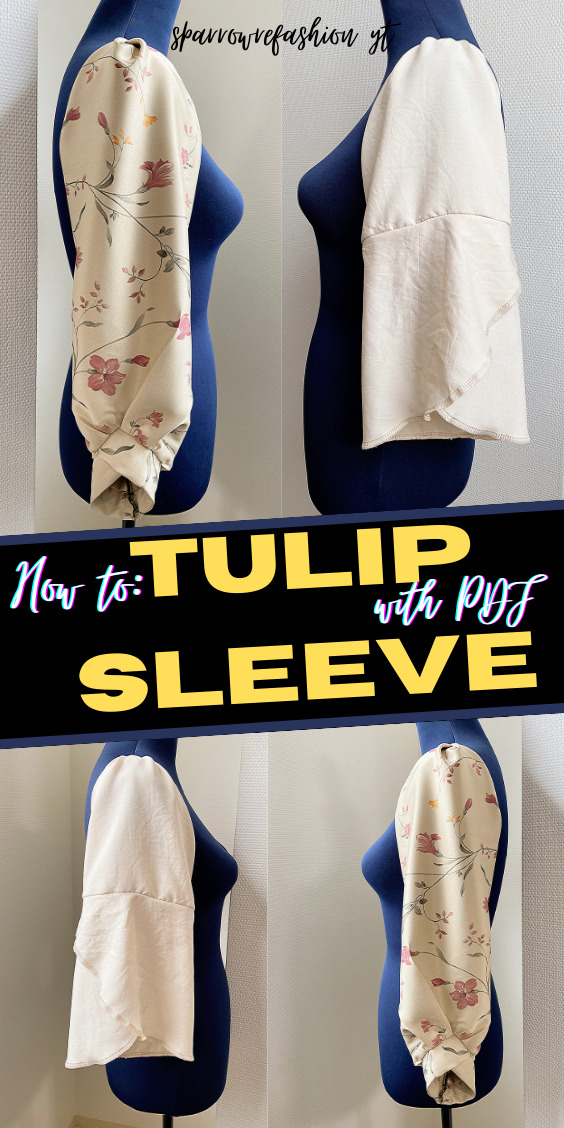
🌷How to Sew 5 Tulip Sleeve Designs: A Step-by-Step Tutorial with Free PDF Pattern for Biginners !🌷
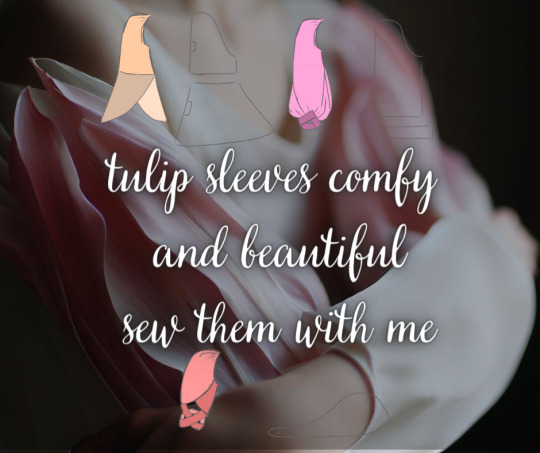
Hey there! Today, I'm thrilled to share with you an exciting and trendy topic – tulip sleeves! 🌸✨ These delightful sleeve designs add a touch of sophistication and charm to any garment, and I can't wait to show you how to create them step by step.
In my latest YouTube video, I'll guide you through the magic of sewing tulip sleeves with an easy-to-follow tutorial. Whether you're a seasoned sewist or just starting your sewing journey, this guide is designed to make you a sleeve expert! 🧵💖
And guess what? To make your sewing experience even more enjoyable, I've prepared a FREE PDF pattern for tulip sleeves in 5 sizes. 🎁💕 Now you can effortlessly customize your sleeves to suit your unique style and measurements!
Get ready to transform your wardrobe and take your fashion game to the next level with these exquisite tulip sleeves. 🌺🌟 Check out the full tutorial on my YouTube channel and let your creativity bloom!
Join me on this journey of creativity, elegance, and craftsmanship – let's sew beautiful tulip sleeves and unlock a whole new level of fashion! 🌷✂️
Pattern and all baners you will find here
step by step video how to hack my PDF pattern and sew your dream tulip sleeves you will find here
#sewing#how to#diy fashion#tutorial#tulip sleeve#easy sewing#free sewing pattern#sewing pattern#printable pattern#sleeves
101 notes
·
View notes
Link
This free pattern looks easy to make and the creator made a tutorial to go with it!
#sewing#sewblr#not gonna tag it as the item for obvious reasons#women's clothing#sewing tutorial#free sewing pattern
92 notes
·
View notes
Last Seen Blogs

nationass
Nationass

krispytriumphtrash-22c0d726-blog
Untitled

sissysamycd
Sissy Samy

ojogodoleicestercity
Untitled

giglr80021
Untitled