#get access to any of our applications soon. i'm the only one working
Text
Subscription for a Paintbrush
A painter might feel like a paintbrush is an extension of themselves, developing muscle memory and skill to create beauty. But what happens when that tool is owned by someone else, and they charge rent? What if they've decided to take it away from you? What if they've decided your art isn't yours?
As a 3D artist, I was professionally trained in using Autodesk Maya, a 3D modelling and animation application. I became really good with it, and grew to love it! I used it at work and at home for my own projects. It became muscle memory, an extension of myself, an organ for expression.
The full version of Maya is ludicrously expensive at CA$2,500 a year! So I had to settle for a cheaper version called Maya LT. It was missing some features, but I wasn't using them at the time so it worked out. I paid CA$360 a year for 3 years.
COVID struck, and I lost my job. I had to use savings to continue paying my license for an additional 2 years, yet in that time they provided no updates. I was just paying for access.
In 2022, Autodesk announced that Maya LT was being discontinued, replaced by a new version called Maya Creative. Instead of a subscription, you'd buy "tokens", spending one token for 24 hours of use. You could only buy tokens in bulk, the cheapest being 100 tokens for CA$405, and they expire after one year.
I've never seen such a predatory, disgusting pricing model for a piece of software. It's like an arcade machine! I thought subscriptions were bad enough! I refused to participate.
Despite spending nearly two grand, the tool I love is going to deactivate itself soon, and I don't have any say in it. It's bytes will still be on my computer, but it'll refuse to launch. Maya LT had a proprietary file format, so all of my projects will be unusable.
It feels like I'm losing a part of myself.
I feel like a fool for even letting this happen in the first place. I let myself become attached to a tool I didn't even own, run by a faceless corporation! My own art is being held hostage! How unfair! Should it even be called a tool, or a service?
I've been avoiding 3D art lately, focusing on programming and game development. My friends and I started working on a game in the Unity Game Engine. A couple months in, Unity's owners were saying and doing some unsavoury things, so we swapped to the Godot Engine. I feel incredibly lucky that we did because of the Unity drama that followed.
Unity wanted to start charging a fee for every user that installed your game. They wanted this to apply to every Unity game retroactively. This is obviously a stupid idea, and they walked it back, but it begs the question: Do you even own the game you developed? It seems like you don't.
I don't want to let myself fall into this trap again. I feel like we as artists form a personal relationship with our tools, and it shouldn't have to be an abusive one! I want to own my art and tools! That shouldn't be difficult as a digital artist! I've been recommended some proprietary subscription based "tools" by friends recently, and I refuse to use them. I won't let this happen to me again.
I'm going to use as much open source software as I can. Open source software is the only software you can truly "own". You have access to the code, and you can do with it as you please! It's often democratically run by the community! You can distribute it to your friends, and it's not piracy! There's a ton of excellent open source art software out there, and I encourage you to check it out!
Autodesk broke my heart. When I get back into 3D art, I'm going to be learning Blender.
#digital art#open source#maya#autodesk maya#autodesk#unity3d#software#philosophy#blender#gamedev#thank you for coming to my ted talk#for the love of god ableton please don't switch to a subscription oh god please don't i need you...#technology#3d art#essay
27 notes
·
View notes
Text
My nocturnal serenade [Moondrop x GN! Reader] Part. 1
[English is not my first language, so sorry for any errors. Check the "nocturnal serenade" tag for the other parts. Part two is already available]
"To all visitors, we are now closing, please turn to the exit. Thank you for coming to Freddy Fazbear's Mega Pizzaplex, please come back and see us soon!" You watched in silence as people headed for their respective exits. The sight of the children running around happily, playing with each other, brought a small smile to your face despite everything. Trying to ignore the slight acceleration of your heart, you looked around, waiting patiently for someone to come and give you instructions. You instinctively looked again at the paper you were holding in your hands. It was slightly creased at the edges, a victim of your anxious movements, but the text was still clear. You still couldn't believe that you had been officially taken on as a security guard. When you heard through the rumors that the famous mall was looking for a new employee, you wasted no time in applying. Honestly, you were surprised, it had only taken a few applications and several signatures to a stack of documents to officially secure you the job. Strange, considering the extreme popularity of that place. "Hey there, y/n right?" You turned around, only now noticing the guy heading your way. Judging by the uniform, he had to be a security guard as well. "Yes, and you're Dylan, right?" "Correct" you shook his hand, feeling the firm grip and noticing the friendly smile. He seemed like a cool guy. "So do you want me to give you a tour or are you already familiar with the place?" your despite myself you smiled "I'm fine as far as the public access part goes, my cousins ask me to accompany them here all the time" Dylan laughed, nodding"I knew it, so let's get to the more professional part so that then we can both start our own jobs, shall we?" "of course, lead the way".
~ ❀ ~
"Here you go, here's your security badge, a flashlight and walkie-talkie, feel free to call me if you need anything" you took them, thanking him, placing them in the belt of your new uniform. You had to admit it was quite comfortable, save the slightly uncomfortable hat. You exchanged smiles, both pleased with the start of what you secretly hoped would be a new friendship. "You know, when i first heard that someone had actually taken the job as a personal guard for the daycare attendant, i really couldn't believe it" every trace of a smile vanished from your face "wait a minute, what?" Dylan, taken aback by that sudden change in atmosphere, looked as shocked as you were "your job...having to guard the daycare animatronic so that it stops wandering all over the mall. Isn't that why you're here?" "What? No! I knew that the job was as a security guard!" Dylan looked as uncomfortable as you were about that situation. You watched him rub the back of his neck, almost embarrassed, turning a nervous smile to you. "Maybe there was a misunderstanding with the boss...". "But don't worry!" he hurried to continue, noticing your expression "it's an easy job, you simply have to keep an eye on the animatronic during your shifts. The daytime as you know it's busy working, but at night you shouldn't have any problems...well, not too many." You didn't like the way those last words sounded "what do you mean?" "Oh nothing, just stay calm and don't be fooled, remember you're the one in charge, not him" and as a final encouragement, he patted you on the shoulder, hard enough to almost knock you over "well, i better get back to my station now! Have a nice night shift y/n! Drop a call if you need me!". You watched him walk away, soon disappearing around the corner. Inside, you had the uncomfortable feeling that you had just been duped.
~ ❀ ~
You stared with a vague sense of unease at the innocent wooden double door in front of you. You had a bad feeling. First of all, why was there a need for a guard in the daycare? From what you had seen, no other animatronics had one. Also, you hadn't liked the way Dylan's behavior had drastically changed when the subject had come up. Honestly, you had never seen the animatronics in that area, having never really had the need to get into it. Your cousins called themselves "too old" for that kind of entertainment, so you'd never felt the need to take them there. Well, judging by the posters hanging on the walls, it looked nice enough. After all, how bad could a robot tasked with working with children possibly be? Encouraging yourself mentally, you entered. Darkness. It was the first and only thing you could see. You blinked, making sure it wasn't some bizarre trick of your eyes. Strange, it seemed as if the power had gone out in that area. You turned on your flashlight, fumbling for the walkie-talkie with the other. "Hey Dylan, is it supposed to be this dark in here? I can't see anything" the answer didn't take long to coming "ugh, looks like the generators are out again. I'm sorry y/n, but i have to ask you to look around and turn the generators back on, there should be five of them" You grimaced, looking around. Thanks to the small beam of light, you were able to get a sense of your surroundings. You looked up at the fake bright sky full of stars. You had to admit it was a respectable area, you probably would have loved coming here as a child. Hesitantly, you walked around, looking for anything that had the vaguest shape of a power generator. Despite yourself, you soon noticed one important factor: it was far too quiet. Where was the animatronic you were supposed to be guarding? Had it already left the area? "Hey Dynal, i don't see anyone here, are you sure he didn't run away-" the sound of laughter echoed through the choking silence. You froze in place, sensing every single hair standing up on the back of your neck. Suddenly, you weren't so sure you were alone anymore. "Well well, what do we have here? A little rebel who's up past their bedtime?" A trill of bells began to ring softly, almost innocently in a specific direction. "You know the rules little one, awake you will stay and a punishment you will receive~". "Yep, that's definitely Moondrop. Now stay calm Y/n and you don't pani-" your screams echoed throughout the whole mall.
#fnaf moondrop#moondrop x reader#moondrop#sunrise and moondrop#moon x reader#fnaf sunrise#sunrise#sunrise x reader#fnaf daycare attendant#fnaf security breach#nocturnal serenade
287 notes
·
View notes
Note
I'm curious of your thoughts on this, if atla took place during modern day (aang still having been frozen in an iceberg for 100 years, the whole storyline still happening etc.) What differences do you think there would be? Especially on the world. How would bending affect their world as well?
hm, this is a really intriguing question. i wrote quite a bit on it, whew -- this clocks out at over 1k words. all under the cut.
i suppose you'd first want to define "the modern world". are we assuming this takes place in our universe, or in theirs, at a point in time where their societies approximately mirror our own? personally, i'm going with the latter -- as much as it might be interesting to set a modern day au in asia, ATLA unfortunately has blended many asian cultures enough to make them inseparable. sticking with the ATLA world with a sort of modern spin is for the best. (it'll also likely be more western, as i am speaking from that particular perspective.)
ATLA itself doesn't take place too long in the past -- from fire nation technology, the show likely takes place only about 200 years prior. this tracks with LoK, which is essentially the 1920s. thus, in this case, aang is born during what approximately appears to be LoK, on the surface, but without republic city.
so, aang lives in the southern air temple, one of the few remaining spiritual havens of the world, and he goes through his early childhood like he did in canon, with barely any differences. he gets declared avatar, he gets upset, he runs away and freezes himself into an iceberg.
the fire nation attacks and wipes out the air nomads soon after. in this world, the fire nation is still imperialist. canonically, ATLA draws parallels between the fire nation to both PRC and WWII imperial japan. while i refuse to directly posit them as one or the other, in this case, they would be more like the latter, with a strong flavor of american imperialism. i suppose the ensuing 100 year war would be a war of attrition, where the fire nation wears at the rest of the nations over the course of decades, slowly gaining colonies, fostering economic dependence, crippling opposing political institutions, nurturing civil war, arming both insurgent groups and tyrannical governments. (in this world, the firelord and the the grand secretariat of ba sing se are on very good terms. but there are whispers that they've recently started to fall apart.)
aang wakes up to a world that looks quite like ours, near the southern water tribe. the SWT in this au is even more of a parallel to inuit and aboriginal cultures. fire nation imperialism has eaten away at their territory, resources, culture, and people. at some point, they started ignoring the SWT, and so in this au, the SWT is very similar to canon, with the exception of maybe a few more pieces of technology. do they have electricity? one generator, powered by water, not enough to provide heating for anyone other than the elderly. do they have phones? two phones, which they charge very, very rarely, and most of the time, they take a rowboat out into the icefields to piggyback their signal from the southernmost reach of the earth kingdom.
the majority of earth kingdom is almost as industrialized as the fire nation, and in the urban areas, slums and skyscrapers stand side by side. omashu, under the rule of king bumi, is a bit better, more like singapore. besides the large urban centers, the sprawling rural areas remain very similar to how they are in canon, with additional technology. they mostly have electricity, phones, and the internet. there is more extensive cultural mixing throughout the earth kingdom. ba sing se, like in canon, is a propaganda state, and they enact this through extensive censorship. even outside of ba sing se, most media is owned by the centralized earth kingdom government (though, again, the exception is omashu). king kuei, like in canon, is only a figurehead, and the monarchy itself no longer has weight in the earth kingdom.
other societies, such as the NWT are also readapted into this world. the NWT is fairly urbanized, but still manages to retain a sense of antiquity. it appears nearly identical to the NWT in canon, and they have little to no electricity -- and yet they thrive, regardless. however, to maintain their own culture, they limit their own access to the outside world. as a result, they are woefully unprepared when the fire nation attack them both by air and water.
overall, the four nations have likely become less discrete, with the exception of the NWT. we currently live in a very globalized world, with significant economic interdependence, so this is just an application of this into ATLA. thus, as aang, katara and sokka travel the earth kingdom, heading north, they meet people of more mixed cultures than in canon.
prince zuko, in this au, is still banished, and it's in disgrace that he receives a rickety, past-century ship, barely retrofitted to the modern era. his father could clearly afford to give him better, but he chose not to. in addition, prince zuko isn't just known throughout the ports, nor is his banishment kept quiet. everyone and their mother can recognize him -- he's been shown on tv since he was a kid. there are rumors on internet forums about why he got banished, some good and some bad. as a result, his presence is more incendiary than in canon. he's practically an underground celebrity. this makes it a lot harder for him to retain anonymity later in the series, and the same can be said of general iroh, although most images of him on the internet and tv are pre-lu ten's death, so most assume he should look younger.
anyway, i could go for a lot longer, but for the sake of brevity, i'll skip to bending. since bending is a natural aspect of the ATLA world, it evolved alongside modernization. however, there are less benders being born nowadays. in the middle of concrete cities, only the toughest earthbenders continue to manifest their bending. in the fire nation, fewer powerful benders are being born. the connection that people have to their own elements have been worn away at by the alienation inherent to modern society. the continued destruction of the environment, and the killing of both badgermoles and dragons contribute to the decline of bending. (this is why toph is even more exceptional in this modern au.)
yet institutions for bending remain. earthbenders still hold earth rumbles, firebenders still challenge others to agni kai. however, bending is more strictly regulated in day to day life. in some cases, the bending energy is redirected from fighting to social productivity -- earthbenders are employed in construction, lightningbenders can work at electricity plants, etc. as aang and katara confront these new applications of bending, they are... confounded. it seems that most benders don't even enjoy their bending anymore; it's simply a tool to them. for aang and katara, who were raised to find joy in their bending, this attitude is stifling. the reason both toph and zuko become aang's teachers, then, is because they defy this bending attitude. for toph, she truly loves bending, as an extension of herself. for zuko, fire lives and breathes alongside him, and within him. their particular style of connection to their own bending make them aberrant, and eventually help place them as aang's teachers.
#SORRY THIS IS SO LONG!!!#atla#avatar the last airbender#atla modern au#mine#text#replies#ask#atla aus and headcanons
13 notes
·
View notes
Text
The Ink Well Foundation.
The Ink Well Foundation is a non-profit that helps bring smiles to the faces of children facing adversity such as illness, neglect, and abuse. I cannot begin to express how big of an honor it is to have Elizabeth Winter on Case—this interview brought me to tears, and it means a lot to share her message on here, so that you all can help more children in need to be able to connect with this incredible foundation.

Bio: I am the Founder and Executive Director of the Ink Well Foundation. Growing up, I had cancer my entire childhood—it was a rare cancer that kept getting misdiagnosed, which meant a fair amount of biopsies and days in the hospital, and finally major surgery where I was told I might wake up without a leg. I am very fortunate in that the doctors were able to remove all the cancer without amputating, and I have been cancer-free since I was about 20 years old.
That experience gave me a lot of empathy and compassion for kids facing long, isolating hospital stays. There were also other issues during my childhood: I experienced a lot of abandonment with a mother who just could not play the role of mother, and who eventually died when I was fifteen. In general, I just had a pretty severe lack of affection and emotional support growing up. All that made me very tough, in some ways too tough and it wound up creating only further isolation and pain.
As an adult, I saw that pain mirrored in other children's eyes and I began to seek out a way to connect with them, to help them and myself learn to nurture and heal together. I strongly feel that genuine human bonding can fuel both physical and emotional healing. I also think getting out into nature and carrying that same respect to all wildlife helps us to become humble and connected in a very powerful way, so we stress those ideas in our work often.
In 2005, I was working in animation in New York City, and I stood up in a meeting at work one day, and asked if any of the other artists would like to come along with me to draw with kids facing illness and hardship. A couple people raised their hands, and we went together to Gilda's Club out in Brooklyn (that club house has since closed, but we still go to the one in Manhattan). The artists who came along in those early years, like Rami Efal and Ray Alma, Pedro Delgado and Sergei Aniskov—those people are all still volunteers today! That says so much to me about the kind of people this work attracts. We've all become like family over the years and I love those guys so much.
It all began at Gilda's Club, but then I reached out to places like the Ronald McDonald House, St. Mary's Hospital and Bellevue Hospitals, and we slowly but surely became accepted and welcomed at healthcare and at-risk support centers all across New York, because the kids loved what we did, and at then end of every event they were begging us to come back. So we always did! That is the true mark of success for me every time, when the kids are yelling at us to get back there as soon as we can.
A few years ago, I learned about the great organization on the Upper East Side, The Society of Illustrators. Their Executive Director, Anelle Miller, connected me with all these other great artists like Stefano Imbert, Bil Donovan, Abby Merrill, and Elana Amity (who is now our Event Director at Mount Sinai Hospital, where she hosts a monthly live drawing call-in show that beams to all the kids' hospital rooms at once). They draw along with us and call or text in with questions and comments. It's hilarious and adorable. We also connected with the great people of the National Cartoonists Society, and wonderful artists like Ed Steckley, Adrian Sinnott, Howard Beckerman, Tim Savage, Marty Macaluso, Joe Vissichelli and so many more.
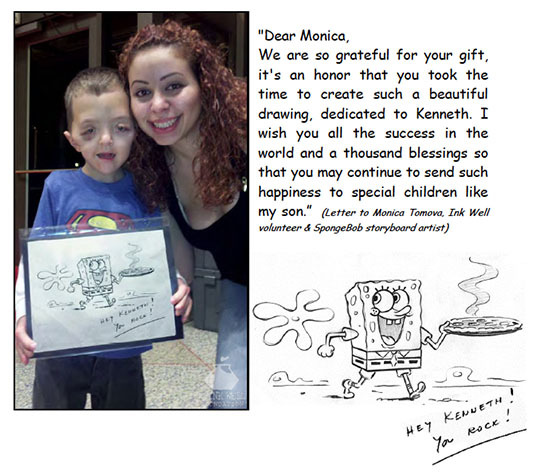
After MTV Animation New York shut down, pretty much all my colleagues and I from great shows like Beavis and Butthead, Daria, The Head, and Celebrity Death Match all moved out west. So I had this great group of talented friends still living there, and based on the Ink Well's popularity in NYC, I thought, let's give it a shot there too! I reached out to my former colleague from Rugrats and Wild Thornberrys, Joseph Scott, and asked if he'd be interested in running things there. He is now heading up all our operations in L.A. and he is just the most phenomenally kind and talented person on earth. With his art skills he could do whatever he wanted but he devotes a huge amount of time to the kids we work with and I'm so moved by his giving spirit and boundless good energy. And Michael Daedalus Kenny is also stepping up in a leadership role as our newest Event Director, we've got amazing artists like Marla Frazee of Boss Baby genius, Monica Tomova from SpongeBob, Jeanette Moreno, king of The Simpsons, Chris Harmon from Futurama, Ashley Simpson from Phineas and Ferb, Christian Lignan of Teenage Mutant Ninja Turtles, graphic novelist, Jeremy Arambulo and so many others so we're in great hands there. I just wish the traffic weren't such a problem! It really is tough to get around that city, unlike NYC where there's a decently functioning subway that goes to all our locations, so getting around is no real trouble comparatively.
Tools of choice: Our events are usually very handmade by design so that the kids can feel like they could do all of this easily by themselves. So we come up with themes like, “Who is your Superhero?,” and we ask the kids to focus on their strengths and what superpowers they wish they would have, and we draw their portraits as such. We are not art therapists, but we feel these event themes help to make the kids focus on positivity and their potential, and therefore help them to bond and heal.
We do sometimes get more elaborate, like when we teach stop motion, claymation, and we once even taught them how to build homemade rockets on the roof of Bellevue Hospital! One of our Event Directors at the time, Nathan Schreiber, used to come up with the most fantastic science-focused events. He now runs a company called Science Ninjas, that helps kids learn about science with fun card games. But usually it's simple by design.
We are extremely fortunate to have Blick Arts as a sponsor. Their support enables us to provide each child with their own art kit after each event so that they can keep creating on their own after they learn new skills with us so thanks to them we have a lot of the arts tools we need.
Tool I wish existed: I think we do great working with anything we've got lying around- we emphasize the potential of just about anything to become art: we often create characters out of inanimate objects, make flip books, sculptures and puppets— using everything from card stock to socks to toothpicks and gum drops. We keep it accessible and inventive.
How can we support The Ink Well Foundation? Because our volunteers are by definition "the artists behind the kids' favorite books, films, comics, and TV shows," we don't solicit volunteers from the general public. We do have an online application on our site, so other professionals that meet our criteria in the illustration, animation, and cartooning industries are welcome to apply there.
What the general public can do is to help us spread the word so that more children can see that others are going through what they're going through, and also so that they see examples of adults believing in them and encouraging them. We try to promote the idea of art as self-expression and a way to get through trying times, ideally together. Connectivity and encouragement are critical to healing, and honestly, to just building a better world. So we talk about that a lot on our social media and at the events themselves. We also honor the kids' intelligence by talking about art in general there— we highlight classic and new artists and ideas and encourage them to learn from those masters as they develop their own skills.
Because we are a very small 100% volunteer-run organization, we focus on giving the kids the greatest events possible, and sometimes that means we don't have a lot of time for social media, self-promotion, and fund-raising. So spreading the word is huge and we are always extremely grateful for, and in need of, any financial donations.
Where are Ink Well Foundation events held? We operate in New York City and Los Angeles because that's where the top artists in our fields are concentrated. We go to hospitals and at-risk support centers like Ronald McDonald House, Gilda's Club, Bellevue, St. Mary's, Mount Sinai, Childhelp, Covenant House and more. You can see the full list here.

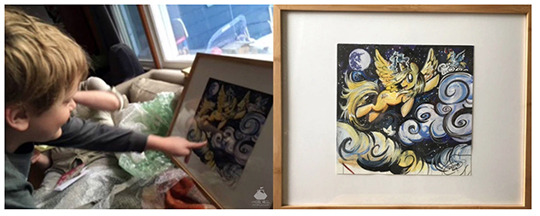
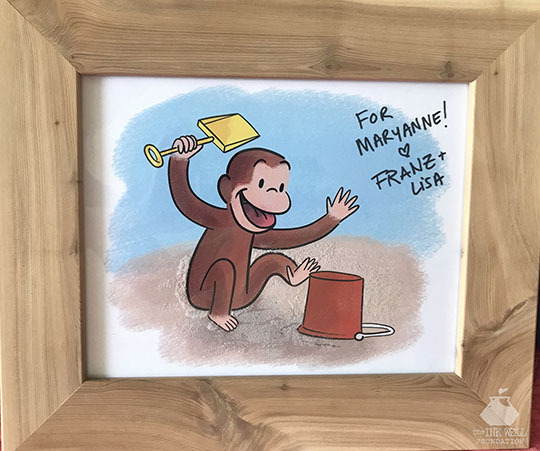
How can children who don't live near Ink Well Foundation events benefit from your Pen Pals Program? This is another reason we want people to spread the word. Loved ones of a child experiencing serious illness or hardship, who is physically or geographically unable to attend our events, can apply to have a special artwork sent straight to them. We ask the kids what their favorite animated films, TV shows, or illustrated books are, and then we have an artist who actually worked on that production make something tailored to that child. We then frame it up, and send it off to them by mail.
We've done this with artists from SpongeBob, Captain Underpants, and just a week ago, we delivered a beautiful drawing of Curious George that our Event Directors, Franz Palomares and Lisa LaBracio (both of whom worked on Curious George) lovingly made. This was for a girl named, Maryanne who lives in Florida. She suffers from a rare disease called, vein of galen malformation that has led to brain damage and vision loss. She is unable to talk or walk or eat through her mouth and she suffers seizures but she understands everything around her, and she can feel texture. So Franz and Lisa made her Curious George playing in a sand box, and they glued real sand into the picture, so that Maryanne could feel that, and enjoy the art on multiple levels. Maryanne's mother, Sandra, said that she was thrilled, and that she loves to hold it.
Our hearts are full being able to share these works with kids who need that moment of light, and that knowledge that an adult they admire, someone who doesn't even know them well, can care enough about them to take the time to create careful, tailor-made artworks just for them. We hope that helps to bring a smile in the moment, and build self-worth long term.
Misc. I'd like to mention that everything we do is 100% free of charge. No one gets paid, no money ever changes hands for the art. We have brilliant artists like Peter de Séve who is on our board and attends many events, while also creating characters for Ice Age, The Little Prince, and all his New Yorker covers. He could get a mint for his works, but he comes down and does this for free, and that's a testament to the power of that loving connection we all feel when we are just selflessly helping one another.
I feel this most acutely when I'm working with youth who have suffered abuse and neglect. We have an Event Director, Jane Archer, who leads our work at Bellevue Hospital. Many of those kids are there because they have been through unendurable trauma, and Jane connects with them beautifully. She begins with a meditation where we all envision our strengths together, we talk about our talents, and hopes for a brighter day, we imagine embodying those gifts and then we gently, patiently, ask the kids to help us draw characters step by step. Many kids start out very suspicious and resistant, even angry. But by the end of the events they are almost always laughing and teasing us, and they don't want to stop creating. It is my greatest joy to experience that transition and I hope we may continue to spread this support and faith in one another for many years to come.
Website, Etc:
We are @inkwellkids on every platform:
Website
Facebook
Instagram
Twitter
Find more posts about art supplies on Case’s Instagram! There is a Twitter as well. If you enjoy this blog, and would like to contribute to labor and maintenance costs, there is also a Patreon!
7 notes
·
View notes
Note
Help, my family and I are getting kicked out of our apartment next week because we couldn't afford to pay the rent and we barely been scraping by. I'm not sure I can handle living in a shelter, like my mom says we might have to. Do you know what I should do? Any experiences?
I’m sorry to hear that. Getting kicked out of the place you live is one of the worst experiences you could ever have. This is going to be a long answer so I’m going to put it under a cut.
First, check your options. Do you have any family or friends in the area that would be willing to house you for a while? Even if it’s for a month or two, it’s at least time off the streets. My mom was lucky enough to have a co-worker that would sublet to us before their lease on their house was up, and I was able to stay with my girlfriend at her mother’s place for almost half a year.
I will stress this but DON’T TAKE OUT LARGE LOANS AND USE THE MONEY ON HOTELS/MOTELS. It sucks not having a real bed to sleep in after a while, I know, but don’t do what we did and take out a loan to fix the car and then spend the remaining money on hotel rooms. Even with third-party sites like Hotels.com, Hotwire, and Booking, it can get really expensive really quickly, especially if you miss things like microwaves and fridges which always make the room cost more.
If those options aren’t available, I would recommend finding a job (if you both don’t have one already) and putting up donation links on your tumblr or any social media site that will allow you to have an external link just as a start. Open up commissions for drawing or writing if you can. While I want to say not to rely too much on the kindness of strangers, just putting a post out there means there is still a chance at least that you’ll get something.
I will say to try an invest in a gym membership, not to stay active though that is a bonus, but to have access to a shower. We went through the YMCA but there’s other places like Planet Fitness and 24 Hour Fitness that are also good options. Believe me, depression when homeless is awful and sometimes having a shower is an instant mood lifter.
Like with the shelters, look into low income housing as soon as possible. Apply for organizations that will work with you into getting you into another apartment or house as soon as they can. The wait time on them can be tricky since some people wait over a year for a place, but that’s makes applying early all the more important. Having a guaranteed place a year from now is better than not having a place for three or four years.
Second, finding a library nearby is also a good idea to check on said links and checking job search websites like Indeed. I highly recommend Indeed since they not only show jobs around your area, but they also allow you to upload a resume directly to the website that you can use on their easy application postings.
Third, finding a shelter now before you’re evicted is a good idea because sometimes they won’t take people right away or they’ll need you to have a reservation with them. Make sure the place is clean and has a decent reputation. My family and I never had a chance to get into a shelter mainly for the reservation reason, but we did have an alternative that I’ll talk about now.
If you have a car, sleeping in it’s not as bad as you think, but that’s going to be your home until you have a spot in a shelter so you have to take the utmost care of it. Make sure you have sheets of fabric (preferably thick or dark) or towels that you can put over the windows when you sleep and plenty of blankets because, depending on how well insulated your car is, it can get cold really fast especially during the winter and fall months (At least that’s how it was for me, but then again I live near San Francisco). Find nearby rest stops on highways and get there as early as possible to ensure a spot (I cannot tell you how many times we had to find another spot to sleep when we came late). In my experience, rest stops start filling up around 5-6 pm and are full by 8-9.
You’re going to have pretty much everything you own in the trunk of your car, so try to keep it as organized as possible so that you know where everything is. Have cans of dry shampoo (I recommend Not Your Mother’s spray on dry shampoo. They’re relatively cheap, about $2.50 to $5 depending on where you get it from) for when you can’t take a shower. When it comes to food, try to get things that you can eat in your car and throw away without much fuss. I wouldn’t recommend canned stuff since, unless you want to eat it cold, you’ll have to buy a miniature stove/hotplate and a pot for it. Dried and cured foods like jerky is good for a quick meal but those can get expensive depending on the brand. Thermoses and reusing water bottles also goes a long way since you’ll need to stay hydrated as much as you can.
I’m sorry I don’t have much advice on the shelters, but this is the best advice I can give you. If you’re confused on anything, please don’t hesitated to send another ask or send me a direct message through the chat here. Homelessness is not fun, and it helps to have someone to talk to who’s had experience. Hopefully your situation gets better sooner rather than later!
1 note
·
View note
Note
yikes do u have any advice for someone who's new to tumblr rping?? i'm asking u bc u seem super nice & i really love ur blog /w\
O U T O F S U N L I G H T
Hello There! Thank you so much for you kind words! And may I be one of the first to welcome you to the Roleplay Community on Tumblr, as well as ( more specifically?) to the Comicbook Fandom! I’ve been exactly where you are now, my friend, as a veteran of RP from other sites and venues, newly branching into this hot little mecca of writing known as Tumblr!
I think you’re really going to like it here. :)
Tumblr is an expansive universe where the possibilities are limitless, both within and beyond the fandom your character might originally hail from. It is the birthplace of some truly wonderful things, like SuperWhoLock, Batfamily Shenanigans, and Redemption from Marvel’s Civil War 2 trash. On here, all those usual rules that controlled the way you wrote your character in an RP Community or chat room no longer exist, granting you freedom to interpret them any way you wish (or multiple ways in multiple settings!). Many fandom, like the DC Comics Fandom, are populated by passionate and friendly writers who want to interact with others that feel just as strongly about the universe as they do!
But, and I’m sure you’ve heard this, RPing on Tumblr is not for the faint of heart. All those things that make this place a source of creativity and inspiration also allow for some serious issues. The site itself can be a challenge, not really designed for intuitive, flowing RP threads. The atmosphere of a fandom, usually so positive, is also constantly changing in nature, and populated heavily by free variables (i.e. people), so that there are no comfort zones for anyone involved.
On one hand, this will make you a better writer, a more conscientious interpreter of character motives, and a much stronger RPer overall. On the other hand…. well, even the best fandoms have their fair share of abuse, and no one is immune to having their feelings hurt.
Knowing all this, me and my fellow roleplayers still come online to write our hearts out everyday, because we love to write and Tumblr is hands-down one of the most prolific places for Roleplay on the internet. And I’ll tell you this, lovely anon, hard as it is, tumblr RP is also a breeding ground for wonderful and meaningful friendships that will last far longer than even the strongest OTP. That’s why I’m so pleased to heard that you are willing to give Tumblr RP a try, even if you don’t feel totally certain about how to start.
As for me, I look forward to seeing you in the this fandom community (or perhaps another!) and possibly interacting with you in the future. Thank you so much for trusting me enough with your question. I’m certainly not an expert on being a successful roleplayer (some days I make a potato look like a better talent than me!), but I hope I can offer a few small pointers that might help you get started on your way to RP glory.
First of all, regardless of whatever fandom has caught your fancy, I suggest you research the atmosphere of the RP community here on Tumblr. Use the search feature to scope out RP tags for the fandom, spot promos for characters, and stalk any RP communities currently seeking applications on the site. All this information will give you a feel for the type of RP experience you’ll have while in that fandom., and may influence your decision to take up a certain character.
If you have a personal tumblr blog, but you want to RP a character in a fandom, then I highly recommend you make another (completely separate) tumblr blog. Sideblogs are nice, but they don’t work well when you’re following others and want to interact via asks, replies etc. Things can get very confusing, very fast, especially in the activity feed!
Many people swear by their ‘About’ pages, and that’s a good thing. Once you’ve created your character blog and start reaching out to others, most RPers on tumblr will bee-line for your ‘About’ or ‘Rules’ page as soon as they see you’ve followed them. This is a courtesy so they can know how to best approach your character and what the important details should be known when RPing with you. So, to hedge your bets in a good way, always make an About Page and include all vital details about your character on it!
Also, keep in mind, there is no wrong way to write an About Page. You can check other RPers’ blogs for examples, but just write it however most makes sense to you. As long as it gives the reader an understanding of your vision with your character, that’s what matters.
Sometimes when you’re starting out, especially if you’re playing an OC or a lesser known Canon character, you’re going to have to be the brave one that reaches out to others and asks for threads. Just posting opens and following other blogs might not get you the responses you hope for, and I don’t want that to discourage you. Don’t be afraid to (respectfully) go after the RPer you’re interested in writing with, I guarantee they’re all super nice people and they will respond favorably to your interest in them!
Depending on the type of person you are, I would recommend possibly getting an instant messenger account for your RP blogs. I know that Tumblr messenger exists, but many RPers prefer to limit access to who can message them via that interface. The most popular instant messenger choices on tumblr are Skype, Kik, and Discord. This is certainly Not a requirement, and please don’t feel pressured to get an account if you are not comfortable with talking to strangers via instant messenger. But, if you love to spazz out over your fandom, and you love to share plot ideas and headcanons, then you will find a great many fast friends in the RP fandoms on tumblr. So many writers (me included!) love to share their inspiration in this quick way, and translate it to writing on the site!
Learn the fine art of tagging posts. Tags are just about the only thing we Tumblr RPers have as a search filter on this website, and some of us follow certain tags religiously. And I don’t just mean our tumblr url, I mean anything we feel is relevant to our character. For example, I track the tags: #sunxking, #apollo, #midnighterandapollo, #midnighter, #TheAuthority, etc. I also generously tag anything I post so that I can easily find it again on my blog, or provide navigation links to it for others to find. (such as #openstarter for all my Apollo RP opens). Additionally, I feel it’s important to be careful in tagging for triggering posts. I always tag with the keyword of the triggering content, and append the triggering keyword with either ‘ts’ (for tumblr savior) or ‘tw’ for “trigger warning.” Keep in mind that if you’re tagging an original post (not a reblog) that only the first five tags are picked up by the tumblr search engine.
Stay open minded. And I don’t just mean in regards to crossovers and alternate universes. There will be RPers that you will meet that may interpret a well-known character in a way that seems entirely contradictory to how you envision them. And you may like it… or you may not. But sometimes thinking outside of the box produces great rewards, and you never know what innovative idea might spring out of a crack conversation. Regardless, always follow the rule of thumb: Respect others and lead with kindness.
Hopefully these initial pointers will help you hit the ground running with an RP blog on tumblr! There are other things people focus on, like the right theme, or text formatting… but that stuff doesn’t really matter to me. Personally, as long as your writing content reflects your dedication to your character, I am interested in reading it!
Again, Welcome to this amazing place, and I wish you all the success and fun with your character.
Best of Luck!
– Red
8 notes
·
View notes
Text
Mastering Props And PropTypes In React
Props and PropTypes are an important mechanism for passing information between React components, and we’re going to look into them in great detail here. This tutorial will introduce you to the details about props, passing and accessing props, and passing information to any component using props. However, it’s always a good practice to validate the data we are getting through props by using PropTypes. So, you will also learn how to integrate PropTypes in React.
Do props and PropTypes confuse you? You’re not alone. I’m going to guide you through everything about props and PropTypes. They can make your life significantly easier when developing React apps. This tutorial will introduce you to the details about props, passing and accessing props, and passing information to any component using props.
Building React applications involves breaking down the UI into several components, which implies that we will need to pass data from one component to another. Props are an important mechanism for passing information between React components, and we’re going to look into them in great detail. This article would be incomplete without looking into PropTypes, because they ensure that components use the correct data type and pass the right data.
It’s always a good practice to validate the data we get as props by using PropTypes. You will also learn about integrating PropTypes in React, typechecking with PropTypes, and using defaultProps. At the end of this tutorial, you will understand how to use props and PropTypes effectively. It is important that you already have basic knowledge of how React works.
Understanding Props
React allows us to pass information to components using things called props (short for properties). Because React comprises several components, props make it possible to share the same data across the components that need them. It makes use of one-directional data flow (parent-to-child components). However, with a callback function, it’s possible to pass props back from a child to a parent component.
These data can come in different forms: numbers, strings, arrays, functions, objects, etc. We can pass props to any component, just as we can declare attributes in any HTML tag. Take a look at the code below:
<PostList posts={postsList} />
In this snippet, we are passing a prop named posts to a component named PostList. This prop has a value of {postsList}. Let’s break down how to access and pass data.
Passing and Accessing Props
To make this tutorial interesting, let’s create an application that shows a list of users’ names and posts. The app demo is shown below:
See the Pen [Passing and Accessing Props](https://codepen.io/smashingmag/pen/MWyKQpd) by David Adeneye.
See the Pen Passing and Accessing Props by David Adeneye.
The app comprises collections of components: an App component, a PostList component, and a Post component.
The list of posts will require data such as the content and the name of the user. We can construct the data like so:
const postsList = [ { id: 1, content: "The world will be out of the pandemic soon", user: "Lola Lilly", }, { id: 2, content: "I'm really exited I'm getting married soon", user: "Rebecca Smith", }, { id: 3, content: "What is your take on this pandemic", user: "John Doe", }, { id: 4, content: "Is the world really coming to an end", user: "David Mark", }, ];
After this, we need the App component to pull the data, Here is the basic structure of that component:
const App = () => { return ( <div> <PostList posts={postsList} /> </div> ); };
Here, we are passing an array of posts as a prop to the PostList (which we’ll create in a bit). The parent component, PostList, will access the data in postsList, which will be passed as posts props to the child component (Post). If you’ll remember, our app comprises three components, which we’ll create as we proceed.
Let’s create the PostList:
class PostList extends React.Component { render() { return ( <React.Fragment> <h1>Latest Users Posts</h1> <ul> {this.props.posts.map((post) => { return ( <li key={post.id}> <Post {...post} /> </li> ); })} </ul> </React.Fragment> ); } }
The PostList component will receive posts as its prop. It will then loop through the posts prop, this.props.posts, to return each posted item as a Post component (which we will model later). Also, note the use of the key in the snippet above. For those new to React, a key is a unique identifier assigned to each item in our list, enabling us to distinguish between items. In this case, the key is the id of each post. There’s no chance of two items having the same id, so it’s a good piece of data to use for this purpose.
Meanwhile, the remaining properties are passed as props to the Post component ( <Post {...post} /> ).
So, let’s create the Post component and make use of the props in it:
const Post = (props) => { return ( <div> <h2>{props.content}</h2> <h4>username: {props.user}</h4> </div> ); };
We are constructing the Post component as a functional component, rather than defining it as a class component like we did for the PostList component. I did this to show you how to access props in a functional component, compared to how we access them in a class component with this.props. Because this a functional component, we can access the values using props.
We’ve learned now how to pass and access props, and also how to pass information from one component to the other. Let’s consider now how props work with functions.
Passing Functions Via Props
In the preceding section, we passed an array of data as props from one component to another. But what if we are working with functions instead? React allows us to pass functions between components. This comes in handy when we want to trigger a state change in a parent component from its child component. Props are supposed to be immutable; you should not attempt to change the value of a prop. You have to do that in the component that passes it down, which is the parent component.
Let’s create a simple demo app that listens to a click event and changes the state of the app. To change the state of the app in a different component, we have to pass down our function to the component whose state needs to change. In this way, we will have a function in our child component that is able to change state.
Sounds a bit complex? I have created a simple React application that changes state with the click of a button and renders a piece of welcome information:
See the Pen [Passing Function via Props in React](https://codepen.io/smashingmag/pen/WNwrMEY) by David Adeneye.
See the Pen Passing Function via Props in React by David Adeneye.
In the demo above, we have two components. One is the App component, which is the parent component that contains the app’s state and the function to set the state. The ChildComponent will be the child in this scenario, and its task is to render the welcome information when the state changes.
Let’s break this down into code:
class App extends React.Component { constructor(props) { super(props); this.state = { isShow: true, }; } toggleShow = () => { this.setState((state) => ({ isShow: !state.isShow })); }; render() { return ( <div> <ChildComponent isShow={this.state.isShow} clickMe={this.toggleShow} /> </div> ); } }
Notice that we’ve set our state to true, and the method to change the state is created in the App component. In the render() function, we pass the state of the app, as the prop isShow, to the ChildComponent component. We also pass the toggleShow() function as a prop named clickMe.
We will use this in the ChildComponent which looks like this:
class ChildComponent extends React.Component { clickMe = () => { this.props.clickMe(); }; render() { const greeting = "Welcome to React Props"; return ( <div style=> {this.props.isShow ? ( <h1 style=>{greeting}</h1> ) : null} <button onClick={this.clickMe}> <h3>click Me</h3> </button> </div> ); } }
The most important thing above is that the App component passes down a function as a prop to the ChildComponent. The function clickMe() is used for the click handler in the ChildComponent, whereas the ChildComponent doesn’t know the logic of the function — it only triggers the function when the button gets clicked. The state is changed when the function is called, and once the state has changed, the state is passed down as a prop again. All affected components, like the child in our case, will render again.
We have to pass the state of the app, isShow, as a prop to the ChildComponent, because without it, we cannot write the logic above to display greeting when the state is updated.
Now that we’ve looked at functions, let’s turn to validation. It’s always a good practice to validate the data we get through props by using PropTypes. Let’s dive into that now.
What Are PropTypes In React?
PropTypes are a mechanism to ensure that components use the correct data type and pass the right data, and that components use the right type of props, and that receiving components receive the right type of props.
We can think of it like a puppy being delivered to a pet store. The pet store doesn’t want pigs, lions, frogs, or geckos — it wants puppies. PropTypes ensure that the correct data type (puppy) is delivered to the pet store, and not some other kind of animal.
In the section above, we saw how to pass information to any component using props. We passed props directly as an attribute to the component, and we also passed props from outside of the component and used them in that component. But we didn’t check what type of values we are getting in our component through props or that everything still works.
It’s totally upon us whether to validate the data we get in a component through props. But in a complex application, it is always a good practice to validate that data.
Using PropTypes
To make use of PropTypes, we have to add the package as a dependency to our application through npm or Yarn, by running the following code in the command line. For npm:
npm install --save prop-types
And for Yarn:
yarn add prop-types
To use PropTypes, we first need to import PropTypes from the prop-types package:
import PropTypes from 'prop-types';
Let’s use ProTypes in our app that lists users’ posts. Here is how we will use it for the Post component:
Post.proptypes = { id: PropTypes.number, content: PropTypes.string, user: PropTypes.string }
Here, PropTypes.string and PropTypes.number are prop validators that can be used to make sure that the props received are of the right type. In the code above, we’re declaring id to be a number, while content and user are to be strings.
Also, PropTypes are useful in catching bugs. And we can enforce passing props by using isRequired:
Post.proptypes = { id: PropTypes.number.isRequired, content: PropTypes.string.isRequired, user: PropTypes.string.isRequired }
PropTypes have a lot of validators. Here are some of the most common ones:
Component.proptypes = { stringProp: PropTypes.string, // The prop should be a string numberProp: PropTypes.number, // The prop should be a number anyProp: PropTypes.any, // The prop can be of any data type booleanProp: PropTypes.bool, // The prop should be a function functionProp: PropTypes.func // The prop should be a function arrayProp: PropTypes.array // The prop should be an array }
More types are available, which you can check in React’s documentation].
Default Props
If we want to pass some default information to our components using props, React allows us to do so with something called defaultProps. In cases where PropTypes are optional (that is, they are not using isRequired), we can set defaultProps. Default props ensure that props have a value, in case nothing gets passed. Here is an example:
Class Profile extends React.Component{ // Specifies the default values for props static defaultProps = { name: 'Stranger' }; // Renders "Welcome, Stranger": render() { return <h2> Welcome, {this.props.name}<h2> } }
Here, defaultProps will be used to ensure that this.props.name has a value, in case it is not specified by the parent component. If no name is passed to the class Profile, then it will have the default property Stranger to fall back on. This prevents any error when no prop is passed. I advise you always to use defaultProps for every optional PropType.
Conclusion
I hope you’ve enjoyed working through this tutorial. Hopefully, it has shown you how important props and propTypes are to building React applications, because without them, we wouldn’t be able to pass data between components when interactions happen. They are a core part of the component-driven and state-management architecture that React is designed around.
PropTypes are a bonus for ensuring that components use the correct data type and pass the right data, and that components use the right type of props, and that receiving components receive the right type of props.
If you have any questions, you can leave them in the comments section below, and I’ll be happy to answer every one and work through any issues with you.
References
(ks, ra, al, il)
Website Design & SEO Delray Beach by DBL07.co
Delray Beach SEO
source http://www.scpie.org/mastering-props-and-proptypes-in-react/
source https://scpie.tumblr.com/post/626729077522546688
0 notes
Text
Mastering Props And PropTypes In React
Props and PropTypes are an important mechanism for passing information between React components, and we’re going to look into them in great detail here. This tutorial will introduce you to the details about props, passing and accessing props, and passing information to any component using props. However, it’s always a good practice to validate the data we are getting through props by using PropTypes. So, you will also learn how to integrate PropTypes in React.
Do props and PropTypes confuse you? You’re not alone. I’m going to guide you through everything about props and PropTypes. They can make your life significantly easier when developing React apps. This tutorial will introduce you to the details about props, passing and accessing props, and passing information to any component using props.
Building React applications involves breaking down the UI into several components, which implies that we will need to pass data from one component to another. Props are an important mechanism for passing information between React components, and we’re going to look into them in great detail. This article would be incomplete without looking into PropTypes, because they ensure that components use the correct data type and pass the right data.
It’s always a good practice to validate the data we get as props by using PropTypes. You will also learn about integrating PropTypes in React, typechecking with PropTypes, and using defaultProps. At the end of this tutorial, you will understand how to use props and PropTypes effectively. It is important that you already have basic knowledge of how React works.
Understanding Props
React allows us to pass information to components using things called props (short for properties). Because React comprises several components, props make it possible to share the same data across the components that need them. It makes use of one-directional data flow (parent-to-child components). However, with a callback function, it’s possible to pass props back from a child to a parent component.
These data can come in different forms: numbers, strings, arrays, functions, objects, etc. We can pass props to any component, just as we can declare attributes in any HTML tag. Take a look at the code below:
<PostList posts={postsList} />
In this snippet, we are passing a prop named posts to a component named PostList. This prop has a value of {postsList}. Let’s break down how to access and pass data.
Passing and Accessing Props
To make this tutorial interesting, let’s create an application that shows a list of users’ names and posts. The app demo is shown below:
See the Pen [Passing and Accessing Props](https://codepen.io/smashingmag/pen/MWyKQpd) by David Adeneye.
See the Pen Passing and Accessing Props by David Adeneye.
The app comprises collections of components: an App component, a PostList component, and a Post component.
The list of posts will require data such as the content and the name of the user. We can construct the data like so:
const postsList = [ { id: 1, content: "The world will be out of the pandemic soon", user: "Lola Lilly", }, { id: 2, content: "I'm really exited I'm getting married soon", user: "Rebecca Smith", }, { id: 3, content: "What is your take on this pandemic", user: "John Doe", }, { id: 4, content: "Is the world really coming to an end", user: "David Mark", }, ];
After this, we need the App component to pull the data, Here is the basic structure of that component:
const App = () => { return ( <div> <PostList posts={postsList} /> </div> ); };
Here, we are passing an array of posts as a prop to the PostList (which we’ll create in a bit). The parent component, PostList, will access the data in postsList, which will be passed as posts props to the child component (Post). If you’ll remember, our app comprises three components, which we’ll create as we proceed.
Let’s create the PostList:
class PostList extends React.Component { render() { return ( <React.Fragment> <h1>Latest Users Posts</h1> <ul> {this.props.posts.map((post) => { return ( <li key={post.id}> <Post {...post} /> </li> ); })} </ul> </React.Fragment> ); } }
The PostList component will receive posts as its prop. It will then loop through the posts prop, this.props.posts, to return each posted item as a Post component (which we will model later). Also, note the use of the key in the snippet above. For those new to React, a key is a unique identifier assigned to each item in our list, enabling us to distinguish between items. In this case, the key is the id of each post. There’s no chance of two items having the same id, so it’s a good piece of data to use for this purpose.
Meanwhile, the remaining properties are passed as props to the Post component ( <Post {...post} /> ).
So, let’s create the Post component and make use of the props in it:
const Post = (props) => { return ( <div> <h2>{props.content}</h2> <h4>username: {props.user}</h4> </div> ); };
We are constructing the Post component as a functional component, rather than defining it as a class component like we did for the PostList component. I did this to show you how to access props in a functional component, compared to how we access them in a class component with this.props. Because this a functional component, we can access the values using props.
We’ve learned now how to pass and access props, and also how to pass information from one component to the other. Let’s consider now how props work with functions.
Passing Functions Via Props
In the preceding section, we passed an array of data as props from one component to another. But what if we are working with functions instead? React allows us to pass functions between components. This comes in handy when we want to trigger a state change in a parent component from its child component. Props are supposed to be immutable; you should not attempt to change the value of a prop. You have to do that in the component that passes it down, which is the parent component.
Let’s create a simple demo app that listens to a click event and changes the state of the app. To change the state of the app in a different component, we have to pass down our function to the component whose state needs to change. In this way, we will have a function in our child component that is able to change state.
Sounds a bit complex? I have created a simple React application that changes state with the click of a button and renders a piece of welcome information:
See the Pen [Passing Function via Props in React](https://codepen.io/smashingmag/pen/WNwrMEY) by David Adeneye.
See the Pen Passing Function via Props in React by David Adeneye.
In the demo above, we have two components. One is the App component, which is the parent component that contains the app’s state and the function to set the state. The ChildComponent will be the child in this scenario, and its task is to render the welcome information when the state changes.
Let’s break this down into code:
class App extends React.Component { constructor(props) { super(props); this.state = { isShow: true, }; } toggleShow = () => { this.setState((state) => ({ isShow: !state.isShow })); }; render() { return ( <div> <ChildComponent isShow={this.state.isShow} clickMe={this.toggleShow} /> </div> ); } }
Notice that we’ve set our state to true, and the method to change the state is created in the App component. In the render() function, we pass the state of the app, as the prop isShow, to the ChildComponent component. We also pass the toggleShow() function as a prop named clickMe.
We will use this in the ChildComponent which looks like this:
class ChildComponent extends React.Component { clickMe = () => { this.props.clickMe(); }; render() { const greeting = "Welcome to React Props"; return ( <div style=> {this.props.isShow ? ( <h1 style=>{greeting}</h1> ) : null} <button onClick={this.clickMe}> <h3>click Me</h3> </button> </div> ); } }
The most important thing above is that the App component passes down a function as a prop to the ChildComponent. The function clickMe() is used for the click handler in the ChildComponent, whereas the ChildComponent doesn’t know the logic of the function — it only triggers the function when the button gets clicked. The state is changed when the function is called, and once the state has changed, the state is passed down as a prop again. All affected components, like the child in our case, will render again.
We have to pass the state of the app, isShow, as a prop to the ChildComponent, because without it, we cannot write the logic above to display greeting when the state is updated.
Now that we’ve looked at functions, let’s turn to validation. It’s always a good practice to validate the data we get through props by using PropTypes. Let’s dive into that now.
What Are PropTypes In React?
PropTypes are a mechanism to ensure that components use the correct data type and pass the right data, and that components use the right type of props, and that receiving components receive the right type of props.
We can think of it like a puppy being delivered to a pet store. The pet store doesn’t want pigs, lions, frogs, or geckos — it wants puppies. PropTypes ensure that the correct data type (puppy) is delivered to the pet store, and not some other kind of animal.
In the section above, we saw how to pass information to any component using props. We passed props directly as an attribute to the component, and we also passed props from outside of the component and used them in that component. But we didn’t check what type of values we are getting in our component through props or that everything still works.
It’s totally upon us whether to validate the data we get in a component through props. But in a complex application, it is always a good practice to validate that data.
Using PropTypes
To make use of PropTypes, we have to add the package as a dependency to our application through npm or Yarn, by running the following code in the command line. For npm:
npm install --save prop-types
And for Yarn:
yarn add prop-types
To use PropTypes, we first need to import PropTypes from the prop-types package:
import PropTypes from 'prop-types';
Let’s use ProTypes in our app that lists users’ posts. Here is how we will use it for the Post component:
Post.proptypes = { id: PropTypes.number, content: PropTypes.string, user: PropTypes.string }
Here, PropTypes.string and PropTypes.number are prop validators that can be used to make sure that the props received are of the right type. In the code above, we’re declaring id to be a number, while content and user are to be strings.
Also, PropTypes are useful in catching bugs. And we can enforce passing props by using isRequired:
Post.proptypes = { id: PropTypes.number.isRequired, content: PropTypes.string.isRequired, user: PropTypes.string.isRequired }
PropTypes have a lot of validators. Here are some of the most common ones:
Component.proptypes = { stringProp: PropTypes.string, // The prop should be a string numberProp: PropTypes.number, // The prop should be a number anyProp: PropTypes.any, // The prop can be of any data type booleanProp: PropTypes.bool, // The prop should be a function functionProp: PropTypes.func // The prop should be a function arrayProp: PropTypes.array // The prop should be an array }
More types are available, which you can check in React’s documentation].
Default Props
If we want to pass some default information to our components using props, React allows us to do so with something called defaultProps. In cases where PropTypes are optional (that is, they are not using isRequired), we can set defaultProps. Default props ensure that props have a value, in case nothing gets passed. Here is an example:
Class Profile extends React.Component{ // Specifies the default values for props static defaultProps = { name: 'Stranger' }; // Renders "Welcome, Stranger": render() { return <h2> Welcome, {this.props.name}<h2> } }
Here, defaultProps will be used to ensure that this.props.name has a value, in case it is not specified by the parent component. If no name is passed to the class Profile, then it will have the default property Stranger to fall back on. This prevents any error when no prop is passed. I advise you always to use defaultProps for every optional PropType.
Conclusion
I hope you’ve enjoyed working through this tutorial. Hopefully, it has shown you how important props and propTypes are to building React applications, because without them, we wouldn’t be able to pass data between components when interactions happen. They are a core part of the component-driven and state-management architecture that React is designed around.
PropTypes are a bonus for ensuring that components use the correct data type and pass the right data, and that components use the right type of props, and that receiving components receive the right type of props.
If you have any questions, you can leave them in the comments section below, and I’ll be happy to answer every one and work through any issues with you.
References
(ks, ra, al, il)
Website Design & SEO Delray Beach by DBL07.co
Delray Beach SEO
source http://www.scpie.org/mastering-props-and-proptypes-in-react/
0 notes
Text
Mastering Props And PropTypes In React
Props and PropTypes are an important mechanism for passing information between React components, and we’re going to look into them in great detail here. This tutorial will introduce you to the details about props, passing and accessing props, and passing information to any component using props. However, it’s always a good practice to validate the data we are getting through props by using PropTypes. So, you will also learn how to integrate PropTypes in React.
Do props and PropTypes confuse you? You’re not alone. I’m going to guide you through everything about props and PropTypes. They can make your life significantly easier when developing React apps. This tutorial will introduce you to the details about props, passing and accessing props, and passing information to any component using props.
Building React applications involves breaking down the UI into several components, which implies that we will need to pass data from one component to another. Props are an important mechanism for passing information between React components, and we’re going to look into them in great detail. This article would be incomplete without looking into PropTypes, because they ensure that components use the correct data type and pass the right data.
It’s always a good practice to validate the data we get as props by using PropTypes. You will also learn about integrating PropTypes in React, typechecking with PropTypes, and using defaultProps. At the end of this tutorial, you will understand how to use props and PropTypes effectively. It is important that you already have basic knowledge of how React works.
Understanding Props
React allows us to pass information to components using things called props (short for properties). Because React comprises several components, props make it possible to share the same data across the components that need them. It makes use of one-directional data flow (parent-to-child components). However, with a callback function, it’s possible to pass props back from a child to a parent component.
These data can come in different forms: numbers, strings, arrays, functions, objects, etc. We can pass props to any component, just as we can declare attributes in any HTML tag. Take a look at the code below:
<PostList posts={postsList} />
In this snippet, we are passing a prop named posts to a component named PostList. This prop has a value of {postsList}. Let’s break down how to access and pass data.
Passing and Accessing Props
To make this tutorial interesting, let’s create an application that shows a list of users’ names and posts. The app demo is shown below:
See the Pen [Passing and Accessing Props](https://codepen.io/smashingmag/pen/MWyKQpd) by David Adeneye.
See the Pen Passing and Accessing Props by David Adeneye.
The app comprises collections of components: an App component, a PostList component, and a Post component.
The list of posts will require data such as the content and the name of the user. We can construct the data like so:
const postsList = [ { id: 1, content: "The world will be out of the pandemic soon", user: "Lola Lilly", }, { id: 2, content: "I'm really exited I'm getting married soon", user: "Rebecca Smith", }, { id: 3, content: "What is your take on this pandemic", user: "John Doe", }, { id: 4, content: "Is the world really coming to an end", user: "David Mark", },
];
After this, we need the App component to pull the data, Here is the basic structure of that component:
const App = () => { return ( <div> <PostList posts={postsList} /> </div> );
};
Here, we are passing an array of posts as a prop to the PostList (which we’ll create in a bit). The parent component, PostList, will access the data in postsList, which will be passed as posts props to the child component (Post). If you’ll remember, our app comprises three components, which we’ll create as we proceed.
Let’s create the PostList:
class PostList extends React.Component { render() { return ( <React.Fragment> <h1>Latest Users Posts</h1> <ul> {this.props.posts.map((post) => { return ( <li key={post.id}> <Post {...post} /> </li> ); })} </ul> </React.Fragment> ); }
}
The PostList component will receive posts as its prop. It will then loop through the posts prop, this.props.posts, to return each posted item as a Post component (which we will model later). Also, note the use of the key in the snippet above. For those new to React, a key is a unique identifier assigned to each item in our list, enabling us to distinguish between items. In this case, the key is the id of each post. There’s no chance of two items having the same id, so it’s a good piece of data to use for this purpose.
Meanwhile, the remaining properties are passed as props to the Post component ( <Post {...post} /> ).
So, let’s create the Post component and make use of the props in it:
const Post = (props) => { return ( <div> <h2>{props.content}</h2> <h4>username: {props.user}</h4> </div> );
};
We are constructing the Post component as a functional component, rather than defining it as a class component like we did for the PostList component. I did this to show you how to access props in a functional component, compared to how we access them in a class component with this.props. Because this a functional component, we can access the values using props.
We’ve learned now how to pass and access props, and also how to pass information from one component to the other. Let’s consider now how props work with functions.
Passing Functions Via Props
In the preceding section, we passed an array of data as props from one component to another. But what if we are working with functions instead? React allows us to pass functions between components. This comes in handy when we want to trigger a state change in a parent component from its child component. Props are supposed to be immutable; you should not attempt to change the value of a prop. You have to do that in the component that passes it down, which is the parent component.
Let’s create a simple demo app that listens to a click event and changes the state of the app. To change the state of the app in a different component, we have to pass down our function to the component whose state needs to change. In this way, we will have a function in our child component that is able to change state.
Sounds a bit complex? I have created a simple React application that changes state with the click of a button and renders a piece of welcome information:
See the Pen [Passing Function via Props in React](https://codepen.io/smashingmag/pen/WNwrMEY) by David Adeneye.
See the Pen Passing Function via Props in React by David Adeneye.
In the demo above, we have two components. One is the App component, which is the parent component that contains the app’s state and the function to set the state. The ChildComponent will be the child in this scenario, and its task is to render the welcome information when the state changes.
Let’s break this down into code:
class App extends React.Component { constructor(props) { super(props); this.state = { isShow: true, }; } toggleShow = () => { this.setState((state) => ({ isShow: !state.isShow })); }; render() { return ( <div> <ChildComponent isShow={this.state.isShow} clickMe={this.toggleShow} /> </div> ); }
}
Notice that we’ve set our state to true, and the method to change the state is created in the App component. In the render() function, we pass the state of the app, as the prop isShow, to the ChildComponent component. We also pass the toggleShow() function as a prop named clickMe.
We will use this in the ChildComponent which looks like this:
class ChildComponent extends React.Component { clickMe = () => { this.props.clickMe(); }; render() { const greeting = "Welcome to React Props"; return ( <div style=> {this.props.isShow ? ( <h1 style=>{greeting}</h1> ) : null} <button onClick={this.clickMe}> <h3>click Me</h3> </button> </div> ); }
}
The most important thing above is that the App component passes down a function as a prop to the ChildComponent. The function clickMe() is used for the click handler in the ChildComponent, whereas the ChildComponent doesn’t know the logic of the function — it only triggers the function when the button gets clicked. The state is changed when the function is called, and once the state has changed, the state is passed down as a prop again. All affected components, like the child in our case, will render again.
We have to pass the state of the app, isShow, as a prop to the ChildComponent, because without it, we cannot write the logic above to display greeting when the state is updated.
Now that we’ve looked at functions, let’s turn to validation. It’s always a good practice to validate the data we get through props by using PropTypes. Let’s dive into that now.
What Are PropTypes In React?
PropTypes are a mechanism to ensure that components use the correct data type and pass the right data, and that components use the right type of props, and that receiving components receive the right type of props.
We can think of it like a puppy being delivered to a pet store. The pet store doesn’t want pigs, lions, frogs, or geckos — it wants puppies. PropTypes ensure that the correct data type (puppy) is delivered to the pet store, and not some other kind of animal.
In the section above, we saw how to pass information to any component using props. We passed props directly as an attribute to the component, and we also passed props from outside of the component and used them in that component. But we didn’t check what type of values we are getting in our component through props or that everything still works.
It’s totally upon us whether to validate the data we get in a component through props. But in a complex application, it is always a good practice to validate that data.
Using PropTypes
To make use of PropTypes, we have to add the package as a dependency to our application through npm or Yarn, by running the following code in the command line. For npm:
npm install --save prop-types
And for Yarn:
yarn add prop-types
To use PropTypes, we first need to import PropTypes from the prop-types package:
import PropTypes from 'prop-types';
Let’s use ProTypes in our app that lists users’ posts. Here is how we will use it for the Post component:
Post.proptypes = { id: PropTypes.number, content: PropTypes.string, user: PropTypes.string
}
Here, PropTypes.string and PropTypes.number are prop validators that can be used to make sure that the props received are of the right type. In the code above, we’re declaring id to be a number, while content and user are to be strings.
Also, PropTypes are useful in catching bugs. And we can enforce passing props by using isRequired:
Post.proptypes = { id: PropTypes.number.isRequired, content: PropTypes.string.isRequired, user: PropTypes.string.isRequired
}
PropTypes have a lot of validators. Here are some of the most common ones:
Component.proptypes = { stringProp: PropTypes.string, // The prop should be a string numberProp: PropTypes.number, // The prop should be a number anyProp: PropTypes.any, // The prop can be of any data type booleanProp: PropTypes.bool, // The prop should be a function functionProp: PropTypes.func // The prop should be a function arrayProp: PropTypes.array // The prop should be an array
}
More types are available, which you can check in React’s documentation].
Default Props
If we want to pass some default information to our components using props, React allows us to do so with something called defaultProps. In cases where PropTypes are optional (that is, they are not using isRequired), we can set defaultProps. Default props ensure that props have a value, in case nothing gets passed. Here is an example:
Class Profile extends React.Component{ // Specifies the default values for props static defaultProps = { name: 'Stranger' }; // Renders "Welcome, Stranger": render() { return <h2> Welcome, {this.props.name}<h2> }
}
Here, defaultProps will be used to ensure that this.props.name has a value, in case it is not specified by the parent component. If no name is passed to the class Profile, then it will have the default property Stranger to fall back on. This prevents any error when no prop is passed. I advise you always to use defaultProps for every optional PropType.
Conclusion
I hope you’ve enjoyed working through this tutorial. Hopefully, it has shown you how important props and propTypes are to building React applications, because without them, we wouldn’t be able to pass data between components when interactions happen. They are a core part of the component-driven and state-management architecture that React is designed around.
PropTypes are a bonus for ensuring that components use the correct data type and pass the right data, and that components use the right type of props, and that receiving components receive the right type of props.
If you have any questions, you can leave them in the comments section below, and I’ll be happy to answer every one and work through any issues with you.
References
(ks, ra, al, il)
Website Design & SEO Delray Beach by DBL07.co
Delray Beach SEO
source http://www.scpie.org/mastering-props-and-proptypes-in-react/
source https://scpie1.blogspot.com/2020/08/mastering-props-and-proptypes-in-react.html
0 notes
Note
Hey there! This question is directed at Rosie and the girls doing Global Politics :) I'm really interested in doing it next year and have done quite a bit of research online, but am looking for macrob specific insights. Who's the teacher and what's her/his teaching style like? What is the class environment like? What does it take to really do well in this subject? I'd love any extra info you could give as well! Thank you so much
Hey there!
Mr Allan is the Global Politics teacher (Mr Short does unit ½, and I didn’t do ½ so it isn’t 100% necessary i guess). If you’ve ever had him for year 9 history, it’s exactly like that. He prints out powerpoint slides, leaves room for notes on the side, and will talk you through information on a powerpoint to teach content. If you ask a question he will always give you an enlightened answer as well! I found that he will give you all the information you need, but you will need to write your own notes and synthesise the information (learn how to apply it as you answer questions) in your own time. He posts lots of extra reading (also some required reading) onto his website, but not all the power points, so try and make sure you’re there all the time (he also goes into a lot of depth on one slide, so you have to be alert)
My class only had around 10 people, so it was really small. However we were also kind of awkward so we didn’t really talk to each other. I would have liked a more open class- having discussions about what you’re learning is super important. Also try and form a study group (he will go through this with you and talk about benefits ahah, basically try and make a group of 3 so you’re able to learn off each other and bounce ideas off each other. There’s also quite a bit of group work (unmarked) in his classes, so he’ll sometimes put some questions up and divide you up into groups, and each group has to come up with the answer to the question on a whiteboard (he’ll go around and give feedback etc), and tell you where and how marks are allocated.
For the first SAC, he’ll talk you through how to answer questions, and how to write an essay. You’ll have to go through these more in depth in your own time (do practice questions etc). Something you might find annoying is that he won’t mark any practice SACs for you, but he will mark maybe 2 questions so if he tells you to submit an answer- do it!! Because that’s likely the only thing you’ll have marked before the SAC. So in terms of answering questions, keep your ears and eyes open in class and learn to answer them yourself through the VCAA past exams (don’t try saving them for later). Also be careful of the questions before answering them- some will only be applicable to the old study, but don’t waste the question, just reword it) Only some of the questions have answers to them, but once you answer enough questions, you’ll kind of know how to answer them. For the next few SACs, he’ll talk you through it much less.
Basically, the content will be given to you (sometimes he’ll split you into groups to research things yourself), but answering questions and learning how to answer in a way to get you marks before a SAC it is mostly put onto you (he will mark any questions after you’ve done a SAC on it), so be ready to have to trudge through questions without answers (and looking for answers yourself). Don’t be too disheartened if you are unhappy with your SAC scores (trust me, I was really unhappy with some of mine), and definitely make good use of him as a resource (he really knows his stuff 10/10 good guy, if you really can’t work out how to answer a question, ask your peers because they might know, or he’ll go through it with you…after your SAC ahah.) Also he doesn’t tell you any SAC averages or rankings (if that matters to you)
To do well, basically you need to know the content inside and out pretty early- write notes as soon as you start learning (i did mine and updated them after each lesson, when i got a bit lazy i would spend hours doing notes for like 3 powerpoints i definitely don’t recommend). How I did it was 2 weeks before a SAC, I’d go through all my notes and make sure that they were coherent, and and then memorise them basically. With a week left to go, I’d do all the practice questions he gave (during the last few SACs he gives less practice for you, so go to VCAA and print out all the relevant questions for the AOS and answer them). Answering questions is the most important thing, so at the end of the year when I started falling a bit behind, I would kind of rush my notes and just get into answering questions (which i found really helped me learn the content anyway). Time yourself to make sure you’re writing within the time limit (you won’t have time to check over answers during the exam- if you do you haven’t written enough).Before the exams, quickly go through your notes one last time and memorise them like a month before the exam.Do all the practice exams you can (I did all of the practice exams accessible to me except 2, if you do it in year 11 you could 100% do all the exams available as global is pretty new as a subject and there aren’t many commercial exams around either) And finally read the news every single day- half an hour from a selection of sources (try to get some from the left and some from the right, and even something from overseas like Al Jazeera or China Daily in contrast to the *western biased* media- he’ll give you heaps of sites to choose from don’t worry!
Global really is an amazing subject- it is a bit hard to score well in, but it’s possible to! There are only a limited number of questions they could possibly ask so as long as you’re prepared, you shoulnd’t be thrown by too many questions (when i did the exam there was only 1 question I was unsure about), and WRITE ESSAYS!!! Write heaps of essays, if you’re not good at them you have to learn to be pretty quickly. You’ll need to have a decent memory, be a fluent, coherent writer, organised and interested (or else you may find the content dry). Global really helped me grow as a person, and learn about the world around me so I hope you choose to do Global next year!! If you have anything else you’re unsure about (there’s too much for me to say to be able to write about it all here), feel free to inbox me or email me etc.
Another FAM leader here:
I’m doing Global ¾ this year so I can’t tell you all that much about our assessments yet because we haven’t had any SACs yet, but here’s what I can add to the amazing stuff written by Rosie above! Our class has 16 people - glopol is definitely growing as a subject, especially as this year there are also now 2 ½ classes!! Our class this year is super super tight knit as last year many of us had the privilege to all be in the same class so we got to know each other pretty well and we helped and still do help each other a lot :) I would say that my glopol class definitely has the best environment out of all the classes I’ve ever taken at MacRob, and a lot is because everyone’s close and willing to help :) Global does require quite a lot of work but it is so rewarding and so enjoyable as well. It’s definitely way more than just a VCE subject to me, as I have learnt so much from it and I know so much more about the world now, inching me towards being a better global citizen (and in this day and age there is SO MUCH emphasis on being a global citizen and not just being confined in your own city). I really recommend you to take Global if you have a deep interest in the world around you and want to find out more!! :) and don’t hesitate to email me (won0060) if you want to know about exactly what we’re doing in Global right now, or anything about current VCE Global Politics :)
All the best! :)
Love, FAM xx
0 notes
Last Seen Blogs

3dthirteen
3D THIRTEEN

missyienah
Miss Bay

biggeekchick
Heather: High Warlock of Cheese

parkchimmies
love me, love me.