#gfx tool
Photo
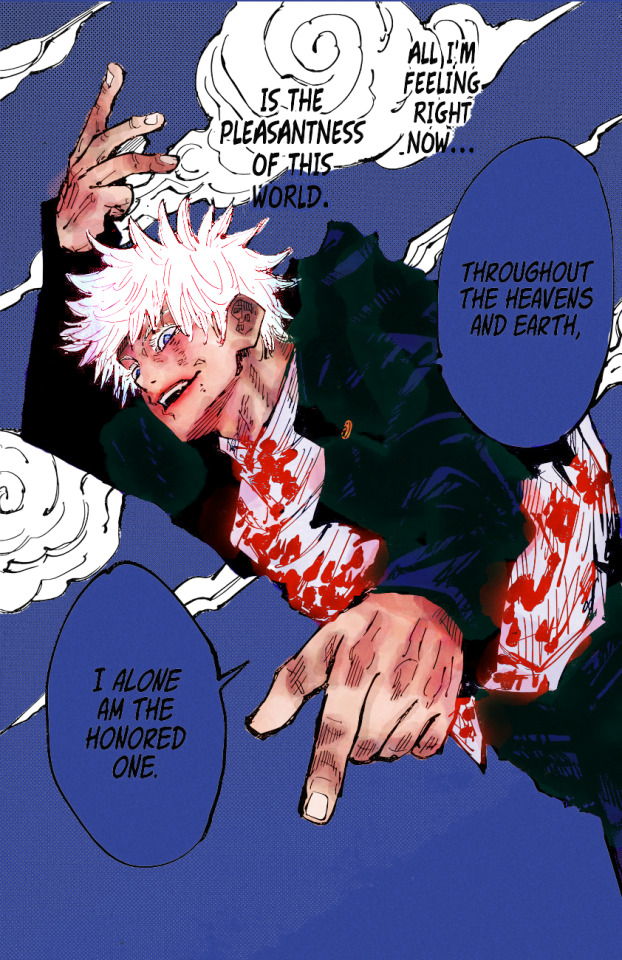
#jjkedit#jujutsuedit#gojou satoru#jujutsu kaisen#userheidi#userkarura#sukerokus#usernikiforova#usergojoana#usermoonz#usersophie#useraki#userzuura#trying to get used to ps again#i need to start making gfx i forgot how to use the tools that are not coloring related;///#idk man i like coloring gojou too much to stop bgfhf#edit:all#edit:color
161 notes
·
View notes
Text
ive never actually made icons to be used by anyone else before so i'm scared but i think they're kind of a little neat so i won't delete them yet kjdghkd
#rin.txt#i'm trying to improve on my ps skills bc i just use it to make basic gifs so i tried branching out into more gfx style things and idk.#how is it going kfhks IDK#but i'm having fun learning about different tools etc
5 notes
·
View notes
Text
i guess its time we once again need to talk about reblogging vs liking
i dont know how else we can say it. likes do not do anything here. they are a bookmarking tool. there is no algorithm. if you think a gifset, gfx, fanart, fic, moodboard, lockscreen... literally anything is cool, you gotta reblog it using this symbol at the bottom of each post:

likes are nice, but they do not do a single damn thing on this website. they do nothing. they dont help artists. they dont do anything. they languish in a part of your blog that nobody but you can see. only liking posts will get you blocked by a lot of artists
reblogs are amazing. they help spread an artists work. they are wonderful. they let artists know that their work is appreciated. they tell artists that people want more of their work. no artist will ever block you for reblogging
reblog stuff! its fun! you can make friends! share the things you enjoy!
111 notes
·
View notes
Text
HOW TO GET YOUR OWN SCREENCAPS FOR MAKING ICONS / GFXs / ETC.
being able to find pre-made icons of whomever you want to roleplay as can be nothing short of tedious, right? well, that's why i've put it upon myself to make this tutorial! because idk about you guys but i prefer making my own icons because mine are all 150 x 65 because i simply like and prefer rectangular icons to square icons. so let's get down to business, yeah? and like pretty much all of my lengthy tutorials, this will be under a READ MORE.
STEP 1: PROGRAMS
the main program you'll need for this is VLC Media Player. the reason for this is because it has a built-in feature that allows you to screencap any video you play. now if you're roleplaying as a video game character and you need the cutscenes from said game ( or video game movies as i call them if they're all together in one video ) then i definitely recommend you getting 4K Video Downloader. the free version allows you to download up to 30 videos / day for free whereas the license grants you an unlimited # of downloads / day off of youtube.
STEP 2: THE SETUP
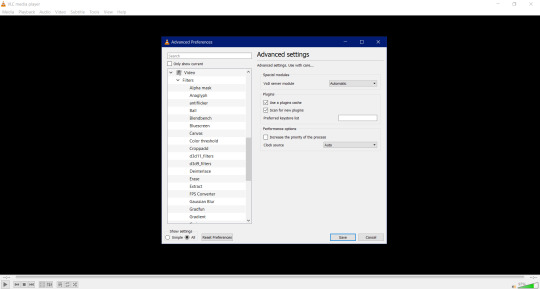
after you've install VLC Media Player, get it going and go to Tools > Preferences. once you've done that something like this should pop up.
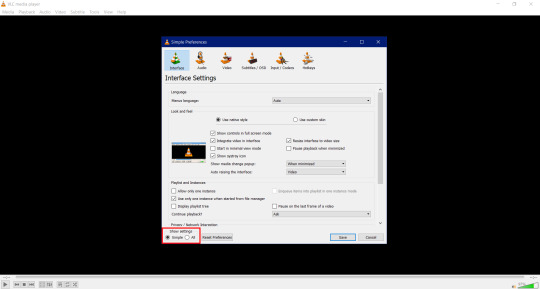

now do me a solid and click All in the box that's highlighted in the red box. by doing so will result in this popping
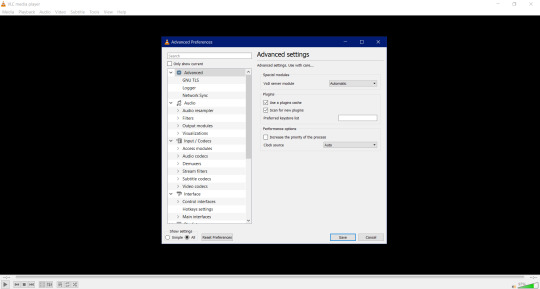

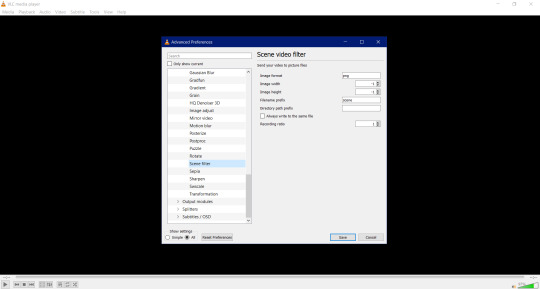
now scroll all the way down to where you see Video and then click on Filter. once done you'll have this pop up.

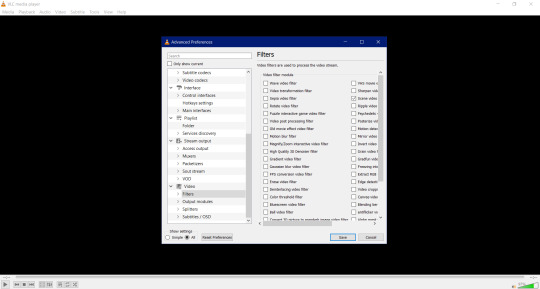
once you have this window up scroll the sidescroll all the way to the right until you see Scene filter video. it'll be third from the top as highlighted down below. check it and then click Save.


STEP 3: WE'RE ALMOST THERE
so once you hit Save, the box closes. there's nothing to freak out or worry about because that's perfectly normal. what we're gonna do now is have you go to ... like ... your Pictures folder and make a folder named after whatever you're getting screencaps for. if you're needing screencaps for, say, crisis core reunion then you'll create a new folder and name it something like ... say ... Crisis Core Reunion Screencaps. now do me a favor and double click on the folder so that you're now actually in it. you'll see why in a minute.
i need you to go back to Tools > Preferences > All > Videos in VLC Media Player. once you do that i need you to click on the little > right next to Filter so that a little drop down menu will pop up. it'll look a little something like this.

now scroll all the way down until you see Scene filter and click on that. once you've clicked on it this window will pop up.

remember when i told you to keep that folder up and running for Crisis Core Reunion Screencaps? well, this is where it comes into play! click on where it says This PC > Pictures > Crisis Core Reunion Screencaps , highlight everything , and the press CTRL + C to copy it. and for those of you wondering ... ... ... ... ... it'll look a little something like this: C:\Users\PROFILE\Pictures\RP Stuff\References. that's perfectly normal!
now i want you go pay close attention to the box i have highlighted down below. why? because the original number they had for the Recording ratio is ridiculous. switching the number to 1 means that it'll take one ( 1 ) screencap every second! and the number of screencaps you'll have will determine how long your video game movie is.

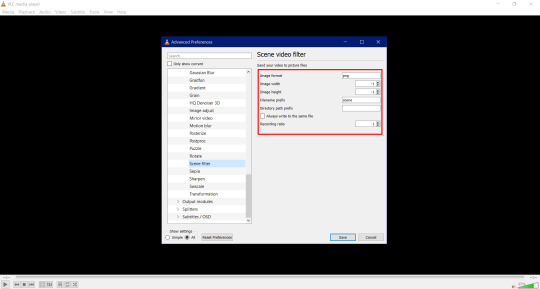
now you're probably wondering why the Directory path prefix is empty. of course you are. why wouldn't you be wondering it? well, that's where you're putting the directory for the directory path you just copied earlier! click on the empty box and press CTRL + V to paste it. once finished, click save and you're good to go.
STEP 4: GETTING THE ACTUAL SCREENCAPS
now that you've gotten all of the hard stuff done and out of the way, this is when you click on Media > Open file and then click on that Crisis Core Reunion movie you downloaded using 4K Video Downloader. once you have that going, the screencapping will commence and all you have to do is just minimize VLC Media Player and go on your merry way until the "movie" is done!
this is all you have to do to get screencaps. and all you have to do every time you want to get screencaps for something super specific is to make a folder for said thing, copy the directory path, and paste it into the Directory path prefix.
i'm hoping this tutorial was simple enough and easy to understand for y'all!
#how to#tutorial#tutorials#rp#rpc#roleplay#roleplay community#rpc tutorial#rpc tutorials#rp tutorial#rp tutorials#screencaps#screencap#icon#icons#iconing#gfx#graphics#photoshop#making icons#making
207 notes
·
View notes
Text


LOADING….INSIGHT
one of the most important moments in an idol’s life is their debut. the path they have worked hard to get towards and the day when the world catches a glimpse of who they are. some may choose to follow and support them from the beginning, others might just keep an eye out for them. those first impressions are key.
our first upcoming event focuses on a debut song/concept of your choice. whether it’d be writing a fic inspired by the song’s meaning, a few lyrics, or just the overall vibe the song may have. the fic does not need to be word for word on what the debut song is about, hence the room for growth above. others may create visuals that took place during an idol’s debut. this can include screen grabs from their debut mv, any content from their debut era, etc.
has your attention been sparked? please reblog this post and continue reading for actual details of our first event!
LOADING….RULES
this event is exclusive to members only. if you’ve seen this on your feed and are interested in joining k-labels, and our future events, please review our official post and our audition forum.
due to this being a members-exclusive event, it is very encouraged that all our members are in our discord server, as that is where any information and questions about this event will be posted. if you are not in our server please reach out to k-labels or our admins cici @iyeonjuni and val @fairybinie and we will provide you with the link. otherwise, you may ask potential questions through our dms and ask box!
SUBMISSIONS FOR THIS EVENT WILL BE ACCEPTED ON AUGUST 7th THROUGH AUGUST 14th (deadline). along with our standard k-labels tag, please use the event tag kl: debut so it’s easier to sort through.
as always, each fic must contain its usual trigger warnings, genre, word count and pairing in the beginning. we will not be accepting any mem x mem fics.
for our writers, the debut song you choose does not need to be the same artist you write for. this way, it can allow for more flexibility! ie. you choose crown by txt but you can write for stray kids.
no smaus or smau dedicated chapters for this event. fake text oneshots will be accepted so long as it adheres to the prompt of this event.
fic word counts must be at least 300 words and a maximum of 4,000 words. be gracious of the keep reading tool.
any glorification or inclusion of triggering topics will not be allowed.
PLEASE DO NOT PLAGIARIZE OTHER CREATORS’ WORKS.
if you intend on writing a nsfw piece, please make sure that the idol in the fic is of age. we will only accept idols born in the year of 2002 and older. minors are not allowed to write nsfw.
for our visuals and gfx creators, it’s pretty much free game. as mentioned in the insights half, content may be used from an idol/group’s debut mv, debut era, etc. still, to make it unique please use your favorite lyric(s) of the debut song as your caption!
members are not required to participate in this event!
if you do choose to participate in this event, a reblog with your clarification and indication would be appreciated as well as a response in our discord server!
LOADING….FINAL WORDS
as mentioned, our discord server will have a dedicated channel for event submissions where you can plug your content for this event on the specified dates. if you are not in our server, remember to use our k-labels and especially our kl: debut tag so it’s easy for us to find it! if we have not reblogged your work please reach out to us.
once again, thank you to anyone who is interested in participating. we look forward to your submissions! let's appreciate these firsts for everything and the special time in an idol’s life that is their debut.
39 notes
·
View notes
Text
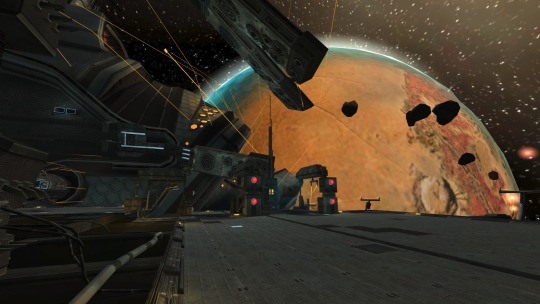
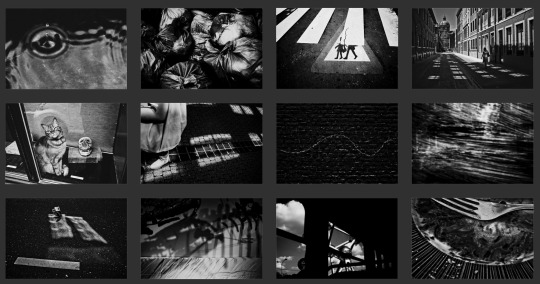
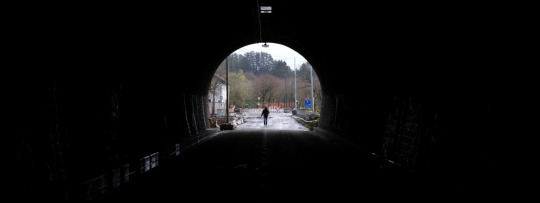
Capturing the ambience of Metroid Prime
This first-person adventure offers an impeccably-crafted series of engrossing environments to explore. The Prime Trilogy was collected in a Wii release, which this post explores in parallel with the Gamecube original.
Capturing footage
The definitive way to play Prime is a specialized fork of the Dolphin emulator, called PrimeHack. It brings mouse-look and robust widescreen display to Prime (vanillaTrilogy only offers anamorphic). It also restores certain Gamecube details that weren't correctly ported to Wii.
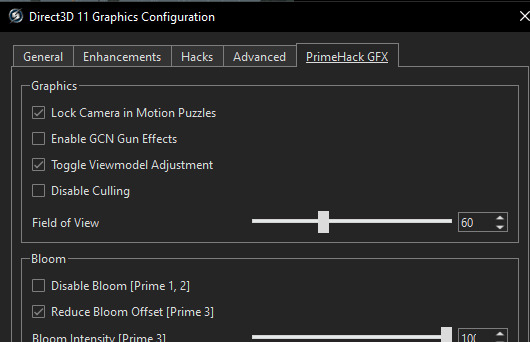
PrimeHack comes with several cheats that are useful for navigating Prime and capturing footage. We can activate noclip to fly Samus around, ignoring gravity and collision, using the movement keys. This is more robust than using Dolphin's Free Look feature, as our final render and game culling frustums will be aligned (that said, we can always disable culling in PrimeHack's GFX panel).
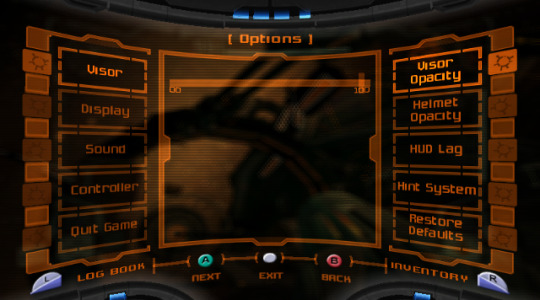
Removing the HUD and viewmodel
To remove the HUD, we can simply use Dolphin's Free Look to push the render forwards a bit. This works because Prime's HUD is drawn using 3D geometry suspended in front of the player.
We can also remove HUD elements using Prime's in-game settings, PrimeHack's Viewmodel Position options, and/or replacing UI textures using Dolphin's loading feature.
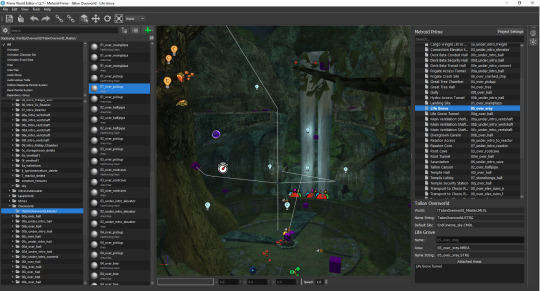
Prime World Editor
This fan-mode editor allows anyone to explore and modify Prime's maps. We can use this tool to identify where ambient sound assets are placed in Prime's areas.
Capturing audio
Amuse can extract and play samples and sequences from games utilizing MusyX. You can use Aruki's PakTool to unpack Prime's archives.
Avoid the Trilogy release for audio recording, as it has issues when compared to the original games (the rain on Tallon IV, for example).
PC port project(s)
Code-named Metaforce, this project seeks to produce a Windows-native version of Prime. There is a decompilation underway as well.
Nintendo Switch remaster
Prime's visuals were overhauled for a 2023 release on Switch. It runs natively in widescreen. I didn't explore this, but it may be possible to achieve some of the above using one of the popular Switch emulators.
Notes and findings
The rain on Tallon IV cycles through four discrete "intensity" (pitch + volume) levels randomly. This is controlled by scripts inside the map file.
There are some unplayed environmental audio cues in Prime's map files, for example howling winds on Phendrana Drifts.
youtube
11 notes
·
View notes
Text
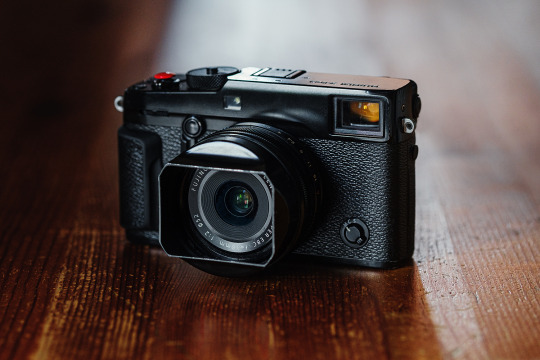
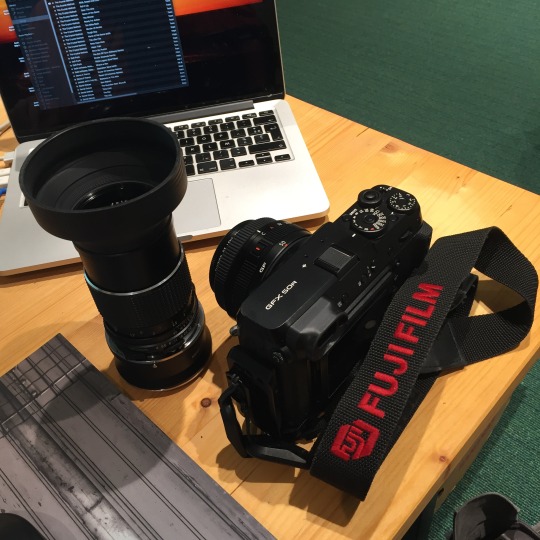
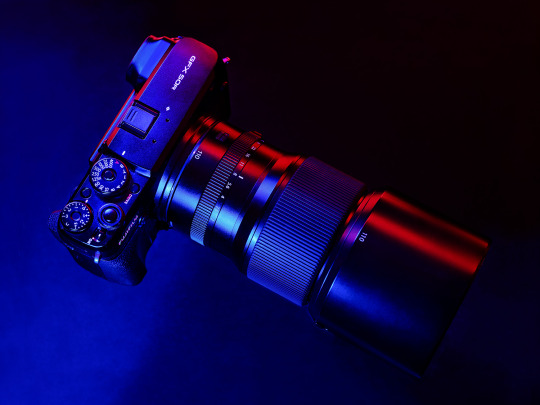
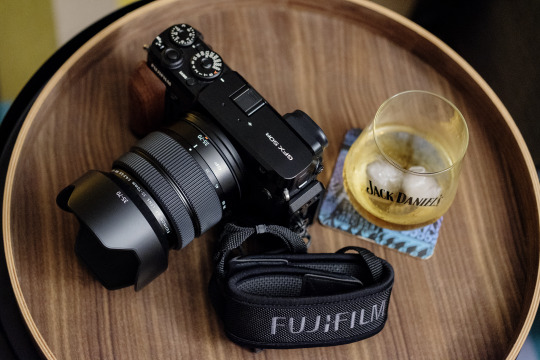
I went Full-Fuji! (GFX One Year Review)
One year ago, I decided to ditch my Nikon DSLRs for a Fujifilm GFX 50R.
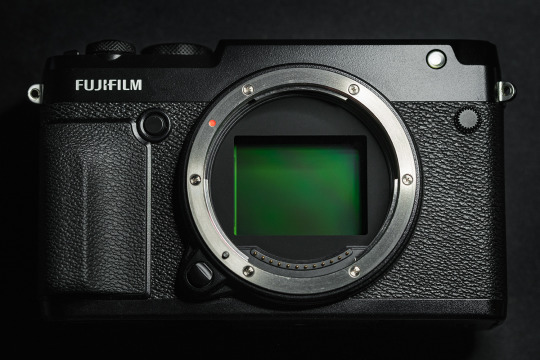
The GFX's sensor is larger than a full-frame sensor with a crop factor of 0.79
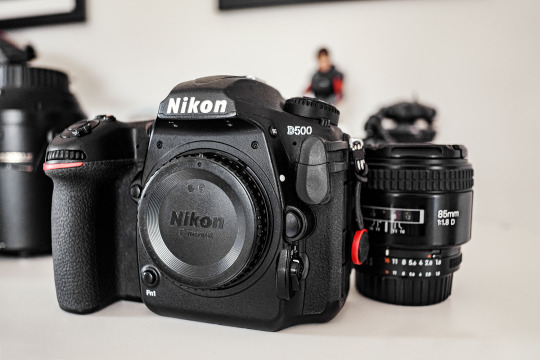
A little over a year ago, I still was using a few Nikon DSLRs to do just about anything. For portraits and landscape, I had a very respectable D810. Enough megapixels to provide some room for cropping and a decent dynamic range for most situations. For action and hobby-wildlife I had a D500. A durable mini-tank with performance that to this day would be hard to dismiss even in the light of mirrorless flagship innovation.
However, the question of my camera-future slowly crept into my mind. Was it time to change and upgrade into the Nikon Z system? Switching to a Z7 would indeed have been a sensible move, adapting older lenses while getting the sensor of the D850 in a smaller, cheaper body with an ecosystem of native lenses with the optical quality up to specs for the next decade. On paper and elsewhere, it should have been the obvious choice. Yet my answer to this question was a resounding "no" and I went against reason to set my sights on a Fujifilm GFX 50R. I took that model over the S because I enjoy the rangefinder form factor.
In hindsight, the smartest of all moves would probably have been to remain with what I had, adhering to the ancient photographic wisdom: "lenses are more important than cameras". My kits could have kept me satisfied for probably another 10 years if we are being honest. I could have stayed within the F mount ecosystem and could have taken advantage of its downright insane price drops to get top-of-the-line lenses for peanuts instead of selling the farm on a whim, however carefully considered it might have been.
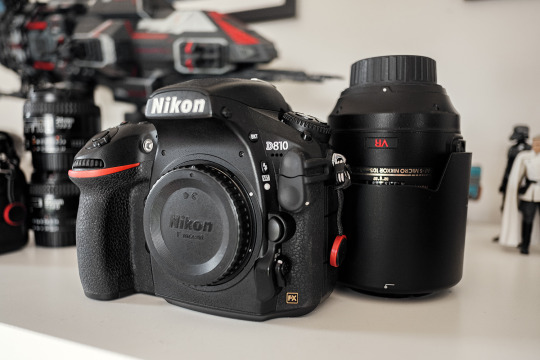
These old and trusty Nikon DSLRs got sold off to finance the 50R
The truth is that after fifteen years of walking the beaten paths camera-wise, I wanted to shake things up. I longed for a change of pace. I felt confident enough in my practice to know what type of photography I would want to engage in for the foreseeable future. I also felt confident enough that I'd be able to answer the call of the occasional assignment using a camera system that would have a non-negligible amount of drawbacks. The challenge even seemed like a fun new variable to add to contracts. Thus, the choice I made for my photographic future has been one born out of love rather than made from a place of reason.
When I think of good photographic memories involving the process — how photography is approached with mind and body — I immediately have two very different ideas jumping to mind and each has an ideal type of tool that best suits it. Neither of these are about efficiency. Neither of these are about performance beside niche-performance, perhaps. But that, is more of an acquired taste and it also comes at a price, but we'll see about that later.
The first idea is an instinctive and spontaneous approach, form of feral and visceral active meditation, akin to Daido's rabid dog method; roaming the streets clear of thoughts and letting the subconscious take the helm. Shooting, shooting, shooting and discovering everything later. No plan, only image-taking. No clear framing, no image-reviewing, no judgement to pass, no threads to weave. Only arrange and make sense later, if there's any of that to find.
Results using the "rabid dog" method, using a Fujifilm X100, 2014
For this type of photography, the Fujifilm X100 was the tool that instantly clicked with me. The "poorman's Leica" is an apt way to describe what the X100 represented when it came out. I got the original 12mp camera in 2012 as a fun but capable toy to bring along my Nikon D700, until the shutter release button (which also is the on/off switch) broke off in 2020 after one power-up too many. I have since replaced it with a Fuji X-Pro 2 with the XF 18mm F2, 27mm F2.8 and 50mm F2 lenses. To this day, such small Fuji bodies are my tool of choice for this kind of photographic mood (and of course, for family pictures).

Fuji X100 later replaced by the X-Pro 2 as street photography go-to.
The second photographic process that I tend to naturally gravitate towards stems from my first year of photography school, during which all projects had to be done using film and would have us deal with the whole process (that is to say; shooting, developing, printing, framing, and displaying our work ourselves). It is with nostalgia that I look upon the memories from that time.
There sure is something inherently different in figuring out what to do with the exposures one has left on their film than being able to inconsequentially shoot within two hours three thousand pictures through which you can almost immediately browse. The latter is of course more practical and a welcome technological improvement, but the former brings an unhurried and deliberate focus that I find both refreshing and appealing.
When I think of my strongest recollection of touching the quintessence of the analog experience, the days of using my Mamiya 645 immediately come to mind. Such sluggish, heavy-as-a-couple-bricks box-machines compel one to being careful and purposeful every step of the way. I need that too.
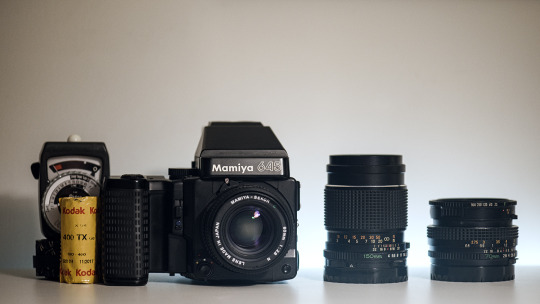
Mamiya 645 Super, since sold to finance GF lenses.
I have for the longest of time considered getting a more serious medium format camera but some quick-math with the price of film, chemicals and photographic paper made me realize that digital medium format was actually much more worth the investment while most definitely retaining some of the core characteristics of its analog counterparts. My love for the film process couldn't hold up against all the advantages of going digital, especially when buying second-hand.
Using medium format always felt like journeying inwards. It has allowed me to spend long hours in daydreaming-states paradoxically laced with an acute awareness of my surroundings. When thinking about medium format, I can recall the soul-washing quality of some of the winds that swept my cheeks while I was standing next to the tripod waiting for the exposure of the 50iso film to finish.
States of contemplation. Another kind of active meditation?
Of course, any camera can provide this type of feeling, but of all of the digital cameras available, medium format is the one type that will weigh you down the most and dictate the pace you work at.
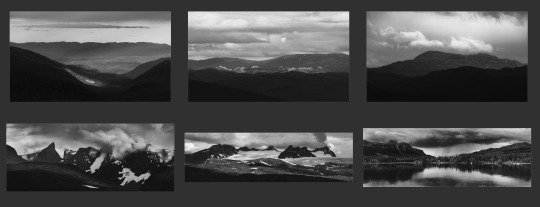
Telepanoramas created with the Fujifilm GFX 50R
Notice how these two ideas are almost the ends of a spectrum?
The first one is nervous and agitated, highly reactive, while the other is composed, meticulous and invites introspective fugue-states, yet they both share one vital element in the way that I approach them in that they take the practical considerations out of the picture to leave more space for what is going on within me.
The setting up of the camera or lack thereof becomes an excuse for something else. Maybe it isn't a surprise, that my adhd-ridden brain experiences this inexorable attraction for both these approaches. For they are in essence, two sides of the same coin, with each side matching different, specific and fluctuating needs.
Let's dive in!
After selling my DSLRs, I started looking for a good second-hand candidate. After a month or so, I found a barely used GFX 50R sold with a 50mm 3.5, a couple additional batteries and an L-bracket to boot. The price was rather attractive for the bundle, so it seemed like the time to take the leap. After a short but excruciating wait for the package to arrive, I finally was able to join the larger-than-35mm-sensor club.
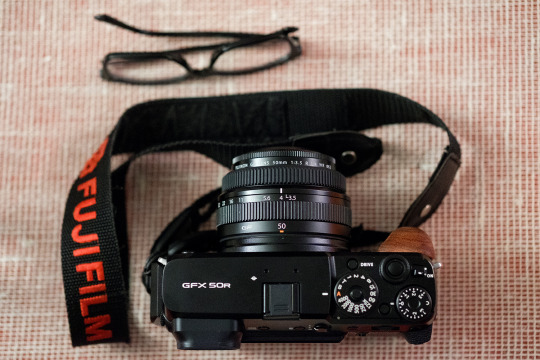
How it started
My first few months with the camera had me immediately blown away by the difference in output. The higher resolution and the sensor's qualities made the (very much existing) noise hardly noticeable when downsized to small printing or screen-viewing sizes. What also immediately struck me, was the looks of the images the camera produced. Images taken with the GFX feel more "3D" to me.
It is a very peculiar and hard to describe feeling. I suspect it is a combination of factors; the depth of field of the larger sensor and the very smooth transitions between what's in focus and what is not that it permits, the colour depth, and the quality of the optics. I've seen many Youtube reviews, read forum threads or been in discussions on Discord about GFX cameras where people (who more often than not don't own one) will maintain that these qualities don't exist at all. After a year in the system I can confidently state that they're wrong.
I can't really put my finger on what causes these differences as I am not as tech-savvy as I could be, but it is still clear as day. To use a pretty apt analogy, I would say that the difference between full-frame and (crop) medium format is akin to the difference between aps-c and full-frame cameras. Are they deal-breaking? Not necessarily. For some people they can be. Are they noticeable? Definitely. It is especially funny to me to see medium format cameras being dismissed by such a many full-frame shooter who at the same time, is constantly bashing aps-c sensors.

Don't you love to pixel-peep? Omnomnom (imagine with 102mp!)
This being said, I will always fully stand by the statement that full-frame cameras are the more sensible choice as they are better all-rounders by design. High-res cameras like Sony's A7RV or equivalent are also better high-iso performers than the aging IMX161 sensor that the GFX 50 series uses, which sees its operational limit at around 6400iso (but the GFX 100 would be another matter entirely). A top-tier full-frame camera is evidently more practical, lighter and cheaper without any deal-breaking image quality difference to what the medium format niche can offer. When all costs are factored in, the choice would seem self-evident. If you consider medium format, it should be understood that you know this before committing to any bigboy sensor. Or don't heed this and make people who buy second hand happy, as GFX gear loses almost one third of its value once it hits the second hand market (a consequence of too many people jumping on the medium format bandwagon only to realise — way too late — that it wasn't for them).
Are we cooking yet?
I need to talk about the GFX's files for a little bit; I'm a raw shooter only — which hopefully you'd have guessed — (in my opinion anyone buying into a medium format to shoot jpeg must have cognitive issues or too much money, or possibly both) and I have to say that when I opened the raw files to give the sliders their very first +100/-100 or +3/+4 EV from base iso (or any combination of these) I was utterly floored by how well the files could handle such an ungodly beating.
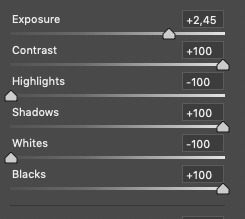
This isn't a joke, I promise.
This type of camera makes the slider memes come true, to a point where for the first few months, my ability to edit properly was severely impaired by the glee I experienced while pushing everything way too far. I believe it is not an uncommon symptom at the start of a medium format journey. It takes a while to come back from that and simply be able to tell yourself "ok here, maybe less dynamic range would be a good edit". I'm getting better at this as I consciously try to avoid overcooking.
Clean recovery? Can do!
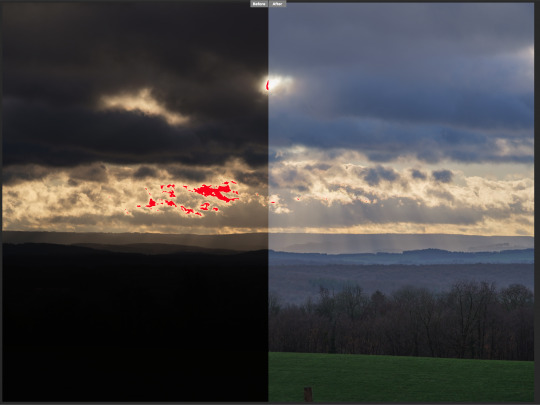
On the image-taking side of things, the major change for me with regards to file-handling is that I'm almost systematically exposing for highlights now. Adding 3EV and boosting shadows in post when shooting at low iso is inconsequential in terms of image quality as there won't be any visible noise whatsoever on the output, unlike my aps-c cameras that will show noise even at base iso. Similarly to many other aspects medium format manages well, this is something I got used to very quickly.
To adapt or to not adapt, that was the question, here's my answer:
At first, I tried adapting my old Mamiya 645 lenses to the 50R. It was useful in the sense that it allowed me to enjoy different fields of view at no cost but it quickly felt like a plaster on a wooden leg. I'm not someone who enjoys the manual focusing as a default and I've grown more and more intolerant of the optical flaws of older lenses as time went by. I realised that it wasn't a viable long term solution for me and quickly chose to sell all my Mamiya cameras and lenses to finance native glass for the GFX.
My experience adapting? It was alright but not at all ideal.
Which lenses then?
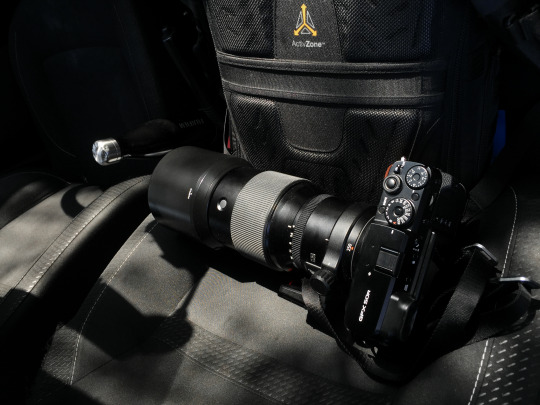
Getting into the GFX system I promised myself I would make no compromise whatsoever on optical quality and directly aimed for the 250mm F4 (mainly for tele-landscapes) and 110mm F2 (mainly for portraits). The grind felt long but it really wasn't, as I managed to secure both lenses from the second hand market within 6 months. It is only later that I added the 35-70mm "kit" lens to my arsenal to fill the wide-angle gap I had. As I seldom feel the need to shoot wider than short-tele fields of views, this is more of a lens of convenience.
The difference between adapting older lenses and using native glass was night and day to me. Two things made this the better choice in my view: first, I've been actively seeking the "clinical" quality of modern optics. I do not care much for the "character" of older lenses especially not if the word is used to help one overlook a lens' unforgivable flaws. Second, while there sure are lenses worth adapting out there, this come at a cost for the adapting to be worth it (the cost of an AF-capable adapter and of course the cost of the lenses themselves) which I saw as a waste of my limited resources. I told myself I wasn't going to make compromises, remember?
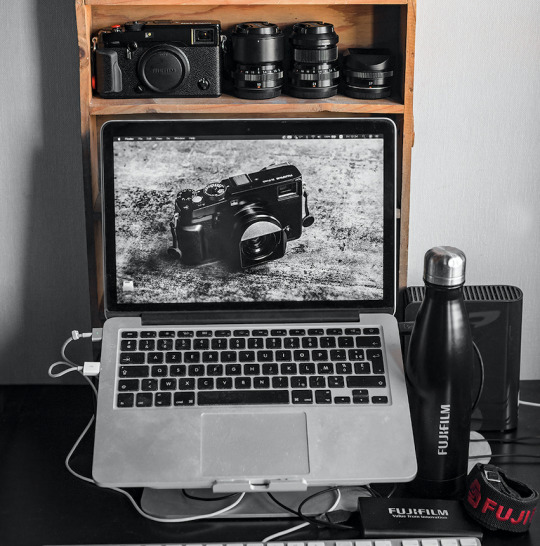
One year after switching, I am now knee-deep into the system, having sold most of my Nikon gear as well as my Mamiya medium format film-cameras to acquire some of the incredibly hard to resist GF lenses.
After a year of transforming a heap of dormant gear and side-gig revenue into new lenses, I also noticed that the representation I had about the worth of money also changed radically when gear was concerned.
A little over a year ago, an XF lens priced 800€ definitely seemed like a steep investment I'd try to find alternative choices for. Nowadays, 800€ is a mere budget lens in my mind. Seeing the price tags of GF lenses doesn't make my head spin anymore and this is somewhat worrisome for the thrifty Dutchman living in the back of my brain.
With the announcement of the 500mm F5.6 lens being in development (a focal length I definitely miss from my Nikon days, I'm a sucker for ultra-telephoto landscape photography), I fear I will manage to push my monetary boundaries further back yet, which I will help achieve by selling my X-T3 video-oriented kit.
APS-C: you're dead to me.
An unforeseen consequence of my GFX switch was that my aps-c cameras were pretty much relegated to the bottom gear drawer and seldom used barring a few notable exceptions (such as a wedding gig) where the need for its autofocusing speed was greater than the need for image and file quality.
To reuse the analogy I made earlier; my X-Pro 2 and X-T3 have become to me what a micro-four-thirds camera would be to a full-frame camera user. Getting into Fujifilm's medium format system prompted me to think about how I use my cameras and to what end. The realisation that there is a clear split in my photographic approaches I evoked at the very beginning of this article is the result of that thought process.
Although I will sell my X-T3 because it feels superfluous and I want to stop my video gigs completely, (and because my need for GFX lens money is still great), I would never part with my X-Pro 2 nor the few XF lenses that I have as they serve a totally different purpose to that of the GFX's.
Having a compact, fast, discreet yet still capable camera that can be casually put into a pocket is an advantage that I would be a fool to part with. The X-Pro is a more practical choice for street-photography, documentary in less-than-favourable conditions, as well as for family pictures, when packing a brick of a camera and two bricks worth of lenses for a walk in the park in suboptimal weather would be met with a tired roll-eye from my spouse.
My dear X-Pro, I'm Never Ever Gonna Give You Up
Of course there have been many occasions for which I have chosen to take the challenge and went into these situations with the GFX. However, I wouldn't want the GFX to be the only option at my disposal in such cases.
For example, during the last wedding I shot, when the dining room got darker and the guests started moving around a lot (and dancing), the switch to aps-c cameras was absolutely necessary because of how difficult it was to consistently get acceptable results in poor light and with subjects making erratic movements. When you are held under a result-delivering imperative, you have to be able to honour it.
Packing a Fuji GF or Fuji X kit can be a slightly different experience
"Megapickles don't matter!"
This was an idea that I lived by just a few years ago. I changed my mind. I still believe that megapixels don't matter when you don't have them. Just like one should shoot with the camera one has / is able to afford. It doesn't matter in the grand scheme of things but all these technical niceties just make one's life more comfortable. Cropping, denoising through file reduction algorithms, or enjoying detail endlessly because one can, these are just the icing on the cake. I just happen to like my cakes with more icing than cake now.
Regarding resolution specifically, it's been another area in which there seems to be no possible coming back. Nowadays, every time a manufacturer announces a new camera and I discover they plan to fit it with a 24MP sensor I dismiss the information entirely. It doesn't register anymore. 32-36 is the new 24 in my mind now and it's sometimes difficult to come back from those expectations.
This being said I have no issue using lower resolution aps-c that I own and could perhaps even have fun with a X-Pro 1 because then the output quality wouldn't be my prime concern. It is only concerning new releases that my interest dips firmly for "low" MP cameras.
Did I tell you that medium format AF sucks?
Before I conclude this one-year review, let me hammer this point in with a two-handed mace; it can't be understated, especially for the GFX 50 series which uses contrast detection — the autofocus will throw you back to the early 2000s. Be ready to be stuck on single point, single AF mode because that's the only thing that will be consistent enough.
Then let's not forget other factors that add to the bad and make it worse; the shutter lag is half a second, the sensor readout speed is 1/4th of a second, and the time the shutter takes to clear the large sensor in combination with the camera's high resolution means you'll need higher shutter speeds in order to get rid of motion blur when shooting handheld (count about one stop faster than usual). Those would be valid reasons as to why a less niche camera system makes more sense for a lot of people.
The final comment:
Despite its sometimes dramatic drawbacks, I definitely have found the pleasure I sought when I originated this system switch. The change and the adapting my process is engaging and makes me think more about what I do, what I use, when and why. This is a win on its own.
All in all I feel like I am still at the very start of my journey though I've had the opportunity to test my GFX 50R in a wide array of situations in the past year (portrait, landscape, documentary) it seems like the way forward is clear and also opened for plunging deeper into this incredibly fun (but needlessly expensive) rabbit hole.
The upcoming 500mm, the prospect of finding an original GFX 100 (with its weirdly appealing tiltable EVF) are ideas that will — for the foreseeable future — definitely keep pulling me back in (and emptying my pockets).
Fun! Fun! Fun!
8 notes
·
View notes
Note
hello :3 could you make a tutorial on your hyunjin day gfx please :3
oh wow! sure, i don't make gfx that don't have gifs much so my process is kind of a mess but i'll try to make it a bit understandable! lol
basic photoshop understanding is needed here, like knowing how to use layer masks & clipping mask the most, also how to cut the background of pictures!
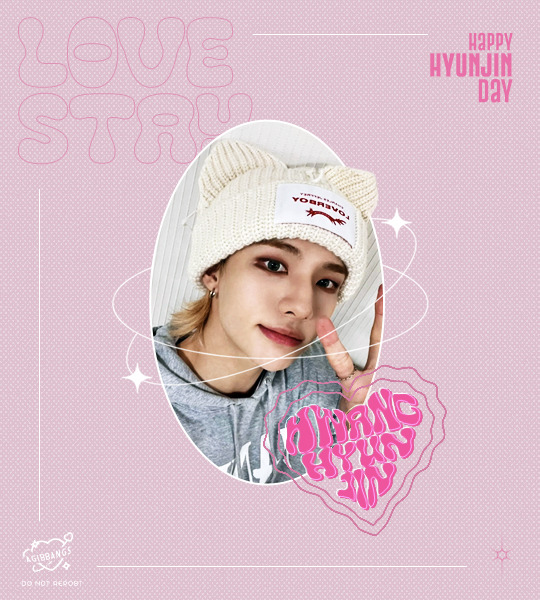
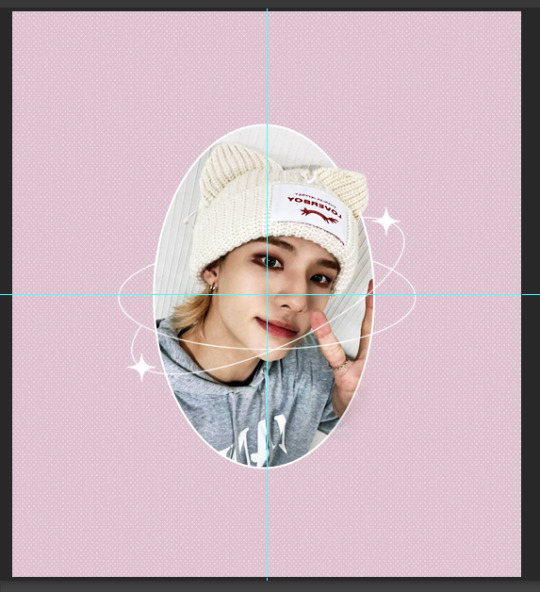
we're making this!
under the cut bc it's kind of image heavy, if something isn't clear pls let me know so i can explain better <3
I started on a blank canvas of 540x600px and colored the background with the shade of pink i wanted to work with, on top of that i added a half tone texture image i found online (i think from deviantart? or maybe another place idk) changed it's blending mode to lighten, adjusted the size and then reduced the opacity of that layer so it didn't look too much in my face. this is what we have so far (ignore the cyan lines, it's only a guide to center everything in the canvas)
now i go to the left panel and click on the shapes tool and choose the ellipse one and draw an elipse in the canvas, the size of the ellipse depends on you tbh, i didn't make it too big bc i knew there was going to be a lot happening in my canvas and i needed the space to work so it's your choice how big you'll make it. once i made the ellipse, i made sure it was centered and proceeded to work on the picture i used
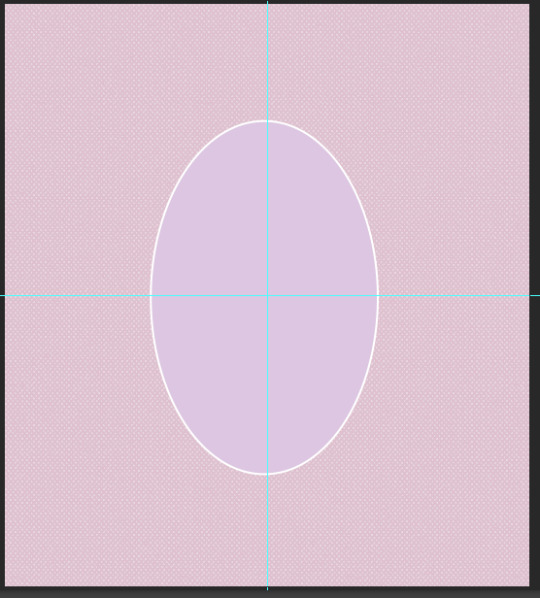
the settings my ellipse had

now the hyun pic! i opened it in another tab on photoshop, and with the pen tool i traced all of hyunjin's shape as if i was working on to erase the background (you can use the quick selection tool or the wand, i prefer the pen tool to erase backgrounds tbh) and then i went right click -> layer via copy (this is very important!) and when i had two layers (the original picture and the new layer of only hyunjin) i dragged them to my gfx canvas, and then resized it around the same height my ellipse was
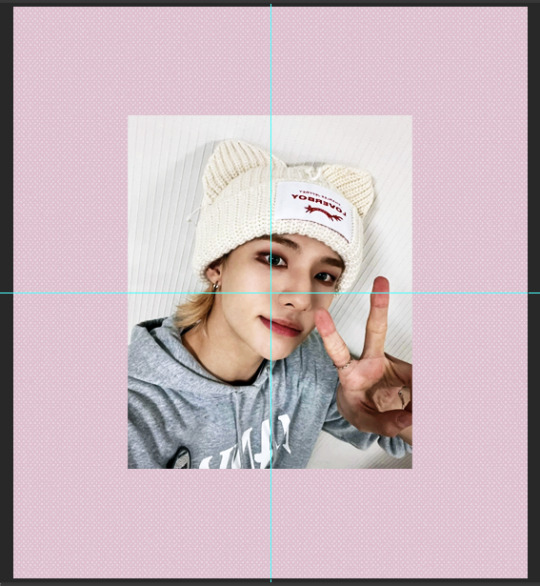
make sure the pictures are ON TOP of the ellipse!!! now select only the layer of the full picture and then right click -> create clipping mask and the full picture will be inside the ellipse
your layers panel should look like this
and your canvas like this
we're almost there! now we select the layer that only has hyunjin and we add a LAYER MASK to it, and with a black brush we paint the parts we want to erase
your layer should be something like this
and the canvas like this
now i added some decorations, found the sparkly lines i used around the image on pinterest! they are called monoline frames and there's lots of them to pick tbh, the one i found had a white background so i just inverted the color of it and then changed the blending mode to screen so only the lines of the frames were visible and then erased anything i didn't want with a layer mask, it would have been easier to find just a transparent image but pinterest doesn't have those so i had to make do lol
the layer panel now looks like this for me
and the canvas
after this i worked on the typography! for the "love stay" i used the font called "Cleo Folk", i arranged it so on the layers panel it would be under the layer of the ellipse, then for the text that says happy hyunjin day i used the font "Gobold Extra 2". i added some lines using the line shape tool too
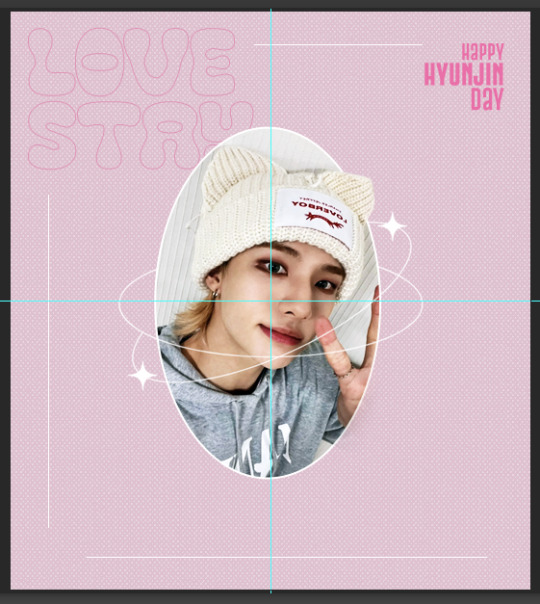
the heart shaped thing that says "hwang hyunjin" is a custom i made myself messing around and if you want to know how just let me know! but you can just use a warped text, it won't look like it's inside a heart but it'll still look pretty ! after that i added my watermark in the corner and saved it as png and all done! for the other image on the set the process was the exact same!
finished result!
i hope this helps? if i missed any detail please let me know!!
10 notes
·
View notes
Note
do u have any advice for making gfx? i really like yours and your concepts are always so creative
ahh, thank you so much, you have no idea how much this means to me 🥹 i'm really hard on myself about my gfx. but i absolutely love making them, and i'd love to share some advice with you!
i'm not sure if you already make gfx or not, so i'll include some things about getting started along with general advice / stuff geared to someone who already has some experience so that hopefully, wherever you are in your journey, something here might be helpful. i hope i'm not just giving you info you already know JBDJB 😭 so feel free to come back and let me know if you need something different ... if you have specific questions about a particular set or anything else like that, i always welcome that too! this got long, so i'll put it below the cut.
1. getting started
- i'll write this point assuming you've never made a gfx before, so if you have, feel free to skip it! the only program i use is photoshop for gfx. and the main thing with these that i didn't know at first is that you can (and should) use a bigger canvas than what you would for gifs ! my typical size for a gfx panel is somewhere around 1080x1200 px. if you are placing gifs anywhere in them, you will likely have to resize down to meet tumblr file size limits.
- some things that you should know how to do in ps: creating a clipping mask, rasterizing/resizing, smart filters, eyedropper tool, and different blending techniques such as overlays. if any of these things sound like 'omg what???' (they did to me as a beginner) let me know and i'm happy to explain more!
- for total beginners, my biggest recommendation is to start by using templates. this helps you get a feel for what layers go into a gfx in the styles that you like, and makes it easier to start making some cool things and boost your confidence before you feel comfortable starting entirely from scratch and developing your own style. you can search 'psd template' here on tumblr, or on deviantart (i'll talk more about sites i use to find things below). just make sure you read each creator's own rules before you use something. i also make templates! you can find them here. i don't require credit and you can edit mine basically however you want, aside from combining them with other templates.
2. finding inspiration
aside from things i see right here on tumblr, source material that just really speaks to me, or ideas that pop into my head while i'm driving (seriously ... almost all my gfx ideas come to me while i'm in my car or out taking a walk 😂), my favorite places to look for inspo are behance and deviantart (both of which are also great for finding elements you can use for free!).
usually i have at least a baseline idea before i go into any gfx, so i know what to search for to find some design ideas -- for example, 'yearbook design,' 'retro advertisement,' 'lyric poster,' 'zine,' 'y2k,' 'film photo story,' etc are all things i've searched before. if i have used a source for inspiration, it will always be linked in my caption, so definitely take a look if there are any in particular that you love to see that inspo source! (as a general note, you should always link back to your own inspiration sources, it's just the right thing to do)
3. my process (from idea into photoshop)
once i have an idea and i've gathered some inspiration, i usually sketch out my basic layout idea into a notebook. with gfx, composition is something you need to keep in mind within each individual panel as well as the set as a whole. i think about what i want the main focus to be and what basic elements i want in each panel. then i will start gathering my resources and start getting things in photoshop! often, i don't really know what it's going to look like until i start putting it together. that's kind of half the fun though.
throughout making most of my gfx, i consult at least one friend on layout, colors, etc especially if i'm not liking something or i'm just stuck and don't know what would make it better. i HIGHLY recommend getting feedback and utilizing other sets of eyes to get your best quality work. i know there are some things i just can't possibly think of on my own, especially when i've been thinking about and looking at something for way too long. once my panels are finished i export them as a png and arrange them on tumblr to see the whole thing together before i post!
4. finding elements i.e. fonts, textures, pngs, etc
again, behance and deviantart are great places for this! on behance, it's best to search 'freebie' with what you're looking for because otherwise all the options may be stuff you have to pay for. but they have SO many textures, pngs, fonts, any resource you can think of.
with deviantart, be mindful of people who just compile texture/png packs from other sources/artists, because that's basically impossible to properly credit (and you really should do your best to do that). but DA is a great source for things like brushes and hand-drawn elements, and templates too! again, just be sure to read all of op's rules before using their resources.
-places to find fonts: behance, fontspace, dafont, and ofc google!
-places to find free pngs/icons (i use these for all of my social media templates and more): flaticon
-photos you can use for free are available on unsplash
-mockups you can use for free are available on behance, unblast, and pixel surplus
5. other important bits
- as i've mentioned a few times throughout CREDIT is so important when you are using other people's resources, and using anyone else's work as your inspiration. i always credit when required and often credit even when not required, and just in general always try to mention where i find all my resources especially for sets that i've used a lot of different things for. of course, we can only do our best with this, and i've definitely made mistakes or just lost where i found something in the process of making things, so just have good intentions and try to do what you can to ensure you're giving credit where it's due - it also helps other people find things that they can use for their own work!
- don't be afraid to experiment and try things out, i think really what i love so much about gfx is that there are literally infinite possibilities, styles, and ways to improve. keep an open mind and know that nothing is out of your range if you can find the right resources.
happy creating, and please know i'm available to talk about anything you have questions on, or if you want to utilize me for feedback !! <3
#wah i hope this is helpful at all 😭 again if you have anything i can speak to more specifically i'm more than happy to#this comes at a good time bc i've been really beating myself up over some gfx i've been working on#so i'm really glad that you like mine and i'd really love to help in any way i can ~!#when i first got started making gifs i NEVER thought i'd be a gfx maker and then i was like i'll never NOT need a template#but now i make everything on my own and even make my own templates! so honestly just keep at it is my biggest advice#i have so much to improve on still but the journey is super fun and rewarding#alright i've written enough here i think JBDGJHB#erimail#mail from: anonymous friend!#.resource tag#gfx help
25 notes
·
View notes
Text
7 rekomendasi game booster terbaik di android 2023

Saat bermain game tentu terganggu apabila pengguna mempunyai ponsel Android dengan RAM kecil. Kapasitas RAM yang hanya sedikit menyebabkan ponsel sering mengalami hang dan ngelag di tengah-tengah aktivitas bermain Game.
Padahal, game-game yang sedang Populer sekarang ini pada umumnya memiliki ukuran yang besar, sehingga memerlukan banyak kapasitas memori penyimpanan. Tenang saja, pengguna dapat menyiasatinya dengan menggunakan aplikasi game booster untuk Android. Berikut 7 rekomendasi game booster terbaik yang Khuyanime bagikan berikut ini:
1. Boost 4x Faster
Boost 4x Faster bisa meningkatkan performa ponsel dengan cepat dan maksimal seperti nama dari aplikasinya. Terlebih lagi, aplikasi ini bisa membantu mengoptimalkan performa game. Maka dari itu, ponsel pengguna tidak akan mengalami macet saat bermain Game.
Bukan hanya itu saja, aplikasi Boost 4x Faster juga dilengkapi dengan menggunakan teknologi AI sebagai bantuan untuk memaksimalkan peforma bermain game. Tidak lupa aplikasi ini memakai fitur GFX Tools yang bisa meningkatkan resolusi game sampai 1080.
Baca Selengkapnya
2 notes
·
View notes
Note
hi !! i love your hyunjin 2022 birthday gifset ❤️❤️ how did you do the dashed lines animation? i have been trying but i can’t figure it out
hi tysm! oh gosh it's kind of hard to explain and quite complicated and made me cry when i was making it LMAO but let me see if i can explain! first, for anyone wondering, this is the set anon is talking about.
this unsurprisingly got a bit long so i'll just put it under the cut!
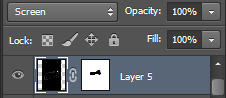
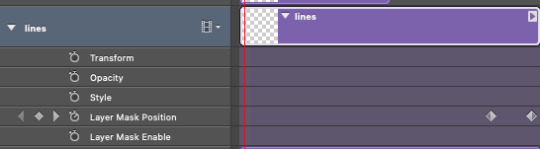
if you want to replicate this, the first thing you'll want to do is make sure you're in the video timeline. i started with using the line tool and just. made a bunch of lines in a dotted pattern, then selected them all and merged them into one layer once i had them laid out how i wanted them.
then, you want to put a layer mask on that, and make sure you turn the little chain in between the mask and layer itself OFF. that makes it so you can move the layer mask separately from the layer itself.
then you'll want to go to the layer on the animation timeline, look at the dropdown menu for the lines layer, and you'll be using layer mask position. now. since you want to reveal something slowly. i cannot for the life of me remember what the line that indicates where you are in the gif is called. but you'll want to make sure you have that where you want the reveal to start, then press the clock next to "layer mask position." then, you'll want to erase the layer mask so it's sort of like you erased the line layer altogether. the animation will start there. then, drag the. red line/your place in the animation to the spot in the gif/animation that you want the reveal to be finished. then, switch to move tool, make sure you have the layer mask on the line layer selected, and drag it in whatever way you want to reveal the lines. depending on the shape of the line i either dragged it from left to right or up to down.
that's how you do the basic animation! knowing how to use the layer mask position animation thing opens up a whole world of creating tbh i think just about everything cool i've ever made involves that animation askdfjaksdkjsg, like anytime you see text revealing slowly on my gifs/gfx or anything of the like, that's how i did it.
if you want to sync it up across a bunch of gifs like i did in the set, though, that's harder asdfasdgasdg you'll want to make sure the gifs are the exact same amount of frames and the exact same speed. do not change the timing in frame timeline before you convert to video timeline or ANYTHING it will make your life a nightmare. just convert everything to video timeline right away....anyway...basically, you just want to make it so that the layer mask position animations are the exact same length and start exactly where the last gif's finished. there's probably an easier way to do this than the way i did it, which involved just eyeballing it, nothing ever syncing up properly because my internet was so bad and loaded everything at different times, and me crying SDGSDGSDG but if a visual would help, this is how the line layer of the oddinary panel (the very last one) looks:
i also used the layer mask position animation for the 2023 birthday set too, with the text and signatures. i had a much easier time this year LMAO
hopefully that all makes sense 😭 and i hope this helps anyone that reads it make some cool new stuff! 🥳
4 notes
·
View notes
Note
hi bee how do you add that paper like texture to that felix billy poster?
hi!
so i've been asked a couple of times recently about adding a paper texture so below the cut is a quick beginners guide where we'll make this image:

okay so to start we'll get our base image, for this tutorial we'll use changbin

now what we're gonna do is find an overlay. i have a stash of them that i use for my gfx but you can google "crumpled paper overlay" and you'll find tons of things that look like this
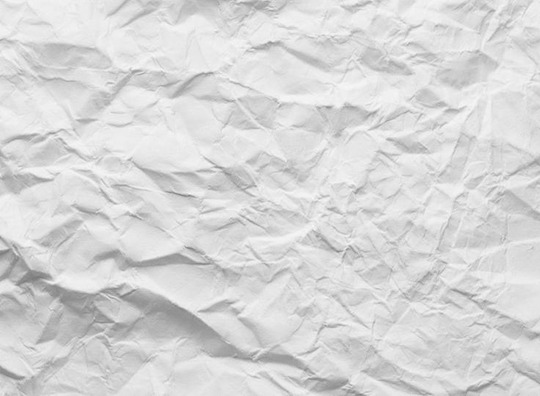
next we'll open up photoshop and open our changbin pic and our crumpled paper

use your rectangle marquee tool to select the whole paper image
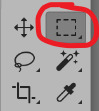
and then the move tool (beside the marquee tool) to move your paper onto changbin

(make sure you cover the whole picture, this was just to show that we're putting one pic on top of the other)
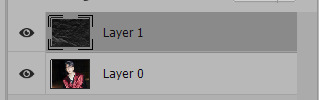
once you have the paper covering the image, we're going to look at the layers tab on the side of the screen

now is where the fun begins. make sure you have your paper later (layer 1 in the pic above) highlighted, then click on the drop down menu i've highlighted then you'll get a whole bunch of options

then you just hover over each option and see which one you like!
if your effect is showing too well, you can hit ctrl + i to invert the colour of the paper
for this tutorial, i inverted the colour and used the option Lighten so that we can see the effect, different base images will need different options, different overlays will need different options, its all a case of having a little play around and seeing what you like!
13 notes
·
View notes
Note
Hello! How are you? :)
How do you create the logo you add to your gifs?
hi there! i'm doing okay, a little sleepy from work 🥱
i use two programs to make my watermark, photoshop, and illustrator. i realize not everyone has access to these programs, so i'm sure there are workarounds to get the same result, but this is just what i do. it's a little long so there's more under the cut.
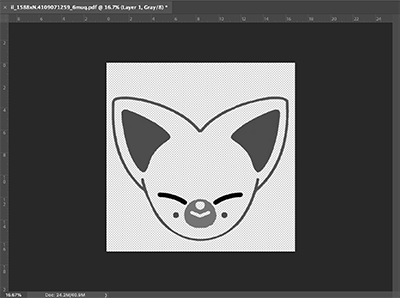
first i find a high-quality version of the image i want to use. for example let's use this image (for purposes of uploading here, the image is lower quality):

once i have my image, i'll convert it to black and white, maximize darkness and contrast and delete anything filling in foxyi.ny's face with the magic wand tool. i know it looks crazy, but bear with me!
after i have my edited image, i save it as a pdf, this will give it a transparent background, which is important later. then i open illustrator and i make a square document, the size doesn't really matter. then i drag and drop the pdf i created. i make a circle shape and then use the type tool to type on the path, giving the text it's round shape easily.
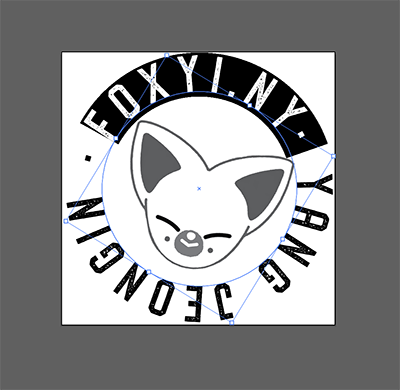
after all of that, i move things around and select a font i like (i'd suggest a bolder one that's easier to see when it's smaller) and just mess with everything until i like how everything looks:

save this as an ".ai" file. NOW we head back to photoshop to make it a brush preset. open your new file and select the brush tool. then go to the very top and click, "edit" and "define brush preset..." name the brush and you're good to go! now you have a fancy brush that is a watermark you can use on gifs and gfxs!

and there you have it! the foxyi.ny mark is in the opposite corner of my bbokari one. i would of course only use one.
however, if you don't have these programs or you want a simpler way to do a watermark just in photoshop, i know some cc's simply make a text box and type whatever they want the watermark to be and then put effects on the text. i used to do this and mine said, "fairyjinani | do not repost" it's all personal preference. i just like the way the brush mark looks!
i know this was really long, but i hope it was helpful! 💖
4 notes
·
View notes
Note
hi!!! i love your gfx so much and i would like to ask u how do u do the outlines so well? because i feel like the blending options are not my biggest friends when i try to do it :(
Eummm~ i think you should be friend with blending options from now 😂 because i usually use stroke to make an outline *whispers* but with a little trick.
For example, to create the outline text effect like my svt leaders gfx, simply type your words > add a stroke > and then copy the text layer > changing the color to black before putting it under the first text layer and giving it a little nudge...and your text would have a slight shadow effect like this!

Or you could create outline with pen tool as well (yep, again) but specifically, I use this to make outlines in pictures.
3 notes
·
View notes
Note
hi mädch !! ty for ur kind words in your tags on my graphics, you’re always so so nice! 🥹💞 for the second panel, the little curvy lines are actually from a graphic elements pack i’ve had for ages, collected along the way for work. i have actually been meaning to put together a resources pack for ccs soon so i’ll be sure to include some! but also, irregular curvy shapes like that are super easy to make! in photoshop (or illustrator if you use that more), you’ll just want the pen tool. then instead of having it set to fill, you’ll set it to stroke! (you can always change that later.) start your shape anywhere on your document with a point, and then from that point when you make your next point, you’ll hold down your mouse and drag to create the curve you want! you keep doing this until you’re back at your original point to close your shape. i don’t know if that made any sense without the visuals LOL but if you have any questions please let me know and i’m happy to try and help!! - @slowrabbitpd 💞
[ @slowrabbitpd ] hi angel !!!! sorry i'm late to this i've been running around like crazy and i got off of work late ;_____; but you are so very welcome !!!! i LOVED your gfx, it was so cute, i like simple but thoughtful stuff like that <3 and AHHH I'VE BEEN WONDERING WHERE IT'S FROM !!! i've seen it is quite the trend these days in the gfx world to do that squiggly thing hahah, i know i may sound really dumb but as i mentioned in the tags, i really don't know anything about ps besides making gifs !!! i think that's partially why it takes me forever to do any sort of gfx because i literally have to look up how to do the simplest things :( let alone find inspiration to make something bc lord KNOWS i am not creative eough to think of something on my own ;___; a resource pack sounds GREAT THO and i think it's really lovely that you are considering doing that !! :D but omg thank u for explaining it all to me !!! i would have never known to do half of this stuff like change it from fill to stroke and stuff like that, i know i sound stupid but it's TRUE ;____; i just feel so behind in the whole gfx aspect, like how does everyone know photoshop so well?? maybe they have the time to play around w it ,,, it's a bit discouraging for me sometimes i'm always like WHY CAN'T I DO ANYTHING COOL :< but, this was really helpful !!!! thank you <3 and do stop by whenever you'd like !!!! i've loved your creations so far and am always excited to see what you do <3 have a nice day !!!!
2 notes
·
View notes
Note
how do you make your edits so vibrant? :0 is it a psd?
Hi anon! Most of it probably has to do with me hand colouring in most of the panels I use, so I'm free to use whatever colours I want, especially if they're lineart pieces or ones I slap a black&white filter on top. It takes a lot of time but it means I have more control over the saturation & shade of colours, if I want to use an overlay style for a more metallic feel, etc. And I like my colours pretty bright, so nine times out of ten my colour tool is pressed right to the right 😅 the first Mystique panel in my Destique gfx was originally black & white, for example, but using multiple different layer styles & stuff made me able to make it quite bright n saturated.
Another way is that I usually play around with the Vibrance adjustment layer after fixing stuff up with selective colour on coloured pieces; I have often used Vibrance at -100 & Saturation at +100, but it depends by and large on the graininess of the image and how the original colours looked, and the order of your adjustment layers. Vibrance at +100 & Saturation at -2t is another one I've used a few times. Vibrance & Saturation both cranked up usually makes things look ugly imo, as it can draw attention to the grain a lot but play around with it! Tbh a lot of it is dependent on how you use curves, exposure, levels, contrast etc, and again, how you've ordered them.
#asks#anonymous#hope this helps! im sorry if its not very useful#ive spent legit HOURS just colouring in b&w sketch pieces bc i was unhappy with the more offical art 😅#in fact i procastinated on a tigra piece by typing this dhsjdnfnndbfndnfnf#but yeah selective colour & vibrance adjustment layers r ur best friends. brightness/contrast too.#used to use hue/saturation more in my older edits and selectively choose to make red super saturated but SelCol & V look better imo
2 notes
·
View notes
Last Seen Blogs
mannequin-magnus
Mannequin Magnus

thirdboywonders
“we’re in the money”
rollingcherries
ROLLING CHERRIES
danhgbo
LE PLUS GRAND SECT INITIATIQUE DE LAFRIQUE

sprituality-life
Spirituality Life