#got photoshop and avisynth downloaded
Note
Hiii, just gotta say, I LOVED your Wendy gifset and I was wondering how you got them to look that pretty?? They looks soft and detailed and like, real? Hehe I hope you can help me out, idk what I've been doing wrong with mine that are looking like shit so, help me out please
henlo anon!
when i first started gif-making, my gifs weren't the bestest either! it's a process and i think you'll get better at it w practice and trying new things !! <3 i'll throw in a bunch of pointers a lot of CCs gave me when i first started giffing and some of my opinions under the cut!
also this is definitely Not a link to download photoshop 2022 for free that i definitely didn't use as an upgrade two weeks ago
what you'll need to know before going through this long long rant of mine:
basic photoshop giffing skills
knowledge of smart filters and blending options
some patience (to hear my nonsense)
interest in maybe picking up new software
disclaimer: image heavy!

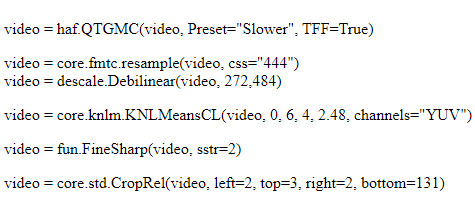
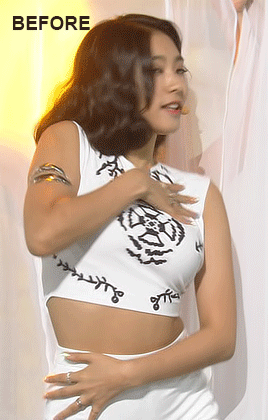
1. always use videos in their highest quality!
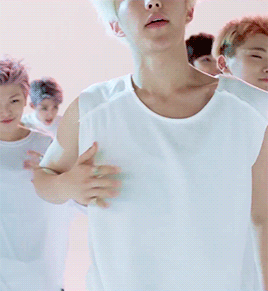
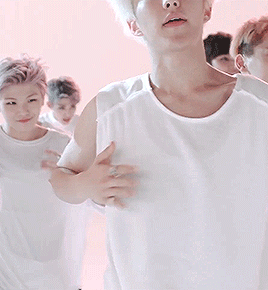
hq videos = hq gifs! i do not recommend using videos below 720p! also if you use photoshop, the number of colours in the gif is limited 268, meaning that sometimes your gifs can lose quality in export, and that could make lower quality videos look worse! (for eg. the video i sourced the wendy set from was 4k that i downloaded from 4kvideodownloader)
here's links to download:
4kvideodownloader
sophistagram (for vlives)
weverse lives download tutorial
twitter video downloader
a smol opinion: i've seen a lot of users use tumblr mobile, and noticed that gifs on tumblr mobile are always a little blurred out? this kind of makes the gifs look less clear </3 so using higher quality videos always helps!
2. vapoursynth / avisynth / km player!
these are softwares to sharpen and denoise your videos! they're completely optional (i used to gif with photoshop alone for the longest time) but they do make quite a lot of difference!
i highly recommend you to check the tutorials below!
gif-making with vapoursynth tutorial by @wonublr
gif-making with avisynth tutorial by @soonhoonsol
gif-making with km player (and vapoursynth!) tutorial by @woozi
a smol opinion: i've never used km player, so i don't have much to say about it. as for avisynth, it's pretty easy to work with, the only down side is that there are no denoise options. vapoursynth has both and is very user-friendly, but i found the shift from avisynth to vapoursynth slightly confusing!
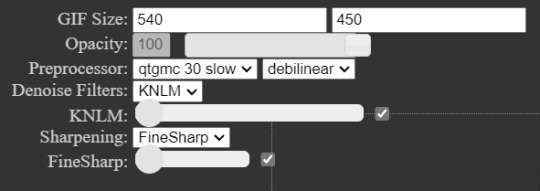
these are my usual settings for vapoursynth:
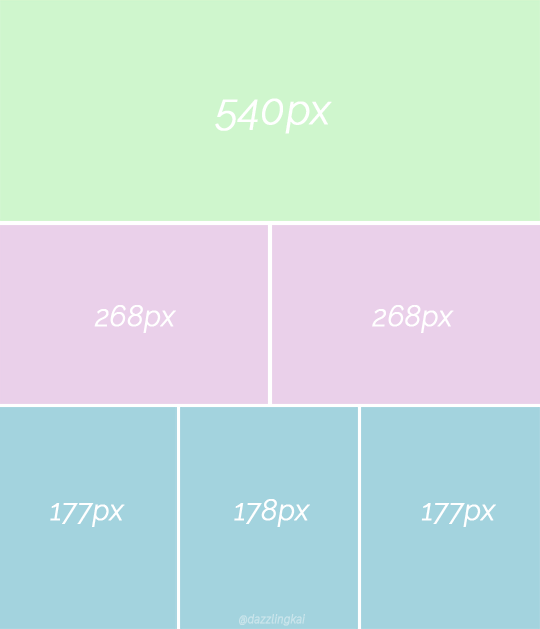
3. gif sizes!
a very big (and maybe bullshit) opinion:
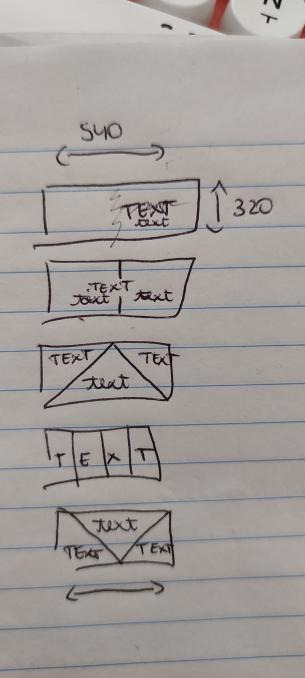
now, tumblr recommends you size your gifs this way:
(img src)
but it,, doesn't necessarily have to be that way 👁
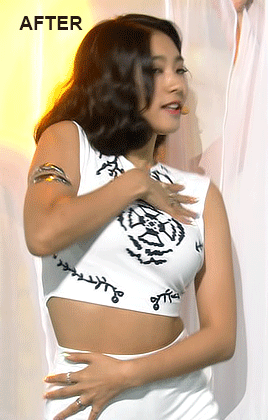
i really like to fuck around and use whatever size i want for my 268px and my 177px gifs, and the wendy set was no exception! the size of each gif in the set was 400px X 580px!! this, in my opinion, makes it easier to view them (a lot more clear, you could say) :o
as for my 540px gifs, they remain the same size!

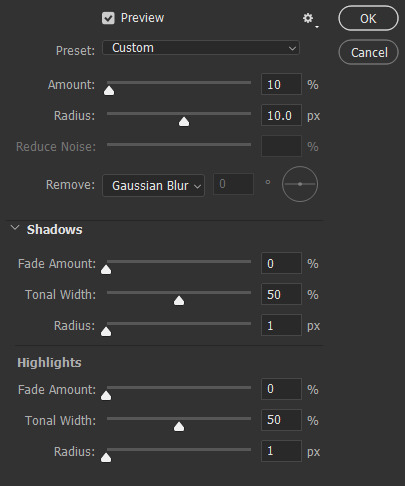
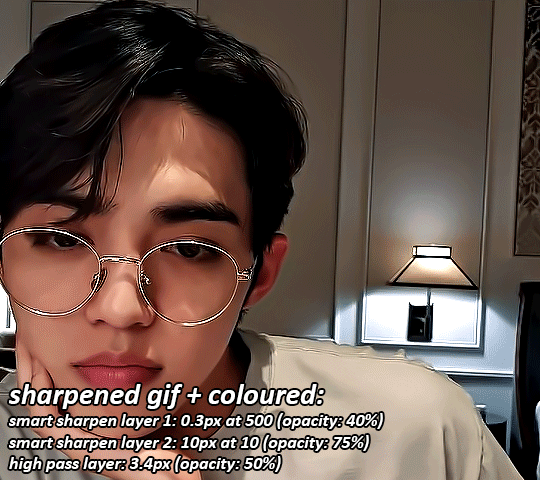
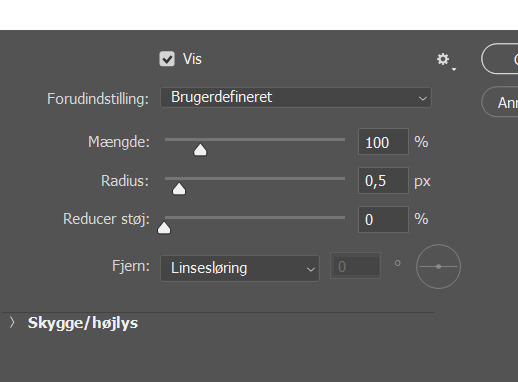
4. sharpening on photoshop!
i would always recommend you to sharpen your gifs again on photoshop. tumblr LOVES reducing gif quality, so i resharpen to give my gifs some 'depth'
this is how i usually sharpen my gifs:
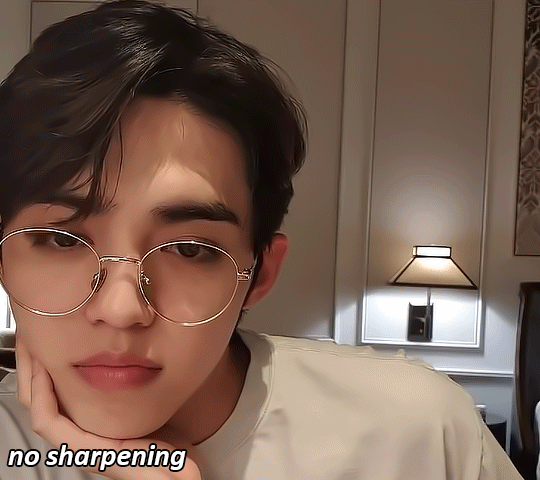
(the gif above was sharpened and denoised on vs w the settings mentioned above!)
step 01:
after you're done converting your gif into a smart object on photoshop, we'll add a layer of smart sharpen. these are my settings:

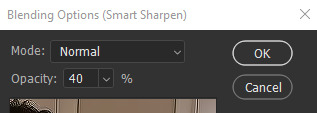
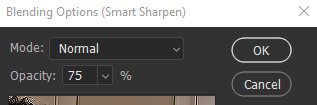
step 02: more... smart sharpen :eye: :
step 03: high pass (optional tbh)
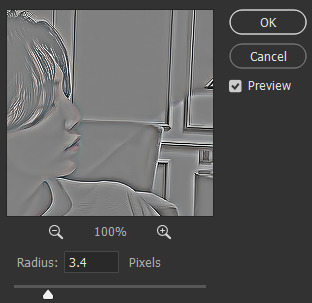
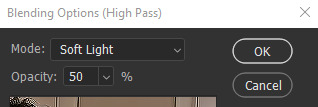
imp: don't forget to change the blending to soft light / overlay (i prefer the former)
now the gif looks like this:
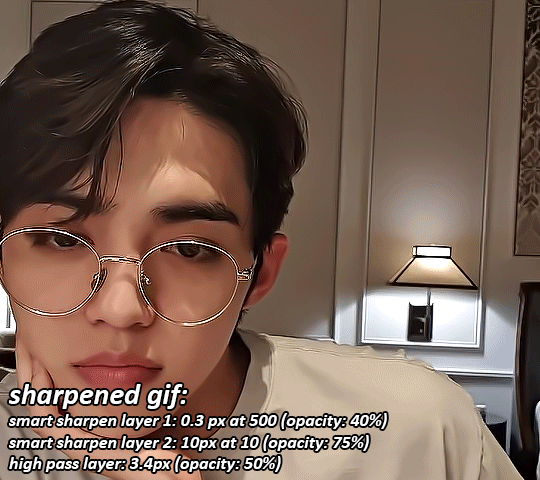
something to note: i like switching up my opacity levels on these settings, and usually only ever change the radius and strength of the sharpening!
here's a few more sharpening tutorials:
sharpening tutorial by @/woozi
tutorial by @/hellboys
tutorial by @yutaslaugh
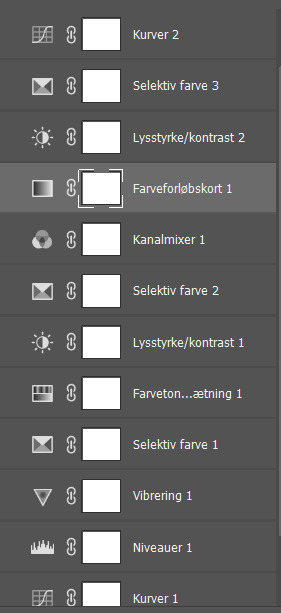
5. colouring!
colouring plays a huge role in making your gifs look sharper and cleaner! this is your playground, and this is the area you have the most freedom to change, and zuzsh up things the way you like them!
generally, i like to draw the attention to the person i'm giffing, so i make sure to set the contrasts right! i also extremely like making the colours cooler, so that it seems more natural!
the layers i use most are:
curves (on auto)
more cuves (using the eyedroppers to set my black, grey and white points)
selective colour (to change contrasts, to recolour skin)
colour balance (to balance my shadows and highlights)
levels (for brightness, contrast and depth!)
i'm not extremely good at colouring either, so here are some more in depth colouring tutorials (i'm terrible at explaining i'm so sorry sksjkd):
colouring tutorial by @/jihan
south-east asian celeb colouring tutorial by @/blueshelp
and here's some pre-made psd packs!:
psd pack by @/kpopco
psd pack by @shuatonin
psd pack by @coupsnim
psd pack by @/wonublr
closing ments:
if you've made it this far, thank you! i'm not extremely great at explaining things, but i hope you found this 'tutorial' useful! (extremely confused what this is tbh it feels like i'm rambling sgkfjsh)
here's a few more tutorials (kinda unrelated) that i found useful and fun!:
tutorial to fix grainy gifs
tutorial to remove panning from gifs
animated text tutorial
gif + more effects tutorial
111 notes
·
View notes
Text
An anon asked for a tutorial on how I make gifs, so here we go!
I believe that everyone with a decent computer can learn how to make gifs.
The programs I use are
Vapoursynth
Photoshop
Topaz denoise (a lot of people don’t use this)
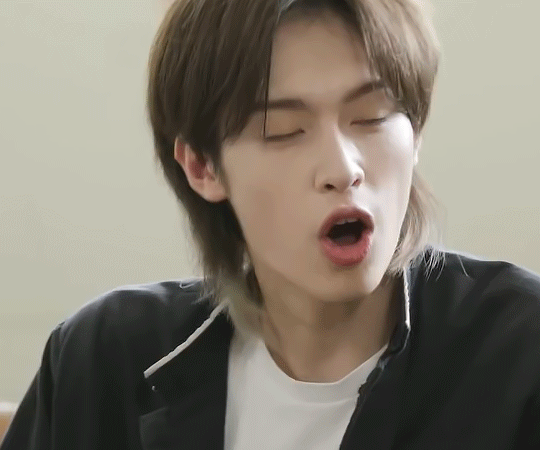
This is the gif I will be making in this tutorial!

Step 1. Find what you want to gif!
Download the video you want to gif in the best quality you can find. This is where ts files are really good! Personally I don’t really mind giffing only 1080p videos, but better the quality, better the gif!
Step 2. Crop it using vapoursynth!
Using vapoursynth is a whole tutorial in itself. You can still make gifs without vapoursynth (or avisynth as some people use). You can just crop the gif in photoshop to the size you want. Vapoursynth is just good at doing so without losing a lot of the quality!
The width for tumblr posts are 540px (one gif), 268px (two gifs) and 177px for the outer gifs and 178px for the middle gif, when making three gifs!
This site has everything you need for vapoursynth!
I don’t really have any set settings. I switch it up a lot, but these are my settings for this gif!
Step 3. Import gif to photoshop!
(My photoshop is in Danish, but it should be the same place in any other language).
You do this by going files > import > video frames to layers
Then you choose the video you got from vapoursynth (if you didn’t use vapoursynth, you just choose the part of your original video you wanted!)
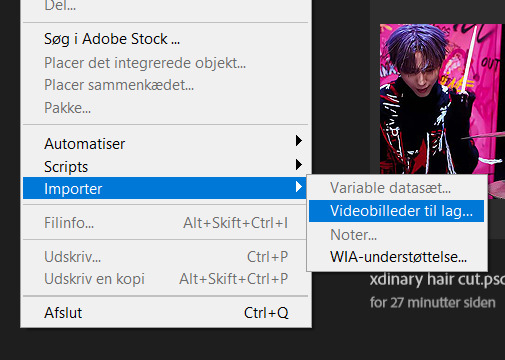
Now we have a basic gif!
Step 4. Colouring!
Now the fun part comes! We colour the gif! This is where your gif truly becomes your gif! Every content creator has their own style of colouring and it really just takes time to find what you really like! Just do whatever you like!
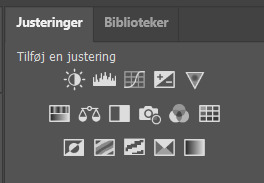
These are the ones you use for colouring! Just play around!
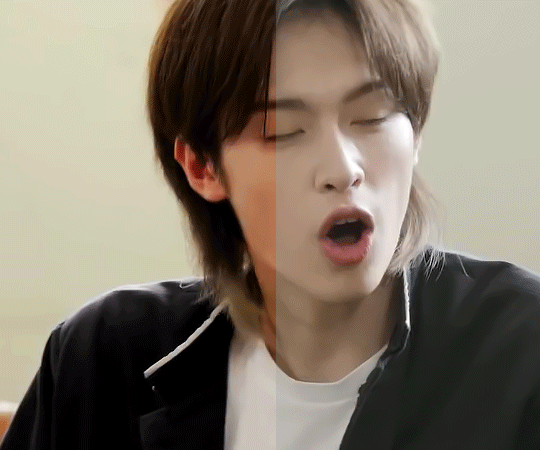
Here we have the gif with colour! I’m not going to do a colouring tutorial, because colouring is really just up to the person making the gif!
These are the adjustments I’ve used on this!
Again, sorry for the Danish!
Here are some of my psds (tho I always make a new one every time I do a gifset)! I feel like there’s a lot to learn through looking at other people’s psds! Just have fun with it!
Step 5. Sharpen (and topaz)
I more or less always sharpen the same way on every gif (depending on how sharp it already is).
To sharpen you have to make sure you’re working as a smart object! You have to make the frame animation into a timeline and the layerss into a smart object!
Timeline:

Smart object: Select all layers > filter > convert to smart
(or select all layers > right click > convert to smart)
It has to look like this

To sharpen you go to filter > sharpen > smart sharpen
These are my settings:
Then I go to topaz denoise! I don’t really have any set settings for this, I just do whatever feels right in the moment. Topaz denoise is also a whole other thing, but it’s easy once you figure it out! I made a video on how to use Topaz here (to help someone who asked)
youtube
Because I don’t like my gifs way too sharp, I always add a blur at 20-30% opasity!
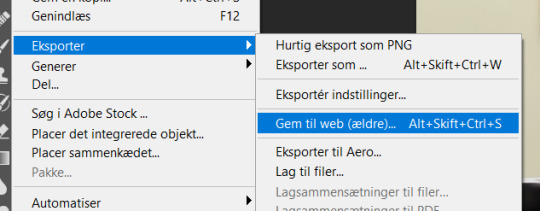
Step 6. Save the gif!
Before saving the gif, make sure everything is as you want it to be! You also have to remember to set the frame delay! I usually go for 0.05 or 0.06!
To save go to files > export > save for web
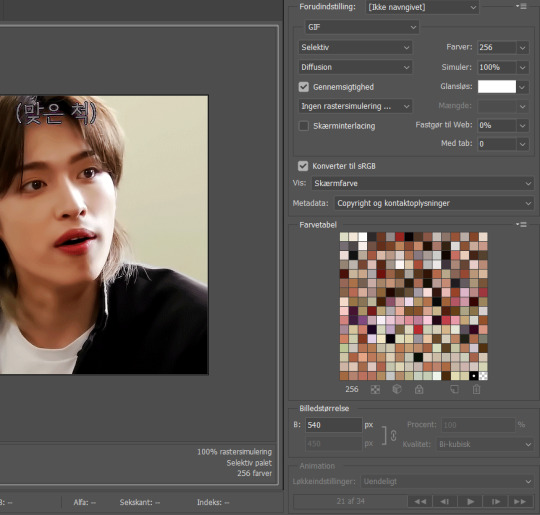
These are my settings!
And there you have it! A finished gif!
If you are more of a visual video learner, here is a video I made of my giffing like over a year ago for a challenge!
youtube
My colouring has changed a lot since then tho! I also didn’t sharpen and use topaz in photoshop (I used a lot in vapoursynth)
I hope this was at least a little helpful! ^8^
#*m.gif#maja talks#ps tutorial#resources#ps resources#photoshop#I am not good with words but here we are
54 notes
·
View notes
Text
.
#I HAVE MY LAPTOP OIEHFBWCDS#thank goodness#got photoshop and avisynth downloaded#cant find where i got denoise for free though..#think someone had posted key codes for it and idk where those are anymore#so if anyone can hook me up lol#cant wait to start giffing again i miss it#should i do like a request thing? would anyone send any? anyone miss me? oehfbwoedsc#also messed up getting into steam so had to send support a message ebfowesd#couldn't remember my password and tried to reset it too many times :/ it wasnt working lol#but anyway im back more now and ill stop rambling#myrena rambles
4 notes
·
View notes
Text
Some Kind of AviSynth Files Update?
Ok, as promised, I present to the 5 of you still making gifs on Tumblr an updated and (sort of) improved process for (somewhat) easily leveraging AviSynth to make (mostly, but not “only”) Tumblr gifs.
I’ll consider this the “final form” for this awful slapped together bat file setup and focus my attention on something much more convenient and interesting for you guys to use--but I will update this as necessary as functional problems arise. I haven’t really had a chance to do a ton of testing, so I hope you guys can help me with that and let me know what kind of experiences you’re having trying this stuff out, good or bad. If you’re running into issues please let me know about them! It would go a long way towards making something better in the future.
Additionally, if anybody has some grievances/wishes/problems/concerns with their current process--whether that’s this set of batch files or your process with the old files/vapoursynth/etc., whatever--please do let me know. I have some pretty cool ideas, but I’d be interested to know what you guys hate about the tools available to you atm, or what you would like to see improved.
** I repeat, I have not done a ton of testing. Problems may be likely. Keep backups of your plugins folder and current C:/video setup for your own sake **
Anyway, on to the stuff, here’s what needs to be done:
Uninstall AviSynth 2.5. Tell them “I love you” and thank them for everything. We need to move on...it’s not them, it’s us...
JK, it’s them. We’re replacing 2.5 with AviSynth 2.6. Download and install. Don’t worry about where your install ends up, though it is most likely C:/Program Files (x86)/AviSynth/
Download this new batch (heh) of files: batinator-2.1.2.zip
The packaged zip includes a plugins folder. Move the contents of the included plugins folder into your AviSynth plugins directory. Refer to step 2, this will most likely be C:/Program Files (x86)/AviSynth/plugins/. Nothing you guys haven’t done a dozen times by now.
From here it should be business as usual. Within the batinator folder is an auto.bat. Drag your videos into this and the process will start. If you’ve ever used “avisynth” for this before it should be very familiar.
For reference, here are some things the new setup does better
Automatically find the avisynth plugins folder, no matter where it is. 32-bit, 64-bit, wrong folder name, doesn't matter. If avisynth is installed, it'll find the corresponding plugins folder.
Work from anywhere, not just c:/video. Put it in your desktop if you want. Put it in your music folder, I don't care.
Take a range OR cut 10 seconds automatically. 17s was too long tbh, you really need 17 seconds for one scene? STOP.
Better time seeking. Have you ever put in a timestamp and had this thing spit out the wrong scene by like a second? Awful. No more of that. Using the power of Math™, no frames are left behind.
Attempts to automatically decide the best process to load the video based on the format. There should be no more need for a lossless.bat to try a different method manually
Be less sloppy in general. What the hell is even happening in that black window? Nobody knows.
Save every output video to the output folder without overwriting, in case people want to make multiple cuts before working in photoshop. Because realizing you have to go back and re-do that gif that got overwritten is the saddest thing ever...
Resizer slightly less ugly (still working on that but I'm lazy)
Less shitty resamplehq errors, calculates better sizes in the resizer so that avspmod stops bitching for once in its stupid life
New remake.bat uses the same video and clip and skips to the steps of resizer + avspmod so you can try again, for when you were too lazy to preview it and SWORE those sharpen settings would look good, and they totally don't.
[NEWER] Leverage AviSynth 2.6 and L-SMASH for previously unsupported/badly supported video formats.
Some known issues/things planned
There are some problems with characters in certain languages that I have yet to fully look into. If you’re running into strange problems, checking if you have any non gringo friendly characters in any of the file paths would be a good first start
Files that load with LWLibavVideoSource may not load 100% perfectly. I’ve had issues with the first 20 or so frames being either janky or frozen, sometimes in the preview, sometimes only in the final output. I THINK I fixed this, but if you do run into it, please let me know. As a temporary solution, I would suggest overcompensating on the start time of your cut and making it start a few seconds earlier, just to ensure the first few frames you need are actually clean.
As usual, AviSynth is a Windows tool. I have cross-platform plans for the macfriends, but this will likely leverage VapourSynth, not AviSynth, and will be a re-write that is essentially the focus of what I intend to move on to now that this is (mostly) out of the way.
TL;DR
Uninstall AviSynth 2.5
Install AviSynth 2.6
Download new files (includes plugins folder): batinator-2.1.2.zip
Move plugins to AviSynth 2.6 plugins directory (located wherever AviSynth was installed)
Drag files into auto.bat and it’s business as usual
Please let me know how it works for you and any errors/issues/you encounter, even if they are known issues. More detail and insight are always welcome
#avisynth#gifhelp#tutorial#thanks for your time#been years and I still don't shut up#seriously tho give me your feedback#all three of y'all#birdman voice
36 notes
·
View notes
Text
#showyourprocess
From planning to posting, share your process for making creative content!
To continue supporting content makers, this tag game is meant to show the entire process of making creative content: this can be for any creation.
RULES — When your work is tagged, show the process of its creation from planning to posting, then tag 5 people with a specific link to one of their creative works you’d like to see the process of. Use the tag #showyourprocess so we can find yours!
Thank you so much for tagging me @lan-xichens, I’ll try my best to explain how I made this set from start to finish hehe ♡ and also a big thank you to @suibianjie @highwarlockkareena @nyx4 @aheartfullofjolllly and you as well Kris for putting this all together! Content creators get a lot less recognition than they deserve for all the time they put into their content, so getting everyone to see the (sometimes excessive) process we all go through to put our content in our blog, I hope it creates a positive change!! 💖
1. Planning
The set in question was actually requested by someone so they could celebrate their friend’s birthday! At first I wasn’t entirely sure if I was going to be able to finish it on time (college is very hectic right now) but I was able to finish it three days before the deadline which was may 1st! ^-^
The first thing I did was decide what characters I wanted to use in the set, I first reached out to the person who requested the set if there were certain characters they wanted me to use but they said they didn’t know enough to really give me any directives outside of the quote. I decided, since the quote is applicable to the entirety of the show, that I would try to put in as many characters as possible.
Thus, of course, came the hunting for scenes. Those of you in the net discord surely know I came into the content help channel a few times to ask for certain scenes here and there, and eventually I had to download an additional 10 episodes to the back then 20 or so episodes I had in my CQL episodes folder.
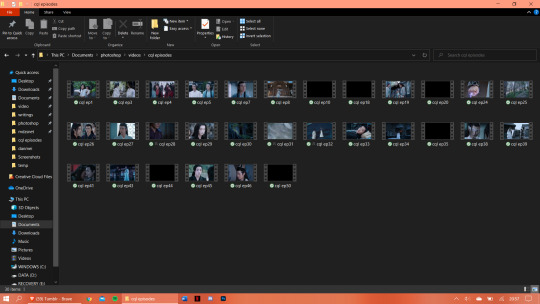
As you can see I have 30 random episodes of CQL downloaded (slowly but surely getting to the point where I have all 50 episodes downloaded) and I think I ended up using scenes out of at least 20 of those episodes.
I planned out beforehand what characters I would use per gif. I knew obviously I would start out with Wangxian, them being the main characters of the show, and then would work my way down the list. The second gif consists of Nie Huaisang, Nie Mingjue, Jin Zixuan, Jiang Yanli, Wen Qing, and Wen Ning. They’re all family pairings, two being siblings and one being a married couple. The next gifset consists of the Yi City characters, then the fourth gif consists of the juniors, and the final gif has Jin Guangyao, Mianmian, Jiang Cheng, and Lan Xichen in it.
I have to admit though that when I had made the first four gifs I’d forgotten who I would put in the last gif and the when I thought about it the first time around I could only think of Lan Qiren and the very cursed Yaoyang ship 😭 it was only at dinner time that same day that I remembered I hadn’t put Jiang Cheng in my gifset yet and that’s when I thought of the other characters as well.
I had already made my first two gifs when I went to check Hanyi’s blog for layout inspo and eventually I decided I wanted to try a triangle-ish layout, which I doodled below. I eventually ended up changing the layout of the last gif in the final design. It was also the first time I would work with a triangle-ish layout so I was a bit nervous as I was scared it wasn’t going to work out...
2. Creating
I use Avisynth 2.5 and Adobe Photoshop 2021 (the paid version, unfortunately, I need it for school except I didn’t need it this year but I wanted it so I paid for it with my own money ouch) to make my gifsets! I always start out with trimming down all the scenes I’m going to use into three to five second videos and putting them through Avisynth. This time around I did it separately for each gif I made, simply because I needed so many scenes. I would include a screenshot of my “gif vids” and “temp” folders but I’ve already deleted all the videos, which is what I usually do immediately after a set is posted.
I’ll try my best explaining this gif by gif since each one had a different layout!
2.1 Wangxian

I think I had up to five different designs of this gif 😭 it started out with the gif on the left originally being more centered and the quote right smack in the center but somehow it felt a bit too... empty? I changed up the design and pulled the gif over to the right and put the two closeups on the left, the exact opposite of the gif I eventually ended up with. I switched things around one more time and saved the gif as you can see it right now, except I didn’t include the lines yet. It was only as I finished up my fourth gif that I decided this gif needed lines as well so I added them ^-^
2.2 Nie Huaisang, Nie Mingjue, Jin Zixuan, Jiang Yanli, Wen Qing, and Wen Ning
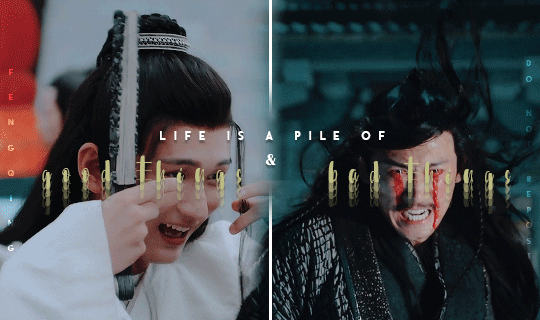
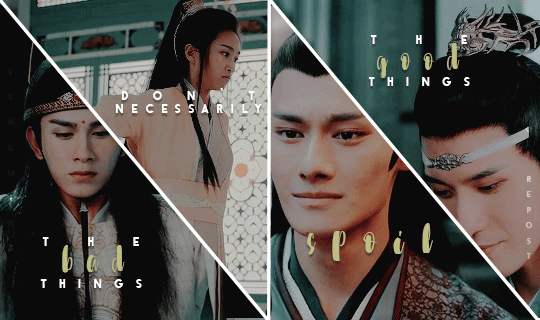
I got the inspiration for the font layout on this gif from this Wenzhou post! I hadn’t tried it before and when I did for this gif I was very happy with the way it turned out :D I wanted to portray that life is a pile of good and bad things, as the quote says, in CQL by mirroring these happy scenes side by side with the sad scenes
2.3 Yi CIty

My first time working with the triangle layout!! Putting in the lines and making sure they would line up with the second gif took me the longest of all actually 😭 I think once I got the line on the left in I just copy pasted it and flipped it horizontally so I didn’t have to fiddle around with angling it anymore :’) my original idea was to get a happy Song Lan scene and a sad A-Qing scene, but when I stumbled upon this A-Qing scene in ep38 I just had to put it in there because her smile is so precious 🥺 Xue Yang and Xiao Xingchen in the center are also supposed to be mirrored, with Xue Yang embodying the “bad things” and Xiao Xingchen the “good things” ! I also think the Yi City characters fit this part of the quote very well!!
2.4 The Juniors
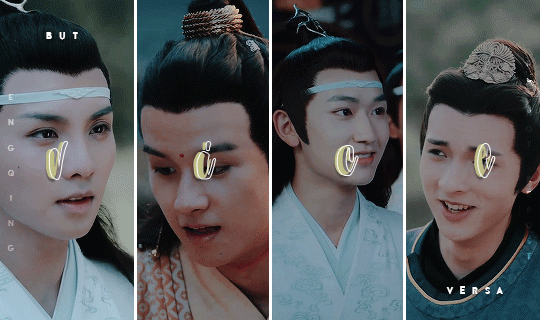
Ah yes, the junior quartet!! :D I had this planned out from the very beginning, that I would include happy versus sad juniors in the “vice versa” part of the quote, and I think it worked out quite well! My first idea was to put the “vice versa” completely in the special font and have it typed out over the gifs like I did with the “vice” but as I typed out the “versa” I realized it had one letter too much to be able to do that 😭😭 it took me a while to come up with how I would position the “but” and “versa” and after some moving around I decided to just place them the way I did in the final gif! For the font, I duplicated the “vice” and added a stroke to the duplicate, then I changed the fill setting to 0% so I could slightly drag the duplicate away from the original layer to create the effect that’s in the gif — also, finding a scene in which Jin Ling smiles is really difficult.... he barely even smiles in the scene I ended up using :(
2.5 Jin Guangyao, Mianmian, Jiang Cheng, and Lan Xichen
The final gif!! I feel like this might come a little across as “I promise I didn’t forget these characters” because they’re a very odd quadruplet to put together, but they were the most important characters left to put in the set! I was thinking of putting Nie Mingjue in here together with Jin Guangyao and Lan Xichen, but I did feel he fit more with his brother up in the second gif. Mei @mylastbraincql cheered me on making this gif for which I was very grateful :D <3 the layout came to be after I googled “how to evenly split a rectangle in four” because I didn’t want a repeat layout in the set (*/∇\*)
2.6 Coloring
For the coloring I pretty much did all of the tweaking on the first gif and then copy pasted all of it onto the second, third, fourth, and fifth gif. This is usually the way I go about my coloring, I will always edit certain gifs if necessary but I don’t think I had to change the coloring much on any of these gifs? Maybe I added in a curve layer here and there, but nothing major! This is really one of my preferred coloring styles, even though I try to step outside of my comfort zones with other sets ^-^
3. Posting
I will always upload sets into my drafts and edit the caption in there as well, clicking on “preview post” a couple times to check everything looks good on my blog as well, before I post a set. However, this time, since there was a deadline and I finished before the deadline, I put this set in the queue so it would automatically post on the 1st of may! Knowing myself, I would’ve forgotten to do so </3
Whew that was... a lot 😭 did it make any sense? Probably not, but it was fun to ramble ( ´∀`)
I’ll tag
@blinkplnk with this set !
@wuxien with this set !
@wendashanren with this set !
@wanyinxichen with this set !
@yibobibo with this set !
@mylastbraincql with this set !
@sugarbabywenkexing with this set !
@yiling-recesses with this set !
@jiancheng with this set !
Please feel totally free to ignore this if you’ve already been tagged and don’t want to do it again!! <3
#showyourprocess#tag game#this got so long i'm sorry ;-;#very curious to see everyone else's processes!!#thank you for the tag kris <3
62 notes
·
View notes
Note
Hey biba💛 I really wanna start making gifs but I dunno where to start what to use and ur like the best giffer?????? (dunno if that's a word lol) ik so can you please help
You don't have to but it would be nice if you could💛💛💛
hi cutie 💕💕💕 of course i will help!!!! im not sure if you're looking for some general tips or an actual giffing tutorial, so imma try making this as detailed as i can and hope it helps!!! this got a bit long so im gonna put everything under the cut <3 if you have any questions be sure to ask <333 and thank you so much for the compliment that really means a lot 🥺💕🥺💕
first of all you need to get your apps to make gifs! you will need a video downloader (i use 4k video downloader for youtube videos and a bunch of online converters for other websites and kpop24hrs.com for stage ts files, you will also find ts files uploaders on twitter though!! for specific groups dont be afraid to ask ccs where they get their files from, for atz i can recomend twitter users @/tamsaahj and @/bomhae0323), photoshop of course, you can find a bunch of ps files online if you google, especially linked in tumblr posts, and (optional) vapoursynth / avisynth preprocessor for stages!! i use vapoursynth and im super happy with it, you can get the files for it here <3
there was a great video that explained how to set vapoursynth up but i guess it got taken down or something?? so imma quickly explain it to you (assuming you have windows), if you don't wanna use vapoursynth you can skip this whole paragraph - download the portable zip file and unzip it wherever you want it and make a shortcut of the "drop video file on me" bat file on your desktop (for easy access). once you do that you can drop a video on it and a cmd window will open where you can put your timestamp and a resizer will open in your browser, as well as a vapoursynth editor window, which should be empty the first time it opens. you will have to navigate through file → open script → and open the script.vpy file in the gifs folder of your vs folder!! after that it's pretty straightforward, you work in the browser resizer to crop and resize your clip, you can use the klnm feature for denoising and the finesharp feature for sharpening and then you copy paste the top right script into your vapoursynth editor and go to script → encode video → set preset to MOV and you can press start!! your clip will be in the vapoursynth output folder <3
after that you can open the clip in photoshop and that's where the magic happens!! in photoshop you have to go to file → import → video frames to layers and find and choose your clip, either the preprocessed VS clip or your video if you skipped the vs part (note that photoshop cannot open some video formats, the most reliable ones are mp4 and mov!) and import the part you wanna gif. you dont have to be very precise as you can delete frames after you import the file too! <3
when you import your clip, you can either work in animation mode, or timeline mode. i prefer timeline mode bc i find it easier to navigate, timeline mode also allows you to use sharpening / denoising and other filters, which you cant do in animation mode.
if you're working with animation mode, you can start coloring straight away, playing with the adjustment layers and see what works for you! if you wanna work in timeline mode to use the filters, you will have to do the following:
1. select all frames

2. select all layers (select → all layers)
3. click on this menu icon (bottom left) under the first frame

4. go to filter and convert to smart filters

this will turn your clip into a smart object and now you can use any smart filter photoshop offers and / or proceed with coloring!!!
like i said, there are many possible ways of coloring your clips, you can play with every layer to see which one works for you best, i usually use curves, vibrance, selective color, hue / saturation, levels and exposure adjustment layers, but there are plenty of others that you might end up liking yourself <3
once you're happy with the clip, you will have to go to file → export → save for web and then you can save your first gif!!
these are my export settings if you wanna compare!
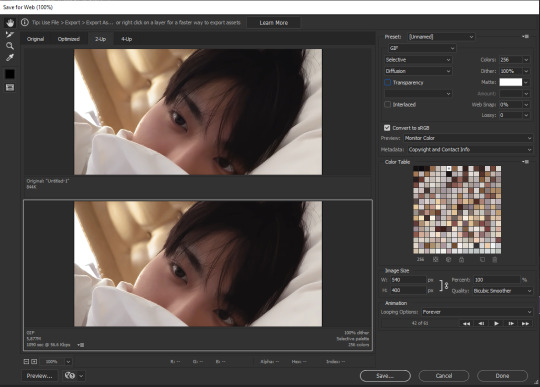
and then you just press save and you're done <3
last note: if you work in timeline mode, you will have to re-import your gif to change the speed of your gif as timeline mode only exports at 0.03 or 0.07 speed from what i noticed, simply click and drag your gif into photoshop (the tab section) and then select all frames and change the speed of your gif! for reference, for 60fps videos (stages) i go for 0.03 (so no need to reimport) and for other videos i go for 0.05 <3
i really hope this helps!!! if you want i can make a video tutorial for you too hshfvbdshvbs just lemme know if you have any more questions <3
#i hope i covered eveything omg jdsvbdsbfv#good luck anon <33333 looking forward to seeing your giffies!!!#reply#anon
5 notes
·
View notes
Note
hi there i hope you're having a great day! just wanted to say that i really admire your gifmaking skills and was wondering if you had any tips for newer gifmakers in regards to getting people to interact with their posts!
hiiii, it's actually been a while since i started giffing and the standards for cc's were different back then. so maybe i'm not the best person to ask, but i'll try my best to answer based off what i've seen~
my first advice is to make gifs that other people aren't making. for most fandoms when new content drops the established cc's will rush to make gifs, and because they already have followings their gifs will usually do better than a new cc's. therefore, i tended to stick with compilation sets when i was starting because the chances somebody else was going to gif my exact same idea on the exact same day was very low. you can still gif new content, just don't expect it to do too well until you've built up a following.
i think it's important to join any cc networks for your fandom. most of the established cc's are generally in these networks and will start seeing your work as the network reblogs it. using the group tags in the first few tags of each set is also vitally important because that will help ensure that your gifs show up when someone searches that fandom on tumblr.
it's helpful to just be friendly with other cc's here. sending asks, writing nice tags, etc... i've seen that the friendliest cc's tend to have a lot of interactions with their sets because people like seeing that cc on their dash. i'm not saying you should go run into everyone's askbox right now, but if you see a post from another cc you enjoy seeing on your dash, it doesn't hurt to interact!
i will also say that the standards for gif quality have gone way up since i started. my gifs looked like ass when i started giffing, and i would still hit 1k notes fairly often. now i think it's important to use avisynth or vapoursynth (if you only use photoshop you *have* to use topaz denoise or something else to clean the gifs up), especially for stage gifs. and you should also practice coloring. sometimes it can be helpful to download a gif from another cc whose coloring you like and to try to match the coloring on your own. i'm not saying you should copy someone else's style, but it helps you build your coloring toolkit so you know what to do. you can also usually ask for advice and other cc's will probably be happy to help you out.
finally, it's going to take some dedication and perseverance. it took a long time for me to integrate into certain fandoms, and even then i'm certainly not one of the most popular creators in any of them. i've had quite a few sets that got like 50 notes along the way. it happens. the solution is not to spam self reblogs, you just have to keep trying. and eventually you'll get there!
#eggteez#answered#tutorials#<- tagging with 'tutorials' because this was way longer than i expected lol#hopefully this is helpful?#and if anyone else has something to add on feel free#like i said it's been a while since i started giffing so maybe it's different now#oh and thank you for the compliment <3#i totally got into the zone while writing this and forgot to acknowledge it
9 notes
·
View notes
Note
hi, what were your sharpening settings for https://yienbot.tumblr.com/post/661900879046279168/160701-bora ? i really like how it looks, it’s so clear. do you use vapoursynth ? and also how do you color your gifs
hello!!
sorry for taking so long to reply to this, and sorry in advance if it's hard to understand, english is not my first language so it may be confusing
I don’t use vapoursynth, I use avisynth instead to resize my gifs
tbh I have no idea of what I’m doing so my settings might not be the best for you but I’ll try to explain everything I do:
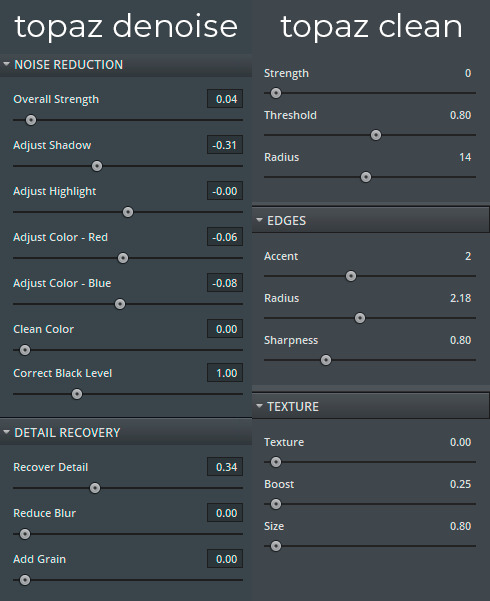
in photoshop I use topaz denoise and clean mostly for music shows, that's what makes the biggest difference for me, I don’t really like the result on videos with bad quality, I bet you could get a good result if you change the settings but I’m too lazy so I prefer to not apply it lol
here are my topaz settings:
for the sharpening I don’t really know the best way to explain the steps to you, so I just will give you the action for it: you can download it here
now for the coloring, I always use the curves before I actually start coloring the gif
I use these two eyedropper tools in the curves properties, I select the color black with the first one and the color white with the third one
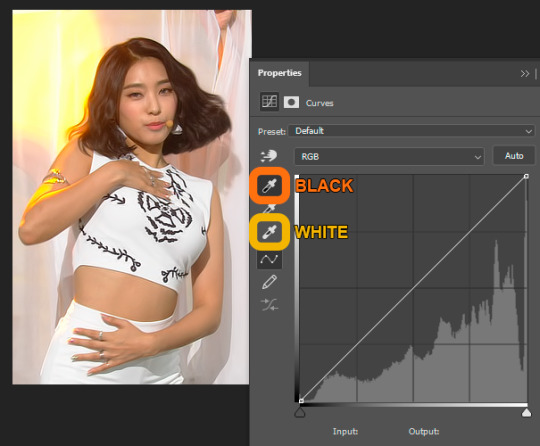
I think it’s easier to color the gif after this because it makes the colors look more natural
for the rest, I mostly focus on one color, using the selective color and hue/saturation I try to get the rest of the colors closer to the one I want to be more prominent
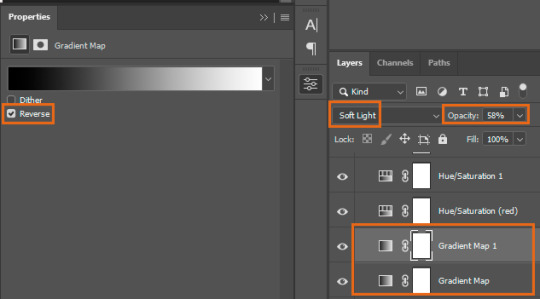
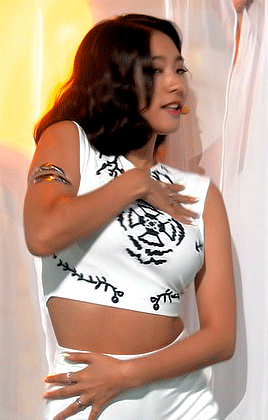
I also adjust brightness/contrast, levels and vibrance, sometimes I use two black and white gradient maps, I reverse one of them and select soft light, then I low the opacity till I like the result (I’ll give you a psd to understand this better, I don’t know how to explain it lol), I feel like this makes everything more smooth and it brings some details to the image
I didn’t save the original psd, so this is the closest I got, you can download it to take a look, I’m not really good at coloring gifs so I just try to make the colors more intense and balanced
2 notes
·
View notes
Note
Hi, sorry to bother you! I was just wondering how you got started making gifs? I really love your gifs, and I've been kinda wanting to try to make some, too!! I just don't know where to start...
hello! it’s not a bother at all!!! :-) bc this is such a complex sort of question and it’s kinda hard (for me) to describe things I’ll give a rundown of what questions I asked myself in the beginning and I’ll also link you to some resources!
how do I download the videos that I want to gif?
performance
vimeo
vlive (sometimes works for youtube, twitter, vimeo, tiktok, does not work for vlive+ content!)
youtube
what program do I want to use?
photoshop cc 2020 - the program I use and am most familiar w (this is a crack ver and I’m not sure if it still works! I know that there’s a monthly payment option that gives you access to ALL adobe programs including after effects, premiere pro, audition etc. the whole shebang!)
photoscape (2) - I used to use this program about 10 years when the gif limit was 500kb so I’m not too familiar w it now but I do remember that it was really easy to get the hang of and it’s free
how do I want to import video frames to photoshop?
now assuming photoshop is your program of choice you will need to find the method you prefer for importing frames! there are 3 ways I am familiar w! included are links on how to download and use
file > import > import video frames to layers - this combination within photoshop will pop up a window and you will need to use the slider to select the scene(s) you want
avisynth - works w windows
vapoursynth (2) - typically for mac but also works w windows (this is the method I use and unfortunately I don’t have any links for downloading on windows)
how do I want to crop and size my gif(s)?
crop tool then image > image size - first you need to decide what size you want your gifs to be! here are some sizes frequently used: 268 x 350, 300 x 300, 540 x 250 / image > image size... this combination within photoshop will pop up a window where you can choose what size you want your gifs to be you usually just want to change it to the size of your gif because if you don’t you’ll go past the 10mb limit
avisynth - using the resizer plug in (this will crop your gif to your liking and isn’t as limiting as the method above)
vapoursyth - the same process as the video linked above ^w^
how do I want to sharpen my gif(s)?
smart sharpen - within photoshop
topaz labs - video enhancer software that once downloaded can be found under the filter options within photoshop / denoise and clean are the 2 most used / here is where you can download and here are codes that might work (I’m not sure if they do I haven’t actually used this in years sorry ;;) and here is how to sharpen ***note*** topaz is incredibly finicky and must be done and saved in a specific order or else photoshop will crash and you will tragically lose all your hard work my advice would be to save as you go to avoid a heartbreak...
vapoursyth - coolest thing about this program is that it comes w topaz installed! no need to download it! you will just want to come up w settings you feel comfortable w
how do I color?
this question is a bit hard bc... it’s all about experimenting! there’s a lot of awesome ppl that do post their psds and you are always welcome to use them but you can also just play around yourself! some adjustment layers I recommend to use are selective color, color balance, curves, levels, and hue and saturation!
here are blogs dedicated to just posting psds! kpop-colorings, kaypoppsds, kcolourings, jjangpsd
here is a tutorial on how to add psds to gifs
how do I save for web?
here is a really nice in-depth post about all of its settings!
that’s really all I can think about atm I hope this helps some ;; and pls feel free to msg me directly if you ever need help w something or if you have questions about certain things, etc.! I’d be more than happy to help!!! (I’m also always down to make a video tutorial of how I make gifs/address any specific question you have or anything you’re struggling w!) something I always say to anyone who asks me for advice is to make some sets w the intention of not posting them as in just a random set for yourself! play w cropping play w sharpening methods play w adjustment layers just have fun and experiment on your own time bc just practicing can become really really fun! I wish you lots of luck and the best w gif making!!! and thank you so much ;w; 💓
#Anonymous#a#gif qs#sorry this took so long ahhh#long post#tagging it just in case tumblr doesnt want it to be under a read more...
19 notes
·
View notes
Photo


gif improvement tag game - remake 4 or 5 of your really old gifs, + tag 5 people to do the same; tagged by @shesnake (x) + @ddonghyun (x)
these old gifs are all so slow and yellow lmfao they’re from when I just got into kpop. can yall tell I was a yg stan 😐
tagging: @aomg @emratas @park-seonghwa @kimdonghyuk @ouinner but I am doing this SO LATE so yall can ignore this if you’ve already done it. for anyone who hasn’t done this yet but wants to- just say I tagged you!
gif notes under the cut cos I love talking 🙄
hoshi - svt were really my first photoshop gifs! I remember my motivation to start giffing in the first place was to try to restore their skin from the adore u mv cos all the gifs I saw washed them out to like a4 paper white. I did end up making them darker + yellower than they were tho. btw they made this low-budget mv work
mino - dude I remember downloading a 720p dailymotion vid every friday to gif this awful show and I didn’t give a shit about cropping logos. ALSO the ONLY reason why I took for fucking EVER to do this tag game is cos mino’s cut of this smtm4 episode was only available on fuckin WEIBO and I was only able to snag it cos I recently asked someone on kpop24hrs to retrieve it for me. if yall want it too lmk
gdragon - WHYYYY IS ZUTTER SO HARD TO COLOR the mv colorists were like we hate yall content creators.
yunhyeong - 151004 airplane was the 1st music stage i ever giffed! this was when I was using avisynth. god bless that sloth ass program. anyway you can tell that I didn’t know what interlaced ts files were lmaoooo
the only group that I also giffed in 2015 that I couldn’t fit into this photoset is exo. all I giffed was xiumin. idk why. he wasn’t even my fave back then
#yo i been wanting to do this since last year when deah tagged me 😭 i am so sorry#i gotta say... i am so proud of my zutter recolor like yall please see how dark the mv originally is#gif:mine#sice#siced#tag game
7 notes
·
View notes
Note
hi, i am quite new in making gifs. i was wondering...how do you make gif sets??
Hello! Admin Amanda from @nueventeen here. I learned a lot from using different tutorials, but this is how I make gifs personally.
I use Photoshop CC and Anivsynth myself. This is a great guide on how to use Anivsynth, and explains it better than I can.
But first you’ll want to download a video file or a TS file. Rosebay is known for having up-to-date TS files from variety shows and music performances. Otherwise, a 720-1080P mp4 works too.
When you have a file, use the Anivsynth tutorial, and you’ll get a mp4 file to use in Photoshop.
I’ll use a clip from My My as an example. I want to gif this moment at 1:25 in the video. Using Avisynth, I got this mp4.

In Photoshop, I go from File > Import > Video Frames to Layers
So now I have this.
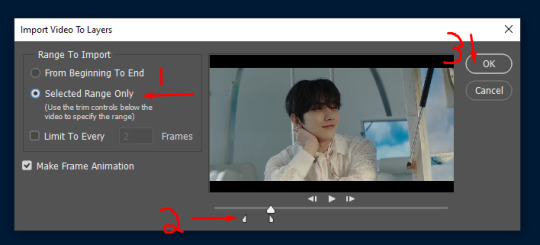
Selected range only (1) if you want just a specific clip. I want a Joshua gif, so I use the range arrows (2) to select just that timeframe, then hit “OK”

In timeline you can change how fast you want the frames to show one after the other. It defaults to 0.02

I’m going to keep it at 0.02 for this, it ranges anywhere from 0.02 to 0.06, depending on how fast you want your gif to be.
When you have that decided, select all your frames in the timeline and hit this button.

Next, select all the layers and hit “convert for smart filter”
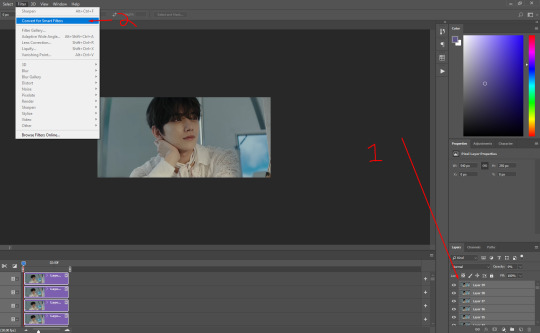
Once you do this, you can edit your gif any way you want.
Then File > Export > Save for Web (Legacy). Everyone has different settings for this, here’s what I have.

Without edits, this is what the gif looks like.

With some edits (color correction and what not) this is what it can look like. I’m no master at coloring gifs, but you can see a difference here. Even added a watermark!

Making gifs takes some time and practice, but hopefully this helps you get started.
Good luck! - Admin Amanda
26 notes
·
View notes
Note
Hi! Can you give tips on quality gif? Do you know of an application or site I can use? I will be very happy if you say :)
Hi! Sorry for responding to this so late. Here are some of my tips for good quality gifs (although mine aren't that great) (putting it under the cut since it got kinda long)
I use photoshop cs5 to make my gifs and topaz extensions for cleaning and sharpening. There are many tutorials on how to download and use both here on tumblr. These are the ones I used (photoshop download tutorial) (avisynth and topaz tutorial) (the first photoshop tutorial i used, it’s easy to navigate)
1. Always use high quality videos (4k if possible) - literally nothing effects your gif quality more - also the more fps a video has the smoother the gifs will be
2. If you have a video that is very large in size you should use a video encoder like avisynth or vapoursynth to compress the file without losing quality - i mainly use this for .ts files since im impatient and avisynth takes time (i would NOT suggest attempting to use avisynth without familiarizing yourself with photoshop and the gifmaking process first)
3. The amount of frames you have in a gif is really important for gif size - if your gif is too big it'll be compressed by tumblr and not look too great (although tumblr's compression algorithm has gotten much better)
4. Changing the coloring drastically will also affect the quality of the gif, if colors are changed too much it may cause the gif to be patchier or grainier so just watch out for the coloring layers you use
5. When saving your gifs on photoshop it will never look like what the optimized version is. Use the 4-up screen to see what saving presets work the best for your gif. For me usually selective + pattern works the best but selective + diffusion with 100% dither works better for some gifs.
6. Look at what everyone else is making! I've learned so much from people here on tumblr so keep an eye out for tutorials, resources or any advice anyone drops. It can also give you great gif inspo.
Please send me more asks if you have any other questions or are unsure about anything!
1 note
·
View note
Note
how do you make your gifs?
hi there! i’m not sure if you wanted the very basics or a tutorial, but i think this is more of a tutorial? sorry if that isn’t what you wanted! i tend to overexplain everything ;;;
i only started making gifs this summer, but i hope i explained everything (somewhat) clearly! feel free to send any other questions if you have any~
to make gifs, i use vapoursynth (alternatively, you can use avisynth) and photoshop cc 2019
under the cut!
downloading videos:
so! for live stages, i always use the ts file for it. ts files give the best quality for your gifs, and i’ve found i don’t like how the quality looks even if it’s 1080p, but that’s all your preference!
to find and download ts files, i use these websites:
4sashi, kpop24hours, kpopexciting // along with these, i’ve heard you can use twitter as well for ts files but i honestly don’t know what to search to find them lol
if you’re downloading from youtube, i always look for 4k videos, but if i can’t find any 4k for what i’m looking for, i use 1080p! i don’t really like going less than that, though ;;
to download youtube videos i use 4k video downloader! it’s really nice because it lets you download any youtube video (no matter the length) and it lets you download it in the highest quality for free! (if you want to download videos with 4k resolution, you have to pay a one time fee of $20 *i believe* and you have an access key for up to three computers! otherwise, 4k video downloader is completely free!).
if you want to download anything from vlive or twitter, i normally just look up “vlive video downloader” or “twitter video downloader” and just click the first thing that pops up
using vapoursynth: (link to where i downloaded vapoursynth -> here)
i somehow by miracle got vapoursynth to work on my windows computer, but i honestly have no idea how because the first time i tried it just would not work! it’s a big pain, but i’ve heard it’s a lot easier to download and get to work on mac! if you’re using windows, though, a nice alternative is avisynth, which i used before i got vapoursynth!
vapoursynth is really simple to use, to be completely honest! i don’t know how good i’ll be at explaining it so i’ll leave a link to a tutorial i used at the end of this explanation! it can be a bit daunting at first because of all the code, but tbh you don’t really need to know everything it says, most of it is just copy and paste!
to get the resizer and the vapoursynth script to load, you just have to click and drag your video file over on top of the file called vapourscript, which can be found in your vapoursynth folder! (my folder is called “VapourSynth64Portable”, because that’s how it came for me) to know if you’re in the right folder, you should see other files in there like “gifs” “scripts” “plugins” and others!
after you drag your video file onto the vapourscript and resize your gif, copy what it says in the resizer and paste it in vapoursynth!
here’s the tutorial i used to explain it easier -> here
options i use:
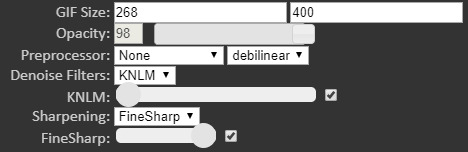
i normally use the size 268 x 400 in the gif resizer (makes it portrait), or if i want it to be a landscape type size, i use 268 x 200!
if you’re using a ts file, click the preprocessor option (the first one that says none), and change it to one of the qtgmc options! i always use qtgmc 60 fast, but it’s up to you!
for anything else (mkv, mp4, etc), i would suggest leaving it on none!
i don’t use any sharpen actions in photoshop, i use vapoursynth instead!
typical vapoursynth settings:
for the amount of frames: ts files i try to keep under 200 (even under 100 if possible) and for everything else i don’t really pay attention to the number of frames!
everything from here on is done on photoshop!
coloring:
this is all preference!! a lot of gifmaking is just about what you like personally! some people actually have a base psd or use others’ colorings (again, preference!), but i personally really love coloring, it’s my favorite thing about gifmaking, so i almost always make a new psd (coloring) for every gifset i make! the main things i use in coloring though are selective layers, color balance, hue/saturation, threshold, contrast/brightness, and then i top it off by lessening the exposure!
frame delay:
0.04 or 0.05 seconds, i never use anything above or below that! this is another preference thing though lol
exporting:
to export your gif go to file > export > save for web (legacy)! here are my export options!

i hope this tutorial helps you! sorry if it was too long or if i overexplained anything/made it even more confusing! i only started making gifs during the summer, so if you have any tips for me as well, please don’t be afraid to send any in! you can send in any more asks as well, if i made things too confusing/you have any more questions!
bye bye!
43 notes
·
View notes
Note
hi auri !! i’ve been playing animal crossing all day so i just now saw ur tags on my coloring tag thingy and i just wanna say !! thank u so much ahh i was literally 🥺🥰🤩 the entire time omg !! thank u so much for everything you’ve said :( and thank u so much for the tips as well !! i’ll have to try those out :) n e ways djdjs in seeing ur tags it got me wondering ! when did u start making gifs? bc seeing you’ve made them in less time than me and they’re already *chefs kiss*, the pure talen t !
💕💕💓💓💗💗💗💖💖 hi annie ASKJDHFGDHSJKA STOP STOP I’M BLUSHING ALKSJHDJSKDF okay so i technically started making gifs last year in july but really last october. i’m exposing myself so you can know how much i didn’t know what i was doing aksjds so the first gifset i ever made was with giphy and i actually posted it (in fact here you go) I KNOW EMBARRASSING!! and then i started using this website called ez-gif. i don’t even want to talk about it i’m just cringing!!! and then time skip i got a working version of photoshop (the version i use now, cc 2019) after countless times of downloading versions of cs6 that did Not work. and then from there i began teaching myself painstakingly how to use photoshop and how to navigate being a content creator. i was making gifs but i didn’t feel right because they just didn’t look like i wanted them to. then i discovered sharpening actions. that definitely changed a lot about my gifs! but eventually i stopped making gifs as much because i still wasn’t completely satisfied (i even tried to save them with topaz and still it just wasn’t it). i found out about this thing called vapoursynth and thought i’d found my savior. downloaded it but i kept getting those stupid errors in the log. then i finally learned where to get avisynth. was satisfied with it for a very short time (i used it for 3 days literally) and then i just really wanted vapoursynth!! that’s when my beloved tumblr friend marie (@/axizzles) helped me to get vapoursynth and THERE! everything changed! all of a sudden my gifs looked like i wanted them to!
omg i literally just gave you my life story alkdjfdsk but yea! that’s a very watered down version of what i went through! THANK YOU SO MUCH FOR YOUR COMPLIMENTS IT MEANS THE WORLD TO ME BECAUSE YOU ARE LITERALLY ONE OF THE BEST GIFMAKERS ON THIS SiTe I’M SO SERIOUS THE FACT THAT YOU SENT THIS ASK 💝💕💞💓💗💖💝💕💞💓💗💖💝💕💞💓💗💖💝💕💞💓💗💖💝💕💞💓💗💖💝💕💞💓💗💖💝💕💞💓💗💖💝💕💞💓💗💖💝💕💞💓💗💖💝💕💞💓💗💖 THANKK YOUUUUUU!!! YOU PURE TALENT!!!!!
2 notes
·
View notes
Note
Hi! Sorry to bother you, but I would like to know if you would be open to explain how you make gifs? I was trying it for myself, but it ended up being worse than 280p lol, therefore useless. I hope I'm not annoying oof.
you’re not annoying at all love, i’m sorry for the long wait! i’ll try and ramble about my giffing journey a little which might be of help
first thing is that i only gif on my laptop, i know it’s becoming more popular to work from phones on tumblr, but i personally think you can always see the quality difference. next key is to download high quality videos. 1080p (i don’t even try to gif 720p anymore). i use 4k video downloader. important tip is that if a video is in 4k on youtube and you want to download it, you need to change the format from mp4 to mkv. or else you’ll just be downloading the video in 1080p (which is also fine, but 4k is even better).
The only thing with 4k videos and the mkv format is that you can’t directly import it into photoshop. that’s why at the start of this blog i only giffed videos and fancams in 1080p, even if there was 4k available. at the start i also didn’t gif performance videos from music shows/award shows, and that’s because without a ts file, the quality of the gifs isn’t going to look good. so i first familiarized myself with giffing other nicer quality videos from youtube (fancams, ads, etc).
only later on i started learning on how to use avisynth/vapoursynth, and that’s when i started giffing music shows, because i was able to use ts files. i really recommend doing the same thing (familiarizing yourself with giffing non music show videos first). and then, if you’ve got some time on your hands, learning how to gif using avisynth/vapoursynth.
before you’re there though, something that can make your gifs look much nicer is topaz clean and topaz denoise! i believe you can download the trials from the official site here, and then it’s pretty easy to google for a key that will make the version permanent instead. otherwise just google on topaz tutorials and i’m sure a bunch of stuff will come up!
This whole thing probably made no sense lmao BUT i’ve got something for you that will help you out for sure! a network i’m a part of from my other blog made a resource blog @bt21help, and their gif tutorial is AMAZING, everything you need to know is in there. i wish their tut had been there when i first started out lol
1 note
·
View note
Note
hi! i just got into gifing and im having a lot of uhh trouble! do you have any tips or a general process of how you gif?
hi, welcome! :) so I’ll preface this by saying I don’t use photoshop/topaz (yet) so I unfortunately won’t be much help there; I’ve personally found a process that I find sufficient enough and is relatively efficient
tools:
savefrom.net for video downloading (you can just google for vlive, twitter, insta download sites)
gfycat for figuring out timing
ezgif for gif creation
vapoursynth for processing live stage videos
tips:
download high quality videos
for live stages, use vapoursynth/avisynth and .ts files (you can find them on twitter or sites like kpopexciting)
slow gifs down - the normal speed at which people move/talk is actually quite fast in gif format lol, but don’t overdo it
coloring - you can probably do a lot more via ps/topaz but typically increasing saturation and contrast is already a dramatic improvement
size - anything over 3 mb in size won’t load on tumblr
beyond this, honestly the best way to get better is to (1) look at gifs you like, figure out what you like about them, and guide your creation process that way, and (2) keep practicing! I’ve been making gifs for over 1.5 years now so I’ve learned a lot along the way~
hope this helps somewhat and please feel free to ask more/reach out off anon if you need more help :) I have a lot more I can share tbh
23 notes
·
View notes
Last Seen Blogs

caylatechsworld
Untitled
bibliophilicpotato
Apurva Mula ✨

survivorwakea
Celestial Survivor: Wākea

apossessionaday
A Possession A Day
loveyour-selfs-world
me myself