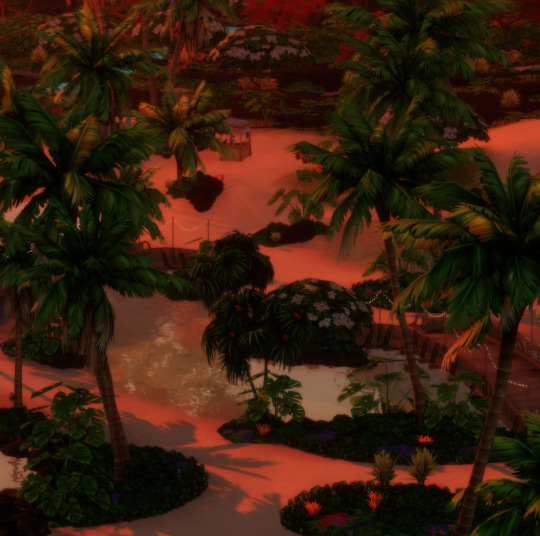
#gshade tutorial sims 3
Text
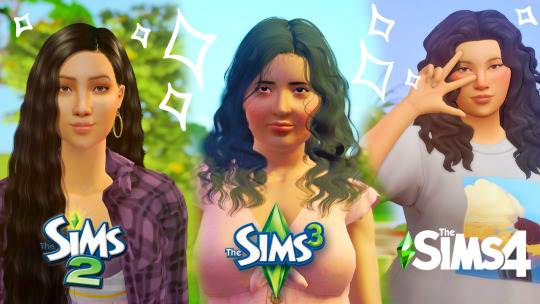
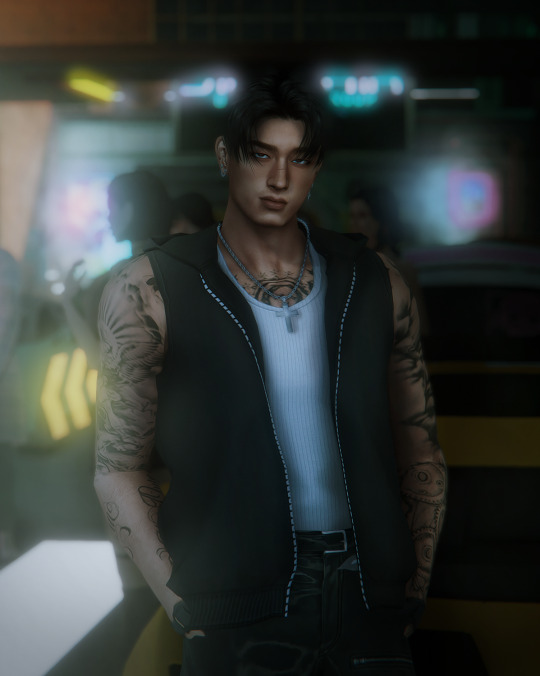
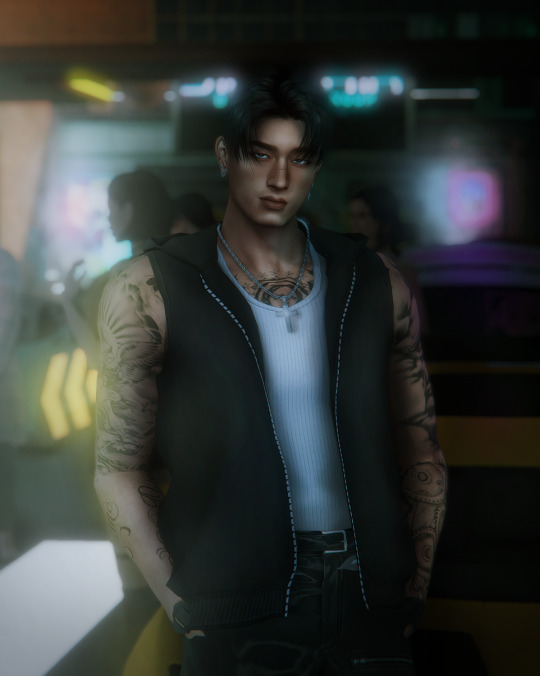
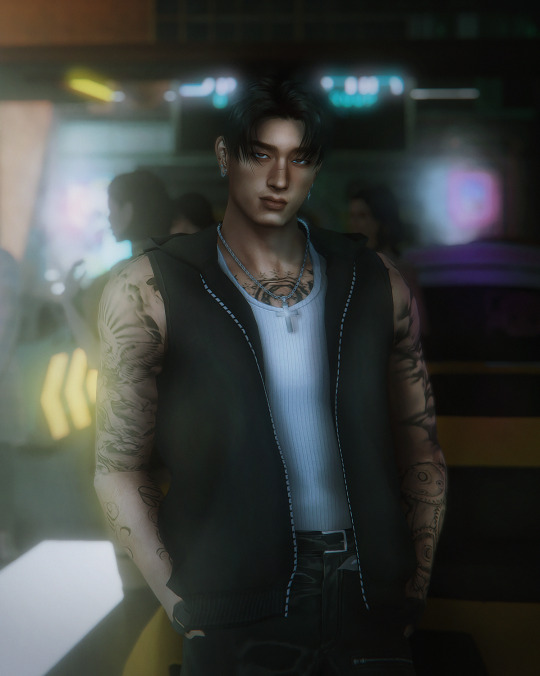
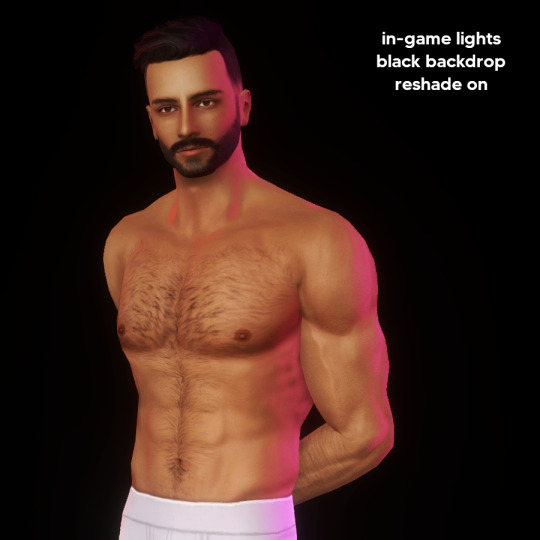
are you tired of reshade and the way it bullies you? WELL ITS TIME TO MEET MISS GSHADE! If you want a hassle-free way of giving your games a lil more life~ is time to check out this gshade tutorial ♥
✨check out the new girl in town here✨
#ts4#the sims 3#the sims 4#ts3#the sims 2#ts2#gshade tutorial sims 4#gshade tutorial sims 3#gshade tutorial sims 2#girl gamer#sims youtuber#youtube sims
239 notes
·
View notes
Note
can you share how you got gshade to work in ts3? i can't get it to run and i dont know why D:
Hi ☺
I honestly kinda just followed the instructions. But I'll show more or less what I did under read more. Please note that I am not an expert at the installation or tutorials!
FIRST COLLECT ALL YOUR RESHADE PRESETS AND PUT THEM IN A FOLDER IN YOUR DESKTOP for later use :) !
I used the windows installer, put my setting to English.
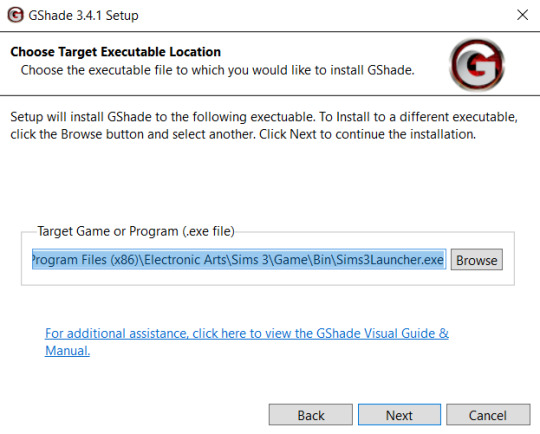
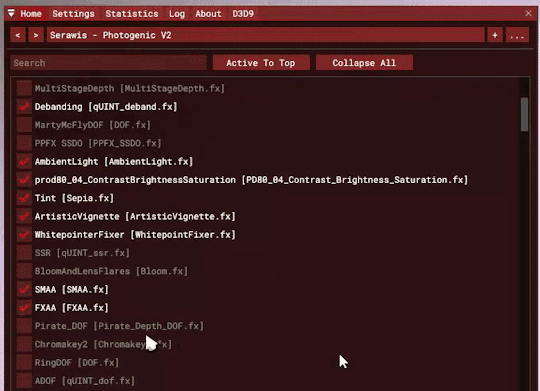
When it asks you to choose a target executable location, you want to choose the .exe file of the sims 3. In the picture below you can see which one I chose Sims3Launcher.exe AND later on I add TS3.exe. For now choose only one of the two, we can add the other one later on.
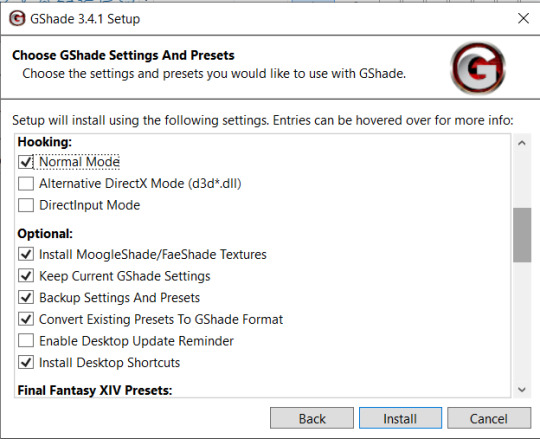
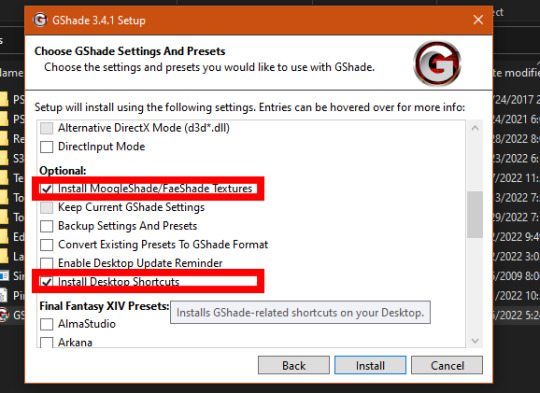
Then it's going to ask you to select what setting you prefer. Below are the ones I put. I also selected all the Final fantasy presets as well!
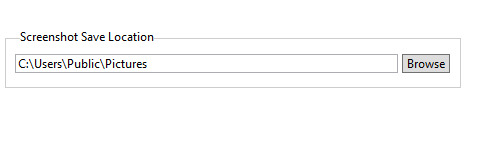
Then I clicked install and waiting for the installation to be complete and clicked next. The next step is to choose where you want your screenshots to be saved. I used the Bin folder like previous reshade settings had it, but this is personal preference.

AND WITH THIS INSTALLATION SHOULD BE DONE!!
Now to be on the safe side, lets open up the Gshade Control panel, and click the Installations tab to the left side of the panel.
You will notice I have 2 .exe files in the installations, if I'm being honest I don't know which one is the correct one so I kept both.

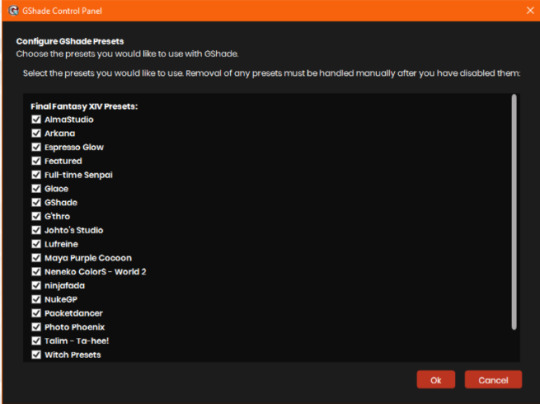
Click the setting tool and select all the presets or just the ones you like and then click ok. To add another .exe file click ADD NEW. It's going to take you back to the installation screen where you need to click UPDATE PRESETS button next to the ADD NEW button.
Now I had to convert my old reshade presets into gshade presets. So I gathered all my old reshade preset in one folder. Then in the gshade control panel, I went into the Tools tab on the left side of the screen. I clicked LAUNCH CONVERTER.
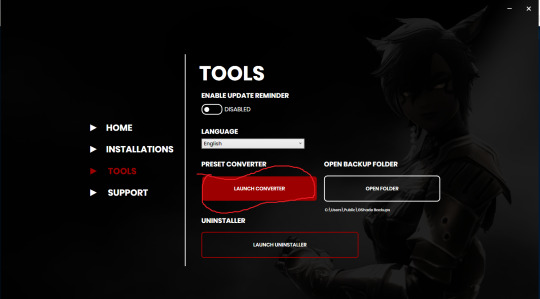
Then you look for where you saved all your Resahde presets so it can convert them :)
After this you should be able to load your game and gshade with no problems. If the loading bar below doesn't show, we did something wrong 😓
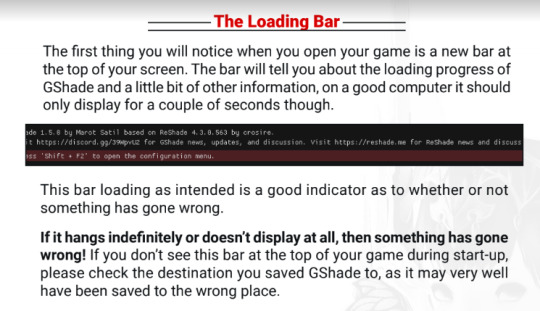
If the loading bar above doesn't show, we did something wrong 😓
Try pressing shift + f2 to see if the gshade interface show up, if it doesn't we might have missed a step!
73 notes
·
View notes
Text
MAC USERS: have you ever figured out a way to use reshade or gshade with your game? information about wether this is possible for either software is extremely conflicting so pls respond if this sounds like you
#the sims 4#ts4#i’ve made multiple reddit posts and posts here and every time people without fail just say#‘yes it’s possible’ or ‘no it isn’t’ and i actively want to bang my head into a wall PLEASE SAY MORE#i have a virtual machine with reshade and the sims installed and apparently that doesn’t work#apparently the convoluted ass way to make gshade work is no longer supported#but i can’t find a way to verify any of this it’s just reddit comments#and 90% of the reddit comments are from windows users being like ‘oh idk just find a tutorial’ kys#AND everyone being like ‘just use lighting mods’ i can change saturation etc in 3 seconds in any editing software. i want the mxao shadows 😭#anyway if you have any tiny shred of knowledge about this i would love so much to hear it#milk text
0 notes
Note
hiya! any tips on creating an immersive save that will attract not only you as the player but others as the viewers? your aesthetic is stunning and im so obsessed with everything you do!! <3
oh wow, this is a super sweet ask, @plumday.
let's see. I interpreted this as an ask about how I setup my sim save in a way that engages me. Hopefully this is helpful!
Setting Up TS4 Gameplay

Revamp Sim Worlds
BRAVE THOSE LOADING SCREENS and leave your residential lot! (I promise it's worth it)
NEW LOTS - Each of my worlds have been renovated with lots I handpicked from the gallery - too much work? I recommend using a savefile! Here are some of my personal faves @ratboysims 1, @down-in-simsland 2, @folkling 3 & @sweetbeagaming 4.
RESIDENTIAL RENTAL - these lots help make the world feel more dense and lived in, plus condensing the local households to 1-2 lots leaves room for more non-residential lots to explore with your sims.
WORK AND SCHOOL - I recommend placing offices, schools, and daycare lots. These combined with a few mods (semi-active custom careers and Zerbu's go to school mod 2) and clubs are something I really enjoy.
Set Up Clubs
I really like @sojutrait's tutorial on how to use clubs to enhance your gameplay and is a MUST HAVE in my humble opinion. I usually have a family chore club, work clubs, neighborhood clubs, extended family clubs, etc... and it's so nice to click a button suddenly there are sims there making my game more lively.
To have more than 3 clubs per sim, I use this mod maintained by @kingzaceofsims.
I also use custom club activities so sims (MOSTLY) behave how I want them to. @srslysims has tutorial on how to make your own.
To be able to have club gatherings in vacation worlds I use this mod. It was helpful with sending my pixel kids to camp.
Set Up the Calendar
@aliennooboo made this AMAZING tutorial on setting up your sims calendar that I just adore. I find this helps me remember to do things with my sims and helps change up their day to day life.
Playing
ROTATIONAL GAMEPLAY - I find this keeps me engaged and prevents boredom. It keeps things fresh and allows me to explore different stories. Here is a great resource to get started!
GAMEPLAY MODS - I find adding various mods keeps my gameplay fresh and interesting. I recommend these creators (1, 2, 3, 4 & 5) in particular.
Screenies
POSES - As a gameplay person, I try to use poses sparingly. It disrupts the game for me but I find sometimes I can't convey what I want to without them, so I try to only use a few. This is what works for me, please do what works for you. Shout out to all the storytellers blogs, though, that keep me fed.
RESHADE or PSD files can add some fun color and effects to screenies. ONLY edit as much as you want to. I felt a lot of pressure to get better at this and I am finally finding the balance of how much and what kind of editing I actually like to do. I have collected reshades/gshades and resources here.
House Keeping
Keep back ups of your trayfiles, screenshots, households, lots, etc 'cause it's sims, things break and go wrong.
Keep your CC and mods organized otherwise fixing your game is a hug pain.
Reblogs and additional tips and recommendations welcomed!
HAPPY SIMMING!
340 notes
·
View notes
Text


summer daze. gshade preset
i know i say this about every preset i put out but this is truly my favorite preset i've ever made. i've been using this as my personal gameplay preset for months now and finally perfected it enough to release. i hope you all love it as much as i do.
preset made using gshade version 4.2.2 (unsure if it is compatible with reshade).
INSTALLATION TUTORIAL: anything not mentioned in these videos i unfortunately can’t help with but this video shows how to install gshade + presets.
How to Make The Sims 4 Look Better! (GShade Install + Tutorial/Presets/Lighting Mods)
IMPORTANT: i use lighting mods/terrain overrides in my game. without those there is a chance your game may look different then mine. i will link all lighting mods/terrain overrides below.
sunblind, no blu, no glo, tech-hippie terrain override
TOGGLE KEYS: ADOF on/off (shift + 3)
FILE LOCATION: C:\Program Files (x86)\Origin Games\The Sims 4\Game\Bin\shade-presets\custom (origin users)
C:\Program Files\EA Games\The Sims 4\Game\Bin\gshade-presets\Custom (ea app users)
TOU: do not reupload and claim it as your own. do not use it as a base, tweak, it and try to claim it as your own. tweaking for personal use is completely fine. i hope you enjoy this preset. if you use it make sure to tag me so i can see 🤭
download (free)
@mmfinds @emilyccfinds @mandy-ccfinds @harperelya @maxismatchccworld @sssvitlanz
#gshade#ts4#sims 4 cc#sims 4 download#ts4 download#the sims 4 cc#gshade preset#the sims 4 download#ts4 cc#ts4 cc finds#ts4cc#s4cc#s4 cc#ts4mm#sims 4 custom content#my cc
551 notes
·
View notes
Text
hello friends! 🌷
recently i got an ask on how i edit my instagram screenshots and here in gemville, all you have to do is ask and you shall receive my child
fun stuff under the cut!
this guide will be divided into two parts: how i take & edit my gameplay screenshots and how i edit my simstagram posts

before we get into the actual tutorial, here are a list of things that i use to help me take better screenies :)
gshade
i'm using an older version of gshade because - thanks to my procrastination - i never updated the version before everything went to shit.
2. presets!
i switch around between presets a lot lmao but for the most part, i use ellcrze's gshade preset for my family dynamics save, sunset n vinyl for my globetrotter save & sim download pictures and a modified boho dreams for my tjol legacy save (first post coming up soon!) sometimes i use lithium for cas pics too :p click here for a somewhat detailed explanation lol
3. tab mode camera mod
this camera mod is a godsend and makes taking screenshots soooooo much easier! 😌 i highly recommend getting this mod!!!

i think i mentioned this before in an ask - i edit my screenshots in photoshop before posting them on tumblr :D i don't really do much, just running a few actions and cropping my screenies. gshade does most of the work for me lol
this tutorial by @buglaur is insanelyyyy helpful omg i based my entire editing process on her tutorial, except for the colouring part because i'm lazy hehe
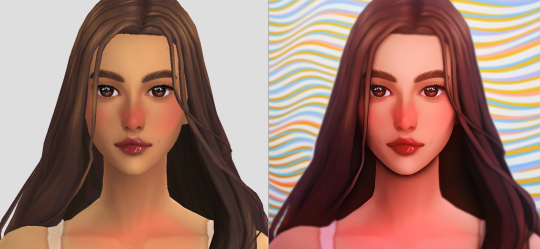
here's an example of my screenshots before and after editing (cropping the screenshot and running some actions)! there’s not much difference because as i said earlier, gshade will basically carry your entire editing process 💀

sometimes i put text in my pics like these screenies below :) i mainly use these two fonts - winkle and lemon milk :D
and that's about it for part one! now it's time for

here's what you neeeeeed
1. photoshop
i'm using a 🏴☠️ version of photoshop that i got from a somewhat sketchy website but it runs great so i'm not complaining 💀
2. instagram post template and instagram story template
a HUGEEEE thank you to @windslar for sharing the instagram story template link 😭 she is such an inspiration to me 💛
3. the actual instagram app
this is how i add text and emojis to my simstagram posts lol
disclaimer: i am NOT a photoshop expert. there's probably an easier way to do what i'm about to show you, but this works for me and i don't really mind the steps hehe
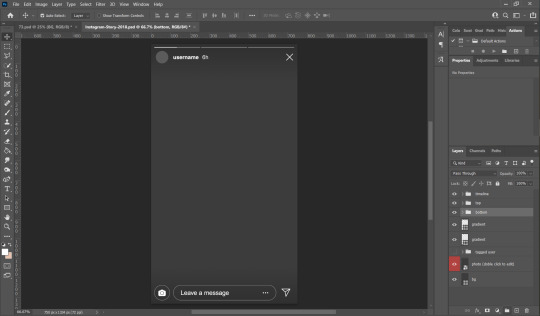
first things first, you're gonna want to open the psd files on photoshop and it'll look like this, depending on which file you opened
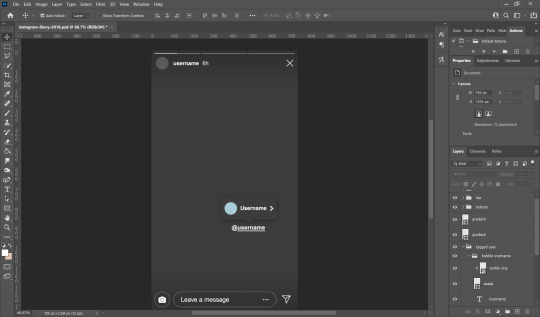
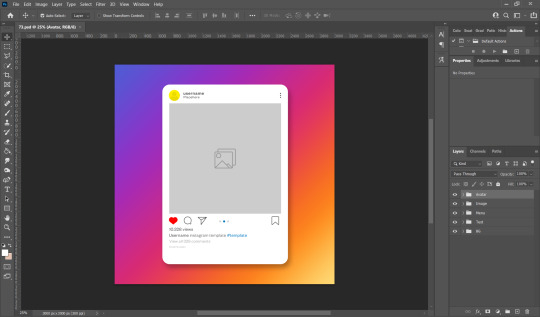
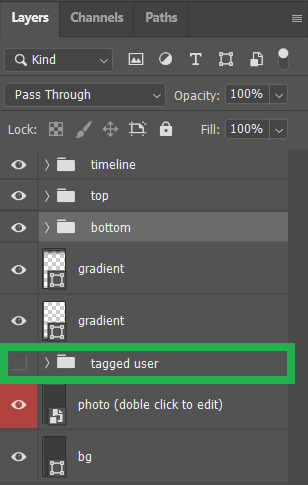
i usually just hide the layers that i don't need so in this case i'll hide the tagged users layer from the story psd and the bg layer from the post psd.

these are the layers that i hide but you can also leave them on if you want hehe totally up to you my dude. then you'll end up with something like the pics below

now we move on to the profile pictures! so what i do is i click these layers (shown below) and go 'file > place embedded > selected picture'

once you do that, you'll end up with something like this (below)! use 'ctrl + t' to resize your picture to fit into where the profile picture would go.
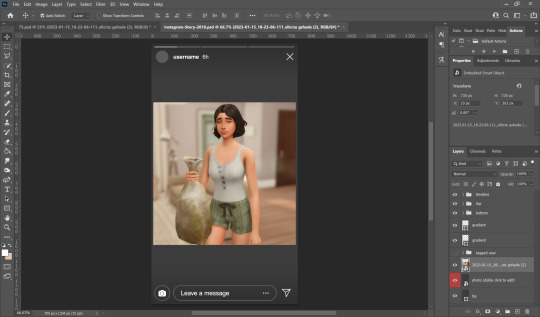


right click on the layer of your selected picture and click 'create clipping mask'. then you can hit 'ctrl + d' to adjust the picture to your liking!
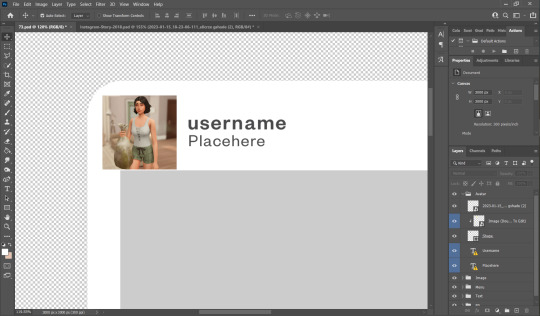
now for the actual pictures for the posts. click on these layers (shown below) and go 'file > place embedded > your selected picture'


now all you have to do is 'ctrl + t' to resize your pictures, right click on the layer of the selected picture and click 'create clipping mask' then 'ctrl + t' again to adjust the pics!
after this whole process, i'll export my pics to my family dynamics folder on my desktop and queue it up on tumblr! :D sometimes my simstagram story posts have text and emojis like these ones below

all i did was upload the pics to google drive, download it to my phone, add text/emoji on the actual instagram app then saving the story to my phone... a lot of work but i don't really mind <3
aaannnnddd that's it!!!! i can't believe i made this guide 😭 hopefully this helps :D english isn't my first language so apologies for any grammar/spelling mistakes i've made in this post 🙈 feel free to ask any questions and i'll try my best to reply to you asap!!
165 notes
·
View notes
Note
Hellooo 🥺 I wanted to know if you have followed a tutorial to make the last gifs? Or would you show how to make them? Than you so much 💕
I didn't follow any specific tutorial, I've just made a quick little process after researching how other people on Tumblr make gifs. I can tell you how I do but I would definitely recommend following a tutorial of someone more qualified! lol
Aj's Guide To Sims Gifs
I am going to show you how I made this gif of Wednesday:
You'll need:
A screen recording program; Streamlabs, OBS Studio
Adobe Photoshop (FYI I am using the newest version).
The full tutorial is below the cut.
I promise it is easy, this tutorial is just long because I want to cover all bases, so if you have no idea what any of what I am saying means you can still follow along easily!
Lets get started!
1. Installing Your Recording Programs
You'll need to be able to record your game. Any streaming or screen recording program with work perfectly! I use Streamlabs because that's what I use for Twitch, but OBS Studio will work too! I've used them all, I recommend Streamlabs because it's more user-friendly.
2. Setting Up Your Recording Programs
You'll need to set up a scene in your streaming program that records your display or your game. In Streamlabs you go to the plus bottom beside sources and add either a Display Capture or a Game Capture, select your display or game. Is there a difference? Using game capture will remove any of your miscellaneous desktop UI and you won't have to crop it out later down the line. Despite that being pretty handy, I do display capture because I am difficult. lol If you have questions about this step feel free to send a ask, but I am going to skip over this to be able to go into more detail about the gif-making process.
3. Recording Your Scenes
Now you'll need to record your scenes in-game! I recommend doing this with ReShade or gshade. I use ReShade. Just make sure your lighting is how you like, the time of day is how you like, and have fun!
Tip #1: Save your game before you start recording any scenes. Especially if you are recording gameplay, this will allow you to go back if you miss an animation or interaction. You'll be able to reload your game where you were and you can try to capture the moment again.
Tip #2: Only record for 10-20 seconds at a time. Yes, you'll have a bunch of small recordings and that is what you want. You'll have to import those clips to Photoshop and if they are over 30 seconds they are going to strain your computer and be difficult to work with. Record animations just one time through, and re-record from different angles. This will let you pick from a variety of clips to get the gif you want. For 5-7 gifs I have 15-ish recordings that are about 10 seconds each, for reference.
Tip #3: If you are alpha like me and are plagued by alpha hair vs. MXAO, just be intentional with the hair choices you make because you cannot edit the MXAO out later (I mean you can but it is a lot of fucking work). I have found updos are better at not having crazy MXAO spots. Or opt for using sims with darker hair.
4. Loading and Shortening Your Clip
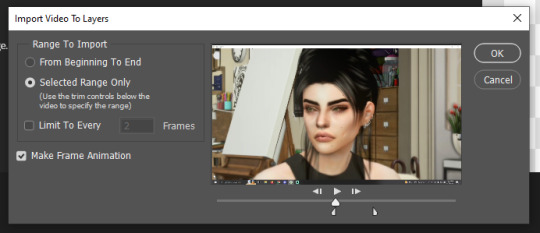
Now, pick the first clip you'd like to convert to a gif. Go to File > Import > Import Videos To Frames and then select the video file for the clip. A window will appear that looks like this:
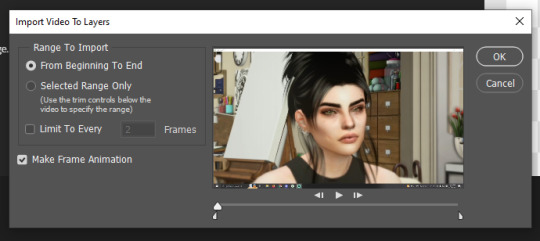
From here you are going to select the exact moment in your clip that you want to use. The two half-sliders underneath the timeline are your start and stop points. You want to move them to just encompass the moment you want to use. Try to cut it down as much as possible to just the moment you need, the longer the clip the more frames, the longer it will take to render and the harder it will be on your computer.
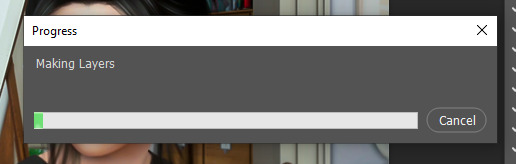
You will know if your clip is too long with this pop-up:
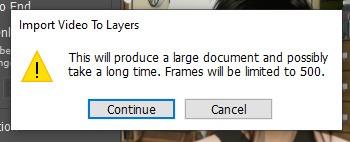
Avoid this!
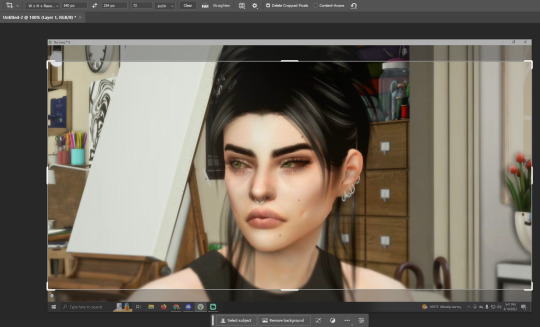
My cut-down clip looks like this:
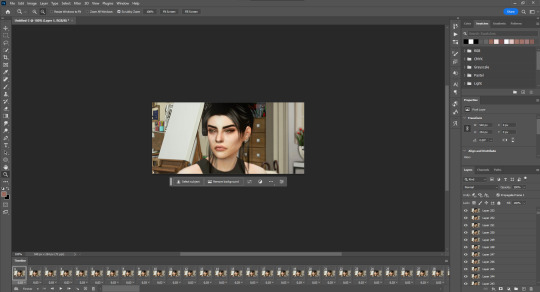
5. Loading In Your Layers & Workspace
Your workspace should look like this!

You should see 100-200ish layers on the right side and a timeline on the bottom. If you do not see the layers on the right side go to Window > Layers, you should be able to see them after doing this. If you do not see a timeline on the bottom, go to Window > Timeline, you should be able to see it after doing this. If your timeline does not look like mine and rather like this:

Don't worry! That's totally fine! If you do want to change it click the three squares on the bottom left and it will show each individual frame.
6. Cropping and Resizing
You want to work with the smallest file possible so you can use the littlest amount of resources and have the smallest file size. This is, one, to reduce strain on your computer but also because Tumblr only allows gifs that are 10MB. We want to keep the gif as small as possible.
First, we are going to crop our gif! In my example, I need to crop out my computer UI. I think long gifs and square gifs look the best, so I am going to crop my long ways.
We also want to resize our gif to 540px. I know people get on me for resizing my screenshots to 540px but this is a MUST for gifs. If not they will be blurry. They are not like screenshots and portraits. In my crop settings, you'll see I have my set to 540px.

That makes the cropping resizing process quicker by killing two birds with one stone. Alternatively, you can crop as normal, and then resize to 540px afterward. I've done both and both get the same result! If your post will have two gifs side by side you'll want to crop your gifs to 268px.
If it takes Photoshop a little bit of time to crop the image, that is normal! Just requires some patience. The same goes for resizing. I've found sometimes resizing takes the longest.
My resized gif looks like this!
7. Editing Your Gif
Technically your gif is done! If you don't intend on editing it you can export it and you're done! I like to do a little editing on my gifs.
To edit gifs you'll need to use non-destructive editing methods, ie. adjustment layers or smart objects but most likely adjustment layers. If you, for example, edit by going to Image > and then adjusting your image, you'd have to do that to all your layers. That's not viable. Instead, you'll want to make a group at the top of all your layers and place your adjustment layers in the group. You can make a group by clicking the folder icon at the bottom of your layers panel. You can create adjustment layers by clicking the half-shaded circle on the bottom of your layers panel.
BE CAREFUL! Make sure you are doing edits on layer 1, if you edit other random layers the edit will only apply to those layers. I've made this mistake a few too many times.
As for sharpening, this is when you'd use your sharpening action or sharpen it yourself. I am going to be using this sharpening action by insomniacgifs. I've used a handful but this is the one I like the most because it converts my layers into a smart object that lets me do more edits later (which I will show you).
All sharpening actions are different so make sure to read their instructions before you use them. Some sharpening actions have a layer limit so they will not work on longer gifs.
To start using insomniacgifs action I have to convert my layers to frames. They have an action for this. I select "Layer 1" and run their "Frames to Timeline" action.

Now my layers are in a smart object!

Smart objects are a non-destructive way to edit and something I recommend using with gifs and your edits. Smart objects also preserve the quality of your images despite you resizing and editing your image.
In regards to gifs, this allows me to use Camera Raw Filter and more heavily edit my gif! All I am going to do is open Camera Raw Filter and edit away! It will apply my edits to a layer attached to this smart object.
After I've done my edits, I will pick which level of sharpening I want to use from insomniacgifs action. I usually pick soft. I am going to press play on the "Soft" action. This does sometimes take a while to load. You may get a progress bar. Just be patient. This may take a few minutes.
Now that the Soft actions have finished, my gif is sharpened! I am extra and want to tweak my gif a little more. After finishing the Soft action all my layers will be in a "gif" folder. Remember how I mentioned before that to edit gifs you want to place a group above your layers and place your adjustment layers inside? I am going to do that now! It looks something like this:

8. Saving Your Gif
Now, finally, we can save! This is the easiest part! Go to File > Export > Export for The Web (Legacy). I window will open that looks like this:

In the top right, make sure the file type is set to GIF. Here you can play your gif and see it in action! Now, this is what I normally notice if I do not like the speed of the gif. It defaults to 0.06 seconds per frame. Sometimes I like this slow pace to get a dreamier gif but with this gif, it's too slow. I will show you how to fix it.
Close this window and go to your timeline. Shift + Left-Click the first and last layers on the timeline. Right-click on the frame duration.

Now click other and change it to your desired duration. For me, that will be 0.03 seconds.
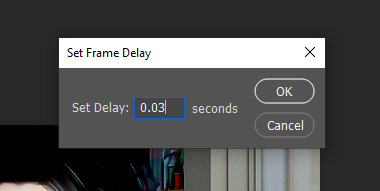
Now let's try to save again! This is the end result!
If you have questions please do not hesitate to ask! I will update this tutorial as people ask questions and clarification is needed! You can always hit me up if you need help!
#Tutorial#Asks#anonymous#Oof this#was a lot of work but I hope it helps you#if you want to learn now to make gifs!
101 notes
·
View notes
Note
How do you get your lighting so scrumptious in edits?
Lighting tutorial under the cut (it's long lol) I use photoshop + topaz clean btw :)
This will be our starting pic!! I use @hazelminesims photoshop action (all in one) to get the smoothening and overall base done first.
First step to colograding is using the 'Camera Raw Filter' in photoshop and adjusting the tint and curves tools. I generally like a greener, more cool toned color for pictures.
2. Now for the shadows on the sim! I make a new layer, set to 'Multiply' and use a soft brush at around 25-40% opacity with the color Black. I generally will add shadows to the parts of the body that are being 'covered' (neck, side of the nose, forehead, insides of arms and clothes). *If you use reshade/ gshade and have the mxao filter on, mimic where that filter adds shadows and either enhance it or add it in photoshop!*

3. In a new 'Multiply' layer, I do the same thing with the background. I darken the elements in the back to emphasize that my sim is in the forefront of the shot. TIP: don't add shadow to the light sources (neon signs, lights in the background) ! We actually want to enhance those.
4. Make a new layer, set to 'Pin light' at 100%. Grab a soft brush and highlight those light sources in the back. You can go crazy here, just take the Eyedropper tool to color match the highlights you want to emphasize. It might look a bit much right now, but we can tone this down by decreasing the layer opacity, Gaussian blurring the layer, and erasing any excess highlights if we want.
5. Now we add highlights to the sim. I make a new layer, set to 'Soft light' at 100% opacity, and with the white color, I highlight the sims body and clothes. (Now we want to add light to the 'raised areas' such as the center of the forehead, nose bridge, chin, chest, and arms). I also like to highlight any jewelry (necklace and belt buckle).
On a separate new layer, set to 'Vivid Light', I changed the brush colors to the ones in the background light sources (I used blue, yellow, and purple.) I'll go over the outlines of the sim's body with these colors (shoulders and arms, hair, side of face and neck.)
If you ever feel like you've gone overboard, just lower the opacity of the highlight layers and Gaussian blur them!
6. After you've messed around with the highlights, add the finishing touches. Usually once I merged all the layers I would go over with the Dodge and Burn tools to enhance the contrasts even more. I also recommend downloading and using LUTs for photoshop (I just use any free ones I find online).
82 notes
·
View notes
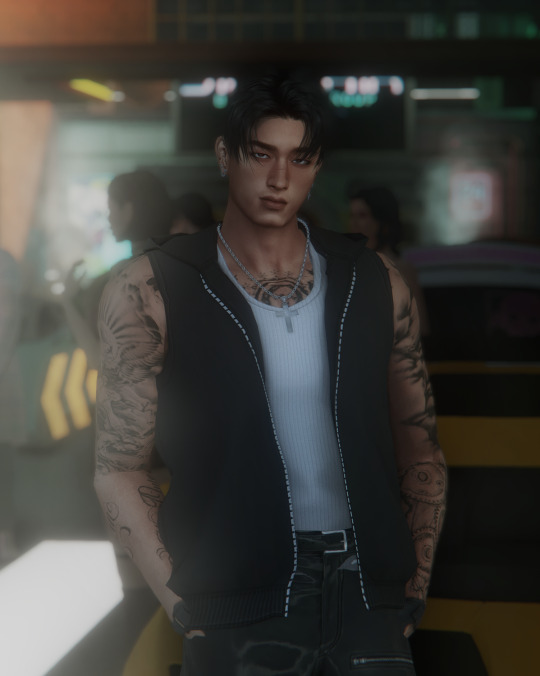
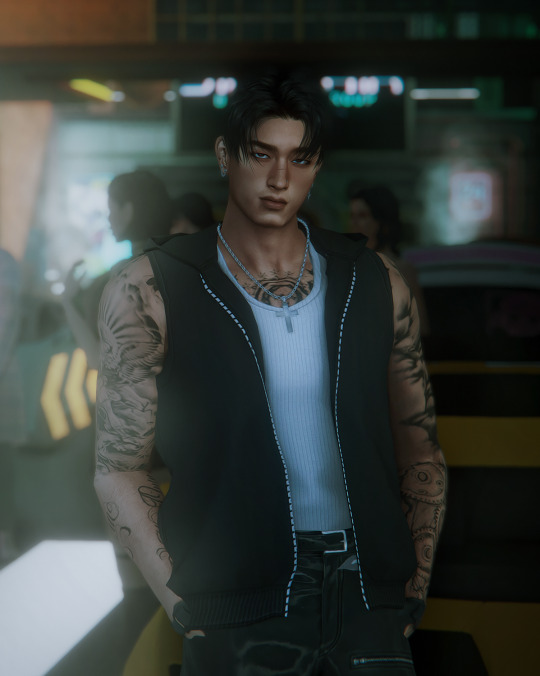
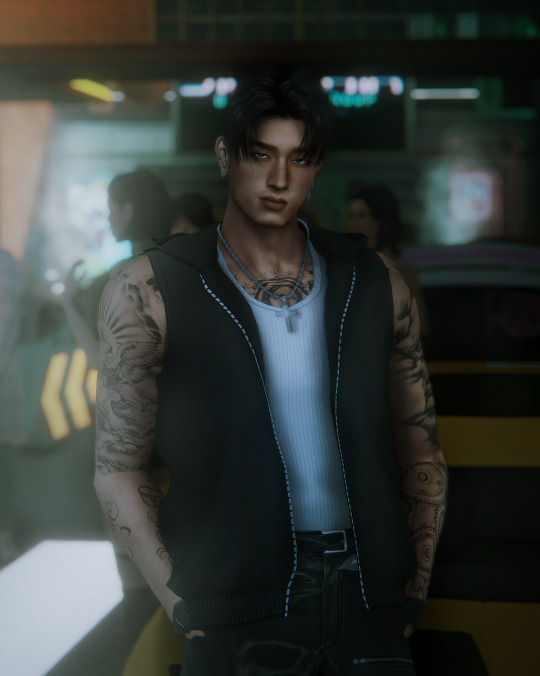
Photo
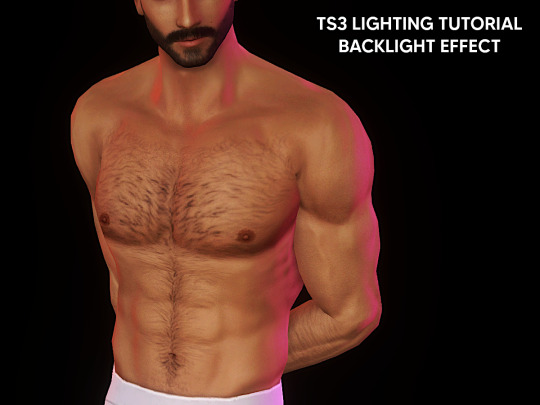

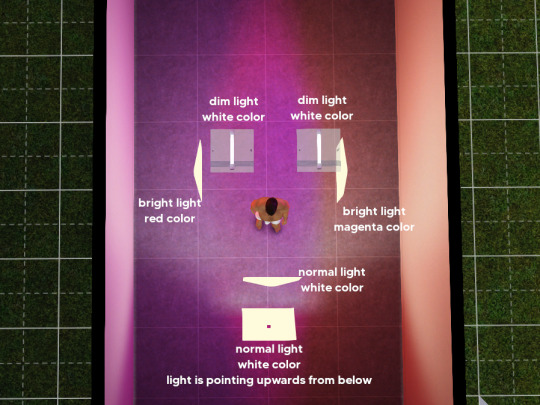
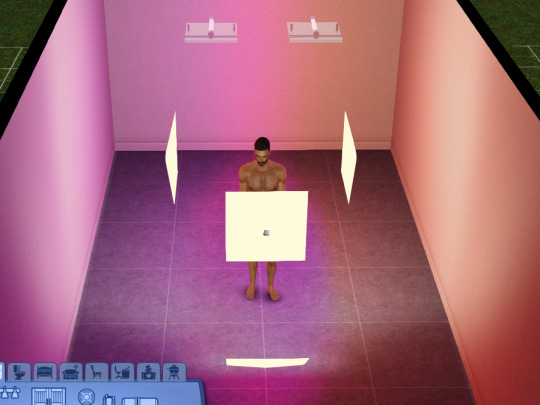
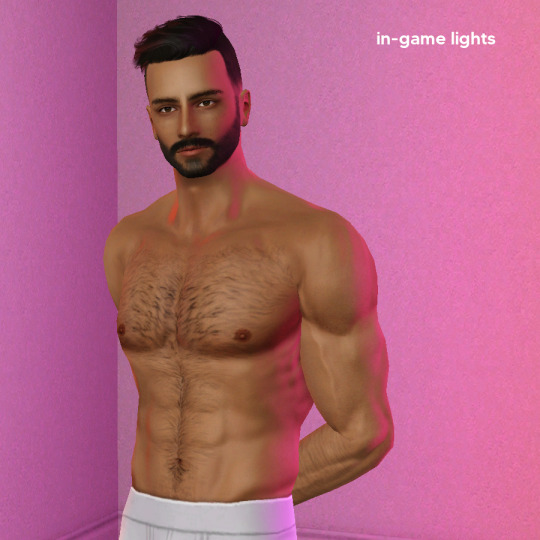
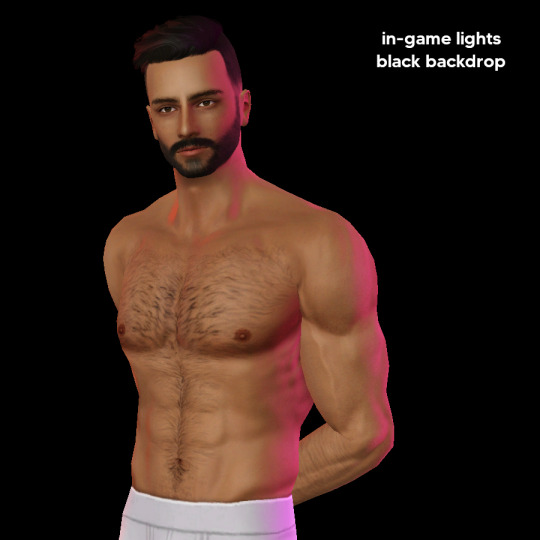
TS3 Lighting Tutorial: Backlighting
A cool lighting setup I came up with for photo studio portraits!
Inspired by @rebouks and @tau1tvec TS4 CAS lighting mods ✨
You need:
Buhudain invisible lights (I always use the “wide spot” versions)
Murano photo backdrop
Pose Player & some poses of your choice
Reshade, Gshade, or a photo editor of your choice
1. Build a closed rectangular room with a roof covering it. Pose your sim and put them in the center. (Use the moveobjects on cheat.)
2. Position the lights as shown in pic 3 and 4. You can adjust the light color and intensity in Live Mode by clicking on them, or Ctrl + Shift + left click on them in Buy Mode.
3. Recolor the photo backdrop to pitch black, and put it around your sim to make sure the room’s walls are not visible. Use more than 1 if necessary, they seamlessly intersect. Murano’s photo backdrop is also technically a light, so make sure you either turn it off, or play around with the light’s color and intensity to create an effect you like.
4. Find a good angle, turn your Reshade/GShade on, and snap your pic. Adjust the contrast, brightness, exposure, and color settings in a photo editor to make it pop even more. You can download my Reshade preset on my downloads page if you want, it works in Gshade as well.
What does each light do?
The white-colored lights are there to provide a general brightness to the sim and the room, and to offset the intense colored lights. Without the white lights, the sim would be completely lit in red & magenta. You can turn up the intensity, or add more white lights if more brightness is needed.
The red and magenta-colored lights are there to provide intense color on the side and outline of the sim, for a neon backlit effect.
Tips
- You can play around with each light’s position, intensity and color to create different effects. For example, you can remove some lights on one side of the sim to create more dramatic shadows. Or remove some white lights so that the colored lights are stronger.
- You can make the colored lights monochromatic, or you can pair them in analogous colors (i.e. red and orange, red and magenta), or you can pair them in complementary colors (i.e. red and green, blue and yellow).
- In Buy mode, hold the Alt key, and click and drag your sim to rotate them in small increments, to make sure the light hits them exactly right.
I hope this tutorial gives you some fun ideas for taking pictures! 💗
#idk if i like this beard on him :/ im so not used to it#the sims 3#yes the m*le n*dity was necessary
397 notes
·
View notes
Text
Tutorial to switch from Gshade to Reshade for ts4
The original tutorial for switching to reshade is for ffxiv, and there are some minor differences for the sims 4, so I figured out I can show you how I switch to Gshade for ts4! Credits to op for sharing the original tutorial for ffxiv.
This is intend for those who want their Gshade presets to look exactly the same on Reshade.
I’m not here to inform why you need to switch to Reshade and force everyone to do so. If you wish to know more about the situation, read this and this). Gshade still works if you’re not on the newest version (4.1.1), and is pretty much safe to use at the time writing this tutorial. Feel free to continue using it if you’re aware of the risks.
1. Backup your preset and shader folder
Go to “Documents/The Sims 4/Game/Bin/Gshade-presets” and “Program Files/GShade/Gshade-shaders” to back up respective folders. Lost/deleted your “Gshade-shaders” already? You can grab it here.
**If you use custom shaders downloaded separately (not from the Gshade program itself, e.g. full bloom multiLUT by picture amoebae), then copy the Gshade custom shader folder as well. (I’m not sure about the location, since I don’t use custom shaders and I’ve uninstalled Gshade already. Gshade should have created a shortcut on your desktop, or you could probably find it in “Program Files/GShade/” as well.)
2. Uninstall Gshade
Run Gshade uninstalled in “Program Files/Gshade/Gshade Uninstaller”, then go to your game folder and delete “d3d9.dll”. (Or “d3d9”. If it doesn’t exist, don’t worry. When you install reshade, it’ll tell you if there’s any file interfering the reshade installation.)
3. Install Reshade
Install whichever Reshade version you’d like to use. Run the exe file, choose the sims 4, then direct X9. Only check “standard shaders”.
4. Replace shaders and presets folder
Replace the content in “Reshade-shaders” in your game folder with those in “Gshade-shaders” you backed up in step 1. Copy and paste the “Gshade-presets” into your game folder, then change the name to “Reshade-presets”.
**if you use custom shaders, paste the content from “Gshade-custom shaders” to “Reshade-shaders” as well
5. Delete Gshade folders
For some reason, your GShade folder may still be there even after the uninstaller told you that the files will be deleted after restarting your pc. Go to “Program Files/Gshade”. Check if it’s still here and delete it manually if it is.
6. Edit global preprocessor definitions
Your MXAO & DOF shaders don’t work? Your game turned into a horror movie like this?

Don’t worry, after you start the game, press “numpad 7” to bring up the menu. Go to edit global preprocessor definitions, change “RESHADE_DEPTH_INPUT_IS_REVERSED” to 0.
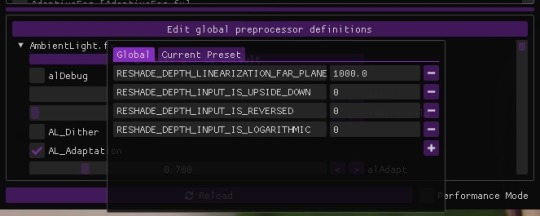
Voilà! These shaders should work again!

Congratulations, your Gshade presets now work on Reshade! If you have any problems feel free to pm me<33 (I’ll respond faster on my instagram)
#I’m too new to tumblr and idk why the spacing looks so ugly on mobile#pls forgive me#sims 4#the sims 4#ts4 gshade#ts4 reshade
125 notes
·
View notes
Text
INSTALLING GSHADE
FOR THE SIMS 3//
This tutorial only covers where to get it, and how to install it for The Sims 3 specifically, and add presets to the presets folder.
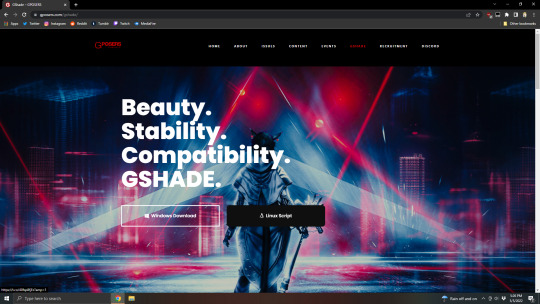
So to begin, download the GSHADE installer here.
I use Windows, so I downloaded that one.
Then go to wherever you downloaded it to, and click/run GShade.Latest.Installer.

Select your language, then in the License Agreement screen, hit I Agree.
Then, in the Choose Target Executable Location window, click on Browse, then navigate to your install folder.

Mine was installed with Origin onto my "F" drive, so I navigated to SSD(F:) > Program Files (x86) > The Sims 3 > Game > Bin. This path will be different for everyone, especially if you got your game off of Steam, or by other means.

In here, you need to find The Sims 3 icon that has the biggest file size, for mine, it's TS3, so I chose that.
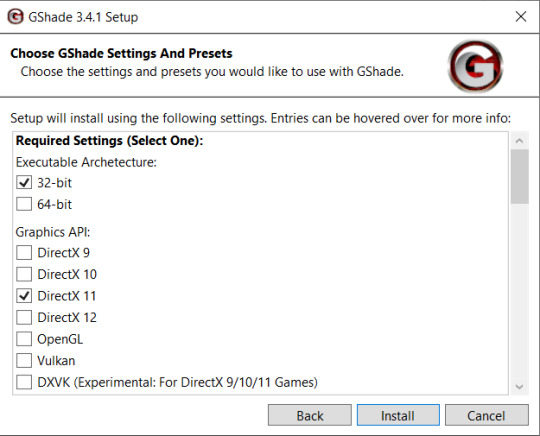
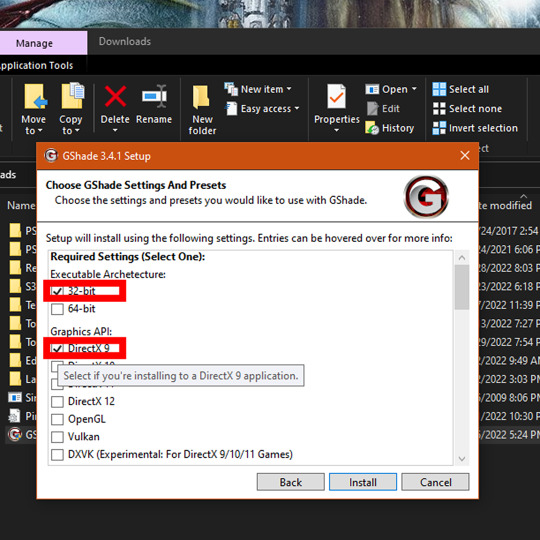
On the Choose GShade Settings And Presets screen, tick the 32-bit box, and the DirectX 9 box.
Then under Hooking, I just ticked Normal Mode.
Scroll down some more and you'll get to the optional settings, so if you're trying to convert Reshade presets to GShade, you might wanna look into that more, I don't really have any I want to convert, so I suggest you look up a more detailed tutorial on that or check out the GPosers site for more info on how exactly that all works.
So for a fresh install we'll just stick with these boxes, but mainly the last one because it adds an icon to your desktop for an app that makes installing GShade binaries into your other games a lot easier, and also uninstalling them as well.
Under Final Fantasy XIV Presets you can tick any and all you want, they're presets created by Final Fantasy XIV players that are preloaded and ready to use if you wish.
When done, click Install.
Then wait until the green progress bar is full, and the Next button is no longer grayed out, then click that.
In the Installation Complete window, it'll give you an option to change the save location of any screenshots you take using GShade, similar to Reshade, feel free to change it, but if you're fine with what's already in the box, just click Finish.
Now to install any presets you've downloaded, like my Pines preset, it's as simple as moving the config file you downloaded to your Program Files (x86) > The Sims 3 > Game > Bin > gshade-presets folder, so in other words, it'll be in the same folder as those icons you navigated to earlier.
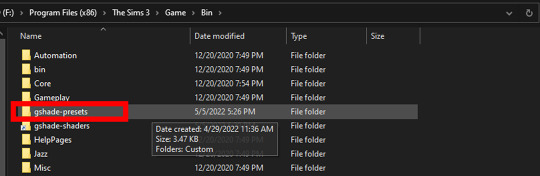
Open the gshade-presets folder, and throw the preset in there, and you're good to go.
When you launch The Sims 3, a little window will pop up at the top telling you, you were successful.

Follow its instructions to continue onto the the UI screen.
GShade looks and works exactly like Reshade, so if you're familiar with Reshade 3, 4 or 5, you shouldn't have any issue working the rest out from here, and if you're not familiar with them, there are tons of tutorials on how to use the UI, switch presets, and create your own presets, and use the shaders. Even if it's a tutorial for The Sims 4, it will work the same for The Sims 3, it all works about the same in every game, that's the magic of Reshade/GShade.
Happy Simming!
467 notes
·
View notes
Text
how to take screenshots using nvidia geforce experience
first off I wanna apologize for the image quality lol I had to use my phone to take a photo of my computer screen because taking screenshots would disable the GeForce Experience overlay. secondly, I’m gonna shorten it to GXP because I am Lazy.
anyways, here we go, all details under the cut so I don’t clutter anyone’s dashboard.
also I’m gonna assume you know how to pose your sim, use gshade, all that good stuff, cuz that’s not what I’m here for, there are plenty of other tutorials for those, love you tho.
so we wanna start off with pulling up the overlay with Alt + Z, and it’s gonna look like this:

so these are all the things you can go with GXP, take screenshots, record, etc. the overlay is mostly useful for pulling up the settings bc you can set keyboard shortcuts for other stuff. so that’s what we’re gonna do now, open the settings.

bam, settings. there’s tons of stuff you can do in here, notably change the shortcuts (I keep the defaults). what I’m gonna show you how to do real quick is change where you save your captures, because it can be a little weird since screenshots are saved in the same place as the recordings (not sure if you can change that, I haven’t found a way to do so).
so just click on recordings, and click the 3 little dots shown below to set it to a different file path if you want to.

ok, now to actually TAKE the HQ screenshots.
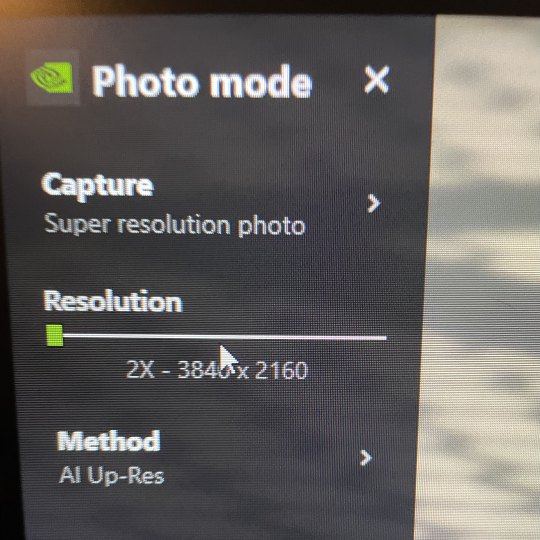
Alt + F2 is the default shortcut for pulling up the “photo mode” overlay, and it’ll look like this, on the side of your screen.
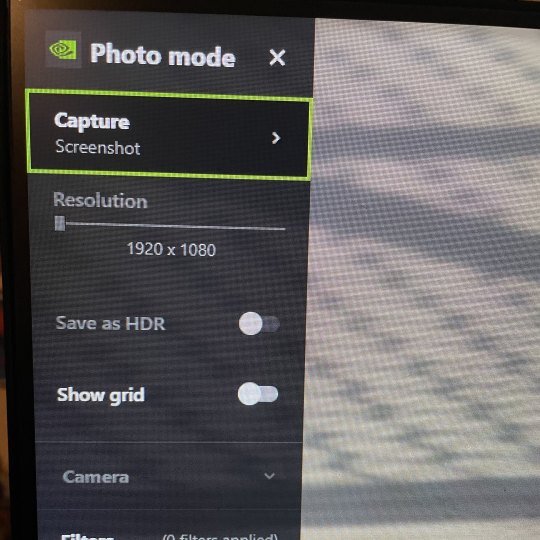
the settings above will take a normal screenshot with your native resolution, but that’s not what we want, so we’re gonna click on capture > screenshot (as shown above) and select super resolution (as shown below):
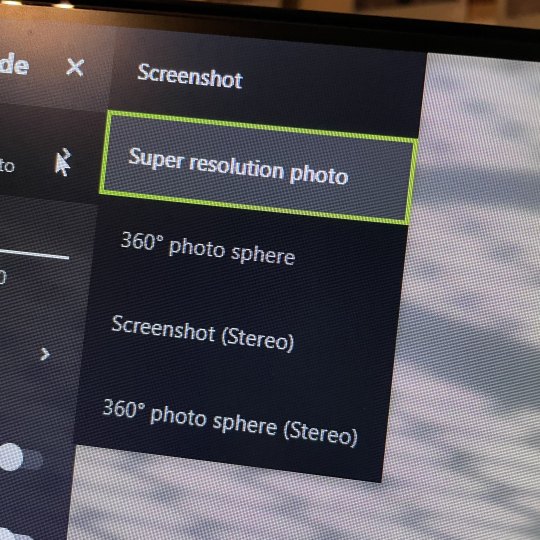
with super resolution enabled, you’ll be able to scale up the image render resolution to either 2x or 4x (maybe you have other options depending on your specs, idk, just know that the higher you go the longer it’s going to take).
and then bam, just click snap (unless you want to mess with the filters, that’s an option, I find it unnecessary bc I already use gshade but hey, do whatever ur little heart desires)
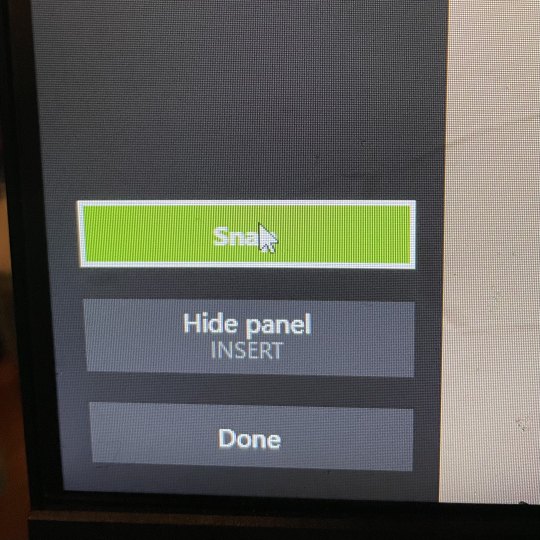
once you snippity snap that pic, you’re gonna get a lil load thingy:

it might take a few seconds (again, depends on your pc specs) and like i said earlier, the higher the resolution, the longer this part is gonna take. ultimately, it is a slightly slower process than using SRWE but it’s one that has less issues, more official support, and you don’t need an external app for it since it comes with your PC and is just an overlay. also it doesn’t crash your game lol.
recording is easier though you just click record (or the keyboard shortcut, default is Alt + F9), click again to stop recording, and bam you’ve got yourself a lil video of whatever you want.
ok love you guys hope you enjoyed this tutorial hope it helps u etc mwah
(OH IF YOU’RE NOT SEEING THE SUPER RES OPTION YOU MIGHT HAVE TO ENABLE NVIDIA ANSEL IN SETTINGS, JUST GO TO PHOTO MODE / GAME FILTER AND CLICK ON. IT’LL LOOK LIKE THIS:)

#s4 tutorials#sims 4 tutorials#ts4 tutorials#the sims 4 tutorials#ts4 tutorial#s4 tutorial#sims 4 tutorial#the sims 4 tutorial#my tutorial
317 notes
·
View notes
Text
how I edit my sims screenshots without a tablet and downloading a program
So, I’m lazy. I own Clip Studio Paint and I own a tablet, but when I’m playing the sims I’m 90% of the time too lazy to paint over my pictures. But I’m still a sucker for ✨aesthetic✨ and I’ve been asked how I do it, so here’s a guide on how to! It might seem long but trust me, it’s super easy, especially when you get used to it.
First things to consider (but not essential)
○ Reshade makes all the difference! You can follow this tutorial without one and I will show you how you can work around it, but it really helps a lot because it acts like a lovely filter in-game. I recommend Gshade because it’s easy to disable so you can just turn it on when you need screenshots. It also has a lot of pre-made presets and supports reshade presets.
How to install Reshade on the Sims 4 || How to install Gshade on the Sims 4 || my fave reshade presets: daisies & rose colored lenses
note: Gshade also has this really cool function that allows you to cut out the background immediately in-game, which works if you have a flat CAS background (either default or custom). You can disable this when you’re finished taking screencaps as it turns the ‘transparent’ bits bright green in game, but saves as transparent.
○ Don’t want to / can’t install reshade/gshade? No worries, they are basically in-game photoshop. All you need is some psd (you don’t need photoshop to follow follow this step, trust!). I really reccomend intramoon’s psd/actions, so download the ones you like! You can also search for ‘psd download’ on tumblr and there will be plenty you can choose from.
Now to the actual editing! (aka the less boring bits)
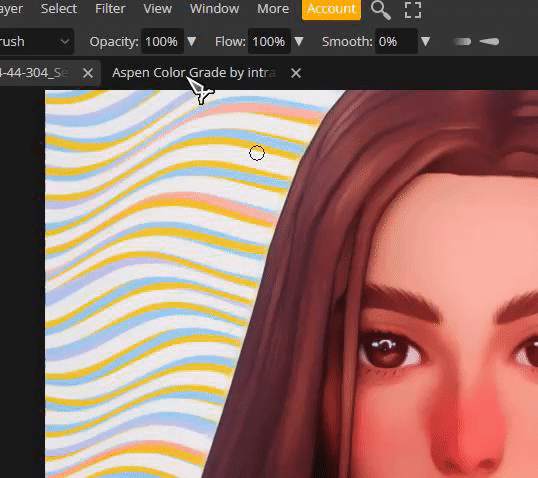
1. Go to photopea.com and open your screenshot there by clicking “Open From Computer”. Photopea is entirely free and supports psd files too!
2. (Skip this if you want to keep your background) Assuming you didn’t activate ChromaKey with Gshade (skip this step if you did) - long press the eraser tool and pick “Background Eraser”. Do your magic.

note: you might want to fiddle with the brush size and “mode” depending on what results you get.

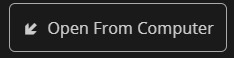
3. (Skip this if you kept your background) If you want to put a new background in, I recommend Pexels.com and search for “abstract background” or whatever you’d like. Once you’ve found one you like, download it.

Open your background in PhotoPea. However, do it through Open > Open & Place

Then resize the image that got imported and put it behind your sim. Bam, there’s your background!
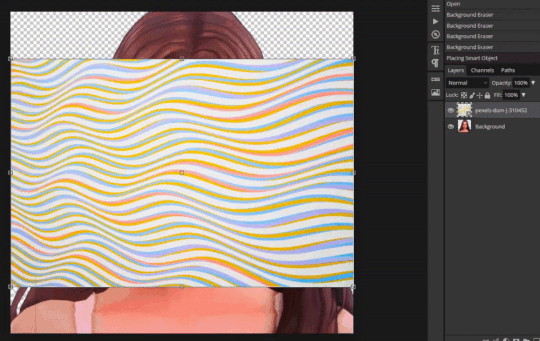
If you’re happy with how it’s looking, merge the layers by right clicking your sim layer and click “Merge Down”
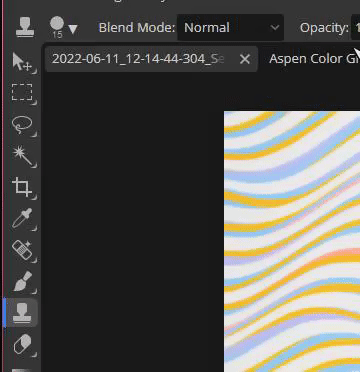
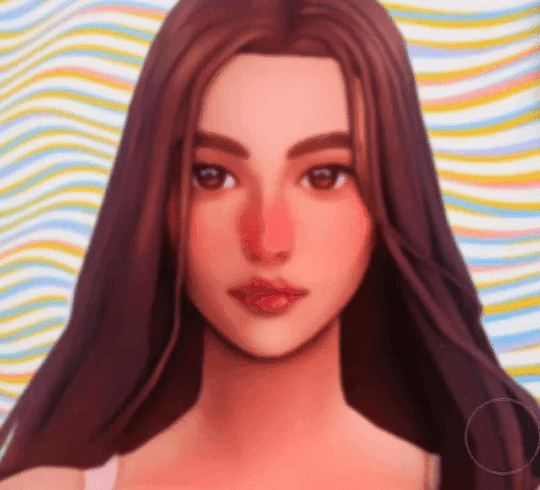
4. (skip this step if you don’t want to use any psds) Open your .psd by clicking “Open”

Then select all the layers and press Ctrl+C

Switch tab and go to the file you were working with, you can find your tabs underneath the top menu

Then once you’re there, press Ctrl+V and your .psd layers will import to that file. Now adjust it accordingly, it might require experimenting since all psd files are different. I typically just collapse the folder (if they have it) and lower the opacity.
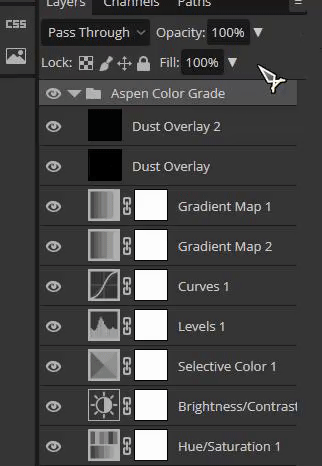
Then once you’re finished, select all your layers and select “Flatten Image”

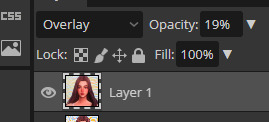
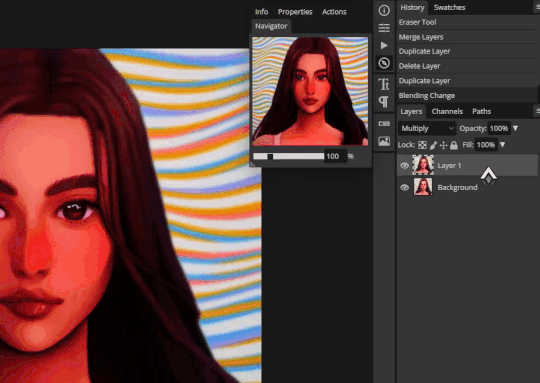
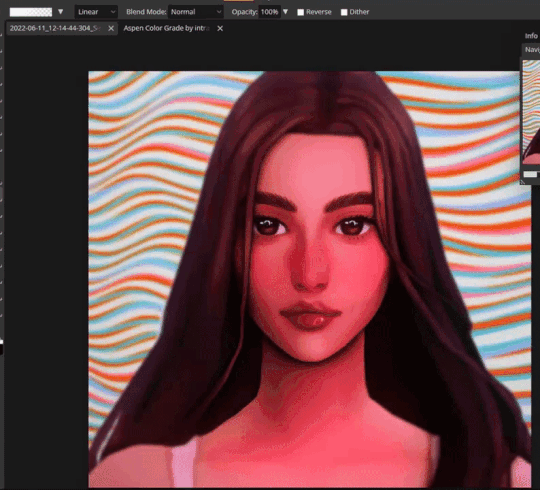
5. (Skip this if you used reshade) To add a soft glow, duplicate the layer by right clicking on it, select “Duplicate Layer” and then change the layer to “Overlay”. It will look extremely bright but don’t worry about that for now!

Go to Filter and press Blur > Gaussian Blur, then press OK.

Then lower the opacity to make it less bright. I usually have it very low, around 15 - 30%
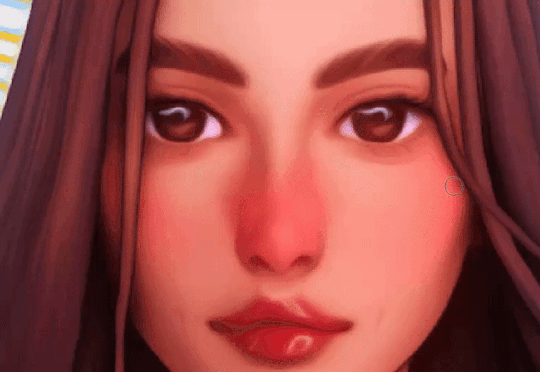
6. Now it’s time to fix the jagged edges. Duplicate Layer by right clicking or press Ctrl+J

Go to Filter > Liquify
Now zoom in on the areas that stick out to you, that you’d like smoothed. Using the liquify brush, carefully manipulate the image until it looks how you’d like. You might have to play around with the settings, but I usually just change the brush size.
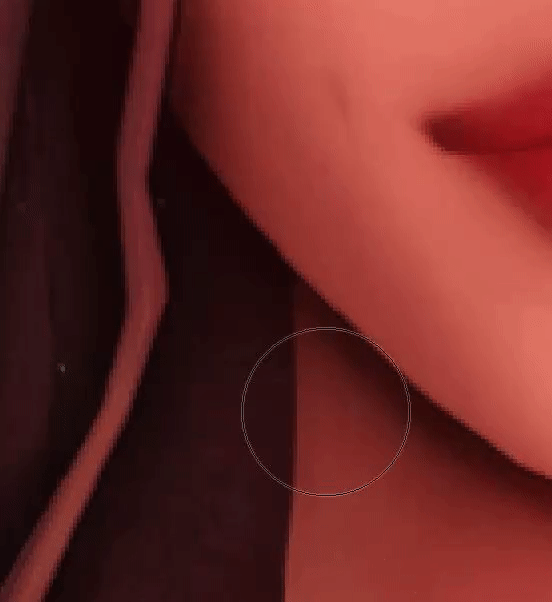
When you’re finished, press OK.

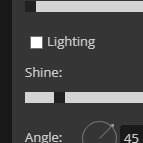
6. Now to polish your piece! Press Ctrl+J to duplicate your layer and then go to Filter > Stylize > Oil Paint
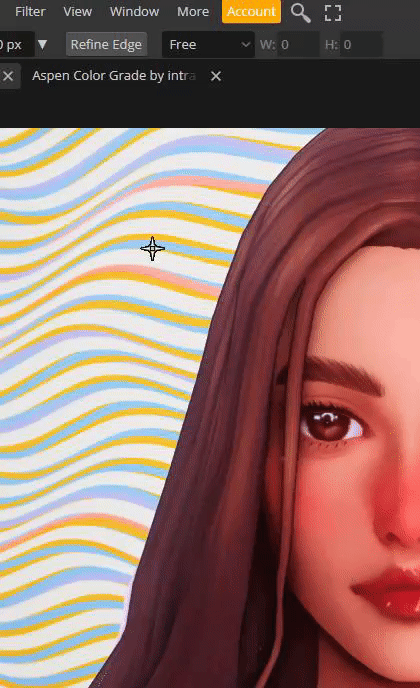
Untick “lighting” to get rid of the squiggly lines. t should now just look smooth, press OK.
Now go to eraser tool (you might have to hold it to get out of the “background eraser”. go to the brush settings and pick a soft brush, you can also adjust the size there.
Use the eraser to get back any detail that was lost when you used the oil paint effect. Usually this is around the eyes, but do it anywhere you feel like you want the detail restored. Click Ctrl+E to merge the layers once you’re finished, or use the flatten image method.
7. Duplicating the layer again (Ctrl+J), to get a more illustrated effect go to Filter > Blur > Surface Blur, then click OK. Repeat the Same process as you did at step 6 where you use the eraser brush to restore any detail lost (usually the hair), and then press Ctrl+E once you’re finished to merge your layer once more.

8. To add depth to the layer, duplicate the layer (Ctrl+J) and press Filter > Blur > Gaussian Blur. Change the radius to something low-ish and press OK.
Then using a bigger eraser brush, focus on the middle of the face/body, leaving the edges of the body/hair and background blurry. Then flatten the image once you’re finished (Ctrl+E)
9. To make ambient light, duplicate layer (Ctrl+J) and set the layer to Multiply. It will look very dark.

Click Ctrl+U and you will get a window that says “Hue Saturation”. Change it to a bit unnatural colour, I usually like pinkish tones but feel free to experiment. Don’t worry if it doesn’t look good right now. Lower the opacity a little bit, but not a lot. You still wand it to look a little odd.
Click on the black and white squares to make your colours black and white. Press the two arrows beneath it so that the white colour in top, then press on the Gradient Tool. Then go to the Menu and select the second option.

Use the gradient tool from one of the corners (select only one corner, feel free to experiment which one! All gives a different vibe), and drag it so that half is light and half still looks dark. Once you’re satisfied, flatten the image. (Ctrl+E)
10. For the last (and easiest step), sharpen your image. This time you don’t have to mess with the layers, just go to Filter > Sharpen and pick any of the sharpen options, I personally like Sharpen More. This maks the facial features pop.
That’s it! Simple, and trust me, the more times you do this, the easier it gets. ♥ I hope this was of any help!

258 notes
·
View notes
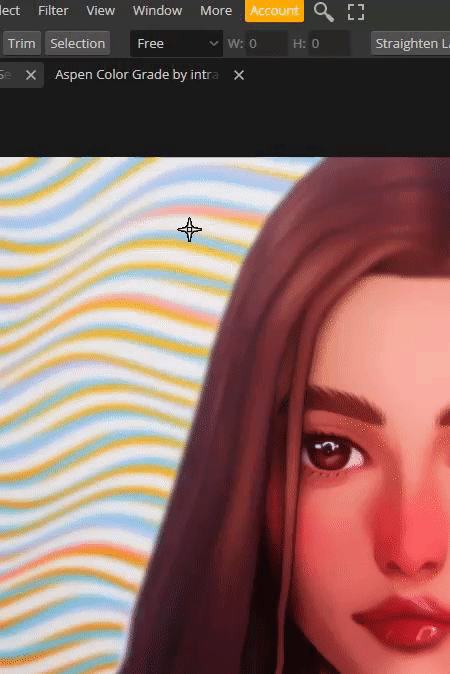
Text
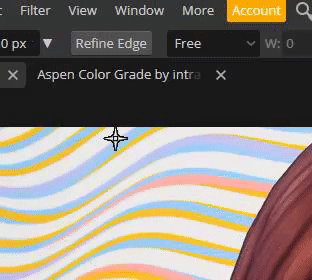
I have a page where I'm listing CC I'm using because TS3 is old and links to CC are scattered. I thought I might share it as a post so it would be easier to see for new TS3-ers. Also I just learned how to do a cut and I wanted to.
Start Here First
Start here.
Second, follow the guide here.
Lastly, follow this guide here, except that I use gshade and not reshade, as I found it performed better with ts3.
After doing the above, here are some more things to check out:
Performance Stuff
Lazy Duchess mods
No Intro mod
No script mods notification
Delphy’s Dashboard to check for conflicts
The ‘Wow This Game is Old’ List
JustMiha’s Clean UI
More BITS Sound Overhaul
TS4 Cursors
Smartphone instead of Blackberry
No plumbob icon on sim tag
Moon Phase icons from TS4
Interaction on Sloped Terrain Enabler
Lighting and Graphics Upgrades I Use
HQ Mod + No Glow and The Sims 3 GPU Add-on and Better Shadows combined
Gelina’s lighting tweaks here*
Tileable Shader Fix, and Reworked EA Lights*
Snow But Better
Ifca’s Default Repacements
*Changing lighting and shadows can make the game too dark sometimes.
Sims CC I Use
Buhudain’s You Are Real Sim normals
Kurasoberina UHD Primer Skin default
Kurasoberina’s Lana Eyes defaulted
Literally everything else by Kurasoberina also
Literally everything by Ifca while we’re on it
Carver’s CAS Overhaul
Walk cycle edits
Horse CC
For an up to date list of pet CC, I joined a Discord called Sims Kennel Union, which has up to date CC lists for both Pets and Horses. Nevertheless here is what I have used and can recommend:
EQHD
Luke Teth Butter HD Horse
HD Eye Mod by Performance Saddlery (in overrides)
IHTL’s Everything EQHD
Raymond Equestrian Center Downloads
Performance’s EQHD Manes
Lakeside Saddlery for EQHD Tack
Snapdragon Vineyard's Marking Folder - start here!
Haxby Stud’s Markings and Coats
Wrenegade Stables Markings
Lavender Equestrian’s Markings
Cheshire Farms Markings
Pure Spirit Markings
Cath Markings
Sliding K Ranch Markings
Faewood Markings
Old Fellow Ranch Markings
Edelweiss Markings
Calvero Terranora Showjumping’s Realistic Hoof Shaders
Briar Vale For the Barn
Halym Rose Build/Buy
Sugars Legacy Stables for the racing tack
Creators to Check Out (haven’t used but look great)
Let them eat burnt waffles for their everything
LatoyaSims who makes seemingly everything
Nilxis’s lots
ChazyBazzy for MM hair
Vasilla’s Objects and lots
Sketchbook Pixels
Donna Cunningham’s Photography Tutorials
Calvero Terranora Showjumping’s Poses
Ancient Sport Stables Poses
Old Fellow Ranch Non-EQHD Resources
Xtina Sims Equestrian
Paso Belle Equestrian’s Lots
Lavender Equestrian’s Lots
Lavender Equestrian’s Downloads Page
Rotherford Download’s List - a list, but more up to date
Other CC Lists (many broken links but still useful)
Rotherford Downloads List
A default database
OneEuroMutt’s list of default replacements
OneEuroMutt’s list of cc
OneEuroMutt’s list of sliders including FOLDER DOWNLOADS
Brntwaffles list of CC
Izo’s tags
Vasilla’s Page of Everything
1s CC Finds
1s CC Finds on non Wayback
This Retexture Catalog
Discipline Resource Guide by Equus Sims
Link List for Equus CC
A list of CC for a horsey lot that is also great
Juno Stark’s List of Horsey Sim Websites
Equus CC Database
Lastly, Actual Gameplay Mods I Use
Sunrise/Sunset Offset Mod - my own version
Longer Equestrian Center Hours - my own version
One with Nature
The Randomizer Mod
Faster Upgrade Times - 1 hr
The Sweet Simmer’s Toddler Mods
No Stretch Children Can Series
Disclaimer
Even CC and mods I have used successfully might break your game. Make a backup.
I just started doing ts3 stuff and I dunno any drama that might be involved with any of the above creators or their creations.
Failing to recommend a creator here doesn't mean that they suck or whatever -- just that i haven't found them yet. (Reblog to rec more and help a simmer out!)
#the sims#the sims 3#ts3#sims 3 horses#equus sims#equiality sims#sims 3 cc#ts3 download#the sims 3 cc#I dunno all the taggggs
103 notes
·
View notes
Note
hey love hope your having a great start to the new year!
i’m fairly new to using gshade and have watched the tutorials to install it properly but i have some questions since i haven’t been able to find a solution so far online.
does your cursor access things in the background when you pull up your gshade overlay?
when you want dof to turn on did you set a hotkey so if you were to press tab for instance it automatically turns on?
do you leave gshade in performance mode? i notice when i do and turn on dof my whole screen will blur and won’t focus on the sim until i turn off performance mode.
thank you for taking your time out your day to answer these questions!
Hello, I hope you're having a lovely weekend!
1 | My cursor is able to access things in the background while my overlay is active!
2 | I set a hotkey for dof to have it be easily accessible. The hotkey that works best for me is 'prt sc'/'print screen'.
3 | I always have performance mode for gshade turned off.
I hope this helped you!
7 notes
·
View notes
Text
Get to Know Me - Sims Edition
I was tagged by @papermint-airplane, thank you! Read my answers below
What’s your favorite Sims death?
Meteor strike! Although I can't remember the last time it has happened, I love the animations. Close second is death by vending machine, but I don't think I've ever gotted that death myself 💀
Alpha CC or Maxis Match?
Maxis Match all the way baby! Although if you've followed me long enough I have some history with Alpha as well.
Do you cheat your sims weight?
No, never! It's never been an issue in my game either, except when I had some lots with buffet tables in my save recently. I then noticed that my npc's tended to get much bigger haha, but still no cheating!
Do you move objects?
Yeah, can't live without that cheat!
Favorite Mod?
BY FAR the remove stencils mod by Velocitygrass! I use this mainly in CAS to remove EA's digusting shine on every piece of clothing. I simply go into create-a-style, open the cheat window and type "deco p" (note: once you've done that, click away to another piece of clothing. Otherwise, if you continue and edit the pattern it will snap back to the original specular) Literal lifesaver!
First Expansion/Game Pack/Stuff Pack?
I can't remember for sure, but probably Late Night, Generations, or an older stuff pack like High End Loft Stuff.
Do you pronounce live mode like aLIVE or LIVing?
Like LIVing!
Who’s your favorite sim that you’ve made?
Delphini Clearwater, I just love her big personality.
Have you made a simself?
No, never. I don't want to hurt my own feelings by trying, I feel like I'd get some face or body dysmorphia if I tried.
Which is your favorite EA hair color?
They're all pretty terrible in my opinion, probably the plain black one.
Favorite EA hair?
Once again, they're all pretty terrible. I like some store hairs.
Favorite life stage?
Young Adult. Closely followed by teens, but because their faces always look funky they're not my first favourite.
Are you a builder or are you in it for the gameplay?
I'd say both! I go through phases for both, but I'd say I'm quite good at building now.
Are you a CC creator?
Yes I am, converter!
Do you have any Simblr friends or a Sim Squad?
I don't have a squad, but definitely some Tumblr mutuals that I think of as friends 🥰
Do you have any sims merch?
Nope, none. Closest I've got is my disk collection with enclosed booklets for Sims 3.
Do you have a YouTube for sims?
Yes! I recently made a "Convert with Me" video and might make a more in depth tutorial series, and might also make a gameplay video if I ever feel like it.
How has your “Sims style” changed throughout your years of playing?
Most noticably I switched from Alpha to Maxis Match. I also did more research on faces and body types to make more diverse sims.
What’s your origin id?
I don't know, and even if I did I wouldn't share it because I share that old ass account with my sister.
Who’s your favorite CC creator?
@nectar-cellar @sweetdevil-sims @kotajose @aroundthesims
How long have you had Simblr?
I have no idea, my guess is since around 2017.
How do you edit your pictures?
I do very minimal editing, I just crop my pictures and let gshade do the work for me.
What expansion/ gamepack is your favorite?
My top three is: University Life, World Adventures and Seasons
Phew! If you've read all of this you're awesome! I tag @hiddengnomes @hiddenspriings @nectar-cellar @rollo-rolls @faeriefrolic
21 notes
·
View notes
Last Seen Blogs

aokisouta
lets choose one future with two hearts

you-sacrifice-to-be-happy
Got me trippin'!


moldinfez
thinking...

aralioideae
As charming as a strange quark