#handmade lolita
Text
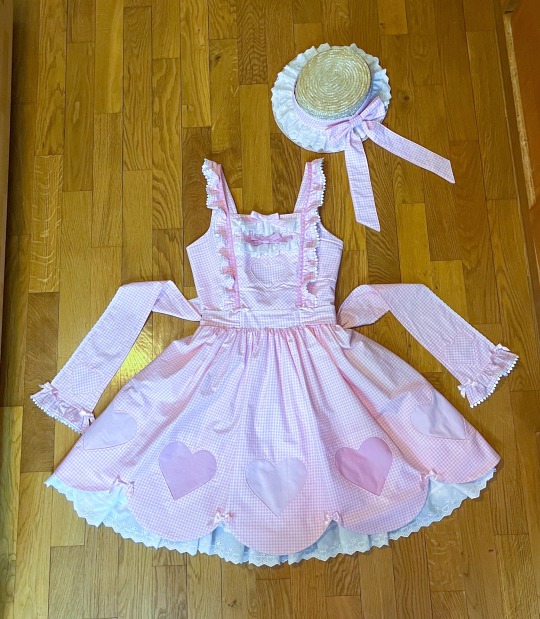


all handmade by me <3
#lolita fashion#egl community#egl fashion#sweet lolita#eglfashion#sweet lolita fashion#country lolita#sewing#lolita sewing#handmade lolita#handmade by me#handmade dress#handmade lolita dress
1K notes
·
View notes
Text

design for a skirt i made 🥀


252 notes
·
View notes
Text

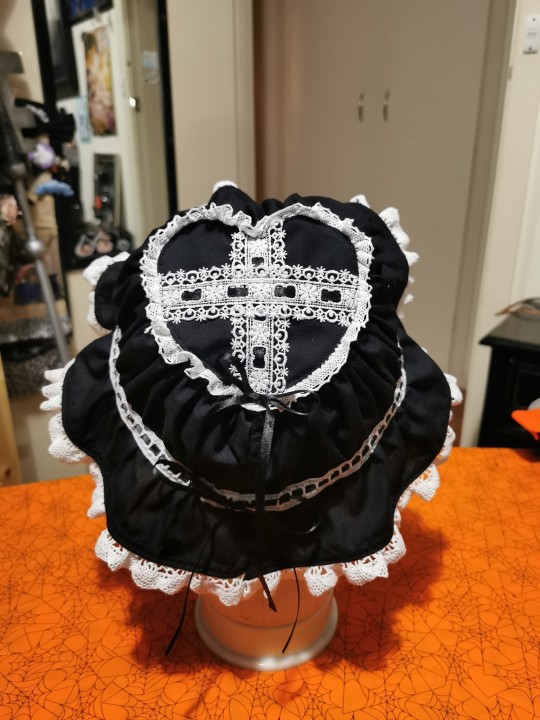
a white rectangle headpiece i made
#harajuku#egl fashion#oldschool lolita#old school lolita#shiro lolita#handmade lolita#lolita fashion#classic lolita#sweet lolita#japanese fashion#jfashion#egl community#egl
912 notes
·
View notes
Text


I made a cap! It's based off a pattern from otome no sewing 16, but I made the top heart shaped instead of circular.
Look closely and you can see heart-shaped top stitching on the brim!! I adore it 🥰
272 notes
·
View notes
Text
Frill Skirt Tutorial
Here's a tutorial for making a lolita skirt with a fully elastic waistband.
Recommended background reading:
How to pick quilt prints for use in lolita fashion.
And here's some things I've previously said about this project.

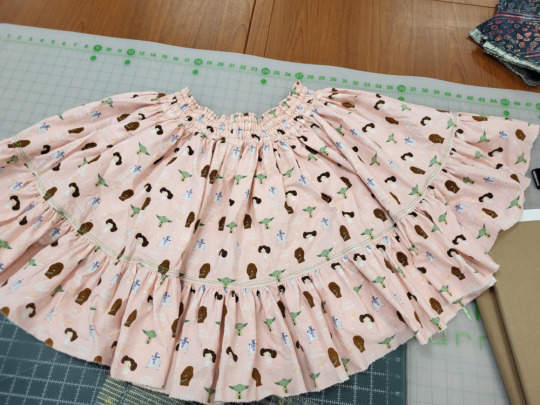
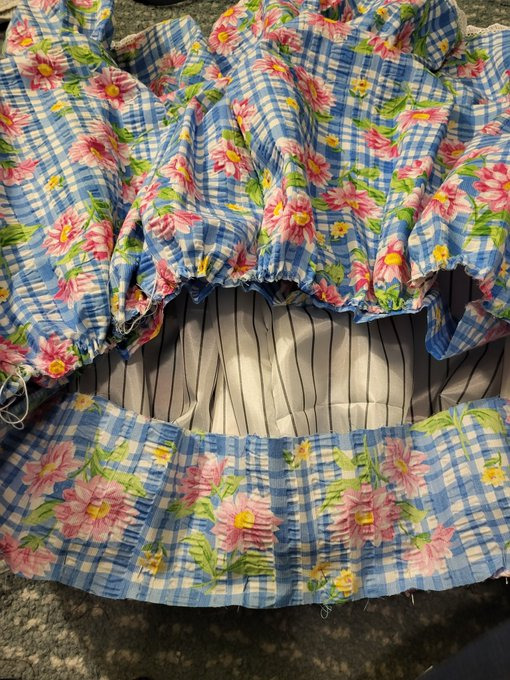
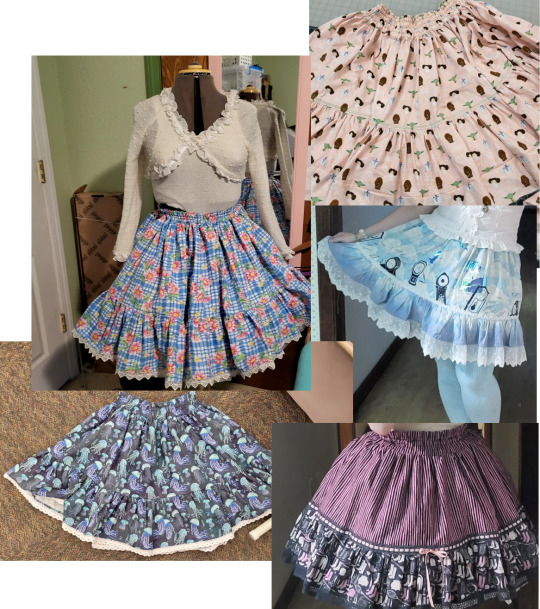
We're going to make some skirts that look like this. This is a really fun project because you can use a lot of quilt prints, and fully elastic skirts are comfortable and flexible wardrobe pieces.
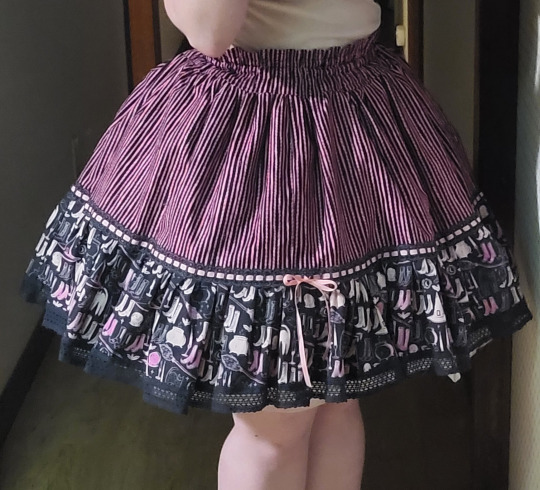
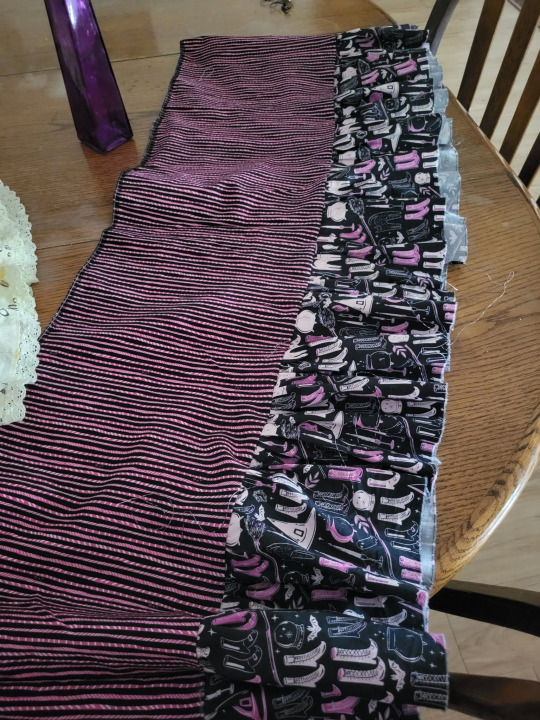
In this skirt, my pink striped fabric is "Skirt", and the navy with the shoes is "frill". The black lace at the bottom of the skirt is the hem lace, and the lace with the pink ribbon is the transition lace.
You can use the same fabric for the frill and the skirt, making it look more like the skirts referenced above. If you use different fabric for the frill and the skirt, it's is a little bit like faking a border print.
Here's some cutting dimensions. Please excuse the fact that I forgot to turn off "emulate brush dynamics".
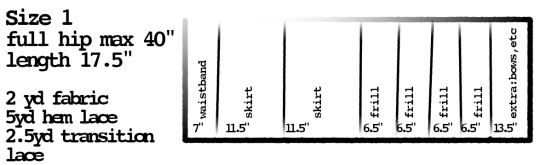
Because this is elastic, we're going to be basing the sizes off how much fabric you cut. When you're working with a big, gathered rectangle, you have a lot of options for how much ease you're going to put in the garment.
I forgot to list it, but these skirts really look better when they're lined with a slippery lining fabric. For lining, you just need the "skirt" measurement. For size 1, you need 23" of lining, or 2/3 of a yard.
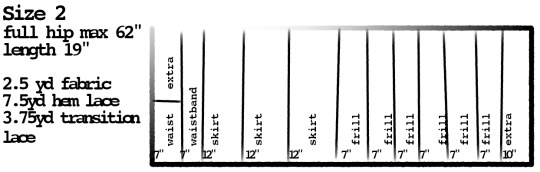
For size 2, you're going to want 36" of lining, or one yard.
All these sizes include some fabric for extra things like bows and hair accessories. I highly, HIGHLY recommend getting into the habit of making matching accessories as part of the project of making a lolita garment. You're going to need them anyway, so they might as well match.

For size 3, you will want 40" of lining fabric, or 1 + 1/8 yards.
All of these sizes assume that you're using 45" wide fabric. If you're using 60" fabric, you can likely go down a size. (This would be max hip of 52" for size 1, 82" for size 2, and 172" for size 3).
For any view, you will also need enough 1/4" or 3/8" elastic to go around your natural waist (or wherever you wear your skirt) about 4 times. Let's be honest, we all have a massive roll of 1/4" elastic hanging around from making covid masks, so let's use it up.
These skirts are a little bit on the shorter side, because that's just how Meta releases them. Since you're the one making the skirt, you can make some decisions. If you're tall, want to wear a fuller petticoat, or are building a skirt for a substyle where you usually want a longer skirt, you can add a few inches. You'll get a slightly different look if you're lengthening the skirt versus lengthening the frill, versus lengthening both equally. If you're not sure, now's a good time to check out lolibrary and look for dresses and skirts and see where they place the details around the hem. Lolibrary lets you search by brand, so search by brand and just take a note of what you see most often in pieces that you like.

For example, Alice and the Pirates often has the hem detail to be pretty close to the hem on their solid pieces, while Baby the Stars Shine Bright will have the detail going up quite a bit higher. (Please do more than the 10 seconds of searching that I did to get these examples). Therefore, if you want to lengthen the skirt and have a slightly more AatP tone, you can add the length to the skirt part of the skirt, and if you want a slightly more BtSSB tone, you can add the length to the frill part.
Researching your garments is the secret to having handmade garments that actually read as lolita fashion. Lolita fashion history is documented to an extent that no other fashion I've ever heard of is, and it really helps to take advantage of that extraordinary resource.
With our pattern ready and maybe lightly adjusted, let's get to work:
Foundational fact #1: fabric that rips will rip in a straight line along the grain of the fabric. Our skirt is made entirely of rectangles, so we're going to take advantage of that fact. If you want to cut your fabric with scissors, or with a rotary cutter, you're completely allowed to. If you don't have a serger with a functional cutting blade, you might want to cut it so that you don't need to trim the edges. I have a serger and I like to rip it. It might not be the best way, but it's how I've been making my lolita skirts since 2011, and I don't like change and I do like the stress-relieving experience of ripping.

So, lay your fabric out, and mark your cutting lines. If you're ripping the fabric, like I am, you just need to cut a little snip to get the tearing started.
This pattern factors in a half inch for seam allowance. If you're ripping the fabric, you will lose a little bit of usable fabric, so add yourself an extra inch to each cut.

Take your nice straight cuts/rips and lay them out in an organized fashion. You should have a frill pile, a skirt pile, a waistband pile, and an extra pile. If you like piles, you can also pile up your lace next to it.

You're going to sew every pile together so that you have each it its own long strip. Your lining (white fabric) should be the same size as your skirt piece. If it's longer (if you're using 45" quilt fabric for the face and 60" lining fabric for the lining), go ahead and trim them so they're the same total length in the long dimension.
Put the skirt on top of your lining and sew the top edges together.
You'll notice that this skirt is made up in doubles. The skirt is twice the long dimension as the waistband, and the frill is twice the long dimension of the skirt. This makes things easy to gather up.
If you're not using an overlocker to assemble this skirt, you will also want to run some kind of seam finish on the long ends of this skirt, to stop fraying.

(please pardon my hypermobile thumb)
A lot of people do gathering stitches by sewing two lines of basting stitches, and then pulling the thread on those stitches to cinch up the gathers. This does work really well on small things. However, as the amount that you need to gather gets longer and longer, it's gets more and more difficult to pull those threads without them breaking. Instead, I like using an applied gathering string. My current favorite string is waxed dental floss. Most dentists recommend unwaxed floss since it grabs more plaque, so make the smart decision and retire your waxed floss to be in your sewing box.

If you are making this project on a serger or an overlocker (and this is a GREAT first serger project), you can overlock over the dental floss. Here you can see the white floss going between the two needles. The needles are not going through the floss, just on either side of it. Tip: that little hole in the front of the presser foot is actually intended for you to put elastic or thread through so you don't need to hold it as carefully. I forgot and so I didn't do that here).
We're applying the dental floss onto the top edge of the ruffle.

If you aren't using an overlocker, you can do some form of hem finish (my favorite is the 3-step zigzag) and then apply the dental floss by doing a zigzag over it. Again, the needle isn't going through the floor, just on either side of it.

Now, pin your ruffle onto your skirt. I divide the ruffle and skirt up into equal portions, and then pin it first. My ruffle is twice the long measure as the skirt is, and they're both cut out of the same width of fabric. This means that dividing the ruffle up is pretty easy, because I can use the seams of the ruffle. The first seam in my ruffle goes halfway between the edge of the skirt and its first seam. The second seam of my ruffle goes on the first seam of my skirt, and so on.
Then, you just pull your dental floss so that it gathers up the fabric, and pin it down. Since we divided the fabric up earlier, we don't need to spend as much fight getting all the ruffles to be even. Go ahead and pin everything down, and then sew it together.
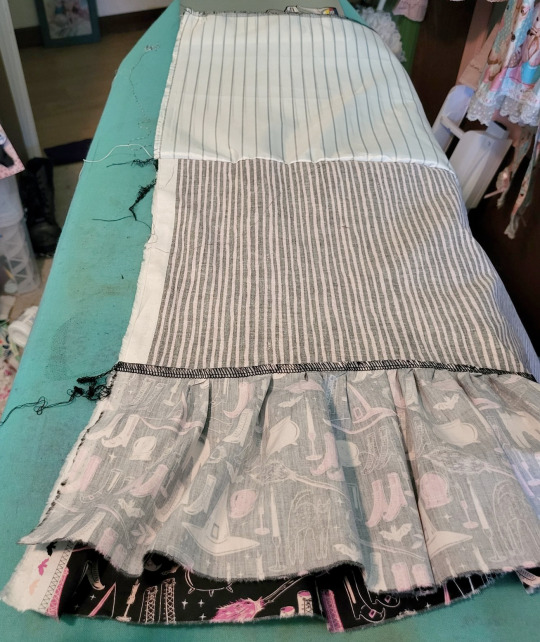
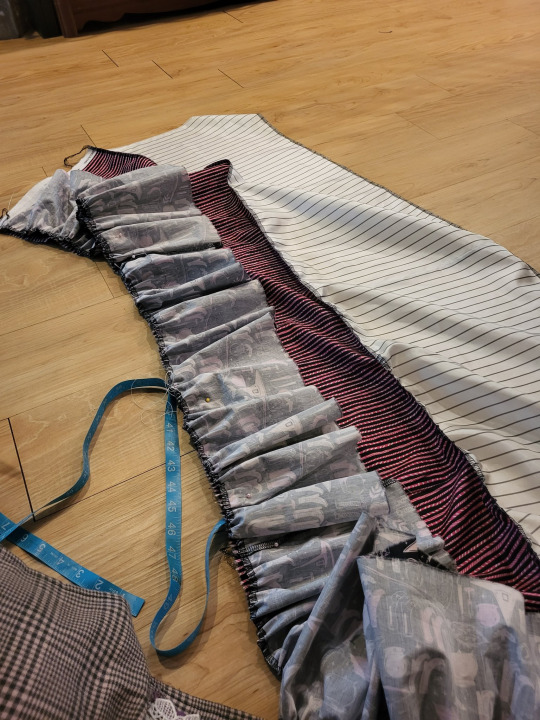
Now you're going to fold the skirt and lining in half to seam it all together. Match up your seams, and unfold your lining (see picture). This will let you sew the frill, the skirt, and the lining all together in one go.
The easiest time to put the hem and transition laces on is before you attach the waistband. The basic rule with gathered skirts is that it's a lot easier to apply anything flat that you can before you gather it.
In a lot of older lolita tutorials, a lot of people treated lace as optional. However, now that it's not 2007 anymore, we have a bit more of an expectation for detail in the garments we wear. Quilt cotton especially has a very flat texture, even when it has a nice print. If you can add a bit of texture and detail, you want to do so. If you're doing the skirt and the ruffle out of the same fabric, you can probably get away without using the transition lace, but you will still want hem lace.
I didn't have any lace when I was making this one, so I used a couple of lines of decorative topstitching between the skirt and the frill. I got the idea from this blog post from 2010. I didn't execute it as well as Lolita Noveau did, but that was the general concept.
Anyway, waistband time.

Take the edges of your waistband and press them in. You don't need to apply a seam finish before you do this. I have overlocking on mine because I ripped my fabric, and used the serger to clean up the edge. If you don't rip your fabric like a savage and use technology like scissors instead, you don't have that problem.

Fold your waistband in half. It's now time to sew the elastic channels.
Here's the secret to this waistband. Start out by stitching a line about 3/16" away from the fold in your waistband.
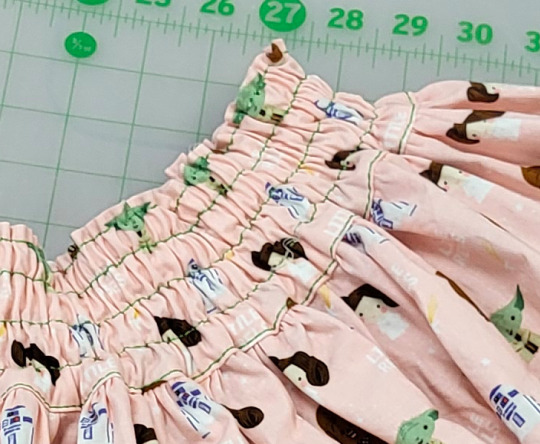
When you put your elastic in, this little line of stitching makes your waistband stay on straight, and adds a tiny ruffle to the top. I picked this up from the Metamorphose frill skirts, and it's amazing.
After you've made that line of stitching, start making channels for your elastic. Add about 1/8" of width from the width of your elastic (so 1/4" elastic, sew your channels at 3/8". 3/8" elastic, sew your channels at 1/2"). Leave a space for you to be able to actually put the elastic in. Don't forget this, or you'll have to redo it. Ask me how I know. I found that three channels works pretty well. Don't sew the channel closest to the edge, because you need to attach your skirt.
You're going to need to gather the top of your skirt, just like you gathered the top of your frill. Get your dental floss and your zigzag stitch ready.
Your waistband (flat) will be twice the length of your skirt, so you can pin and pull the gathers just like you did for the ruffle.
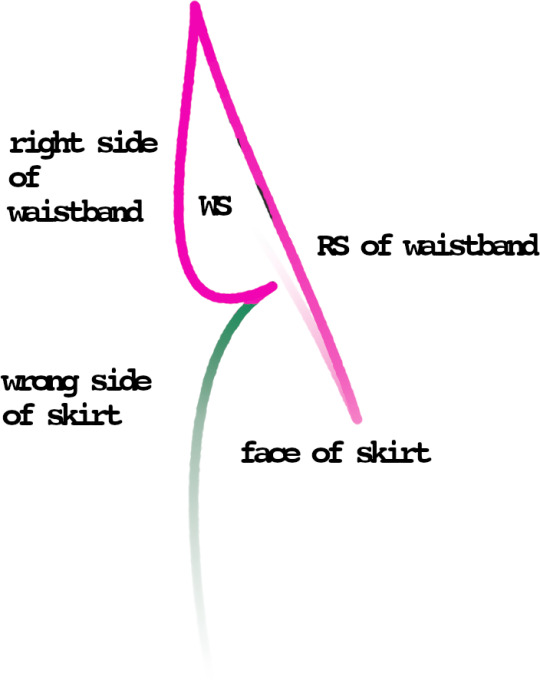
So this part is important: You are going to sew the right side of a single thickness of the waistband onto the wrong side of the skirt. I don't have a good picture of this, but here goes trying to explain it.
You need to sew the waistband so that the top seam of the skirt (the part that's sewn to the lining) is sandwiched between the front and back of the waistband. You are going to have your edges of the waistband turned under to hide the raw edge.
While you CAN do this by just putting the top of the skirt edge into the waistband seam and sew it down, you can make it look prettier by doing it like this:
You sew the right side of a single thickness of the waistband to the wrong side of the skirt. This means that, when you unfold it, the seam will be pointing outward, towards the viewer. This feels like it would look bad.
You then press that seam so that it's flat, and then wrap the front of the waistband to the front of the skirt. You tuck the raw edges into the waistband, so that they're all sandwiched between the back and the front of the waistband. You then sew the front of the waistband down from the front.
What this does is it allows you to have very precise control of where your final line of topstitching is. If you've ever sewn a skirt facing and been told to stitch the back of the facing by doing a stitch-in-the-ditch, this is like that but in reverse. It's the same process, but with the top stitching definitely showing.
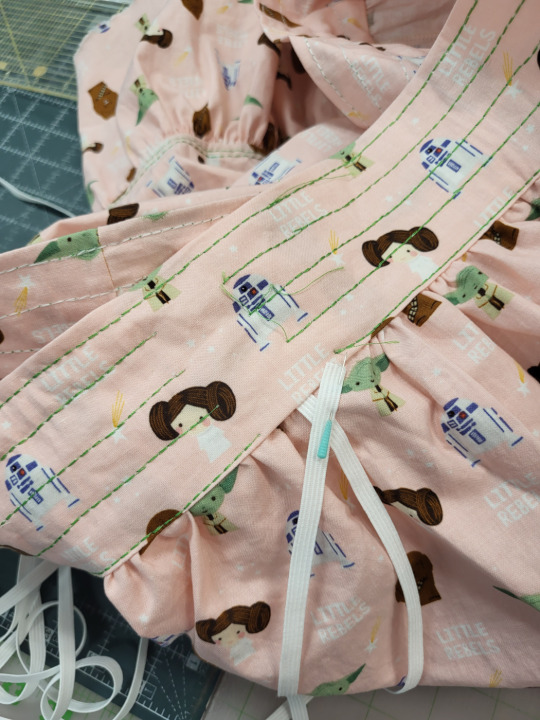
Anyway, you can now cut your elastic to your waist measurement (or maybe about an inch shorter than your waist measurement) and start feeding it through your elastic channels. Since you're using such thin elastic, it helps to have negative ease (which is the technical name for "cut it smaller because it'll stretch) in your elastic measurements. Start by putting in the elastic at the top casing, and go down.
Sew your elastic ends together when you're done, and there you go! If this is your first lolita garment, congrats! See if Wunderwelt Closet Child has a blouse in your size that goes with your skirt, because they ship fast and some items are really discounted. 42lolita is a lolita-themed taobao reseller that's easy to shop. Basically just don't overpay from devilinspired. If you're going to have to wait crazy long lead times anyway, you might as well be not spending their big marked up prices.
Finish up any little last things, like threading the ribbon through your beading lace, if you used it.
Anyway, now you have a skirt! Yay. Make yourself several and learn how colors, prints, scale, and texture work with each other.
673 notes
·
View notes
Text
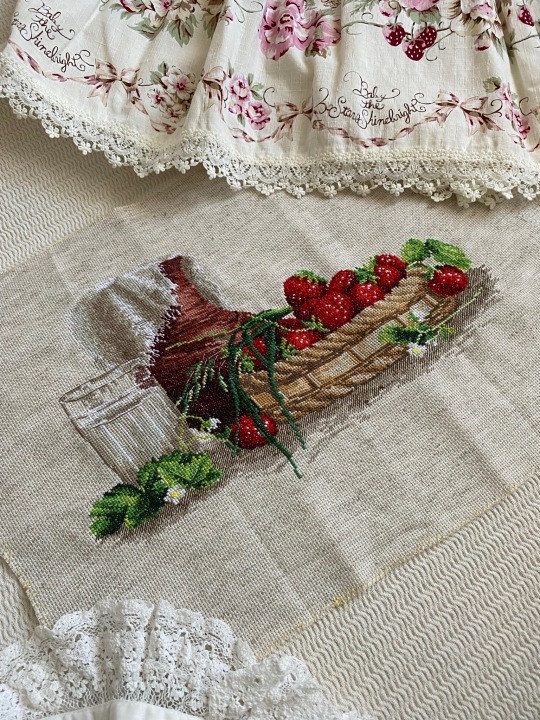
🧺🥛Cross-stitch inspired by old BTSSB prints🍓


#cross stitch#handmade lolita#baby the stars shine bright#btssb#embroidery lolita#sweet classic lolita#old school sweet#lolita fashion#sweet lolita#lolita handmade
307 notes
·
View notes
Text
I broke multiple sewing machine needles on this one
157 notes
·
View notes
Text
Someone on a sewing discord I follow that was created by @20dollarlolita asked if anyone had the dimensions of a BtSSB headbow so they could make their own and I drew up a schematic. Decided to also include my AP headbow as well for comparison. Enjoy!

The bow itself is extra long because of internal wire. To create the double bow effect you just fold in the edges of the loop.
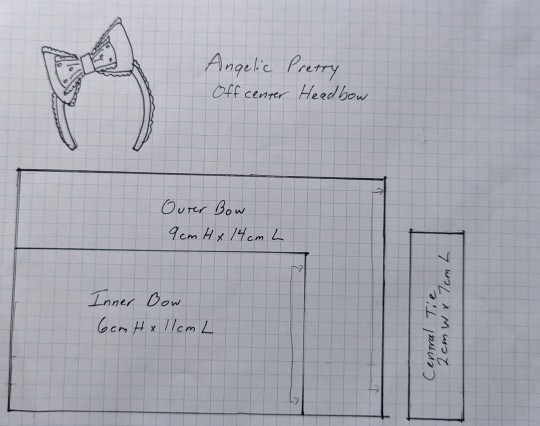
The AP bow is really good to scale up or down because the finished product is very precise.
Both of these are the finished dimensions. If you want to use it to make your own- don't forget seam allowance! ❤️🧡💛💚🩵💙
205 notes
·
View notes
Text

Today I went to the arcade with my friends Sora and Allie, we tried to match our coords as much as we could and we had fun playing PIU


#me#and my friends#egl#lolitafashion#egl community#baby the stars shine bright#btssb#oldschool lolita#handmade lolita#jfashion#PIU#Pump it up
124 notes
·
View notes
Text


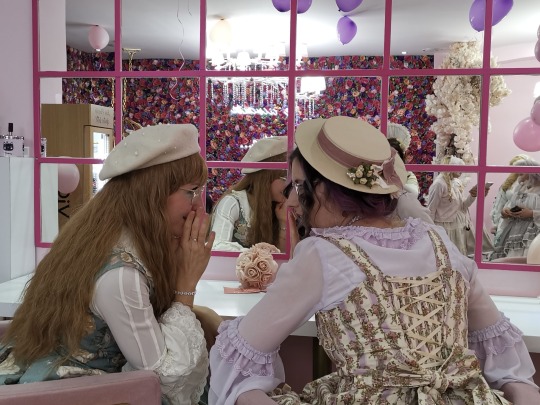
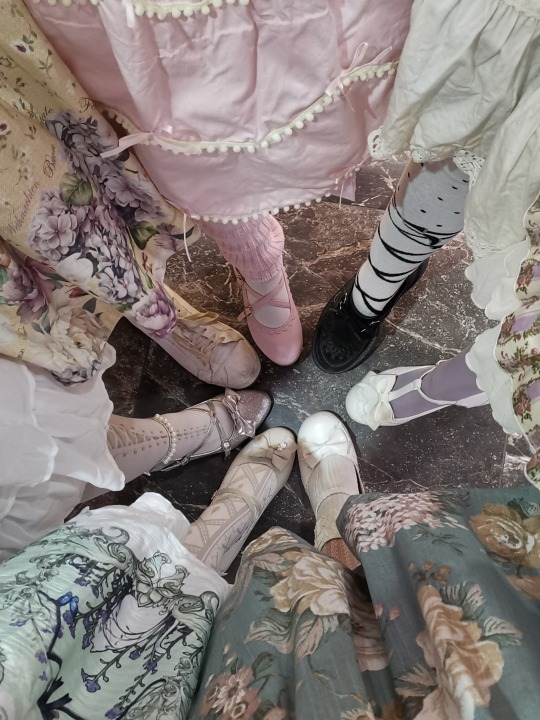
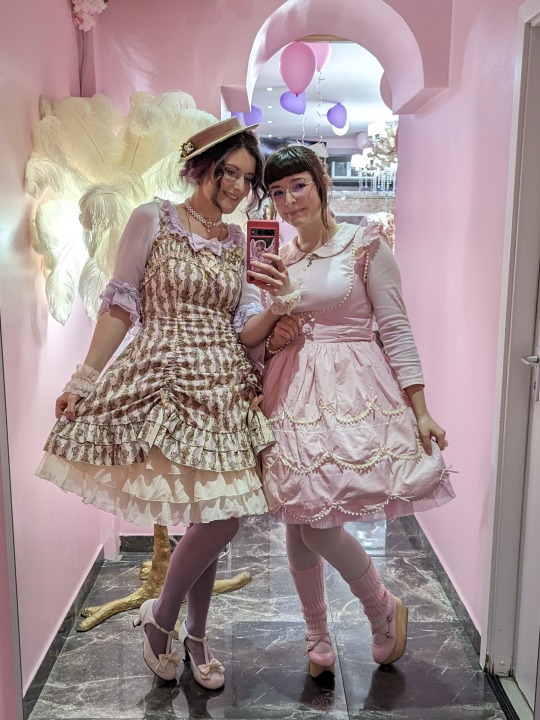
Some photos from our recent meetup. I had a lovely time at this super cute café and it was a great last meetup before moving away <3
#also: how pretty is this bodyline jsk?#egl fashion#egl community#egl coord#lolita fashion#classic lolita#sweet lolita#my coords#my posts#bodyline#handmade lolita#made by me#hime lolita
101 notes
·
View notes
Text
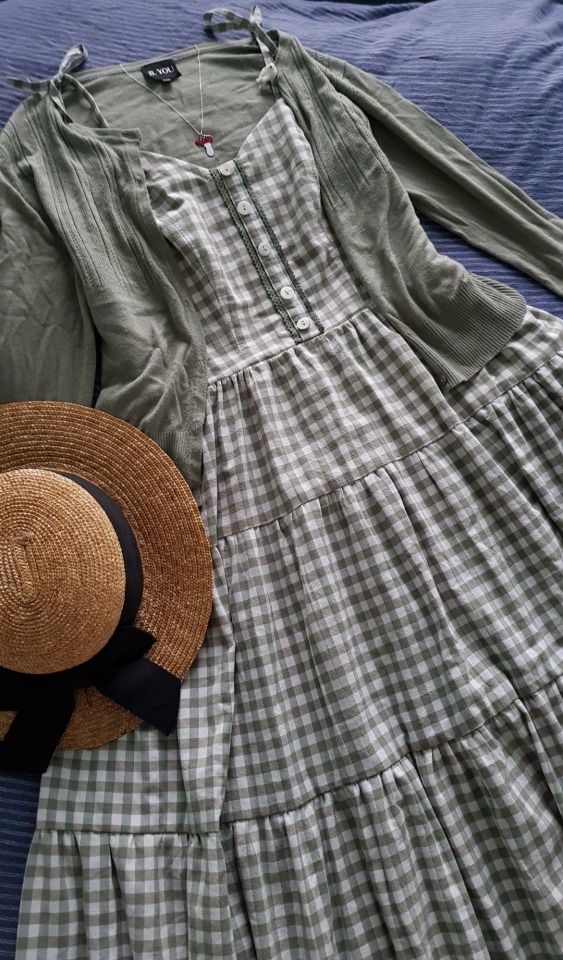
🌱S o f t G r e e n🌱
🍄I loved this sage gingham (duvet cover) as soon as I clapped eyes on it, and I knew exactly what I wanted to make :")
🌱Self drafted sundress bodice with button placket and back shirring, with self draft tiered skirt. Styled with thrifted cardi and hat, and a little enamel mushroom necklace from mairijewellery.bigcartel.com 🍄
🍄Drafting that tiered skirt was hard! Proportions for a flattering waist-hip ratio are actually quite delicate (I have no hips), so I wound up making the top tier 2.5x waist and the same length as the side bodice after a LOT of trial and error ;_;
#classic lolita#dolly kei#mori kei#vintage#mori girl#mori fashion#natural kei#offbrand#autumn style#ootd#handmade fashion#handmade lolita#handmade dress#thrift flip#thrifted fabric#cottagecore#light academia#mushroom necklace#cute style#cozy style#gingham dress#gingham#girly kei#country lolita#lolita sewing#sewing#dressmaking#memade#straw hat
376 notes
·
View notes
Text
I wanted a velveteen skirt, so I made a velveteen skirt🖤
#egl#egl fashion#egl sewing#egl community#lolita fashion#lolita community#lolita sewing#sewing#handmade#handmade lolita#diy#handmade fashion
355 notes
·
View notes
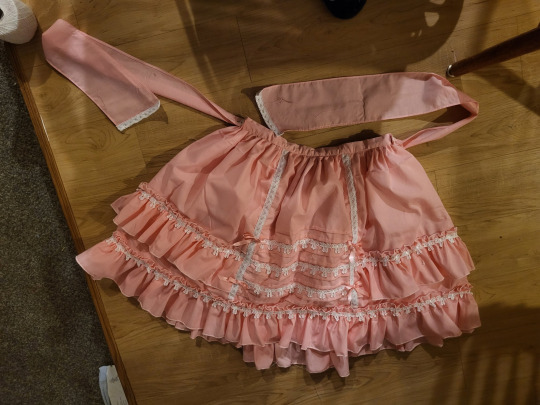
Text


Handmade from a BTSSB pattern
Gloomy Bear Apron (2022)
135 notes
·
View notes
Text

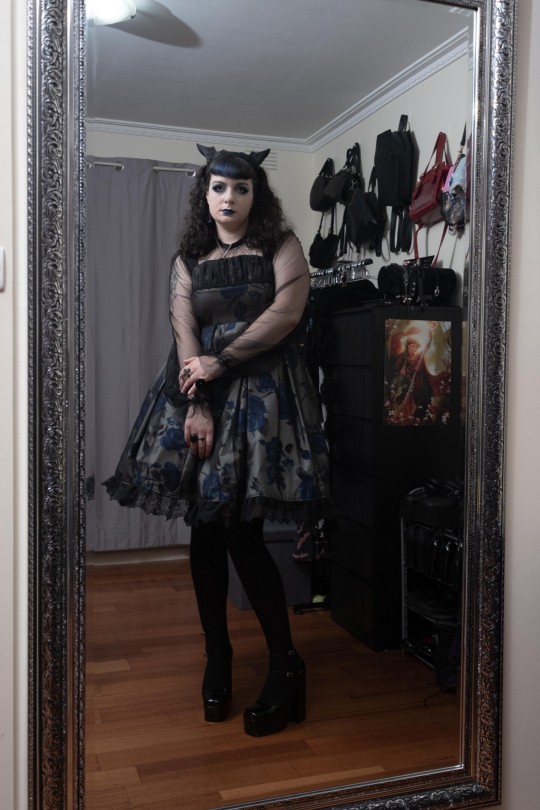

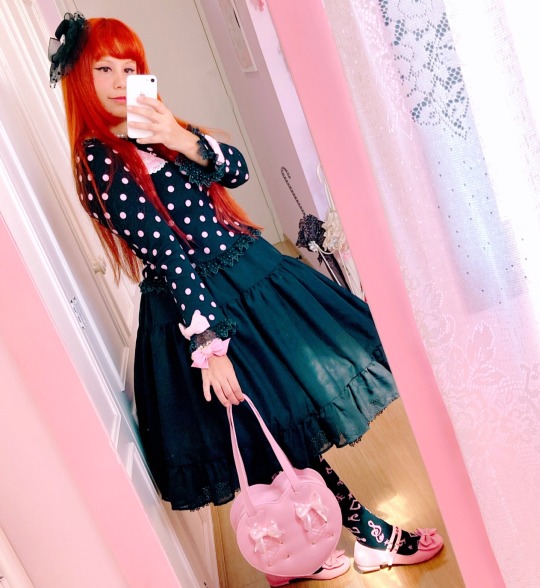
Last week I finished sewing this jsk and blouse combo.
This weekend, I was able to put together a coord 💙
#lolita fashion#egl fashion#gothic lolita#handmade lolita#lolita coord#j fashion#egl#egl coord#sewing#gothic fashion
163 notes
·
View notes
Text
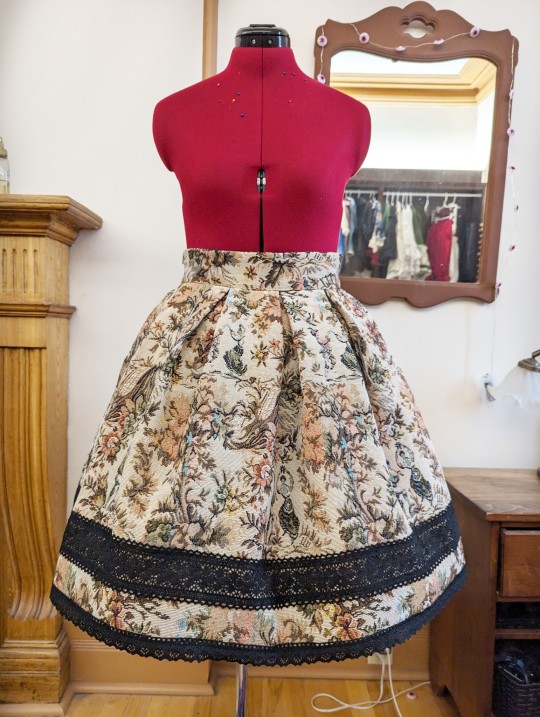
If anyone is wondering, this tutorial to make this skirt is still a method that works. Both those links are from wayback machine captures from a time before Photobucket betraying us all and deleting pictures.
Yes, I'm still mad about that.
Anyway, in the spirit of seeing if budget lolita was still doable in 2023, here we go with a cost breakdown:
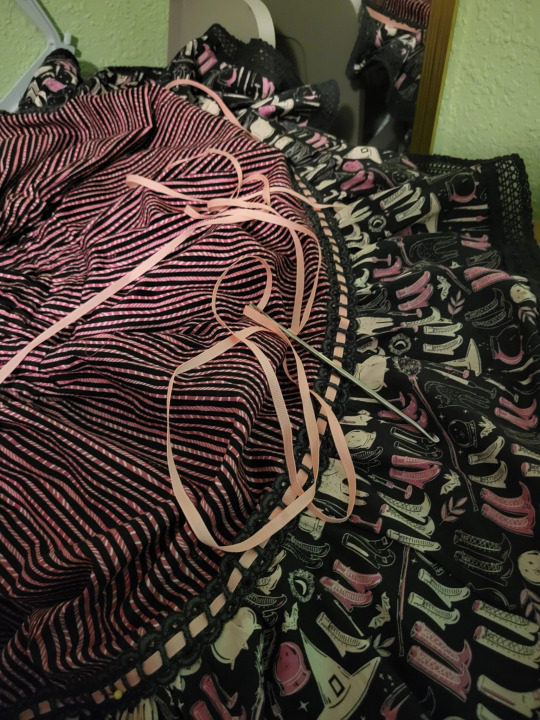
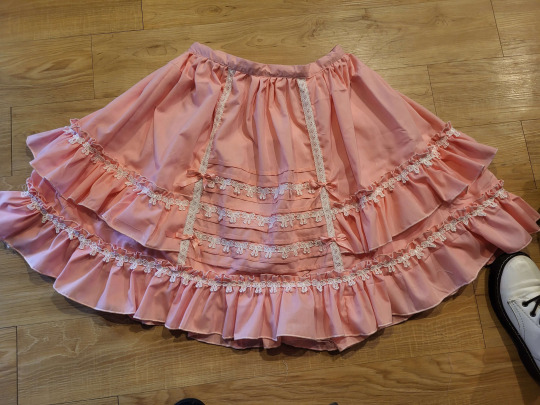
>Main skirt fabric was a $10 walmart 4-yard precut; enough fabric to make waist ties not pictured here
>Skirt is fully lined with a polyester bedsheet I got for $1 at a surplus store
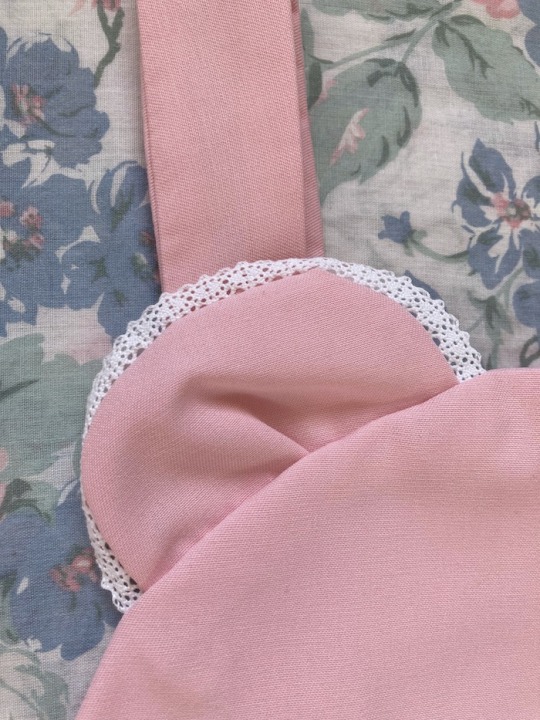
>The bow lace was part of a bulk purchase, ended up costing 21cents a yard. Skirt probably has 6-8 yards of lace on it. The little vertical strips were scraps from another project. Back shirring on skirt is 1/4" elastic, which covid conveniently made super cheap.
>I didn't have the zipper on hand, so I had to buy one for $1 at walmart. As anyone who has been on Wawak knows, that's massively overpaying for zippers.
This skirt is 3" longer and a few sizes larger than the one in the post. I had to make a new cutting layout for the skirt, and it took a fair bit of additional fabric. In addition, to save on fabric width, the "side seams" on this are actually a little bit farther back than the side of the skirt. I cut the back of the skirt to full fabric width, and then added the adjustment for the fullness into the side front pieces. Clarice, who wrote the original tutorial, mentions that the person she made it for was very small, so I sized it up a little bit.
I make sketches like this as I go for personal reference, but maybe it'll be helpful.
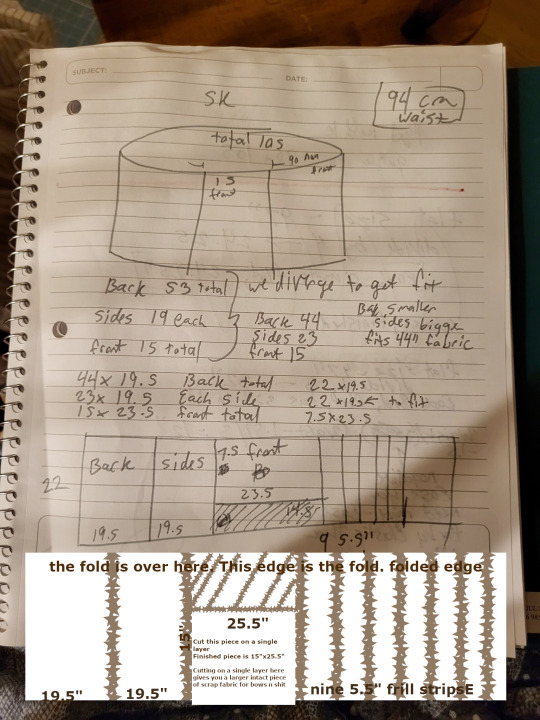
In the spirit of livejournal, I "clarified" my sketch by making it more confusing in GIMP.
(Your pieces you need to cut will be back: 44"x19.5", cut 1. Side Front, 22"x19.5", cut 2. Center Front, 15"x25.5", cut 1. Frills, 5.5"x44", cut 9 or 10).
So, when we get into it, yeah, if you have a good design (or can copy a good design) and you're willing to put some time into it, you can still do a budget lolita skirt for under $20 of materials, if you're careful. I'm mostly making this post to save which archive.org captures are the ones with working pictures.
(It also helps if you don't mess up on the waistband so many times that it slowly shrinks into a 1" waistband.)
Fun fact: the trim on the ends of the waist ties may or may not be because I hemmed them sloppily and the hem came up bubbly, and zigzagging some lace onto the bottom handily covered up the bubbling. One of the advantages about knowing a decent amount about lolita fashion is that you can look at things and go, "Yeah, if I added x here, it'd be fine," and knowing enough about sewing to go, "yeah, if I do x cheat here, it'll look better" and being able to put the two together and go, "hey, if I cheat here, it'll still look lolita!" It's a good feeling.
Anyway, if anyone else has ever used Clarice's tutorial to make a skirt, I'd love to see it! This is my second time using it, but the last time was almost a decade ago at this point, and I think I've improved a lot since then.
389 notes
·
View notes
Text


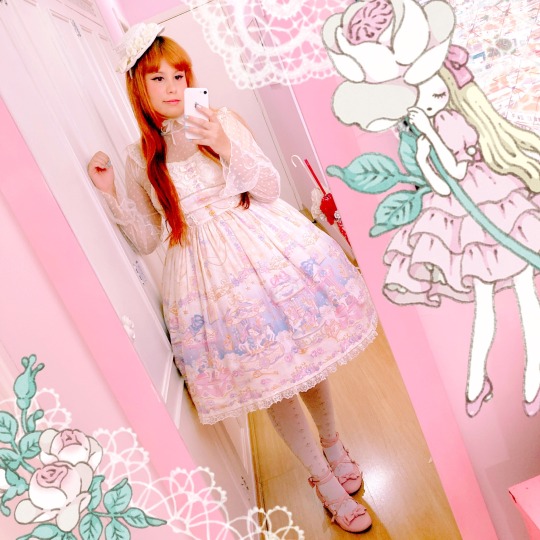
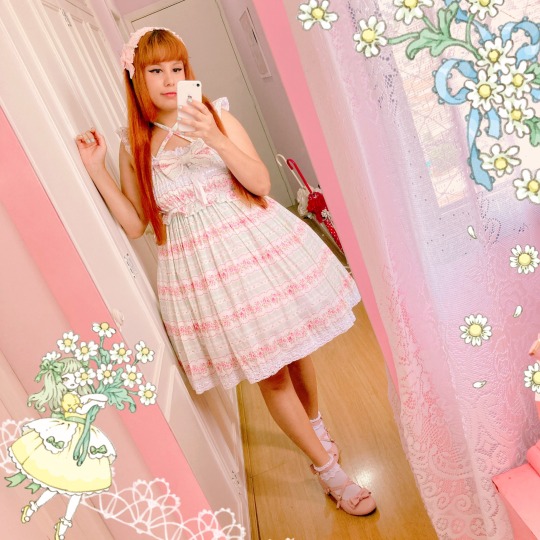
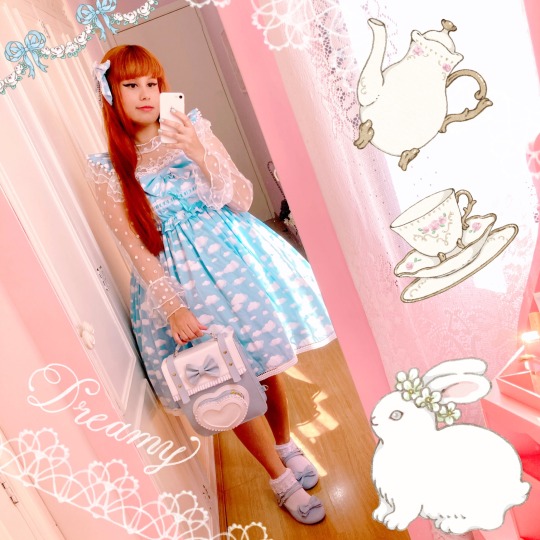
This week’s outfits, the cloud dress, the black skirt and the floral dress were made by me
#eglcommunity#angelic pretty#kawaii#eglfashion#lolita fashion#lolita lifestyle#sweet lolita#egl#kawaiifashion#kawaii aesthetic#baby the stars shine bright#handmade lolita#lolita handmade
139 notes
·
View notes
Last Seen Blogs

pickledmermaid
Hannah Austin
chickensloth
My life is weird

lemontree14
~Drawing As A Hobbie~
wormsinc
Worm Inc.

doterradiva-blog
Untitled