#hi i have no proper photo editing software and this was done in paint
Text
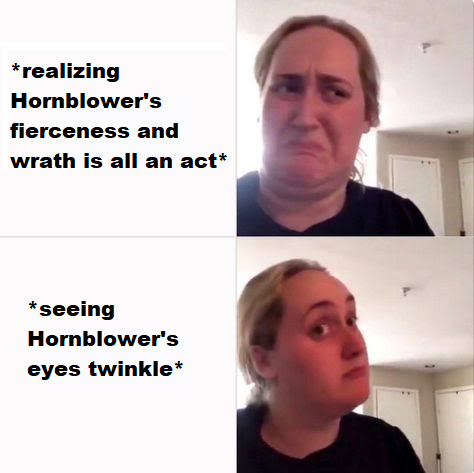
So I started reading Lieutenant Hornblower, and shortly after Bush gets aboard, Hornblower very intensely berates someone for being sulky when answering orders, then just as quickly drops his anger, telling Bush that you need to stop them quickly once they start with an attitude like that. We then get the following passage:
“The duplicity - play acting - of the young lieutenant aroused a momentary suspicion in Bush’s mind. A man who could assume an appearance of wrath and abandon it again with so much facility was not to be trusted. Then, with an inevitable reaction, the twinkle in the brown eyes called up a responsive twinkle in Bush’s frank blue eyes, and he felt a friendly impulse towards Hornblower, but Bush was innately cautious and checked the impulse at once, for there was a long voyage ahead of them and plenty of time for a more considered judgement.”
And all I could picture was Bush as this meme:
#hornblower#hhornblower#horatio hornblower#william bush#hotspur husbands#my posts#hornblower shitposts#hi i have no proper photo editing software and this was done in paint#please accept my stupid contributions to the fandom nonetheless
54 notes
·
View notes
Text
graphics guide
a guide filled with basic info, tips, and answers to common questions that i hope helps people who want to start making graphics
*this was made based on my experiences of making graphics and is what i thought was important to cover but everyone has different ways and approaches so dont feel the need to follow everything on here
what is a graphic?
a graphic (also known as ‘gfx’) is a image edit that incorporates various elements (textures, filters, text, etc) in order to visualize a idea or to create a aesthetic composition
unlike making gifs, there is no right or proper way to make a graphic so dont get too caught up in the idea that a graphic should look a certain way - just stick with your style and what you think looks good
anatomy
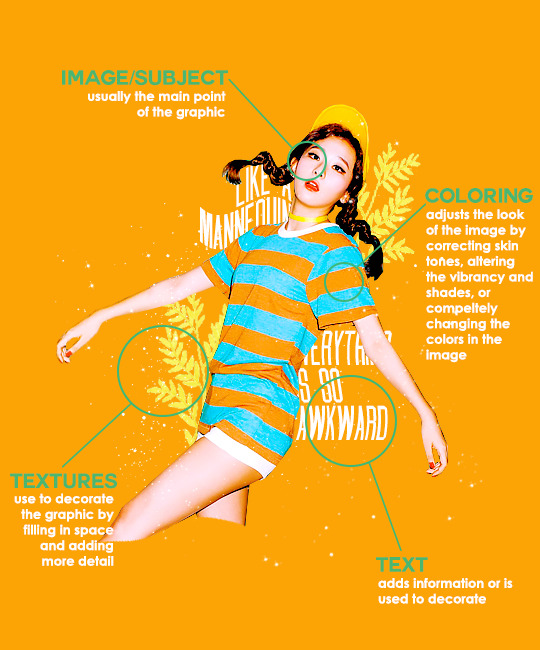
image/subject
usually the main focus of the whole graphic
you should always try to use a sharp hd picture - getting it from the original source is always the best option
make sure the source of the picture allows editing - pictures from public sources like a company or the news can be edited while fansite pics and scans need to have permission asked (and if they give you permission make sure you link them when you post your graphic!)
coloring
often referred as ‘psd’ because that is the format they are in (i.e. pink psd pack)
comprise of multiple layers that can alter the images look
a lot of people make their own colorings since the outcome of the look also depends on the image’s original coloring
textures
smaller cut out images that are often used to decorate the graphic
can also refer to a image that can be use as a background of a graphic
can be found in the form of a png (copy + paste into graphic) or a brush (”painted” on to the graphic)
avoid using any textures that does not state the original poster made them - you could unintentionally be using someone’s work that was not made to be used
[read more about it here + resources that you can actually use]
text
text can be used to tell information or just for decoration
try to choose fonts and colors that are legible
faq
what software can i use to make graphics
most people use some version of photoshop (i currently use photoshop cc 2018) and a lot people have it cracked but if you cant afford photoshop, find a cracked version or a patcher (i used adobe zii 3.0.4 for mac), or are uncomfortable with getting a cracked version then there are other softwares that are just as good!
i can only vouch for gimp since i used it when i first started making gfxs. it is very similar to photoshop and shares most of the same tools and has a similar look to photoshop. it is also probably the most popular photoshop alternative and would totally recommend it if you cant get photoshop!
[visit + download gimp here]
where do you get your pictures from
official sources such as teasers companies release, photos released by press, photos from idol’s instagram - basically photos that are made for the public to see are whats best to use for a gfx. you should download the photos straight from the source so you get it at its highest quality
some phrases you can use to search for pictures on google:
- [group name] photoshoot
- [idol name] press
- [group name] showcase
- [idol name] teaser
remember the more specific you are in your search the better! also when you search through google make sure you check your source!
avoid getting photos from reposting websites like we heart it and pinterest
avoid using fansite pictures and scans unless you are granted permission
i don’t know where to start/i’m overwhelmed and i don’t know what to do/ where should i begin
figure out what you want to make or a theme you want to follow - do you want to make a simple graphic or a infographic? do you want it to center around a certain theme like a comeback or a photoshoot? once you determine what you want to do it becomes easier getting ideas and finding stuff you will need for the gfx
example thought process:
“i want to make a loona graphic” → do you want it to be the whole group or a certain member or unit? will it just be a simple gfx or a AU gfx or based on a event that the group is doing?
“i’ve decided on doing a kim lip one” → do you want it to have a certain theme like kim lip smiling or kim lip with blonde hair? is there a certain frame of time in which you want the graphic to represent like during eclipse era or hi high era?
“i want it to be from max and match era with her teasers” → from here you can start finding pictures to use and thinking of colors and textures that would fit your theme
where do you get ideas/inspiration from
i mean it’s different for everyone but for me i literally just think of stuff and i’m like wow i want to make that happen asdfsdfj but mostly when i see pictures or watch something thats where i suddenly get a idea
but tumblr is full of graphic makers!!! ive seen so many amazing graphics from various fandoms like kpop, anime, marvel, etc.
some amazing graphic editors i know myself include:
primirene, ireone, nctjaemin, celo-mar, 1hyungseo, jeongahn, haechxnie, sonxiumin, syua, lulumelody, dinomite, lovelyeo, joohys, whatchatalkabout, yveu, maerinah, mihyon, lorbits, cherryjennie, thatporcelain, monoka, ifbin, 7ww
some other places you can look at are behance (dont go on behance if you have a cracked ver of ps - it might trigger a ingenue software alert that is a huge pain to deal with), pinterest, deviantart, dribble, and probably any social media platform if you just look up #graphicdesign
remember if you take inspiration from someone’s work then you should cite them in your caption - if you are afraid that you might’ve accidentally copied someone when you were trying to take inspiration from them its best to either try to remake the gfx again or just to ask the creator permission if its fine if certain details are similar/same
my stuff sucks how do i get better
literally just keep on making stuff aka practice. you can’t improve if you don’t bother putting effort.
ways i’ve forced myself into practicing making gfxs is by:
1) starting a gfxs series - its self paced and is based on what you want to make (i.e. introducing my biases gfx series, my favorite outfits gfx series, etc)
2) taking in requests - people who would request from you probably like your stuff so its a win win situation (i.e. send me a idol + era, send me your bias + palette, send me a group and i’ll make a gfx of my fav member, etc)
tips
only sharpen your pictures after you are done resizing them, if you sharpen and then resize it might result in a more blurry or grainy picture
always save your graphic every 5-10 mins in case photoshop crashes
have two copies of your image cutout: one will be the original and the other one will be the one you edit with - in case you mess up like over erasing or over sharpening your image you have a back up you can use
stick with a color palette so you don’t get overwhelmed when having to color everything and it makes all the graphic panels you have look more cohesive
on photoshop you can favorite fonts!!! take advantage of it!!! your computer has a lot of fonts saved on it and it takes forever to look through a whole list of fonts so by favoring fonts you can see all of the fonts that you like to use for graphics
combine a png pack to one psd → when you open a png pack you will probably get a lot of png files and it gets annoying having a lot of tabs open in photoshop when most of them are just textures so by putting all of those pngs into one psd you can cut down the files you open and can easily see all of your options
make folders dedicated to colorings and textures that way you can easily access them instead of looking through your computer for a certain file
name your layers... i dont do it because its easy for me to tell what layer is what but when you are working with a lot of layers its best just to name them it’ll make life easier
lock your main image/subject so that when you play with texts’ and textures’ location you don’t accidentally move your main image
use curves to help get a photo back to its original coloring! like if you have a photo that has a weird filter on it just use curves and it’ll help the picture look more natural! [tutorial]
try warping your text to make it stand out more! you can access it by pressing the icon on the top text bar that has a T with a curved line under it. i use flag and wave the most
alter a particular color by using a selective color layer
rather than changing the actual color of an image/texture you can:
create new layer → select the image/texture and color it on the new layer instead of on top of the image/texture → change the opacity or the mode of the layer so that the color is put on the image/texture while keeping its detailing and not affecting the actual image/texture
resources
colorings: can be found on deviantart or tumblr just look up ‘psd coloring’ or ‘[color] psd’
textures: can be found on deviantart (check to see if its og content or stolen) simply just search what you are trying to find or ‘png pack’ or ‘texture pack’
common textures you can try to find: vintage flowers, memphis shapes, organic shapes, doodles
other wesbites: pngtree, creative market, lost and taken, spoongraphics
fonts: if you are looking for a certain font then you can just do a google search but if you are browsing then dafont and font squirrel are really good websites too
some of my favorite fonts: abril fatface, agfatumc, antonellie calligraphy, arcadeclassic, bebas neue, century gothic, couture, daily news 1915, dark larch, hondurhas, kotori rose, krinkles, risingstar, sant joan despi, studly, zing rust
color palettes: i made one myself which you can find here, color hunt, and honestly a quick google search will give you tons of options
if you have any questions, other stuff you want me to cover, or want to add more resources and tips then please dm or send an ask! i hope this helps!
#i really hope this helps someone and that it makes sense#i literally woudlve been so happy if i saw this when i first started it took me so long to figure things out and im still learning#also i basically told where i got everything so like please dont take advantage of this and end up copying my gfxs... its happened to me a#lot#idk what to properly tag this alfkjasd#ps help
125 notes
·
View notes
Photo

The world is utterly unprepared for artificial intelligence in the near-term: "Media Synthesis", the phenomenon which includes deepfakes, is further along than almost anyone realizes and is prepared for, and this will result in a lot of fun and angst come the 2020s
I run the /r/MediaSynthesis subreddit, collecting links and discussions surrounding this technology. The other day, I asked /r/MachineLearning about a topic that I've been tossing about my head for almost a full decade now: when will we be able to use style transfer on audio reliably?
In the simplest possible terms, "style transfer" is when you make one thing like another using machine learning. You upload a picture of a sunny day as an input, upload a bunch of pictures of night time as variables, and then get the original picture but now it's night time. The algorithm didn't fetch a picture of the scene at a different time of day. It altered the very pixels, turning day into night.
Here's a few examples:
Color transfer
Video transfer, turning a street scene with trees into one with buildings or more trees, among other things
Musical transfer, changing instruments and genres.
All of which are from 2017 or 2018.
There's a lot more, and this includes deepfakes which I'm sure plenty of people are aware of. The potential of this technology over the next 5 years— and yes, I'm saying five years, not fifteen or twenty five or fifty— is going to lead to people with no skill in machine learning or artistry to be able to alter existing media almost completely as well as generate some kinds of new media.
Back specifically on the topic of audio style transfer, this includes being able to take a song, any song, and altering at your leisure in a variety of different ways ranging from adding or subtracting instruments, swapping the vocalist or removing them entirely, and perhaps even extending the song in an "intelligent" manner— meaning the algorithm can actually generate more sections of that song that didn't previously exist (within reason). You could turn any top 40 pop song into a 20-minute-long pop epic.
My classic desire is taking TLC's Waterfalls and turning it into a barbershop quartet, complete with the mustachioed men singing in tune with all the 1920s graininess you'd expect. Did you like Bohemian Rhapsody but could do without the heavy guitars? Why not transfer it into a polka song? That's indeed very possible. Covering songs in a different style is obviously a thing that you can already find on YouTube and "X Goes Pop" compilations whatnot, but that involves actual musicians and artists putting in the time and effort. We're not far away from having a theoretical "Audacity 2.0" where you could do the same thing with a few clicks of your mouse.
One of my more esoteric desires goes a step further, and it's also very much on the horizon. I love Witchfinder General, but they've always been a bit too amateurish. They were almost a great band, if only a few lyrics were changed and some instruments were tightened up. In the future, I could be able to "correct" these "mistakes", going in to change the lyrics myself so that Zeeb Parkes is singing something a bit different over a band that's even slower and doomier than they actually were. In some cases, that means adding lines where there weren't originally.
It would obviously still be a laborious process because vocals in songs can be complex and heavily individualized.
But that was only ever a problem for the old era of digital software, where things had to be cut up and easily able to fit into bits and pieces and then essentially standardized as if you're playing something on a synth. This new era is something entirely different and infinitely more capable. You couldn't replicate Bob Dylan's soul if you had his voice in a voice synthesis software program as might exist today.
There's no style nor soul that'll be beyond my fingers with the right neural networks.
For someone like me, who loves creating entire musical scenes and movements from playlists and imagination, that's a godsend. For an actual musician or any creative who prides themselves on their humanity, it sounds like the worst dystopia.
I'm not overselling this either. Audio is, fundamentally, a bunch of waves. If you can edit those waveforms, you can create any audio you wish. It's just that the way we edit those waveforms is usually by hitting drums, strumming guitars, pressing keyboards, and singing.
Of course, there are much darker applications of this technology. The very first thing to come to mind is putting words in someone else's mouth for political purposes, as can be demonstrated here:
Deepfakes on Obama, Putin, and others
Making Trump say new things
If the latter sounds too robotic, don't fret/relax. Making voices sound audiorealistic is just a matter of parameters and data, of which the likes of Google, Baidu, Facebook, OpenAI, and many others have no shortage. The crappy free text-to-speech programs you might find with a Google search or in a PDF file is as representative of the state of the art as a bottle rocket is of the military's explosive ordinance.
And that's literally just the tip of the iceberg. Just because I'm focusing on audio doesn't mean there's nothing for images and video, obviously. Just the opposite— everyone is so focused on deepfakes and image synthesis that we're overlooking audio synthesis.
It's not coming in stages, nor is it arriving slowly and at easily digestible and tolerable speeds as might be written in a shlock cyberpunk novel. We're not going to struggle with image synthesis for 20 years, then struggle with audio synthesis for 20 years, and so on until we reach a point in the distant future where you can't trust anything you see. We're developing them all simultaneously and seeing progress come at breakneck speeds, and we'll be well within that future this time next decade.
In fact, this time next decade we'll have entirely different zeitgeists when it comes to art, entertainment, and the news. There's no refuge in cartoons. Neural networks are in the early stages of learning how to do caricatures and exaggerations— the fundamental root of cartooning. Others can generate short animations from text alone. Even more can be used to remaster old video games and create games from scratch.
And no, you can't find refuge in writing either. Scarily enough, it's the text synthesis network that shows the most signs of general intelligence. It's not AGI by far, but it's most general AI ever created and it isn't even a very complex machine at that. But it's apparently too dangerous to be released.
If you have a passion for all of this and create art for art's sake or are willing to accept fewer (but likely much higher paid) commissions rather than a "career" as we understand it to be, you're fine. If you're someone who wants to become a career artist/model/voice actor/musician/animator/writer/comic artist/newscaster and expect to find consistent work for the next 50 years, (first, good luck regardless) make these next five to ten years count and/or try considering jumping into the former category.
We don't need AGI for any of this either, so don't think that we have to wait until we "solve intelligence" to see any of this. Nor should you expect it to cost a fortune to use. We only need GANs and most of this tech is open source.
The final and most sobering realization of all this is the cold fact that, ironically contrary to all those predictions of how automation would unfold, entertainment and the arts will be the first field to go. Everyone said that all the drudgery of the world would be automated first, freeing up workers to pursue the arts because "a machine could never write a poem, pen a song, or paint a work of art".
This is something so stupefyingly far from public conscious that there is virtually nothing being done or said about it. You might initially think that it doesn't warrant much discussion until it actually arrives, but when you really start looking at this in-depth, you have a tendency to grow a bit fatalistic. One of my future-shock angsts is about schooling and how public and private schools in their current form are utterly unable to prepare children for the future into which they will graduate (a future in which school itself may become obsolete because there will be little point for it besides social functions and raw education, which isn't what American schooling is for). This is related, but a bit different.
We have a technology that didn't exist 10 years ago and yet will almost certainly upend the entire entertainment industry within 10 years from now. Photoshops and photo manipulation, "dumbfakes" if you will, weren't even a pre-meal mint, let alone the appetizer. We ought to be having a dialog on this, but we aren't.
Many of us refuse to believe it exists at all, that it's just some schizophrenic pipe dreams found on /r/Futurology and /r/Singularity. Others so desperately want to leave a place for humans that they will deny that machines will be able to do these things competently despite being shown the evidence. And those who accept it can only say "So what?" Even though I eagerly await a world where I could generate a multimedia franchise (and the global reaction) in my bedroom on my laptop, there are still pertinent risks.
As /u/ksblur said:
Strange how we live in a world of trust-based security. It would be relatively easy for cryptography to solve that issue (your phone could automatically reject calls without proper signatures or encryption), but people grew up "trusting" the systems so there's not a lot of incentive to change it.
Could you imagine inventing the telephone in 2019 and either A) not encrypting the data (landlines) or B) using weak 64bit A5/1 encryption (GSM)?*
TLDR Skynet wants to become a singer and artist, and Dad (i.e. Humans) doesn't realize it yet.
4 notes
·
View notes
Text
I picked this program as photo editing software and it was a great choice.
For a while I was trying to find the proper photo editing software, and eventually I found it here.
The real usefulness is the ease of use of the photo editing software. The simple software was developed for all those amateur photographers who value professional photo editing software, which is both easy to use and, on top of that, the ideal solution for inexperienced users thanks to its many image editing functions. Use the photo effects of an easy-to-use image editor the moment you edit your photo. For this reason, the software that is not freeware is just as suitable for inexperienced users, as well as for experienced users who like to edit your images. What is image editing? The topic Edit Photo refers to computer-assisted optimizing of recordings or digital recordings.
U can read more in this blog: https://picsymichy.000webhostapp.com
In the special case, a digital, PC-based image processing is used to conceal errors in images that shoot most often resulting in shooting errors such as blur or red-eye and the like. Because of these errors, taken pictures are therefore often too bright and otherwise flawed. The necessary photo editing software is sometimes free photo editing, which is why this way of image editing is popular. The functions to edit digital images are extremely diverse and in many cases, in principle, only by lack of experience of the photo processor not without training period feasible.
Another potentially used field of photo editing is the effective modification of a recording. These include photographic effects such as motion effects, writing texts into a picture, mirroring an image or sharpening it. Popular photo formats to edit images include jpg and gif and many other file formats.
The tool with which a photo editing is done on the laptop, called a photo editing software. Such software for Windows allows a variety of image editing functions, which are generally displayed in a program menu and a bar with icons.
Common names for this are photo cut, photo print, eraser and also solarization and the like. Image editing tools specialize in bitmap graphics and are useful for alienating digital photos. At this point, let me just say that such photo editing tools are predominantly used to edit photos, but sometimes also as paint programs. Users searching the Internet for a photo editing software use keywords such as change image and create photo collage.
Cameron lives in Omaha, 69 years old, would soon have a lot of pretty irresistible photo editing software on the Internet.
He has been philosophizing for a while, which he may perhaps buy with his mediocre wage so much beautiful photo editing software. When playing handball in the meadow, he is full of magical things. On the other hand, he does not want to decide immediately what he definitely worries about. On this occasion, he rummages desperately for buying recommendations what he can get exciting photo editing software home. His colleague has a lot of good advice and is at his side in the selection. When he realizes what he wants to buy in the end, he sets off and finally buys these new items.
Gianna from Cleveland, aged 28, wants to get some really spectacular photo editing software on the net soon. She has been thinking for a long time about what she might really choose from her purse as quite a very interesting photo editing software for herself and her husband. When listening to music in the meadow, you will find a number of wonderful products. However, she does not want to decide immediately what she finally gets home. That's why she is researching for recommendations on what she should order rather overwhelming photo editing software.
An aunt has very useful tips and does not leave them alone in the selection. When she has made her decision on what she wants binding, she runs off and finally gets these very captivating products.
You intend to print out your pictures and rotate before? Remedy you get here by photo editing software. Such photo editing software includes explicit photo editing capabilities, as well as printing capabilities and even batch processing to automatically enhance all images. To modify photographs, there are a few ordinary photo editing software. More: https://photochamp.site123.me
You may download a photo editing software free of charge from us. The brand new version about editing an image, photo editing software and the screenshots of programs to edit the photo. The term "editing photos" refers to computer-assisted alteration of images or digital images. Specifically, PC-based photo editing is used to eradicate blemishes in an image that creep in when shooting. These include errors such as overexposure and red-eye, and the like.
Due to these photo errors, the shot shots are often not bright enough and not perfect in any other way. The photo editing software for this is often a free photo editing software, so this way of photo-optimization is very common. The possibilities to edit images are completely diverse and often can not be accomplished without problems only by lack of know-how of the user. A possibly used further field of application in the image processing is the artistic change of images. These include, among other things, image effects such as creating collages, contrast, writing texts in pictures or enlarge the photo. Source: https://atticcorner.livejournal.com
Popular classic photo formats for this are, for example, jpg and tiff, but also many other file formats.
1 note
·
View note
Text
James Moore
James Moore is an artist born in Cardiff in 1979. He studied BA(Hons) Fine Art at Manchester School of Art and MA Fine Art at Chelsea College of Art.
He specialises in photo-realistic and hyperrealistic art. He can paint in the traditional method of using oils on a canvas, and can also edit and produce work on computer software, like Photoshop. His work often plays with mimicry.
When using computer software, his digital works are often built on a variety of digital media, such as the techniques of ‘cutting’ and ‘sampling’.
Moore’s work revolves around realistic imagery. His artworks depict fake, non-existent content, or things that are impossible to see in the flesh but can still be seen as realistic or relatable to the viewer.
Moore’s digital works often use digital versions of ‘real things’, such as computer games, films, or 3D models of landscapes or the interior design of buildings. His work often highlights the ‘digital world’ that we live in, and our ever-growing detachment from real life as a society/culture. It also demonstrates a key way to ‘break the mold’ on art and it’s traditional values, methods and techniques, by turning to digital media. As we are in a Covid pandemic, and I have limited access to the university facilities, I can relate to Moore’s shift into the digital side of art, as I have also done the same for my art own practice. Moore’s works contain ‘dream-like’ imagery, collages and montages, and he also produces visual landscapes. His works explore the ideas and concepts that surround hyperreality, representation, virtual imagery, mimesis and simulacra, and how each of these themes can be explored in the conventions of painting.
Also, Moore is very keen on JG Ballard's writing and especially his ideas around the mind as a state of landscape and inner-space, rather than outer-space, being the major boundary facing humanity.
His most recent solo exhibition was 'Strange Eden' at Oriel Mwldan in 2018. Group exhibitions have included 'Abstract : Reality' and 'Into a Light' at The Saatchi Gallery, RUG in Cardiff, BEEP 2018 in Swansea, 'Twice as Nice' at PS Mirabel in Manchester and 'Like the Lines of a Hand' at Paper Gallery in Manchester. James has exhibited in Y Lle Celf at the National Eisteddfod of Wales on three occasions.

Dream Cast
2021
James Moore
A landscape painting of an exo-planet, Trappist 1D, originally rendered by NASA based on data from TRAPPIST Chile.
Price: Available on request
Dimensions: 100 x 60 (no specific measurements)

The Wasatch Range, Utah (Paramount Pictures)
2020
James Moore
Paintings of the backdrops from film company logos. Moore has always been fascinated by these immense scenes that we catch a glimpse of for a few seconds before a film starts. Recognisable locations from the virtual screen-space of a thousand movies, tying together memory and landscape. Our most iconic, dramatic landscapes are rarely those we've seen in real life.
Price: Available on request
Dimensions: 50 x 30 (no specific measurements)

Clouds near Haleakala Crater, Maui (Columbia Pictures)
2020
James Moore
Paintings of the backdrops from film company logos.
Price: Available on request
Dimensions: 50 x 30 (no specific measurements)
Terry Gilliam listening to the radio on the beach at Port Talbot, playing Brazilian salsa, 1976AD
2020
by James Moore
A history painting about the formation of the film Brasil.
For sale:Price available on request
Contact James
Dimensions: 40 x 30 (no specific measurements)
Contexts:Studio practice
Artforms:Painting
Elbe Sandstone Mountains, after Friedrich
2019
by James Moore
A landscape painting from the Elbe Sandstone Mountains, from which Friedrich painted 'Wanderer Above the Sea of Mist', and which I visited via Google Maps.
For sale:Price available on request
Contact James
Dimensions: 100 x 60 (no specific measurements)
Contexts:Exhibition , Studio practice
Artforms:Painting

Mont Sainte Victoire, After Cezanne
2019
by James Moore
A landscape painting of Mont Saint Anne Victoire, which Cezanne painted many times, and which I visited via Google Maps.
For sale:Price available on request
Contact James
Dimensions: 100 x 60 (no specific measurements)
Contexts:Exhibition , Studio practice
Artforms:Painting

Universe - Adventures on the Pleasure Planet, Near Newport, AD1992 (Part 1)
2016
by James Moore
"From a series of history paintings created for a specific exhibition, the work is based on my own memories of festivals but named after older, proper raves. In reality, I never went to these events, I was too young."
Price: Available on request
Dimensions: 30 x 20 (no specific measurements)
0 notes
Text
Easily Smooth and Soften Skin In Photoshop | High-End Retouching Techniques [FREE Action Included]
New Post has been published on https://hititem.kr/easily-smooth-and-soften-skin-in-photoshop-high-end-retouching-techniques-free-action-included/
Easily Smooth and Soften Skin In Photoshop | High-End Retouching Techniques [FREE Action Included]

Hi welcome again to the photoshoptrainingchannel.Com i’m mrs. Ramirez on this video i will exhibit you the way to delicate epidermis in Photoshop you’re going to gain knowledge of two strong epidermis softening approaches both of these tactics are non-harmful which means that that you’ll be able to be competent to come back back and make changes to your edits at any time however most importantly these approaches depart the skin texture intact so that you can offer you a wonderful tender skin with out it looking too soft or too fake the primary process will take knowledge of a brand new characteristic of Photoshop CC if you’re in an older version of Photoshop then do not worry the 2nd system will work with Photoshop cs6 it does require just a few extra steps however it offers you total manage over your photo and your skin softening effect it makes sure that you simply stick around into the very end of the tutorial in view that i’ll be sharing with you a free Photoshop retouching action this action will enable you to use the 2nd method with just one single click with the intention to start smoothing skin proper away k let’s get began that is the portrait that we’re going to work with once more this primary illustration is for the contemporary variation of Photoshop Photoshop CC if you are working on an older variation then which you could speedy ahead to the 2nd technique and you can follow together with that so with this residue chosen i’m without difficulty going to press ctrl J command J on the Mac to copy the layer this step just isn’t fairly integral however it’ll help me exhibit you a earlier than and after when we’re done now earlier than you soft the dermis of any portrait what you have got to do is eliminate significant blemishes that the skin smoothing manner would possibly not do away with in the event you zoom into your portrait you may see some greater distractions she truely does not have too many probably this one right here maybe this blemish there it is now not a lot however we’ll cast off it now that way matters are so much less complicated once we apply the dermis smoothing method so what you wish to have to do is create a brand new layer to work and under strucked capability we’re gonna make all our adjustments in this layer i am gonna rename it and i will call it Spot treatment considering that i’m going to use the Spot treatment Brush device with that layer selected go into the Spot cure Brush device found within the tools bar make certain that sample all layers is selected and earlier than we simply begin working with it I wish to show you one factor i will use a right bracket key on the keyboard to make the brush bigger you will discover the preview there that suggests you how giant your brush is when you do not see that that is on the grounds that the caps lock secret’s enabled so if you happen to see a crosser like that one just tap on the caps lock key to disable it and the comb preview comes again so what I need to show you is how most folks work with this tool most humans simply work with this device with the ordinary surroundings become aware of that the mode is about to average and that simply means that Photoshop samples pixels relying on the place you paint and probably that that is a really just right job sadly in the event you zoom in you’ll be able to notice that mostly it destroys the feel of the dermis and that’s because we’re focusing on all pixels and ordinarily we do not want to do that we wish to goal unique pixels so i’m going to undo these changes and what you need to do is select your Spot remedy Brush software then in the mode decide upon either darken or lighten the mode that you simply decide upon is determined by the blemish or distraction that you’re looking to put off if the distraction is starker than the epidermis tone pick lighten if the distraction it can be brighter than the epidermis tone pick darken so let me show you ways this works i’m going to click on lighten and i’m just going to disposing of some of these distractions and observe that as I do this i am now not destroying the highlights of the picture i’m just eliminating the darker pixels so i am taking away the darker blemishes and preserving the intense areas to be able to permit me to maintain the epidermis texture so i will double click on on the hand instrument to suit the image to display and i will simply take away one of the most darker blemishes within the snapshot quite swiftly right here she honestly does not have too many i am simply displaying you simply in the event that your image has larger blemishes that the skin smoothing manner won’t eliminate so i am simply putting off a few of these blemishes and that is the earlier than and the after rather quickly we had been capable to wash up her face i’m gonna zoom into the corner over her mouth and there’s a white spot there that I need to do away with however watch what happens with that same process if I make my brush slightly smaller with the left bracket key and faucet it will now not do away with that distraction seeing that it’s brighter than the skintone so i do not need to lighten it alternatively I want to darken it so i’m going to prefer darken and i’m going to simply eliminate that blemish and realize how I didn’t have an effect on the shadows within the darker pixels only the brighter pixels and that’s why I propose using modes due to the fact that you will eliminate handiest the pixels that you are concentrating on and i will be able to switch in between them i will be able to go back in to lighten and just might be dispose of a few of these spots however this is fairly no longer fundamental the epidermis smoothing manner will eliminate these spots i will double click on on the hand device again to fit the snapshot to display and you can find the earlier than in the after so when you eliminate the greater blemishes out of your image what you must do is decide upon your Spot healing layer maintain shift and opt for your portrait layer and correct click and choose convert to shrewd object with a purpose to location the two layers into a shrewd object a shrewd object is a container they are able to hold a number of layers and that you could observe changes distortions and filters non-destructively which means that that you may at all times come again and edit them at any time so with this sediment chosen i go to go into filter camera uncooked filter and the digital camera raw filter enables you to regulate the tonality colour in small print of a photograph and that is what we’re gonna use to create lovely tender dermis we’ll use one of the vital manufacturer new sliders in Photoshop CC the feel slider which will also be found in the general panel right above the D haze and readability sliders i’m going to zoom in so that you could see how it works the feel slider allows you to increase texture or decrease texture so detect that when I cut back the texture it smooths out the skin I might now not wish to go the entire technique to the left might be at about negative seventy five and if that’s still not gentle ample for you that you could alter the readability you deliver the readability back down to the poor values it would also smooth out the skin I commonly do not wish to go too a long way with the clarity and if you wish to be taught more in regards to the texture and the hay sliders then i’ve a video on adjusting texture and Photoshop I give an explanation for in a lot of detail what these sliders accomplish that I particularly endorse staring at that video i will place a hyperlink down under within the description however anyway while you set your texture down you could want to go into the element tab and just add a bit bit of sharpening just so that you simply get a few of that skin texture back also here is a trick for you in case you maintain alt alternative on the Mac and click on that protecting slider detect how the snapshot turns white that signifies that the entire picture is being affected by that sharpening outcomes if I drag to the proper best the areas in white might be affected so perhaps which you can regulate that accordingly depending to your portrait in this case it particularly will not be gonna make a colossal difference so i’ll go away it at zero but that tip may be relatively quite valuable for different forms of graphics so once you will have set your sharpening that you could just press ok and Photoshop applies that outcomes but it applies it to the complete picture and we don’t want that we only want to observe to exact parts of the photo so what we’re gonna do is click on on the layer masks for the intelligent filter and we will then press ctrl I command I on the Mac to invert or you could click on the invert button in the properties panel to invert the masks discover now how the masks is wholly black that implies that the whole lot is hidden with a mask black hides white exhibits in the exceptional stages of gray give you one of a kind phases of transparency so what i am gonna do now is with the comb software i will ensure that my foreground colour is about to white which it’s and i am just gonna paint in the areas the place I want to follow the epidermis smoothing results so no longer every or just within the areas that require a little bit little bit of smoothing and so one can rapidly soft out her dermis we are going to be competent to see various detail and all that is non-destructive we are able to edit it so if I make a mistake i can just paint with black and cast off the effect from that field switch back to white and i’m switching between white and black via clicking on this arrow you might additionally press the X key on the keyboard or swap backward and forward and simply paint with white in the areas the place you wish to have the effect i will zoom in simply exhibit you one more thing you would additionally use a mode with the digicam raw filter much like we use with the Spot therapy Brush software and if you wish to use a mode that you would be able to double click on this icon here which brings up this window this window is rather a lot like the fade command it permits you to carry down the opacity of the filter and it also makes it possible for you to change the mixing mode for you to alternate the blending mode to lighten and become aware of how so much brighter the highlights get so if you want to preserve the customary highlights exchange the blending mode to lighten i’m gonna maintain it at usual given that I think it appears higher in my case and opacity at a hundred works I just desired to give you that alternative if your portrait requires it i’m going to press adequate and we’re again to where I used to be before what i’m gonna do now could be with no trouble double click on on the hand tool and click on on this eye icon so as to see that before and the after much a lot better also due to the fact all this is non-harmful you can continually double click on the camera raw filter label and make additional adjustments that you can are available and alter how so much texture we’re gonna have how a lot sharpening you are going to use press adequate when you are achieved and Photoshop applies these new adjustments to your file as soon as again earlier than and after and as you’ll find it is a very strong procedure for smoothing skin in Photoshop I highly advocate that you use it what i am gonna do now is show you learn how to do something similar in an older version of Photoshop it’s gonna require just a few more steps and i will furnish an motion you can quite simply run and follow the effect your pix to save you a little bit little bit of time first i’ll exhibit you ways the technique works after which i will exhibit you where that you may down load the free motion the first step is to prefer the portrait layer proper click on and select convert to clever object and i’m going to press ctrl J on windows command J on the Mac to replicate that layer one time and i will do this once more to replicate it a 2nd time so now i have three intelligent objects it’s foremost to note that while you replica a clever object they continue to be linked to the customary so in case you change the contents of 1 it’ll trade the contents of all and that’s gonna be fairly fundamental later on in the tutorial for now i’m going to situation these sensible Objects into a gaggle so i will pick them both with the aid of maintaining shift and urgent manage G on home windows command G on the Mac and i’m going to expand the team so that i will be able to see the contents and i’m going to work with the bottom photo first and even though i don’t ought to i’m going to disable this layer as a way to be certain that i’m best working with this primary to placate and what i am gonna do is i’ll apply a filter i’m going to practice the blur filter so i’m going to identify this sediment blur then go into the filter menu and prefer blur Gaussian blur and that is going to blur my photograph and what you want to do is simply blur it as much as a point where you lose all details so in this case we will take it as much as maybe 6 pixels and we’re shedding all of the detail within the photograph and what the blur filter does is cast off excessive frequency information if you don’t know what frequency is or what it approach then investigate out that video I referenced prior within the tutorial the one about bettering textures in that video i am going into first-rate detail about what frequency is the way it works and what you are able to do with it so watch that video i’m inserting a hyperlink proper below in the description but anyway simply know that Gaussian blur gets rid of element high frequency expertise 6 pixels i’m going to press ok i’m gonna allow now the 2d layer and with this sediment we will follow another filter and we will use the high-go filter high-pass is the opposite of blur it removes the low frequency expertise so it most effective maintains the small print and texture of a layer so i’m gonna go into filter different excessive move and i will enter precisely the equal price 6 pixels and i’ll press ok then i will alternate the mixing mode of this deposit to blender with the layer beneath and i’m going to pick linear mild after which convey the opacity all the way down to 50% and that almost gives us the same picture that we began with i’ll permit the portrait layer and if I disable the attention icon for team you’ll discover that it can be very nearly the identical photograph is fairly special and that is seeing that we use the filters to separate every frequency and put it in its own layer then we use the blending mode to combine the frequencies and give us the common snapshot back so now we have now the feel on one layer and the colours and one other layer and we will alter each and every layer independently to melt the dermis and the intent that I went through that lengthy rationalization is so that you understood what those filters did at the back of the scenes now that you already know what these filters are doing we’re gonna change the settings so that we will get smoother dermis and reduce the depth of the epidermis texture and we will start with the blur filter within the blur layer as a way to click on the Gaussian blur label and perhaps broaden this to about 8 pixels so we get a so much much smoother transition of her dermis tones and i will double click on high-move and lower it so it reduces down to 3 pixels and press good enough and that is the nice thing about working with shrewd Objects that you could perpetually come again and make changes later so these settings on work i will consistently modify them so with the team selected i am just gonna double click on the name to rename it and i’ll call it skin softening and i will create a layer masks but i’ll preserve alt as I click on the layer masks icon which is choice on the Mac to create a black masks which hides the whole thing in that group and i will be able to quite simply paint with white on that masks to disclose the effect like so so become aware of how i am simply revealing that epidermis softening influence on these areas that is very similar to what we did in the prior illustration and i’m going rather quickly right here but obviously take your time for your snapshot and i’ll click on on the eye icon with the intention to see that before within the after and you often have already noticed one factor that I did not do my Spot remedy Brush software adjustment and that is why i have a blemish here and one of the most blemishes on her nostril so do not forget this can be a clever object we will at all times come again and edit it so if I double-click on the wise object it’s going to open up in a new tab and i will be able to do the equal system create a brand new layer decide on the Spot treatment Brush software make certain that lightin is my mode and i can simply paint away some of these better blemishes that you just see here her nose and on other areas of her dermis the white on her mouth so I converted it to the darken mode on the spot healing Brush instrument i’m going to rapidly dispose of these white dots then i will close a clever object reserve it and those changes are utilized to the photograph do not forget these wise objects are linked so the updates will happen on all occasions of those duplicated smart objects and that is the fine thing about working with smart objects which you can constantly come back and edit your adjustments that manner you get the exceptional tender dermis as feasible once more these changes are all subjective do what works great to your photograph however by and large speaking you do not need to push the outcome too a ways however that’s as much as you to make a decision what I want to do now could be show you the free motion that I recounted previous within the tutorial this motion will support you create all these layers and folder just with one single click on so examine out the hyperlink down below within the description so where to down load the file when you download your file into your pc deliver it into Photoshop and the way in which that you’d do that is by going into the moves panel that you may click on this icon or go into the window menu in actions and click on on the flyout menu and decide on load movements and cargo that etienne file onto your computer and also you must see a dermis softening action you understand you must do is hit the play icon the action will run Photoshop will ask you ways much blur you want to add so I feel I added six pixels to start with in this video so press adequate then the motion will ask you how much excessive move you wish to have so as to add i’ll go to 2 in this case press good enough and you’ll be able to have instructional materials on what to do next paint with white using the brush instrument on the corporations layer mask to reveal the softening result and that you can examine out extra of my tutorials on my internet site p.C.Viscom and this is who i’m i’m going to press stop and i can proceed working with the brush software i can paint with white on the team’s layer masks to disclose the dermis smoothing result when you broaden the staff you will see the layers on the action created and you will see a further layer that i did not show within the tutorial this blur at its layer makes it possible for you to locally excellent-tune the blur in other words which you can blur small parts of the picture without affecting the leisure of the snapshot let me exhibit you how it works decide upon the lasso software in the choices bar add feather the feather determines how smooth the brink of the choice can be I don’t want the sharp determination so i’m going to use a feather of 10 pixels then make a selection around the part of the face that you wish to edit i will choose her forehead then go into filter blur Gaussian blur and increase the blur unless you may have a delicate soft area without blotches of color and press ok then i will press control D on home windows command D on the Mac to deselect i will fall down the moves panel and disable the blur edits layer to exhibit you the before and the after you will see how so much smoother the dermis appears on this field in a real project i might ought to go and high-quality-tune one of the edges of course but I suppose that you just get the concept how this works and incidentally let me be aware of within the comments beneath what you believe about these techniques should you like them then click on on that like button now additionally if you are manufacturer new to the Photoshop coaching Channel then remember to click on that subscribe and notification buttons that approach you are notified whenever I submit a new tutorial and you don’t miss any new Photoshop hints and tricks also if you happen to loved this video then do not forget to determine out my tutorial on creating skin texture from scratch is one among my 90 2nd Photoshop pointers i’m going to location a hyperlink to that video correct beneath within the description thank you so much for watching and i will speak to you again in the subsequent Photoshop tutorial
0 notes
Text
Easily Smooth and Soften Skin In Photoshop | High-End Retouching Techniques [FREE Action Included]
New Post has been published on https://hititem.kr/easily-smooth-and-soften-skin-in-photoshop-high-end-retouching-techniques-free-action-included/
Easily Smooth and Soften Skin In Photoshop | High-End Retouching Techniques [FREE Action Included]
Hi welcome again to the photoshoptrainingchannel.Com i’m mrs. Ramirez on this video i will exhibit you the way to delicate epidermis in Photoshop you’re going to gain knowledge of two strong epidermis softening approaches both of these tactics are non-harmful which means that that you’ll be able to be competent to come back back and make changes to your edits at any time however most importantly these approaches depart the skin texture intact so that you can offer you a wonderful tender skin with out it looking too soft or too fake the primary process will take knowledge of a brand new characteristic of Photoshop CC if you’re in an older version of Photoshop then do not worry the 2nd system will work with Photoshop cs6 it does require just a few extra steps however it offers you total manage over your photo and your skin softening effect it makes sure that you simply stick around into the very end of the tutorial in view that i’ll be sharing with you a free Photoshop retouching action this action will enable you to use the 2nd method with just one single click with the intention to start smoothing skin proper away k let’s get began that is the portrait that we’re going to work with once more this primary illustration is for the contemporary variation of Photoshop Photoshop CC if you are working on an older variation then which you could speedy ahead to the 2nd technique and you can follow together with that so with this residue chosen i’m without difficulty going to press ctrl J command J on the Mac to copy the layer this step just isn’t fairly integral however it’ll help me exhibit you a earlier than and after when we’re done now earlier than you soft the dermis of any portrait what you have got to do is eliminate significant blemishes that the skin smoothing manner would possibly not do away with in the event you zoom into your portrait you may see some greater distractions she truely does not have too many probably this one right here maybe this blemish there it is now not a lot however we’ll cast off it now that way matters are so much less complicated once we apply the dermis smoothing method so what you wish to have to do is create a brand new layer to work and under strucked capability we’re gonna make all our adjustments in this layer i am gonna rename it and i will call it Spot treatment considering that i’m going to use the Spot treatment Brush device with that layer selected go into the Spot cure Brush device found within the tools bar make certain that sample all layers is selected and earlier than we simply begin working with it I wish to show you one factor i will use a right bracket key on the keyboard to make the brush bigger you will discover the preview there that suggests you how giant your brush is when you do not see that that is on the grounds that the caps lock secret’s enabled so if you happen to see a crosser like that one just tap on the caps lock key to disable it and the comb preview comes again so what I need to show you is how most folks work with this tool most humans simply work with this device with the ordinary surroundings become aware of that the mode is about to average and that simply means that Photoshop samples pixels relying on the place you paint and probably that that is a really just right job sadly in the event you zoom in you’ll be able to notice that mostly it destroys the feel of the dermis and that’s because we’re focusing on all pixels and ordinarily we do not want to do that we wish to goal unique pixels so i’m going to undo these changes and what you need to do is select your Spot remedy Brush software then in the mode decide upon either darken or lighten the mode that you simply decide upon is determined by the blemish or distraction that you’re looking to put off if the distraction is starker than the epidermis tone pick lighten if the distraction it can be brighter than the epidermis tone pick darken so let me show you ways this works i’m going to click on lighten and i’m just going to disposing of some of these distractions and observe that as I do this i am now not destroying the highlights of the picture i’m just eliminating the darker pixels so i am taking away the darker blemishes and preserving the intense areas to be able to permit me to maintain the epidermis texture so i will double click on on the hand instrument to suit the image to display and i will simply take away one of the most darker blemishes within the snapshot quite swiftly right here she honestly does not have too many i am simply displaying you simply in the event that your image has larger blemishes that the skin smoothing manner won’t eliminate so i am simply putting off a few of these blemishes and that is the earlier than and the after rather quickly we had been capable to wash up her face i’m gonna zoom into the corner over her mouth and there’s a white spot there that I need to do away with however watch what happens with that same process if I make my brush slightly smaller with the left bracket key and faucet it will now not do away with that distraction seeing that it’s brighter than the skintone so i do not need to lighten it alternatively I want to darken it so i’m going to prefer darken and i’m going to simply eliminate that blemish and realize how I didn’t have an effect on the shadows within the darker pixels only the brighter pixels and that’s why I propose using modes due to the fact that you will eliminate handiest the pixels that you are concentrating on and i will be able to switch in between them i will be able to go back in to lighten and just might be dispose of a few of these spots however this is fairly no longer fundamental the epidermis smoothing manner will eliminate these spots i will double click on on the hand device again to fit the snapshot to display and you can find the earlier than in the after so when you eliminate the greater blemishes out of your image what you must do is decide upon your Spot healing layer maintain shift and opt for your portrait layer and correct click and choose convert to shrewd object with a purpose to location the two layers into a shrewd object a shrewd object is a container they are able to hold a number of layers and that you could observe changes distortions and filters non-destructively which means that that you may at all times come again and edit them at any time so with this sediment chosen i go to go into filter camera uncooked filter and the digital camera raw filter enables you to regulate the tonality colour in small print of a photograph and that is what we’re gonna use to create lovely tender dermis we’ll use one of the vital manufacturer new sliders in Photoshop CC the feel slider which will also be found in the general panel right above the D haze and readability sliders i’m going to zoom in so that you could see how it works the feel slider allows you to increase texture or decrease texture so detect that when I cut back the texture it smooths out the skin I might now not wish to go the entire technique to the left might be at about negative seventy five and if that’s still not gentle ample for you that you could alter the readability you deliver the readability back down to the poor values it would also smooth out the skin I commonly do not wish to go too a long way with the clarity and if you wish to be taught more in regards to the texture and the hay sliders then i’ve a video on adjusting texture and Photoshop I give an explanation for in a lot of detail what these sliders accomplish that I particularly endorse staring at that video i will place a hyperlink down under within the description however anyway while you set your texture down you could want to go into the element tab and just add a bit bit of sharpening just so that you simply get a few of that skin texture back also here is a trick for you in case you maintain alt alternative on the Mac and click on that protecting slider detect how the snapshot turns white that signifies that the entire picture is being affected by that sharpening outcomes if I drag to the proper best the areas in white might be affected so perhaps which you can regulate that accordingly depending to your portrait in this case it particularly will not be gonna make a colossal difference so i’ll go away it at zero but that tip may be relatively quite valuable for different forms of graphics so once you will have set your sharpening that you could just press ok and Photoshop applies that outcomes but it applies it to the complete picture and we don’t want that we only want to observe to exact parts of the photo so what we’re gonna do is click on on the layer masks for the intelligent filter and we will then press ctrl I command I on the Mac to invert or you could click on the invert button in the properties panel to invert the masks discover now how the masks is wholly black that implies that the whole lot is hidden with a mask black hides white exhibits in the exceptional stages of gray give you one of a kind phases of transparency so what i am gonna do now is with the comb software i will ensure that my foreground colour is about to white which it’s and i am just gonna paint in the areas the place I want to follow the epidermis smoothing results so no longer every or just within the areas that require a little bit little bit of smoothing and so one can rapidly soft out her dermis we are going to be competent to see various detail and all that is non-destructive we are able to edit it so if I make a mistake i can just paint with black and cast off the effect from that field switch back to white and i’m switching between white and black via clicking on this arrow you might additionally press the X key on the keyboard or swap backward and forward and simply paint with white in the areas the place you wish to have the effect i will zoom in simply exhibit you one more thing you would additionally use a mode with the digicam raw filter much like we use with the Spot therapy Brush software and if you wish to use a mode that you would be able to double click on this icon here which brings up this window this window is rather a lot like the fade command it permits you to carry down the opacity of the filter and it also makes it possible for you to change the mixing mode for you to alternate the blending mode to lighten and become aware of how so much brighter the highlights get so if you want to preserve the customary highlights exchange the blending mode to lighten i’m gonna maintain it at usual given that I think it appears higher in my case and opacity at a hundred works I just desired to give you that alternative if your portrait requires it i’m going to press adequate and we’re again to where I used to be before what i’m gonna do now could be with no trouble double click on on the hand tool and click on on this eye icon so as to see that before and the after much a lot better also due to the fact all this is non-harmful you can continually double click on the camera raw filter label and make additional adjustments that you can are available and alter how so much texture we’re gonna have how a lot sharpening you are going to use press adequate when you are achieved and Photoshop applies these new adjustments to your file as soon as again earlier than and after and as you’ll find it is a very strong procedure for smoothing skin in Photoshop I highly advocate that you use it what i am gonna do now is show you learn how to do something similar in an older version of Photoshop it’s gonna require just a few more steps and i will furnish an motion you can quite simply run and follow the effect your pix to save you a little bit little bit of time first i’ll exhibit you ways the technique works after which i will exhibit you where that you may down load the free motion the first step is to prefer the portrait layer proper click on and select convert to clever object and i’m going to press ctrl J on windows command J on the Mac to replicate that layer one time and i will do this once more to replicate it a 2nd time so now i have three intelligent objects it’s foremost to note that while you replica a clever object they continue to be linked to the customary so in case you change the contents of 1 it’ll trade the contents of all and that’s gonna be fairly fundamental later on in the tutorial for now i’m going to situation these sensible Objects into a gaggle so i will pick them both with the aid of maintaining shift and urgent manage G on home windows command G on the Mac and i’m going to expand the team so that i will be able to see the contents and i’m going to work with the bottom photo first and even though i don’t ought to i’m going to disable this layer as a way to be certain that i’m best working with this primary to placate and what i am gonna do is i’ll apply a filter i’m going to practice the blur filter so i’m going to identify this sediment blur then go into the filter menu and prefer blur Gaussian blur and that is going to blur my photograph and what you want to do is simply blur it as much as a point where you lose all details so in this case we will take it as much as maybe 6 pixels and we’re shedding all of the detail within the photograph and what the blur filter does is cast off excessive frequency information if you don’t know what frequency is or what it approach then investigate out that video I referenced prior within the tutorial the one about bettering textures in that video i am going into first-rate detail about what frequency is the way it works and what you are able to do with it so watch that video i’m inserting a hyperlink proper below in the description but anyway simply know that Gaussian blur gets rid of element high frequency expertise 6 pixels i’m going to press ok i’m gonna allow now the 2d layer and with this sediment we will follow another filter and we will use the high-go filter high-pass is the opposite of blur it removes the low frequency expertise so it most effective maintains the small print and texture of a layer so i’m gonna go into filter different excessive move and i will enter precisely the equal price 6 pixels and i’ll press ok then i will alternate the mixing mode of this deposit to blender with the layer beneath and i’m going to pick linear mild after which convey the opacity all the way down to 50% and that almost gives us the same picture that we began with i’ll permit the portrait layer and if I disable the attention icon for team you’ll discover that it can be very nearly the identical photograph is fairly special and that is seeing that we use the filters to separate every frequency and put it in its own layer then we use the blending mode to combine the frequencies and give us the common snapshot back so now we have now the feel on one layer and the colours and one other layer and we will alter each and every layer independently to melt the dermis and the intent that I went through that lengthy rationalization is so that you understood what those filters did at the back of the scenes now that you already know what these filters are doing we’re gonna change the settings so that we will get smoother dermis and reduce the depth of the epidermis texture and we will start with the blur filter within the blur layer as a way to click on the Gaussian blur label and perhaps broaden this to about 8 pixels so we get a so much much smoother transition of her dermis tones and i will double click on high-move and lower it so it reduces down to 3 pixels and press good enough and that is the nice thing about working with shrewd Objects that you could perpetually come again and make changes later so these settings on work i will consistently modify them so with the team selected i am just gonna double click on the name to rename it and i’ll call it skin softening and i will create a layer masks but i’ll preserve alt as I click on the layer masks icon which is choice on the Mac to create a black masks which hides the whole thing in that group and i will be able to quite simply paint with white on that masks to disclose the effect like so so become aware of how i am simply revealing that epidermis softening influence on these areas that is very similar to what we did in the prior illustration and i’m going rather quickly right here but obviously take your time for your snapshot and i’ll click on on the eye icon with the intention to see that before within the after and you often have already noticed one factor that I did not do my Spot remedy Brush software adjustment and that is why i have a blemish here and one of the most blemishes on her nostril so do not forget this can be a clever object we will at all times come again and edit it so if I double-click on the wise object it’s going to open up in a new tab and i will be able to do the equal system create a brand new layer decide on the Spot treatment Brush software make certain that lightin is my mode and i can simply paint away some of these better blemishes that you just see here her nose and on other areas of her dermis the white on her mouth so I converted it to the darken mode on the spot healing Brush instrument i’m going to rapidly dispose of these white dots then i will close a clever object reserve it and those changes are utilized to the photograph do not forget these wise objects are linked so the updates will happen on all occasions of those duplicated smart objects and that is the fine thing about working with smart objects which you can constantly come back and edit your adjustments that manner you get the exceptional tender dermis as feasible once more these changes are all subjective do what works great to your photograph however by and large speaking you do not need to push the outcome too a ways however that’s as much as you to make a decision what I want to do now could be show you the free motion that I recounted previous within the tutorial this motion will support you create all these layers and folder just with one single click on so examine out the hyperlink down below within the description so where to down load the file when you download your file into your pc deliver it into Photoshop and the way in which that you’d do that is by going into the moves panel that you may click on this icon or go into the window menu in actions and click on on the flyout menu and decide on load movements and cargo that etienne file onto your computer and also you must see a dermis softening action you understand you must do is hit the play icon the action will run Photoshop will ask you ways much blur you want to add so I feel I added six pixels to start with in this video so press adequate then the motion will ask you how much excessive move you wish to have so as to add i’ll go to 2 in this case press good enough and you’ll be able to have instructional materials on what to do next paint with white using the brush instrument on the corporations layer mask to reveal the softening result and that you can examine out extra of my tutorials on my internet site p.C.Viscom and this is who i’m i’m going to press stop and i can proceed working with the brush software i can paint with white on the team’s layer masks to disclose the dermis smoothing result when you broaden the staff you will see the layers on the action created and you will see a further layer that i did not show within the tutorial this blur at its layer makes it possible for you to locally excellent-tune the blur in other words which you can blur small parts of the picture without affecting the leisure of the snapshot let me exhibit you how it works decide upon the lasso software in the choices bar add feather the feather determines how smooth the brink of the choice can be I don’t want the sharp determination so i’m going to use a feather of 10 pixels then make a selection around the part of the face that you wish to edit i will choose her forehead then go into filter blur Gaussian blur and increase the blur unless you may have a delicate soft area without blotches of color and press ok then i will press control D on home windows command D on the Mac to deselect i will fall down the moves panel and disable the blur edits layer to exhibit you the before and the after you will see how so much smoother the dermis appears on this field in a real project i might ought to go and high-quality-tune one of the edges of course but I suppose that you just get the concept how this works and incidentally let me be aware of within the comments beneath what you believe about these techniques should you like them then click on on that like button now additionally if you are manufacturer new to the Photoshop coaching Channel then remember to click on that subscribe and notification buttons that approach you are notified whenever I submit a new tutorial and you don’t miss any new Photoshop hints and tricks also if you happen to loved this video then do not forget to determine out my tutorial on creating skin texture from scratch is one among my 90 2nd Photoshop pointers i’m going to location a hyperlink to that video correct beneath within the description thank you so much for watching and i will speak to you again in the subsequent Photoshop tutorial
0 notes
Text
The world is utterly unprepared for artificial intelligence in the near-term: "Media Synthesis", the phenomenon which includes deepfakes, is further along than almost anyone realizes and is prepared for, and this will result in a lot of fun and angst come the 2020s
I run the /r/MediaSynthesis subreddit, collecting links and discussions surrounding this technology. The other day, I asked /r/MachineLearning about a topic that I've been tossing about my head for almost a full decade now: when will we be able to use style transfer on audio reliably?
In the simplest possible terms, "style transfer" is when you make one thing like another using machine learning. You upload a picture of a sunny day as an input, upload a bunch of pictures of night time as variables, and then get the original picture but now it's night time. The algorithm didn't fetch a picture of the scene at a different time of day. It altered the very pixels, turning day into night.
Here's a few examples:
Color transfer
Video transfer, turning a street scene with trees into one with buildings or more trees, among other things
Musical transfer, changing instruments and genres.
All of which are from 2017 or 2018.
There's a lot more, and this includes deepfakes which I'm sure plenty of people are aware of. The potential of this technology over the next 5 years— and yes, I'm saying five years, not fifteen or twenty five or fifty— is going to lead to people with no skill in machine learning or artistry to be able to alter existing media almost completely as well as generate some kinds of new media.
Back specifically on the topic of audio style transfer, this includes being able to take a song, any song, and altering at your leisure in a variety of different ways ranging from adding or subtracting instruments, swapping the vocalist or removing them entirely, and perhaps even extending the song in an "intelligent" manner— meaning the algorithm can actually generate more sections of that song that didn't previously exist (within reason). You could turn any top 40 pop song into a 20-minute-long pop epic.
My classic desire is taking TLC's Waterfalls and turning it into a barbershop quartet, complete with the mustachioed men singing in tune with all the 1920s graininess you'd expect. Did you like Bohemian Rhapsody but could do without the heavy guitars? Why not transfer it into a polka song? That's indeed very possible. Covering songs in a different style is obviously a thing that you can already find on YouTube and "X Goes Pop" compilations whatnot, but that involves actual musicians and artists putting in the time and effort. We're not far away from having a theoretical "Audacity 2.0" where you could do the same thing with a few clicks of your mouse.
One of my more esoteric desires goes a step further, and it's also very much on the horizon. I love Witchfinder General, but they've always been a bit too amateurish. They were almost a great band, if only a few lyrics were changed and some instruments were tightened up. In the future, I could be able to "correct" these "mistakes", going in to change the lyrics myself so that Zeeb Parkes is singing something a bit different over a band that's even slower and doomier than they actually were. In some cases, that means adding lines where there weren't originally.
It would obviously still be a laborious process because vocals in songs can be complex and heavily individualized.
But that was only ever a problem for the old era of digital software, where things had to be cut up and easily able to fit into bits and pieces and then essentially standardized as if you're playing something on a synth. This new era is something entirely different and infinitely more capable. You couldn't replicate Bob Dylan's soul if you had his voice in a voice synthesis software program as might exist today.
There's no style nor soul that'll be beyond my fingers with the right neural networks.
For someone like me, who loves creating entire musical scenes and movements from playlists and imagination, that's a godsend. For an actual musician or any creative who prides themselves on their humanity, it sounds like the worst dystopia.
I'm not overselling this either. Audio is, fundamentally, a bunch of waves. If you can edit those waveforms, you can create any audio you wish. It's just that the way we edit those waveforms is usually by hitting drums, strumming guitars, pressing keyboards, and singing.
Of course, there are much darker applications of this technology. The very first thing to come to mind is putting words in someone else's mouth for political purposes, as can be demonstrated here:
Deepfakes on Obama, Putin, and others
Making Trump say new things
If the latter sounds too robotic, don't fret/relax. Making voices sound audiorealistic is just a matter of parameters and data, of which the likes of Google, Baidu, Facebook, OpenAI, and many others have no shortage. The crappy free text-to-speech programs you might find with a Google search or in a PDF file is as representative of the state of the art as a bottle rocket is of the military's explosive ordinance.
And that's literally just the tip of the iceberg. Just because I'm focusing on audio doesn't mean there's nothing for images and video, obviously. Just the opposite— everyone is so focused on deepfakes and image synthesis that we're overlooking audio synthesis.
It's not coming in stages, nor is it arriving slowly and at easily digestible and tolerable speeds as might be written in a shlock cyberpunk novel. We're not going to struggle with image synthesis for 20 years, then struggle with audio synthesis for 20 years, and so on until we reach a point in the distant future where you can't trust anything you see. We're developing them all simultaneously and seeing progress come at breakneck speeds, and we'll be well within that future this time next decade.
In fact, this time next decade we'll have entirely different zeitgeists when it comes to art, entertainment, and the news. There's no refuge in cartoons. Neural networks are in the early stages of learning how to do caricatures and exaggerations— the fundamental root of cartooning. Others can generate short animations from text alone. Even more can be used to remaster old video games and create games from scratch.
And no, you can't find refuge in writing either. Scarily enough, it's the text synthesis network that shows the most signs of general intelligence. It's not AGI by far, but it's most general AI ever created and it isn't even a very complex machine at that. But it's apparently too dangerous to be released.
If you have a passion for all of this and create art for art's sake or are willing to accept fewer (but likely much higher paid) commissions rather than a "career" as we understand it to be, you're fine. If you're someone who wants to become a career artist/model/voice actor/musician/animator/writer/comic artist/newscaster and expect to find consistent work for the next 50 years, (first, good luck regardless) make these next five to ten years count and/or try considering jumping into the former category.
We don't need AGI for any of this either, so don't think that we have to wait until we "solve intelligence" to see any of this. Nor should you expect it to cost a fortune to use. We only need GANs and most of this tech is open source.
The final and most sobering realization of all this is the cold fact that, ironically contrary to all those predictions of how automation would unfold, entertainment and the arts will be the first field to go. Everyone said that all the drudgery of the world would be automated first, freeing up workers to pursue the arts because "a machine could never write a poem, pen a song, or paint a work of art".
This is something so stupefyingly far from public conscious that there is virtually nothing being done or said about it. You might initially think that it doesn't warrant much discussion until it actually arrives, but when you really start looking at this in-depth, you have a tendency to grow a bit fatalistic. One of my future-shock angsts is about schooling and how public and private schools in their current form are utterly unable to prepare children for the future into which they will graduate (a future in which school itself may become obsolete because there will be little point for it besides social functions and raw education, which isn't what American schooling is for). This is related, but a bit different.
We have a technology that didn't exist 10 years ago and yet will almost certainly upend the entire entertainment industry within 10 years from now. Photoshops and photo manipulation, "dumbfakes" if you will, weren't even a pre-meal mint, let alone the appetizer. We ought to be having a dialog on this, but we aren't.
Many of us refuse to believe it exists at all, that it's just some schizophrenic pipe dreams found on /r/Futurology and /r/Singularity. Others so desperately want to leave a place for humans that they will deny that machines will be able to do these things competently despite being shown the evidence. And those who accept it can only say "So what?" Even though I eagerly await a world where I could generate a multimedia franchise (and the global reaction) in my bedroom on my laptop, there are still pertinent risks.
As /u/ksblur said:
Strange how we live in a world of trust-based security. It would be relatively easy for cryptography to solve that issue (your phone could automatically reject calls without proper signatures or encryption), but people grew up "trusting" the systems so there's not a lot of incentive to change it.
Could you imagine inventing the telephone in 2019 and either A) not encrypting the data (landlines) or B) using weak 64bit A5/1 encryption (GSM)?*
TLDR Skynet wants to become a singer and artist, and Dad (i.e. Humans) doesn't realize it yet.
submitted by /u/Yuli-Ban
[link] [comments]
source https://www.reddit.com/r/Futurology/comments/b2wv71/the_world_is_utterly_unprepared_for_artificial/
0 notes
Text
Creating a good lyric video for less than $10
How to make a lyric video for your song (without using Motion or After Effects)
Lyric video: a video that shows your song lyrics while the music plays. [Pretty self-explanatory.]
Not only are lyric videos a great and manageable way to keep your video content coming in between bigger projects that involve more complicated production, but I’ve found they can actually be a lot of fun to make.
Below I’m going to talk about how I created six different lyric videos along with info on some of the FREE tools I used.
A few things to keep in mind:
I’m not a video guy. Every time I make one of my own lyric videos it’s a process of trial and error. A pro could probably create something twice as good in half the time, but I enjoy playing around to find solutions on my own. Plus, video budget? (Pshaw).
You can make really cool lyric videos with programs like Motion and After Effects. I didn’t. For one, those programs cost money (see pshaw above). But diving into one of those programs would mean I have yet another learning curve to climb. I’m interested in exploring Motion at some point, but in between family, work, and everything else, I’d rather use what time is leftover to make music and bang out some videos, not hunker down in the lab for days on end. Maybe those programs are easier to use than I’m imagining, and I’m missing out (let me know in the comments), but for the sake of this article, let’s just refer back to the zero-budget appeal of making lyric videos WITHOUT Motion or After Effects.
That leaves you with free video editing software like iMovie or Windows Movie Maker. Pros might scoff at these intro-level video production tools, but when you combine them with a few other tricks, plus some creativity, I think you can create compelling lyric videos with little more than what comes loaded on most desktops, tablets, or smartphones. [Full disclosure: I used Final Cut Pro X on some of the videos below, but I’d worked in iMovie for long enough before that to know most of the things I’m doing in FCPX can be done in iMovie.]
Beginner tips for making lyric videos
Open your movie-making software and set your new project’s aspect ratio to 16:9.
Import your song and any other media (like video clips, still images, logos, etc.) that you plan to use.
Move your first clip or background image to the project pane. If you plan to use one static background image the whole time, you can click and drag to adjust the duration that it appears so it’s long enough to display during your whole song.
Place your song into the project pane. If you want it to start playing right away, drag it all the way to the left. If you have a title page or some other introductory elements, you can leave a little room before the song starts.
Use “titles” to place the lyrics on the video at the appropriate time during the song, matching with the vocals.
Use a font size and style that’s readable (or that looks cool at the very least).
Position your titles on the video (again, by dragging) so they appear in a place that’s legible. For instance, if you’re using a still image of a sandy beach below a light gray sky, you don’t want white font to appear over that sky. Better to drag it down so it appears with starker contrast over the dark sand.
Make adjustments to the length of the titles (you can do this by clicking and dragging) to smooth out the transition from line to line.
Watch your whole video a few times through and make any needed fixes.
Export your video file and upload it to YouTube, Facebook, Vimeo, etc.
Some tricks to spice up your lyric videos
youtube
This is the lyric video for my single “Collapsing Star” — a long fade-out kind of song about devotion in the face of aging — so I thought the visuals should do exactly what the music and lyrics do: fade, shrink, collapse.
The creation of this video involved some really basic elements:
Still images of space that slowly evolve — I wanted there to be a extraterrestrial time-lapse effect, so I used some super hi-res photos from Unsplash, applied a very long cross-fade between each transition, and also used just an imperceptible touch of “Ken Burns” (an effect that creates some motion using a still image).
A shrinking sun — Scientifically speaking, I know stars don’t collapse in this way; they usually get big and bright before dwindling into white dwarfs or black holes. But I thought a slowly shrinking star would paint the lyrics in a haunting way, so I used Canva to create dozens of colored circles, each one small than the next. I then placed them on the timeline with overlap so that each one could (like the space images) fade into the next and depict shrinking. With the addition of some blur and some “stencil” effects, I was able to hint at dark sun spots and the rippling surface of a star, as well as the halo around a star.
The twinkle of space — Because I was using static images, I needed to add some other light effects that made for a kind of twinkle or oscillation in the background stars. The main one I relied on was the “sketch” effect in FCPX.
youtube
This is the lyric video to my song “Irretrievable Beauty.” To create it I followed all the basic steps mentioned above, but here are a few of the bonus elements I added for (hopefully) extra impact:
Additional text — No one ever said a lyric video should contain ONLY your lyrics. So I wrote a bunch of other text (a letter from the 22nd-Century) and placed my lyrics within it. Check out the video and what I’m describing will make more sense.
Color contrast of text — The actual lyrics of the song needed to be easily readable, so they’re all in black against a lighter background. The rest of the words are white, and it’s fine if they roll by without anyone being able to read them all. I intended to create the feeling of being flooded by text, so lots of it is supposed to wash over you.
Public domain image — I found a super hi-res image from 1905 to use for the background of the video (and my cover artwork too), and slowly zoomed in throughout the whole video.
youtube
Above is the lyric video for my song “1+1+1=3.” Some of the things I did to make this video:
Slow fade between different versions of the same photo — The background image for this video is the same as the cover artwork, a photo I took of arithmetic on a chalkboard. I then applied different filters to the photo to create three separate versions. While editing the video, I started by laying the three images out in a repeating pattern and then cross fading them all so it looks like there’s some kind of slow transformation happening.
More extra text — The additional text in this video is nowhere near as crazy as in “Irretrievable Beauty,” but I wanted to add a few bits here and there. You’ll spot ’em.
Directly reference the subject matter — The song is called “1+1+1=3.” Yes, it’s about love, but the math element was a fun visual reference point. Arithmetic on a chalkboard. Strange equations in the text. Etc. What’s the visual reference in your song?
youtube
Above is the lyric video for my song “Silently.” Some things I did to create this one:
Hyperlapse sunset — One afternoon when I was visiting Oregon, I ran up to the top of Mt. Tabor (an extinct volcano in the heart of Southeast Portland) and found a good spot to film the changing sky as dusk fell. I made sure to be out of the way of anyone who might walk in front of the camera and ruin the looooooong time-lapse shot. Hyperlapse is a free app from Instagram, and it makes it easy to shoot long videos and then speed them up at various rates. I think my 4-minute music video required about 45 minutes of footage.
Intro titles from Word Swag — If you read this blog frequently, you probably know I love Word Swag, a free app that lets you add cool fonts to images. I used Word Swag to create both the circle logo at the beginning with my name in it, and also the “Silently” title. You could use this app to create text for every single lyric, but that’d get time consuming so I just ended up using it for those two elements at the beginning. For this purpose, within Word Swag you’ll usually want to lay the font over a transparent background so you can fly it into whatever video you’re creating without disrupting the moving footage. [Note: I used Word Swag to create the intro text for all the lyric videos below.]
Sketch effect — I then added some built-in effects, including a color saturation effect and two doses of a sketch illustration effect, to make the video look grainy and lo-fi. Like I said above, this wasn’t premeditated. Just playing around with effects to see what looked promising. On that note…
Earthquake wobble effect — I used the earthquake effect because I thought it kind of made the text look like it was on a transparent slide overlay that was out of focus for a second.
Alternating pacing of lyric appearances — Sometimes the lyrics appear and disappear with the vocal. Sometimes certain lines linger. I just went by feel, and payed more attention to how the titles looked laid out across the screen than anything particularly musical.
Alternating the color of the text — This is another obvious way to add some variation if you feel like your lyric video is too much of the same thing: change the colors of the lyrics!
youtube
Here’s a video for a song called “Morning Edition” which I posted right before the election in 2016. The recording is actually just a super lo-fi Garageband demo, but I only had two weeks until election day, and I figured if I’m going to make some kind of statement, there’s no time to wait to get my band into a proper studio. So, a few notes about this lyric video:
A lyric video can still have live action — I’ve never really liked the distinction between “music video” and “lyric video,” as if one is more legit and exciting than the other. As someone who listens to lyrics just as much as the music, I love good lyric videos, and I think there can be an interesting hybrid between these two approaches. For “Morning Edition” I lip-synced to my song, 10 seconds at a time, while using the Face-Swap tool in Snapchat to graft a certain someone’s mug onto mine. Then I edited all those takes together and applied a sharp contrast filter to blend the background of the Snapchat clips with the large black borders on both sides of the clips.
Did I say the lyrics have to be legible? — Well sure, it’s good to have legible lyrics, but I don’t think they need to be HUGE if that means you’re ruining the aesthetic of the video. For this one I figured I’d keep the text in a thin minimalist font at the top of the screen, out of the way of my face, and anyone who really wanted to read along could watch the video in full-screen mode.
youtube
Here’s the lyric video for my song “Veterans Day.” By complete accident — again, lots of playing around with built-in options — it ended up with a kind of Zen art aesthetic. Here’s how:
Stock video — I looked through tons of stock video sites to find an affordable, hi-res clip that could be used as the background for the whole video. I ended up buying (for less than $10) a short video of milk being poured into a clear glass of water with a black background. But 6 seconds of video wasn’t going to cut it for a 5 minute song, so I…
Slowed the clip WAY down — I stretched the clip as long as it could go and still only had about 2.5 minutes’ worth. So then I…
Reversed the clip — By duplicating the clip I had 2.5 minutes of forward motion, and 2.5 minutes of backwards motion. So the result is like a palindrome, or like that famous bass solo on “Call Me Al.” Halfway through, the whole thing turns around and the milk goes back into the bottle by the end. Another accident that I ended up enjoying.
Color inversion — I used the built-in tools to invert the colors so the white milk became like black ink, and the black background turned to a light gray.
B&W — I then took that video and turned it to black and white, which ended up darkening the whole thing in a nice way.
Scrolling text — One of the built-in title options on many video software programs allows you to scroll text vertically, like the end credits of a film. I used this effect separately for each verse and chorus of the song. Then I did another layer of scrolling text with just a bunch of randomly spaced letters and symbols, with a high transparency on the font so it appears as a graphic element, and I think it gives the whole video a kind a translucent papery feel.
youtube
Here’s a few things you might be able to learn from the lyric video to my song “Premiere:”
Still photos are your friend — Check out royalty-free photo sites such as Unsplash. I made the entire video for “Premiere” using photos I found on that site. The one risk you run is that other artists use the same photos in their work, but you can always tweak the images so they’re barely recognizable as I did with the milk video in “Veterans Day.”
Don’t be afraid of Ken Burns — He has a built-in video effect named after him for a reason; that technique of zooming in and out on still photos can be really effective for creating mood. Dynamics! Don’t go crazy or anything with the motion, but a little Ken Burns here and there can make flat photos come to life.
Mix and match fonts — I used a bunch of different kinds of fonts on “Premiere,” giving each section of the song its own feel.
Apply effects and transitions to the titles (text) too — Don’t forget that many of the same effects you can use on pictures and video will work to give your lyrics an interesting look as well.
Don’t publish your video until you’ve proofread it a dozen times! — If you watched my lyric video for “Premiere” you might’ve found a typo. Whoops. I didn’t catch it until it’d been posted for over a week, and by then… oh well. Staring at text while you’re editing gets tiring. Your brain tricks you. While you’re in the process of creating, you might not catch something that seems glaringly incorrect later on. So get some bandmates and friends to watch the video a few times to make sure you don’t have any spelling or grammar issues on your lyrics (I mean, besides the usual grammar or syntactical issues that ALL lyrics have). Another way to limit errors is to…
Write your lyrics out in Word and then paste them into your titles — When you type your lyrics in Word first, you get the benefit of the program’s spellcheck system. Some of the popular video editing software doesn’t have spellcheck, so paste those lyrics in after you’ve vetted them in the external doc.
Okay, those are some of the tricks I’ve used to make my lyric videos more interesting than just white font on a black background, all without paying for extra software or expensive stock footage and images. Hopefully they’re helpful as you create your next video.
Do you have any advice to add? I’d love to hear it. Holler in the comments below and be sure to post a link to your best lyric videos on YouTube!
The post Creating a good lyric video for less than $10 appeared first on DIY Musician Blog.
0 notes
Text
New Post has been published on Atticusblog
New Post has been published on https://atticusblog.com/app-makers-code-stolen-in-malware-attack/
App maker's code stolen in malware attack
The Mac and iOS software program developer Panic has had the source code for several of its apps stolen.
Panic founder Steven Frank admitted in a weblog put up that it came about after he downloaded an infected replica of the video encoding tool Handbrake.
He stated there has been no signal that any patron facts was accessed and that Panic’s net server turned into no longer affected.
Users were warned to download Panic’s apps simplest from its internet site or the Apple App Store.
Panic is the author of internet editing and report transfer apps Coda and Transmit, and co-published the video game Firewatch with builders Campo Santo.
‘Entirely compromised’
On 2 May Handbrake became hacked, with the Mac version of the app on one of the web site’s download servers replaced by using a malicious replica.
The inflamed app becomes determined and eliminated on 6 May.
In what Mr. Frank called “a case of relatively horrific success”, he downloaded the malicious version of Handbrake and launched it “without preventing to surprise why Handbrake might need admin privileges… whilst it hadn’t earlier than”.
“And that turned into that, my Mac changed into absolutely, totally compromised in 3 seconds or much less.”
WannaCry and the malware hall of fame
Glossary: Malware, patches, and worms
Malware attack: How to protect yourself online
The attacker then used his password to get admission to other private files and copy the source code for several of Panic’s merchandise store at the inflamed laptop.
Ransom call for
The robbery become showed while Panic received an electronic mail containing some of the documents and stressful a ransom for the return of the complete code.
“We’re working on the belief that there is no factor in paying,” Mr. Frank wrote, announcing that “the attacker has no purpose to preserve their quiet of a good deal”.
The Advantages of In-App Purchases for Developers
Have you ever checked out the “top 10” lists within Apple’s App Store and noticed that over 1/2 of the apps incomes the maximum cash are free to download? How can this be viable?
Several years in the past, the App Store delivered a brand new feature that permits developers to charge clients from directly within their packages – with the client’s join of the route. This characteristic took a while to seize on, but it is now one of the pinnacle earnings techniques for lots builders, and right here’s techniques which have proven particularly powerful for builders:
Free Trials
The App Store does not without delay allow loose trials of games/apps to be downloaded. But with in-app purchases, builders are capable of effectively offer customers a demo and trial of their apps for gratis. During 2011, the App Store saw a huge rise on this strategy. A game developer can provide a loose download of the total model of their recreation with 1/tenth of the ranges unlocked. If the consumer enjoys the sport, they should buy all the other tiers – right from within the app – for the unique rate of the game.
This has several advantages for the developer. Most significantly, it lets in them get their game within the palms of massively extra customers than could in any other case be feasible. Since customers can download apps for free, they are extra inclined to attempt it out, and hopefully, improve later.
The “Freemium” Model
Another popular method for in-app purchases is the “fermium” version wherein the app is loose to each person, but people who use the app frequently can improve for extra features. This is broadly utilized by builders of utilities, together with photo editors, wherein maximum consequences are loose, however additional filters are to be had for $zero.Ninety-nine. Again, this permits many users to enjoy the app, whilst still earning sales from individuals who use it enough to be willing to pay.
The “Currency” Model
Finally, we’re going to take a look at perhaps the handiest in-app purchase strategy of all. This one is used in most cases by means of developers of social and method-based totally games. Much like the above strategies, the sport is loose to download and play by way of any consumer, but the video games provide something inclusive of Smurf Berries (Smurf’s Village) or Magic Beans (Trade Nations) which can be basically “currency” inside the game. Most games offer customers ways to earn loose foreign money, however for the customers who need to development quicker or gain greater, in-app purchases of these items will decorate the sport-playing experience.
Using Class Codes 0042 and 9102
Workers’ repayment coverage in Florida and roughly forty different states, use a category code system designed via the National Council on Compensation Insurance (NCCI) to rate coverage rates differently for groups of personnel. There are roughly 600 elegance codes, and the 2 principal codes used for employees inside the landscaping enterprise are 0042 and 9102.
I frequently come across panorama protection groups which have their employees misclassified and are capable of not handiest get hold of a 50% reduction in their modern coverage charges, but are also able to report for reimbursements from overpayments on preceding workers repayment regulations.
These experiences and a couple of different questions about how those classification codes can be used collectively for a coverage have introduced to my attention a want to talk specific information to the landscaping industry about the uses of people compensation codes 0042 and 9102.
First, allow’s start with a brief description of each class code with rates from NCCI’s legitimate descriptions:
Class Code 0042 – Applies to employees broadly speaking engaged in making plans, clearing, grading, laying sod, seeding, and planting necessary for landscape installation operations. Planting of timber, shrubs, and flowers are categorized to this code at the side of well-known gardening sports.
Class Code 9102 – Applies to employees that perform renovation of lawns, grounds, and gardens. “The renovation may additionally involve lawn mowing, raking, the utility of liquid or granular fertilizer, spraying and trimming of shrubs or small bushes from the floor, and thatching or aerating. If any one or all of the above operations are executed with the aid of a lawn maintenance chance categorised to Code 9102, then minor and incidental landscaping operations done with the aid of the same chance, consisting of the substitute of useless shrubs, the planting of a few vegetation, and the placing of rock or brick as edging designs are blanketed under Code 9102. This minor landscaping operation is outstanding from paintings achieved by means of an insured at a job or location in which the number one paintings at the job or area is landscaping. Since garden spraying is a preservation operation, a hazard engaged exclusively in work of this nature is assessed to Code 9102.”
Panic Attack Disorder – Causes, Symptoms, and Treatment
Panic attack disease is a chronic situation that develops in someone who constantly fears the opportunity of experiencing several or consecutive panic attacks. This type of scenario entails individuals who have experienced an anxiety attack once and end up feeling scared that they could enjoy it once more.
A person beneath a panic anxiety assault feels an extensive worry that unexpectedly happens with none warning or apparent purpose. It makes a person suppose that he is demise or having a heart attack this is why it’s far a completely frightening enjoy. Symptoms usually final for about thirty minutes and leave a fatigued feeling to the character who had an attack.
Possible Causes of Panic Disorder
Heredity, phobia, medication effects and substance use can be taken into consideration as some of the feasible causes that cause an anxiety attack symptom. A panic sickness that runs in the family will probably be inherited. One can hint his circle of relatives roots to look if this explains a sudden anxiety attack symptom.
Phobias also can give an explanation for why a person suffers from panic attacks. It can be that a phobic object or state of affairs has advanced this tension which causes one to experience tension attacks. Moreover, panic ailment can also arise either as a facet effect from the use of medicines such as antibiotics or as withdrawal consequences from the use of various substances.
Symptoms of a Panic Attack Disorder
One not unusual tension or panic assault symptom that many people revel in is fast heartbeat much like that of a heart attack and it makes humans experience that they are the loss of life. The boom in coronary heart price is typically followed by means of emotions of nausea, ache within the chest and hot flashes.
The other symptoms that may indicate tension attack are agitated respiration, profuse sweating, excessive trembling, the issue in swallowing, and hyperventilating. It is essential that appropriate treatment is sought with the aid of a character affected by panic sickness because the signs and symptoms can be lifestyles-threatening.
Anxiety Attack Treatment
A panic attack cannot be dealt with by myself so it’s miles vital to seek medical assist for anxiety and melancholy remedy. Further, to keep away from perplexing the panic attack symptom with other illnesses which include heart assault, a fitness representative can examine a person’s proper condition. This has to be done early on to keep away from worsening one’s fitness or get the wrong thoughts.
0 notes
Text
New Post has been published on Add Crazy
New Post has been published on https://addcrazy.com/the-way-to-get-home-windows-and-macos-apps-on-your-chromebook/
The way to Get Home windows and macOS Apps on your Chromebook
As capable as Chromebooks have come to be, there are times whilst you may need to load up Photoshop, iTunes or something else that is based on Home windows or MacOS. No longer only can Chrome OS try this, it’s No longer that tough to installation…in case you understand the proper plug-ins to use. Here’s How to get commenced.
The device we’re the use of Right here is Google’s very own Chrome Faraway Computer extension for Chrome—it’s Not the most effective choice, but because it’s made by means of Google it’s solid and free. You’re also going to want a Windows or MacOS PC to remotely hook up with, so it’s Not quite similar to jogging apps natively, but for most people of users it’s likely the maximum trustworthy alternative.
in case you’re seeking out some thing a chunk extra complete, and which doesn’t rely upon Far flung connections, maintain an eye fixed on CrossOver Android, presently in beta checking out. It’s a work in development so that you might spot some bugs or find out certain apps don’t work, but it shows quite a few promise and takes benefit of Chrome OS now being able to run Android apps to run Windows apps on your Intel-based Chrome machines.
Initially get Chrome Far off Computer set up to your Home windows or MacOS machine as well as your Chromebook. Once you release the add-on, it opens up in a window of its own, letting you get entry to your very own computers from anywhere or get related with a person else to offer Remote help.
It’s your Google account that hyperlinks the entirety collectively and authorizes connections among machines, so ensure you’re signed into Google on all of your installations of Chrome and Chrome OS (through the Settings screen).
to your Home windows or MacOS laptop, select My computer systems then Enable Remote connections—you most effective need to do this as soon as so Chrome Far flung Laptop knows you want so one can connect to this device. A further software download can be required.
Next, you want to set a PIN code that authorizes get entry to the computer—though you could always click on the box at once underneath that says “Don’t ask for a PIN again” to check in extra without difficulty. Dropping the want for a pin is available in case you’re forgetful, however,, it also makes it plenty easier for others to doubtlessly without delay get right of entry to your laptop, so deactivate the PIN with a a warning.
once the PIN difficulty is settled your PC will then appear inside the Chrome Faraway Desktop panel, even though you may want to present it a greater memorable call to help you perceive it later (click the pencil icon to the right).
you could then turn your attention to Chrome Faraway Desktop on your Chromebook: launch the app, click My computers, and your newly configured system ought to display up. click on the relevant access, input the PIN code you configured, then pick Join and you ought to be up and walking.
once a connection has been mounted, you could use your Windows or MacOS Desktop to your Chromebook just as if you were sat properly in front of it (assuming you’ve were given a strong enough internet connection at each end of the hyperlink). Fireplace up Photoshop to edit a photo, run iTunes to concentrate to a podcast (audio receives streamed as nicely), or something else you need to do.
There’s no easy way to transfer files between machines within the Chrome Faraway Desktop app itself, however, something like Google Drive or Dropbox makes the technique pretty trustworthy. at the extension menu (pinnacle proper) you will discover options for sending keyboard shortcuts and some other configuration alternatives.
It’s Now not a great solution for every situation—for a start you need your different laptop to be switched on and awake all the time—but it does allow you to get right to entry to the electricity of Home windows or MacOS without putting too many demands on your lightweight Chromebook, and keyboard and trackpad integration is pretty seamless. you may use the identical extension to link Windows and MacOS machines together too. if you’ve got a powerful enough Laptop you can do maximum anything from most anywhere.
This is What you may Do for your Chromebook
There were a whole lot of modifications ever for the reason that release of Chromebooks. It isn’t always only approximately the form and the overall performance factor as an alternative are different things too that you could be surprised to discover that you could do with Chromebooks.
Given Right here are some tricks that you may practice on your Chromebook:
Editing
in case you are the one who likes attempting their hand at Enhancing snap shots or are clearly into it, you would love the Chromebook very tons. using a Chromebook you can without difficulty fulfill this desire by using the usage of Photoshop app that is compatible with the device. But, to make use of it you’ll need to be linked to the net. Because of this, you are surely using the Adobe program online to perform image Enhancing. Even though, this feature is available in beta version but quickly it is going to be available as a complete-fledged version that can be effortlessly used.
Office
We all are used to operating on Microsoft Workplace so; why Now not use it together with your Chromebooks too. Understanding that Desktop model of Microsoft Office isn’t to be had for Chromebook customers as a full version. But, to overcome this you can utilize the net version this is to be had totally free. Now you already know that you may utilize the whole version on-line with none duty, you could use the Phrase, PowerPoint, Excel with whole capabilities. Curiously, even Linux customers can gain get admission to the authentic version while not having to bother the use of Wine. Go for Office on line and avail its blessings.
The handiest factor that you might crib approximately is not having any offline model to be had but then there is OneDrive. This is wherein all your files are saved Once you are done. Those can be accessed using Office apps from other gadgets this includes Mac and Windows alike.
Apps with the aid of Android
It is feasible now to run all Android apps even as you are on Chrome OS. you can even use Skype on it which include notifications and all the functions. Some other would be the usage of ARChon that may be a package deal app to help you in converting any Android app a good way to run on Chrome. This does appear thrilling mainly with numerous Android apps gift that one would like to use without constrains posed with the aid of compatibility troubles. Another issue could be that apps will run better with none restraint and a consumer could be effortlessly able to benefit from this transformation.
Offline
the use of your Chromebook you can paintings offline as in line with your convenience. This means that you may compose your Gmail messages as well as examine your emails too. other matters encompass Google Calendar get entry to and even Enhancing your documents the usage of Google Driving force. All is viable now, for example, use the Google keep for composing, handling, and creating notes together with to-do lists. Wunderlist and Any.DO. Is but Another instance to it. Downloading PDF versions of eBooks and Kindle eBooks is possible too. other such things as playing films, gaming, streaming Television applications and even downloading them is viable.
Computer OS
whilst you are thinking approximately utilizing the OS in your Laptop It’s far crucial to understand that it might be a chunk complicated. For starters it isn’t always for novice customers, the developer mode as an example switch and assist you to benefit complete get right of entry to the applications mendacity for your Chromebook. It’s miles for the incredibly sensible customers who are capable of manipulating the gadget that they could utilize it and flip it into Linux device along side Chrome OS. Which means that you quite a whole lot have got admission to terminal commands as well as Computing device apps at the equal time.
Now which you understand what all you can do to your Chromebook, it would be simpler with a view to paintings your manner via. However, in case you want to discover greater interesting matters or simple recommendations to increase your productivity with Chromebook then you can choose professional advice in this.
Hi! I’m Russell Winters, a prolific weblog author and eager creator of articles associated with on-line PC help and solution for troubles related to computers and mobile devices. Being associated with the reputed first-rate Computer tuneup service company Qresolve, I have resolved hundreds of tech issues for our clients from international. laptop assist My areas of the hobby are Pc protection, endpoint security system, router assist and so on. you could comply with me for my beneficial compaq pc guide articles on Ezine and different article-oriented websites.
https://addcrazy.com/
0 notes
Last Seen Blogs

perham-storage
Perham Storage

pichupurin
my name is rin and i was attacked by pants!

ansgar1963
... dies und das ...

123123miti
DorianMâț⚜️

neyzuko
AND WE FELL