#houston youtuber
Text
#tennessee#houston#htx#houston texas#h town#houstontx#htown#liltrentmusik#0#youtuber#houston youtuber#hip hop#hiphop#black love#baecation#youtube#blacklove#houstonblogger#black couples#black couple#couple goals#twitch#twitter#streaming#streamer#livestream#twitchaffiliate#twitchsteamer
3 notes
·
View notes
Text
youtube
youtube
#80s music tourney#bonnie tyler#holding out for a hero#whitney houston#i wanna dance with somebody#80s#polls#Youtube
84 notes
·
View notes
Text
youtube
youtube
Listen to both songs before voting, and define "better" any way you wish!
#the 90s song ever#poll#polls#music poll#tournament poll#90s music#depeche mode#synth rock#synth pop#whitney houston#the bodyguard#pop ballad#90s pop#Youtube
46 notes
·
View notes
Text

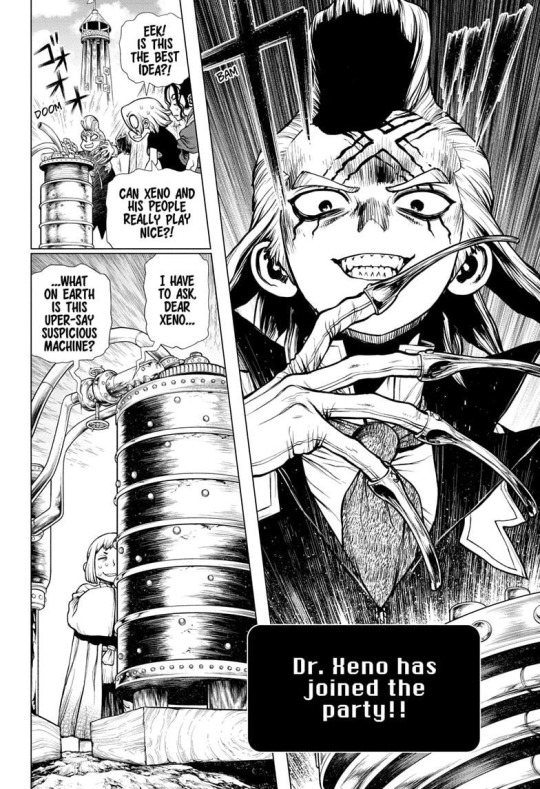
He is that my one favorite polish science youtuber
context for non-Poles below
SciFun, the said Youtuber, once made a series debunking all the "evidence" that the earth is flat, fighting all flat earthers beautifully.
all are with the eng sub so you should be able to watch it!
here is first part
youtube
#dr stone#drst#drst meme#dr stone meme#polish memes#xeno houston wingfield#dr xeno#drst magma#magma would be totally a flatearther#dr. stone#dr stone manga#drst manga#Youtube
118 notes
·
View notes
Text
youtube
Kevin McHale Receives the HRC Visibility Award at the 2024 HRC Houston Dinner
2:07 Kevin thanks Amber Riley, Jenna Ushkowitz, Chris Colfer, Alex Newell and Naya Rivera.
#Kevin McHale#Naya Rivera#Chris Colfer#Alex Newell#Amber Riley#Jenna Ushkowitz#HRC Houston Dinner#Youtube
22 notes
·
View notes
Text
youtube
Hello, newcomers to the Renee Rapp-bit hole!
May I present this for your enjoyment?
24 notes
·
View notes
Text
🎤 Whitney Houston ~ I will always love you 🎧
youtube
#chanson#chansons#variété internationale#song#songs#musique#music#musica#whitney houston#i will always love you#cinéma#cinema#film#movie#bodyguard#charly#charly mon amour#mon Charly#amour toujours#youtube#Youtube
27 notes
·
View notes
Text
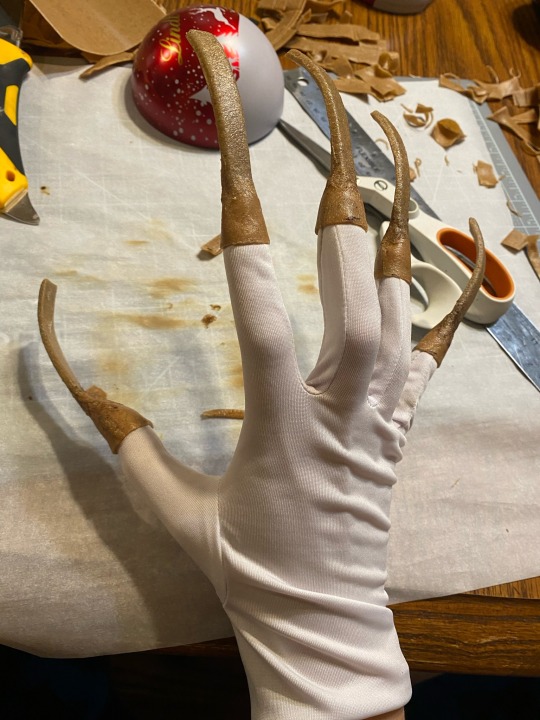
How i made xenos nails!!
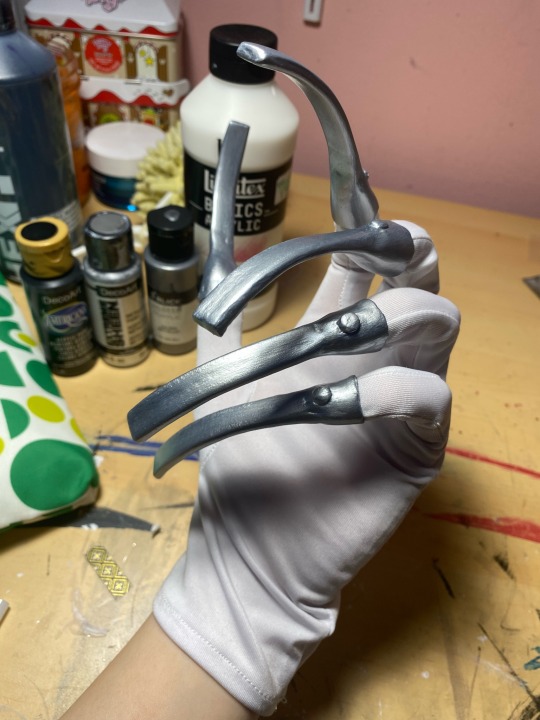
Materials
-worbla
-2mm eva foam
-scissors
-heat gun
-soldering iron (technically optional but helps A LOT)
-gesso (i used regular gesso, but if you can id buy heavy body gesso)
-P400+P600 sand paper
-acyrlic paint (just silver is ok, but black will help)
-white gloves
-hot glue
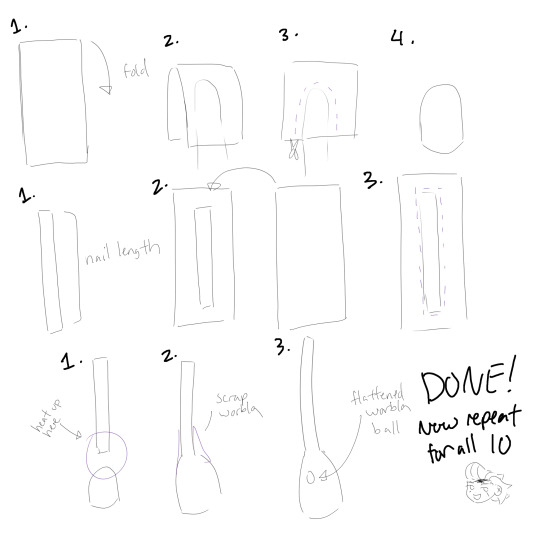
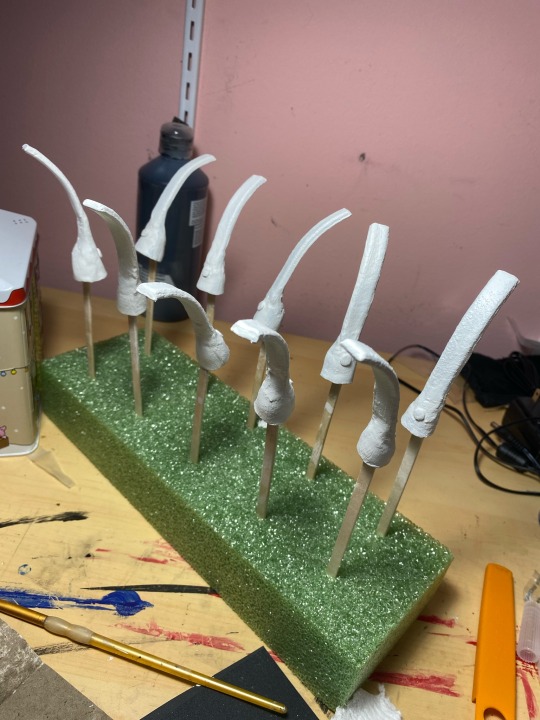
PART 1- forming the base
This part is VERY hard to explain so hopefully the diagram helps- ill explain every step here
Finger tips
1. Cut out a piece of worbla thats double the length of the finger tip you want + a little extra.
2. Heat it slightly and fold that piece of worbla in half around your finger.
3. Form it slightly around your finger, leaving a little extra space for the glove material, then cut it out with good scissors. (NOTE- if you try to form it on your finger while wearing gloves, the worbla MAY stick to the gloves. Id recommend just doing it on your bare finger)
4. Heat it up again until its very soft and round out the shape, making sure the sides stick together. If its too small when you test fit it around the glove, try to push out the walls a bit more.
Nails
Watch this video before starting this part-
youtube
1. Find a good length for your nails- mine are approx. 3 inches. Make a template and then cut the shape out of eva foam.
2. Cut out TWO pieces of worbla a little bigger then the nail strip and heat one up, sticky side up (the sticky side is shiny). Put the eva foam strip in the middle. Heat up the second piece of worbla and put it on top, sandwiching the eva foam.
3. Score all around the eva strip then cut AS CLOSE as possible to the edge.
Attaching the pieces
1. Heat up the finger tip and half of the nail. Attach the nail to the finger tip while wearing it to make sure it doesnt cave in. Use a picture from the manga as reference while doing this part
2. Once again, using a manga reference, use scrap worbla to fill out the sides and smooth everything down. This is the part where you can use a soldering iron to smooth everything out- be careful though, because you can easily burn the worbla.
2.5. I forgot to make a diagram but dont forget to curve the nails! I used a little metal dome to get a consistent curve for all of them.
3. Make little worbla balls, flatten them with something flat, then attach them to the nails while still hot.
Now repeat ALL these steps for all 10 nails! Yay!
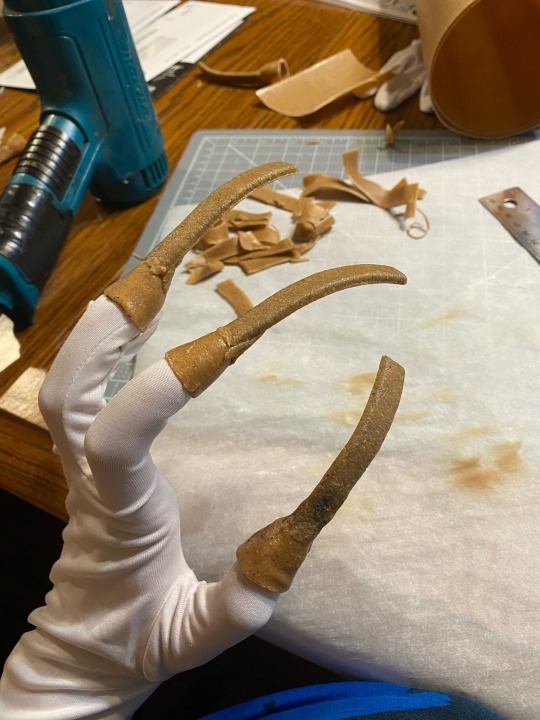
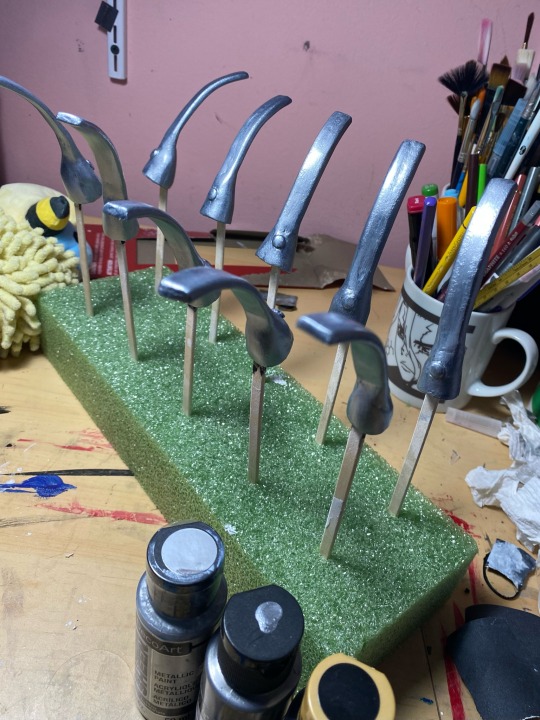
PART 2- priming

For priming i used regular gesso because I was impatient, but if you have plenty of time I recommend heavy body gesso. It took me 12 layers to get everything decently smooth, but if you used heavy body it would probably take 3-5 layers.
I also used floral foam, craft sticks, and sticky tack for my painting setup- if you can think of a better method without sticky tack id recommend trying something else- just because i had to pick out the sticky tack with tweezers, and it took forever lol
Two things to note about gesso-
1. It doesnt self level so you need to sand it smooth
2. DO NOT DRY SAND!! Always wet sand gesso
My exact steps were this-
4 layers of gesso -> sand with P400 -> 4 layers of gesso -> sand with P400 -> 4 layers of gesso -> sand with P600
This part is very time consuming if you use regular gesso, but its definitely worth it for the smooth finish.
PART 3- painting
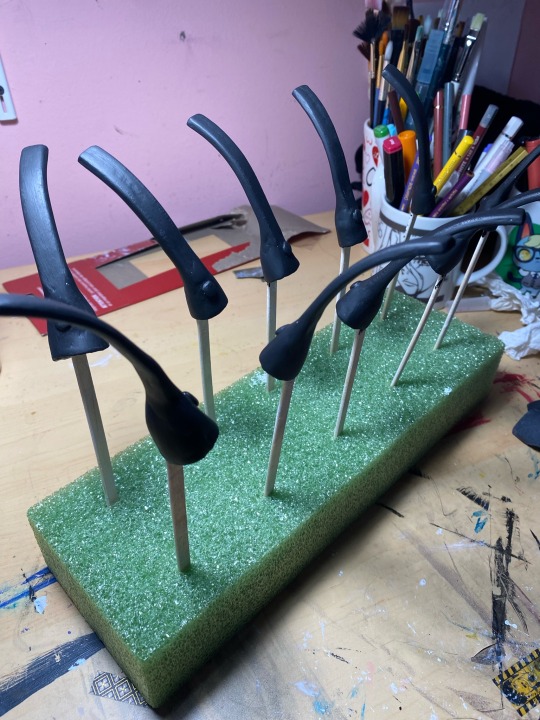
Before adding silver, I threw down a quick matte black layer. It tends to make metals look much better and it wont take long to dry, so I highly recommend it.
For the silver, i used decoart extreme sheen in silver, which i highly recommend. Relatively cheap and can be found in any craft store
Id also recommend having all your brush strokes go vertically if you can- it looks much cleaner.
PART 4 (final part)- attachment
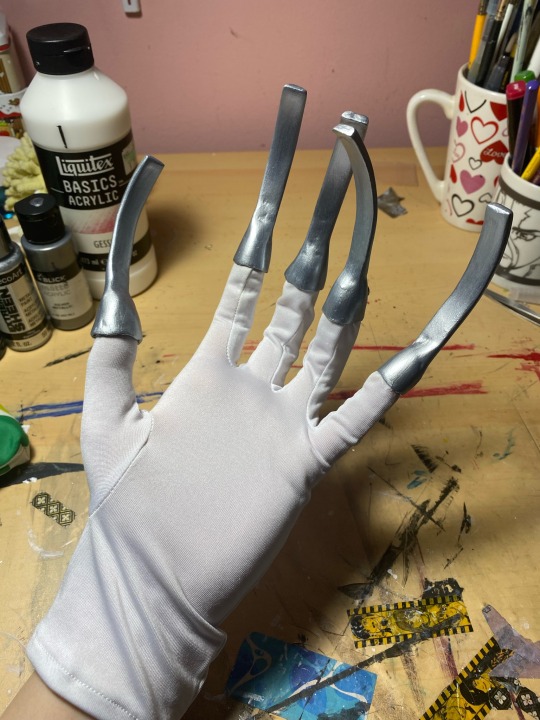
I used a pair of white gloves i bought a while back at spirit halloween, but you can make them or buy them- doesnt matter as long as you like them.
This part is kinda dumb but I genuinely dont know if theres a better method… i put hot glue in the nails, let it cool for a couple of seconds, then put them ON MY FINGERS while wearing the gloves. It gets you the best fit possible but also burns a little so watch out.
And thats it! Thats all there is to it. Let me know if you found this helpful, and if anything was confusing leave a comment and ill try to help you.
As a bonus heres a picture that works very well for reference
#dcst#dr stone#cosplay#cosplay tutorial#worbla#xeno houston wingfield#xeno cosplay#xeno dr stone#xeno#Youtube
59 notes
·
View notes
Text
Sports Science: MMA fighter Houston Alexander's Adrenaline shot Part 2
youtube
MMA great, Houston Alexander, gets injected with epinephrine, causing his heart rate to skyrocket. Always loved Sport Science. A rare TV gem of cardiac testing purely for science and hunky athletes.
19 notes
·
View notes
Text

I would never know what he thinks! He looks so meaningful you choose one. Love cats
18 notes
·
View notes
Text
youtube
Wish You Were There Win the HOUSTON ASTROS ⚾️ WON the 2022 WORLD SERIES‼️
#houston#htx#houston texas#h town#houstontx#htown#liltrentmusik#youtuber#houston youtuber#astrosphillies#houston astros#minute maid park#world series#world series 2022#championships#champs#downtownhouston#downtown houston#fuck the astros#baseball#world series champions#jose altuve#viral#fyp#black youtuber#we want houston#we want houston sign shirt#mattress mack#world champion 2022#houstonblogger
3 notes
·
View notes
Text
youtube
youtube
#80s music tourney#oh shit#tears for fears#everybody wants to rule the world#i wanna dance with somebody#whitney houston#80s music#polls#Youtube
30 notes
·
View notes
Text
youtube
youtube
(I Will Always Love You was originally recorded by Dolly Parton in 1973; the entry for this tournament is Whitney Houston's 1992 version!)
Listen to both songs before voting, and define "better" any way you wish!
#the 90s song ever#poll#polls#music poll#tournament poll#90s music#mazzy star#dream pop#alternative rock#whitney houston#the bodyguard#movie theme#pop#r&b#pop ballad#Youtube
38 notes
·
View notes
Text
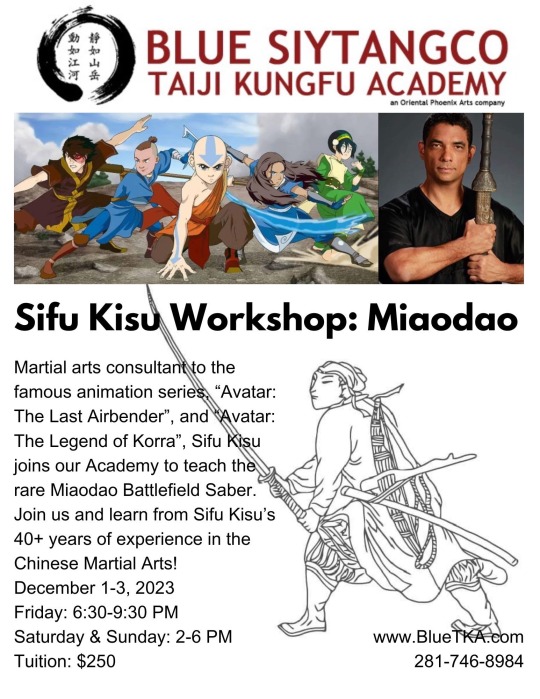
#sifu kisu#lok#atlab#northern shaolim#northern shaolin#atlab lok#kung fu#baguazhang#youtube#jian#Miao Dao#Mei Dao#Houston#Texas
24 notes
·
View notes
Text
Finally the full version and it speaks to the entirety of my soul.
youtube
#introvert#subradio#sub radio#sub-radio#don't wanna dance with nobody#don't wanna dance#whitney houston#bop#pop song#parody#I love this so much I could cry#Youtube
80 notes
·
View notes
Text
Whitney Houston - I Have Nothing (Official Video)
Super Hit! ♫♪♫ 🎶🎻
15 notes
·
View notes
Last Seen Blogs