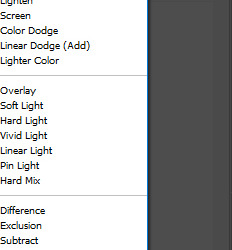
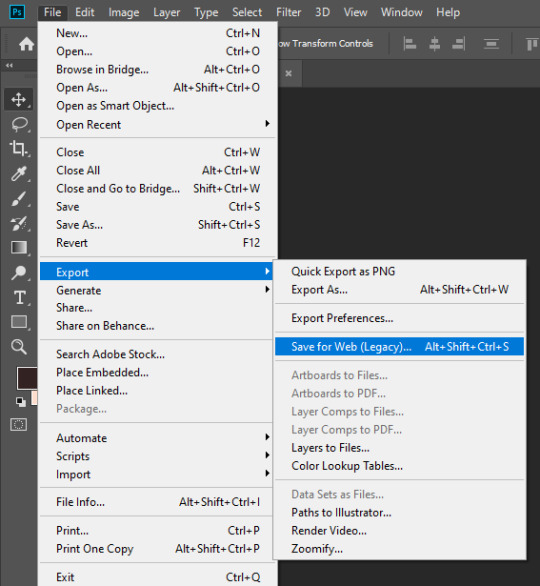
#how to cut using adobe photoshop
Text

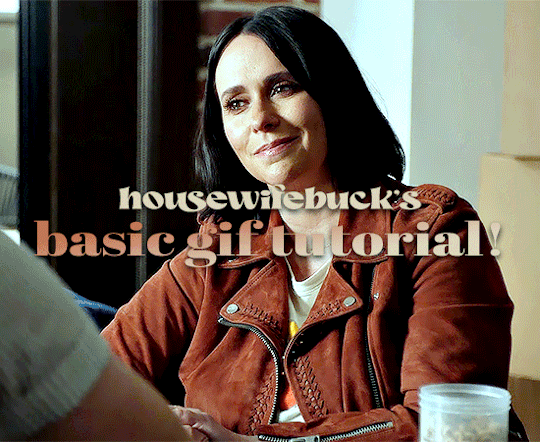
HOW TO: Make an iPhone Layout
+ Downloadable Template
Hi! I've gotten a few messages asking for a tutorial on my iPhone gifsets — but instead of only doing a tutorial (that would probably be triple the length this one already is), I decided to turn my layout into a template with all the bits and bobs! In the "tutorial" under the cut, I'll share everything you'll need, a free template download, and quickly go over how to use this template. :)
Disclaimer: This template uses Video Timeline and this tutorial assumes you have a basic to intermediate understanding of Photoshop.

PHASE 1: THE ASSETS
1.1 – Download fonts. These are the fonts used for all assets I've included in my template:
– SF Pro or SF Pro Display (Regular, Medium, Bold): Either version works, they look nearly identical. You can download directly from https://developer.apple.com/fonts/ or easily find it via Google
– Bebas Neue: Free on Google Fonts, Adobe Fonts, and dafont
– Times New Roman (Bold): Should be a default font in Photoshop

Make sure to download and install any of the fonts you don't already have before opening my template. That way, once you open the template file, all the settings (font size, weight, spacing, color, opacity, etc.) are as intended.
1.2 – Download my template.
Before you use my template, all I ask is that you don't claim or redistribute it as your own and that you give me proper credit in the caption of your post. Making these iPhone gifsets takes me a longgg time and turning this layout into a template took several hours too.
DOWNLOAD TEMPLATE VIA KO-FI ← This template is completely free to download (just enter $0), but if you feel inclined to tip me, I appreciate you! 💖

BTW this template also includes some of my frequently used icons!
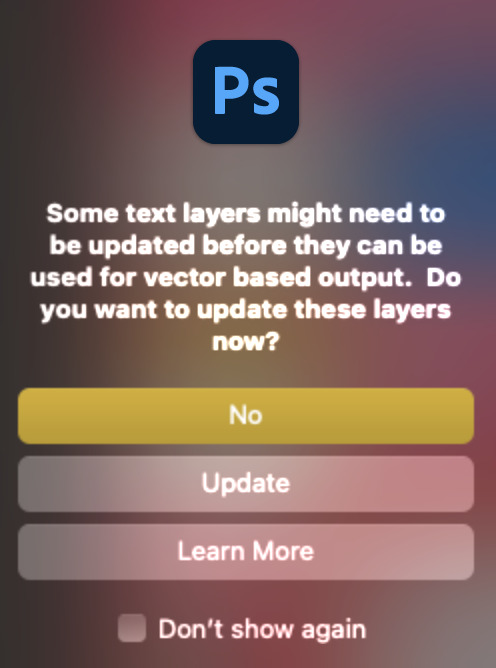
NOTE: If, for some reason, you open the template and see the pop-up shown below, click "NO" — otherwise, the fonts will be all messed up:
And if you see this triangle with an exclamation point by a text layer, don't double-click it — it'll mess up the font as well:

PHASE 2: THE GIFS
I'm just going to briefly go over gif sizes and my recommendations. Also, keep in mind when grabbing your scenes, you'll want all of these gifs to be the same amount of frames.
2.1 – Background Gif: 540 x 540 px.
I recommend this size so you have a good amount of visibility for the gif behind the iPhone wallpaper. I also recommend making this black and white (or in my case, black and white with a slight blue tint — idk I just like the way it looks) so the wallpaper coloring can stand out.
2.2 – Wallpaper Gif: 230 (w) x 500 (h) px.
Keep in mind the very narrow dimensions of the wallpaper! And also keep in mind that you'll have a bunch of apps and widgets covering the image. I try to use wide shots (or layer my clips into looking like wide shots). Also, keep in mind your color scheme for your set and your character's aesthetic! I tend to focus on one or two colors for the wallpaper.
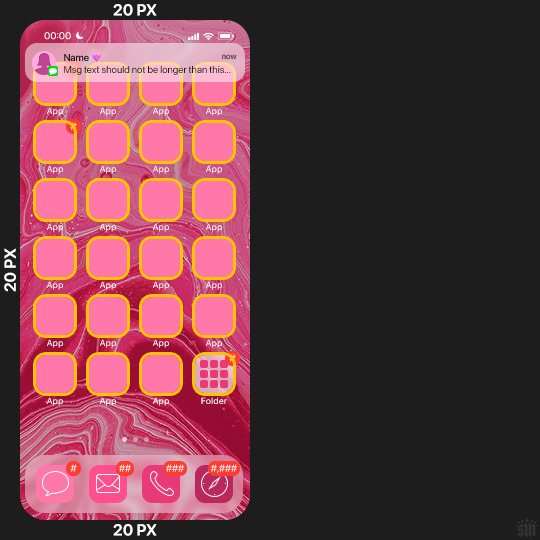
I usually position the wallpaper to the side with 20px bumpers, so there's lots of space to see the background:
2.3 – Large Photo Widget Gif: 201 (w) x 96 (h) px.
2.4 – Small Photo Widget Gif: 94 x 94 px.
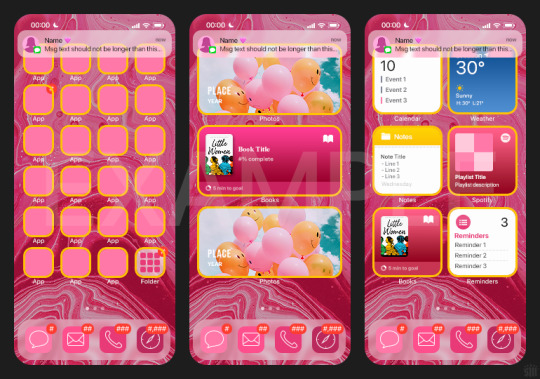
PHASE 3: THE TEMPLATE – "IPHONE" FOLDER
In this section, I'll try to quickly walk you through how to use this template and some bits that may require extra instructions. I'll be going through each folder from top to bottom.
3.1 – Status Bar.
Time, Service, and WiFi are pretty self-explanatory. In the Battery folder, you can use the shape tool to adjust the shape layers labeled "Fill (Adjustable Shape!)" to customize the battery level.
3.2 – Message Notification.
Again, these are pretty self-explanatory. I've already masked the circle for the contact photo, so you can simply import any photo and use the transform tool to shrink it down. The circle is 24x24 px. If you don't want to use a photo, there's another folder called Default Initials.
If your message text can't fit the text box, the message should end with ellipses which is how iOS caps off long texts.
3.3 – Blurred Banner (IMPORTANT)
This folder is easy to miss because there's only one placeholder layer in there. On iPhones, the area behind a banner notification and the dock get blurred (including the wallpaper and any apps).
What to do: Make a duplicate of the apps in Row 1 and/or widgets that intersect the message banner, convert them all into one smart object, apply a Gaussian Blur filter (Radius: 3.0 pixels) on the smart object, and move the smart object into this masked folder!
(There's another masked folder in the Wallpaper folder for the dock which I'll go over in that section.)
3.4 – Apps
Turn off the yellow guide if you don't need it to keep things aligned and turn off layers you don't need by clicking the eye icon. Replace the "App" placeholder text with your app name, change the color or gradient of the square to compliment your color scheme, and add your custom app icon overlay!
If you can't find an app icon you need from the ones I provided, flaticon.com is a great resource. Also, if you can only find the filled version of an icon, check out this tutorial for how to make any text or shape into an outline.
Also, each app folder has 4 notification bubble options (1-4 digits). Again, you can toggle these on and off as you need!
3.5 – Big Widgets
I like using these when my wallpaper has A LOT of negative space to fill. I included the Photos and Books widgets in my template, but there are lots of widgets available on iPhones. You can check some of the other ones I've done here, or if you have an iPhone, simply try adding some widgets to your phone!
There are also widgets bigger than these, but they would take up half of the phone screen which is why I don't use them for these edits.
3.6 – Small Widgets
The only thing I'll say about these — because they're pretty straight forward — is there are a lot more weather themes than I included in my template. Also, if you set your character's phone to evening, the weather widget will show a dark background (sometimes with stars), so keep that in mind.
Speaking of, I've included Light Modes and Dark Modes for, I think, every applicable widget.
3.7 – Page Dots
These barely perceptible dots indicate that your character has more pages of apps than shown in your gifset (so if an anon tries to come at you, you can just say "it's on the next page of apps" /j /lh)
3.8 – Dock
Again, the dock has notification bubble options and I've included the default app designs, custom filled designs, and custom outlined designs for iMessage, Phone, Email, and Safari (there's also a FaceTime alternative if that's how your character rolls). These are usually the apps people keep in their Dock, but this is fully customizable too. So, if your character is, like, super obsessed with Candy Crush or something and needs it in thumb's reach — you can put it in the dock.
3.9 – Wallpaper
This whole folder is masked already to a 230x500 px rounded rectangle.
Inside, you'll find another "Blurred Portion" folder for the area behind the message banner notification and the dock.
What to do: Duplicate your gif layer and place it in this folder, remove any sharpening filters, and apply a Gaussian Blur filter (Radius: 3.0 px). Be sure to add any coloring/adjustment layers ABOVE this folder and your original sharpened gif layer.
PHASE 4: EXPORT
We made it!
I hope this template makes it super easy for you to recreate this layout! If you decide to try it out, feel free to tag me with #usernik.
If you notice anything wonky about the template, kindly let me know so I can fix it! And if you have any questions about how to use this template, please don't hesitate to send me a message! I just ask that you try to be specific in your question so I'm able to answer you the best I can!
#gif tutorial#completeresources#userpickles#usersmia#userabs#usertreena#alielook#userkosmos#usershreyu#userzaynab#tuserabbie#useryoshi#usersalty#tuserlucie#usernanda#userelio#userhella#usercats#gfx*#resource*
752 notes
·
View notes
Text


Neural Filters Tutorial for Gifmakers by @antoniosvivaldi
Hi everyone! In light of my blog’s 10th birthday, I’m delighted to reveal my highly anticipated gifmaking tutorial using Neural Filters - a very powerful collection of filters that really broadened my scope in gifmaking over the past 12 months.
Before I get into this tutorial, I want to thank @laurabenanti, @maines , @cobbbvanth, and @cal-kestis for their unconditional support over the course of my journey of investigating the Neural Filters & their valuable inputs on the rendering performance!
In this tutorial, I will outline what the Photoshop Neural Filters do and how I use them in my workflow - multiple examples will be provided for better clarity. Finally, I will talk about some known performance issues with the filters & some feasible workarounds.
Tutorial Structure:
Meet the Neural Filters: What they are and what they do
Why I use Neural Filters? How I use Neural Filters in my giffing workflow
Getting started: The giffing workflow in a nutshell and installing the Neural Filters
Applying Neural Filters onto your gif: Making use of the Neural Filters settings; with multiple examples
Testing your system: recommended if you’re using Neural Filters for the first time
Rendering performance: Common Neural Filters performance issues & workarounds
For quick reference, here are the examples that I will show in this tutorial:
Example 1: Image Enhancement | improving the image quality of gifs prepared from highly compressed video files
Example 2: Facial Enhancement | enhancing an individual's facial features
Example 3: Colour Manipulation | colourising B&W gifs for a colourful gifset
Example 4: Artistic effects | transforming landscapes & adding artistic effects onto your gifs
Example 5: Putting it all together | my usual giffing workflow using Neural Filters
What you need & need to know:
Software: Photoshop 2021 or later (recommended: 2023 or later)*
Hardware: 8GB of RAM; having a supported GPU is highly recommended*
Difficulty: Advanced (requires a lot of patience); knowledge in gifmaking and using video timeline assumed
Key concepts: Smart Layer / Smart Filters
Benchmarking your system: Neural Filters test files**
Supplementary materials: Tutorial Resources / Detailed findings on rendering gifs with Neural Filters + known issues***
*I primarily gif on an M2 Max MacBook Pro that's running Photoshop 2024, but I also have experiences gifmaking on few other Mac models from 2012 ~ 2023.
**Using Neural Filters can be resource intensive, so it’s helpful to run the test files yourself. I’ll outline some known performance issues with Neural Filters and workarounds later in the tutorial.
***This supplementary page contains additional Neural Filters benchmark tests and instructions, as well as more information on the rendering performance (for Apple Silicon-based devices) when subject to heavy Neural Filters gifmaking workflows
Tutorial under the cut. Like / Reblog this post if you find this tutorial helpful. Linking this post as an inspo link will also be greatly appreciated!
1. Meet the Neural Filters!
Neural Filters are powered by Adobe's machine learning engine known as Adobe Sensei. It is a non-destructive method to help streamline workflows that would've been difficult and/or tedious to do manually.
Here are the Neural Filters available in Photoshop 2024:


Skin Smoothing: Removes blemishes on the skin
Smart Portrait: This a cloud-based filter that allows you to change the mood, facial age, hair, etc using the sliders+
Makeup Transfer: Applies the makeup (from a reference image) to the eyes & mouth area of your image
Landscape Mixer: Transforms the landscape of your image (e.g. seasons & time of the day, etc), based on the landscape features of a reference image
Style Transfer: Applies artistic styles e.g. texturings (from a reference image) onto your image
Harmonisation: Applies the colour balance of your image based on the lighting of the background image+
Colour Transfer: Applies the colour scheme (of a reference image) onto your image
Colourise: Adds colours onto a B&W image
Super Zoom: Zoom / crop an image without losing resolution+
Depth Blur: Blurs the background of the image
JPEG Artefacts Removal: Removes artefacts caused by JPEG compression
Photo Restoration: Enhances image quality & facial details
+These three filters aren't used in my giffing workflow. The cloud-based nature of Smart Portrait leads to disjointed looking frames. For Harmonisation, applying this on a gif causes Neural Filter timeout error. Finally, Super Zoom does not currently support output as a Smart Filter
If you're running Photoshop 2021 or earlier version of Photoshop 2022, you will see a smaller selection of Neural Filters:


Things to be aware of:
You can apply up to six Neural Filters at the same time
Filters where you can use your own reference images: Makeup Transfer (portraits only), Landscape Mixer, Style Transfer (not available in Photoshop 2021), and Colour Transfer
Later iterations of Photoshop 2023 & newer: The first three default presets for Landscape Mixer and Colour Transfer are currently broken.
2. Why I use Neural Filters?
Here are my four main Neural Filters use cases in my gifmaking process. In each use case I'll list out the filters that I use:

Enhancing Image Quality:
Common wisdom is to find the highest quality video to gif from for a media release & avoid YouTube whenever possible. However for smaller / niche media (e.g. new & upcoming musical artists), prepping gifs from highly compressed YouTube videos is inevitable.
So how do I get around with this? I have found Neural Filters pretty handy when it comes to both correcting issues from video compression & enhancing details in gifs prepared from these highly compressed video files.
Filters used: JPEG Artefacts Removal / Photo Restoration
Facial Enhancement:
When I prepare gifs from highly compressed videos, something I like to do is to enhance the facial features. This is again useful when I make gifsets from compressed videos & want to fill up my final panel with a close-up shot.
Filters used: Skin Smoothing / Makeup Transfer / Photo Restoration (Facial Enhancement slider)
Colour Manipulation:
Neural Filters is a powerful way to do advanced colour manipulation - whether I want to quickly transform the colour scheme of a gif or transform a B&W clip into something colourful.
Filters used: Colourise / Colour Transfer
Artistic Effects:
This is one of my favourite things to do with Neural Filters! I enjoy using the filters to create artistic effects by feeding textures that I've downloaded as reference images. I also enjoy using these filters to transform the overall the atmosphere of my composite gifs. The gifsets where I've leveraged Neural Filters for artistic effects could be found under this tag on usergif.
Filters used: Landscape Mixer / Style Transfer / Depth Blur
How I use Neural Filters over different stages of my gifmaking workflow:
I want to outline how I use different Neural Filters throughout my gifmaking process. This can be roughly divided into two stages:
Stage I: Enhancement and/or Colourising | Takes place early in my gifmaking process. I process a large amount of component gifs by applying Neural Filters for enhancement purposes and adding some base colourings.++
Stage II: Artistic Effects & more Colour Manipulation | Takes place when I'm assembling my component gifs in the big PSD / PSB composition file that will be my final gif panel.
I will walk through this in more detail later in the tutorial.
++I personally like to keep the size of the component gifs in their original resolution (a mixture of 1080p & 4K), to get best possible results from the Neural Filters and have more flexibility later on in my workflow. I resize & sharpen these gifs after they're placed into my final PSD composition files in Tumblr dimensions.
3. Getting started
The essence is to output Neural Filters as a Smart Filter on the smart object when working with the Video Timeline interface. Your workflow will contain the following steps:
Prepare your gif
In the frame animation interface, set the frame delay to 0.03s and convert your gif to the Video Timeline
In the Video Timeline interface, go to Filter > Neural Filters and output to a Smart Filter
Flatten or render your gif (either approach is fine). To flatten your gif, play the "flatten" action from the gif prep action pack. To render your gif as a .mov file, go to File > Export > Render Video & use the following settings.

Setting up:
o.) To get started, prepare your gifs the usual way - whether you screencap or clip videos. You should see your prepared gif in the frame animation interface as follows:

Note: As mentioned earlier, I keep the gifs in their original resolution right now because working with a larger dimension document allows more flexibility later on in my workflow. I have also found that I get higher quality results working with more pixels. I eventually do my final sharpening & resizing when I fit all of my component gifs to a main PSD composition file (that's of Tumblr dimension).
i.) To use Smart Filters, convert your gif to a Smart Video Layer.
As an aside, I like to work with everything in 0.03s until I finish everything (then correct the frame delay to 0.05s when I upload my panels onto Tumblr).
For convenience, I use my own action pack to first set the frame delay to 0.03s (highlighted in yellow) and then convert to timeline (highlighted in red) to access the Video Timeline interface. To play an action, press the play button highlighted in green.

Once you've converted this gif to a Smart Video Layer, you'll see the Video Timeline interface as follows:

ii.) Select your gif (now as a Smart Layer) and go to Filter > Neural Filters

Installing Neural Filters:
Install the individual Neural Filters that you want to use. If the filter isn't installed, it will show a cloud symbol (highlighted in yellow). If the filter is already installed, it will show a toggle button (highlighted in green)

When you toggle this button, the Neural Filters preview window will look like this (where the toggle button next to the filter that you use turns blue)

4. Using Neural Filters
Once you have installed the Neural Filters that you want to use in your gif, you can toggle on a filter and play around with the sliders until you're satisfied. Here I'll walkthrough multiple concrete examples of how I use Neural Filters in my giffing process.
Example 1: Image enhancement | sample gifset
This is my typical Stage I Neural Filters gifmaking workflow. When giffing older or more niche media releases, my main concern is the video compression that leads to a lot of artefacts in the screencapped / video clipped gifs.
To fix the artefacts from compression, I go to Filter > Neural Filters, and toggle JPEG Artefacts Removal filter. Then I choose the strength of the filter (boxed in green), output this as a Smart Filter (boxed in yellow), and press OK (boxed in red).
Note: The filter has to be fully processed before you could press the OK button!

After applying the Neural Filters, you'll see "Neural Filters" under the Smart Filters property of the smart layer

Flatten / render your gif
Example 2: Facial enhancement | sample gifset
This is my routine use case during my Stage I Neural Filters gifmaking workflow. For musical artists (e.g. Maisie Peters), YouTube is often the only place where I'm able to find some videos to prepare gifs from. However even the highest resolution video available on YouTube is highly compressed.
Go to Filter > Neural Filters and toggle on Photo Restoration. If Photoshop recognises faces in the image, there will be a "Facial Enhancement" slider under the filter settings.

Play around with the Photo Enhancement & Facial Enhancement sliders. You can also expand the "Adjustment" menu make additional adjustments e.g. remove noises and reducing different types of artefacts.

Once you're happy with the results, press OK and then flatten / render your gif.
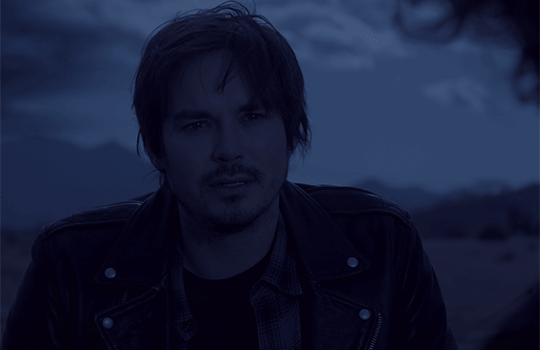
Example 3: Colour Manipulation | sample gifset
Want to make a colourful gifset but the source video is in B&W? This is where Colourise from Neural Filters comes in handy! This same colourising approach is also very helpful for colouring poor-lit scenes as detailed in this tutorial.
Here's a B&W gif that we want to colourise:

Highly recommended: add some adjustment layers onto the B&W gif to improve the contrast & depth. This will give you higher quality results when you colourise your gif.
Go to Filter > Neural Filters and toggle on Colourise.

Make sure "Auto colour image" is enabled.
Play around with further adjustments e.g. colour balance, until you're satisfied then press OK.
Important: When you colourise a gif, you need to double check that the resulting skin tone is accurate to real life. I personally go to Google Images and search up photoshoots of the individual / character that I'm giffing for quick reference.
Add additional adjustment layers until you're happy with the colouring of the skin tone.

Once you're happy with the additional adjustments, flatten / render your gif. And voila!

Note: For Colour Manipulation, I use Colourise in my Stage I workflow and Colour Transfer in my Stage II workflow to do other types of colour manipulations (e.g. transforming the colour scheme of the component gifs)
Example 4: Artistic Effects | sample gifset
This is where I use Neural Filters for the bulk of my Stage II workflow: the most enjoyable stage in my editing process!
Normally I would be working with my big composition files with multiple component gifs inside it. To begin the fun, drag a component gif (in PSD file) to the main PSD composition file.
Resize this gif in the composition file until you're happy with the placement

Duplicate this gif. Sharpen the bottom layer (highlighted in yellow), and then select the top layer (highlighted in green) & go to Filter > Neural Filters

I like to use Style Transfer and Landscape Mixer to create artistic effects from Neural Filters. In this particular example, I've chosen Landscape Mixer
Select a preset or feed a custom image to the filter (here I chose a texture that I've on my computer)

Play around with the different sliders e.g. time of the day / seasons
Important: uncheck "Harmonise Subject" & "Preserve Subject" - these two settings are known to cause performance issues when you render a multiframe smart object (e.g. for a gif)

Once you're happy with the artistic effect, press OK
To ensure you preserve the actual subject you want to gif (bc Preserve Subject is unchecked), add a layer mask onto the top layer (with Neural Filters) and mask out the facial region. You might need to play around with the Layer Mask Position keyframes or Rotoscope your subject in the process.
After you're happy with the masking, flatten / render this composition file and voila!

Example 5: Putting it all together | sample gifset
Let's recap on the Neural Filters gifmaking workflow and where Stage I and Stage II fit in my gifmaking process:
i. Preparing & enhancing the component gifs
Prepare all component gifs and convert them to smart layers
Stage I: Add base colourings & apply Photo Restoration / JPEG Artefacts Removal to enhance the gif's image quality
Flatten all of these component gifs and convert them back to Smart Video Layers (this process can take a lot of time)
Some of these enhanced gifs will be Rotoscoped so this is done before adding the gifs to the big PSD composition file
ii. Setting up the big PSD composition file
Make a separate PSD composition file (Ctrl / Cmmd + N) that's of Tumblr dimension (e.g. 540px in width)
Drag all of the component gifs used into this PSD composition file
Enable Video Timeline and trim the work area
In the composition file, resize / move the component gifs until you're happy with the placement & sharpen these gifs if you haven't already done so
Duplicate the layers that you want to use Neural Filters on
iii. Working with Neural Filters in the PSD composition file
Stage II: Neural Filters to create artistic effects / more colour manipulations!
Mask the smart layers with Neural Filters to both preserve the subject and avoid colouring issues from the filters
Flatten / render the PSD composition file: the more component gifs in your composition file, the longer the exporting will take. (I prefer to render the composition file into a .mov clip to prevent overriding a file that I've spent effort putting together.)
Note: In some of my layout gifsets (where I've heavily used Neural Filters in Stage II), the rendering time for the panel took more than 20 minutes. This is one of the rare instances where I was maxing out my computer's memory.
Useful things to take note of:
Important: If you're using Neural Filters for Colour Manipulation or Artistic Effects, you need to take a lot of care ensuring that the skin tone of nonwhite characters / individuals is accurately coloured
Use the Facial Enhancement slider from Photo Restoration in moderation, if you max out the slider value you risk oversharpening your gif later on in your gifmaking workflow
You will get higher quality results from Neural Filters by working with larger image dimensions: This gives Neural Filters more pixels to work with. You also get better quality results by feeding higher resolution reference images to the Neural Filters.
Makeup Transfer is more stable when the person / character has minimal motion in your gif
You might get unexpected results from Landscape Mixer if you feed a reference image that don't feature a distinctive landscape. This is not always a bad thing: for instance, I have used this texture as a reference image for Landscape Mixer, to create the shimmery effects as seen in this gifset
5. Testing your system
If this is the first time you're applying Neural Filters directly onto a gif, it will be helpful to test out your system yourself. This will help:
Gauge the expected rendering time that you'll need to wait for your gif to export, given specific Neural Filters that you've used
Identify potential performance issues when you render the gif: this is important and will determine whether you will need to fully playback your gif before flattening / rendering the file.
Understand how your system's resources are being utilised: Inputs from Windows PC users & Mac users alike are welcome!
About the Neural Filters test files:
Contains six distinct files, each using different Neural Filters
Two sizes of test files: one copy in full HD (1080p) and another copy downsized to 540px
One folder containing the flattened / rendered test files
How to use the Neural Filters test files:
What you need:
Photoshop 2022 or newer (recommended: 2023 or later)
Install the following Neural Filters: Landscape Mixer / Style Transfer / Colour Transfer / Colourise / Photo Restoration / Depth Blur
Recommended for some Apple Silicon-based MacBook Pro models: Enable High Power Mode
How to use the test files:
For optimal performance, close all background apps
Open a test file
Flatten the test file into frames (load this action pack & play the “flatten” action)
Take note of the time it takes until you’re directed to the frame animation interface
Compare the rendered frames to the expected results in this folder: check that all of the frames look the same. If they don't, you will need to fully playback the test file in full before flattening the file.†
Re-run the test file without the Neural Filters and take note of how long it takes before you're directed to the frame animation interface
Recommended: Take note of how your system is utilised during the rendering process (more info here for MacOS users)
†This is a performance issue known as flickering that I will discuss in the next section. If you come across this, you'll have to playback a gif where you've used Neural Filters (on the video timeline) in full, prior to flattening / rendering it.
Factors that could affect the rendering performance / time (more info):
The number of frames, dimension, and colour bit depth of your gif
If you use Neural Filters with facial recognition features, the rendering time will be affected by the number of characters / individuals in your gif
Most resource intensive filters (powered by largest machine learning models): Landscape Mixer / Photo Restoration (with Facial Enhancement) / and JPEG Artefacts Removal
Least resource intensive filters (smallest machine learning models): Colour Transfer / Colourise
The number of Neural Filters that you apply at once / The number of component gifs with Neural Filters in your PSD file
Your system: system memory, the GPU, and the architecture of the system's CPU+++
+++ Rendering a gif with Neural Filters demands a lot of system memory & GPU horsepower. Rendering will be faster & more reliable on newer computers, as these systems have CPU & GPU with more modern instruction sets that are geared towards machine learning-based tasks.
Additionally, the unified memory architecture of Apple Silicon M-series chips are found to be quite efficient at processing Neural Filters.
6. Performance issues & workarounds
Common Performance issues:
I will discuss several common issues related to rendering or exporting a multi-frame smart object (e.g. your composite gif) that uses Neural Filters below. This is commonly caused by insufficient system memory and/or the GPU.
Flickering frames: in the flattened / rendered file, Neural Filters aren't applied to some of the frames+-+
Scrambled frames: the frames in the flattened / rendered file isn't in order
Neural Filters exceeded the timeout limit error: this is normally a software related issue
Long export / rendering time: long rendering time is expected in heavy workflows
Laggy Photoshop / system interface: having to wait quite a long time to preview the next frame on the timeline
Issues with Landscape Mixer: Using the filter gives ill-defined defined results (Common in older systems)--
Workarounds:
Workarounds that could reduce unreliable rendering performance & long rendering time:
Close other apps running in the background
Work with smaller colour bit depth (i.e. 8-bit rather than 16-bit)
Downsize your gif before converting to the video timeline-+-
Try to keep the number of frames as low as possible
Avoid stacking multiple Neural Filters at once. Try applying & rendering the filters that you want one by one
Specific workarounds for specific issues:
How to resolve flickering frames: If you come across flickering, you will need to playback your gif on the video timeline in full to find the frames where the filter isn't applied. You will need to select all of the frames to allow Photoshop to reprocess these, before you render your gif.+-+
What to do if you come across Neural Filters timeout error? This is caused by several incompatible Neural Filters e.g. Harmonisation (both the filter itself and as a setting in Landscape Mixer), Scratch Reduction in Photo Restoration, and trying to stack multiple Neural Filters with facial recognition features.
If the timeout error is caused by stacking multiple filters, a feasible workaround is to apply the Neural Filters that you want to use one by one over multiple rendering sessions, rather all of them in one go.
+-+This is a very common issue for Apple Silicon-based Macs. Flickering happens when a gif with Neural Filters is rendered without being previously played back in the timeline.
This issue is likely related to the memory bandwidth & the GPU cores of the chips, because not all Apple Silicon-based Macs exhibit this behaviour (i.e. devices equipped with Max / Ultra M-series chips are mostly unaffected).
-- As mentioned in the supplementary page, Landscape Mixer requires a lot of GPU horsepower to be fully rendered. For older systems (pre-2017 builds), there are no workarounds other than to avoid using this filter.
-+- For smaller dimensions, the size of the machine learning models powering the filters play an outsized role in the rendering time (i.e. marginal reduction in rendering time when downsizing 1080p file to Tumblr dimensions). If you use filters powered by larger models e.g. Landscape Mixer and Photo Restoration, you will need to be very patient when exporting your gif.
7. More useful resources on using Neural Filters
Creating animations with Neural Filters effects | Max Novak
Using Neural Filters to colour correct by @edteachs
I hope this is helpful! If you have any questions or need any help related to the tutorial, feel free to send me an ask 💖
#photoshop tutorial#gif tutorial#dearindies#usernik#useryoshi#usershreyu#userisaiah#userroza#userrobin#userraffa#usercats#userriel#useralien#userjoeys#usertj#alielook#swearphil#*#my resources#my tutorials
366 notes
·
View notes
Text
they say write what you know and what i know is academic stress and yearbook pain. so anyways it's a yearbook club au!!!!
YEARBOOK CLUB MEMBERS:
supervising teachers: gertrude and leitner. they become uncontactable like a week into the project (do they die? do they resign? tim has a running theory that they eloped.)
elias: head of yearbook club. dips unexpectedly in the middle of the entire thing (something about an optical surgery) and forces jon to take over. his dad paid for the adobe subscription they’re using
rosie: treasurer, she’s very efficient, they’ve probably exchanged like 3 emails in total and she’s gotten everything funded. knows well enough to stay out of the dumpster fire that is yearbook production otherwise
jon: de facto head of yearbook club. thinks it should have gone to sasha instead. hes a bit incompetent but plans like it’s doomsday the next week so they are always in a wealth of excel sheets. writer, editor
tim: joined partly because he wanted an excuse to get out of football fixtures. also because he is 1 out of jons 3 friends including his ex and jon asked him. he has a tiktok. marketing, editor
sasha: joined partly to impress gertrude (she’s looking for her to write her letter of recommendation as head girl in sixth form). also because she is 1 out of jons 3 friends including his ex and jon asked her. she still uses livejournal. designer, writer
gerry: sixth form, occasionally helps out with networking at gertrude’s behest. tim is a bit starstruck over him. he saves their asses many, many times
melanie and georgie: got unofficially roped in as photographers. why you ask? manuela dominguez may have the cutting edge cameras but she is simply too scary to approach. melanie has a youtube channel that all the girls and tim are apparently subscribed to.
martin: there is not one single picture of him. apparently he didn’t turn up for photo day, neither was he involved in any school events. even the people who have shared half-remembered facts about him seem to forget about him when questioned a second time. where did he go?
PLOT:
it’s the month before the yearbook is due to be sent in for production, and the team have discovered numerous issues with the draft: pictures of random people keep getting swapped over like they’ve been photoshopped, some pages are illegible and distorted unless they are physically written out in hand and scanned, one paragraph is a leitner. and nobody can find martin blackwood so they can get his picture in the yearbook. what will they do.
SIDE CHARACTERS:
annabelle cane: current head girl
mikaele salesa: somehow knows literally everyone, involved in the funding of yearbook production
mike crew: uneasy alliance with gerry in their pursuit of jurgen leitner
oliver banks: had a mental breakdown sometime during his gcses but hes fine now
david from research: nobody says it to his face but he has genuinely the most atrocious clothing choice in the entire school apart from michael shelley, and even then michael shelley makes work
grifter’s bone: the band of the school, except no one actually knows anyone who’s part of it. their shows are legendarily terrible. manuela says ambulances were phoned.
daisy and basira: prefects, currently invested in making sure yearbook club remains LEGAL and not STALKING ANY STAFF OR STUDENTS, JON
jmag: principal. boo. what a creep
julia montauk: apparently her dad went to jail. but who is she living with now? i don’t know, manuela told me. how does manuela know? julia told her in a sleepover during year 6. and she’s telling other people? wow. that’s messed up. is that old guy her grandpa? why does he carry a rifle around
jared hopworth: prejudiced gymbro, but importantly, NOT a homophobe.
the admiral: what else needs to be said
FAMOUS ALUMNI:
agnes montague (campus celebrity from literally decades ago) (her relationship with jack barnabas is mythicised)
jude perry (allegedly caused some fire-related, agnes-related events)
edwin burroughs (allegedly commited atrocities during one year’s christmas dinner)
jane prentiss (left for uni a year ago, allegedly brought many live organisms onto campus) (keeps talking about this guy called jordan)
eric delano (he did WHAT to his eyes)
MISCELLANEOUS POINTS:
daedalus crew is astronomy club
breekon and hope are the manufacturers for much of the schools equipment and stationery
jon keeps finding notes from gertrude stashed in random places about yearbook difficulties its like a fun cool treasure hunt
they cant figure out where a computer they were initially using for yearbook club is from. it says ‘ushanka’ on the bottom of the display and the keys are slightly crusty
what the hell are the drama students actually up to
257 notes
·
View notes
Text
Using Neural Filters to colour correct
i’ve had a couple of people ask about how i’ve coloured the pocket dimension scenes so i thought i’d just do a run-through tutorial kind of thing to show it, rather than going through it with everyone separately.
so this is a tutorial for how i made this:
from this:
follow along under the cut:
so just some things to point out before we move on which are essential and could get in the way of this working for you:
you will need adobe photoshop cc - v.22 or above. any versions older than this won’t work. you can find what version you currently have by opening photoshop, clicking ‘help’ on the top toolbar, and selecting ‘about photoshop’. my current version is 23.2.2.
you should know how to make a gif from frames, use timeline and work with the gif as a smart object. if you don’t know what i mean, i’ve tried to explain it briefly below.
using neural filters is resource heavy so expect photoshop to be slow in processing/exporting/saving anything you use them on. it might be worth having other programs closed while you use it if your computer has a lower or mid-range spec.
and so...
1. make your gif
to do this, import your frames, crop, set frame speed etc however you normally would. if you usually make gifs with the animation bar set to ‘frame animation’, you will need to change this so that you can create a smart object. you will need to press the button with the video timeline symbol on your animation bar:
then you should select all your layers (not frames as you shouldn’t see them anymore) and right-click > convert to smart object:

you should leave your animation in timeline mode, but the purpose of the smart object is so you can add smart filters. this is especially good for things like sharpening, any effects you want to add, and of course... neural filters.
2. brighten the image and convert to black and white
contrary to what we’re trying to achieve here, you should change the image to black and white and brighten it up so that you have as smooth and plain a base for the filters to apply to.
i do this by adding a black and white adjustment layer, and clicking ‘auto’ on the properties tab:

you should then add a ‘levels’ adjustment layer and drag the right tab along until it meets the beginning of the histogram. you should also move the left tab along a little bit for some contrast - how far depends on how you want your gif to look:

following this, select the smart object and two adjustment layers > right-click > convert to smart object. you don’t have to do this but i find it helps and it reduces the number of layers you have to work with.

my gif now looks like this:

3. adding the neural filter
now your image is about to change in a huge way. click on filter on the top toolbar and select ‘neural filters’:

from here, you will see this screen and a bunch of current filters and beta filters on the right-hand side. you may have to download them to get them to work. for this, we’re using ‘colorize’ so at least make sure you have that one downloaded and ready to use:

when you turn the ‘colorize’ filter on, after processing (this can take a few seconds), your image now looks like this:

(note: this gif is an exception in how well it turned out first time - the filter has applied evenly minus a couple of issues i’ll go over below. how successful it will be depends on how much movement is in the clip, or how many colours it will need to find, and it sometimes gets confused with dark and light tones. you’ll find most of the time that the gifs will have patches that aren’t coloured, or will have incorrect colour correction that you’ll need to go in frame-by-frame and patch in by hand. the filter does do a lot of heavy lifting though.)
you can then play around with the saturation (i usually reduce it to -10) and the colours similarly to how you would in ‘colour balance’, however it has a more all-over even tone:

the last thing you need to do is select ‘smart filter’ on this drop-down menu:
if you don’t change it to smart filter, the filter will only apply to the frame you can currently see and won’t apply to the whole animation.
my gif now looks like this:

this might be enough for you in which case great news! you get to stop here, apply whatever sharpening and colouring you want, and save as normal!
however, i’m a perfectionist to a fault so i need to do a few more things first...
(note: it’s always worth doing the next step even if you’re happy with the finished product here, just in case you missed a spot)
4. check the filter has applied throughout the whole gif
you’ll see that you now have a much more even base to work from and colour your gif as normal, however neural filters aren’t perfect and do leave funny little glitches throughout your gif sometimes. in order to check this, i usually scrub through to see if there are any issues. in this gif, i spotted two.
in these two areas - on the moving gif - i can see the colouring flickering. the filter hasn’t applied the right colour on every frame, or simply hasn’t coloured it at all:
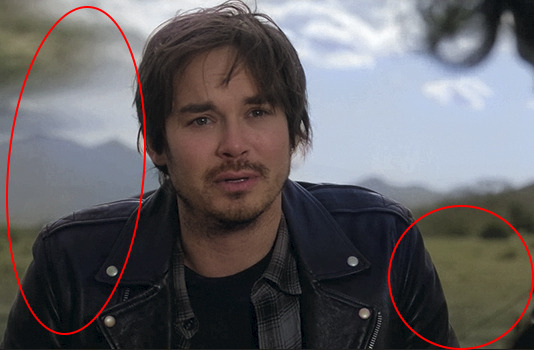
this gif isn’t the worst offender for this, but if you look closely you’ll see it. so...
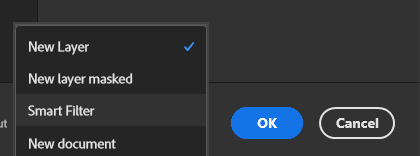
5. make a new layer and fill in the flickering areas
press the ‘new layer’ button:

and now use the ink dropper tool to pick up the colour you want to use, and paint over the area where the colour is flickering - e.g. i used the dropper to pick up the colour from the desert in the background and painted over that area. i also picked up some of the colour from the sky and coloured over the flickering by the storm. i used these brush settings:

when you’ve painted on the colour you want, and as much as you want, set the layer to ‘color’. i also change the opacity to 80% to let some of what’s underneath still come through a little bit, but do what’s best for you and your gif:
my gif now looks like this, with less noticeable flickering:
7. brighten, colour and sharpen however you normally do
idk if you have an existing psd or just experiment with adjustment layers, but your gif is now ready to start colouring however you normally would. the neural filter is basically acting as a reset to give you a blank canvas in which to gif as normal. for this gif i started with a ‘hue and saturation’ adjustment layer to change the green background to a more dirt/sand colour as it’s meant to be the desert, and then just played around with my usual combination of adjustments until i came up with the final product! i then sharpen using filter > sharpen > smart sharpen and it should be done.
8. export (save for web)
you all know how to do this by now, but be aware that these will load slowly. gifs aren’t the fastest things to save on a good day but with the neural filter applied, they’re particularly slow. this is why i said to do work on the gifs one at a time - don’t have photoshop doing more than it needs to do or it might slow down to a halt.
so after all that, this is the final version of my gif:
tips and tricks
avoid making gifs of moments with a lot of movement - this could be the subject of the gif moving, the background, the wind blowing something around etc. while normal colouring can tolerate these changes, the filter isn’t yet clever enough to work it out and it makes the gifs unsalvageable because you can’t paint over the flickering accurately enough - e.g.:

(p.s. if anyone knows how to get the filter to work on this specific scene you have to tell me lmao it’s been driving me mad...)
try and keep the gifs short - i haven’t made one above 55 frames, i think. that is still quite a lot but it is a challenge to ensure the filter can cope with it. shorter gifs would probably mean a cleaner result.
you have to set the gif to black and white first - the colorize filter is designed to bring black and white photos/videos to life. i tried it over the blue filter directly and it was successful but i had more consistent luck when starting in black and white.
make sure you brighten the gif significantly before applying the filter - it really helps to give a cleaner canvas for the filter to apply to, but it’s not essential if you really don’t want to.
if you have any questions, don’t hesitate to ASK. i’m by no means an expert and this is just what i’ve observed from using this feature and the workarounds i’ve found working for me so far, but happy to try and help where i can and happy to take suggestions too! <3
#malex#roswell new mexico#gif tutorial#photoshop tutorial#ps help#allresources#completeresources#itsphotoshop#*laurengifs#*tutorial#this is so long#but i hope it's helpful#i think needing the newer versions of ps is probably what's going to get in the way most but just in case it doesn't... ta-daaa#1k
2K notes
·
View notes
Text
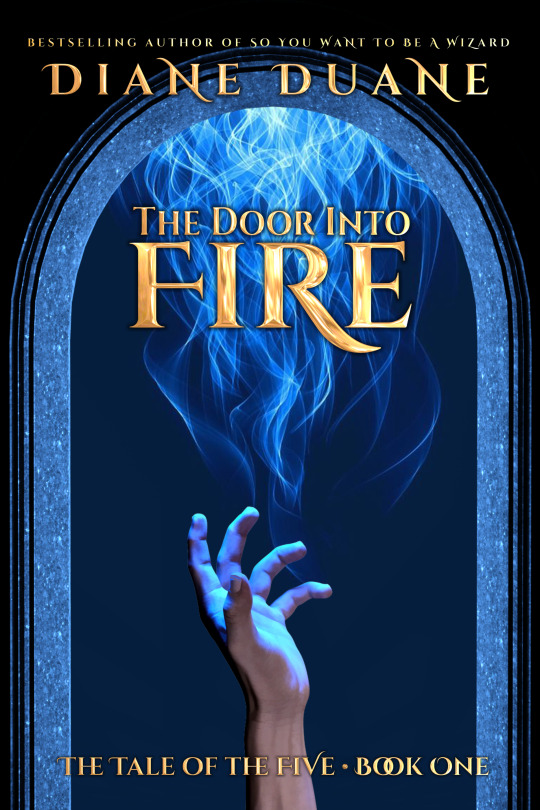
Middle Kingdoms "Tale of the Five" Mark V covers, minimalist (type 1) group, TDIF
This is the only one of these where I'm not going to put the work under a cut, because there are going to be twelve of them before I'm done, and I don't want to bore people with the roughs in progress.
So this was the sketch for this group's Door Into Fire cover the other day...
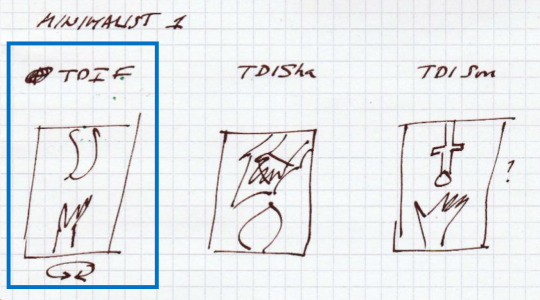
And here's a rough example of what I was seeing in my head.
Possibly a little on the nose, but (a) I had to start somewhere, and (b) it was 1 AM when I finished work on this one and I was beyond caring. :)
The "since we're talking about doors, let's lean into that" concept is one that's appeared in previous covers on this series—both mine and other people's—but none of mine have looked this polished, because I just wasn't as good at this stuff ten years ago as I am now, and I've now got far better tools.
...Though one hilarious exception to this situation has been applied to the lettering. The extremely nice Eye Candy plugin from Exposure Software once in its much earlier versions ran on both Corel Photo Paint (my preferred design software for pushing three decades now) and Adobe's various versions of Photoshop. But for whatever reason(s), that situation came to an end. Now, I have Eye Candy for Photoshop... but I really hate Photoshop, and avoid using it whenever possible.
So in order to add some pop to the Cinzel Decorative font on this page, I had to go elsewhere... which in my case means to the little Samsung notebook computer that lives (mostly snoozing) in the front window of the living room, and is still running Windows XP. (Because of this it's never allowed to go online any more, as it can't be made secure.) I refuse to get rid of it because we've traveled too far together, and I've written too many books on it, and I love it too much. But its other chief virtue is that it will still run Corel 11 (which my newer Windows machines refuse to do). And the install of Corel PP 11 in the Samsung will still happily run the old version of Eye Candy, which has all the familiar presets that I tinkered together over years of use. I really need to sit down, eventually, and figure out how to train the current version of Eye Candy to accept the presets from the older one.
But today is not that day. Today I just plugged in the .cpt Photo Paint file and edited it to add the golden-colored effect on those letters. That was all this rough needed for me to kick it to one side and get on with thinking about the next one.
Anyway, for those interested in materials: the hand and the doorway were created using Daz Studio. The blue fire is stock art. (I do have a very nice app called Flame Painter, from Escape Motions, but I'm not yet expert enough with it to use it much in cover work.) The basic (parent) font is Cinzel, as I mentioned: both Cinzel Bold and Cinzel Decorative Bold variants are used in this cover.
There are still a number of things that can use some tweaking in this one, but as I said, this is a rough. Over the next week or so I'll get around to the other two in this set, and get a better sense whether this whole idea is workable—as if the style doesn't work well across all three covers in the trilogy, it's useless.
And now I'm going to go make some oatcakes, as @petermorwood someone seems to have eaten all the ones I made last week. :)
(cc: @mutantenfisch: Links to the print copies at Amazon are over here, if you don't feel like waiting for the new covers...)
#Middle Kingdoms#Middle Kingdoms meta#The Door Into Fire#cover design#tag to make finding these easier:#MK Mk 5 covers
57 notes
·
View notes
Text
hi everyone! I've gotten several requests to make a tutorial on how to make gifs for someone just starting out and I finally got around to slapping a tutorial together.
This tutorial will cover:
software recommendations
choosing what to gif
creating a gif step by step with probably a lot of unnecessary detail
some tips and tricks:)
(This particular tutorial will not cover how to find tv and movies to download and gif, or any specific instructions on coloring. only the basic gif making process.)
so for the purposes of this tutorial, we will be using Adobe Photoshop, which is the most common program for making gifs, and the one I recommend. the version you have doesn't make a major difference in terms of capabilities but the interface may be slightly different looking if you have an older version or a different type of device. you cannot make or edit gifs in any mobile version of the photoshop application.
Optionally, we will also be using Adobe Premiere Rush/Pro or another video editing software of your choice. wherever you are downloading Photoshop, whether from Adobe or a third party, you should easily be able to acquire Premiere as well.
I am aiming to be as detailed as possible in this tutorial, so it may sound more time consuming than it really is. once you get the hang of things, it goes fast. the most time consuming part by far is the editing and coloring.
in my opinion, one thing that majorly saves time while giffing is knowing your keyboard shortcuts and using your mouse/trackpad as little as possible. I will be going over these in this tutorial as well.
before we begin, some general tips:
gifs of single shots that do not cut between angles or subjects generally will look the best, barring exceptions
for a single gif set, choosing scenes and shots with similar lighting will be easiest to get to look uniform when compiled together, since editing wildly different looking scenes to have similar coloring and lighting is hard and takes some practice!
avoid shots that will require you to majorly crop or zoom to properly frame the subject, as this will greatly diminish quality
speaking of quality, gifs will look best using 1080p video, but you can get away with 720p as well. I would not recommend giffing with anything lower resolution than that
Tumblr's upload capacity for image and gif files is 10mb. be sure when exporting your finished gif that it is under that size. if it is a bit over, you can try trimming a few frames off your gif in the video timeline.
if you get frustrated, don't give up! giffing is hard and complicated especially if you are new to photoshop. I tried to make this tutorial as detailed as possible so it's easy to understand (although im sure I still forgot some stuff)
ok onto the tutorial!!!
STEP ONE: choose what range of frames you want to gif, and how.
once you have decided what you want to gif, there are two main way to convert your episode into a range of frames to make into a gif. the first is by screencapping. this involves downloading a program like mplayer or vlc which can be used to convert video files into "stacks" of screencaps, which can then be separated into whatever range of frames you want and imported into photoshop. this is seemingly by far the most common method I have seen amongst gifmakers*, but personally I don't care for it and I think it's more confusing and time consuming overall, so I will be explaining the second method: importing video frames to layers.
now, normally what this would mean is opening the full episode in photoshop and using the pathetic little playheads on either end of the scrub bar to trim the file into a clip. this is where your video editing software comes into play.
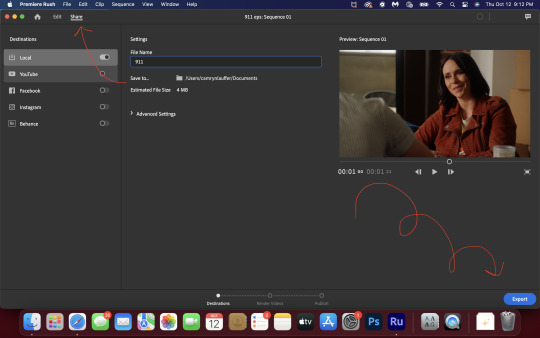
open whatever episode or movie you want to gif in your program. if it is a large file like a long movie in 1080p, this may take a few seconds. like I said, I am using Premiere Rush. I will be using a random episode of 9-1-1 for my example gif.
in your media browser, hover over whichever episode you want (you can also just add the whole episode to your project and scrub through, but that can take longer unless you know what time stamp you're after). click the fullscreen button by the bottom righthand corner.
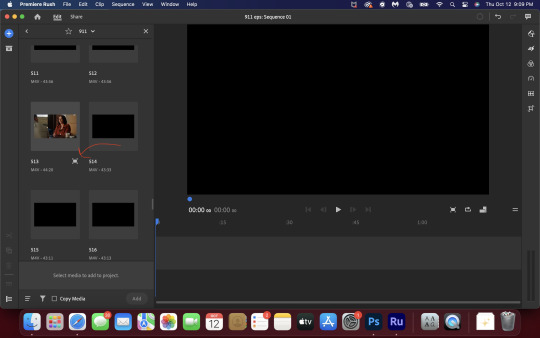
now you can scrub through and trim the episode before you even import it to premiere. this makes trimming your clip even easier.
use the trim bar (yellow outlines) to trim as close as you can around the scene you want to gif.
then click this plus, and then "add" below. this will add the clip to your project.
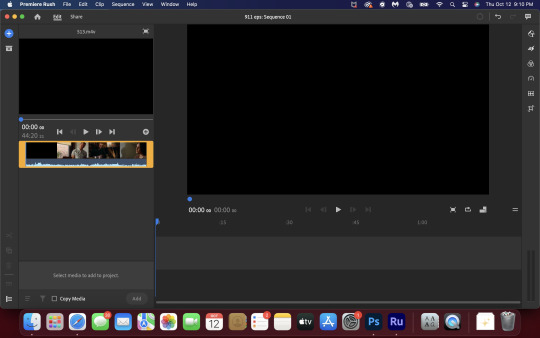
now, move the blue playhead up to the frame you want your gif to start on. then, use the scissors button off to the left to slice the clip. select the portion before the playhead, and delete it.
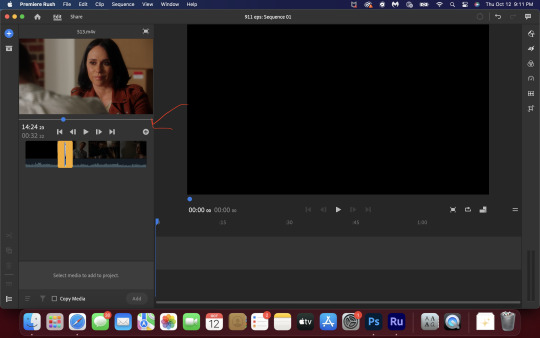
now move the playhead to where you want the gif to stop. a good length for most gifs is around 1.5-2 seconds in my opinion. some may be shorter depending on how long the shot is, or longer if you plan on making them smaller (remember, the uploading capacity on Tumblr is 10mb per file.) trim again, now delete the portion after the playhead. you can also use the left and right arrows beside the play button to move frame by frame, and you can adjust the side of the horizontal scroll bar below your clip to “zoom” in on it and make scrubbing easier.
once you have your clip, go up to where it says "share". your clip will be rendered, and then you can click export to save it.
repeat step one as many times as you want for each gif. I know this may sound complicated, but like I said above once you get in the rhythm this step takes only a few seconds.
STEP TWO: create your gif!
close premiere. open photoshop. head to the control bar at the top. select file > import > import video frames to layers.
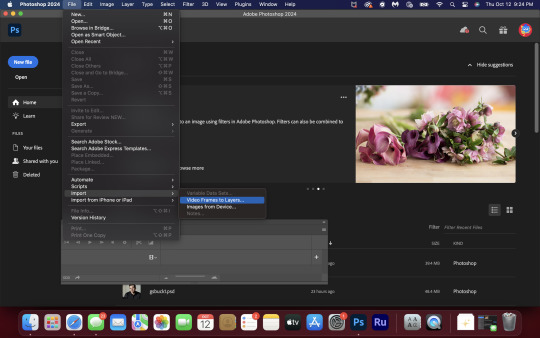
navigate to whatever folder you exported your clip to. select it, and hit enter. a second popup will appear asking you to select your range of frames. since you have already trimmed your clip to your liking, simply hit enter a second time.
now your screen looks like this, and we are going to crop and resize our gif! (troubleshooting: if you do not see the timeline bar at the bottom, select window from the control bar, scroll down, and make sure timeline is selected as part of your workspace. Adjustments and layers should be there automatically but if not add them too).

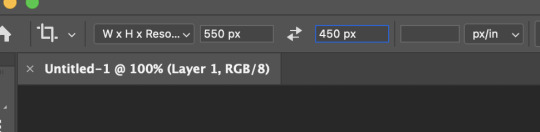
Tumblr posts are 540px wide, so in order to make my gifs as small as possible while maintaining quality, I typically crop my gifs to be around 550-600px wide, with varying heights depending on what shape I want the gif to be. experiment with this a little and decide what works for you. just don't make the width lower than 540px. once you have the portion of the frame you want inside the cropping grid, hit enter again. sometimes you have to hit it twice.
here are the measurements I am using for this gif
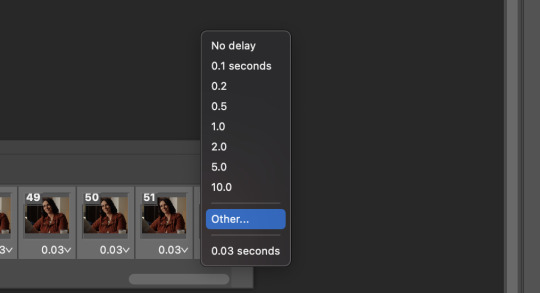
now in your timeline, select frame 1. hold down the shift key and scroll to the end to select the very last frame, thereby highlighting them all. from here we will edit our frame delay rate. photoshop will automatically set it to .03s, which will make your finished gif awkwardly fast. I typically use .05s, or .06s if I want a gif to be subtly slower (this comes in handy if the shot you are trying to gif is very short). anything longer than .06s will look weird though. choose "other" from this menu and type in your delay rate. make sure not to miss the zero after the decimal.
once you've set your frame rate, go to the other end of your timeline and click here to convert your frames into a video timeline.

then press option + command + A (on Mac) or windows + alt + A (on PC) to select all layers. then right click (control + click with a trackpad) on any one of the highlighted layers in your layers tab off to the right. scroll down in the popup menu and select Convert to Smart Object.
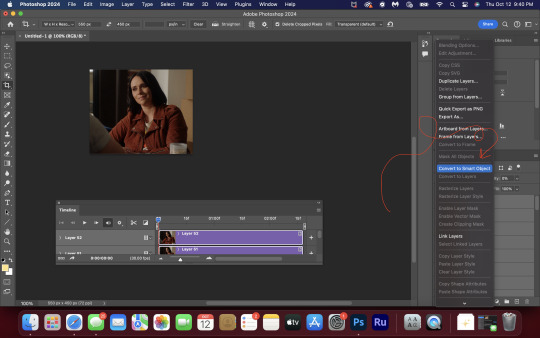
THAT'S IT!! CONGRATULATIONS!!!!! WE HAVE GIF!!!
from here comes the fun part!! you will begin adding action filters like sharpening as well as adjustment layers to color and edit your gif. experiment with different adjustments and styles until you find something you like. too many adjustment layers will up the size of the finished gif though, so I tend to keep mine to 3-4 layers max unless its a really hard to color scene. if anyone is interested in a separate coloring tutorial, please let me know!
once you are finished editing your gif, click file > export > save for web (legacy) OR hit shift + option + command + S. play your gif in the export window to make sure it looks okay, and then hit save!
I hope you guys find this helpful and informative! please hit up my in box if you have any questions or if anything doesn't make sense. happy giffing!!!
*one reason people seem to prefer screencapping to this method, is saving all the individual clips as video files does take up a lot of space on your scratch drive, which in turn can cause your computer to work slowly or crash programs. this can be rectified by making sure to delete the clips from your computer once you are done making the gifs. another space hoarder to look out for is the proxy files of your episodes that will be automatically saved to your hard drive whenever you add an episode to your project in Premiere. Periodically, go through your storage and delete all the .proxy video files. this will not delete the original episode files, only the proxy files created by Premiere.
tagging some mutuals to sb hehe: @shitouttabuck @lover-of-mine @honestlydarkprincess @eddiediaaz @compactdiscmp3 @eddiebabygirldiaz @bigfootsmom @callaplums @athenagranted @firemedicdiaz @sibylsleaves @loserdiaz @buck2eddie @diazass @eddiediaztho @giddyupbuck @monsterrae1 @icecreampotluck @sunflowerdiaiz @swiftfootedachilles @singlethread @aziraaphales @911onabc
116 notes
·
View notes
Text
How I Make Gifs!
I've gotten multiple asks in my inbox about the method I use to make these animal crossing gifs:
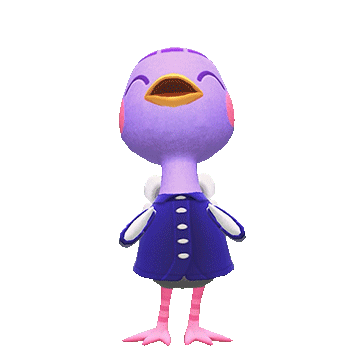
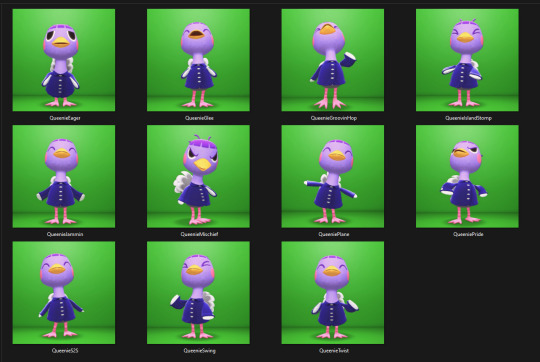
So I figured it was about I time I answer these asks in the form of a separate post using gifs and screenshots to help explain things! I will warn that this will be an EXTREMELY LONG explanation, but I want to give as much details as I can under the cut. I'm going to use Queenie as my example!
The first thing I do is go to Photopia on Harv's island, a place where you can take photos using any of the villagers in the game and all the items you've collected. I use the Custom Designs app on the nook phone to download different colored wallpapers and floors. The colors that I use depends heavily on the villagers. I've used different backgrounds to make these gifs: green, blue, magenta, and (very rarely) black. For Queenie's colors, it was best to use green! I usually place the villagers towards the back of the wall while I stand in the center of the room. From there, I take out the phone's camera and start recording different reactions.


To record these I use my capture card, the Elgato HD60 S, and the capture software that you can download from Elgato's website. Any capture card and recording application will work.
I use three adobe apps to make these gifs: Premiere Pro, After Effects, and Photoshop. I know not everyone has access to these, but I was able to obtain these with the help of some friends. I won't go into details, but I will leave you with this image as a friendly reminder:
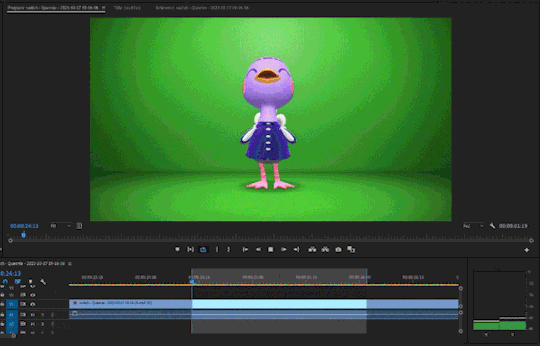
Premiere Pro - Here is where I drag all of my videos down onto the timeline and begin the editing process!
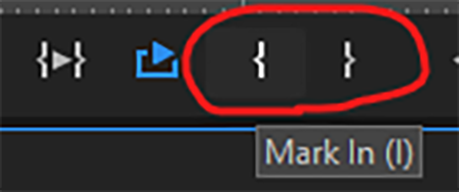
I try to find the best looping points for each reaction. I mark those points using the "Mark In" and "Mark Out" buttons located at the bottom of the preview window. The "Mark In" sets the starting position for the villager reaction and the "Mark Out" sets the ending point, creating a bracket for that specific reaction.
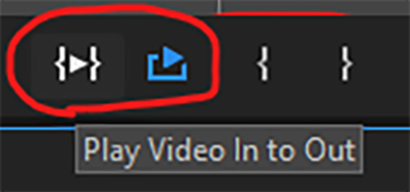
After marking these points, I use the "Play Video In and Out" button and then I make sure to click on the "Loop Playback."
This will not only play the parts of the timeline that I've marked, but it'll loop that exact bracket.
From there, I go to File > Export > Media (or ctrl+m on keyboard). This will bring up the export settings window. I turn the "Source Range" tab to "Sequence In/Out," so it only exports the spots I've marked with the "Mark In" and "Mark Out" buttons.

I then go to the source tab at the top and select the cropping tool.
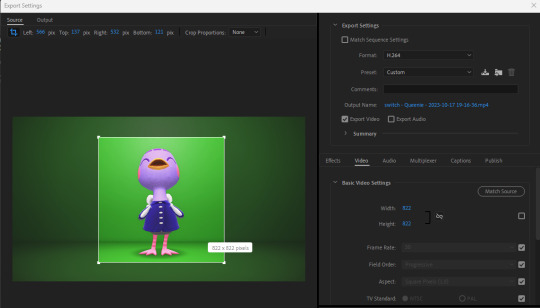
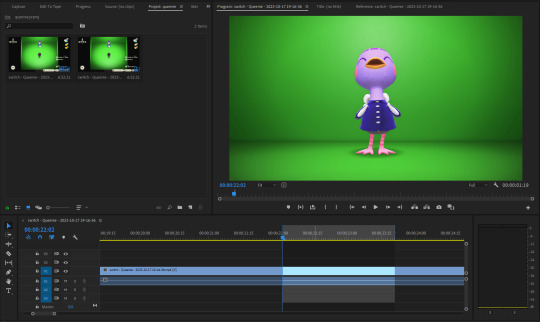
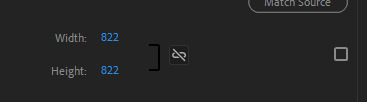
I make sure to click the box under the "Match Source" button to remove the check mark, and then click the chain icon next to height and width settings to put a slash through the symbol. This allows me to freely crop the video and adjust the height and width of the output, so I can make a perfect green screen box around the villager

I then export this video and move on to the next reaction.
I have folders for each gif set that I make. They usually look like this for all the villagers I've completed sets for:
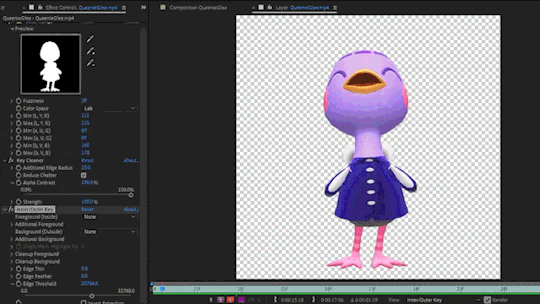
After Effects - Here's where I open all of the reaction files. I go to the effects panel and open the keying tab.
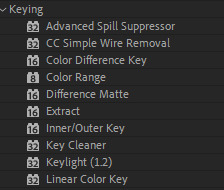
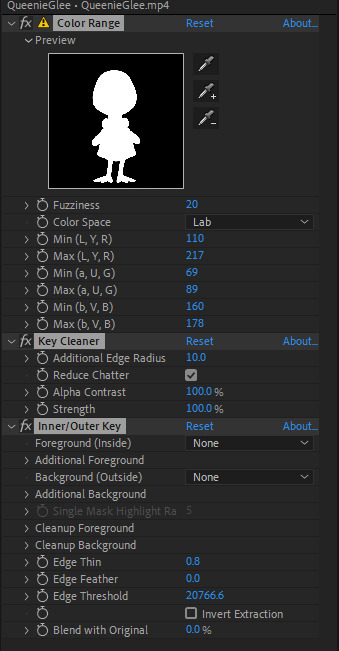
This is where the magic happens! There are three keying effects that I use: Color Range, Key Cleaner, and Inner/Outer Key.
First Effect : Color Range - Starting the keying process, I use dropper tool on any part of the green that's behind the villager. This will only remove some of the background elements because how unevenly colored the green is, due to the lighting of the game.
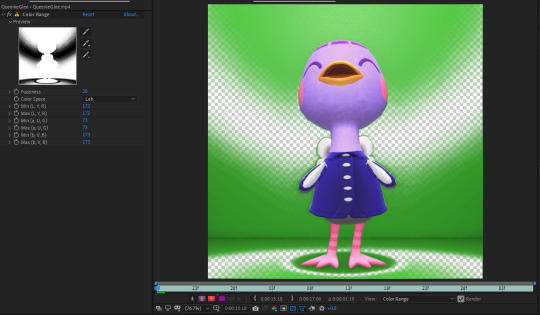
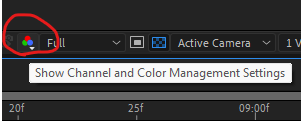
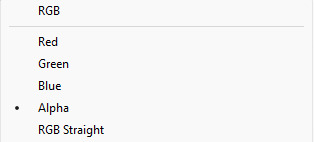
I then use the dropper with a "+" icon on the rest of the background. What helps me is clicking the "Show Channel and Color Management Settings" button at the bottom of the preview window and switching to the "Alpha" view. The alpha channel deals with the transparency of an object and switching to this view allows me to see every bit of the wallpaper and floor that remains. This is where I can apply that dropper+ tool to get rid of them. It doesn't have to be perfect, because the other keying effects that'll be used will help get rid of the loose pixels of green that may still be present.
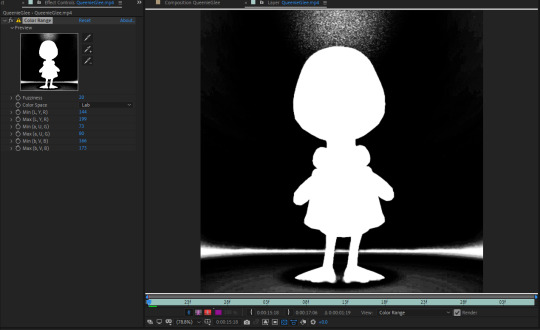
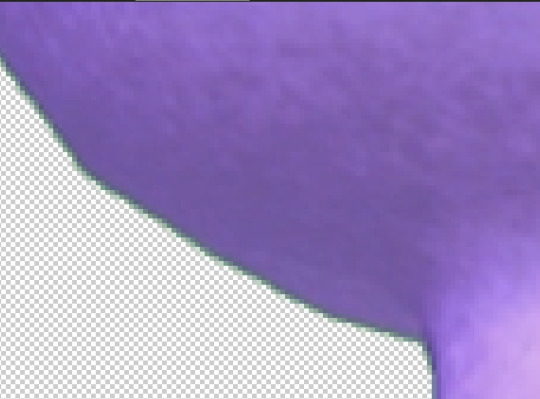
From here, the only adjustment that I sometimes use under this effect is the "Fuzziness" tool. Some villagers will have various color patterns that'll get keyed along with the background. Bringing down the fuzziness helps bring some of those colors back. This does run the risk of bringing some the background pixels back into the video, but that can easily be erased. I usually don't need to adjust the fuzziness. Again, it all largely depends on the colors of the villagers. After all of this is done, I now have a transparent background, but now there's a green outline around the villager:
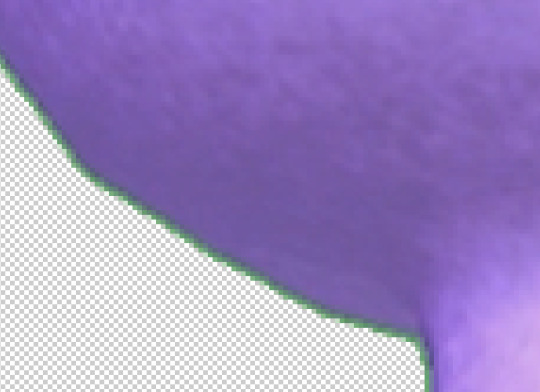
Luckily, the next effect will help with that!
Second Effect: Key Cleaner - This plugin helps clean up the alpha channel around the edges of the villager. The only thing I do here is select the box labeled "Reduce Chatter" and turn the "Alpha Contrast" all the way to 100%.
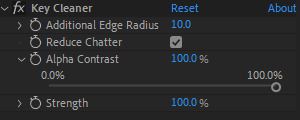
This helps erase most of the outline and makes the edges a little sharper, but there's still a tiny bit of green that surrounds the villager.
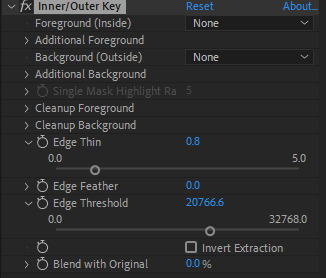
Third Plugin: Inner/Outer Key - I will admit that I don't utilize the entirety of this effect's capabilities. I only adjust the "Edge Thin" and "Edge Threshold" sliders, which should shave off the rest of the green outline.
Using these tools, I've now completed the keying process and I have a nice, crisp villager reaction with a completely transparent background!
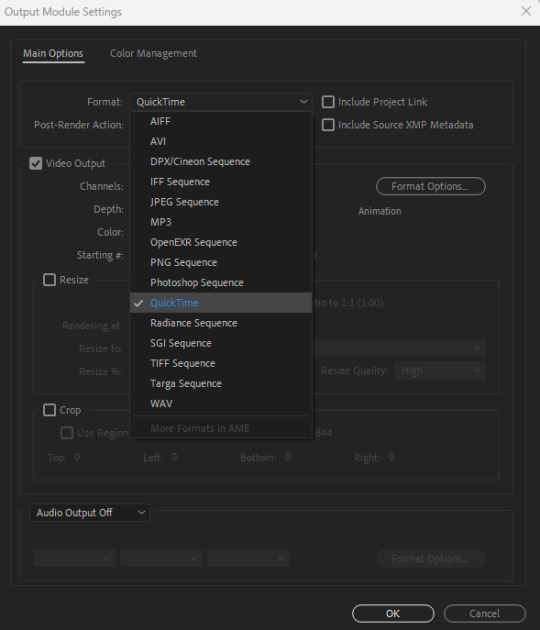
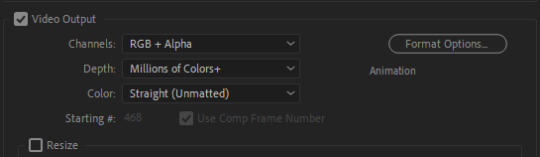
Next I go to File > Export > Add to Render Queue (or ctrl+m on keyboard). I bring up the output settings by clicking on the "Output Module." I then change the format to QuickTime, which will render the reaction as a ".mov" file. I then change the channel to "RGB + Alpha" to render the object (which is the villager) and the transparent background.
Once this is done, I hit the render button and the reaction has been exported! After doing all of this with the first video file, I highlight all of the effects that I've applied from the effects panel by clicking on the names:
I then hit ctrl+c on my keyboard, open the next reaction into the timeline, and then hit ctrl+v. This copies all the effects applied to the first reaction and pastes them to the next video. I repeat this process for each file so I don't have to redo the entire keying process for all of the reactions. After they're all rendered, I can move onto the final adobe step.
Photoshop - This is where I open all of the QuickTime files that I've exported from After Effects.
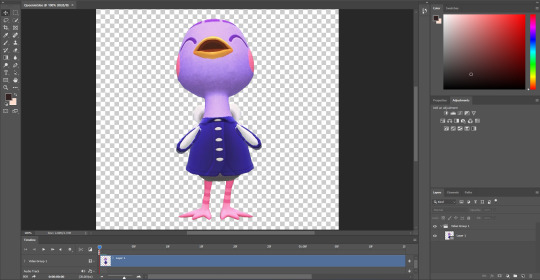
From here, I can apply any adjustments to the villager, whether it be adjusting the brightness, messing around with the hues and saturation, increasing the speed, etc. The main thing I do here is decrease the size. These files are usually huge so I have to adjust the size so I don't risk putting groups of extremely large gifs on peoples' dash. I go to Image > Image Size (or Alt+Ctrl+I on keyboard) and change the width and height to five inches. Of course, any size you choose will work. Five is just perfect for me because it's not too small to ruin the quality of the gif.

After this is done, I got to File > Export > Save for Web (or Alt+Shift+Ctrl+S on keyboard). This is where I can preview the gif.
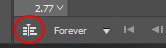
I go to looping options on the bottom right and change it to "Forever," otherwise the gif won't loop. I then turn the matte to "None" so the gif doesn't export with an outline around it. I also make sure that the transparency box is checked. This is what my window looks like before I hit the save button:
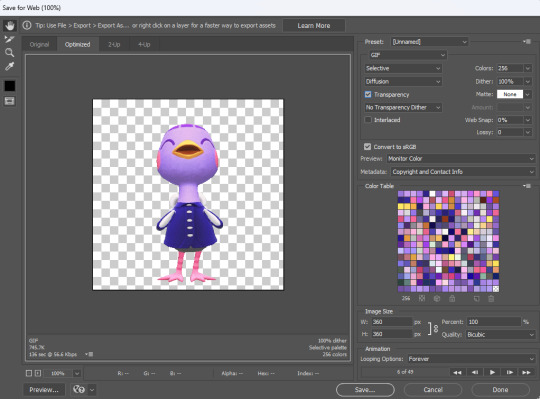
Once I hit save, that's it! Queenie has been exported as a gif. You can see that gif at the top of this post.
If you've made it this far, thank you for reading all of that! I know some parts of this could've been just a simple summary, but I really wanted to show all the details of how I use every application in this gif making process. I will say that I'm no expert at adobe. This is just a method that I pieced together after experimenting with different combinations of keying effects and I managed to make it all work. I apologize if this process seems messy to advanced users out there and I welcome any tips if they help make things easier!
84 notes
·
View notes
Text
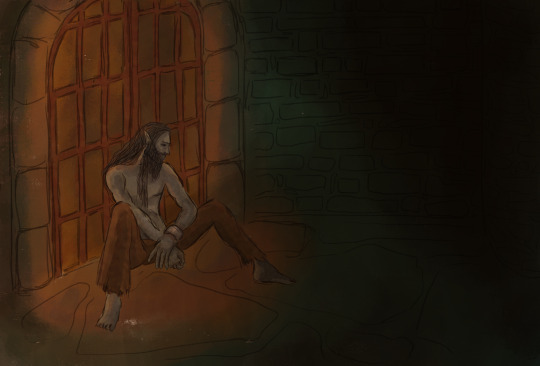
Drew this one in 2022 and I'm still incredibly happy with how the lighting ended up.
Veryn in the Imperial Prison at the start of my Morrowind fic.
The Imperial Prison ran deep, all the way down to the old Ayleid ruins below the City. His cell was below the lake, damp and cold even in summer. The lack of daylight ensured that Veryn was unsure how long he slept, but his exhaustion told him it was never enough. He tossed and turned, often waking himself up when he tried to move around and instead feeling the iron manacles dig into his wrists. They allowed his hands no more than a foot of slack, and had Daedric runes carved on the rim: an enchantment to cut him off from any magicka. Almost everyone could cast a few spells, but to Veryn, doing magic used to be as natural as breathing.
From Fear in a Handful of Dust, Chapter 1
Digital, Adobe Photoshop, Wacom Bamboo CTH-470, 2665x1808 px; 2022
#art#tesart#tes art#morrowind#imperial prison#oblivion#morichedraws#morichesfic#oc: veryn#tesblr#the elder scrolls#elder scrolls#tes#tes fic#tes fanart#tes oc
41 notes
·
View notes
Text
FAQ
I made an FAQ about Commissions, online store, brushes etc here a while ago! I'll do a more informative pinned post for people who access tumblr only from their dash, so please refer to the FAQ here under the cut.
What program do you use?
I use Adobe Photoshop CC and Procreate. Photoshop for painting and colouring, Procreate for sketching and inks.
What brushes do you use?
I can’t share most brushes since I bought them ages ago and don’t have the source for them anymore, sorry. For Photoshop, I use flat or rake brushes, and one flat, calligraphy-like one that tilts with pen sensitivity, and an airbrush that has some kind of grainy paintspray effect.
For Procreate, I most commonly use Max Ulichney brushes for textury brushes, standard procreate pencil brushes and Joe’s Fine Ink Line for inks.
Do you do commissions?
Not right now, no. If I do, I’ll announce it, but on Patreon first.
Do you have a patreon?
Yes, you can find it here. Support is much appreciated. 💛
Do you have an online store?
Yes, thought it’s currently closed. Will reopen hopefully in 2024, for abouth a month. Later half of the year more likely.
What’s Heart of Gold?
Heart of Gold is a mystery/drama webcomic with overarching religious themes that revolves around the tenuous relationship which grows between the main characters Dunant and Ionel.
Is Heart of Gold on Hiatus? Will I be able to purchase volume 1 and 2 in print someday?
Yes, it’s on hiatus. We sell volume 1 at conventions, and will do our best to sell it online as well. There are some plans for volume 2 in print.
What about your Curse of Strahd campaign/CoS art?
I love to share about our campaign! I have an artbook about it, or rather, the relationship between my PC Kasper and the NPC Lydia. I’d like to make a 2nd volume of it, and maybe something more gen too in print.
Feel free to ask… Hoping to do more stuff for it, as always with a big LydiaKasper & Fiona focus haha
How do you color/do you pick your colors?
Honestly, I just experiment a lot. Use the color wheel! Look at how other artists you like use colors! This helps me more than anything. This, and curves sometimes.
I’ve been planning to do a tutorial for patreon for a while now, but haven’t gotten around it yet.
What pronouns do you use?
They/Them and He/Him.
#not art#this is to sum up some of the asks i’ve received regarding the aforementioned topics so apologies if i don’t reply!#one day i’d like to make a newsletter to inform yall what i’m working on next and online store stuff too but… next year… next year…….
79 notes
·
View notes
Text
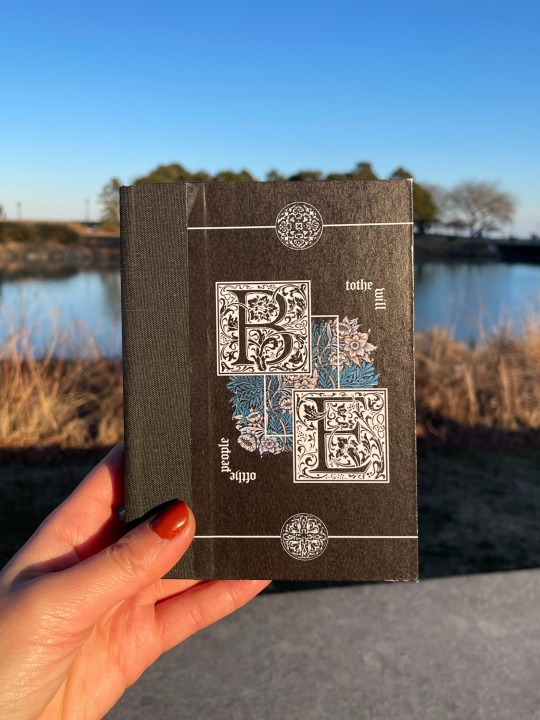
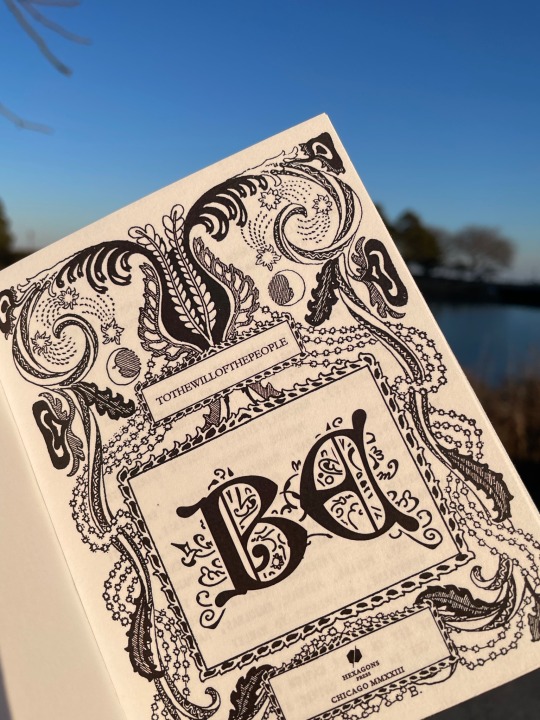
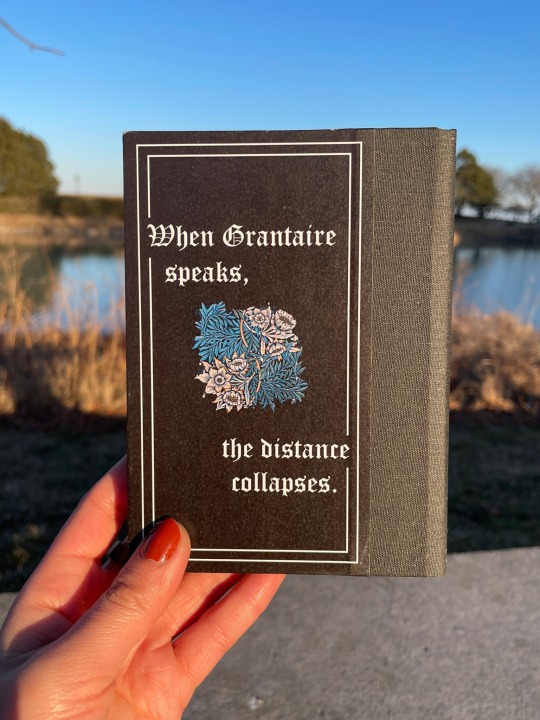
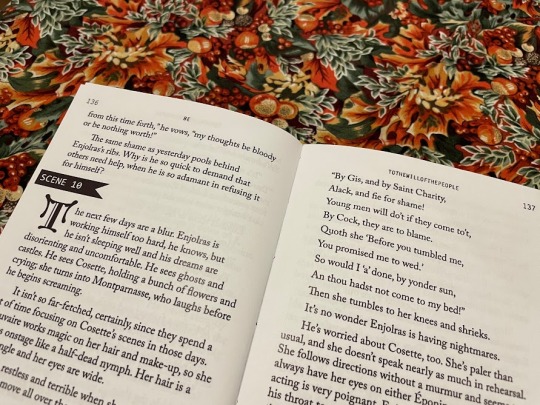
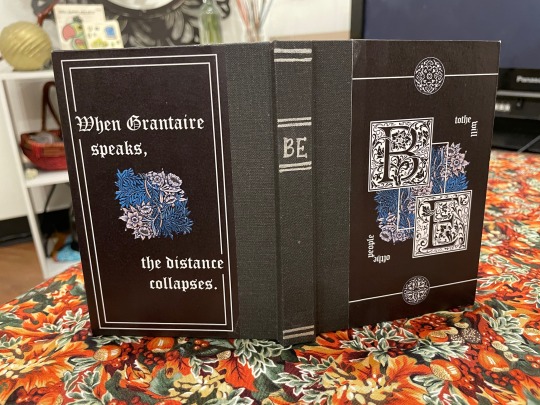
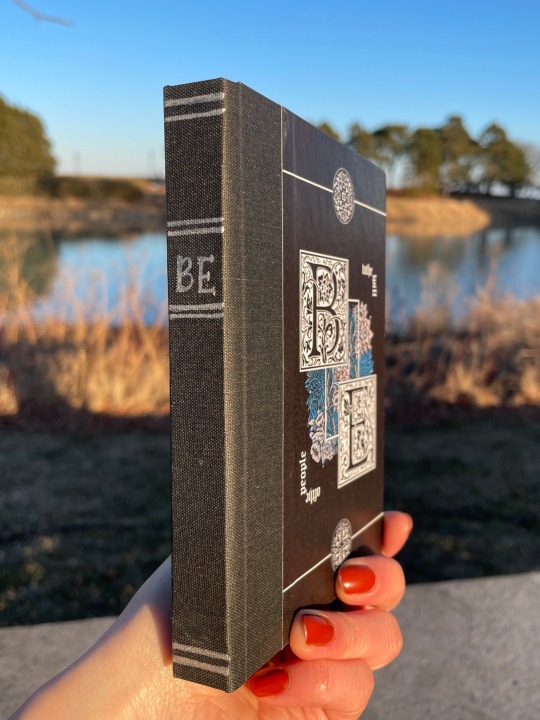
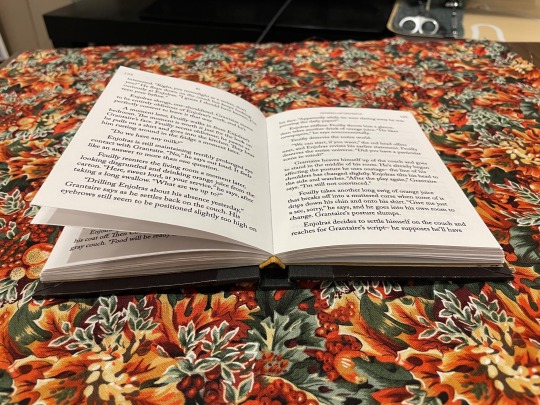
BE by tothewillofthepeople
Grantaire is earnest in this, and it’s heartbreaking. Enjolras can’t look away. This is just a rehearsal. Grantaire is still wearing skinny jeans. They have lights and phones and textual analysis and thousands of years of history between now and then and yet–
When Grantaire speaks, the distance collapses.
(Grantaire as Hamlet.)
Title: Middle Ages Deco
Headers/Accents: Letter Gothic Standard
Body text: Adobe Caslon Pro
Case title: Goudy Initialen
38,667 words | 224 pages
Binderary book 1: a long-favourite EXR fic. I love wild Les Mis AUs and I love Shakespeare and this is all of that in such a lovely lovely form. Stage manager Enjolras is inspired. Also, I've been frothing at the mouth to use my special blackletter fonts and go suuuper overboard designing and this was Perfect for that purpose.
More pictures/design/process under the cut.
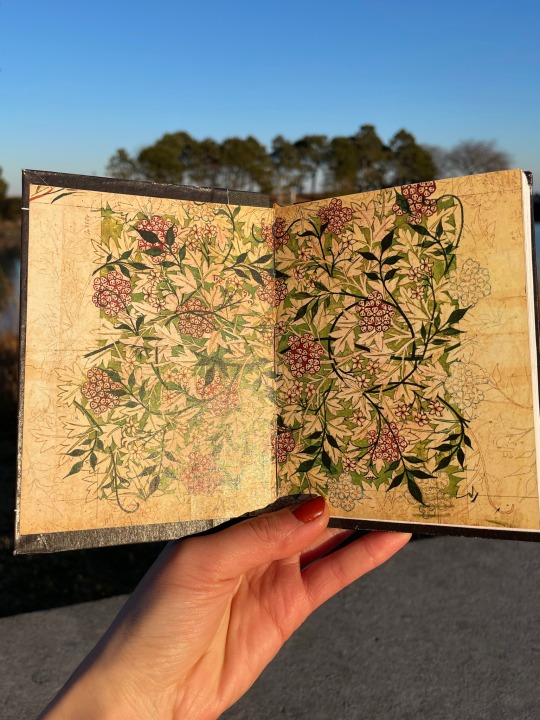
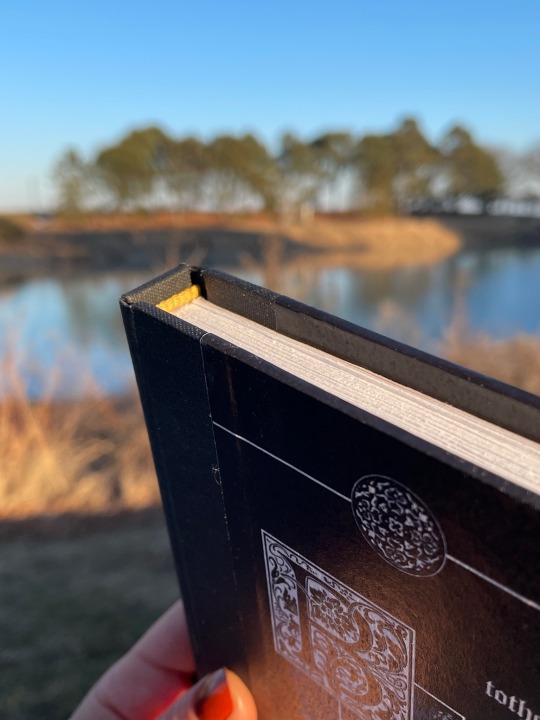
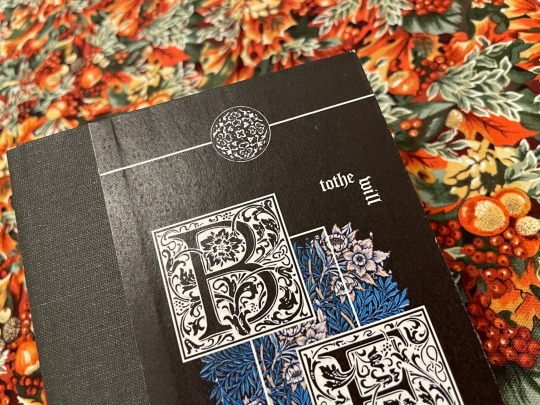
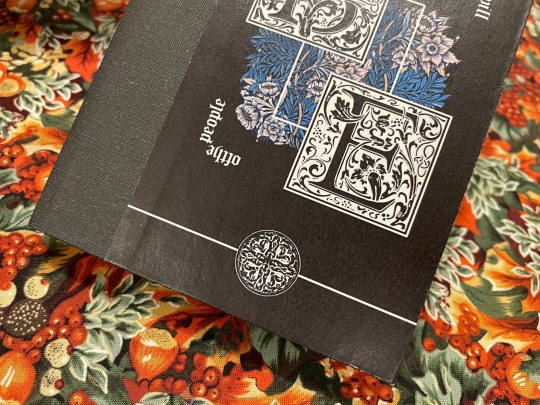
Design and Construction
Case: Flat-back case binding with bradel board covers and spine. The spine cloth is Hollander's pearl linen in charcoal grey. The painted titles were done in Amsterdam acrylic ink in silver, with a pair of scissors because I don't own a painting brush and likely never will. The cover papers are printed on 80gsm white printer paper and glued with a regular Elmer's glue stick and PVA on the turn-ins, and the whole case is sprayed with workable fixatif to (hopefully) preserve it longer-term.
Covers: The front and back covers were designed in Photoshop. The centre image is a William Morris pattern, and the top and bottom little circles are Renaissance printer's ornaments (pngs by the lovely @helle-bored of Renegade Bindery) that I vectorized in Illustrator (Illustrator and I were sworn enemies until this month. Now we're forced friends. Like enemies to lovers).
Insides: Endpapers are a William Morris pattern recoloured in Photoshop to be a richer green and red, obv, for EXR. Printed with inkjet on 80gsm printer paper and glued to gold cardstock, and sewn into the textblock. Endbands are pre-sewn from Hollanders, dyed gold with acrylic ink to match the endpapers.
Typesetting
Typeset was done in InDesign. This is a one-shot with scene breaks, so to match the theatre theme of the piece I replaced the horizontal line breaks with flagged scene numbers. I tried to strike a balance in the typesetting between classic Shakespearean aesthetic with the blackletter drop caps and cover fonts versus what you might see in a theatre script book with the monospace accents. The title spread uses a transparent decorative frame, again from Helle's collection; the large box in the middle with the title was part of the original frame and then I duplicated and resized it for the author name and my imprint.
We All Do It, or, the Mistakes Section
I somehow managed to print the cover papers nine inches tall and didn't see a problem with it until they came off the printer. Truly who knows how that happened.
I was working on the case at two in the morning and cut the spine cloth the wrong length three separate times...earned the measure once cut twice badge big time for that one.
The endpapers were an ordeal and a half for real. What I learned: print them too big and glue the cardstock to the back, then trim the paper to size, not the other way around otherwise you'll end up with big ugly gaps where the trimming was a few millimeters off. Whoops.
And...more pictures
I'm particularly pleased with how the covers here came out so here's closeups. Also, the arc on the spine that you can see in the endband on the last one is really pleasing to me lol I fought a war trying to get the flatback hinge calculations right.
220 notes
·
View notes
Note
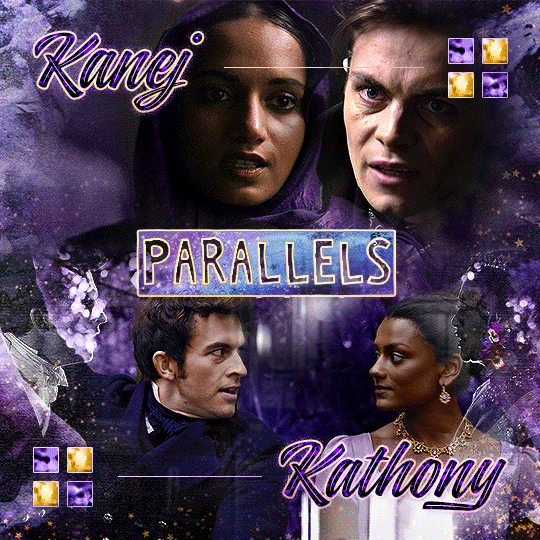
Oh I’m sorry I have GOT to ask! How did you do the text animation in the first gif of 718688291365502976/pscentral-event-15-favourite-ships-kanej?? It’s just. It’s so beautiful
Hi anon! I've used After Effects to create the text animation in the first panel of this post. I'll show you the basic idea of how I've created the animated text effect here :D
What you need:
A cutout font (the font that I've used is Trouble Child Outblack by @justlikethistrain)
Adobe Photoshop with Video Timeline feature
Adobe After Effects
Supplementary files: gif prep action pack / golden outline layer style / assorted textures
Difficulty: advanced; knowledge in gifmaking with the video timeline interface assumed
Note: This tutorial assumes that you're working with all of the composite gifs in a Photoshop composition file and using the video timeline interface
Other useful tutorials to refer to: Text overlay effect / After Effects text animation / clipping mask vs layer mask
Tutorial under the cut. Like / reblog if you find this useful!
1) Photoshop: Preparing your gif panel
Setting up your PSD composition panel: Create a blank PSD file and set it to Tumblr dimensions (540px x 540px in this particular gifset)
Enable Video Timeline and drag all of the component gifs from your folder to the PSD composition file. Resize / move these gifs around until you're happy with the placements.
Trim the timeline work area so it's the same length as the shortest component gif you've added to the PSD composition file. You can also add some textures & additional adjustment onto this panel.
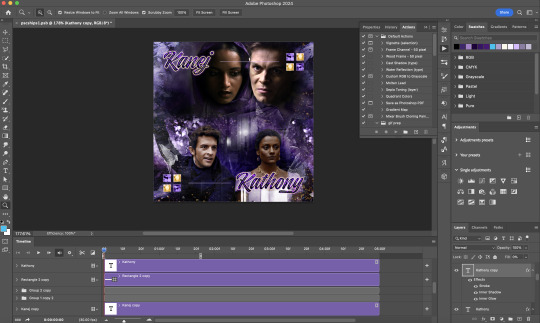
2) Photoshop: Exporting your base gif
I highly recommend exporting the base gif right now, to ensure a smoother experience scrubbing through the video timeline when adding finishing touches later on in the workflow.
My preferred method is to render the composition as a video clip from File > Export > Render video.
To get the optimal export quality, I use the following settings:
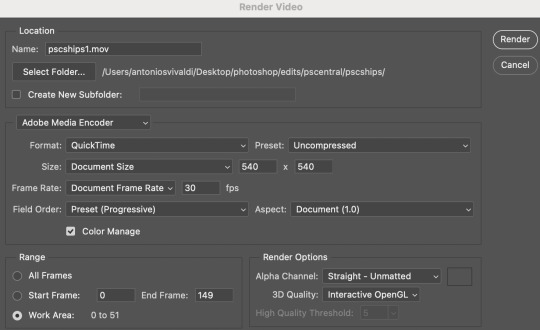
3) Photoshop: Preparing your text layer
Make a new Photoshop composition file of Tumblr dimensions

Drag in the video clip that you've just rendered (the base gif) to this composition file
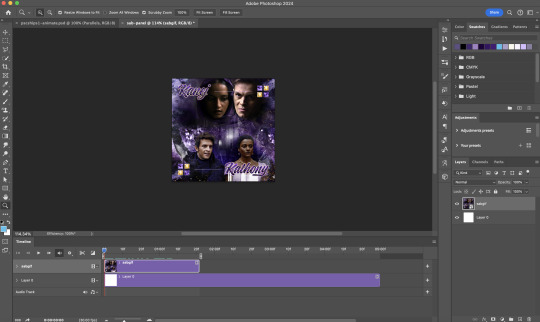
Add a new text layer in your PSD composition file and set the colour to white then tweak this layer until you're happy with the text placement.
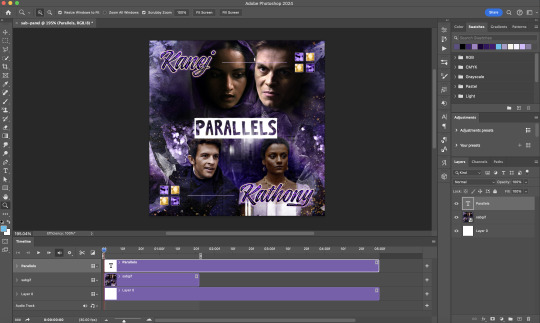
For performance optimisations on After Effects, I duplicate the PSD composition file and delete all other layers. This PSD file contains only the text layer that will be animated.
4) Photoshop: Adding overlays & decorations on the text layer
This step allows you to preview the text effect without the animations (i.e. allows you to tweak the texturings & colourings)
Duplicate the text layer. Set the bottom layer's (highlighted in red) blend mode to Exclusion and apply the gold outline layer style to the top layer (highlighted in green). Make sure the Inner Shadow is disabled!
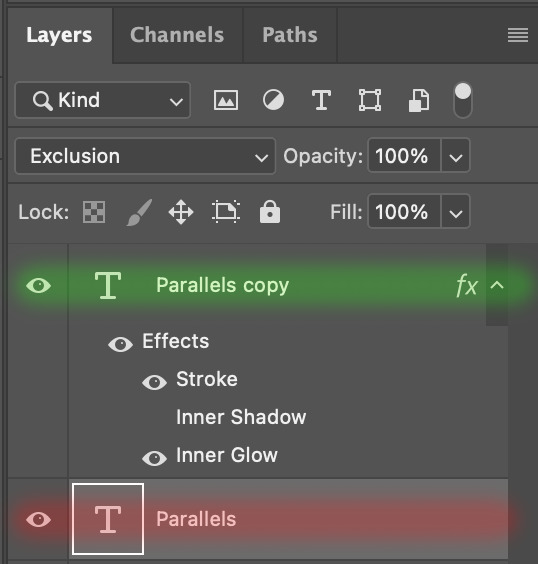
The panel now looks like this
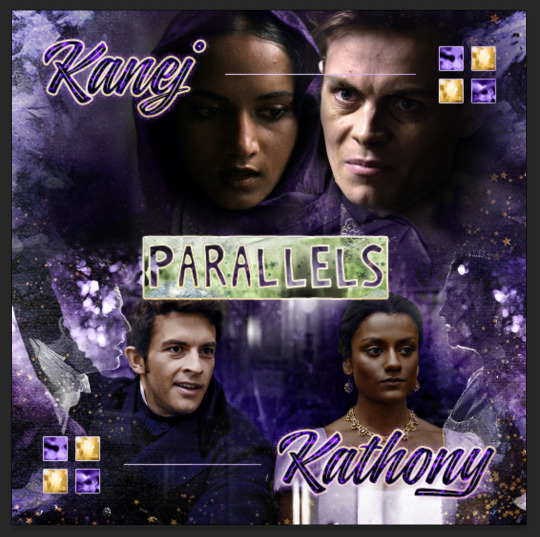
I want to have the liberty to use different colours & textures on the bottom text layer with animation, so the next thing I do is to right click on the bottom text layer and select "Group from Layers"
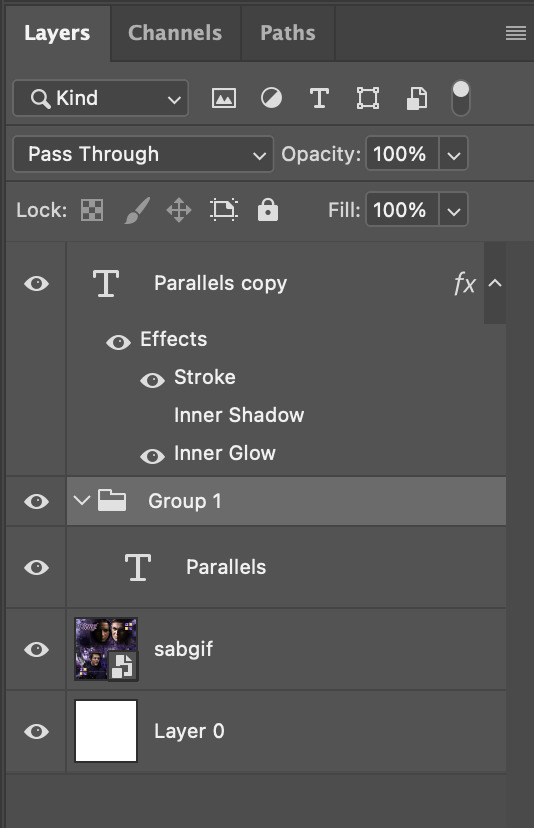
To change the colour of the filled text layer to purple:
Collapse the Group that you've just created
On top of the collapsed Group a purple Colour Fill layer,
Set the Fill layer's blend mode to "Colour"
Right click on the Fill layer and select "Create Clipping Mask"
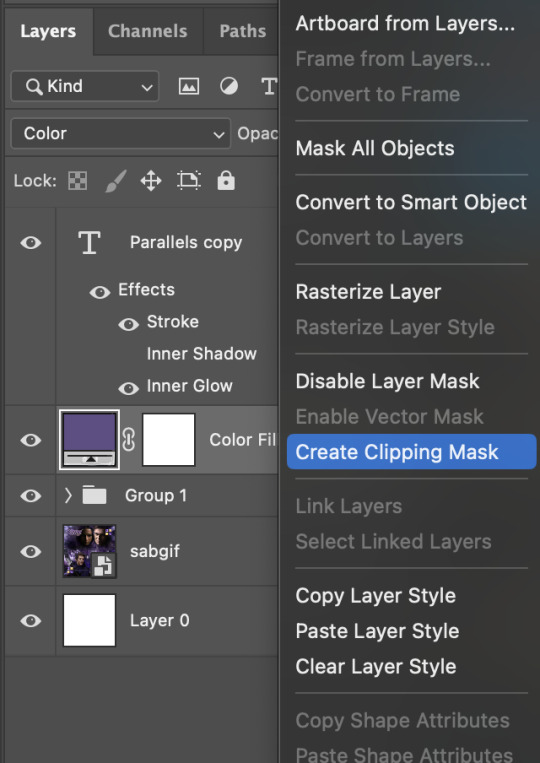
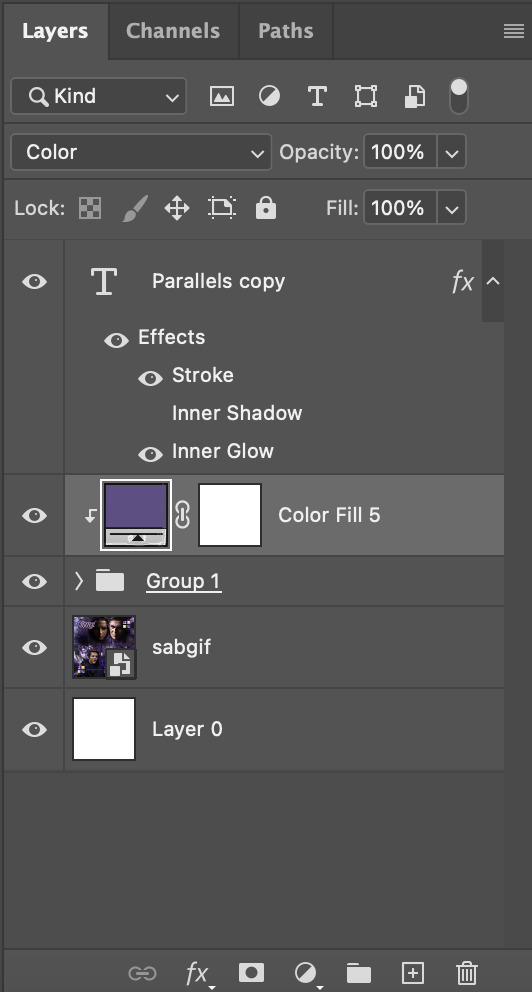
Now the colour of the filled text layer is purple
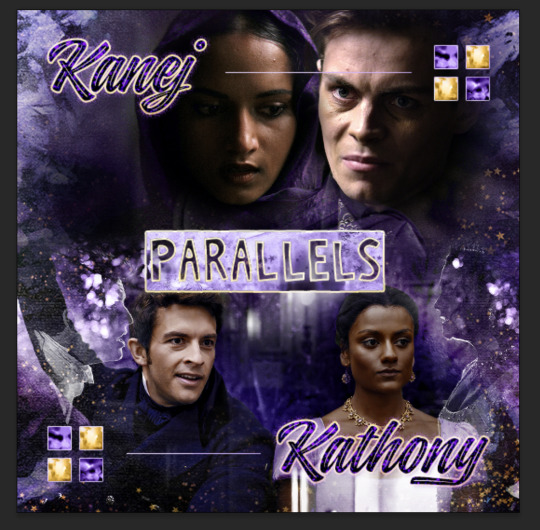
After adding more textures & decorations on the text layer (with photo negative effects) I get the following:
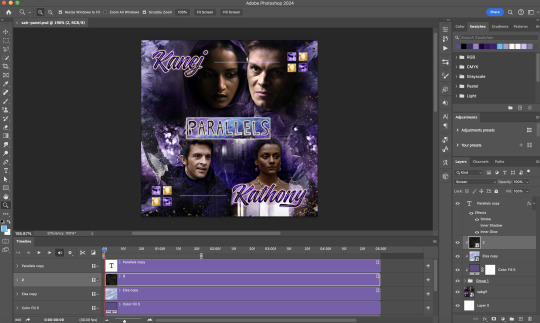
5) Photoshop: Adding overlays & decorations on the text layer
To avoid performance issues on After Effects, I make a new PSD file of the same dimension. With both the PSD files open, I select the text layer (highlighted in red) while holding Shift, I drag this to the blank PSD file (see the green arrow)
Holding Shift ensures that the layer's placement is preserved when it's copied to a separate PSD file.

In the new PSD file, I set the text layer's blend mode to "Normal"
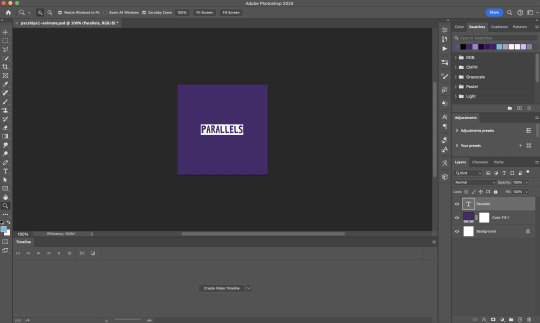
6) After Effects: Animating your text layer
Make a new project on After Effects and drag in the text layer PSD file. Import this file as a Composition

Also drag in the base gif video clip to the AE project.
While we won't be exporting anything with the base gif visible, having this file in the project file is useful if you want to have a better picture of how the animation will look in tandem with the gif.
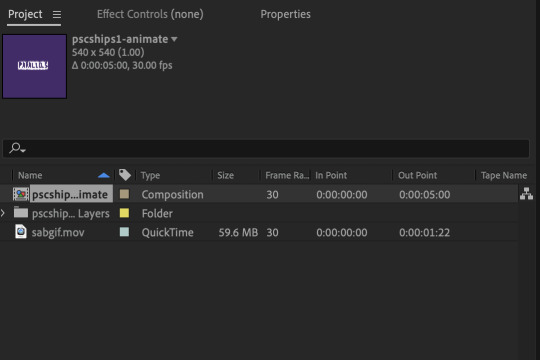
Double click on the composition. Hide the colour fill and background layers. Then right click on the text layer, go to Create > Convert to Editable Text
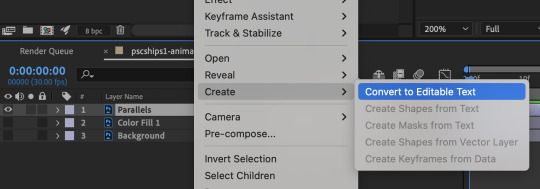
To be able to preview the animation with the base gif, drag the video clip to the composition file and below the text layer. The visibility of the layer can be toggled on / off anytime in the After Effects workflow
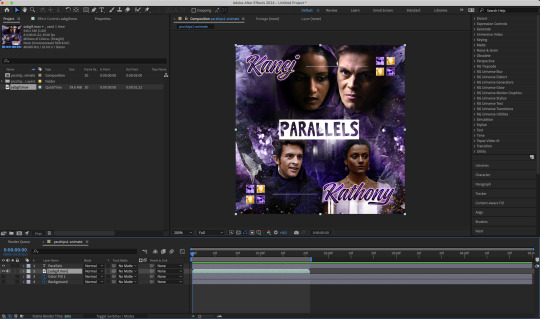
Now we prepare the text layer to be animated. Because the final animated effects is 3D & has motion blur, right click on the text layer and select "3D layer" (highlighted in green) and Switches > Motion Blur (highlighted in red)

Go to Animation Presets > Text to browse through some presets that you could use to animate the text layer. For this gifset, I've used a preset within the 3D Text folder called "3D Random Spike Tumble in".
While selecting your text layer, press U to view the keyframes and you can adjust the position of these keyframes until you're happy.
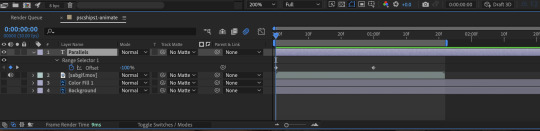
For more finishing touches, press U again to tweak more options in this preset. In this case, I do to Animato 1 > Range Selector and changed the Colour Fill to #fff (the default colour is light yellow)
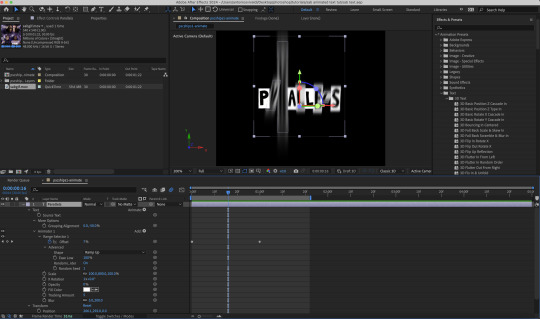
Then do you File > Export > Add to Render Queue
Click on the Output Module and use the following settings to render the text layer as a video file with transparency
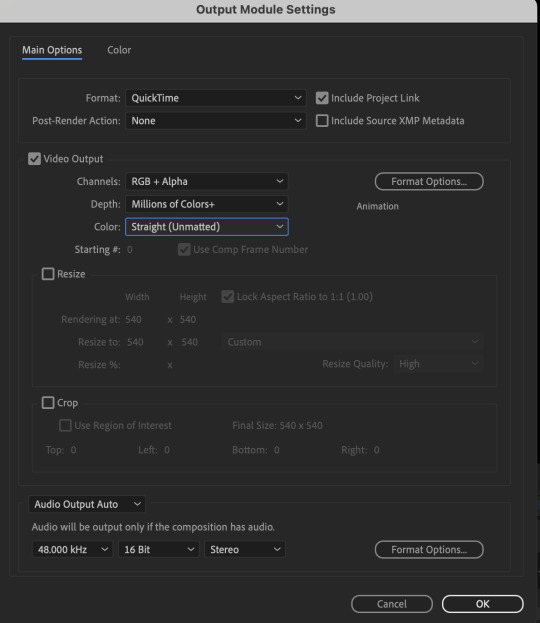
Then after specifying the folder in which you'll export the video to, click "Render" to render the video file containing your animated text layer.

7) Photoshop: Adding the animated text & finishing touches
On Photoshop, drag the rendered clip containing animated text, to the PSD composition file with the static text layers.
Duplicate the animated text video layer
Drag one of the layers inside Group 1 and set the blend mode to "Exclusion" (Highlighted in green)
Move the other layer to the top and apply the gold outline layer style with Inner Shadow disabled (highlighted in red)
Hide both text layers (highlighted in yellow)

By scrubbing through the timeline, I've noticed that the animation didn't look clean enough, so I'll add some finishing touches
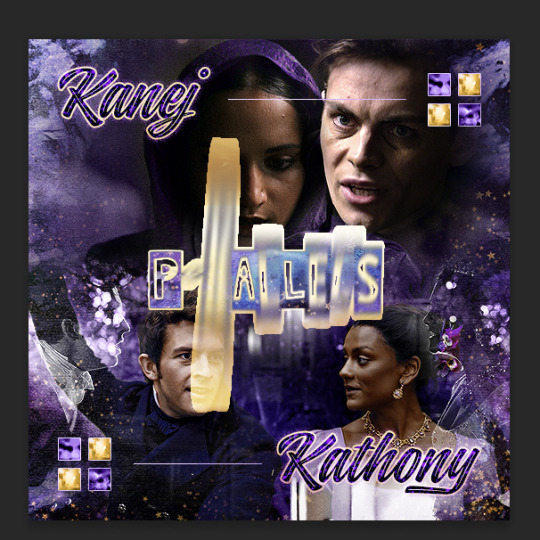
By selecting the upper text layer containing layer styles, go to the timeline and add opacity keyframes going from opacity 0% to 100% a few frames apart

Once you're happy with the finishing touches, flatten / render your PSD composition file, change the frame delay to 0.05s and export your gif and voila!

I hope this helps 💖
#tutorial#gif tutorial#photoshop tutorial#after effects#chaoticresources#dearindies#userriel#useralien#userraffa#usershreyu#user.tee#useryoshi#usernik#userjoeys#usersole#arthurpendragonns#userhallie#*#my tutorials#my resources
104 notes
·
View notes
Text
So uhm... I did a thing...
✨Character Info Template✨
Been meaning to do this a long time ago (and actually started it but never finished it, lol) as a way to share some more information about my ocs without needing to use a custom page theme, but mostly because I haven't found any page theme that looks exactly as I want and allows this much customization.
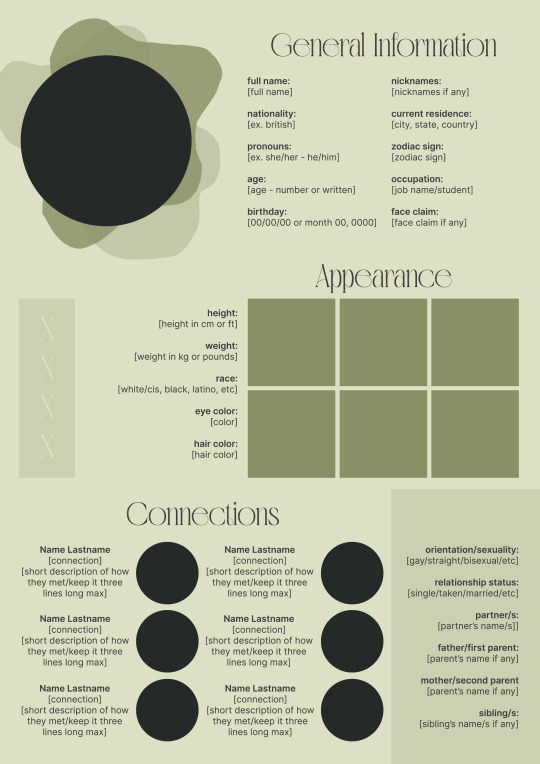
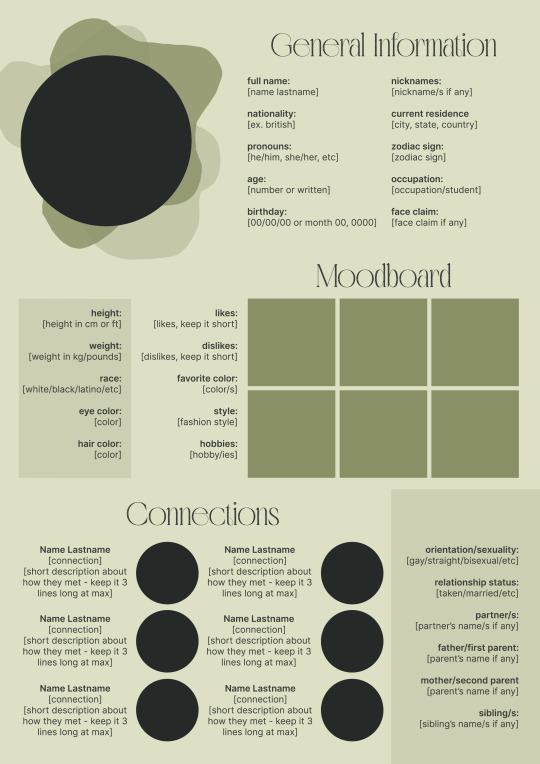
There are two versions and both are almost exactly the same; but the example shown in the left has an 'appearance' section which is small and has few quick facts regarding the oc's appearance; while the example on the right has a 'moodboard' section instead which allows you to add more info about your oc.
You can change every section/title to fit your needs like I did in the examples below; I personally removed some categories as well and got rid of some connections as this oc doesn't have that many close friends/partners to fill the original template. However, I also included an extra separated 'connections' section in the download in case you want to add more people and more information.
I recommend you stick to square-shaped pictures so it's easier to fit them to each section. Also if and when you edit the information or section titles, please select only one line at a time to replace it so you don't lose the text format. (Titles shouldn't change because that's a single format/font within the same text box, but should it change you can always hit ctrl+z hehe) When you're done, I strongly recommend you save this as a .png instead of .jpg so it's the best possible quality!
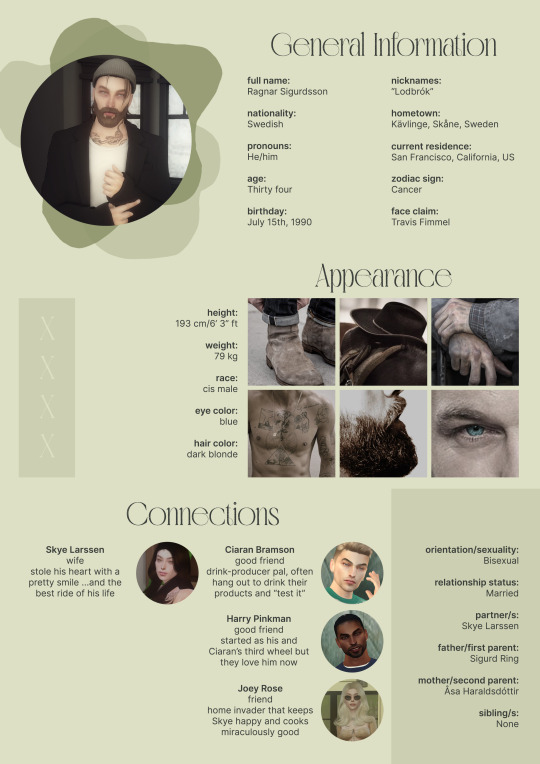
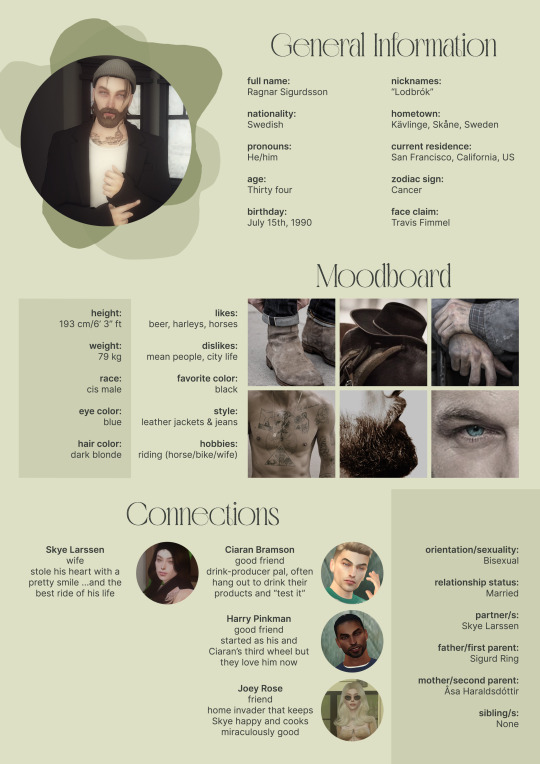
Last but not least, this is a .psd file. So you'll need either Photoshop (I did this with Photoshop Portable, but it supports newer versions of PS and it *should* support older versions too) or Photopea to open and edit this file.
Credits: Adobe Photoshop, Inter font, Golften Vintage font
>DOWNLOAD< (patreon but free :p)
(note: I'm posting this with my gaming blog because I think my fellow gamers might be interested in this, but please consider giving credits to me if you use this template by tagging @synindoodles instead of this blog)
More info on how to use and edit this template below the cut!
Layers:
>Each layer is properly named and categorized. The general layers such as the background, the icon shape and background shapes are under the groups.
>If you don't want to see/don't need one of the connections' pictures and information, I recommend you find which one it is (1, 2, 3, 4, 5 or 6) and click on the eye symbol next to the layer to hide it so that way if you ever need it, it won't be truly gone.
>To edit a text section, simply find the layer (such as General Information>Left Column) and double click on the 'T' symbol next to the layer. That way it will open edit mode and allow you to edit the text, just don't hit delete or enter while everything is selected or you'll erase it :p
>Main text sections aren't separated, they're blocks of text. I recommend you don't remove the amount (for example, if you downloaded the version with the 'appearance' section, which has 5 sections of information, don't remove the fifth line.) Either leave it empty or replace it with another data, otherwise it will look weird. The 'general information' section might look good even if you remove a few lines, just don't get rid of the whole block of text.
Pictures:
>To add a new picture, simply paste it over this document and move it using the Move Tool.
>To frame it (so it becomes a circle or fits over the shape you want), make sure the picture layer is over the layer you want, then while holding alt click between the two layers. [For example, if you want to add a new main oc picture: 1) paste the pic you want, 2) move it with the Move Tool so it's covering the big circle, 3) once you've fully covered the shape (if it isn't you can resize it by right clicking on it then on 'free transform', sometimes you might need to hold shift to proportionally resize it) make sure the newly pasted pic layer is over the layer named "picture goes here", 4) hold the alt key and hover your mouse cursor over the line between your pic layer and the circle layer until you see an arrow going down symbol, once you see it click it and tah dah! your picture should now have the same shape as the circle! - you can further move it if it doesn't fit the way you want with the Move Tool (;
Others:
>You can change every color, font and section to your liking, just don't change the general layout of the template.
>To hide/show the guides (those bright blue lines all over the document), click ctrl+,
>'Inter' is a free font and you can get it in the link above (linked with the credits), Golften Vintage is not, but you can get the demo version >here< (just scroll down and click the blue download button under license). I will not tell you how to install fonts as it might be different for everyone (for me it's C:/Windows/Fonts and I just drop the zipped files (except the .txt one) there), but google is your friend.
>I can't think of anything else that needs to be said here, but if you have any other question feel free to send me an ask or dm and I'll help you out!
>Last but not least, a like is appreciated if you plan to use this plus consider tagging @synindoodles if you use it <3
#psd template#template#characters page#muses page#muse page#muse template#character template#character page template#oc page#oc page template#synindoodles#rp resources#rp template#roleplay resources#roleplay template#writers resources#writing resources#writing template#writers template
49 notes
·
View notes
Text
low quality video ➜ "HD" gifs tutorial! (2022 UPDATE!)
back by popular demand. warning, this is a work in progress! so far I have found this is the best way to restore low quality movie videos into somewhat clear and “hd” gifs. I will update if I discover anything different (:
this works on movies/videos in 720p and lower
you must have basic gif making knowledge
I'm using adobe photoshop cc 23.4.1 (2022) for windows
link to previous version of this tutorial
TUTORIAL UNDER THE CUT 🔽
so this tutorial is going to show you how to create the ILLUSION of high quality and film grain in your gifs just by using smart filters, coloring, and the filter gallery tab! this trick works on 720p, 480p, 360p, and 144p resolutions
1. MAKE YOUR GIF BASE
I’ll be using a scene from hello mary lou: prom night 2 in a *really* gross 480px lol
2. RESIZE YOUR GIF
ctrl + alt + “I”
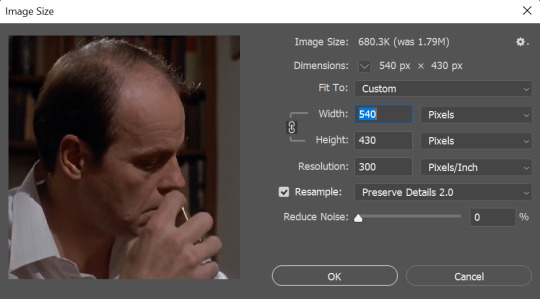
These are my resizing settings (copy these).
Resampling your gif under the ‘preserve details 2.0′ option allows you to resize your gif without losing those small details - essentially making your gif sharper.
⭐ please note that gifs will look better if resized to 268px instead of 540px as its easier to hide low quality trails that remain in the end.
3. ADD ‘SMART SHARPEN’ FILTER
filter ➤ sharpen ➤ smart sharpen...

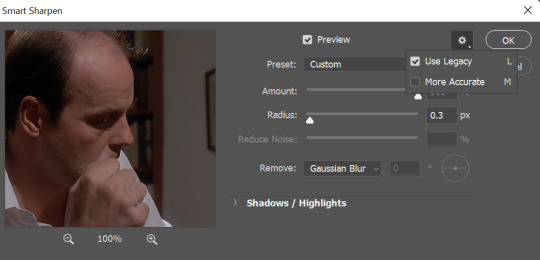
When adding your smart sharpening layer, be sure to unselect More Accurate from the drop down menu at the top. (You can access this menu by clicking the gear in the right hand corner)
Unselecting this option will add more sharpness to the highlights and shadows of your gif, which is essential for this trick to work
⭐ of course if you have preferred sharpening settings, feel free to use those instead!
3. ADD ANOTHER ‘SMART SHARPEN’ LAYER
filter ➤ sharpen ➤ smart sharpen...
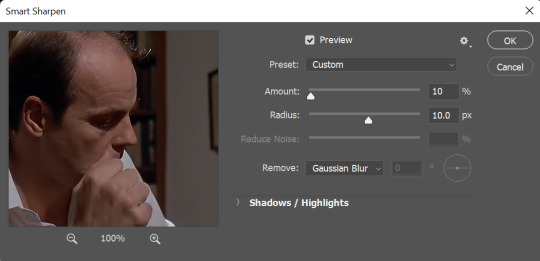
Copy these settings
Keep the More Accurate option SELECTED for this layer!!!
4. CREATING FILM GRAIN
filter ➤ filter gallery... ➤ texture ➤ grain

These settings will depend on what you think looks best! For this gif, these are the settings I ended up with
Be sure that the “Soft” option is selected from the drop down menu. Its the cleanest grain filter photoshop offers and its the closest you’ll get to grain used in films
The intensity will depend on you and what your gif needs. Don’t go too crazy here. Keep the number low (no higher than 10)
Contrast will generally stay in the 50′s but if you need more black areas in your gif feel free to push that number a bit
⭐ Don’t get too attached to these right now as they may change throughout your process!
4.2. ARRANGING SMART LAYERS
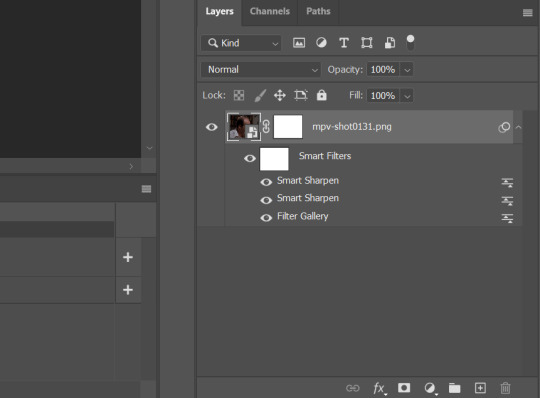
MUY IMPORTANTE!!!!
In order to get that sharp grain look, you’ll need to place the “Filter Gallery” layer beneath the 2 smart sharpen layers like in the pic above
Edit your grain settings as needed!
5. COLOR COLOR COLOR
After all of that is said and done, add your coloring! Try to push the shadows and add more black in your 'selective color' adjustment layer just to give your gif more contrast. This will clean up the pixel-y blacks and make your gif look a bit nicer to look at. Again this will all depend on what you’re looking for and what you think looks best!
6. SAVE!
Once you're satisfied with how your gif looks, alt + ctrl + shift + “S” and you're done! Here are my save for web settings
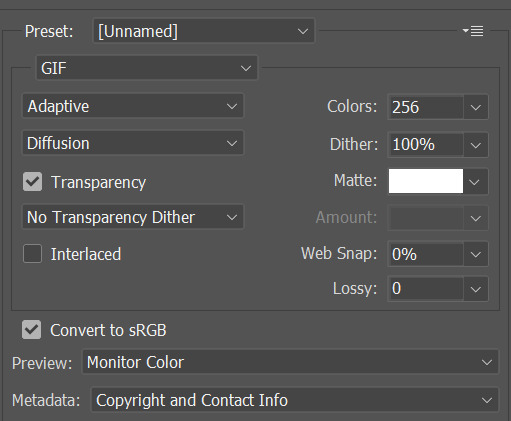
MY RESULTS!
480px video, before and after:
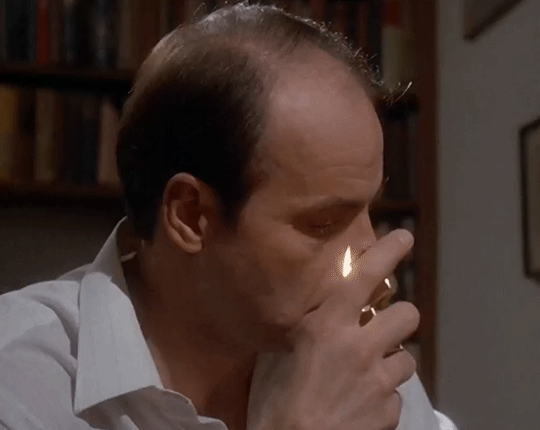
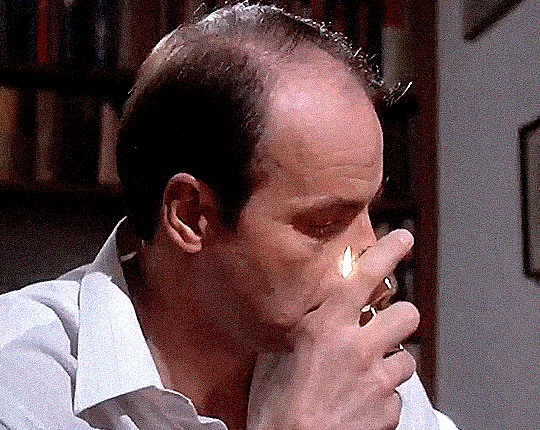
(Still looks pretty shitty but I guess its better than the original ???)
360px video, before and after:

(I ripped this movie straight from the DVD and the glitch you see came with it unfortunately 😒)
End notes/tips!
This trick will not work on every low quality movie
Please play around with the sharpening, grain, and color settings to find the best version for you!
The higher the quality of the video (720p, 1080p dvd) the less grain you will need to add
Again, gifs look even better if they are put into 2 column posts instead of a single column (268px instead of 540px)
The grain filter will unfortunately make your gif size very large which is something I havent been able to work around
And once more for the people in the back - this is FAKE HD, it won't turn your 480p video into a crisp blu-ray 1080p quality. it just gives an illusion of higher quality 🤠
Please feel free to send me a DM or an ask if you need further help or have any questions whatsoever! Thank you!✨🖤
#i fought for my life getting these to look somewhat decent#but ig im proud considering how bad the originals are#anyways i hope this helps someone#gif resources#resources#gif tutorial
988 notes
·
View notes
Note
Hellooo 🥺 I wanted to know if you have followed a tutorial to make the last gifs? Or would you show how to make them? Than you so much 💕
I didn't follow any specific tutorial, I've just made a quick little process after researching how other people on Tumblr make gifs. I can tell you how I do but I would definitely recommend following a tutorial of someone more qualified! lol
Aj's Guide To Sims Gifs
I am going to show you how I made this gif of Wednesday:
You'll need:
A screen recording program; Streamlabs, OBS Studio
Adobe Photoshop (FYI I am using the newest version).
The full tutorial is below the cut.
I promise it is easy, this tutorial is just long because I want to cover all bases, so if you have no idea what any of what I am saying means you can still follow along easily!
Lets get started!
1. Installing Your Recording Programs
You'll need to be able to record your game. Any streaming or screen recording program with work perfectly! I use Streamlabs because that's what I use for Twitch, but OBS Studio will work too! I've used them all, I recommend Streamlabs because it's more user-friendly.
2. Setting Up Your Recording Programs
You'll need to set up a scene in your streaming program that records your display or your game. In Streamlabs you go to the plus bottom beside sources and add either a Display Capture or a Game Capture, select your display or game. Is there a difference? Using game capture will remove any of your miscellaneous desktop UI and you won't have to crop it out later down the line. Despite that being pretty handy, I do display capture because I am difficult. lol If you have questions about this step feel free to send a ask, but I am going to skip over this to be able to go into more detail about the gif-making process.
3. Recording Your Scenes
Now you'll need to record your scenes in-game! I recommend doing this with ReShade or gshade. I use ReShade. Just make sure your lighting is how you like, the time of day is how you like, and have fun!
Tip #1: Save your game before you start recording any scenes. Especially if you are recording gameplay, this will allow you to go back if you miss an animation or interaction. You'll be able to reload your game where you were and you can try to capture the moment again.
Tip #2: Only record for 10-20 seconds at a time. Yes, you'll have a bunch of small recordings and that is what you want. You'll have to import those clips to Photoshop and if they are over 30 seconds they are going to strain your computer and be difficult to work with. Record animations just one time through, and re-record from different angles. This will let you pick from a variety of clips to get the gif you want. For 5-7 gifs I have 15-ish recordings that are about 10 seconds each, for reference.
Tip #3: If you are alpha like me and are plagued by alpha hair vs. MXAO, just be intentional with the hair choices you make because you cannot edit the MXAO out later (I mean you can but it is a lot of fucking work). I have found updos are better at not having crazy MXAO spots. Or opt for using sims with darker hair.
4. Loading and Shortening Your Clip
Now, pick the first clip you'd like to convert to a gif. Go to File > Import > Import Videos To Frames and then select the video file for the clip. A window will appear that looks like this:
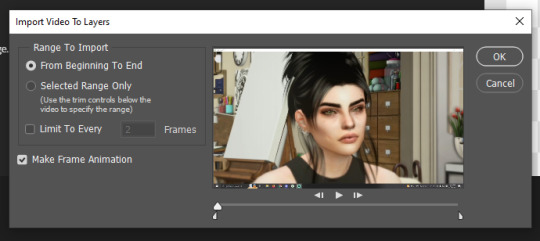
From here you are going to select the exact moment in your clip that you want to use. The two half-sliders underneath the timeline are your start and stop points. You want to move them to just encompass the moment you want to use. Try to cut it down as much as possible to just the moment you need, the longer the clip the more frames, the longer it will take to render and the harder it will be on your computer.
You will know if your clip is too long with this pop-up:
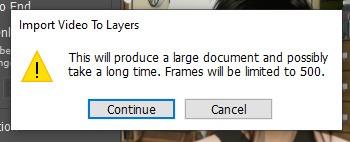
Avoid this!
My cut-down clip looks like this:
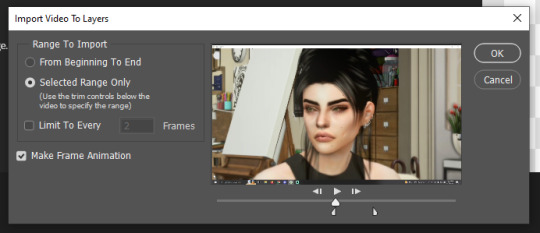
5. Loading In Your Layers & Workspace
Your workspace should look like this!

You should see 100-200ish layers on the right side and a timeline on the bottom. If you do not see the layers on the right side go to Window > Layers, you should be able to see them after doing this. If you do not see a timeline on the bottom, go to Window > Timeline, you should be able to see it after doing this. If your timeline does not look like mine and rather like this:

Don't worry! That's totally fine! If you do want to change it click the three squares on the bottom left and it will show each individual frame.
6. Cropping and Resizing
You want to work with the smallest file possible so you can use the littlest amount of resources and have the smallest file size. This is, one, to reduce strain on your computer but also because Tumblr only allows gifs that are 10MB. We want to keep the gif as small as possible.
First, we are going to crop our gif! In my example, I need to crop out my computer UI. I think long gifs and square gifs look the best, so I am going to crop my long ways.
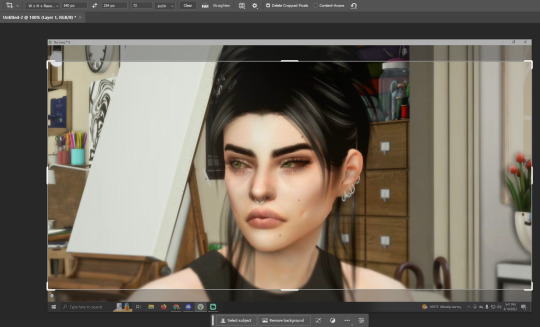
We also want to resize our gif to 540px. I know people get on me for resizing my screenshots to 540px but this is a MUST for gifs. If not they will be blurry. They are not like screenshots and portraits. In my crop settings, you'll see I have my set to 540px.

That makes the cropping resizing process quicker by killing two birds with one stone. Alternatively, you can crop as normal, and then resize to 540px afterward. I've done both and both get the same result! If your post will have two gifs side by side you'll want to crop your gifs to 268px.
If it takes Photoshop a little bit of time to crop the image, that is normal! Just requires some patience. The same goes for resizing. I've found sometimes resizing takes the longest.
My resized gif looks like this!
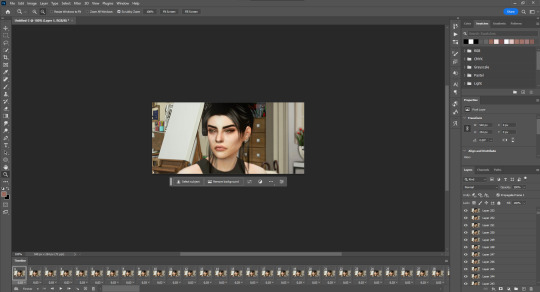
7. Editing Your Gif
Technically your gif is done! If you don't intend on editing it you can export it and you're done! I like to do a little editing on my gifs.
To edit gifs you'll need to use non-destructive editing methods, ie. adjustment layers or smart objects but most likely adjustment layers. If you, for example, edit by going to Image > and then adjusting your image, you'd have to do that to all your layers. That's not viable. Instead, you'll want to make a group at the top of all your layers and place your adjustment layers in the group. You can make a group by clicking the folder icon at the bottom of your layers panel. You can create adjustment layers by clicking the half-shaded circle on the bottom of your layers panel.
BE CAREFUL! Make sure you are doing edits on layer 1, if you edit other random layers the edit will only apply to those layers. I've made this mistake a few too many times.
As for sharpening, this is when you'd use your sharpening action or sharpen it yourself. I am going to be using this sharpening action by insomniacgifs. I've used a handful but this is the one I like the most because it converts my layers into a smart object that lets me do more edits later (which I will show you).
All sharpening actions are different so make sure to read their instructions before you use them. Some sharpening actions have a layer limit so they will not work on longer gifs.
To start using insomniacgifs action I have to convert my layers to frames. They have an action for this. I select "Layer 1" and run their "Frames to Timeline" action.

Now my layers are in a smart object!

Smart objects are a non-destructive way to edit and something I recommend using with gifs and your edits. Smart objects also preserve the quality of your images despite you resizing and editing your image.
In regards to gifs, this allows me to use Camera Raw Filter and more heavily edit my gif! All I am going to do is open Camera Raw Filter and edit away! It will apply my edits to a layer attached to this smart object.
After I've done my edits, I will pick which level of sharpening I want to use from insomniacgifs action. I usually pick soft. I am going to press play on the "Soft" action. This does sometimes take a while to load. You may get a progress bar. Just be patient. This may take a few minutes.
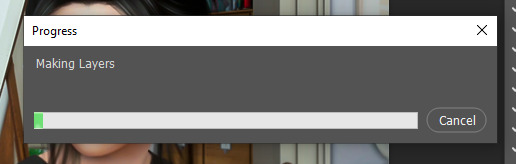
Now that the Soft actions have finished, my gif is sharpened! I am extra and want to tweak my gif a little more. After finishing the Soft action all my layers will be in a "gif" folder. Remember how I mentioned before that to edit gifs you want to place a group above your layers and place your adjustment layers inside? I am going to do that now! It looks something like this:

8. Saving Your Gif
Now, finally, we can save! This is the easiest part! Go to File > Export > Export for The Web (Legacy). I window will open that looks like this:

In the top right, make sure the file type is set to GIF. Here you can play your gif and see it in action! Now, this is what I normally notice if I do not like the speed of the gif. It defaults to 0.06 seconds per frame. Sometimes I like this slow pace to get a dreamier gif but with this gif, it's too slow. I will show you how to fix it.
Close this window and go to your timeline. Shift + Left-Click the first and last layers on the timeline. Right-click on the frame duration.

Now click other and change it to your desired duration. For me, that will be 0.03 seconds.
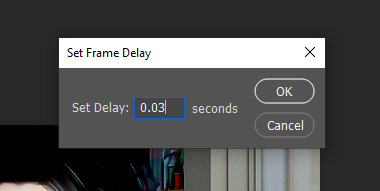
Now let's try to save again! This is the end result!
If you have questions please do not hesitate to ask! I will update this tutorial as people ask questions and clarification is needed! You can always hit me up if you need help!
#Tutorial#Asks#anonymous#Oof this#was a lot of work but I hope it helps you#if you want to learn now to make gifs!
101 notes
·
View notes
Note
Hi there! I saw the screen recording you did for the Aemond gifset (superb work, by the way) and I was wondering if you would be open into doing a step-by-step tutorial on how you played with the colors (what was the graph on the right side of the window?) and how you manipulated the color palette when saving the gifs? No pressure! Was just curious :) Thank you!
Hi there, nonny! Step by step below the cut here.
I don't keep the psd files of my gifs, mostly because I don't have the storage space to do that, so I've made a different gifset of the same scene, so it should be much the same, if not better.
I believe this:

is the graph you were asking about? This is the histogram. I don't believe it has any practical usage in gifmaking. If any other gifmaker here has a different opinion, please share it. (I'm doing a photography degree, photoshop is my next unit so I'll know more about it soon)
Right, step by step. Hold your horses, this is long:
Step 1: get the clip. Some gifmakers use screen caps to make gifs. I do not know how to make them or how to use them and I find my own method works. If another gifmaker could add on how you make your screen caps, and if it is better than my own method, please add it. 😊
Where you get the clip from is a question. YouTube, somewhere else... as long as it's saved as a MP4 file on you computer/laptop, it doesn't matter. What does matter is the quality of your clips. A lot of people use 4K (super high quality) clips. I find those to be slow and arduous and may have been responsible for the fall of my old, decrepit laptop. HD or UHD are likely enough for some decent quality.
Step 2: Get the clip in the software (I use Adobe Photoshop. For some softwares, you might have to clip the clip i.e. make it shorter before just dumping it in) In Photoshop go to File > Import > Video Frames to Layers and a window will come up. Move the sliders until you have approximately what you want (don't worry about being exact. Just as long as you have what you need.) (Don't forget to click Limit to every 2 frames)
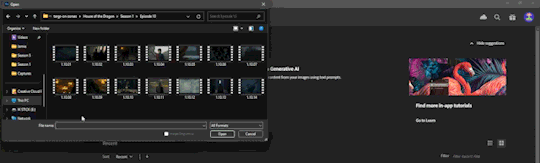
Step 3: Once the clip has opened and your ready to start, crop out any black/white edges. Then cut out the frames you don't want

Step 4: We are now ready to begin editing!! 🥳🥳🥳 Editing tends to just be a huge pile of trial and error. I have an order to things, but I often have to go back and adjust my first layers later.
I like to start with the Brightness/Contrast, for obvious reasons (I like to SEE what I'm doing *cough cough* HBO *cough cough*
The I adjust the Hue/Saturation, where I reduce the saturation of each individual colour. That reduction tends to be useful when I make further adjustments in effort to 'fix' as much of the shit colour grading as I can.
The next step is a combination of a Photo Filter (set to the default warming filter) and a Vibrance adjustment layer.
Next the where most of the magic happens. The Colour Balance allows me to adjust the colours in the shadows, midtones and highlights. The aim of this is to attempt to restore some colour. It can look a little weird when editing.
Finally is the Levels. This is a final brightness edit where I add most of my contrast.
Video featuring both sets here. Pause as needed to see the adjustments
Then, change the frame delay to 0.1, or whatever suits your fancy, but 0.1 is the most natural. Then, Click the button in the bottom left corner of the timeline which Converts to Video Timeline, then select all the layers, right click and Convert for Smart Filters.
After this is sharpening, cropping and then exporting. Either File > Export > Save for Web (Legacy) or Alt + Shift + Ctrl + S
Here I change the size. (Usually adjust the height to 540px. Width depends on how I've cropped it. I my source clip excluding black edges was in the ratio 16:9, 540px is usually half that)
If you are uploading gifs to Tumblr, keep an eye of the file size. Tumblr doesn't allow for file sizes about 10MB, although for me it's always been more like 9.5MB. If that number is too high and you have made the gif as short as possible (no more the 50 frames if possible) and you have reduced the size (my limit tends to be about 480px height dependant on my crop ratio), then you change the number of the colours from 256 to NO LESS THAN 200. (lower than this may considerably reduce your quality)
Then you press Undo or Ctrl + Z a few times until you have all of your frames again and then repeat.
And all that can take half an hour or more. Hope this answers the question as well.
14 notes
·
View notes
Photo
ପ( ໊๑˃̶͈⌔˂̶͈)੭ ✶⠀𝑙𝑜𝑠𝑡 𝑠𝑢𝑚𝑚𝑒𝑟⠀!

introducing lost summer, the latest photoshop template by tinytowns. design was inspired by txt's we lost the summer music video. be aware that the file was originally just practice so the sizing is somewhat wonky. basic knowledge of clipping masks is necessary for this template. please like or reblog if you plan on using, or click on the read more to find an adjustment guide for the gradient circle icon. download link can be found in the source. font used is poppins. large gif is 503x303 & smaller gifs are 154 x 102
✶ tutorial
if you don't want to meddle with the gradient icon then there is an alternative option hidden for you just under the layer. for those that do want to fiddle, though, follow my steps.
first, we're going to double click on the "option 1 double click," layer right where the transparent box is. if you're unsure, i've circled what you should be clicking in the image below.
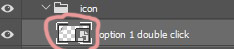
a new window should open up. you are going to unhide the "eclipse 1" layer. right click on the layer and hit convert to smart object - then again, but we're going to hit rasterize layer.
put your image over it and try to align where you want the head & where the circle will cut everything else off.
once you're satisfied with your image placement, we're going to right click the transparent box on eclipse 1's layer. like we did above, in the image. except it's a right click, and you're going to hit - select pixels.
click on your image layer - then hit the mask button that's circled below.

great. now your image is a circle, so lets celebrate by clicking on your favourite lasso tool so we can outline beomgyu (for example)'s body. for mine i used the regular lasso tool. when you've got everything outlined, delete it. make sure you're on the layer mask when you do this in case there's a mistake.
you can go ahead and hide the eclipse shape now. that should be it. but, if you want to change the gradient colour, just double click the "gradient fill 1" layer and it should come up with a window to do so.
now, we're done. so lets save what we've done so it can apply to the template.
i must admit, i never know how to save these things properly. but the method i use that works is just closing the window and making sure to hit "yes" on the "save changes to the adobe document......?" - hit yes otherwise your hard work will not save.
and that's it! let me know if there are any problems or bugs.
#photoshop#photoshop template#free rph#free rpc#template#rph#rpc#resources#rph resource#rpc resource#muse template#gif template#rpc template#rph template#free resources#free resource#tinytowns#m: resources
329 notes
·
View notes
Last Seen Blogs
robillardthoughts
i want to retire but spicy

mebukispa5
Spa Uy Tín Tại TPHCM - Mebuki spa10
customisedfavours
Customised Favours by LollyTalk

just-r-connection
Info utili
transcendencek-blog
gaia