#how to gif
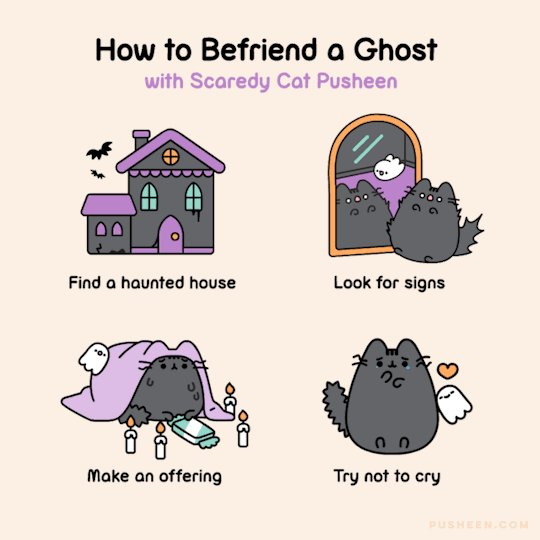
Text

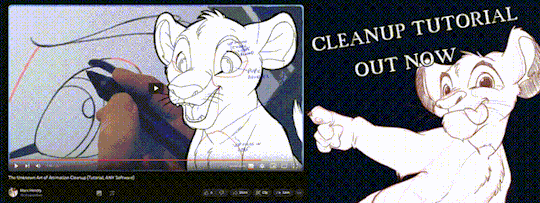
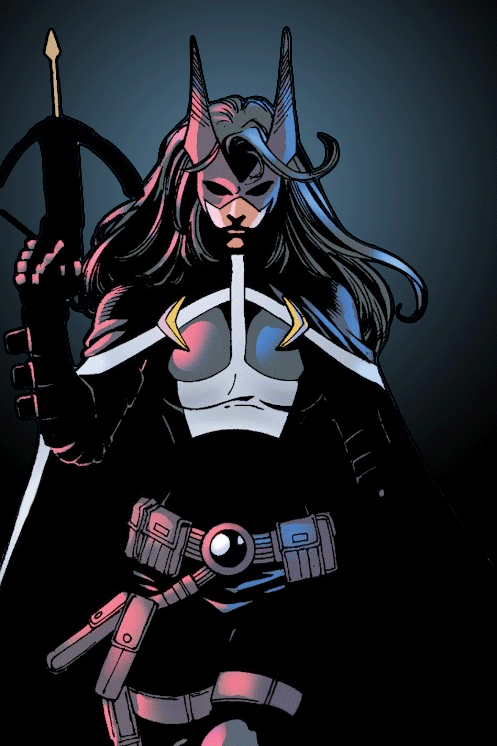
'ello folks, my Cleanup tutorial is finally done and out!
hope you find it useful
#Animation#Tutorial#Advice#Lesson#The Lion King#simba#animation#Disney#character design#how to#2D#traditional animation#frame by frame#Adobe#Photoshop#Animate#Flash#After Effects#Premiere#Video#Film#Drawing#Tips#Gestures#cleanup#lines#krita#toon boom#procreate#tvpaint
1K notes
·
View notes
Note
Hello, I have a weird question but maybe you can answer it. When I was a teenager I was gifted a yukata and taught to tie the obi to make it look like a bow. That was cute then, but now that I'm in my mid 30s I wonder if this is still appropriate. Are there other ways to tie the obi of a yukata that are maybe a bit more mature ? I love wearing my yukata, but I'm starting to get self-conscious about maybe being too old for that… (I only wear it for matsuri in Japan so it's not like it's often, but it makes me even more self-conscious because I am very clearly not Japanese so I don't want to look ridiculous.) Thank you !
Hi fellow mid-30's kimono wearer :D It's true some styles can feel a bit weird depending on ages.
Though nothing truly forbids you to keep wearing bunko musubi, if you don't feel confortable with a bow knot or its variations (for ex. this one or this one?), don't despair! there are many (like MANY) other knots which would work with your age and "status" :D
If you wish for something classical, I'd recommend:
Kai no kuchi musubi (clam mouth knot) - a super all purpose knot, worn by women and men alike. It's been around for ages and never went out of style!
Ronin musubi (ronin knot) or katabasami - unisex knots that have been around for a long time too, pretty sturdy and chic.
Karuta musubi (card knot) - easy to tie and quite flat so perfect if you have to ride a car/train or sit on Western chairs.
Taiko musubi (drum knot) or tsunodashi musubi (also called Ginza musubi) - you can fake those ones (usually tied with wider obi) with a hanhaba obi, see examples here and here.
More on the novelty side :
Kamifusen musubi (paper balloon knot) - a more whimsical knot but could still work depending on your style. It asks for preparation but it's very cute :)
Neko mimi musubi (cat ears knot) - there are many variations, with or without hanhaba obi - look at this one for ex
Not-tied obi, a super modern way of wearing obi. Ayaaya has a lot a those, check for example this one and look at her socials for more (especially "frilly" variations)
Any variations of what I call the "waterfall" musubi, where obi ends are elegantly arranged thanks to elastique belts. It's super fashionable atm, see it shown step by step on Billy Matsunaga's channel.
To go further, searching for "hanhaba obi musubi" will gives you a lot of other ideas ;)
Hope it helps, and that you'll have a lot of fun at matsuri!
#ask#hanhaba obi#obi musubi#obi#obi knot#musubi#yukata#kai no kuchi#ronin musubi#katabasami#Karuta musubi#Taiko musubi#tsunodashi musubi#Kamifusen#Neko mimi#modern kimono#step by step#tutorial#how to#kitsuke#着物#帯
185 notes
·
View notes
Text
Masterlist
started: 11/22/23
last edited: 3/15/24
Coriolanus snow x reader
ch1 ch2 ch3 ch4 ch5 ch6 ch7
#masterlist#how to#fanfiction#imagines#blurbs#coriolanus snow#coriolanus x reader#coriolanus snow x reader#coriolanus snow fanfiction#a ballad of songbirds and snakes#sejanus plinth#coriolanus x lucy gray#lucy gray x coriolanus#the hunger games#my fic#fanfic#tom blyth#tom blyth x reader#lucy grey baird#young coriolanus snow
126 notes
·
View notes
Text


🌟How to make a neon pom pom sensory bottle!🌟
• Square Sand Bottle - SKU 1417054 Hobby Lobby
• Sequin Variety Pack - SKU 2265551 Hobby Lobby
• Neon Pom Poms 7mm - SKU 387282 Hobby Lobby
• Elmer’s Clear Glue
• Bottled Water
#stim#stimblr#sensory#sensory bottles#sensory bottle#tutorial#how it’s made#how to#neon stim#rainbow stim#visual stim#pom pom stim#confetti stim#shaker stim#also please please please don’t hate me because I shop at hobby lobby I know it’s a bad company :/
149 notes
·
View notes
Text
Knives!
if you're new to cooking you may be confused or even intimidated by cooking knives. the truth is, you don't need many. In fact, most people only really need two.
first, i wanna address a common concern with newbies (or some seasoned home chefs):
"Big knives feel dangerous"
they might look dangerous, and you should study up on proper knife safety in order to use them, but the thing is: when cutting on a cutting board, you need to use a knife larger than the object you're cutting. Two reasons
The knife has to be able to make a complete cut across the thing, so it needs to be larger
Larger knives are more stable than smaller knives
When your knife is smaller than the thing you're cutting, it requires more force to do its job. Applying more force while cutting increases the risk of your knife slipping while cutting, which causes it to go somewhere unexpected. That could be somewhere like your other hand.
Big knife = less force = more control.
back to the original topic:
What knives do I need?
Like I said, you only really need two. You may need more if and only if you do specific things more frequently than most other people. For example, there are these long thin knives called carving knives that are used for cutting very big pieces of meat into small pieces. If you buy large pieces of meat in bulk and cut them up yourself, then you'd want a carving knife to make that job easier. If you don't do that, then you don't need one.
First i'm going to go over the two most-used knives. Then I'm going to talk about cost and what to look for.
Chef's knife

A chef's knife is a large, heavy knife that has a curved blade of around 8 inches in length. the shape of this knife makes it a generalist, and can do all kinds of things from slicing to chopping to scoring and even paring, in a pinch.
If you cook, you will use your chef's knife in pretty much everything you make. No exaggeration. If the recipe requires you to cut a thing into smaller pieces, you'll use it.
Paring knife

A paring knife is suited to paring and peeling. Its blade is around 3 inches in length. You use this for small, hand-held jobs off the cutting board. Like this:

Paring is a different motion than what you use on a cutting board, where the knife stays in one place and the food moves into it. It's certainly a less frequent action than what you do with a chef's knife, but since you can also use a paring knife on the cutting board for really fine cutting of small things, it's worth having around.
So, that's it. I've been cooking for 20+ years and those are the two knives I use for easily 90+% of my cooking. I have a few special knives I rarely reach for but still use, but those two are my workhorses.
What kind of knives should I buy?
When buying knives you run into the common conundrum of capitalism: you can buy ten cheap knives over ten years that break or dull without being able to sharpen, or one expensive knife that will last ten years or more.
You should buy whatever you're comfortable with spending, as in the long run it's cheaper to cook for yourself than to buy prepared food. However, I would recommend spending more on knives since they're so important and frequently used.
Brand new: A good chef's knife will be in the $100-200 USD range. A good paring knife will be about $50 USD.
However, you can always look for these at thrift stores, garage sales, hand me-downs, and dont forget about sales and factory discounts.
A good knife will be forged, not stamped, and made of stainless steel. Not ceramic. Forged means the knife was created by pounding a piece of steel into a knife shape. Stamped means they had a big sheet of already flattened steel and they cut a knife shape out of it. Forged tends to be higher quality and more solid construction. Stamped is fast and cheap.
The measurement of grade of stainless steel is so fucking complicated I don't want to get into it in this post. But what you should avoid is knives that tout how long they stay sharp. That's a bad sign. Hard steel stays sharper longer, but takes way more effort to sharpen once it needs it. To the point where it's relatively impossible to re-sharpen at home in some cases. Soft steel dulls faster, but is very easy to maintain. Read reviews and keep an eye out for people mentioning the ease of sharpening.
If you're going to sharpen at home, it doesn't take much time, sharpening blocks are cheap, and you only do it about once every 1-3 months depending on how frequently you use your knives. I suggest using the sharpening stone method. If you don't want to sharpen at home, you can bring your knives to a sharpening service, which some kitchen supply stores will have. You're gonna have to research where it can be done for your area.
I know sharpening and knife safety are big topics, which is why I linked those videos above. You need visuals for that. It takes time to hone (ha) these skills so start slow when you're new. Feel free to shoot me an ask about kitchen knives if you have any questions!
111 notes
·
View notes
Text
How A KickFlip Is Done. (be careful)
18 notes
·
View notes
Text


▒_⃨ ꒱ 🪽﹕ © ɾᥱ꯭ᥢᥱ᥉mᥱ꯭ᥱ ᥆ᥢ tᥙ꯭mbᥣᥰ ꒲ ﹗ ▒༅ 🫖 ᭄

#kpop#icons#gg icons#messy moodboard#moodboard#moodboard blackpink#messy layouts#bp jisoo#jisoo headers#lisa lq#jennie icons#blackpink rose#red moodboard#aesthetic layouts#how to#icons lq#story gift#headers#kpop gg#kawaii#moodboard edit#amino moodboard#moodboard gray#graphic design#industrial design#moodboard blackpink green#moodboard blackpink blue#moodboard minnie gidle#lettering
22 notes
·
View notes
Note
🌴 with some more intimate questions
So I was reading your new bingo instalment, and I must say perfect as always! But it sparked some questions for me about kissing, and how you described that.
I’ve seen it described so many times in fics in similar ways and situations but how would that be put in practice. How on earth do you even kiss someone beyond the peck on the cheeks you can give. How does it work in order to “taste” your partner? The only experience I have in this subject is someone attempting kiss me like that and me being extremely unwilling which meant my whole lower face was just wet? It was not something that I’d ever want again!
I now have a wonderful partner but it’s getting to the point I know they want more than a sweet kiss on the cheek, so I guess my question is how?
Hope that made sense *runs off to hide in a hole out of embarrassment*
{Let’s Talk about Kissing…!}
Heyyy 🌴 anon…!! It is so good to hear from you again. Thank you for your kind words, sweet anon!! Thank you for stopping in again! And thank you for being vulnerable and asking more questions 🥰 I deeply appreciate your sharing, and I always look forward to your questions.
So, kissing— How is it put into practice?
Well first off, there are many different kinds of kisses. I believe you’re mainly talking about French kissing, as that is what’s often described in fics, but it’s important to note that French kissing isn’t the only kissing style. Check out this article for more types of kissing—Know All About the Different Types of Kisses.
By back to French kissing. French kissing is also referred to as tongue kissing, deep kissing, and sometimes making out. I want to make a note here that it’s okay if you’re not into French kissing. It’s not for everybody. Just because it’s written about a good amount, does not mean it’s for you. And that’s okay ♥️
French kissing involves tongue-to-tongue contact. It can include pecking, nipping, biting, and more, but the main part and crux of French kissing is the tongue-on-tongue contact. This type of kissing is often the most common when written and showed on entertainment for romantic partners.

In my personal opinion, a not so good kisser will just shove their tongue in your mouth (if it’s sounds gross, good because it is). A better kisser will ask for permission before by either using words or nipping/licking your bottom lip. A good French kiss is a give and take, with usually one person leading. They moved their tongue around and along your lips, as well as inside your mouth and around your tongue.
A bad kisser (especially French) can be horrendous. It sounds like you experienced something like that. I’m sorry ♥️♥️ I have as well. But the good news is, you yourself can become a better kisser so that hopefully you are never that bad kisser.
Next, what is “tasting” your partner?
“Tasting” your partner is when your partner has something or the flavor of something already in their mouth. This can happen if they just did oral on you, and you taste yourself, or if they drank alcohol, and you can then sometimes taste the alcohol on their tongue. Things like that.
Time to Explore, what next?
I am so glad to hear that you have a partner that you feel safe enough to want to try this with. I would recommend you ask your partner how they feel about kissing, have a conversation with them. See if they have had any bad experiences, see what they like, see what they don’t like, etc.
And when you do start, start slow. Start with simple pecks and go from there. You got this, sweet anon.
This made absolute sense. Thank you for asking, dear anon! You are very courageous, and I am very proud of you. No need to be embarrassed ♥️♥️ Hope this was informative! Hope to hear from you again soon!! 💞💞💞
Talk with Me ❤️🔥
#talk with me#🌴 anon#anon asks#kissing#let’s talk about it#how to kiss#kisses#kiss kiss#lesbian kissing#girls kissing girls#how to#cissyenthusiast010155 answers
41 notes
·
View notes
Note
Hi! Do you happen to have basic/simple/easy tutorials for editing comic panels to recommend?
i do not actually have one to refer you to, but i’m happy to write some things up! i’m assuming this is just for removing backgrounds and creating icons; if you want a how-to on the way i animate panels, that lives here.
i use photoshop cs6, but the same general principles should work in other editors. also, there are probably easier or faster ways to do the things i do. i like my methods and i’m comfortable with them, but i’d recommend experimenting to find what works best for you.
and... yeah! let's get into it.
step one: finding a panel
i save panels as i’m reading comics. they all live in one PSD file named “panels,” and i make a new one for each run. anything that seems pretty or thematically resonant gets copied and pasted in there. this way, i don’t have to dig through endless comic issues to find a specific image that stuck with me. i usually save the full page just so the edges are clean and everything is included.
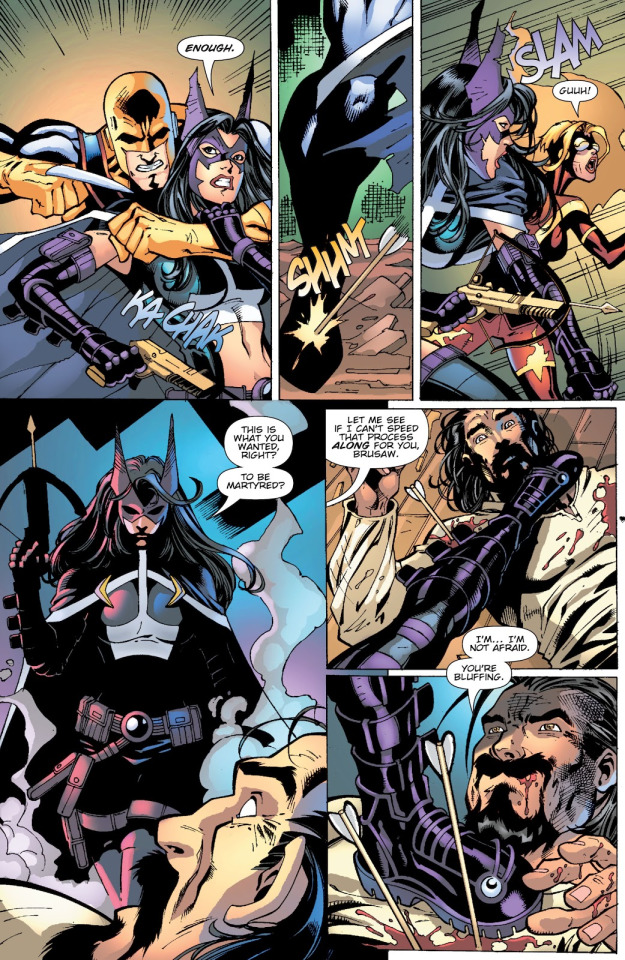
let’s go with this page from birds of prey:
step two: cropping
the way i crop the image depends on two things: what i’m hoping to make, and what the image looks like. here, i’m just doing a basic portrait, and helena is taller than she is wide. that makes it easy; let’s crop it so she takes up most of the frame.

(my preferred ratios are 4x6 for smaller panel edits like this; for banners, i usually do 2x1, but if the framing works better as 3x2, I have done that, too. just feel it out. actual pixel sizes depend on the size of the original image.)
step three: removing the background
this part is, I think, the area with the most room for personal preference. we need to erase the background, and there are a LOT of tools to do this. each one varies depending on what the image itself looks like. there’s the magic selection tool, the eraser, or the lasso or magnetic selection tool.
(i don’t use the lasso or magnet because they’re evil, to me, but they work reasonably well when you have a character on a mostly solid background and art with thick, defined lines. i have no real advice other than that.)
here, we can mix and match some things. i’m going to start by using the magic selection tool to grab all the white or solid colors and remove them with the delete key, like so:

surprise! gone.
after that, for the more finicky areas, i am a perfectionist and i go in and erase pixels using the eraser tool at 4-5px width. i start by outlining the character, like so:

from there, you can use the lasso tool to select all of the remaining background and delete it. i usually hide the white background layer at this step, too. (i'm also going to color the smoke and the man in the foreground black and redraw the crossbow string with the paintbrush tool. this ain't about him.)
you should end up with something like this:

step four: cleaning the linework
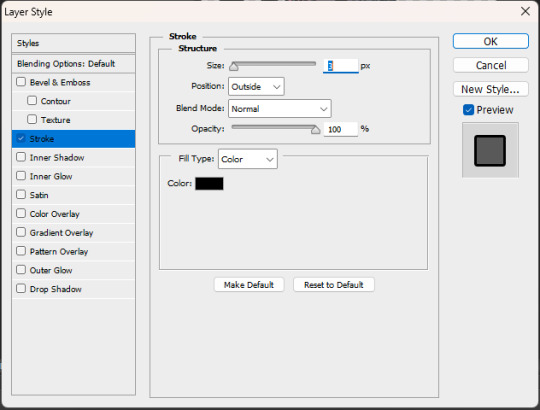
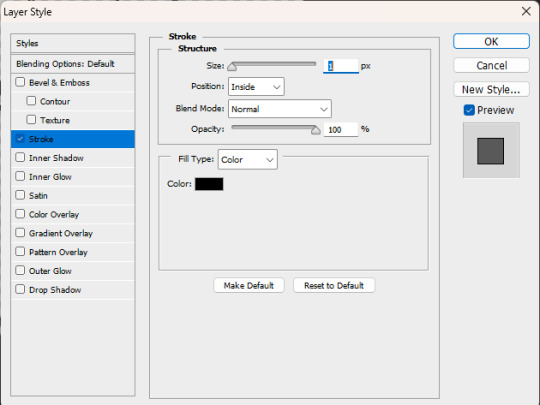
this part is mostly using the layer style stroke and the tool refine edge.
so, because of how selection tools and erasers work, there are a bunch of hidden pixels throughout the image you can’t really see. this drives me absolutely bonkers. at this point, i combine all the layers of the paint i've done so far -- everything except for the transparent background. select the layer with the character — Helena — and apply the layer style stroke, set to “outside” at 3px.

those little black dots are what we're after. there aren't too many right now, because this was a fairly clean edit; sometimes, it looks scary and messy, but that’s okay. the layer style has just outlined all those invisible pixels. i go through and erase them — especially in tight places like corners. for example, this pesky area between strands of hair:

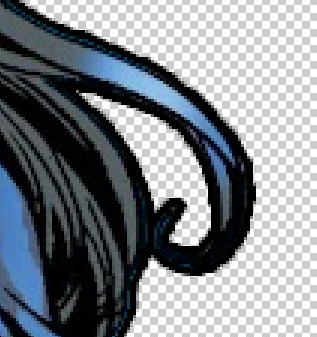
(before vs. after)
once you’ve erased all of those pixels and cleaned up the image, you can go back into the stroke layer style.
you’ve done a lot of erasing and feathering and cleaning up, so chances are, the line work is not nearly as crisp as it looked in the original panel. that’s fine! shift the settings to “inside” and 1px, like so:
sometimes it’ll need to be 2-3 px, sometimes it’ll need to be center-aligned, and sometimes you might even decide it looks better outside or without the stroke style at all! this is all personal preference. do whatever you like.
once it's where you want it to be, i like to duplicate the layer -- to save the one without the new outline in case anything goes wonky. then right click the copy of the layer and "rasterize style" to get a flat image with new linework.
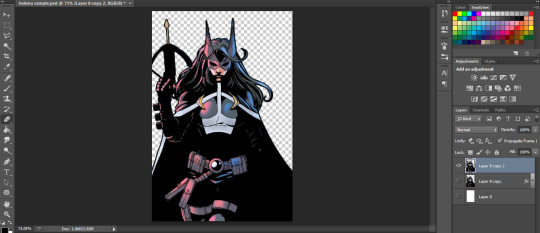
your workspace should look something like this:
if it happens to feel like the edges are a little harsh — which happens sometimes! especially when using selection instead of eraser — you can select the whole image and use refine edge. this softens it. you don’t need to do much; i usually do 2-3px of feathering, a couple pixels of smoothing, and some contrast, depending on how it looks. see below:


you'll have three layers now. it gets confusing, so try to keep track of which one is your active layer. you can delete old ones, if you want; i generally don't, just in case.
there isn’t a hard and fast rule for this part. do what you think looks good. and if you want to refine the edge before you add the new linework, that can work! do another stroke layer style after the first round! test things out and find out what you like. most of the time, it depends on the image and your preference.
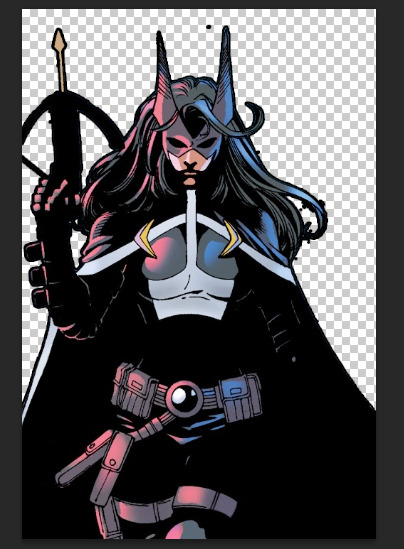
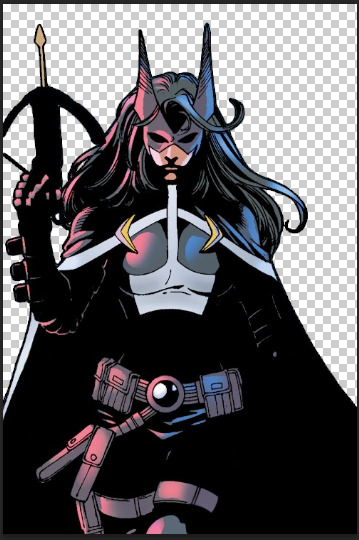
after all that, this is the helena we now have:
step five: creating a new background!
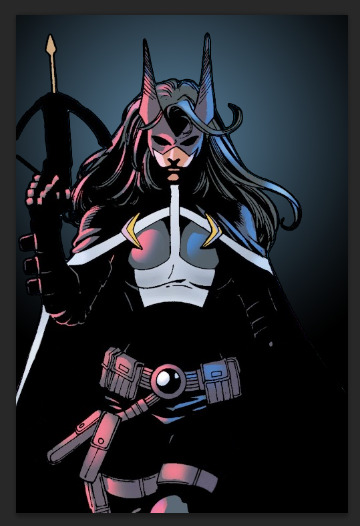
this part is easy. create a new layer, pick a color you like — i tend to pull from the actual background using an eye dropper tool, or if it’s for a multiple-part edit, I use the swatches i’ve decided on for the color scheme of the whole thing — and paint bucket that thing right on there. this is some of the blue that was behind her originally:

i don’t like flat colors, pretty much ever, because they feel harsh to me. so i go back and add artistic touches and mess around with the filters a lot. sometimes i pull text or accents from other panels and follow the same steps as above to incorporate them into the edit; sometimes, i don’t. no rules just vibes.
in this case, i want it to be pretty simple. so i’ll make a new layer, then fill it in with a gradient tool. i usually make a custom gradient; one side is the color of the background and the other side is either black or white, depending on the vibe I want.

i do an orbital gradient most of the time — circles are your friend — and focus the center on something that I want to draw the eye to. here, i’m going to do helena’s face.

then i mess around with the opacity until it looks the way i want it to. like this:
step six: final steps
congrats! you have an edited panel! you’re perfectly fine to post/share/use it at this point, but there are a couple other things i like to do to give it that final polish:
if you want to jazz up your edits, try messing around with outer glow, or drop shadow. both of those layer styles can add some emphasis to your focal point. (i prefer those be kept at a low opacity, when i use them, which isn’t often.)
i'd also recommend messing around with gradient maps if you want to superimpose a larger silhouette over the background. that would take more room than i have left in this already far too long guide, but it does add something to have it in there.
i dislike having text bubbles in my edits unless i specifically put them there, so i do have a process for removing them, much like the smoke or the man in the foreground. again, we are running long already, so i won't get into that here. my recommendation if you don't want to deal with entirely removing a bubble is to just paint over the text inside with white so you have an empty text box or speech bubble instead. it's simpler, quicker, and honestly the more common practice based on what i've seen.
that being said, if you want to know how i paint over them -- or how to do anything i didn't get into here -- feel free to ask. i don't mind writing these up.
i have a guide on how i size my images here, which walks through the exporting process. it’s not strictly necessary, but i like for my edits to remain consistent in size, so i do usually follow it.
and that’s it! you’re now ready to edit comic panels to your heart’s content. happy cropping and so on, and thanks for asking me. <3
#how to#ask.tb#anonymous#i hope this answered your question#and i especially hope it did so in a simple and easy to follow manner. despite how lengthy it got. i tried to stick to basics here.#but yeah! thank you for asking#best of luck!
31 notes
·
View notes
Text
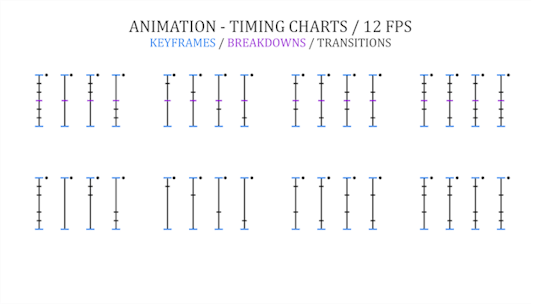

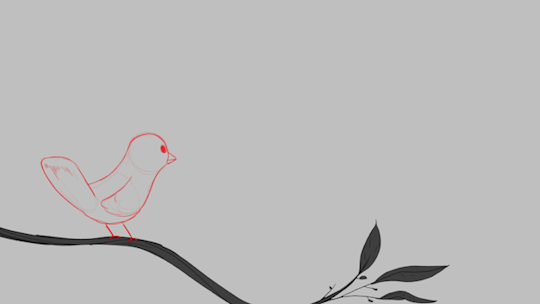
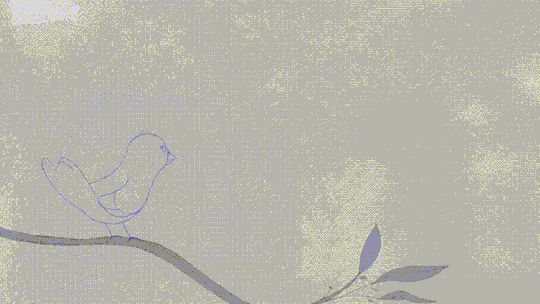
Animation - Timing Charts / 12 FPS
Most animations typically use 12 FPS in a 24 FPS video format, which causes each frame of the animation to repeat.
1 Second = 12 frames
1 Frame = 0.08333... seconds
1 Keyframe every 6 frames
2 Timing charts = 1 second
-
I prepared a second example to notice that although the timing charts have different effects, the time that the animation takes place is exactly the same.
-
Download on:
Gumroad
Blogger
Payhip
#animation#animation tutorial#2d animation#animated gif#animated#frame by frame#anime#cartoon#keyframe#how to#how to draw#gif#tutorial#art tutorial#keyframes#anime gif
175 notes
·
View notes
Text
Hey y'all! I've seen a lot of fan fic authors confused how to use a read more on this site, since it's a little specific to this site.
What's a read more? This little link right here!
To enter a read more, there's two methods. I'll go over the desk top and mobile versions first.
Desk top
Make sure that you have at least one line of text before adding your read more, even if it's a period.
enter a new line with no characters or spaces
click the icon to the furthest right, the grey icon with a line and a zigzag.
if it's successful, your post editor should automatically add this to your post, and that is where your read mroe will be cut at. You can hover over the read more and drag it to another paragraph if you'd like.

Mobile
To add a read more to your mobile post, hit your enter key to create a new line without any text, characters, or text.
type in :readmore: with the colons on either side, and hit enter
You should be able to see a new line denoting the read more
#tumblr features#how to#fanfic#fanfic author#tumblr post#read more#begging authors to do thsi#rb ok#rn encouraged
55 notes
·
View notes
Text
⋆ ˚。⋆୨୧*❀ dream girl daily habits ❀*˚୨୧⋆。˚ ⋆
Even if you’re busy these habits are so short and simple that you’ll have no problem incorporating them into your daily life ~☆

1. Sunscreen and skincare (5 minutes)
Take care of your skin angel🧴Sunscreen protects your skin from damaging sun rays that cause up to 90% of skin ageing and sometimes even cancer!
Just a little bit of sunscreen every morning and some cream every night can keep your skin safe and glowing for decades to come ♡

2. Signature sent (<1 minute)
Perfume sounds intimidating but a good signature scent doesn’t have to be expensive - mine is from bath and body works ;)
If you don’t even know where to start with fragrances, here’s a quiz to help you figure out what kind of sent would suit your personality
(it’s really cool! It uses images that trigger memories and synesthestia to find what kind of scent you’d like - I got gourmand with layers of caramel and vanilla which is very similar to my current signature scent)


3. Update your planner (<5 minutes)
There are loads of different ways to keep organized: bullet journaling, keeping a physical planner, digital planner, google calendar, etc.
I bullet journal and I love it! My planner keeps me motivated and productive, and I get to be creative with stickers and washi tape.
4. Clean your space (10 minutes)
Even just a ten minute clean a day can keep your space looking so nice and will boost your mental health.
Put on some music or a podcast and make it a party!
5. Give yourself a compliment (<1 minute)
I’ve said this tip before in my how to feel confident post, but this tip is just so quick and easy and will do wonders for your self esteem.
Confidence is key! A dream girl is confident in who she is.
#how to#dream girl#that girl#glow up#level up#level up journey#pink aesthetic#perfume#skincare#sanrio#self care#self worth#self love#manifestation#daily habits#sailor moon#kawaii#my posts#routines
600 notes
·
View notes
Text
Guide to Tumblr for all the Twitter refugees

So you wanna be free from the mess that’s going on in that blue hellscape? Welcome to the half functional site called tumblr dot com, birdapp people. Let me show you some basic How-To’s before you get started!
Tumblr is half functional most of the time, but don’t worry at least we don’t have mister twitter boss here!
Tumblr is not like Twitter, where the content you “liked” automatically show up on your followers’ dashboards (dashboards equals Twitter timeline) — meaning if you like something and want to show that thing you like some appreciation, the only way to do it is to click that “reblog” button. That’s how you can support the creator. If you “like” something but don’t “reblog” it, well it doesn’t really mean anything, to be honest. Because “liking” on Tumblr doesn’t help hype the post. No one will see it. If you want to support your favorite creators, always reblog.
People can see the posts you’ve liked by visiting your blog and going through your “like” section. But you can choose whether or not you want your Like Section (as well as your following list) to be public. I mean you can keep it private, if you’re more comfortable that way. But reblog is to support creators. So don’t be shy.
Reblog. Don’t repost. This is very important, you guys. If you reblog something, you’re supporting the OP by hyping their posts up. Any “like” or “reblog” the post you reblogged receives from your followers goes directly to the OP. But if you “repost” it, you’re basically stealing their post. Keep in mind: Reblog. Don’t repost.
Tumblr is PG rated. Meaning no n s f! w content, sadly. (There’s this new “label” thing where they allow you or even other people to “label” any post if it contains mature content, but tbh even with this site having p0*n b0t problem, any post that shows so much as a n¡pple will get you flagged). So… it sucks, but better play it safe if you don’t wanna get flagged.
If you did get flagged, your profile pic will automatically be censored, resulting in it looking like this ↓

And if people go to your profile or blog or account, it will look like this ↓
You can appeal to have your blog unflagged, if you believe you’ve been flagged by a mistake. But my advice would be to play it safe and avoid posting anything n s f! w.
Tumblr anon is fun. You can choose whether or not to allow anon in your inbox. And you can anonymously drop by other people’s inbox (if they allow anon) to say hi, or to compliment them if you’re shy and rather be anon.
But always remember: anon hate isn’t cool. Don’t be an anon hate. Because honestly hiding behind “anon” in order for you to be able to send hate to people doesn’t make you look “intimidating” like you may think it does. It just makes you look like an aggressive chihuahua barking at this Person You Don’t Like while at the same time you’re hiding behind a corner (in this case, a corner equals anon) because that person does, in fact, intimidate you and not the other way around. Anon hate honesty just makes the sender look pathetic, small and a coward. Don’t be that person. If you have something to say to someone, at least grow some balls and say it off anon.
Okay I think that’s it for now. Other than that, just enjoy this chaotic site (not as chaotic as the birdapp currently is, apparently). Have fun. Be wild. Love y’all xx
#tumblr#twitter#elon musk#elon musk twitter#current events#news#guidebook#guide#useful#how to#useful tips#useful tip#text posts#2022#meme#memes#tweet#tweets#useful information#advice#guidance#funny meme#funny memes
167 notes
·
View notes
Text
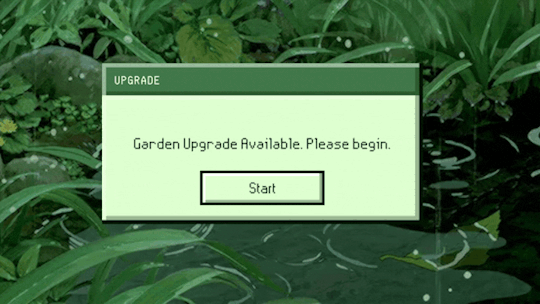
Garden Upgrade Available. Please begin.
+ 25 Garden XP ; Herbs Available
-> Welcome to the vertical oasis tutorial, where you'll learn to turn a small space into an herbal fortune.
Ready to Start?
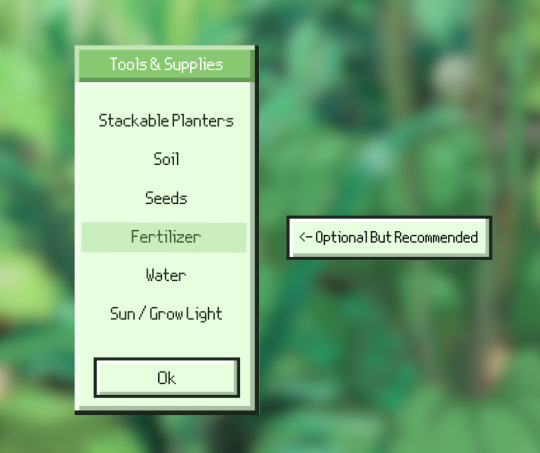
You'll need a few things to get started and a little bit of time. To start, you'll need some sort of space to work with. For my personal herb tower I'm using stackable planters that are around 1.2 sq ft (14 inches i think) + 5 in deep.
[ These from dollar tree specifically ]
I recommend a place that has at least partial sunlight available. If you live in an area with no outside space, you can place this near a window + add a grow light if you need. I also use fish fertilizer which is completely optional but recommended, as it can help grow strong, fruitful plants. The amount of plants you have will primarily depend on your vertical space available.
I have ~ 6ft worth of vertical space (which I'll need a step stool to tend to) and I plan on using it. My planters are about 5 inches tall, which means I can fit a maximum of fourteen of these planters. But I'll only be doing twelve so that the plants have a little bit of room at the top of the stack. That means, in total, I will have 36 "pots" for plants. The downside is, the plants will grow outwards and up, which means I can't have big plants.

Choosing seeds can be a little frustrating when you're new to this. For simplicity sake, we'll say you have around the same amount of space that I have. Since this is an herbal oasis, we'll focus on that.
One thing I absolutely recommend is marigold (edible variety means brownie points) because it's a wonderful pest repellent. It also helps the bees out, so! Marigold is good.
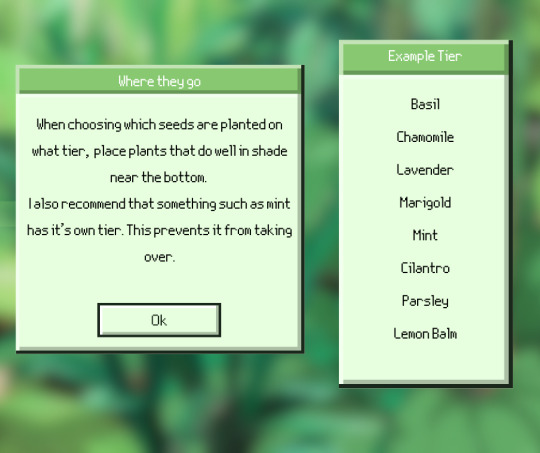
You can use the list provided in the image or you can come up with your own list of things to plant. Personally, each "tier" will get three of the same plants. Otherwise I forget what I planted where. If you have a lot of vertical planters, get a plant caddy so it's easy to rotate and move.
I do recommend you spend a little time learning which plants need the most sun / water but otherwise gardening is fairly straight forward. If something is wrong with your plant, you will know. The leaves will change or wilt, the plant will stop growing, etc. And remember, you can always try again.

#filed under: resources#filed under: projects#gardening#tutorial#bunny gardens#herbal oasis#herbal garden#herbs#plants#plantblr#aesthetic#plantcore#+ 25 garden xp#garden upgrade#garden#greenery#tea#how to#life hacks#helpful#made by bunny#open folder: fun
31 notes
·
View notes

Last Seen Blogs
midnightraain
𝑻𝒂𝒌𝒆 𝒎𝒆 𝒕𝒐 𝒕𝒉𝒆 𝒍𝒂𝒌𝒆

kuribohpanties
Kuriboh Panties

luka-art-shack
Luka's Art Shack
latelierderiot
L'atelier d'Eriot
howitzerhoney
saccharine sad girl