#i can only import and export 1 gif at a time before i have to restart the program all over again
Text
hi everyone! I've gotten several requests to make a tutorial on how to make gifs for someone just starting out and I finally got around to slapping a tutorial together.
This tutorial will cover:
software recommendations
choosing what to gif
creating a gif step by step with probably a lot of unnecessary detail
some tips and tricks:)
(This particular tutorial will not cover how to find tv and movies to download and gif, or any specific instructions on coloring. only the basic gif making process.)
so for the purposes of this tutorial, we will be using Adobe Photoshop, which is the most common program for making gifs, and the one I recommend. the version you have doesn't make a major difference in terms of capabilities but the interface may be slightly different looking if you have an older version or a different type of device. you cannot make or edit gifs in any mobile version of the photoshop application.
Optionally, we will also be using Adobe Premiere Rush/Pro or another video editing software of your choice. wherever you are downloading Photoshop, whether from Adobe or a third party, you should easily be able to acquire Premiere as well.
I am aiming to be as detailed as possible in this tutorial, so it may sound more time consuming than it really is. once you get the hang of things, it goes fast. the most time consuming part by far is the editing and coloring.
in my opinion, one thing that majorly saves time while giffing is knowing your keyboard shortcuts and using your mouse/trackpad as little as possible. I will be going over these in this tutorial as well.
before we begin, some general tips:
gifs of single shots that do not cut between angles or subjects generally will look the best, barring exceptions
for a single gif set, choosing scenes and shots with similar lighting will be easiest to get to look uniform when compiled together, since editing wildly different looking scenes to have similar coloring and lighting is hard and takes some practice!
avoid shots that will require you to majorly crop or zoom to properly frame the subject, as this will greatly diminish quality
speaking of quality, gifs will look best using 1080p video, but you can get away with 720p as well. I would not recommend giffing with anything lower resolution than that
Tumblr's upload capacity for image and gif files is 10mb. be sure when exporting your finished gif that it is under that size. if it is a bit over, you can try trimming a few frames off your gif in the video timeline.
if you get frustrated, don't give up! giffing is hard and complicated especially if you are new to photoshop. I tried to make this tutorial as detailed as possible so it's easy to understand (although im sure I still forgot some stuff)
ok onto the tutorial!!!
STEP ONE: choose what range of frames you want to gif, and how.
once you have decided what you want to gif, there are two main way to convert your episode into a range of frames to make into a gif. the first is by screencapping. this involves downloading a program like mplayer or vlc which can be used to convert video files into "stacks" of screencaps, which can then be separated into whatever range of frames you want and imported into photoshop. this is seemingly by far the most common method I have seen amongst gifmakers*, but personally I don't care for it and I think it's more confusing and time consuming overall, so I will be explaining the second method: importing video frames to layers.
now, normally what this would mean is opening the full episode in photoshop and using the pathetic little playheads on either end of the scrub bar to trim the file into a clip. this is where your video editing software comes into play.
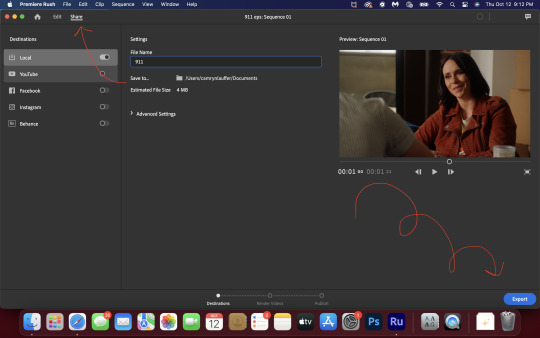
open whatever episode or movie you want to gif in your program. if it is a large file like a long movie in 1080p, this may take a few seconds. like I said, I am using Premiere Rush. I will be using a random episode of 9-1-1 for my example gif.
in your media browser, hover over whichever episode you want (you can also just add the whole episode to your project and scrub through, but that can take longer unless you know what time stamp you're after). click the fullscreen button by the bottom righthand corner.
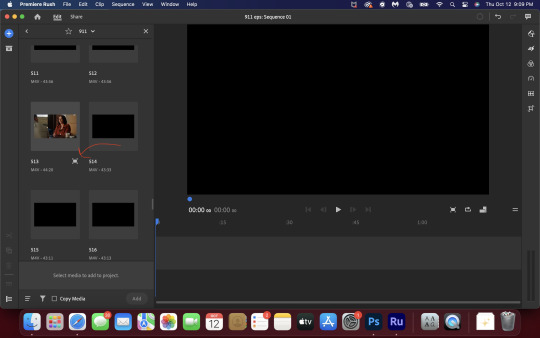
now you can scrub through and trim the episode before you even import it to premiere. this makes trimming your clip even easier.
use the trim bar (yellow outlines) to trim as close as you can around the scene you want to gif.
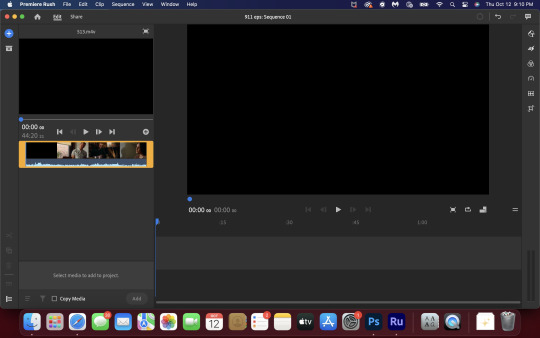
then click this plus, and then "add" below. this will add the clip to your project.
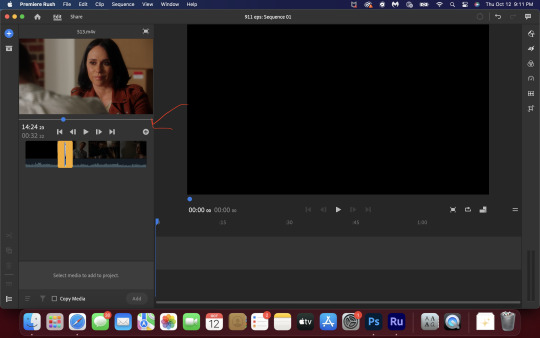
now, move the blue playhead up to the frame you want your gif to start on. then, use the scissors button off to the left to slice the clip. select the portion before the playhead, and delete it.
now move the playhead to where you want the gif to stop. a good length for most gifs is around 1.5-2 seconds in my opinion. some may be shorter depending on how long the shot is, or longer if you plan on making them smaller (remember, the uploading capacity on Tumblr is 10mb per file.) trim again, now delete the portion after the playhead. you can also use the left and right arrows beside the play button to move frame by frame, and you can adjust the side of the horizontal scroll bar below your clip to “zoom” in on it and make scrubbing easier.
once you have your clip, go up to where it says "share". your clip will be rendered, and then you can click export to save it.
repeat step one as many times as you want for each gif. I know this may sound complicated, but like I said above once you get in the rhythm this step takes only a few seconds.
STEP TWO: create your gif!
close premiere. open photoshop. head to the control bar at the top. select file > import > import video frames to layers.
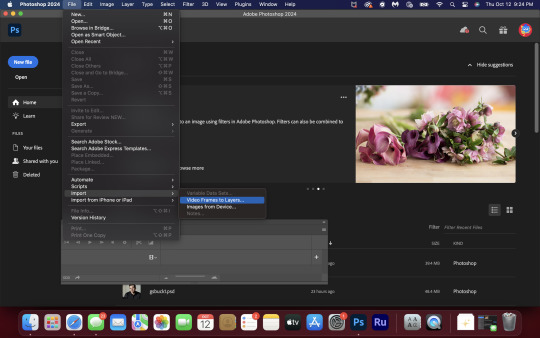
navigate to whatever folder you exported your clip to. select it, and hit enter. a second popup will appear asking you to select your range of frames. since you have already trimmed your clip to your liking, simply hit enter a second time.
now your screen looks like this, and we are going to crop and resize our gif! (troubleshooting: if you do not see the timeline bar at the bottom, select window from the control bar, scroll down, and make sure timeline is selected as part of your workspace. Adjustments and layers should be there automatically but if not add them too).

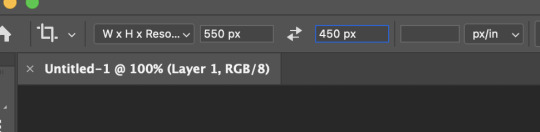
Tumblr posts are 540px wide, so in order to make my gifs as small as possible while maintaining quality, I typically crop my gifs to be around 550-600px wide, with varying heights depending on what shape I want the gif to be. experiment with this a little and decide what works for you. just don't make the width lower than 540px. once you have the portion of the frame you want inside the cropping grid, hit enter again. sometimes you have to hit it twice.
here are the measurements I am using for this gif
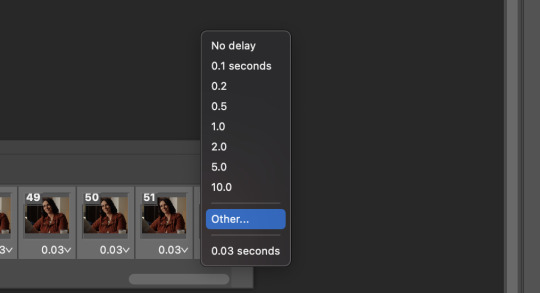
now in your timeline, select frame 1. hold down the shift key and scroll to the end to select the very last frame, thereby highlighting them all. from here we will edit our frame delay rate. photoshop will automatically set it to .03s, which will make your finished gif awkwardly fast. I typically use .05s, or .06s if I want a gif to be subtly slower (this comes in handy if the shot you are trying to gif is very short). anything longer than .06s will look weird though. choose "other" from this menu and type in your delay rate. make sure not to miss the zero after the decimal.
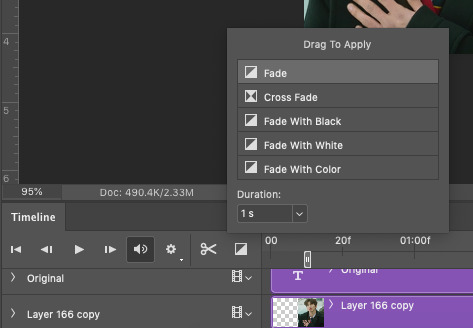
once you've set your frame rate, go to the other end of your timeline and click here to convert your frames into a video timeline.

then press option + command + A (on Mac) or windows + alt + A (on PC) to select all layers. then right click (control + click with a trackpad) on any one of the highlighted layers in your layers tab off to the right. scroll down in the popup menu and select Convert to Smart Object.
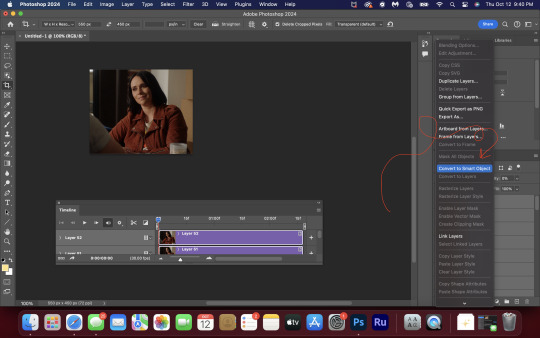
THAT'S IT!! CONGRATULATIONS!!!!! WE HAVE GIF!!!
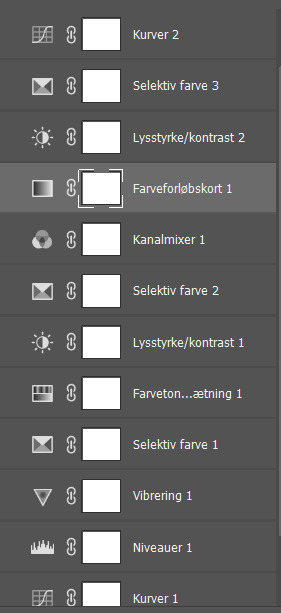
from here comes the fun part!! you will begin adding action filters like sharpening as well as adjustment layers to color and edit your gif. experiment with different adjustments and styles until you find something you like. too many adjustment layers will up the size of the finished gif though, so I tend to keep mine to 3-4 layers max unless its a really hard to color scene. if anyone is interested in a separate coloring tutorial, please let me know!
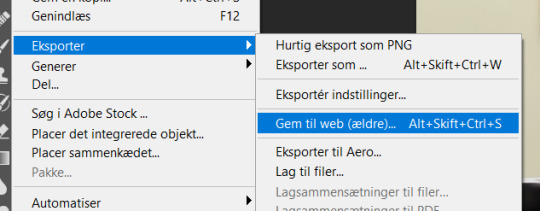
once you are finished editing your gif, click file > export > save for web (legacy) OR hit shift + option + command + S. play your gif in the export window to make sure it looks okay, and then hit save!
I hope you guys find this helpful and informative! please hit up my in box if you have any questions or if anything doesn't make sense. happy giffing!!!
*one reason people seem to prefer screencapping to this method, is saving all the individual clips as video files does take up a lot of space on your scratch drive, which in turn can cause your computer to work slowly or crash programs. this can be rectified by making sure to delete the clips from your computer once you are done making the gifs. another space hoarder to look out for is the proxy files of your episodes that will be automatically saved to your hard drive whenever you add an episode to your project in Premiere. Periodically, go through your storage and delete all the .proxy video files. this will not delete the original episode files, only the proxy files created by Premiere.
tagging some mutuals to sb hehe: @shitouttabuck @lover-of-mine @honestlydarkprincess @eddiediaaz @compactdiscmp3 @eddiebabygirldiaz @bigfootsmom @callaplums @athenagranted @firemedicdiaz @sibylsleaves @loserdiaz @buck2eddie @diazass @eddiediaztho @giddyupbuck @monsterrae1 @icecreampotluck @sunflowerdiaiz @swiftfootedachilles @singlethread @aziraaphales @911onabc
116 notes
·
View notes
Text
Revenant - Chapter 1
word count: 4392
Pairing: Colonel Miles Quaritch x Female! Wife! Reader Warnings/Tags: None
Chapter Summary: You discuss the mission a bit more in depth, and visit someone very important to you.
[Masterlist] - [Previous Chapter] - [Next Chapter]
In Tenebra Fidemus - In darkness we trust.
In Luce Vigemus - In light we thrive.
---
“Do you have any questions, [Y/N]?” James throws the last file into the fire. He assures you information will be clearer and more readily available once you touch down moon side.
“What of communication? How long is the delay to reach Earth?”
“Ah. You’ll be pleased to know that the Superluminal Communications used by the RDA allow for instantaneous interstellar communication between worlds. And naturally, we have set up our own private networks.”
Your eyes widen slightly at this. You had thought communication took as long as the commute; 6 years. You are happy to be wrong.
“There is a drawback, however, in that you can only send three bits of information per hour, and at the cost of $7,500 per bit. So do keep it as concise as possible, won’t you? And only when necessary.”
“Of course, James. Who shall be my contact on world? What of supplies? Gear?”
“Your on-world Handler shall be a woman by the name of Paz Socorro; a pilot with SecOps. She will be responsible for meeting any and all of your needs. Now in regards to your cover…”
James retrieves a thin black folder from his desk, handing it to you.
“You have two options. One – you will arrive as a Magistrate of the Interplanetary Commerce Administration. It is by their hand that the RDA has a monopoly on Pandora and the export of her resources. You will be there to oversee that the RDA adheres to the strict rules set by the ICA, less their monopoly be revoked. You will be given complete authority over the entire base in this instance; thus you shall be able to move about unhindered. We will also assign Miss Socorro as your personal pilot for the duration of your stay. The downside here is that, by being in such a position of authority, you will have eyes on you constantly. You may also encounter resistance from some personnel in both SciOps and SecOps.”
You nod quietly as he explains further.
“Two – you will be a bioengineer, sent at the behest of the RDA to work alongside Grace’s team. You will be researching ways to utilise the planets flora and fauna to combat disease, prolong human life, perhaps chemical warfare if you feel so inclined. We will forge the necessary scholarly documents as required. In this position, you will be far more inconspicuous; just another member of the SciOps team. However your interactions with Miss Socorro will be lessened, as we cannot guarantee she will always be your designated pilot in the field.”
You nod, crossing your arms as you consider the two options.
“What would you suggest, James?”
“Honestly? Option one. I believe it will make your life easier. No one will question your decisions, and even if they perhaps did, you may simply ask them under who’s authority do they operate. Anything you do, can be under the guise of the ICA’s interests, and never will you have to explain your reasonings. Conversely, you may use your position as a bioengineer to gain access to invaluable research on deadly fauna and how it could be used to eliminate your target. Either way worry not; you needn’t give your answer just yet. You have until tomorrow night to come up with the decision.”
“Tomorrow evening. A shuttle will collect you from your apartment at 2300 hours.”
‘That soon?!’ That left you barely any time at all to tie up any loose ends here on Earth. Without any true way to estimate the length of time you’d spend away, you wanted to make sure you left nothing behind undone.
“Time is of the essence my dear. Here, some light reading for you before your long slumber.” He hands you a book detailing the Na’vi language; aptly named the same.
“It’ll be lonely without you here…Try and come back in one piece won’t you? In Tenebra Fidemus.” He half bows with a hand flat on his heart.
“In Luce Vigemus.” You mimic his gesture. “Thank you James, for all you have done for me and mine. I will not disappoint.”
“I know...Good luck, [Y/N], and stay safe.” He places a firm hand on your shoulders, and you look up. Your eyes meet piercing silver. You commit his face to memory; the thick grey mop of hair he keeps styled back, the wrinkles strewn on his face, the crookedness of his mouth and the crease in his eyes when he smiles. Time has been unrelenting, aging him like fine wine.
He is old, you realise, and you suddenly ponder if he’ll be there to greet you upon your return. A round trip would be over a decade, and that’s without factoring in time spent planet side. The realisation sits heavy on your heart, for you now are certain this is perhaps the last time you shall see your father figure. Although he was the one to pull you into his dark world of blood and shadow, he still did more for you than your birth parents ever did.
You jump at him, wrapping your arms around his mid, burying your face into his chest. By sheer force of will you do not cry, but your shoulders shake still.
Words remain unspoken, unneeded, as he wraps his arms around you in turn. He knows precisely what you’re thinking. He holds you for a moment not yet long enough.
“Go. Before I try and change your mind.” He gently pushes you from him. You take his hand, squeezing the back of it to your cheek. Your eyes meet once more, and with a final determined nod, you turn and briskly walk out of the suite.
You don’t look back.
---
Descension was no less easier.
Your new mission weighs heavily upon your mind. You have faced dangers untold and hardships unnumbered in your pursuit of betterment. But to be pulled nearly 4 and a half light years away? Unthinkable. Inconsiderable.
But of course you had agreed; in actuality, there was little choice to be made. Denying would look poorly upon both you and your handler for a start, and you were not about to tarnish the reputation of the man that essentially raised you. More importantly, you thought of your dear brother, Tom.
As smart as he was, he was not built for combat. He was decidedly the smarter twin. Academically gifted , the man was inundated with PhD honours. He deserved the safety of his books, the certainty of walls and structure. What kind of sister would you be then, if you let his gentle soul venture into these uncharted wilds, leaving him at the mercy of this xenosanctuary?
Thus your choice was clear; you must accept the contract. You gave yourself a secondary mission then; eliminate all who would threaten the safety of your brother. From the lowest grunt, to The Director themself; no one would be spared your golden stiletto blades.
Family above all else.
---
A shuttle awaits you as you exit the premises after a quick shower and wardrobe change. You inform the AI of your destination, and with monotone acceptance, you’re off into the skies.
A song you don’t recognise plays, but you enjoy the feeling of the dark bass as it pulses through your bones.
Far off in the distance, thick grey clouds reach up towards an unseen sky. Deep orange cuts through the effervescent neon sea; the remnants of your last mission set ablaze.
You peel your eyes from the scene, dragging your gaze over the city below. Flashing lights, dancing holograms. The people move as one; a single living organism splintering itself into every nook and cranny, invading the dark crevices below.
And somewhere in this hell of concrete spires and minds of metal, your two brothers reside.
---
Tom’s apartment complex resides somewhere in the nicer part of town; if you can even call it that. The shuttle drops you off at a designated landing zone, several floors above where you need to be.
The moment your heel touches down, you’re off in a hurried gait. You become one with the crowd, pirouetting through the sea of warm bodies, avoiding their touch as you weave through. The air is thick, laden with the stench of garbage, street food, and something sickly sweet.
You pay no mind to the AI holos that vie for your attention, their faux voices disappear into the background as you press forward. Advertisements in a language you don’t understand lick at your ears from all directions, drowned only by the sound of the locals around you; drunks arguing with any who look at them wrong, the not so sound of mind and their unintelligible ramblings, users openly abusing on the streets, even the faint moans wafting on the air from dark corners unseen.
You hate this cesspool of debauchery and sin. But time and time again, your brother refuses your offers to live with you. Your apartment is high in the clouds, far away from the lower dregs of society. It would be much safer you insisted, pleaded, but your brother is as stubborn as you are deadly. He doesn’t want to rely on you, wants to be able to stand on his own two feet. An intellectual prodigy, you often wonder if common sense was perhaps lost on him. Never the matter, you had him under constant surveillance. Thanks to your connections, the criminals operating in this sector know the resident of this apartment is off limits – no exceptions.
You arrive to his front door. With your knuckles, you perform a rhythmic set of taps; a secret signal to let him know it was safe to open, and whom to expect. You hear hurried footsteps from inside, a loud thump followed by muffled cursing. There is the distinct sound of things being knocked over, followed by more footsteps, and the fumbling of several locks. The door is wrenched open, and you are greeted with the flushed face of your beloved brother.
“[Y/N]!!!” He exclaims, grabbing you by the hand and pulling you into a hug. You return it with equal enthusiasm.
“Tommy! Sorry, did I come at a bad time? I hope I didn’t wake you.” You step into the apartment, closing the door and reengaging the multitude of locks.
“No not at all! I’ve just been going through some of my notes from my dissertation.” He busies himself with picking up scattered papers and books strewn along the floor; no doubt the result of the scuffling you heard before. You make yourself comfortable on the couch.
“Don’t you already have a PhD?”
“Yeeeeees, but one can never be over prepared! Grace Augustine is a world renowned Xenobotanist and Xenolinguist. I have to cover all my bases if I want to impress her!” Your heart melts and your expression softens when you see the twinkle in his eye, and hear the fire in his voice.
“Tommy – you’ve already impressed her. You start training next year! I’m sure she’s just as excited for you to get there, as you are.”
“Maybe you’re right…” He gives you a shy smile, a small huff of a laugh leaves him as he rubs the back of his head. His expression morphs to confusion though as he gives you a thoughtful look.
“Hey, it is pretty late...What did you come by for? Not that you’re unwelcome or anything! It’s just, you know, later than usual…”
You cover your mouth as you giggle at his fumbling.
“Nothing bad, don’t worry! It’s good news actually!”
Tommy ceases his cleaning, and comes to sit beside you. He faces you, giving you his undivided attention.
“Soooo you know how I have that government job that I’m under strict contractual obligation to not divulge, under any circumstance, to anyone, ever?”
“You mean the very suspicious career that Jake and I are both convinced is actually you working as a high-class escort for the billionaires that run the world? Yes, please do go on.”
You make an offended gasp, but laugh as you playfully punch him in the arm.
“AAH! No! Stop! I’m sorry! I bruise easily!”
The two of you are in a fit of giggles as you continue to shove each other, which then devolves into the two of you grabbing couch cushions and start wailing on one another.
Tom holds up his hands in surrender, yielding to your superior strength. The conversation resumes once the two of you become calm once more and the laughter dies down.
“As I was saying—I’m being shipped off-world for my next big project.”
“Oh? Which colony are off to? Somewhere in the Zeta quadrant?”
You shake your head. You let him fire off a few more guesses, enjoying the frustrated look slowly developing on his face as he wracks his brain for an answer.
“Try something a little closer to home. Something you might one day be, intimately familiar with, as it were.”
He stares at you, brow furrowed with confusion.
Realisation then hits him, eyes widening.
“Noooooo…”
“Yeeeeees,” there is a tease in the tone of your voice as you nod with a widening smile.
“[Y/N]! Are you serious?! This is amazing!” Without warning he has you trapped in another hug, vigorously swaying side to side.
“I have so many questions! When are you going? What will you be doing? Will we be at the same RDA base? Is the government giving you your own Avatar? Have you been practising the Na’vi language? Have you even started? Would learning it even be beneficial to whatever it is you’re doing there?! What—”
“Tom!” Both of your hands are immediately cradling his head. It shuts him up instantly.
“Breathe bro. You know damn well I can’t answer, ANY of those questions! Ah well, except I’m actually getting flown out tomorrow night…”
“Tomorrow?! That’s so soon…” Tom grabs your hands in his, slowly lowering them to his lap. His eyes are cast downward. You can see his pupils shifting rapidly as his mind races with unknown thoughts.
Quickly his on his feet, releasing your hands. He sprints off into his room without a word. You call after him.
“Tom…?”
“One sec!”
After a few minutes, he’s right back in front of you, cradling a small black box.
“I was gonna wait till your birthday to give this to you—but seeing as I won’t see you for a few years…” He holds the box out to you.
The material is soft velvet, smooth under your skin. You let out a faint gasp when your eyes see the contents within.
A small pendant of silver, fashioned into the shape of a rose, with a ruby fastened into the centre; tied to a thin silver chain.
“Tom, it’s beautiful.”
“You’re welcome.” He gives you a self-assured smile, clearly quite pleased with himself. You turn around and he helps fasten it around your neck. It sits comfortably just below your clavicle.
“Thank you, you really didn’t have to do this.”
“I know…But I wanted to give you something special, now that I can afford to. It’s made of platinum by the way, so it’s nice and durable.” You wordlessly nod, putting the small black box into your jacket pocket. Tom grabs both your hands in his, holding them up in the space between you two.
“…Listen. You always took good care of Jake and I, ever since…Well you’ve acted not only as our big sister, but also filled the shoes of mom and dad. And you know what? I’m happy it was you there, and not them. Seeing you work hard, coming home at ridiculous hours, but still finding time to spend with us? It must’ve been hard, having to grow up so fast…But you were always smiling—Hell I don’t remember you ever complaining, even when we were being brats for no reason…You’re one of, if not, the strongest person I know.”
There comes a painful throb in your chest, the soft silk of his words wraps itself around you, squeezing. Your eyes glisten with the promise of tears, but you hold steadfast to your emotions.
“Look, all I’m trying to say is, thank you. Thank you, for taking care of me. Without you, I wouldn't have gotten all those scholarships, wouldn’t have had the drive to get my PhDs, and probably wouldn’t be sitting in front of you right now. So, my beloved big sister [Y/N], thank you for being my family. I love you.”
And the dam breaks.
You crash into him, hugging him with all your might. Tears flow freely down your face as you wail uncontrollably. Hearing him say those things, suddenly makes everything you have done, everything you have sacrificed, worth it all. There is an almost indescribable feeling that washes over and through you. It brings about a peace you hadn’t known you needed. It was a reassurance that your brother was going to be okay—his future was secure, thanks you both yours and his efforts; all in spite of the rough start you had in life.
“TOOOOOM!!! IT’S OKAY!!! I’D DO IT ALL AGAIN FOR YOU GUYS!!! I LOVE YOU TOOOOO!!!” You bawl out, still crying.
Tom laughs as he pats your back.
---
“Here, just TAKE it. It’ll give me peace of mind!” You hold out your spare apartment keycard. He sighs at your antics.
Some time after you had finally calmed down, you brought up the idea that he should live in your apartment while you are away; look after the place as it were. He wouldn’t have to pay rent, as that was covered by your job, and it would be in a safer neighbourhood. Still he fights you on this. You pout at him, puffing your cheeks.
“You owe me for making me cry!”
“Oh my GOD fine! Give it here!” He grabs the card, and immediately you face turns to a victorious smile.
“Good. I’ll be gone by tomorrow, so you can start moving your stuff in the day after.”
Tom nods but stifles a yawn at the same time. You cast a glance at the clock on the wall, realising the time.
“I should probably head off then, it’s getting rather late, and you clearly need your beauty sleep.”
He swats your arm playfully, and calls you something in a language you don’t recognise as the two of you make your way to the door.
“What did you just call me?”
“Ha! It’s Na’vi for ‘moron’. Even if you don’t need to learn the language for your job, I suggest you do. Because even if we’re not at the same base, you better believe I’m going to annoy you every chance I get! Even if it has to be over comms.”
You roll your eyes at him as you undo the various locks. With the door open, you turn to your brother once more. You pull him into one final hug. This time the two of you remain quiet as you embrace.
Your stomach flips, an uncomfortableness settles deep within. This goodbye feels far too final, and you do not like that.
Hesitantly do you remove yourself from his embrace, taking a small step back and out into the cold.
“I’d say goodbye, but that doesn’t feel right. So, I’ll see you later?”
He gives you a confident smile.
“Yeah…See ya later [Y/N]. Have a safe trip home. And a safe journey too. Keep Pandora warm for me.”
With a tiny wave, you turn and slowly start the ascent to the shuttle bay. Before you disappear behind the next flight of stairs, you turn to meet his gaze once more. The two of you share one final wave and an exchange of smiles.
He knows you won’t move first, and so you watch him disappear safely behind his apartment door.
---
The penthouse is dark when you arrive. You remove your shoes, leaving them in the entryway. Your hands glide over the walls as you meander into the living room, collapsing on the couch.
You lay there for a few moments, idly playing with the pedant on your chest. You can feel sleep tugging at the recesses of your mind, threatening to take you in a moments notice. With a grunt you sit yourself up. You know you have to call Jake now; you’ll be far too busy tomorrow.
You heart feels heavy in your chest as you think of him. He was deployed into active service in Venezuela a few months back, and contact with him is few and far between. The odds of him picking up are unlikely, but you attempt to establish a connection anyway.
It rings and rings, but there is no answer. The AI offers for you to record a video message.
You sigh in defeat, saddened that you would not be able to speak with him before you leave. For you it would feel like days, maybe weeks till you spoke with him next. But for him, he’d have to wait 6 years before he hears from you again. Guilt gnaws away at you, but the situation is out of your hands. Despite your pleas, he was insistent on joining the marines. He was more adamant than ever once he was accepted and started their rigorous training.
Often he would call you all hours of the night, once he retired with his fellow recruits to their bunkers. And even though he looked battered and bruised, his smile was toothy and genuine. The comradery of his fellows made known as they always invaded his personal space when he was chatting with you.
“Yooo Sully!!! Aye, bro! Is that your missus?!” The face of a stranger pushes against Jake’s as they try and get a better look at you on the comm pad in his hands.
“No you dick—that’s my sister! Urgh, [Y/N] this is Waitara. Waitara, this [Y/N] my SISTER.” You hide your mouth behind your hand as you let out a soft giggle.
“Hiiii Waitara. I hope you guys are taking good care of my baby brother?”
“Ayyyye, I promise, we’re taking good care of this one!” He puts one arm around Jake, giving him a noogie in the process. You once again laugh at your brother’s annoyed reaction as he tries to swat the other man away.
“Well then you have my deepest thanks Waitara.”
“Aww Miss! You can just call me Matiu, means ‘Gift of God’—”
“OKAY Romeo that’s enough! Stop trying to flirt with my sister!” Jake interrupts Matiu with a hard shove to the side. You can hear him laughing at Jake’s expense off camera. You faintly hear him call out to the others, Jake rolling his eyes, and before you know it, you’re being introduced to the others; much to Jake’s annoyance.
You on the other hand are all smiles and laughter as they inundate you with embarrassing stories of Jake, plus variations of “Miss Sully! Look what I can do!”
You smile at the memory, but remind yourself you need to record this now lest you fall asleep.
You hit the button to begin the recording, and your image appears on the screen.
You give an enthusiastic wave to the camera and a wide smile.
“Hi Jake! How are you doing? I hope everything is uhh, as good as it can be…” Your smile falters when you realise the man is in active duty, not training. He could very well be on the battlefield right now, under enemy fire. You bite your lip to stop yourself from over-thinking. Unlike Tom, Jake was always a fighter. Where Tom excelled academically, Jake excelled physically. His confidence was easily backed by the strength of his heart, and the strength of his fist. You shake your head and continue.
“Urgh sorry. I know you’re on active duty right now and it probably sucks…But I have some good news! Uhh, though whether you think it’s good remains to be seen…Anyway! You know my job, government, classified, NDA yadda yadda. Well! I have been given a big new assignment to take on…And for it, they’re going to be shipping me off-world! It’s gonna take me 6 years to get there cuz it's about four and a half light years away…I was hoping to speak with you before I leave, but I guess the universe has other plans huh? I’d tell you where, but, ya know. NDA and all that…”
Unfortunately you couldn’t really speak of where you going, nor elude to what you were doing. Tom was also under restrictions in regards to his future work with the Avatar Program. The only reason he spoke of it to you was, one, you are his big sister and he was always going to spill the beans to you, risks be damned. But two, your ‘government job’ meant you were well entitled to be privy to such information. At least that’s how you spun it to him.
“Oh! I just came back from seeing Tom, look what he gave me, isn’t it pretty?” You lean in closer to the camera, showing off the pendant.
“Said it was for my upcoming birthday…” You go quiet again, but only for moment.
“Listen Jake. I don’t know how often, if at all, I’ll be able to get in contact with you once I touch down. It’s a pretty remote place, and the work I’m doing…Look I don’t want you to feel like I’m abandoning you here on Earth while I go, chasing the stars or whatever. Everything I do, I do for you and Tommy. I love you guys, so, SO much. You’re my precious baby brother, and there isn’t anything in the entire God damn galaxy I wouldn’t do for you. I hope you know that… I love you Jake. Please stay safe out there. Come back to me in one piece? Love you, and I’ll see you later…”
You hit stop on the recording, sending it in one go.
There is so much more you want to say, so much more you feel you should say. But your emotions are running high, and you feel so utterly drained from everything that has happened, compounded with your worries for the future.
With conscious effort you drag yourself to the bedroom, changing into you usual sleep attire.
You move to throw yourself onto the bed.
You’re asleep before your head even hits the pillow.
---
[Masterlist] - [Previous Chapter] - [Next Chapter]
---
Author's Notes: And so the adventure begins. Thank you to @mechformers for her constant support and feedback! <3 Apologies for grammatical errors, hope you all enjoy this first step.
---
Fic Tag List: @sofiebstar @winxschester @yhern05 @an0th3rsss @gamerxpfighter @to-earth-from-the-sun @exulqnsisxthoughts @sweetirilly @wolfgirl497 @thebeckyjolene @goddesslilithmoriarty @the-anjos @bitchykittenconnoisseur
---
Perma Tag List: [Interactive Post] alternatively reply below if you want to be tagged just for the story
@mechformers @wwebaby657 @zomerlovesme @girlnred @raving-raven-writing @meeeeep5 @imavaduh @mxn14 @ashy-kit @manymaria111 @johoevi @iamwh0iam @jadesmyname @lvangel98 @watertastesnice1 @belos-simp69 @wren-solos @pandoragalora @strbyallycow @so-this-is-a-thing-noww @grimistangel @drinking-tea-and-be-obsessed @ducks118 @graysonmalik2550 @p9scal @ohshititsfenharel @ourmurdermessiah @cocoaflare @sarcasticrandy @liyahsocorro
#colonel quaritch x reader#colonel miles quaritch x reader#recom quaritch x reader#miles quaritch x reader#quaritch x reader#colonel quaritch x reader smut#recom quaritch x avatar reader#colonel miles quaritch#miles quaritch x you#miles quaritch#miles quaritch fluff#recom miles quaritch#miles quaritch smut#avatar fanfiction#avatar reader#human reader#mom reader#reader is spider's mom#wife reader#Spotify
232 notes
·
View notes
Text
how i make gifs using filmora x
(for anon ❤️)
read under the cut!
hey!! thanks for reading this! just a few notes before i explain about my editing process:
filmora x works very differently from photoshop. it's a video-editing software anyways, so treat it like that!
always use high-quality sources!! most of my issues with grainy gifs come from using low-quality sources. so, i always ensure to use sources at 1080p, at least!
if i'm creating multiple gifs from one match, i usually download the entire match (which is a hugeeee file 😵💫 but it's so worth it!!). but if it's only a scene or two, i screen record them! i have an astro supersport subscription and a beinsports account, so i don't have an issue screen recording clips, as their content are always in high-quality! but if you're using other sources or streams, then do ensure the quality is good!!
if the only available source is of low-quality, my trick is to make smaller gifs! for smaller gifs, i usually keep a 1:1 or 4:3 size ratio, and post them side-by-side in a single post - usually two in a row!
general colouring stuff applies here as well, you can check out the photoshop guide i've linked in the ask!
remember, there isn't one "correct" way to gif, you can gif however you like!
and now without further ado:-
step one: adjust video settings, speed and length
after importing the clip into filmora, setting the aspect ratio, resolution and frame rate according to preference, the first thing i'd do is to adjust the speed of the clip. i like to slow them down, so i usually go for a 0.5x speed. you can always adjust the speed to your preference!
i like to keep my gifs within a 3 to 5-second length, depending on the content, so i'll trim the clip or adjust the speed as desired. if the clip is shaky, i usually add stabilization at about 10%, but you can adjust as you like! here's an example of a clip before and after speed reduction:

step two: auto-enhance
once the clip is at your preferred length, size and speed, now it's time to make it look pretty! in filmora, there's an 'auto-enhance' feature, so i usually begin with that, setting it somewhere between 50% to 100%. here's an example of how it looks like before and after auto-enhancing at 100%:
step three: colour correction
head over to 'advanced colour correction', where you can use either the given presets, or manually adjust to your liking. i always manually adjust them!! you can also start off with a preset and make additional manual adjustments as I did below! what i did here was to darken it, then adjust the colour enhancement, white balance (hue and tint), colour (exposure, brightness, contrast, vibrance, saturation), lighting (highlight, shadow, black, white), and hsl (for this example, i adjusted only the red).
you can also save your adjustments as custom presets so that you can use them again in the future!
here's a quick look at how i do the colouring! from the before and after colour correction examples, you can see that this is the important part of the whole process!!

step four: sharpen
once i'm satisfied with my colouring, i sharpen them by adding the 'luma sharp' effect (usually at 50% or 70% alpha and 50% intensity)
here's how it looks like before and after sharpening:
step five: final touches and exporting
before i export, i make some final tweaks to the brightness, contrast and saturation, etc., ... and voila!! there also many other effects available for you to add (grainy effect, blur effect, etc.) so feel free to play around!

once you're satisfied with your result, it's time to export! now, video-editing softwares HATE gifs. you can always just export as gif from filmora directly, but i don't really like the way it turns out 😭 so, i export them as video (.mp4) and use external gifmakers (like ezgif!) to convert them from video to gif!
aaaand that's all!! here's a comparison of the original clip vs the end result!
final note: remember to size your gifs correctly for tumblr (540px for full width, and 268px for half), and keep each gif within the size limit of 10mb!! if you find that your gifs exceed the size limit, try reducing the number of frames or removing duplicate frames, increasing the contrast, or you may also crop the height if necessary.
if you have any questions about making gifs using filmora, feel free to reach out! thank you for reading, mwah mwah!! 💞
11 notes
·
View notes
Text
An anon asked for a tutorial on how I make gifs, so here we go!
I believe that everyone with a decent computer can learn how to make gifs.
The programs I use are
Vapoursynth
Photoshop
Topaz denoise (a lot of people don’t use this)
This is the gif I will be making in this tutorial!
Step 1. Find what you want to gif!
Download the video you want to gif in the best quality you can find. This is where ts files are really good! Personally I don’t really mind giffing only 1080p videos, but better the quality, better the gif!
Step 2. Crop it using vapoursynth!
Using vapoursynth is a whole tutorial in itself. You can still make gifs without vapoursynth (or avisynth as some people use). You can just crop the gif in photoshop to the size you want. Vapoursynth is just good at doing so without losing a lot of the quality!
The width for tumblr posts are 540px (one gif), 268px (two gifs) and 177px for the outer gifs and 178px for the middle gif, when making three gifs!
This site has everything you need for vapoursynth!
I don’t really have any set settings. I switch it up a lot, but these are my settings for this gif!
Step 3. Import gif to photoshop!
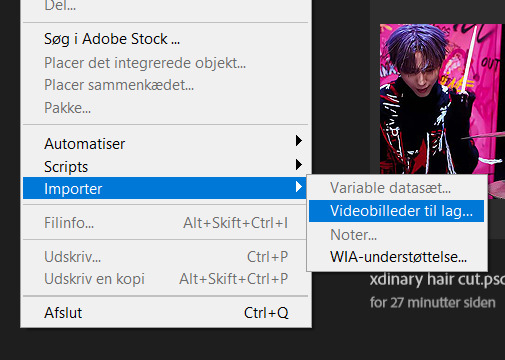
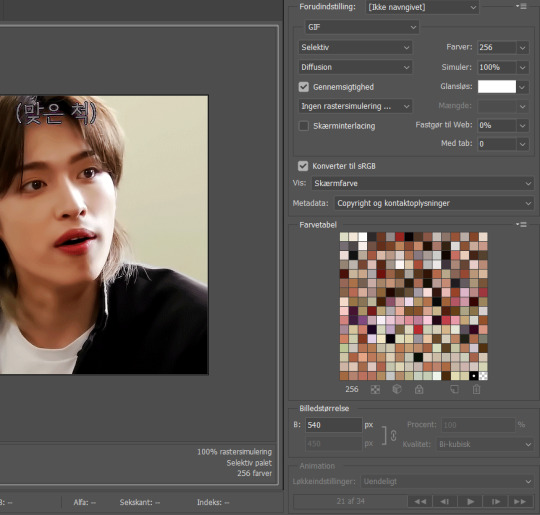
(My photoshop is in Danish, but it should be the same place in any other language).
You do this by going files > import > video frames to layers
Then you choose the video you got from vapoursynth (if you didn’t use vapoursynth, you just choose the part of your original video you wanted!)
Now we have a basic gif!
Step 4. Colouring!
Now the fun part comes! We colour the gif! This is where your gif truly becomes your gif! Every content creator has their own style of colouring and it really just takes time to find what you really like! Just do whatever you like!
These are the ones you use for colouring! Just play around!
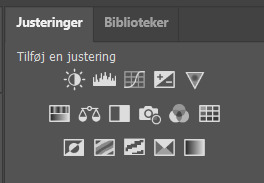
Here we have the gif with colour! I’m not going to do a colouring tutorial, because colouring is really just up to the person making the gif!
These are the adjustments I’ve used on this!
Again, sorry for the Danish!
Here are some of my psds (tho I always make a new one every time I do a gifset)! I feel like there’s a lot to learn through looking at other people’s psds! Just have fun with it!
Step 5. Sharpen (and topaz)
I more or less always sharpen the same way on every gif (depending on how sharp it already is).
To sharpen you have to make sure you’re working as a smart object! You have to make the frame animation into a timeline and the layerss into a smart object!
Timeline:

Smart object: Select all layers > filter > convert to smart
(or select all layers > right click > convert to smart)
It has to look like this

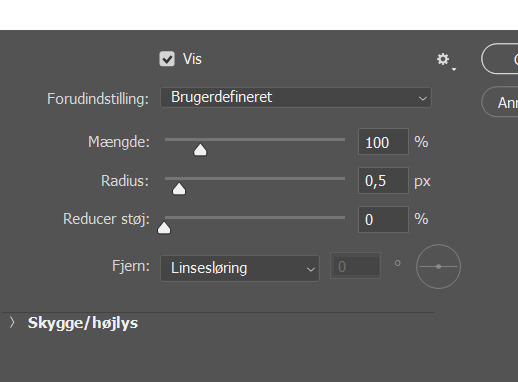
To sharpen you go to filter > sharpen > smart sharpen
These are my settings:
Then I go to topaz denoise! I don’t really have any set settings for this, I just do whatever feels right in the moment. Topaz denoise is also a whole other thing, but it’s easy once you figure it out! I made a video on how to use Topaz here (to help someone who asked)
youtube
Because I don’t like my gifs way too sharp, I always add a blur at 20-30% opasity!
Step 6. Save the gif!
Before saving the gif, make sure everything is as you want it to be! You also have to remember to set the frame delay! I usually go for 0.05 or 0.06!
To save go to files > export > save for web
These are my settings!
And there you have it! A finished gif!
If you are more of a visual video learner, here is a video I made of my giffing like over a year ago for a challenge!
youtube
My colouring has changed a lot since then tho! I also didn’t sharpen and use topaz in photoshop (I used a lot in vapoursynth)
I hope this was at least a little helpful! ^8^
#*m.gif#maja talks#ps tutorial#resources#ps resources#photoshop#I am not good with words but here we are
54 notes
·
View notes
Text
Taking breaks

Originally posted on Oct 4, 2022
Progress was moving at an encouraging pace, until it wasn't.
I've been struggling to get the most "basic" things working in the prototype. The only goal was to get my penguin character model to move along the ground with player input. But after many hours of effort, really all I had was a dumpster fire of Unity mechanics that I don't really understand. My penguin would start flying away from the map on movement, or it would get stuck and only be able to rotate, or it would be able to pass through the tree when it shouldn't. All kinds of things were going wrong and I have been struggling to explain why.
I did eventually get past my issues, and learned a lot about Unity in the process. But the most important learning was really just a reminder to take breaks. In trying to stay motivated for this project, I've been pretty strict about goal setting: I told myself I wanted to work on it every day, whether or not I was working, and that by December I should be prepared to transition into learning this stuff full time for a while. But I was getting so sick of it that I just had to step away from it for a few days.
In that time, I made a huge vat of bone broth, cleaned my house, played a ton of Divinity: Original Sin 2, and cooked some chicken for my cats (which they are extremely skeptical of so far). I re-watched Little Miss Sunshine and read some Land of the Lustrous. I also slept in some days even though I had also set a goal not to do that in early September.
Then, this morning, I sat down to work on things again and got really far! My prototype now allows you to move the character around (just a geometric mesh I made in Unity, since importing my custom models from Blender is still being problematic), interact with a tree, and "chop" it down so that it de-spawns. There are no animations and no logs spawned yet, but I now have an infrastructure set up in my code for the concept of an Interactable object, the ability to detect Interactables and interact with them, and a concrete implementation of my first Interactable, the tree that can be chopped down.
I'm very happy that I've made progress, but mostly I'm excited that this feels fun again. This was a reminder to not put too much pressure on myself and to build taking breaks into the process. We all learn unhealthy work habits, and will gradually unlearn them, too.
Before is a summary of some technical stuff I learned, for my own future notes or if you are interested. But consider it a footnote. I'll end the actual post with some photos of the last few days :-)


Unity Learnings
Here's a summary of what's gone wrong and what I learned:
1. I was able to import my penguin into the scene and rotate it so it's standing up. But when I started to move the penguin around with user input, it would go into a prone position and levitate above the ground.
What I learned: The orientation of the penguin at the time of import into Unity was incorrect. Unity uses a coordinate system where the Y axis is up and Z axis is forward, and Blender uses the opposite. I had to rotate the model in Blender before saving and exporting to Unity. You know you've got it right when you drag the model into the scene and it is standing right side up.
I also learned: That there seems to be some limitations in the online Q&A resources. I was able to easily find articles addressing this same issue I was having, and though the solutions were in essence the same (adjust the orientation in Blender before exporting the model), the details differed: some said to just rotate the model so the Z position was 90°, some said -90°, and some said 0°. In the end, what worked for me was -270°. I'm not sure yet what accounts for the difference, but my best guess is that these articles may have become outdated with more recent updates to Blender/Unity.
2. Character movement has been a mess! Once I got the above issue sorted, I ran into new issues pertaining to the character falling over when moving, floating slightly above the ground, and being unable to move across the ground while still being rotatable. This is what I'm currently stuck on still.
What I learned: I learned the Character Controller component has a "skin width" property which defines the thickness of the area around the character's collider in which other colliders may intersect. In other words, two colliders can overlap in an area as thick as the skin width. A low skin width often causes characters to get stuck (however this wasn't the issue in my case).
I also learned: Character Controllers come with a capsule collider automatically. I'm not sure why nor how it differs from a regular capsule collider, but it seems part of the reason why my character was floating a bit off the ground was because the capsule collider was not correctly oriented (both the position and size) within my character model. Updating this allowed the character to stand with their feet flat on the ground, but caused them to get stuck despite the skin width.
3. I used the Cinemachine package to quickly set up a third-person camera that follows the player character as they move. Cinemachine has a concept of "top rig, middle rig, and bottom rig" which are essentially circles/orbits at which the camera moves. When the character is closer to the ground, the camera moves into the bottom rig/orbit, which is traditionally a camera view which brings you lower and closer to the character. This was all very interesting and mostly worked well, but in practice the transition between different rigs felt more random.
What I learned: All about Cinemachine! And I think I'll understand the camera mechanics more once I can get the basic character navigation handled, since I suspect the weirdness there influenced the camera's AI decision making.
4. Raycasting
I learned about Raycasting. Raycasting is the process of drawing an invisible ray/line, starting at some origin point and going in some direction, and detecting collisions along the way. It can be used to have a player shoot a gun or, in this case, to detect whether the player is facing an Interactable object and is within the appropriate distance to interact with it.
0 notes
Note
I was wondering if you could do a tutorial on this gifset that you did i really like ittt
Thank you for sending this in, anon! I’m glad you liked it and wondered how it was made :) Fun fact: the day before you sent this, I had just started working on my next set in that “Select Filmography” series. I hope you like that one too when it’s ready!
I think I should start by saying I’m pretty new to giffing myself and there might be more efficient ways of getting to the same result. However, the point here is to show you the process I went through to make this gifset and hopefully help you understand how to make a similar one.
To follow this tutorial, you will need some version of Photoshop and some giffing knowledge. I know there are multiple ways of making gifs so I’m just letting you know I’m using the timeline and the “Convert for Smart Filters” option (I don’t really know how else to call it).
Now let’s get started!
STEP 1 - CHOOSE THE SCENES
It might sound obvious but, in my opinion, this is the most crucial step. It’s also the one that takes the longest (along with step 7, aka the coloring).
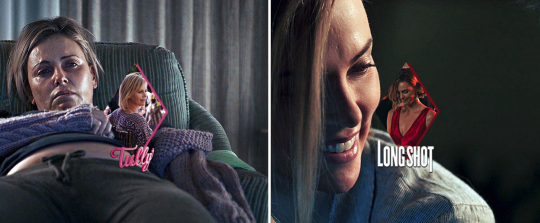
At this stage, you need to have a general idea on how you want your set to look like so you can choose the scenes accordingly. In my case, I knew I needed two types of shots for each movie: one close-up for the main gif and one mid shot for the shape. I also needed to take two other criteria into consideration: the movement (because of the shape) and the lighting (because darker scenes are such a pain to color). Last but not least, I didn’t want the characters to be talking (but that’s just a personal preference).
With all of that in mind, you can start saving a few screenshots of scenes that meet your criteria (or at least some of them). In the end, there won’t be that many to choose from so be prepared to make compromises.
STEP 2 - MAKE A DRAFT
Now that you’ve preselected a few scenes, you can make a first draft. This will help you turn your general idea into something more concrete.
Basically, this is your opportunity to organize your thoughts. What size do you want your gifs to be? What shape are you going to use? On which side do you want the close-ups to be? Do you want all of them to be on the same side or do you want to alternate from one gif to the other? Do the scenes you chose work together (gif-wise but also set-wise)? Are you happy with the way it looks, overall?
By answering all of the questions you might have now, you’ll save yourself a lot of time, trust me. Of course, you can totally skip this step if you already know exactly which scenes you’re going to use and how you’re going to present them together.
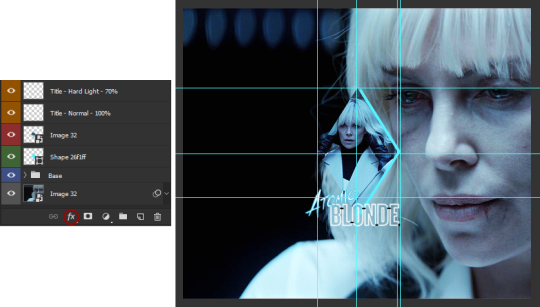
To give you an idea, this is what my draft looked like for Atomic Blonde.
STEP 3 - PREPARE YOUR GIFS
Once you have a clearer view on how you want your set to look like, you can finally start giffing like you usually would (i.e. importing, cropping, resizing, etc.).
It should then look something like this.
The important thing to mention here is that you want both of your gifs to be the same number of frames (32, in my case).
Ideally, you should also aim for the ~same~ coloring (especially for the skin tone, since both gifs will be so close to each other). This bit is particularly difficult when you chose scenes which have opposite lighting (see my two uncolored gifs below). Remember how I insisted on steps 1 and 2? It was to help you avoid this. So my advice would be not to choose these types of contrasted scenes, unless you can’t do otherwise and you’re ready to suffer!
STEP 4 - MAKE YOUR SHAPE
To make your shape, you can click right on the Shape Tool (U) and select the last one, Custom Shape Tool. From the Shape menu appearing on top, you will be able to choose the shape you want from the drop down list and start drawing on your gif.
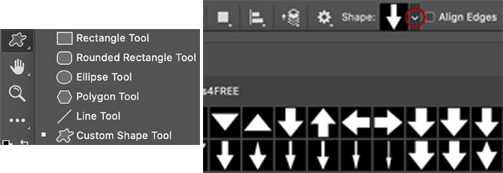
To be more precise with the dimensions, you can manually adapt the length and height from the Shape menu itself. I decided to go with the same ones as my gif.
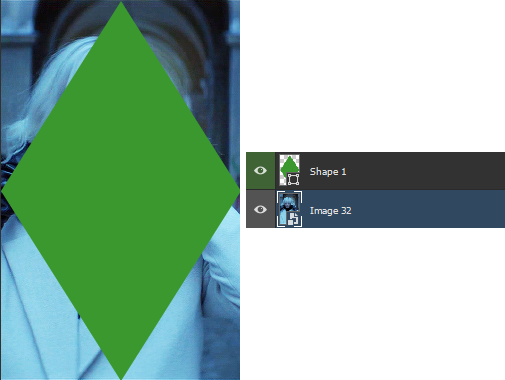
Once your shape is positioned like you want it to be, you can drag and drop the shape layer under your gif. Next, you will have to click right on the gif layer/smart filter and select Create Clipping Mask. The result is as below. Note that if the size of your shape was smaller than your gif, you would still be able to reposition your gif with the Move Tool (V).
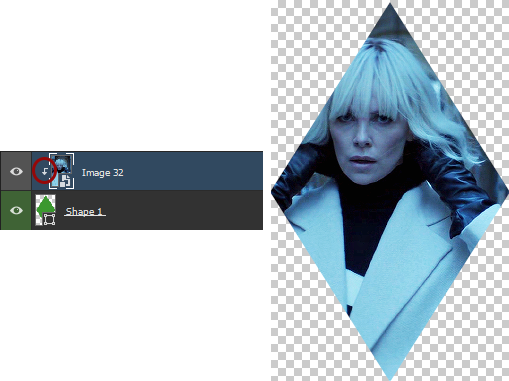
You can now export your shape gif, reopen it in Photoshop and convert it again to the video timeline and to a smart filter. This is where I’m not sure it’s the most efficient way of doing things but it’s the only way I found to keep the coloring of each gif separate. I also find it easier to work with a smart filter.
STEP 5 - COMBINE YOUR GIFS
To add your shape gif to your main gif, you can simply click right on the shape gif you just reopened and select Duplicate Layer. You can then choose the project which contains your main gif to duplicate it in there. Now go to your main gif and reposition your shape gif where you want it to be (how many times did I say gif here?). Finally, you can draw a new shape, using the same dimensions as in step 4, reposition it and choose any color you want from the Shape menu.
Since you will be repeating this process with your following gifs, I suggest you add a few guides so you know exactly where you should place everything to make all of your final gifs look the same.
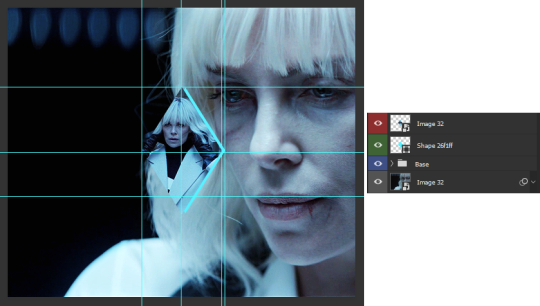
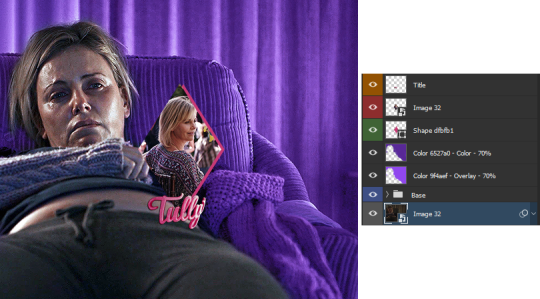
(In case you’re wondering, the “Base” folder contains my adjustment layers/basic coloring for the main gif.)
STEP 6 - ADD THE TITLE
This step is pretty simple: go on the web and type “[name of the movie] title”. Download the png you like most, open it in Photoshop and resize it to a length of about 150-200 pixels. Next, duplicate the layer to your main gif and reposition it. In case you need to resize it again, select the title layer and go to Edit > Free Transform (Ctrl+T).
This is optional but in case you want to change the way it looks, know you can always duplicate the title layer and play with the blending options (see below). The good thing with a png is that you can also add some effects by clicking on the “fx” button.
STEP 7 - ADD COLORING (OPTIONAL)
To be honest, I had not planned on coloring my gifs. But I had already spent so much time on them and I was still unhappy with the way they looked. I mean, see how grey-ish they are? Not great...
So the only thing left for me to do was to add some colors. Now, since coloring is worth a tutorial on its own and it already exists, I suggest you read through becca’s mega coloring tutorial (and especially steps 3 & 5). Seriously, shoutout to her for making this incredibly useful tutorial. She is so talented and I love everything she makes!
My Atomic Blonde gif barely even needed coloring so I’ll show you what I did for my Tully and The Old Guard gifs.
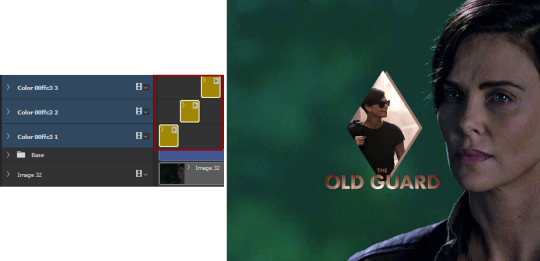
For the first one, once I had found which colors to use with which blending option and opacity level, I only had to remove the colors from the left side of the gif because there was barely any movement in that scene (phew!). For the second one, on the other hand, I decided to color frame by frame because there was way more movement, in comparison. This is quite a tedious process, which is why you want to limit yourself to a certain amount of frames.
I’ll conclude by saying there are so many things you can do with coloring and what works with one scene might not work with another. So experiment with it: try different colors, play with the blending options and opacity levels, add some gradients and/or gradient maps, etc. Just know it will take some time to get to a somewhat satisfying result!
And that’s it... I hope this tutorial made sense and was somehow helpful. Of course, don’t hesitate if you have any questions! Also, if you do end up making a similar edit, pleeease send me the link or tag me in the replies or something ‘cause I would definitely love to see it!!
#asks#anonymous#tutorials#resources#completeresources#allresources#itsphotoshop#putting all of this process into words took so long i really hope it makes sense#also i can't help but wonder if it was my before/after post which prompted this ask...#gifs#gifs: tutorials
368 notes
·
View notes
Text
COMPREHENSIVE GIFFING TUTORIAL (vapoursynth + ps cc 2018)
+ some tips and tricks on color correction, blending and subtitles
You guys asked for it, so here we are! This is by no means the gold standard to giffing. Rather, this is simply my process and my own preferences. Take it as you will. Additionally since I use a mac some of my controls/panels may look different than what you would see for windows users.
DOWNLOADING YOUR SOURCE
This step is extremely important to the quality of your gifset. If you want high-quality gifs I would recommend giffing sources in 1080p whenever possible (especially if you’re going for larger dimensions). You may get away with 720p for smaller gifs. For kdramas, your go-to source would be dr*maday or torrents. (you can search my faq tag if you’d like to know specifics on finding and downloading torrents).
IMPORTING + PROCESSING YOUR FILES WITH VAPOURSYNTH (VS)
Please note that this tutorial does not cover basic installation and set-up of vs. If you would like to know how to download and set-up vapoursynth (it works for both mac and pc) along with some of it’s basics you can find more information at: https://hackmd.io/@nibreon/vapoursynth-book/%2F%40nibreon%2Fvapoursynth-book
Once you’ve identified what portion of your video you’d like to gif, simply drag your video file into VS. Specify the start time and duration of the clip you’d like to import. Typically you’ll be aiming for ~3-8 second clip depending on how big your gifs will be. I am very lazy when it comes to importing. The less of it I have to do, the better. Therefore, I often import clips that are 10-15 seconds long, sometimes even up to 20 seconds. I wouldn’t recommend going over 15 seconds most of the time though, because this will usually bring you over the 500 frames photoshop allows you to import at once. (when I do go over, I will sometimes import the processed VS file into PS in segments). You can also choose to import the VS output as segments if you want all your gifs on separate canvases. (I'll go into more detail on this later)
Once you’ve imported the clip into VS your screen should roughly look like this once the resizer pops up:
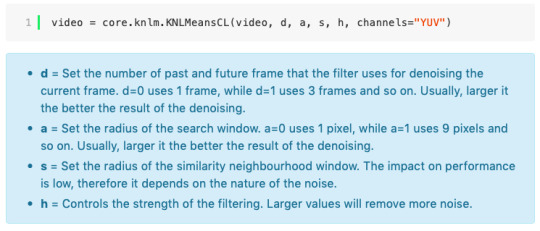
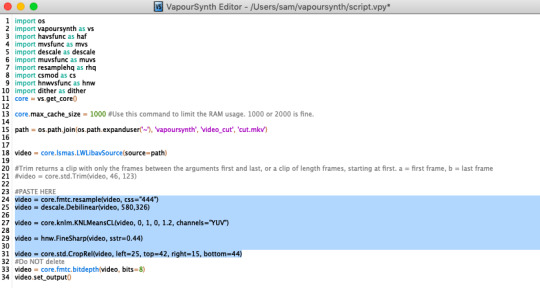
In the top left is where you will be applying your cropping, sharpening and denoising filters. Cropping: Keep in mind the Tumblr dimensions: 540px for full-width gifs and 268px for half size gifs, 177/178/177px for 3 gifs across. The height is completely up to your own preference. Usually I work in 540x300px. Once you edit those parameters you can drag/resize your video file to fit your new canvas. Sharpening + Denoising: You can choose to skip this if you would rather sharpen in ps. I personally do all my cropping, denoising and sharpening in vs. I use finesharp and KNML for sharpening and denoising respectively. Once you select those two filters from their drop down menus, be sure the select the checkbox as well. You should now notice 2 additional lines of code in the top right box. The line that reads: video = core.knlm.KNLMeansCL(video, 0, 6, 4, 1.2, channels="YUV") is where you will adjust your denoising parameters. You will only be adjusting those 4 numbers. I usually use: 0, 1, 0, 1.2. Now find the line that reads: video = hnw.FineSharp(video, sstr=0.22). These are your sharpening parameters. once again we’re only adjusting the number at the end. I typically use somewhere between 0.33-0.55. Depending on the quality of your source and preferences these parameters may change.
Here is a breakdown of the KNML parameters (source: @/nibreon HackMD):
Once you have finalized your parameters, copy all the code in that top right box and paste it into your vapoursynth editor. Note: you can ‘inactivate’ certain lines of code by adding the # symbol at the start the line. That line of code will then be greyed-out. This is what your code should now look like (the highlighted section is the part I just copy and pasted):
If you would like to preview your filters and see if you need to make any adjustments, simply navigate to the top bar and select script > preview. If you like what you see, great! If not, you can adjust the parameters directly in the editor until you see a result you’re happy with. Once you’re happy you can move onto the final step in vs: processing.
Processing: Once again, navigate to the top bar and select script > encode video. Another window should pop up. Make sure you set ‘header’ to ‘Y4M’ then click ‘start’. Patiently wait for that to finish processing. The longer your clip is and the more filters you add, the longer it will take.
IMPORTING YOUR CLIP INTO PHOTOSHOP (PS)
Now you’re done with the vapoursynth section! Not too hard, right? I use the timeline method when I gif. To import your video file into ps navigate to file > import > video frames to layers. Here you can use the sliders to further specify what range you would like to import. Make sure the ‘make frame animation’ box is checked. To optimize smoothness of your gif, avoid checking the ‘limit to every _ frames’ box. Hit ‘OK’ and wait for the frames to import. Depending on the size of your clip, ps may notify you that you are importing a large file and it may take a long time to process, simply say ‘ok’ to this. UNLESS you get a message saying it will limit to 500 frames. This means your clips contained more than 500 frames and you should select a smaller section to avoid cutting out any critical parts. (Note: you can always go back and repeat this process to select a smaller range of frames from the same video clip until you’ve imported all the frames you need).
Timing: You can adjust the timing of your gifs before converting to timeline. Select all the frames (Navigate to the icon with the 4 bars at the bottom right of you screen. Select “select all frames”). Click the drop down next to the timing of any of the frames. Select ‘other’ and input a your preferred timing. I personally use ‘0.04′ but I've seen people use anywhere from 0.4-0.8ms. Also as a note: when you convert your gif to timeline it has a tendency to mess up your timing so even if you input 0.04 or 0.05 it won’t actually be that timing later. If you want the true frame rate you can set your timing right before saving. You can also adjust timing at the end. (see export/saving gif section for more info)
Now the next part can be tedious and for that reason I’ve created numerous actions to speed up this process. But for the sake of this tutorial I will walk you through the steps. At the bottom of your screen is your timeline. As you can see, it defaults to frames, but we want to convert this into a smart object so that all your coloring/edits are made to all of the layers. To do this: 1) Navigate to the icon with the 4 bars at the bottom right of you screen. Select “select all frames” 2) Now select all your layers in your layer panel. On mac you can use cmd + option + A as a shortcut. 3) Back to the icon with the 4 bars, select “convert to video timeline” 4) Right click on all layers (which should still all be selected) and find “convert to smart object”
(Aside: Actions) actions are SUPER helpful to streamlining your giffing process. you can find actions people have made available on resource blogs like itsphotoshop OR you can choose to make your own custom actions. To do this, all you need to do is locate your action panel. Then from the controls at the bottom of the panel select the one that looks like a sheet of paper to “create a new action” Once you’ve named it and hit ‘ok’ the record icon should now be red. PS will now basically ‘record’ whatever you do. To stop recording hit the square icon. Now whenever you want ps to execute the same set of steps you just did, you can locate the action you just made and ‘play’ it by selecting the triangle icon. I highly recommend making an action for the steps I just outlined above to convert your gif into a smart object timeline. It will make your process much faster and more painless.
COLORING
Now the fun part! I focus on emphasizing the colors already present in the video source or getting rid of some less-than desirable overtones when I color. It gives the gif a natural look, but makes everything pop a little more. We will be working with selective color, curves, levels, and brightness/contrast mostly. This is the original gif I will be using to demonstrate coloring:
Curves: I always start with curves. The first curve layer I use to set a desirable black point. To do this, locate the top dropper icon from the curves panel and select the darkest point of your image. This will set that section to “true black” Feel free to play around with this until you find a desirable outcome. Now add another curves layer. This one we will be using to adjust the brightness/contrast. First, I always start off with ‘auto’ and see where that takes me. If you like the outcome, great! If you don’t play around with the different curve points until you get an outcome you like.

Selective Color: This adjustment layer will be your best friend. For me, I will typically work with reds, yellows, and black. If the source has a lot of blue/cyan I will use those too. Basically look at your source and determine which base colors you’d like to emphasize/alter. For blacks I usually up the black by +1-5 depending on the source. For reds, it also depends on the source. But I will typically either decrease cyan (to make red stand out more) or increase cyan (to make the red not look so overexposed). You want to be careful here. Overexposing the red can make your skin tones look like red tomatoes! And for my content base, where most of the actors are of asian descent, we should be emphasizing the yellows and NOT the reds (see aside on color correction + skin tones for more info). After altering the reds to my liking, I do the same process for the yellows. To bring back natural skin tones and color, you will likely want to darken the yellows, expose them a bit more and maybe even up the yellow slider. A common rule of thumb: if you want to make any of the colors less exposed, increase the cyan. If you want to increase exposure on any of the colors, decrease the cyan. If you want a color to appear more strongly or prominently, increase the black. The magentas and yellows I use more to adjust hues. You can add multiple selective color layers to further emphasize your changes.
Levels: Now we will work on the lighting some more. This creates more contrast and depth to your gif, often making them look ‘crisper’ To emphasize the bright parts, move the right-hand slider to the left. The emphasize the dark parts, move the left-hand slider to the right. You may also choose to move the middle slider to adjust more neutral lighting. Do so until you find a setting to your liking.
Miscellaneous: Depending on your gif you may need to play with other adjustment layers. Some other ones I often use are the brightness/contrast and exposure to adjust lighting and add more dimension to the gif. For additional color correction I use color balance and to a lesser extent hue/saturation and vibrance.
(Aside: Color correction + skin tones): We are anti-whitewashing and anti-redwashing when it comes to asian media. Like I mentioned earlier, natural asian skin tones have yellow undertones, not red/pink. Therefore when you’re bringing in color you should be mindful of this delicate balance. Adding more red does NOT equal un-whiteashing. Be VERY careful how you balance the yellows with selective color/hues/color balance.
^^ Here is an example of what I mean by overexposing the reds. Poor seungho is looking as sunburnt as a cherry tomato. Note: if your original source is already overexposed with red, fix it! You can do this by applying the same basic principles I explained earlier. Try upping the cyan on the reds in selective color, or shifting the color balance to favor cyan over red with the color balance adjustment layer. You may also choose to favor the yellow over blue.
^^ Now this is straight-up whitewashing. This is what happens when you are not careful with your correction of yellow. I’m not saying you can’t touch the yellow slider or get rid of some yellow form the overall image (because sometimes it is very much needed), but you should be very mindful how your corrections can affect skin tones. If you decide to decrease saturation of yellows, or decrease yellow in the selective color section of the reds, do so with caution. If your reds are looking too pink, add some yellow in the red selective color, up the yellow and black of the yellow selective color.
^^ If you hit that happy medium, you can emphasize the natural skin tones without overexposure. Here the underlying tones are very much still in the yellow range.
(Aside: Blending): I will very briefly talk about how to blend two gifs together. First make sure you’ve imported both your gifs into ps and converted them into the timeline format. On one of the gifs, right click the gif layer in the layer panel > duplicate layer > select the canvas of the gif you’d like to blend the gif with. On the canvas you just copied your second gif to, you can now drag the two layers around the on the canvas to get your desired positioning. On the top gif apply a layer mask. This can be found in your layers panel at the bottom, and is indicated by the white rectangle with the circle. Next, make sure you select the mask in the layer panel (it will show up as a white rectangle on the layer you applied the mask). Grab your paintbrush tool and make sure your color is set to black. Now you can effectively ‘erase’ the part of the top gif you don’t want to show anymore. I recommend setting your brush hardness to 0% to get a smoother transition. You can also play with the opacity settings. If you want to add back in a part you erased, just switch to a white paintbrush and you will be able to undo what you had just ‘erased’ with the black. When you merge the gifs, they will play the same number of frames. This means your blended gif length is limited by the gif with the fewer number of frames. You can move around your timeline layer and shorten the included portion by dragging either end of the timeline layer in until you get both gifs to play the parts you want.
CAPTIONS/SUBTITLES
I often get asked about my subtitle font/styling settings. Personally I find the best fonts for subtitles are calibri and arial. I use calibri with the following settings: 12-14px, bold italic plus faux bold, 1px black stroke (optional: drop shadow set to ‘multiply’ at around 85% opacity), and tracking (VA) set to 75. If you would like your subtitles to fade-in or fade-out you can apply the ‘fade effect’. Locate the b/w square icon in your timeline panel. Select fade and drag it onto your text layer in your timeline. You can then right click on the wedge shape to adjust your fade duration. I usually use 0.35s. If you drag and drop the effect towards the beginning of your text you can get the fade-in effect. To get the fade-out, simply drag and drop your fade towards the end of your text layer.
SAVING/EXPORTING YOUR GIF
We’ve reached the final stretch! If you need to adjust your frame rate timing: you will need to revert your timeline to frames. To do this: 1) Navigate to the icon of 4 bars at the right of your timeline panel. Select convert frames > flatten frames into clips. 2) Navigate to the icon of 4 bars at the right of your timeline panel. Select convert frames > convert to frame animation > when promoted hit ’ok’. If at this point you see more than one frame in your timeline panel, delete the frames until only one is left. In the example below I would delete the first frame by hitting the trash icon from the timeline panel.

If there is only one frame, leave it as is. 3) Navigate to the icon of 4 bars at the right of your timeline panel. Select ‘make frames from layers’ You will most likely need to delete the first frame in your timeline panel (it won’t have your coloring). Sometimes ps adds in some ‘blank’ frames as well, delete those too. Now you can adjust your timing.
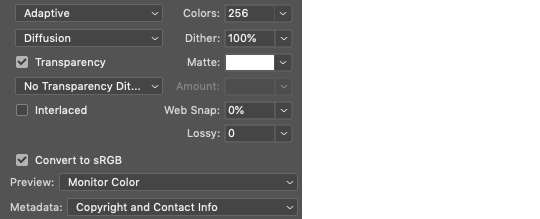
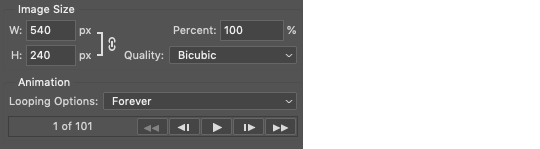
Once your timing is set: When you’re saving your gif, just keep in mind it must be under 10mb. Navigate to file > export > save for web. When it comes to your save settings I typically use either selective diffusion or adaptive diffusion. I also also occasionally use adaptive pattern (I find this is best for dark scenes without a lot of contrast). Set colors to 256, quality to bicubic and looping options to forever. If you want to preview your gif, hit the preview button in the bottom left. Otherwise, go ahead a hit ‘save’ and you’re DONE!
ADDITIONAL RESOURCES
Feel free to check out my ‘ps things’ tag for more photoshop stuff/mini tutorials. Additionally @/nibreon and the hackmd site I linked previously are your best resources for vs questions. If you would like to see my giffing process in motion feel free to check out this video. It’s sped up but you can slow down the playback. Additionally be sure to check out resource blogs like itsphotoshop for more helpful tutorials and resources.
If you reached the end of this beast, kudos to you! I hope this helps and never be afraid to reach out with any questions.
521 notes
·
View notes
Text
gif tutorial ♡ by @tifaa
Lately I’ve had a few questions about how I make my gifs, so under the cut is a small tutorial about how I make them! If I forgot something or you have any questions, please just send a message or an ask. It’s also best to view this on desktop because mobile with mess with the quality ; - ; ♡
I’m going to show you the process of how I turned the gif on the left into the one on the right. (Please ignore the middle one for now!) Basically, turning a gif with absolutely no editing into a coloured, sharpened, and smooth gif!
1. Downloading Videos
I use 4k Video Downloader to get videos from YouTube.
☆ The most important thing is to download videos in the highest quality possible (I personally never gif a video that is below 1080p)
2. Preprocessing
This is optional, but I do see a big difference between gifs that I have preprocessed and ones that I used to make using only photoshop. It doesn’t take that long and you get a really smooth result, so I definitely recommend it!
Vapoursynth download + tutorial (make sure you download the one that’s titled ‘VapourSynth64Portable(200616).zip’). Since it’s quite complicated to download for Mac, I recommend trying Avisynth instead. I may do a seperate turotial on VS, but since the one I linked is in a video format rather than text, I found it really easy to follow compared to other written tutorials I had found!
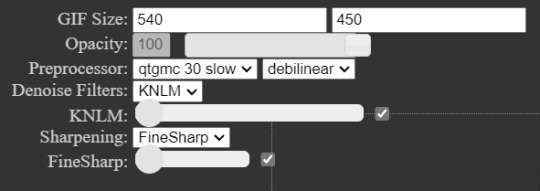
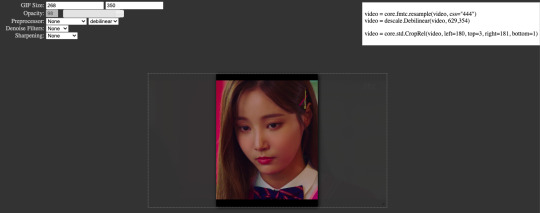
These are my VS settings:
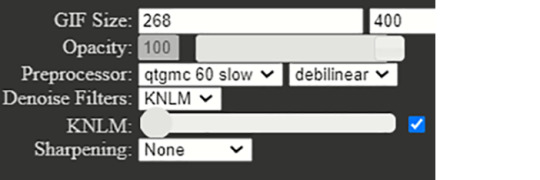
☆ GIF Size will change depending on how many gifs you want to make per row:
1 gif per row: 540px
2 gifs per row: 268px
3 gifs per row: 177px
You can change the height to whatever size you want, but I wouldn’t recommend going over 540px.
☆ Preprocesser is how many frames per second you want your gif to be. qtgmc 60 slow gets you the smoothest possible gif. As for the second setting, I always use debilinear. You can find more information on these here!
☆ KNLM is a denoising filter that basically smoothens your gif and makes it less grainy! You can also choose to utilize the sharpening setting here, but I prefer to do that in Photoshop!
Once you have chosen your desired settings, you can paste the output script that’s on the right-hand side into the VS Editor resizer.html window. (Please refer to the video tutorial〜)
3. Importing into Photoshop
To open the video in PS, go to file > import > video frames to layers (the preprocessed clip will be located in the ‘output’ folder). These are my import settings:
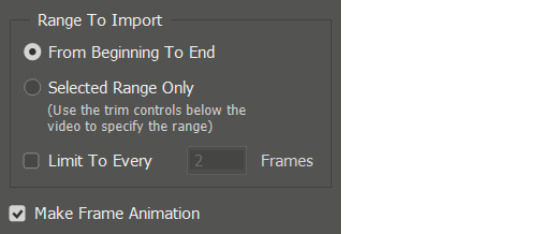
Your workspace will now look something like this: ( I’ve highlighted the frames in pink and the layers in blue, so you can remember!)
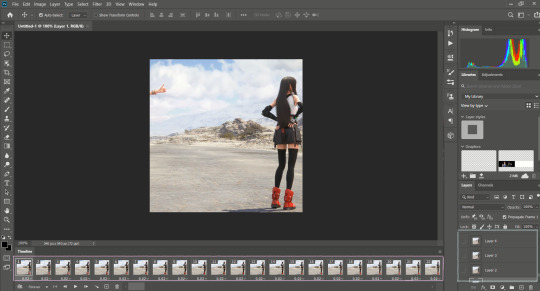
Now, delete any excess frames from the timeline if you have any (eg. frames that include a different scene). Then, select all of your remaining frames and click on this little button on the top right-hand side of the timeline:

From this menu, go to > convert to video timeline. Now, look at the layers on the right-hand side of the screen. If you deleted excess frames at the beginning, you should now delete the corresponding layers (that is, all of the layers without the eye symbol next to them).
To be able to colour and sharpen the gif, we have to convert it into a Smart Object. To do this select all of your layers and go to > filter > convert for smart filters.
4. Colouring
Now, you can colour your gif however you’d like! There isn’t necessarily a right or wrong way to do this, but some settings I’d recommend trying out to begin with are colour balance, selective colour, levels, hue/saturation. To apply these settings go to > layer > new adjustment layer.
☆ Below is are some examples of this lovely scene of Tifa ♡ The first one is a base gif (no colouring at all), and the second one is what it looks like once I’ve coloured it. We’ll get to the third one soon, don’t worry!
5. Sharpening
Click on your Smart Object in the layers tab and go to > filter > smart sharpen. These are my settings:
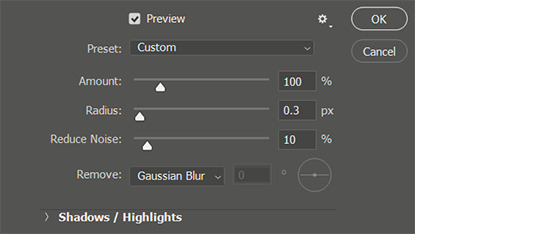
☆ The next step is optional, but it’s just a preference for how I like my gifs (it just makes them really smooth and removes a lot of the noise)!
Once I have sharpened my gif, I duplicate the sharpened later (right-click on the layer and select ‘duplicate layer’ from the menu). Then I add a gaussian blur filter to the duplicate layer (filter > blur > gaussian blur) and set the radius to 1.3.Your layers should now look something like this:
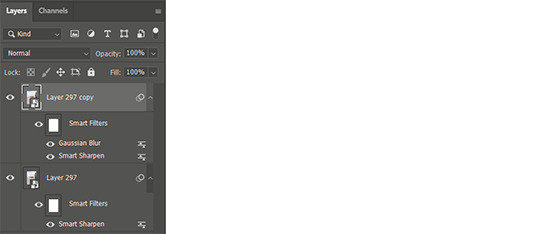
You can see the result is the third gif from the above step. Nice and smooth, right〜?
6. Saving your gif
To save our gif, we have to convert it back into a frame animation.
To do this, select all of your layers and press the little bars icon above the timeline (the one we used to convert our frames into the video timeline from before!), and select convert frames > flatten frames into clips. Now, select all of the visible layers (the ones with the eye symbol shown), and from the same menu as last time, convert frames > make frames from clips. Again, from the same menu, go to convert to frame animation.
To set the speed of your gif, select all of your frames and click on the little number icon below it (it should say something like 0.03), then click ‘other’. Here you can set the speed. I usually put it somewhere between 0.02 - 0.04 depending on the scene, so just try out which speed you prefer.
Now, we can finally save the gif: file > export > save for web (legacy)! These are my output settings.
☆ To make sure that your gif plays more than once, you must have looping options (near the ‘save’ button’) set to ‘forever’ ! ! !
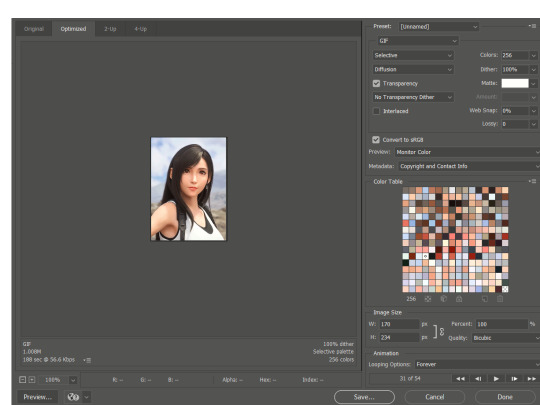
Again, this is just the way I make gifs, so there are many other tutorials out there that may be more suited to your preferences! You can find some examples of my gifs here.
☆ I’ve never made a tutorial before, so I really hope that it helps you even a little bit! Please please do ask if you have any questions, either by dm or inbox! ♡
#gif tutorial#yeahps#itsphotoshop#wehearttutorials#completeresources#anon who requested please let me know if you see this!#i hope it's OK!#♡♡♡#daily gaming#videogamewomen#videogameedit#gamingedit#gamingnetwork
69 notes
·
View notes
Text
🌻 a gif tutorial by: me! 🌻
i know there are so so many WONDERFUL tutorials out there, but i can’t say no to a very kind anon so!!! here we go. hopefully this is helpful for someone out there! if anyone doesn’t do well with picture tutorials and would find it more helpful for me to do a video, i would also be happy to try that too!!
this is definitely not the fastest way to do it, i’m sure, just the way i’ve always done it and i’m bad at learning new things so ldkjfoiw also i’m using photoshop cc 2021 (tho this method should work for any version of photoshop i think) and i use video frames to layers to gif just as an fyi
step 1: get whatever media you’re giffing! i use torrents and direct downloads. that’s how i’ve always giffed, i’ve never tried capping so i can’t help with that. sorry!
step 2: make clips of the scenes your fc is in! i have a folder dedicated to the character the fc is playing and keep all my clips in there. when i do movies, i typically only do about 12 clips at a time because it just feels less overwhelming for me. when i do a show, i only clip one episode at a time for the same reason. i use quicktime to clip, but i know some people use VLC and i’m sure there are other options out there to try, too! again, this is just what i’ve always used so i’m comfortable with it and know how it works.
when i clip, i try to start the clip a few seconds before the scene my subject is in and a few seconds after just to make sure i’m getting every single frame.
step 3: import video frames to layers! so once you have photoshop open, go to file > import > import video frames to layers
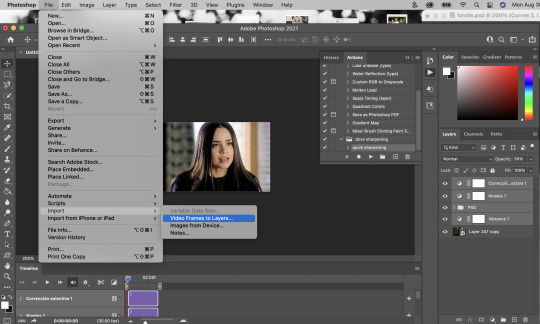
then go to your folder where you have all your clips saved and choose the one you want. i took this one out of my trash because the rest of the gifs i have to do in this episode are in the dark and that was gonna be too annoying to me lkdjfkslofw so i’m just re-making one i already did a few days ago. i’m giffing sofia carson and you can see that my clip starts on someone else’s face so i can make sure i have every frame of hers!
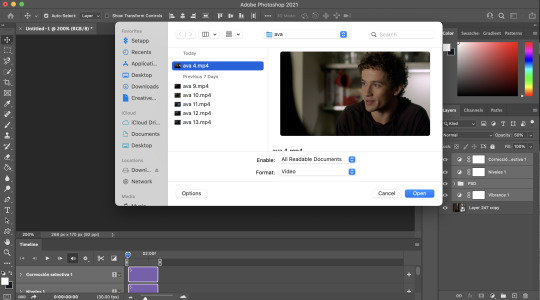
step 4: select the range for your gif! just like with clipping, i try to get a few frames before and a few frames after of the fc i’m working on so that i don’t miss anything. if you aren’t interested in giffing them in every single second (which is totally fine, i know a lot of people prefer not to!) then you don’t need to be as concerned with it

because i’m using a direct download, i’m not going to limit my frames to every 2. it’ll be really fast and choppy. if you screen recorded, i would suggest limited to every 2 frames and then going through and deleting each duplicate frame (when i giffed via screen recording, i found that every 6 frames or so was a duplicate). this will make sure your gif is smooth and exactly the same as one made from a direct download. it IS time consuming though, so i recommend doing a direct download/torrent if possible! if you ever need help finding downloads or need something torrented and converted for you, please feel free to message me and i’ll be happy to help!!
step 5: delete the frames you don’t need! this is the time to delete any extra frames at the beginning, end, and any duplicates
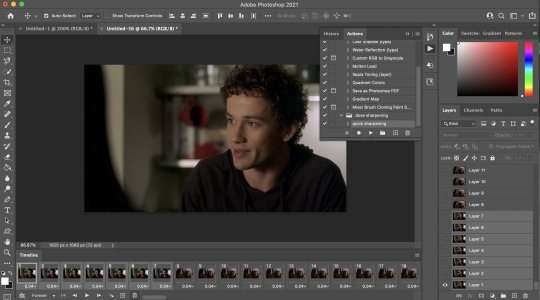
step 6: set your speed! you can do this later if you want, but i like to do it as soon as all my extra frames are deleted. my personal preference is typically .06 seconds for most of my gifs. if they’re on the shorter side (under 35 frames), i’ll do .07-.09. i know some people have very strong feelings on gif speed lskdfjpwe i do not. it’s all about what feels best for you! .06 is where i feel my gifs feel the best, but there are plenty of beautiful gifs that are slower or faster!
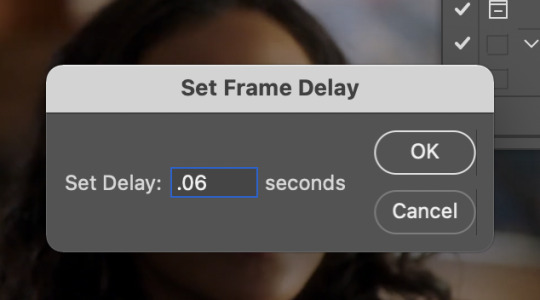
step 7: crop it! as you can see above, i set my W x H ratio to 268px x 170px. this is a size i really like, but you can make yours smaller or larger. i do suggest using the W x H ratio setting to set it to your specific pixel measurements because it cuts out having to resize after cropping.
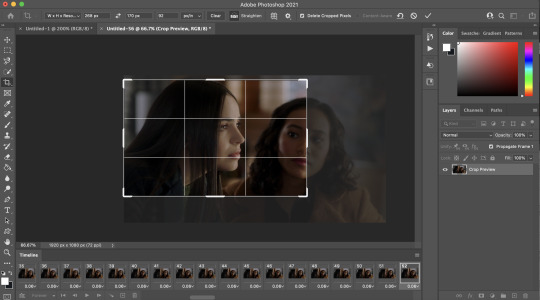
also, i have a few hundred frames in this one particular gif that i’m going to cut down in the next step. however, i know that she remains pretty much in the same place throughout the frames which is why i’m cropping them all at once. if it’s a gif where you get a few hundred frames that you’re going to turn into multiple gifs and the person moves around a lot, definitely only crop one gif at a time!
step 8: delete the frames you aren’t using! everyone has a different way of deciding how many frames their gifs are. for me, if they’re talking, i actually go and watch the segment i’m giffing to see what they’re saying, read their lips as i go through each frame, and crop it there. it’s a little more time consuming i guess but i feel like it gives me the best results. totally optional, though! if the person is NOT talking, then i typically just try to make it between 60-80ish frames and base it on facial expressions or body language. sometimes it’s more, sometimes it’s less! again just comes down to what your preference is.

step 9: convert to timeline! basically just press that lil highlighted button down there next to the “forever” and convert to timeline. pretty self explanatory
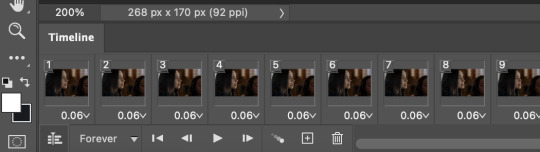
step 10: sharpening! this is where i use my sharpening action which is linked right here. i’ve been using it for a while now and i really love it! i’ve tried other sharpening actions since i made it and they just don’t make me as happy as this one lol
hit play on your action:
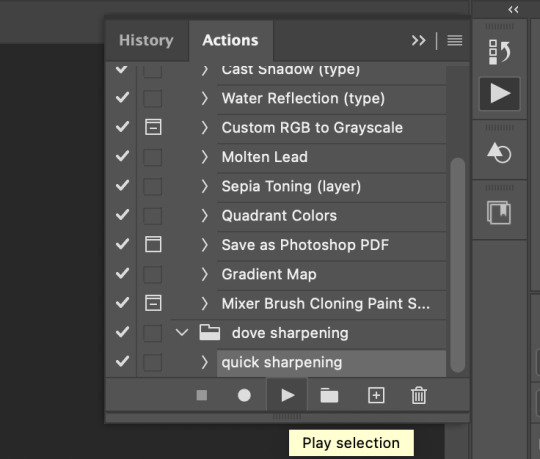
for my action, i get this popup twice and just hit “continue” and it keeps going through the steps with no problem
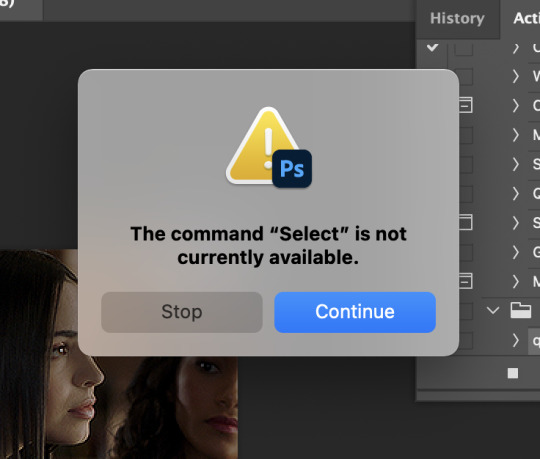
step 11: COLORING!!! get your psd and slap it on! i have different one base psd that i use for almost everything and will edit it to fit whatever scene/show/movie i’m working on. i’ll also save different versions of it based on the media i’m giffing. for example, the lighting on liv & maddie is SUUUUUPER different from the writing on pll: the perfectionists. so i have a “liv” psd and a “loralie” (name of my char that i use sofia for, idk why i named the first psd after liv and not my char but whatever ldkfjsoi) psd. same base, same layers, just different levels. i also will often combine psds! i’ll put my base down and then add layers from other psds or create new ones to fit whatever scene i have going!
step 12: save your gif! go to file > export > save for web (legacy)...
people use different settings for saving their gifs, too. these are my personal settings. i really like them and feel they work for my gifs. feel free to copy them or play around with your own settings! just make sure it’s always on the 256 colors
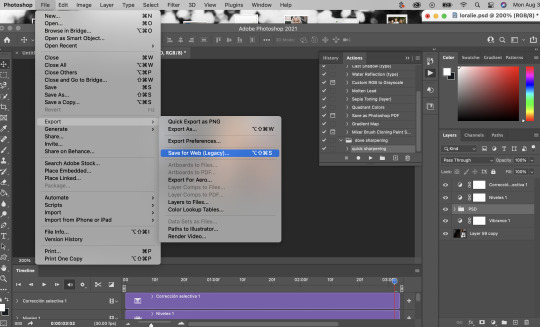
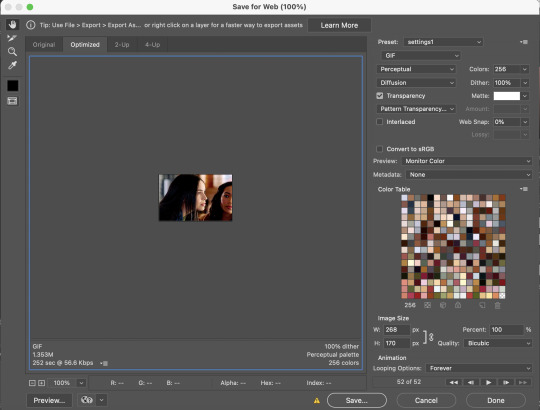
step 13 (optional): preview! i like to hit the preview button just to make sure i like my gif before i save it. if i don’t like it (coloring looks off, too fast/too slow, feels like it cuts off in a weird place) i’ll hit cancel and undo everything until i’m back to wherever i need to fix it.
step 14: save your gif, yay!! YOU DID IT!!!! save that beautiful gif and feel so proud of yourself!!

step 15 (optional): if you’re making multiple gifs from the segment you imported, go back and cntrl/cmmnd + z everything until you’re back to having allllll the frames again. delete the frames of the gif you just made (in this case, it would be 52) and start again from step 8!
i hope this made sense and was helpful for anyone! please let me know if there’s anything you need clarification on!!
35 notes
·
View notes
Note
hiii i love the gifs you make!!!! i was wondering if you could explain how you made them? links to tutorials work too!! :D
hey yes ofc!! i’ve included some general info & links first then there’s a step by step process with screenshots of how i make gifs! ~~ this is just a basic gif tutorial, i didn’t go into colouring or adding text etc because it was already so long but if you wanted to know any of that stuff just lmk!
general info:
for drag race gifs i’ll usually screen record from wowpresentsplus but this site is great if you want to actually download the eps (they have untucked, all stars etc too)
for youtube videos the 4k video downloader is my go to
i’d highly recommend downloading vlc media player! especially if you’re making gifs from downloaded videos
i use photoshop cc 2018, but if you don’t have photoshop yet here’s a masterlist (i tried so many before finding one that worked for my laptop so don’t worry if it doesn’t work first time ^.^)
gif making:
1. if you’ve only got a short video you can skip this step! but to start off with i’ll use vlc media player to cut the video into smaller clips (this makes it easier when you’re using photoshop later but its also helpful for planning gifsets!)
- for this make sure you have advanced controls on: ‘view’ --> ‘advanced controls’
- open your video then find the scene you want, click the red record button to start recording and stop once you’ve got your clip (i recommend recording about 10 seconds before the clip you want starts as it takes a second to start recording sometimes)

photoshop time! i have a small laptop so my layout might look different to yours and if this is your first time using ps you’ll need to select all of these from ‘window’
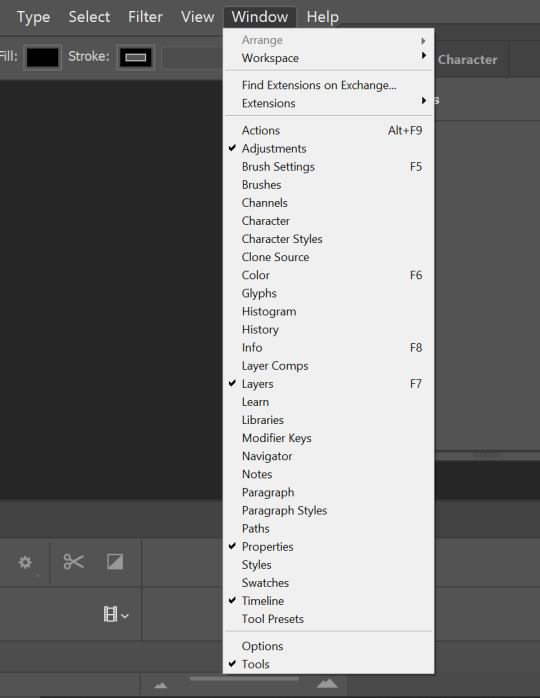
2. click ‘file’ --> ‘import’ --> ‘video frames to layers’, open your video clip and you can either use the whole clip (select ‘from beginning to end’) or fine tune it more with the trim controls! (doesn’t have to be exact as you can delete frames later), once you’re ready click OK!

3. play the gif through then delete any frames you don’t want from the timeline. around this time i’ll also go to layers, select all the layers and group them together with the folder button. then i’ll select all the frames and adjust the speed (the little arrow at the bottom of the frames); i have 61 frames in this gif so i changed it to 0.06
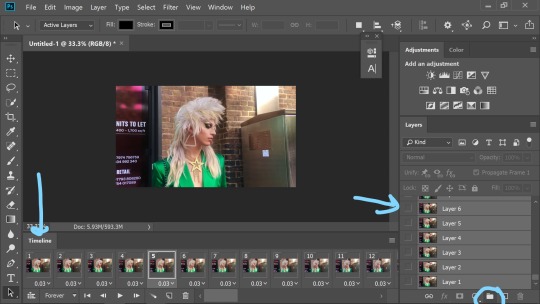
4. cropping and resizing! select the crop button from the tool bar on the left, then change the ratio at the top to whatever your heart desires (i want this gif to be wide so i didn’t crop it much!) once i’ve cropped i’ll play it through to double check im happy then select all the frames and click ‘convert to video timeline’. now go to the top bar and click ‘image’ --> ‘image size’ --> and make sure its set to ‘pixels’!!!!
i changed the width to 540 as its only 1 gif but for a row of 2 gifs i tend to do 300 each and for 3 i do 178
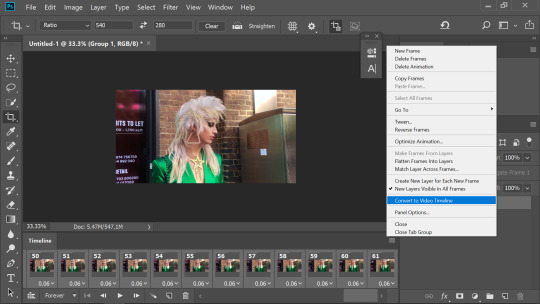
5. sharpening! make sure the group 1 folder is selected then go to ‘filter’ --> ‘convert for smart filters’, then back to filter --> ‘sharpen’ --> ‘smart sharpen’ . these are my usual settings but i’ll adjust the radius to 0.3 for some gifs if it looks too much.
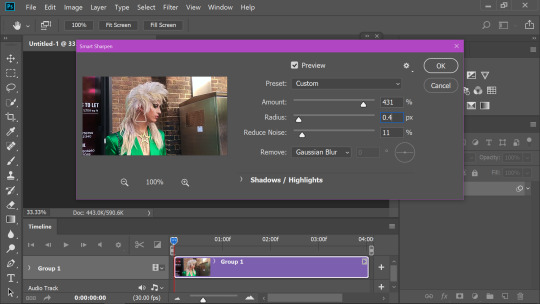
6. saving the gif! go to ‘file’ --> ‘export’ --> ‘save for web’. i keep it on ‘4up’ so i can easily compare the gif quality to other options. most of the time i’ll end up using ‘diffusion’ with dither at 100%, but sometimes i’ll swap to pattern.. its a gif by gif basis really! sometimes if the gif is close to 10mb i’ll save it with pattern as that tends to be lower then once ive done all the colouring i’ll save it with diffusion ^^ also make sure looping is set to forever! otherwise the gif will play once then stop :p
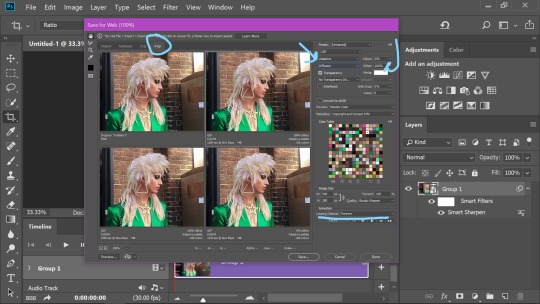
7. thats the basic gif done!! now i’d save it to my drafts to check the speed is alright before reopening it on photoshop and colouring it!

#ask#saminator#this is so long sorry i always give way too many details when explaining things!#gif tutorial
16 notes
·
View notes
Text
MY GIF-MAKING TUTORIAL
for @sunshinesquash
i use photopea.com for making gifs so if you have photoshop i’m not sure how much different these tools will be, but i hope this can help!! i also have a windows computer so if you have a mac my recording technique might not work :’( all the tools i use are pretty simple and basic so if you can’t afford to download a lot of software dont worry!
recording:
when you’re finding videos to use for gifs, you want to use the highest quality footage u can find! you normally always want to use 1080p, but if you can only find 720p then make sure its not too grainy!
for the actual recording, i use the (windows + g) shortcut. once you click that this should pop up!

if this is your first time opening the game bar, it might just show only the top bar - if that happens, click on the second icon! when the capture sidebar shows up click on the third icon and the recording will begin :] make sure that your recording is 4-5 seconds max, otherwise it will be too big for photopea to handle and there will be too many frames!
opening the recording:
all your recordings from the windows game bar will automatically show up in videos > captures.
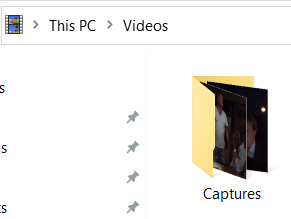
open photopea, and then click file > open and locate your recording!
when it’s opened photopea should look like this:

this image size is 1920 x 1080 which is way too big for photopea to load your final gif and for tumblr to accept! because of this you’ll click file > new and get to a pop-up that looks like this:

the size that i normally make my gifs is 540 x 540 which is what i’m going to use for this tutorial! you can always go for other dimensions - whatever you’re comfortable with :]. click create!
ok now comes the complicated part :
select all of the frames that you’re going to work with until they become highlighted grey. make sure the folder is not selected!

right click on the highlighted area so an options bar pops up!
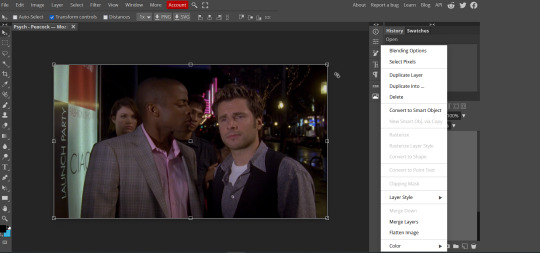
click on ‘duplicate into...’ and select the drop down menu and click on ‘new project.psd’. there will be a ‘new project’ and a ‘new project.psd’ option - ‘new project.psd is the one you want to click on! ‘new project.psd’ is the 540x540 project that you created.
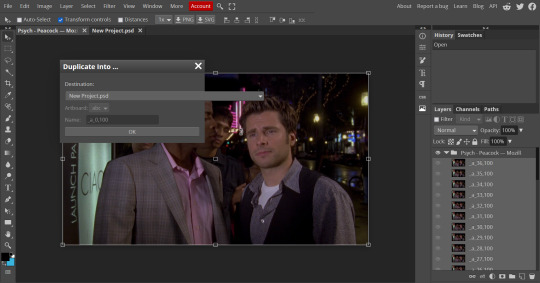
next, click on the tab that says ‘New Project.psd’ and it should show you something like this:
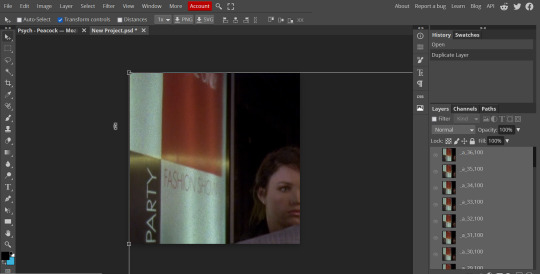
the frames are really zoomed in because of the different dimensions, so we’re going to fix that! make sure all of your frames are still highlighted and then click on the little folder button that i circled:
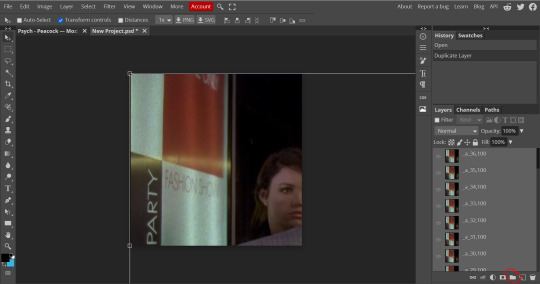
now all of your frames are going to be under a single folder. make sure ‘transform controls’ on the top menu is selected! now single click on the edge of the selected frames:

now a new menu is going to show up where it used to say ‘transform controls’ was! make sure the little hamburger button in between the dimensions is selected.

replace the 100% with 50% and now your dimensions will look like this!
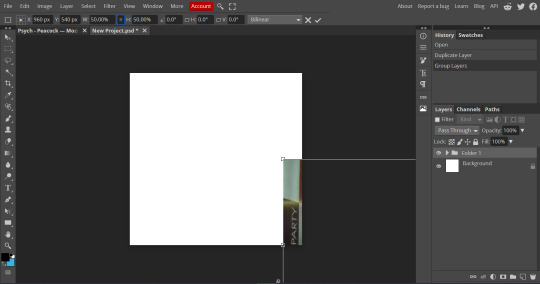
now just drag that box of frames onto the white area! (make sure only the folder is selected on the side bar):

sharpening + color:
now you’re going to open that folder and then select all your frames again (make sure the folder is not highlighted):

now click filter > noise > and type in 1%.

im adding noise here because it helps smooth out the gif and makes sure there arent any wavy/grainy lines!
after you click ‘ok’ then click filter > sharpen > smart sharpen. you don’t have to change any settings here! just click ‘ok’ with the default settings.
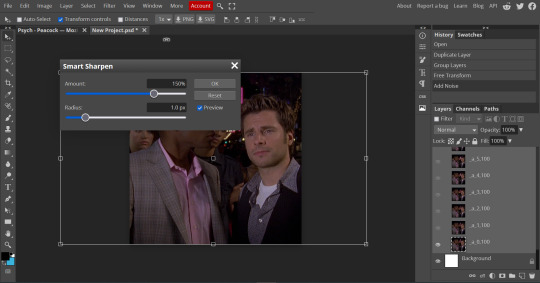
now your base gif is ready for coloring!
all your coloring tools will be under layer > new adjustment layer.
always remember that whatever settings/coloring that i use may be different from the way you want to do it! gif-making always starts with exploring and experimenting with your style :]
the first type of adjustment layers that i always start with are the ones that deal with adjusting brightness! depending on how dark your gif is you will either want to start with ‘brightness/contrast’ or ‘levels’. (you can also use curves but levels are easier to control for me.)
if you have a super dark gif, you’re going to want to start with ‘brightness/contrast’. no actual adjustments will be made to this layer but you’re going to make its type ‘screen.’

BE CAREFUL WITH THIS LAYER! doing ‘screen’ with brightness/contrast will often whitewash characters of color so for this gif we’re going to just use ‘levels’! (there are ways to get the original skin tone back when using this layer, so if it’s completely necessary depending on the scene, you’re going to have to work a lot with coloring adjustment layers to make sure not to oversaturate or whiten when doing this. you’ll get there with practice, but for this tutorial we’re going to work with safe adjustments!)
if the gif becomes too bright because of ‘screen’ in brightness/contrast you can adjust the opacity!
whenever you use brightness/contrast you’re also going to use a levels layer because just this layer can remove a lot of the depth
now let’s open the levels layer!
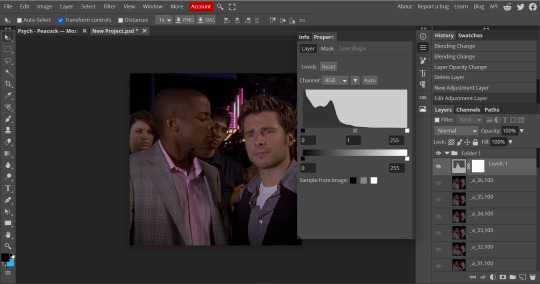
you’ll see the three squares that you can adjust - the black is shadows, the grey is mid-tones, and the white is highlights. when working with characters of color don’t brighten the mid-tones, this will also whitewash them! dragging the squares to the left will brighten, and to the right will darken. each scene will require different adjustments so explore and figure out what’s right! make sure when brightening, that you remember to give it enough depth.

now the gif has proper lighting!
after your brightening layers, you’re going to look at the scene and check whether you need a photo filter layer! if your scene has a strange filter - for example, cw shows often use a weird dark yellow filter: this is where a photo filter comes in.
for this tutorial im going to show how to use the photo filter! shawn’s face has a yellow tint so we’re going to try this out. (there are ways to get rid of the yellow in selective color, but for this tutorial we’re going to start with photo filter.)
photopea automatically provides a yellow color photo filter which is not what we want for this scene! (if you have an especially blue scene this might help though!)

click on the orange square and drag the color picker to the opposite color of the one you’re trying to get rid. we’re getting rid of yellow, so we’ll select blue.
now, we’re going to adjust the density so it doesn’t look so blue. now it looks perfect!

now we’re going to go to my favorite tool: selective color :]
you can see hints of blue, and pink in the scene already - so we’re going to really bring those out!!

click on the drop down that will bring up a list of colors! we’re going to especially go for cyan and blue. when i really need to bring out blue, i drag the cyan fully over to 100% and the yellow to -100%

if you look at the gif now, you can see that the blue is starting to come out! duplicate that selective colors layer until the blue becomes saturated enough, but not grainy. i duplicated mine’s three times for this gif!

now that you see how to manipulate the colors with selective colors, experiment and see what you can do! i felt like the skin tones were too pale so i messed with the reds :] you may think differently, that’s why coloring is subjective not objective!
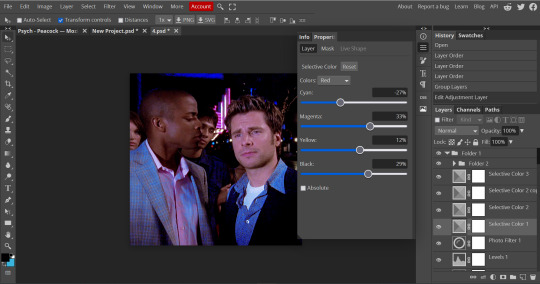
one of my other favorite tools to use is the vibrance tool! make sure not too saturate your colors too much so be careful with this layer!
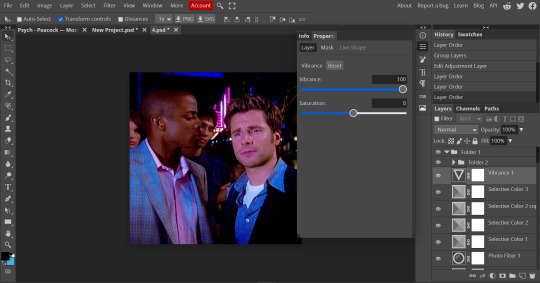
another really fun tool to use is the hue/saturation tool! if you have a very prominent stable color that isnt too grainy, you can manipulate it to another totally different color! this gif may not do too well, since the blue isn’t completely solid, but we can still test it out!
click on the drop down to the color you want to manipulate and have fun with it! i could make the blue a little cyan here without making it too grainy so this is what we ended up with :]
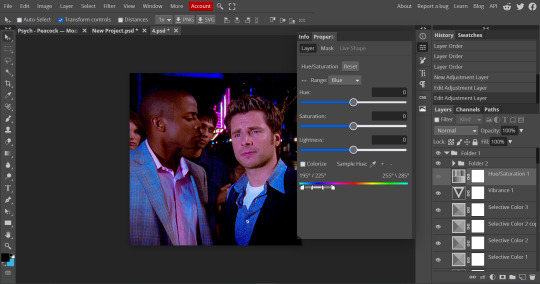

this is going to be the end of the tutorial for now but always feel free to ask me if you need some more advice. if some of it was confusing dm me or i can always make a video of my process!
[VERY IMPORTANT: REMEMBER that photopea.com is a website so it’s always prone to crashing. always ALWAYS save your psd’s after you’re done editing. a psd will save all your coloring and frames! go to file > save as psd. to export your frames as a gif go to file > export as > gif > save! if photopea starts lagging, it might be the time to open it in another tab and start making your other gifs there.]
this is our before and after coloring!:

#husband.message#*mystuff#gif tutorial.#i hope this could help a little bit!!!!#ok for anyone to rb!!!
21 notes
·
View notes
Photo
Welcome to soonhoonsol’s gif tutorial!
As a nice anon asked me how I make my gifs, I thought it’d be cool to create an in-depth tutorial :) Perhaps this can help some others enter the gif-ing world too!
What we’ll be using for this tutorial:
Software: Bandicam, Avisynth, Photoshop CC 2018, Topaz Labs
File Format: .mp4
Operating System: Windows
Disclaimer: This is just my method. Every gif maker works differently and has different preferences. What works for me may not work for you, and that’s completely okay!
Let’s get into it!
1. Find the best quality video you can find
This really depends on the content you want to gif. For variety shows, music videos or photoshoots, any video of [1080p] should be sufficient. Try not to use anything below 720p.
For stage performances, fancams tend to have higher resolutions [1440p, 4k]. Use these if your computer can handle it. If not, usually 1080p works fine. The best option would be to download .ts files, which provide clearer and less grainy videos.
For Seventeen, you can get .ts files from The Rosebay on Twitter :)
2. Screen recording
As a Windows user, I don’t have a built-in screen recorder on my laptop. So, I use Bandicam, which is a free screen recording software. The only con to it is that it has a watermark.
To combat the watermark, I always have the boundary box a little bigger than the video itself so that I can crop it out of the gif.
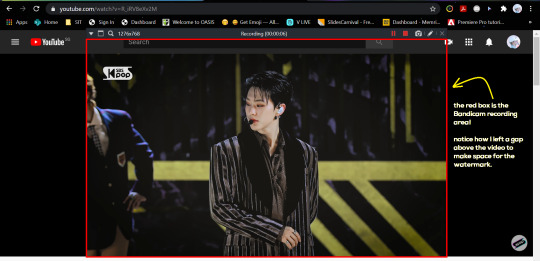
This is what the recording would look like:
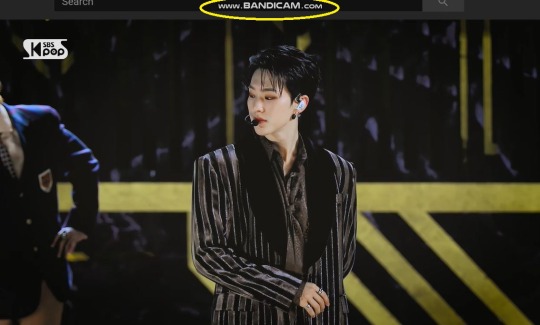
Just record the scene(s) that you want to gif so your video file doesn’t end up too large! Your recording should be in .mp4 format.
(You may use pure .ts files in Avisynth but it never worked well for me so I usually screen record the .ts video and move on)
You can find your recorded videos in Documents > Bandicam.
3. Avisynth
I followed THIS tutorial to download Avisynth. This software is really helpful if you want sharp and clear gifs! I recommend to follow the steps in the tutorial as the below method stems from it.
- Once you have downloaded it, open up your recorded video from Step 2 and watch it. Take note of the duration you want to gif. (e.g. from 00:01 to 00:05)
- Drag your video file into normalwebrange.bat. On Windows, you can find this in File Explorer > Local Disk (C:) > video. For other .bat files, you may check out THIS tutorial.
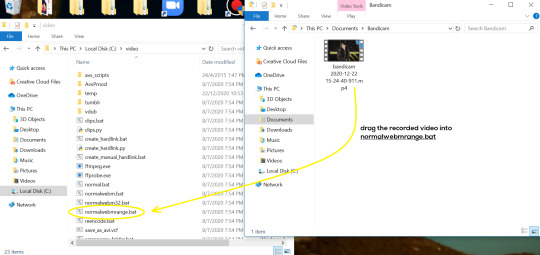
- In the pop-up box, key in the start time for your gif (e.g. 00:00:01). It has to be in hh:mm:ss format. Press “enter”.
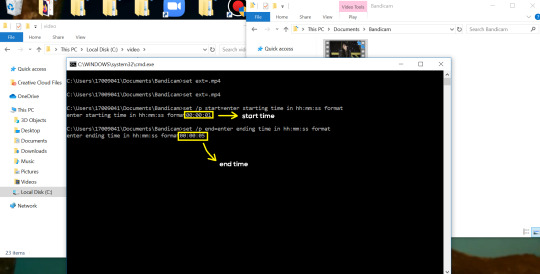
- Key in the end timing and press “enter” again. A resizer should pop up in an Internet Browser. I found that Firefox works best for me.
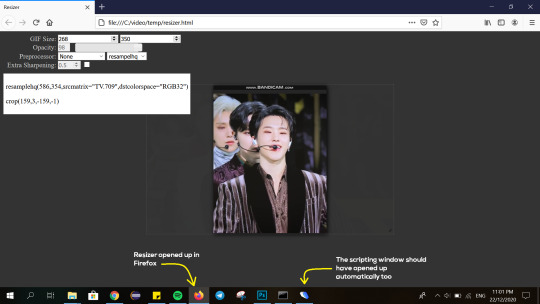
- In the resizer, you may indicate the size of the gif you’d like to make. You can also click and drag the video to resize and frame it to your liking. You may refer to THIS post for Tumblr dashboard sizing.
(These are some common gif sizes for stage performances):
1 gif - 540px by 540px (square)
2 gifs - 268px by 350px
3 gifs - 177/178px by 250px
- Under “Preprocessor”, select “debilinear” for the second box. For the first box, you may pick between qtgmc 30 (same frame rate as video) or qtgmc 60 (doubles the frame rate; smoother).
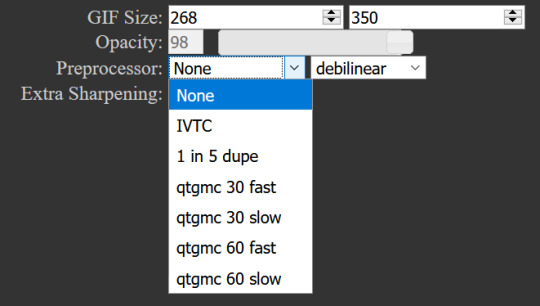
- You will also see “fast” or “slow” options. These are just how long the video will take to render. “Fast” will give you slightly lower quality as compared to “slow”, but usually is good enough.
(You can see that his features are sharper and more defined in the “slow” gif as compared to the “fast” one.)
- Copy the code in the white box. Navigate to the scripting window (it should have popped up with the resizer) and paste the code at line 17. Type a “#” before qtgmc on the same line. This will prevent the software from lagging.
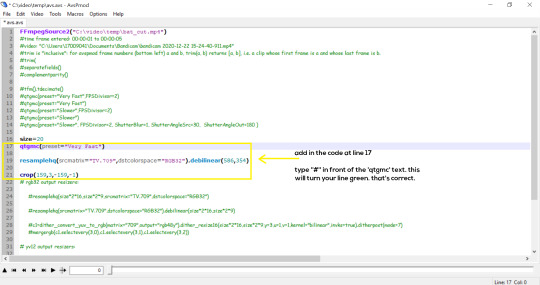
- Click on the inverted triangle at the bottom of the screen. Your video will now appear in the scripting window. Drag the slider to the intended starting point of your gif and press the “home” key on your keyboard.
- Drag the slider again to the intended ending point of your gif and press the “end” key on your keyboard. This blue area you see is the duration of your gif.
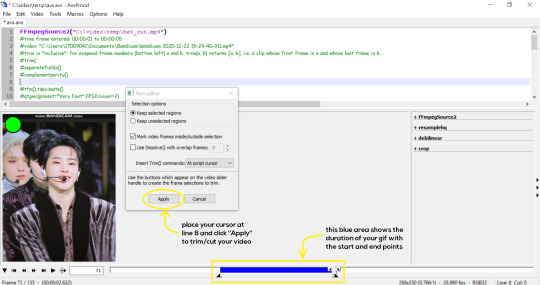
- On an empty line (I usually go to line 8), place your cursor there and click “Apply” in the mini pop-up window. Afterwards, remove the “#” from line 17.
- Go to File > Save or press Ctrl + S to save the code. Close the scripting window. The video renderer will pop up. When it’s done, it will automatically close by itself.
4. Using Photoshop and Topaz
I’m using my school license for Photoshop 2018, but if you don’t have that, there are plenty of cracked versions for free. I don’t have any to recommend though so I’m sorry about that :(
I followed THIS video tutorial to download Topaz plug-ins for free. I use Topaz DeNoise (the most helpful) and Clean, but you may use others if you’d like :)
Alright, let’s dive in to the steps!
- Open up Photoshop and go to File > Import > Video Frames to Layers.
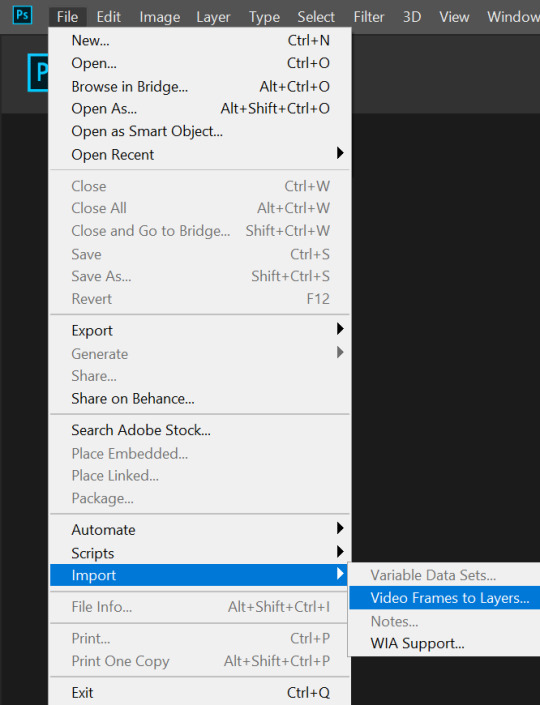
- A pop-up will appear. You can find your deinterlaced Avisynth video in File Explorer > Local Disk (C:) > video > temp > video.avi. Follow the settings in the picture and click “OK”.
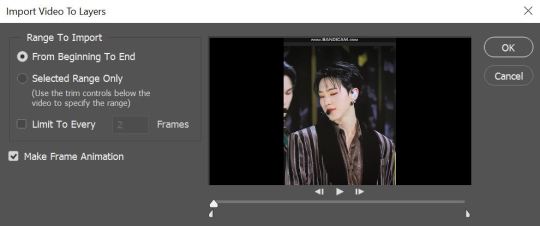
- Go to Window > Timeline to open up the timeline. You should be able to see your gif spread out in frames. If you press the play button, it should play like a video.
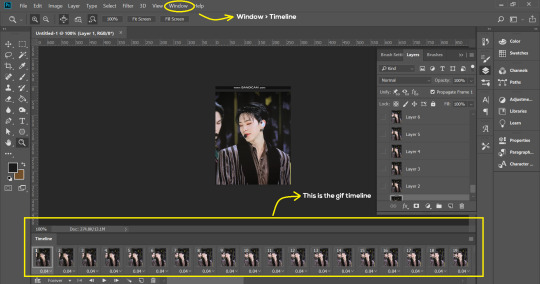
- (Quick optional step I learned from THIS tutorial) Go to Image > Canvas and set the Resample option to “Bicubic (smooth gradients)”.)
- Select the first frame of your gif in the timeline. Shift select the last frame. Go to Window > Layers. Shift select these layers as well.
- With everything selected, click the 3 lines at the top right corner of the timeline. Select “Convert to Video Timeline”.
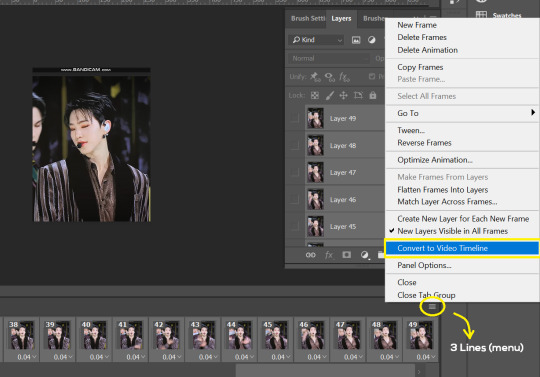
- At the top of the screen, select Filter > Convert for Smart Filters. Your layers will condense into one layer. Don’t worry, your gif is fine.
- Now it’s time to sharpen the gifs. Go to Filter > Sharpen > Smart Sharpen. Play around with the settings to your liking!
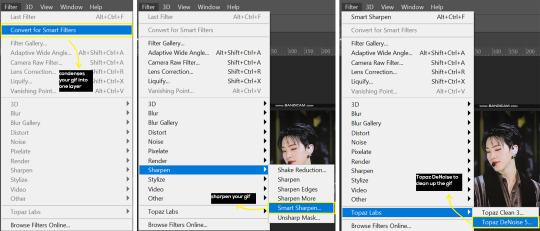
- If you’ve downloaded Topaz correctly, it should appear under Filter > Topaz Labs. If a pop-up asks you for an activation key, you may use THESE to activate it for free.
- Go to Filter > Topaz Labs > DeNoise and/or Clean and play with the settings until you’re satisfied.
5. Blurring
If your gifs have captions/logos that are distracting, you’d want to blur them out. Don’t be like 2018 me that blurred out the logo frame by frame; it’s very tiring. Instead, using this method from @scoupsy‘s tutorial, you’ll save lots of time.
- In the Layers tab (Windows > Layers), select the “New Layer” icon. It should be blank.
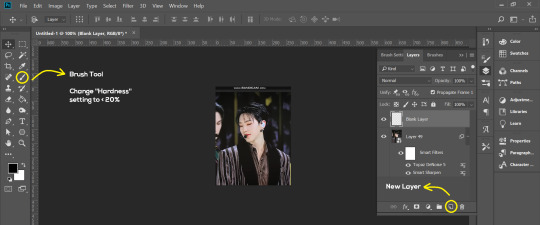
- Select the Brush tool. Make sure the “Hardness” setting is below 20%. This will blend the blurring nicely into the gif.
(For the sake of this tutorial, I will be blurring out the Bandicam logo to show you.)
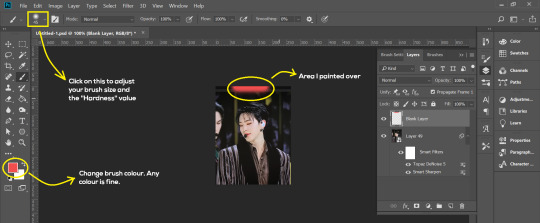
- Paint over the captions/logos. Make sure this is on the blank layer!
- Duplicate (Right Click > Duplicate) the gif layer and drag it so that it’s on top of the blank layer.
- Right click on the duplicate layer and select “Create Clipping Mask”.
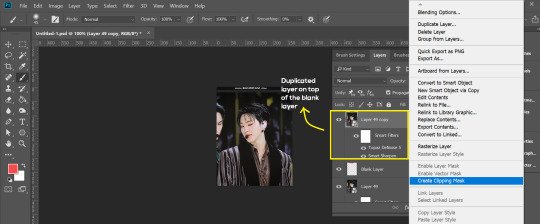
- Go to Filter > Blur > Gaussian Blur and play around with the settings until you’re satisfied with the level of blurring. Click “OK”.
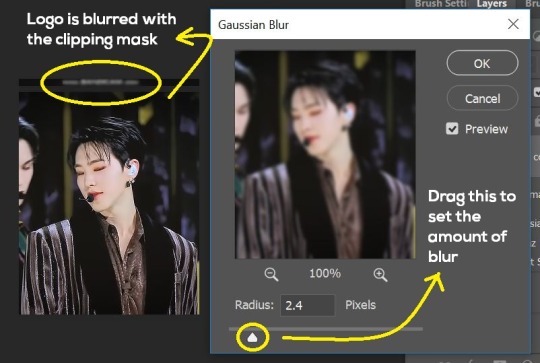
6. Flattening & Colouring
- Once you’re done with sharpening and/or blurring, click on the 3 lines on at the right corner of the video timeline and go to Convert Frames > Flatten Frames Into Clips.
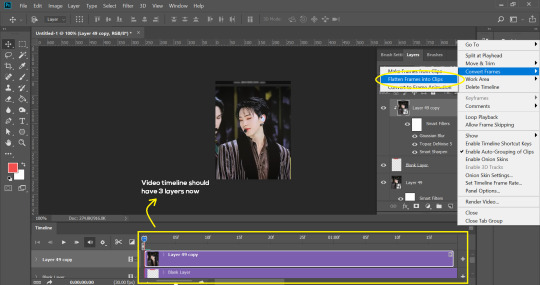
- Topaz layers and blurring will take some time to render so you can just chill for now~
- When it’s done rendering, click again on the 3 lines and go to Convert Frames > Make Frames From Clips.
- Convert it back to the gif timeline by clicking on the 3-box icon at the bottom left of the timeline.
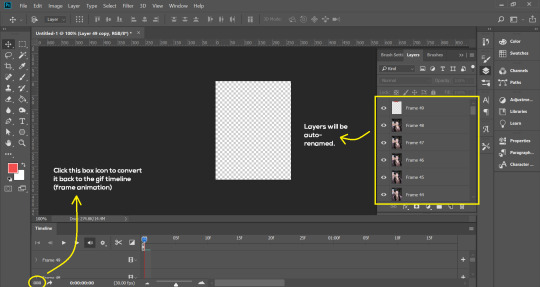
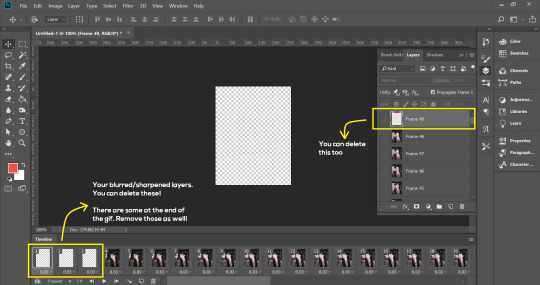
- Select the first frame of your gif. It must be the FIRST.
- Scroll to the top of the layers and select the layer at the top. Any other layers you add should be on top of this layer. VERY IMPORTANT!!
- In the Adjustments Tab (Window > Adjustments), there are many different things to play with. There’s a high chance you won’t use everything, but here’s a few of my favourites.
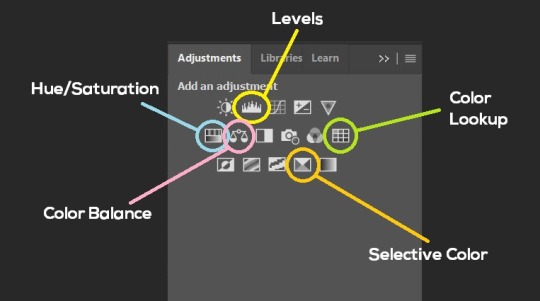
Levels - Adjust the brightness and contrast of your gif in depth.
Hue/Saturation - Useful for changing colours, or switching it to black and white.
Color Balance - Tweak the colours to your liking.
Colour Lookup - Comes with built-in LUTs that you can use as a preset. Great starting point for colouring. Saves time too. You can even download plug-ins for this. 11/10 tool.
Selective Colour - Adjust the vibrancy of specific colours.
- Colouring is completely up to the gifmaker. Go crazy go stupid :D
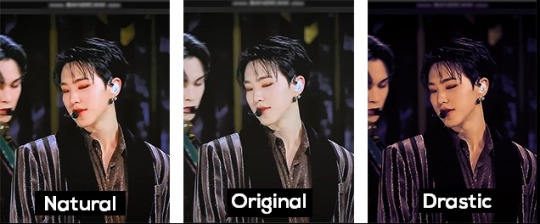
7. Exporting
We’re almost to the end!
- Set the timing for your gif.
If you used qtgmc30, the best timing would be 0.04s / 0.05s / 0.06s.
If you used qtgmc60, the best timing would be 0.02s / 0.03s / 0.04s.
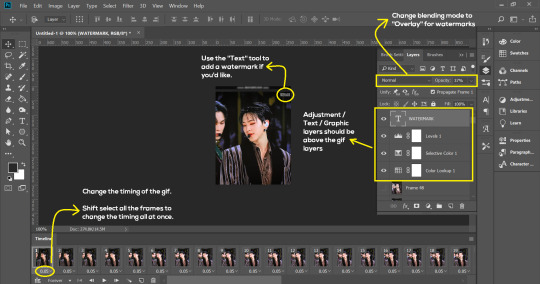
- Once you’re satisfied with everything, go to File > Export > Save for Web (Legacy).
- Follow the settings in the picture below:
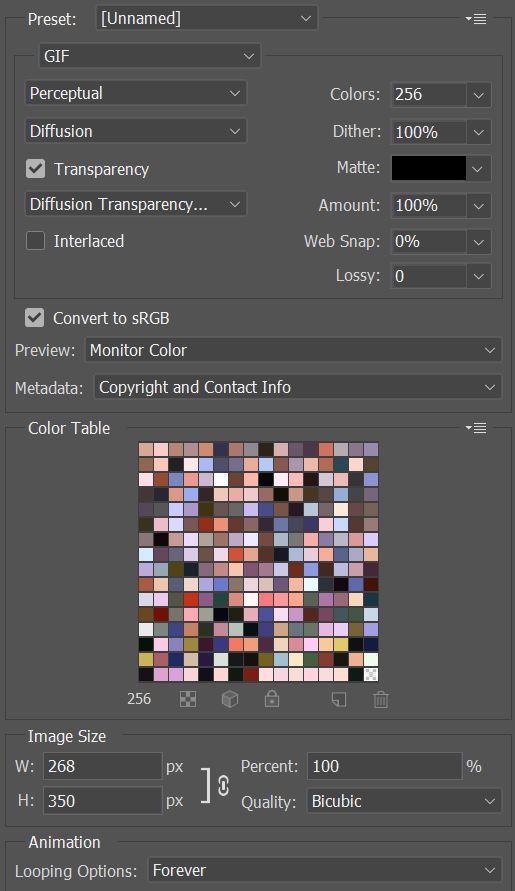
- Tumblr’s gif limit is 10mb per gif. Check the gif size at the bottom left of the pop-up window. Make sure it’s below 10mb; the smaller the better.
- Click “Save”. Choose where you’d like to save the gif.
- Done!
~~~~~~~~~~~~~~~~
And that’s it! You’ve successfully made a gif! Good job you :D
I hope this tutorial was helpful! Please leave some feedback if it helped, or if you have other methods you’d like to share :)
Lastly, if you have any questions, feel free to send in an ask or DM me!! :)
Good luck and happy gif-ing :’D
#gif tutorial#kpop gifs#avisynth tutorial#topaz tutorial#gifs#chey.resource#kpop#idk what else to tag so...#i finally posted the tutorial yay!!#please spare a reblog if you find this even remotely helpful thank you <3#also to spread it hehe i spent a lot of time on this#if anyone has any questions please feel free to DM me!!#i apologize if there are any spelling errors
221 notes
·
View notes
Photo
i finally decided to take the time & do a heavily requested gif tutorial! this will be very detailed & is how i make every single one of my gifs from start to finish! i’ll also include resources for ps downloads, actions, etc. if you have any questions, don’t be afraid to ask! & if this helps you, pls rb!!
TUTORIAL UNDER THE CUT!
i’m going to break it down into sections to hopefully make it easier to understand!
1. software i use
2. hq movie/tv show/video downloads
3. screencaps
4. importing screencaps into photoshop
5. cropping
6. actions/sharpening/gaussian blur
7. image sizing
8. time delay
9. coloring
10. saving
1. software i use
photoshop - i use photoshop cc 2020 on my macbook air but any version of photoshop with video timeline/frame timeline will work for creating gifs! i pay for my photoshop but i know there are ways to get it for free. if you don’t want to/can’t pay for photoshop, here (x, x, x, x) are some links to download it without paying!
mplayer osx extended - this is the software i use for my screencaps. there are a lot of software’s out there & i think it truly comes down to preference. i’m just more familiar with mplayer & the screencaps come out really smooth in my opinion. it’s free as well & here is a link to download it!
2. hq movie/tv show/video downloads
ok so i’ll be real, i never used t*rrents until recently & i’ve personally noticed a huge difference when it comes to quality. before using them, i was using files from MEGA & if you’re not comfortable with t*rrents, i would definitely recommend MEGA links! when it comes to downloading any videos, try to make sure they are 1080p or 2160p if available! 720p is also ok but always try to get 1080p. also i’ve found that with movies, 1080p Blu-ray versions look better but again, it’s all about preference!
t*rrents - i only use one t*rrent site which is r*rbg. they have a huge variety of tv shows & movies from what i can tell.
MEGA - MEGA is really nice for people that aren’t comfortable with t*rrents. the way i used to use MEGA was, i followed accounts on twitter that would upload MEGA links to tv shows. here (x, x, x, x, x, x) are some of the accounts that post a wide variety of links to MEGA downloads! i will say, the only downside to MEGA links is that they seem to take longer to download & you can cap out at a certain amount of GB each day.
folx - i use this to download stuff from r*rbg! download this before you try to download anything from r*rbg. its free to use & there are multiple sites you can download this software from but i’ll link a few right here (x, x, x this one is a link directly from the apple store but it costs $15.00). if you don’t want to download from any of those links, you can just simply look up ‘folx mac/windows download’ in google!
4k video downloader - i use this to download videos from youtube! it’s free as well & you can download it here!
3. screencaps
once you’ve downloaded a movie or tv show or whatever you want to gif, open whichever screencap software you’re using & start playing the video. for mplayer osx extended, to screencap you just go to the scene you want to gif, pause the video, & hold down shift + command + S on mac (i think it’s the same for windows i’m not sure).
4. importing screenshots into photoshop
now that you’ve got the screencaps of the scene you want to gif, it’s time to open photoshop! to upload the screencaps, in photoshop go up in the lefthand corner to file > scripts > load files into stack. once you click on that, you’ll click ‘browse’ over to the right & the files on your computer will pop up. go to wherever you saved your screenshots & select all of them! once you’re done selecting them, hit ‘open’ in the bottom right corner.
5. cropping
now all of your screencaps are imported!!! now it’s time to crop the screencaps. go to the crop icon over to the left.

for this gif, i want dimensions to be 540 x 350, so i go up top & type it in
great! now the gif will look like this:
6. actions/sharpening/gaussian blur
now that the gif is cropped, we’re going to sharpen it. i use actions because they are so much faster & easier. i use the action that kylos uses in her giffing tutorial & the direct link to download the action is right here! to access actions, you can either go to window > actions or go over to the play button to the right that looks like this:
when you hit that play button, you will see the actions that you have downloaded pop up! select where it says ‘select here!’ & then go down to the play button at the bottom to play the action. i circled both steps down below

the default radius in this action is 0.3 & i normally change it to 0.4 (it’ll normally pop up & ask you like shown below & just change it to 0.4!)

now the action has been played!! i add an extra step but it’s optional! what i do next is i add a layer of gaussian blur on top of the action. to do that, go to filter > blur > gaussian blur. once you select that, it’ll have a pop up that looks like the one below & you’ll just select ok or hit the enter button

once you do that, you’ll notice your gif looks soft or not sharpened so the next step is to change the percentage of the gaussian blur layer you just applied. to do this, you go to the bottom right corner & hold down option by clicking on the gaussian blur layer. there will be options that pop up & you’ll select ‘edit smart filter blending options’ like shown below (my handwriting looks like a five-year-olds ik)

another pop up will show up in the middle of the screen & you’ll be able to select which percentage you want to place on your gif. the opacity really depends on the gif but i normally do 10%-30%. for a lot of my gifs recently i’ve applied 15% which is what i did on this gif! once you change the opacity to whatever you want, hit ok!
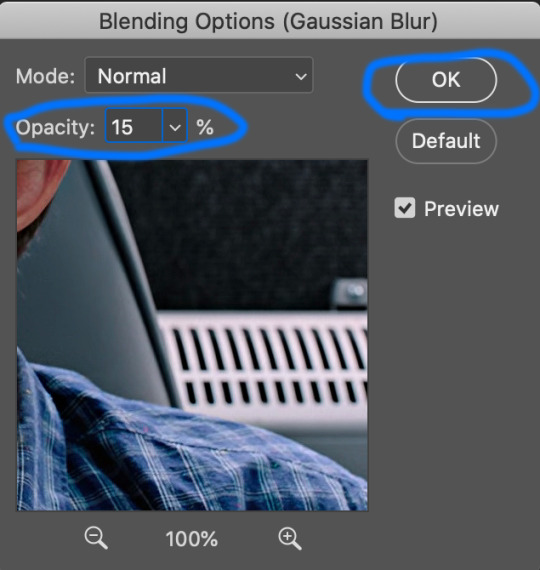
after that you want to change the image size to the same size you cropped the gif to. to do this, you’ll go to image > image size > & change it to 540 x 350 (or whatever the size of your gif is! also make sure it’s switched to pixels instead of inches! once you’ve done that hit ‘ok’ or press enter.
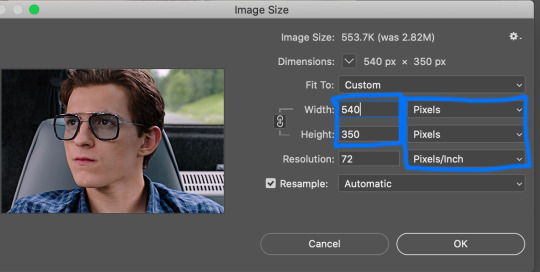
once that’s done, go ahead & save the gif! to do this, go to file > export > save for web (legacy). it’ll show you the size of the gif down in the bottom left & as long as it’s under 10mb you’ll be fine!!! down below i circled my save settings as well! also its SUPER IMPORTANT THAT YOU SET LOOPING OPTIONS TO FOREVER! once you’ve done all that, save your gif by hitting the ‘save...’ button down below that’s circled. you can name your gif however you like just make sure you keep the .gif after it!

now my gif looks sharper than before:

now for time delay & coloring!!!
7. time delay
open the gif you just saved in photoshop by going to file > open. once it’s opened, you’ll see a timeline of all the frames towards the bottom. it’ll likely say 0.07 sec with a small little downward arrow next to it. select the downward arrow & select other. change the speed from ‘0.07′ to ‘0.05′! gifs look much better & more natural at this speed. (also yes i did delete a few frames because i felt it was too long so to delete frames you just select the ones you want to delete & click the trash button down by the scroller!)

8. coloring
coloring can be so much fun but so tricky! i personally use a base psd that i made for all of my gifs & then adjust it according to the gif i’m coloring but for this gif i colored it from scratch! so for most of my gifs i only color/edit them using levels, selective color, brightness/contrast, curves, color balance, & vibrance (in that order) to access these, go to layer > new adjustment layer > & then select whichever one you want to start with.
1. levels

2. selective color
blacks: black +2
reds: cyan -9, magenta +1, yellow -3
cyan: cyan +100

3. brightness/contrast
brightness: 5
contrast: 6

4. curves
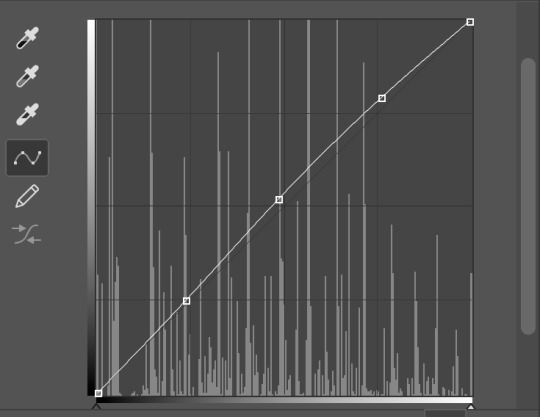

5. vibrance
vibrance: +16
saturation: 0

then you save it just like earlier by going to file > export > save for web (legacy) & you’re all set!!!! i hope this helps anyone who is trying to get into gif making & if you have any questions, don’t be afraid to reach out!!!!
#this is so long i apologize#gif tutorial#allresources#resources#completeresources#quirkyresources#my tutorial#photoshop
603 notes
·
View notes
Photo
GIFFING 101 - YOUR ULTIMATE GUIDE ON HOW TO GIF
I have gotten many, many asks before about how I gif and I finally decided to make a tutorial. This is going to be very long, very image heavy and with a lot of details and examples. I mean it, I’m going through every, single aspect of giffing that I can possibly think of. From start to finish. And please read the disclaimer at the very start.
* I use a macbook pro but this should probably work on windows too!
I hate doing this but if this helped and you want to, please consider donating to my ko-fi or if you want, commission a theme or page from me at @amaanat <3
tutorial under cut, I hope it helps!
★★★★★
- CONTENTS
disclaimer
what will you need to create gifs?
how to download videos?
extracting your scene from handbrake using VLC / built in video player
opening in photoshop
trimming, cropping and resizing videos
sharpening
colouring and psds
masks
adding subtitles
editing frames / timeline speed
multiple gifs in one grid.
actions
exporting the gif
last minute tips and extra links.
★★★★★
- DISCLAIMER
First off, this is not meant as a post where I am saying look here, this is the only and perfect way of giffing. Not at all. When I started out, there were many tutorials available that helped me figure out how to gif, and I slowly developed my own style and I would like to create an in depth tutorial that helps you grasp the basics. Heck, make your gifs whatever way you want, go absolutely crazy on colours or whatever, this tutorial is just here to guide you through the process of gifmaking, because I know it can be very intimidating to people who are just getting into it. That is why I made this and why I spent 8 hours writing this, because I want others to know too and this is the kind of in depth tutorial I needed when I was starting out 4 years ago. Thanks for reading, hope it helps and go crazy ahhh go stupid.
★★★★★
- what will you need to create gifs?
photoshop. I use photoshop CC 2020 on a mac and I pay monthly bc of student discount. There are many, many links you can find on @completeresources for downloads. You can use any photoshop you like, as long as you have the timeline option.
Handbrake. This nifty program is used mostly to convert MKV files to MP4, but I also use it to quickly extract the part of the video I want, because opening an entire movie in photoshop can quickly clog up space bc of cache and it’s a pain to find that one second scene you want with that tiny scrollbar. Download it from here.
your video (downloading explained down below)
extras: VLC, just to find how many seconds the scene is at, so we can input the time in Handbrake. You can use any other player though for that step, I use VLC or Quicktime. Download VLC from here.
★★★★★
- how to download videos
Ok so I will quickly go through a few methods here for getting your clips.
1. t*rrenting.
This is the most popular method for getting your film or tv episode. I personally get my t/rrents from rarbg dot to or if I am having trouble finding one, I go to 1337x dot to, because they compile them from different sites. I copy the magnet link and go to the qbittorrent application, import magnet link, choose the files I want and it downloads. Remember, the higher the seeder leecher ratio, the quicker it will download.
But which file should I choose?? there’s so many? Well yes there are many many files for different movies. On RAR, I found more than 40 t/rrent files for Endgame. I think that generally, the 4/5 GB 1080p copies are just fine. I have compared giffing with a 60GB Interstellar Remux (which is directly ripped from bluray) file to giffing from a 4GB 1080 file, it literally gave me the same quality and the 1080 looked crisper. So yeah don’t kill your computers space, just go for those 3/4/5GB files.
hot tip - don’t download from yify, the quality is way worse.
2. movies from twitter accounts such as logolessHD.
these accounts post MEGA links to movies and shows, but you will have to request to follow them to be able to get the links. Then you can download the movie from there. The accounts you can get these links from are here: 1 - 2 - 3 - 4. The quality can be a bit less though compared to t/rrents. Here is a link to a tumblr blog with these kinds of downloads too.
3. downloading from youtube.
ok, use 4kvideodownloader for this. It is incredibly easy to use, you just need the youtube link. Always Always go for 1080p, if you can’t then 720 at the most because otherwise quality gets really bad really fast.
4. netflix / screenrecording
If you don’t want to download / can’t find something, try using netflix and screen recording. In my experience, SC only works on google chrome and not safari so jsyk!! Here is a tutorial on how to screen record on mac (or for quick access, click command+shift+5) and windows.
NOTE: quicktime screen records at 60fps, which is nearly thrice the frame rate of movies and shows, so at the end you may end up with duplicate frames in the timeline of photoshop, so you will have to delete those frames one by one sorry.
★★★★★
- extracting your scene from handbrake using VLC / built in video player
muahaha here’s where the magic starts to happen. Open handbrake and import your video. For this part I am going to use a scene of Keanu Reeves from the 2019 movie Always be my Maybe. I will demonstrate with that scene up until colouring, because then I will show how I colour different scenes!
So when you have opened the image in HB, you get this layout. (link to imgur)
it is a bit intimidating, I know. So basically, first, click on where it says chapters near the top right and click seconds. then, input the time you want to extract from the entire video. For the Keanu scene, that scene starts at 00:57:18 and ends at 00:57:21. These are not exact timings, I usually add an extra second so the entire scene is captured and I heavily recommend you do the same.

Now down below, you can click browse and edit where your new video will be saved and you can also change the name of the new clip. Always ALWAYS remember to keep the .mp4 ending do not cut that part out!!! If the ending says .m4v change it to mp4!!

Ok then I undertake the following steps to ensure the video that will be exported is of the highest quality possible:
Firstly, I uncheck all these three boxes:

Then you see this bar here right? Well I will edit the dimensions, filters and video now. You don’t have to do anything for audio, subtitles or chapters so leaving that alone is best. Lets go to dimensions first.

Here are my settings for dimensions:
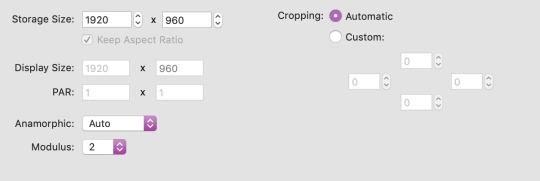
The storage size depends on if your file is 1080p or 720p. Most movies are shot in a ratio of 2.35:1, so if it does not say 1920x1080 like a 1080 file should be, don’t fret. The cut off parts are just the black bars you see when watching the movie. Handbrake doesn’t recognise nor convert them so that’s one less thing we have to worry about.
Now onto filters. Literally do NOT change anything there. Leave the settings as they are, which is like this:
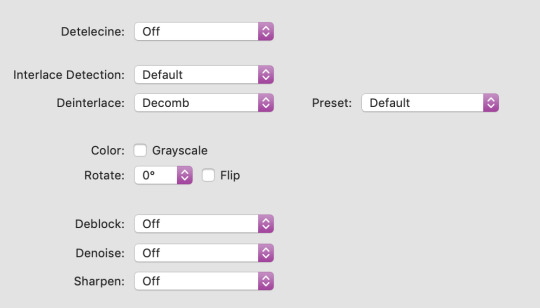
Finally, go to video. You will see this kind of window and these are my settings (imgur)
Firstly, leave video encoder at H264 or 265 depending on how your video is encoded. For the FPS, choose same as source for the framerate and click constant instead of variable!!! This will ensure your video is smooth. For quality, bring the slider all the way to the right. RF0 means it will be at the best quality possible. I didn’t edit the settings at the bottom at all so just leave them be.
Now click this green icon (imgur) at the top and your video will start encoding! It does not take long at all and then your video is ready to made into a nice lil gif!
★★★★★
- opening in photoshop
woohooo we got our video!! Ok now open photoshop. Click on file -> open:
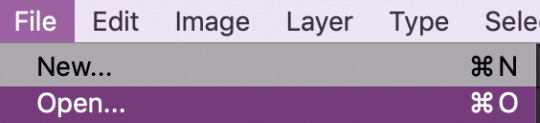
now search for the file you extracted from VLC and import it! Now your screen will look like this (imgur). With a different video, of course lol.
★★★★★
- trimming, cropping and resizing videos
ok so firstly, we will trim the video. As you can see in the image I linked in the step before, the screencap you see is of someone else in ABMM, not Keanu, like I want. So use this slider:
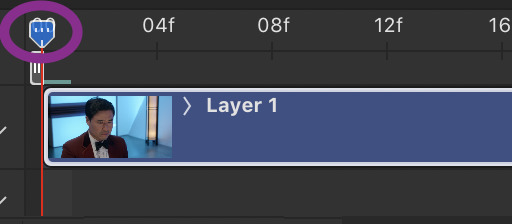
and click and drag it to where your scene begins and shows up in the window. Then, click the following button to split at playhead.

This will split the clip and so the timeline and layers section will look like this (imgur) (mine has three sections because there was space before and after the keanu scene so I cut two parts which made three clips)
so now all there is left in trimming is delete the layers of the video you do not need! For me in that image it was layer 1 and 3!
cropping and resizing
This depends on the kind of gifset you want to make. This picture is a handy guide for resizing:

This post is also very very useful for resizing info
Ok now I will crop my gif. Click on this tool:

and now my interface looks like this. I am using the ratio 6 by 4 but you can use whatever you want.

Ok now you may need to crop some black bars but since I don’t have to, I just moved the crop area around a bit and clicked enter to crop it. Just play around with sizes and whatnot, and get a feel of what you like!!
cropping tip: crop as close as you can to the edges. The more you zoom in, the more pixels that will be visible and it will make your gif extremely grainy!!
So now for resizing, go to image -> image size or click command-shift-i

and you will get this window.

A LITTLE NOTE - I personally do not use automatic but a friend who shared her sharpening psd would prefer if I kept it secret, but automatic is what most people use and it is what I used up until november 2019 and it worked just fine.
Ok anyway now I want to make my gif 268px wide so I will input that as width and make sure you click this!! It makes sure your height and width are proportional!
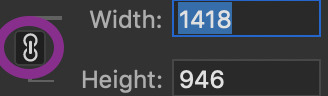
ok now we have this. After you’ve done that, click ok!

congrats, you just resized a gif!! Your gif probably looks smaller now in the main window once you click ok, just zoom in to it! don’t worry about it looking bad quality, sharpening is next!
This is how my gif looks with trimming, cropping and resizing (with 0.05 speed)
★★★★★
- sharpening
Now we sharpen! Make sure your layer is selected Go to filter -> sharpen -> smart sharpen and this window will pop up:

These are my settings which most people use. Just remove gaussian blur
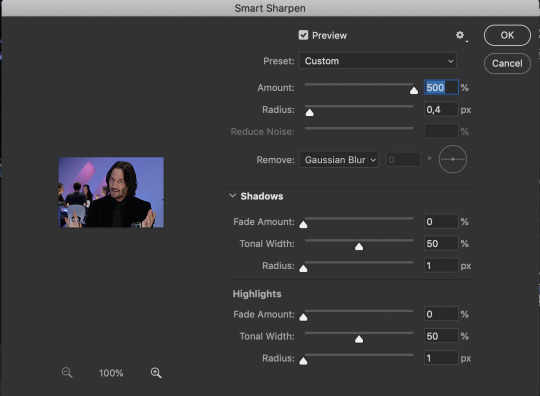
I have more accurate and use legacy checked too!
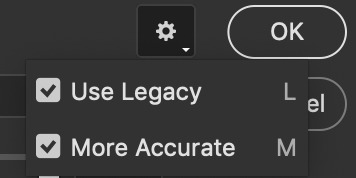
click ok! Now ... your gif might look a bit oversharpened. That’s why we use a bit of gaussian blur. Go to filter -> blur -> gaussian blur.

now I think most people also use a 1.0 radius so set that and click ok.
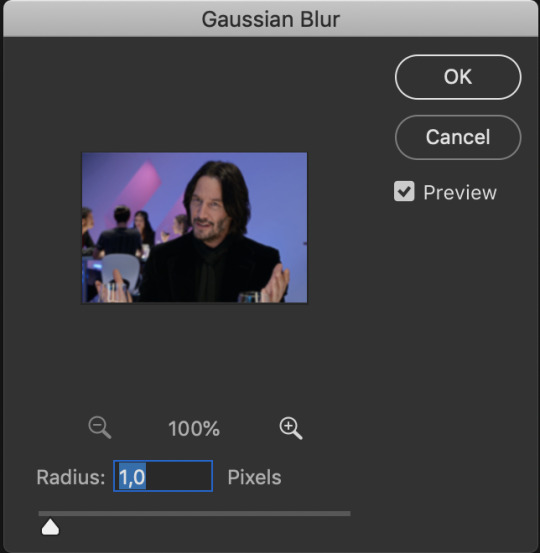
But now your gif looks too blurry. Lets fix that. Double click the icon below in the layers panel

and adjust the opacity! My go to is between 25 to 35, just so the gif looks smooth!

Now we’re done with sharpening! This is how our gif looks with sharpening with 0.05 speed:

sweet right? Now .... the best and hardest part ... colouring!!!!
★★★★★
- colouring and psds
First I will shortly talk about psds. They are photoshop files, that save the entire document which means you can share it with someone after uploading it and when they download and open it, they can edit the layers, tweak things just like they made the file in the first place. Many people upload psds of gifs with colouring so others can use that colouring. You can find so many psds on completeresources (I only linked gif psds but they have psds for icons and headers too) or allresources. I do not use psds but colour from scratch every time so I will not be explaining them further, sorry.
So for colouring, I will go very in depth into different styles. Here are the main types of colouring I have noticed people use on here:
simple - I normally use this for scenes with people in it
vibrant, bright - I use this for scenes with lots of colours in them
pale
black and white
gradients - I use this to spice scenes up a bit
colour palette
I only go for simple, vibrant and gradients and never do cp, pale or black and white, but I will link a few tutorials by talented creators who do and after that I will explain the three ways I colour by showing you three different examples :)
Some useful tutorials I have found for pale/bw/cp colouring are:
this pale tutorial by @samecoin. Especially useful read because Tippy explains how to avoid whitewashing in pale edits.
this pale tutorial by @kateausten. Very easy to read and to follow.
this colour palette tutorial by @freddyfreemen. They explain the basics and provide a psd too.
this colour palette tutorial by @stenbranlons. Very image heavy which guides you through every step of the way.
A blog dedicated to pale resources is @finesources and is definitely worth checking out!
this tutorials page by completeresources has many many tutorials on how to do different kinds of styles
Btw, this is a useful website that explains all the different adjustment layers in photoshop if you’re still getting the hang of them
ok now onto my examples for the colouring. I will first do simple colouring for which I will use the keanu gif. For vibrant and gradient I will use two different gifs. I usually put my colouring into a group so first, close the video group layer and click this to make a new group which will contain the adjustment layers for our colouring:

SIMPLE COLOURING
First I will brighten the gif up with some curves. That is this tool:

Then you get this window:
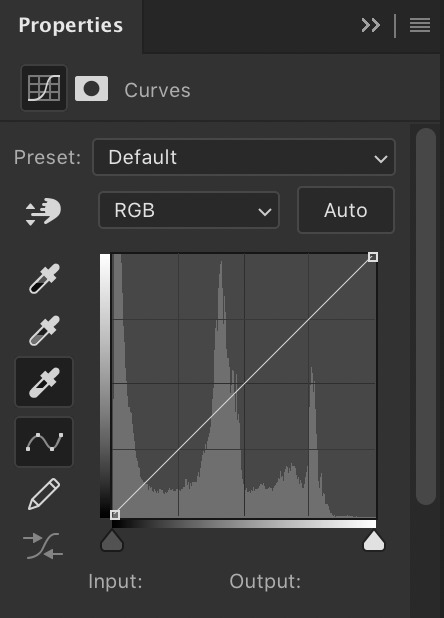
As you see, I have selected that white eyedropper tool. Using that I will brighten the image. Basically, you want to click on the whitest part of the gif using that tool. This is because wherever you click, the eyedropper will turn that part into white and adjust the entire gif that way so if you click somewhere dark, you’ll get this white bright fuzzy mess. So I clicked on the lightest place which imo is the white specks near the glass in front of his hand and now my gif looks like this:
Ok now if you look at the above image, there is a black eyedropper two steps above the white one. You want to use that to click on the darkest place of the gif bc it’ll turn that to pure black. Here is my gif when I did that:

not a massive difference but it balances things out. Now I will add some saturation. Click this icon:
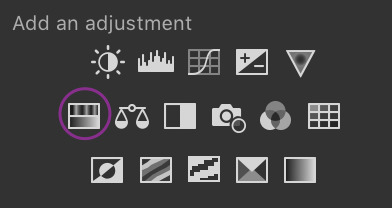
which brings up this window. I have already set saturation to around 15 to make it a bit warmer:
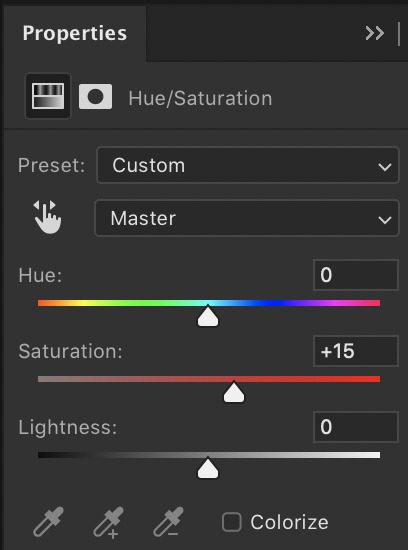
and the gif looks like this now:
I think it looks nice, but I would like to add something extra. That is why I am going to play around with selective colour to make the background pop a bit and make the black colour more dark. So click this icon:
and you get this window and these colours (imgur). You can play around a lot with selective colour and manipulate colours! So if I turned the black dial on reds to +100, they would become wayyyy darker. However because I want the background to pop, I would use the colours magenta and blue (and black for the final touch). For those my settings are this: 1 - 2 - 3 (imgur). So now my gif looks like this:

And now i think we are done! For comparison, this is what the gif looked like with absolutely no colouring or sharpening:
And that was all for simple colouring!! Lets move on to vibrant colours!!
VIBRANT COLOURING
For this I will use an example from Thor: Ragnarok bc thor is my soft bb. I did not do much for this first example except play around a lot with selective colour and I used the exact way of adding saturation and curves as shown before. Honestly just playing around with selective is the best bet to get vibrant colouring. The gif without sharpening etc was this:
the gif after colouring and sharpening is this:
pretty sweet huh? Just play a lot with saturation, hue and selective colour and channel mixer and you can create a lot of styles that way!
GRADIENT
for this I will use another clip from Thor, but from The Dark World. It is a bare clip where it is raining and I will add a gradient on it. This is the gif without colouring nor sharpening:

now we will do the sharpening and colouring. I already applied a basic curves and saturation layer so now it looks like this:
It looks a bit better right? Ok lets get that gradient applied. Click here:

and click on gradient, NOT gradient maps bc those are different things and I honestly dont know how maps work.

now this is what will appear, I haven’t changed anything to this yet:
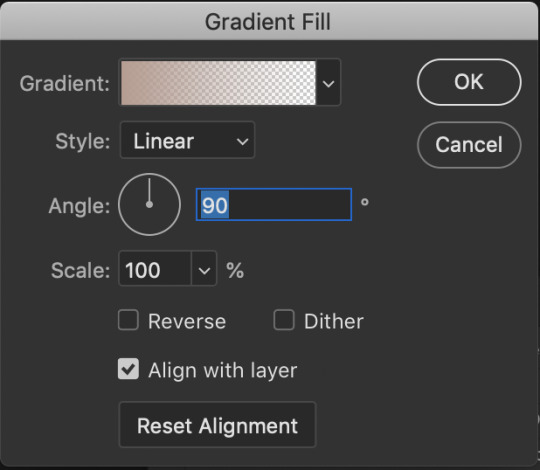
What style, colours, angle you choose is up to you. I personally am going for 0 angle because I want it going right. Now, to choose colours, double click on the colour shown next to the word gradient. This window will show up:
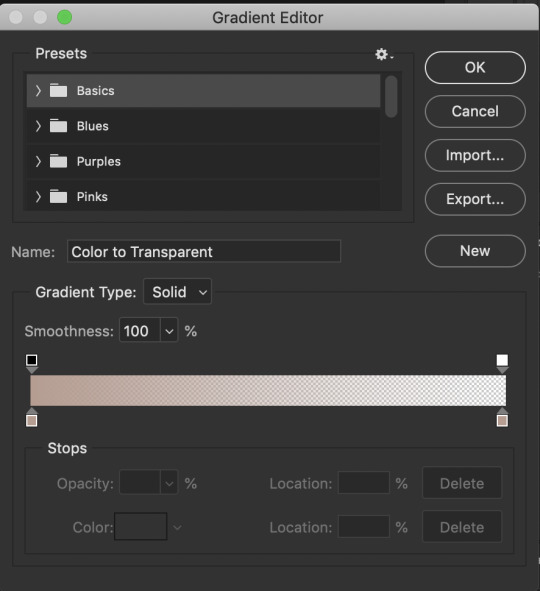
The fun part is you can do what you want here. Just experiment, click the buttons, adjust opacity etc. When you click at the bottom of the bar somewhere another stop marker appears meaning you can have even more colours! Just click on the bottom markers and edit to your hearts content! Use the top button to adjust opacities. Personally I went for this gradient:

Ok but now we have a problem because our gradient is fully covering the image and you can’t see anything. That is where blending modes come in. Right click on the gradient layer and click blending options. This window will pop up (ingur). When you click blending mode, these options appear (imgur).
Here is a good guide explaining the blending modes
I just recommend playing around seeing which one suits you. I went for overlay, which makes my final gif look like this:
and that was that on colouring!! Let me know if u have questions about it! Onto the next part, masks!
★★★★★
- masks
I will not go in depth here, but instead I will link some tutorials but the amazing @thepunisher who has explained it much better than I ever will be able to. The tutorials are all in this link. If you have any questions do lmk but idk how I could explain it.
★★★★★
- adding subtitles
although we wish we could, we can’t all lip read so we need subtitles also I’m hard of hearing and need them anyway but yeah, I will quickly highlight how I add subs! I use the font Arial Rounded MT Bold Regular.
I will first link to this post because it helped me a lot and may explain stuff better than I do.
Lets take the keanu gif we had earlier. In it, he says ‘fish flakes’. Now what I do is this. Click on this icon:

and drag a box around the gif fully. Add your text. Mine looks like this now:
Well that ... does not look like a subtitle. BTW my settings are:
*when there are two people speaking I change the colour of the second person to #ffff00 - also for 540px gifs I usually use 12/13px text.
Ok now I will add the stroke and drop shadow. Right click on the layer of text, click blending options and change your stroke and drop shadow settings to this and this (imgur). Now just click the move tool or hit V on keyboard to select it and drag the gif down wherever you want. Now my final gif looks like this:

Ok, now if you have two gifs and you want them to be the same distance from the bottom, right click the text layer of the first gif document, click duplicate layer and you will get this window:
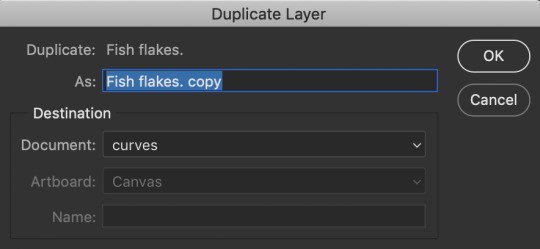
now click on destination and depending on what files you have open in PS, you will get this window:

now just choose where you want the text to go and if the gifs are the same sizes itll appear exactly where it did in the first one and you can edit the text for the second. You can do this with adjustment layers, groups etc too!!
Now text is done! Off to the next part!
★★★★★
- editing frames / timeline speed
We are done editing, now time to convert to frame animation and edit the speed!
Ok click on the four bars on the right side of the video timeline. It will bring up a menu. From there, select this:
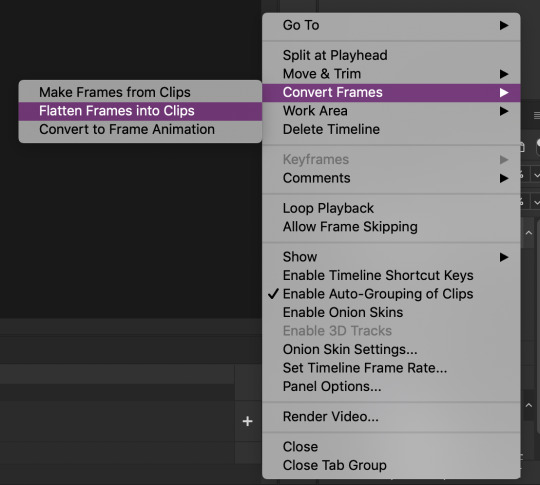
This will make individual layers of every frame into clips. Now, click this at the bottom left side of the video timeline:

This will convert your video timeline to a frame animation timeline. Now it looks like this (imgur). you’re probably wondering wait where the heck did my layers go well don’t fret, lets click the four bars on the right side again and click this:

now look! We have got all our frames into the timeline! Just delete the excessive frames at the front. Now click the four bars again, select all frames and then click the number at the bottom and change it to 0.05 or 0.06 or whatever speed you want:
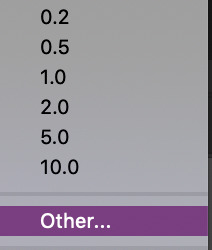

Now we are done with this step!
★★★★★
- multiple gifs in one grid
I myself am not going to explain this, instead here are links to a few amazing tutorials that will help you further
this tut by @brolinjosh
this tut by @futurist
★★★★★
- actions
Now actions ... man they make everything so much easier. Basically actions are a sequence of steps you undertake in photoshop that are recorded which you can then save and use on multiple files. This makes the giffing process much much faster!!! For instance, these are the actions I have saved (mind the doubles lol I am experimenting a bit!)
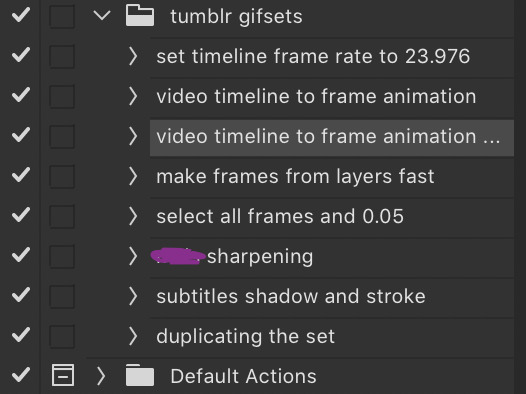
As you can see, I have one for undertaking the entire video timeline to frame animation process and one for sharpening and the subtitles. It has saved me around 75% of the original time I put into creating sets before which is a lifesaver.
I cannot explain how to make actions bc I am really bad at explaining stuff, but here are some tutorials:
- https://helpx.adobe.com/photoshop/using/creating-actions.html
- https://completeresources.tumblr.com/post/66560261468/how-make-action-%D0%B7
- https://completeresources.tumblr.com/post/50583786863/how-to-use-an-action
- https://completeresources.tumblr.com/post/50362731526/how-to-use-actions-on-gifs
https://www.creativebloq.com/adobe/create-own-photoshop-actions-61411918
★★★★★
- exporting the gif
now we’re at the final stage! When you have your gif ready, go to file -> export -> save for web legacy
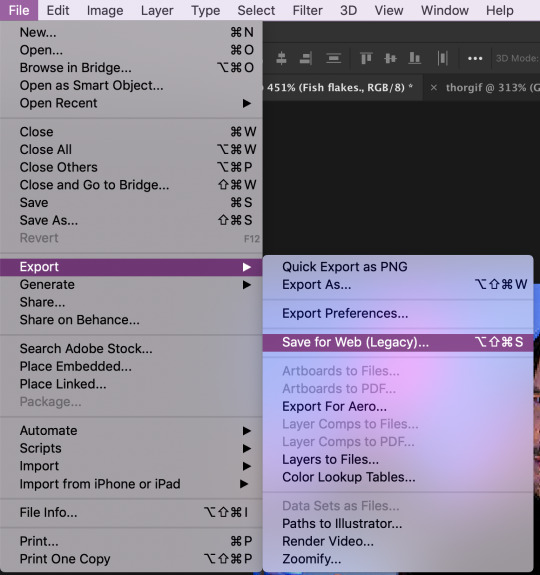
ok now the next window is this which looks intimidating I know
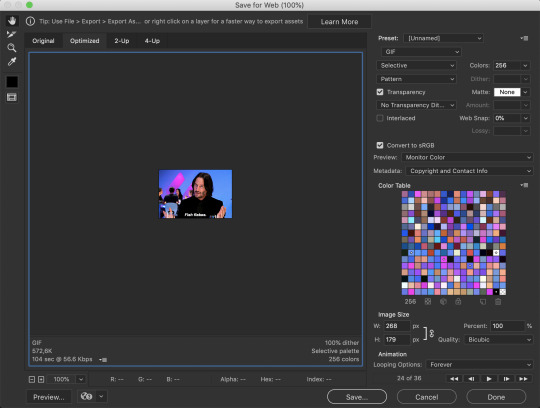
Well basically, those are my settings above. Make sure the looping option is set at forever. Also on the left size you see how big your gif is, make sure it is under 8mb but tumblr is unstable so keep it under 5MB and it should be fine.
I use different exporting types at times. Sometimes I use selective and pattern, sometimes diffusion or adaptive+dif. Just remember that the gif size depends on which you choose so keep that in mind. Here’s the difference (if u can even spot it).
selective + pattern

selective + diffusion

adaptive + diffusion
Personally I mostly only use selective + pattern!
btw make sure your matte is at NONE!!! This is because otherwise you have those whitish transparent borders on your gif, esp noticable on dark gifs, like shown in this tutorial by the talented @joewright !
And congrats, you have officially made a gif! Now go experiment, have the time of your life and do whatever the heck u want with your gifs. And if you want me to see them, tag me!! I track #usernums !!!
★★★★★
- last minute tips and extra links
man idk what to say here really but here goes:
@completeresources and @allresources are amazing places to learn more about gifmaking, pls take advantage of the opportunity
reminder: quicktime records at 60FPS, so unless you want a laggy gif delete the extra duplicate frames in the frame animation timeline!!
When opening import video frames to layers, do not click skip every second frame!! do not!!!!
Do not steal gifs. Try making them. I know it takes time and it can get frustrating but don’t post someone elses gifs as your own. Even the ugliest gifset in existence made originally by someone is better than a stunning set put together full of stolen gifs from various users. Don’t be that person
Don’t be afraid to ask for help pls just go on anon if u want!!
use the tumblr dimensions!!! I cannot stress enough how important this is because if you don’t, your gifs will look stretched af and lose quality so like .. don’t do that
1K notes
·
View notes
Note
I've been wanting to this but I've been too shy for too long hahahaha
I've been making verivery content for a while but I really want to improve my gif sets, and your gifs are mighty beautiful TT_TT may I ask for advice? Like do you use your laptop or your phone? Do you use photoshop??
oh feel free to ask me anything ! :D and yes of course ! gifmaking is actually fairly complex on tumblr ;-; so i'll try my best to include the basics and all the important stuff !
for gifmaking i use photoshop 2018 and so i use a laptop >.< i’ve seen a lot of asks where people ask about what apps gifmakers use... and to put it nicely ... there is no easy way to get nice gifs T-T the reason gifmakers on tumblr have such nice gifs, is bc there’s a lot of patience, learning, and practice involved in creating gifs for this platform... you can’t just plug in a video clip to a gif converter and expect it to spit out an hd gif for you ... unfortunately ...
before beginning i’ll recommend this tutorial ! it’s the tutorial i used when i was first learning... and my best advice is to have lots of patience ;;;; tumblr is a hard platform to make gifs for and learning how to make nice gifs will not happen overnight
Photoshop and other resources
i personally downloaded ps 2018 and that works fine for me but i’ve noticed that ps cs5 or earlier tends to have a broken ‘import frames to layers’ action so i’d suggest newer versions for gifmaking ! to download i basically looked up youtube videos and checked comments to make sure the tutorials actually worked,,, but if you want you can try these posts ! (1, 2) i’m not sure if they work but usually there’s a lot of posts made on tumblr + other sites for downloading it for free !
About video processing programs
i also use avisynth to process my frames... this might be a really complex bit to learn and it’s not 100% necessary so i’d say you can skip over it when you’re first learning photoshop and everything but if you are interested ! basically programs like avisynth and vapoursynth reduce the video file size down to tumblr’s preferred image size without reducing the quality as much as resizing in photoshop does :o ! additionally it helps process torrents (these are the ts and tp files for live performance stages that are super hd !) but again it’s somewhat complicated i’d recommend this tutorial for download and use if you ever want to ! (vapoursynth additionally has sharpening and denoising options, but since i’ve never used vs it’d be easier to look up a vs tutorial than to ask me >.<)
Where to get videos
this part is CRITICAL !! for gifmaking,,, you could be the best gifmaker on this whole site but if you have a video with poor quality... no matter what,,, your gifs will not come out nicely T-T so when downloading any vlives or youtube videos, they should be at least 1080p in quality ! or as high quality as possible ! this is bc you need to reduce the file size down by a lot for tumblr’s dimensions and this means you need the best quality :o ! i typically just screenrecord videos these days bc downloading whole hour long vlives / long youtube videos is a strain on my laptop hhh ;;; for live perfo stages you should always download torrents to use but this means you need video processing programs like i said above >.< there’s a resource here to help find them !
these are the basic tools you’ll need hhhh there’s a lot more including sizing, sharpening, coloring, frame rate delay, exporting, saving, etc... and i don’t want to make this too long but !
essentially tumblr has size dimension restrictions for image files, a pixel too big or too small will cause tumblr to stretch or compress your gifs making them blurry... the dimensions are optimally:
a.) 540pixels (width) for one gif in a row
b.) 268pixels (width) for two gifs in a row
c.) 177pixels / 178pixels / 177pixels for three gifs in a row
for sharpening many people use topaz etc. and i’ll point you to other tutorials if you want to use it but tbh ! i use photoshop’s smart sharpen options and those work just fine for me... (plus topaz takes forever to render and i h8 its guts so)
coloring - okay so this is probably THE MOST time consuming part for gifs for me.... idk if you’ve noticed but lots of times, gifmakers’ gifs have pretty colors and nice lighting when you compare to the original video ! that’s bc we add layer adjustments in photoshop to make them look nice ! these include brightness, saturation, exposure, vibrancy, etc. but knowing how to use adjustments is a whole post on its own >.< there’s lots of coloring tutorials out there as well if you want me to direct you to them !
for frame rate delay, i use 0.05 seconds for 30fps (so your normal videos) and 0.03 for 60fps (if none of that made sense that’s okie ! it’s just basically how fast you set frames to play in your gif !)
when exporting - tumblr has a 10mb gif limit but honestly anything above 8mb starts making me anxious or takes too long to load .... so most my gifs are like ... 3-7mb only
but yea these are just some basic tips and stuff ?? i’m sorry it took me so long to respond and it wasn’t as nicely organized as it could be... there are a lot of really good gif tutorials out there ! you just have to look a little ! if you have any additional questions tho feel free to let me know ! i just didn’t have the heart to type out the literal process i have to go through everyday when making just one gif :p i’m sure a lot of gifmakers can relate haha,,,, happy gifmaking !~
#one day when i'm about to d*e i will release a comprehensive gif tutorial#but for now .... even i am astounded still on how much work making content is sigh#me and my cc moots should be getting paid .... ngl T_T#bonknanab#asks#🌱.text#resources#the way this doesn't even go over sharpening all that well sigh ....#there's just so much#and sorry if this sounds?? like salty in any way LMAO#idk how many times i've seen asks where people are like ??? what app do you use on your phone#and bro .... there is no app it is all my blood sweat tears and avisynth#like the frustration i feel#when people repost and are like ? what's up it's just a video anyone could make gifs#and i'm like ??? then make your own and stop reposting mine ???#sigh#anyway i hope this was helpful ;;;;#i've been gifmaking for a while and even now i'm like ... but do my gifs actually look ok#or am i making it up in my head and they're ugly ;((#fjhdgkfjghdkf#do people even want to hear gif things from me LOL
18 notes
·
View notes
Photo

So, since I got a couple of asks about making a manip tutorial, I’m going to walk you guys through how I made the Sofia Martinez x Diego Hargreeves gif that you see above! I use photoshop on mac for all of my gifs, so it may look different on other computers, but the theory is the same (I don’t know what version of photoshop it is lmao, I got it free through school)
This is admittedly not my best gif ever but it was less complicated than a lot of what I make so it seemed like a good one to make a tutorial for! Details are below the cut since this is super long
1. So first I start by loading the first of the two gifs! If you’ve never used photoshop before, you can do that in “file”
NOTE: If you already know how to get a gif loaded then you can skip ahead to step 4, and if you know how to get the gif to only include the frames that you want then you can skip to 6!
(Ik most people will use premade gifs but I make all of mine from scratch so I included that in this)
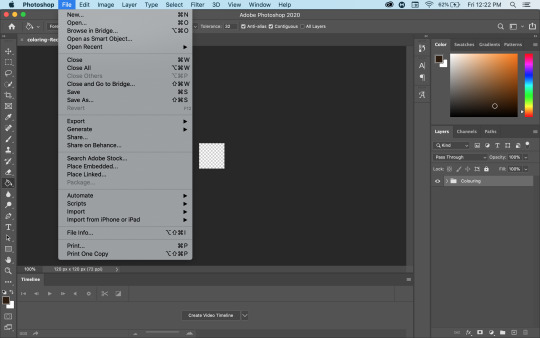
2. So I know that different people load gifs differently, but I always go with import video frame to layer! It opens my files and I find the mp4/mov file that I want to load from!
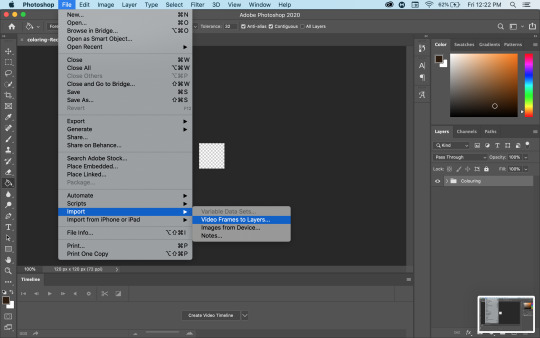
3. So I forgot to screenshot this originally which is why you can sort see the final result lmao but anyways then I go and select what part of the file I want! Now I’ve used this Diego scene in a lot of edits so I know exactly where I want it, but finding the exact moment sometimes takes a bit more time/attempts before you get exactly what you want!
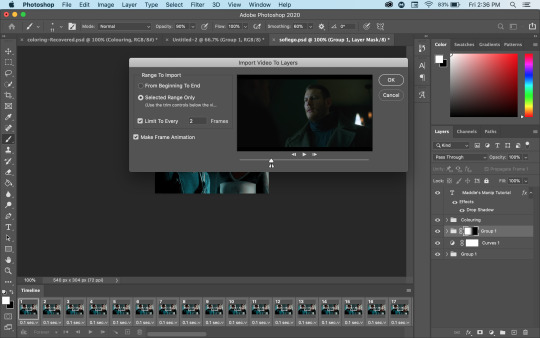
4. So now that I have a gif, you can see my timeline at the bottom! The first step to making an actual gif is to go through the timeline and delete all of the frames that you don’t want! In my case, that includes all of the Luther frames that came before this scene! And I decided to make this a 50 frame gif, so once I had 50 frames of Diego, I also deleted everything after that!

5. So once you get just the frames that you want, go to your layers on the side and delete all of the layers that are no longer in your gif! After that I make the remaining layers into a group because I find gif making a lot easier when everything is in groups lmao!
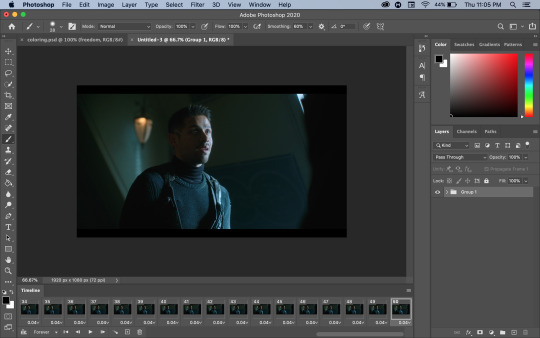
6. Then I like to create the curve layer! This may look different on pcs but on mac you go to the layers dropdown into new adjustment layer to curves!

7. For creating the curves that I want, use the highlight (circled pink) and lowlight (circled yellow) eyedrops! I start with the highlight and I click on what I want to have as the lightest point of the gif (in this case, Diego’s neck), then I use the lowlight and click on what I want to be the darkest point (in this case, his harness)

7b. Now, if you want to change any of the curves from there, you can click on where it says RGB and choose which colour to adjust! If I want the entire thing to be brighter then I’ll go through each colour and increase them all by the same amount; if I want to make one colour stronger or weaker then I only change that one!
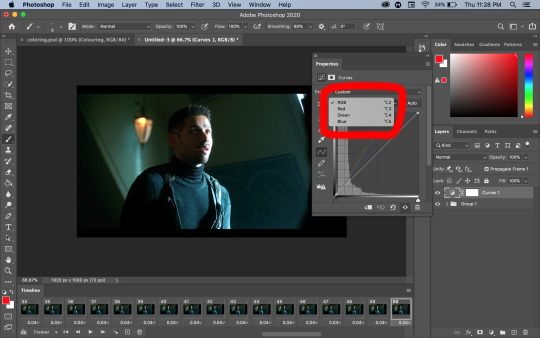
7c. in this closeup you can see where the numbers are on the bottom! I only ever adjust the input number, I don’t touch the output at all! Once you’re on a specific colour, click on the square at the top (highlight) or bottom (lowlight) of the curve to determine what you’re adjusting!

NOTE: Don’t assume that these will be your final settings! Once you combine the gifs and we get to the real colouring, they will definitely be changing! But I personally prefer having the base curves already done and then adjusting things later rather than trying to start it later!
After that, I repeat the process to make the second gif, and now we get to making the manip!
So my Diego gif is bigger (1920x1080) than my Sofia gif (1280x720), so I’m going to be moving his gif onto hers!
8. So to copy the gif you’ve made, select all of your frames and then click the three little lines on the bottom right of your timeline! Make sure you’ve selected all of the frames
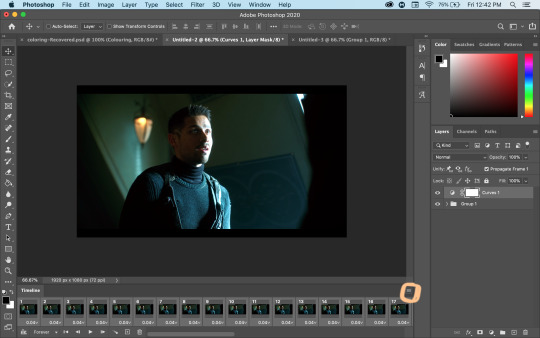
9. Then, you can choose the copy frames option!!
Note: I should have done it sooner but I forgot; at this point make sure that your curves layer has been moved into the group so that it copies with everything else!

10. So then we move to our other gif, and again we make sure that we’ve selected all the layers, and we click the three little lines again! Make sure that you’ve selected the top layer of the gif so that the layers from the other gif will go on top of it!

11. This time, we’re going to choose to paste frames, and when the pop up appears, make sure to select “Paste Over Selection”! That’s what will put the gif you copied on top of the gif you have selected!
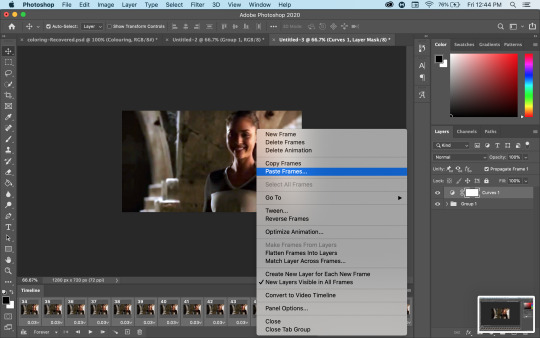
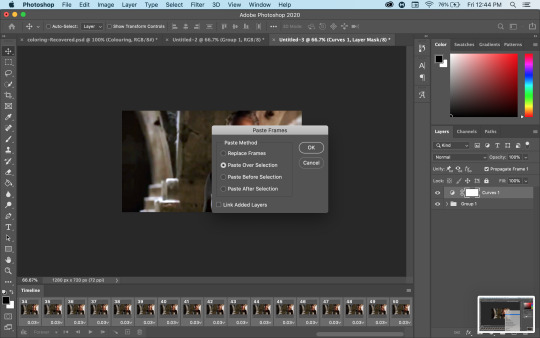
12. so now we this! At this point I can’t see the gif underneath it, so we’re going to create a layer mask (circled in orange in the second screenshot) and get to really making the manip!
NOTE: this will actually say add layer mask, but when I press the command key to take a screenshot it switches to vector, sorry about that!


12b. Circled in orange here is the layer mask! This is the layer that we’re going to do all of the editing on now to make the other gif visible!
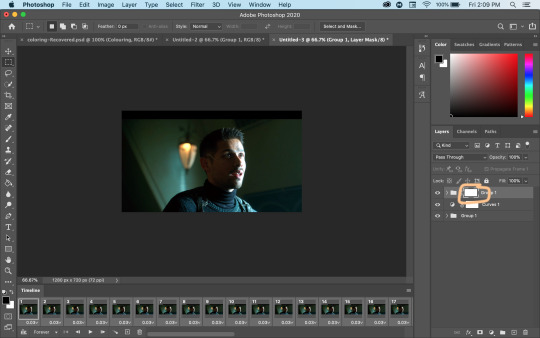
13. Now, because of the size difference between the two gifs, I decided to move the Diego gif to be fully centred to start! So I used the free transform tool and just dragged it over! This won’t be its final size or position, but it means that when I go back to editing the layer mask, I’ll be able to see more of the Sofia gif to know what I want to change!
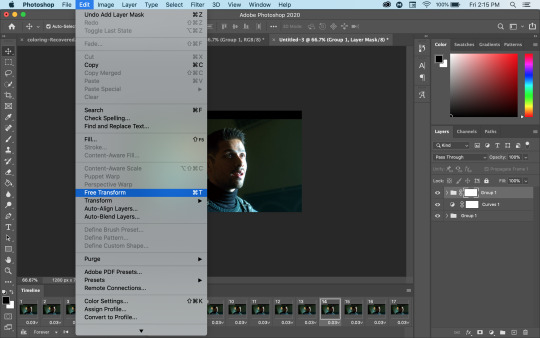
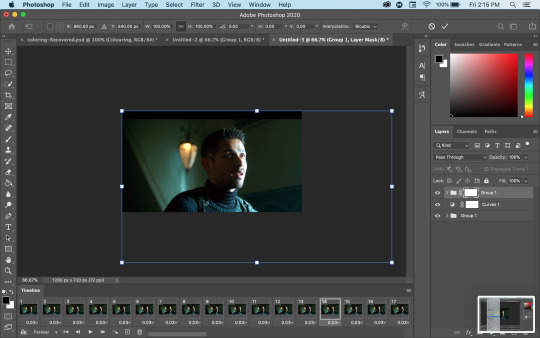

14. So now that it’s more or less where I want it for now, it’s time to get my brush! I always start off with a big brush (better for the fast, imprecise work that I do to start) with 0% hardness! I almost always use 0% hardness unless I need a really defined edge. Make sure that your foreground colour is black and then just paint on the layer mask until you can see the bottom group! If you accidentally hide more than you meant to, just switch your foreground colour to white and paint over it, which will re-reveal it


15. So now that I can actually see the entire Sofia (Lindsey) gif, I’m going to go back to the free transform tool and resize/move the Diego gif until they’re roughly the same size! Then I’ll go back to my layer mask (still with black as my foreground colour) and paint over the mask until it’s as visible as I want!
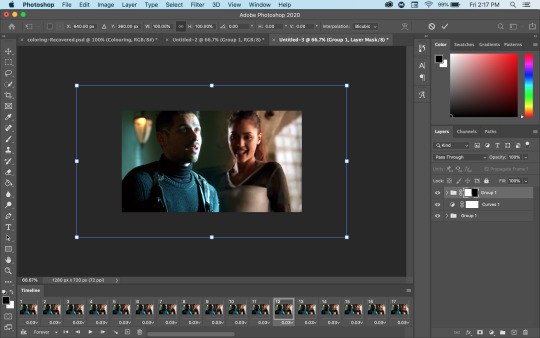

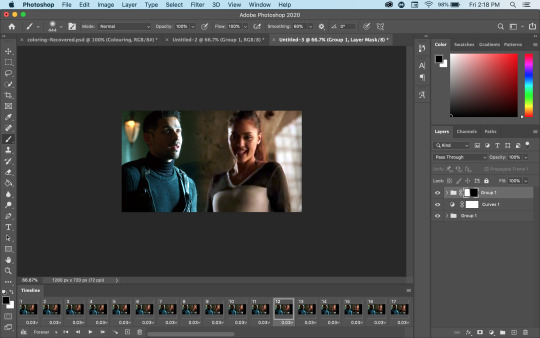
15b. Now I found the entire gif was too far to the left for my liking, so I selected both groups and went back to the free transform tool and just moved everything to the right until it was more centred!

16. So now I have a manip that I like, but the lines are still harsher than I want them to be!! So I go and right click on the layer mask and choose the Select And Mask function!

17. Now this brings us to a new menu, where we can work more on the mask! I like to use the feather function (you can see where the box is highlighted blue) to soften the edges of the manip! I usually start with 50px and either lower or increase the number until I like the way it looks! I can’t describe exactly what it does but it makes the edge softer and the manip looks more blended
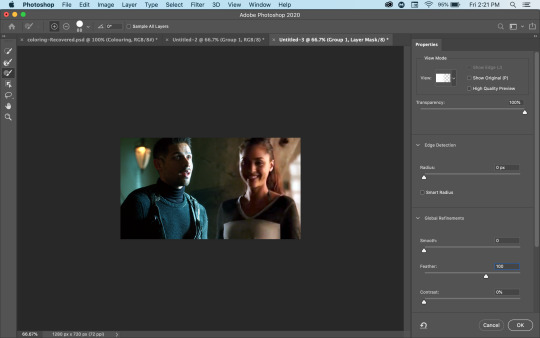
18: Now it’s time to colour the gif! So I have my psd open here, so I right click on the group and choose duplicate group, and then for the destination, I choose my manip (untitled 3, in this case!)
NOTE: I use a colouring PSD that was shared with me, but you can find colourings all over tumblr and deviantart — you don’t even need a psd, you can make your own or just play around with different adjustment layers until you like it!
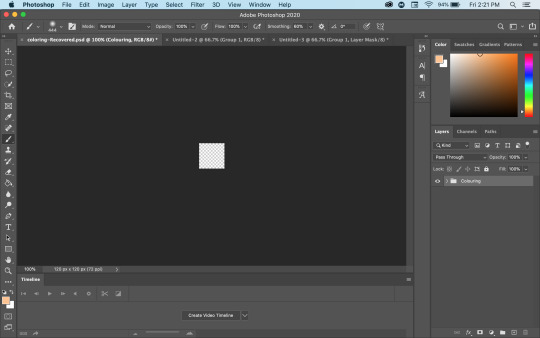


19. Now I go back to my manip file and oof, if looks way worse like this! So I go back to those curve layers from the beginning and adjust things until it looks better and matches better! For Sofia, I made the green and blue curves stronger, and for Diego I made the red stronger! For Diego I also added a brightness/contrast layer to lessen the harsh contrast!

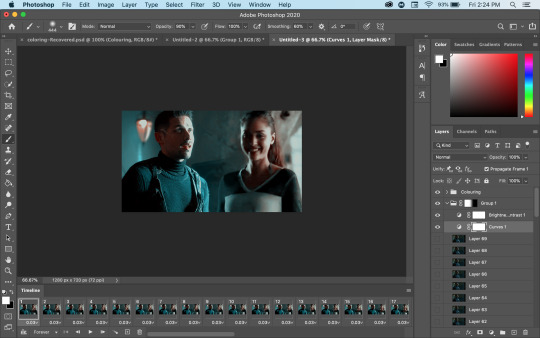
20. Now it’s time to resize the gif! Tumblr limitations don’t allow gifs wider than 540px (no height limit that I know of), so that’s what I set mine to! Then it automatically changes the height to keep the ratio the same!
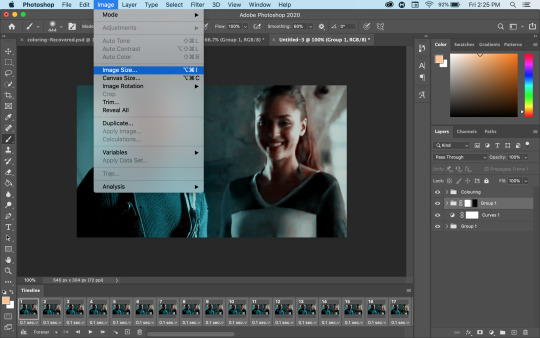
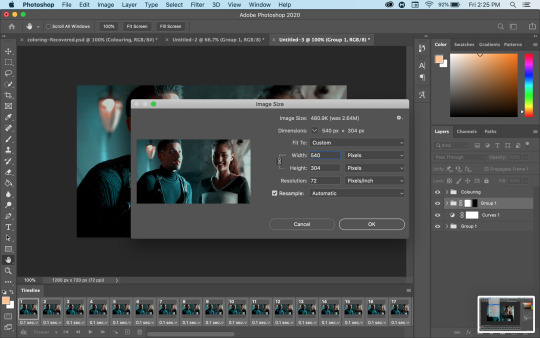
21. Now when I make my gifs smaller, I always end up with this awkward little empty space on the edge, so we go back to our layer mask, now with white as our foreground colour, and just using a small brush we will that in again so it looks normal!


22. then we save!!! Go to file > export > save for web, and then you’ll get the first save popup (the big one), click save, and then you get the smaller one and you can name it whatever you want!

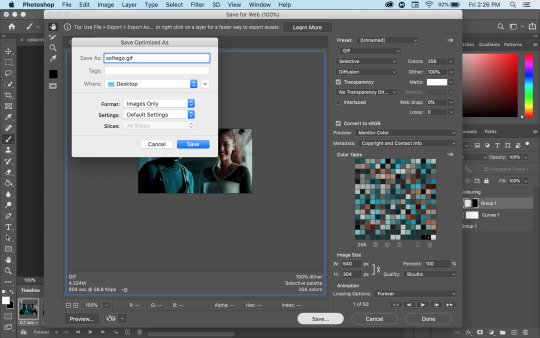
23. and now we have a gif!!!!

I really hope this tutorial helps at all! If you ever have any questions about this tutorial, feel free to shoot me a DM or an ask and I’ll try to clarify; and if you’d ever like to know how I do another type of edit or a specific edit, shoot me an ask and I’ll try to put together a tutorial!
Happy creating y’all!!!
80 notes
·
View notes
Last Seen Blogs

skillcdhands
ᵇˡᵒᵒᵈʸ ᵐᵉˢˢ
sae-something
meow
apricotings
to love and to be loved

ace-bard
•◇allophobic◇•
loddazuveget
Karl! Lődd az üveget!