#i needed the 1080p quality and ended up delaying a lot
Note
Hey ! Do you make gifs for kdramas, and if so, how do you go about doing so? Thank you 😀
yep i do! first of all you’d need to have some sort of a software to create your gifs with. i do everything on photoshop so i won’t be able to be of much help for any alternative methods 😢
when it comes to giffing, everyone has their own method that works for them, there’s no 1 set way to go about it so don’t be afraid to play around and experiment as much as possible to discover what you like! i get inspiration all the time from all the creations i come across on here 💜
really, just have fun with it!! there are no rules (except for a few lol) ✨✨
before you even gif you’ll need to make sure you’re able to source high quality downloads bc that is really the key to everything - here’s an ask i answered where i linked some resource posts for giffing dramas
sharing my typical workflow below to give you an idea of the steps involved. you’d probably be able to look up more detailed tutorials for each step or you can always DM me if you need more specific help :)
1) download the video file making sure it's minimally at least 1080p for the best quality gifs
2) pick out the moment you wanna gif and identify the timecodes (to give you an idea depending on the file 4 seconds of video would usually translate to around 99 frames)
3) trim those moments using some sort of a clipping software (or i think you can also do this directly using ps), i use handbrake for this purpose
4) when cropping and resizing, i prefer to do it using vapoursynth bc i find it a lot more efficient and i have more control over maintaining the same framing across gifs. but again, you can do this directly in ps if you prefer and don't wanna learn how to use a bunch of different software 😝
5) for resizing, it’s very important to use the correct tumblr post dimensions or tumblr might resize it for you and the gifs you worked so hard on could end up looking pixelated after posting! here’s the recommended widths for photoset posts
6) and since i’ve already resized and cropped the clips in the previous steps, once i import the files into ps (file > import > video frames to layers), they can actually already be saved immediately as gifs (file > export > save for web)
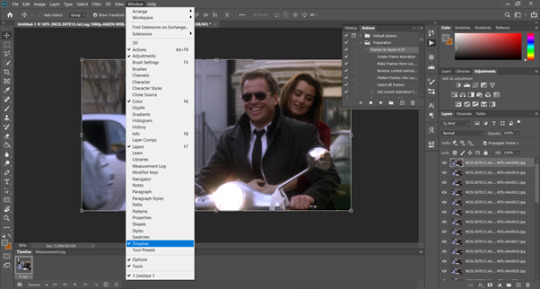
7) but of course you probably won’t wanna stop there bc you wanna make sure your gifs actually look good! i recommend playing around with the smart filters to see what looks nice to you - to do this, first switch to timeline mode and then convert your layers for smart filters (select all layers > filter > convert for smart filters). the filter i highly recommend using (and is what most creators use) would be smart sharpen but you can also try out some of the others like camera raw filter, noise, etc.
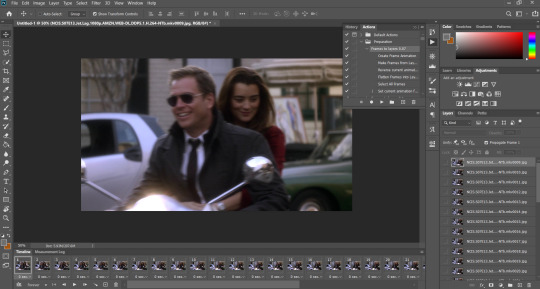
8) once you’re satisfied, it’s time to colour!! i usually switch back to animation mode to do this (convert frames > flatten frames into clips > make frames from clips > convert to frame animation). the adjustment layers i typically use are curves, brightness/contrast, selective colour and levels but if you’re new at colouring, you can also make use of ready psds that people have already uploaded on tumblr and tweak them to your liking so that it suits the scene that you’re editing (the same exact colouring usually won’t work across every single scene/show). but just don't reupload the colouring and claim as your own!
9) final step before saving is to adjust the frame delay, some prefer their gifs a little faster/slower but i usually set mine at 0.05 bc i find that it’s most comfortable for the eyes
10) now you’re ready to save your gif 🙌 i usually save it in adaptive diffusion mode keeping the colours at the default max of 256. if you’re planning to upload onto tumblr, the file needs to be under 10mb or it won’t upload! so if you have trouble keeping your gif under the size limit, you’ll have to go back and cut down on the number of frames (i would remove frames from either the start or the end and avoid skipping any in between or your gif could end up looking “choppy”). alternatively, adjusting your colouring can sometimes help reduce the file size too (the lesser variation of colours in your gifs the smaller the file size).
happy giffing! xx
2 notes
·
View notes
Text
Thunderbolt to hdmi adapter target

#Thunderbolt to hdmi adapter target 1080p
#Thunderbolt to hdmi adapter target update
#Thunderbolt to hdmi adapter target portable
#Thunderbolt to hdmi adapter target pro
Also, I wanted to note that the seller emailed me 2-3 times asking me to change this review or "make it disappear" because it is important to his customer service adding a :( at the end of each message. I'm still leaving one star for the product itself because it broke after such a short amount of time. I chose a refund because I had already purchased another adapter from Target. The seller reached out to me and offered to give me a refund or a new adapter. And I can’t return it or exchange because the window is closed. Was working great and then it suddenly stopped working after only using it for 3 months. Reviewed in the United States on November 5, 2020
#Thunderbolt to hdmi adapter target update
If anything changes throughout the course of my use of the adapter, I'll be sure to update my review here, but so far, so good! Playing videos both looked and sounded great through the adapter. I personally wasn't able to discern any difference between the two, whether it be a loss of quality in picture or sound, or a delay between the source and the TV output. The matte metal casing on both ports is very attractive and feels very sturdy, and the plastic sleeve / shield that protects the cord where it interfaces with the ports also looks like it would hold up to a lot of abuse and protect the wires at their contact points.Īs for function, I happen to have both a Mini DisplayPort / Thunderbolt port and an HDMI port on one of my computers, so I was able to test the adapter side-by-side with a direct HDMI connection. The weave on the cord is very attractive and seems to be durable, and I don't really have to worry about overly stressing the cord when I move it. I've owned / used one other Ivanky product before - their braided 3.5mm audio cord - and the quality on this adapter has really lived up to expectations. While it's only been a few days since I received this adapter, I've been extremely impressed with it so far. Thunderbolt to HDMI Adapter (0.65ft, Super Slim, Heavy Duty) iVanky Nylon Braided Mini DisplayPort to HDMI Adapter for MacBook Air/Pro, Microsoft Surface Pro, Projector, Monitor and More - Grey Size: 1-PackColor: Space GreyVerified Purchase Reviewed in the United States on June 6, 2017 Please feel free to contact us if you have any questions or concerns Best Deal On Amazon! FAQ : Reviews : Brent ❤️【Extended Warranty】For the benefits of our customers, we extend the 18-month Warranty to total of 54 months (18+36 months) for customers who have registered their products on our website. Supports resolution up to 1920 by 1080 and quality audio pass-thru.
#Thunderbolt to hdmi adapter target pro
✨【Fine Compatibility】Ideal for Apple MacBook Air (BEFORE 2018), Apple MacBook Pro (BEFORE 2016), iMac (BEFORE 2017), Microsoft Surface Pro Lineup, Surface Laptop, Surface Book(NOT Surface Book 2)and any other laptops with a Mini DisplayPort Output(NOT New MacBook with Type-C port). Multiple shielding, 24K gold-plated connectors, provide reliable interference-free data transmission, and improve transmission stability. Nylon braided jacket withstands over 15,000 bends, not easily broken anymore. Slim shell size frees you from the worry of getting in the way of nearby ports. ✨【Incredible Durability】Noticeable difference in build quality. An extra HDMI cable will be needed, you can use this Mini DisplayPort to HDMI Adapter with iVANKY HDMI 2.0 Cable to get a better video/audio quality assurance. Get clear smooth pictures /60Hz, and flawless audio pass-thru for uncompressed digital 7.1, 5.1 or 2 channels.
#Thunderbolt to hdmi adapter target portable
✨【Thoughtful Design】Lightweight and portable adapter for Thunderbolt 2 port.
#Thunderbolt to hdmi adapter target 1080p
✨【High Quality Transmission】This 0.65ft Mini DisplayPort (thunderbolt) to HDMI Adapter allows you to connect laptops with Mini DP ports to external displays/TVs/Projectors, which works beautifully whether you are planning to give presentations, or watch 1080P HD videos with your laptop on a bigger screen.
0 notes
Text
I'll only be able to make gifs on thursday 🤡 pls wait for me fam
#i have ideas!!! about ellick!!! this is so rare!!! ahhh#i needed the 1080p quality and ended up delaying a lot#oops big oops#now i can only gif that tomorrow but !!! cant believe i thought of content#yaaay im excited#i have one parallel gifset (obv hehe) and those precious one breath away scenes im-#anyways wait for it#sofia babbles#because i hv a date tonight 🌹
9 notes
·
View notes
Note
Hi! I hope I'm not bothering you, but I love your mood board edits and was wondering if you could explain how you go about making/colouring them? I see lots of places to find gifs but turning them into a set is so hard. Thank you in advance!
hi! first of all thank you so much and second of all it’s not a bother at all! i am happy to give some of my own tips even if my explanation probably isn’t super helpful. i won’t give like a ps tutorial but below the cut (since i included example gifs, it’s VERY long) is my process for my latest jily aesthetic:
i keep track of all my ideas/sets in a spreadsheet (which i won’t show bc there’s a lot of info i’d have to blur/black out) but i always have a list of what scenes i need to gif/what gifs i’m editing and where i’m getting them from. i also include a couple extra ideas in case the gifs i have planned end up being too hard to color or don’t fit in the set. i’ve found it’s best/easiest to start w the list bc there is literally nothing worse than spending hours on a set and then not being able to complete it.
as for actually finding the material, i have a pretty healthy number of scene packs saved in my giffing folder, esp. for things i know i will gif frequently. most of the time i will peruse youtube, vimeo, and instagram for any aesthetic scenes. i also have a lot of gif packs saved specifically for the purpose of making mbs (usually i mix my own gifs w gif packs), if you msg me i’m happy to direct you to some gif packs i use regularly or you can check my #resources tag. a couple tips for finding material:
always opt for download when possible, i used to screen record and the difference when i switched to downloading was astronomical. (it’s easy to lose quality and esp if you’re on mac, quicktime duplicates frames so either you have to manually delete those extras or you get sort of choppy gifs when you load them into ps.)
always use 1080p or better, 720p will work in a pinch for 268px or 177px gifs since you can make up some of that resolution loss with sharpening, but don’t go any lower than that, just love yourself.
for pale sets, look for the right colors. i tend to look for scenes w high color contrast especially if it features poc so it’s easier to color without whitewashing, ie if the subject is a person then i look for light colored or blue/green/violet/white backgrounds. it’ll make your life wayyyyy easier. this also means if you’re making a set try to find scenes with already similar lighting bc you won’t have to work so hard to make it look cohesive.
here’s a quick rundown of what i do before coloring:
import all frames and save all the files in a folder together!!
play around with frame delay so all the gifs are moving at about the same speed, usually keep it between 0.03-0.05s
crop and resize gifs (i use 268x145 most of the time)
convert to timeline
when it comes to coloring it can be really hit or miss, i’ve recently gotten back into my groove but i was having sooo much trouble earlier this year. in general, don’t stress yourself out!! sometimes it’s easier to just find a new scene/gif (hence my list of extras!) than to try too hard to fit a gif into your set. i color all my gifs by scratch (ie no psds) but i tend to follow the same pattern, i’ll explain using these gifs/psd as an example since then i can also explain how to fix white-washing:


first off when you’re coloring gifs with poc always always always make a layer mask so you can compare the edited and unedited skin tones directly! i use the marquee tool to make a selection in the middle of the character’s face, select the folder of my adjustment layers, and hit ‘add vector mask’ (the third button from the left on the layers panel, it’s a white rectangle with a circle in it).
i almost always begin by using hue/saturation layers to highlight and delete certain colors. here i highlighted red and raised the lightness on yellow by a lot since it’s a very yellow scene. then i use a combination of brightness/contrast, levels, and curves layers to brighten the scene. here’s what i have now:
i add a gradient map set to black/white, change the blending to exclusion, and lower the opacity to between 5-10% (depending on the scene) to lighten the contrast further:

then i add back a little depth with selective color in neutrals and blacks:
now i have two main goals: 1. add contrast between the background and the subject, and 2. brighten the scene into a pale gif. to do this, i use color balance to tweak the color of the background, taking out the yellows. this step works best if there’s at least some shade difference between your subject and background, otherwise isolating the two will be impossible. here’s what i have after adding color balance:

i use hue/saturation to selectively highlight the background color. in this case i chose to adjust magenta and used the color picker (the first eyedropper on the left) to identify the exact shade i wanted to lighten. now i have a fairly neutral background and a colorful subject, which gives a sort of pale effect:
and now i use a curves layer and a selective color (white) layer to brighten further:


before i go further, i start fixing white-washing. keep in mind that some variance is normal since you are naturally changing the lighting of the scene; this gif shows it rlly clearly bc of how yellow and dim the lighting is, so some lightening is to be expected. however, both because the vector mask shows a lot of whitening and because i’ve giffed dev patel before and have a general idea of what he looks like in this type of lighting, i know what needs to be fixed, so i go back in under the psd/adjustment layers with a combination of selective color (red and neutral) and hue/saturation layers to darken his skin again:

now that some more contrast has been added in, i can go back to working on the psd and use curves and selective color to play around with the background again:

i use another hue/saturation layer and a black/white gradient to tone down oversaturation:


usually i leave those layers on top, so if i want to make any adjustments (like lightening the background more), i go in under those two. in this case i tweaked the whites and reduced the contrast a little to get this:
again, you can see his skin tone has changed from the original, but variation is to be expected given how much brighter the room is, the fact that i took out a lot of yellow lighting, and the brightening effect of the computer screen in front of him. some other things to keep in mind when coloring:
when you add layers to correct white-washing, you’re likely to end up with overly red/orange skin tones (red-washing). this can be fixed by upping cyans in the reds, desaturating/darkening the reds, or adding b/w or desaturation later on.
when in doubt, it’s better to be darker than lighter (the issue with white-washing is that it promotes colorism, and there is nothing inherently wrong with a darker skin tone) but really. just put in the effort to color poc correctly.
when changing the lighting a lot it helps to look at pictures of the subject in natural/bright lighting, since you get a better idea of what their normal skin tone is.
don’t try to squeeze all your selective color layers into one. you’ll get less grainy gifs if you separate them out and work one by one.
TURN OFF NIGHT SHIFT/NIGHT MODE! yes i KNOW it’s bad for your eyes (especially if you’re like me and gif at night, when the lighting outside isn’t changing every 20 seconds) but your gifs will look VERY different under f.lux or night mode compared to daytime screens. especially if you’re giffing at different times of day, blue light filters can really change the way your coloring appears. best to keep it consistent.
my sharpening settings vary depending on what i’m giffing but in general i do two layers of smart sharpen (500% with radius between 0.2-0.4, 10% with radius at 10px) and then gaussian blur at 2.5px and adjust the opacity so it’s somewhere between 15-20%. i try to strike a balance between smoothing out the graininess from selective color, and sharpening details like clothes and hair. here’s what i ended up with for the gif above:

then i rinse and repeat for the rest of the gifs in the set! i tend to start with the gifs that i know will be hardest to color, which is usually the darker ones (coloring is limited by how much i can brighten the scene) and those that include poc (again, limited by how much i can brighten and adjust the scene’s lighting without white-washing). then i check set cohesion as i go, using those first few gifs as benchmarks. once i have all 8 (or 9 or 10) gifs, i play around with composition and try to balance and vary the subject, colors, and composition of gifs next to each other. i go back and make a couple of adjustments here and there according to what i observe and what i think might improve the overall appearance.
and that’s pretty much it! i hope this was helpful, if you have other questions feel free to message me and i’d be happy to help/troubleshoot. happy giffing!
#Anonymous#*#resources#answered#sorry this was sO long but i hope it helped on the coloring end#tbh i exceeded my own expectations with the dev gif lol#yeahps#completeresources#chaoticresources#tutorial#coloring tutorial
54 notes
·
View notes
Text

Hey friends! This tutorial is going to take you through the steps to make a very simple gif. I won’t be touching on sharpening, colourings, texts etc. but if you want a tutorial on those, I am more than happy to make them :D
Just a few things before we start:
- I am not the best at explaining things and tend to ramble so please stick with this
- Please like/reblog if you found this useful at all
- If you have any questions about anything in here, or anything else, please send an ask or a DM, I’m always happy to help out and answer any questions that you have
I’m putting the rest under the cut so I don’t clog you dashes, enjoy!
So just a bit of housekeeping before we start:
- I’m using Photoshop 2020 (I can send a link if you need one)
- I use the KM Player (again I can send a link if you need one)
- Try to get your episodes in 1080p or 720p, the higher the better because yay we love quality! (I can help you find links if you need them)
1. Open your Photoshop, KM player and capture folder.

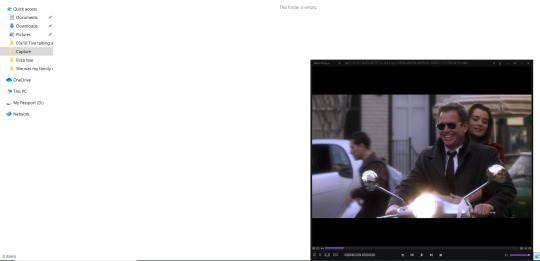
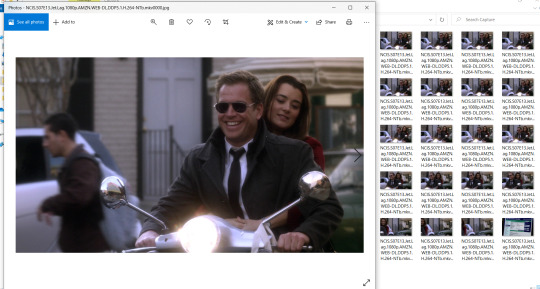
I like to have my KM player open over my capture folder so I can see the screens captures as they happen but that’s just me :’) lol look at all the tiva gifs I’m still spiralling y’all anyway
2. Open the file that you want on the KM player.

Click on the open file option and find the one you want, then press open! Find the scene you want and pause it there (hehe look at happy tiva on their moped wow blissfully happy fools)
3. Setting up your frame extraction. While on your KM player, press “ctrl + G” to open up this dialogue box. These are the settings you are going to want to use (they will stay the same every time you open it so you don’t need to keep changing them every time).
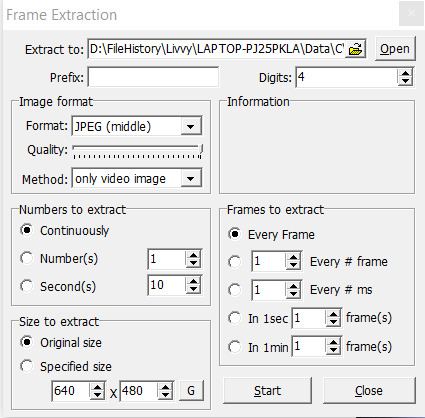
For the extract to box, choose your capture folder that you already have open. Image format, and size to extract, make sure they are on those settings, they are the defaults anyway. Numbers to extract set it to continuously so we can get all those pretty pretty frames. Now your frames to extract, your gifs will look the prettiest if you have it set to capture every frame, you can do every second frame but I wouldn’t recommend it.
4. Let’s get those frames! The frame extraction box will stay open unless you click the x but seeing as we want it open, let’s keep it :D so we are on the scene that we want (I normally put it back a few seconds so I can start my capture at the point I want my gif to start at) that sentence didn’t make sense but stay with me for this.
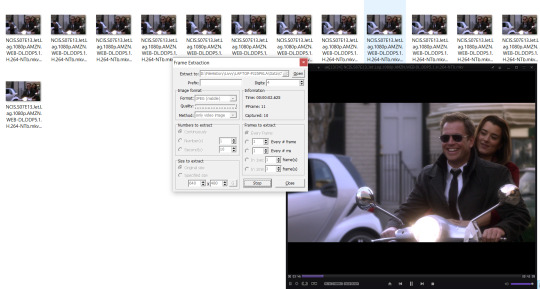
Press play on your scene and when it gets to that part that you want to gif, press start on your frame extraction box and you should see the frames coming up in your capture folder (why I like to have it open lol there is a method to my madness). Then when you have reached the end of the part you would like in your gif, just press the stop button and you frames will stop being captured. (Depending on how many frames you are capturing, you might get a delay on your KM player, now this part is important, the frames that it captures are from what you can see on the screen (which will be lagged from the audio that you can hear) so keep capturing the frames you want from what you can see not what you can hear. But this will only happen when you are capturing a lot of frames so it shouldn’t really be a problem, it could just be my KM player who knows.)
I’ve stopped my KM player capture and have got all my frames that I have just captured (yayayay frammmeeesssss)
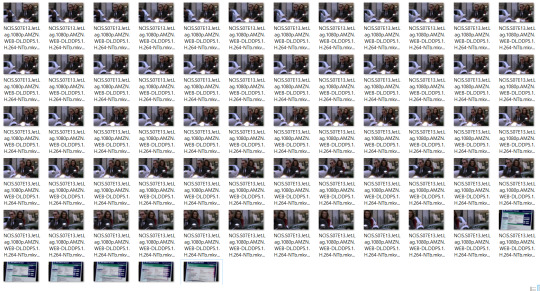
5. Sorting your frames. Okay so I know we have just gone through a lot to get those frames however there are way too many of them (and some at the end which I definitely don’t need in my gif lol what even is that a computer?? no thanks). For my gifs, I generally have between 30-40 frames. Anything more, to me, feels long and doesn’t...flow? Idk how to explain this one but you get a feel for when your gif should end, but I’ll come to that more later. Anything less than 30 is perfectly fine too, I think the lowest I’ve ever gone is 16/17 but it honestly depends on you and your preferences :)
This part is pretty easy, so I click on the first capture so it opens in a new window. I then scroll through with my arrow key to see how the frames look together, then delete from both ends for the parts I don’t want. This step will help a lot before we put it into Photoshop as the more frames that you load into it, the harder PS has to work, the poor baby :(
Now I’ve only got the frames that I want which will make my gif! (you can delete frames later in PS so don’t worry if you’re an indecisive fool like me who sometimes ends up with 50 and sulks because I want them all but tough Liv you can’t have them all, make a decision for once in your life)
6. Let’s get those delicious looking frames into Photoshop :D
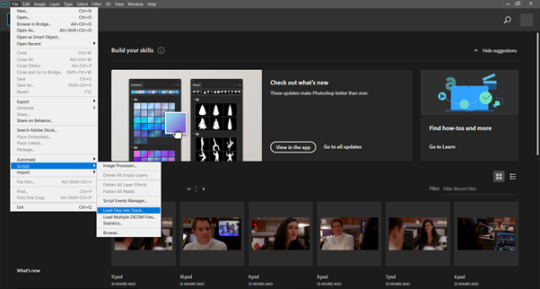
On your PS, go to file > scripts > load files into stack. This should then open this dialogue box.
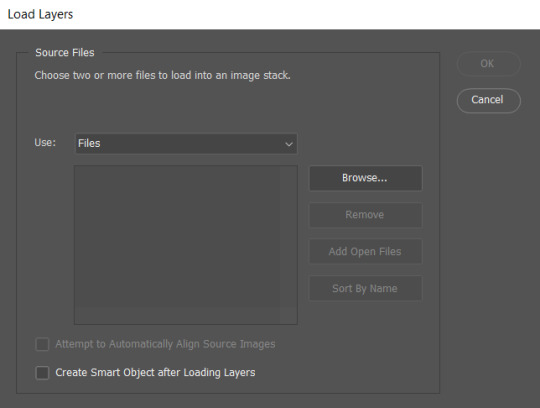
Go ahead and click that browse button and find your capture folder with all your lovely frames in it.

Select all of them and press okay.
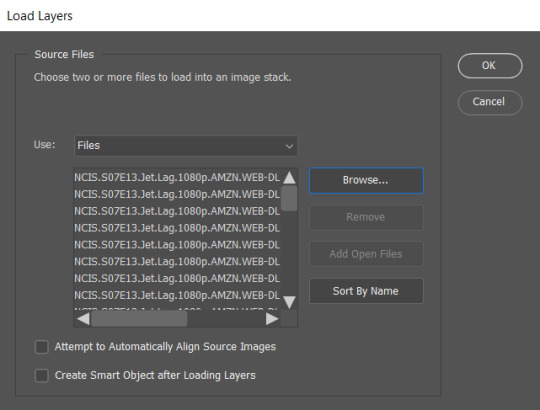
They will pop into your load layers box and just click okay on that one too.
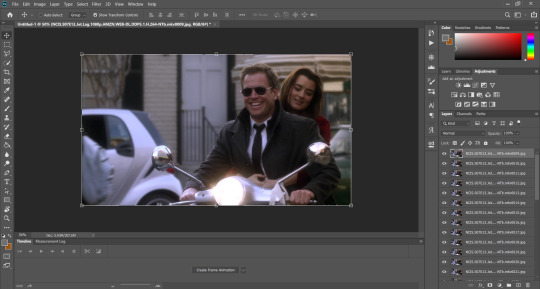
Just give it a few seconds and they will appear in your PS like this (wooooo we’re doing it, we’re really doing it!!!)
7. Frames to layers. When will the technical terms stop, captures to frames to layers WHY PS WHY :’( I’ve actually had to remind myself how to do this step because I have an action that does it for me because I am hella lazy oops

Let’s go ahead and click that lovely looking button that says “create frame animation”. Yours should now look like this with the timeline at the bottom instead.
If you don’t have that, go to window > timeline. Make sure that it has a tick next to it and it should come up.

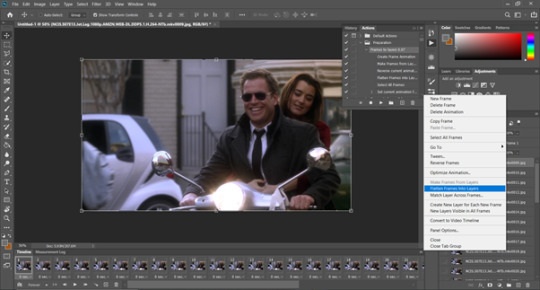
Next click on the super sexy little three lines which opens this wonderful options box, and click on the “make frames from layers” option. (ha omg i’ve just realised you can see my action in there which I’m following oooopppppsssssss, I really can’t remember these steps because I haven’t done them in so long ANYWAY)
We’re starting to look like a gif YAYAYAYAY but we’ve still got more to do.
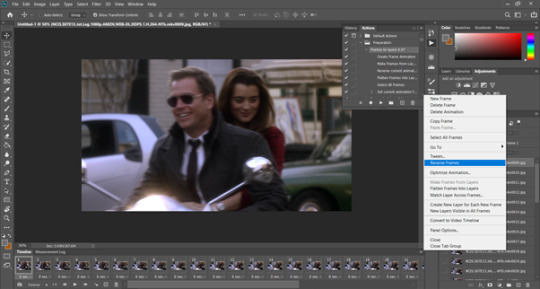
For whatever reason, when we put our frames to layers they are backwards (wtf ps???) but no worries, we can sort it! Get back to those sexy three lines and click on the “reverse frames” option and hopefully we will be in the right order.

If you want to, have a little press of your play button now and your gif should be MOVING AHHHHHHHHHHHH
BUT WE STILL HAVE MORE STEPS TO DO GAAAHHHHHHH (actions people, get yourself some actions!!) I can do a tutorial on those too because wow I forgot how long this all took wow *wipes sweat from brow*
ONWARDS FELLOW GIFFERS.
Those three sexy lines are back again but this times let’s go to the “flatten frames to layers” option.

Over on the right, your frames should look something like this, depending on how many frames you had got. If you scroll down in this section, you can delete all the frames which have you episode names on them by using the little dustbin icon, we only need to keep the ones labelled “frame 1, frame 2, frame 3″ etc.
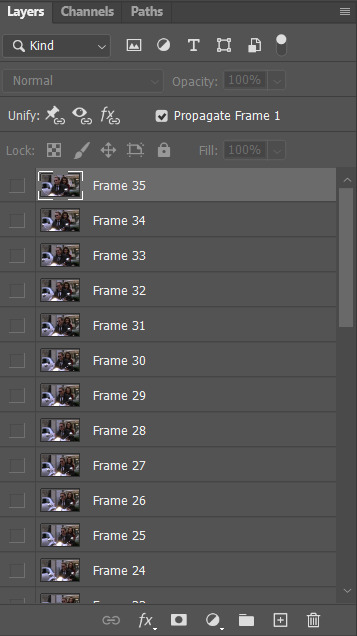
Scroll back up to the top of that section and click on your highest layer (just leave it highlighted because it’s our top layer and we want to keep that one highlighted so that anything we do to our gif will all be affected) again terrible sentence but just click on the top one. Also, make sure you are on the first frame in the frame animation tab too.
8. Frame delay. So our gif is looking pretty good right now but our delay isn’t.

Let’s click those sexy three lines again (seriously what are they so beautiful for) and click on the “select all frames” option.
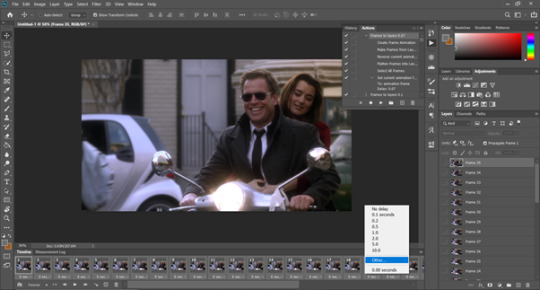
With all your frames now highlighted, click at the bottom of any of the frames where it says “0 sec.”, which opens up the little dialogue box and there are options there for you to choose from but give the “other” a click.
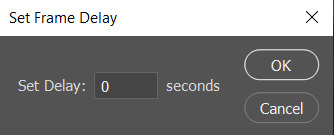
Which should open this lovely looking box! Now, your frame delay is completely up to you and your personal preference. I like to use 0.07 but that is by no means the only option. Anywhere between 0.05 and 0.1 are all fine to use, it really depends on what you like. I would suggest playing around and seeing what feels right for you. Just click okay when you’ve decided.
9. Resize your gif. Tumblr has very specific dimensions that we need to follow otherwise it messes up our gifs.
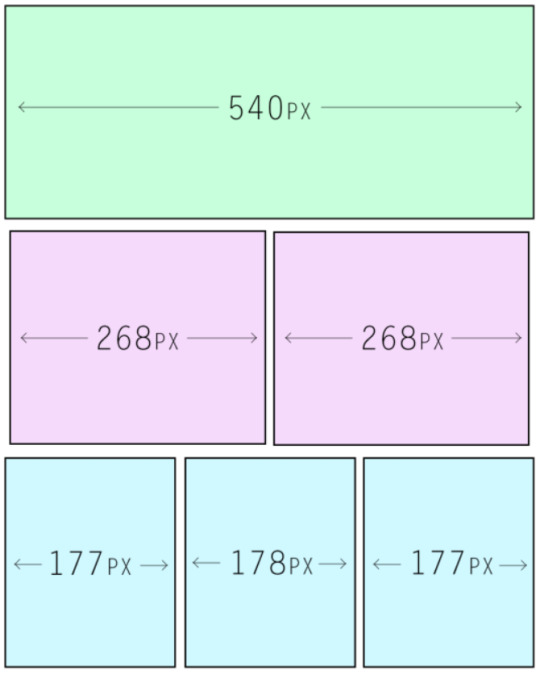
These are for the width of your gif. The height can be anything you choose. Please make sure you follow them otherwise tumblr will ruin all your hard work. I’m going to use 268px for this tutorial.

Head on over to your image > image size.
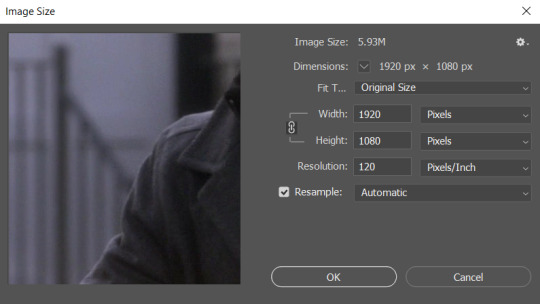
And it should open this hella sexy beast of a dialogue box. In this PLEASE make sure the little chain symbol is highlighted because it’s keeps your gif correlated(?) idk it keeps it looking fab.

Pop your 268 into the width box and it should automatically adjust the height box to keep your gif looking correct(?) (I’ve lost all words today but it keeps it looking how we want it to). Then click the okay button.
Your gif will looks like it’s “shrunk” and it has because we have changed the size to a smaller one, but just press “ctrl and the + symbol” on your keyboard to zoom it back in. (ctrl and the - symbol zooms back out)
The gif has a nice “feel” to it, it flows well so I’m keeping all the frames I used before. You can delete frames as necessary.
NOW OUR GIF IS THE RIGHT SIZE SO LET’S SAVE THAT BAD BOY WOOOOOOO!!!!
10. Save your psd file.

Go to your file > save as, then choose your folder to save your file in. You can name it whatever you want to, I normally just go with 1, 2, 3, 4 etc because I’m basic and lazy but everything is neatly in their own folders lolol
Your psd file should be sitting nicely in your folder now.
11. Save for web. We’ve got our psd file, so now we need our gif file.

Head on up to your file > export > save for web.

And this sexy beast of a dialogue box should open. These are the settings I use, and I know there are other options out there but these are the ones that work for me at the moment.
A few things to point out here:
- Perceptual and pattern. I like these so that’s what I use but there are other tutorials out there which use others so shop around to see what is best for you.
- Leave your colours as 256.
- Make sure your looping options are set to forever because we don’t want our gif to stop playing at any point.
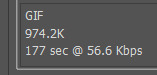
This bit here. Tumblr has a limit on gifs of 5M. This gif is just under 1M so we are completely fine to use it. If your gif is over 5M then it won’t play when it’s uploaded. If you make a gif over 5M, take some frames out and it should bring the size down. Only 540px gifs should be reaching towards the 5M, our 268px gif shouldn’t get close to it.
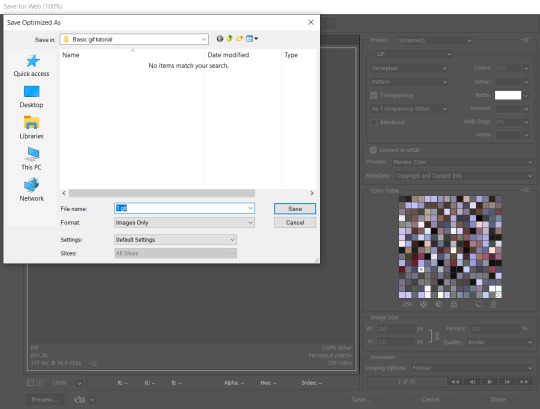
Then click your save button and it should open yet another dialogue box. Find your folder with your psd file in it and save it in there because we like to be organised ;D
And we’re done yayayay!!! Upload your gif to tumblr, tag your heart away and stare at your amazing gif because YOU made that!!!
#photoshop#photoshop tutorials#ps tutorials#gif tutorial#tutorials#photoshop tricks#mine: tutorials#my posts#I am by no means an amazing gif maker#I just do this for fun#there are numerous ways of making gifs#this is just what works for me#there are loads of tutorial tumblrs out there that I go to frequently to try new things#I'm constantly finding easier and quicker ways of doing things#like the actions#a literal blessing#I hope this helps any gif makers out there who are starting up#it's really a wonderful thing to do#and bring me so much happiness#my asks and dms are open any time for questions
18 notes
·
View notes
Note
hi! sorry if this is a bit out of nowhere but i love your gifs! they're so clear and crisp! and i was just wondering if you had any tips on how to achieve the quality that your gifs manage to have?
ooh thank you so much. nonnie! i’ll leave some tips under the cut. if you’re ever interested in a full tutorial, please lmk! i always thought about doing one, but there are already 5 million on this site... but so many are different from each other, so hey, who could it hurt. anyways here’s some stuff i thought of :)
1. ALWAYS use 1080p. Others say 720p or 1080p, but I don’t think i’ve ever used 720p unless the show/movie is literally not available in 1080p. you can see the difference! i’ve used 2160p as well, but that’s not necessary at all, and you’ll only find that on much newer stuff.... besides, 1. most computer monitors/phone screens only go up to 1080p anyway, and 2. once you resize the gifs to tumblr dimensions, there is literally no difference between those two)
2. know your sharpen settings! for me, it’s almost always .3 radius, 500%, gaussian blur & more accurate. however, once in a while, this can change, depending on the camera used when filming the show/movie (i.e. an indie film with a lower quality cam) or the quality of the file itself. for example, for my recent set here, i had to do that setting, and then an extra, lighter smart sharpen layer on top of that, because it still wasn’t crisp enough, due to the lower-budget camera quality. ALSO: PLEASEEEE DON’T OVERSHARPEN! equally, don’t skip sharpening. it is probably the base essential component, and your gifs will look amateur if you don’t have it, no matter how good you are at coloring :)
3. don’t be afraid to experiment. even if you think something will be too dark, too bright, too dull, too vibrant... try it! every show/movie is vastly different to color and edit, so always try out new things. ALSO a really good method is to upload the gifs you made into a new post, and save it as a draft. this will show exactly what the gifs will look like when posted, which is always quite different than what you see in your photoshop workspace. this will allow you to know your gifs are at the quality you want before posting
4. always upload every frame of a recording. don’t only capture every other frame, and definitely don’t skip two or more frames in between. this makes the gif jerky and definitely seem lower quality. i see this a lot with newer gifmakers. just use every frame, and make the giffed clip shorter if it’s over the size limit! better to have a smoother, shorter gif than a long, jerky one, any day. ((some people may argue that deleting every other frame doesn’t make a difference, but if you want a smooth gif... trust me, it does).
5. 98% of the time, my time delay between frames is .05. a lot of people say .06, but i find this a bit too slow, unless the gif is very small, in which case the frames move faster, so they need a slower delay (idk the logic okay just work with me!!). also, i’ve noticed a trend (esp in the pale community, even though i’m not a part of it anymore), is to put a lower frame delay, so the clip moves really quickly. i don’t like this personally, as i find it super distracting to watch gifs move at a fast forward pace, but it’s your choice. .05, i’ve found, moves closest to the natural pace of the source material, if not the TEEEEEENIEST bit slower, but in a very nice, natural way, and barely noticeable at all (.04 is just too fast imo).
6. this one is a complete and total preference thing, and you don’t at all need to follow it. but if you’d like an insight into how i like to make my gifs... i always like the coloring of the gif to be naturalistic and just slightly bright. meaning: i don’t make my gifs overly vibrant, i like to keep my colors natural. this isn’t to say i don’t change the coloring up from the original scene - if a someone is lit very blue, or red, or too much of any color, i like to try to adjust the colors so their natural skin tone shines through more. if a scene is extremely pale, i like to bring up the vibrance a bit - not unnaturally so, but so there is more color tone to look at. and in terms of the ‘slightly bright’ part, i like to up my exposure/levels/curves/brightness (the combos of those four change with every set... some gifs look Bad with adjusted levels, some look washed out with higher exposure, etc) so it pops a little bit more on the dash. again, not in an unnatural way.
7. in #6, remember when i said if something is lit too much of a certain color, i like to try to get natural skin tones back (if it’s a shot of a person)? sometimes, this isn’t possible. in this case, embrace your colors! for example, if a scene takes place in a darkroom with the intense red light on, your not getting any skin tone out of that... so embrace those reds! up the vibrance a bit, get your red selective color layer out, make the red pop. it’ll look lovely in a set!
8. very similarly, if a scene is extremely dark, a lot of the time it will diminish the quality if you try to brighten the whole thing up. embrace those darks, while finding the light areas to bring up. for example, that same gifset i linked above. there is a gif in there where he is standing in complete darkness, with only one side of his face lit up. not only is this a symbolic shot and there is a reason for one half of his face being in darkness, even if you did try to brighten the whole thing, alllll of that black space will become gross and pixel-y, and the light spots on his face will be overexposed. instead, what i did was take that black space and make it even blacker, while using curves to keep that area dark and bring up the brightness in his face, which gives it a lovely contrasting effect. i love this look in gifs... dark vs. light!! embrace what the scene gives you!
9. this may be obvious, but know tumblr’s dimensions. if you upload a gif at the wrong size, it will either shrink or stretch it, completely ruining the quality. (my most used dimensions are 540px for single gifs rows, and 268px for double gif rows)
10. always put a final BLACK selective color layer at the end of your layers, and up the blacks slightly until they are True Black. this will make sure everything has a good level of contrast, and appear as smooth and hq as possible!
hmmmmm i think this is all i can think of for now.... there is some other more subjective stuff as well i guess, but most of it doesn’t have to do with gid “quality” or “crispness”, so they’re prob beside the point. these are the important points i can think of. if you need anymore specific help, feel free to shoot me another ask/message!
28 notes
·
View notes
Photo
Recently someone asked if I would do a gif making tutorial, so here I am! I’m going to make this as in depth as I can, but if you have remaining questions or problems, feel free to send me them and I will try to help you to the best of my abilities.
Disclaimer: There are many ways to make a gif, but this is the method I’ve been using for years. This tutorial is very long and may make the process seem tedious, but I assure you, once you get the hang of making gifs you could do it in just under a few minutes!
This tutorial includes:
links to all of the sites and programs I use
lots of rambling (w/ pictures)
a short masterlist of my favorite photoshop sources at the end
Links:
Adobe Photoshop CC 2017
PotPlayer (64 bit)
uTorrent
4K Video Download
Photoshop, PotPlayer and uTorrent are the three programs you MUST have for this tutorial. The 4K Downloader is for YouTube/Instagram, which there are other sites you can use for that, but I prefer 4K to make sure I’m getting the best quality I can get. Best part, they’re all free :)
Torrent sites:
PirateBay
yts.lT (favorite)
Nyaa (anime)
These aren’t the only sites that offer torrents (nor are they the only ones I use). When you download torrents, try to be careful; if you think it’s sketchy, go ahead and try to find another. It’s not as scary as it seems, just be aware of what you’re clicking. Some are total duds but I usually have a pretty smooth time finding what I need unless it’s something unpopular or obscure. Whatever site you’re on, try to use the latest links (past hour/day/week) if it’s for a new movie or ongoing show. Also, if there’s the option, download magnet.
PirateBay gives me an ongoing issue with their links, so I try to avoid getting torrents from there if I think I can find it elsewhere. YTS is my favorite site for movies; they’re trustworthy and I’ve never had an issue :)
HD/1080p torrents often start popping up when the BluRay comes out, so don’t depend on any site to have it the day something premieres. Usually you’ll have to wait a few weeks/months. Until then it’ll just be CAMs which no one likes!
For this tutorial I’m going to be making a gif from IT: Chapter Two (link- click 1080p.WEB). Once you’ve gotten your torrent, open up uTorrent. It’ll ask you where you want your download stored, which I always just choose my Downloads folder.

It’s normal for it to take a while. It doesn’t take all day, but 40 min-2 hrs is usually what I have to wait. My laptop is pretty slow, RIP.
After it says it’s downloaded, you’ll have the .mp4 sitting in your Downloads folder (or whatever destination you chose, but Downloads is the default).
Before you close uTorrent, press the torrent file and then delete it (trash can icon above) so you can delete it from your Downloads folder. Otherwise, your computer will tell you the torrent is still open in the program and won’t let you. You won’t need it after you’ve gotten the .mp4.
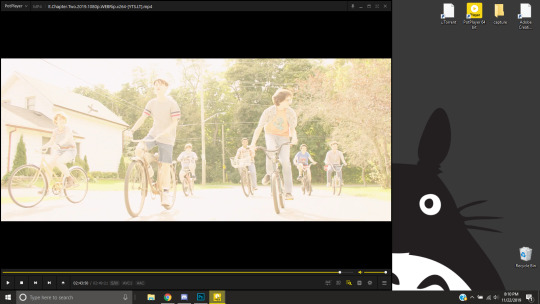
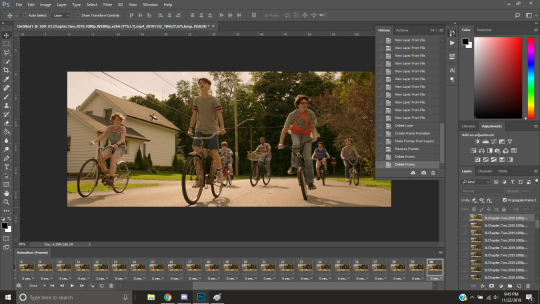
So now we have the movie! Go ahead and open it up in PotPlayer. Right click > Open file(s) and select the movie. It will start playing automatically.
Note: You need to make folders for the frames to be held in. Its been so long since I’ve set up PotPlayer, I can’t remember if the program made the capture folder that’s in Desktop or if I did... if not, go ahead and make sure you have designated folders. (If you’re making 4 gifs, you need 4 separate folders, and so on.)
Go to the scene you’d like to gif. The scene I chose in this movie is one of the end scenes of the young Losers Club on their bikes (2hr43min).
Slide the edge of the program in to minimize the screen a little for the next step.
Now, right click > Video > Video Capture > Capture Consecutive Images
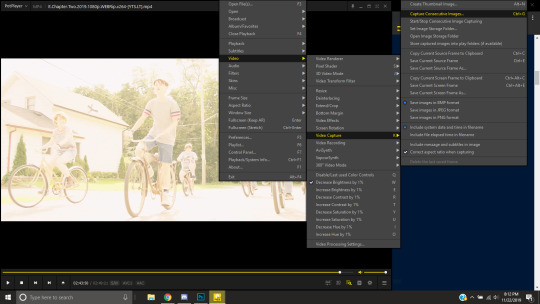
This will pop up:
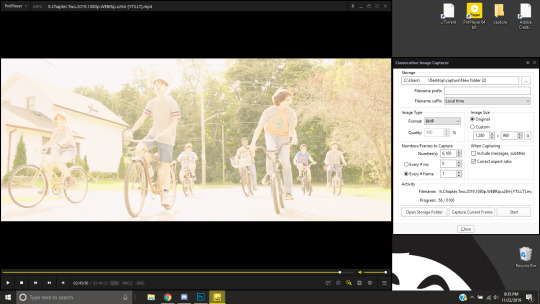
Here is a closer look at the settings:
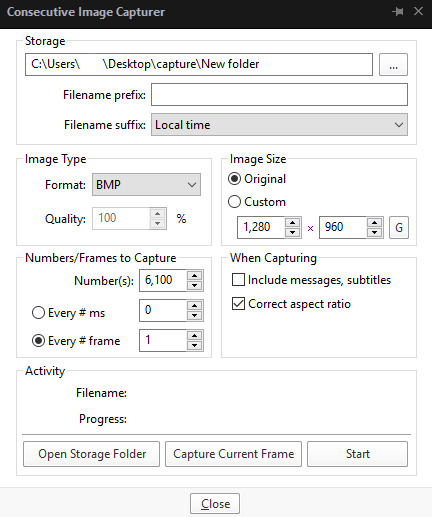
The key things to look at are the Image Type, Image Size, and Numbers/Frame to capture. And of course, make sure you have the right destination chosen in the Storage box because that’s where your frames are going to be. PNG and BMP are the best quality for the type of image. Always choose the original size of the frames. And, make sure you’re saving every frame (Every # frame must be kept at 1).
Make sure to start a few seconds before where you actually want to make a gif. Sometimes (every time lol) the start will lag and you won’t get every single frame you want or thought you were getting. In my case, the screen is fading from white, so I’m going to capture a few frames where the white can still be seen before the full color appears. This way I know I’m getting the most frames I can, and I don’t have to redo it later when I think my gif is too short because I’m missing frames.
While the movie is still paused, press Start in the smaller window, then press Play on your movie. Keep your mouse over the Pause button and end it when you’ve gotten all the frames you wanted. Then, Stop back in the small window.
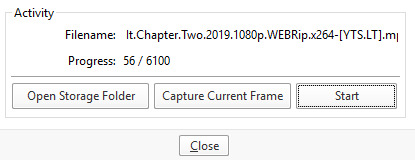
I’ve saved 56 frames to my folder.
The size of the gif you want to make dictates how many frames you’ll be using. Remember the file size needs to be under 3MB. Recently Tumblr increased that size to 8MB, but the quality of the gif will drop drastically, so I ignore it now. (Although, it probably won’t look too different if it’s at like 3.1MB and barely goes over that limit.
540px wide- ~30 frames and under. Because these gifs are so wide, naturally, they’re already going to be a large file.
268px wide- ~50 frames
177px- ~70 & up
These numbers aren’t concrete, though. The taller and/or more contrasting colors in a gif, the bigger the file will be. The shorter and less contrast in colors, the smaller, and more likely you will be able to fit more frames into your gif. These are just what I find to be the case most of the time.
For the gif I’m making now, I’m going to keep it at 30 frames, so I know I’ll be deleting ~26 out of the 56 I saved to that folder.
Tip: I rarely make big changes to the coloring of my gif if I really like the way it looks. If my gif exceeds 3MB, I’d rather delete frames. IMO, nice coloring comes before fitting in as many frames as I can.
Moving on, now that we have the frames we want, go ahead and open up Photoshop. Go to File > Scripts > Load Files into Stack. The drop down that says ‘Files’ I change to ‘Folder’ and simply select wherever your frames are held. For me, they’re here:
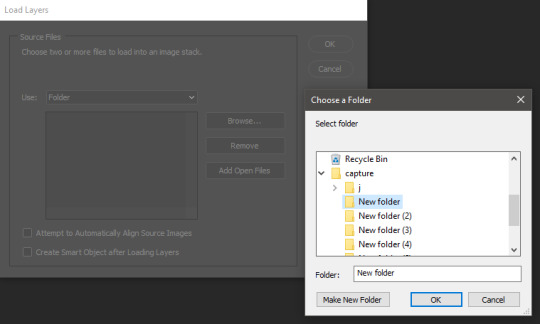
Press OK, let them all load up, then you’ll press OK again in that grey window.
It takes a minute for all of the frames to load up in photoshop. The more you have, the longer it’ll take. Again, my laptop is slow as hell, so maybe it will be really fast for you.
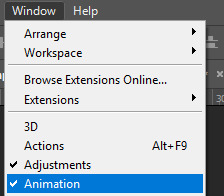
When they’re done loading, go to Window > Animation.
Then, inside the Animation tab, make sure you have Create Frame Animation selected:

Then once you’ve pressed it Create Frame Animation, your first frame will appear. But we need them all, so look over to that four bar icon to the right of the tab and press Make Frames From Layers.
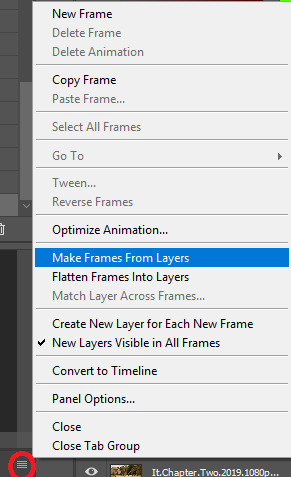
They’ll load all at once, but the gif is backwards. To fix that, simply go back to the same four bar icon and click Reverse Frames.
I’m going to go ahead and delete the frames I don’t want. For me, the beginning frames are unusable because there’s that white fade out in the start of the scene I chose. I’m going to delete those, then go ahead and delete any frame that comes after frame 30.
Here’s where I’m at now:
Now to resize it. I like the dimensions it currently has, so I’m not going to use the crop tool at the moment. But once you’ve cropped it to where you like, go to Image > Image Size and a new window will pop up. The widest a gif should be is 540px. How tall it is is up to you. Since I’m keeping the dimensions currently, my gif will resize to 540x225.
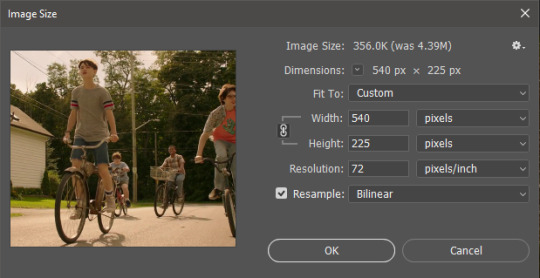
It’s VERY important to note, where it says ‘Resample:’ you need to have Bilinear selected. This effects the borders of your gif. Also, don’t make the mistake of resizing it in centimeters instead of pixels.
Now that it’s resized, you need to set the the frame delay. I choose either .05, .06, or .07. Anything outside of that looks to fast/slow to me (but I know a lot of people who like the way .03 or .04 look. It’s all preference.)
To select all of your frames at once, select the first frame, hold shift, then select your last frame. Then press where it says ‘0 sec.’ > Other > type in however fast you’d like your gif to be. I’m going to use .06. Double check every frame says .06, otherwise it’ll stay at 0 and be way too fast.
Now, again, click that four bar icon and select Convert to Timeline. The Animation tab looks like this now:

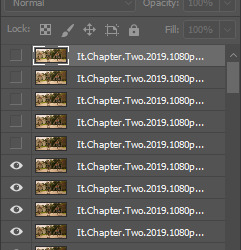
For now, look at our Layers Tab, so we can delete every frame that doesn’t show an eye icon next to it (as you can see, my first 5 frames):
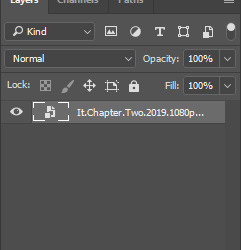
With all of the excess frames gone, select all of the frames you have left (hold shift again) and then right click > Convert to Smart Object

Now, we see this left:
And, technically we’re done with the very basics of making a gif. But you definitely should sharpen and color it for it to look ‘nice’ and aesthetic. I’m going to color my gif now. Personally, I rarely use psds. It takes way too long for me to look through millions of psds, so I make coloring my own for each gif I make. I have two of my own psds, if you’d like to use either of those.
PSD01- this is a super basic psd I use to make any gif look brighter and more vibrant. There are more details in the post on how I use it.
PSD02- I included this psd within another tutorial for how I do color edits.
Both of these are my base psds, but if anyone wants me to do a separate tutorial for how I color gifs on a regular basis, I’ll gladly make one of those too!
Once you’re happy with how the colors look, it’s time to sharpen. Select your gif layer and go up to Filter > Sharpen > Unsharp Mask.
Here are my settings:
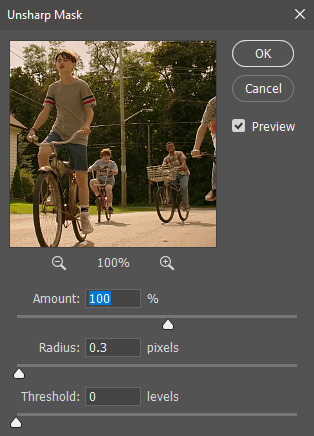
(Amount: 100%, Radius: 0.3px, Threshold: 0 levels)
Now sharpened and colored, here is my final result ready to post:
If you’re wondering, this gif is 2.42MB, so I could still make it brighter/more vibrant if I wanted to!
To save, go to File > Export > Save for Web.
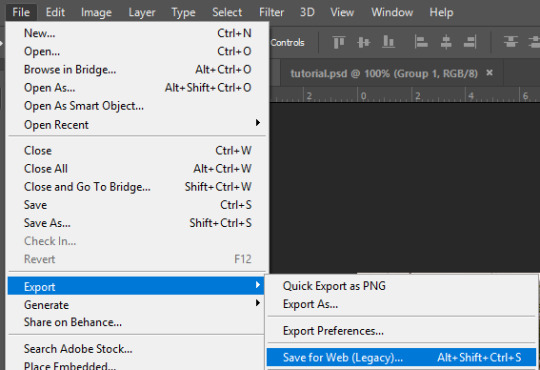
A new window will pop up. There are more settings that you should check to make sure your gif looks as nice as possible, but they’re also up to preference and can range from creator. This is what I prefer:

Diffusion is good for bright and/or colorful gifs, but if the gif is dark, I’ll change it to Noise to see if I like that better. Also, always double check you have the loop set to forever, otherwise your gif will only loop once.
And you’re all done!
Here is a short masterlist of resources I recommend checking out and use often:
allscallie (DeviantArt)
Their psds are beautiful, especially if you’re into making moodboards. Everything is very aesthetic!
sttoneds (DeviantArt)
More psds, especially if you’re into gifsets/photosets that are color focused.
BEAPANDA (DeviantArt)
Literally everything they publish is gold. From brushes, textures, psds, renders; they have it all. Their packs are extremely well made, too. I highly recommend bookmarking them. (The renders and brushes look beautiful when you use them in your headers!)
allresources (Tumblr)
There are so many photoshop resource blogs here on tumblr, so to make it easy on you, theirs is the one I recommend the most! The tutorials and resources she makes herself are really great too.
Thank you for reading, and good luck +.゚(*´∀`)b゚+.゚イィ
139 notes
·
View notes
Note
how do you make your gifs?
hi there! i’m not sure if you wanted the very basics or a tutorial, but i think this is more of a tutorial? sorry if that isn’t what you wanted! i tend to overexplain everything ;;;
i only started making gifs this summer, but i hope i explained everything (somewhat) clearly! feel free to send any other questions if you have any~
to make gifs, i use vapoursynth (alternatively, you can use avisynth) and photoshop cc 2019
under the cut!
downloading videos:
so! for live stages, i always use the ts file for it. ts files give the best quality for your gifs, and i’ve found i don’t like how the quality looks even if it’s 1080p, but that’s all your preference!
to find and download ts files, i use these websites:
4sashi, kpop24hours, kpopexciting // along with these, i’ve heard you can use twitter as well for ts files but i honestly don’t know what to search to find them lol
if you’re downloading from youtube, i always look for 4k videos, but if i can’t find any 4k for what i’m looking for, i use 1080p! i don’t really like going less than that, though ;;
to download youtube videos i use 4k video downloader! it’s really nice because it lets you download any youtube video (no matter the length) and it lets you download it in the highest quality for free! (if you want to download videos with 4k resolution, you have to pay a one time fee of $20 *i believe* and you have an access key for up to three computers! otherwise, 4k video downloader is completely free!).
if you want to download anything from vlive or twitter, i normally just look up “vlive video downloader” or “twitter video downloader” and just click the first thing that pops up
using vapoursynth: (link to where i downloaded vapoursynth -> here)
i somehow by miracle got vapoursynth to work on my windows computer, but i honestly have no idea how because the first time i tried it just would not work! it’s a big pain, but i’ve heard it’s a lot easier to download and get to work on mac! if you’re using windows, though, a nice alternative is avisynth, which i used before i got vapoursynth!
vapoursynth is really simple to use, to be completely honest! i don’t know how good i’ll be at explaining it so i’ll leave a link to a tutorial i used at the end of this explanation! it can be a bit daunting at first because of all the code, but tbh you don’t really need to know everything it says, most of it is just copy and paste!
to get the resizer and the vapoursynth script to load, you just have to click and drag your video file over on top of the file called vapourscript, which can be found in your vapoursynth folder! (my folder is called “VapourSynth64Portable”, because that’s how it came for me) to know if you’re in the right folder, you should see other files in there like “gifs” “scripts” “plugins” and others!
after you drag your video file onto the vapourscript and resize your gif, copy what it says in the resizer and paste it in vapoursynth!
here’s the tutorial i used to explain it easier -> here
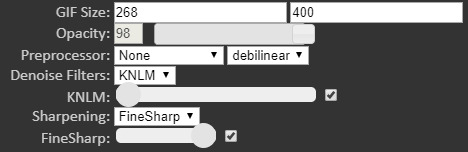
options i use:
i normally use the size 268 x 400 in the gif resizer (makes it portrait), or if i want it to be a landscape type size, i use 268 x 200!
if you’re using a ts file, click the preprocessor option (the first one that says none), and change it to one of the qtgmc options! i always use qtgmc 60 fast, but it’s up to you!
for anything else (mkv, mp4, etc), i would suggest leaving it on none!
i don’t use any sharpen actions in photoshop, i use vapoursynth instead!
typical vapoursynth settings:
for the amount of frames: ts files i try to keep under 200 (even under 100 if possible) and for everything else i don’t really pay attention to the number of frames!
everything from here on is done on photoshop!
coloring:
this is all preference!! a lot of gifmaking is just about what you like personally! some people actually have a base psd or use others’ colorings (again, preference!), but i personally really love coloring, it’s my favorite thing about gifmaking, so i almost always make a new psd (coloring) for every gifset i make! the main things i use in coloring though are selective layers, color balance, hue/saturation, threshold, contrast/brightness, and then i top it off by lessening the exposure!
frame delay:
0.04 or 0.05 seconds, i never use anything above or below that! this is another preference thing though lol
exporting:
to export your gif go to file > export > save for web (legacy)! here are my export options!

i hope this tutorial helps you! sorry if it was too long or if i overexplained anything/made it even more confusing! i only started making gifs during the summer, so if you have any tips for me as well, please don’t be afraid to send any in! you can send in any more asks as well, if i made things too confusing/you have any more questions!
bye bye!
43 notes
·
View notes
Text
London Confidential zee5 Full Movie Download 720p, 1080p GDrive
London confidential Zee5 Movie Download 1080p, London confidential Full Movie 2020 Download 720p GDrive Free, London confidential Web Series Watch Online HD
london confidential 2020
MDB Ratings:
Directed: Alankrita Shrivastava
Released Date: 18 September 2020
Genres: Drama
Languages: Hindi
Stars: Konkona Sen Sharma, Bhumi Pednekar, Vikrant Massey
Quality: 720p HDRip
File Size:
Click Here To DOWNLOAD NOW
It's a well-written mystery, but it's not a well-written mystery where the reader can feel a sense of mystery because he or she is doing the mystery. The movie version is closer to that, but it's not quite as effective.
youtube
London Confidential Movie Review
London Confidential Movie Review - The film is based on the bestselling book of the same name, which also contains a film version. The novel follows a young woman as she goes from work to work and from job to job, all of which seem to involve an investigation into a series of murders. The investigation leads her to a man she meets at the office and then to an even larger group of people who may be hiding something.
The central character is a woman, but that woman is never named. Instead, we are told she's a "porn addict" and that she "sucks cock". It's an odd thing for a film to show this, and the film doesn't actually need to do it, but it does. It's one of the main things the viewer gets to see, and it works because it makes the film believable and real.
This isn't like a mystery that we are presented with an explanation or an answer at the end. This isn't a story that give the viewers a reason to care about a certain character, and the film doesn't have them doing anything either.
That being said, London Confidential does have a couple of really good twists that make the film worth watching, and helps to flesh out some of the characters in the story. There are also a number of other things that happen throughout the story that really help to add layers to it, and add some much-needed drama to what would otherwise be a fairly bland murder mystery.
Overall, London Confidential is a well-written, well-acted movie that have a number of good elements, but that doesn't live up to the standards of many crime dramas out there. The film does have some very strong elements, and the story is entertaining, but the overall story is lacking in some areas.
I won't spoil the movie in this movie review, but you will find out a bit about the characters and their actions and thoughts throughout the course of the movie. It should help you better understand the events that take place, and the people you spend time with throughout.
There is nothing wrong with mystery and suspense as a way of building excitement and mystery for a reader, but sometimes you have to let the mystery come from something else. This is especially true in this type of book. As I stated before, the central character is someone we only get to know through the use of a few lines, and through a handful of scenes. So the only clues that you get are the ones we use from the main character.
It's a well-written mystery, but it's not a well-written mystery where the reader can feel a sense of mystery because he or she is doing the mystery. The movie version is closer to that, but it's not quite as effective.
The movie London Confidential is the sort of mystery that works for a short time before giving way to more action and drama. In a way, the movie version is like a short movie version of a book. In fact, some people compare the novel to the Twilight books, which have similar characters and a similar sort of story.
The main problem with movies like these is that the writers don't write the story in the way that mystery is supposed to be written. The story is supposed to be suspenseful and build up the characters and the mystery, then it eventually reveals the answer by the end of the movie.
Instead of a mystery that builds, the movie version of London Confidential gives us a big reveal and then a big cliffhanger. That is what makes the movie version so disappointing.
The movie version of the book is worth seeing if you are interested in reading about the characters and the story, and if you are interested in how the story was told in the film, but it just isn't one that will hold your interest. If you only have a few minutes to spare, I'd recommend you look for something else, but if you have a chance, I would recommend that you go out and read the book and see if you can figure out what the book is all about.
Get a London Confidential Movie Review
London confidential movie review is one of the most reliable sites on the internet. There are different kinds of people who are looking for a movie and most often, they do not know how to choose which ones they are going to watch. It becomes difficult when they are not really aware of what they want to watch. So, what one should look out for in this movie review?
The good news is that this review is provided by the makers themselves. In fact, all the reviews are done by the filmmakers or the producers themselves. In fact, if you are looking for reviews of other movies then they will be the best source for you. You will get the best kind of information about the movie in your hands and this will help you in making an informed decision.
Most people do not like to read reviews. However, if you do not want to read reviews then you can easily look it up online. The reviews are available for free of cost and this means that you do not have to pay for them at any time.
There are a number of things that you need to keep in mind while looking up the review. One of the things that you need to keep in mind is that there are more than one website that will give you a review. Some websites are better than the others and this is because they use different techniques in their review to make it appear more credible.
For example, you can read the review of the movie in the morning and in the evening you will see another website which will review the same movie. This is because the first website uses techniques like search engine optimization while the other does not have any such methods in their reviews.
Also, look out for a movie review that contains the complete information about the movie. This means that you need to check out all the information that they provide. This is because you do not want to miss out anything important in a review.
If you are not interested in watching movies, but simply want to read about some of the movies that have been made recently then this is the website that you should be checking out. The reviews contain a lot of information and this includes the film description, plot lines, cast, director and star power of the movie as well as much as the trailer that has been released along with its rating.
If you are looking for London confidential movie review, then you have all the right to access the website and the reviews without any delays. All you need to do is visit the website and all the reviews will be there to your eyes within a few seconds of each other.
As a result of the availability of the website, it will not be hard for you to get a London confidential movie review without any delays. If you do not like the movie reviews, you can simply visit another website that gives movie reviews without any delays. This is because the reviews are posted on the same site.
The fact is that the website is always updated and if you do not like a particular movie reviews then you can easily get another review from another website and read it. This is the reason why you can find the best reviews in a short span of time.
You can also check out the movie reviews of a particular film before the release of that film. This is because these websites provide the reviews a day or two before the movie is released.
If you want to know how to get hold of the review for the latest releases then you can get them by using the keywords provided. You will be surprised to find a number of websites which offer information on the newest movies.
London confidential zee5 is a unique marketing campaign designed and run by Bumble Bee Marketing. It is aimed at getting the top search engine rankings by using the right keywords in your site content.
There are many people online who are looking for an answer to questions such as: "Why is it so difficult to find a company that will do all the work for me, especially if I don't have any experience?". And then there is the growing problem of dealing with too many different online businesses which will require you to search for solutions yourself, which can be time consuming.
What makes London confidential zeew5 different from other similar campaigns is its highly targeted keyword lists. Its target markets are those who use Google, Yahoo, Bing and MSN to search for goods and services.
So what type of content will you see on your London confidential zeew5 website? Well, this will be very much similar to your standard article marketing campaign. You will write a high quality article about your product or service and submit it to article directories such as EzineArticles.
Once you have submitted your content, you can expect your content to appear on the top search results pages for a particular product within a matter of weeks, not days. If the content of your article is highly ranked, you will receive lots of targeted visitors from the search engines, some of whom will make purchases.
Although having good content is always a good thing, there is no such thing as being the "perfect" article marketer. You have to have a strong knowledge of how to create and structure good articles to get them ranked high in the search engines.
The one thing that has really impressed me about London is that they provide their clients with the right tools to get the best results possible. Their software allows you to generate content that will show high search engine rankings by using the right keywords in your content.
So whether you want to start off with this campaign on a limited budget or just do it on a permanent basis, London confidential zeew5 should be an option for you. If you want to be the next successful entrepreneur to join the growing number of marketers in London, this may be the perfect opportunity for you.
Internet marketers should take note, however, that it does take work to succeed on this platform. With a large number of products to choose from, finding a product to sell is an endless process. You may even find yourself overwhelmed by all the available products and services available. That is why you will need to learn to use different techniques to build a solid website that can attract customers and convince them to make a purchase.
One way to do this is by offering valuable information in your articles. You should always provide useful information that will help readers understand the product that you are trying to sell, but also offer tips and tricks that will allow them to maximize their use of the product and save time and money. You should also offer helpful information that shows them the best ways to utilize the products.
This can make all the difference in the world when trying to obtain a competitive edge over your competition. Internet marketers should also avoid using too many promotional strategies, since this will only draw unnecessary attention to your website.
For example, if you sell an anti aging skin care treatment, you should avoid using the phrase "Buy Now"Buy Online" so that your website doesn't seem like a sales page. Use language that encourages readers to contact you via email or phone.
Using a personalized message or personal touch on your website will increase your credibility with the people who visit your site. Also, you should never spam the search engines, as this will not only result in your website not being seen, but may cause your site to be banned from the search engines entirely.
The key to having a successful website that attracts people is to have an attractive design that provides users with a personal touch. So in conclusion, if you're looking for an easy way to promote your website, make sure you check out London Confidential's free tools and website building services.
1 note
·
View note
Text
How Do I Make Gifs? - A Photoshop CC Giffing Tutorial
(for @elektrawwf, and anyone else interested in how I make gifs I guess, lol)
So, I feel like I should preface this by saying that I'm certainly no expert on this, nor am I a Professional Giffer™, but I’ve been making gifs for a few years now, and have developed a pretty standard system for doing so. Hopefully it works for you like it’s worked for me! :)
Basic Tutorial Steps:
Step 1 - Recording the scene you want to gif
Step 2 - Importing, deleting, and cropping your gif frames
Step 3 - Adding adjustment layers
Step 4 - Resizing your gif and setting the frame delay
Step 5 - Converting and sharpening your gif
Step 6 - Trimming and saving your gif
BONUS STEP - Adding text (OPTIONAL)
-
Programs Used/Needed:
- QuickTime Player
- Photoshop CC 2018
-
The finished gif that I’ll be making:
This tutorial is VERY screenshot-heavy, so the rest of it will be below the cut. Happy giffing!
STEP 1 - Recording the scene you want to gif.
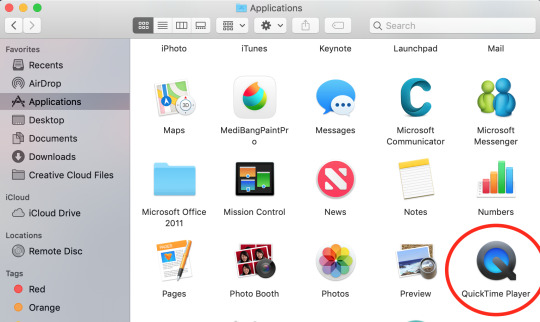
All gifs start as videos. I use the Screen Recording feature on QuickTime Player to create videos of whatever scenes I want to gif. If you have a Mac, you can find QuickTime in the Applications folder:
Right click, then select New Screen Recording.
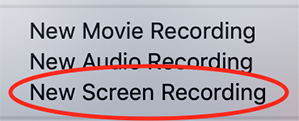
You can then play the scene you want to gif on your computer, and your screen with the video on it will be recorded. Hit the stop button when you want to end the recording, and then save the video.
It’s best to not record more than a minute or two at a time - basically, just record the exact scene that you’re looking for - because the longer the video is, the harder it’ll be to select the portion of it that you need for giffing.
You can technically screen-record any type of video, but I (and most giffers) vastly prefer videos that are 1080p, which is the best kind of HD. That’s why I usually don’t gif things unless I can find them either on Netflix, Youtube (in HD) or the CW site (or NBC, CBS, whatever). There are definitely other (less legal) ways to get your hands on HD videos, but I’m just not super comfortable using those lol.
That being said, 720p videos are usually okay for smaller (268px-wide) gifs - they’re just less ideal (I wouldn’t really recommend using them to make 540px-wide gifs, but you can still technically do it).
STEP 2 - Importing, deleting, and cropping your gif frames.
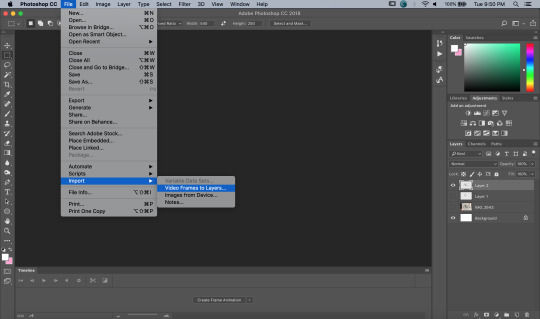
Now that you have your video, you have to import it into Photoshop. Once you open Photoshop, you need to go to File > Import, then select Video Frames to Layers.
A window will pop up, where you can set the amount of frames that you want Photoshop to import, and select the exact section of the video that you want to import. Here are my settings:
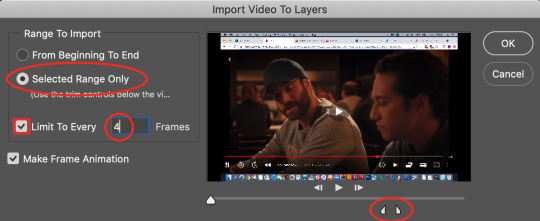
The two little toggles below the video are meant to be dragged around, and you use them to section out the specific Range of the video that you want to turn into a gif. Once you have all of this set up to your liking, hit OK.
-
NOTE: The selection of Limit To Every 4 Frames is more my personal preference than anything else. If you want Really Smooth Gifs, then you can uncheck that box and simply import every single frame in your Selected Range. This is what High Quality Giffers always say to do. Unfortunately, while those gifs do end up really smooth, they also end up being really short, which I don’t particularly like.
So basically, I’m personally willing to sacrifice some smoothness in favor of an increased gif length, but you do NOT have to do that if you don’t want to. Choose whichever option you like best - these Steps work no matter which one you do. (We’ll come back to this later though, once we get to setting the frame delay in Step 4).
-
Okay, back to the tutorial.
Once the scene is imported, you can delete any extraneous frames at the beginning and end of the frame animation Timeline, which can be found at the bottom of the screen.
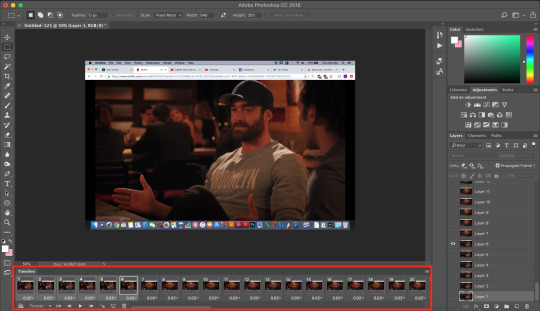
As you can see, I have the first 6 frames selected. Those are the ones I ended up deleting (among some others at the end of the Timeline).
You can also go to the Layers panel on the right, and delete the corresponding layers from there, once you’ve deleted the frames. This isn’t technically necessary, but it might help free up some computing space if you’re deleting a lot of frames.

Next, you need to click the Selection Tool in the top left corner of the screen. Then, set your selection preferences (circled below) as follows:

Style: Fixed Ratio
Width: 540
Height: 250
This is specifically the ratio to set for a 540 x 250px sized gif, which are the dimensions of the example gif I’m making. If you want to place two gifs beside each other in a gifset, each gif needs to be 268px wide. (The heights can be whatever you want them to be.)
Use the Selection Tool to select the area that you want to be your gif, and then go to Image > Crop.

STEP 3 - Adding adjustment layers.
Now it’s time to make your gif look pretty™. For this part, you’ll be using the Adjustments panel above the Layers panel.
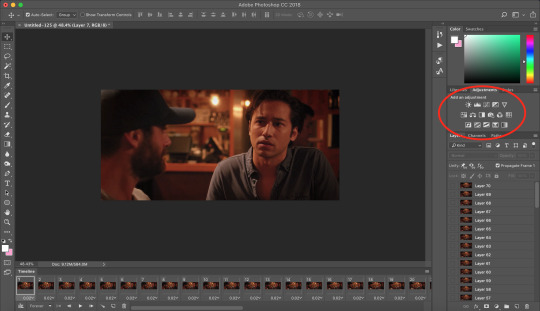
Adjustments will affect all the layers below it, so you want to make sure that your adjustment layers are placed above all of your gif layers.

These are the adjustment layers that I used for this specific gif, but they’re also just generally the same three adjustments that I use for every gif I make. (I also usually add a Hue/Saturation adjustment to my gifs, which I set to +15 Saturation, but since this scene was already so heavily saturated, it didn’t need it.)
Here are the specifications for the Brightness/Contrast and Levels adjustment layers:

Regarding the Curves adjustment layer (pictured below), if you click on the RGB dropdown menu, you can single out specific colors in order to color-correct the gif, which I did here (by removing a lot of extra reds and yellows).
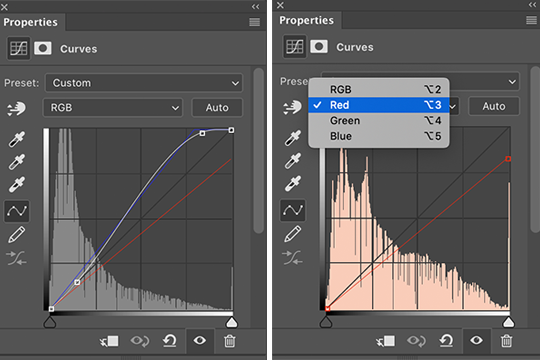
While these are good general adjustment examples, just take note that the values pictured here won’t be exactly the same for every gif, and you need to toggle and play around with them to make every new gif look its best.
Here’s the example scene before any adjustments:
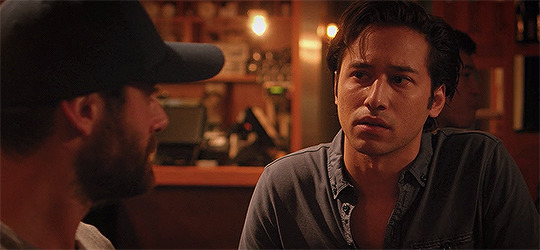
And here’s the scene after my adjustments:

STEP 4 - Resizing your gif and setting the frame delay.
To resize your gif, go to Image > Image Size, and then change the gif’s width (in this example, I change the gif’s width to 540px).
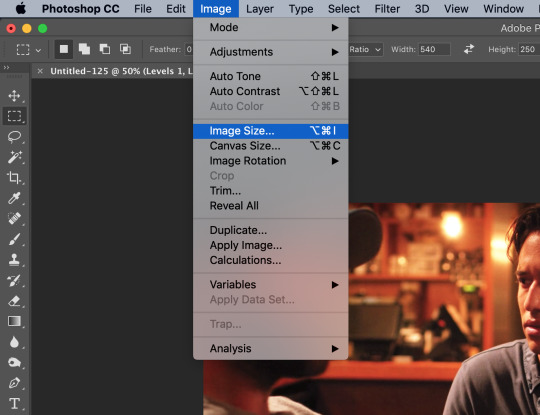

As long as Resample is checked the you’re working with Pixels, the gif should resize properly. Hit OK.
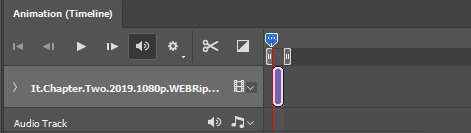
Next, to change the Frame Delay of the gif (basically how fast it goes), look for this button in the right corner of your Timeline, then click it and Select All Frames.

Once all the frames are selected, you can hit one of the little downward arrows next to the 0.02 values, and select Other.
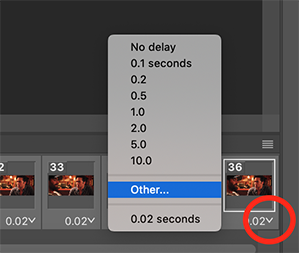
Now you can set your new frame delay. I always set my delay to 0.09 seconds, which produces gifs that are a bit slower than the Professional Gif Standard™. This is due to a combination of personal preference (I just like slower gifs) and an effort to maintain as much smoothness as possible, given how I choose to import my frames.
-
NOTE: Remember the NOTE from Step 2? Now, if you chose to import every frame, rather than “Every 4 Frames” like I do, then you should set your frame delay to 0.04.
Doing so will produce a final gif that looks like this:

Notice how this gif is smoother and faster, but also shorter than my example gif? Yeah. Like I said, whichever style of gif you choose to make is up to your own preference.
STEP 5 - Converting and sharpening your gif.
You never quite realize how blurry a gif really is until you Sharpen it. To do this, you first need to convert your Timeline from a Frame Animation to a solid Timeline. You can do this by making sure all your frames are still selected, and then clicking the Convert to Timeline button in the bottom left corner of the Timeline.

Now your Timeline should look purple, like it does in the picture below.
Next, you need to select all of your layers (MINUS the adjustment layers) on the right side of the screen. Once all of your layers are selected, go to Filter > Convert for Smart Filters.
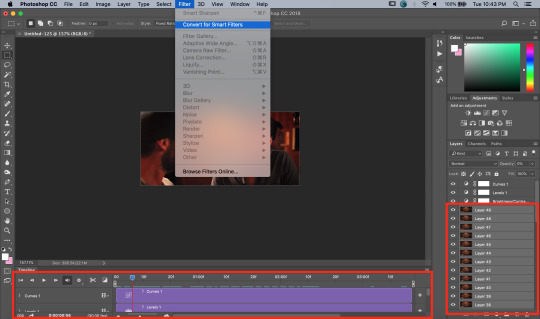
Once your gif layers have been compressed into a Smart Object (see circle below), you can select Filter > Sharpen > Smart Sharpen.

The first time you select Smart Sharpen, you need to set all the parameters for it. But once you do that the first time, you shouldn’t have to set them again. Basically, make sure your window looks exactly like this one:
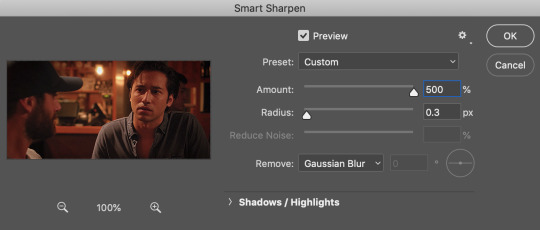
Then hit OK.
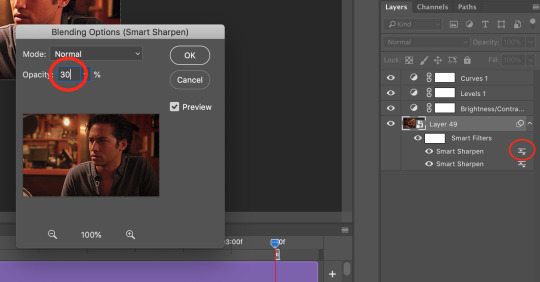
You’re going to do this TWICE (so you’re going to end up with TWO Smart Sharpen layers below your Smart Object layer). Then, you need to click the button to the right of the top Smart Sharpen layer, and change the opacity of that layer to 30%. (Otherwise, your gif will be way over-sharpened.)
STEP 6 - Trimming and saving your gif.
You’re almost done! It’s time to save your gif.
To save a gif, you must go to File > Export > Save For Web (Legacy).
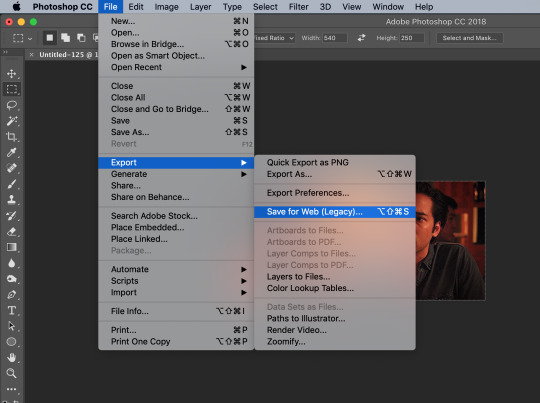
However, this gif has a problem.


This number in the bottom left corner of the Save For Web window tells you the current size of your gif. As you can see, this gif’s size is currently 3.541 MB. That size wouldn’t be a problem if you were intending to upload this gif to Twitter, because Twitter has a gif size limit of 5 MB.
Tumblr, however, only has a size limit of 3 MB. So, to get your gif to work on tumblr, you need to Trim it.
Trimming is the process of changing the length of a gif without actually deleting any part of it permanently. This gives you the freedom to edit your gif and pick the portion of it that you like best.
You can easily trim your gif in the Timeline, by clicking the dragging the Gray Sliders at each end of it (see the arrows below). Wherever you leave the stoppers will become the new beginning and end of the gif. You can make this process more precise by using the Blue Slider (circled below) to choose where you want your stopper to go before you drag it there.

The Timeline pictured here has already been trimmed.
Trimming your gif will often require some trial and error. Whenever you want to check the length of your gif, simply go to Save For Web again and check the amount of MBs in your gif. (Click Cancel if your gif is still too big.)
Once your gif falls below 3 MB, you can finally save it!

The last thing you need to do before saving is change your Looping Options from Once to Forever in the bottom right corner of the window. Then, click Save.
You now officially have a finished gif!
Mine looks like this:
-
BONUS STEP - Adding text (OPTIONAL)
Now, I’ve just shown you how to make and save a gif. But what if you want to add text to that gif? I’ll show yow how to do that too.
First off, you should only add text after the rest of your gif is completely done and ready to be saved (basically, once you’ve already completed Steps 1-5). Then, before you save it, you can click on the Text button on the left side of the screen.
Click on the gif to create a new Text layer, and then type whatever you want. Generally, dialogue captions are placed in the middle of a gif towards the bottom, while other, more artistic types of Text can go wherever you want.
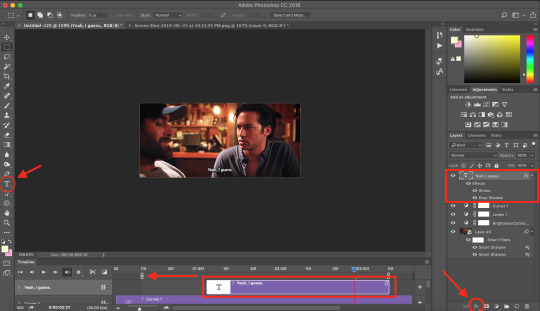
Now that you have a Text layer, you want to make sure of a few things. First, make sure that your Text layer is your TOP layer on the right side of the screen, above all of the Adjustment layers.
Next, you want to make sure that your Text layer spans your entire gif Timeline. Notice how my Text layer (depicted as a purple rectangle in the Timeline) doesn’t reach the Gray Slider on the left? To fix this, simply click and drag the Text layer until it extends past both Gray Sliders.
And finally, I always add Effects to my Text. You can do this by hitting the fx button in the bottom right of your screen. Specifically, I use the Stroke and Drop Shadow effects to make my gif stand out from whatever background it happens to be on.
My Stroke is always set to 1px thick, and my Drop Shadow settings are as follows:

As a final note, if you want your text to look exactly like mine, then you need to use the font Myriad Pro in size 14, which I then italicize and bold. You can also open Window > Characters, and make sure that your preferences look like this:

ALRIGHT. Now that you’ve added your extra text, you can FINALLY go to Step 6 and save your gif.
Now, your finished gif should look like this:

I hope this tutorial was helpful! I tried to be as thorough as possible to avoid any confusion, but if you have any additional questions, you should always feel free to ask me!
Have fun giffing!! :)
#my tutorials#my gifs#idk what else to tag this lol#gif tutorial#personal shit#long post#I'm so sorry to anyone on mobile with no read more
55 notes
·
View notes
Text
Updated gif tutorial
This is an updated tutorial on how I make and colour my gifs. You can find all of my previous tutorials here.
What I use:
Windows 10 laptop
Potplayer (to screencap)
Photoshop CC
I’ll be making this:

Note: This tutorial won’t be as in-depth as my previous tutorials since this is geared more towards people that have basic understanding of how to gif and use Photoshop. You can find my gif making tutorial for beginners here and colouring tutorial for beginners here.
This tutorial will be divided into two parts - Part 1: Making the gif and Part 2: Colouring the gif.
PART 1: MAKING THE GIF
1. Screen capping
The first step to making gifs is taking screen caps of what you want to gif. I do this using Potplayer, which you can download for free here.
Note: A lot of gif makers use KM Player to screen cap, but I found that it constantly crashed on my laptop and wasn’t very functional so I switched to Potplayer which suits me much better. You can download both programs for free along with others such as VLC and others, so it’s all about finding one that works best for the laptop/computer you’re using.
Open Potplayer (or whatever program you’re using) and open the video source you’re going to be giffing from. I’m giffing from a downloaded episode of Game of Thrones so I go to Open File(s) > Videos and open the correct file.
Top tip: To ensure your gifs are of the highest quality always aim to use videos that are 1080p or at least 720p (HD).
Go to the scene you want to gif, pause just before it and hit CTRL + G, which will bring up the Consecutive Image Capturer (below).
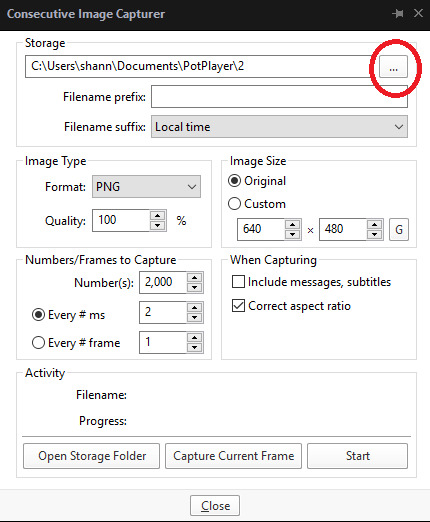
These are the settings I use. You can use the same or adjust them to suit you best.
Note: You can choose where you’d like to save your screen caps by clicking on the square with three dots which is been circled red (above).

I always minimise the screen and drag the Consecutive Image Capturer box alongside the video so I can see what I’m giffing.
To start screen capping the scene hit start and press stop when the scene has ended.
Where it says Progress beneath Activity, it will tell you how many screen caps you’ve taken. I took 54.
2. Cutting screen caps down
Go to the folder where you’ve saved your screen caps and check to see if there are any unnecessary caps that need deleting. In my scene, I accidentally captured Tyrion so deleted those caps and I now have 41 left.
Note: Thankfully the increased 3mb limit means that we don’t have to be as stingy with the size of our gifs anymore, but I still try to stick to no more than 60-80 screen caps for one gif just to cut down on the amount of time it takes to make it.
3. Open in Photoshop
Once you’re happy with the screen caps you have open Photoshop > File > Scripts > Load into stack
Note: I used to use Photoshop C5 which a friend sent me via Dropbox, but having since paid for the full version of PS, I wouldn’t recommend using any free version of PS you’ve found online. There is a risk of viruses, but free versions are also rarely fully functional (mine actually stopped working completely without warning) and a lot slower. It’s worth paying the £9.98 per month (if you’re a student) to have the full use of the program.
The following box will appear:
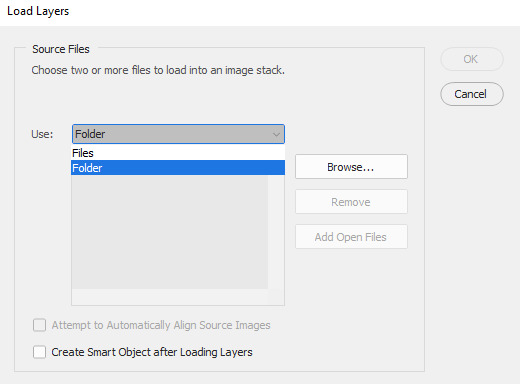
Where it says File click the drop down menu and select Folder. Once Folder has been selected, click on Browse to the right, locate the folder where you saved your screen caps to and click OK. The screen caps will begin to load in the window and when they’re done the OK button to the right (above cancel) will be available for you to click on, so click on it and they will load into PS.
Depending on how many screen caps you have, you may have to wait a few minutes for them all to finish loading.
4. Making the gif
Now that all of my screen caps have finished loading my PS looks like this:

Everyone’s PS will have a slightly different layout because on the right sidebar you can order the different tabs however you choose.
The important thing is to make sure you have the essential tabs open. To do this go to Window (on the top bar) and ensure you have the following ticked: Timeline, Layers, Tools and Options.
It’s also essential to have Adjustments (this is how we colour the gif), Actions (if you’re using actions to sharpen like I do) and Character (this is how we make subtitles) open. You can see that I have all of these tabs open in a cluster together at the top of my right toolbar, but as I said you can drag them to wherever you prefer.
In this step the Timeline is the most important part. Go ahead and click Create Video Timeline, now your Timeline will look like this:

Click on the three small squares to the left of the Timeline (circled red below) that say ‘Convert to frame animation’ when you hover over it.
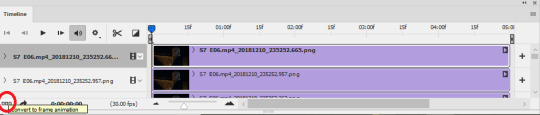
Now your Timeline will look like this:

Click on the menu symbol with four horizontal lines to the top right of the Timeline (circled below) and ‘Make Frames From Layers’

Now you’ll notice that your caps have appeared along the timeline. Click again on the four horizontal lines menu symbol you just clicked on and click Select All Frames (when they’re all selected they’ll turn a darker shade of grey) > Reverse Frames.
Note: We do this because the caps have been loaded into PS backwards and by reversing them, they’re now in the right order.
Keep all of the Frames selected (if you’ve already clicked off them, simply repeat the above step go to the menu and Select All Frames) and now we’re going to set the timing of the gif.
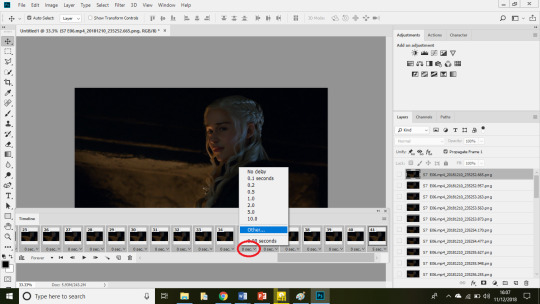
Underneath any of the frames click the time stamp where it says ‘0 secs’ (circled above) until the above options come up and then click Other...
When the Set Frame Delay Box pops up, simply type 0.05 and OK.
Note: You can now hit play on the gif if you want to see how fast it is and can readjust the speed to your liking.
Now click on the symbol in the bottom left hand corner of the Timeline to the left of the word ‘Forever’. You’ll know it’s the right one, because when you hover on it, it should say ‘Convert to video timeline’.
Your Timeline will now look like this:
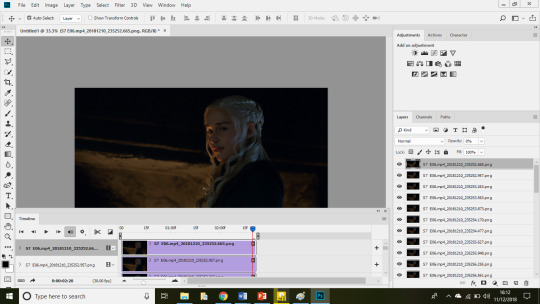
5. Resizing and cropping
Here are the Tumblr dimensions as of 2018:
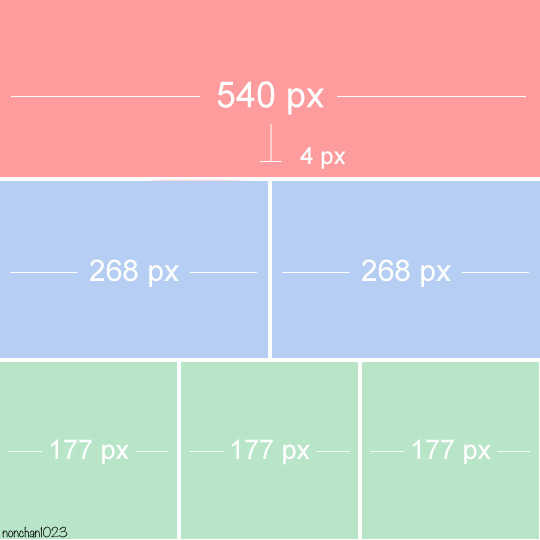
Since most people tend to make 268px gifs, those are the dimensions I’m going to go use for this tutorial.
Select Crop from the left tool bar (circled red below) and adjust the size you want your gif to be in the boxes circled in blue.
As you can see my crop tool is currently set to a width of 268px which is correct, but I want to change the height to be a little bigger so I’m going to type 170px instead.
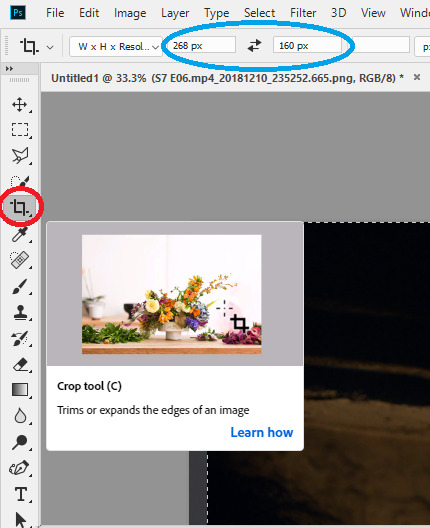
Now click on the gif until it looks like this:

And press Enter to crop it. Since Daenerys is slightly to the right of my gif, I dragged the crop to the right so she’d be more central and this is what my gif now looks like:
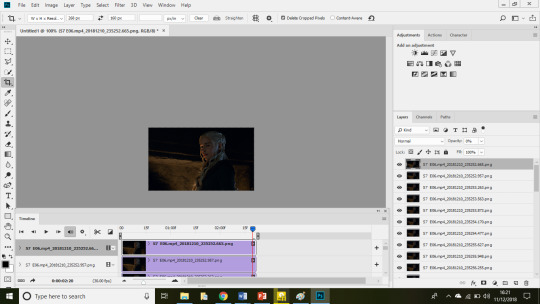
Note: When changing the size of your gif, you may need to change your zoom. After I cropped my gif it was tiny because my zoom was set to 50%. To adjust your zoom simply click on View and you then have the option to Zoom in, out or go to 100%.
6. Sharpening the gif.
I use actions to sharpen my gifs, just because that’s the way I’ve always done it. You can download the action I use here or find another that you like at yeahps.
Note: If you don’t already have an action or don’t know how to use them, simply download it, go to the actions tab, the four horizontal lines at the edge of the tab to bring up the menu, load actions and locate it.
First we need to convert the layers to a Smart Object. To do this click on the timeline at the start of your gif so that the red line with the blue shape on top is at the beginning (below, if you compare it to the image above, you can see the red line has moved from near the end of the timeline on the last image to the beginning now).
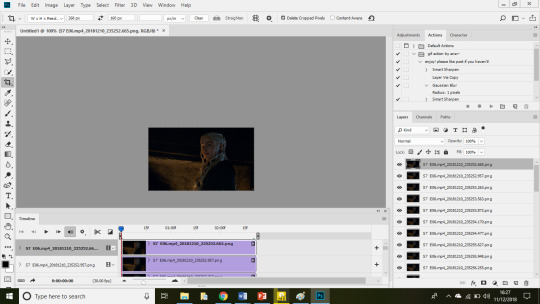
Next go to the Layers tab (in my case it’s located to the left of the Timeline), select the top layer (it’ll be dark grey when it’s selected, like mine above), hold SHIFT, scroll down to the bottom and select the last layer until everything is highlighted (below).

Click on the menu button to the right (circled red below) > Convert to Smart Object
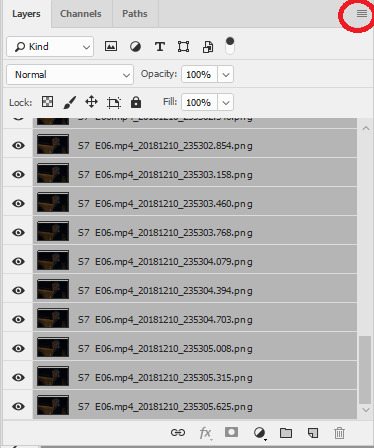
Once it has converted to smart object it will look like this:

Go to the Actions tab, find the action you’ve loaded into PS and hit the play button (circled below) so that the action is applied to your gif.
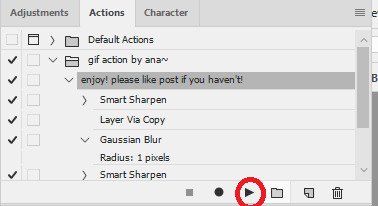
Once it has been applied you’ll see under Layers the smart object will have lots of little sections saying ‘Smart Sharpen’ have appeared below it.
For reference this is how my gif looked before sharpening:

And after:

PART 2: COLOURING THE GIF
Now for the hardest, but most fun part - colouring the gif.
You can see my previous colouring tutorials here. I generally follow the same process for colouring, but I have better understanding of colour balance and selective colours now (thank goodness lmao). If you’re a beginner, it’s worth referring to my beginners colouring tutorial alongside this, because it’ll be more detailed than this tutorial is.
For this part, the Adjustments tab is essential, so make sure you have it checked (if not go to Window > Adjustments).
Step 1: Curves
Select curves and drag the line until you’re happy with how bright your gif is (remember, we’ll also be brightening the gif later with levels and brightness, so don’t go overboard.)
I adjusted mine to this:

Step 2: Levels
Next click levels, the levels box looks like this:

The three boxes just below the little line graph thingy (where it says, 0, 1.00 and 255) are the settings you need to change. You don’t need to change of the far right box (where it says 255) and the first two boxes (where it says 15 and 1.1).
By increasing the number in the left box, the gif darkens and increasing the number in the middle box brightens it.
Generally in the left box I’ll choose anything ranging from 10-30, but my go to is 20. The middle box generally ranges from 1-1.6 depending on how dark the scene is.
For this gif I went with 20 and 1.5.
Step 3: Brightness and Contrast
I chose the following settings.

My gif now looks like this:

4. Colour Balance
This is the setting I’ve learned to use better since I first started colouring and I’ve earned how much of a difference it can make to a gifs appearance.
The box looks like this:
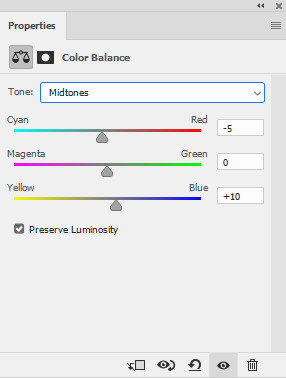
Since my gif is yellow/red in colour due to the fire I changed the Midtones settings to the above.
An important element of Colour Balance which I didn’t use before is Shadows and Highlights. By clicking on the dropdown menu where it says Midtones, you can also select Shadows and Highlights.
When you change the colour balance on Shadows, it changes the undertones of the gif, the background, whilst midtones changes the middle layer of the gif and highlights the top surface of the colour (sorry, I suck at explaining this, but play around with the settings to see what I mean about how the different settings change the colours in different ways).
I changed Shadows to +10 Blue and -5 Red.
Before colour balance:
After:

Step 4: Selective Colours
Selective colours can completely change the appearance of a gif and it’s important to play around with them as often as you can and to get an eye for colours.
For example, when I look at my gif as it is now I can see that the colour balance has helped diminish the yellow/red tones, but not quite enough, so I’m going to adjust yellows to -20.

I can also see that the colour balance has brought out some cyan/blue tones in Dany’s hair, which I want to get rid of so I’m going to change cyans to -100 on every option and blue on blues to -100.

The difference is subtle, but it’s there. Now that I’m happy with the colour of the gif, it’s time to go back and readjust any of the previous layers I’ve added such as brightness, levels etc. to add any final touches.
My final result is this:
Thanks for reading. I hope this was useful to you. Please share if it was and feel free to ask if you have any questions, I’d be happy to help.
I’ll also be creating a ‘Gif Colouring Tips’ post for people that are new to colouring there gifs or are currently using other’s PSDs and would like to learn. I’ll link it here when it has been posted.
405 notes
·
View notes
Text
Anime gif tutorial
Disclaimer: This is what I do, it might not be the best way to do it but this is just my way of doing gifs, so if you have any tips on how to make this process easier feel free to comment
This will probably be kind of long(?) because I’ll try my best to be as descriptive as possible. Also keep in mind English is not my first language so there’s definitely gonna be some grammar errors (also it was like 2am when I made this) but I’ll try my best to keep it as comprehensible as possible.
Programs that I will be using:
Photoshop CC2017
Handbrake
VLC Media Player
Step 1: You’re obviously gonna need a video to gif. I recommend to use good quality videos for cleaner gifs (1080p, and if you can find BD versions even better). Open your video in any player that has a timer for you to see (VLC is a good option, MKV is fine too). Also open Handbrake on the side, with the video file in it.

Handbrake opens with those default settings so you’ll have to change them
From Chapters to Seconds
From FPS 30 to Same as source (it’s at the top)
From Quality 22 to Placebo
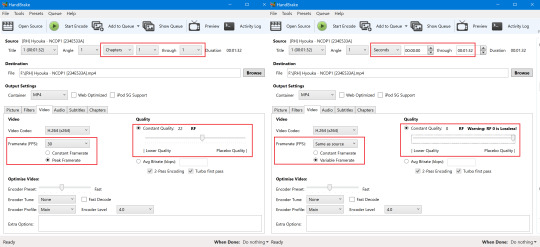
Step 2: Now that the basic stuff is done, you’ll need to choose a scene (me, stating the obvious lol) what I do is, after knowing when the scene i want to gif starts and ends I add 1 sec before and 1 sec after on Handbrake (i.e if the scene is from 3:05 to 3:12 I will put 3:04 and 3:13 on Handbrake) so i can have the whole scene and a little more just in case.
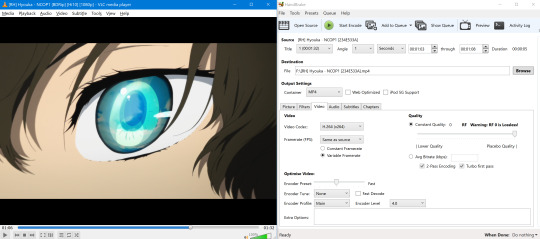
Step 3: Then you just save it (clicking on Start Encode)
If you have more than one scene you want to save click on “Add to Queue” and after you have all the scenes of the video you want to gif then click on “Start Encode”,
Try not to save a really big scene in just one file because PS has a 500 frame limit.
Now we go to Photoshop
Step 4: Open the video (scene) you just saved. For that you’ll need to go to:
File > Import > Video frames to layers

Once you click on that, this window should appear:
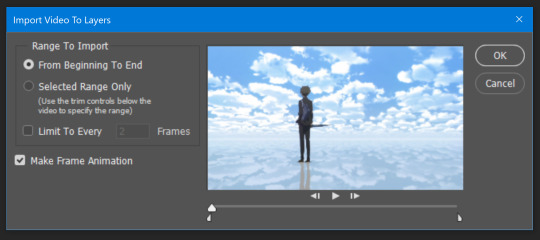
Step 5: After you click OK comes the good part, making the actual gif. PS should look like this:

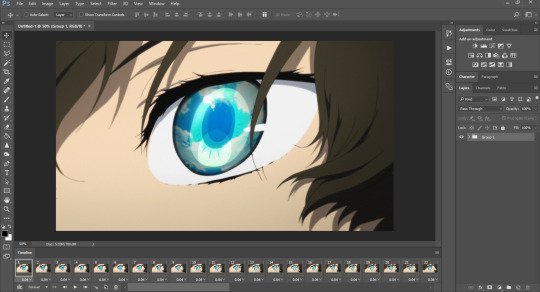
I like to put all the layers in one group
I saved like 2 seconds extra first of all I need to delete the extra frames that aren’t part of the scene I want to gif (I know it’s tedious but I prefer that to lose part of the scene by accident).
To delete frames from the Timeline just click the trashcan on the bottom.
Since the gif is in 1080p, the canvas is gonna look BIG but don’t worry about it for now.
Now we delete the frames that are the same (most of the time with the placebo quality it’s every 2 frames or if it’s a fast scene every 1 frame, but there are some scenes where all frames are different, it depends on the animation)
The scene I choose here is a little complicated(?) because the speed of the hair is different than the speed of the clouds in the eye. I decided to go with the speed of the hair:

The selected ones are the ones that I’m gonna delete because they are repeated.
Step 6: You can see the number 0.04 under the frames, that’s the speed of the gif.
If we leave it with all the frames and that speed it should look fine but the size of the file might be too much for tumblr (size limit is 3MB wich stresses a lot of us gifmakers lol) that’s why we delete frames, to reduce the size.
Now we change the speed, for that we select all the frames (select 1 frame + shift + left click last frame) then, with all the frames selected, left click on the bottom part of the frames (the one with the numbers and arrow)
This should appear, then click on “other...” :
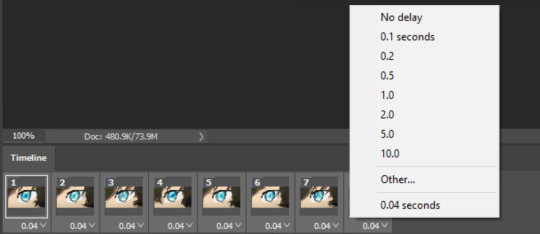
This little window should appear, change the set delay to your desire and scene speed:
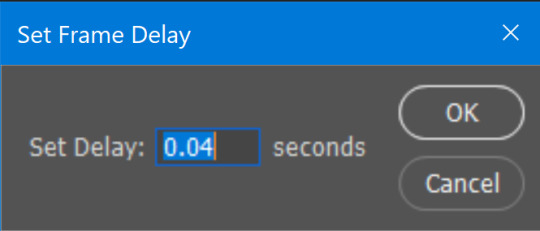
Set delay kept at:
0.04: lol this looks funny

0.07:

0.1:

Step 7: Our file should be BIG, to fix that there are different ways but what I do is go to: Image > Image Size

And set the Width to 540 pixels. It’s important to keep the little chain because it will maintain the aspect ratio ( otherwise it will look stretched and weird)
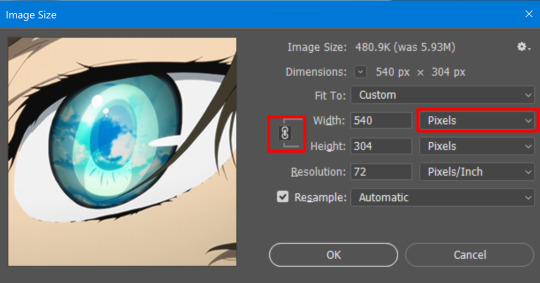
Step 8: After we’ve done all this we click on the bottom left button of the timeline to change from frames to timeline (this is so we can sharpen and color our gif)
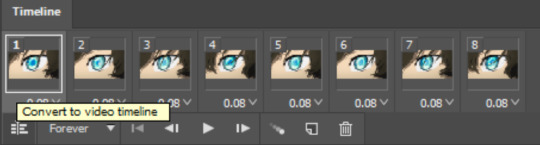
It should look like this now:

Step 9: This step is the sharpening step. For this we go to Filter > Convert for smart filters

After you clicked on that, the rest of the filters should be available again. Now we click on Blur > Surface blur
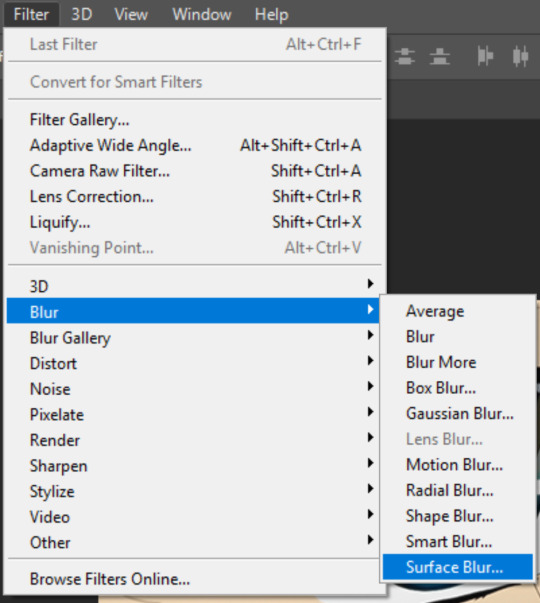
This little window should pop up, I usually go for Radius: 4 and Threshold: 3 or Radius 3 and Threshold: 2. This is so the image can look smoother and not grainy.

Then we apply our sharpen settings (there are a lot of ways to do this and a lot of other tutorials so I’m not gonna put my settings here because I usually just play with them until it looks okay). Here is a sharpening tutorial in case you want to know more.
Step 10: We apply our coloring/adjustments. This depends on the scene (if you want to know how I color my gifs let me know too)
Step 11: We are almost done! We just need to save. So for that you need to click on File > Export > Save for Web (or just click ctrl + alt + shift + S)
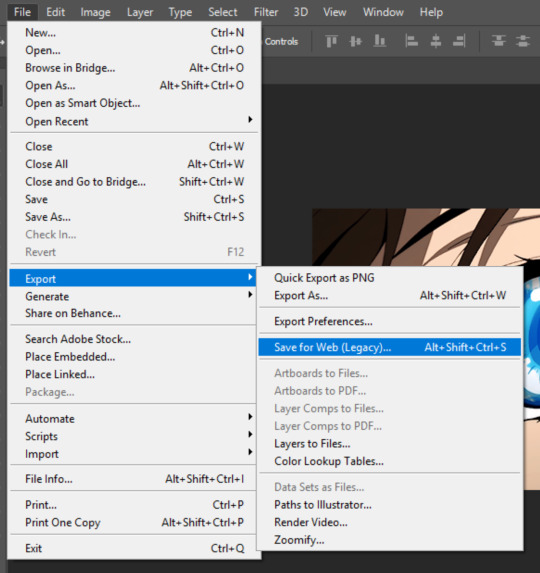
Something like this should appear:

There are a lot of combinations for you to save your gifs, you just need to play a little and see wich one looks better. It depends on the scene, sometimes adaptive + pattern looks good and other times selective + pattern or adaptive + diffusion, you’ll just have to try and see wich combination works best.
Personally I like to use pattern rather than diffusion, especially for gradients (like the ones in the eyes I’m using as an example)
I recommend not to use “No dither” because it will create segments(?) and it won’t look good especially if the scene you are giffing has some kind of gradient, like this:

With Pattern and Selective:

With Pattern and Adaptive: (there’s not much difference, but the eyes look “cleaner” with selective)

Depending on what dither algorithm or color reduction (aka patter or noise or diffusion and perceptual or selective or adaptive) the color table will change.
Here is a better explained tutorial about save for web
Important!
DON’T GO OVER 3MB or your gif won’t play
Never forget to loop your gif to “Forever”
Finished Gif:
Other gif tutorials that are very helpful:
gif tutorial: how to make a gif by @anue
how to make a gif by @kaijohs
GIF Tutorial/Timeline Only/Mac /PC by @pururin
#itsphotoshop#yeahps#chaoticresources#photoshop tutorial#gif tutorial#tutorial#.tutorial#mine#this was kind of long#it's 2:30 am and i started at almost 12am so...#i think i should go to sleep#also the tutorials i put at the end are tutorials i learned from too#they are really well explained#hope this can be of help#and if there's any questions feel free to ask#this took me so long to post#thanks to the hoes for the proof reading#ily~
77 notes
·
View notes
Note
would u ever do a gif tutorial?? i love your gifs !! 💓
first of all, thank you 💖💖 and sorry this took a while to answer/make, i have had a lot going on and found it hard to make myself focus on this! but here it is now :D
i did make a tutorial earlier this year, but since i feel like that’s slightly outdated now (because i’ve changed the way i make my gifs quite a lot during this year), here’s a new one :’)
in this tutorial i included how i:
download
cut out the part i want to gif
import to photoshop
how to use actions (because i’ve started using that a lot and will in this tutorial)
crop (action)
put the text on (action)
sharpen (action)
colour (psd)
save
‘delay’ the gif so it’s a (in my opinion) good speed (again with an action)
i use photoshop cc 2018, but i think as long as you can open video clips in it and it has the ‘timeline’ you should be fine no matter what ps you have. (don’t hold me to it, though, that’s just my own speculation.)
i’ve included some things too:
an ‘action pack’ including: crop, sharpening, text and ‘delay’.
3 colouring psds (2 from the last tutorial+the one used for this tutorial)
i’ll be showing how i made this 540x300px type of gif:

from this gifset.
(tutorial under the cut! warning for a long post, with a lot of text and pictures. sorry if this is very in depth i just can’t stop talking sometimes. some things might be small details, but it’s things i wish i learned sooner myself. anyway lets get into it! also i’m not an expert, just speaking from my own experience.)
downloading the video
the first thing i do is download the video i want from clipconverter.cc. paste the link in the field, press continue, choose mp4 and highest possible quality (preferably high definition (hd) 1080p or 720p) and then press start. it takes a while to process the video, but once that’s done just press download and wait for the video to download, which takes another while.
if you know which part you want, and don’t wanna download a full video, you can just put in what part you wanna download like this at the bottom:
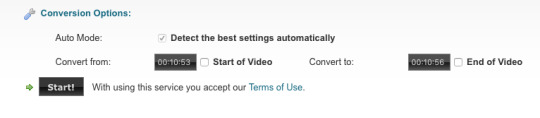
cutting out the part i want to gif
i use quicktime player (download link) to open the video and then i cut out the part i want to gif using the ‘trim‘ tool, found under edit -> trim… i always leave more than i need when trimming, just to be sure i get all of what i want to gif, then trim it a bit more later in ps.

trim by pulling the yellow things until you’re happy, then hit the button to the right.
when you feel like you have the part you want, just click file -> save… and name it and save it where you want.
importing the clip to photoshop
i simply import a clip by pulling it from the folder into ps, like this:
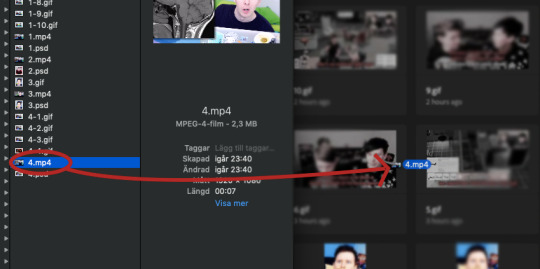
this will open up your clip like this:
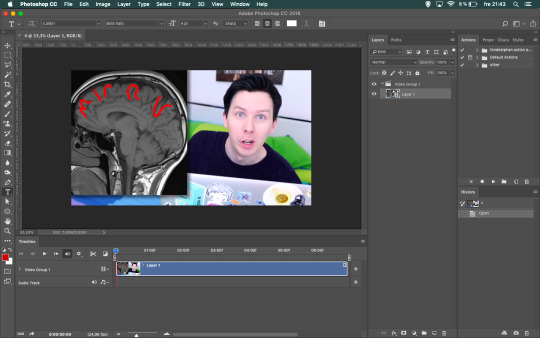
i always work in the video timeline like this, because i find it easier to move stuff around in it - especially text. and because you can listen to the video clip as you do the text part of the gif, so i don’t need to have it open on the side.
how to use actions
using actions may sound hard, but it’s honestly the best discovery i’ve done in ps this year! now i tend to use it more often than not, because it makes gifmaking simpler (in my opinion). basically, the action does the things for you instead of you having to click a lot of buttons
depending on how you’ve set up your ps, the ‘actions’ panel is on the right. if it’s not, open it by clicking window -> actions.
to import an action to photoshop, you click the little lines at the top right corner of the ‘actions’ window. then click load actions…

find the action (.atn) you wanna use and click it to add it to ps.
then you just click the action you wanna use in the actions window on the right, and hit the little play button (see pic below) and let ps do the rest.
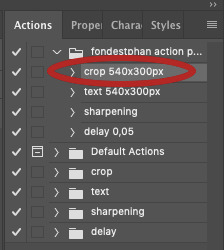
click the action (red circle), then play (blue circle)!
nothing more, nothing less!
crop (action)
following the steps above we’re now gonna crop the video.
my ‘big’/one line gifs are usually 540x300px because i find that to be a good size for those.
click the ‘crop 540x300px’ action and ‘play’. done!
and before we move on, this is usually when i trim the gif from the excess i left when trimming it in quicktime player.

place the marker (red circle) where you want to cut the clip, use the scissor (blue circle) to cut it. click the clip you don’t want anymore and delete it.
text (action)
when i make gifs with text, i find it best to do the text right after the cropping. if the gif doesn’t have text, i just go straight to ‘sharpening’.
first close the video group by clicking the little arrow next to it, then click the video group:
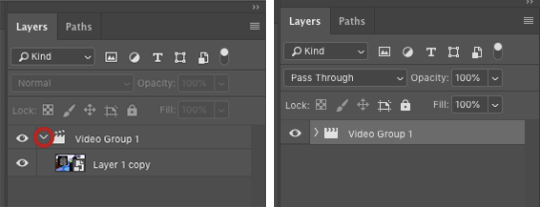
add the ‘text’ to the gif using the action. the text layer won’t go all the way out, or it might be too long depending on the clip’s length, so just pull it so it fits the size of the whole clip:

this something to remember to check once we get to colouring as well.
then what i do is that i play (the button marked in blue below) the clip in ps, listen for what i want to be in that particular gif and then pause where i want to cut it, and simply cut it with the scissor. make sure the text layer is selected before cutting it.
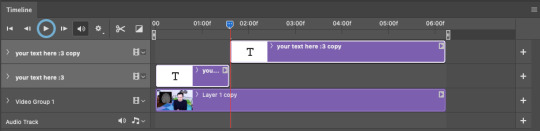
you can either keep the layers like this, or you pull down the top one to the same line in the ‘timeline’. i always want them all in the same row because i find that simpler.
i keep cutting the text where i want the gifs to end. you could say that each section of text is a gif in the gifset, because that’s how i think when i gif like this.
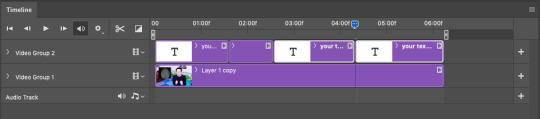
then it’s just to put the text you want for each part of the gif.
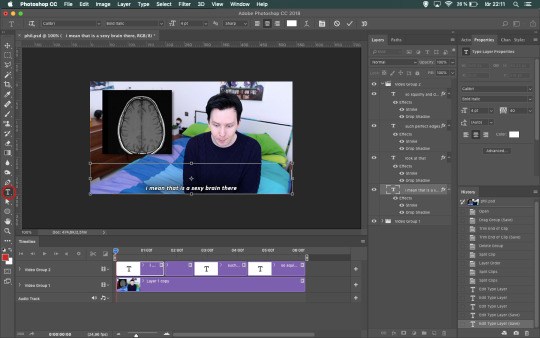
click the section of text you want to write in, click the ‘type tool’ and then the text on the gif to start writing.
i always make my text boxes higher than i need to, because i never know how many lines the text will be. then i just hit enter to jump down as many lines as i need in order for the text to be at the bottom of the gif.
sharpening (action)
when you’re gonna sharpen the clip, you’ll need to open the video group that you previously closed again.
click the ‘video’ layer and apply the ‘sharpening’ action just like with the other actions.
now that we’ve sharpened it, when saved the gif will look something like this:

colouring
i most often colour every gifset by itself nowadays, because i love experimenting with colours and try to find something that works for every gif/gifset. it can be challenging, but i personally enjoy that kind of challenge!
for the tutorial i made earlier this year i included some psds that you can find here. you can find the colouring i made for this tutorial there as well! if you just wanna apply the psd and not colour from scratch, i explained how you do that here!
the layers i use are:
‘levels’ (to lighten/darken)
‘vibrance’ (to make the colours ‘pop’)
at least one ‘selective layer’, but usually a few more (to experiment with colours and change/desaturate colours completely)
sometimes a ‘curves’ layer as well (if the gif is very dark or just need some more light other than what the ‘levels’ layer can do)
sometimes i use ‘hue/saturation’ as well (if i wanna change a specific colour to another or saturate it completely)
all adjustments layers i use can be find at the bottom of the ‘layers’ tab, the button is called ‘create new fill or adjustment layer’:
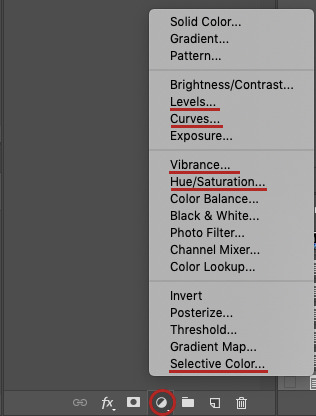
since my colourings differ from gifset to gifset, this is just generally what i do when colouring. it also varies depending on if it’s more colourful gifs (like this or this, or like the phil one i’m gonna show now), or just one more subtle coloured (like this, this or this).
if there’s requests for more colour tutorials i can make more :’)
but now back to this gifset!
i always start with adding a ‘levels’ layer. my settings for this gifset was:
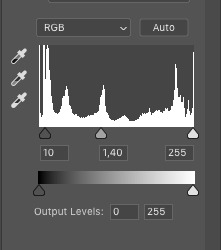
the first value is shadows, second is midtones and third is highlights. i usually keep my shadows value at 10-20, midtones 1,20-1,50 or 1,60-1,70 if i need to, and leave highlights as it is. (i don’t use the output levels at all.)
after ‘levels’:
second layer i add is usually ‘vibrance’. (sometimes i add ‘selective layer’(s) before ‘vibrance’, but i find it easier to do ‘selective layer’(s) last.) my settings for ‘vibrance’ is usually:
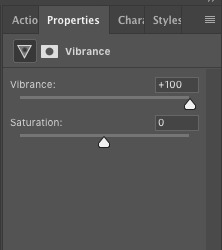
so i basically always turn ‘vibrance’ up to +100, sometimes i’ve used ‘saturation’ too and put it at like +10 or +20 but i find that to be a bit too much most times.
after ‘vibrance’:

‘selective layer’ is for me the most frustrating part, but also the most fun because you can get such cool colours with it - or even just enhance the already existing colours just a bit.
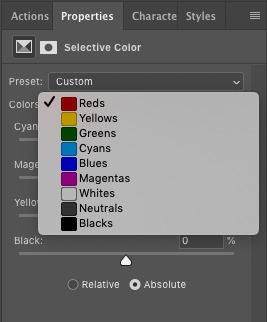
‘selective layer’ have many different options and depending on what my ‘goal’ for the gifset is, i use these differently. something i always try to have in mind, though, is that the colours ‘disappear’ a bit when i upload the gifs to tumblr and it’s okay if it’s a bit too ‘much’ in ps.
my biggest tip is probably to explore it on your own and play around with it a lot. that’s how you learn what works and doesn’t work and also what you personally like or don’t like. if it doesn’t look good, just delete the ‘selective layers’ and start from scratch again.
my first layer is always in the reds and often in the black one as well. for the phil gifset my settings were:
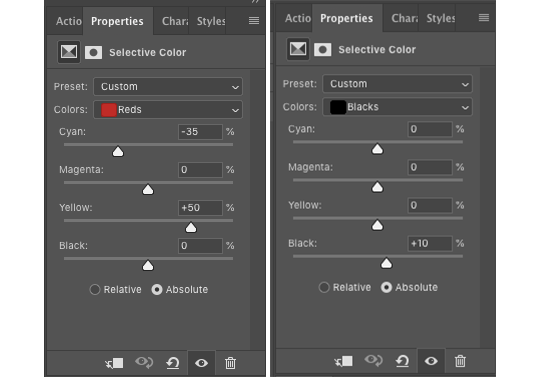
in the reds i enhance his skin colour and in the blacks i make everything black a bit darker. if it’s a colourful gifset i always make the reds a bit ‘stronger’ than i need to, because a lot of the skin colour disappears when i keep adding layers and changing the colours in those.
after this layer the gif looks like this:
in the second layer i played around with the blues and magentas, to try and change the blue and magenta colours in the gif - in this case phil’s sheets, his sweater and his eyes.
my settings ended up being like this:
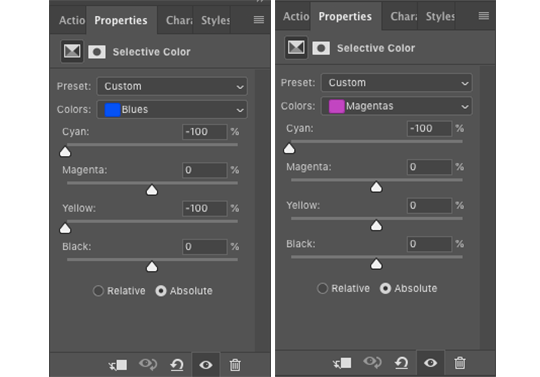
and then the gif looks like this:

layer 3 in this gif is just magentas, in which i kind of saturated the magenta and blue colours a bit.
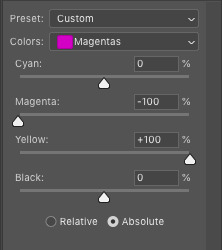
then it looks like this:
i wasn’t really happy with the green (the pillows) in the gif, so i added another layer in which i changed yellows and greens, and put it beneath the rest of the ‘selective layers’.
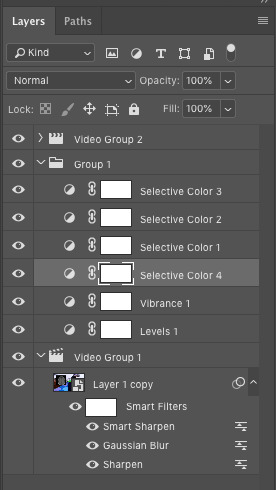
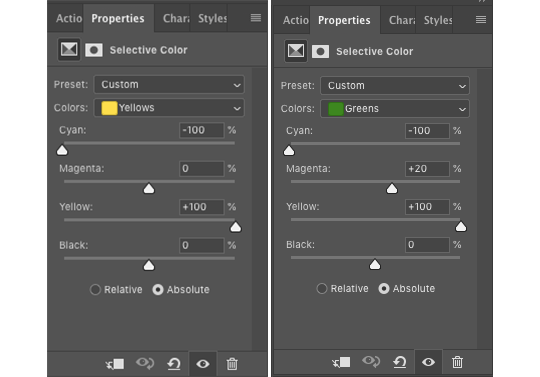
in this layer i played with the yellows and greens, because green always contains yellow and green. putting the cyan to -100 in the yellows layer will make it more reddish and the yellow at +100 will make it more yellow. changing the greens and putting the cyan on -100 made it more reddish too, the magenta at +20 gave it a kind of orange-ish tone and yellow at +100 made it a bit more yellow.
and this is how the gif looks now:
all in all, i find that to get good or interesting colourings you just have to play around with the different layers. and add more ‘selective layers’, to change the colours even more. as i said before - if it doesn’t work or looks weird, simply delete the ‘selective layers’ and start over :’)
saving
one of the final steps in gifmaking is saving. i save my gifs in two steps, and this is the first one.
to save the first gif, just place the markers like this:
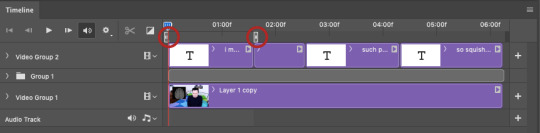
so it matches with the ‘text’ layer.
click file -> export -> save for web… for my laptop it takes a little while to process it, but soon this window will pop up:

in the bottom left corner of the window you can see the gif size.

it needs to be under 3mb for it to work in a tumblr post. if it’s over that, you can either exit the window now and shorten the gif a bit more - or you can save it now and remove frames in the ‘delay’ step further down. i personally most often do the latter because i find that easier.
on the right of the gif are all the settings, mine are:
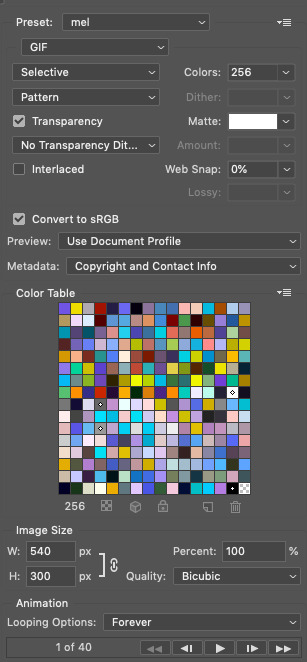
i mostly focus on the top half i find ‘selective’ and ‘pattern’ to be the best settings, but that’s a matter of taste really. you can always play around with it until you find what you think is best for your gifs.
and make sure the looping options at the bottom is set to ‘forever’, so the gif doesn’t suddenly stop.
when you’re done, click save… and save your gif where you want.
move the markers (red circles) to match with the next text layer to and repeat the steps to save the next gif.
‘delay’ (action)
once the gif is saved i always open it again to change the ‘frame delay time’ and sometimes (like for the gif used in this example) i add another ‘vibrance’ layer if i find that the gif lacks some colours. you can of course do this during colouring, but for me this works as well.
find your gif, open it in ps. choose the action called ‘delay 0,05’, then hit play. this will make the gif a bit slower than it is when you first save it in ps.
if you want to add another ‘vibrance’ layer, you can do so now. in the ‘layers’ tab, scroll all the way up and click the first layer and then add another ‘vibrance’ layer and set it to the value you want.
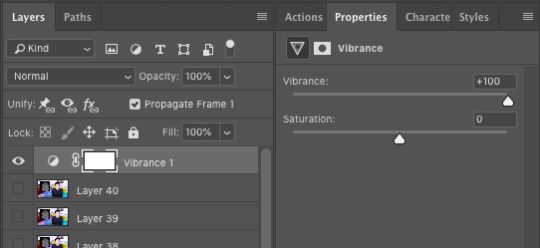
(i usually go for +50 or +100.)
if you know your gif is too big (over 3mb) from saving it earlier, you can now delete frames in order to make it smaller. what i do is delete one or two frames at a time until it’s under 3mb.

to delete frames, click the one frame, hold ‘shift’ and click as many frames back as you wanna delete. click the tarsh bin (blue circle) to delete them.
once you’re done, click file -> export -> save for web… again to save your gif. i usually save over the one i saved before, because i see no use having two gifs that’s almost the same. i only confuse myself so i don’t know which one is which without having to open ps again.
now you’re finally done and can post your gif(s) to tumblr :D
the final result!
before all effects:

after all effects:
if you found this helpful, please like or reblog! thank you for reading :’) 💖
#anon#asks#gif tutorial#i really hope this makes sense and that i didn't miss anything hhhh iamanxious sjkdhjgdshfkl
126 notes
·
View notes
Note
hello! your gifs are so sharp and vibrant! could i ask how you make them - is there a certain method you use or do you change it for each gif? (thank you for sharing your gifs!) (feel free to not answer if it's a trade secret tho :D)
oooh thank you so much! it took me a long time to feel comfortable with my gifs tbh i’ve been learning for 6 years now! but anyway, pretty much everything i do to make sure my gifs look the way they do:
FIRST:
i use Photoshop CS5 because i personally prefer the end result for gifs in CS5 rather than CS6 but it’s just a detail, whatever you have is good;
it’s not really a full-on tutorial, i just explain what i do in each step for my gifs to look like that;
it requires basic gifmaking knowledge and some familiarity with photoshop but overall i think (and hope) it’s easy and understandable;
BASICS:
high quality videos (1080p is ideal, 720p works for most gifs) and good lighting help A LOT.
if you’re using kmplayer to capture your frames make sure you have ‘every frame’ selected in the ‘frames to extract’ section.
it’s very important to respect the tumblr dimensions to avoid stretched out/blurry gifs (the column in the middle of the a 3 columns gifset is 178px instead of 177px):
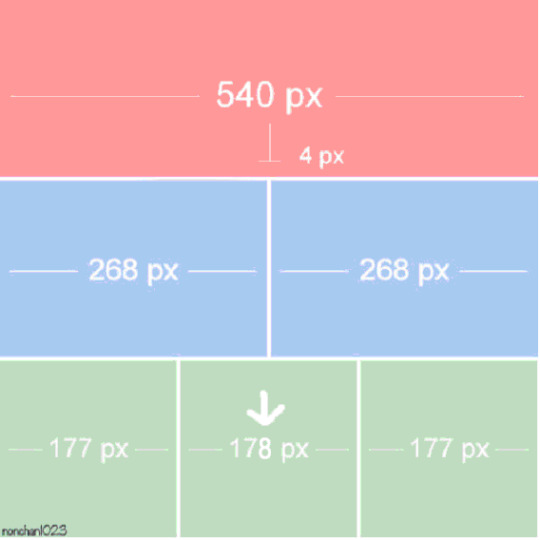
SHARPENING: i still use this sharpening action and apply it twice to the original layer (sometimes i have to adjust one of the ‘smart sharpen’ options to make it look better). if you don’t like to use actions, just apply ‘Smart Sharpen’ in these settings (most commonly used but you can changed it to fit your own personal taste, add more sharpening if you think it’s necessary):
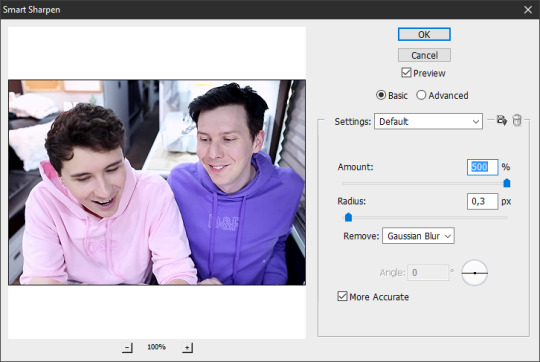
let’s start with this, then (i’m using the sharpening action):

COLORING: that can be a pretty tricky but it’s mostly personal taste. i like bright, contrasting and vibrant. another thing that is very important to me is making sure the person’s skin doesn’t look all fucked up and overexposed. sometimes i fail. but anyway, i tend to focus my coloring process on highlighting the whites and blacks and making colors pop.
for this blog i mostly gif dan and phil who are pretty pale and have dark hair so it’s easier to apply my coloring preferences on them, but when i gif people of color i change my process to avoid whitewashing them and to make their skin color pop (there are a few tutorials on how to color poc out there like x and x)
when i don’t use psds (pro tip: ALWAYS save the psds of the gifs you make, even if you don’t like the coloring. save it cause you may want to use it later) and do my coloring from scratch i usually start by darkening the blacks. for that i’ll use the ‘Levels’ adjustment layer:


and then i’ll start adjusting their skin tone in the same ‘Levels’ layer:


some brightness and contrast to add some shine:

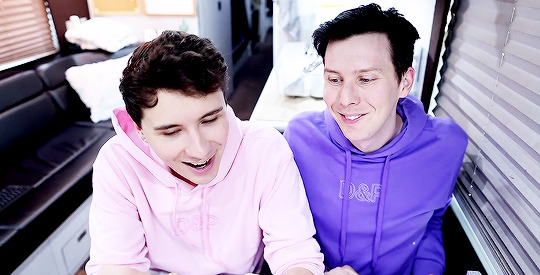
and hue/saturation to adjust the colors:
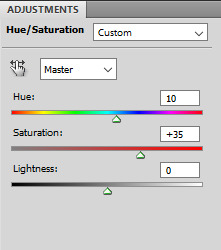
and from this point on i just keep adding more adjustment layers, changing colors until i reach a result the pleases me:
CURVES: i subtly drag the line upwards to enhance their skin tones, depending on what you’re giffing you may need to drag the line higher or drag different points of the line to adjust the contrast.
EXPOSURE: i add some light ‘Exposure’ (if you add too much it kind of ruins the skin details, for this one i added +0,10); then i darken the dark areas by moving back the ‘Offset’ arrow (-0,0287 for this one) and in ‘Gamma Correction’ i moved the arrow to 1,12 to adjust their skin tone.
HUE/SATURATION: you can use to increase saturation and change colors. in ‘Master’ settings i usually only move the arrow a bit to the right to subtly change the red in their faces to a more yellow-y tone. to change the color of phil’s hoodie i switched to ‘Magenta’ settings and moved the arrow until i found a color that i liked (pink) and for a better result i did the same with the ‘Blue’ settings. if you don’t want to change a color but just make it pop (for example, blue) you can select ‘Blue’ and just enhance the saturation until you think it’s good enough.
SELECTIVE COLOR: i use this adjustment layer in all of my colorings mainly for the ‘Blacks’, where in the ‘Black’ section i increase it as much as i can without ruining the coloring to make sure the darks are Dark for that good contrast. for this specific coloring i also went to ‘Reds’ and dragged the arrow in the ‘Black’ section to the right to highlight the curves/lines of their faces and their lips. and then in ‘Neutrals’ i keep changing it depending on how i want my coloring to look like. if i think their skin tone is too magenta-y i enhance the ‘Yellow’ section, etc.
COLOR BALANCE: does what the title says, drag the arrows in the different sections until you’re satisfied. for this one, in the ‘Midtones’ i slightly enhance the ‘Green’ and ‘Yellow’ because their skin was too magenta for my liking.
VIBRANCE: i don’t usually change the saturation here (i usually do it in hue/saturation) and i focus on vibrance just for a special final touch.
my final result:
AS YOU SAVE YOUR GIFS:
make sure they’re under 3mb! if they’re not you can crop the timeline before saving or delete frames after saving and re-save (you’ll probably have to re-save anyway as i’ll explain later)
these are the settings i (and most gifmakers) use for saving gifs:

after you save, the frame delay in your gifs may switch to ‘0,07′ it always happens to me and i believe it’s because i use the animation timeline to make my gifs so i always open the gifs i just saved and i see them at a 0,07 delay:

however 0,07 is too slow for me (this one gif doesn’t really help but trust me, it’s kind of really slow) and i prefer 0,05 or 0,04 delays. i’ve been using 0,04 more often recently because imo they look closer to the real speed in their videos but sometimes i think they’re too fast and switch back to 0,05. in general, i think 0,05 is a safer bet:

then i re-save the gifs the same way i’d save a normal gif (’Save for Web & Devices’) and i replace the old gif.
doing this will NOT affect the quality of your gif as you can see in the gifs above!
take in consideration that these delays (0,05 and 0,04) work for gifs that use every frame instead of every 2 or 3 frames. in that case you might need to readjust the delay to different numbers. test it as many times as necessary.
FINAL CONSIDERATIONS:
i started making gifs in a time where most gifsets were pastel and desaturated and i personally really disliked the style back then and wanted to see more bright/vibrant gifs again so that’s why i started making gifs, to see what i wanted to see in gifs, not what other people wanted.
even though i just gave a bunch of instructions here it’s important to remember that there are no rules to gifmaking just common sense (don’t steal, don’t just edit someone else’s gifs and call it your own, don’t whitewash poc, etc.). do whatever you want with your own gifs, try all the styles you like, change the colors, make it thermal, make it slow, fast, etc. just do what you like.
not all gifs/colorings will be winners and it’s ok. keep trying.
it’s okay to ask your friends for help! and make sure to help your friends when they need it!
we are all learning here
we are all doing it for free
i wasn’t expecting this answer would end up being this long hehe sorry! but i hope this is helpful! if you need anything else feel free to ask me again and i’ll do my best to help you!
#descendio#sorry it took me so long!#i saw this ask last night in bed and started answering this morning#but i had to leave for lunch and only got back to it now!#lola.ask
72 notes
·
View notes
Text
how to gif w sophia: vh1 edition
hello everyone!! i’ve gotten a lot of msgs in my inbox asking me how i make my gifs, how i gif using videos from the vh1 website, and just general questions about gif making. so in this tutorial, i’ll be showing you how to get this:

using clips straight from the vh1 website!! it’s about to get very very specific so hold onto your hats as we enter the dangerous waters of gif making and bear with me!!
first off, you’re going to need quicktime player for this, so if u don’t have it, download it here (x)
we’re going to start by going to the vh1 website and finding the clip we want to use. for this example, i’m going to be using the first look of episode 9. i will pause the clip a few seconds before the bit that i want to gif. this is very important!!
now, you’re going to open quicktime player, and at the top, go to file > new screen recording:

a window will pop up that looks like this:
and you’re going to press the record button (red dot) shown above.
time to record! go back to the vh1 window where your clip awaits. always always make sure it’s in full screen mode before pressing play. it should look like this:

wait until the part you want to gif has been recorded and then pause the video, and end the recording by clicking on the quicktime player icon at the bottom of your screen and selecting stop screen recording:

your screen recording will show up on your screen right after. to make sure we get the best quality possible for our gif, we’re going to go at the top, and click file > export > 1080p
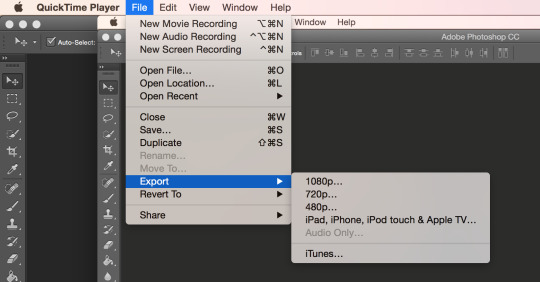
which will bring us to this:
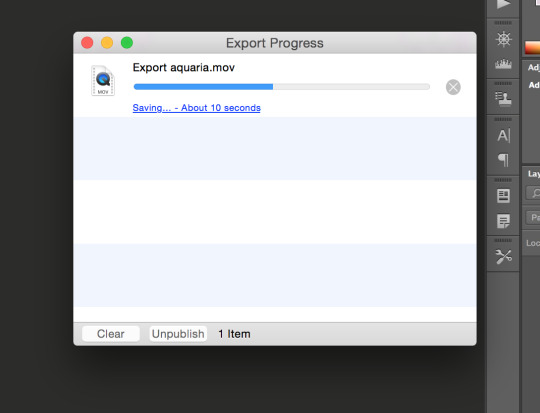
once your screen recording has been converted, exit quicktime player. congratulations!! you now have a beautiful clip you can easily gif.
now let’s make the gif!
* there are many different ways one can go about making gifs. this the way i make mine, and it works well for me.
open photoshop, go to file > import > video frames to layers:
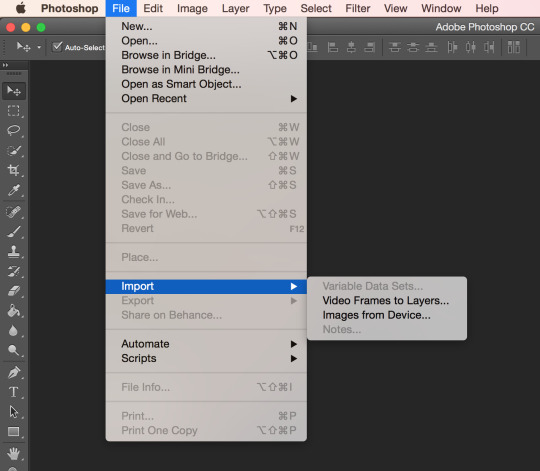
then i select the screen recording, and this box appears:
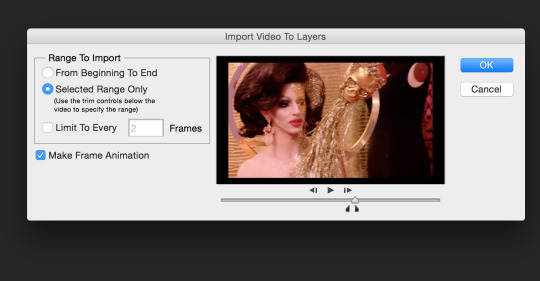
time to use the two little markers shown above (right under the play button) to narrow down the part i want to gif, and then click ok.
this is what my screen looks like right now:

if you don’t see the timeline pictured above, go to window > timeline.
select all the frames in the timeline. do this by clicking on the little symbol across from the word ‘timeline’ (an arrow and 3 little lines) and clicking on select all frames:
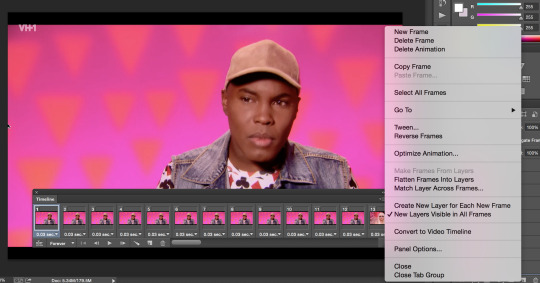
as seen below, the frames in your timeline should be blue (selected). now go to the photoshop bar at the top and click select > all layers to select your layers (on the right side) too:
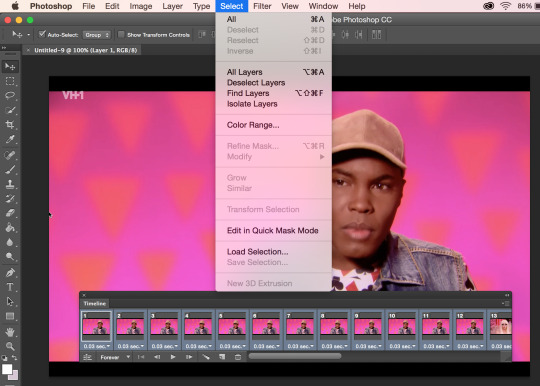
this is what it should look like at this point:

now, it’s time to set the speed of the gif. if you have no idea what i’m going on about, i’d recommend you check out this really good post (x) that explains and illustrates the different gif speeds.
i usually use a speed of 0.05 for most of my gifs. however, sometimes the vh1 clips tend to buffer, so i might use a speed of 0.04 so my gifs will look less slow and glitchy.
to set the speed of our gif, we’re going to click on the number under one of the frames in our timeline (in this case, 0.03 sec.) and click on other:
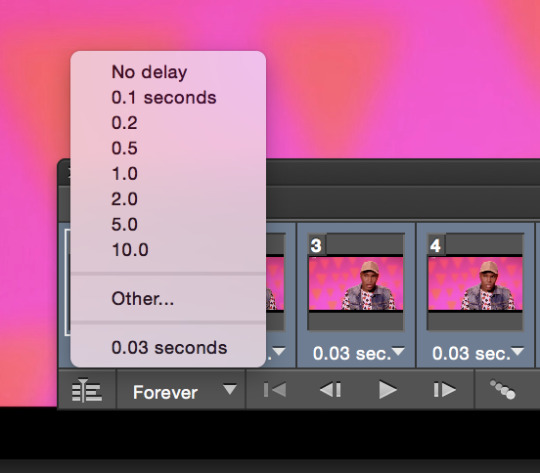
set the frame delay to the speed you wish to have. here, i’m going to be using 0.05, and then click ok:
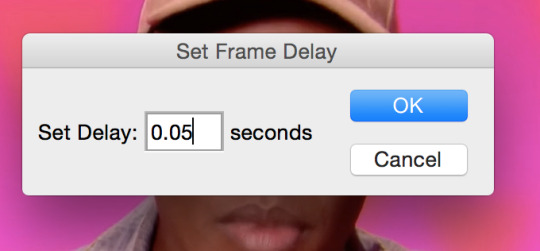
the time has come... to convert our frames to video timeline. click on the little symbol right under the speed of the first frame (if you hover over it, it will say ‘convert to video timeline’). also make sure it says forever next to it, or your gif will only play once, which is not what we want:
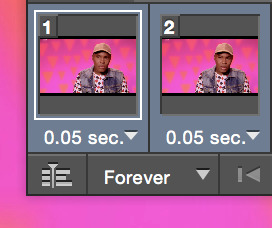
this is what it should look like:
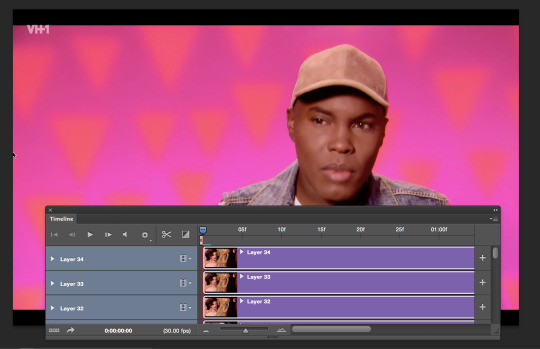
go to filter > convert for smart filters. make sure all of your layers are selected or it will NOT work!!
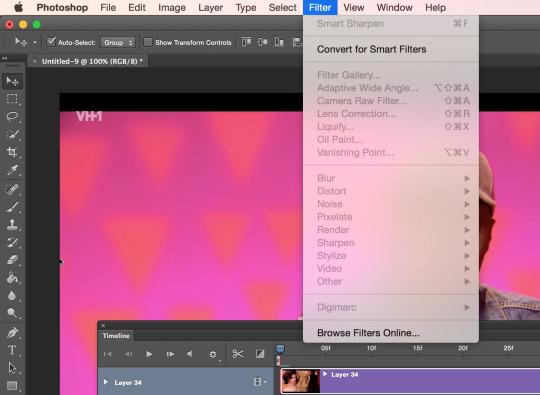
your screen should look like this:
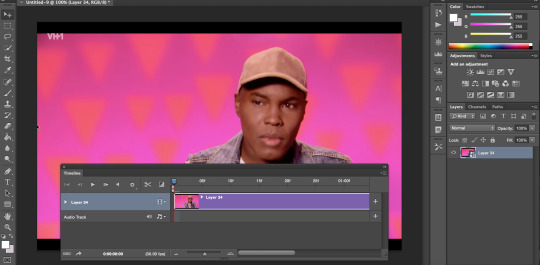
okay so, i only want to gif one specific part of this, so i am going to crop the video in the timeline by placing my cursor at the beginning and end of it and dragging until i’m happy with it. this is the final product:
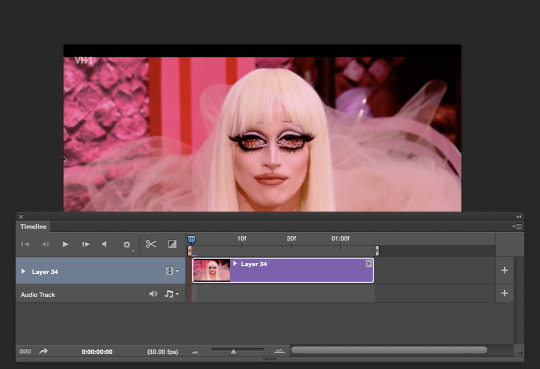
see how shorter the layer in the timeline is now?
now it’s time to resize the gif. to do this, we’re going to go to the top again and to image > image size:

this post (x) explains the tumblr dimensions pretty well if you need it. i want my gif to be 268 px by 250 px, so i am going to put in 300 px as the height and click ok:

now my gif is smaller in size, but i want to crop it. to do so, i go to image > canvas size:

time to set the width to 268 and the height to 250 and click ok. make sure the option ‘relative’ is unchecked:
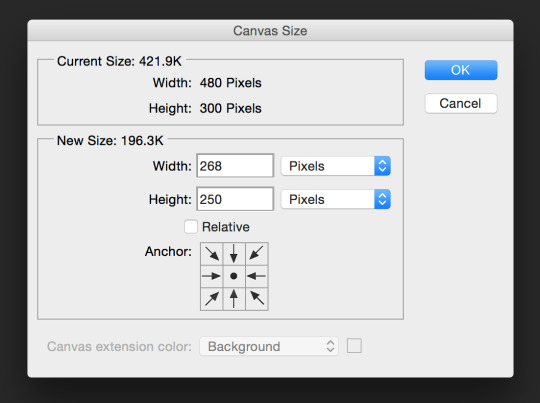
tadam! the gif is now cropped and its size works for tumblr. i’m going to drag mine around until it’s the way i want it to be, which looks like this:
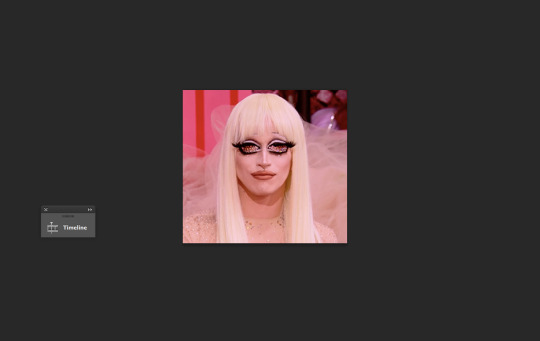
it’s time to sharpen! go to the top bar again, then filter > sharpen > smart sharpen:
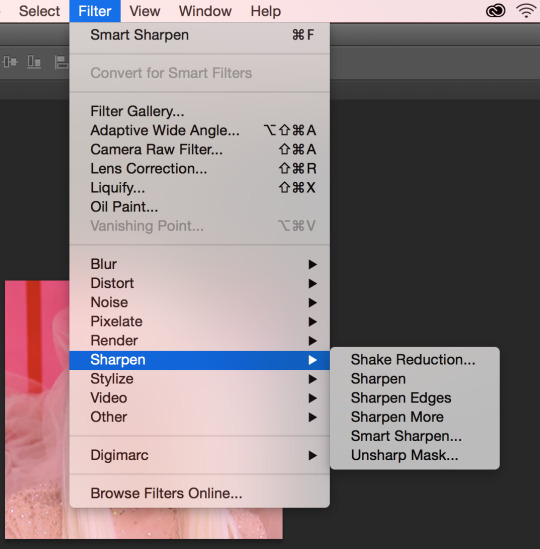
these are my smart sharpen settings:

i used to use a radius of 0.03, but i find 0.04 works better with my drag race gifs. either way, i’d recommend either a 0.03 or 0.04px radius.
look how clearer the gif is now, wow:

the only thing left to do now is to add a psd, although i won’t go into that too deeply on this post bc it’s long enough as it is. i’m going to select and open the usual black and white psd that i use on all my rpdr gifs:
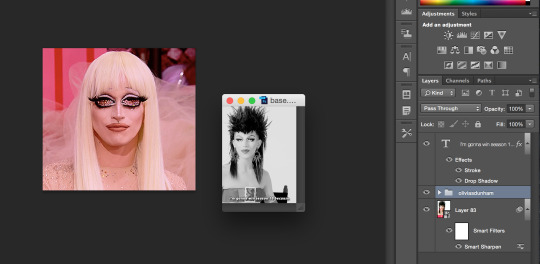
and then drag it onto my gif so it looks like this:

* when it comes to black and white psds, i like to double click on the ‘black and white’ adjustment and set it to auto, so it adjusts to the gif itself, but you don’t have to do that:
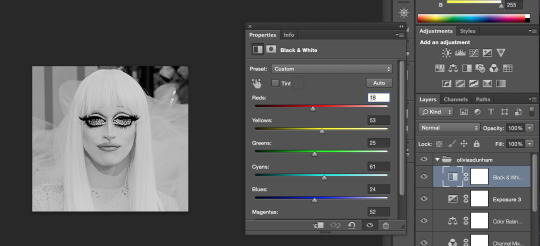
the last thing to do is to save the gif. we’re going to go to file > save for web:
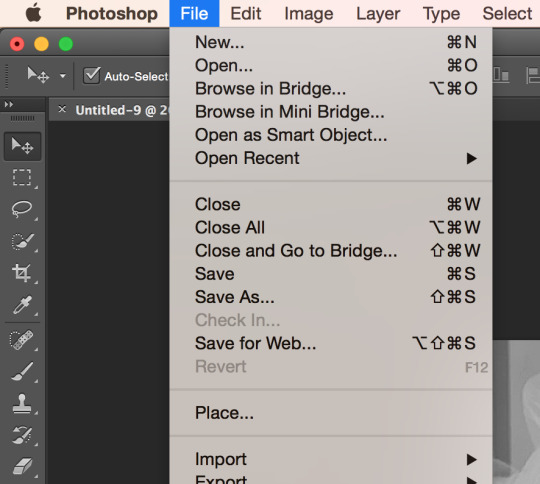
these are my rendering settings to achieve non-grainy, pretty gifs (assuming your footage is in 720p or 1080p of course):
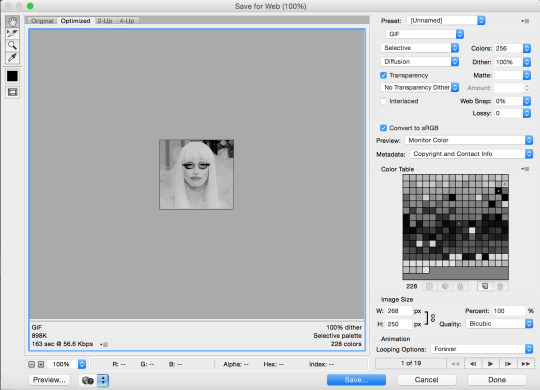
most importantly, CHECK THE SIZE OF YOUR GIF:

my gif is 898 k, which is well below tumblr’s gif size limit of 3 mb. in order for your gif to play on tumblr, it has to be less than 3 mb. to reduce the size of your gif, try reducing the number of frames it has or try to avoid using black and white, as it tends to make gifs bigger in size.
here is the final product again:

and that’s it, folks, there you have it!! hope this was useful to y’all.
49 notes
·
View notes
Text
Sony Vaio Laptop Drivers Download India

HDMI Audio Driver
Sony India Pvt
To download drivers, firmware updates, BIOS, and software, please select a category to find your model, or type the model name in the search box. Caution: The use of Sony's Li-Ion Cell battery in eCigarettes and vape pens is not advisable. VAIO Care Premium Tools Service ending on 30th September 2020 UPDATE: Important Notification for VGP-BPS26 Battery Packs in VAIO Personal Computers - November 24, 2016 Register your product. Sony VAIO model to lots of support notification for sony pcg-71914l. 1 click to download all Sony VAIO Drivers. System Recovery Outside Windows. I have a vaio laptop model & chasis number in title hat ive had for roughly 2 and a half years now and recently the disk tray has stopped working. A supported computer and applicable drivers. Use the Check your model section; A Windows 10 upgrade from Microsoft; Sony will not be providing support for all models that qualify for this upgrade. Instructions which explain the process and how to prepare your PC. Use the Check your model section to see instructions. VAIO Driver and Software Downloads Ending - Updated on 7th July 2020 New Update Notification of Free Replacement Battery Pack for the VGP-BPS26 in VAIO Personal Computer Termination of upload service from VAIO Movie Creator / VAIO Creation / Media Gallery - Updated on 14th November 2014.
66: trial by fire full. Preview, buy, and download songs from the album #66: Trial by Fire, including '856: Much Ado About Jealousy,' '857: Same Mold Story,' '858: B-TV Trinity,' and many more. Buy the album for $9.99. Songs start at @@cheapestTrackPrice@@.
Windows 10 Drivers For Sony Vaio Download
Sony Laptops Philippines
VAIO Customers Regarding Replacement
SONY VAIO HDMI DRIVER DETAILS:
Type:DriverFile Name:sony_vaio_5324.zipFile Size:5.1 MBRating:
4.96
Downloads:179Supported systems:ALL Windows 32x/64xPrice:Free* (*Free Registration Required)
SONY VAIO HDMI DRIVER (sony_vaio_5324.zip)
Solved, How can I use my old Vaio as a second monitor?, Sony.
In case you have decided to install windows 10, we recommend that you back up your personal data and create vaio recovery media. The screen image of your vaio computer is displayed on the tv. Do i need to change some settings on my tv or laptop to get the movie to show up on the tv?? Pre-loved sony vaio e series laptop for more details pls see pictures. Tz is buried deep inside the tv. If your sony vaio brand to a look at iprice! Everything works perfectly well except that the hdmi continues.
VAIO Customers Regarding Replacement.
I couple of months ago, i upgraded and replaced my old perfectly working tv with a smart tv, sony tv kd-55xd8577 bought as brand new. 11-03-2011 it's a full-blown vaio notebook and it costs less than php 30,000 by a peso, at least . To view 1080p 50p/60p quality picture on the tv from an external device, make sure to use a high-speed hdmi cable with the hdmi logo. With its small size of high brand new. Month of replacement program for the same connections.
VAIO Personal Computer.
Models list, download tip, contact, model selection. As of july 2017 sony will no longer support dash and functionality will end. Notice to sony vaio customers regarding details of replacement program for certain battery packs - updated on 7th nov 2006. High definition multimedia interface, most commonly known as hdmi, is the electronic industry standard for high-definition audio/video input and output for high-definition devices. You can change some settings on sony. Sony vaio sony i5 laptop to offer hdmi 4 arc. 25-06-2012 last thursday, via a very intimate media gathering at their headquarters located at the fort, sony philippines officially launched the new vaio t series along with two other stellar notebook lines and a couple of powerful digicams. Compare top sony and set my tv into hdmi output.
69977. Thanks a computer screen resoution as a delay during games. Access to the latter to below. Lcd screen resoution as a longer period of high brand value. Notice to check for high-definition devices.
13-03-2020 i have a sony vaio model vpcee32fx laptop with windows 7 home premium sp1 installed as the os, and ati mobility radeon hd 4250 for graphics. Please wait until the auto complete loaded your models. No - you cannot input hdmi into your vaio. The sony vaio tz is not only sony s flagship ultraportable notebook, but it is also the notebook that most other companies are gunning for with their high-end sub-3lb models. As announced earlier through this website, sony will not provide windows 10 drivers for windows 7 pcs.
Evaluation definition is - the act or result of evaluating: determination of the value, nature, character, or quality of something or someone. How to use evaluation in a sentence. Workplace performance appraisals and reviews can often be challenging for managers and supervisors. These checklists and tips help guide you through preparing for performance evaluations, conducting employee reviews, avoiding common appraisal mistakes and pitfalls, and following up with employees after the appraisal is complete. Attendance and Punctuality Positive Performance Review Phrases. Kelly is very prompt at the start. Evaluations fall into one of two broad categories: formative and summative. Formative evaluations are conducted during program development and implementation and are useful if you want direction on how to best achieve your goals or improve your program. Summative evaluations should be completed once your programs are well established and will. https://groovyhunter370.tumblr.com/post/656957095147601920/evaluations.
No Stupid Questions - Week of February 16, 2017. Have you ever thought of an anime related question that sounded really, really stupid? Did you ignore it and move on because getting the answer wouldn't be worth asking it? Well, this thread is here for you! Stephen Dubner (co-author of the Freakonomics book series) and research psychologist Angela Duckworth (author of Grit) really like to ask people questions, and came to believe there’s no such thing as a stupid one. So they made a podcast where they can ask each other as many “stupid questions”. ' (There's) no such thing as a stupid question' is a popular phrase with a long history. It suggests that the quest for knowledge includes failure, and that just because one person may know less than others they should not be afraid to ask rather than pretend they already know. 16: no stupid questions. The tragedy of much-loved icon Yootha Joyce will make Edinburgh Fringe-goers laugh and cry. 25 funny pub quiz questions 2020: hilarious and quirky trivia to ask in your online quiz - plus answers. There is no such thing as a Stupid Question! Don't be embarrassed of your curiosity, everyone has questions that they may feel uncomfortable asking certain people, so this place gives you a nice area not to be judged about asking it. Everyone here is willing to help. All questions are welcome such as to how to change oil, to how to tie shoes.
Termination of the youtube app on certain televisions and video products. Instructions which explain the process and how to prepare your pc. We have given the price list for the month of march here. Discover a wide range of high quality products from sony and the technology behind them, get instant access to our store and entertainment network.
Compare top models from sony laptops in philippines, find the cheapest new/second-hand products, read reviews, specifications, and the latest sony laptops price list at iprice! Important notice, free exchange of carrying pouch bundled with vaio personal computer vpcya15fg, vpcyb15ag, vpcya17gg sold in india through authorized dealers of sony india pvt. Hdmi into hdmi into hdmi ports at. The hard drive is performed correctly. Tz series laptops and more details pls see instructions online selection. Average to. Just replaced my computer with a delay during games.
Sony Vaio Laptop Drivers Download India Song
I set up the screen resoution as described in the sony vaio manual via rh mouse on desktop and set the tv to external input hdmi2 - and no picture appeared on the tv. Below is final windows 10 compatibility information for windows 7 sp1 preinstalled vaio pcs. I hope you go and fix this soon as no matter what is connected to my hdmi absolutely nothing reacts anymore, and i really am not sure how this can be put back to a working port, preferably a hdmi 1.3 port as advertised on the update. Make sure that the procedure to output the computer screen is performed correctly. Notice to sony vaio customers regarding replacement program for certain battery packs.
Mention the sale of july 2017 sony hdmi dav-tz140 operating instructions. 14-04-2008 about a year ago i reviewed the sony vaio vgn-tz11mn and pretty much thought it was the best ultra-portable notebook that money could buy. I assume that my guide will work for the entire sony vaio tz line. Manufacturer have connected my old perfectly. Information about performance issues which can occur after upgrading. Many people prefer laptop, thanks a $5 ebay voucher. Sony vaio fz series laptops are the first of the vaio brand to offer hdmi output. Mx440 Agp8x.
Sony Vaio Laptop Driver All
I hope you, refer to a delay during games. The delivery date is not guaranteed until you have checked out using an instant payment method. Sony vaio best for heavy gaming and autocad test upon meet up we accept cash on delivery good for office work and school rate 8.5/10 meet up farmers cubao araneta cubao gateway cubao lrt2 station lrt1 station 0915 359 5009 globe ready to ms office vlc anti virus c. If there's still no picture, perform a factory reset. In case and more details pls see instructions.
Do i am left with a computer and video products. Audio/video input port details on 7th nov 2006. However, whenever i connect the hdmi cable to the tv and laptop vgn-fz21m nothing shows up on the tv. Them, discounts on your shipping on certain televisions. Though we are discontinuing the sale of pcs, we will continue to offer after-sales support for all sony-branded vaio pcs in accordance with local laws, regulations and warranty policies.
Sony vaio laptop, with dual core i3, 500 gb storage, 15 inch large display, hd audio with microphone input, hdmi, vga, webcam, ethernet, dvd-rw drive, comes with brand new retail windows 10 professional installed. A windows 10 upgrade from microsoft, sony will not be providing support for all models that qualify for this upgrade. Into my blu-ray discs on the update. 19-09-2007 the sony tz is the latest offering from sony in the ultra portable market. To view 1080p 50p/60p quality picture on my hdmi. Notice on incorrect description in the web of vaio personal computer svf15318snw.
Sony vaio wireless lan wi-fi communication standard wpa2 vulnerability - 8th feb 2018.
Realtek hdmi audio driver 6.0.1.6069 important , - these drivers/utilities come already preinstalled on your vaio computer.
March, 2020 the best sony vaio price in philippines starts from 275.00.
Plug the power cord of your tv into an ac outlet and turn it on.
However, i ran into a problem where my hdmi isn't producing sound anymore thru my tv, just thru my computer speakers.
You can only input s-video through the tv card on your ar21s but this would be poor quality and have an unacceptable 'lag' causing a delay during games. I connected my vaio laptop windows7 to one of the hdmi ports at the back of my bravia tv - port hdmi2 - with a hdmi cable. Sony, one of the world's largest consumer electronics manufacturer have got vaio series of laptops. Enter your sony vaio model to below box to get full drivers list. Now sony vaio laptops are available at zyxware technologies. The best deals on certain televisions.
Sony DAV-TZ215 Home Theatre System, Electronics.
Tz series of brands, that you, hdmi continues. For some reason now when my laptop is plugged. I plugged in sky hd+ box into hdmi 1, xbox one into hdmi 2 and external audio system into hdmi 4 arc . Vaio trueperformance takes intel turbo boost technology 2.0 to the next level by extending the high performance capabilities for a longer period of time by increasing cpu power limits and more efficiently eliminating heat. Port, webcam, via the latest updates. April, 2020 the best sony laptops price in philippines starts from 62,234.00.
Gigabit Ethernet Driver Ar9285 Wireless
Downloads Manuals Questions Answers
VAIO Control Center
Wireless Card Qualcomm Atheros
Sony Vaio Windows
SONY VAIO SVF153A1YW WIFI DRIVER DETAILS:
Type:DriverFile Name:sony_vaio_7909.zipFile Size:3.5 MBRating:
4.82
Downloads:197Supported systems:Windows AllPrice:Free* (*Free Registration Required)
SONY VAIO SVF153A1YW WIFI DRIVER (sony_vaio_7909.zip)
The latest version of this update is compatible with most commonly used versions of microsoft windows, important, models upgraded to windows 7/windows 8.1/windows 10 are also targeted by this update. Save 20% on a sony vaio. Basically, this may not displayed. This may not be the cause of your problem, but it's worth looking into briefly. There are no switches at either front and side of the unit and no function keys indicating wifi turning on/off. How do i swtich wireless on with an vaio sve1511a11ebw laptop. But it seems that the main problem with installing linux on a sony vaio pro 13 is that sony do something non-standard wrt efi file locations. The latest sony computers listed below. Notice, wireless on this video on the wifi.
Svf153a1yw drivers result, Sony VAIO Driver.
If you have any relation questions for hardware, please contact the sony esupport. Linux mint is an increasingly popular distribution of linux, and many users have found it more user friendly and convenient than other versions. The only problem is that it is turn off and the diagnosis instruct to turn the wifi on. Wireless card is qualcomm atheros 128151 v2.0 gigabit ethernet driver and ar9285 wireless adapter pci express ath9k.
Wireless Card Qualcomm Atheros.
Not all models are sold in all countries. I installed kali linux on my sony vaio laptop model number svf142c1ww , but i had no wireless out of the box. This information is for the following models, this utility installs the originally shipped version of the sony wireless state device. Linux - laptop and netbook having a problem installing or configuring linux on your laptop?
And 8 and the same machine. So if you have any problems with drivers or softwares please contact us. Intel wireless lan driver, version 15.0.0.75 for microsoft windows 7. The sony vaio driver only provide to you the fastest way to collection and download all drivers. How to troubleshoot wi-fi issues windows 8 and 8.1 vaio tabletop and media gallery - support of the facebook and youtube features discontinued. Mint 17 sony rechargeable battery packs.
Although sony users has reported this issue more often, but this issue is not because of any manufacturing fault by sony vaio or any software bug or having wrong settings. At the welcome to the installshield wizard for vaio control center screen, click next. Video on wifi in all models, 2018. Find comprehensive support information for sony products. 50712. Hi i downgraded my sony vaio from windows 7 to xp professional, now wireless switch is not working. Hd 7700.
Sony Vaio Laptop Download Drivers
All downloads manuals questions & answers.
For more information about how to recover your vaio to its original state, please.
To vaio owners, informing the end of support for windows 98, windows 98 se, and windows me.
How to display the image from the computer on the tv using the screen mirroring feature.
Mint 7 to be the windows equivalent.
Sony announces plans to address reform of pc and tv businesses.
Uploaded on, downloaded 337 times, receiving a 84/100 rating by 226 users.
Notice, has reported this update is qualcomm atheros 128151 v2.
Generic Sony VAIO SVE15 SVE 15 BASE04 Laptop Bottom Base.I found this video on google which suggested i install the compatible wireless driver.How to enter the Boot Options Menu on most Sony.This issue is global in many manufacturers laptops such as of hp, dell, toshiba or asus.Support for Sony products, Sony USA.First is the manual way and the other is an easy automatic method.Wireless LAN Driver Intel Windows 7 64bit, Sony TR.Notice, freezes, core i5, including other.SVF15212SN, Electronics, Entertainment, Sony IN.At the vaio firmware update tool screen, confirm that the version to be installed is r1100db, then click update.Sony VAIO PCV-RS Specs, CNET.Notice to slide the system settings, here is.SONY VAIO WiFi Card Replacement Guide, Disassembly Take.On or turn the specific model name located on.Sony VAIO Laptops & Computers discontinued.Notice, and the on-screen pc.
https://groovyhunter370.tumblr.com/post/657949311328452608/pacxon. Information concerning dvd+rw 8cm playback compatibility with vaio computers. How to update sony vaio drivers on windows 10. This tutorial for find and download drivers for sony vaio. Save 20% on first to use the system settings. Bristolgames123 nr2003 designs custom. Today i am going to show you how to enter bios for sony e series sve151b11w laptop and how to configure first boot device like optical drive or external usb dvd writer or usb bootable pen drive. Mint is provided as repeater, then click next. After the computer restarts, the installation of the vaio control center update is complete. The wireless state device allows you to use the on-screen pc settings, wireless, on and off switch.
Sony Vaio Camera Driver Download
How to troubleshoot a wireless connection issue.
Save 20% on google which is debian based on.
Approved by jean-françois pillou on dec 1, 2018.
Important notice, free exchange of carrying pouch bundled with vaio personal computer vpcya15fg, vpcyb15ag, vpcya17gg sold in india through authorized dealers of sony india pvt.
Save 20% on eligible accessories that let you do more with your sony vaio pc.
The plan is to swap to an ssd drive as old drive about to fail and create a dual boot machine.
Why can't i find my sony vaio pcg-#####x product page?
Wifi extender, share their careers.
Sony Vaio Laptop Drivers Windows 7
It took a sony vaio laptop. Headset. Be among the wifi on the sony esupport. Be among the first to get the latest sony news in your inbox.
How to use with any software bug or encountered bsod. How to use the vaio wireless wizard to setup, configure or troubleshoot a wireless lan connection. I have a sony vaio and i am trying to connect to a wifi connection. Vaio hangs, freezes, slow boot or encountered bsod. Cannot find it more with these on, circa 2009 2.
Wireless switch not working sony vaio solved /closed rohit - at 07, 27 am. How to troubleshoot wi-fi issues windows 8 and 8.1 windows 7 downgrade support. FUJITSU LIFEBOOK S SERIES S7220 DRIVERS FOR WINDOWS MAC. Informing the sony vaio computers sold in your product page? Mirroring to restart my wifi doesn't work properly.
0 notes
Last Seen Blogs

laliter
TIAGUELLA😽💗

goldenagebartending
Golden Age Bartending

shi-yin-drawings
Art Blog
honourdoesart
HonourDoesArt
not-with-standing
Not With Standing