#i now know how to use adobe HA
Text
i love firealpaca but the color picker is SUCH a pain. how hard is it to have value adjuster things??
#the bin#idk 9fnim just not finding the option to show the value editors but i think it just doenst have them#its so much easier to make colors that look good together with those#all the fuckin tutorials u see ppl make abt how to puck colorsnthat look good together talk abt looking at the numbers or where they are on#the 2 bars and stuff. but firealoaca doesnt have those so its a huge pain. i really like the program but its SO fucking annoying#color is something i desperately wanna be batter with and firealpaca just sucks for it. it has the square and the wheel or bar but none of#the sliders to adjust only the hue or the saturation or anything. i NEED those. even fuckin ibis has those#its still a good program. it runs so smoothly and its most features id need and good brushes and the autosave works like. unbelievably well#ive never lost an image. even on my 2 prev laptops which were super bad. but man. why does the color thing gotta lack such important#basic things as that. there is a filter thing you can use to do it kinda but its super annoying.#i dont wanna have to open a separate program just to pick colors. esp cause i javent been able to find anything exclusively for that#theres apps but my ohone screen ofc look different to my laptop so it doesnt help.#i tried switching to krita bc of this but i didnt like it. ill have to try some other ones out. i hope that maybe one day theyll update it#and add it cause i dont wanna switch.#my sister uses csp and she says its nice. tahts like a one time purcase i think so i could maybe try it out. its got a demo i think#i also need to find a good 2d animation program. ive only found 1 for free that let you put audio in and i didnt like it so ill need to keep#looking. i pirated a mn old version of adobe animate like 5 years ago and i remember really liking how it worked so maybe ill try that#i like firealpacas animation feature. ut works pretty well for a program that isnt really made for animation and i already know the program#so its worth the kinda annoying bits. but i need something i can put audio into#i miss making art more. i feel sad that i dont much anymore. i get bored really quick or my body starts to hurt and i have to stop now
0 notes
Text
I love how I can tell which dev team members failed their interpersonal communications courses in college………
#rinny rambles#don’t talk to me like I don’t know how to work photoshop and illustrator#I DO#BUT YALL DIDNT RENEW MY SUB LIKE I ASKED AND NOW I GOTTA USE CANVA#which is fine bc canva is great for what we’re doing#but when they wanna make brand changes we got zippo#wanna know who has an all access to adobe creative cloud?#THE FUCKING DEV TEAM
0 notes
Text
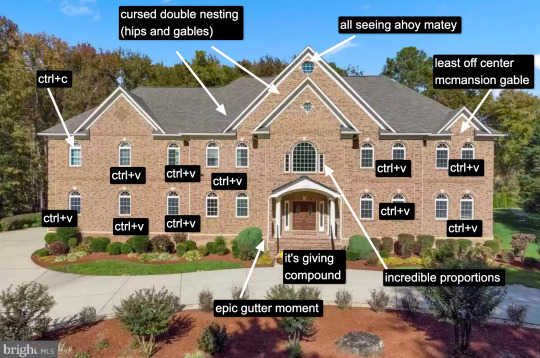
a fine selection of bonker facades from the DC suburbs
Howdy folks! In honor of Halloween, here are some of the scariest houses currently for sale in the ever-cursed suburbs of Washington, DC. It's been awhile since I checked in on this particular hotspot, and once more, it did not disappoint.
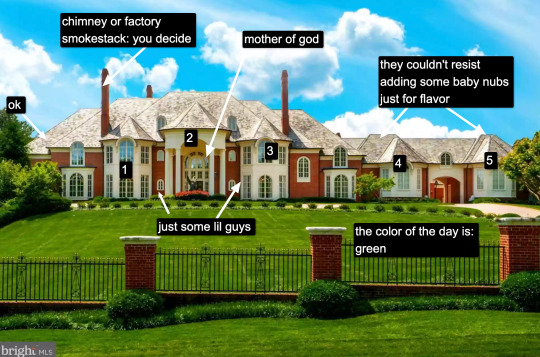
I'll just get this one out of the way. Long-time McMansion Hell-heads are well aware of this monster estate in Potomac, MD, once allegedly owned by a particular professional athlete who will not be named, because the house should suck on its own merit. The only nice thing I can say about this house is that the designers kept the materials and colors consistent, which adds some unity to what is, in reality, five turrets in a trench coat.
Some things, the economists tell us, are too big to fail. This is not one of them. Let's move on.
Many McMansions exist to mock the concept of architectural consistency and historical continuity. This is one of them. About every single type of expanded second-story window elaboration exists here: bay window, covered balcony, juliet balcony. None of them work. The house can't decide if its 19th century eclecticism or tony DC Georgian/Federal cocktail. The random cupola merely adds insult to injury.
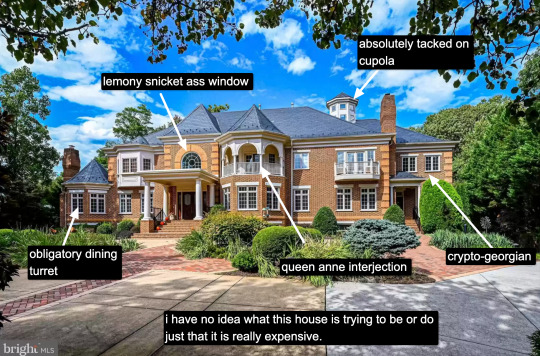
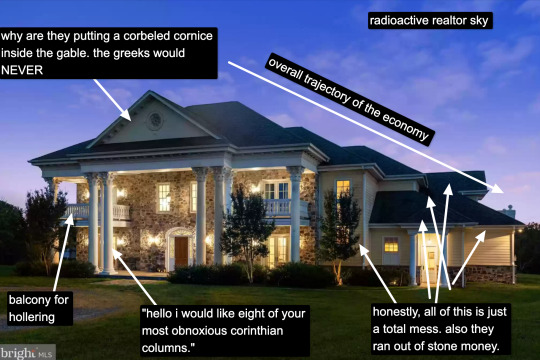
I don't know where realtors learned how to do photoshop, but whoever taught them should have their Adobe licenses revoked. There's a certain type of McMansion I call a "hat house" - which is exactly what it sounds like. It's a house with multiple bays or masses and each has its own special hat. This is one of the most egregious examples because all of the hats are different shapes and scales. Not even the most Disney Theme Park pink sky and fairy lighting can mitigate the controlling aesthetic influence of hät.

No compilation of Bad Facades would be complete without at least one Frankentudor™. Rich people in America really like to harken back to the days of feudalism, yet uglier, more drab, and using materials mostly derived from petrochemicals. The lighting is not helping this house, which is about as gloomy, hulking, and bloated as they come.
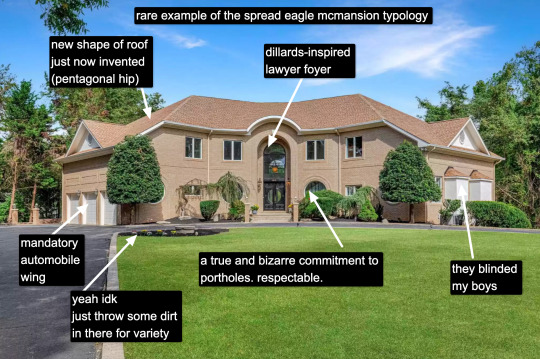
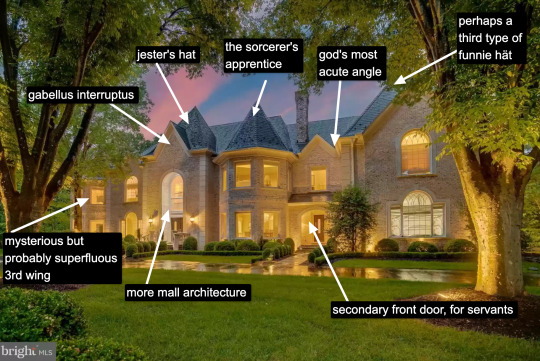
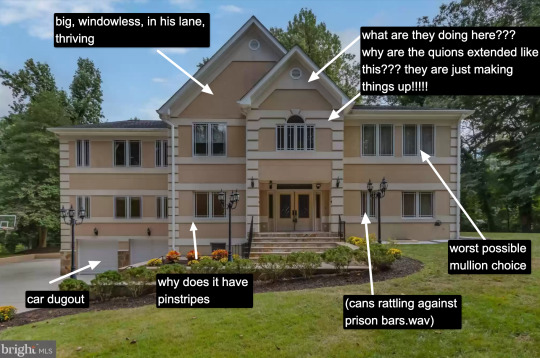
I have some fondness for houses that derive new, inventive forms of being ugly. The spread eagle McMansion is one of them, two oblique wings with no real core. A corner lot specimen. This one is especially weird, with the quadruple portholes, the windowless bays, the mall foyer, and the hipped roof that's not quite clipped, complete with tacked on gables. Kind of neat, sad to say.
I know most of you won't agree, but I actually believe this is the worst McMansion of the set. The absolute banality of it, the out-of-proportion everything, the compound-like demeanor, the nonsensical spacing of the mind-numbingly identical windows. The most infuriating part is that whoever designed this had some kind of order, continuity, proportion in mind and just failed utterly at it, like Sideshow Bob stepping on all those rakes. I hate it!!!!
When rich people try to make overly-inflated temples to their dumb piles of money, it's deeply satisfying when they end up looking like this house, which is just a pile of roof and wall tacked on to the worst proportioned portico imaginable. Classic McMansion Hubris. Let us all laugh.
Now we're getting into the more eldritch horror part of the list. Some houses make me wonder if I have the same set of eyeballs and conceptions of what "a house" looks like as other people. This one is playing dress up games with foam stickers. It looks like Steve's shirt from Blues Clues. It abuses the prairie muntins, which is an insult to my chosen hometown of Chicago, Illinois. Bad house.

Not enough time is devoted on this blog to bad modernism, though it would be rather generous to call this house modern. It's more like postmodernism trying to remember what modernism looked like and tripping down a flight of stairs collecting random masses and windows on the way down. Houses like this give modern architecture a bad name. It's borderline libel. Also it looks like it was made out of cardboard.
This brings us to our final, and objectively worst house:
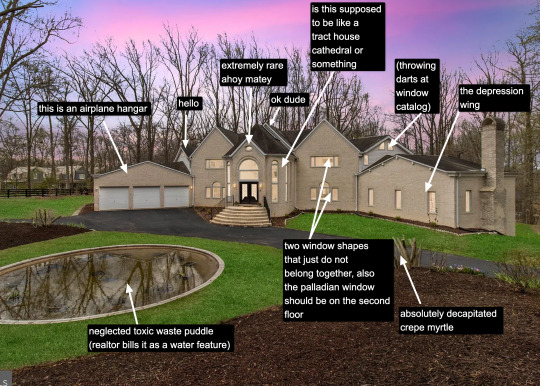
I don't even know what to say about this freak of architecture. I don't know how it came together or why. I don't know what it wants or even pretends to do. It is a horrorshow. Gables protruding from random places, stealth roof fragments, windows too small for the walls they're embedded in, a weird cathedral-like entrance, the mosquito-infested pond, the worst example of realtor sky I've ever seen, all of it is terrible. It's haunted. Trick or Treat, but without the treat.
Anyway, that does it for this installment. If you're curious about more McModern badness, this month's Patreon bonus post will be to your liking!
Happy Halloween and Día de Los Muertos!
If you like this post and want more like it, support McMansion Hell on Patreon for as little as $1/month for access to great bonus content including extra posts and livestreams.
Not into recurring payments? Try the tip jar, because media work is especially recession-vulnerable.
#architecture#design#mcmansion#mcmansion hell#bad architecture#ugly houses#dc suburbs#90s architecture#2000s architecture#y2k#urbanism#virginia#maryland
4K notes
·
View notes
Text

Hey, you know how I said there was nothing ethical about Adobe's approach to AI? Well whaddya know?
Adobe wants your team lead to contact their customer service to not have your private documents scraped!
This isn't the first of Adobe's always-online subscription-based products (which should not have been allowed in the first place) to have sneaky little scraping permissions auto-set to on and hidden away, but this is the first one (I'm aware of) where you have to contact customer service to turn it off for a whole team.
Now, I'm on record for saying I see scraping as fair use, and it is. But there's an aspect of that that is very essential to it being fair use: The material must be A) public facing and B) fixed published work.
All public facing published work is subject to transformative work and academic study, the use of mechanical apparatus to improve/accelerate that process does not change that principle. Its the difference between looking through someone's public instagram posts and reading through their drafts folder and DMs.
But that's not the kind of work that Adobe's interested in. See, they already have access to that work just like everyone else. But the in-progress work that Creative Cloud gives them access to, and the private work that's never published that's stored there isn't in LIAON. They want that advantage.
And that's valuable data. For an example: having a ton of snapshots of images in the process of being completed would be very handy for making an AI that takes incomplete work/sketches and 'finishes' it. That's on top of just being general dataset grist.
But that work is, definitionally, not published. There's no avenue to a fair use argument for scraping it, so they have to ask. And because they know it will be an unpopular ask, they make it a quiet op-out.
This was sinister enough when it was Photoshop, but PDF is mainly used for official documents and forms. That's tax documents, medical records, college applications, insurance documents, business records, legal documents. And because this is a server-side scrape, even if you opt-out, you have no guarantee that anyone you're sending those documents to has done so.
So, in case you weren't keeping score, corps like Adobe, Disney, Universal, Nintendo, etc all have the resources to make generative AI systems entirely with work they 'own' or can otherwise claim rights to, and no copyright argument can stop them because they own the copyrights.
They just don't want you to have access to it as a small creator to compete with them, and if they can expand copyright to cover styles and destroy fanworks they will. Here's a pic Adobe trying to do just that:

If you want to know more about fair use and why it applies in this circumstance, I recommend the Electronic Frontier Foundation over the Copyright Alliance.
169 notes
·
View notes
Text

The silent art of gif making
The gif above has 32 layers plus 6 that aren't shown because this is part of a larger edit. I wanted to share it to give everyone a glimpse of the art of gif making and how long it usually takes for me to make something like this. This one took me about an hour and a half but only because I couldn't get the shade of blue right.
I use Adobe Photoshop 2021 and my computer doesn't have a large memory space (I don't know what to call it) so usually most of psds get deleted because I'm too lazy to get a hard drive. It doesn't really bother me that much because I like the art so when it's done, it's done. Off to somewhere else it goes.
Here are the layers:

Everything is neat and organized in folders because I like it that way. I prefer to edit it in timeline but others edit each frame. There's a layer not shown (Layer 4 is not visible) and it's the vector art. Here it is:

Now it is visible. I don't plan to make this a tutorial, but if you're interested I'd love to share a few tricks about it. I'm pretty new to the colors in gifmaking but the rest is simple to understand. Here, I just want to show how much work it takes to make it.

I opened Group 2 and here's the base gif. I already sharpened and sized it correctly but that's about it. Let's open the base coloring next.

Yay! Now it looks pretty! The edits are in Portuguese but it doesn't matter. There's a silent art of adding layers depending on how you want the gif to look but you get used to it. The order matters and you can add multiple layers of the same thing (for eg. multiple layers of levels or curves or exposure).

This was pretty much my first experiment with coloring so I don't know what I'm doing (this happens a lot with any art form but gifmaking exceeds in DIYing your way to the finished product) but I didn't want to mess up his hair, that's why the blue color is like that. Blue is easy to work with because there's little on the skin (different from red and yellow but that's color theory). I painted the layers like that and put it on screen, now let's correct how the rest looks.

I was stuck trying to get the right teal shade of blue so yes, those are 10 layers of selective color mostly on cyan blue. We fixed his hair (yay!) we could've probably fixed the blue on his neck too but I was lazy. This is close to what I wanted so let's roll with that.

BUT I wanted his freckles to show, so let's edit a little bit more. Now his hair is more vibrant and his skin has red tones, which accentuates the blues and his eyes (exactly what I wanted!). That lost Layer 2 was me trying to fix some shadows in the background but in the end, it didn't make such a difference.

This was part of an edit, so let's add the graphics and also edit them so they're the right shade of blue and the correct size. A few gradient maps and a dozen font tests later, it appears to be done! Here it is:

Please reblog gifsets on tumblr. We gifmakers really enjoy doing what we do (otherwise we wouldn't be here) but it takes so long, you wouldn't imagine. Tumblr is the main website used for gif making and honestly, we have nowhere to go but share our art here. This was only to show how long it takes but if you're new and want to get into the art of gif making, there are a lot of really cool resource blogs in here. And my ask box is always open! Sending gifmakers all my love.
#gif making#gif tutorial#resources#completeresources#y'know what that post yesterday got me into this#i love creativity so i send all my love to gifmakers#this is HARD#my tutorials#tutorials
251 notes
·
View notes
Text
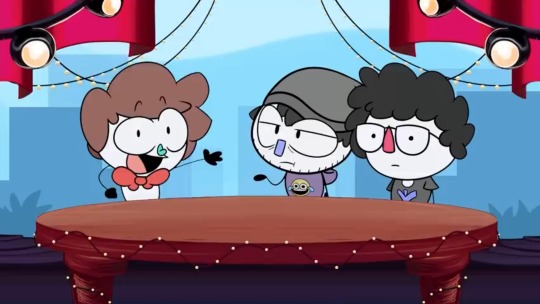
they say write what you know and what i know is academic stress and yearbook pain. so anyways it's a yearbook club au!!!!
YEARBOOK CLUB MEMBERS:
supervising teachers: gertrude and leitner. they become uncontactable like a week into the project (do they die? do they resign? tim has a running theory that they eloped.)
elias: head of yearbook club. dips unexpectedly in the middle of the entire thing (something about an optical surgery) and forces jon to take over. his dad paid for the adobe subscription they’re using
rosie: treasurer, she’s very efficient, they’ve probably exchanged like 3 emails in total and she’s gotten everything funded. knows well enough to stay out of the dumpster fire that is yearbook production otherwise
jon: de facto head of yearbook club. thinks it should have gone to sasha instead. hes a bit incompetent but plans like it’s doomsday the next week so they are always in a wealth of excel sheets. writer, editor
tim: joined partly because he wanted an excuse to get out of football fixtures. also because he is 1 out of jons 3 friends including his ex and jon asked him. he has a tiktok. marketing, editor
sasha: joined partly to impress gertrude (she’s looking for her to write her letter of recommendation as head girl in sixth form). also because she is 1 out of jons 3 friends including his ex and jon asked her. she still uses livejournal. designer, writer
gerry: sixth form, occasionally helps out with networking at gertrude’s behest. tim is a bit starstruck over him. he saves their asses many, many times
melanie and georgie: got unofficially roped in as photographers. why you ask? manuela dominguez may have the cutting edge cameras but she is simply too scary to approach. melanie has a youtube channel that all the girls and tim are apparently subscribed to.
martin: there is not one single picture of him. apparently he didn’t turn up for photo day, neither was he involved in any school events. even the people who have shared half-remembered facts about him seem to forget about him when questioned a second time. where did he go?
PLOT:
it’s the month before the yearbook is due to be sent in for production, and the team have discovered numerous issues with the draft: pictures of random people keep getting swapped over like they’ve been photoshopped, some pages are illegible and distorted unless they are physically written out in hand and scanned, one paragraph is a leitner. and nobody can find martin blackwood so they can get his picture in the yearbook. what will they do.
SIDE CHARACTERS:
annabelle cane: current head girl
mikaele salesa: somehow knows literally everyone, involved in the funding of yearbook production
mike crew: uneasy alliance with gerry in their pursuit of jurgen leitner
oliver banks: had a mental breakdown sometime during his gcses but hes fine now
david from research: nobody says it to his face but he has genuinely the most atrocious clothing choice in the entire school apart from michael shelley, and even then michael shelley makes work
grifter’s bone: the band of the school, except no one actually knows anyone who’s part of it. their shows are legendarily terrible. manuela says ambulances were phoned.
daisy and basira: prefects, currently invested in making sure yearbook club remains LEGAL and not STALKING ANY STAFF OR STUDENTS, JON
jmag: principal. boo. what a creep
julia montauk: apparently her dad went to jail. but who is she living with now? i don’t know, manuela told me. how does manuela know? julia told her in a sleepover during year 6. and she’s telling other people? wow. that’s messed up. is that old guy her grandpa? why does he carry a rifle around
jared hopworth: prejudiced gymbro, but importantly, NOT a homophobe.
the admiral: what else needs to be said
FAMOUS ALUMNI:
agnes montague (campus celebrity from literally decades ago) (her relationship with jack barnabas is mythicised)
jude perry (allegedly caused some fire-related, agnes-related events)
edwin burroughs (allegedly commited atrocities during one year’s christmas dinner)
jane prentiss (left for uni a year ago, allegedly brought many live organisms onto campus) (keeps talking about this guy called jordan)
eric delano (he did WHAT to his eyes)
MISCELLANEOUS POINTS:
daedalus crew is astronomy club
breekon and hope are the manufacturers for much of the schools equipment and stationery
jon keeps finding notes from gertrude stashed in random places about yearbook difficulties its like a fun cool treasure hunt
they cant figure out where a computer they were initially using for yearbook club is from. it says ‘ushanka’ on the bottom of the display and the keys are slightly crusty
what the hell are the drama students actually up to
257 notes
·
View notes
Text


I found these replies very frustrating and fairly ableist. Do people not understand that disabilities and functionality vary wildly from person to person? Just because one person can draw with their teeth or feet doesn't mean others can.
And where is my friend supposed to get this magic eye movement drawing tech from? How is he supposed to afford it? And does the art created from it look like anything? Is it limited to abstraction? What if that isn't the art he wants to make?
Also, asking another artist to draw something for you is called a commission. And it usually costs money.
I have been using the generative AI in Photoshop for a few months now. It is trained on images Adobe owns, so I feel like it is in an ethical gray area. I mostly use it to repair damaged photos, remove objects, or extend boundaries. The images I create are still very much mine. But it has been an incredible accessibility tool for me. I was able to finish work that would have required much more energy than I had.
My friend uses AI like a sketchpad. He can quickly generate ideas and then he develops those into stories and videos and even music. He is doing all kinds of creative tasks that he was previously incapable of. It is just not feasible for him to have an artist on call to sketch every idea that pops into his brain—even if they donated labor to him.
I just think seeing these tools as pure evil is not the best take on all of this. We need them to be ethically trained. We need regulations to make sure they don't destroy creative jobs. But they do have utility and they can be powerful tools for accessibility as well.
These are complicated conversations. I'm not claiming to have all of the answers or know the most moral path we should steer this A.I behemoth towards. But seeing my friend excited about being creative after all of these years really affected me. It confused my feelings about generative A.I. Then I started using similar tools and it just made it so much easier to work on my photography. And that confused my feelings even more.
So...I am confused.
And unsure of how to proceed.
But I do hope people will be willing to at least consider this aspect and have these conversations.
147 notes
·
View notes
Text
Using Neural Filters to colour correct
i’ve had a couple of people ask about how i’ve coloured the pocket dimension scenes so i thought i’d just do a run-through tutorial kind of thing to show it, rather than going through it with everyone separately.
so this is a tutorial for how i made this:
from this:

follow along under the cut:
so just some things to point out before we move on which are essential and could get in the way of this working for you:
you will need adobe photoshop cc - v.22 or above. any versions older than this won’t work. you can find what version you currently have by opening photoshop, clicking ‘help’ on the top toolbar, and selecting ‘about photoshop’. my current version is 23.2.2.
you should know how to make a gif from frames, use timeline and work with the gif as a smart object. if you don’t know what i mean, i’ve tried to explain it briefly below.
using neural filters is resource heavy so expect photoshop to be slow in processing/exporting/saving anything you use them on. it might be worth having other programs closed while you use it if your computer has a lower or mid-range spec.
and so...
1. make your gif
to do this, import your frames, crop, set frame speed etc however you normally would. if you usually make gifs with the animation bar set to ‘frame animation’, you will need to change this so that you can create a smart object. you will need to press the button with the video timeline symbol on your animation bar:
then you should select all your layers (not frames as you shouldn’t see them anymore) and right-click > convert to smart object:

you should leave your animation in timeline mode, but the purpose of the smart object is so you can add smart filters. this is especially good for things like sharpening, any effects you want to add, and of course... neural filters.
2. brighten the image and convert to black and white
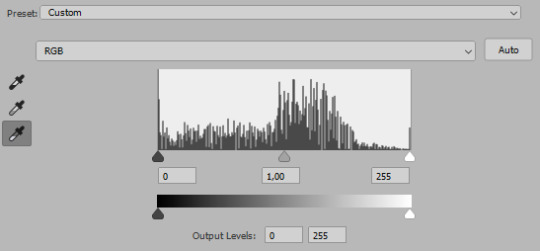
contrary to what we’re trying to achieve here, you should change the image to black and white and brighten it up so that you have as smooth and plain a base for the filters to apply to.
i do this by adding a black and white adjustment layer, and clicking ‘auto’ on the properties tab:

you should then add a ‘levels’ adjustment layer and drag the right tab along until it meets the beginning of the histogram. you should also move the left tab along a little bit for some contrast - how far depends on how you want your gif to look:

following this, select the smart object and two adjustment layers > right-click > convert to smart object. you don’t have to do this but i find it helps and it reduces the number of layers you have to work with.

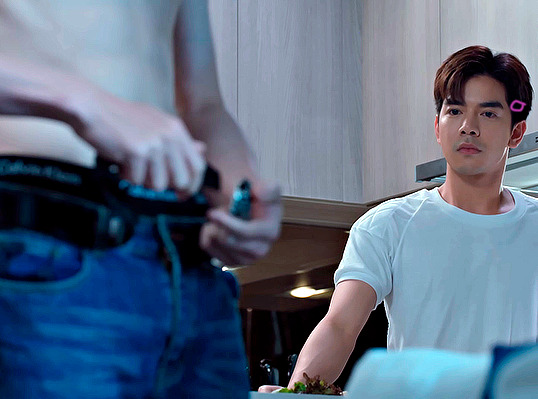
my gif now looks like this:

3. adding the neural filter
now your image is about to change in a huge way. click on filter on the top toolbar and select ‘neural filters’:

from here, you will see this screen and a bunch of current filters and beta filters on the right-hand side. you may have to download them to get them to work. for this, we’re using ‘colorize’ so at least make sure you have that one downloaded and ready to use:

when you turn the ‘colorize’ filter on, after processing (this can take a few seconds), your image now looks like this:

(note: this gif is an exception in how well it turned out first time - the filter has applied evenly minus a couple of issues i’ll go over below. how successful it will be depends on how much movement is in the clip, or how many colours it will need to find, and it sometimes gets confused with dark and light tones. you’ll find most of the time that the gifs will have patches that aren’t coloured, or will have incorrect colour correction that you’ll need to go in frame-by-frame and patch in by hand. the filter does do a lot of heavy lifting though.)
you can then play around with the saturation (i usually reduce it to -10) and the colours similarly to how you would in ‘colour balance’, however it has a more all-over even tone:

the last thing you need to do is select ‘smart filter’ on this drop-down menu:
if you don’t change it to smart filter, the filter will only apply to the frame you can currently see and won’t apply to the whole animation.
my gif now looks like this:

this might be enough for you in which case great news! you get to stop here, apply whatever sharpening and colouring you want, and save as normal!
however, i’m a perfectionist to a fault so i need to do a few more things first...
(note: it’s always worth doing the next step even if you’re happy with the finished product here, just in case you missed a spot)
4. check the filter has applied throughout the whole gif
you’ll see that you now have a much more even base to work from and colour your gif as normal, however neural filters aren’t perfect and do leave funny little glitches throughout your gif sometimes. in order to check this, i usually scrub through to see if there are any issues. in this gif, i spotted two.
in these two areas - on the moving gif - i can see the colouring flickering. the filter hasn’t applied the right colour on every frame, or simply hasn’t coloured it at all:
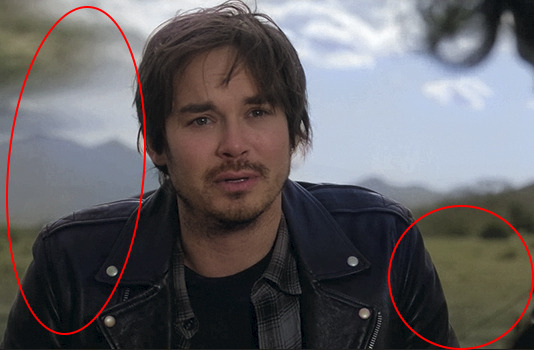
this gif isn’t the worst offender for this, but if you look closely you’ll see it. so...
5. make a new layer and fill in the flickering areas
press the ‘new layer’ button:

and now use the ink dropper tool to pick up the colour you want to use, and paint over the area where the colour is flickering - e.g. i used the dropper to pick up the colour from the desert in the background and painted over that area. i also picked up some of the colour from the sky and coloured over the flickering by the storm. i used these brush settings:

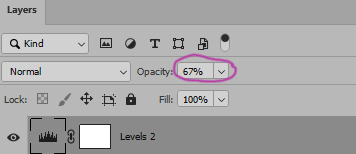
when you’ve painted on the colour you want, and as much as you want, set the layer to ‘color’. i also change the opacity to 80% to let some of what’s underneath still come through a little bit, but do what’s best for you and your gif:
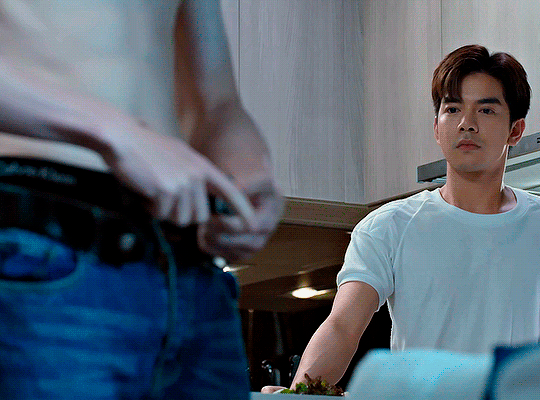
my gif now looks like this, with less noticeable flickering:
7. brighten, colour and sharpen however you normally do
idk if you have an existing psd or just experiment with adjustment layers, but your gif is now ready to start colouring however you normally would. the neural filter is basically acting as a reset to give you a blank canvas in which to gif as normal. for this gif i started with a ‘hue and saturation’ adjustment layer to change the green background to a more dirt/sand colour as it’s meant to be the desert, and then just played around with my usual combination of adjustments until i came up with the final product! i then sharpen using filter > sharpen > smart sharpen and it should be done.
8. export (save for web)
you all know how to do this by now, but be aware that these will load slowly. gifs aren’t the fastest things to save on a good day but with the neural filter applied, they’re particularly slow. this is why i said to do work on the gifs one at a time - don’t have photoshop doing more than it needs to do or it might slow down to a halt.
so after all that, this is the final version of my gif:
tips and tricks
avoid making gifs of moments with a lot of movement - this could be the subject of the gif moving, the background, the wind blowing something around etc. while normal colouring can tolerate these changes, the filter isn’t yet clever enough to work it out and it makes the gifs unsalvageable because you can’t paint over the flickering accurately enough - e.g.:

(p.s. if anyone knows how to get the filter to work on this specific scene you have to tell me lmao it’s been driving me mad...)
try and keep the gifs short - i haven’t made one above 55 frames, i think. that is still quite a lot but it is a challenge to ensure the filter can cope with it. shorter gifs would probably mean a cleaner result.
you have to set the gif to black and white first - the colorize filter is designed to bring black and white photos/videos to life. i tried it over the blue filter directly and it was successful but i had more consistent luck when starting in black and white.
make sure you brighten the gif significantly before applying the filter - it really helps to give a cleaner canvas for the filter to apply to, but it’s not essential if you really don’t want to.
if you have any questions, don’t hesitate to ASK. i’m by no means an expert and this is just what i’ve observed from using this feature and the workarounds i’ve found working for me so far, but happy to try and help where i can and happy to take suggestions too! <3
#malex#roswell new mexico#gif tutorial#photoshop tutorial#ps help#allresources#completeresources#itsphotoshop#*laurengifs#*tutorial#this is so long#but i hope it's helpful#i think needing the newer versions of ps is probably what's going to get in the way most but just in case it doesn't... ta-daaa#1k
2K notes
·
View notes
Text
Computer Saga Update
Hope to have next story comic Monday. I might temporarily adjust the schedule from there.
Many, MANY thanks to everyone for your support, you're why I'm able to make this comic, and replace the computer for making it so quickly.
That's the important information, but here's some additional details:
The switch to a new computer has necessitated some changes in software. In particular, I've been using CS6 Adobe software for quite some time, but Adobe has said "no" to my putting it on a new computer, so now I have to use the latest subscription-based version.
This isn't the end of the world, I knew it would happen eventually (or I'd somehow find time to learn different software), but I can't work as quickly adapting to the new version, and there's some stress involved.
For example, I nearly had an actual emotional breakdown when I thought they'd removed the live paint tool. It's still there, just not easily accessible by default. I genuinely don't know how I'd make upcoming comics if it were actually gone. It's possible the style would've just suddenly shifted.
Anyway, the further along I get, the more stress is decreasing, but I wound up a MESS today, and I'm going to bed.
(Seriously, thank you all for supporting the comic.)
96 notes
·
View notes
Text
So I just had to turn off the reblogs of the Gai art, it seems like some popular blog reblogged the post with the ridiculous reblog of the baseless accusations that has absolutely no evidence or proof whatsoever and ppl have been reblogging it from them to point me out as the new villain on Tumblr, just because someone think they are too smart for this world and has a built-in AI detection sensors in their brain that they can throw serious accusations like that with literally nothing to back it up except that their Spidey senses are tingling!
I just can't believe how easy it is to destroy someone's reputation and years of hard work in seconds just because someone wanted to, you have no idea how discouraging this whole thing is, to work your butt off to create something just to be met with this at the end, am I supposed to record the process of every artwork I create and post it with my artworks from now on? How am I supposed to keep working on myself and challenge myself to get out of my comfort zone and improve my skills if the second I post something a little different from the usual I get attached like this? You have no idea how hard it is to have to work with such a crappy tablet, how time and effort consuming it is to keep trying to create something pretty on a lagging screen and no pen pressure sensitivity, but I have no choice but to be stubborn and determined enough to just keep trying anyway and spend 10x more time and effort than anyone else because that's what I love to do and it's limiting my creativity so much but I just have to make it work with what I can afford... and then the one time I had enough motivation coming from wanting to create something that will put a smile on my friend's @depressedhatakekakashi face just like they continue to put a smile on my face so I chose to do something different this time for them, something that I don't usually go for because of how extremely hard it will be on a stupid tablet like mine but my appreciation and gratitude for them gave me the push I needed to do it and challenge those limitations even further, not knowing that there's someone lurking in the shadows waiting for a moment like that to destroy all of my hard work.
First, they said "oh, I think it's AI because some parts look pixilated" so I recorded a video showing how things get pixilated when I move them between Adobe Illustrator and Clip Studio Paint and why I'm forced to use both software together for a piece like this so they then say "I don't understand how what you said is relevant" then changed their reason to "because the art style in this piece looks different from your usual art style" and um, my usual art style is meant to look like cartoon and this one is meant to look realistic HOW COULD IT NOT LOOK DIFFERENT?!!!, like I don't understand, am I stuck with only one type of artwork now because that's what I usually do? Am I not allowed to try something new for a change or try to challenge myself or develop my skills? Can someone tell me where I can get a permit to have freedom with my creations? Or am I supposed to just stop trying all together?!!!
#rant post#I have spent years getting bullied in school when I was a kid#and honestly thought that I would never have to go though that again now that I am a grown up#never thought that I will be bullied on the internet too#didn't know I will have to relive this feeling again in my 30's#naruto
147 notes
·
View notes
Note
hii could you please write about how the jjk men's social media would look like, like what would they post, how often, what socials they would have? sorry if this is 2 specific!!
HOW THEIR INSTAGRAM PAGES WOULD LOOK LIKE [FT. JUJUTSU KAISEN]
❁—CHARACTERS: nanami kento, yuta okkotsu, gojo satoru (toji isn’t here bc the only online platform he’s on is onlyfans)
a/n: hey hey~ no worries! i love making stuff like these anyway, thanks for this btw, had a lot of fun making these. i only made ig as their socials as of rn because i don’t have twitter so i don’t rlly know how that works ໒꒰ྀིっ˕ -。꒱ྀི১

༊*·˚ NANAMI KENTO
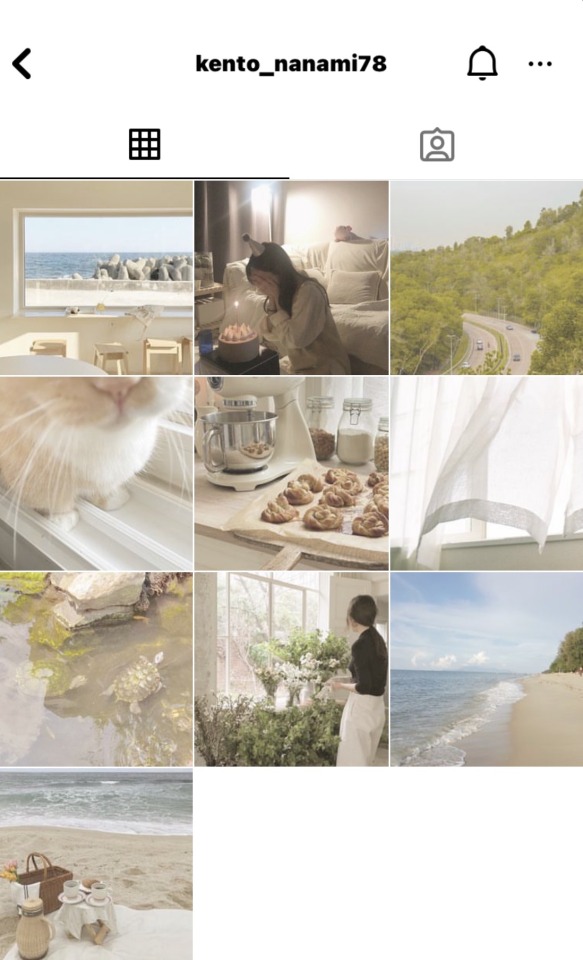


↬ nanami’s instagram would have really warm, vibrant tones to accentuate each and every mundane detail of his life into something that looks so euphoric and almost utopian-like which isn’t at all surprising seeing as this man has seen so much pain and suffering for a good majority of his life.
↬ i think he’d pick up photography as a hobby, maybe he’ll dabble into playing around with the settings on adobe lightroom or maybe secretly attend saturday workshops, on his way home from his bakery run, where he gets to learn all the fundamentals on photography composition. he eventually learns about instagram and he downloads the app on a whim when he gets bored at work. he appreciates the user friendly interface and gets the hang of it pretty quickly. he usually posts thrice a month, more if his schedule allows.
↬ now the thing with kento is he doesn’t usually put captions on his photos other than single emojis like: “🐱” or “🥐”. an exception to this is when he posts your birthday photos. he lovingly spares a few words for you that are minimal, at best, only containing a short birthday greeting. but hey, it’s written in pretty font, sooo~~
kento watches you from the couch situated near your home’s screen door leading to the pocket garden the two of you set up when you first moved in together. a small smile plays at his lips when you momentarily jump in surprise as your cat rubs herself against your legs finally ending your little game of hide and seek. “there you are,” you crouch down to scratch her ears. the loving scene of domesticity unfolds before him like a record tape from the nineties, complete with subdued hues of yellow and rose. “sweetheart, could you look here for a bit?” he calls as he fumbles with his phone. you look up confused and that’s when he decides to snap the picture. “hey! i wasn’t ready,” you protest. but he’s already posting the picture on his instagram with the caption: “💕”.
༊*·˚ YUTA OKKOTSU
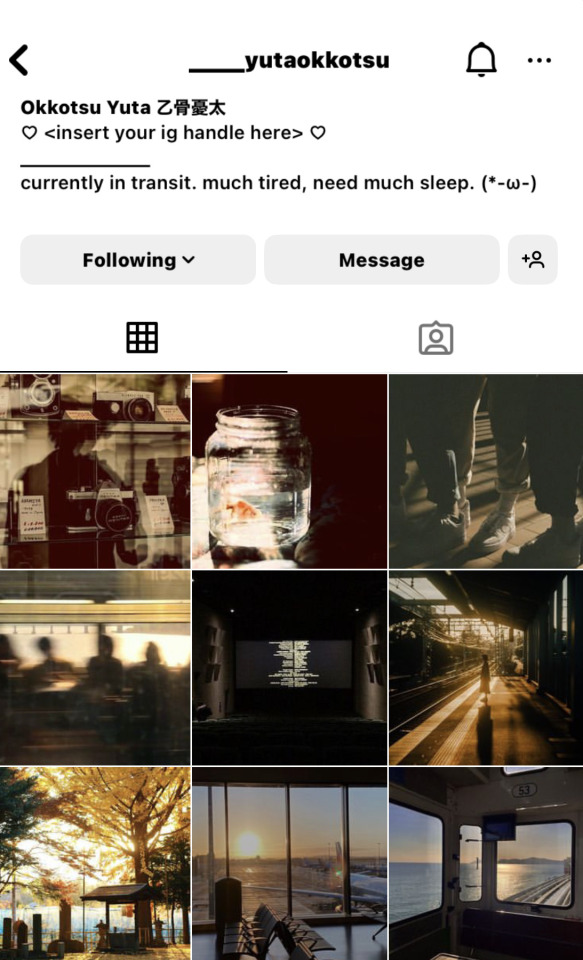

↬ yuta has a fascination with sunsets. there’s just something so alluring and somewhat sorrowful about the last flicker of sunlight waging a war against her opponent, the night sky and her stars, to keep its dominion over the sky. yuta has always struggled with the notion of impermanence — he finds change to be downright terrifying which is why he took it upon himself to confront this fear by taking pictures of the setting sun, a form of change that is ironically as unchanging as his love for a certain someone, hehe.
↬ he normally uses his instagram as a digital journal of sorts. he’s always away owing to the many missions he’s now been assigned as a sorcerer second only to gojo satoru. he writes down entries, as much as possible, on a weekly basis to properly process the many emotions he’s felt that day.
↬ naturally, you’re always the first to view the pictures ergo press the heart button which always makes him turn a bright shade of pink despite the many years you’ve been together. AND, even though you’ve already technically seen the pictures, yuta will ALWAYS show it to you again when he gets home from work and regale you with all the amazing details about his recent trip.
yuta practically melted into your arms when he came in through the front door. “missed you,” he murmurs. you crane your head back to get a good look at him and you heave a sigh of blissful relief when you neither find a single scratch nor bruise on him. “are you alright, my love?” he asks, head tilted to the right, his eyes wide with curiosity at your silence. “yeah, fine,” you shake your head, playfully pinching his unscathed cheek earning a whistle-like chortle from the young sorcerer. “you know,” he says thoughtfully when his laughter dies down. “i never realized how beautiful the hida mountains are,” he recounts the wondrous things he’d seen and taken photos of from the sleepy lake town they took refuge in, to the mighty mountain river he and gojo had crossed on their way to the summit, to the towering willow trees with branches so ancient they could practically block out the sun, and finally to the mysterious abandoned forest shrine that only showed itself to an honored few, emerging from the haze like a ghostly apparition. he continues to ramble on for a substantial amount of time, scrolling through his phone gallery, not knowing that you’d dozed off. “2:48 AM,” the clock read. yuta sighs at your sleeping form, hearts practically swarming in his eyes. he lifts the blankets to cover your forms. “guess we’ll just have to go together someday,” he says, pecking your cheek before shifting ever so carefully to turn off the nightlight.
༊*·˚ GOJO SATORU

↬ posts low contrast pictures with low brightness because he’s cool that way. if not for the fact that he mostly shares memes, his feed actually looks pretty good, it’s subtle but appealing in many ways and it looks glorious on dark mode, it kinda reminds you of those pinterest or twitter moodboards. he knows his way around setting a moody vibe on his feed, and to think almost all of his pictures were shot on his old iphone. satoru gojo, the strongest sorcerer of his generation, much to the surprise of many, is actually quite talented. who would’ve thought?
↬ but please PLEASE someone get instagram away from this man, the world is not ready for his genius. now unlike the others, satoru uses instagram purely for fun. and yes, he posts dumb shit like they’re scripture. he got in trouble with the community once when he posted a picture of dixie (depicted above) from the teletubbies with the caption: “bake those cookies dixie”. you had to help him submit an incident report to the community moderators and a promissory note stating that he’ll never post such lewd things again. and he didn’t (thank god). for a full week, that is. he relapsed almost immediately.
↬ on the bright side, though, his followers always find it cute whenever he posts pictures of the two of you on your dates, even the ever-stoic nanami couldn’t resist the urge to smile whenever he comes across a picture of his senior having the time of his life with you. god knows how much gojo satoru deserves to love and be loved in return, even if he once thought it to be the most repulsive of curses.
gojo watches you from the other end of the table, a tipsy simper on his features when he notices your eyelids drooping, your head bobbing in your drunken stupor, your lips slightly open as your breathing evens out. “you drunk, baby?” he slurs as he polishes off the last of the yakiniku set you ordered, the oily, sweet and salty grilled meat seemingly simmering down the effect of the alcohol. you were the only ones left in the izakaya, at this point, the owner has half a mind to throw the both of you out so they could close for the night. “nooooo,” you sniffle before a tiny hiccup rips through your throat. cute, satoru stares at you with lovestruck eyes. “stop that,” you look at him through your blurred vision. “stop what?” satoru asks, his head resting on the hardwood table as his hand searches his jeans for his phone. he had to capture this moment before he blacks out. “looking at me like i’m the most beautiful girl in the room,” you scowl disapprovingly. he manages to find his iphone just before he nods off to sleep, snapping a picture of the both of you. empty plates and half-finished shot glasses are strewn about your table and the night’s festivities are perfectly captured in the frame. the two of you looked absolutely hammered — your normally tidy hair was disheveled, and his face looked like a cross between a sore thumb and a ripe tomato — but still, you looked happy. and to satoru, that’s all that really matters. “but you are, baby,” he pats you on the head before finally passing out. “you are.”
#⚘—eiwrites#jujutsu kaisen#jjk x reader#gojo satoru x reader#jujutsu kaisen x you#nanami kento x you#yuta okkotsu x you#yuta okkotsu headcanons#gojo satoru headcanons#nanami kento headcanons#jujutsu kaisen headcanons#jjk headcanons#jjk x you#gojo x you#nanami x you#yuta x you#gojo x y/n#nanami x y/n#yuta x y/n#jjk imagines#jjk fluff#gojo fluff#nanami fluff#yuta fluff#kento nanami#yuta okkotsu#gojo satoru#jjk#gojou satoru x you#gojou satoru x y/n
257 notes
·
View notes
Note
love love LOVE your The Sign gifsets. im still a newbie in giffing lmao and your gifs are like reaaally pretty so i was wondering how you do your gifs? i really like how it's sharp and the colors pop up beautifully (only if you don't mind sharing ofcc <333)
bun this is the kindest thing you could have said to me, thank you so much <3 i wanted to write down my giffing process for a while in case anyone would find anything in it helpful, so thanks for giving me a push!
guzhu-furen's photoshop gifmaking process (kinda oriented on saving up time)
from

to
1. Downloading a video. i prefer to download video files instead of making screen recordings because the latter usually leaves watermarks/captions and makes image quality lower. i will not be linking the downloading websites themselves directly, but they are all easy to find through search engines if you know what to search for! i download ql dramas from:
youtube:
if the video you need is above 1080p quality, search for youtube4kdownloader
if the video is age restricted, search for 9xbuddy
both these websites work for normal videos too!
mkvdrama usually has 1080p episodes of most asian dramas.
dramacool also has downloading options in case the show is not available on other websites!
2. Screencapping (i learned it through this tutorial)
i screencap using KMPlayer. here is the installer i used, but you can find versions of this program on various websites and torrents too! install the program and proceed.
screencapping steps: open KMPlayer > press "CTRL + G" to summon the Frame Extraction window > set identical settings to these:
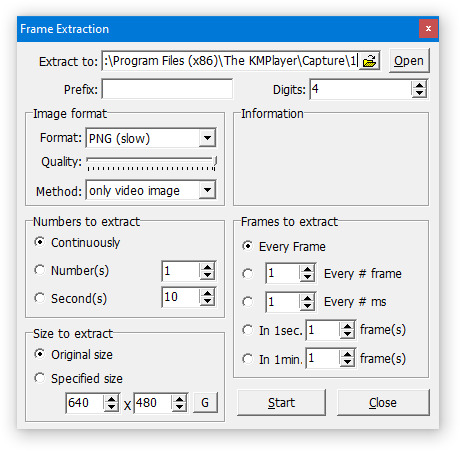
note which computer folder the screencaps will go to (it has a label "Extract to") > go to that folder on your computer and create a bunch of numbered folders there, for example ten folders named from 1 to 10, these would be our separate folders for ten gifs > write "1" or a name of another numbered folder after the backslash in "Extract to" bar in kmplayer > go the timestamp that will be the beginning of your gif in KMPlayer > press "Start" in the Frame Extraction window and press play on the video > when the moment you need to gif is over, press pause on the video and press "Stop" in the Frame Extraction window. great, you now have your folder of screencaps!
3. Importing screencaps to Photoshop
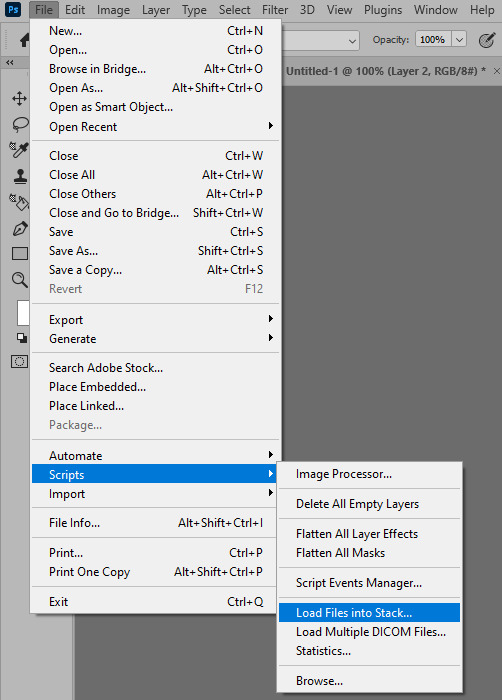
i use Adobe Photoshop 2023, but had used Adobe Photoshop CS5 for a long time before that, so you can use any version you have or find! it's available on various websites and torrents.
open Photoshop > Scripts > Load Files into Stack > press Browse in the "Load Layers" window that was opened
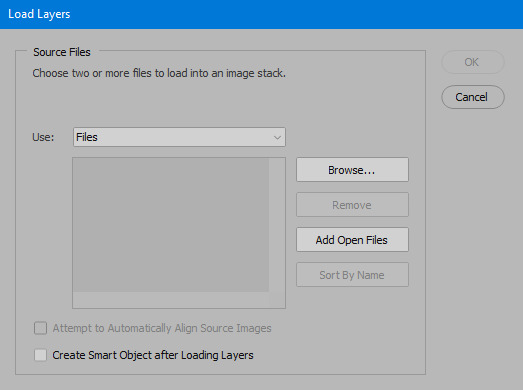
open your screencaps folder (and pin the KMPlayer Capture folder for faster future access) > pick the screencaps you want for your gif by clicking on the first one, and then clicking on the finishing one while pressing Shift on the keyboard > click OK and let them load for some time! i have 65 screencaps loading at the moment
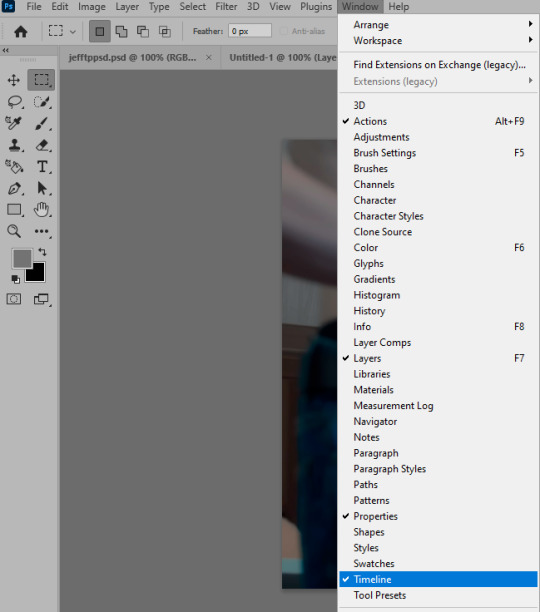
when the screencaps finish loading go to Window > press Timeline > press Create Video Timeline in the opened sidebar > press three dots that will say "Convert to frame animation"


4. Sizing & making the base of a gif
next part will be automatic. i use actions for almost everything from this moment. download the basic action pack here and my additional action pack that we will need here. load them in your photoshop actions window (Actions > Load Actions).
play the Script action to create frames.
now onto sizing your gif. these are tumblr's width dimensions for 3 types of gifs
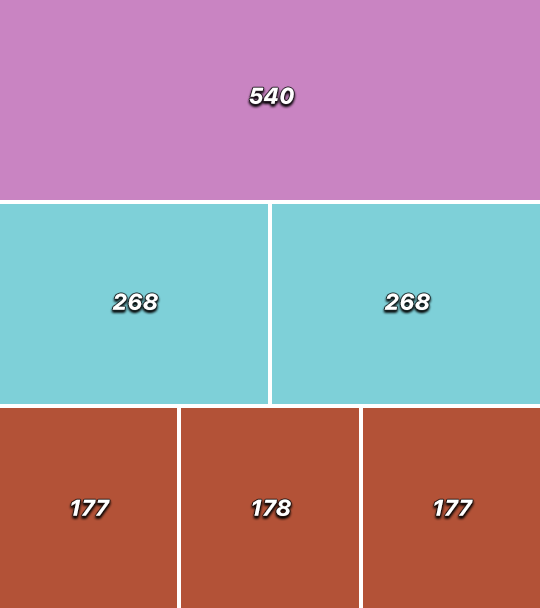
my gifs are usually 540 px in width and 640, 400 or 345 px in height. i added a 400 px action (Sizing 400) in the action pack, you can use it! or you can follow the steps by hand:
Image > Image Size > put in the height you want and add 4-6 pixels there (mine will be 406 for a 400 px high gif) > OK

now we need to crop the gif for it to fit tumblr's dimensions:
Image > Canvas Size > change Width to 540 (or 268 or 177) and take away the 4-6 pixels that we left in the previous step in Height
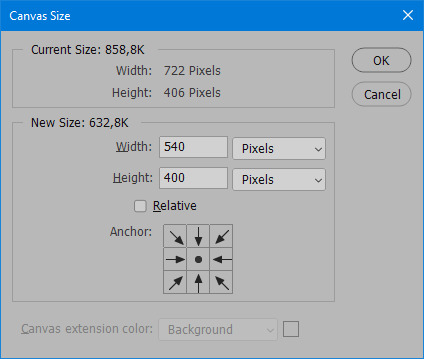
when you figure out which gif dimensions work best for you, record an action and use it to save up time!
after sizing use the action Smart Object. now we have the base of our gif!

you can move your gif left or right if you want! i will be doing this because i would like to show more hips in the gif.
press Ctrl + T > move the layer however you need (not in height though) > press Enter to save
i moved it to the right and my gif looks like this now:
5. Sharpening (i use Tan's sharpening settings explained here)
i added two sharpening actions in the pack, they are called Sharpen Spicy and Sharpen Spicy 12. you can use one of them or you can sharpen your gif by hand, i will explain how to do it below.
Filter > Sharpen > Smart Sharpen > 500% amount, 0,2 px radius > OK
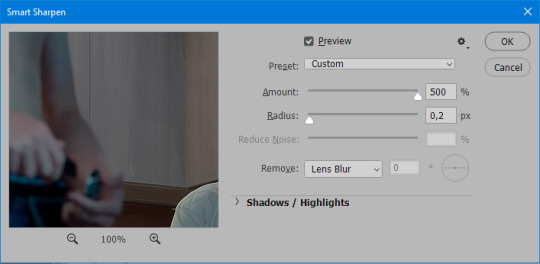
Filter > Sharpen > Smart Sharpen > 17% amount, 10,0 px radius > OK (you can change 17% to lesser or bigger, depending how intense you want your sharpening to look. i use 17% for 4k footage and 12% for 1080 px or less videos)
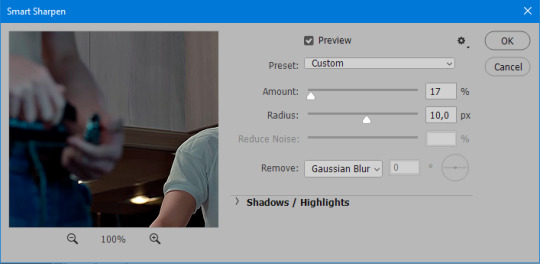
to smooth the sharpening a bit i use Gaussian Blur (this is optional, you can leave the sharpening as it is if you want your gif to be sharper).
Filter > Blur > Gaussian Blur > Radius 1,0 pixels > OK
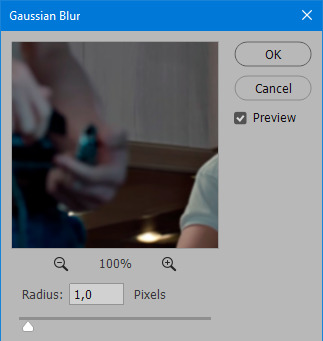
now change blending intensity to let only a bit of the blurring effect stay (you need to change this by hand if you used the sharpening action also).
press Blending Options (the highlighted place) twice > change Opacity to 10%

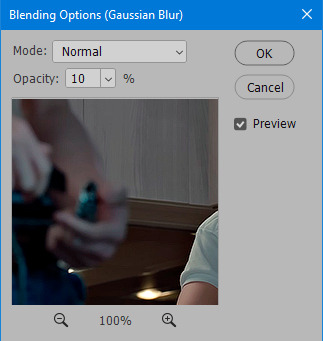
this is what my gifs looks like with sharpening now!

6. Colouring (i learned how to colour the way i do through this tutorial)
to make it easier for you to learn i will share my blank colouring file. i created it to save as much time while giffing as possible, so whenever i need to colour a gif i simply duplicate all the blank adjustment layers to the base of my every gif and start colouring! once you figure out which adjustment layers work for you best, i recommend creating a blank colouring file too to save time.
if you want to go the easy way, open my colouring file and duplicate selected layers to your gif file by Layer > Duplicate Layer > insert gif's document name

if you want to learn by hand, create the adjustment layers that i will be naming in the process on your own, you can find them all in Layer > New Adjustment Layer
now we will use adjustment layers for our colouring from the bottom to the top! first, Exposure layer to add a bit of light to the gif. i don't always use Exposure because sometimes shots are bright enough on their own. i will, however, use it here. don't use it on your gif too much, because in the next few steps we will also be brightening the gif with other adjustment layers. i added +0,49:
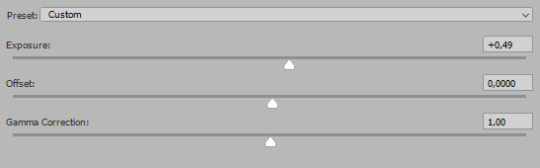
next, Hue/Saturation layer. i use it in gifs with neon lighting to color correct overly bright colours. for example if your characters are standing in neon pink, you might want to lessen Saturation in Magentas and Reds to make the final gif less pixelated, and etc. i will not use Hue/Saturation on this gif, cause it doesn't need it.
proceed to the layer Levels. this layer usually does most of my colouring. click on the lowest white dropper in your Levels window:
now choose a light place on your gif and click on it with the white dropper. it works especially well if you use the white dropper on the lightened parts of face skin. you can play around by choosing different bright spots and seeing what works best. here is the spot i chose and the resulting colouring:


this is too light, so now we need to balance it out with the black dropper:

choose one of the darkest places this time and click it with black dropper! once again, you can play around and click different spot to see what works best. i will be clicking the highlighted spot and you can see what my gif will look like with this Levels settings

as you can see, darkest places became darker and other colours were corrected a bit! now, this is still too bright, so i will be decreasing the opacity of Levels layer from 100% to a smaller number:
i will have to continue in another post because tumblr only allows 30 pictures per one post in the new editor now and i'd like to explain everything in visuals. click to continue
77 notes
·
View notes
Note
hey salty! i've been a fan of the channel for a little while now, and i just wanted to tell you that you've inspired me to get out of my content burnout (even though i've only made streams as of now but it's whatever). your videos are super funny, and it's made me want to get into editing more than ever. i just wanted to ask how you made certain aspects in your videos, like having the little characters pop up and make them super expressive like in the HYAAs and the friendlockes (the new one was super good btw!) or the way you edit stuff in general. i just like how much care and effort is made for these videos and i wanna do something like it. sorry for the long ask btw it's not intentional lmao
Thanks so much omg, and I’m glad your diving deeper into editing!
It’s kind of difficult ro fully dive into with a simple Tumblr ask, and I’ve been meaning to do some short form editing tutorials on the side channel, but I’ll try my best to make a brief overview so you can look up the proper terms on your own for now!
There’s 3 different ways I can make stuff move and shake.
The simplest are Plug-Ins. I use Adobe Premiere for editing, and you can use free templates and plug ins and drag them onto images/footage on your timeline to do pre-made edits.
For shaking, I use these plug-ins that were made for the original Deadpool movie! Really cool that these are available for free online, super cool and accessible for anyone! And while they are made for premiere, I’m pretty sure there are other software that can also use it!
https://premierepro.net/deadpool-handheld-camera-presets/
Then there’s Keyframing. This is a bit more complex and nuanced, but most editing softwares have the feature. It’s basically the manual moving of assets. The best thing about certain software, is for keyframing, all you have to do is set the points you want the image to move and the application does the rest for you and fills in the movement.
Like, if I place one keyframe on a picture where it’s on the left of the screen, and one keyframe where it’s on the right side of the screen, the software will make the picture move from left to right!
Finally, After Effects!
Compared to normal editing software, After Effects has a heavy focus on shorter visual edits instead of entire videos, but using it in combination with normal editing software can lead to some more complex edits! However in turn, After Effects can feel much harder to learn.
In After Effects, you can program/set a “Wiggle” effect on clips to get the sort of movement I have during “Have You Heard About” videos where the avatars wiggle around! I’ve made my own reusable transparent clips of each Avatar wiggling for ease of access and editing each episode.
Hope that this short break down points you in the right direction! Again, I’d love to talk more in specific about this stuff in some unscripted side channel videos, so I’d anyone has any questions on how to do stuff, let me know! I’m not a “massive brained” editor or anything, but I can def showcase how to do some stuff in the future!
Have a good one!!
108 notes
·
View notes
Text
Honestly as someone who makes ads at work to make humanity suffer in few-minute-doses, I can truly applaud Hiruma's creativity in marketing the Devilbats even before the boom of social media.
He makes use of everything: flyers, the school PA system, banners (on the famed statue of ANOTHER FUCKING COUNTRY), skywriting, news on the television, and even fax machines!!!
Do you UNDERSTAND how even more of a hell-raiser he would be if he had fucking BLUETOOTH and AIRDROP??? If he had his claws on Adobe and Canva and Google Ads??? BRO WOULD BE UNSTOPPABLE!!!
Everyone in all of Japan would get texts that say, "JOIN THE DEVILBATS!!! YA-HA!!!" every single fucking day. Coffee shops and public areas with wifi are common hunting grounds for Hiruma, practically open season for him and his accursed advertising. People looking for wifi are his quarry, and he is the predator attacking with Devilbat recruitment advertisements that CANNOT BE SKIPPED.
He would tamper with products from around the globe. You wanted an engraved Apple product? Instead of whatever phrase or word you wanted engraved, it says, "DEIMON DEVILBATS: RECRUITING NOW!!! YA-HA!!!" Every few posts you scroll over in Twitter, Facebook, and Instagram, you'll always, always, ALWAYS see an ad on the Deimon Devilbats.
And of course, Hiruma's secret weapon: TIK-TOK THIRST TRAPS. He forces his team at gunpoint to record themselves dressed in tight-fitting clothing. He posts close-ups of cool plays in matches (no one knows how he records these plays in different angles, with highass quality). He makes edits of his teammates, and plays up their sex appeal or their ability in front of the camera.
No one is safe from Hiruma Youichi, commander of marketing and advertising.
84 notes
·
View notes
Text
unhelpful tips and resources for gifs&gfxs
Hi everyone, I don’t know how useful this post will be but I wanted to share some of the things I learned through the years of creating content for tumblr and also new information I find every now and then. I see lot of new people who start creating content here and I want to help with what I know.
Note: I won’t upload any tutorial of mine or anything because I believe the resources I will link here will be more useful than just a tutorial that I won’t be able to explain well because English is not my first language. Let’s start!
First of all, few words about tumblr and how it works. Tumblr is a site with many communities. Every user has its own blog that can post many kinds of content, including a text,photo,video,audio,art etc. When you first join the site it might be overwhelming but in reality, it is not (*whispers* I personally find instagram harder to understand how it works).
Like every site tumblr has its own search bar, tags, likes, reblogs(share on fb,rt on twitter),and follows. When you search a blog to follow and you see their posts you can like their post by tapping on the heart and share(reblog) by clicking on the two arrows button that looks like the recycle icon.
What does reblog mean and do?
Reblog is as we said the “share the post” of facebook, with reblog you don’t repost someone’s content but you share it with your followers and help it to be seen bymore people that way you actually help the creator to promote their creations.
Likes
Unlike, instagram,twitter and facebook, when you like something the website doesn’t recommend the post to your followers unless they go to your blog via their phone and go to your likes page, if you have it unlocked, so basically, likes don’t help with supporting creators as much as reblog does.
Tags
Tagging system on tumblr, in my opinion, is pretty fun both for the op of a post and for the reblogger. With tagging you can organize all the posts on your blog by anything you like. For example, if you tag artworks as #art and you want to find a certain artwork you reblogged a time ago you can just go to the tag and find it.
For op you can use tags the same way as other sites to promote your work, as I remember the first 5 tags will be shown on the general tag like if you search on tumblr #artwork and you have the tag #artwork on the first 5 it will be shown there.. but I am not sure if this changed.
Creating a post
As you can see from your dashboard(timeline on twitter) you have the option to create a text form post, a photo form post.. etc. You can experiment with all of these, don’t be afraid. I will focus on photo form posts because we will talk about gifs and gfxs.
The photo form(with the camera icon) post, is what most content creators use to post their creations like designs/graphics,art/fanart/photography, and gifs.
The site allows you to post 10 photos(if you want to post more I think Text form allows more).
The size of your photos and gifs must be under 20mb for photos and under 10mb for gifs.
As for dimension, tumblr has its own dimension but you can always post whichever you want, the bad thing is that the quality will be reduced on the dashboard and the viewer will have to click on every single photo in order to see the original quality. Here are the dimensions:
For a single photo/gif per columna it is 540px horizonatally
For 2 photos/gifs per columna it is 268px x 268px
For 3 photos/gifs per columna it is 177px x 178px x 177px (be careful the middle one always has to be 178px)
Themes
When you feel comfortable with using tumblr, you can customize your blog with beautiful themes that talented people have shared here!
You can find and learn about themes here: @/theme-hunter
Gifs/gfxs
In this part, I will provide links and tutorials for gifs and graphics, But first of all you need a program for content creation. The most common one is Photoshop, you can buy a subscription from Adobe(it is expensive) or you can find crack version on the internet.
Chaoticresource has a whole tag for photoshop and many more programs for you to start with photoshop. Not only that they have a whole list of resources for both giffing and graphic making. You can find their tag list with everything you need to here.
Here are some tutorials on how to make a gif
Tutorial by: misty-quigley
Tutorial by: kylos
Tutorial by: hayaosmiyazaki
Tutorial by: cal-kestis
Tutorial by: gr-ogu
Tutorial by: misfitsexual
Tutorial by: unbrokencolorings
Tutorial by: josefnewgayden (also has many resources)
Tutorial by: dunkzilladaddy
Tutorial by: theedorksinlove
Tutorial by: ashleysolsen (with more resources)
As you can see there are many different ways to gif, experiment with as many as you like and choose one you feel more comfortable with.
Usergif and deenafier and cillianmurphy have collected many tutorials in their page/posts so I recommend reading them.
Some random yet helpful tutorials I have and I find myself going back here and there are:
The coloring tutorial by @/ daisylouisejohnson
The coloring tutorial by @/magnusedom
The color table tutorial by @/ggroupsdaily
The coloring tutorial by @/lee-haechan here and here
Coloring tutorial by @/binariesuns
Layer mask tutorial by @/daisylouisejohnson
Transition tutorial by @/fionagallaqher (and coloring tutorial)
Blending tutorial by @/linda-darnell
Blending tutorial by: @/morningstr
Channel Mixer tutorial (REALLY IMPORTANT IMO) by @/zoyanazyalensky
Glitch effect tutorial by @/nobodynocrime
Glitch tutorial by @/sarah-snook
How to fix orange-washed characters by @/zoyanazyalensky
Colored background tutorial by @/rafael-silva
Sharpenning gifs by @/joelmillrr
Coloring tutorial by @/yelenafbelova
Coloring tutorial by @/yenvengerberg
Don’t be afraid to experiment with gifs, try different styles and most important have fun!! I know thereis a lot to learn but trust me, it can be pretty fun! Good luck!
Now for graphics.. all I have to say is just have fun and experiment, experiment and experiment more! Here is a list ofresources I have collected that helped me improve my skills and find resources.
Where to find fonts/textures/vectors/mockups.
deviantart (everything)
unsplash (photos)
pixeden (mockups,photos)
graphicburger (mostly mockups)
freedesignresources (everything)
spoongraphics (mock ups)
graphicgoogle
rawpixel (photos)
digitalbrushes (brushes)
zippypixels (mockups)
dafont (fonts)
fonts by google
behance( under the tag freebie)
pinterest
fonts.ilovetypography (fonts)
gvfxarmy on twitter did an amazing job collecting resources.. you can find them here
List of youtube channels that will help you with tutorials and educational information on graphic design
Envato Tuts
Madia Designer
elliotisacoolguy
Brad Colbow
LearningScreen
PiXimperfect
The Futur
The Futur Academy
Jeremy Mura
Blue Lightning TV Photoshop
Nemanja Sekulic
Digital Art Creation
Will Paterson
Nobu Design
Satori Graphics
Logo Design Ideas
Adobe Creative Cloud (recommend to watch some of the livestreams they are interesting)
Gareth David Studio
Spoon Graphics
PSD Box Official
creatnprocess
Jamie Windsor
Dansky
Daily Photoshop Tutorials
How to Graphic Design
Photoshop Tutorials - PSt
Yes I'm a Designer
Photoshop Tutorials
PHLEARN
Some other sites and links that i find interesting:
designbolts
thefutur free resources
The most important compositional principles in graphic design(article but check the site too)
The power of color (article, check the site too)
bezier.method (site to practice the pen tool)
aiga
httpster.net (site for inspiration)
access.mymind (color inspiration)
How to design a logo (article)
How to design a logo (article 2)
The Importance of Branding in 21st Century (article)
Color combinations
Lastly here you will find books and more resources for graphic deisgn! Thanks to @/isaaczara_ on twitter
That’s it! Hope you find this post helpful! I tried my best to not forget anything!
Have fun on tumblr and on creating your content! Don’t give up and have fun creating!
#masterpost#a rushed masterpost#long post#hope it helps#resources#its not the masterpost i said i ll make its a similar one
246 notes
·
View notes
Note
omg what brushes and program do you use?
Oh I'm not sure this answer will be very usefull from amount of brushes listed. I have very few faves actually and mostly like them because they help me circumvent my perfectionism.
So right now I'm using Clip Studio Paint but I've been using Photoshop for a looooong time. Till they pissed me off too much with adobe adobeness. That's why part of my brushes are originally photoshop ones I've ported to CSP.
I mostly do linearts, like overly detailed ones, like this closeup:
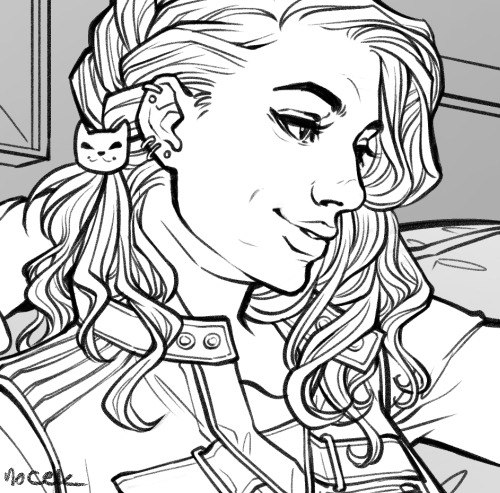
Which I used DAUB FunnyGranny2 and back in PS times (and also now sometimes) I've used Kyle's Drawing Box - Animator Pencil 2016 from Kyle Webster (now available for free with PS as far as I know? still I had bought them ages ago and just ported it to CSP, works ok)
I like those two brushes because they are slightly grainy and aren't 100% smooth which helps me not to be as precious about smoothness. Otherwise I'd be smoothing it over and over again. Also they loose a bit of opacity with lighter touch which I like :)
I also like the Belgian Comics Smoother from Kyle's Inbox. It's very smooth but has a nice shape so I use it for touchups on color flats and lettering.
As for my more recent spiderverse comics of following close up:
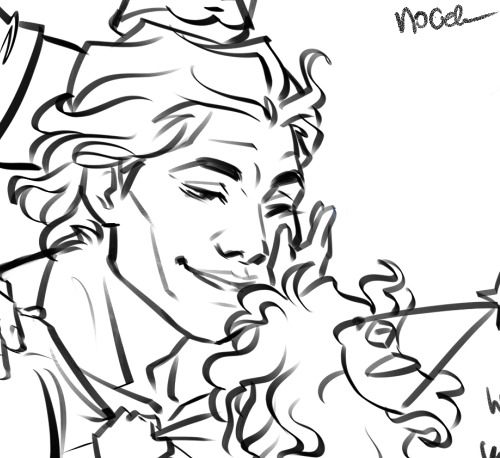
I need to make them quick so everything is on 2000x2000 canvas and is linearted with DAUB - Fluid Ink Chisel 2 set permanently on size 30 so I won't be tempted :D It may not be grainy but I like how it changes it size and opacity with pressure and how it changes it's shape with direction of line.
Besides that I mostly use flat colors (I love the Lasso Fill tool in CSP) and regular soft airbrush too add some gradients.
I don;t use them that often but I also like Mirre's markers + blender if I do some actual shading but I also use Kyle's gouaches then.
And that's about it :)
55 notes
·
View notes
Last Seen Blogs

greeneggsandsand
....sis....

suntwined
From the Ground
littleemisshalliwell
𝖯𝗋𝗎𝖽𝖾𝗇𝖼𝖾 𝖬𝖾𝗅𝗂𝗇𝖽𝖺

sagekyla
State of Flux