#i'll choose the size that best fits the image
Text

DEMO (TBA) | Cast Profiles | Cast Interviews
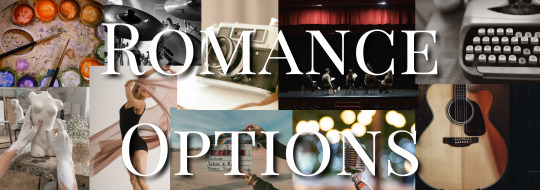
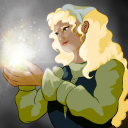
The Muse is a 18+ slice of life interactive fiction novel set at NYU focusing mostly on the art departments in the Steinhardt and Tisch schools. Inspired by my love for shows and movies like Felicity, Fame (the show), Skins UK, and Center Stage. This will not be an accurate depiction of school life at NYU, I'll be taking lots of creative liberties.
Content Warnings: explicit language, sexual themes, substance use, violence, mention of SA
You come from a family of artists and art lovers. Your mother is a passionate curator for a small gallery in the city and your father is a sculptor and painter with a very dedicated cult following. They met when they were just starting out and have built a lovely life for themselves and their two children, you and your older brother Cameron.
Your parents have always been super supportive of you and your brother’s dreams and ambitions. They were a great source of encouragement and guidance for your brother on his path to discovering his goal to become a game designer and you on your path to become whatever you choose.
Growing up surrounded by such creativity just so happened to inspired you to want to create something of your own.
Now that you’ve graduated high school it’s time for you to head off to university! You’ve decided to leave the mid sized city that you call your hometown, and go to the big city NYC! You’ll be attending NYU more specifically, but you won’t be making this move alone you’ll be attending with your best friend Maxine!
What will you discover in your university life?
Will you solely focus on schoolwork or wind up in the raging party scene?
Will you explore new creative endeavors or solely focus on honing your craft?
With so much going on will you even have the time to possibly find your muse, or maybe even become someone else’s?

Design your mc from clothing style to physical appearance to pronouns, gender identity, name, looks, and more.
Choose 1 of 9 majors that grant you different classes with new students and professors: (Studio Arts, Dance, Drama, Photography and Imaging, Jazz Studies, Songwriting, Recorded Music, Collaborative Arts, Dramatic Writing )
Curate your MCs personality and how they react to all the drama and excitement university life has to offer. Style your MC’s dorm room and their aesthetic style.
Navigate the cliques and scenes to figure out where your MC fits in. Maybe you're a social butterfly and you just float from one social group to another!
Engage in a romance with 1 of 10 characters. 5 female/male gender selectable and 5 gender set characters. And 2 poly routes one with The Rebel Rejects and on with The Exes.
Choose one of three part time jobs to give you a little extra spending money for things like spring break and birthday gifts for your new friends.
Follow The Muse through your MC’s freshman and sophomore years. Junior and senior year will come much later in Book Two of The Muse. The third and final book in The Muse series will cover the start of MC's new life after graduation.
Roxanne/Robbie Sawyer: (f/m) The lead singer and guitarist of The Rebel Rejects. Ro is everything you would want in a lead singer cool, charismatic, and super talented. Don’t let their dazzling aura intimidate you though because though they may have a raging wild side they can also be extremely down to earth.
Joleen/Johnny Nielsen: (f/m) The drummer of The Rebel Rejects. Jo is the oddball of the band with a sunny exterior and twisted flower child past. They may be a sweet boho bimbo with a heart of gold, but there’s a lot more that lies behind those blue green eyes.
Delphine/Desmond Hartley: (f/m) The bassist for The Rebel Rejects. De is the super glue propelling the group forward. With high expectations from her parent, and dreams that soar even higher, success is the only option.
Rina/Ren Fukushi: (f/m) R is the best ballet dancer in this incoming freshman class, and no one would ever think to say otherwise. They’re cold and closed off, if it isn’t about ballet then they don’t want to hear it.
Everly/Everett Thompson: (f/m) Eve is a triple threat. Singing, dancing, acting they can do it all. They hope to complete their EGOT before they turn 40.
Karla Reyes: (she/her) Karla is a sophomore at NYU studying Studio Arts. Their favorite medium is watercolor on canvas. They’ve dabbled with sculpting and ceramics...until they broke up with their ex, Faye, and can’t stand to be in the same studio with them.
Faye Winters: (she/they) Fae is every bit the ethereal being they seem to be, and just as flighty. She is a sophomore majoring in dance with a minor in studio arts. She has this effortless charm and beauty that extends to her art whether its her dancing or her sculptures.
Sebastien Auclair: (he/him) Sebastien is in his third year of university, he’s an exchange student from the Paris College of Art. He is studying photography and imaging. Sebastian loves Paris, but he is excited for this change of scenery.
Maxine Matthews: (she/her)Max is your best friend in the world! Your parents are friends so you were destined to best pals since birth, thank god you actually like each other or all those shared family functions would have been really awkward. Max is funny and always has great commentary for every show or movie that you watch together. Which is why you weren’t surprised when they decided to major in dramatic writing. Some people think that you’re too close. They wonder how is it possible that you could be just friends.
Silas Walker: (he/him) Silas is your RA. As your Resident Advisor he's super helpful and friendly. You have question about the best study spots, bad professors, how to use the subway, well he's got answers. He keeps all his advisees at arms length because everyone knows RAs can't canoodle with their advisees. And that just makes it all the more enticing.
#interactive fiction#dashingdon#twine if#twine interactive fiction#interactive novel#interactive if#choice of games#choice script#choose your own adventure#choose your own story#twine game#twine story#if: intro#if: themuse#interact if#interact-if#if wip
542 notes
·
View notes
Note
hi how do you put gifs in stamps? i cannot figure it out for some reason

I'll be happy to give you a hand! I've put most of this under the cut because I have two different methods of editing gif stamps, and I don't want to clog someone's dash LOL
I want to preface that I edit using a PC, so I'm not confident in giving advice/tips to anyone who is mobile-bound.
For the first method, and generally the easier one, I entirely use EZgif. It really is a lifesaver of a website... ^^
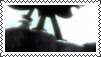
I start by cropping the gif I want to make a stamp of. Here’s the gif I’ll be using!
(Note: You can’t make stamps using gifv/webp files on EZgif, they will bug out. You can convert gifv files to gif by going to its URL and removing the “v,” and you can convert webp files to gif using this section of the website!)
[Photo ID: Gif of Shadow the Hedgehog.]
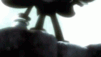
Sometimes you don't need to do this, but usually, I crop the gif to remove unnecessary background space and to put more focus on the character.
[Photo ID: Cropped gif to put more focus on Shadow and remove background space.]
Now, I resize the cropped gif. Set the width to “91″ and the height to “47.”
(Note: Sometimes after you size down the image, the gif gets corrupted. You can fix this by changing the resize method. I find Gifsicle works the best, though that isn't guaranteed.)

[Photo ID: Prior gif resized to 91 x 47.]
We’re almost done! All we have to do now is put the stamp border on through using the overlay section.

[Photo ID: Transparent downloadable stamp border.]
Here’s the stamp border I’ll be using!
Note: If you want to use a different border, you'll likely have to find its area on your own to properly resize the gif again.
Once you are on the overlay page with your resized gif, you want to click this button once.

[Photo ID: Screenshot of Canvas Size button. Picture reads “Extend canvas size (use if overlay exceeds gif size).”]
After you do that, you want to insert the stamp border with this button.
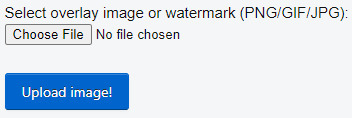
[Photo ID: Screenshot of Choose File button. Picture reads “Select overlay image or watermark (PNG/GIF/JPG): Choose File: No file chosen. Upload Image!”]
Now that the border is inserted, change left to “41″ and top to “19,″ then click "Generate image!"
Note: You'll also have to find the left and top on your own if you're using a different stamp border. This is important because if you don't have the correct numbers, your gif will have a random sliver of transparency in it.

[Photo ID: Gif stamp with a noticeable amount of unnecessary transparent space.]
You should have something like this, but we aren’t done yet though. Do you notice all the transparent space we don’t need that’s around the stamp? We need to crop that out using this easy button!

[Photo ID: Screenshot of Autocrop button. Picture reads “Autocrop: trim transparent pixels around the image.”]
After you click "Autocrop," click "Generate image," and then you’re done!
[Photo ID: Completed gif stamp.]
You're free to add whatever aesthetic changes you like using the "Effects" section, though I usually tend to lay off that since I see it as a hassle.
Now, for the second, and more tedious method, that I have been using recently!
Starting off, we are going to find and crop our gif using EZgif again, so just copy the first two steps from the last method.
[Photo ID: Gif of Shadow the Hedgehog.]
[Photo ID: Cropped gif to put more focus on Shadow and remove background space.]
Now that's done, we need to resize the gif to fit the same stamp border I used before! But instead of using the prior numbers, we're going to use new ones.
Resize your gif by using the width “101″ and the height “57.”
Note: If you're using a different border, you can easily find these numbers because they'll be the same as your border's, as long as it doesn't have any background space. If your border does, please crop it out.
[Photo ID: Prior gif resized to 101 x 57.]
Now, here's where things get different. We're going to use the website "Photopea," which is basically just online Photoshop.
Click "File" on the top left corner of the website and then click "Open," then insert the resized gif.
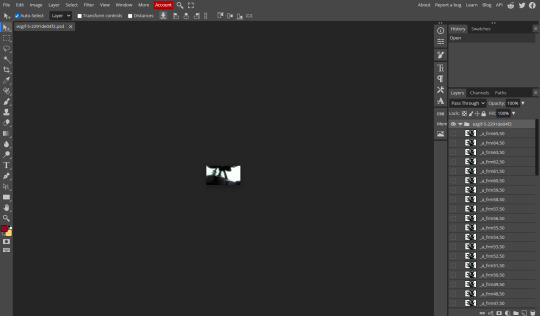
[Photo ID: Photopea editing software with stamp opened.]
You should now have something like this! It's important to keep in mind that all of those layers are the frames of your gif.
Now, insert the stamp below, which is just the same border from earlier except with the stamp part colored in, onto the gif by clicking "File," and then clicking "Open & Place."

[Photo ID: Filled in downloadable stamp border, edges are still transparent.]
It will automatically paste onto a new layer at the top of the folder layer list. You need to move it down so that it's on the bottom of the folder, not the layer list. You can do this by simply dragging and dropping.
[Photo ID: Two images. One shows the filled-in stamp on top of the folder layer list. The other shows the filled-in stamp on the bottom of the folder.]
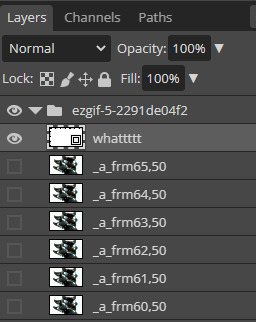
Here's the tedious part. You now need to set ALL of the gif's frames to "Clipping group," not including the filled-in stamp. This can conveniently be done by clicking each frame while holding down "Ctrl" and "Alt" on your keyboard. This process can either last a few seconds or up to a full minute depending on how many frames the gif has. Sorry...
[Photo ID: Example of the gif's frames all set to "clipping group." You can tell this has been done successfully because the frames have a small arrow pointing downward on the left side of the layer preview image.]
Don't forget to double-check in case you missed any frames! You should now have something like this at the center of your screen.
[Photo ID: Screenshot of the gif at the center of the screen, now looking stamp-shaped.]
We're not done yet! We still need to add a light stamp border and a dark stamp outline. We can do this by pasting the images below.


[Photo ID: Two photos. One is a transparent downloadable outline of a stamp. The other is a transparent downloader border of a stamp.]
Paste the light one first, and then the dark one last on top of the folder's layer list.
[Photo ID: Previous screenshot after the templates have been pasted.]
Click on "File," and then click "Save," and now you're done!
[Photo ID: Completed gif stamp made in Photopea.]
This part is optional, but if you want, you can mess around with the layers and add some aesthetical changes! Here's an example of the previous stamp after I edited it like I normally do!
[Photo ID: Completed gif stamp made in Photopea with effects.]
That's all for now! If you have any questions or need more help, don't be afraid to ask! :D
-Mod Shadow
74 notes
·
View notes
Note
Oops I didn't mean to post that anonymously. Yes, if you have the time to post more about giffing, that would be awesome!
Okay so I'll make a quick tutorial and I hope it's easy to understand ksjsk. It's very image heavy and I apologize for any typos. We'll be making this:
So I start by taking the screencaps with Potplayer. Just open your video (preferably 1080p x264). The shortcut to take your screencaps is Ctrl + G, it'll open this window:

(those are my configurations, it's in portuguese but it's easy to understand)
I usually create a folder in Documents for each gif. Also remember to start capturing a little earlier because it takes a few seconds to start, same thing when you finish.
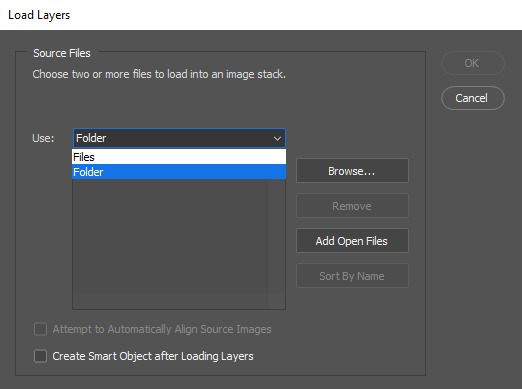
Now it's time to open it on photoshop! Make sure you have your timeline set up, if it's not showing up go to Window > Timeline. Now go to File > Scripts > Load File into Stacks
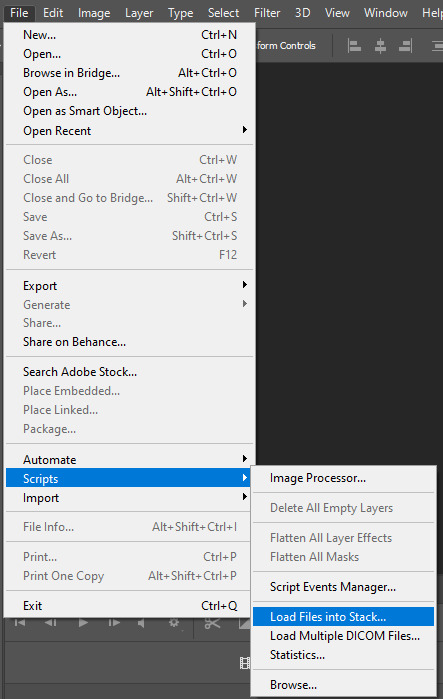
When this window opens, just choose your folder and click okay after it loads (might take a while if there's too many files)
So when it opens, you'll click on the 'Create Frame Animation' option in the timeline

It'll create a single layer, so go to the little button at the side and click on make frames from layers

they'll show up backwards, so go back and choose reverse frames

Now you're all set. It's time to delete what you don't want. Since tumblr accepts up to 10mb, I usually keep it between 60 frames. Really it depends on the scene and the dimensions you're gonna make your gif. (for example, if after your coloring, the background of your gif is completely black, you can go up to 175 frames, even if you make a 540x gif, i did that once lol)
So when you have your scene ready, select all frames and set your frame delay to 0,05.

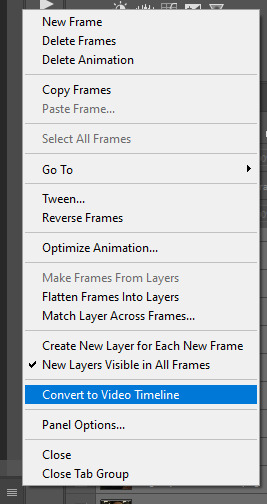
Then, with all your frames still selected, convert them to video timeline
Go to your frames, select all of them and convert them to smart object

So after that, you can crop your image! Check the tumblr dimensions here. When making big gifs I like to use 540x400, 500 or 600. Just what I think it'll fit best. For 2 per row, I usually use 268x180 or 268x200. For this gif I used 540x400 and cropped it, I always try to crop the borders so there's no risk of the gif having that weird white border around it.

Then go to Image > Image Size on top of the screen

Set to the dimensions you used when cropping, so for me it was 540 x 400:

I use bicubic smoother to resample but honestly i don't really know the difference kdjsk
Now let's sharpen it! I usually use this one for big gifs (comes with a better tutorial than this kdjsk) but it's got a lot of steps to it that i like to do it myself, so i just use to sharpen it. And if you're following this tutorial, we already did all the steps on the action, so just click on the Smart Sharpen.
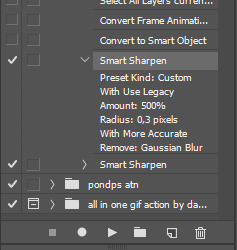
I also recommend this action for when you're making 268px gifs (two per row). I love this action too. Btw if you're just downloading your actions, you have to load them on those 3 little lines:

So for coloring! I use a base for most of my gifs and I edit them from there. Here's a great blog for coloring psds. If you want, I can make a separate tutorial on how I color my gifs, because it won't fit it all in 1 post.
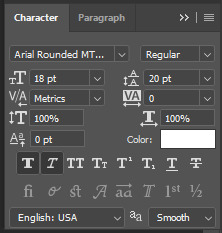
Then I added my subtitles. Make sure the subtitle layer is on top of the coloring one so it doesn't look weird. Here's the settings I'm using for this one:
Now we're gonna add blending options. Go to the bottom of the screen with your subtitle layer selected and click on that little Fx:

I added drop shadow, outer glow and stroke:


When you're done, you're gonna want to Save for Web. The shortcut is Ctrl + Shift + Alt + S. All at once. This window will open up:

This is how I like to save them. Don't forget to make sure your gif is set to forever and less than 10mb (you can check at the bottom of the screen, below your gif, mine is 5,5mb). And you're done!
Or not. I don't know why I have this problem, but after save it, my photoshop sets the frame delay back to 0,07, and that's too slow. So I open my gif again in File > Open. Or Ctrl + O.
Select all frames and set your frame delay to 0,05 again

Do not convert to video timeline. Just Save for Web again. And now you're really done.
#gif tutorial#i hope this is not too confusing#im a terrible teacher#but please lemme know if you have any questions or if i didnt touch on something you were wondering
38 notes
·
View notes
Text
WELCOME TO THE DESOLATE SEKAI ...
hey there, everyone ♪ welcome to a yet another prosekai edit blog!! there are a lot of them already, howeveeeer— my main priority for starting this blog is to have an archive for my own edits ★ i haven't done them in a long time and i wanted to start anew, so they might not be the best, but i'm doing it just for fun!! i don't have a main blog for the time being and i'm still figuring out tumblr again, but i hope we can get along well ww
if you like my edits, though, then you can look under the cut for more details about requesting and my dni criteria ★
any transparents that aren't the in-game transparents are gonna be by @/prsk2dmv-transparents and @/sekaitransparents!! will be crediting them whenever i use them, but if i ever forget then the credit is here ~

WHAT CAN I DO
icons: only square ones for now. these can contain either card icons (icon that is just a close-up of the card, optionally with some touch-ups), general icons (icon of a character on a certain background, mostly of a monochrome color) and pride icons (icon of a character on a pride flag, although i want to try making icons with disability flags as well). i won't do gif icons, though, or at least not for now ):
twitter layouts: a set containing an icon (please specify which one from the icons above) and a twitter header; the types of headers are general headers (containing the requested character/pairing on a certain background; works with pride flags as well), picture headers (headers that are a picture fitting the icon) and mixed headers (made from three pictures — two fitting the icon and one containing the character/pairing)
tba...!
WHAT I MIGHT DO
moodboards: either open ones (where every picture is separated) or closed ones (where everything is in one picture). if you choose a closed one, i will as well do two versions; one with only pictures used in the moodboard and one with a requested character/pairing on top of it.
stimboards: nothing to say in this one, just that i might deny the request when i won't be able to find good gifs. you can send me gifs you want to see in the stimboard, though
wallpapers: either phone or pc ones, specified size would be appreciated. similiar to icons, these can contain either card wallpapers (preferably only to be requested for phone wallpapers), general wallpapers and pride wallpapers. i might experiment with some of them, however!
tumblr layouts: not too confident in making these, but i might as well try. works the same way as twitter layouts, but the only header type is gonna be a general header
reply icons: also not too confident with these, but work the same way as normal icons. they're just uhh shaped like reply icons you know.
tba...!
i'm ok with doing any pairing that is not proship or toyasaki/toyakasa! i'll also think about adding more sources someday, but for now i just want to stick to prosekai ww
BEFORE YOU REQUEST
— i prefer simple edits over the overly aesthetic ones!
— please tell me directly if i do something wrong, eg. use a wrong flag! i can't correct myself if i don't know what i did wrong
— please, please use tonetags when needed! i'm autistic and i can't read the tone well, so i'd hate to get a request or an ask wrong because of it!
— i have full rights to deny a request! i won't do it much and i'll always state a reason to why i'm denying it, but i want you to be aware of this possibility
— i'll try my best to get the requests done quick, but i'm still a high schooler and i have my own personal life!
— feel free to ask about anything!
— the cards from revival my dream and island panic sets won't be edited, and it also goes to any possible racist sets in the future!
— dni if you fit the basic criteria, but also if you're a fetishist, colopale defender, sexualize minors, don't see mizuki as a canon transfem and/or use he/him on them and ship toyasaki/toyakasa or other canon found families!
— i'll add the alt text for all images in the future, but i have to learn how to properly write it first!
3 notes
·
View notes
Note
Hi! I purchased the always connected full bundle. How exactly do I edit with it?
Hello ! First of all: thank you for purchasing my psd, I hope you enjoy using it as much as I enjoyed making it !
I also hope that it's ok that I'm posting your ask for everyone to see, I was going to answer it privately but I thought this could be a great way of posting a mini tutorial in case someone else has the same question ( let me know if you want me to delete this and i will ).
Below the read more, you can find an in-depth explanation on how to edit the "always connected" full bundle !
This is what the screen looks like as soon as you open the psd on photoshop:

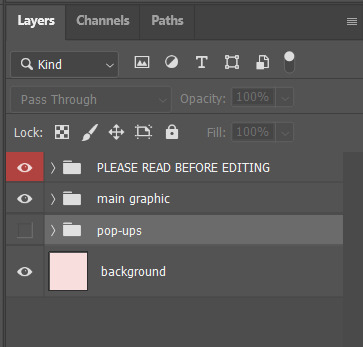
On the screen, you can see a note and the rules. The original layers are divided in the group layer, the main graphic group layer and the pop-ups group layer.
The first thing you should do, is to toggle off the visibility of the first group layer. You'll be left with what I call the main graphic ( images below ).

The main graphic has a lot of parts and possible iterations, so let me know if you want a more in-depth tutorial on how to edit them. But as you can see, I have some "optional" group layers, which means they can be used to substitute each other. That way, you can have the reminders aspect of the graphic, the notes aspects of the graphic or another photo, see below for the other two options:

After you figured out which of the two options you want, you can start editing each individual group layer. All of them are formatted so you can just clip the photo to their respected shape and it'll work. ( to clip, the photo needs to be in a layer directly above the shape you want to clip them to and you can either use ctrl + alt + g on windows or right click the layer of the photo you want to add and select "create clipping mask" )
Now, onto the pop-ups. This is what you see as soon as you click the pop-ups group layer:

I made it so all of the elements in the main graphic had a customizable pop-up. That means you'll have to remember to edit the "widget notifications" to match the original graphic, but I think it looks cute when it's done. I also formatted all of them to work with clipping masks, so all you have to do is to go through the ones you want to use and clip the photos to the correct shapes.
I, once again, can go through a more in-depth tutorial about all of those group layers if you want, just let me know !
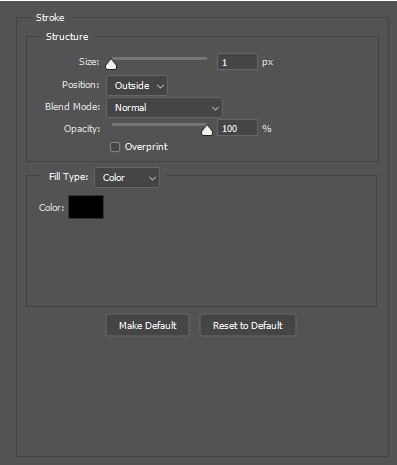
All of the colors and fonts are also fully customizable, so here's how to edit them to the palette you want/fits you the best:
First of all, I like to enable "properties". To do that, all you have to do is to open the windows menu and select properties. The tab below will open and you can choose where you want to leave it ( i like to add it to the collapsible menu next to the fixed one on the right of the screen )
As you can see, "properties" allows me to see the sizes of the shapes, their colors and so many other aspects of the shape selected. To change their color, all i do is select the shape I want, open "properties" and scroll down to "appearance". Most of the shapes only have "fill" enabled, so I click on the current color and choose a new one.
Let me know if you have any more questions and I'll be happy to help !
4 notes
·
View notes
Note
Hello there, I am CM, I'll be participating in your ask game, and I'll be choosing option 2! 🖼️
Person to channel - future spouse (I'd prefer a woman, but they can be of any gender)
I think there is a person in your life, or will encounter, someone who deeply cares for you, in every sense of the word (it feels romantic, but it might be a friend or a family member you'll be reconnecting with as well). I feel they work in the medical field, and they're very respected as a professional. If not, it might be another job where you have to care for people, like social service. They're a very creative person, and they try to bring in some happiness into their daily routine, and you'll feel that. They are affectionate when it needs to be, so don't worry about them acting cold or manipulate you. (I got love-bombing, but it can be anything) They look conventionally attractive, pretty tall, fit for their size, and and also good with kids (regardless of them being a fan of kids or not).
Oh I love @a-d-nox , she's an amazing reader, I loved her ask game!
hello!!! thank you for participating in my game and for the lovely reading. thank you for the effort you put into it and i think the things you’re saying are pretty accurate!! i think pretty much everything you mentioned has come up in readings for me before so thank you!
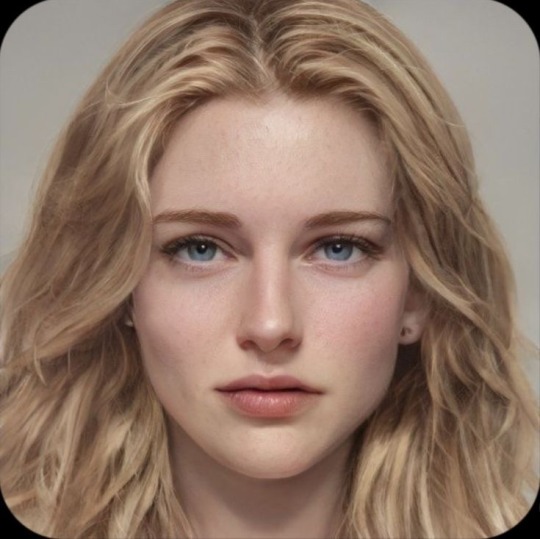
cards i pulled: the fool, the star, king of cups, queen of cups, the lovers, six of wands. (many cards because they kept flying out and it felt wrong to put them back)
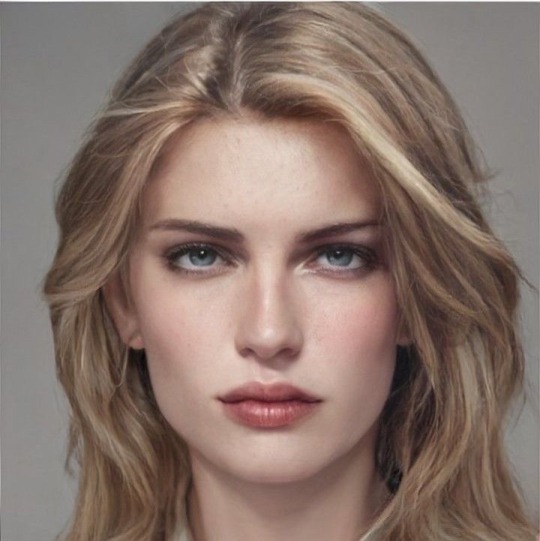
to be honest, i don’t think this is the most accurate image of your future spouse, but it is definitely the image that suits their energy the best. i do think certain features such as the hair and eyes may be similar, but i think your future spouse may have sharper features than the woman shown above. i think that your future spouse may be very career driven, and very much focused on their career. i’m also not sure if you have any plans to ever go hiking up a mountain with a partner, but i keep getting an image of that in my mind. i think your future spouse may frequently have their hair up in a high ponytail, and sometimes a low and loose braid. i think physical activities may be the theme for frequent dates, especially physical activities involving nature and exploration. i feel like this person may have a pretty athletic body. might have grown up pursuing a sport very passionately. also, regardless of your age right now, i think you may meet this person when they are in their mid/late twenties to early thirties. i think this person will definitely have lighter features (blond hair, blue eyes energy). i think you may be more in tune with your emotional side as well, but that’s not to say that they’re going to be very cold and unemotional. i almost feel like this person may have grown up with a very gentle nature, but grew to be a bit more assertive and more like a leader because of their career. i think you will help them feel a bit younger, and more in tune with their more vulnerable and calm nature.
thank you for letting me read for you, and i hope this reading resonated!!
edit: i found an image that is a lot more similar to the image of the person i had in mind!!
3 notes
·
View notes
Note
After reading your last entry I.. can only imagine Ray putting your tiny butt into a birdcage and some really overdressed outfits he probably did himself, even. And, like, all these Barbie accessories like the hairbrush..
Imagine it's the time where you pushed his buttons, too. Then you have two glowing, dark eyes just quietly stare at you, drowning in worship, whenever he has his break as you stand beside the computers on the table—
Kait what have you done to me, I cannot fall victim to another AU like this aaah-
Borrowers AU or Pocket-Sized AUs are just so fun to play around with! There's a level of threat to them, though. it's not always just some fluff piece because you're definitely at their mercy when it comes to your safety. Personally, I enjoy the fluff value since there's something sweet about comforting someone you have faith in and nobody else. But, you bring up the good thought that most people wouldn't think about because it's a part of the risk.
I love when Ray handles the player like that normally. I don't want to use my head sometimes, just let Ray take care of everything since I know he's got my best interest at heart. In this situation, you would have to listen to Ray. He wants to protect you! I mean, look at this situation. You tuned in to a tiny version of yourself and there are a lot of things that could hurt you. If he leaves you by yourself, anyone in Mint Eye could waltz in and take you!
He can't let that happen!
He can't lose you after choosing you!
So, ideally, what I see him doing is picking another MC to take your place with the RFA. He didn't want to lose you to them, anyway, so this is kind of a win-win situation. With any luck, that'll be an MC in passing that wants to get with Jihyun and that might help you out later with escaping but I can't make any promises since you never know what MCs will do. But, I can tell you that you'd be staying with Ray without a shadow of a doubt. He has no reason to let you leave now.
Of course, he'd make you a little play to sleep! It could be a cage at first... but not forever, he might want you to have your own room to sleep in... your own bed... I can see him spending hours trying to do whatever he can to recreate the room he made. You can't sleep in there anymore... so, he'll make a tinier version for you! That's not an issue for him. He'll spend hours trying to make you something very special... perfect for someone your size.
If you feel cramped or uncomfortable at first, he'll apologize and make it up to you later! You can't be too mad, right? He makes you food that's just right for your size. He would spend hours working on sizing outfits for you... he can't just let you go without! You're his and he would be pained to think that you couldn't have everything! It's so much easier now, though... he can afford to give you the world since your world is contained within his world.
God, he's got so many photos of you it's not even funny! He loves seeing you on his phone like that... he can let you rest when he's working that way. If he needs to see you, he won't have to bother those delicate hours. His favorite photos are the ones where the flowers he gifts you stand taller than you do. He starts to feel like hours could be better spent capturing your image when he sees those things.
"Huh? What do you mean it's not you? I thought you'd feel like you came fit from the castle with this..." he would say, watching as you tried to take a good look at yourself in the reflection of his phone camera. "I did my best to choose your favorite colors... patterns... maybe I... I'm not doing enough to make you happy... I knew it... I knew I wasn't doing enough to make you happy! Please, please... forgive me... I'll try harder this time. I'll do whatever it takes to make you happy."
Are you going to let him feel upset over all the work he puts into making you safe and happy? It's not like he pushes you around... Ray's trying to make sure you're safe. He lies and hides you whenever someone comes into the room, and he always makes sure that if he gets taken away for a while that you'll be able to take care of what you need by yourself!
Don't throw a tantrum. Don't get upset with Ray for trying to protect you from harm. He doesn't want to lock you away without warmth or love. But, if you try to hurt yourself by leaving or running off... well, it hurts his heart. He hates to do that. But, you have to learn that Ray is the only one capable of keeping you safe. When that happens, he's so quick to shut your door. He gently rubs the side of your face with his gloved hand. "I don't want to punish you, my flower. But, you'll need to stay in your room and think about what you did. I refuse to lose a single part of you... stay safe where you belong, in my caged heart. I'll protect you from harm... so please, don't make me force you to be a good doll."
And sometimes, that's what it feels like. You feel like you're less of a person and more of a doll. He dresses you up like he likes, he takes a lot of care to pose you in front of him, his fingers close enough to do what he wants but just far enough to let you have a false sense of security. He props himself up on his arms, looking at you with eyes that seem to glow in the darkness, thick and cloudy with infatuation and desire.
Ray realizes that having a cute little doll satisfies all his needs. He never has to be afraid of losing you ever again.
#pocket mc#jennis one shot#ask#mod kait#ray choi#choi ray#mysme#mysticmessenger#saeran choi#choi saeran#ray mystic messenger#ray mm#ray mysme
38 notes
·
View notes
Text
How to design Interactive Web Design in best price?
Designing an interactive web design on a budget requires careful planning, creativity, and efficient use of resources. In this guide, I'll provide you with a step-by-step approach to creating an engaging and interactive web design within the best price constraints.
Interactive web design is a powerful tool for creating memorable and effective online experiences that benefit both users and businesses alike. As technology continues to evolve, web designers must keep innovating and adapting interactive elements to cater to the ever-changing expectations of users.
Set Clear Goals and Scope
Before starting any project, define your goals and project scope. Understand the purpose of the Interactive Websites, its target audience, and the specific Interactive Websites elements you want to include. Having a clear vision will help you stay focused and avoid unnecessary expenses.
Choose the Right Platform and Tools
Select a web development platform that aligns with your budget and requirements. Popular cost-effective options include WordPress, Joomla, or using a website builder like Wix or Squarespace. These platforms often come with built-in interactive features and templates that can save you time and money. Utilize free or affordable design tools like Canva or GIMP for graphics and image editing.
Responsive Design
Ensure your web design is responsive, meaning it adapts to different screen sizes and devices. Responsive Interactive Websites design eliminates the need for separate mobile versions, reducing development costs.
Minimalistic Design Approach
Embrace a minimalistic design approach that focuses on simplicity and clean aesthetics. Fewer design elements mean less time spent on development and lower costs. Use negative space effectively and choose a cohesive color palette to create an elegant yet cost-efficient design.
Open-Source Templates and Themes
Explore free and open-source website templates and themes available online. Platforms like WordPress offer a wide range of themes with Interactive Websites elements that can be customized to suit your needs, saving you both time and money.
DIY vs. Hiring Professionals
Assess your skills and expertise in Interactive Websites and development. If you have the required knowledge, consider doing some parts of the design yourself. For complex interactive features, like animations or custom coding, it may be worth hiring freelancers or a web development agency. Compare prices and portfolios to find the best fit for your budget.
Optimize for Performance
Performance optimization is crucial for user experience and search engine rankings. Compress images, minify CSS and JavaScript, and enable caching to reduce loading times. Faster-loading pages often lead to higher engagement and conversion rates with your Interactive Websites.
User-First Approach
Place user experience at the forefront of your design. Ensure that Interactive Websites elements enhance usability and engagement, rather than complicating the navigation. Conduct user testing and gather feedback to refine your design iteratively.
Integrate Social Media
Use social media integrations to increase user engagement and expand your online presence. Social media plugins and sharing buttons can be easily added to your Interactive Websites for little to no cost.
Educational Content and Tutorials
Create educational content and Interactive Websites tutorials that provide value to your audience. Informative videos, infographics, and interactive guides can be cost-effective ways to engage users and establish your expertise.
Continuous Maintenance and Updates
Regularly update and maintain your website to ensure it stays relevant and functional. Promptly fix any bugs or issues that arise to avoid costly repairs in the future.
Therefore creating an interactive web design on a budget requires smart decision-making and resourceful use of available tools and platforms. By following these guidelines and maintaining a user-centric approach, you can design an engaging website without breaking the bank. Remember to regularly evaluate the performance and user feedback to make improvements over time.
Interactive Web Design
Interactive web design refers to the process of creating web pages or applications that engage users and allow them to interact with the content and functionality. The primary goal of interactive web design is to enhance user experience, encourage user participation, and make the website or web application more enjoyable and effective.
Key Elements of Interactive Web Design:
User Interface (UI): The UI is the visual and Interactive Websites elements of the website that users interact with, such as buttons, menus, forms, and navigation. A well-designed UI makes it easy for users to understand and use the website's features.
User Experience (UX): UX focuses on creating a positive and seamless experience for users while they interact with the website. This involves considering user needs, preferences, and behaviors to design intuitive and efficient interactions.
Animation and Transitions: Adding subtle animations and transitions to elements can make the website feel more dynamic and responsive. However, it's essential not to overdo it, as excessive animation can lead to a cluttered and distracting experience.
Responsiveness: Interactive web design should adapt to different devices and screen sizes. This means the website should be mobile-friendly and work well on various devices, including smartphones, tablets, and desktop computers.
Feedback and Validation: Providing real-time feedback to users when they interact with elements like forms or buttons helps them understand their actions and prevents errors. Validation messages for form inputs are crucial to guide users and reduce frustration.
Microinteractions: These are small, subtle interactions that serve a specific purpose, such as liking a post, clicking a button, or expanding a menu. Microinteractions add a sense of delight and engagement to the user experience.
Scroll and Parallax Effects: Scrolling can be used creatively to enhance storytelling or to trigger animations and effects as users move down the page. Parallax effects, where background elements move at a different speed than foreground elements, can create a sense of depth and immersion.
Gamification: Incorporating game-like elements, such as points, badges, or progress bars, can make the website more fun and encourage users to explore and engage with the content.
Multimedia Elements: Using images, videos, audio, and interactive elements like sliders and carousels can make the website more engaging and visually appealing.
Personalization: Tailoring the user experience based on individual preferences and behavior can make the website feel more relevant and user-centric.
Remember that interactive web design should not sacrifice usability and accessibility for the sake of novelty. The goal is to strike a balance between creativity and user-friendliness, ensuring that all visitors can easily interact with and enjoy the website.
Interactive web design is a powerful and essential approach to creating engaging and user-friendly websites. By incorporating interactive elements, such as animations, hover effects, interactive forms, and dynamic content, web designers can enhance the user experience and encourage visitors to stay longer on the site.
One of the key benefits of interactive web design is its ability to create a more memorable and enjoyable browsing experience. Users are more likely to connect with a website that responds to their actions and provides instant feedback. This increased engagement can lead to higher user retention, increased conversions, and improved brand perception.
Furthermore, interactive web design plays a crucial role in keeping up with the ever-evolving digital landscape. As technology advances and user expectations grow, static and traditional web designs may fall short in delivering the desired user experience. By embracing interactive design principles, websites can adapt to various devices and cater to different user preferences, ensuring they remain relevant and competitive in the online space.
Additionally, interactive web design fosters better communication and interaction between businesses and their customers. Through interactive elements like chatbots, feedback forms, and interactive product showcases, companies can gather valuable insights, understand their audience better, and provide personalized solutions to their users' needs.
However, while interactive web design can be highly beneficial, it should be approached with care. Overloading a website with unnecessary animations or complex interactions can lead to slow loading times and a cluttered user interface, which can be counterproductive and frustrating for users. Thus, striking the right balance between functionality, aesthetics, and user-friendliness is crucial.
Interactive web design is a vital component of modern web development that can significantly impact user engagement, brand perception, and business success. By creating dynamic, user-centric, and visually appealing experiences, web designers can elevate their websites and ensure they stay ahead in an increasingly competitive digital world.
2 notes
·
View notes
Text
Updating the visuals
Hey guys,
Sorry it's been awhile since I've updated the Tumblr I've been pouring all of my efforts into Grimfel. Now that a sneek peak is out and backers had a grasp of what is to come I thought I would share some updates to the visuals you'll see in the next demo.
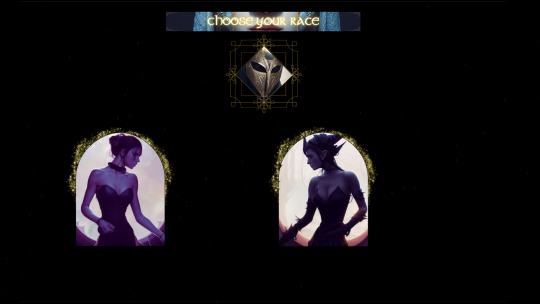
This is the original screen for choosing race. Gender also looks similar.

On my wide monitor the images go a bit all over the place and so depending on screen size it can vary in how it looks. To prevent this I coded in containers that resize to the resolution. I also updated the visuals to look more modern and in line with Grimfel's grimdark atmosphere.
They've both been replaced for animated orbs. The custom section remains the same in both because I feel it fits both. These little changes will be seen in the second demo that'll release this Sat!
Also:
I'm also in the process of getting the cover art done for the boxes. This has taken longer than anticipated due to work on the game itself.
The release date might be slightly delayed but nothing too drastic. I'll do my very best to release it asap. I'll inform you on dates etc.
7 notes
·
View notes
Note
I'm so tired of people discrediting Jungkook. This is no shade to any of the members, but seven would not have gotten the same results if it was given to another member. Jimin did a huge western collab with Angel pt1 and that didn't chart high on the hot 100.
Layover is another good example. Everyone assumed it would be on par to seven, but sadly, that's not the case. we will continue to see this with rm and jimin once they release their next projects. I just think people underestimate jungkook's popularity. Just look at bts spotify, 2/5 of their most streamed songs are jungkook's. If his next single doesn't do as well, then I'll take it back, but I have a feeling it'll be just as big since there's so much anticipation.
For real. Imo, to successfully record Seven, a few skills were needed: good vocals (which ruled out Namgi, leaving only the maknae line to choose from), good English pronunciation (which V struggles with still), pop vocals (not V's strongest suit, though I think his voice would fit the song better than Jimin's - but it would sound sweeter and more melancholic than JK's version, so it wouldn't be as commercial), charisma/popularity/visuals/etc. to help sell the song (obviously they all have it in spades). Jungkook's obviously the best vocalist, whose voice is the most suited for easy pop songs like Seven, has the best English pronunciation, and is also the most recognizable member of BTS to the GP - especially after the World Cup and CK, which are both GP friendly. Jungkook also has a more American-friendly image, because of the tattoos, piercings, etc.. He resembles an American male artist the most, so he's more accessible to Western audiences.
Imo, Vmin could not pull off the song like Jungkook, and the vocals are the biggest reason why. I also think, and keep in mind that I love Jimin to bits, but his Like Crazy performances showed he's still a bit timid performing on his own. Compared to BTS stages, his energy was muted, for the lack of a better word. Jungkook was so at ease, he radiated confidence, charm and power in every performance, regardless of the size of the audience (WC or Times Square). He was more nervous in interviews, but RM's the only one who doesn't look nervous often. I think V could pull off the performances and stuff, but his voice and English pronunciation wouldn't be well received.
I don't think anyone assumed Layover would be on par with Seven. It was obvious from the moment the first song dropped that it would not be super GP friendly and wouldn't be able to compete on a global scale with a bright English pop song that was promoted in the US. Tbh, I underestimated V's popularity, because I assumed Layover wouldn't perform as well as Face, but it surpassed it in many regards. V is really a lot more popular than I gave him credit for, and has very dedicated fanbases, though Jimin arguably has much bigger GP recognition. But V really proved his popularity with the streams and sales he pulled for an album like Layover - although the album has 4 versions, which definitely helped with sales. Yet, Jungkook will easily, and with 100% certainty, blow V and Jimin's records out of the water, and snatch that first nr. 1 on the BB 200 for the albums (assuming V hasn't already).
Jungkook's popularity is definitely underestimated. It's practically fanon that V's the most popular member. Even after Seven's amazing performance that's taken as a fact. I'd argue that even in the past it wasn't true or easy to say V was more popular, but since 2022, at least, Jungkook's popularity has sky rocketed. Everyone still insists on V being more popular or on the same level as Jungkook, but his TikTok, YT and Twitter records show otherwise. Plus, like you said, his songs perform very well.
I think JK's next single will be the Butter to his Dynamite, which is Seven. His Vogue photoshoot, more than the Dazed interview, have me actually believing that his next single will be a bit darker, maybe more rock? Perhaps it will be trendier but not as easy of a listen as Seven, which is exactly like Butter vs. Dynamite. The anticipation will be huge, and a lot more people will tune in for his single, so he'll likely outdo himself in many regards, but I doubt he'll beat Seven's biggest records and impact. There's also the issue with very little time having passed since Seven.
Yeah, not to sound like a solo stan, which I'm not, but only Jungkook could do Seven - and Dreamers too.
Thanks for the ask!
1 note
·
View note
Text
pokemon husbandry of the day
Are you an artist looking for a pokemon companion? back at university I knew lots of art students who kept smeargle and ditto, but both are rarely the best options for most people, and I'll tell you why:
wild-caught ditto are often sedentary, choosing to transform into single objects and stay there for long periods of time. this can make them poor fits for more active lifestyles! additionally their status as prey animals in the wild means they're extremely prone to hiding the health issues that are unfortunately common among their species. amateur trainers, and even more experienced ones, often struggle to recognize the signs of their ditto's emotionality.
smeargle, on the other hand, is just out of most people's price range! as an obsessively bred species, they're extremely expensive to take care of, and the sort of health issues that arise from the sort of breeding that produced the round-snouted, long-tailed smeargle commonly seen today bring that price up even more. an uneven and haughty temperament can also make them unwieldy in home environments.
to that end, the pokemon I most commonly recommend to artists looking for a mon that suits their lifestyle is Mime Jr.! don't worry, females won't evolve and are generally more social anyway, so if you're one of many who find Mr. Mime uncomfortable, there's no risk of accidental evolution there!
Mime Jr. are extremely playful and are natural artists in the wild, painting on rocks and trees both to mark territory and simply for enrichment. many a wilderness painter report being watched by groups of juvenile mime jr.s for hours on end, who will then go off and try to recreate what they saw the artist painting themselves!
as younger relatives of the ever-dreaded Mr. Mime, Mime Jr. are often tactile-y fixated, meaning they love to work with their hands and are constantly looking for things to pick up and hold, seemingly just for comfort. they excel at taking simple instructions, and their upbeat and caring temperaments make them amazing assistants in a studio--not to mention their small size!
there are two things I would caution about with Mime Jr.: the first is that, as psychic types, they're incredibly sensitive to their trainer's emotional state. their natural mimicry behaviour makes this even more extreme. the second is that they are, by their nature, a little messy. healthy and happy Mime Jr. will paint their environments constantly to mark territory. you may also see them attempting to paint images of the places they've visited or whatever food happens to be on their mind! to that end many trainers will offer their mons a steady supply of canvases, though in my experience, paper sheets taped to your mime jr's eye level along the bottoms of your walls can be an incredibly enriching experience for them, allowing them to paint all around the home and, when they've filled up the space, simply take down the paper and replace it with a new fresh canvas!
that's been professor rain's pokemon husbandry of the day! i hope you enjoyed!
#pokemon#real pokemon#pokemon husbandry#animal husbandry#pkmn blog#pkmn#mime jr#pokehusbandryoftheday
3 notes
·
View notes
Text
Petite sizes Tips:
youtube
Proportion:
Human eyes are electrically programmed to see some proportions as attractive and pleasurable and others as less so. (I'll go into more depth about this later in this essay). If a person is born tall with longer legs, he or she possesses the section favoured by the eyes by default. Since most petites are under 5'4", we all wish our legs were longer. (This isn't to imply that there aren't any petite women who are blessed with the short torso/long legs physical type.
Petite Fashion Rule of Thirds
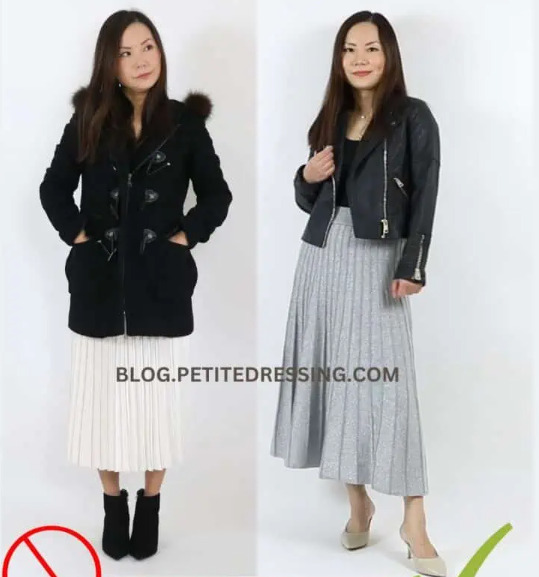
The ancient Greeks recognised this natural ratio concerning what human eyes find most visually beautiful. The 1/3 to 2/3 ratio, in particular, is the most visually pleasant split of space to human eyes. It has been used in mathematics, architecture, and art. Have you ever considered applying this to tiny fashion? The "rule of thirds" is a ratio that, if followed, would instantly modify the proportion of your body and make your clothing seem very pleasing. Petite clothing samples make it easy to demonstrate.

The first clothing, with an equal-length top and skirt, clearly splits the torso into 12 and 12. The second outfit features a much shorter top, dividing the figure into one-third on top and two-thirds on the bottom. This is not restricted to a shorter top and a longer bottom; it may also be applied in the opposite direction, i.e. a longer top and a shorter bottom, as seen in the third outfit. This method applies not just to sweater tops and blouses, but also to coats and jackets. As you can see, it gives your form a more proportional appearance. The comparison of the three costumes demonstrates how much of a difference it makes when our outfit focuses on thirds rather than halves or quarters. If you're wearing a short skirt and bare legs, the top third is your blouse, the middle third is your skirt, and the bottom third is your naked legs. Although we presented this principle with a skirt attire, the same rule of thirds applies to a trousers outfit. A cropped top or a well-fitted cropped blazer or jacket is a wardrobe requirement for small ladies in order to attain the appropriate ratio.
The Right Necklines
Why is the neckline so crucial, particularly for petites? Because it has the potential to alter your proportion! In general, shorter ladies look better with lower necklines. (This explains why lower neckline shirts are always the most popular in my tops collection.) The reason for this is that showing some flesh generates space, which has a lengthening effect. Because most petite women have shorter necks, it is critical to stretch our necks. Hence, whether you're looking for the finest tiny top or the best petite dresses, the neckline is the first thing you should consider.
Examples of necklines:
Deep V neck
A deep plunging V neckline flatters most ladies, and it is especially attractive on petites. The reason for this is that tiny ladies often have a shorter torso than taller ones. When you wear a low V neck, the flesh from your neck to your upper chest is visible, which helps to balance off your short torso. Furthermore, if you are a small lady with a large breast, a deep V neck may successfully modify your upper body's "top heavy" image and make your curves figure seem much more balanced.

Off the shoulder
Off-the-shoulder shirts and dresses are generally flattering and look especially good on small women. The reason for this is that by exposing the flesh on the shoulders, the off-the-shoulder design significantly lengthens your neckline and improves your proportion. In the winter, choose for an off-the-shoulder cashmere jumper that will keep you warm while also making you seem seductive. When the weather is cold, 34 sleeves is another design that will display just the proper amount of flesh.
Sweetheart neckline

One of the most feminine necklines that are generally flattering to shorter women, and especially the body types that want to add some curves, such as the rectangle body type.
The Right Sleeve Length
The quality of outstanding style is in the details, and sleeves may be one of our outfit's most ignored features. The sleeve length of dress shirts and formal suits is strictly enforced in men's formal clothing, whereas the standards appear to be considerably more flexible in women's formal wear. The improper sleeve length, on the other hand, can rapidly degrade the quality of your dress and the image it gives others about you, especially at work or on formal social events.
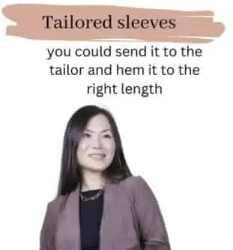
Sleeve length is particularly significant for jackets and coats, and it is a crucial aspect of diminutive fashion. Because most tiny girls have shorter arms, one typical problem in their clothing is that coat or jacket sleeves are excessively long. The optimal length for full-length sleeves is just around the wrist. If the sleeves are too long for a tiny woman, it will appear that the jacket or coat is not the proper size for her, even if it fits fine elsewhere. That is why it is vital to get your outerwear from a petite department store or a petite designer.
High-waisted Everything

High-waisted apparel, whether in the form of high rise jeans, pants or skirts, is a must-have component in the tiny fashion collection. They are also the most popular styles in my petite jeans and trousers line. It efficiently lifts your waistline, quickly elongating your bottom half and making your legs appear longer. We discussed the Golden Mean ratio and how vital it is to produce the appropriate proportion of your body previously, and a high rise may successfully make your body seem more proportional. High-rise skirts and trousers look great on small women. Wearing high-waisted trousers conceals muffin top, which is a worry for many apple-shaped tiny ladies.
0 notes
Text
Why Do Balloons Consider Perfect Decoration Item For Every Event?
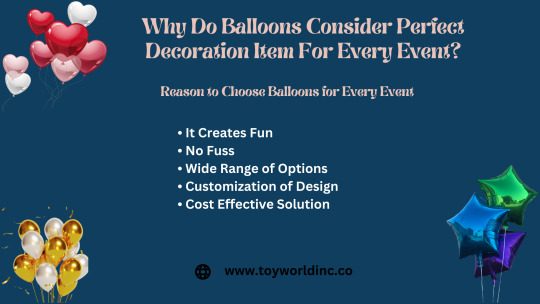
There is a lot of planning and thinking to ensure a party or special event goes off without a hitch. Many things need to be planned before an event, such as sending out invites and deciding what food will be served, but balloons can be considered different when picking the best decorations for the event. I'll explain why.
Reason to Choose Balloons for Every Event
It Creates Fun
Anagram Balloons, with their bright colors and upbeat attitudes, never fail to put a smile on people's faces. They make having a good time and enjoying oneself more. They are ideal for generating a warm and welcoming environment and improving one's general disposition in virtually any setting.
No Fuss
Balloons are the easiest and most convenient way to decorate for any party. When preparing and transporting Anagram Latex Balloons, you must blow them up with regular air and exercise creativity. You can also use balloon accessories like sticks, cups, and ribbons. After that, you're done. Balloons are incredibly convenient in both of these respects.
If you want your balloons to float, you must fill them with helium instead of conventional air when you inflate them.
Wide Range of Options
Balloons come in various shapes, sizes, and colors that may be effortlessly combined and rearranged to fit virtually any motif. Creating a one-of-a-kind, unique, and personalized decoration with the help of custom balloons like the Baby Shark Balloon is the ideal method to add a unique and special touch to an event.
Customization of Design
Do you need something more distinctive than the standard plain balloons? Do you need per-printed graphics that are available off the shelf? Personalized balloons may be the answer. Ideal for including your custom phrase, image, or logo in the colors of your choice.
Cost Effective Solution
Beautiful decorations don't have to cost a fortune. If you are searching for decorations that will make a big statement but won't break the bank for your upcoming party, why not consider using balloons? The fact that each Balloon Letters costs only a few cents makes the colors a perfect economical choice.
Conclusion
Consider employing balloons as entertaining and ornamental highlights if you want to make an eye-catching presentation for your upcoming event. Colorful balloons tied to ribbons and filled with helium catch people's attention as they swing and dance in the breeze.
0 notes
Text
What You Must to Know About MaySneaker?

There are sneakers of various styles and sizes on the marketplace in the present. There are also specific types of sneakers designed for various purposes. For instance there are dance shoes for dancers, and sports shoes for athletes. Because of the popularity of sneakers lots of shoe manufacturers are producing special shoes for various activities so that everyone can have a an easy ride and do their best at the sport of their choice.
Sneakers were known as plimsolls when they first came into use in the 18th century. They were referred to as "sneakers" because they didn't create much noise when used during walking or running. These sneakers typically come with rubber soles, which makes them quiet. It is commonplace for each of us to have at minimum the one shoe in the collection. Without sneakers our shoe collection appears to be rather bare.
Let's take a look at a few essential points you need to be aware of about sneakers:
MaySneaker are available in a variety of shapes and sizes. The shoe industry today has developed special kinds of sneakers designed for those with flat feet with high arch, or high heels. This ensures that everyone can get the same amount of style and comfort regardless of the shape or size of their feet.
Sports sneakers that we can find these days are designed to meet the needs of every sport. While sports sneakers don't appear different from normal sneakers on the outside, inside of these sneakers is a bit different. If you walk in a pair of sports shoes and notice the distinction. Dance shoes are, however are completely different. Therefore, it is important to ensure that you are selecting the right shoes designed specifically for the sport you're taking part in.
Sneakers last longer than regular footwear due to their ability to withstand wear and wear and tear. But, it is important to keep your sneakers clean to ensure that the sneakers look clean and don't develop a bad smell. If your sneakers become wet, be sure to dry them promptly. Do not wear shoes that are wet because they can cause a smell of the shoes.
A worn-out shoe with a poor grip could cause you to get injured and pain in your feet, so it's better to buy an updated pair as soon as possible. It is also possible to replace the shoes if they're less comfortable than they were.
Selecting the appropriate pair of shoes is important in order to prevent injuries while you exercise and to perform better in dancing or in sports. It is also important to be aware of your foot's shape prior to buying your shoes. Take note of the style of shoes you wear to prevent rolling backwards or forwards later on. Be aware of what you would like to accomplish with your sneakers and purchase a pair of sneakers that fit the purpose you are looking for.
Keep these things in my bag, you'll be able to locate the perfect pair of sneakers to fit your needs. You can find a wide selection of sneakers at regular shoe stores as well as the online stores for shoes. The majority of people find it affordable to purchase sneakers from online stores.
Choose A Good Website For Sneaker
The fake shoes pose a more serious issue than we initially believed. The new fakes being sold from Asia are very similar with regards to appearance but not physical characteristics. I'll be releasing an article up soon on this scam that is serious and what shoe makers are taking to stop these con makers. Read more: www.maysneakers.com
SoleCollector Magazine issue one contains an in-depth review of fake shoes and clear images of genuine Jordans as well as Fake Jordan XIs to ensure you can identify the difference by yourself.

You have come across a website featuring a full size pair of your most loved shoes and you're thinking whether they are genuine or genuine. There are a few tell-tale indicators you can find in this article to protect yourself from being scammed. The kicks website is distinctive because they offer full-size runs in hard to locate shoes, so we receive questions every day, such as "Are these shoes real?" Or "How can you have this many old shoes?" on the Kicks website, each shoe is original and is their real claim to fame, and the primary reason behind their popularity.
There are plenty of other websites waiting to steal your cash. Many of them will not even deliver the shoes, they'll just take your money only to reveal that their site is now abandoned. If you're fortunate enough to get the shoes, you're going to be very dissatisfied. Although the appearance of replica sneakers are getting better, but the quality is exactly the same, which is extremely disappointing. Beauty is not just about skin. can be used to this case.
1 note
·
View note
Note
HII LLIA (idk if i spelled it right lawl) but can i request niragi doing ur eyeliner and picking out ur fits for the day?? THIS HAS BEEN STUCK IN MY HEAD FOR DAYS tysm :DD
🧥=Dress up & Makeup=💄[NIRAGI X FEM!READER] [Pre borderland AU]
AIB Masterlist
Characters: Niragi Suguru, Y/n.
Summary: Your Boyfriend Niragi decided to help you get ready for the day <3
Warning!: none
Genre: Fluff,Crack
Word count: none (too lazy :'V)
Tags: @theyluvmegan <3
Note: "IT'S ALRIGHT IF YOU SPELLED IT WRONG, BUT IT'S I-L-A, ALSO HOPE YOU ENJOY~!"
Enjoy~♡

Niragi woke up with the sound of drawers being opened and shutted. The sound of a Wardrobe being open and shutted as well as rustling.
He opens his eyes and looks at the other side of the bed to see you not there but standing in the middle of the room with a black over sized shirt and some white shorts, as you lift up two pieces of clothing that are still in there hangers "Which one..maybe this one? No- this!..nope not that one.." He heard you muttered as he got up from his bed and stood right behind you as he hugged you "What the heck are you doing..it's 6 in the morning.." "Niragi I have no time for this! Today I have a meeting and I don't know which clothes are formal or not!" You say as you wiggle away from his touch and put the two clothes away inside your wardrobe again.
Niragi sat on the edge of the bed looking at you, squinting his eyes "Maybe I can help you?" He asked you paised on what you were doing "Are you sure?..like, do you know anything about formal attire?" You asked him tilting your head a bit "Oh please, when I was a kid I used to go to family dinner wearing something formal and being fancy and stuff" He says getting up and looking through your closet to find something that would fit you. You just stood there watching him choose things for you "Too sexy" He mutters putting it back "Too..cheerful" "Too tight" "Too emo" "Too black" You watch him pit your dresses and clothes back in and back out again as he chooses patiently, looking for the best outfit that say's 'formal meeting' "Perfect" You looked up to see him holding a light blue dress with long sleeves and a pattern of flowers on them. The dress ends to your knees-
(you know what? I'll just give you the image on what it looks like even thought it's a bit cringe of me to add a photo here -ila)
(There! It looks like that! But light blue..OKAY BACK TO THE STORY-)
"I didn't know I had that dress-" You said to your self as you stood up and grabbed it from his hands and went in the bathroom to change. After that you walked back out admiring yourself on the mirror "You look beautiful love" He says as he hugs you from behind, putting his head on your shoulder, grazing he lips against your neck "Thank you..NOW I MUST GO! Oh I forgot that I have to bring you with me too!" You said, as you got out of his touch and sat on the chair that was in front of the mirror and desk "Welp, okay I'll be ready in a sec..where is this meeting anyway?" "It's at Fendi's Cafe! The most popular brand of bags!" You said as you put on some lipstick/lip gloss "Okay" He says and got into the bathroom to take a quick shower.
You put on some heels and a necklace-let'sbe honest that you hate and love heels at the same time- but it's okay since you di have to attend a formal meeting at a fancam restaurant!. You got out of the bedroom to the living room waiting for Niragi to finish.
He got down wearing a suit "Good now lets go! We have to go!-" "Okay okay! Just calm down!, lemme just" He goes in front of you and kisses the tip of your nose "Okay i'm done now"
(I'm sorry that this is short! My mind is empty right now HELP! -)
#alice in borderland#niragi suguru#suguru niragi#niragi suguru x reader#niragi x y/n#niragi suguru fluff#alice in borderland fanfic
133 notes
·
View notes
Text
PSA for other folk not in the "normal" size ranges- DIY shirring is not nearly as daunting as it seems!
Part one of two: Making Replacement Shirring to Expand the Bodice of a JSK (or other styles/dresses, this is not limited to the realm of lolita fashion!)

A few things to note:
I am not a professional seamstress, and I'm probably doing some steps in an asinine, backwards manner, but hey- they work for me... 😬👍🏻
I have never written a tutorial on any of my sewing projects before now, I wish you luck lol
I didn't think to photograph some stages of the process such as taking out the existing shirring, but once I thought about it I did grab these while working on the new one to the best of my ability. I'll try to at least describe anything not pictured.
I am not an expert in lolita fashion. I've fawned over it for over a decade, a newbie to wearing it personally. I still have many things to learn!
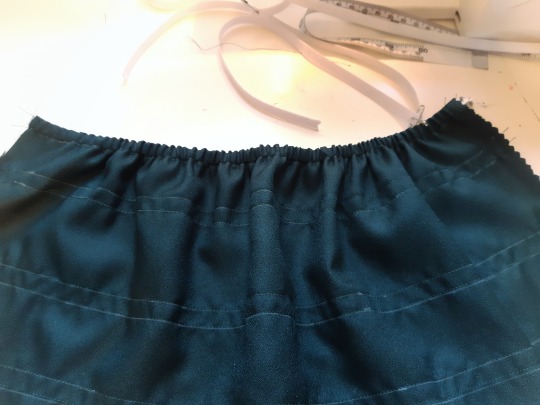
This is actually my very first (be it indie) brand jsk (!!!), recieved in one of Soufflesong's recent lucky packs- what I think is an older design for the Rossellt Roses print, the bodice is a different design from the current one available.
I selected XL, the highest size available for them at the time, knowing that the items would still be a few inches shy of fitting comfortably.

Tools and materials: dress to alter, matching, nice quality, comfortable feeling fabric, elastic, matching colored sewing thread, seam ripper, ruler, a non-staining, fabric safe, washable sewing pencil or chalk, sewing pins, safety pins, and a sewing machine!
So first, using a seam ripper -carefully- remove the existing shirring or back panel! Save this fabric, I'm making accessories with my scraps, you can too! :3
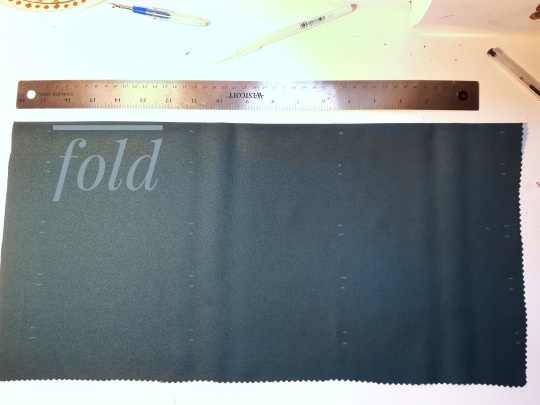
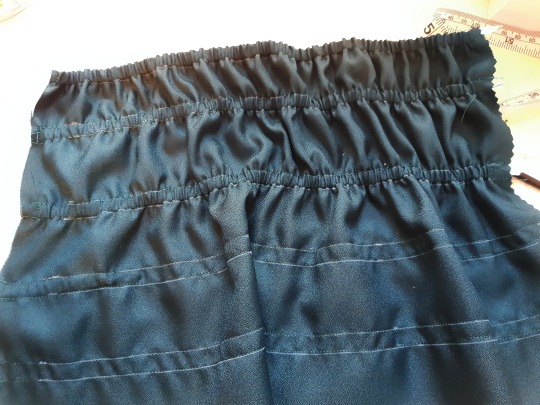
Your replacement fabric needs to be cut twice the height of the piece you removed (folding this piece in half while we work creates a sleek and professional looking interior, beautiful top edge, and the easiest elastic casing you'll ever sew), adding any extra seam allowance that you prefer (I typically work with 1cm), and the width should be the measurement of the existing piece you removed + the shortage from the dress fitting properly + a bit more for gathering (I estimated an extra 10cm or so), and another two seam allowances for the sides. In the image above the fabric is already folded in half, the fold at the top where indicated.
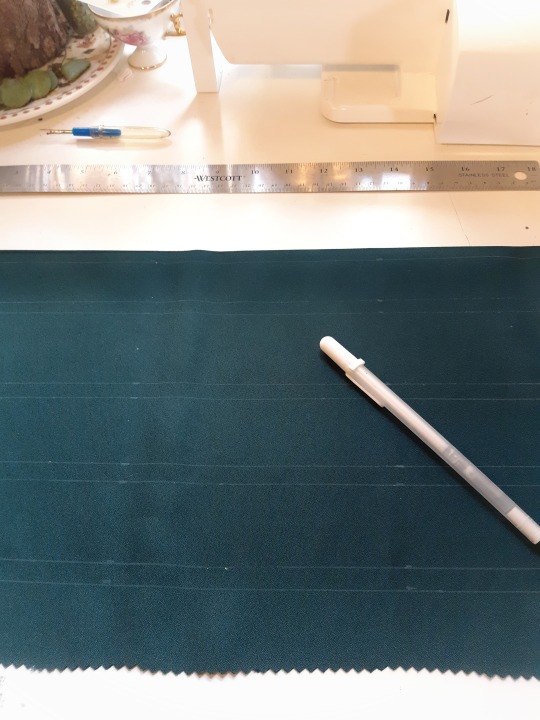
The next step is to measure and mark where the casings will be. For this step I measured the spacing for the existing casing on the old panel, translating this to the new fabric. You can also choose to decide on the spacing yourself. Make sure that the channels are wide enough to accommodate the elastic you've picked up (I am using 1/4" elastic, making 1cm channels), and not too wide where your elastic can go swimming and do somersaults.

After lightly marking the lines across, pin the fabric to keep the back piece (from folding it in half earlier) secured in place as you sew all of your casings.

Cut the necessary amount of elastic strips- I typically measure elastic in scenarios such as this by cutting a length that, when gently stretched almost to it's full extent, will reach from one end of the channel to the other.
Put small safety pins through the ends- we're using these lil friends to feed the elastic through! You can get crafty and pull them through with a long wire or something of the sort from there, but at least having something attached to the ends helps to shimmy them across from the outside of the fabric.
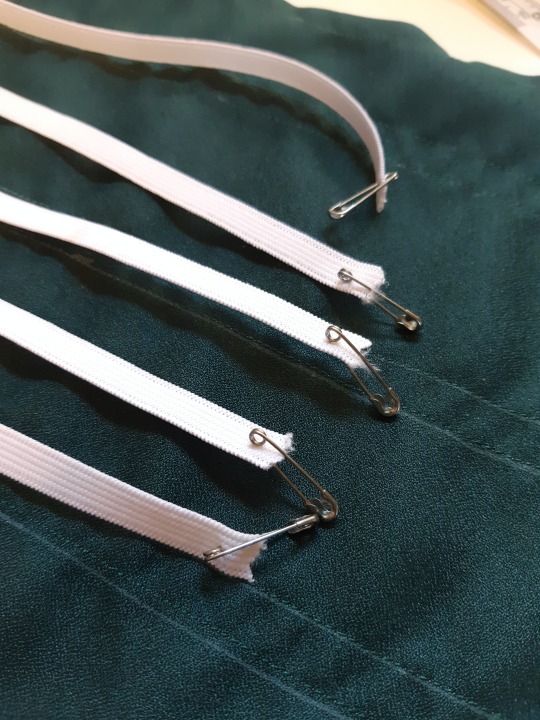
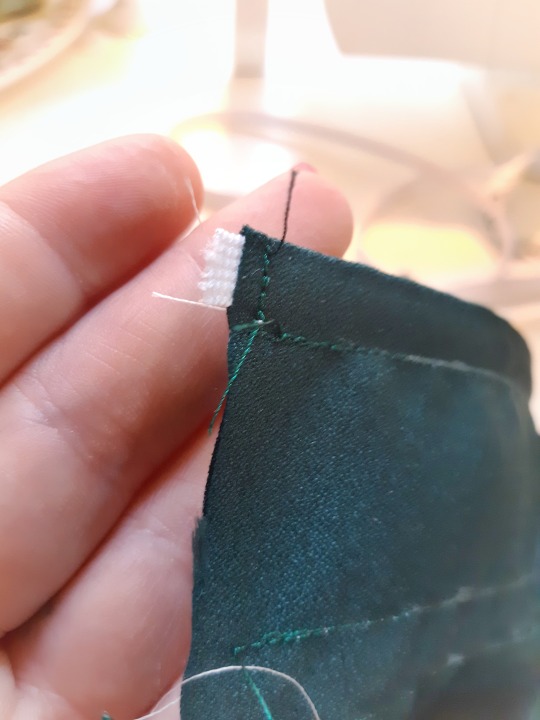
Once you have an end of the elastic pulled to the edge of fabric, secure it in place with a couple of quick stitches so you can pull it through to the other side to do the same.
Continue until all pieces are worked in with both ends sewn in place.
Hopefully I can write up the rest soon! Part two will also have the tag "shirring tutorial", so it can be found later.
💖🧵 serothivia
#lolita sewing#budget lolita#plus size lolita#lolita fashion#classic lolita#lolita diy#diy sewing#diy#plus size sewing#my sewing#shirring#shirring tutorial#sewing#sewing tutorial#sewing tips#long post
529 notes
·
View notes
Last Seen Blogs
toimoiluiii23
🫧🫧🫧

masterpandyiv
Master Pandy IV
m0mmat0rtle
𝑻𝑼𝑹𝑻𝑳𝑬𝑺
altheastoycorner-blog
Altheas Toy Corner