#if you download this you have to PROMISE not to open the mesh in blender
Text
Tutorial - extracting stuff from Disco Elysium (+ viewing the models in blender)
Due to... recent events, I decided to finally get myself to write a tutorial about this, because all I found was some half-assed reddit comments when I was trying to figure out how to do it sometime last year.
I'll show you how to extract... pretty much everything (including voice lines) from the game.
This is a beginner tutorial, so you don't have to know shit about any of these programs, I'll try to explain everything.
I promise it's pretty easy! I extracted stuff from various games, and this is one of the easiest I ever did, so yeah.
You'll need:
Disco Elysium on PC
AssetStudio
Blender
+1 Interfacing
+2 Endurance (mostly to survive my bad jokes)
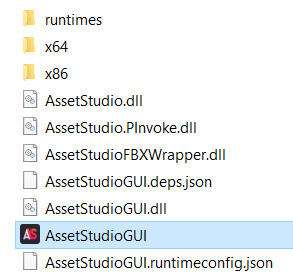
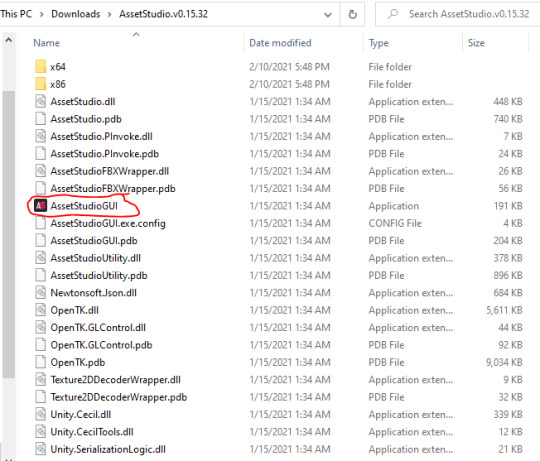
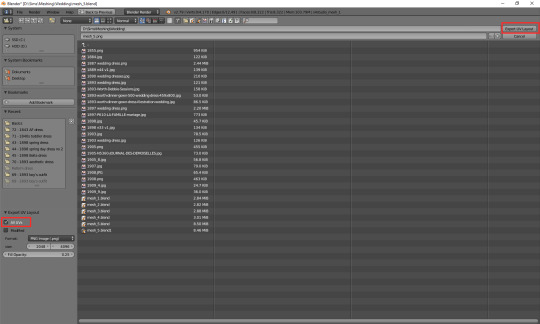
First of all, open AssetStudio. You don't have to install it or anything, just unzip the file you downloaded and open the program inside (AssetStudioGUI).
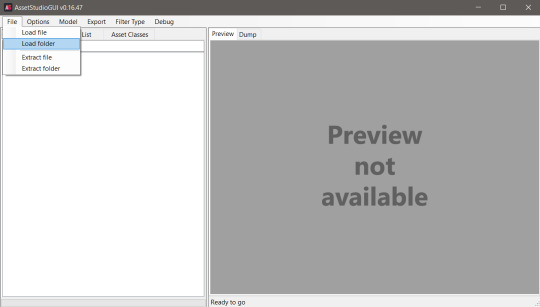
This is how the bad boy looks like, we'll be able to see the asset list on the left and the preview on the right.
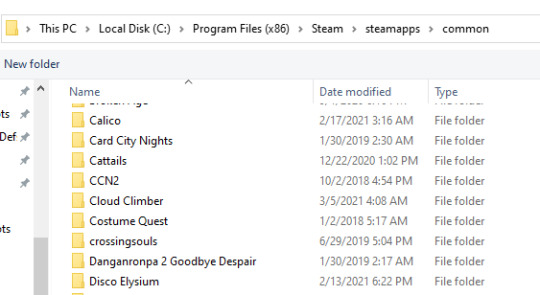
Click on File../Load Folder.
Select the folder where the game is installed. For me it's Steam\steamapps\common\Disco Elysium\disco_Data. You can load individual files too, but it's easier to just list everything and then filter them imo.
Wait... for a while. It's a lot of assets. Make a tea or something (hydration is important).

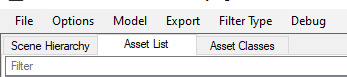
After everything loaded up, click on the Asset List tab. You can see all the stuff! Well, it's rather confusing. Let's see what is what!
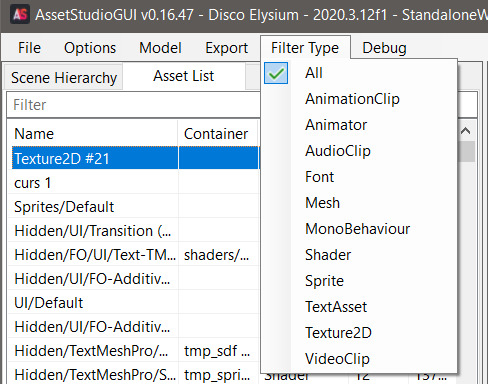
If you click on Filter Type, you can see the types of the assets. These are:
AnimationClip: I think these are supposed to be the animations, you can export them if you select an animator asset alongside and right click Export Animator + selected Animation Clips (couldn't get the animation to play but that's probably on me).
Animator: These are the rigged models, you can export them to .fbx format, but I couldn't figure out what to do with them in Blender because they were kinda distorted (funnily enough, when I imported it to the shitty Milkshape program it showed up just fine... and people wonder why I prefer shitty Milkshape XD) Anyway, I hope someone can figure this out that actually knows something about Blender lol.
Audio Clip: Sounds, voice lines, background music. (.wav format)
Font: Well, fonts. Can be exported and installed to your device like any fonts.
Mesh: 3D models of the characters, objects, scenes. (.obj format)
MonoBehaviour: No fucking clue.
Shader: Shaders for the game. Not interesting in our case.
Sprite: Images that the game uses: portraits, object thumbnails, user interface elements.
Texture 2D: The textures that belong to the 3D models. (.png format)
TextAsset: ??
VideoClip: The stuff that plays when you open the game.

You can preview any assets (well, the ones that you can preview), if you click on them. You can view them in the right panel.

You can extract by left click on the asset in the list -> Export selected assets. You can select multiple assets and export them at the same time.

The program will ask you to select a folder where you want to export the stuff. It'll export them into separate folders, by assets.
Well, yeah, now you know what is what, and how to extract them, but there are still a lot of assets. Good news, you can filter them with the little search bar too, if you type in some gibberish! Some stuff are a little tricky to find.

Voice lines are grouped by task / place, so if you know where the particular thing takes place, you can try to filter for those. The assets are named with the speaker's name - either a character or a skill. I think the numbers mean some kind of order, but I couldn't really figure it out. If you click on one of them, you can preview, and listen to it in the right panel! Super easy! (if you want your own daba-doop-doop-dead it's Kim Kitsuragi-YARD HANGED MAN-556. Just saying)
For objects and characters, you can find them by name, although some characters are named differently. Like, Harry is referred as Tequila in the game files.
Basically if you want to have a character or an object extracted, you’ll need to extract a mesh and a texture that belongs to it. You can quite literally play dress-up game with Harry, because all of his clothes are separate files (and named with kinda the clothing item name). The Kineema has multiple parts (exterior - interior - door - whatever else).
Anyway, let's move on to the Blender part before I forget how to do it (I learned it this morning lol).
(Disclaimer: I don't know jack shit about Blender, I use it for extracting stuff and creating the simplest shapes in existence. I use the godforsaken program Milkshape on a daily basis.)
Open Blender.
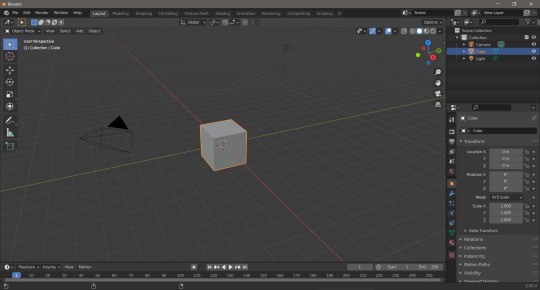
Hit delete to get rid of this beautiful default cube.
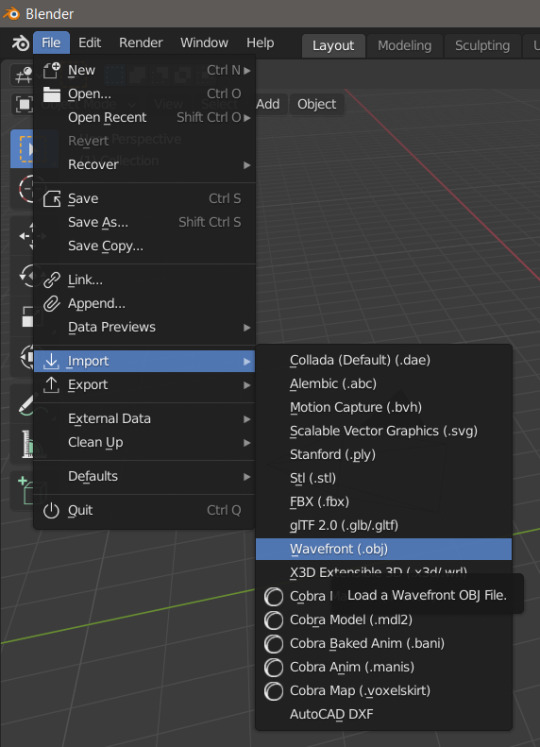
File.../Import.../Wavefront (.obj)

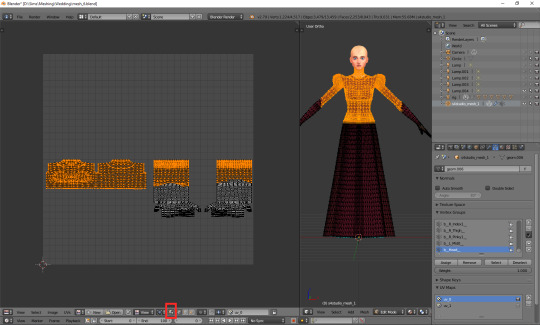
Select the thing you want to import (I'll import the gremlin child).

There he is! And he doesn't fucking care!
Btw, you can zoom with the middle mouse button scroll or middle mouse button + Ctrl, rotate with middle mouse button, move the view with middle mouse button + Shift. So you can see his itty-witty mischievous face from very close!

Now, that's great, but he doesn't have textures still. First of all, change the Viewport Shading to Material Preview.

Select him (just click on him, you'll see an orange outline). And go to the Material Properties tab on the side.
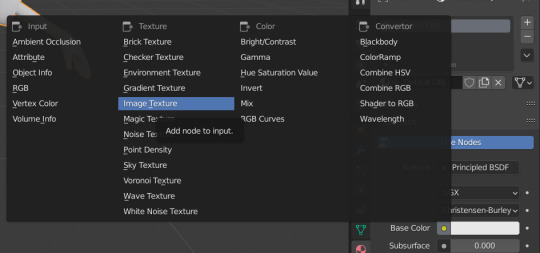
Click on the little dot next to Base Color, and select Image Texture.


Click on the Open button that appeared out of nowhere, and search for the Cuno texture.
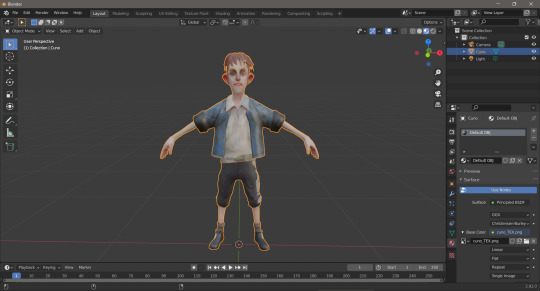
Tada! He looks beautiful now! (and he still doesn’t fucking care)
You can do the same with any 3D models, objects from the game, really.
Well, that's it lol. I hope it made sense! And I really hope someone runs away with extracting the animators + animations, because I'm pretty sure it's doable, I just have no clue how.
500 notes
·
View notes
Text

Custom Rig / SimRipper Tutorial
Hi hello, welcome to todays lecture! Nah it's real simple even if it doesn't look it, I promise! I'm gonna go ahead and assume you have some basic knowledge of Blender/pose making for this tutorial, so I won't be going over how to set up your rigs or anything. Feel free to ask me any questions though! My previous pose tutorial is here if that's what you're looking for.
Disclaimer: I use this process to rip sims for posing only, idk if it's different for making renders 'cause that I ain't my jam. Although I assume it's pretty similar.
You're gonna need Blender (I use 2.79b but I'm pretty sure the newer version works okay for posing too) and SimRipper which you can get here...
Blender (2.79b)
SimRipper
First things first, you're gonna wanna dress your sims! Just go in game like you usually would and once you're done dressing 'em you can save and exit.
Hint: SimRipper will load up your sim wearing the outfit they're dressed in when you exit the game. I usually make sure they're wearing the right outfit before I quit. You can load up other ones later but it can take a while so it just saves some time.
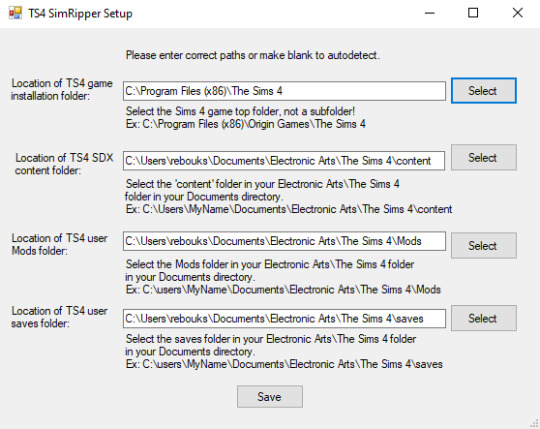
Okay! Once your simmies are dressed and you've downloaded the SimRipper/extracted the file, double click on the .exe to open the application. You'll be greeted with this:

Click "Retry" to set up the correct paths then hit save.
(I only needed to set up the first one so I'll assume you do too! If not just let it know where everything's installed)
Once you've hit save the application will open! Hit "Select" on the right and choose the correct save file, like so:

Hint: SimRipper is slow so don't worry if it says Not Responding or seems to take a while, it's pretty normal. The less sims/outfits there are in a save file, the quicker it'll work. You can make a blank save to make it faster but I don't bother; it doesn't take too long and I can't be arsed.
You'll be greeted with a long list of all the sims in that save file. Find and click on the sim you wanna rip:
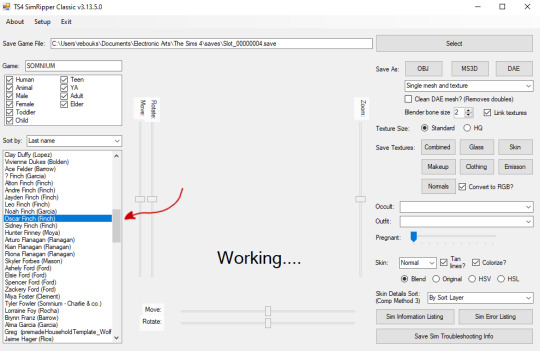
Once your sim has loaded up there's a couple of things we wanna change:
Change the top drop down menu to "Solid and glass meshes and textures" - this'll make it easier to get rid of eyelashes etc later (we don't really need those for posing and they get in the way of the eyes)
Click HQ - it'll look better, trust me!
You can change their outfit here too if they're not wearing the right one - though it'll take a while to load up again.
I like to hit the "Tanned" option, especially for paler sims, since blender seems to really wash them out and it hurts my eyes 😂 - personal preference though!
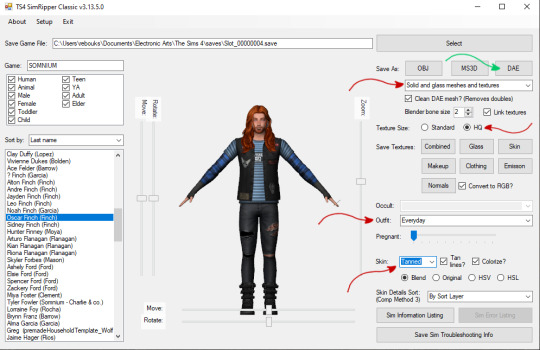
Once everything's set you'll need to click on "DAE" near the top right, this'll save your sim as a .dae file ready for blender. Again, it might take a while! Once you're done, you should have these files:

Okie doke! Now we're off to Blender. Open up your rig and click the little plus to the left of it to extend the menu.
You're gonna right click on each of these body parts like "bottom" "feet" etc etc and hit delete until they're all gone.
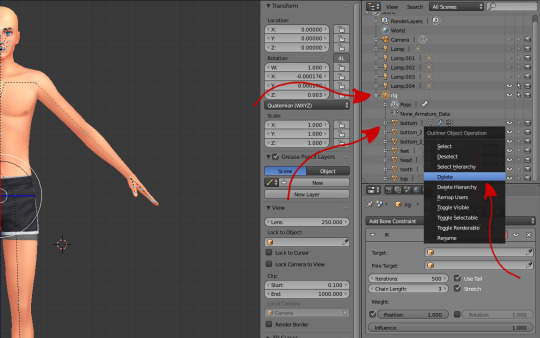
Once you've deleted every body part, you'll be left with an empty rig like this:
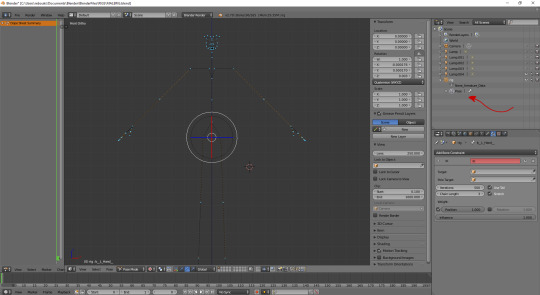
Now that our rig is empty, we can import our .dae file!
Go to "File" -> "Import" -> "Collada (Default) (.dae) like so:
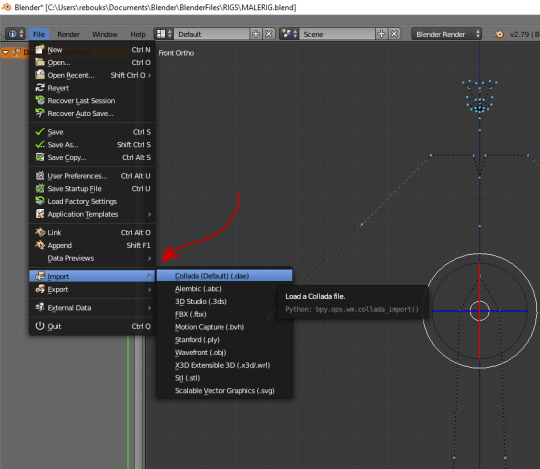
Find your .dae file and double click on it to import it.
Hint: I like to make a separate folder for my .dae files and I regularly delete 'em once I've saved my rig. I like tidy files!
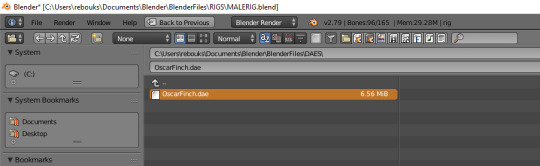
Hi Oscar!
I'mma go ahead and right click on this extra lamp that was imported and hit delete 'cause I don't need it! You can keep it if your eyes aren't sensitive little babies like mine, it doesn't matter much.

Okay.. so now we should have a "rig" and a "rig.001"! Click the little plus signs to the left again so you can see what's in the hierarchy of each one, and then:
Click the upside down orange triangle of your sim from the "rig.001" rig and drag it up to the first one, then drop it on top of "rig"
A box should come up like the one below and you wanna click on "Object"
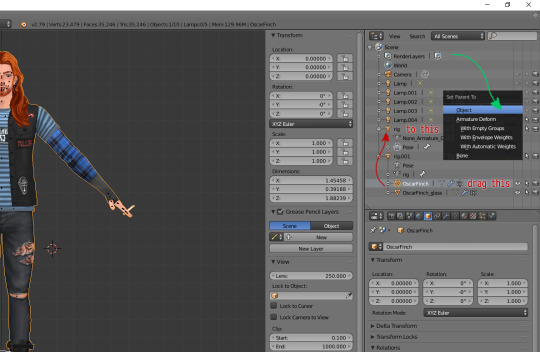
All we've done here is move Oscar (or whoever) from the extra imported rig to the original. We don't need that extra rig or the glass textures (the eyelashes etc) anymore so get rid of it by right clicking it and hitting "Delete Hierarchy" like so:
Hint: "Delete Hierarchy" is different from "Delete" and gets rid of the whole hierarchy (shocker) at once!

I like to rename my rigs, it can get complicated when you start posing more than one sim so naming them just makes it easier. Double click on where it says "rig" then rename it:

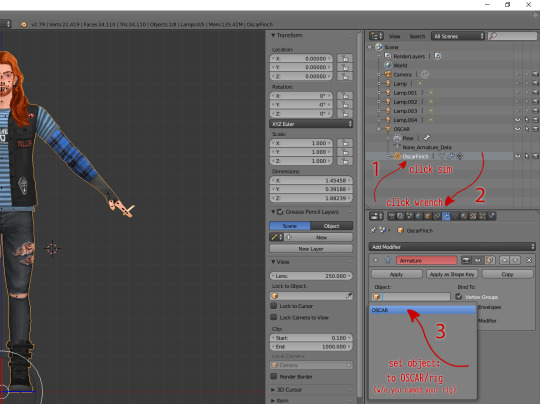
Now we need to attach your sim to the rig, as below!
Left click on the sim (aka "OscarFinch" in this case)
Head to the toolbar just below and click on the little wrench/spanner.
A little further down, click on the box beneath "Object:" and choose your sim/rig
In this case it's called "OSCAR", but if you didn't rename your rig it'll still be called "rig".
And that's it, you now have a custom rig 👍
Just make sure you save it!
You can go ahead and click on the little plus/minus to hide the drop down/extra info of the rig and start posing! \o/

Once you've done this a couple of times you won't even have to think about it anymore! I do it almost everyday and I had to really pay attention to what I was doing for this tutorial 'cause I was like ??? when I tried to think how I do it lmao.
They're so much more fun to work with than the base rigs, no more clipping, better facial expressions, poses with clothes in mind?! Amazing 😌
Extra Hint!
If you rip a sim who's dressed with a pose accessory assigned to a stigmata joint, it'll still move as if you imported that accessory via blender. I randomly found this out by accident but it might save you some time!

I hope you found this easy enough to follow, but lmk if you have any questions! I think this is one of those things everyone kinda does a bit differently. Like.. one tut I saw you had to add the textures in separately n' shit? Idk that one confused me so this is how I do it and it works, so I hope it does for you too! ❤
Happy SimRipping!
(sounds kinda painful, doesn't it? ouch)
#sims 4#ts4#blender tips#custom rig tutorial#simripper tutorial#simripping tutorial#simblr#posing tips#tips
456 notes
·
View notes
Note
Hi there, I have seen and downloaded your GIMI BRANKO outfit. Its on the very spot! Do you plan to make/recreate more Sims 2 PSP cloth? This is not request but genuine question, out of pure curiosity.
honestly, i have no idea. i don't know how to use blender or milkshape yet, or fiddle with meshes in any way, and that was the first time i ever recolored something. so i'm not making any promises because even though in theory i think i know what could be used to recreate certain outfits, i don't know how to do them myself just yet.
i just figured recreating gimi's jumpsuit would be easy to do because while his jumpsuit's opened wider than the exterminator/repo jumpsuit, it was otherwise the right shape. so i did it. if i can figure out how to recreate other outfits, i might... unless they've already been done first by someone else. :P
1 note
·
View note
Text
4t2 Hair Texture Tutorial
So this is for @frauhupfner or anyone curious in reply to THIS post.
In this tutorial, I will show you how to resize the Sims 4 textures for better sized files for the Sims 2. This tutorial can also be used for accessories. And for beginners, this is a simple tutorial. Don’t be afraid!
Edit: I made a video for those that are more visual learners. It has no sound and can be found here: https://youtu.be/bgZ3UR_E3QU
Picture heavy with commentary under the cut:
So what do you need for this tutorial? Well, you will be converting hair so Blender, Milkshape, Simpe, MeshToolKit, etc. You already got all that for the conversion. This is just for the texture specifically. So you will need a photo-editing program. I have Photoshop, but for this tutorial, I am going to be using Photopea because not everyone has Photoshop and Photopea is totally online and free to use. They are a lot alike. So if you have Photoshop, this should be very similar.
Let’s start with a preface to get you acquainted with the Materials tab and Texture Coordinate Editor in Milkshape. Let’s start by pulling up that hair you are converting.
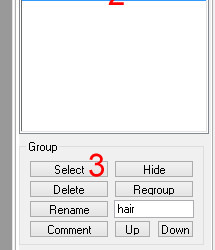
Select the hair mesh group and click over to the Materials tab.

Let’s hit the New button, then the first <none> and find our texture, select it and then click the Assign button. I generally change “Default” to “Ignore Alpha” to see the textures better.
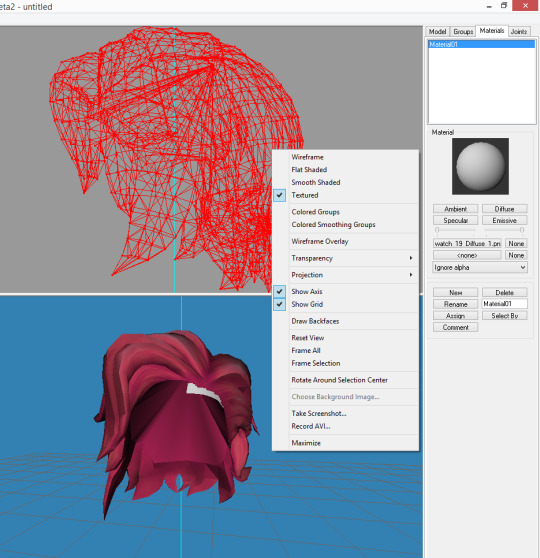
You should have something like this. If not, right click on the 3D model and make sure “Textured” is selected. I also make sure “Draw Backfaces” is unselected because backfaces will not show up in the game.

Let’s go to Window->Texture Coordinate Editor.
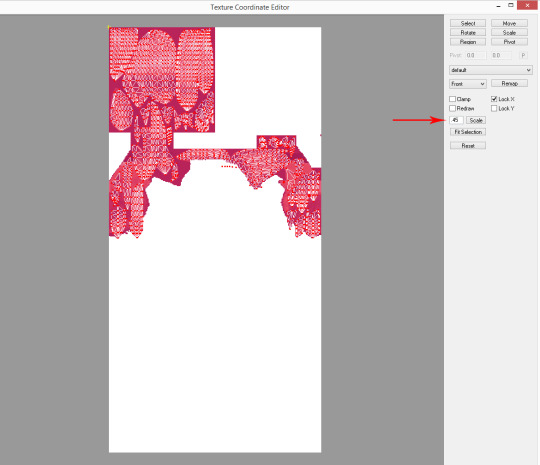
So I have scaled the image to .45 so we can view it better. You will notice that the texture for the hair will be a vertical rectangle (traditionally 1024x2048 pixels) with the texture of the hair on the top portion of the image. Sims 4 models have their textures for the sims on one texture file so hair and accessories will be on the top half, clothes and shoes on the bottom half.
Exit out of the Texture Coordinate Editor and click the Delete button in the Materials tab. Let’s get our texture ready!

So this is where our tutorial really begins. Go to Photopea (or whatever photo-editor you are using). Click File and Open then find where you have your project saved. Select the texture.
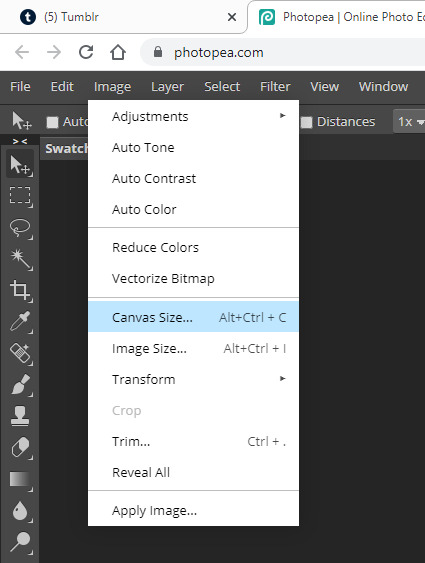
Click Image->Canvas Size.

In the window set the Anchor to the top middle box. Then set the height to 1024 (make sure it is set to pixels) so that the image will be a perfect square 1024x1024. Click OK.
Edit: If you encounter a 2048x4096 (because I notice they are becoming popular for some stupid reason), click the top left anchor and set width/height as 1024x1024.
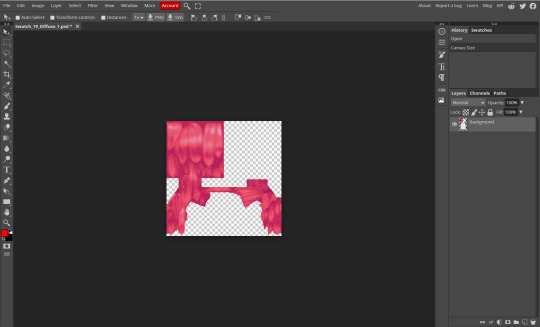
Your screen should look like this now. This is exactly what we want.

So now we File->Export As->PNG. This gives us the transparent parts we want in the image. This is especially helpful for when you convert alpha hair.
(This part is a little different than Photoshop. You can select the kind of image you want it saved as in the Save dialogue box.)
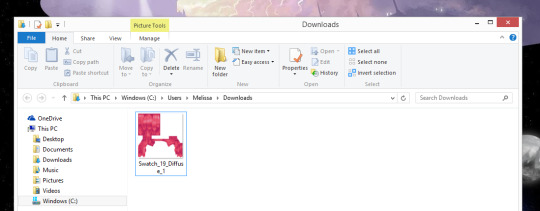
So it will save in your Downloads folder, at least that’s where mine did. Since this is my first time using Photopea, I’m not sure if there’s a way to change the navigation, but for tutorial purposes, just find where it saved and move it to where you have saved your project files.

Back in Milkshape, go through the process of adding our new texture size (like we did at the top). You will notice that it does not look quite right. We are going to fix that. Promise!

In the Texture Coordinate Editor, you will notice the red dots (which are the vertices of the mesh) are squished. Let’s un-squish them.
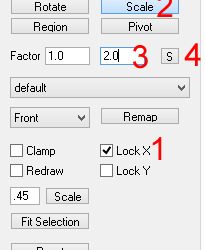
First, let’s check the “Lock X.” This will make sure nothing shifts horizontally. Next, hit Scale, then change 1.0 to 2.0 in the second Factor box. Then hit the “S” box.
Edit: If the original image size was 2048x4096, do not Lock X and set both factor boxes to 2.0 and hit the “S” box.

If you do those steps above correctly, it will look like this now. The reason why this does not work for clothes is because it is on the bottom portion of the image so it does not automatically snap where the clothes are and you have to move it vertically to fit. Luckily though, hair and accessories just snap where you want it.

If we view our hair, it should look like this. This is what we want. You can exit out of the Texture Coordinate Editor and continue with your conversion.
Tutorial now over.
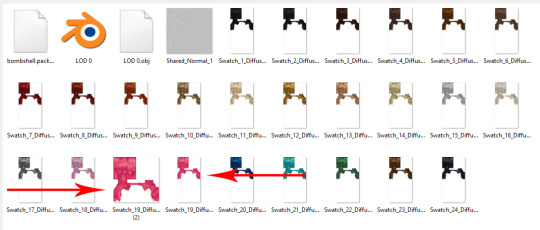
Edit: Remember when you go to select your image in SimPE during the converting process to select the resized 1024x1024 image; otherwise, it is set to the wrong one. I know this seems like a common sense thing, but above you can see how these look similar, but you want the pink texture on the left.
#tutorial#4t2 conversion tutorial#sims 4 to sims 4 conversion tutorial#ts4 to ts2 conversion tutorial#edited: forgot a picture#edit 2 for a bonus thought#remember we are all learning here
101 notes
·
View notes
Note
where do you get the models for the characters from katamari? i’ve been looking for the model for the black cat forever :( but if anything, do you make transparent versions of the gifs you post?
okay so! ill preface this by saying ive never gotten the second way to work, because my computer is full of video games and doesnt have enough space to process something this big properly
the way i do this is i just go into my game and hit record, no character models required, However if you think your computer can handle it
keep in mind you need to own the game <3 and this works on any unity game
go here (this is safe i promise it comes from a github link)
install that, go to wherever its downloaded, unzip it, it should look like this
open the application there
go to file -> load folder
then from there go to where your games are (usually something like this if its steam)
then open a game! something with 3d is going to take a Lot longer to open, katamari wrecked my computer for a couple hours and while everything opened i wasnt able to look at any of the files
once the game is open click on asset list
and then go to filter type and keep only the things you want to see (probably the meshes, textures, and maybe sprites)
from there youll have to export the models/textures you wanna use and then open em in a program like blender! i dont have blender installed atm so i cant help with that but i hope this has gotten you far enough!!
#anon#mod post#idk how to tag this#model extraction#asset extraction#this program also lets u rotate the meshes directly in it. its rly cool wish i could use it proper
70 notes
·
View notes
Text
VI a. UV_0
(Previous: V. Adding missing body parts / Frankenmeshing / Finishing touches)
As promised, I'll finally talk about uv maps today. About time! Sorry it took so long; I hope at least you'll feel that it was worth the wait.
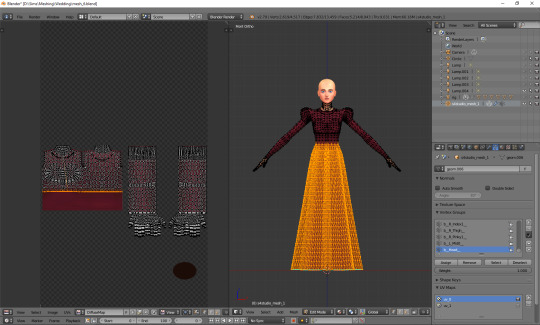
Generally speaking, uv maps are 2D representations of a 3D mesh. A mesh cut into pieces and made flat. TS4 meshes use two of them, called – very originally – uv_0 and uv_1. You can see them listed if you click the little triangular symbol in the panel on the very right (if you hover over the triangle, it says 'Data').

Why are there two? Because they serve very different purposes. To put it simply, uv_0 is responsible for the texture of your mesh, while uv_1 makes the mesh move with body sliders. Therefore we'll need to discuss them separately. Let's start with uv_0.
As you can see, uv_0 is the one selected by default. If you switch the mesh shading to 'Material' or 'Texture', you're going to immediately see any changes you make to it. The map itself is located in the window on the left – the one which we haven't used so far at all. Let's go into edit mode and then make that window bigger, so that we could see all the icons at the bottom.
Right now nothing is happening there. But let's just try selecting a random part of the mesh...
Important: when you use shortkeys, pay attention to your cursor's position! E.g. if you press b with your cursor in the uv map area, it'll activate the selection tool for the map, not for the 3D mesh.

You can see that a bunch of little dots appeared on the map! Those are your selected vertices.
Now, I don't know why this is the default option for Blender – your vertices being invisible on the uv map unless selected – but you can easily change it, so that you could always see them. You just have to click one of those tiny icons at the bottom. If you hover over it, it says 'Keep UV and edit mode mesh selection in sync'.
I find it way easier to work with this way: you can see all the vertices, and the ones which you selected are highlighted now, just like in case of the 3D model.
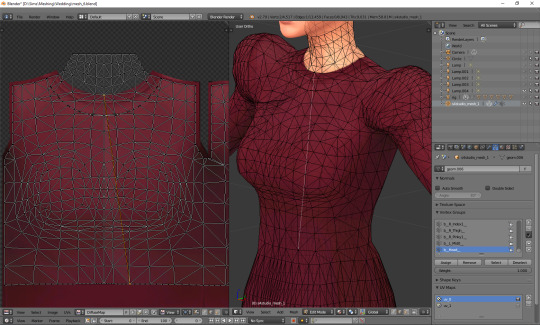
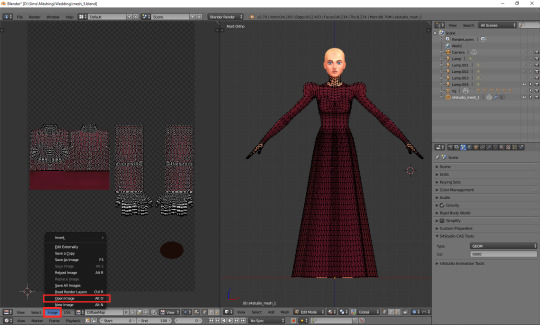
Then there's another important tiny button, right between 'UVs' and 'New'. If you click it, you'll see a list of all texture files associated with your mesh. In my case it's only two basic files: the body texture and the texture of the top I used as a base, but if you're frankenmeshing, that list can get much longer. Let's choose the original diffuse map.

You can see that the map reflects perfectly whatever is going on with the 3D mesh. The parts not covered by any texture use the skin texture instead. Not the whole texture of the top is used, because at the very beginning I cut off the bottom part of the mesh. There's also an abundance of vertices in the waist area, because I extruded the lowest row of vertices to make a skirt; and, as I didn't make any changes to the uv map yet, the new vertices appeared right on top of the original ones. In fact, if you select that lowest line on the uv map, you'll see that the whole skirt gets selected.
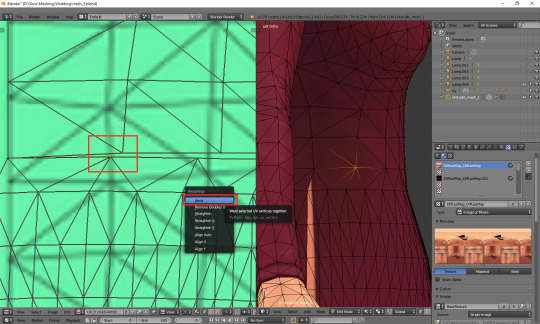
UV maps can also be useful for detecting weird stuff happening to your mesh. I can see that there's some line going across the top. I switched to edge select, selected it and found out it really is some completely useless edge going through my 3D mesh. No idea how it got there, but thanks to the uv map I could spot and delete it.
Just a couple of other tiny icons before we proceed to fixing our uv_0 map. Firstly, there's the little pin, which let's you – unsurprisingly – pin the currently used texture, so that Blender wouldn't switch to any other ones (yep, it likes doing it). Just click it and you're safe.
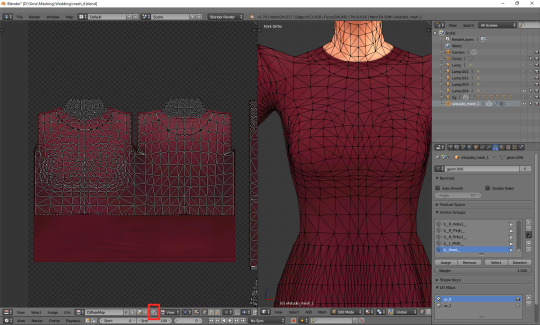
And then, right next to it, there's a little cross. Remember what I said about the list of used textures getting super long if you're frankenmeshing? It can get annoying if you don't need 80% of them, but have to scroll through them all whenever you want to switch from texture A to texture B. If you're sure you don't need a certain texture, select it and then shift-click that little cross. That'll tell Blender that this texture is not used, so it doesn't have to load it. You'll need to save your mesh, close Blender and reopen it for the changes to be applied!
OK. Now that you have an idea what's what, we can finally talk about editing the uv_0.
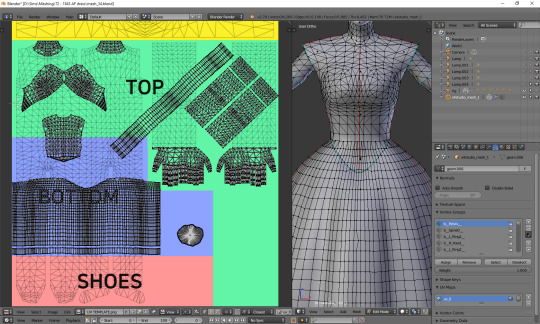
In case of TS4 diffuse maps, it's very important where you put your texture. Each category has its designated part on the map. It looks like this:
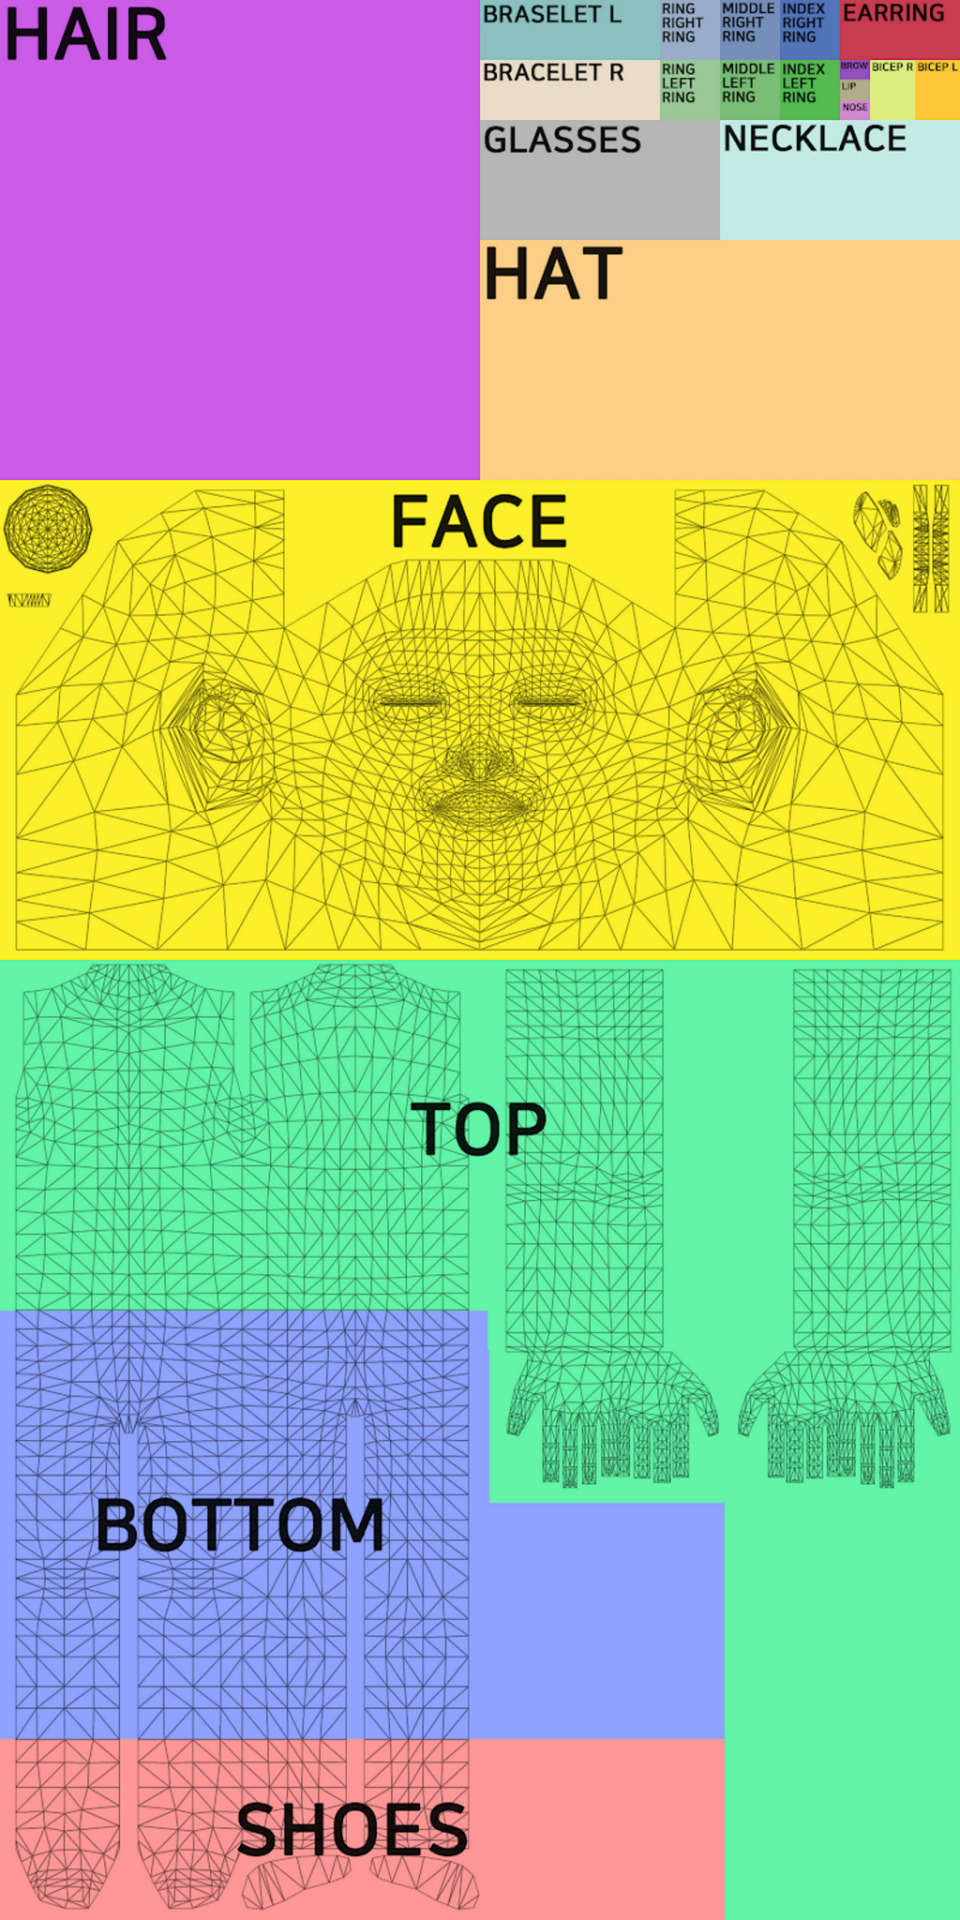
You can download the template in default, EA size (1024x2048) HERE, and a twice bigger one (2048x4096) HERE. In my own creations I always use the 2048x4096 format – it lets me fit in way more details without stuff getting badly pixelated – but that's obviously not a must. Now, at the bottom of the uv window, click 'Image' and then 'Open image'. Find the template you just downloaded and double-click it (or choose 'Open image').
Whatever you do with your uv map, there are two basic rules you have to follow. One, fit the vertices only in the place meant for the category you're working on. If you're making a dress, you can ignore the top/bottom division (although be aware that if you do ignore it, you won't be able to split your dress into separates), but that's the only exception. Don't let your vertices go into the shoes or face area. If you're making a skirt, stick to the area marked as bottom. If you're making a top, fit them all in the area marked as top. It seems obvious, but I've seen sooo many CC pieces which are incompatible with each other, because their textures overlap. Some of them are beautiful and even made by really well-known, established creators. So I think it doesn't hurt to overstress this point a bit. Please pay attention to it!
And two: don't move anything which is supposed to be bare skin. Or half-transparent texture printed on top of the skin (not 3D). It's an absolute no-no. Terrible stuff will happen if you do it. If you accidentally did it, then... Oh boy. You may try to move it back into the right position, but maybe it'd be easier to just delete those parts altogether and just append them anew (as explained in the previous part).
As for the parts which you intend to texture – so, in this case, your dress – you can theoretically put them anywhere you want (that is, as long as you stay in the top/bottom area and don't overlap the bare skin parts). Your map doesn't necessarily have to look like the ones made by EA. However, I think not following the EA style (top on the left, bottom underneath, sleeves on the right, any extra deco in the free slots) may result in your clothing being sunbathing-incompatible. I can't say for sure, as I don't have Island Living, so my sims don't tan, but I suspect the tan lines depend exactly on your uv_0 map. I don't think it makes any difference in case of Victorian dresses, but if you're making something more modern, which could leave some visible tan lines, you probably shouldn't go too wild while making your uv_0 map.
Let's go back to our dress. Because we used the top as a base, half of the work is already done. We only need to 'unwrap' the skirt (and any decorations, if you added them). There are 4 ways in which I usually approach it:
1) Selecting the rows in 3D view and moving them manually (g, y) on the uv map
It's not very practical now, when the skirt is already full of those horizontal lines, but at an earlier stage it would have been very quick and easy. The important thing is, you should do it before adding 'fillers' (i.e. those lines which you don't move, scale or whatever, but just add them and leave them as is). Depending on the size of your dress, you probably achieved the desired shape with 3-5 lines. Move them on the uv map, make sure the proportions look correct (you can always try to open some patterned image for a second, to see if everything looks ok – see part VI b) and only then add the fillers. They'll automatically appear in the right places on the map.
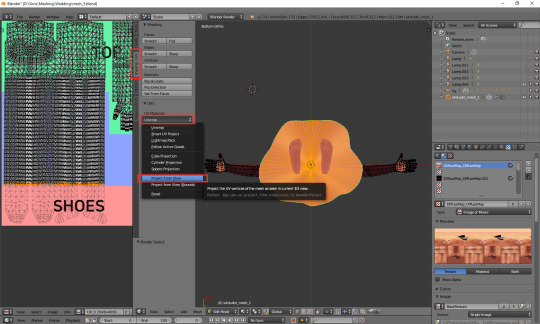
2) Cylinder projection
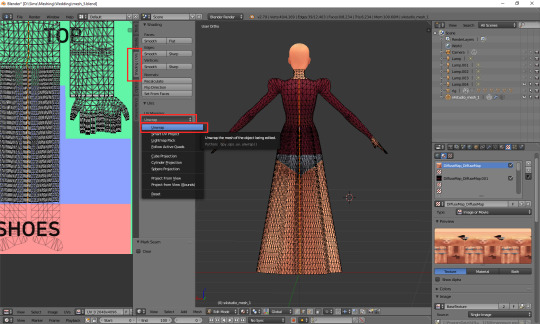
You can also decide to unwrap the skirt. Select it, either in the 3D mesh or uv map window. Now, with your cursor in the 3D mesh window, press t to unhide the panel on the left and go to the 3rd category: 'Shading/UVs'. In the UVs section you'll see a button called 'Unwrap'. If you click it, a drop-down menu will appear, with different unwrapping styles/options. Choose 'Cylinder projection'. Watch out: your viewpoint matters! Before you unwrap, go to the right side view (num 3).
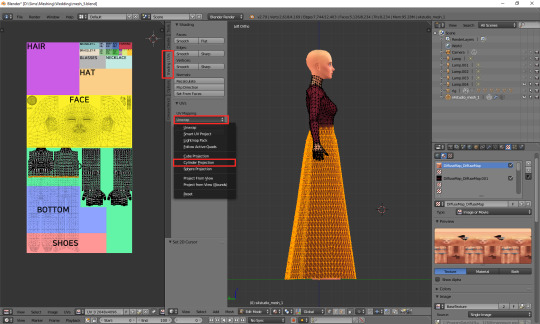
I took the screenshot from the wrong side, please pretend you didn't notice (-.-)
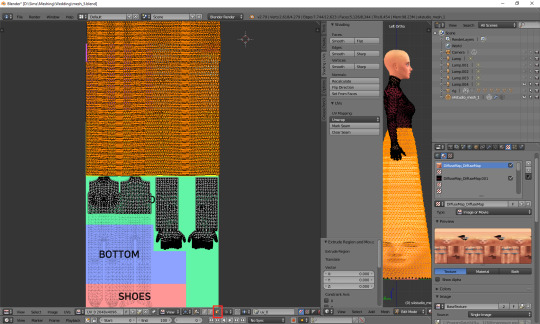
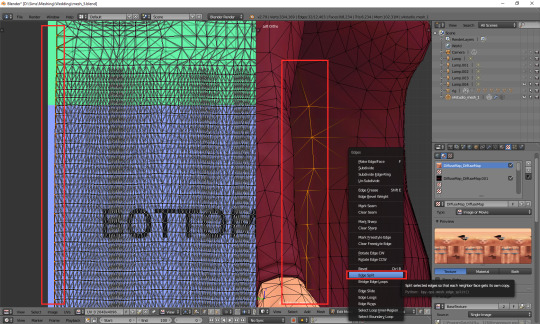
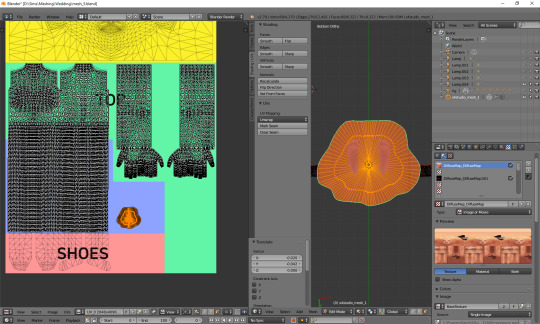
A whole bunch of new vertices should appear on your uv map – in a completely wrong place. We'll have to move them under the top. You'll notice, however, that if you try to move, scale or do whatever else with your skirt, it affects the lowest line of your top as well. That's because the top line of the skirt and the bottom line of the top are actually the same vertices, just duplicated on the uv map. You could select only that one line and edge split it (ctrl + e, in the 3D view), but an easier way around it is simply switching from vertex select to face select. Face select has some special powers when it comes to uv maps: it lets you not only move stuff separately, but also select parts of the mesh with L (multiple select with shift + L). Neither of those things works when in vertex or edge select mode.
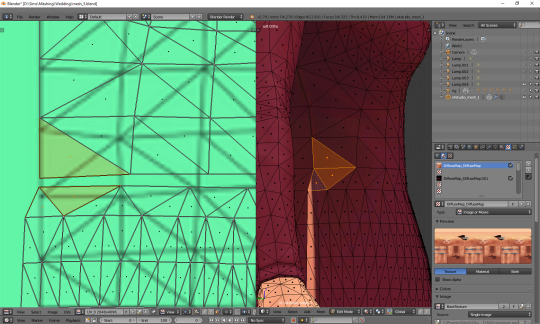
Now you can simply scale the selection down and put it under the top. Adjust it in any way necessary, so that it'd align with the top nicely. Make sure that the faces are in the right places! Select the bottom-left face of the top and then, in the 3D view window (left side view, ctrl + num 3), click the face right underneath it. Is it the top-left one of the skirt on the uv map? If so, perfect! If not, you've got some manual moving to do. Just select any faces which are in the wrong place and move them along the x axis (g, x) till they are placed properly.
It should look fine by default though. That's exactly why we went to the right-side view before unwrapping.
If your skirt goes into the shoes area, scale it down along the y axis! (g, y)
Now the only thing left to do is to weld the vertices and get rid of the gap between the skirt and the top. Go back to vertex select and select the second vertex from the left. You'll see that – just as before – a vertex of the top gets highlighted too. Press W and, from the drop-down menu, choose 'Weld'.
Do the same for all the vertices in that line, except for the first and last one.
What about the first and last one? The problem is, they are all actually the same vertex. If you select any of them, you'll see that the other one gets highlighted as well. Welding them would make them meet in the middle, and that's not something you want to happen. So what can you do? This time there's no other way around it than splitting. Select the whole vertical line (either the left or right one), move the cursor to the 3D view area, press ctrl + e and choose 'edge split'.
Now you should be able to weld each of those vertices separately. When you're done, select all (a) and (in 3D view) remove doubles (w).
And that's basically it. Of course, if you want to, you can dedicate some more time to your uv map, making sure everything looks absolutely perfect. You can, for example, edit certain lines – or all – and make them perfectly straight. Just select a line, press w and choose 'Align x/y'. It's especially useful for deco parts – you'll see what I mean once you get to texturing.
3) Professional tailoring (marking seams)
This method is quite crazy, but can be very useful in some cases – e.g. if you're making a patterned dress with a huuuuge skirt and want the pattern to look even. To use it, you have to imagine for a second that you're a tailor/seamstress and that your mesh is a real dress, made from real pieces of material. Where would this material be cut and sewn together?
Once you know where the seams would be, go to edge select mode and, well, select those edges. Then press ctrl + e and choose 'Mark seam'. Make sure you really mark all the seams which would be there in case of a real dress!
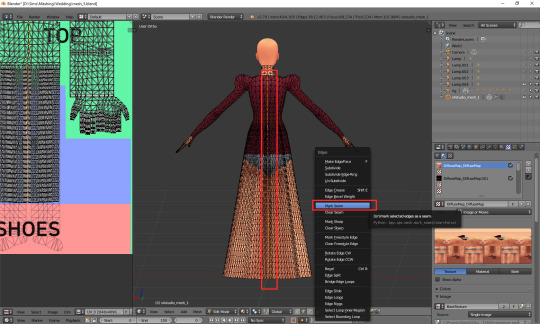
Once you're done, select your whole dress (or whatever it is that you're making). Do not select body parts! Once again go the panel on the left (if it's not there, unhide it with t) and this time simply select 'Unwrap'.
And now just go to face select, scale down the results of your unwrapping and put them anywhere (but in the right category :P). If something looks wrong, that most probably means you forgot to mark some seam. You'll have to go on a search for it. I'll be honest: I have zero idea of sewing, so using this method is quite tricky for me and I'm struggling myself with marking all the right edges as seams. I used it only twice so far, in my last 2 projects. Here's how my 1843 dress looks like after unwrapping:
As you can see, the uv map is plain crazy and, as mentioned before, definitely not tanning-compatible, but thanks to it later I didn't have to adjust the pattern to each part of the mesh individually – I could just fill the whole texture with pattern and only had to erase it from the parts which were supposed to be uncovered. It does make your life easier if you make 66 swatches :P.
4) Projecting from view
Yet another unwrapping option, useful mostly for smaller, decorative elements. Or in general: for stuff which you can see properly. I use it mostly for bottoms (I mean... That thing 'closing' the dress at the bottom). Go to the bottom view (ctrl + 7), select the whole bottom part (might be easier to do on the uv map, now that you've unwrapped the skirt!) and, from the unwrap drop-down menu, select 'Project from view'.
Go to face select, scale the thing down and put it somewhere in the area for decorative elements. For example here:
Done!
***
Here's also a small general tip: it's always better to separate clothing parts from body parts on the uv_0 map. I'm thinking especially of the neckline. It's the only way to get a sharp, clear line; if you just paint the neckline in your graphic editor, it'll become blurry in game. It seems that the devs realised it at some point too, as at least some pieces from later DLCs have a gap in the uv_0 between the neck and the collar. Just select the whole top-bottom area, deselect the neck and move the part which should be textured a bit down.
***
Whichever method you chose, your dress has a ready uv_0 map. Now there's only one thing left to do: you should export the uv layout, so that you'll know where to put your texture. At the bottom of the uv map area, click 'UVs' and then choose 'Export UV Layout'.
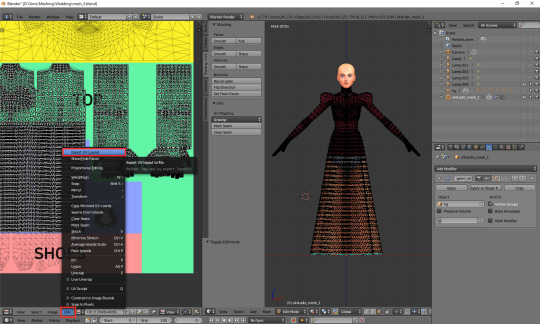
A new window will appear. Save it wherever you want, under whichever name. The only important thing is, you must tick that little box on the left saying 'All UVs'. Then just click the 'Export UV Layout' button.
And that's all. Congratulations! You're fully done with your uv_0 map.
(Next: VI b. Changing the texture displayed in Blender)
71 notes
·
View notes
Text
I. Getting started
It seems like there's a whole bunch of people who'd like to learn how to make their own CC – so, without further ado, let's jump right into it! Thank you everyone for your feedback; I hope what you'll find here will meet your expectations.
This tutorial is intended for people who are at the absolute beginner level and the only thing they know about CC making is that they'd like to learn it. Of course you're not forbidden to use it if you've already got some experience, but just to warn you, I'll start with the very basics. Also, it'll be divided into many parts and I can't predict how quick I'll be with adding new ones, so please don't get too impatient!
It's intended to work as a complete, step-by step course, so in the later parts I'll assume that you're familiar with the previous ones. In case something isn't clear to you, please check first if that topic wasn't already explained before you say you don't understand what's going on.
So, let's start with the basic questions: what do you even need to get started and how much is it going to cost you?
Just to immediately calm you down: the answer to the 2nd question is 'almost nothing'.
What you need:
A 3-button-mouse
And that's the only thing you'll have to pay for, assuming you don't have one yet.
Blender 2.79
Blender is a 'free and open 3D creation software', as its slogan says. It's the place where the magic happens, where you mold your clay into whichever shape you want, in other words – where you mesh. A very important thing: you MUST download version 2.79, not 2.8. Why? Because only meshes created in pre-2.8 Blender can be read by S4S (see below). Why? No idea, we just have to accept it. Follow THIS link and download the version meant for your operating system.
EDIT: Make sure you're really on version 2.79! It seems S4S will try to automatically download an even earlier version (2.70) for you, which doesn't have some options you'll need later.
Sims 4 Studio
Sims 4 Studio (aka S4S) is a fan-made program which enables you to import your mesh (and a bunch of other information, like textures, bump maps etc.) and change it into a nicely packaged .package file. You can download it HERE (again, choose your op system and scroll down a bit for a direct download link)
Free image editing software (unless you have Photoshop)
Yes, I know it sounds unbelievable, but you can actually make decent textures without Photoshop! You will need the following:
Paint.net
A very user-friendly program where 99% of your job can be done. Download HERE.
A set of custom plugins for paint.net
Useful for many things, absolutely necessary for making specular maps (we'll come back to it waaaaaay later). Download HERE.
A 'Normal Map Plus' custom plugin for paint.net
Necessary for making more detailed bump maps (again, we'll come back to it later). Download HERE.
GIMP
A not-so-user-friendly program that I'm still struggling with, so I try to avoid using it more often than necessary. However, it is necessary for turning those bump maps I mentioned earlier into normal maps, which can be read by your game. Download HERE (choose the 'download directly' option!).
Enough disc space for your creations
Your final package is one thing, but all the half-made meshes and textures you're going to create on the way are a completely different story. Trust me, your creations folder will grow very quickly. If you don't have much space on your PC, you should get yourself an external disc.
LOTS of patience
Getting your first creation ready is going to be a long and painful process. I've already mentioned it a couple of times, but making my very first dress work took me TWO MONTHS. Hopefully the whole experience will be less frustrating for you (because you'll have me :) ), but nevertheless, be prepared. Read everything carefully, pay attention to details, don't give up too easily and don't be too hard on yourself. It gets easier, I promise.
What you don't need:
Marvellous Designer
Another meshing software, used mostly by alpha CC creators, which looks cool, but has one big downside: it's horrendously overpriced. If you treat meshing as a hobby, then you probably don't feel like spending 50 euro/dollar per month on necessary software, therefore... Nope.
Photoshop
No hate to Photoshop; if you have it then cool, stick to it. But you don't need it, so we're going to go for free software instead.
A gaming PC with amazing specs
Let's just put it that way: if your computer can run TS4, it can run Blender and S4S. Till last month I was meshing on a laptop. I could have problems with TS4, but Blender? Never. So don't worry about it, you're fine.
(Next: II. Learning to mesh)
146 notes
·
View notes
Last Seen Blogs
tyriq-edits
Lockscreens, Moodboards And Icons

doobledabbadoo
Dillydale’s Most Wanted
vale3252any
vale457
rhyiiona
moved to diazbuckley
taxcncmy
be ready to fall