#ihaveresources
Text
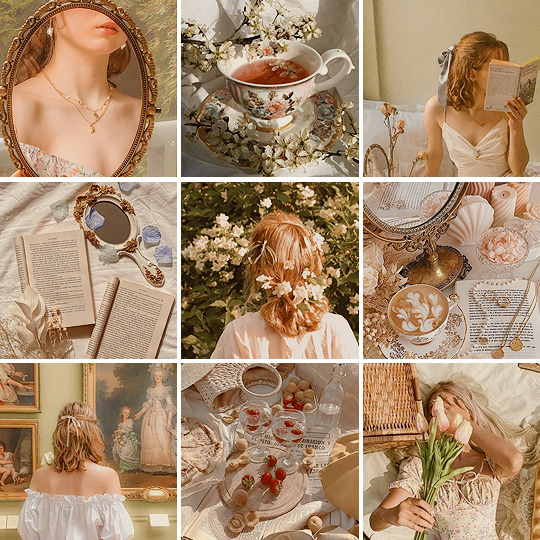
PSD #243
Download here
Like or reblog if you download
Like my content? Support me on ko-fi! ☕💖
#psd#psds#rresources#completeresources#dailyresources#hisources#makersleague#ihaveresources#allresources#pastel#*#photo
56 notes
·
View notes
Text

WELCOME TO DAILYTHEMES!
We are a source blog focused on themes, pages, posts about themes help, html and codes. This blog honors all the theme and page creators, the credits are all for them!
We track #dailythemes — tag us!
#signal boost#themes#pages#dailyresources#hisources#rresources#completeresources#finesources#allresources#evansyhelp#userbru#resourcemarket#ihaveresources#theme hunter
63 notes
·
View notes
Photo


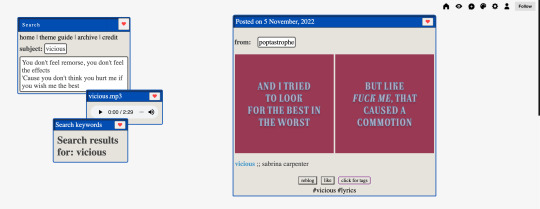
unsent theme [preview & code]
now available in the theme garden
a premium theme inspired by sabrina carpenter’s ‘emails i cant send’ and more specifically the vicious lyric video; icon by @louieglitter
the link to purchase is on the preview blog’s pinned post; price: 19usd
250/400/500/540/600px post size options
sidebar with audio player, title, description, search bar and links
pages with “show link to this page” enabled will appear here
music player is updated via the customize window, instructions are in the theme guide
responsive theme, sidebar becomes header on smaller screens
day pages
clicking on ‘posted on ___’ will take you to all posts from that day
the heart button in the upper right of each post links to the post’s permalink page
draggable elements: the audio player can be dragged around, there is an option to allow for draggable posts, on day pages and search pages the title boxes can be moved around
there is an option for the credit to be in the sidebar (default) or in the bottom right corner
full theme credits
view more detailed customization information in the theme guide
contact @capecoding with any questions
#completeresources#code hunter#themehunter#allresources#codingcabin#ccnet#supportcontentcreators#codetoon#resourcemarket#ihaveresources#userlex#theme#tumblr theme#cute themes#themes#tumblr layouts#my themes#unsent#cape codes
378 notes
·
View notes
Photo


pink luv | install & preview
FEATURES
title + subtitle in header
slide down navigation
includes search bar
any pages with “show link to this page” option enabled will appear here
fully responsive theme made with w3.css
text like and reblog buttons
two side columns for blog info + updates
OPTIONS
choose font + font-size
can select different font for headings and body
show or hide tags on index pages
toggle box shadows
right column can be hidden
full credits
contact @capecoding with any questions, suggestions, or feedback
#completeresources#code hunter#themehunter#allresources#codingcabin#ccnet#supportcontentcreators#codetoon#resourcemarket#ihaveresources#userlex#theme#tumblr theme#my themes#responsive theme#tumblr themes#w3.css
325 notes
·
View notes
Photo

Theme #002: October | by Anyh S.
┗ PREVIEW 👀 ┛
⤳ 💕 Please, like and/or reblog this post if you use this theme!
Por favor, curta e/ou reblogue este post se for usar esse tema!
⤳ 💬 Contact me if you find any bug.
Entre em contato se você encontrar algum bug.
Features/Características:
Customizable colors, fonts, links, icons, images and proportions;
Cores, fontes, links, ícones, imagens e proporções customizáveis;
Can be used in 1, 2, 3, 4 or 5 columns;
Pode ser usado em 1, 2, 3, 4 ou 5 colunas;
Can be used with Infinite Scroll or Numbered Pagination;
Pode ser usado com Rolagem Infinita ou Paginação Numerada;
Includes option to show/hide the number of likes on posts;
Inclui opção de mostrar/esconder o número de likes nos posts;
Includes customizable Light/Dark mode;
Inclui modo Claro/Escuro customizável;
It contains an option to hide captions for Image, Photoset and Video posts (click here to know more);
Possui uma opção para esconder a descrição de posts de Imagem, Photoset e Vídeo (clique aqui para saber mais);
NPF compatible (works well with Tumblr’s new post format);
Compatível com NPF (o novo formato de posts do Tumblr);
It contains Localization (the notes in the theme will show in the language you have set for your blog in its settings);
Contém Localização (as notas no tema serão mostradas no idioma que você definiu para o seu blog em suas configurações);
Fully responsive (includes mobile version);
Inteiramente responsivo (inclui versão móvel);
And more!
E mais!
Download
#theme#themes#tumblr themes#tema#temas#theme hunter#ihaveresources#codingcabin#free themes#temas gratuitos#grid#grid theme#tema em grade#codes#custom themes#custom theme#custom code#tema personalizado#theme maker#templates
272 notes
·
View notes
Text
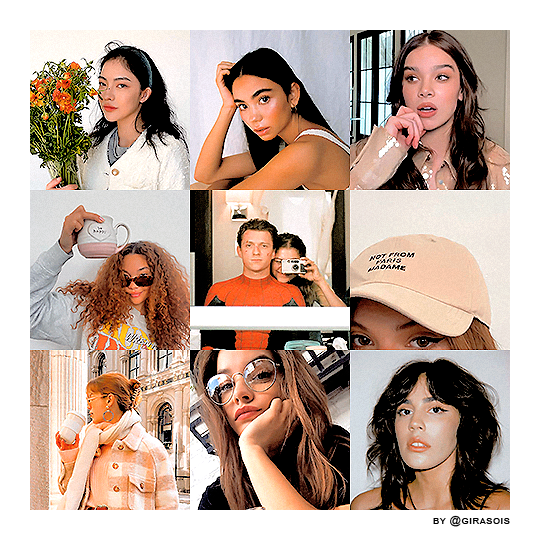
psd sunflower by @girasois
rules: don’t copy or use as a base, don’t share the psd or claim as your own. feel free to edit the layers as you want/need to. credits aren’t necessary, but always appreciated. (if you want to, tag me in your post, i’d love to see your edits!!)
download: to get the psd file, you must follow me + like and/or reblog this post + ask me (no anon) “sunflower psd link, please?”.
#psd coloring#supportcontentcreators#completeresources#itsphotoshop#dailypsd#allresources#makersleague#ihaveresources#resourcemarket#yeahps#psds#resources
119 notes
·
View notes
Text
Photoshop/Gifmaking
@completeresources: #completeresources
@userphotoshop: #userphotoshop
@usergif: #usergif
@clubgif: #clubgif, #gif tutorial
@refercnces: #tusermelissa
@allresources: #allresources
@ihaveresources: #ihaveresources
@dailyresources: #dailyresources
@pscentral, @resourcemarket, @oblivionresource,
other tags: #gif tutorial, #colouring tutorial
10 notes
·
View notes
Text
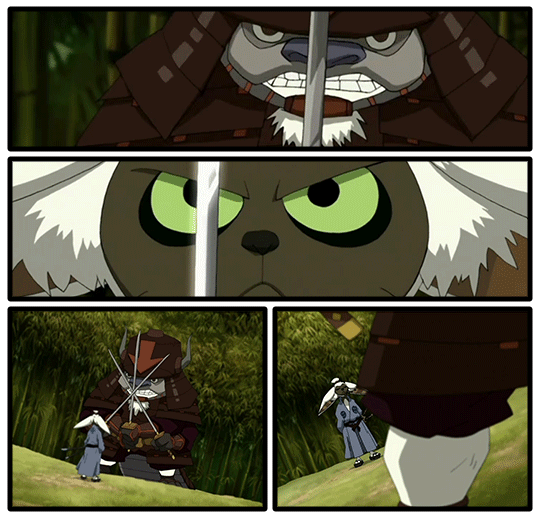
Tutorial: Comic Book Gifs
I got a request for a tutorial on how I create gifs stylized like comic books, so I will be walking through how I made this gif (from this gifset):

Tutorial under the cut:
I’m going to break this tutorial into 3 sections: organizing the panels, creating the comic book “look”, and adding the sound effects.
1. Creating the Panel Layout
1. Start by deciding how you want your “layout” to look. These really don’t have to be too fancy: usually I’ll just do rows of 1 or 2 panels, but if you need help getting a rough idea of what a layout might look like here are all my comic book edits. Again, nothing too fancy (unless that’s what you want).
It’s probably best to plan which gifs are going in which panels in advance but I kind of make it up as a go.
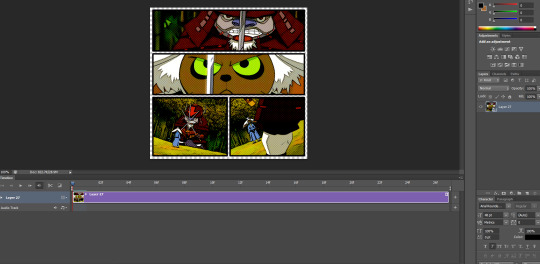
2. Create a new psd and start in video timeline mode. Then using the rectangle tool, draw the rectangles based on your desired layout:
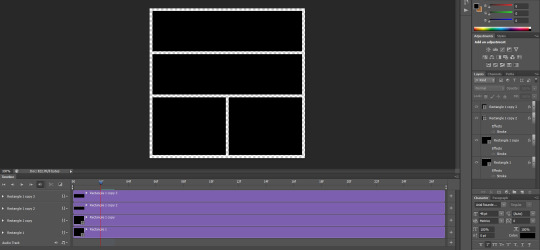
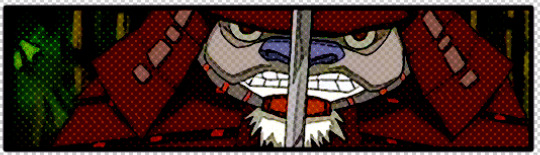
3. Create the gifs you will use for each panel. (Note: It’s important that the # of frames in your gifs are all the same.) Make sure the gif is in video timeline mode & is converted to a smart object. No need to sharpen yet - we will do that later. These are the four gifs I will be using (one per panel):
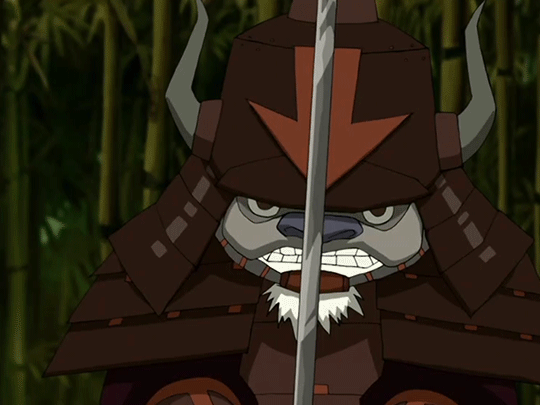
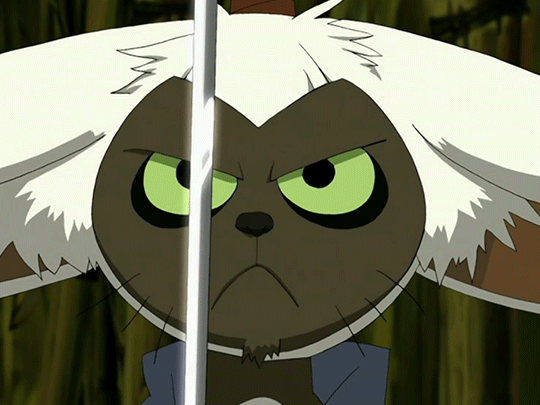


The framerate is a little fast right now but that’s ok - I will fix this at the very end.
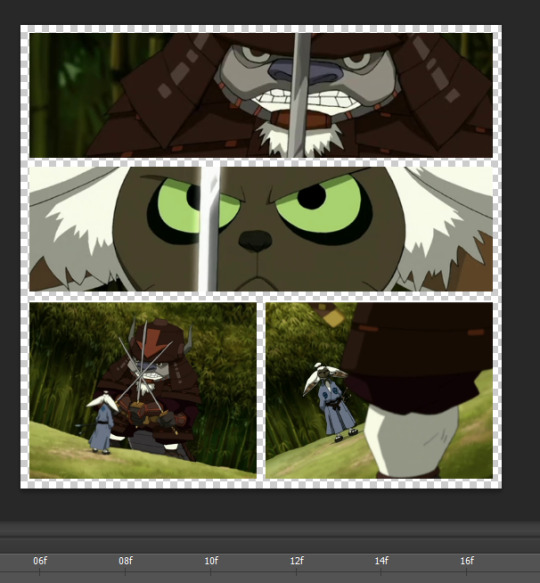
4. Now, you want to drag your gifs onto the psd.Use a clipping mask (ctrl + alt + G) to attach the gifs to the “panel boxes”. To resize your gifs within the panel you can just use ctrl + t.
So this is where we should now be at:
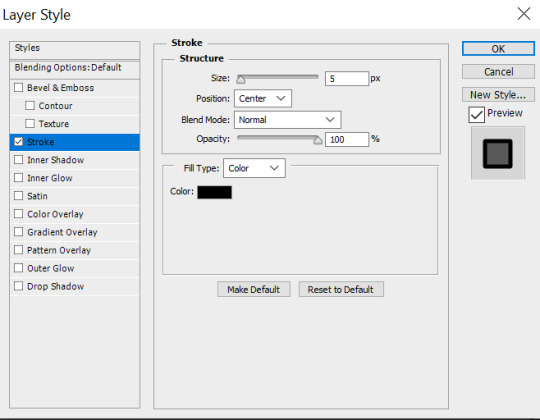
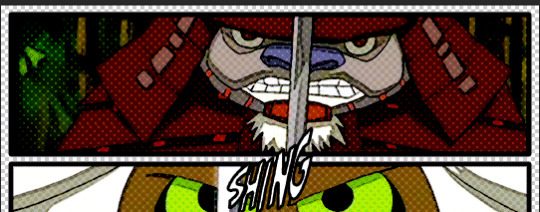
4. Final step is to add borders. So click on the rectangles, and then click on add layer style -> stroke to add a border. Personally I like the borders a little thicker to make it look more “comic book-y”. So I use a 5px stroke with position set to center:
And this is what our gifs should look like now:
So now we’re done with the setup, and we can move onto styling.
2. Styling the Gifs
1. Start by just applying your usual sharpening settings (I used a surface blur & smart sharpen).
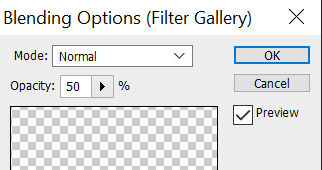
2. After that, add a poster edges filter to the gifs. You can do this by clicking on filter -> filter gallery -> artistic -> poster edges:

These are the settings I used for this gif, but I do tweak them a little depending on the set (I’d recommend playing around with it a little until you find the setting you think works nicest for whatever scene you are giffing):
3. Click on the little arrow next to it and adjust the opacity. I usually like to set it to 50%:

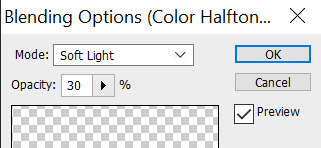
4. Now, to add the halftones click on filter -> pixelate -> color halftone. These are the settings I recommend using:

5. Click on the little arrow next to the halftones filter and adjust the blending options. I recommend setting opacity to no higher than 50%. You can use overlay, soft light, or darken - again, I usually play around with various setting until I find whatever I think looks nicest. These were my settings for this particular gifset:
So now our psd looks like this:
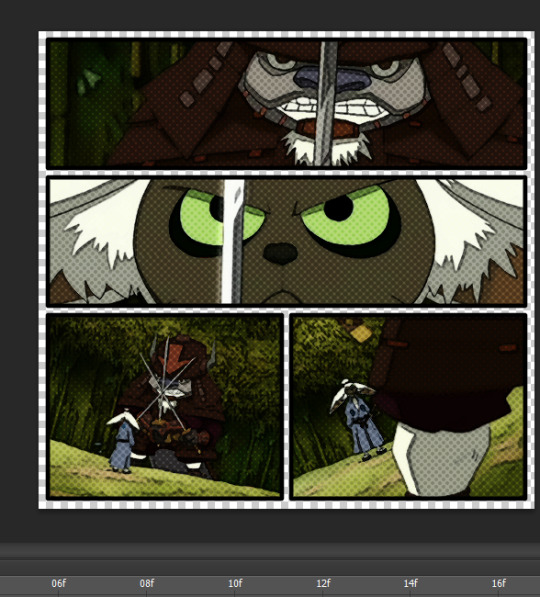
6. Final step is to add some coloring - I went for a bright & greenish coloring, so this is what I ended up with:

And now the gifs are complete. All that’s left is adding sound effects.
2.1 Save and Reopen (Optional)
A thing I like to do before adding sound effects is to save my gif and then work with the gif as a fresh psd. My photoshop starts to get really slow once I add all these filters. Adding the sound effects requires analyzing every single frame and this is a pain when photoshop is being slow. I find saving my gif and working with that instead makes photoshop much more tolerable so I do recommend these quick steps:
1. Save your gif. this is what it looks like currently:

2. Open your gif in photoshop:

3. Switch to timeline mode & convert to smart object:
4. Save as a new psd, which we will now be working on.
Ok, now onto the sfx!
3. Adding Sound Effects
For the sound effects there are actually two parts here: getting the sound effects and then animating them:
3.1 Getting/Making Sound Effects
First step for adding sound effects is to get the actual png images you will use. I actually got all my sound effects off the a:tla comics. This process is pretty straightforward:
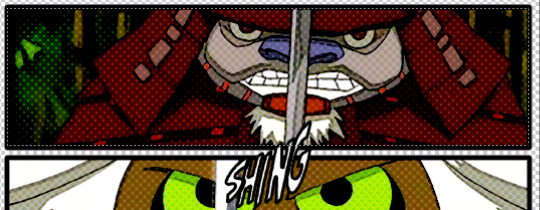
1. Open the online comic book (I recommend comiconlinefree(.)net), find the sound effects you want and take a screenshot (I use snipping tool for this). For this particular gif, I am using the ‘shing’ sound effect from the bottom panel:
2. Open the screenshots in photoshop, and use the pen tool click on each letter, then right click 'layer via copy’. You should now have a separate layer for each letter.
3. Highlight all of the individual letters, right click, and convert them into a smart object. Then add stroke (I used 3px):

You can also use layer style -> color overlay if you want to change the color.
And I repeated the process for the swish sound effect:

Now that we have our sfx, it’s time to add them to the gifs!
3.2 Animating the Sound Effects
Ok, this step is definitely the most tedious. I recommend doing this one panel at a time. So let’s start with the first one.
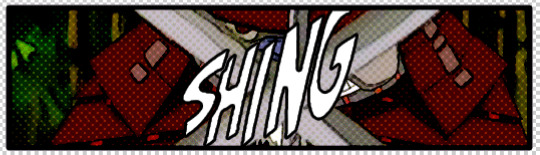
1. Using the timeline feature, go frame by frame until you’ve decided where you want your sound effect to start. This is the frame I’ve decided I want the sound effect to start on:
2. Now drag the sound effect onto the psd and use transform (ctrl + t) to resize accordingly:
3. Add a layer mask (layer -> layer mask -> reveal all). Using the rectangular maquee tool, draw a rectangle around the panel the sound effect will be in:
Then right click -> select inverse. Now, with your layer mask selected, click on the paint bucket tool. Set the color to black and click on the psd. Unlink the layer mask from the layer by clicking on the link symbol in between them. Your layer mask should now look like this:

This will prevent your sound effects from flowing outside the panel.
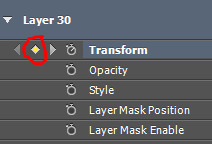
4. On the videotime, click on the arrow to the left of where it says ‘Layer 30′. Then click the little clock to the left of ‘Transform’. It should now look like this:

5. Move a couple frames ahead. Click on the diamond by the transform button:
Now, use transform (ctrl + t), to resize/rotate/move your sound effect to where you want it to be in this frame:
6. Move a couple frames forward and repeat:

Continue doing this until your sound effect animation is over.
7. Repeat steps 5 and 6 for the other sound effects you want to add. This is how I animated the ‘swish’ sounds in the 3rd panel:


8. Now our gif should look like this:

9. Final step: save your gif, reopen and adjust the framerate (if necessary). And this is our final product:
And we’re done! Then you can just repeat for every other gif in the gifset!
I hope this tutorial was helpful - please let me know if anything is unclear/there are any questions. If you use this tutorial to make a comic-style gifset I’d love to see your work so please tag me in it! I track #kahtaras
#mine: tutorials#mine: all#completeresources#itsphotoshop#allresources#dailyresources#quirkyresources#ihaveresources#onlyresources#ps tutorial#gif tutorial
397 notes
·
View notes
Photo
🌙 Death : PSD ® @wiiintermoon
PSD PREMIUM
Not available free !
Buy by : DEVIANTART or PAYHIP
Any problems or questions, contact me by ask or chat

#kpop psd#download psd#psd#colorize#coloring#colorized#effect#psd dark#ihaveresources#quirkyresources#finesources#dailypsd#tusermelissa#hisources#onlyresources#vannilapsds#wehearttutorials#wealphotoshop#allresources#completeresources#chaoticresources
245 notes
·
View notes
Photo

fonts for gif watermarks
below is how you could style/use them as watermarks (using my url for reference), tracking is set to 350 for that spaced look.
Poppins // Alata // Varela Round // Dogica // Momcake // Nunito // Sulphur Point // Montserrat // Minitel // Quicksand
please like or reblog if you find this useful!
#*resource#watermark fonts#font#ps resources#allresources#sibylresources#ihaveresources#monojoons#varietae#taemaknae#useryoonqiful#usersaav#tagging some moots so they can see#i hope this helps!!
309 notes
·
View notes
Photo
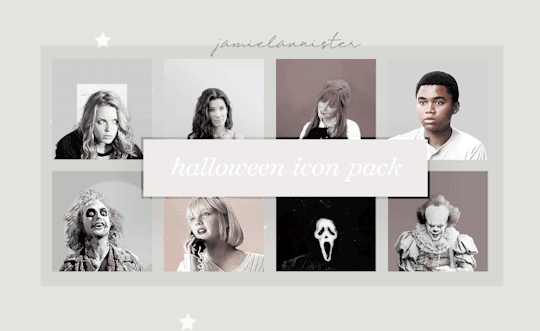
Halloween Icon Pack ● by jamielannister
- Please follow this ghoul if taking
- Please like or reblog if downloading
- Icons are 200 x 200
- Please request an icon if I don’t have it in the pack.
- Download {here}
Includes Icons From
Beetlejuice (3), Buffy the Vampire Slayer movie (7), Edward Scissorhands (4), Happy Death Day (3), Haunting of Hill House tv (3), Hocus Pocus (11), It movie (4), Jennifer’s Body (2), Legally Blonde (2), Mean Girls (3), Practical Magic (2), Scream (3), Sleepy Hollow movie (4), Stranger Things (5), The Craft (2)
If you prefer a more pale look, comparable to the graphic above, add an vibrance adjustment layer with: Vibrance: -70, Saturation: -67.
#icon pack#icon#icons#halloween#spooky#halloween icon#halloween icons#halloween icon pack#halloween movie#*#*icons#ihaveresources#allresources
13 notes
·
View notes
Photo

PSD #241
Download here
Like or reblog if you download
Like my content? Support me on ko-fi! ☕💖
#psd#psds#rresources#completeresources#dailyresources#hisources#makersleague#ihaveresources#allresources#pastel#photo#*
56 notes
·
View notes
Note
Any SC psds you have would be so appreciated for learning!
Here you go lovely!

download
download

download
download
#Schitt's Creek#schittscreekedit#allresources#ihaveresources#dailypsd#Hopefully these help!!!#Answers to Things#Anonymous#*mypsds
25 notes
·
View notes
Photo

unsent: an f.a.q by @capecoding [preview & code - 3USD]
this page is designed to accompany my unsent blog theme, but can of course be used with any theme
draggable sections
audio with one song in sidebar (instructions here)
2 column layout
easily customizable colors + fonts
Like // Reblog to share
Contact @capecoding with any questions, comments, or feedback
#completeresources#codehunter#themehunter#allresources#codingcabin#ccnet#supportcontentcreators#codetoon#resourcemarket#ihaveresources#userlex#theme#tumblr theme#tumblr page#tumblr pages#tumblr codes#unsent faq#cape codes
144 notes
·
View notes
Photo


oh, she is | preview & install link
a page by foundcas/capecoding
This is a tags page that uses no javascript so it can be used without requesting an exception from tumblr.
75 x 75 image in header
header image in preview from @doyoungr
title + subtitle
blacklist to list any spoiler/trigger warning tags
responsive page
colors easily edited (instructions in code)
like or reblog if using and to share
if you have any questions, contact @capecoding
#themehunter#allresources#codingcabin#ccnet#supportcontentcreators#codetoon#resourcemarket#ihaveresources#tumblr page#tags page#navigation page#tumblr pages#my themes#tumblr theme#theme
147 notes
·
View notes
Photo

☆ FALLING .01
falling resource
814 notes
·
View notes
Last Seen Blogs

zildabarbosandrade
Zilda Barbosa de Andrade
isafms
𝒆𝒗𝒆𝒏 𝑖𝑓 𝑖𝑡 𝐇𝐔𝐑𝐓𝐒
craft-of-survive
Craft of Survive

thefugitives
#thefugitives

currious00
Untitled