#indoor presets
Text
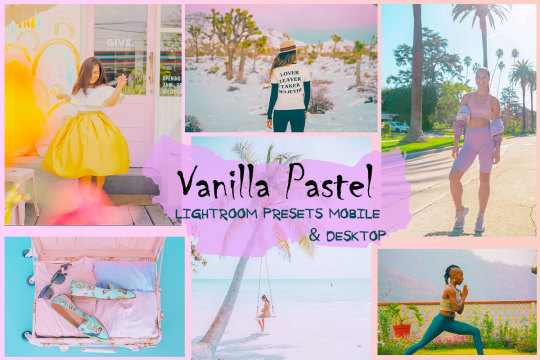
Capture the warmth and joy of Christmastime with rich hues that bring out the cozy home atmosphere. Find Christmas lightroom presets that are perfect for selfies, family portraits, and candid shots, both indoors & outdoors. These Christmas presents infuse your images with the holiday spirit, featuring soft greens, warm browns, and enhanced textures. Give your memories the gift of Christmas magic. Visit victoriabeepresets.com to get the Christmas Lightroom preset and make your photos shine with festive cheer!
0 notes
Text
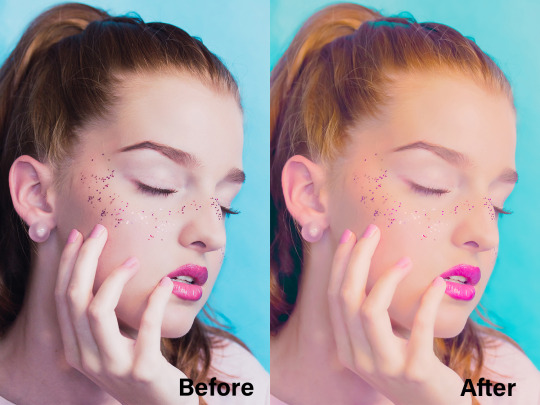

i have a sale in my shop now. So you are very welcome =) Thats a cool lightroom presets which could make your photos more attractive.
https://www.creativefabrica.com/designer/onyx-inhale/
#ACR presets#Android Presets#Best Presets#blogger presets#cozy presets#desktop presets#everyday presets#film presets#indoor presets#instagram presets#iphone presets#light presets#lightroom mobile presets#lightroom presets#lr presets#mobile presets#natural presets#outdoor presets#photo edit#photo filter#photo presets#photography presets#Photoshop presets#portrait preset#preset bundle#travel presets#warm presets#wedding presets
1 note
·
View note
Text

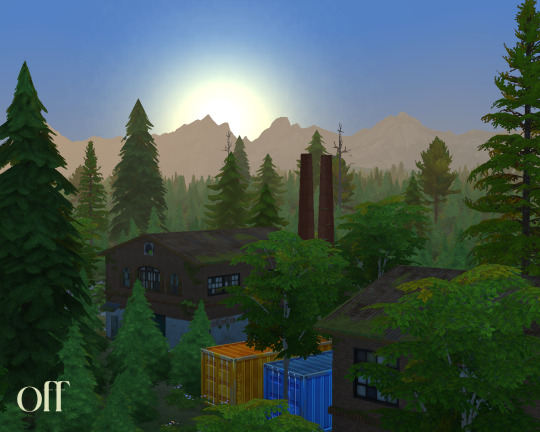
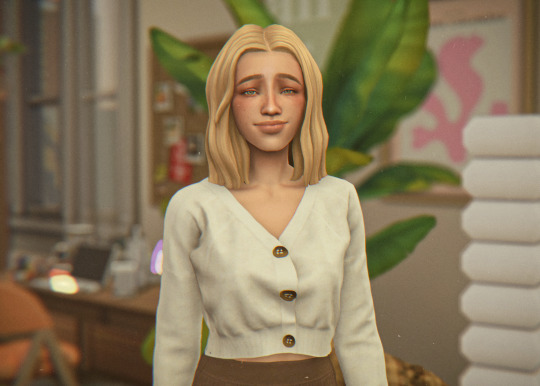
New game.. the Bay or San Sequoia?
#ts4#sims 4#ts4 scenery#it's bae.. obvs#eheheuh#do you like my new preset?#i'm liking it.. i think#it can be a bit overexposed in some indoor lighting tho.. gotta fix that
139 notes
·
View notes
Text
it’s the way i was -just- getting ready to update and clean everything up so i could resume my bc with the new compatibility features, but uhh ~ that’s a pASS
#been spinning the blorbos in my brain at hyper-speed and i want to shove them into your eyeballs expeditiously (and the last time i was fire#i got ill with symptoms that trigger my anxiety and i could not be present in my body foR LITERALLY MONTHS#so making good on those plans#well 🙃 impossible.. i could’ve said so but also i couldn’t’ve because i wanted to yeet out of my brain anytime i thought about it so! it’s#anyway#my plan at the moment is to redo the intros cuz i rushed myself and didn’t build it out the way i wanted to#which means the thought has been nagging me since i posted it and stopping me from progressing because i can’t let that be what’s there whe#and i’m a little more comfortable playing around with reshade i THINK#so getting a preset to look good indoors may hopefully be less of a hurdle as well 🙏🏾#bleas raise your hand if i’m allowed to ask you for help 🙋
9 notes
·
View notes
Photo

Sol - Marzo 2022
#art#vintage#photography#film#preset#edition#photoshop#model#people#portrait#fashion#interior#indoor#natural#light#lifestyle
8 notes
·
View notes
Text

~indoor garden CAS background room~ (with mirror!)~
-
this was made bc I wanted to make a plant-based CAS room for a while now, and literally could not rest until I did it lmao
♥ Download the package file and put it right in your Mods folder! (up to 5 folders deep)
♥ You can only have one CAS background/room in your game at once, remove any other before putting this one in!
♥ Reflections need to be set to low, medium, or high but not OFF in your game's graphics settings for the mirror to be functional.
♥ Base Game Compatible!
-
Follow me on twitch!
Support me on patreon!
DOWNLOAD THE "INDOOR GARDEN" CAS BACKROUND ROOM ON SIM FILE SHARE!
WATCH MY TUTORIAL ON HOW TO MAKE YOUR OWN HERE!
-
TOU: do not redistribute, reupload, or claim my cc/CAS rooms/presets as your own! recolour/convert/otherwise alter for personal use OR upload with credit. (no paywalls)
♥ built using littledica's original CAS room files ♥
♥ round rug (not cc) ♥
♥ botanical prints (not cc) ♥
stuff I'm using here: reshade | cas lighting | (I'm wcif friendly if you want anything on the sim!)
#sims 4#ts4#sims4#thesims4#maxis match#maxis mix#s4cc#sims 4 cc#sims 4 custom content#my cc#cas background#sims 4 cas#cas room#ts4 cas background
735 notes
·
View notes
Text
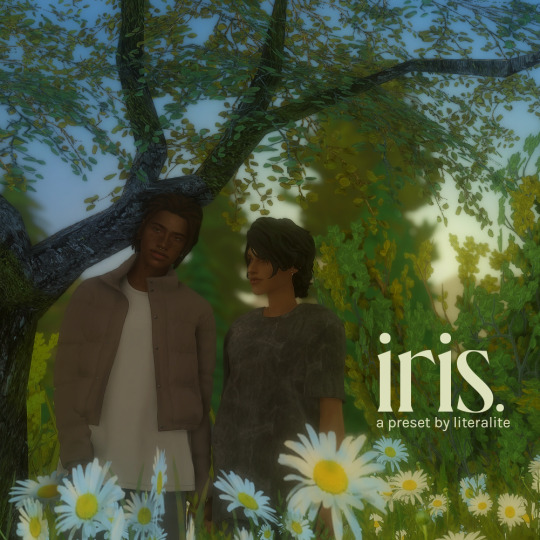


iris.
named after iris by the goo goo dolls. a yellow-toned saturated and glowing preset that comes in both an ingame version and a cas version that i've been using pretty regularly of late. has a very slight highlight and shadow effect on some sims
works with both gshade and reshade
in my opinion it actually looks best indoors and in lower lighting. i recommend sunblind but it looks fine without it
the cas version is NOT meant for white/pale cas backgrounds, so it looks it's best in a room or on a black background. i have no idea what it looks like with the default cas lighting, i recommend these replacements
works best on mid to dark skintones, pale sims will look slightly washed out especially under harsh lighting
DOWNLOAD (google drive)
thank you to everyone who tested this for me! ty also for being patient guys ik i've been sitting on this one for a while but i really hope u guys like it <3
#all images as per usual totally unedited aside from adding text and cropping#ts4#gshade#reshade#ts4 reshade#ts4 gshade#ts4 download#download#manny#a*#ophelia#araceli#p
915 notes
·
View notes
Text
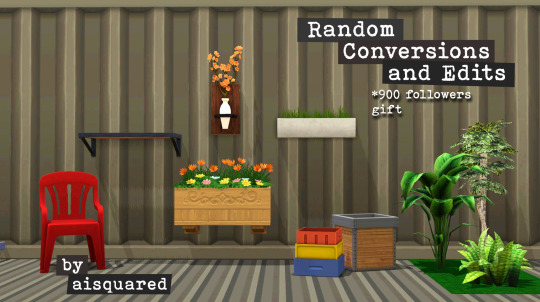
I know I said I'm getting a little rest from making cc, but I just can't sit here knowing I reached 900 followers and do nothing about it. Though these were just unreleased projects that were wating to be posted during the time I had a broken internet at home so no worries, I didn't pressure myself to make these as these were made carefully and with love. So here's a token of gratitude for the huge following I continuously receive all throughout. Thank you everyone! 🥰
4to3 Eco Lifestyle "Panel to the Metal" Wall
-- Three channels, cost §3, found in Walls > Paneling
4to3 Eco Lifestyle "Layered Paneling" Floor
-- Two channels, cost §4, found in Floors > Metal
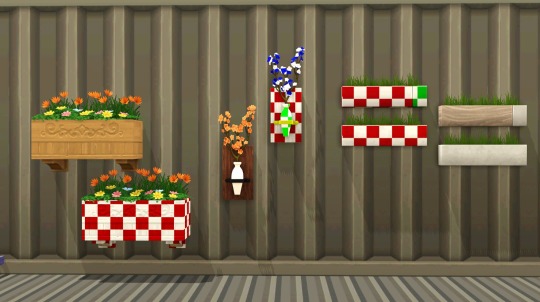
4to3 Cottage Living "All Good Days Daisy Box"
-- Ah yes, this is the plant I showed on the tutorial I shared not a little long ago. One channel with 7 presets for each flower variation, costs §50, found in Decor > Plants. Contains the original catalog description from TS4.
4to3 Seasons "Branching Out"
-- Four channels (yes, even the flowers!), costs §50, found in Decor > Plants. Contains the original catalog description from TS4.
4to3 Spa Day "Wheatless-Wheat Grass"
-- Two variations, one with a single channel and another with two channels. Costs §65, found in Decor > Plants. Contains the original catalog description from TS4.
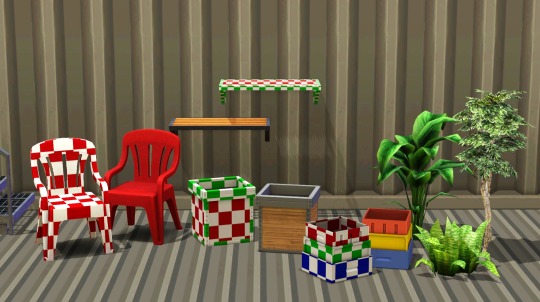
4to3 For Rent "Indoor Outdoor Plastic Chair"
-- I had my eyes set on this plastic chair when For Rent came out, so I know I have to convert it for my game. And anyone else who wants it can have it too! One channel, costs §30, found in Comfort > dining Chairs, Misc. Contains the original catalog description from TS4.
***UPDATE 12 APR 2024: PLEASE REDOWNLOAD!
***The chair's holes are not shown to be transparent. This is now updated with the corrected transparency. Sorry for the inconvenience!
4to3 Greenhouse Haven Kit "The Plant Platform by Plant-It"
-- Two channels, costs §175, found in Surfaces > Shelves, Misc. Shiftable with 7 slots. Contains the original catalog description from TS4.
Decades "JuxtaPlant" Separated Planter* and Plant
-- Self-explanatory, made the planter and plant as separate objects. The planter has the same two channels and a single slot for the plants to put on, price is reduced to §100. The plant is non recolorable and costs §75. Both are found in Decor > Plants.
Fast Lane "Stack O'Storage" as Planter*
-- Aside from being a garage clutter, this stack of crates from Fast Lane can also be a planter of your choice too, also with a slot for your plants. Priced §75, found in Decor > Plants.
Base Game Ficus and Philodendron as Separate Plants
Same with the JuxtaPlant plant, these were also 'depotted' from their vases and can be freely placed in any emptied planters. Non-recolorable, cost §150 (Ficus) and §50 (Philodendron). Both found in Decor > Plants.
*note: these planters will not work with harvestable plants, as these are made for decorative purposes only. If someone wants to remake them as functional planters, please do so!
Everything is base game compatible!
DOWNLOAD: Simfileshare | Mediafire
166 notes
·
View notes
Text
PXL'S Anatomy of Screenshots
So you want to take better screenshots? There are multiple factors to consider, and if you don't enjoy tweaking reshade settings for every image, my ultimate method may not be for you. That being said, there are tips and resources in this guide that are applicable to everyone and you can select to explore those that are useful to your specific situation.
Disclaimer: I am not claiming to be an expert, nor am I offering to provide troubleshooting on an individual basis. This is a general guide and if you are unfamiliar with any of the concepts, please use the mighty power of the internet to find tutorials. I promise everything that I have learned over the years has been published and documented a thousand times better than I ever could.
There are five factors to address:
Your computer's inherent capabilities
The game's limitations
The mods you're using
Reshade
Post Processing
Graphics Card Settings & Drivers:
Become familiar with your graphic options. If you don't have a dedicated graphics card (i.e. a desktop or gaming laptop, these features may be unavailable and you should skip.)
I have an AMD Radeon Pro card which is designed for workstation level systems. It's overkill for sims, but useful for 3D rendering and modelling work. I have changed the following settings for DirectX 9 applications:
anti-aliasing - enhance application settings
anisotropic filtering - enabled
anisotropic filtering level - 16x
texture filtering quality - high
surface format optimization - high
Consider overclocking your graphics card to unlock it's full potential. DO NOT pursue this venture unless you are ok with the risk of burning out your card prematurely. I use at present, overclocked Bootcamp Drivers from BootcampDrivers.com obviously, if you're not playing on an intel based mac through Bootcamp, this is irrelevant to you.
None of these settings are useful until you address the default games limitations, which leads nicely into the next factor.
Addressing The Sims 4's Graphic Limitations:
Everyone should be familiar at this point with lighting mods, 4k, textures, disabling ssao, etc. but, I'm still going to spell it out. None of this is new information and has been covered many a time by various players ad nauseum.
remove ugly blue toned lighting in the world by choosing a lighting mod from @softerhaze here
overhaul your graphics.cfg file (i use a custom blend with features specific to me), however @simp4sims has done a ridiculous amount of work in providing a simple to install file that can be found here - read through their tutorials!! they have provided an excellent oversight of exactly what this does and why it matters
improve the indoor lighting for your sims - previously i used @luumia's no blu, no glo - recently i switched to @northernsiberiawinds better in game lighting mod here, though i have tweaked some of the settings to suit my own personal preferences
i don't use the HQ mod, i don't find that it makes enough difference for the amount of effort it requires to convert CAS CC
It should go without saying, but tweaking your graphics config file is absolutely useless if you can't play TS4 at it's maximum in game graphic settings!
The Mods You're Using:
Now that you've put in all this work into getting the game ready to make use of quality mods where do you start? Well, the CC you install matters. Whatever your preference, whether it be maxis-match, alpha or somewhere in between, priority should be given to using items textured in 2k or 4k resolutions, and specific attention should be paid to using wall and flooring textures with bump maps, and or high quality resolutions (this is important later for reshade if you intend to learn about ray tracing).
I will separately post a guide to creators with crispy textures because that is it's own novel.
Reshade:
Phew. Still with me?
There are many many many reshade presets out there, most are alike, but none employ ray tracing, and that is because a) it needs to be manually adjusted for every screenshot, b) they are paid shaders, and c) this requires advanced knowledge of reshade and a decent enough graphics set up that won't overheat - games running native ray tracing recommend a minimum VRAM of 8GB (please note RAM and VRAM are not the same) - i therefore do not recommend pursuing this option if your system does not meet those minimum requirements.
Start here to understand what ray tracing for reshade is. In my opinion, the shaders are well worth the price of $5 for the amount of work that has gone into creating them by the talented Pascal Gilcher. That link is a comprehensive starting point into expanding your knowledge of reshade and it's capabilities.
I have always created my own reshade presets from scratch, and while the core colorization settings I utilize remain largely the same, using ray tracing and re-light means every screenshot needs to be manually adjusted (lights repositioned, bounce and AO factors adjusted, etc) before being captured. @pictureamoebae just published a very timely post discussing the re-light shader and you can read it here.
Post Processing
Reshade does 99.99% of the work that traditionally would be accomplished in a photo editing software like photoshop. Occasionally, I need to adjust exposure manually, add depth of field manually, or color correct. Beyond that I use it to scale images to fit the resolution and file size limits of various platforms. Conceptually this reduces the amount of uncontrolled loss encountered when platforms like tumblr auto compress files that are too large. In reality, tumblr still makes images crappy compared to how they appear in my file folder.
optimize your images for various social media platforms using this guide
fix exposure or colorization issues using a software like photoshop
I hope that this gives you a starting point into expanding your methodologies. My process is continuously evolving and I find this aspect of the game most entertaining. For others who don't enjoy this process, it's probably not worth it!
Thanks for reading ❤ PXL
271 notes
·
View notes
Note
What is a good beginning camera for someone? I want to be able to take my own photos to paint and draw.
For what you're doing, anything within your budget is a good camera.
Point and shoots are good! I still use my Nikon Coolpix and my dad uses Canon Powershot. These ones are more for people who are playing around with it and don't necessarily need to shoot in Manual, but the Powershots on the high-end do have manual settings if you're interested in learning how to use it.
(I like cameras with Manual options because now that I know how to shoot in Manual mode it gives me a lot of creative freedom that auto and presets do not have. But if you don't know Manual and want to learn, there is a rather frustrating learning curve that a lot of people struggle to get over. Just be prepared for that.)
If you're interested in learning photography and want something a little above the point and shoots, my first DSLR was a Canon Rebel (I think it was a Rebel 3). It still has presets and auto functions, but its the middle ground between beginner and pro.
You might get a good deal on DSLR cameras soon because most companies are going mirrorless and the mirrored cameras are becoming obsolete.
I'm going to tell you this: the cheaper the camera, the worse it will be at shooting dark scenes. That's pretty much where most of the money goes towards in development.
So if you're looking to take pictures outside or in well-lit places or with an built-in flash, then you may be happy with a point and shoot.
If you're looking to be in more challenging places, like indoor places that aren't terribly well lit, then a DSLR might be a good place to start. The Rebel I used to use was great for doing candids inside schools. You can also use an external flash with DSLR cameras, if you're feeling ambitious.
Anything priced higher than that is going to be able to do all of these things AND be able to take photos in poorly lit bars. My Canon Mark II just about struggles in dark places, but you can still get some cool looks if you know how to work your exposure settings (-grumbles in photographer-)
41 notes
·
View notes
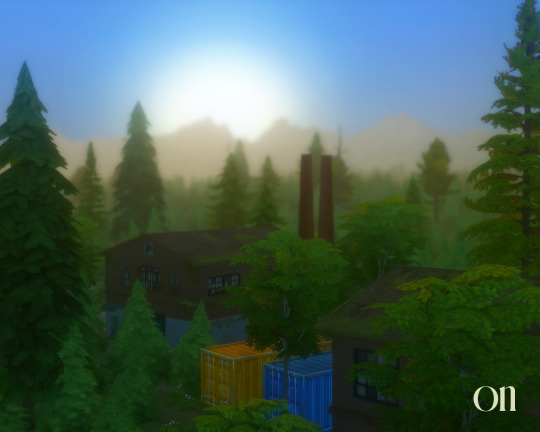
Text
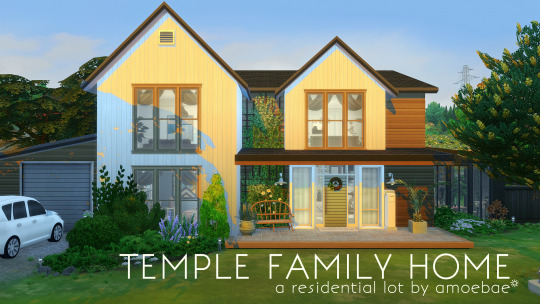
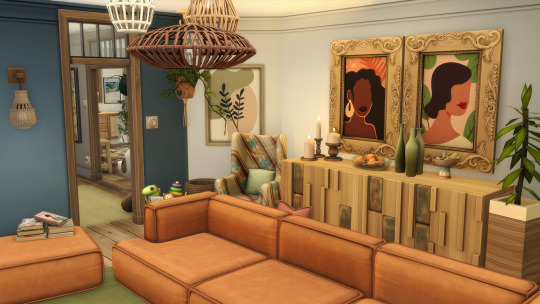
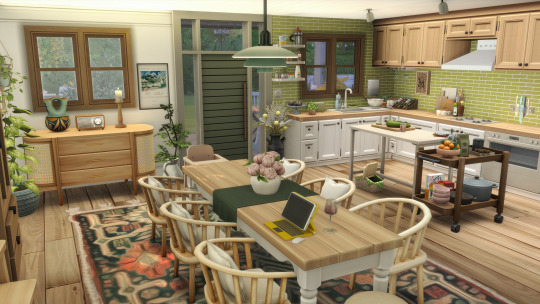
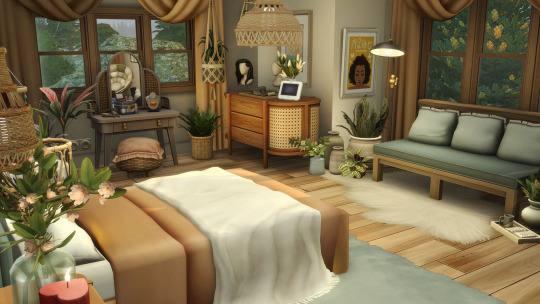
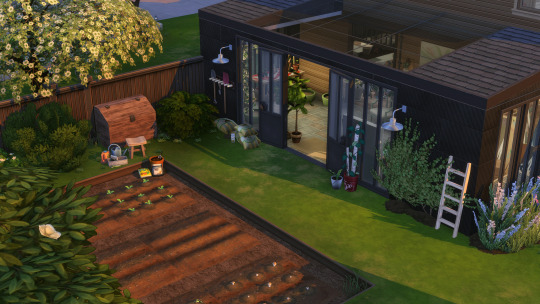
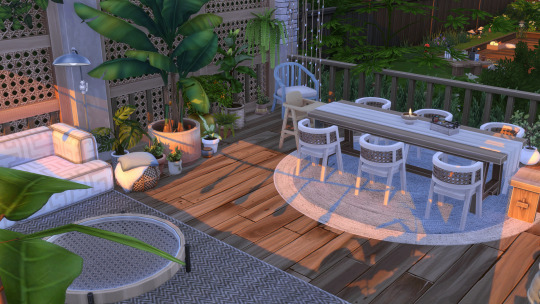
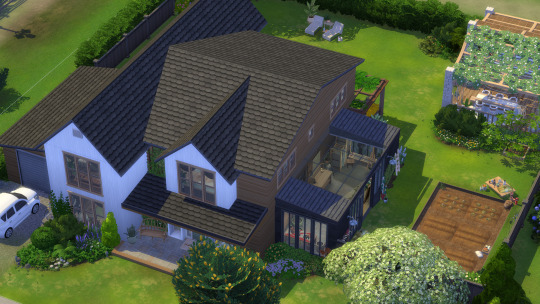
TEMPLE FAMILY HOME - a residential lot by amoebae
Made by request. A charming modern farmhouse home steps away from the heart of Sable Square, Temple Family Home is the ideal abode for a new and expanding family moving to Brindleton Bay. With 4 bedrooms, plenty of room to expand, as well as ample entertaining space indoors and out, this house offers everything your family could need for generations to come.
I used lots of cc for this build. I've created a spreadsheet with all the links you need.
Additionally, I've included my own cc in the download.
I have every build/buy pack and kit, up to the most recent Horse Ranch EP, and used a lot of them for this build. Anything missing can be replaced with whatever you have in your own game.
You can see some screenshots of the lot here: https://imgur.com/a/EYUJn21
---
DOWNLOAD NOW @ PATREON (free)
---
INSTALLATION:
- Place the loose Tray files in your Tray folder
- Add the cc from the spreadsheet and my download to your mods folder if you don't already have it
- Remember to tick the 'Include CC' box when searching for the lot in your library
---
With thanks to everyone whose beautiful custom content I used, and to the person who requested this build, which was a lot of fun to create.
Find me here:
pictureamoebae @ tumblr
amoebae @ twitter
amoebae @ ko-fi
amoebae @ patreon
pictureamoebae @ instagram
pictureamoebae @ threads
amoebae's TS4 screenshots @ flickr
amoebae's cc, builds and ReShade presets in one place @ flickr
amoebae's amoebas discord server
123 notes
·
View notes
Text


It’s been a while since I created a new Gshade preset, so introducing Beau a vibrant, blue tone preset perfect for indoor, outdoor, day or night this preset is very versatile.
• I highly recommend using Sunblind by Softerhaze & Northern Siberia Winds Better In-Game Lighting Mod V1.1, if you would like your game to look like the screenshots above. The look may differ depending on your PC specs please keep that in mind.
• Be sure to toggle ADOF off if you’d like to unblur the background during gameplay, feel free to tweak to suit your style.
• Please do not reupload & claim as your own.
• Feel free to tag me in all your gorgeous photos when using this preset 🤍
• Follow me on, Twitter, TikTok & Instagram
DOWNLOAD: Patreon (PUBLIC 08/02/24)
33 notes
·
View notes
Text
Last updated 02.12.2023
As a few people have come here recently, I wanted to make a post in which I will write a little about how I like to play, what I use most often and what are my must-haves in the game. This will be a bit of a resources/faq.
Am I WCIF friendly?
Yes I am, text me I’ll be happy to help.
How do I like to play Sims 4?
I like cozy vibe gameplay. I basically love everything about this game.
Maxis match or Alpha?
Maxis match only!
What presets do I use?
I use gshade, Gia by Kindlespice for screenshots and Luminescent by Hazelminesims for gameplay.
What do I use to edit photos?
I don't edit my photos, I only use gshade (Gia preset). Buffs, emotions pop ups I add in Canva
Will I upload my sims to download?
Yes I don’t have problem with uploading any of my sim, they don’t feel personal for me at all. It’s just a game. But I create sims usually only with CC so below is the list of what I use.
Skin details/Body details:
Eye shine remover
Beetle eyes (default and addons)
Teeth replacement
Pregnancy belly overlay
Pierced ear detail
Tan lines
Little details
Belly overlay
Stretch marks details
Skin detail cc pack by peachyfaerie (clevage and collarbones)
Clevage overlay
Starch Masks
Cellulite overlay
Age wrinkles (just a few of all set)
Face definition
NosemasksSD-faaeish
Misc. face details
About face skin details by pyxis
To the bone nosemasks by pyxis
Under Cover Nose Details
Dimples by PoyoPoyo
Eyebags by Tamosims
Wedding ring tan line by XUrbanSimsX
Teeth:
Nondefault Maxis Teeth
Imperfection Teeths Set
Happy Gappy Teeth Set
Skinblends:
Bare Skintones
Agave Default Skinblend
Cartoon Skins
Thuja Skinblend
Aeonium Skinblend
Pufferfish Skinblend
Posie Skinblend
Sage Skinblend
Sliders:
Breast sliders
Teanmoon Mouth Scale Slider
Nails:
Natural Nails
True Almond Nails
Serpentine Nails
Classic Ombre French Nails
Makeup:
EA Eyelashes Remover by Kijiko
3D Lashes Uncurled Eyelashes by Kijiko
Eyelashes by Obscurus
Eyelashes NO.1 by TwistedCat
Eyelashes Part [1] [2] [4] [5] by Miiko
Petals Blush by Breezytrait
Eyebrows N4-N6 by Northern Siberia Winds
Every eyebrows (No. 2- No.7) by TwistedCat
Maxis Match Eyebrows (61-65) by Obscurus
Eyebrows 68 by Obscurus
Eyeliner N26 by Cosimetic
Lip Kit by Peachyfaerie
Honey and Suga Gloss by XUrbanSimsX
Gameplay Mods:
MC Command Center by Deaderpool
Tidy CAS by YoruQueenofNight
Stand Still in CAS & CAS Close Up by Helgatisha
CAS Tuning by NSW
More CAS Presets by Zerbu
UI Cheats by Weerbesu
Control any sim by TitanNano
Sleep All Night By LittleMsSam
No Cold Clothes Inside by scarletqueenkat, (stopped creating so link doesn’t work)
Dance Override 2.0 by Steven Studios
Shorter University Degrees by Peridot (I'm using 6 credits)
Selfie override (single and paired) by DearKim
Faster Uni Homework by LittleMsSam
Longer Parties & More Guests by Weerbesu
The Missing Plumbob by mintvalentine
No Zzz by Krys29
Memory Keeper Journal by Ravasheen
ISO Full Control Camera by Ravasheen
Photographic Memory 2.0 by Ravasheen
Sims Portrait Maker by Ravasheen
Indoor Dog Potty Pads by Ravasheen
Music Festival and Concert Mod by Mercuryfoam
Change outfit in Mirror by BrazenLotus
Phone replacement by FrenchieSim
Steady Sit & Seat Any Sim by Amellce
Food Related Mods:
Drink Tray by Somik and Severinka,
Grannies Cookbook by Littlbowbub
Functional champagne bottles by Somik and Severinka
2xSlower fish and food Spoil by simmythesim
Home Chef Hustle Pizza fix by Channel4sims
Drinkable beer by Icemunmun
Custom Drink Interactions by TheFoodGroup
Romance mods: (because I'm all about the love and drama relationship in my Sims)
Wicked Whims by Turbodriver (E404P, Amra72, Kiki, lupobianco, Mia, Mike24, ooOLaLaWorld, Yummy-o-Tummy)
Cute Romance by thepancake1 and MizoreYukii
First Impressions by Lumpinou
Kiss-n-Grind 1.5 by Utopya_cc
Passionate Gifts 0.1 by Utopya_cc
Carry and Kiss animation interaction mod by Khlas
More kisses 1.5 by Maplebell
Bed cuddle by thepancake1 and MizoreYukii
Romance Interactions by KiaraMods
Relationship & Pregnancy Overhaul by Lumpinou
Expanded Storytelling Relationship Bits Mod by Maplebell
70 notes
·
View notes
Note
Hiii! I was wondering if you do any editing to your pictures besides using reshade !! I love how your screenshots look <3
Hello! My editing is pretty simple. I use Adobe Photoshop 2021, Topaz Clean and Analog Effex Pro plugins.
First I crop my picture and run all-in-one action from this pack to make it look crisp and smooth like this:
next I apply Analog Effex Pro 2 plugin (i play around with different filters from picture to picture depending on what I want to achieve so i don't have any go-to presets). It's such a lifesaver tool providing a wide rage of editing options. I go with basic adjustments, film type, and dust and scratches to get smthn like this:
At this point if I feel like going extra I may apply color grading or use some @wooldawn's actions

For an outdoor shot that would be it, but if the picture was taken indoors like this one I enhance lighting by, well, paining it. Here's what I do: first create an empty layer, fill with color black and change blending mode to soft light. Then take large soft brush (color white), paint areas where you imagine the light source is and apply gaussian blur (set the radius to high values to make the edge of dark and light areas smooth). Lower the opacity to 15-30%

Here's what I get in the end. Hope that was helpful
74 notes
·
View notes
Note
I’m on a quest for advice. I downloaded CC skin tones they are gorgeous btw! Currently I’m giving townie makeovers and picking the cc skin tone that matches the original. Is it okay that I made some of the black sims darker since I couldn’t properly match it? I didn’t want them to get white washed by my reshade so I made them darker.

.... is what I always say.
You can always adjust your reshade settings as an alternative, too. There was a really good post about which settings to play with to keep the melanin in tact when you're using reshade but for the life of me I couldn't find it.
Anyway, I've seen even dark skinned sims washed out with re/gshade so take some time to try out your presets on Black sims both indoors and outdoors in game. Its probably the first thing I do when I download a new preset.
25 notes
·
View notes
Last Seen Blogs

butecatasa
Untitled

gfriendlane250
gfriendlane


wonitodoso
Untitled

zorilleerrant
wrong about canon on purpose