#it will likely become my breaktime art over the next while
Photo

even when you have a bazillion things to be working on, sometimes you gotta step back, take a break, and make a thrawn WIP
#thrawn#grand admiral thrawn#star wars#star wars rebels#star wars art#star wars rebels art#the thrawn trilogy#star wars legends#my art#fanart#WIP#this will be finished eventually#it will likely become my breaktime art over the next while#i finally started reading the old books with thrawn so there is a possibility he may pop up more frequently#because hoooo boy#yes please#alright i'm done
121 notes
·
View notes
Text
Batarou Headcanon - Yakuza AU
Hello guys, it's me again bringing more Batarou headcanon! 👀✨
While I'm still trying to finish my writing on webcomic Batarou headcanon/ficlet/oneshot (??), also battling with my stressed out condition, I will offering this silly AU headcanon instead in the meantime.
Warning: implication of nsfw-ish thing towards the end, but nothing explicit, also many inaccurate depiction of the topic matters I'm so sorry.
----------------------------
Badd is the firstborn of the strongest Yakuza clan, and also the Yakuza family's successor after both of his parents were assassinated by enemy clan.
The assassination happened when Badd was only a little kid while Zenko still a baby. Badd and Zenko survived from the tragedy after being saved by Bang, the leader and owner of martial art dojo, who worked as Badd's family bodyguard. They were both raised by Bang until Badd is reaching his adulthood, ready to take over his family's legacy.
Badd felt so sad after the death of his parents, sometimes mourning for them every night after Zenko was asleep. He swore to himself that he wont let the tragedy happening again, not when he still has the only precious person left from his family: Zenko. Once Badd reaching coming of age and finishing his school, he would be the Boss of his family clan.
Badd thought he wont get a friend because of his status and his intimidating look, until Bang bringing his adopted son into the dojo and introducing him to Badd. His name is Garou.
Garou, Bang's adopted son, was taught to be the next family bodyguard by Bang. So he can be the greatest martial artist to protect Badd for the rest of their life.
At first Garou was reluctant to take his future responsibility. But after seeing Badd, the most beautiful yet fierce person he ever witnessed, Garou gladly accept it. Especially after Badd bravely saving him from the bullies at school, showing how determinated he was to protect anyone he considered as his "family". Thus they started their relationship as childhood bestfriend, either in school or their home at Bang's dojo.
During that time, Garou encouraged himself to training as the best as he can in martial art. There's no way a bodyguard is weaker than the one they supposed to protect. He didn't want someone hurting Badd in the future, like what happened to his entire family. Badd is his bestfriend, his future boss, and also his first love.
Garou would be more than happy to be on Badd's side forever, protecting Badd from anyone who has ill intention towards him. It doesn't matter if Badd returned his feelings or not, because the most important thing is Badd's own happiness.
On the other hand, Badd was astonished by Garou's development and determination to become the greatest martial artist. It's like the "Fighting Spirit" is not only being inherited by his family's lineage, but also could be obtained by anyone who has strong determination. Someone who can be Badd's equal, not a subordinate no matter what people say. That's why Badd likes Garou, maybe more than just a friend along the way.
Badd also started to strengthen himself by learning how to self-defence, and to strike offensive attacks if it was needed. He didn't take martial art lesson like Garou did from Bang, instead Badd creating his own combat style using his family heirloom: a metal bat. Besides, it matched with Badd's current image as delinquent punk kid. In which could be frightening enough once he becomes full-fledged Yakuza Boss.
At school, because Garou and Badd didn't have the same class as Badd was one year younger than Garou, they would hangout on school breaktime and after school. Despite being a Yakuza's son and looking like tough kid, it doesn't mean that Badd is a bully. In fact, he was the one who becomes school protector along with Garou.
There's bully gang trying to pick on poor classmates? These delinquent duo would showed up and make sure they wont get 2nd chance to do that again at all (everyone didn't know what exactly Garou and Badd have done but clearly they put the fear of god into those bullies effectively).
After school, they were either hangout on local diner/family restaurant/cafe/ice cream parlor/game arcade depends of their moods, so they could still living their live as normal teenagers for awhile. Or immediately went home at Bang's dojo to do training routines. Sometimes Badd and Garou training separately, sometimes they would sparring with eachother.
Most favorite time was everytime they're trying on new techniques onto eachother in sparring session at training field, while Bang supervising them the whole time from dojo's main building entrance.
When Garou and Badd weren't in training hours, they spend time to do their own hobby as a form of relaxation. Garou likes to study in Bang's library or writing poems, whereas Badd have a fondness on cooking or baking to try out his mother's recipes, Zenko often joined him, too.
Sometimes whenever Badd has difficulty on studying for exams, he always comes to Garou for help, so he ended up as Badd's tutor. In exchange, Garou asking Badd to cook for him since his cooking is delicious, thus Badd making special lunchbox for Garou as the payment.
Imagine after both of them graduated from highschool, Bang with the entire Badd's family alliance clans holding an inauguration ceremony for Badd. Badd was officially becomes the Yakuza boss and the leader of his family clan, taking his family legacy as the survivor.
Then Garou pledged his loyalty for Badd as his bodyguard during the ceremony, vowed to be always be on Badd's side for the rest of his life and would never betrayed him at all cost.
Imagine Garou kneeled before Badd when he pledged his loyalty. And as soon as Garou finished his vow, he took Badd's hand and kissed his knuckle softly. Then looking at Badd with so much adoration yet there's hidden fire in those golden eyes, his trademark smug grin slowly showing on his handsome face.
If Badd didn't fully realized he was in the middle of inauguration ceremony, he would thinks Garou was proposing him! Not a bad thought, actually. Maybe someday Garou would do that, if it was allowed. Nothing can stop Badd from hoping.
Imagine how badass these two when they're on-duty, and their compatible dynamic is legendary among the clans. Everyone who is Badd's family subordinate really admired and respected them wholeheartedly. Not only both are very strong equally, they're also charismatic in their own way.
Badd is a good and kindhearted leader despite looking rough on the outside, but never hesitated to show the frightening side if someone trying to mess with his beloved family. A feared leader for the enemies, but a loving leader for the family. Also very protective for Zenko and Garou. Has the alias as "Metal Bat" regarding his choice of weapon during the battle. His "Fighting Spirit" would be activated as the ultimate power only when it was in a very necessary time, but enough to put a fear onto his enemies. Not very good at delivering speech at meeting but always has the best motivational words. Secretly in love with his own bestfriend a.k.a. his bodyguard. Badd has 2 kind of tattoos: Dragon tattoo on his whole left arm and Phoenix tattoo on his back.
Garou is a total monster when in the middle of combat, especially when it comes to protect Badd, Zenko, and their entire family. Have excellent sense to detect any assassin who tried to target Badd and would eliminated them in a matter of second. Basically the Best Guardian ever. That's why their enemies would call him as "Human Monster" based on his strength and abilities to fight. But even a "monster" still has the pure and softest heart for Badd, and only Badd. Have a soft spot for any underdog and bullied kids. Garou was kinda spokeperson for Badd since he's better at delivering speech than Badd. Garou has 2 kind of tattoos: Oni/Demon tattoo on his left torso and Wolf tattoo on his back.
Zenko is the "Princess" among the family clans, but that doesn't mean she couldn't participate on being badass. She was very intelligent and the most sophisticated person among the three. Also learning battōjutsu martial art for self-defense, it's always fascinating seeing Zenko training using real sword so elegantly. Really adores her big brothers, yet never hesitated to slap some sense onto them when they're being such dumbasses. Very proud of what Badd has becomes. In the future after reaching adulthood, Zenko has 2 kind of tattoos: Cherry-blossom tattoos on her whole right arm and Samurai tattoo on her back.
Both of Garou and Badd also taking Tareo as a part of their family, after saving Tareo's family from being the enemy's hostage in a war between clans. Thus, Tareo becomes Zenko's BFF and possibly also a great trusted advisor for Badd's family in the future. Admired Garou very much. Garou inherited most of his knowledges and nerdy side to Tareo, hoping they would be useful someday. In the future after reaching adulthood, Tareo has 2 kind of tattoos: Koi tattoo on his whole right arm and Lotus tattoo on his left arm.
Imagine Garou and Badd had been mutual pining the whole time, but managed to keep it down so their family and subordinates wont noticed. Once Garou successfully confessed his romantic feeling for Badd (very awkward but sweet nonetheless), in which Badd accepted immediately, they're having a secret relationship behind the family's back.
Because they didn't want to cause a ruckus between the clan family just because the Boss is currently doing lots of scandalous things together with his own bodyguard for every single day. Also the fact that Badd the Boss is the bottom most of the time, since he prefers to have Garou being an aggressive top (but there's no way Badd would never be submissive, as he always serve the good challenges for Garou to prove who's Boss).
Eventhough the family hadn't know yet about their "scandalous things", they could see how affectionate Badd towards Garou and vice versa. It's almost like those two men are lovers instead of only boss-bodyguard or bestfriends.
The way Garou being so protective for Badd, the way Badd patching up Garou's battle wounds, the way they're always looked so harmonious on fighting side-by-side in combat, the way they're gazing at eachother whenever they think noone noticed, the way Garou always kissing Badd's knuckles everytime they were going to clans war, also the way Badd kissing Garou's forehead as a blessing, the way they looked so happy when spending off-duty freetime together doing whatever they like at the moment, etc.
All of those proving that whatever relationship Garou and Badd have together is already beyond what the family members could imagine.
One time the family finally found out their nature of relationship was when Badd gotten hurt seriously after failed attempt of assassination, done by the order from another leader of clan who eventually becomes a traitor in the alliance. Garou was a second too late on completely protecting Badd because he didn't expect that there was a traitor among the family alliance.
Knowing Badd was hurt sent Garou in berserk mode as he annihilated all the rest of traitor's assassins in the building, while Badd's family taking care of their unconscious Boss.
The whole betrayal angered the entire alliance members, especially Badd's core family. Garou's wrath was totally understandable because he was the closest person for Badd, seeing the devastation he caused upon the traitor clan. Zenko was in rage once she knows who was betrayed her big brother, she almost going to execute that person by herself with her own sword. Bang, who had seen this kind of assassination happened twice on Badd's family, and already considered Badd as his own son, in a silent fury immediately arranging what punishments the traitor clan would get.
The traitor clan was punished severely, and its leader was executed on the following day. Badd still resting in his home, in which guarded securely by his subordinates. Zenko was helping the caretakers to heal Badd's wounds, worrying for her big brother's condition.
Garou never leaving his bedside, his hands holding Badd's hands as he quietly apologizes profusely for letting Badd hurted, for nearly losing Badd because of his own carelessness. Garou was ready if Badd wants to punish him, anything will do to get his forgiveness.
Regaining consciousness a little bit after hearing Garou's long rambling, Badd weakly ordering him to shut up and stop apologizing, because there's nothing wrong with Garou. In fact, Badd was actually grateful for Garou's good reflex to prevent the assassination from being 100% successful.
That's why Badd still survive and alive, soon to be back being the Big Boss again. He smiled tenderly to reassure Garou, the hands that Garou was currently holding caressing him back.
If Garou still a small weakling kid like back then, he would be sobbing pitifully seeing his only bestfriend almost died. But now as a full-grown adult and the strongest martial artist, he just silently crying out of relief having his secret lover smiling brightly for him.
Just like a Phoenix, Badd wont die too easily, always regenerating fast and reviving again so he can comes back stronger than before. As Badd said, "Death is just a flesh wound, you can totally revive through fighting spirit and have another go!".
Wiping Garou's tears away with his hands, Badd whispering a "Thank you" for him. He cupped the bodyguard's cheeks before trying to get on sitting position, which Garou quickly supporting Badd's back by pulling him closer with his arms so he could sit properly on the bed. Now that they're facing eachother, Badd slowly reduce the distance between them until he could kiss Garou softly on the lips.
Garou was so happy to have Badd in his arms again, without any hesitation he reciprocated the kiss so it would go deeper, one hand still supporting Badd's back while the other caressing his nape, pulling the Boss even more closer than before. As the kiss becomes intimate, Badd humming in joy while his arms encircled Garou's neck, never letting him go.
They both were deep in passionate moment to notice that some of their family members saw the entire thing from the window, or from the door when the others wanted to relay the meeting report to Garou so he could tell it to their Boss. But since they were already in their own world and looked so happy, they just backed off silently and keeping the secret for the sake of the Boss. Or trying to cleanse their minds because it was "too much information to see".
Despite their status, with Badd as the infamous Yakuza Boss and Garou as his monster bodyguard, the family wont mind about their love life. As long as Garou keeps their Boss happy, why not? They both deserved everything best in their life..
--------------------------
---- THE END ----
--------------------------
Notes:
I'm so sorry for spawning another dumb AU headcanon again! And for working on completely impromptu writings instead continuing current WIP aaaah I can't focused enough my mind was going everywhere-- 😫😅🙏💦
Originally I was currently working for webcomic headcanon feat. short haired Fedex man (or mover?) Garou and tired Neo Heroes Badd, but something happened irl made me stressed out for whole 2 days nonstop. My mind was like a bottomless pit full of darker thoughts, I tried to think something anything so I wont be too focused on those thoughts. Hufff..
Then suddenly, this headcanon was born! Idk why I got this idea but I saw a Batarou fanart when scrolling through my phone gallery, it has nothing to do with Yakuza things but it sparked the whole idea!
It was just Garou and Badd wearing matching Boyfriend Jackets™ with delinquent-esque tattoos motifs on the fabrics, with Badd resting on Garou's thigh while they're holding hands, both blushing brightly. I wish I could show you all but I forgot the source, since it was older fanworks from a Batarou Japanese artist on twitter 😢
I even trying to search what's popular tattoos motifs for yakuza members, and which one that matched their position/personality/depiction. It was kinda fun, imho.
Did you notice that tattoos placement for Badd and Zenko are mirrorring eachother? And that the tattoos motifs on their arms = their images (Dragon and Cherry-blossom, respectively), on their back = their way of life (Phoenix and Samurai, respectively)?
Or Garou's tattoos, Demon on the front = his mask/job, while Wolf on the back = his true nature as both predator and protector?
While Tareo's tattoos, Koi on the right arm = his soft and loving nature, Lotus on the left arm = his life journey to reach his full potential?
Also because I like the image of Zenko handling a sword like a badass, I was researching which sword martial art that suits her, both to self-defense and also to combat in emergency times. After looking through the types of sword martial art, I choose battōjutsu since it looks awesome yet still so elegant!
Kinda punny when Badd choosing to use bat (literal bat) for fighting, whereas Zenko using battō (swordmanship) for fighting. Both words has similar pronounciation in Japanese, lmao! 😆
I hoped you enjoyed this AU, despite I know this wasn't impressionable enough as usual I'm so sorry. This idea was only done for 1 hour, another 1 hour to edit so it would coherent enough, so the quality was not quite good enough.. 😔
And after re-reading for several times, I just realized that I reused many elements/dynamic from my WereVamp AU welp, there goes me not being a creative person, already proven several times hhhh 😓
If there's anyone who wants to say something about this AU, please let me know. I'm always happy to receive some feedback even for the smallest, it's okay 👀💦👉👈
Also if anyone interested to use this Batarou AU, I will gladly rolling out the red carpet for you~ 👍❤❤
Thank you always for:
@hiro-gari, @the-goddessfighter, @kaincuro, @garous-nipple, @jusqu-une-etudiante, @guby1620, @lovelybutnot-ablankcanvas, and @personne-tmblr, also all of Batarou shippers in the fandom!
Thank you for always putting up with me on my lowly stupid af writings, I LOVE YOU guys! 😚❤💜💙💖💝💐
Wished me luck I can bounce back from the depression soon (I haven't getting any sleep for a whole day by the time I wrote this sentence ehehehe), and I hope you have great days, guys. Thank you all.. 🙏🙇💕💞💖🌼🌻
-Little1993lamb-
-------------------------
~Lilia:
dw I gotchu😉 it’s opm_small_dduck on Twitter, their art is amazing ✨ I knew exactly which one u meant, definitely sets the tone for this hc!!
YAAAS tho I LOVE this AU! Especially them growing up together and having a reliable partner while being raised to fill their unique roles AWWW. They’ve had each other’s backs since the beginning and nobody better mess with them! Big Boss Badd 😤 it suits him so well 👏
The scene at the end tho 🥺 agh, I can imagine how shitty Garou would feel if something happened to Badd under his watch 😖 even if there was nothing he could have done to prevent it, he’d still be all emotional about it... Just might make out with the Yakuza Boss in front of his family without a second thought.., 🤷🏻♀️💗
And yes omg I’m love the tats!! The symbolism 👌 you nailed it!! Sword wielding Yakuza Zenko though 🙇♀️ Queen. Yes.
Thank you so much for this anon!! Hope you are getting some sleep 😩💖 LOTS OF LOVE TO YOU😚
#what to heck#HOW#you are telling me you did this in two hours??#that’s incredible omfg T~T#I cannot write a coherent paragraph in that amount of time#i hope you get lots of rest and feel better soon 💕💗💖#thank you so much for this#submission#batarou#garou#metal bat#opm#yakuza!au
11 notes
·
View notes
Text
Beach House: End Of The Year Tour!
Beach house progress, both big and small, feels like it’s happening so quickly that we hardly have time to keep up with documenting it, but I did walk through the whole house yesterday and make a big ol’ video tour… which basically catches you right up to date! So excuse this post for only having around a dozen photos (we have thousands on our phones, but they’d take us all day to upload and explain, and nobody got time for that with Christmas being less than a week away).
First let’s start at the front door. We hung a wreath (from Tar-jay) and put some battery powered LED candles with timers in the windows (so they’re auto-pilot even when we’re not there). Hallelujah, the house finally looks lived in! I mean, except for the whole it-has-no-landscaping-and-I-desperately-need-to-sand-and-stain-the-front-door thing. Also I still want to paint those white blocks behind the lanterns to match the house. Someday…
lanterns / wreath / house numbers / doormat / siding: SW Mellow Coral / ceiling: SW Breaktime / trim: SW Pure White
While things are far from finished, things are even farther from where they were this time last year. This photo is from almost exactly a year ago, and looking back is a nice reminder that wrinkly curtains and an unfinished pantry are far smaller problems to work through than THE ENTIRE SIDE OF THE HOUSE BEING TORN OFF. Here’s that whole story if you missed it (yup, we literally had to have 500 square feet removed and rebuild from scratch).
SO YEAH. It’s looking a lot better at the end of 2017 than it did at the end of 2016. And weirdly enough that picture makes me excited to get started on the duplex, because as much as I love having finished walls to decorate and finished floors to arrange furniture on, the process of planning (and dreaming about) all of the potential that’s fills the air during a big demo/rebuilding project is oddly addicting. Can’t wait to share our duplex progress as soon as we have our plans approved and all of our permits pulled! But back to the pink house, where I’m walking you guys through every room in a little video tour of sorts: If you can’t see this in a reader, click through to view it on our blog or you can view it here on YouTube.
If you can’t watch the video right now, I’d definitely recommend dropping back in and catching it when you can (a video is basically worth a million photos and I pretty much cover every crevice and explain a lot of extra stuff I couldn’t squeeze into this post).
One recent update, after months and months of debate, is that we finally pulled the trigger and painted the railing. The vertical balusters had all already been painted (SW Stone Isle), so it was just that top rail and the post at the end that were “wood.” I’ll explain why that’s in quotes in a second. It’s hard to see in this picture since that front post is getting hit with a ton of light through the open door, but we went with a deeper gray tone (SW Perpetual Gray) that’s about 3 shades darker than the trim, so it accents the post and the top rail without being too crazy and compete-y with the standout stars of the entire house (those stained glass windows).
I know what some of you are thinking. NOOOO! How could you disgrace such old beautiful wood with paint?!?! Well, this railing had been covered in a thick paint-like brown stain that showed zero grain and was sticky, roughed up, and ruined in a bunch of places (covered in paint splatters, spackle globs, and decades of other issues). After attempting to sand it down, we learned it was a darker redder wood – meaning we’d never be able to stain it to match the lovely heart pine floors. So, we reasoned that a fresh coat of paint applied nice and evenly was a heckuva lot better than its current state. And it really does look glossy and lovely in person, which makes us incredibly relieved.
The good news is that we don’t have any shortage of wood tones in this house. We have original heart pine everywhere (we stripped and clear-sealed all of the original doors that we could, brought the original floors both upstairs and downstairs back to their glory, etc). This house’s middle name could be wood. Pinkie “Wood” House. Wait that sounds bad. Forget the middle name thing.
Down in the living room, we added this cool wall-mounted bookcase, which instantly made us both say “Ahhh! It looks like an actual room people live in!” We also got to hang some cozy white curtains which need DESPERATELY to be steamed and hemmed. They’re Lenda curtains from Ikea– I just cut off the top tabs and make sure to wash them to pre-shrink them before hanging. We also have them in our home office and love how washable and easy they are. Also, my secondhand brass grasshopper (aka: Brasshopper) is a total badass and I love him more each day.
bookcase / blue pillow / curtains / rods / similar brass grasshopper
Also bought a rug from New England Loom (if you don’t follow them on Instagram you’re missing out because they have so many lovely secondhand rugs to be discovered) and the colors and patterns and antique feeling of the rug is PERFECT for a room that will be assaulted with food and sand and everything else that a rental living room has to deal with, so I have high hopes for it holding up like a champ (seeing as it is decades old already, that really does inspire confidence). That pretty blue pillow is from this Etsy shop (I love all of her pillows) and the pink one is from Target a while back. And you guys know the sofa is the Ikea Karlstad that they no longer make, which is a straight up travesty.
We also updated the light in here to this gleaming beauty from West Elm. The old light was a one-bulb fixture that we hung and immediately said “this room needs way more light.” We love the juxtaposition of this leggier modern light and the old-looking medallion (which is actually from Home Depot – shhh). And the old brick chimney that we discovered behind the wall and exposed is probably my favorite feature in the room, along with the giant windows (this room is 9′ tall, so the windows are easily over 6.5′ feet tall – that’s taller than John!). Don’t mind that TV on the floor. We found something we think will work for in there, just gotta get it out there in our next car load. #AlwaysRoadTrippingWithFurniture
rug source / chandelier / ceiling medallion /curtains / rods
The kitchen came a long way too, with the quartz island going in (it’s Pearl Jasmine by Silestone and we LOVE it so much) and a working sink. Cue the choir of angels! You can hear two ways we saved money on our quartz counters in Podcast Episode #74, which also covers why our original plan to do butcher block there didn’t work out. There are still some things missing though. Mainly, the backsplash that we’ll add after we hang the other missing element: shelves on either side of the stove under the sconces (probably two per side, not sure yet but we’ll keep you posted).
stools / quartz / butcher block / cabinets / range: secondhand refurbished / trim: SW Stone Isle / walls: SW White Heron
The back door was blue for a hot second, which some of you might have seen on Instagram, but as the room came together more John and I both realized that the same gray as the trim (SW Stone Isle) would let the pink stove do her thing and be the accent in the room that she has always been destined to become. Plus, we have a blue chippy door leading to the mudroom nearby, and one blue door + one pink stove is… enough. You know I didn’t love painting that door twice, so if I did it, it had to be done. Ha!
green vase / wood cutting board / wood stand / hanging rod / hood / kettle / sconces / pink salt & pepper
Upstairs the bedrooms are coming along with some art up on the walls, layered cozy bedding, and even headboards. HUZZAH! Still need to hang all the curtains up there (once we do that the headboard will look exactly as wide as the window because we are tricky tricksters). Stay tuned…
rug / large art / lamp / side table / striped blanket / headboard / fan
This is another view of that front bedroom, which is the largest of the four (the bunk room is teeny tiny and the middle bedroom and back bedroom are just fine but not giant). It also has that exposed brick chimney that we discovered hiding behind the wall, and next to it you’ll see my favorite craigslist find of all time that you might have already “met” on Facebook or Instagram when I shared a quick shot of it this weekend. Yes, I really did find an inlay piece of furniture on Craiglist, and yes, it’s currently selling for $2,000 on Restoration Hardware (I got it for $400!). Insert that screaming cat emoji face here. Seriously, it’s the score of a lifetime, and I’m going to share the whole story, including how I fix up a few missing inlay spots soon. So… stay tuned. Again.
And before we move on, that sconce looks crazy small above the dresser (we just hung it as a placeholder and it’s looking like a placeholder, so we’ll probably get a wider double-sconce for that spot soon). Anyway, on with the tour! Or should I say “roll the next flashback!” This is that wall a year ago. Same house. Just nekkid a year ago versus clothed now. With walls. You get what I mean.
And now, the back bedroom. Aka: our room whenever we stay there! Although the front room is the largest and has that lovely exposed brick, the back bedroom has its own master bathroom (complete with my big beautiful clawfoot tub) and it has its own stairs that lead up to it, which are surprisingly useful. We originally thought those back stairs would be more of a fun thing for kids and a cool historic detail to preserve, but we weren’t sure we’d actually use them very much but we go up and down them all the time!
rug / fan / leather stools / striped duvet cover / pocked doors: SW Riverway
One of our bigger projects this past weekend was this built-in dresser that we added to the nook behind the pocket doors that you see above. We love gaining some storage and function in that formerly blank area at the top of the back steps, and there’s more than enough room to pull out the drawers and take like five steps back before you’d fall down the steps (you know I’d be the one to bite it all the way down these steps, so we have to make sure these things we’re adding won’t curse me later).
dresser / mirror / wood top / door color: SW Riverway
John would be quick to point out it’s not complete. We ran out of nails for our nail gun, so the trim still needs to be attached, caulked, etc. But basically, a Malm from Ikea fit pretty perfectly in the space, so we made it look even more built-in by removing and reinstalling the molding around it (see below) and adding a few skinny filler pieces to each side (scraps from our kitchen install). We also popped some leftover butcher block counter from downstairs on top to tie into the pine floors and we’re also planning to add some leather pulls to it to tie in the stools at the foot of the bed (you can see them in the shot two photos up). Can’t wait to finish it up and share the final pics!
Next let’s move onto the master bathroom, which is easily my favorite room because I get to soak in that big ol’ tub after hours of DIY and it feels so freaking good every time. Except for the first time. I had sort of a false start in there (more on that in this podcast) but now the tub and I are bros and only happy things happen when I’m in there. And the kids love it too.
marble table / floor tile / accent floor tile / wall hooks / blinds / tub color: SW Riverway
I’m basically salivating while looking at this because we’re back home and our house has two bathrooms that we still have to redo and two tubs that are about 10″ deep (half of my body sticks out like an iceberg) so I’m itching to add a deeper bathtub into my life here at home.
The hall bath is still my boo too, thanks to my favorite vanity ever. The top is tiled with marble and the rounded wood drawers make it look like a furniture piece we converted to be a vanity but it came that way and WE SALUTE IT because goodness knows we have other stuff to keep us busy. Still on the list: making built-in bunk beds, building out the pantry and the mudroom, tiling the backsplash, landscaping, etc, etc. That big round silver mirror is an awesome (and recent!) HomeGoods find (the same one in brass hangs above our mantel at home) so if you’re looking for one in either color, try HomeGoods. Target also has a really similar one that’s slightly smaller and thinner in gold.
vanity / faucet / drum stool / light fixture / floor tile
And although we haven’t built the wall to wall bunkbeds in our small-but-mighty kids room yet, we did hang art. And that’s half the battle, right? (Nope, half the battle is being halfway done with the bunkbeds, but let me lie to myself for a second, ok?). That cute colorful painting is from our dear friend Lesli Devito (remember when we house crashed her wayyyy back here) and if you don’t have one of her paintings or prints I highly recommend getting one. The door also got a sign that says Mermaids Welcome and it made my whole life to hang it up (also we took a poll among a bunch of kids and basically everyone is cool with mermaid and pirates, but don’t get me started on how split the group was on dolphins).
marble table / mermaids welcome plaque / art by Lesli DeVito
So there you have it: a tour as of yesterday of the beach house (remember: watch the video! it has approximately 98% more info than some pics and captions can convey). Also, we hope you have a very happy holiday surrounded by the ones you love and delicious food and all the mermaid-related memorabilia that your heart desires. And if you have a tub where your entire body can be submerged, know that I, for one, now know what I’m missing and am deeply deeply jealous.
P.S. To see the entire process of fixing up this beach house (from floor planning and demo to tiling and tiling and tiling and getting the floors redone) here’s a full category of beach house updates for you to flip through.
*This post contains affiliate links*
The post Beach House: End Of The Year Tour! appeared first on Young House Love.
Beach House: End Of The Year Tour! published first on http://ift.tt/2qxZz2j
0 notes
Text
Beach House: End Of The Year Tour!
Beach house progress, both big and small, feels like it’s happening so quickly that we hardly have time to keep up with documenting it, but I did walk through the whole house yesterday and make a big ol’ video tour… which basically catches you right up to date! So excuse this post for only having around a dozen photos (we have thousands on our phones, but they’d take us all day to upload and explain, and nobody got time for that with Christmas being less than a week away).
First let’s start at the front door. We hung a wreath (from Tar-jay) and put some battery powered LED candles with timers in the windows (so they’re auto-pilot even when we’re not there). Hallelujah, the house finally looks lived in! I mean, except for the whole it-has-no-landscaping-and-I-desperately-need-to-sand-and-stain-the-front-door thing. Also I still want to paint those white blocks behind the lanterns to match the house. Someday…
lanterns / wreath / house numbers / doormat / siding: SW Mellow Coral / ceiling: SW Breaktime / trim: SW Pure White
While things are far from finished, things are even farther from where they were this time last year. This photo is from almost exactly a year ago, and looking back is a nice reminder that wrinkly curtains and an unfinished pantry are far smaller problems to work through than THE ENTIRE SIDE OF THE HOUSE BEING TORN OFF. Here’s that whole story if you missed it (yup, we literally had to have 500 square feet removed and rebuild from scratch).
SO YEAH. It’s looking a lot better at the end of 2017 than it did at the end of 2016. And weirdly enough that picture makes me excited to get started on the duplex, because as much as I love having finished walls to decorate and finished floors to arrange furniture on, the process of planning (and dreaming about) all of the potential that’s fills the air during a big demo/rebuilding project is oddly addicting. Can’t wait to share our duplex progress as soon as we have our plans approved and all of our permits pulled! But back to the pink house, where I’m walking you guys through every room in a little video tour of sorts: If you can’t see this in a reader, click through to view it on our blog or you can view it here on YouTube.
If you can’t watch the video right now, I’d definitely recommend dropping back in and catching it when you can (a video is basically worth a million photos and I pretty much cover every crevice and explain a lot of extra stuff I couldn’t squeeze into this post).
One recent update, after months and months of debate, is that we finally pulled the trigger and painted the railing. The vertical balusters had all already been painted (SW Stone Isle), so it was just that top rail and the post at the end that were “wood.” I’ll explain why that’s in quotes in a second. It’s hard to see in this picture since that front post is getting hit with a ton of light through the open door, but we went with a deeper gray tone (SW Perpetual Gray) that’s about 3 shades darker than the trim, so it accents the post and the top rail without being too crazy and compete-y with the standout stars of the entire house (those stained glass windows).
I know what some of you are thinking. NOOOO! How could you disgrace such old beautiful wood with paint?!?! Well, this railing had been covered in a thick paint-like brown stain that showed zero grain and was sticky, roughed up, and ruined in a bunch of places (covered in paint splatters, spackle globs, and decades of other issues). After attempting to sand it down, we learned it was a darker redder wood – meaning we’d never be able to stain it to match the lovely heart pine floors. So, we reasoned that a fresh coat of paint applied nice and evenly was a heckuva lot better than its current state. And it really does look glossy and lovely in person, which makes us incredibly relieved.
The good news is that we don’t have any shortage of wood tones in this house. We have original heart pine everywhere (we stripped and clear-sealed all of the original doors that we could, brought the original floors both upstairs and downstairs back to their glory, etc). This house’s middle name could be wood. Pinkie “Wood” House. Wait that sounds bad. Forget the middle name thing.
Down in the living room, we added this cool wall-mounted bookcase, which instantly made us both say “Ahhh! It looks like an actual room people live in!” We also got to hang some cozy white curtains which need DESPERATELY to be steamed and hemmed. They’re Lenda curtains from Ikea– I just cut off the top tabs and make sure to wash them to pre-shrink them before hanging. We also have them in our home office and love how washable and easy they are. Also, my secondhand brass grasshopper (aka: Brasshopper) is a total badass and I love him more each day.
bookcase / blue pillow / curtains / rods / similar brass grasshopper
Also bought a rug from New England Loom (if you don’t follow them on Instagram you’re missing out because they have so many lovely secondhand rugs to be discovered) and the colors and patterns and antique feeling of the rug is PERFECT for a room that will be assaulted with food and sand and everything else that a rental living room has to deal with, so I have high hopes for it holding up like a champ (seeing as it is decades old already, that really does inspire confidence). That pretty blue pillow is from this Etsy shop (I love all of her pillows) and the pink one is from Target a while back. And you guys know the sofa is the Ikea Karlstad that they no longer make, which is a straight up travesty.
We also updated the light in here to this gleaming beauty from West Elm. The old light was a one-bulb fixture that we hung and immediately said “this room needs way more light.” We love the juxtaposition of this leggier modern light and the old-looking medallion (which is actually from Home Depot – shhh). And the old brick chimney that we discovered behind the wall and exposed is probably my favorite feature in the room, along with the giant windows (this room is 9′ tall, so the windows are easily over 6.5′ feet tall – that’s taller than John!). Don’t mind that TV on the floor. We found something we think will work for in there, just gotta get it out there in our next car load. #AlwaysRoadTrippingWithFurniture
rug source / chandelier / ceiling medallion /curtains / rods
The kitchen came a long way too, with the quartz island going in (it’s Pearl Jasmine by Silestone and we LOVE it so much) and a working sink. Cue the choir of angels! You can hear two ways we saved money on our quartz counters in Podcast Episode #74, which also covers why our original plan to do butcher block there didn’t work out. There are still some things missing though. Mainly, the backsplash that we’ll add after we hang the other missing element: shelves on either side of the stove under the sconces (probably two per side, not sure yet but we’ll keep you posted).
stools / quartz / butcher block / cabinets / range: secondhand refurbished / trim: SW Stone Isle / walls: SW White Heron
The back door was blue for a hot second, which some of you might have seen on Instagram, but as the room came together more John and I both realized that the same gray as the trim (SW Stone Isle) would let the pink stove do her thing and be the accent in the room that she has always been destined to become. Plus, we have a blue chippy door leading to the mudroom nearby, and one blue door + one pink stove is… enough. You know I didn’t love painting that door twice, so if I did it, it had to be done. Ha!
green vase / wood cutting board / wood stand / hanging rod / hood / kettle / sconces / pink salt & pepper
Upstairs the bedrooms are coming along with some art up on the walls, layered cozy bedding, and even headboards. HUZZAH! Still need to hang all the curtains up there (once we do that the headboard will look exactly as wide as the window because we are tricky tricksters). Stay tuned…
rug / large art / lamp / side table / striped blanket / headboard / fan
This is another view of that front bedroom, which is the largest of the four (the bunk room is teeny tiny and the middle bedroom and back bedroom are just fine but not giant). It also has that exposed brick chimney that we discovered hiding behind the wall, and next to it you’ll see my favorite craigslist find of all time that you might have already “met” on Facebook or Instagram when I shared a quick shot of it this weekend. Yes, I really did find an inlay piece of furniture on Craiglist, and yes, it’s currently selling for $2,000 on Restoration Hardware (I got it for $400!). Insert that screaming cat emoji face here. Seriously, it’s the score of a lifetime, and I’m going to share the whole story, including how I fix up a few missing inlay spots soon. So… stay tuned. Again.
And before we move on, that sconce looks crazy small above the dresser (we just hung it as a placeholder and it’s looking like a placeholder, so we’ll probably get a wider double-sconce for that spot soon). Anyway, on with the tour! Or should I say “roll the next flashback!” This is that wall a year ago. Same house. Just nekkid a year ago versus clothed now. With walls. You get what I mean.
And now, the back bedroom. Aka: our room whenever we stay there! Although the front room is the largest and has that lovely exposed brick, the back bedroom has its own master bathroom (complete with my big beautiful clawfoot tub) and it has its own stairs that lead up to it, which are surprisingly useful. We originally thought those back stairs would be more of a fun thing for kids and a cool historic detail to preserve, but we weren’t sure we’d actually use them very much but we go up and down them all the time!
rug / fan / leather stools / striped duvet cover / pocked doors: SW Riverway
One of our bigger projects this past weekend was this built-in dresser that we added to the nook behind the pocket doors that you see above. We love gaining some storage and function in that formerly blank area at the top of the back steps, and there’s more than enough room to pull out the drawers and take like five steps back before you’d fall down the steps (you know I’d be the one to bite it all the way down these steps, so we have to make sure these things we’re adding won’t curse me later).
dresser / mirror / wood top / door color: SW Riverway
John would be quick to point out it’s not complete. We ran out of nails for our nail gun, so the trim still needs to be attached, caulked, etc. But basically, a Malm from Ikea fit pretty perfectly in the space, so we made it look even more built-in by removing and reinstalling the molding around it (see below) and adding a few skinny filler pieces to each side (scraps from our kitchen install). We also popped some leftover butcher block counter from downstairs on top to tie into the pine floors and we’re also planning to add some leather pulls to it to tie in the stools at the foot of the bed (you can see them in the shot two photos up). Can’t wait to finish it up and share the final pics!
Next let’s move onto the master bathroom, which is easily my favorite room because I get to soak in that big ol’ tub after hours of DIY and it feels so freaking good every time. Except for the first time. I had sort of a false start in there (more on that in this podcast) but now the tub and I are bros and only happy things happen when I’m in there. And the kids love it too.
marble table / floor tile / accent floor tile / wall hooks / blinds / tub color: SW Riverway
I’m basically salivating while looking at this because we’re back home and our house has two bathrooms that we still have to redo and two tubs that are about 10″ deep (half of my body sticks out like an iceberg) so I’m itching to add a deeper bathtub into my life here at home.
The hall bath is still my boo too, thanks to my favorite vanity ever. The top is tiled with marble and the rounded wood drawers make it look like a furniture piece we converted to be a vanity but it came that way and WE SALUTE IT because goodness knows we have other stuff to keep us busy. Still on the list: making built-in bunk beds, building out the pantry and the mudroom, tiling the backsplash, landscaping, etc, etc. That big round silver mirror is an awesome (and recent!) HomeGoods find (the same one in brass hangs above our mantel at home) so if you’re looking for one in either color, try HomeGoods. Target also has a really similar one that’s slightly smaller and thinner in gold.
vanity / faucet / drum stool / light fixture / floor tile
And although we haven’t built the wall to wall bunkbeds in our small-but-mighty kids room yet, we did hang art. And that’s half the battle, right? (Nope, half the battle is being halfway done with the bunkbeds, but let me lie to myself for a second, ok?). That cute colorful painting is from our dear friend Lesli Devito (remember when we house crashed her wayyyy back here) and if you don’t have one of her paintings or prints I highly recommend getting one. The door also got a sign that says Mermaids Welcome and it made my whole life to hang it up (also we took a poll among a bunch of kids and basically everyone is cool with mermaid and pirates, but don’t get me started on how split the group was on dolphins).
marble table / mermaids welcome plaque / art by Lesli DeVito
So there you have it: a tour as of yesterday of the beach house (remember: watch the video! it has approximately 98% more info than some pics and captions can convey). Also, we hope you have a very happy holiday surrounded by the ones you love and delicious food and all the mermaid-related memorabilia that your heart desires. And if you have a tub where your entire body can be submerged, know that I, for one, now know what I’m missing and am deeply deeply jealous.
P.S. To see the entire process of fixing up this beach house (from floor planning and demo to tiling and tiling and tiling and getting the floors redone) here’s a full category of beach house updates for you to flip through.
*This post contains affiliate links*
The post Beach House: End Of The Year Tour! appeared first on Young House Love.
Beach House: End Of The Year Tour! published first on http://ift.tt/2qCHnUt
0 notes
Text
Beach House: End Of The Year Tour!
Beach house progress, both big and small, feels like it’s happening so quickly that we hardly have time to keep up with documenting it, but I did walk through the whole house yesterday and make a big ol’ video tour… which basically catches you right up to date! So excuse this post for only having around a dozen photos (we have thousands on our phones, but they’d take us all day to upload and explain, and nobody got time for that with Christmas being less than a week away).
First let’s start at the front door. We hung a wreath (from Tar-jay) and put some battery powered LED candles with timers in the windows (so they’re auto-pilot even when we’re not there). Hallelujah, the house finally looks lived in! I mean, except for the whole it-has-no-landscaping-and-I-desperately-need-to-sand-and-stain-the-front-door thing. Also I still want to paint those white blocks behind the lanterns to match the house. Someday…
lanterns / wreath / house numbers / doormat / siding: SW Mellow Coral / ceiling: SW Breaktime / trim: SW Pure White
While things are far from finished, things are even farther from where they were this time last year. This photo is from almost exactly a year ago, and looking back is a nice reminder that wrinkly curtains and an unfinished pantry are far smaller problems to work through than THE ENTIRE SIDE OF THE HOUSE BEING TORN OFF. Here’s that whole story if you missed it (yup, we literally had to have 500 square feet removed and rebuild from scratch).
SO YEAH. It’s looking a lot better at the end of 2017 than it did at the end of 2016. And weirdly enough that picture makes me excited to get started on the duplex, because as much as I love having finished walls to decorate and finished floors to arrange furniture on, the process of planning (and dreaming about) all of the potential that’s fills the air during a big demo/rebuilding project is oddly addicting. Can’t wait to share our duplex progress as soon as we have our plans approved and all of our permits pulled! But back to the pink house, where I’m walking you guys through every room in a little video tour of sorts: If you can’t see this in a reader, click through to view it on our blog or you can view it here on YouTube.
If you can’t watch the video right now, I’d definitely recommend dropping back in and catching it when you can (a video is basically worth a million photos and I pretty much cover every crevice and explain a lot of extra stuff I couldn’t squeeze into this post).
One recent update, after months and months of debate, is that we finally pulled the trigger and painted the railing. The vertical balusters had all already been painted (SW Stone Isle), so it was just that top rail and the post at the end that were “wood.” I’ll explain why that’s in quotes in a second. It’s hard to see in this picture since that front post is getting hit with a ton of light through the open door, but we went with a deeper gray tone (SW Perpetual Gray) that’s about 3 shades darker than the trim, so it accents the post and the top rail without being too crazy and compete-y with the standout stars of the entire house (those stained glass windows).
I know what some of you are thinking. NOOOO! How could you disgrace such old beautiful wood with paint?!?! Well, this railing had been covered in a thick paint-like brown stain that showed zero grain and was sticky, roughed up, and ruined in a bunch of places (covered in paint splatters, spackle globs, and decades of other issues). After attempting to sand it down, we learned it was a darker redder wood – meaning we’d never be able to stain it to match the lovely heart pine floors. So, we reasoned that a fresh coat of paint applied nice and evenly was a heckuva lot better than its current state. And it really does look glossy and lovely in person, which makes us incredibly relieved.
The good news is that we don’t have any shortage of wood tones in this house. We have original heart pine everywhere (we stripped and clear-sealed all of the original doors that we could, brought the original floors both upstairs and downstairs back to their glory, etc). This house’s middle name could be wood. Pinkie “Wood” House. Wait that sounds bad. Forget the middle name thing.
Down in the living room, we added this cool wall-mounted bookcase, which instantly made us both say “Ahhh! It looks like an actual room people live in!” We also got to hang some cozy white curtains which need DESPERATELY to be steamed and hemmed. They’re Lenda curtains from Ikea– I just cut off the top tabs and make sure to wash them to pre-shrink them before hanging. We also have them in our home office and love how washable and easy they are. Also, my secondhand brass grasshopper (aka: Brasshopper) is a total badass and I love him more each day.
bookcase / blue pillow / curtains / rods / similar brass grasshopper
Also bought a rug from New England Loom (if you don’t follow them on Instagram you’re missing out because they have so many lovely secondhand rugs to be discovered) and the colors and patterns and antique feeling of the rug is PERFECT for a room that will be assaulted with food and sand and everything else that a rental living room has to deal with, so I have high hopes for it holding up like a champ (seeing as it is decades old already, that really does inspire confidence). That pretty blue pillow is from this Etsy shop (I love all of her pillows) and the pink one is from Target a while back. And you guys know the sofa is the Ikea Karlstad that they no longer make, which is a straight up travesty.
We also updated the light in here to this gleaming beauty from West Elm. The old light was a one-bulb fixture that we hung and immediately said “this room needs way more light.” We love the juxtaposition of this leggier modern light and the old-looking medallion (which is actually from Home Depot – shhh). And the old brick chimney that we discovered behind the wall and exposed is probably my favorite feature in the room, along with the giant windows (this room is 9′ tall, so the windows are easily over 6.5′ feet tall – that’s taller than John!). Don’t mind that TV on the floor. We found something we think will work for in there, just gotta get it out there in our next car load. #AlwaysRoadTrippingWithFurniture
rug source / chandelier / ceiling medallion /curtains / rods
The kitchen came a long way too, with the quartz island going in (it’s Pearl Jasmine by Silestone and we LOVE it so much) and a working sink. Cue the choir of angels! You can hear two ways we saved money on our quartz counters in Podcast Episode #74, which also covers why our original plan to do butcher block there didn’t work out. There are still some things missing though. Mainly, the backsplash that we’ll add after we hang the other missing element: shelves on either side of the stove under the sconces (probably two per side, not sure yet but we’ll keep you posted).
stools / quartz / butcher block / cabinets / range: secondhand refurbished / trim: SW Stone Isle / walls: SW White Heron
The back door was blue for a hot second, which some of you might have seen on Instagram, but as the room came together more John and I both realized that the same gray as the trim (SW Stone Isle) would let the pink stove do her thing and be the accent in the room that she has always been destined to become. Plus, we have a blue chippy door leading to the mudroom nearby, and one blue door + one pink stove is… enough. You know I didn’t love painting that door twice, so if I did it, it had to be done. Ha!
green vase / wood cutting board / wood stand / hanging rod / hood / kettle / sconces / pink salt & pepper
Upstairs the bedrooms are coming along with some art up on the walls, layered cozy bedding, and even headboards. HUZZAH! Still need to hang all the curtains up there (once we do that the headboard will look exactly as wide as the window because we are tricky tricksters). Stay tuned…
rug / large art / lamp / side table / striped blanket / headboard / fan
This is another view of that front bedroom, which is the largest of the four (the bunk room is teeny tiny and the middle bedroom and back bedroom are just fine but not giant). It also has that exposed brick chimney that we discovered hiding behind the wall, and next to it you’ll see my favorite craigslist find of all time that you might have already “met” on Facebook or Instagram when I shared a quick shot of it this weekend. Yes, I really did find an inlay piece of furniture on Craiglist, and yes, it’s currently selling for $2,000 on Restoration Hardware (I got it for $400!). Insert that screaming cat emoji face here. Seriously, it’s the score of a lifetime, and I’m going to share the whole story, including how I fix up a few missing inlay spots soon. So… stay tuned. Again.
And before we move on, that sconce looks crazy small above the dresser (we just hung it as a placeholder and it’s looking like a placeholder, so we’ll probably get a wider double-sconce for that spot soon). Anyway, on with the tour! Or should I say “roll the next flashback!” This is that wall a year ago. Same house. Just nekkid a year ago versus clothed now. With walls. You get what I mean.
And now, the back bedroom. Aka: our room whenever we stay there! Although the front room is the largest and has that lovely exposed brick, the back bedroom has its own master bathroom (complete with my big beautiful clawfoot tub) and it has its own stairs that lead up to it, which are surprisingly useful. We originally thought those back stairs would be more of a fun thing for kids and a cool historic detail to preserve, but we weren’t sure we’d actually use them very much but we go up and down them all the time!
rug / fan / leather stools / striped duvet cover / pocked doors: SW Riverway
One of our bigger projects this past weekend was this built-in dresser that we added to the nook behind the pocket doors that you see above. We love gaining some storage and function in that formerly blank area at the top of the back steps, and there’s more than enough room to pull out the drawers and take like five steps back before you’d fall down the steps (you know I’d be the one to bite it all the way down these steps, so we have to make sure these things we’re adding won’t curse me later).
dresser / mirror / wood top / door color: SW Riverway
John would be quick to point out it’s not complete. We ran out of nails for our nail gun, so the trim still needs to be attached, caulked, etc. But basically, a Malm from Ikea fit pretty perfectly in the space, so we made it look even more built-in by removing and reinstalling the molding around it (see below) and adding a few skinny filler pieces to each side (scraps from our kitchen install). We also popped some leftover butcher block counter from downstairs on top to tie into the pine floors and we’re also planning to add some leather pulls to it to tie in the stools at the foot of the bed (you can see them in the shot two photos up). Can’t wait to finish it up and share the final pics!
Next let’s move onto the master bathroom, which is easily my favorite room because I get to soak in that big ol’ tub after hours of DIY and it feels so freaking good every time. Except for the first time. I had sort of a false start in there (more on that in this podcast) but now the tub and I are bros and only happy things happen when I’m in there. And the kids love it too.
marble table / floor tile / accent floor tile / wall hooks / blinds / tub color: SW Riverway
I’m basically salivating while looking at this because we’re back home and our house has two bathrooms that we still have to redo and two tubs that are about 10″ deep (half of my body sticks out like an iceberg) so I’m itching to add a deeper bathtub into my life here at home.
The hall bath is still my boo too, thanks to my favorite vanity ever. The top is tiled with marble and the rounded wood drawers make it look like a furniture piece we converted to be a vanity but it came that way and WE SALUTE IT because goodness knows we have other stuff to keep us busy. Still on the list: making built-in bunk beds, building out the pantry and the mudroom, tiling the backsplash, landscaping, etc, etc. That big round silver mirror is an awesome (and recent!) HomeGoods find (the same one in brass hangs above our mantel at home) so if you’re looking for one in either color, try HomeGoods. Target also has a really similar one that’s slightly smaller and thinner in gold.
vanity / faucet / drum stool / light fixture / floor tile
And although we haven’t built the wall to wall bunkbeds in our small-but-mighty kids room yet, we did hang art. And that’s half the battle, right? (Nope, half the battle is being halfway done with the bunkbeds, but let me lie to myself for a second, ok?). That cute colorful painting is from our dear friend Lesli Devito (remember when we house crashed her wayyyy back here) and if you don’t have one of her paintings or prints I highly recommend getting one. The door also got a sign that says Mermaids Welcome and it made my whole life to hang it up (also we took a poll among a bunch of kids and basically everyone is cool with mermaid and pirates, but don’t get me started on how split the group was on dolphins).
marble table / mermaids welcome plaque / art by Lesli DeVito
So there you have it: a tour as of yesterday of the beach house (remember: watch the video! it has approximately 98% more info than some pics and captions can convey). Also, we hope you have a very happy holiday surrounded by the ones you love and delicious food and all the mermaid-related memorabilia that your heart desires. And if you have a tub where your entire body can be submerged, know that I, for one, now know what I’m missing and am deeply deeply jealous.
P.S. To see the entire process of fixing up this beach house (from floor planning and demo to tiling and tiling and tiling and getting the floors redone) here’s a full category of beach house updates for you to flip through.
*This post contains affiliate links*
The post Beach House: End Of The Year Tour! appeared first on Young House Love.
Beach House: End Of The Year Tour! published first on http://ift.tt/2r6hzQy
0 notes
Text
Beach House: End Of The Year Tour!
Beach house progress, both big and small, feels like it’s happening so quickly that we hardly have time to keep up with documenting it, but I did walk through the whole house yesterday and make a big ol’ video tour… which basically catches you right up to date! So excuse this post for only having around around a dozen photos (we have thousands on our phones, but they’d take us all day to upload and explain, and nobody got time for that with Christmas being less than a week away).
First let’s start at the front door. We hung a wreath (from Tar-jay) and put some battery powered LED candles with timers in the windows (so they’re auto-pilot even when we’re not there). Hallelujah, the house finally looks lived in! I mean, except for the whole it-has-no-landscaping-and-I-desperately-need-to-sand-and-stain-the-front-door thing. Also I still want to paint those white blocks behind the lanterns to match the house. Someday…
lanterns / wreath / house numbers / doormat / siding: SW Mellow Coral / ceiling: SW Breaktime / trim: SW Pure White
While things are far from finished, things are even farther from where they were this time last year. This photo is from almost exactly a year ago, and looking back is a nice reminder that wrinkly curtains and an unfinished pantry are far smaller problems to work through than THE ENTIRE SIDE OF THE HOUSE BEING TORN OFF. Here’s that whole story if you missed it (yup, we literally had to have 500 square feet removed and rebuild from scratch).
SO YEAH. It’s looking a lot better at the end of 2017 than it did at the end of 2016. And weirdly enough that picture makes me excited to get started on the duplex, because as much as I love having finished walls to decorate and finished floors to arrange furniture on, the process of planning (and dreaming about) all of the potential that’s fills the air during a big demo/rebuilding project is oddly addicting. Can’t wait to share our duplex progress as soon as we have our plans approved and all of our permits pulled! But back to the pink house, where I’m walking you guys through every room in a little video tour of sorts: If you can’t see this in a reader, click through to view it on our blog or you can view it here on YouTube.
If you can’t watch the video right now, I’d definitely recommend dropping back in and catching it when you can (a video is basically worth a million photos and I pretty much cover every crevice and explain a lot of extra stuff I couldn’t squeeze into this post).
One recent update, after months and months of debate, is that we finally pulled the trigger and painted the railing. The vertical balusters had all already been painted (SW Stone Isle), so it was just that top rail and the post at the end that were “wood.” I’ll explain why that’s in quotes in a second. It’s hard to see in this picture since that front post is getting hit with a ton of light through the open door, but we went with a deeper gray tone (SW Perpetual Gray) that’s about 3 shades darker than the trim, so it accents the post and the top rail without being too crazy and compete-y with the standout stars of the entire house (those stained glass windows).
I know what some of you are thinking. NOOOO! How could you disgrace such old beautiful wood with paint?!?! Well, this railing had been covered in a thick paint-like brown stain that showed zero grain and was sticky, roughed up, and ruined in a bunch of places (covered in paint splatters, spackle globs, and decades of other issues). After attempting to sand it down, we learned it was a darker redder wood – meaning we’d never be able to stain it to match the lovely heart pine floors. So, we reasoned that a fresh coat of paint applied nice and evenly was a heckuva lot better than its current state. And it really does look glossy and lovely in person, which makes us incredibly relieved.
The good news is that we don’t have any shortage of wood tones in this house. We have original heart pine everywhere (we stripped and clear-sealed all of the original doors that we could, brought the original floors both upstairs and downstairs back to their glory, etc). This house’s middle name could be wood. Pinkie “Wood” House. Wait that sounds bad. Forget the middle name thing.
Down in the living room, we added this cool wall-mounted bookcase, which instantly made us both say “Ahhh! It looks like an actual room people live in!” We also got to hang some cozy white curtains which need DESPERATELY to be steamed and hemmed. They’re Lenda curtains from Ikea– I just cut off the top tabs and make sure to wash them to pre-shrink them before hanging. We also have them in our home office and love how washable and easy they are. Also, my secondhand brass grasshopper (aka: Brasshopper) is a total badass and I love him more each day.
bookcase / blue pillow / curtains / rods / similar brass grasshopper
Also bought a rug from New England Loom (if you don’t follow them on Instagram you’re missing out because they have so many lovely secondhand rugs to be discovered) and the colors and patterns and antique feeling of the rug is PERFECT for a room that will be assaulted with food and sand and everything else that a rental living room has to deal with, so I have high hopes for it holding up like a champ (seeing as it is decades old already, that really does inspire confidence). That pretty blue pillow is from this Etsy shop (I love all of her pillows) and the pink one is from Target a while back. And you guys know the sofa is the Ikea Karlstad that they no longer make, which is a straight up travesty.
We also updated the light in here to this gleaming beauty from West Elm. The old light was a one-bulb fixture that we hung and immediately said “this room needs way more light.” We love the juxtaposition of this leggier modern light and the old-looking medallion (which is actually from Home Depot – shhh). And the old brick chimney that we discovered behind the wall and exposed is probably my favorite feature in the room, along with the giant windows (this room is 9′ tall, so the windows are easily over 6.5′ feet tall – that’s taller than John!). Don’t mind that TV on the floor. We found something we think will work for in there, just gotta get it out there in our next car load. #AlwaysRoadTrippingWithFurniture
rug source / chandelier / ceiling medallion /curtains / rods
The kitchen came a long way too, with the quartz island going in (it’s Pearl Jasmine by Silestone and we LOVE it so much) and a working sink. Cue the choir of angels! You can hear two ways we saved money on our quartz counters in Podcast Episode #74, which also covers why our original plan to do butcher block there didn’t work out. There are still some things missing though. Mainly, the backsplash that we’ll add after we hang the other missing element: shelves on either side of the stove under the sconces (probably two per side, not sure yet but we’ll keep you posted).
stools / quartz / butcher block / cabinets / range: secondhand refurbished / trim: SW Stone Isle / walls: SW White Heron
The back door was blue for a hot second, which some of you might have seen on Instagram, but as the room came together more John and I both realized that the same gray as the trim (SW Stone Isle) would let the pink stove do her thing and be the accent in the room that she has always been destined to become. Plus, we have a blue chippy door leading to the mudroom nearby, and one blue door + one pink stove is… enough. You know I didn’t love painting that door twice, so if I did it, it had to be done. Ha!
green vase / wood cutting board / wood stand / hanging rod / hood / kettle / sconces / pink salt & pepper
Upstairs the bedrooms are coming along with some art up on the walls, layered cozy bedding, and even headboards. HUZZAH! Still need to hang all the curtains up there (once we do that the headboard will look exactly as wide as the window because we are tricky tricksters). Stay tuned…
rug / large art / lamp / side table / striped blanket / headboard / fan
This is another view of that front bedroom, which is the largest of the four (the bunk room is teeny tiny and the middle bedroom and back bedroom are just fine but not giant). It also has that exposed brick chimney that we discovered hiding behind the wall, and next to it you’ll see my favorite craigslist find of all time that you might have already “met” on Facebook or Instagram when I shared a quick shot of it this weekend. Yes, I really did find an inlay piece of furniture on Craiglist, and yes, it’s currently selling for $2,000 on Restoration Hardware (I got it for $400!). Insert that screaming cat emoji face here. Seriously, it’s the score of a lifetime, and I’m going to share the whole story, including how I fix up a few missing inlay spots soon. So… stay tuned. Again.
And before we move on, that sconce looks crazy small above the dresser (we just hung it as a placeholder and it’s looking like a placeholder, so we’ll probably get a wider double-sconce for that spot soon). Anyway, on with the tour! Or should I say “roll the next flashback!” This is that wall a year ago. Same house. Just nekkid a year ago versus clothed now. With walls. You get what I mean.
And now, the back bedroom. Aka: our room whenever we stay there! Although the front room is the largest and has that lovely exposed brick, the back bedroom has its own master bathroom (complete with my big beautiful clawfoot tub) and it has its own stairs that lead up to it, which are surprisingly useful. We originally thought those back stairs would be more of a fun thing for kids and a cool historic detail to preserve, but we weren’t sure we’d actually use them very much but we go up and down them all the time!
rug / fan / leather stools / striped duvet cover / pocked doors: SW Riverway
One of our bigger projects this past weekend was this built-in dresser that we added to the nook behind the pocket doors that you see above. We love gaining some storage and function in that formerly blank area at the top of the back steps, and there’s more than enough room to pull out the drawers and take like five steps back before you’d fall down the steps (you know I’d be the one to bite it all the way down these steps, so we have to make sure these things we’re adding won’t curse me later).
dresser / mirror / wood top / door color: SW Riverway
John would be quick to point out it’s not complete. We ran out of nails for our nail gun, so the trim still needs to be attached, caulked, etc. But basically, a Malm from Ikea fit pretty perfectly in the space, so we made it look even more built-in by removing and reinstalling the molding around it (see below) and adding a few skinny filler pieces to each side (scraps from our kitchen install). We also popped some leftover butcher block counter from downstairs on top to tie into the pine floors and we’re also planning to add some leather pulls to it to tie in the stools at the foot of the bed (you can see them in the shot two photos up). Can’t wait to finish it up and share the final pics!
Next let’s move onto the master bathroom, which is easily my favorite room because I get to soak in that big ol’ tub after hours of DIY and it feels so freaking good every time. Except for the first time. I had sort of a false start in there (more on that in this podcast) but now the tub and I are bros and only happy things happen when I’m in there. And the kids love it too.
marble table / floor tile / accent floor tile / wall hooks / blinds / tub color: SW Riverway
I’m basically salivating while looking at this because we’re back home and our house has two bathrooms that we still have to redo and two tubs that are about 10″ deep (half of my body sticks out like an iceberg) so I’m itching to add a deeper bathtub into my life here at home.
The hall bath is still my boo too, thanks to my favorite vanity ever. The top is tiled with marble and the rounded wood drawers make it look like a furniture piece we converted to be a vanity but it came that way and WE SALUTE IT because goodness knows we have other stuff to keep us busy. Still on the list: making built-in bunk beds, building out the pantry and the mudroom, tiling the backsplash, landscaping, etc, etc. That big round silver mirror is an awesome (and recent!) HomeGoods find (the same one in brass hangs above our mantel at home) so if you’re looking for one in either color, try HomeGoods. Target also has a really similar one that’s slightly smaller and thinner in gold.
vanity / faucet / drum stool / light fixture / floor tile
And although we haven’t built the wall to wall bunkbeds in our small-but-mighty kids room yet, we did hang art. And that’s half the battle, right? (Nope, half the battle is being halfway done with the bunkbeds, but let me lie to myself for a second, ok?). That cute colorful painting is from our dear friend Lesli Devito (remember when we house crashed her wayyyy back here) and if you don’t have one of her paintings or prints I highly recommend getting one. The door also got a sign that says Mermaids Welcome and it made my whole life to hang it up (also we took a poll among a bunch of kids and basically everyone is cool with mermaid and pirates, but don’t get me started on how split the group was on dolphins).
marble table / mermaids welcome plaque / art by Lesli DeVito
So there you have it: a tour as of yesterday of the beach house (remember: watch the video! it has approximately 98% more info than some pics and captions can convey). Also, we hope you have a very happy holiday surrounded by the ones you love and delicious food and all the mermaid-related memorabilia that your heart desires. And if you have a tub where your entire body can be submerged, know that I, for one, now know what I’m missing and am deeply deeply jealous.
P.S. To see the entire process of fixing up this beach house (from floor planning and demo to tiling and tiling and tiling and getting the floors redone) here’s a full category of beach house updates for you to flip through.
*This post contains affiliate links*
The post Beach House: End Of The Year Tour! appeared first on Young House Love.
Beach House: End Of The Year Tour! published first on http://ift.tt/2uiWrIt
0 notes
Text
Beach House: End Of The Year Tour!
Beach house progress, both big and small, feels like it’s happening so quickly that we hardly have time to keep up with documenting it, but I did walk through the whole house yesterday and make a big ol’ video tour… which basically catches you right up to date! So excuse this post for only having around around a dozen photos (we have thousands on our phones, but they’d take us all day to upload and explain, and nobody got time for that with Christmas being less than a week away).
First let’s start at the front door. We hung a wreath (from Tar-jay) and put some battery powered LED candles with timers in the windows (so they’re auto-pilot even when we’re not there). Hallelujah, the house finally looks lived in! I mean, except for the whole it-has-no-landscaping-and-I-desperately-need-to-sand-and-stain-the-front-door thing. Also I still want to paint those white blocks behind the lanterns to match the house. Someday…
lanterns / wreath / house numbers / doormat / siding: SW Mellow Coral / ceiling: SW Breaktime / trim: SW Pure White
While things are far from finished, things are even farther from where they were this time last year. This photo is from almost exactly a year ago, and looking back is a nice reminder that wrinkly curtains and an unfinished pantry are far smaller problems to work through than THE ENTIRE SIDE OF THE HOUSE BEING TORN OFF. Here’s that whole story if you missed it (yup, we literally had to have 500 square feet removed and rebuild from scratch).
SO YEAH. It’s looking a lot better at the end of 2017 than it did at the end of 2016. And weirdly enough that picture makes me excited to get started on the duplex, because as much as I love having finished walls to decorate and finished floors to arrange furniture on, the process of planning (and dreaming about) all of the potential that’s fills the air during a big demo/rebuilding project is oddly addicting. Can’t wait to share our duplex progress as soon as we have our plans approved and all of our permits pulled! But back to the pink house, where I’m walking you guys through every room in a little video tour of sorts: If you can’t see this in a reader, click through to view it on our blog or you can view it here on YouTube.
If you can’t watch the video right now, I’d definitely recommend dropping back in and catching it when you can (a video is basically worth a million photos and I pretty much cover every crevice and explain a lot of extra stuff I couldn’t squeeze into this post).
One recent update, after months and months of debate, is that we finally pulled the trigger and painted the railing. The vertical balusters had all already been painted (SW Stone Isle), so it was just that top rail and the post at the end that were “wood.” I’ll explain why that’s in quotes in a second. It’s hard to see in this picture since that front post is getting hit with a ton of light through the open door, but we went with a deeper gray tone (SW Perpetual Gray) that’s about 3 shades darker than the trim, so it accents the post and the top rail without being too crazy and compete-y with the standout stars of the entire house (those stained glass windows).
I know what some of you are thinking. NOOOO! How could you disgrace such old beautiful wood with paint?!?! Well, this railing had been covered in a thick paint-like brown stain that showed zero grain and was sticky, roughed up, and ruined in a bunch of places (covered in paint splatters, spackle globs, and decades of other issues). After attempting to sand it down, we learned it was a darker redder wood – meaning we’d never be able to stain it to match the lovely heart pine floors. So, we reasoned that a fresh coat of paint applied nice and evenly was a heckuva lot better than its current state. And it really does look glossy and lovely in person, which makes us incredibly relieved.
The good news is that we don’t have any shortage of wood tones in this house. We have original heart pine everywhere (we stripped and clear-sealed all of the original doors that we could, brought the original floors both upstairs and downstairs back to their glory, etc). This house’s middle name could be wood. Pinkie “Wood” House. Wait that sounds bad. Forget the middle name thing.
Down in the living room, we added this cool wall-mounted bookcase, which instantly made us both say “Ahhh! It looks like an actual room people live in!” We also got to hang some cozy white curtains which need DESPERATELY to be steamed and hemmed. They’re Lenda curtains from Ikea– I just cut off the top tabs and make sure to wash them to pre-shrink them before hanging. We also have them in our home office and love how washable and easy they are. Also, my secondhand brass grasshopper (aka: Brasshopper) is a total badass and I love him more each day.
bookcase / blue pillow / curtains / rods / similar brass grasshopper
Also bought a rug from New England Loom (if you don’t follow them on Instagram you’re missing out because they have so many lovely secondhand rugs to be discovered) and the colors and patterns and antique feeling of the rug is PERFECT for a room that will be assaulted with food and sand and everything else that a rental living room has to deal with, so I have high hopes for it holding up like a champ (seeing as it is decades old already, that really does inspire confidence). That pretty blue pillow is from this Etsy shop (I love all of her pillows) and the pink one is from Target a while back. And you guys know the sofa is the Ikea Karlstad that they no longer make, which is a straight up travesty.
We also updated the light in here to this gleaming beauty from West Elm. The old light was a one-bulb fixture that we hung and immediately said “this room needs way more light.” We love the juxtaposition of this leggier modern light and the old-looking medallion (which is actually from Home Depot – shhh). And the old brick chimney that we discovered behind the wall and exposed is probably my favorite feature in the room, along with the giant windows (this room is 9′ tall, so the windows are easily over 6.5′ feet tall – that’s taller than John!). Don’t mind that TV on the floor. We found something we think will work for in there, just gotta get it out there in our next car load. #AlwaysRoadTrippingWithFurniture
rug source / chandelier / ceiling medallion /curtains / rods
The kitchen came a long way too, with the quartz island going in (it’s Pearl Jasmine by Silestone and we LOVE it so much) and a working sink. Cue the choir of angels! You can hear two ways we saved money on our quartz counters in Podcast Episode #74, which also covers why our original plan to do butcher block there didn’t work out. There are still some things missing though. Mainly, the backsplash that we’ll add after we hang the other missing element: shelves on either side of the stove under the sconces (probably two per side, not sure yet but we’ll keep you posted).
stools / quartz / butcher block / cabinets / range: secondhand refurbished / trim: SW Stone Isle / walls: SW White Heron
The back door was blue for a hot second, which some of you might have seen on Instagram, but as the room came together more John and I both realized that the same gray as the trim (SW Stone Isle) would let the pink stove do her thing and be the accent in the room that she has always been destined to become. Plus, we have a blue chippy door leading to the mudroom nearby, and one blue door + one pink stove is… enough. You know I didn’t love painting that door twice, so if I did it, it had to be done. Ha!
green vase / wood cutting board / wood stand / hanging rod / hood / kettle / sconces / pink salt & pepper
Upstairs the bedrooms are coming along with some art up on the walls, layered cozy bedding, and even headboards. HUZZAH! Still need to hang all the curtains up there (once we do that the headboard will look exactly as wide as the window because we are tricky tricksters). Stay tuned…
rug / large art / lamp / side table / striped blanket / headboard / fan
This is another view of that front bedroom, which is the largest of the four (the bunk room is teeny tiny and the middle bedroom and back bedroom are just fine but not giant). It also has that exposed brick chimney that we discovered hiding behind the wall, and next to it you’ll see my favorite craigslist find of all time that you might have already “met” on Facebook or Instagram when I shared a quick shot of it this weekend. Yes, I really did find an inlay piece of furniture on Craiglist, and yes, it’s currently selling for $2,000 on Restoration Hardware (I got it for $400!). Insert that screaming cat emoji face here. Seriously, it’s the score of a lifetime, and I’m going to share the whole story, including how I fix up a few missing inlay spots soon. So… stay tuned. Again.
And before we move on, that sconce looks crazy small above the dresser (we just hung it as a placeholder and it’s looking like a placeholder, so we’ll probably get a wider double-sconce for that spot soon). Anyway, on with the tour! Or should I say “roll the next flashback!” This is that wall a year ago. Same house. Just nekkid a year ago versus clothed now. With walls. You get what I mean.
And now, the back bedroom. Aka: our room whenever we stay there! Although the front room is the largest and has that lovely exposed brick, the back bedroom has its own master bathroom (complete with my big beautiful clawfoot tub) and it has its own stairs that lead up to it, which are surprisingly useful. We originally thought those back stairs would be more of a fun thing for kids and a cool historic detail to preserve, but we weren’t sure we’d actually use them very much but we go up and down them all the time!
rug / fan / leather stools / striped duvet cover / pocked doors: SW Riverway
One of our bigger projects this past weekend was this built-in dresser that we added to the nook behind the pocket doors that you see above. We love gaining some storage and function in that formerly blank area at the top of the back steps, and there’s more than enough room to pull out the drawers and take like five steps back before you’d fall down the steps (you know I’d be the one to bite it all the way down these steps, so we have to make sure these things we’re adding won’t curse me later).
dresser / mirror / wood top / door color: SW Riverway
John would be quick to point out it’s not complete. We ran out of nails for our nail gun, so the trim still needs to be attached, caulked, etc. But basically, a Malm from Ikea fit pretty perfectly in the space, so we made it look even more built-in by removing and reinstalling the molding around it (see below) and adding a few skinny filler pieces to each side (scraps from our kitchen install). We also popped some leftover butcher block counter from downstairs on top to tie into the pine floors and we’re also planning to add some leather pulls to it to tie in the stools at the foot of the bed (you can see them in the shot two photos up). Can’t wait to finish it up and share the final pics!
Next let’s move onto the master bathroom, which is easily my favorite room because I get to soak in that big ol’ tub after hours of DIY and it feels so freaking good every time. Except for the first time. I had sort of a false start in there (more on that in this podcast) but now the tub and I are bros and only happy things happen when I’m in there. And the kids love it too.
marble table / floor tile / accent floor tile / wall hooks / blinds / tub color: SW Riverway
I’m basically salivating while looking at this because we’re back home and our house has two bathrooms that we still have to redo and two tubs that are about 10″ deep (half of my body sticks out like an iceberg) so I’m itching to add a deeper bathtub into my life here at home.
The hall bath is still my boo too, thanks to my favorite vanity ever. The top is tiled with marble and the rounded wood drawers make it look like a furniture piece we converted to be a vanity but it came that way and WE SALUTE IT because goodness knows we have other stuff to keep us busy. Still on the list: making built-in bunk beds, building out the pantry and the mudroom, tiling the backsplash, landscaping, etc, etc. That big round silver mirror is an awesome (and recent!) HomeGoods find (the same one in brass hangs above our mantel at home) so if you’re looking for one in either color, try HomeGoods. Target also has a really similar one that’s slightly smaller and thinner in gold.
vanity / faucet / drum stool / light fixture / floor tile
And although we haven’t built the wall to wall bunkbeds in our small-but-mighty kids room yet, we did hang art. And that’s half the battle, right? (Nope, half the battle is being halfway done with the bunkbeds, but let me lie to myself for a second, ok?). That cute colorful painting is from our dear friend Lesli Devito (remember when we house crashed her wayyyy back here) and if you don’t have one of her paintings or prints I highly recommend getting one. The door also got a sign that says Mermaids Welcome and it made my whole life to hang it up (also we took a poll among a bunch of kids and basically everyone is cool with mermaid and pirates, but don’t get me started on how split the group was on dolphins).
marble table / mermaids welcome plaque / art by Lesli DeVito
So there you have it: a tour as of yesterday of the beach house (remember: watch the video! it has approximately 98% more info than some pics and captions can convey). Also, we hope you have a very happy holiday surrounded by the ones you love and delicious food and all the mermaid-related memorabilia that your heart desires. And if you have a tub where your entire body can be submerged, know that I, for one, now know what I’m missing and am deeply deeply jealous.
P.S. To see the entire process of fixing up this beach house (from floor planning and demo to tiling and tiling and tiling and getting the floors redone) here’s a full category of beach house updates for you to flip through.
*This post contains affiliate links*
The post Beach House: End Of The Year Tour! appeared first on Young House Love.
Beach House: End Of The Year Tour! published first on http://ift.tt/2BedaSe
0 notes
Photo
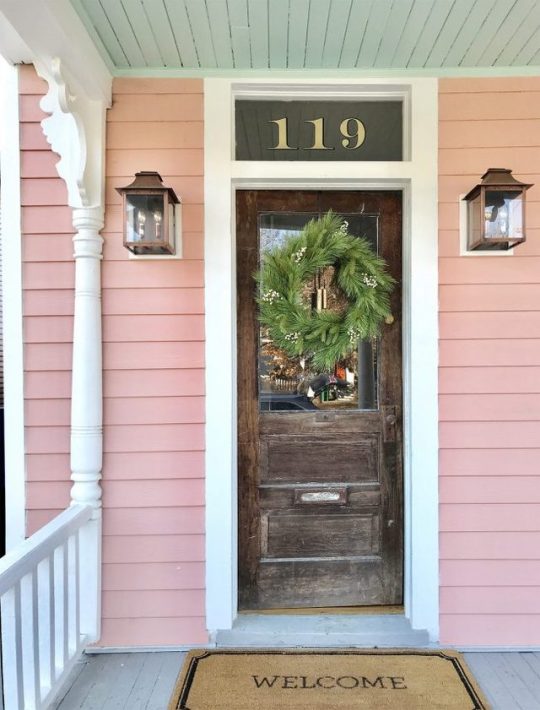
Beach House: End Of The Year Tour! http://ift.tt/2D8c9Mf
Beach house progress, both big and small, feels like it’s happening so quickly that we hardly have time to keep up with documenting it, but I did walk through the whole house yesterday and make a big ol’ video tour… which basically catches you right up to date! So excuse this post for only having around around a dozen photos (we have thousands on our phones, but they’d take us all day to upload and explain, and nobody got time for that with Christmas being less than a week away).
First let’s start at the front door. We hung a wreath (from Tar-jay) and put some battery powered LED candles with timers in the windows (so they’re auto-pilot even when we’re not there). Hallelujah, the house finally looks lived in! I mean, except for the whole it-has-no-landscaping-and-I-desperately-need-to-sand-and-stain-the-front-door thing. Also I still want to paint those white blocks behind the lanterns to match the house. Someday…
lanterns / wreath / house numbers / doormat / siding: SW Mellow Coral / ceiling: SW Breaktime / trim: SW Pure White
While things are far from finished, things are even farther from where they were this time last year. This photo is from almost exactly a year ago, and looking back is a nice reminder that wrinkly curtains and an unfinished pantry are far smaller problems to work through than THE ENTIRE SIDE OF THE HOUSE BEING TORN OFF. Here’s that whole story if you missed it (yup, we literally had to have 500 square feet removed and rebuild from scratch).
SO YEAH. It’s looking a lot better at the end of 2017 than it did at the end of 2016. And weirdly enough that picture makes me excited to get started on the duplex, because as much as I love having finished walls to decorate and finished floors to arrange furniture on, the process of planning (and dreaming about) all of the potential that’s fills the air during a big demo/rebuilding project is oddly addicting. Can’t wait to share our duplex progress as soon as we have our plans approved and all of our permits pulled! But back to the pink house, where I’m walking you guys through every room in a little video tour of sorts: If you can’t see this in a reader, click through to view it on our blog or you can view it here on YouTube.
If you can’t watch the video right now, I’d definitely recommend dropping back in and catching it when you can (a video is basically worth a million photos and I pretty much cover every crevice and explain a lot of extra stuff I couldn’t squeeze into this post).
One recent update, after months and months of debate, is that we finally pulled the trigger and painted the railing. The vertical balusters had all already been painted (SW Stone Isle), so it was just that top rail and the post at the end that were “wood.” I’ll explain why that’s in quotes in a second. It’s hard to see in this picture since that front post is getting hit with a ton of light through the open door, but we went with a deeper gray tone (SW Perpetual Gray) that’s about 3 shades darker than the trim, so it accents the post and the top rail without being too crazy and compete-y with the standout stars of the entire house (those stained glass windows).
I know what some of you are thinking. NOOOO! How could you disgrace such old beautiful wood with paint?!?! Well, this railing had been covered in a thick paint-like brown stain that showed zero grain and was sticky, roughed up, and ruined in a bunch of places (covered in paint splatters, spackle globs, and decades of other issues). After attempting to sand it down, we learned it was a darker redder wood – meaning we’d never be able to stain it to match the lovely heart pine floors. So, we reasoned that a fresh coat of paint applied nice and evenly was a heckuva lot better than its current state. And it really does look glossy and lovely in person, which makes us incredibly relieved.
The good news is that we don’t have any shortage of wood tones in this house. We have original heart pine everywhere (we stripped and clear-sealed all of the original doors that we could, brought the original floors both upstairs and downstairs back to their glory, etc). This house’s middle name could be wood. Pinkie “Wood” House. Wait that sounds bad. Forget the middle name thing.
Down in the living room, we added this cool wall-mounted bookcase, which instantly made us both say “Ahhh! It looks like an actual room people live in!” We also got to hang some cozy white curtains which need DESPERATELY to be steamed and hemmed. They’re Lenda curtains from Ikea– I just cut off the top tabs and make sure to wash them to pre-shrink them before hanging. We also have them in our home office and love how washable and easy they are. Also, my secondhand brass grasshopper (aka: Brasshopper) is a total badass and I love him more each day.
bookcase / blue pillow / curtains / rods / similar brass grasshopper
Also bought a rug from New England Loom (if you don’t follow them on Instagram you’re missing out because they have so many lovely secondhand rugs to be discovered) and the colors and patterns and antique feeling of the rug is PERFECT for a room that will be assaulted with food and sand and everything else that a rental living room has to deal with, so I have high hopes for it holding up like a champ (seeing as it is decades old already, that really does inspire confidence). That pretty blue pillow is from this Etsy shop (I love all of her pillows) and the pink one is from Target a while back. And you guys know the sofa is the Ikea Karlstad that they no longer make, which is a straight up travesty.
We also updated the light in here to this gleaming beauty from West Elm. The old light was a one-bulb fixture that we hung and immediately said “this room needs way more light.” We love the juxtaposition of this leggier modern light and the old-looking medallion (which is actually from Home Depot – shhh). And the old brick chimney that we discovered behind the wall and exposed is probably my favorite feature in the room, along with the giant windows (this room is 9′ tall, so the windows are easily over 6.5′ feet tall – that’s taller than John!). Don’t mind that TV on the floor. We found something we think will work for in there, just gotta get it out there in our next car load. #AlwaysRoadTrippingWithFurniture
rug source / chandelier / ceiling medallion /curtains / rods
The kitchen came a long way too, with the quartz island going in (it’s Pearl Jasmine by Silestone and we LOVE it so much) and a working sink. Cue the choir of angels! You can hear two ways we saved money on our quartz counters in Podcast Episode #74, which also covers why our original plan to do butcher block there didn’t work out. There are still some things missing though. Mainly, the backsplash that we’ll add after we hang the other missing element: shelves on either side of the stove under the sconces (probably two per side, not sure yet but we’ll keep you posted).
stools / quartz / butcher block / cabinets / range: secondhand refurbished / trim: SW Stone Isle / walls: SW White Heron
The back door was blue for a hot second, which some of you might have seen on Instagram, but as the room came together more John and I both realized that the same gray as the trim (SW Stone Isle) would let the pink stove do her thing and be the accent in the room that she has always been destined to become. Plus, we have a blue chippy door leading to the mudroom nearby, and one blue door + one pink stove is… enough. You know I didn’t love painting that door twice, so if I did it, it had to be done. Ha!
green vase / wood cutting board / wood stand / hanging rod / hood / kettle / sconces / pink salt & pepper
Upstairs the bedrooms are coming along with some art up on the walls, layered cozy bedding, and even headboards. HUZZAH! Still need to hang all the curtains up there (once we do that the headboard will look exactly as wide as the window because we are tricky tricksters). Stay tuned…
rug / large art / lamp / side table / striped blanket / headboard / fan
This is another view of that front bedroom, which is the largest of the four (the bunk room is teeny tiny and the middle bedroom and back bedroom are just fine but not giant). It also has that exposed brick chimney that we discovered hiding behind the wall, and next to it you’ll see my favorite craigslist find of all time that you might have already “met” on Facebook or Instagram when I shared a quick shot of it this weekend. Yes, I really did find an inlay piece of furniture on Craiglist, and yes, it’s currently selling for $2,000 on Restoration Hardware (I got it for $400!). Insert that screaming cat emoji face here. Seriously, it’s the score of a lifetime, and I’m going to share the whole story, including how I fix up a few missing inlay spots soon. So… stay tuned. Again.
And before we move on, that sconce looks crazy small above the dresser (we just hung it as a placeholder and it’s looking like a placeholder, so we’ll probably get a wider double-sconce for that spot soon). Anyway, on with the tour! Or should I say “roll the next flashback!” This is that wall a year ago. Same house. Just nekkid a year ago versus clothed now. With walls. You get what I mean.
And now, the back bedroom. Aka: our room whenever we stay there! Although the front room is the largest and has that lovely exposed brick, the back bedroom has its own master bathroom (complete with my big beautiful clawfoot tub) and it has its own stairs that lead up to it, which are surprisingly useful. We originally thought those back stairs would be more of a fun thing for kids and a cool historic detail to preserve, but we weren’t sure we’d actually use them very much but we go up and down them all the time!
rug / fan / leather stools / striped duvet cover / pocked doors: SW Riverway
One of our bigger projects this past weekend was this built-in dresser that we added to the nook behind the pocket doors that you see above. We love gaining some storage and function in that formerly blank area at the top of the back steps, and there’s more than enough room to pull out the drawers and take like five steps back before you’d fall down the steps (you know I’d be the one to bite it all the way down these steps, so we have to make sure these things we’re adding won’t curse me later).
dresser / mirror / wood top / door color: SW Riverway
John would be quick to point out it’s not complete. We ran out of nails for our nail gun, so the trim still needs to be attached, caulked, etc. But basically, a Malm from Ikea fit pretty perfectly in the space, so we made it look even more built-in by removing and reinstalling the molding around it (see below) and adding a few skinny filler pieces to each side (scraps from our kitchen install). We also popped some leftover butcher block counter from downstairs on top to tie into the pine floors and we’re also planning to add some leather pulls to it to tie in the stools at the foot of the bed (you can see them in the shot two photos up). Can’t wait to finish it up and share the final pics!
Next let’s move onto the master bathroom, which is easily my favorite room because I get to soak in that big ol’ tub after hours of DIY and it feels so freaking good every time. Except for the first time. I had sort of a false start in there (more on that in this podcast) but now the tub and I are bros and only happy things happen when I’m in there. And the kids love it too.
marble table / floor tile / accent floor tile / wall hooks / blinds / tub color: SW Riverway
I’m basically salivating while looking at this because we’re back home and our house has two bathrooms that we still have to redo and two tubs that are about 10″ deep (half of my body sticks out like an iceberg) so I’m itching to add a deeper bathtub into my life here at home.
The hall bath is still my boo too, thanks to my favorite vanity ever. The top is tiled with marble and the rounded wood drawers make it look like a furniture piece we converted to be a vanity but it came that way and WE SALUTE IT because goodness knows we have other stuff to keep us busy. Still on the list: making built-in bunk beds, building out the pantry and the mudroom, tiling the backsplash, landscaping, etc, etc. That big round silver mirror is an awesome (and recent!) HomeGoods find (the same one in brass hangs above our mantel at home) so if you’re looking for one in either color, try HomeGoods. Target also has a really similar one that’s slightly smaller and thinner in gold.
vanity / faucet / drum stool / light fixture / floor tile
And although we haven’t built the wall to wall bunkbeds in our small-but-mighty kids room yet, we did hang art. And that’s half the battle, right? (Nope, half the battle is being halfway done with the bunkbeds, but let me lie to myself for a second, ok?). That cute colorful painting is from our dear friend Lesli Devito (remember when we house crashed her wayyyy back here) and if you don’t have one of her paintings or prints I highly recommend getting one. The door also got a sign that says Mermaids Welcome and it made my whole life to hang it up (also we took a poll among a bunch of kids and basically everyone is cool with mermaid and pirates, but don’t get me started on how split the group was on dolphins).
marble table / mermaids welcome plaque / art by Lesli DeVito
So there you have it: a tour as of yesterday of the beach house (remember: watch the video! it has approximately 98% more info than some pics and captions can convey). Also, we hope you have a very happy holiday surrounded by the ones you love and delicious food and all the mermaid-related memorabilia that your heart desires. And if you have a tub where your entire body can be submerged, know that I, for one, now know what I’m missing and am deeply deeply jealous.
P.S. To see the entire process of fixing up this beach house (from floor planning and demo to tiling and tiling and tiling and getting the floors redone) here’s a full category of beach house updates for you to flip through.
*This post contains affiliate links*
The post Beach House: End Of The Year Tour! appeared first on Young House Love.
0 notes
Text
Beach House: End Of The Year Tour!
Beach house progress, both big and small, feels like it’s happening so quickly that we hardly have time to keep up with documenting it, but I did walk through the whole house yesterday and make a big ol’ video tour… which basically catches you right up to date! So excuse this post for only having around around a dozen photos (we have thousands on our phones, but they’d take us all day to upload and explain, and nobody got time for that with Christmas being less than a week away).
First let’s start at the front door. We hung a wreath (from Tar-jay) and put some battery powered LED candles with timers in the windows (so they’re auto-pilot even when we’re not there). Hallelujah, the house finally looks lived in! I mean, except for the whole it-has-no-landscaping-and-I-desperately-need-to-sand-and-stain-the-front-door thing. Also I still want to paint those white blocks behind the lanterns to match the house. Someday…
lanterns / wreath / house numbers / doormat / siding: SW Mellow Coral / ceiling: SW Breaktime / trim: SW Pure White
While things are far from finished, things are even farther from where they were this time last year. This photo is from almost exactly a year ago, and looking back is a nice reminder that wrinkly curtains and an unfinished pantry are far smaller problems to work through than THE ENTIRE SIDE OF THE HOUSE BEING TORN OFF. Here’s that whole story if you missed it (yup, we literally had to have 500 square feet removed and rebuild from scratch).
SO YEAH. It’s looking a lot better at the end of 2017 than it did at the end of 2016. And weirdly enough that picture makes me excited to get started on the duplex, because as much as I love having finished walls to decorate and finished floors to arrange furniture on, the process of planning (and dreaming about) all of the potential that’s fills the air during a big demo/rebuilding project is oddly addicting. Can’t wait to share our duplex progress as soon as we have our plans approved and all of our permits pulled! But back to the pink house, where I’m walking you guys through every room in a little video tour of sorts: If you can’t see this in a reader, click through to view it on our blog or you can view it here on YouTube.
If you can’t watch the video right now, I’d definitely recommend dropping back in and catching it when you can (a video is basically worth a million photos and I pretty much cover every crevice and explain a lot of extra stuff I couldn’t squeeze into this post).
One recent update, after months and months of debate, is that we finally pulled the trigger and painted the railing. The vertical balusters had all already been painted (SW Stone Isle), so it was just that top rail and the post at the end that were “wood.” I’ll explain why that’s in quotes in a second. It’s hard to see in this picture since that front post is getting hit with a ton of light through the open door, but we went with a deeper gray tone (SW Perpetual Gray) that’s about 3 shades darker than the trim, so it accents the post and the top rail without being too crazy and compete-y with the standout stars of the entire house (those stained glass windows).
I know what some of you are thinking. NOOOO! How could you disgrace such old beautiful wood with paint?!?! Well, this railing had been covered in a thick paint-like brown stain that showed zero grain and was sticky, roughed up, and ruined in a bunch of places (covered in paint splatters, spackle globs, and decades of other issues). After attempting to sand it down, we learned it was a darker redder wood – meaning we’d never be able to stain it to match the lovely heart pine floors. So, we reasoned that a fresh coat of paint applied nice and evenly was a heckuva lot better than its current state. And it really does look glossy and lovely in person, which makes us incredibly relieved.
The good news is that we don’t have any shortage of wood tones in this house. We have original heart pine everywhere (we stripped and clear-sealed all of the original doors that we could, brought the original floors both upstairs and downstairs back to their glory, etc). This house’s middle name could be wood. Pinkie “Wood” House. Wait that sounds bad. Forget the middle name thing.
Down in the living room, we added this cool wall-mounted bookcase, which instantly made us both say “Ahhh! It looks like an actual room people live in!” We also got to hang some cozy white curtains which need DESPERATELY to be steamed and hemmed. They’re Lenda curtains from Ikea– I just cut off the top tabs and make sure to wash them to pre-shrink them before hanging. We also have them in our home office and love how washable and easy they are. Also, my secondhand brass grasshopper (aka: Brasshopper) is a total badass and I love him more each day.
bookcase / blue pillow / curtains / rods / similar brass grasshopper
Also bought a rug from New England Loom (if you don’t follow them on Instagram you’re missing out because they have so many lovely secondhand rugs to be discovered) and the colors and patterns and antique feeling of the rug is PERFECT for a room that will be assaulted with food and sand and everything else that a rental living room has to deal with, so I have high hopes for it holding up like a champ (seeing as it is decades old already, that really does inspire confidence). That pretty blue pillow is from this Etsy shop (I love all of her pillows) and the pink one is from Target a while back. And you guys know the sofa is the Ikea Karlstad that they no longer make, which is a straight up travesty.
We also updated the light in here to this gleaming beauty from West Elm. The old light was a one-bulb fixture that we hung and immediately said “this room needs way more light.” We love the juxtaposition of this leggier modern light and the old-looking medallion (which is actually from Home Depot – shhh). And the old brick chimney that we discovered behind the wall and exposed is probably my favorite feature in the room, along with the giant windows (this room is 9′ tall, so the windows are easily over 6.5′ feet tall – that’s taller than John!). Don’t mind that TV on the floor. We found something we think will work for in there, just gotta get it out there in our next car load. #AlwaysRoadTrippingWithFurniture
rug source / chandelier / ceiling medallion /curtains / rods
The kitchen came a long way too, with the quartz island going in (it’s Pearl Jasmine by Silestone and we LOVE it so much) and a working sink. Cue the choir of angels! You can hear two ways we saved money on our quartz counters in Podcast Episode #74, which also covers why our original plan to do butcher block there didn’t work out. There are still some things missing though. Mainly, the backsplash that we’ll add after we hang the other missing element: shelves on either side of the stove under the sconces (probably two per side, not sure yet but we’ll keep you posted).
stools / quartz / butcher block / cabinets / range: secondhand refurbished / trim: SW Stone Isle / walls: SW White Heron
The back door was blue for a hot second, which some of you might have seen on Instagram, but as the room came together more John and I both realized that the same gray as the trim (SW Stone Isle) would let the pink stove do her thing and be the accent in the room that she has always been destined to become. Plus, we have a blue chippy door leading to the mudroom nearby, and one blue door + one pink stove is… enough. You know I didn’t love painting that door twice, so if I did it, it had to be done. Ha!
green vase / wood cutting board / wood stand / hanging rod / hood / kettle / sconces / pink salt & pepper
Upstairs the bedrooms are coming along with some art up on the walls, layered cozy bedding, and even headboards. HUZZAH! Still need to hang all the curtains up there (once we do that the headboard will look exactly as wide as the window because we are tricky tricksters). Stay tuned…
rug / large art / lamp / side table / striped blanket / headboard / fan
This is another view of that front bedroom, which is the largest of the four (the bunk room is teeny tiny and the middle bedroom and back bedroom are just fine but not giant). It also has that exposed brick chimney that we discovered hiding behind the wall, and next to it you’ll see my favorite craigslist find of all time that you might have already “met” on Facebook or Instagram when I shared a quick shot of it this weekend. Yes, I really did find an inlay piece of furniture on Craiglist, and yes, it’s currently selling for $2,000 on Restoration Hardware (I got it for $400!). Insert that screaming cat emoji face here. Seriously, it’s the score of a lifetime, and I’m going to share the whole story, including how I fix up a few missing inlay spots soon. So… stay tuned. Again.
And before we move on, that sconce looks crazy small above the dresser (we just hung it as a placeholder and it’s looking like a placeholder, so we’ll probably get a wider double-sconce for that spot soon). Anyway, on with the tour! Or should I say “roll the next flashback!” This is that wall a year ago. Same house. Just nekkid a year ago versus clothed now. With walls. You get what I mean.
And now, the back bedroom. Aka: our room whenever we stay there! Although the front room is the largest and has that lovely exposed brick, the back bedroom has its own master bathroom (complete with my big beautiful clawfoot tub) and it has its own stairs that lead up to it, which are surprisingly useful. We originally thought those back stairs would be more of a fun thing for kids and a cool historic detail to preserve, but we weren’t sure we’d actually use them very much but we go up and down them all the time!
rug / fan / leather stools / striped duvet cover / pocked doors: SW Riverway
One of our bigger projects this past weekend was this built-in dresser that we added to the nook behind the pocket doors that you see above. We love gaining some storage and function in that formerly blank area at the top of the back steps, and there’s more than enough room to pull out the drawers and take like five steps back before you’d fall down the steps (you know I’d be the one to bite it all the way down these steps, so we have to make sure these things we’re adding won’t curse me later).
dresser / mirror / wood top / door color: SW Riverway
John would be quick to point out it’s not complete. We ran out of nails for our nail gun, so the trim still needs to be attached, caulked, etc. But basically, a Malm from Ikea fit pretty perfectly in the space, so we made it look even more built-in by removing and reinstalling the molding around it (see below) and adding a few skinny filler pieces to each side (scraps from our kitchen install). We also popped some leftover butcher block counter from downstairs on top to tie into the pine floors and we’re also planning to add some leather pulls to it to tie in the stools at the foot of the bed (you can see them in the shot two photos up). Can’t wait to finish it up and share the final pics!
Next let’s move onto the master bathroom, which is easily my favorite room because I get to soak in that big ol’ tub after hours of DIY and it feels so freaking good every time. Except for the first time. I had sort of a false start in there (more on that in this podcast) but now the tub and I are bros and only happy things happen when I’m in there. And the kids love it too.
marble table / floor tile / accent floor tile / wall hooks / blinds / tub color: SW Riverway
I’m basically salivating while looking at this because we’re back home and our house has two bathrooms that we still have to redo and two tubs that are about 10″ deep (half of my body sticks out like an iceberg) so I’m itching to add a deeper bathtub into my life here at home.
The hall bath is still my boo too, thanks to my favorite vanity ever. The top is tiled with marble and the rounded wood drawers make it look like a furniture piece we converted to be a vanity but it came that way and WE SALUTE IT because goodness knows we have other stuff to keep us busy. Still on the list: making built-in bunk beds, building out the pantry and the mudroom, tiling the backsplash, landscaping, etc, etc. That big round silver mirror is an awesome (and recent!) HomeGoods find (the same one in brass hangs above our mantel at home) so if you’re looking for one in either color, try HomeGoods. Target also has a really similar one that’s slightly smaller and thinner in gold.
vanity / faucet / drum stool / light fixture / floor tile
And although we haven’t built the wall to wall bunkbeds in our small-but-mighty kids room yet, we did hang art. And that’s half the battle, right? (Nope, half the battle is being halfway done with the bunkbeds, but let me lie to myself for a second, ok?). That cute colorful painting is from our dear friend Lesli Devito (remember when we house crashed her wayyyy back here) and if you don’t have one of her paintings or prints I highly recommend getting one. The door also got a sign that says Mermaids Welcome and it made my whole life to hang it up (also we took a poll among a bunch of kids and basically everyone is cool with mermaid and pirates, but don’t get me started on how split the group was on dolphins).
marble table / mermaids welcome plaque / art by Lesli DeVito
So there you have it: a tour as of yesterday of the beach house (remember: watch the video! it has approximately 98% more info than some pics and captions can convey). Also, we hope you have a very happy holiday surrounded by the ones you love and delicious food and all the mermaid-related memorabilia that your heart desires. And if you have a tub where your entire body can be submerged, know that I, for one, now know what I’m missing and am deeply deeply jealous.
P.S. To see the entire process of fixing up this beach house (from floor planning and demo to tiling and tiling and tiling and getting the floors redone) here’s a full category of beach house updates for you to flip through.
*This post contains affiliate links*
The post Beach House: End Of The Year Tour! appeared first on Young House Love.
Beach House: End Of The Year Tour! published first on http://ift.tt/2hUI8pL
0 notes
Text
Beach House: End Of The Year Tour!
Beach house progress, both big and small, feels like it’s happening so quickly that we hardly have time to keep up with documenting it, but I did walk through the whole house yesterday and make a big ol’ video tour… which basically catches you right up to date! So excuse this post for only having around around a dozen photos (we have thousands on our phones, but they’d take us all day to upload and explain, and nobody got time for that with Christmas being less than a week away).
First let’s start at the front door. We hung a wreath (from Tar-jay) and put some battery powered LED candles with timers in the windows (so they’re auto-pilot even when we’re not there). Hallelujah, the house finally looks lived in! I mean, except for the whole it-has-no-landscaping-and-I-desperately-need-to-sand-and-stain-the-front-door thing. Also I still want to paint those white blocks behind the lanterns to match the house. Someday…
lanterns / wreath / house numbers / doormat / siding: SW Mellow Coral / ceiling: SW Breaktime / trim: SW Pure White
While things are far from finished, things are even farther from where they were this time last year. This photo is from almost exactly a year ago, and looking back is a nice reminder that wrinkly curtains and an unfinished pantry are far smaller problems to work through than THE ENTIRE SIDE OF THE HOUSE BEING TORN OFF. Here’s that whole story if you missed it (yup, we literally had to have 500 square feet removed and rebuild from scratch).
SO YEAH. It’s looking a lot better at the end of 2017 than it did at the end of 2016. And weirdly enough that picture makes me excited to get started on the duplex, because as much as I love having finished walls to decorate and finished floors to arrange furniture on, the process of planning (and dreaming about) all of the potential that’s fills the air during a big demo/rebuilding project is oddly addicting. Can’t wait to share our duplex progress as soon as we have our plans approved and all of our permits pulled!
But back to the pink house, where I’m walking you guys through every room in a little video tour of sorts: If you can’t see this in a reader, click through to view it on our blog or you can view it here on YouTube.
If you can’t watch the video right now, I’d definitely recommend dropping back in and catching it when you can (a video is basically worth a million photos and I pretty much cover every crevice and explain a lot of extra stuff I couldn’t squeeze into this post).
One recent update, after months and months of debate, is that we finally pulled the trigger and painted the railing. The vertical balusters had all already been painted (SW Stone Isle), so it was just that top rail and the post at the end that were “wood.” I’ll explain why that’s in quotes in a second. It’s hard to see in this picture since that front post is getting hit with a ton of light through the open door, but we went with a deeper gray tone (SW Perpetual Gray) that’s about 3 shades darker than the trim, so it accents the post and the top rail without being too crazy and compete-y with the standout stars of the entire house (those stained glass windows).
I know what some of you are thinking. NOOOO! How could you disgrace such old beautiful wood with paint?!?! Well, we love the old wood here. In fact, we stripped doors and floors to restore it! But this railing had been covered in a thick paint-like brown stain that showed zero grain and was sticky, roughed up, and ruined in a bunch of places (covered in paint splatters, spackle globs, and decades of other issues that had built up). After attempting to sand it down, we learned it was a darker redder wood – meaning we’d never be able to stain it to match the lovely heart pine floors. So, we reasoned that a fresh coat of paint applied nice and evenly was a heckuva lot better than its current state. And it really does look glossy and lovely in person, which makes us incredibly relieved.
The good news is that we don’t have any shortage of wood tones in this house. We have original heart pine everywhere (we stripped and clear-sealed all of the original doors that we could, brought the original floors both upstairs and downstairs back to their glory, etc). This house’s middle name could be wood. Pinkie “Wood” House. Wait that sounds bad. Forget the middle name thing.
Down in the living room, we added this cool wall-mounted bookcase, which instantly made us both say “Ahhh! It looks like an actual room people live in!” We also got to hang some cozy white curtains which need DESPERATELY to be steamed and hemmed. They’re Lenda curtains from Ikea– I just cut off the top tabs and make sure to wash them to pre-shrink them before hanging. We also have them in our home office and love how washable and easy they are. Also, my secondhand brass grasshopper (aka: Brasshopper) is a total badass and I love him more each day.
bookcase / blue pillow / curtains / rods / similar brass grasshopper
Also bought a rug from New England Loom (if you don’t follow them on Instagram you’re missing out because they have so many lovely secondhand rugs to be discovered) and the colors and patterns and antique feeling of the rug is PERFECT for a room that will be assaulted with food and sand and everything else that a rental living room has to deal with, so I have high hopes for it holding up like a champ (seeing as it is decades old already, that really does inspire confidence). That pretty blue pillow is from this Etsy shop (I love all of her pillows) and the pink one is from Target a while back. And you guys know the sofa is the Ikea Karlstad that they no longer make, which is a straight up travesty.
We also updated the light in here to this gleaming beauty from West Elm. The old light was a one-bulb fixture that we hung and immediately said “this room needs way more light.” We love the juxtaposition of this leggier modern light and the old-looking medallion (which is actually from Home Depot – shhh). And the old brick chimney that we discovered behind the wall and exposed is probably my favorite feature in the room, along with the giant windows (this room is 9′ tall, so the windows are easily over 6.5′ feet tall – that’s taller than John!). Don’t mind that TV on the floor. We found something we think will work for in there, just gotta get it out there in our next car load. #AlwaysRoadTrippingWithFurniture
rug source / chandelier / ceiling medallion /curtains / rods
The kitchen came a long way too, with the quartz island going in (it’s Pearl Jasmine by Silestone and we LOVE it so much) and a working sink. Cue the choir of angels! You can hear two ways we saved money on our quartz counters in Podcast Episode #74, which also covers why our original plan to do butcher block there didn’t work out. There are still some things missing though. Mainly, the backsplash that we’ll add after we hang the other missing element: shelves on either side of the stove under the sconces (probably two per side, not sure yet but we’ll keep you posted).
stools / quartz / butcher block / cabinets / range: secondhand refurbished / trim: SW Stone Isle / walls: SW White Heron
The back door was blue for a hot second, which some of you might have seen on Instagram, but as the room came together more John and I both realized that the same gray as the trim (SW Stone Isle) would let the pink stove do her thing and be the accent in the room that she has always been destined to become. Plus, we have a blue chippy door leading to the mudroom nearby, and one blue door + one pink stove is… enough. You know I didn’t love painting that door twice, so if I did it, it had to be done. Ha!
green vase / wood cutting board / wood stand / hanging rod / hood / kettle / sconces / pink salt & pepper
Upstairs the bedrooms are coming along with some art up on the walls, layered cozy bedding, and even headboards. HUZZAH! Still need to hang all the curtains up there (once we do that the headboard will look exactly as wide as the window because we are tricky tricksters). Stay tuned…
rug / large art / lamp / side table / striped blanket / headboard / fan
This is another view of that front bedroom, which is the largest of the four (the bunk room is teeny tiny and the middle bedroom and back bedroom are just fine but not giant). It also has that exposed brick chimney that we discovered hiding behind the wall, and next to it you’ll see my favorite craigslist find of all time that you might have already “met” on Facebook or Instagram when I shared a quick shot of it this weekend. Yes, I really did find an inlay piece of furniture on Craiglist, and yes, it’s currently selling for $2,000 on Restoration Hardware (I got it for $400!). Insert that screaming cat emoji face here. Seriously, it’s the score of a lifetime, and I’m going to share the whole story, including how I fix up a few missing inlay spots soon. So… stay tuned. Again.
And before we move on, that sconce looks crazy small above the dresser (we just hung it as a placeholder and it’s looking like a placeholder, so we’ll probably get a wider double-sconce for that spot soon). Anyway, on with the tour! Or should I say “roll the next flashback!”
This is that wall a year ago. Same house. Just nekkid a year ago versus clothed now. With walls. You get what I mean.
And now, the back bedroom. Aka: our room whenever we stay there! Although the front room is the largest and has that lovely exposed brick, the back bedroom has its own master bathroom (complete with my big beautiful clawfoot tub) and it has its own stairs that lead up to it, which are surprisingly useful. We originally thought those back stairs would be more of a fun thing for kids and a cool historic detail to preserve, but we weren’t sure we’d actually use them very much but we go up and down them all the time!
rug / fan / leather stools / striped duvet cover / pocked doors: SW Riverway
One of our bigger projects this past weekend was this built-in dresser that we added to the nook behind the pocket doors that you see above. We love gaining some storage and function in that formerly blank area at the top of the back steps, and there’s more than enough room to pull out the drawers and take like five steps back before you’d fall down the steps (you know I’d be the one to bite it all the way down these steps, so we have to make sure these things we’re adding won’t curse me later).
dresser / mirror / wood top / door color: SW Riverway
John would be quick to point out it’s not complete. We ran out of nails for our nail gun, so the trim still needs to be attached, caulked, etc. But basically, a Malm from Ikea fit pretty perfectly in the space, so we made it look even more built-in by removing and reinstalling the molding around it (see below) and adding a few skinny filler pieces to each side (scraps from our kitchen install). We also popped some leftover butcher block counter from downstairs on top to tie into the pine floors and we’re also planning to add some leather pulls to it to tie in the stools at the foot of the bed (you can see them in the shot two photos up). Can’t wait to finish it up and share the final pics!
Next let’s move onto the master bathroom, which is easily my favorite room because I get to soak in that big ol’ tub after hours of DIY and it feels so freaking good every time. Except for the first time. I had sort of a false start in there (more on that in this podcast) but now the tub and I are bros and only happy things happen when I’m in there. And the kids love it too.
marble table / floor tile / accent floor tile / wall hooks / blinds / tub color: SW Riverway
I’m basically salivating while looking at this because we’re back home and our house has two bathrooms that we still have to redo and two tubs that are about 10″ deep (half of my body sticks out like an iceberg) so I’m itching to add a deeper bathtub into my life here at home.
The hall bath is still my boo too, thanks to my favorite vanity ever. The top is tiled with marble and the rounded wood drawers make it look like a furniture piece we converted to be a vanity but it came that way and WE SALUTE IT because goodness knows we have other stuff to keep us busy. Still on the list: making built-in bunk beds, building out the pantry and the mudroom, tiling the backsplash, landscaping, etc, etc. That big round silver mirror is an awesome (and recent!) HomeGoods find (the same one in brass hangs above our mantel at home) so if you’re looking for one in either color, try HomeGoods. Target also has a really similar one that’s slightly smaller and thinner in gold.
vanity / faucet / drum stool / light fixture / floor tile
And although we haven’t built the wall to wall bunkbeds in our small-but-mighty kids room yet, we did hang art. And that’s half the battle, right? (Nope, half the battle is being halfway done with the bunkbeds, but let me lie to myself for a second, ok?). That cute colorful painting is from our dear friend Lesli Devito (remember when we house crashed her wayyyy back here) and if you don’t have one of her paintings or prints I highly recommend getting one. The door also got a sign that says Mermaids Welcome and it made my whole life to hang it up (also we took a poll among a bunch of kids and basically everyone is cool with mermaid and pirates, but don’t get me started on how split the group was on dolphins).
marble table / mermaids welcome plaque / art by Lesli DeVito
So there you have it: a tour as of yesterday of the beach house (remember: watch the video! it has approximately 98% more info than some pics and captions can convey). Also, we hope you have a very happy holiday surrounded by the ones you love and delicious food and all the mermaid-related memorabilia that your heart desires. And if you have a tub where your entire body can be submerged, know that I, for one, now know what I’m missing and am deeply deeply jealous.
P.S. To see the entire process of fixing up this beach house (from floor planning and demo to tiling and tiling and tiling and getting the floors redone) here’s a full category of beach house updates for you to flip through.
*This post contains affiliate links*
The post Beach House: End Of The Year Tour! appeared first on Young House Love.
0 notes
Text
Beach House: End Of The Year Tour!
Beach house progress, both big and small, feels like it’s happening so quickly that we hardly have time to keep up with documenting it, but I did walk through the whole house yesterday and make a big ol’ video tour… which basically catches you right up to date! So excuse this post for only having around around a dozen photos (we have thousands on our phones, but they’d take us all day to upload and explain, and nobody got time for that with Christmas being less than a week away).
First let’s start at the front door. We hung a wreath (from Tar-jay) and put some battery powered LED candles with timers in the windows (so they’re auto-pilot even when we’re not there). Hallelujah, the house finally looks lived in! I mean, except for the whole it-has-no-landscaping-and-I-desperately-need-to-sand-and-stain-the-front-door thing. Also I still want to paint those white blocks behind the lanterns to match the house. Someday…
lanterns / wreath / house numbers / doormat / siding: SW Mellow Coral / ceiling: SW Breaktime / trim: SW Pure White
While things are far from finished, things are even farther from where they were this time last year. This photo is from almost exactly a year ago, and looking back is a nice reminder that wrinkly curtains and an unfinished pantry are far smaller problems to work through than THE ENTIRE SIDE OF THE HOUSE BEING TORN OFF. Here’s that whole story if you missed it (yup, we literally had to have 500 square feet removed and rebuild from scratch).
SO YEAH. It’s looking a lot better at the end of 2017 than it did at the end of 2016. And weirdly enough that picture makes me excited to get started on the duplex, because as much as I love having finished walls to decorate and finished floors to arrange furniture on, the process of planning (and dreaming about) all of the potential that’s fills the air during a big demo/rebuilding project is oddly addicting. Can’t wait to share our duplex progress as soon as we have our plans approved and all of our permits pulled! But back to the pink house, where I’m walking you guys through every room in a little video tour of sorts: If you can’t see this in a reader, click through to view it on our blog or you can view it here on YouTube.
If you can’t watch the video right now, I’d definitely recommend dropping back in and catching it when you can (a video is basically worth a million photos and I pretty much cover every crevice and explain a lot of extra stuff I couldn’t squeeze into this post).
One recent update, after months and months of debate, is that we finally pulled the trigger and painted the railing. The vertical balusters had all already been painted (SW Stone Isle), so it was just that top rail and the post at the end that were “wood.” I’ll explain why that’s in quotes in a second. It’s hard to see in this picture since that front post is getting hit with a ton of light through the open door, but we went with a deeper gray tone (SW Perpetual Gray) that’s about 3 shades darker than the trim, so it accents the post and the top rail without being too crazy and compete-y with the standout stars of the entire house (those stained glass windows).
I know what some of you are thinking. NOOOO! How could you disgrace such old beautiful wood with paint?!?! Well, this railing had been covered in a thick paint-like brown stain that showed zero grain and was sticky, roughed up, and ruined in a bunch of places (covered in paint splatters, spackle globs, and decades of other issues). After attempting to sand it down, we learned it was a darker redder wood – meaning we’d never be able to stain it to match the lovely heart pine floors. So, we reasoned that a fresh coat of paint applied nice and evenly was a heckuva lot better than its current state. And it really does look glossy and lovely in person, which makes us incredibly relieved.
The good news is that we don’t have any shortage of wood tones in this house. We have original heart pine everywhere (we stripped and clear-sealed all of the original doors that we could, brought the original floors both upstairs and downstairs back to their glory, etc). This house’s middle name could be wood. Pinkie “Wood” House. Wait that sounds bad. Forget the middle name thing.
Down in the living room, we added this cool wall-mounted bookcase, which instantly made us both say “Ahhh! It looks like an actual room people live in!” We also got to hang some cozy white curtains which need DESPERATELY to be steamed and hemmed. They’re Lenda curtains from Ikea– I just cut off the top tabs and make sure to wash them to pre-shrink them before hanging. We also have them in our home office and love how washable and easy they are. Also, my secondhand brass grasshopper (aka: Brasshopper) is a total badass and I love him more each day.
bookcase / blue pillow / curtains / rods / similar brass grasshopper
Also bought a rug from New England Loom (if you don’t follow them on Instagram you’re missing out because they have so many lovely secondhand rugs to be discovered) and the colors and patterns and antique feeling of the rug is PERFECT for a room that will be assaulted with food and sand and everything else that a rental living room has to deal with, so I have high hopes for it holding up like a champ (seeing as it is decades old already, that really does inspire confidence). That pretty blue pillow is from this Etsy shop (I love all of her pillows) and the pink one is from Target a while back. And you guys know the sofa is the Ikea Karlstad that they no longer make, which is a straight up travesty.
We also updated the light in here to this gleaming beauty from West Elm. The old light was a one-bulb fixture that we hung and immediately said “this room needs way more light.” We love the juxtaposition of this leggier modern light and the old-looking medallion (which is actually from Home Depot – shhh). And the old brick chimney that we discovered behind the wall and exposed is probably my favorite feature in the room, along with the giant windows (this room is 9′ tall, so the windows are easily over 6.5′ feet tall – that’s taller than John!). Don’t mind that TV on the floor. We found something we think will work for in there, just gotta get it out there in our next car load. #AlwaysRoadTrippingWithFurniture
rug source / chandelier / ceiling medallion /curtains / rods
The kitchen came a long way too, with the quartz island going in (it’s Pearl Jasmine by Silestone and we LOVE it so much) and a working sink. Cue the choir of angels! You can hear two ways we saved money on our quartz counters in Podcast Episode #74, which also covers why our original plan to do butcher block there didn’t work out. There are still some things missing though. Mainly, the backsplash that we’ll add after we hang the other missing element: shelves on either side of the stove under the sconces (probably two per side, not sure yet but we’ll keep you posted).
stools / quartz / butcher block / cabinets / range: secondhand refurbished / trim: SW Stone Isle / walls: SW White Heron
The back door was blue for a hot second, which some of you might have seen on Instagram, but as the room came together more John and I both realized that the same gray as the trim (SW Stone Isle) would let the pink stove do her thing and be the accent in the room that she has always been destined to become. Plus, we have a blue chippy door leading to the mudroom nearby, and one blue door + one pink stove is… enough. You know I didn’t love painting that door twice, so if I did it, it had to be done. Ha!
green vase / wood cutting board / wood stand / hanging rod / hood / kettle / sconces / pink salt & pepper
Upstairs the bedrooms are coming along with some art up on the walls, layered cozy bedding, and even headboards. HUZZAH! Still need to hang all the curtains up there (once we do that the headboard will look exactly as wide as the window because we are tricky tricksters). Stay tuned…
rug / large art / lamp / side table / striped blanket / headboard / fan
This is another view of that front bedroom, which is the largest of the four (the bunk room is teeny tiny and the middle bedroom and back bedroom are just fine but not giant). It also has that exposed brick chimney that we discovered hiding behind the wall, and next to it you’ll see my favorite craigslist find of all time that you might have already “met” on Facebook or Instagram when I shared a quick shot of it this weekend. Yes, I really did find an inlay piece of furniture on Craiglist, and yes, it’s currently selling for $2,000 on Restoration Hardware (I got it for $400!). Insert that screaming cat emoji face here. Seriously, it’s the score of a lifetime, and I’m going to share the whole story, including how I fix up a few missing inlay spots soon. So… stay tuned. Again.
And before we move on, that sconce looks crazy small above the dresser (we just hung it as a placeholder and it’s looking like a placeholder, so we’ll probably get a wider double-sconce for that spot soon). Anyway, on with the tour! Or should I say “roll the next flashback!” This is that wall a year ago. Same house. Just nekkid a year ago versus clothed now. With walls. You get what I mean.
And now, the back bedroom. Aka: our room whenever we stay there! Although the front room is the largest and has that lovely exposed brick, the back bedroom has its own master bathroom (complete with my big beautiful clawfoot tub) and it has its own stairs that lead up to it, which are surprisingly useful. We originally thought those back stairs would be more of a fun thing for kids and a cool historic detail to preserve, but we weren’t sure we’d actually use them very much but we go up and down them all the time!
rug / fan / leather stools / striped duvet cover / pocked doors: SW Riverway
One of our bigger projects this past weekend was this built-in dresser that we added to the nook behind the pocket doors that you see above. We love gaining some storage and function in that formerly blank area at the top of the back steps, and there’s more than enough room to pull out the drawers and take like five steps back before you’d fall down the steps (you know I’d be the one to bite it all the way down these steps, so we have to make sure these things we’re adding won’t curse me later).
dresser / mirror / wood top / door color: SW Riverway
John would be quick to point out it’s not complete. We ran out of nails for our nail gun, so the trim still needs to be attached, caulked, etc. But basically, a Malm from Ikea fit pretty perfectly in the space, so we made it look even more built-in by removing and reinstalling the molding around it (see below) and adding a few skinny filler pieces to each side (scraps from our kitchen install). We also popped some leftover butcher block counter from downstairs on top to tie into the pine floors and we’re also planning to add some leather pulls to it to tie in the stools at the foot of the bed (you can see them in the shot two photos up). Can’t wait to finish it up and share the final pics!
Next let’s move onto the master bathroom, which is easily my favorite room because I get to soak in that big ol’ tub after hours of DIY and it feels so freaking good every time. Except for the first time. I had sort of a false start in there (more on that in this podcast) but now the tub and I are bros and only happy things happen when I’m in there. And the kids love it too.
marble table / floor tile / accent floor tile / wall hooks / blinds / tub color: SW Riverway
I’m basically salivating while looking at this because we’re back home and our house has two bathrooms that we still have to redo and two tubs that are about 10″ deep (half of my body sticks out like an iceberg) so I’m itching to add a deeper bathtub into my life here at home.
The hall bath is still my boo too, thanks to my favorite vanity ever. The top is tiled with marble and the rounded wood drawers make it look like a furniture piece we converted to be a vanity but it came that way and WE SALUTE IT because goodness knows we have other stuff to keep us busy. Still on the list: making built-in bunk beds, building out the pantry and the mudroom, tiling the backsplash, landscaping, etc, etc. That big round silver mirror is an awesome (and recent!) HomeGoods find (the same one in brass hangs above our mantel at home) so if you’re looking for one in either color, try HomeGoods. Target also has a really similar one that’s slightly smaller and thinner in gold.
vanity / faucet / drum stool / light fixture / floor tile
And although we haven’t built the wall to wall bunkbeds in our small-but-mighty kids room yet, we did hang art. And that’s half the battle, right? (Nope, half the battle is being halfway done with the bunkbeds, but let me lie to myself for a second, ok?). That cute colorful painting is from our dear friend Lesli Devito (remember when we house crashed her wayyyy back here) and if you don’t have one of her paintings or prints I highly recommend getting one. The door also got a sign that says Mermaids Welcome and it made my whole life to hang it up (also we took a poll among a bunch of kids and basically everyone is cool with mermaid and pirates, but don’t get me started on how split the group was on dolphins).
marble table / mermaids welcome plaque / art by Lesli DeVito
So there you have it: a tour as of yesterday of the beach house (remember: watch the video! it has approximately 98% more info than some pics and captions can convey). Also, we hope you have a very happy holiday surrounded by the ones you love and delicious food and all the mermaid-related memorabilia that your heart desires. And if you have a tub where your entire body can be submerged, know that I, for one, now know what I’m missing and am deeply deeply jealous.
P.S. To see the entire process of fixing up this beach house (from floor planning and demo to tiling and tiling and tiling and getting the floors redone) here’s a full category of beach house updates for you to flip through.
*This post contains affiliate links*
The post Beach House: End Of The Year Tour! appeared first on Young House Love.
0 notes
Text
Beach House: End Of The Year Tour!
Beach house progress, both big and small, feels like it’s happening so quickly that we hardly have time to keep up with documenting it, but I did walk through the whole house yesterday and make a big ol’ video tour… which basically catches you right up to date! So excuse this post for only having around a dozen photos (we have thousands on our phones, but they’d take us all day to upload and explain, and nobody got time for that with Christmas being less than a week away).
First let’s start at the front door. We hung a wreath (from Tar-jay) and put some battery powered LED candles with timers in the windows (so they’re auto-pilot even when we’re not there). Hallelujah, the house finally looks lived in! I mean, except for the whole it-has-no-landscaping-and-I-desperately-need-to-sand-and-stain-the-front-door thing. Also I still want to paint those white blocks behind the lanterns to match the house. Someday…
lanterns / wreath / house numbers / doormat / siding: SW Mellow Coral / ceiling: SW Breaktime / trim: SW Pure White
While things are far from finished, things are even farther from where they were this time last year. This photo is from almost exactly a year ago, and looking back is a nice reminder that wrinkly curtains and an unfinished pantry are far smaller problems to work through than THE ENTIRE SIDE OF THE HOUSE BEING TORN OFF. Here’s that whole story if you missed it (yup, we literally had to have 500 square feet removed and rebuild from scratch).
SO YEAH. It’s looking a lot better at the end of 2017 than it did at the end of 2016. And weirdly enough that picture makes me excited to get started on the duplex, because as much as I love having finished walls to decorate and finished floors to arrange furniture on, the process of planning (and dreaming about) all of the potential that’s fills the air during a big demo/rebuilding project is oddly addicting. Can’t wait to share our duplex progress as soon as we have our plans approved and all of our permits pulled! But back to the pink house, where I’m walking you guys through every room in a little video tour of sorts: If you can’t see this in a reader, click through to view it on our blog or you can view it here on YouTube.
If you can’t watch the video right now, I’d definitely recommend dropping back in and catching it when you can (a video is basically worth a million photos and I pretty much cover every crevice and explain a lot of extra stuff I couldn’t squeeze into this post).
One recent update, after months and months of debate, is that we finally pulled the trigger and painted the railing. The vertical balusters had all already been painted (SW Stone Isle), so it was just that top rail and the post at the end that were “wood.” I’ll explain why that’s in quotes in a second. It’s hard to see in this picture since that front post is getting hit with a ton of light through the open door, but we went with a deeper gray tone (SW Perpetual Gray) that’s about 3 shades darker than the trim, so it accents the post and the top rail without being too crazy and compete-y with the standout stars of the entire house (those stained glass windows).
I know what some of you are thinking. NOOOO! How could you disgrace such old beautiful wood with paint?!?! Well, this railing had been covered in a thick paint-like brown stain that showed zero grain and was sticky, roughed up, and ruined in a bunch of places (covered in paint splatters, spackle globs, and decades of other issues). After attempting to sand it down, we learned it was a darker redder wood – meaning we’d never be able to stain it to match the lovely heart pine floors. So, we reasoned that a fresh coat of paint applied nice and evenly was a heckuva lot better than its current state. And it really does look glossy and lovely in person, which makes us incredibly relieved.
The good news is that we don’t have any shortage of wood tones in this house. We have original heart pine everywhere (we stripped and clear-sealed all of the original doors that we could, brought the original floors both upstairs and downstairs back to their glory, etc). This house’s middle name could be wood. Pinkie “Wood” House. Wait that sounds bad. Forget the middle name thing.
Down in the living room, we added this cool wall-mounted bookcase, which instantly made us both say “Ahhh! It looks like an actual room people live in!” We also got to hang some cozy white curtains which need DESPERATELY to be steamed and hemmed. They’re Lenda curtains from Ikea– I just cut off the top tabs and make sure to wash them to pre-shrink them before hanging. We also have them in our home office and love how washable and easy they are. Also, my secondhand brass grasshopper (aka: Brasshopper) is a total badass and I love him more each day.
bookcase / blue pillow / curtains / rods / similar brass grasshopper
Also bought a rug from New England Loom (if you don’t follow them on Instagram you’re missing out because they have so many lovely secondhand rugs to be discovered) and the colors and patterns and antique feeling of the rug is PERFECT for a room that will be assaulted with food and sand and everything else that a rental living room has to deal with, so I have high hopes for it holding up like a champ (seeing as it is decades old already, that really does inspire confidence). That pretty blue pillow is from this Etsy shop (I love all of her pillows) and the pink one is from Target a while back. And you guys know the sofa is the Ikea Karlstad that they no longer make, which is a straight up travesty.
We also updated the light in here to this gleaming beauty from West Elm. The old light was a one-bulb fixture that we hung and immediately said “this room needs way more light.” We love the juxtaposition of this leggier modern light and the old-looking medallion (which is actually from Home Depot – shhh). And the old brick chimney that we discovered behind the wall and exposed is probably my favorite feature in the room, along with the giant windows (this room is 9′ tall, so the windows are easily over 6.5′ feet tall – that’s taller than John!). Don’t mind that TV on the floor. We found something we think will work for in there, just gotta get it out there in our next car load. #AlwaysRoadTrippingWithFurniture
rug source / chandelier / ceiling medallion /curtains / rods
The kitchen came a long way too, with the quartz island going in (it’s Pearl Jasmine by Silestone and we LOVE it so much) and a working sink. Cue the choir of angels! You can hear two ways we saved money on our quartz counters in Podcast Episode #74, which also covers why our original plan to do butcher block there didn’t work out. There are still some things missing though. Mainly, the backsplash that we’ll add after we hang the other missing element: shelves on either side of the stove under the sconces (probably two per side, not sure yet but we’ll keep you posted).
stools / quartz / butcher block / cabinets / range: secondhand refurbished / trim: SW Stone Isle / walls: SW White Heron
The back door was blue for a hot second, which some of you might have seen on Instagram, but as the room came together more John and I both realized that the same gray as the trim (SW Stone Isle) would let the pink stove do her thing and be the accent in the room that she has always been destined to become. Plus, we have a blue chippy door leading to the mudroom nearby, and one blue door + one pink stove is… enough. You know I didn’t love painting that door twice, so if I did it, it had to be done. Ha!
green vase / wood cutting board / wood stand / hanging rod / hood / kettle / sconces / pink salt & pepper
Upstairs the bedrooms are coming along with some art up on the walls, layered cozy bedding, and even headboards. HUZZAH! Still need to hang all the curtains up there (once we do that the headboard will look exactly as wide as the window because we are tricky tricksters). Stay tuned…
rug / large art / lamp / side table / striped blanket / headboard / fan
This is another view of that front bedroom, which is the largest of the four (the bunk room is teeny tiny and the middle bedroom and back bedroom are just fine but not giant). It also has that exposed brick chimney that we discovered hiding behind the wall, and next to it you’ll see my favorite craigslist find of all time that you might have already “met” on Facebook or Instagram when I shared a quick shot of it this weekend. Yes, I really did find an inlay piece of furniture on Craiglist, and yes, it’s currently selling for $2,000 on Restoration Hardware (I got it for $400!). Insert that screaming cat emoji face here. Seriously, it’s the score of a lifetime, and I’m going to share the whole story, including how I fix up a few missing inlay spots soon. So… stay tuned. Again.
And before we move on, that sconce looks crazy small above the dresser (we just hung it as a placeholder and it’s looking like a placeholder, so we’ll probably get a wider double-sconce for that spot soon). Anyway, on with the tour! Or should I say “roll the next flashback!” This is that wall a year ago. Same house. Just nekkid a year ago versus clothed now. With walls. You get what I mean.
And now, the back bedroom. Aka: our room whenever we stay there! Although the front room is the largest and has that lovely exposed brick, the back bedroom has its own master bathroom (complete with my big beautiful clawfoot tub) and it has its own stairs that lead up to it, which are surprisingly useful. We originally thought those back stairs would be more of a fun thing for kids and a cool historic detail to preserve, but we weren’t sure we’d actually use them very much but we go up and down them all the time!
rug / fan / leather stools / striped duvet cover / pocked doors: SW Riverway
One of our bigger projects this past weekend was this built-in dresser that we added to the nook behind the pocket doors that you see above. We love gaining some storage and function in that formerly blank area at the top of the back steps, and there’s more than enough room to pull out the drawers and take like five steps back before you’d fall down the steps (you know I’d be the one to bite it all the way down these steps, so we have to make sure these things we’re adding won’t curse me later).
dresser / mirror / wood top / door color: SW Riverway
John would be quick to point out it’s not complete. We ran out of nails for our nail gun, so the trim still needs to be attached, caulked, etc. But basically, a Malm from Ikea fit pretty perfectly in the space, so we made it look even more built-in by removing and reinstalling the molding around it (see below) and adding a few skinny filler pieces to each side (scraps from our kitchen install). We also popped some leftover butcher block counter from downstairs on top to tie into the pine floors and we’re also planning to add some leather pulls to it to tie in the stools at the foot of the bed (you can see them in the shot two photos up). Can’t wait to finish it up and share the final pics!
Next let’s move onto the master bathroom, which is easily my favorite room because I get to soak in that big ol’ tub after hours of DIY and it feels so freaking good every time. Except for the first time. I had sort of a false start in there (more on that in this podcast) but now the tub and I are bros and only happy things happen when I’m in there. And the kids love it too.
marble table / floor tile / accent floor tile / wall hooks / blinds / tub color: SW Riverway
I’m basically salivating while looking at this because we’re back home and our house has two bathrooms that we still have to redo and two tubs that are about 10″ deep (half of my body sticks out like an iceberg) so I’m itching to add a deeper bathtub into my life here at home.
The hall bath is still my boo too, thanks to my favorite vanity ever. The top is tiled with marble and the rounded wood drawers make it look like a furniture piece we converted to be a vanity but it came that way and WE SALUTE IT because goodness knows we have other stuff to keep us busy. Still on the list: making built-in bunk beds, building out the pantry and the mudroom, tiling the backsplash, landscaping, etc, etc. That big round silver mirror is an awesome (and recent!) HomeGoods find (the same one in brass hangs above our mantel at home) so if you’re looking for one in either color, try HomeGoods. Target also has a really similar one that’s slightly smaller and thinner in gold.
vanity / faucet / drum stool / light fixture / floor tile
And although we haven’t built the wall to wall bunkbeds in our small-but-mighty kids room yet, we did hang art. And that’s half the battle, right? (Nope, half the battle is being halfway done with the bunkbeds, but let me lie to myself for a second, ok?). That cute colorful painting is from our dear friend Lesli Devito (remember when we house crashed her wayyyy back here) and if you don’t have one of her paintings or prints I highly recommend getting one. The door also got a sign that says Mermaids Welcome and it made my whole life to hang it up (also we took a poll among a bunch of kids and basically everyone is cool with mermaid and pirates, but don’t get me started on how split the group was on dolphins).
marble table / mermaids welcome plaque / art by Lesli DeVito
So there you have it: a tour as of yesterday of the beach house (remember: watch the video! it has approximately 98% more info than some pics and captions can convey). Also, we hope you have a very happy holiday surrounded by the ones you love and delicious food and all the mermaid-related memorabilia that your heart desires. And if you have a tub where your entire body can be submerged, know that I, for one, now know what I’m missing and am deeply deeply jealous.
P.S. To see the entire process of fixing up this beach house (from floor planning and demo to tiling and tiling and tiling and getting the floors redone) here’s a full category of beach house updates for you to flip through.
*This post contains affiliate links*
The post Beach House: End Of The Year Tour! appeared first on Young House Love.
Beach House: End Of The Year Tour! published first on http://ift.tt/2qxZz2j
0 notes
Text
Beach House: End Of The Year Tour!
Beach house progress, both big and small, feels like it’s happening so quickly that we hardly have time to keep up with documenting it, but I did walk through the whole house yesterday and make a big ol’ video tour… which basically catches you right up to date! So excuse this post for only having around a dozen photos (we have thousands on our phones, but they’d take us all day to upload and explain, and nobody got time for that with Christmas being less than a week away).
First let’s start at the front door. We hung a wreath (from Tar-jay) and put some battery powered LED candles with timers in the windows (so they’re auto-pilot even when we’re not there). Hallelujah, the house finally looks lived in! I mean, except for the whole it-has-no-landscaping-and-I-desperately-need-to-sand-and-stain-the-front-door thing. Also I still want to paint those white blocks behind the lanterns to match the house. Someday…
lanterns / wreath / house numbers / doormat / siding: SW Mellow Coral / ceiling: SW Breaktime / trim: SW Pure White
While things are far from finished, things are even farther from where they were this time last year. This photo is from almost exactly a year ago, and looking back is a nice reminder that wrinkly curtains and an unfinished pantry are far smaller problems to work through than THE ENTIRE SIDE OF THE HOUSE BEING TORN OFF. Here’s that whole story if you missed it (yup, we literally had to have 500 square feet removed and rebuild from scratch).
SO YEAH. It’s looking a lot better at the end of 2017 than it did at the end of 2016. And weirdly enough that picture makes me excited to get started on the duplex, because as much as I love having finished walls to decorate and finished floors to arrange furniture on, the process of planning (and dreaming about) all of the potential that’s fills the air during a big demo/rebuilding project is oddly addicting. Can’t wait to share our duplex progress as soon as we have our plans approved and all of our permits pulled! But back to the pink house, where I’m walking you guys through every room in a little video tour of sorts: If you can’t see this in a reader, click through to view it on our blog or you can view it here on YouTube.
If you can’t watch the video right now, I’d definitely recommend dropping back in and catching it when you can (a video is basically worth a million photos and I pretty much cover every crevice and explain a lot of extra stuff I couldn’t squeeze into this post).
One recent update, after months and months of debate, is that we finally pulled the trigger and painted the railing. The vertical balusters had all already been painted (SW Stone Isle), so it was just that top rail and the post at the end that were “wood.” I’ll explain why that’s in quotes in a second. It’s hard to see in this picture since that front post is getting hit with a ton of light through the open door, but we went with a deeper gray tone (SW Perpetual Gray) that’s about 3 shades darker than the trim, so it accents the post and the top rail without being too crazy and compete-y with the standout stars of the entire house (those stained glass windows).
I know what some of you are thinking. NOOOO! How could you disgrace such old beautiful wood with paint?!?! Well, this railing had been covered in a thick paint-like brown stain that showed zero grain and was sticky, roughed up, and ruined in a bunch of places (covered in paint splatters, spackle globs, and decades of other issues). After attempting to sand it down, we learned it was a darker redder wood – meaning we’d never be able to stain it to match the lovely heart pine floors. So, we reasoned that a fresh coat of paint applied nice and evenly was a heckuva lot better than its current state. And it really does look glossy and lovely in person, which makes us incredibly relieved.
The good news is that we don’t have any shortage of wood tones in this house. We have original heart pine everywhere (we stripped and clear-sealed all of the original doors that we could, brought the original floors both upstairs and downstairs back to their glory, etc). This house’s middle name could be wood. Pinkie “Wood” House. Wait that sounds bad. Forget the middle name thing.
Down in the living room, we added this cool wall-mounted bookcase, which instantly made us both say “Ahhh! It looks like an actual room people live in!” We also got to hang some cozy white curtains which need DESPERATELY to be steamed and hemmed. They’re Lenda curtains from Ikea– I just cut off the top tabs and make sure to wash them to pre-shrink them before hanging. We also have them in our home office and love how washable and easy they are. Also, my secondhand brass grasshopper (aka: Brasshopper) is a total badass and I love him more each day.
bookcase / blue pillow / curtains / rods / similar brass grasshopper
Also bought a rug from New England Loom (if you don’t follow them on Instagram you’re missing out because they have so many lovely secondhand rugs to be discovered) and the colors and patterns and antique feeling of the rug is PERFECT for a room that will be assaulted with food and sand and everything else that a rental living room has to deal with, so I have high hopes for it holding up like a champ (seeing as it is decades old already, that really does inspire confidence). That pretty blue pillow is from this Etsy shop (I love all of her pillows) and the pink one is from Target a while back. And you guys know the sofa is the Ikea Karlstad that they no longer make, which is a straight up travesty.
We also updated the light in here to this gleaming beauty from West Elm. The old light was a one-bulb fixture that we hung and immediately said “this room needs way more light.” We love the juxtaposition of this leggier modern light and the old-looking medallion (which is actually from Home Depot – shhh). And the old brick chimney that we discovered behind the wall and exposed is probably my favorite feature in the room, along with the giant windows (this room is 9′ tall, so the windows are easily over 6.5′ feet tall – that’s taller than John!). Don’t mind that TV on the floor. We found something we think will work for in there, just gotta get it out there in our next car load. #AlwaysRoadTrippingWithFurniture
rug source / chandelier / ceiling medallion /curtains / rods
The kitchen came a long way too, with the quartz island going in (it’s Pearl Jasmine by Silestone and we LOVE it so much) and a working sink. Cue the choir of angels! You can hear two ways we saved money on our quartz counters in Podcast Episode #74, which also covers why our original plan to do butcher block there didn’t work out. There are still some things missing though. Mainly, the backsplash that we’ll add after we hang the other missing element: shelves on either side of the stove under the sconces (probably two per side, not sure yet but we’ll keep you posted).
stools / quartz / butcher block / cabinets / range: secondhand refurbished / trim: SW Stone Isle / walls: SW White Heron
The back door was blue for a hot second, which some of you might have seen on Instagram, but as the room came together more John and I both realized that the same gray as the trim (SW Stone Isle) would let the pink stove do her thing and be the accent in the room that she has always been destined to become. Plus, we have a blue chippy door leading to the mudroom nearby, and one blue door + one pink stove is… enough. You know I didn’t love painting that door twice, so if I did it, it had to be done. Ha!
green vase / wood cutting board / wood stand / hanging rod / hood / kettle / sconces / pink salt & pepper
Upstairs the bedrooms are coming along with some art up on the walls, layered cozy bedding, and even headboards. HUZZAH! Still need to hang all the curtains up there (once we do that the headboard will look exactly as wide as the window because we are tricky tricksters). Stay tuned…
rug / large art / lamp / side table / striped blanket / headboard / fan
This is another view of that front bedroom, which is the largest of the four (the bunk room is teeny tiny and the middle bedroom and back bedroom are just fine but not giant). It also has that exposed brick chimney that we discovered hiding behind the wall, and next to it you’ll see my favorite craigslist find of all time that you might have already “met” on Facebook or Instagram when I shared a quick shot of it this weekend. Yes, I really did find an inlay piece of furniture on Craiglist, and yes, it’s currently selling for $2,000 on Restoration Hardware (I got it for $400!). Insert that screaming cat emoji face here. Seriously, it’s the score of a lifetime, and I’m going to share the whole story, including how I fix up a few missing inlay spots soon. So… stay tuned. Again.
And before we move on, that sconce looks crazy small above the dresser (we just hung it as a placeholder and it’s looking like a placeholder, so we’ll probably get a wider double-sconce for that spot soon). Anyway, on with the tour! Or should I say “roll the next flashback!” This is that wall a year ago. Same house. Just nekkid a year ago versus clothed now. With walls. You get what I mean.
And now, the back bedroom. Aka: our room whenever we stay there! Although the front room is the largest and has that lovely exposed brick, the back bedroom has its own master bathroom (complete with my big beautiful clawfoot tub) and it has its own stairs that lead up to it, which are surprisingly useful. We originally thought those back stairs would be more of a fun thing for kids and a cool historic detail to preserve, but we weren’t sure we’d actually use them very much but we go up and down them all the time!
rug / fan / leather stools / striped duvet cover / pocked doors: SW Riverway
One of our bigger projects this past weekend was this built-in dresser that we added to the nook behind the pocket doors that you see above. We love gaining some storage and function in that formerly blank area at the top of the back steps, and there’s more than enough room to pull out the drawers and take like five steps back before you’d fall down the steps (you know I’d be the one to bite it all the way down these steps, so we have to make sure these things we’re adding won’t curse me later).
dresser / mirror / wood top / door color: SW Riverway
John would be quick to point out it’s not complete. We ran out of nails for our nail gun, so the trim still needs to be attached, caulked, etc. But basically, a Malm from Ikea fit pretty perfectly in the space, so we made it look even more built-in by removing and reinstalling the molding around it (see below) and adding a few skinny filler pieces to each side (scraps from our kitchen install). We also popped some leftover butcher block counter from downstairs on top to tie into the pine floors and we’re also planning to add some leather pulls to it to tie in the stools at the foot of the bed (you can see them in the shot two photos up). Can’t wait to finish it up and share the final pics!
Next let’s move onto the master bathroom, which is easily my favorite room because I get to soak in that big ol’ tub after hours of DIY and it feels so freaking good every time. Except for the first time. I had sort of a false start in there (more on that in this podcast) but now the tub and I are bros and only happy things happen when I’m in there. And the kids love it too.
marble table / floor tile / accent floor tile / wall hooks / blinds / tub color: SW Riverway
I’m basically salivating while looking at this because we’re back home and our house has two bathrooms that we still have to redo and two tubs that are about 10″ deep (half of my body sticks out like an iceberg) so I’m itching to add a deeper bathtub into my life here at home.
The hall bath is still my boo too, thanks to my favorite vanity ever. The top is tiled with marble and the rounded wood drawers make it look like a furniture piece we converted to be a vanity but it came that way and WE SALUTE IT because goodness knows we have other stuff to keep us busy. Still on the list: making built-in bunk beds, building out the pantry and the mudroom, tiling the backsplash, landscaping, etc, etc. That big round silver mirror is an awesome (and recent!) HomeGoods find (the same one in brass hangs above our mantel at home) so if you’re looking for one in either color, try HomeGoods. Target also has a really similar one that’s slightly smaller and thinner in gold.
vanity / faucet / drum stool / light fixture / floor tile
And although we haven’t built the wall to wall bunkbeds in our small-but-mighty kids room yet, we did hang art. And that’s half the battle, right? (Nope, half the battle is being halfway done with the bunkbeds, but let me lie to myself for a second, ok?). That cute colorful painting is from our dear friend Lesli Devito (remember when we house crashed her wayyyy back here) and if you don’t have one of her paintings or prints I highly recommend getting one. The door also got a sign that says Mermaids Welcome and it made my whole life to hang it up (also we took a poll among a bunch of kids and basically everyone is cool with mermaid and pirates, but don’t get me started on how split the group was on dolphins).
marble table / mermaids welcome plaque / art by Lesli DeVito
So there you have it: a tour as of yesterday of the beach house (remember: watch the video! it has approximately 98% more info than some pics and captions can convey). Also, we hope you have a very happy holiday surrounded by the ones you love and delicious food and all the mermaid-related memorabilia that your heart desires. And if you have a tub where your entire body can be submerged, know that I, for one, now know what I’m missing and am deeply deeply jealous.
P.S. To see the entire process of fixing up this beach house (from floor planning and demo to tiling and tiling and tiling and getting the floors redone) here’s a full category of beach house updates for you to flip through.
*This post contains affiliate links*
The post Beach House: End Of The Year Tour! appeared first on Young House Love.
Beach House: End Of The Year Tour! published first on http://ift.tt/2qxZz2j
0 notes
Text
Beach House: End Of The Year Tour!
Beach house progress, both big and small, feels like it’s happening so quickly that we hardly have time to keep up with documenting it, but I did walk through the whole house yesterday and make a big ol’ video tour… which basically catches you right up to date! So excuse this post for only having around a dozen photos (we have thousands on our phones, but they’d take us all day to upload and explain, and nobody got time for that with Christmas being less than a week away).
First let’s start at the front door. We hung a wreath (from Tar-jay) and put some battery powered LED candles with timers in the windows (so they’re auto-pilot even when we’re not there). Hallelujah, the house finally looks lived in! I mean, except for the whole it-has-no-landscaping-and-I-desperately-need-to-sand-and-stain-the-front-door thing. Also I still want to paint those white blocks behind the lanterns to match the house. Someday��
lanterns / wreath / house numbers / doormat / siding: SW Mellow Coral / ceiling: SW Breaktime / trim: SW Pure White
While things are far from finished, things are even farther from where they were this time last year. This photo is from almost exactly a year ago, and looking back is a nice reminder that wrinkly curtains and an unfinished pantry are far smaller problems to work through than THE ENTIRE SIDE OF THE HOUSE BEING TORN OFF. Here’s that whole story if you missed it (yup, we literally had to have 500 square feet removed and rebuild from scratch).
SO YEAH. It’s looking a lot better at the end of 2017 than it did at the end of 2016. And weirdly enough that picture makes me excited to get started on the duplex, because as much as I love having finished walls to decorate and finished floors to arrange furniture on, the process of planning (and dreaming about) all of the potential that’s fills the air during a big demo/rebuilding project is oddly addicting. Can’t wait to share our duplex progress as soon as we have our plans approved and all of our permits pulled! But back to the pink house, where I’m walking you guys through every room in a little video tour of sorts: If you can’t see this in a reader, click through to view it on our blog or you can view it here on YouTube.
If you can’t watch the video right now, I’d definitely recommend dropping back in and catching it when you can (a video is basically worth a million photos and I pretty much cover every crevice and explain a lot of extra stuff I couldn’t squeeze into this post).
One recent update, after months and months of debate, is that we finally pulled the trigger and painted the railing. The vertical balusters had all already been painted (SW Stone Isle), so it was just that top rail and the post at the end that were “wood.” I’ll explain why that’s in quotes in a second. It’s hard to see in this picture since that front post is getting hit with a ton of light through the open door, but we went with a deeper gray tone (SW Perpetual Gray) that’s about 3 shades darker than the trim, so it accents the post and the top rail without being too crazy and compete-y with the standout stars of the entire house (those stained glass windows).
I know what some of you are thinking. NOOOO! How could you disgrace such old beautiful wood with paint?!?! Well, this railing had been covered in a thick paint-like brown stain that showed zero grain and was sticky, roughed up, and ruined in a bunch of places (covered in paint splatters, spackle globs, and decades of other issues). After attempting to sand it down, we learned it was a darker redder wood – meaning we’d never be able to stain it to match the lovely heart pine floors. So, we reasoned that a fresh coat of paint applied nice and evenly was a heckuva lot better than its current state. And it really does look glossy and lovely in person, which makes us incredibly relieved.
The good news is that we don’t have any shortage of wood tones in this house. We have original heart pine everywhere (we stripped and clear-sealed all of the original doors that we could, brought the original floors both upstairs and downstairs back to their glory, etc). This house’s middle name could be wood. Pinkie “Wood” House. Wait that sounds bad. Forget the middle name thing.
Down in the living room, we added this cool wall-mounted bookcase, which instantly made us both say “Ahhh! It looks like an actual room people live in!” We also got to hang some cozy white curtains which need DESPERATELY to be steamed and hemmed. They’re Lenda curtains from Ikea– I just cut off the top tabs and make sure to wash them to pre-shrink them before hanging. We also have them in our home office and love how washable and easy they are. Also, my secondhand brass grasshopper (aka: Brasshopper) is a total badass and I love him more each day.
bookcase / blue pillow / curtains / rods / similar brass grasshopper
Also bought a rug from New England Loom (if you don’t follow them on Instagram you’re missing out because they have so many lovely secondhand rugs to be discovered) and the colors and patterns and antique feeling of the rug is PERFECT for a room that will be assaulted with food and sand and everything else that a rental living room has to deal with, so I have high hopes for it holding up like a champ (seeing as it is decades old already, that really does inspire confidence). That pretty blue pillow is from this Etsy shop (I love all of her pillows) and the pink one is from Target a while back. And you guys know the sofa is the Ikea Karlstad that they no longer make, which is a straight up travesty.
We also updated the light in here to this gleaming beauty from West Elm. The old light was a one-bulb fixture that we hung and immediately said “this room needs way more light.” We love the juxtaposition of this leggier modern light and the old-looking medallion (which is actually from Home Depot – shhh). And the old brick chimney that we discovered behind the wall and exposed is probably my favorite feature in the room, along with the giant windows (this room is 9′ tall, so the windows are easily over 6.5′ feet tall – that’s taller than John!). Don’t mind that TV on the floor. We found something we think will work for in there, just gotta get it out there in our next car load. #AlwaysRoadTrippingWithFurniture
rug source / chandelier / ceiling medallion /curtains / rods
The kitchen came a long way too, with the quartz island going in (it’s Pearl Jasmine by Silestone and we LOVE it so much) and a working sink. Cue the choir of angels! You can hear two ways we saved money on our quartz counters in Podcast Episode #74, which also covers why our original plan to do butcher block there didn’t work out. There are still some things missing though. Mainly, the backsplash that we’ll add after we hang the other missing element: shelves on either side of the stove under the sconces (probably two per side, not sure yet but we’ll keep you posted).
stools / quartz / butcher block / cabinets / range: secondhand refurbished / trim: SW Stone Isle / walls: SW White Heron
The back door was blue for a hot second, which some of you might have seen on Instagram, but as the room came together more John and I both realized that the same gray as the trim (SW Stone Isle) would let the pink stove do her thing and be the accent in the room that she has always been destined to become. Plus, we have a blue chippy door leading to the mudroom nearby, and one blue door + one pink stove is… enough. You know I didn’t love painting that door twice, so if I did it, it had to be done. Ha!
green vase / wood cutting board / wood stand / hanging rod / hood / kettle / sconces / pink salt & pepper
Upstairs the bedrooms are coming along with some art up on the walls, layered cozy bedding, and even headboards. HUZZAH! Still need to hang all the curtains up there (once we do that the headboard will look exactly as wide as the window because we are tricky tricksters). Stay tuned…
rug / large art / lamp / side table / striped blanket / headboard / fan
This is another view of that front bedroom, which is the largest of the four (the bunk room is teeny tiny and the middle bedroom and back bedroom are just fine but not giant). It also has that exposed brick chimney that we discovered hiding behind the wall, and next to it you’ll see my favorite craigslist find of all time that you might have already “met” on Facebook or Instagram when I shared a quick shot of it this weekend. Yes, I really did find an inlay piece of furniture on Craiglist, and yes, it’s currently selling for $2,000 on Restoration Hardware (I got it for $400!). Insert that screaming cat emoji face here. Seriously, it’s the score of a lifetime, and I’m going to share the whole story, including how I fix up a few missing inlay spots soon. So… stay tuned. Again.
And before we move on, that sconce looks crazy small above the dresser (we just hung it as a placeholder and it’s looking like a placeholder, so we’ll probably get a wider double-sconce for that spot soon). Anyway, on with the tour! Or should I say “roll the next flashback!” This is that wall a year ago. Same house. Just nekkid a year ago versus clothed now. With walls. You get what I mean.
And now, the back bedroom. Aka: our room whenever we stay there! Although the front room is the largest and has that lovely exposed brick, the back bedroom has its own master bathroom (complete with my big beautiful clawfoot tub) and it has its own stairs that lead up to it, which are surprisingly useful. We originally thought those back stairs would be more of a fun thing for kids and a cool historic detail to preserve, but we weren’t sure we’d actually use them very much but we go up and down them all the time!
rug / fan / leather stools / striped duvet cover / pocked doors: SW Riverway
One of our bigger projects this past weekend was this built-in dresser that we added to the nook behind the pocket doors that you see above. We love gaining some storage and function in that formerly blank area at the top of the back steps, and there’s more than enough room to pull out the drawers and take like five steps back before you’d fall down the steps (you know I’d be the one to bite it all the way down these steps, so we have to make sure these things we’re adding won’t curse me later).
dresser / mirror / wood top / door color: SW Riverway
John would be quick to point out it’s not complete. We ran out of nails for our nail gun, so the trim still needs to be attached, caulked, etc. But basically, a Malm from Ikea fit pretty perfectly in the space, so we made it look even more built-in by removing and reinstalling the molding around it (see below) and adding a few skinny filler pieces to each side (scraps from our kitchen install). We also popped some leftover butcher block counter from downstairs on top to tie into the pine floors and we’re also planning to add some leather pulls to it to tie in the stools at the foot of the bed (you can see them in the shot two photos up). Can’t wait to finish it up and share the final pics!
Next let’s move onto the master bathroom, which is easily my favorite room because I get to soak in that big ol’ tub after hours of DIY and it feels so freaking good every time. Except for the first time. I had sort of a false start in there (more on that in this podcast) but now the tub and I are bros and only happy things happen when I’m in there. And the kids love it too.
marble table / floor tile / accent floor tile / wall hooks / blinds / tub color: SW Riverway
I’m basically salivating while looking at this because we’re back home and our house has two bathrooms that we still have to redo and two tubs that are about 10″ deep (half of my body sticks out like an iceberg) so I’m itching to add a deeper bathtub into my life here at home.
The hall bath is still my boo too, thanks to my favorite vanity ever. The top is tiled with marble and the rounded wood drawers make it look like a furniture piece we converted to be a vanity but it came that way and WE SALUTE IT because goodness knows we have other stuff to keep us busy. Still on the list: making built-in bunk beds, building out the pantry and the mudroom, tiling the backsplash, landscaping, etc, etc. That big round silver mirror is an awesome (and recent!) HomeGoods find (the same one in brass hangs above our mantel at home) so if you’re looking for one in either color, try HomeGoods. Target also has a really similar one that’s slightly smaller and thinner in gold.
vanity / faucet / drum stool / light fixture / floor tile
And although we haven’t built the wall to wall bunkbeds in our small-but-mighty kids room yet, we did hang art. And that’s half the battle, right? (Nope, half the battle is being halfway done with the bunkbeds, but let me lie to myself for a second, ok?). That cute colorful painting is from our dear friend Lesli Devito (remember when we house crashed her wayyyy back here) and if you don’t have one of her paintings or prints I highly recommend getting one. The door also got a sign that says Mermaids Welcome and it made my whole life to hang it up (also we took a poll among a bunch of kids and basically everyone is cool with mermaid and pirates, but don’t get me started on how split the group was on dolphins).
marble table / mermaids welcome plaque / art by Lesli DeVito
So there you have it: a tour as of yesterday of the beach house (remember: watch the video! it has approximately 98% more info than some pics and captions can convey). Also, we hope you have a very happy holiday surrounded by the ones you love and delicious food and all the mermaid-related memorabilia that your heart desires. And if you have a tub where your entire body can be submerged, know that I, for one, now know what I’m missing and am deeply deeply jealous.
P.S. To see the entire process of fixing up this beach house (from floor planning and demo to tiling and tiling and tiling and getting the floors redone) here’s a full category of beach house updates for you to flip through.
*This post contains affiliate links*
The post Beach House: End Of The Year Tour! appeared first on Young House Love.
Beach House: End Of The Year Tour! published first on http://ift.tt/2qxZz2j
0 notes
Last Seen Blogs

nuka-lixir
WELCOME HOME

gackgackgoescam
Clamming Out

carpp
Carpp

onedaywewill69
Untitled

iloveapocalypto-12
#SmileAlways