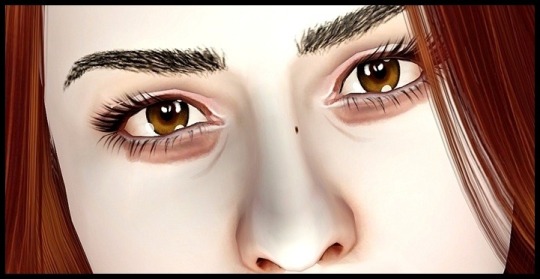
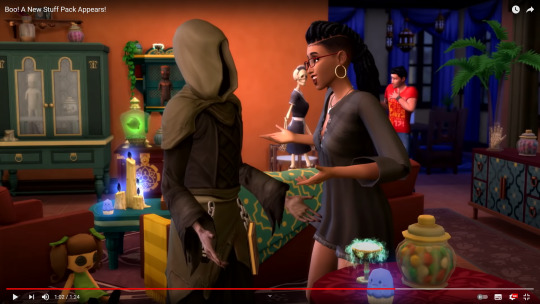
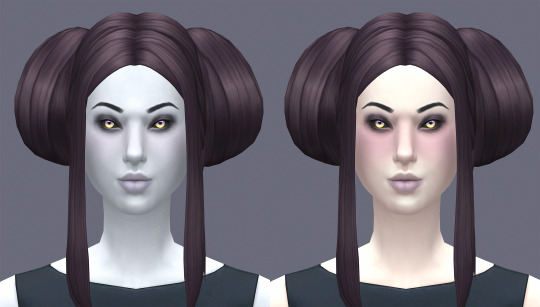
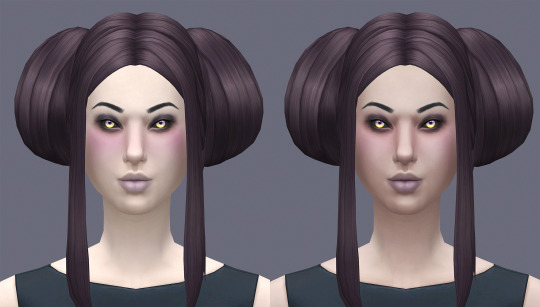
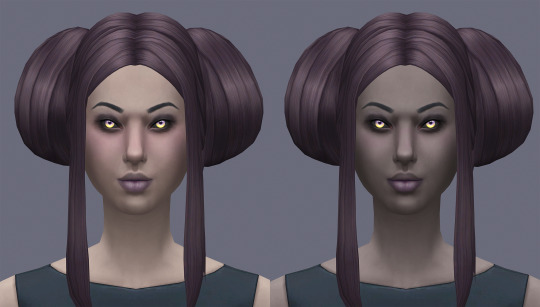
#just finalizing the occult skintones !!
Photo
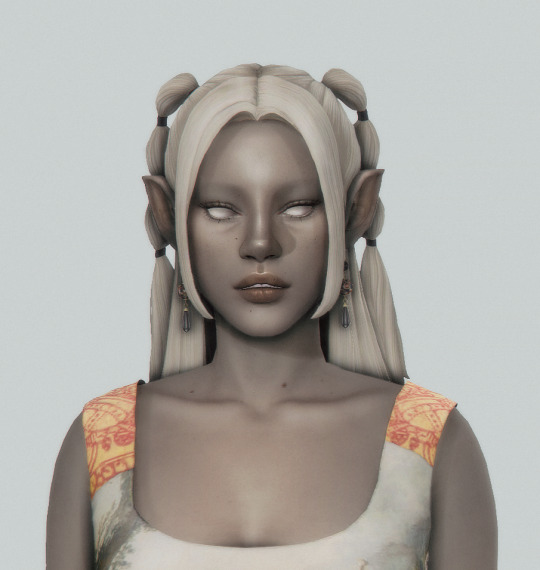

girlies (✿◠‿◠)
#ts4#ts4 edit#ts4 portrait#ts4 occult#mine#edits#just finalizing the occult skintones !!#i spent all day adjusting em why is this mentally tiring
660 notes
·
View notes
Text
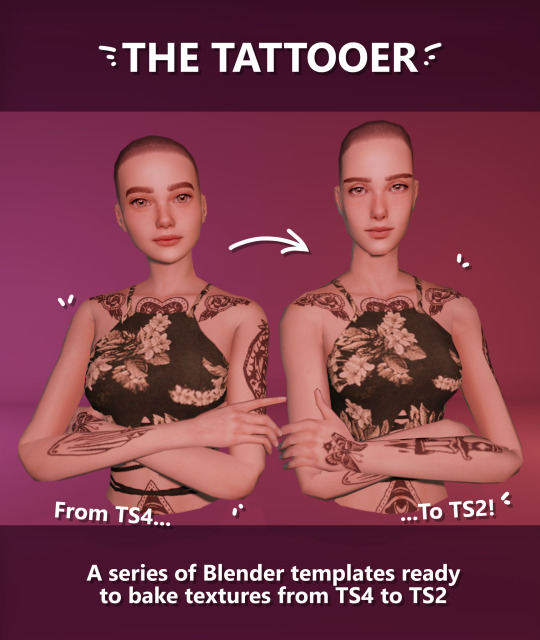
Updating... The Tattooer (ver. 3.4)!

Finally! Took me a while, huh. This is the updated version of the Tattooer project. It skips some steps, making the workflow much, much faster! Huge thanks to @applewatersugar for his
suggestion on how to bake textures while preserving the transparency. This is kind of a repost of the original Tattooer post, but it actually has some new stuff and a few changes here and there, so please take a look if you want to learn how to use this new version.
This is a series of Blender template files already set up to quickly bake textures from The Sims 4 to The Sims 2. The different Blender files will allow you to:
-Bake body textures from TS4 to TS2 (Female)
-Bake body textures from TS4 to TS2 (Male)
-Bake body textures from TS4 (Female) to TS2 (Male)
-Bake body textures from TS2 (Female) to TS2 (Male) [Bonus!]
-New! Bake face textures from TS4 to TS2 (Unisex) [Bonus!]
-Bake head textures from TS4 to TS2 (Face + Scalp) (Unisex) [Still experimental]
Check the file names to see which one is which, and the resolution of the baked texture it will give.
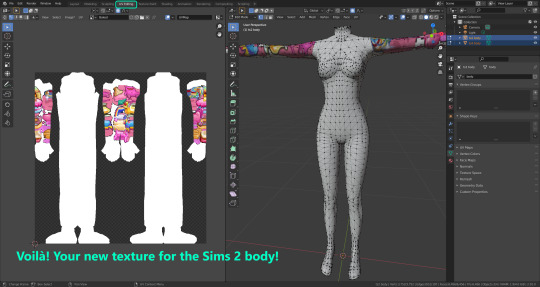
Everything you see in the render above was 100% converted using those Blender files.
Download here! SFS / GD
Update: Version 3.4.1 (27/08/2023) Fixed some issues on the shoulders for the AF-body-4t2-1024 and AF-body-4t2-2048 templates. Now the top straps on most converted underwear/swimwear should look right.
Update: Same version (13/12/2023) As requested, added a new spanish version of the included pdf guide!
These templates were made mainly to bake and convert tattoos, but there’s more you can do with them if you get creative. I have to say, these are NOT perfect. Results may vary depending on what you are trying to convert, so! With that in mind, this is all the stuff you will be able to convert almost seamlessly from TS4 to TS2:
-Tattoos.
-Other body details such as body hair, scars, freckles, supernatural/occult details…
-Body painted underwear and swimwear, as well as some other clothing that’s mostly painted on the body.
-Socks, stockings and maybe leggings.
-Even skintones! In some areas they will look weird, so I recommend editing and blending them with other existing TS2 skins.
-Makeup, eyebrows and beards. In the old version this was just a proof of concept, but now I’ve added a new Face file template which gives some pretty decent results!
-Hair scalps. Very useful when converting some hairs! Although keep in mind part of that texture might also need to be baked on the face mesh, you know, that hairline makeup stuff.
Got your attention? Nice! Editing some of the textures from TS4 to match the UV mapping in TS2 using a 2D editing program can be incredibly hard. That’s where texture baking in Blender comes to the rescue!
You will need to download Blender, at least version 3.4, but you could always use a newer version. It is only incompatible with versions older than 3.4.
-You can download Blender for free here.
-You will also need Sims 4 Studio to extract the original Sims 4 CC textures you want.
In the first version of these Blender files, there was a necessary step using Photoshop, but that’s no longer needed. However, there’s still a tiny extra step which requires resizing the newly baked texture on some of the high resolution templates, so you might need a 2D editing program like Photoshop. More on that later.
So, before we begin, let’s clear out some questions you might have. What the heck is this texture baking thing and what does it do? Well, let’s imagine you have a video projector and point an image into a blank wall. Then you pick up some brushes and start painting and copying that projected image in that wall. Texture baking is kinda like that when it comes to 3D models. You align two models and match them as closely as you can in shape and form, and once you adjust some parameters and values, Blender does the rest for you: it will give you a new texture for a new model with a different UV map. These files I’m sharing have everything already set up, so it’s a matter of plopping in that Sims 4 texture and you will get that new texture for TS2 in just a few clicks.
This tutorial assumes you know literally nothing about how to use Blender, so if you feel uncomfortable with it, worry no more! This will guide you with pictures showing where you need to click and explaining what is happening. For Sims 4 Studio and Photoshop the process might be a bit less detailed, but still this should be pretty beginner friendly. For this tutorial, I will use some tattoos as an example (properly credited at the end of the post). Alright, enough with the rambling. Let’s get started!
·EXTRACTING TEXTURES IN SIMS 4 STUDIO:
First things first, you will need to extract as pngs all the textures you want to convert from TS4 using Sims 4 Studio. It should be pretty straightforward. Just open the packages and export the Diffuse textures. Keep them organized in a folder for easy access.
·BAKING THE TEXTURES IN BLENDER:
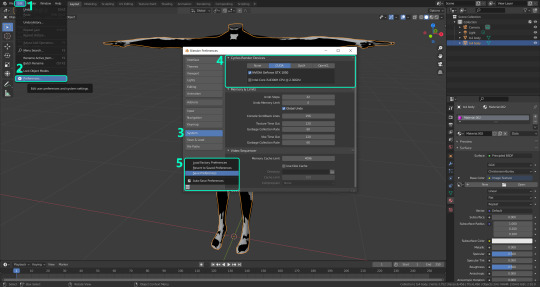
PRELIMINARY STEP 1: CONFIGURING BLENDER’S GRAPHICS SETTINGS:
Open your preferred Blender file depending on what you’re going to bake and the desired resolution (in this example I’m going to use the AF-body-4t2-1024 file). Before we start messing around in Blender, there’s one thing you should set up. It is a onetime step, and once it’s done, you won’t need to do it again. So, does your computer have a dedicated graphics card? If you don’t know or you’re not sure, just skip to the next step. Configuring Blender so it uses your graphics card instead of your CPU will make the baking render much faster, so it is recommended you set it up correctly.
If your computer has a dedicated graphics card, click File (1) > Preferences (2) > and on the window that pops up click System (3) > and select CUDA and make sure your graphics card is there and tick it (4). I have an Nvidia Graphics card but your case may vary. Once you’re done, click on the tiny button on the bottom left corner and Save Preferences (5).

PRELIMINARY STEP 2: CHOOSING THE RENDERING DEVICE:
Click on the tiny camera button on the right, called Render Properties (1), and on Device (2) select GPU Compute if it’s not already selected. If you’re not sure if you have a graphics card or not, just select CPU. Then select the Material Properties tab (3) and Save your changes, either by pressing Ctrl + S, or clicking File (4) > Save (5). You might need to do this second step with the other Blender files, but once you have it done and saved, you won’t need to do this again. Okay, time to get into the good stuff!

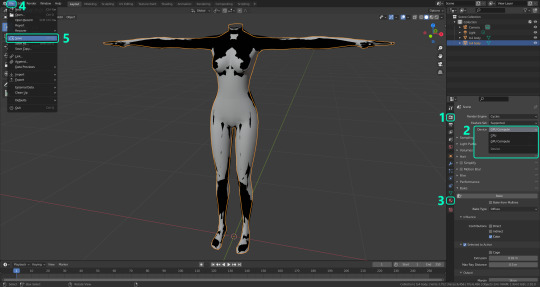
·STEP 1: LOADING YOUR TS4 BASE TEXTURE:
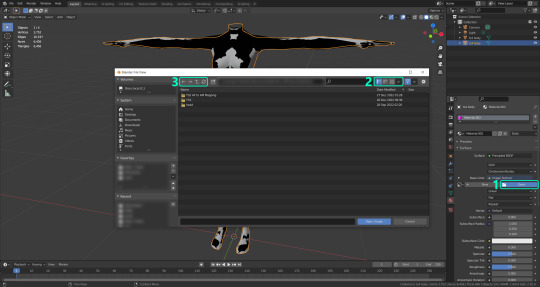
In the Material Properties tab, click the folder icon that says Open (1) and on the window that pops up, navigate through your folders and select your first texture. To navigate easily, the 3 buttons on the top right (2) are for the display mode. They will show your files in list mode, vertical and horizontal, and the one on the right will display the file thumbnails, pretty useful if you want to easily preview your textures here. The icons on the left side (3) will let you go one folder back and forward, go to the parent directory, and refresh the folder in case you just dropped something new in there. Double click on the image you need and that will load the texture into the Sims 4 body model, named “ts4 body”.

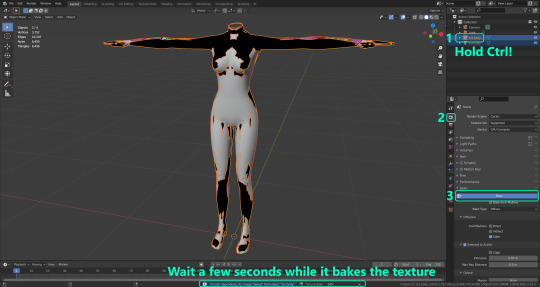
·STEP 2: SETTING UP YOUR SELECTION AND BAKING THE TEXTURE:
On the top right of the screen, you will see the names of the 2 models in the scene. Hold the Ctrl key in your keyboard and left click on the “ts2 body” model (1). If you did it correctly, you should see “ts2 body” in a yellowish orange color, and right down below, “ts4 body” should look more like a red orange. If not, try again by clicking first on ts4 body, and then while holding Ctrl click again on ts2 body. Then switch to the Render Properties tab by clicking the tiny camera icon (2) and click Bake (3). Depending on your screen resolution, you might need to scroll down a bit with your mouse to see the Bake button. Wait a few seconds for it to finish. You will see the progress percentage down on the bottom of your screen. Don’t panic if you notice your computer fans start ramping up, that’s completely normal! As I said in the beginning, using your GPU will bake the textures much faster than the CPU.

·STEP 3: SAVING YOUR NEW TS2 TEXTURE:
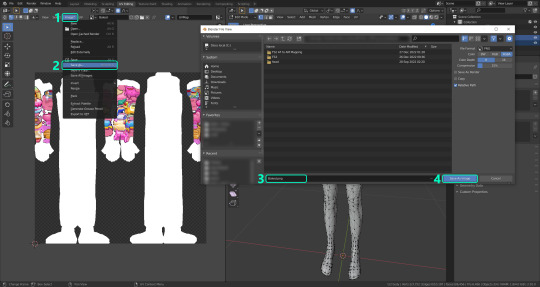
Once it’s finished, switch to the UV Editing Mode by clicking “UV Editing” on the top of your screen. And there it is: your new texture! You might have to scroll up your mouse wheel a bit to zoom in and see it in all its glory on the left side of the screen. We’re still not done yet though. You need to save it to yet another new folder (always try to keep your stuff organized!).

You can save it by pressing Shift + Alt + S, or clicking on Image* (1) and then Save As… (2). That will pop a window where you’ll need to navigate again and save it somewhere. Give it a proper name (3) and hit Enter to save it… well, Enter doesn’t always work for me for some reason, so if that happens just click Save As Image (4). And that’s it! You’ve successfully converted your baked texture. Congrats!

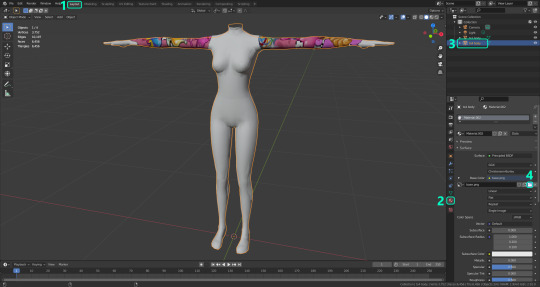
·STEP 4: GOING BACK TO STEP 1:
Alright! If you’re done with your textures, you can close Blender without saving and call it a day. But let’s say you want to keep baking other swatches. In order to go back to step 1 and start the process once again, click Layout (1), go back to the Material Properties tab (2), select “ts4 body” (3) and click on the folder icon (4) to open and load your next swatch.

Then it’s just a matter of repeating the process from step 2. When you’re ready to move on, close Blender without saving. If you see a small check telling you it will save some images, make sure you uncheck it, so you will be able to use it again in the future from the starting point with no issues. I don’t think it really matters if you accidentally save your progress in these files, but I like to keep it clean and fresh so I can do the process where I left it from the beginning next time I open it. And in case you mess up and save somewhere, you can always just delete the .blend file and download the template files again.
In case you’d like a video tutorial on how to use these files, the amazing @platinumaspiration recorded this fantastic video showcasing the process! You can watch it here.
One final note: some of the baking .blend files save the textures with a resolution of 2048x2048 pixels, as clearly stated at the end of their file name. That’s way too overkill, because TS2 only properly supports up to 1024x1024 for most of its textures and you should always resize your final product to that max resolution (or lower if needed). I just made those 2048 versions because there might be some really tiny and slim details on some tattoos that might look a little too blurry when baked into a 1024 resolution texture, so for those cases use that if you want and then resize them using your 2D editing software of choice.
In Photoshop, in the Resample mode of the Image Size menu, there are a few options to choose. For the fine details, I like the Nearest Neighbor (hard edges) option, which, even if it looks a bit pixelated, it still preserves most of the texture and quality.

For anything else, I would just directly bake them using the 1024 versions in Blender (512 for the face and scalp).
And for the folks who feel comfortable playing around in Blender, this is just the beginning! Texture baking opens a LOT of possibilities, so feel free to move stuff around and edit the models to your liking! If you notice the baked textures look warped or stretched somewhere, or don’t like where some textures are placed in the S2 body, poke around that area moving stuff and then give it another try. The main objective of the baking process is keeping both overlapping models as close in shape as possible. You may also edit and save new copies of the templates, or make new ones from scratch using mine as a reference (keep a close look on those Baking settings and values, I think they work pretty well) and share them if you want to. Go ham, do whatever you want with them! I still have plans on making templates to convert body textures from Sims 3 to Sims 2, but for now it’s not on my priorities, so we’ll see when that happens.
Whew! Hope none of this was too confusing. Need help or have any issues with these? Please ask/message me here and I’ll be glad to help when I’m able to!
Credits for the CC used in the render demonstration:
-Skin by Sims3Melancholic.
-Eyes by Northern Siberia Winds.
-Eyebrows by PeachyFaerie.
-Tattoos by xtc.
-Top by SerenityCC.
And the Tattoo I used for the tutorial can be found here, by ValhallanSim.
Last but not least, a huge thanks to all the people who somehow contributed to make this project and update possible, either by doing initial testing, finding issues to fix, or teaching me new Blender tricks to make the workflow way faster and easier. So thanks again to @elvisgrace @moyokeansimblr and @applewatersugar on Tumblr! <3
And thank you for reading! Hope you have fun playing with this (not so) new toy hehe.
#tattooer project#tattooer update#ts2 tutorial#ts2 resources#ts2 blender#ts2 overlays#ts2 texture baking#4t2 conversion tutorial#this took me so LONG to update#im really sorry for the delay :(
286 notes
·
View notes
Text
I have been massively dropping the ball on posting ANYTHING to tumblr about game dev progress - or any social media publicly, tbh - I am currently "rebranding" the IG dedicated to the game for when I have the energy to maintain it, which is unfortunately not right now. Lol.
So...since all of this has been revealed to backers already months ago, I feel comfortable sharing here. These are some sprites that have been FULLY finished* in the past year, along with a short blurb about the character shown. ^^ Apologies in advance that some of these images aren't formatted or watermarked in the same way as others.

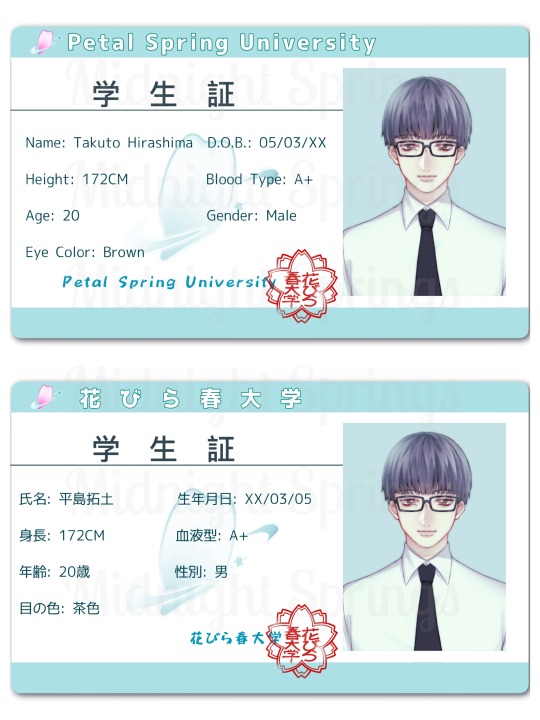
Takuto Hirashima is a possible love interest for Mikuru, one of the twin protagonists. They both share an interest in the occult and horror movies. Takuto frequently goes on excited tangents about his interests, and has a photographic memory, so he tends to have a lot of information to spill. He has pretty severe carpal tunnel from being an active gamer.
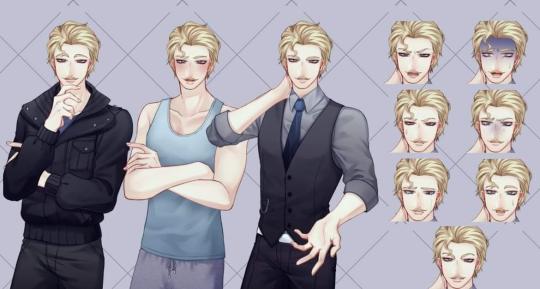

Noah Reid is a potential love interest for Mikuru, as well. He is a Canadian model based out of Tokyo at the moment, the reason he is in Hokkaido at the time of the game is unclear. He likes to think he's very good at keeping himself shrouded in mystery. He was surviving on his own for several weeks after the outbreak.

Hanako Akechi is a possible love interest for Toshiro, the other twin protagonist. She has a pretty reserved personality, but when she finally reaches her boiling point, you'll wish she hadn't. She doesn't seem to have many hobbies and really keeps to herself. While she used to be a childhood friend of the twins, things soured, and they mostly lost contact. In hopes of patching things up, she managed to follow them to their attended university. It was not well-received.
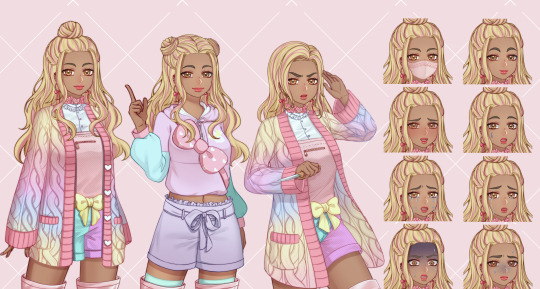
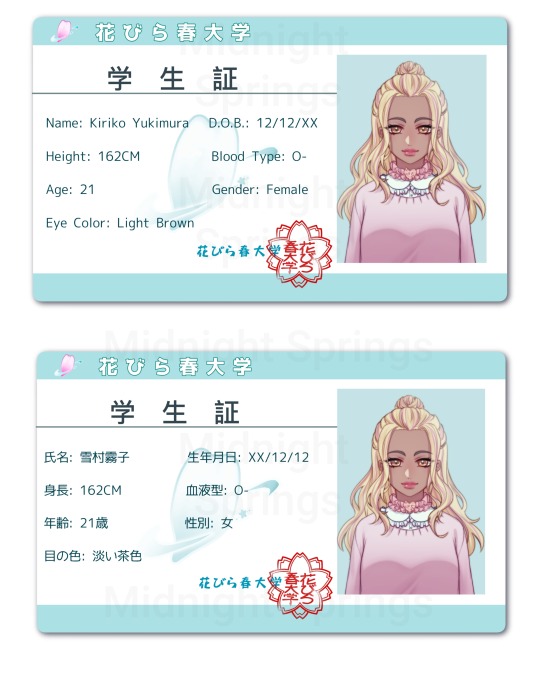
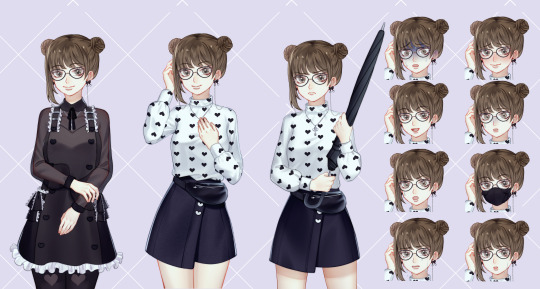
Kiriko Yukimura is a possible love interest for both Mikuru and Toshiro (not at the same time...), depending on routes chosen. She is Arisa's closest friend, if not her only friend, and they've been bonded since childhood. Kiriko discovered gyaru style growing up, and decided it was a perfect aesthetic for her to build on to. She loves pastels and all things "girly," and at first it made her feel better to have a darker skintone when wearing a fashion known for intense tans in a country intolerant of mixed-race kids. Eventually, she felt really comfortable in her skin, and that shines through in her warm personality.
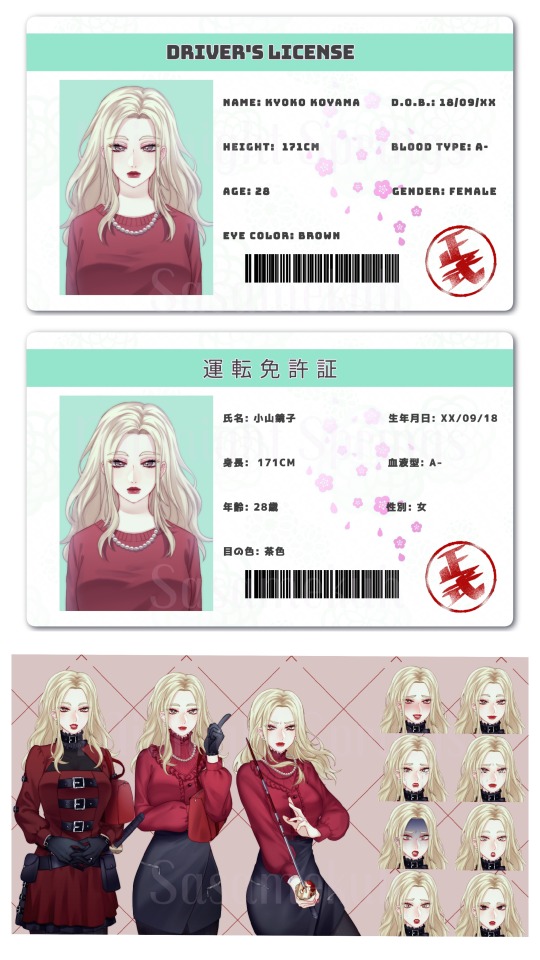
Kyoko Koyama is Arisa's older sister by 8 years. She is recently widowed. It's incredibly hard to read her real feelings through her expression, as she's very good at masking her real emotions, a skill learned from having to raise Arisa mostly alone. She loves Kiriko like family, and is desperate to mend the strained relationship she now has with Arisa as they both became adults.
A part-2 kickstarter to raise more funds for programming, the remaining art balance, and potentially even help with writing (I have a lot of health issues going on, have to do more conventions now than ever in order to afford rent, and I need hip surgery that I can't yet afford or make time for), and more...will launch early 2024. Please keep an eye on this page for updates!
*the sprites done first in order to be included in the demo are not actually finished, they're about halfway done. Each main character has 2 normal poses + 1 "fight" pose, multiple outfits, etc. In order for them to be done in time for demo publication, they just have 1-2 poses and 1 outfit each. Sprite artist is Sasamekuh!
#Apocalyptic Dream#ApoYume#Game dev#Indie game dev#Horror game#Otome game#Zombie horror#zombie apocalypse#Zombie apocalypse au#Video game art#Dating sim#Amare game#Sprite art#Midnight springs
14 notes
·
View notes
Photo

Cordial Rouge Cupcake’s Bachelorette Challenge
Us here at Berry Shores Programing are excited to announce the latest season of The Bachelorette! It will be a slightly mystery themed season, taking place at Nightshade Manor, outside of Starlight Shores. The bachelorette is an aspiring actress, and Starlight Shores native, named Cordial Rouge Cupcake. Cordial was actually the person who suggested the idea for this season!
Will Cordial find true love at Nightshade Manor? Stay tuned to find out!
Inquire Below!
Hello! I’m excited to finally be hosting this BC. I had the original idea for it in February 2020! I would like to take 10 contestants for this challenge. The winner of this challenge will be Cordial’s spouse for Generation Four of The Cupcakes!
Send me a message to enter, after reading the requirements below.
Contestant Requirements
Must be a YA Berry (I prefer dark and saturated colors for this rainbowcy.)
All Genders & Occults Welcome
Please pick an unmarked LTW, from my list.
I would love to have a short bio for each of the contestants.
I own all EPs, and Outdoor Living, Master Suite, Diesel, and 70s, 80s, 90s.
For CC, I would prefer it to just be these skintones (x)(x), Chazy hair, MM Makeup/Markings, and Patterns. No clothes or sliders, please!
Private download for now. Feel free to release your sim, if they are eliminated.
The contestant deadline will be July 10th!
Slots (Full)
1. @poisonfireleafs | Baby Blue Indigo
2. @trinitymarconeptune | Mimari Yugure
3. @melien | Hally Thule
4. @tiny-tany-thaanos | Io Neutrino
5. @alovelikesims | Cypress Viridian
6. @arogaba | Peridot Greenleaf
7. @amixofpixels | Ivy Moss
8. @aestheicpixels | Wisteria Lace
9. @nikatyler | Twinkle Bright
10. @ommlette-du-plumbob | Ollie Laurel
#the sims 3#ts3#berry sweet sims#cordial's bachelorette challenge#cordial's bc: contestants#Cordial Rouge Cupcake
23 notes
·
View notes
Text
Simblr Asks - TS3
Saw these questions by Teauke on my dash, and y’all know I love talking/ranting about The Sims; let’s go! ^0^
1. how big is your mods folder?
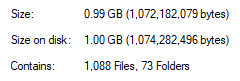
That’s my mods folder with only mods/hacks/overrides; no CAS or build/buy CC installed. It’s a miracle that nothing conflicts, at least not as far as I can tell.
2. how would you describe your style? A sporadic mix of tv/gaming fandom-inspired conversions and recreations, of mostly fanciful and/or cultural themes & genres.
3. What is your favorite challenge? I’m a builder at heart, so I love recreating lots and interiors. Challenges where we find IRL rooms/scenes and remake them in TS3 are always the most fun for me.
4. do you make cc? if so, what kind? I make fanciful & cultural custom content (occult, sci-fi, boho, etc). I make CAS CC sometimes, but I prefer making buy/build CC.
5. what type of cc do you hoard? Not everything, but a lot. As creators retire and links die, I’m even more paranoid than I already was that CC will no longer be available anywhere.
6. what default eyes and skin do you use? I don’t use default-replacement skintones, but I do use Buhudain’s You Are Real mod.

As for eye defaults, I absolutely love Moonskin’s Shiny Glass replacements.
7. how many urls have you had, and what are the meanings behind them? All of my simming URLs on MTS, TSR, the officials, and Tumblr are some variation of my first name, Murfee Lee. Because yes, I am that darn creative.
8. who is your favorite gameplay blog? 9. who is your favorite storytelling blog? Ugh, there are too many good ones out there.
10. who is your favorite cc creator? All of my favorite creators retired years ago: DyM/Hekate999 (fantasy build/buy), Parsimonious (everything), Luna (everything build/buy), Qingshuangtongzi (Asian everything), Amethyst (Asian CAS), Art-Sims (CAS everything), etc. I swear, the day Sandy/ATS3 (everything build/buy) retires is the day I’m having a panic attack.
11. how do you edit your photos? Badly. Tweak the brightness & contrast and call it a effing day.
12. what is the last screenshot you took? It’s a surprise.
13. what do you do when you are unmotivated? I am never “unmotivated,” so much as I am distracted. I think the reason I’ve simmed so long is strictly because I’m always inspired by fandoms. If I get distracted by a tv/game, it becomes my next muse (aka current obsession). It’s not that I get unmotivated to finish the old stuff I pretty much abandon, it’s just that there aren’t enough hours in the day for me to do everything I want. Sometimes I return to older saves/gameplay. Most times I don’t though--unless someone messages me wanting to see it again (and that’s effing rare).
14. who is your current favorite sim? Sakura and Nasir are my alltime favorite sims. But I must admit that I patted myself on the back pretty dang hard when I created Tsukihime-Sama for my Moon Medicine gameplay. I love every sim I made for that gameplay (which I really need to finish one day, ugh), but my Lunar Moth Goddess? 👌
15. who is your current favorite sim that is not by you? Every sim that @obscurus-noctem is out here sacrificing goats in order to create. It’s just disgusting how pretty everything on their blog is. Those mersims? Those graphics? That editing? Makes me effing sick.
16. recreate someone else’s sim in your style. I think I saw a challenge like this a few months/years ago, but never did it. But I DID do the Picrew version.
17. do you talk about sims with people in real life? One of my professors plays SimCity. Naturally, we bonded over how wack EA is. ^_^
18. how many of the packs do you own? All of them, except the Stuff Packs. Barring Fast Lane and Movie Stuff, none of the other SPs are worth the price; it’s just build/buy/CAS CC any MaxisMatch creator.could make for free. I’ve always felt that way about SPs, which is why I never bothered with them in TS1 or TS2 either. I will say though, that TS4′s SPs are something else entirely, which brings me to #24 (see below).
19. how many posts do you have on your blog currently? 2764. JESUS.
20. how many drafts do you have on your blog currently? 363. U_U And most of those are CC sets & gameplay posts I never finished.
21. how many posts are in your queue currently? It’s a secret. ^_^
22. have you ever moved blogs? Never. I never even changed my theme or URL.
23. are you in any sims related discord servers? Yes, the Creators Cave, but I effing hate Discord; it’s just a royal pain to navigate, IMO.
24. what are your thoughts on the most recent pack? (paranormal) Speaking of Stuff Packs!
RANT ALERT!
If anything, TS4′s SPs are doing way too much (adding new gameplay, careers, lifestates/NPCs, lots, etc!? WUT.) Or rather, its EPs aren’t doing nearly enough. I love that TS4′s SPs add meaningful content. But if they’re raising their bar, that means the Expansion Packs need to rise by the same degree, to stay relevant, if anything.
But EA, in their infinite ineptitude, seems to be scaling back with their EPs! Cutting what should be 1 cohesive EP into multiple SPs & GPs piecemeals the content and cheats people out of money, by having us pay more for less! The TS4 SPs do a lot, yes, but now let’s talk about the Paranormal SP for example:

Paranormal Stuff does perhaps the most any SP in The Sims 1/2/3/4 ever has, and has by far the most worth for its money...but at a dire cost:
- the career only has 5 levels instead of 10 (thus being nowhere as deep as TS3′s combination of the Ambition EP’s Ghost Hunter and the Store’s crystal ball--which links with the Supernatural EP’s Spellcasting skill)
the crystal ball is a 1-trick pony
unlocking Bonehilda is tied to grinding skill/career levels, only for her to do EFF ALL once she finally arrives (and her face looks like melted cookie dough WTF)
most of the gameplay is tied to the pack’s new lot/venue
and the ghosts are still meh
So rather than TS4 having an actual Supernatural EP, instead it has the ok-but-disappointing Realm of Magic Game Pack (which I’ve already ranted about), the watered-down Paranormal Stuff Pack, and the INCREDIBLY OP Vampires Game Pack (which I’ve salivated over). That’s already $40--the cost of TS3′s Supernatural Expansion Pack, mind you--but with the glaringly absent inclusion of Fairies, Werewolves, AND Zombies. O_O WHAT THE HELL, EA. To get the full Supernatural experience in TS4 is gonna end up running people not $40, but perhaps DOUBLE, if werewolves & fairies get their own GPs (unless EA waters them down in SPs, which would still be anywhere from $50-60). EA is robbing people blind.
25. how many hours have you played sims? I have no idea, no doubt thousands.
26. if you play gameplay, do you play with mods? See #1 above
27. what’s the farthest you’ve gotten in a challenge? See #3 above.
Thanks for reading!
46 notes
·
View notes
Text
Paranormal Stuff
As usual, at this point, some things I noticed in the new trailer.

Curtain, dreamcatcher and small old picture frame are nice, but I’, not convinced about the fireplace look, despite the side shelves. Also, I don’t think I’ve ever seen the moon so big??
I hope lights actually do this.

The doll is so cute. Also the cube boc and the written hand are nice.

Again, I hope candles actually turns black/blue. The bird thing is also nice, reminds me of Egypt.

I mean, it’s nice I guess, but I wasn’t expecting this “style” to go with this pack. Remove the ghosts and you’re actually going to have Movie stuff 2.0. I’m kinda tired of this “bohemian/country style and desaturated clothes” like Movie, Laundry, Strangerville, Batuu etc. I wish there had been a more “edgy” approach in terms of clothes/furnture like RoM and Vampires.

Initially I thought these were the captured ghosts, but apparently they are just decor?
The “2020 mood” ghosts. And a, what appears to be, african statuette? Also, another hanging plant finally.
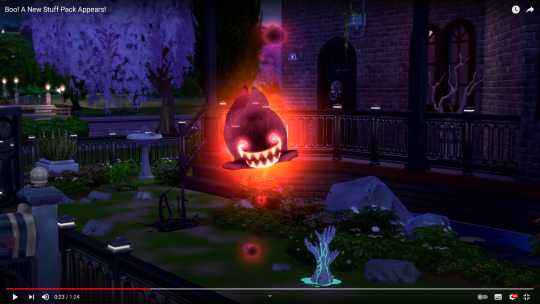
OMG so fricking scaaaryyyyyyy *sarcasm* but at least the hands plant on the background is cute. More of that kind of stuff please.
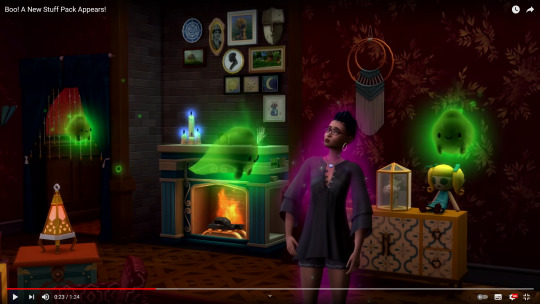
The small cowplant is cute and the fact that they used Strangerville plant on the frames is nice too.
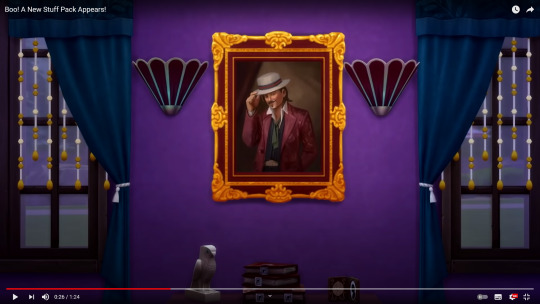
Johnny Depp, is that you? At this point couldn’t it have been Tim Burton’s aesthetic?

Uhm, nice I guess? But still the style doesn’t scream fortune teller nor creepy dark witch to me. The characters dressed like this seem out of place.
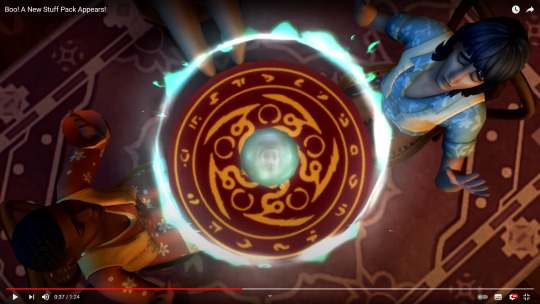
I hope you can actually see the face inside and that’s not just a video effect.

I’m not really sure if I like the animation overall, seems a little stiff and repetitive? Idk.
Bob is me right now. Not fazed at all.
Gnomes and bees 2.0.
Apparently the ghosts are going to mess the place and the the new career includes being a maid.
Don, don’t try to flirt with the new dead maid. The candy vases remind me of Coraline, the cups are nice but probably just decore, and I hope the cupcakes aren’t made with actual ghosts.

What a nice bonding activity to do with your kids! I mean, they can’t take care of plants but I’m sure trying to break the wall between the living world and the realm of the dead is way less dangerous!
In conclusion, my personal opinions are: I don’t like the style of the pack, nor I like the fact that the ghosts are more cute than anything (at this point it seems they aren’t even trying to appeal to the older players, but just to the very young ones). I really would have liked a more dark/creepy/edgy approach. The evoke/banish ghosts alone seems boring in term of visuals and I think making it a career is the only right thing to do to make this feature more useful. I speak as a player who loves supernatural and occults, but this pack doesn’t inspires me that much. I admit, before the Disney ad pack I really really loved TS4 and I couldn’t stand all the negativity surrounding it, but after that extremely urequired pack the game didn’t appeal me that much anymore. Each announcement after that, except for the skintones and sliders, never really made me excited for the game again, and I know at the moment TS4 isn’t really pleasing family nor occult players with the new releases. I, at least, will hardly call this supernatural/occult and I hope they are not going to hide behind this SP and say that they’ve fulfilled occult players wishes. I’m still hoping that this year we’re going to get another proper occult type (like fairies, werewolves, maybe helves, zombies etc) and the preview pics of the skintone update kinda hinted at that, I distinctly remember there were a pink and yellow swatch on the unnatural category, something we don’t have and can’t achieve with the sliders and existing skin colors. Maybe this is just a precursor of something bigger since the year just begun. In the end I’ll still buy it cause I like some things and I’m a collector (except for batuu) but I’ll wait for a 50% sale at least.
PS: I’m probably going to write a post about life and stuff in the next days. I needed some time off for myself and I’m sorry I left you like this.
#faq#the sims 4 paranormal stuff#sims 4 paranormal stuff#paranormal stuff#paranormal stuff pack#ts4 paranormal stuff#the sims 4#sims 4#ts4#long post
23 notes
·
View notes
Photo

SPOOKY GHALLAGER -a sim (obviously)
so @termlinnator asked me if i could upload Spooky after i posted an edit of her and then i disappeared for almost a year ha ha..…i am honestly so so sorry about that
anyways here she finally is!!! ive uploaded a sim exactly once and that was like 8 years ago for ts3 so please let me know if theres anything wrong/missing/whatever
gallery id: squiddieland (………..dont ask)
*tray download and cc list under the cut!*
TRAY FILES DOWNLOAD
i tried to keep as many of her stuff as base game as possible but she still requires Parenthood, Get to Work, Outdoor Retreat, and Backyard Stuff for all of her clothing (really Parenthood is the most important and thats just for her acne and shirt and honestly? i dont remember what uses Backyard Stuff lol)
i also tried to cut down on her cc but she still requires some so here it is
cc list:
* = very essential (like if you dont download these she absolutely wont look the same)
-*skintone - snoglo trio (i lov these highly reccomend i think they need some manual fixing to work on occults tho)
-*eyelashes (aka how does anyone not have these in their game already)
-*tattoos
-*hair
-*nosemask & eyelids (i hope these are the right ones lmao)
-*lips
-(knuckle) tattoos 2: (just right arm but theyre all nice)
- facepores
- moles (ily cabsim queen)
- teethteethteethteeth TEETH
- clevage overlay (or rather lack of clevage overlay lmao)
- earrings
- default skin (i think?) i use (that probs wont matter since i used 3472983 face overlays anyways so dont worry about it)
3 notes
·
View notes
Photo

REAL LIPS VAMPIRES -- by amoebae
UPDATE 2023-04-30:
Updated for infants and a few extra tags here and there. Merged instead of zipped now.
UPDATE 2021-02-03:
Updated to work with colour sliders.
Finally added compatibility with all occult states, and hot and cold weather tags.
-----
I was asked to create a version of my Real Lips Revisited that matched the new vampire skintones, so here it is.
There are far fewer colours available than in my original sets, with just 12 swatches in total, but just as with the others you’ll find them in both the lipstick and facepaint sections, enabled for all ages and genders, and disabled for random. You can use them on humans and aliens too.
There are 6 subtle pinky-purple swatches, and 6 subtle bluey-purple swatches. A selection are shown here on EAxis’ skin texture. There are no swatches for the red skintone, because there are plenty that can match in my original RLR sets. In fact, I think those go well with all the vampire skintones anyway, but that’s neither here nor there. These were knocked up very quickly, and I’m sure I could do better, but these should fill a gap.
DOWNLOAD
Merged @ SIMFILESHARE
Merged @ PATREON
CREDITS
Again, many thanks to @simsontherope for his texture and kind permission to recolour.
TOU
The same as for RLR: Permission isn’t entirely mine to give, since even though I put a lot of time and energy into these I used Rope’s texture as the base. I’m happy for you to use this in your creations (credit, no pay sites, no adfly or similar) but you must also seek permission from Rope.
#my ts4 cc#real lips revisited vampires#rlr vampires#real lips vampires#real lips vampires release#ts4cc#ts4 cc#s4cc#s4 cc#the sims 4#ts4#sims 4#s4#the sims#sims#simsontherope
566 notes
·
View notes
Text
Introducing... The Tattooer!
[This version is OUTDATED! Please, check the new version here. I updated the workflow, skipping a lot of unnecessary Photoshop editing. It's way faster! I'll leave this old version and files up though, for archiving purposes. But yeah I still totally recommend you use the new version!]
Finally! I’ve been working on this for so long and I couldn’t wait to share it. This is a series of Blender template files already set up to quickly bake textures from The Sims 4 to The Sims 2. Really neat for cc creators! The different Blender files will allow you to:
-Bake body textures from TS4 to TS2 (Female)
-Bake body textures from TS4 to TS2 (Male)
-Bake body textures from TS4 (Female) to TS2 (Male)
-Bake body textures from TS2 (Female) to TS2 (Male) [Bonus!]
-Bake head textures from TS4 to TS2 (Face + Scalp) [Experimental]
Check the file names to see which one is which, and the resolution of the baked texture it will give.
Download! SFS / GD
Everything you see in the render above was converted using those Blender files. I only did a couple tiny edits to the eyes and lips to fix them.
These templates were made mainly to bake and convert tattoos, but there’s more you can do with them if you get creative. I have to say, these are NOT perfect. Check out the eyebrows on the render above. They look a bit wonky compared to the original, don’t they? I left them as is to keep your expectations with these as realistic as possible. Results may vary depending on what you are trying to convert, so! With that in mind, this is all the stuff you will be able to convert almost seamlessly from TS4 to TS2:
-Tattoos.
-Other body details such as body hair, scars, freckles, supernatural/occult details…
-Body painted underwear and swimwear, as well as some other clothing that’s mostly painted on the body.
-Socks, stockings and maybe leggings.
-Even skintones! In some areas they will look weird, so I recommend editing and blending them with other existing TS2 skins.
-Makeup. Kinda bad but hey it works! Eyeliner and anything that is around the eyes looks terrible for now, but other stuff like blush may look just okay.
-Eyebrows and maybe beards. A bit of hit or miss with those.
-Hair scalps. Very useful when converting some hairs! Although keep in mind part of that texture might also need to be baked on the face mesh, you know, that hairline makeup stuff.
Got your attention? Nice! Editing some of the textures from TS4 to match the UV mapping in TS2 using a 2D editing program can be incredibly hard. That’s where texture baking in Blender comes to the rescue!
It is recommended you download Blender version 2.91.0, which is the one I use. Don’t worry, it’s free! There’s also 3 Photoshop actions you will need to set up the textures for baking and then putting them back together, because unfortunately Blender doesn’t support transparencies in that baking process, so that takes a couple extra steps to make it work, but I think it’s still pretty fast and easy. And just in case Tumblr manages to blow up or something, I decided to include a pdf with the upcoming tutorial that will guide you step by step with all this process, so if this post gets deleted somehow (I really hope not!), you will still have that pdf as a backup archived.
You can download Blender here. Personally I recommend picking the fourth option, “blender-2.91.0-windows64.zip”, which is a portable version and doesn’t need to be installed.
You will also need Sims 4 Studio to extract the original Sims 4 CC textures you want.
As for Photoshop… I’m not going to tell you to buy that subscription service and give Adobe some undeserved money, so… yeah, there might be some other options out there to get it (very legit, yes yes).
So, before we begin, let’s clear out some questions you might have. What the heck is this texture baking thing and what does it do? Well, let’s imagine you have a projector and point an image into a blank wall. Then you pick up some brushes and start painting and copying that projected image in that wall. Texture baking is kinda like that when it comes to 3D models. You align two models and match them as closely as you can in shape and form, and once you adjust some parameters and values, Blender does the rest for you: it will give you a new texture for a new model with a different UV map. These files I’m sharing have everything already set up, so it’s a matter of plopping in that Sims 4 texture and you will get that new texture for TS2 in just a few clicks.
This tutorial assumes you know literally nothing about how to use Blender, so if you feel uncomfortable with it, worry no more! This will guide you with pictures showing where you need to click and explaining what is happening. For Sims 4 Studio and Photoshop the process might be a bit less detailed, but still this should be pretty beginner friendly. For this tutorial, I will use some tattoos as an example. Alright, enough with the rambling. Let’s get started!
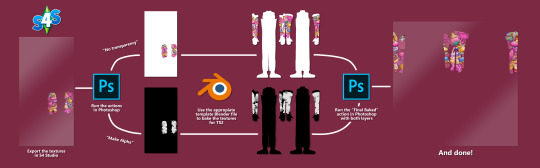
·EXTRACTING TEXTURES AND EDITING THEM WITH PHOTOSHOP:
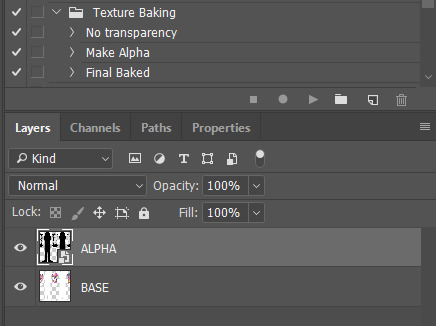
First things first, you will need to extract as pngs all the textures you want to convert from TS4 using Sims 4 Studio. Once you’ve done that, open them up one by one in Photoshop and run the “No transparency” action. This will remove the alpha channel from the image, getting rid of all the transparency. Go ahead and save a png copy of it. Then run the “Make Alpha” action on those same swatches (from the beginning, make sure you’re not running the action on an already edited swatch!), which will only show the alpha channel of the image in black and white, and save another copy of that. You should have 2 textures for each tattoo swatch. For the “No transparency” action I like to name it BASE (And your swatch number or name), and for the “Make Alpha” action I usually name it ALPHA (And that same swatch number/name). I recommend saving them in different folders named BASE TS4 and ALPHA TS4 respectively to keep it organized. If you want to make this much faster in Photoshop, there’s an automation option in it that allows you to run an action through a batch of files in a folder and then saves it all. I won’t cover how to do it in this tutorial, but you should be able to find it easily on Google by searching something like “Photoshop automate batch”. It’s really powerful and will make your workflow with actions much faster. Definitely recommend learning about that!
·BAKING THE TEXTURES IN BLENDER:
PRELIMINARY STEP 1: CONFIGURING BLENDER’S GRAPHICS SETTINGS:
Open your preferred Blender file depending on what you’re going to bake and the desired resolution (in this example I’m going to use the AF-body-4t2-1024 file). Before we start messing around in Blender, there’s one thing you should set up. It is a onetime step, and once it’s done, you won’t need to do it again. So, does your computer have a dedicated graphics card? If you don’t know or you’re not sure, just skip to the next step. Configuring Blender so it uses your graphics card instead of your CPU will make the baking render much faster, so it is recommended you set it correctly.
If your computer has a dedicated graphics card, click File (1) > Preferences (2) > and on the window that pops up click System (3) > and select CUDA and make sure your graphics card is there and tick it (4). I have an Nvidia Graphics card but your case may vary. Once you’re done, click on the tiny button on the bottom left corner and Save Preferences (5).
PRELIMINARY STEP 2: CHOOSING THE RENDERING DEVICE:
Click on the tiny camera button on the right, called Render Properties (1), and on Device (2) select GPU Compute if it’s not already selected. If you’re not sure if you have a graphics card or not, just select CPU. Then select the Material Properties tab (2) and Save your changes, either by pressing Ctrl + S, or clicking File (4) > Save (5). Okay, time to get into the good stuff!
·STEP 1: LOADING YOUR TS4 BASE TEXTURE:
In the Material Properties tab, click the folder icon that says Open (1) and on the window that pops up, navigate through your folders and select your first texture. For now we’re going to bake the BASE texture, so go to that folder where you saved the edited “No transparency” image. To navigate easily, the 3 buttons on the top right (2) are for the display mode. They will show your files in list mode, vertical and horizontal, and the one on the right will display the file thumbnails, pretty useful if you want to easily see your images. And the icons on the left side (3) will let you go one folder back and forward, go to the parent directory, and refresh the folder in case you just dropped something new in there. Double click on the image you need and that will load it into the Sims 4 body model, named “ts4 body”.
·STEP 2: SETTING UP YOUR SELECTION AND BAKING THE TEXTURE:
On the top right of the screen, you will see the names of the 2 models in the scene. Hold the Ctrl key in your keyboard and left click on the “ts2 body” model (1). If you did it correctly, you should see “ts2 body” in a yellowish orange color, and right down below, “ts4 body” should look more like a red orange. If not, try again by clicking first on ts4 body, and then while holding Ctrl click again on ts2 body. Then switch to the Render Properties tab by clicking the tiny camera icon (2) and click Bake (3). Depending on your screen resolution, you might need to scroll down a bit with your mouse to see the Bake button. Wait a few seconds for it to finish. You will see the progress percentage down on the bottom of your screen. Don’t panic if you notice your computer fans start ramping up, that’s completely normal! As I said in the beginning, using your GPU will bake the textures much faster than the CPU.
·STEP 3: SAVING YOUR NEW TS2 TEXTURE:
Once it’s finished, switch to the UV Editing Mode by clicking “UV Editing” on the top of your screen. And there it is: your new texture! You might have to scroll up your mouse wheel a bit to zoom in and see it in all its glory on the left side of the screen. We’re still not done yet though. You need to save it to yet another new folder (always try to keep your stuff organized!).
You can save it by pressing Shift + Alt + S, or clicking on Image* (1) and then Save As… (2). That will pop a window where you’ll need to navigate again and save it somewhere. Give it a proper name (3) and hit Enter to save it… well, Enter doesn’t always work for me for some reason, so if that happens just click Save As Image (4). In this case, I personally like to call it something like “BASE TS2”.
·STEP 4: GOING BACK TO STEP 1:
Alright! So you have your new baked base texture, but we still need to bake the alpha channel to give it its transparency. In order to go back to step 1 and start the process once again, click Layout (1), go back to the Material Properties tab (2), select “ts4 body” (3) and click on the folder icon (4) to open and load the alpha texture you did in the beginning in Photoshop.
Then it’s just a matter of repeating the process from step 2: bake the alpha channel and save it again as a new image (watch out, don’t overwrite your previous image!). This one I like to name “ALPHA TS2”. When you’re ready to move on, close Blender without saving. If you see a small check telling you it will save some images, make sure you uncheck it, so you will be able to use it again in the future from the starting point with no issues. I don’t think it really matters if you accidentally save your progress in these files, but I like to keep it clean and fresh so I can do the process where I left it from the beginning the next time I open it. And in case you mess up and save somewhere, you can always just delete the .blend file and download the template files again.
·FINAL STEP: PUTTING EVERYTHING BACK TOGETHER IN PHOTOSHOP:
We’re almost done! Open Photoshop and drop in both your 2 new baked textures, “BASE TS2” and “ALPHA TS2”. Keep both layers on top of each other and aligned. For that you can enable the snapping in View > Snap to… > All. Rename these layers so the Alpha layer is “ALPHA” and the Base is “BASE”, and make sure ALPHA is on top.
Then run the “Final Baked” action and now for real, it’s finally over! You just fully baked and converted these new textures. Congratulations!
So, to summarize, here’s a small guide with all the steps of the workflow I developed. Once you get the hang of it, baking and converting one swatch of a texture just takes a couple minutes. It really is that easy!
One small note though, some of the baking blend files save the textures with a resolution of 2048x2048 pixels, as clearly stated at the end of their file name. That’s way too overkill, because TS2 only properly supports up to 1024x1024 for most of its textures and you should always resize your final product to that max resolution. I just made those 2048 versions because there might be some really tiny and slim details on some tattoos that may look a little too blurry when baked into a 1024 resolution, so for those cases use that if you want and then resize them in Photoshop. In the Resample mode of the Image Size menu, there are a few options to choose. For the fine details, I like the Nearest Neighbor (hard edges) option, which, even if it looks a bit pixelated, it still preserves most of the texture and quality.

For anything else, I would just directly bake them using the 1024 versions in Blender.
And for the folks who feel comfortable playing around in Blender, this is just the beginning! Texture baking opens a LOT of possibilities, so feel free to move stuff around and edit the models to your liking! If you notice the baked textures look warped or stretched somewhere, or don’t like where some textures are placed in the S2 body, poke around that area moving stuff and then give it another try. The main objective of the baking process is keeping both overlapping models as close in shape as possible. You may also edit and save new copies of the templates, or make new ones from scratch using mine as a reference (keep a close look on those Baking settings and values, I think they work pretty well) and share them if you want to. Go ham, do whatever you want with them! I have plans on making templates to convert body textures from Sims 3 to Sims 2, but for now it’s not on my priorities, so we’ll see when that happens.
Whew! Hope none of this was too confusing. Need help or have any issues with these? Please ask/message me and I’ll be glad to help when I’m able to!
Credits for the CC used in the render demonstration:
-Skin by Sims3Melancholic
-Eyes by Northern Siberia Winds
-Eyebrows by PeachyFaerie
-Tattoos by xtc
-Top by SerenityCC
And the Tattoo I used for the tutorial can be found here, by ValhallanSim
Last but not least, a huge, special thanks to @elvisgrace for all her help testing this for me. I’ve never shared Blender files, so hopefully everything works as intended and everyone can use them with no weird issues. Fingers crossed! And thank you for reading! Hope you have fun playing with this new toy hehe.
#ts2 tutorial#ts2 resources#ts2 blender#ts2 overlays#ts2 texture baking#4t2 conversion tutorial#i swear blender is the coolest thing ever#yes you can consider this post as blender propaganda
302 notes
·
View notes
Last Seen Blogs

joseduardomuiz
Conoce todo acerca de cómo diseñar los interiores de tu morada
vgjewel-com-blog
Indian Culture
mattkenzie
Matt of Riptide

ananyherve
ananyherve

batdongsan111-blog
Căn hộ Stella Võ Văn Kiệt