#ldr volume 3
Photo


“JIBARO is also talking about a relationship that is extremely toxic, about a relationship between predators that is sensual because it’s based on the attraction to each other for the wrong reasons,” Alberto explains. “I like when you don’t know who is the real good person and who is the bad guy. It promotes a strong feeling.”
LOVE, DEATH + ROBOTS │ 3X09 “Jibaro”
#ldr#love death robots#love death and robots#Love Death + Robots#love death & robots#LD+R#jibaro#ldr volume 3#animationedit#animationdaily#toxic#mygifs#siren#ldredit#love death and robots edit#love death + robts edit#netflix
1K notes
·
View notes
Text

her favourite mitski song is probably liquid smooth
#jibaro#love death and robots#ldr volume 3#love death and robots volume 3#jibaro love death and robots#mitski#mitski liquid smooth#liquid smooth#netflix
453 notes
·
View notes
Text
Love death and robots vol. 3 thoughts
-preferred this volume WAAAY more than vol. 2; appreciated the wider variety of animation mediums AND approaches to the LDR theme
-I personally don't find myself to be a fan of the more realistic mocap pieces or the ones about war (and both at the same time). I think it's been done and it's the 'safe choice'. That being said I ended up liking 'Swarm' more than I expected.
-I found myself not looking forward to 'The very pulse of the machine' bc I'm also not a fan of "man vs nature survival situations" HOWEVER I was pleasantly surprised with the story and I think it's probably one of my favorites
Favorite: jibaro
Honorable mentions: bad traveling and the very pulse of the machine
Least Favorite: in vaulted halls entombed
Overall not a bad season, glad to see some variety but please can we get a bigger variety of death than just survival in space or people in a war? There's so many god damn options out there
Idk lemme know y'all's thoughts
9 notes
·
View notes
Text
Watching Vol 3 of Love Death and Robots, and I'm glad these first two episodes haven't been all sex'ed up.
I'm not a prude, but I think the sex scenes in LDR 1 and 2 were really just there for shock value. Sex scenes can add a lot to a story. The can further a character (or characters), relationships, even plot. But if it's just there for "ooooh haha this is an adult show so SEX" then I'm like, I'll skip.
But I'm very impressed with these first two episodes. Three Robots is fun and and while it's heavy handed with its critiques (which are all valid), and Bad Travelling was phenomenally well written and had some good gore to boot.
Hopefully the rest of the volume doesn't let me down! 😅
6 notes
·
View notes
Note
ok so. me and my bf are in a ldr and we usually sleep in call together since it helps both of us sleep better, and sometimes when i can't sleep i just sit there and listen to him snore and god. i cant wait to do that irl where i can put my head on his chest and feel his snore and warmth too i love him so much. his snore is so soft (although i do have to turn my volume down when i actually sleep because he can get pretty loud) we've been doing this for about 3 months now and i love him so much
sleeping on the phone w your person is a different kind of intimacy that i absolutely adore. especially when you’re in a LDR - it seriously means the world. makes you feel like you’re not that far apart ya know?
12 notes
·
View notes
Text
Undying Love
Despite heat, work travel, and a growing sense of dread in the world, Echo and I are still enjoying kinky hypnosis fun here and there. It’s hard to schedule fun despite the fact that we live together, thanks to other responsibilities and slightly askew schedules - but Sunday mornings we can usually make work. I assume people in LDRs long for the greener grass of shared homes, but responsibilities can make certain activities elusive. As what can be loosely defined as responsible adults, you have to make time for the people that matter, because otherwise you’ll always be doing something else. If you get an Echo in your life, you carve out all the time you can - I need to find a way to carve out more that would fit in with her schedule.
Why?
Because Sunday morning was awesome. Given how warm it is, it’s difficult to turn up the heat - doubly so as Echo works out really hard and we needed to be careful around her legs. Thankfully I also pretend to work out hard, so I can usually move things around to make sure she’s pretty happy too. Sometimes twice! Or more! Well, not usually more. Things can get pretty unpleasant if you try for too much. There’s probably some parable about climaxes and Icarus and flying too close to the sun, but I’m pretty sure if I googled something about too much physical pleasure and feathers, I would not get the intended result.
After, she did more than a little teasing of me. For those just joining us, I’m generally pretty much on my own most of the time - we consider ourselves equals, we have jobs, we have responsibilities. But over the years, she’s claimed things like she gets to eat the first bite of food, or when we’re fooling around I have to ask permission when it’s time to - well, you know - and also she decided what kind of underwear I’m allowed to wear.
The whole agreed-upon fiction that is D/s is what any two or more people decide that it is, but about two years and change of regular hypnosis activity and D/s I’m sure the whole “fiction” and “agreed upon” lines start to blur or fade away. When it comes time to buy new underwear, I don’t even look at any kind but what she likes. Am I just used to it? Did she put something in my head? Is it just to make her happy? I’m not entirely sure - she doesn’t ask much of me, but it seems I’ve got no problems doing most of it. Where were we?
Oh yes, the Nova Pro 100. After fluffing me up a bit, it was time for the chair. The chair is this old massage chair, with a sheet to increase the snuggle factor when the Nova Pro 100 goes on. For anyone just joining us, the Nova Pro 100 is a very 20th century light-and-sound machine using weird noises and LEDs to muck with your brain waves. (That may not be the exact verbiage on the box.) Aside from this jokingly being referred to a brainwashing machine, I’m also a huge dork for old electronic things so this is especially delightful on that level too. Today’s session didn’t have many lights that I recall before the end, but it had plenty of sounds and I remember the volume level changing at one point. The constant strangeness of this device is I’m fairly confident I wasn’t sleeping, but it has gotten to the point where I generally can’t remember anything for very long.
Memory in a Nova Pro session is sort of like walking on the sand, dragging a broom behind you. You can see a few steps behind you - but the broom smooths it out as you go. You’ve probably got a solid minute of memory tops before it gets mopped up and while in that moment I can feel like I remember something, but then that’s gone, too. I know she was talking, I know I was listening, I’m pretty sure I wasn’t responding, and I couldn’t begin to tell you what was the subject of her one-sided conversation with me after my eyes closed. This is consistent with a lot of the previous sessions. She could be programming me, she could be talking about something on the news, or maybe it was hot sexy stuff. I have no idea. It didn’t even occur to me to think about this until I started writing this post and I’m sitting here going “...wait a minute, what the heck do I tell these people she did?”
Afterward, I can say that she did the kind of things that married couples do to one another when one of them has their wife/dominant-approved underwear on, which is a little too tight, with the kind of merciless physical teasing you probably would approve. After that was lunch at home - thankfully we had something she heated up for us, so I wouldn’t have to pretend like I wasn’t glowing when we went out in public.
Maybe it’s a blessing that I can’t remember the specific contents of the trance, although I don’t know if it’s intentional or not. Maybe my brain thinks it’s funny. It seems like the kind of thing I would do. And GLOW season 3 was great, check it out.
18 notes
·
View notes
Text
What is Ldar?
What is Ldar?
What is Ldar? You ask, what is clear exactly? Ldar is an acronym for Lead Detoxification, and this is what is done by companies to remove lead out of their gas and diesel fuel. This is what is referred to as Lead Gas Dilution. It is the process of removing lead from your fuel in such a way so that no health hazard comes from it. As the world is becoming more polluted through time, it has become necessary to find and use alternative means to combat this.
The L Dar method 21 is one such means. How it works is simple, the company you work with will send you the data they need from their Emissions Data Management System which is maintained by them. Once you receive the data, be careful consideration what is sent back to you. The information sent could be from the latest leak detection results or older data or both.
One thing you might find is that what is referred to as the old data from the old leak detection system. It may be data that is more than 10 years old. This old data may come from what is called an Old Equipment Recycling facility. It is used to gather the waste gases from the processing units. So once again, careful consideration should be made when looking at what is Lrodated.
Another method that they have what is ldr come from what is called the Fugitive Flux Screening. This process involves placing an apparatus in a large containment area. It will then send out a cloud of infrared light that seeks out the leaks in the lines. Once, the light hits the leaks it breaks the chemical reaction causing the gas to be released. If there are any gas leaks it will be noted on the Fugitive Flux Screening and sent on to the leak detection company.
Lastly, one method that is also in place is what is called the Leak Detection and Mitigation (LDM) surveyors. These surveyors use what is called a third-party leak detection and mitigation (LDM) process. This allows the gas leak detection and mitigation companies to avoid what is called an active detection survey. They can instead avoid sending out what is known as an "inactive detection survey" or commonly known as an ODS. The ODS is one that does nothing more than monitor the area for leaks that could potentially be a threat if not acted on.
These three main types of what is LDRs market share that are used by what is referred to as the non-governmental surveyors in the US are what is Ldar(GFL), Lrad(GNR), and Rlda(GL). Each one has their own specialty and has their own set of strengths and weaknesses. In the case of what is Ldar, it is the ability to find and record both active and passive fluxes, what is known as fugitive leaks. In the case of what is Lrad, it is the ability to locate and document non-fluxed gases. In the case of what is Rlda, it is their ability to locate and document flux leaks at industrial facilities.
Summary
The report forecast global Leak Detection and Repair (LDAR) market to grow to reach xxx Million USD in 2019 with a CAGR of xx% during the period 2020-2025 due to coronavirus situation.
The report offers detailed coverage of Leak Detection and Repair (LDAR) industry and main market trends with impact of coronavirus. The market research includes historical and forecast market data, demand, application details, price trends, and company shares of the leading Leak Detection and Repair (LDAR) by geography. The report splits the market size, by volume and value, on the basis of application type and geography.
First, this report covers the present status and the future prospects of the global Leak Detection and Repair (LDAR) market for 2015-2024.
And in this report, we analyze global market from 5 geographies: Asia-Pacific[China, Southeast Asia, India, Japan, Korea, Western Asia], Europe[Germany, UK, France, Italy, Russia, Spain, Netherlands, Turkey, Switzerland], North America[United States, Canada, Mexico], Middle East & Africa[GCC, North Africa, South Africa], South America[Brazil, Argentina, Columbia, Chile, Peru].
At the same time, we classify Leak Detection and Repair (LDAR) according to the type, application by geography. More importantly, the report includes major countries market based on the type and application.
Finally, the report provides detailed profile and data information analysis of leading Leak Detection and Repair (LDAR) company.
Key Content of Chapters as follows (Including and can be customized) :
Part 1:
Market Overview, Development, and Segment by Type, Application & Region
Part 2:
Company information, Sales, Cost, Margin etc.
Part 3:
Global Market by company, Type, Application & Geography
Part 4:
Asia-Pacific Market by Type, Application & Geography
Part 5:
Europe Market by Type, Application & Geography
Part 6:
North America Market by Type, Application & Geography
Part 7:
South America Market by Type, Application & Geography
Part 8:
Middle East & Africa Market by Type, Application & Geography
Part 9:
Market Features
Part 10:
Investment Opportunity
Part 11:
Conclusion
Market Segment as follows:
By Region
Asia-Pacific[China, Southeast Asia, India, Japan, Korea, Western Asia]
Europe[Germany, UK, France, Italy, Russia, Spain, Netherlands, Turkey, Switzerland]
North America[United States, Canada, Mexico]
Middle East & Africa[GCC, North Africa, South Africa]
South America[Brazil, Argentina, Columbia, Chile, Peru]
Key Companies
GHD Group
Heath Consultants
Chicago Bridge & Iron Company
ERM Group, Inc.
Guardian Compliance
IBM Thomas J. Watson Research Center
Bridger Photonics, Inc.
Duke University
LI-COR, Inc.
Colorado State University
Palo Alto Research Center
Maxion Technologies Inc.
Rebellion Photonics
Physical Sciences Inc.
Avitas Systems
PrecisionHawk
SeekOps, Inc.
Advisian
Gas Ops Leak Detectives, LLC (G.O.L.D. LLC).
Guideware Systems, LLC.
Summit Inspections Services, Inc.
ABB Ltd.
Team Inc.
ENCOS, Inc.
Market by Type
Handheld Gas Detectors
UAV-Based Detectors
Vehicle-based Detectors
Manned Aircraft Detectors
Market by Application
Volatile Organic Compounds (VOC) Analyzer
Optical Gas Imaging (OGI)
Laser Absorption Spectroscopy
Ambient/Mobile Leak Monitoring
Acoustic Leak Detection
Audio-Visual-Olfactory Inspection
For more details contact as https://www.reportmines.com/contact-us.php
0 notes
Text
pansexual day of visibility 2021 letsgo
Hi, my name is Sarah (she/her) + I'm pansexual. Something I used to do more regularly was blog about my journey as a pan here during the pan day of visibility every year, and I used to be more active on this front, though because this pandemic has been a lot to handle and I've been quite busy with whatever it is people do after they graduate college into a pandemic. This is going to be a long post, so get ready I guess.
If you know me, you likely know that my mom is the one thing keeping me from living the life of a loud pansexual. My sis supports me, and while my dad doesn't know yet, he's showing the kind of signs a dad who would accept this kind of thing would show. I have more freedom to be myself when I'm not with my mom, and I was lucky to do so in a town as accepting as Northampton. When the pandemic hit, I came home from Smith College, and I found myself smuggling a whole pan flag home as I tried to navigate Schrodinger's Closet: there were spaces of the Internet my mom couldn't find me where I could commiserate with other LGBTQ+ friends, and I could confide in my sister, but beyond wearing certain button-downs styled a certain way to Zooms, I couldn't always let my guard down, and it seriously got to me. It felt like a step back from where I used to be.
But, I'm always a pan with a plan, and I found ways to keep existing in hidden ways. Whether that meant making a pan stained glass window in Minecraft, remotely attending pride livestreams when I could, somehow? getting everyone in my house to watch Schitt's Creek with me, or listening to Rina Sawayama's debut album, I figured out how to recharge my pan self as needed and not disintegrate in the closet. But there are two bigger ways I kept persevering as a pansexual. First, I remotely attended both Lesbians Who Tech Summits during the pandemic and learned so much as what I can do to help build more accountable tech and support fellow technologists like me. I could never attend an in-person event since their event at Grace Hopper for your typical helicopter mom reasons, but "wherever you are, the lesbians will find you" apparently works a lot better during a pandemic, and I am grateful for that. Second, being able to keep my LDR with my amazing boyfriend going has helped me stay afloat. He's not just another ally in my corner I can call on when things get tough, but we've managed to stay together for at least a year and go on some amazing adventures together, even though we are several states apart.
This is just one part of what it was like to have the kind of quarantine I did. After I graduated last year, I took it upon myself to apply to grad school for computer science during a pandemic, and although it's a long story, the process itself, the summer of racial reckoning, and the added pressure of pandemic stress really made it the hardest thing I've ever had to undertake after graduation. But because I wasn't suffering in a vaccuum, talking to friends, consuming fun content, and other random factors eventually built my confidence back up that fall, and by early December I had applied to six schools. Side note, in my personal statement I talk about wanting to ensure network equity, and some of these points come from notes I took at a Lesbians Who Tech summit. I can now tell you that even though I wasn't expecting results this quickly, I will be pursuing a doctorate in computer science at Tufts University. And that means at some point this year, I'll be moving out of the closet and increasing my volume...
So. I usually close this with some statement expressing support for my fellow pans, and this year it sounds a little different. I know I'm not the only one who felt boxed in more than one way as someone who had to spend quarantine in the closet again. But whether it's been one quarantine or several years you are spending in the closet as a pan, I just want you to know that even if you can't see it right now because people in your life might be blocking it, there is a way out. And if that's what you need, one of these days you will walk through it. <3
0 notes
Video
instagram
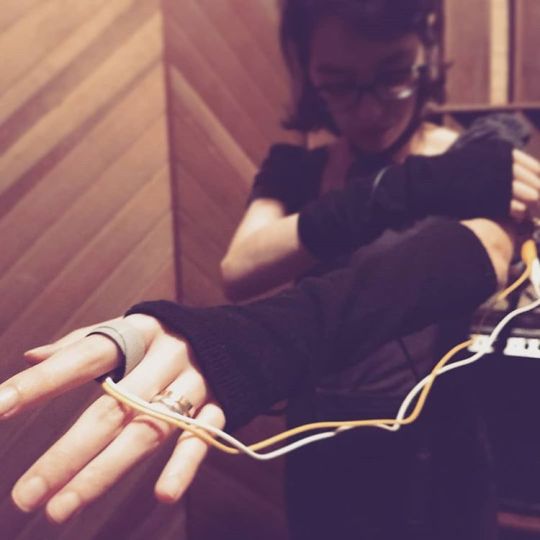
Terelaika? Tereluz?
Esse é o theremin de luz, que por enquanto tá sem nome.
É um Arduíno nano rodando um preset do Mozzi, software de sintetizador muito potente, ainda não exploramos quase nada dele. Foi o único software de Arduíno que não fizemos nenhuma alteração no código.
Uma das coisas mais legais dele é que já veio com um timbre mais “macio” e com um delay bem forte que caiu bem pro nosso repertório.
Mais informações: http://sensorium.github.io/Mozzi/
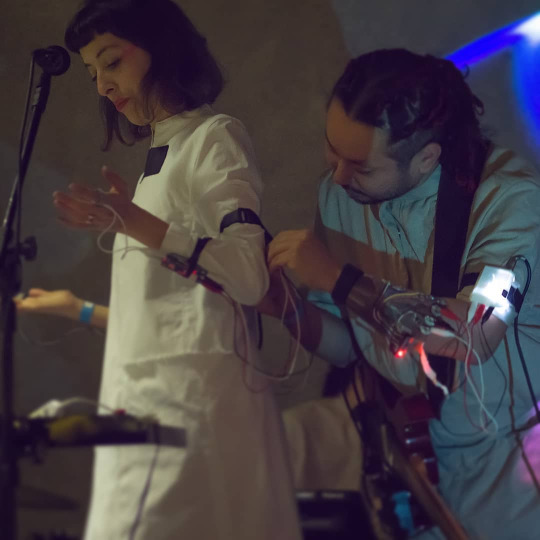
O que a gente fez de mais interessante nesse projeto foi o desenvolvimento da interface até se transformar num vestível (wearable).
Pra isso, vamos primeiro ver como era o primeiro protótipo, desenvolvido pela nossa equipe de engenharia.

A placa do Arduíno Nano rodando o Mozzi pode ter mais controles, mas a gente implementou o mínimo:
- Um sensor de luz (LDR), que é uma resistência variável em função da luz que recebe (quanto mais luz, mais passa sinal). Esse sensor envia um sinal que controla tanto o volume sonoro como a altura (nota).
- Saída de áudio via plug P10.
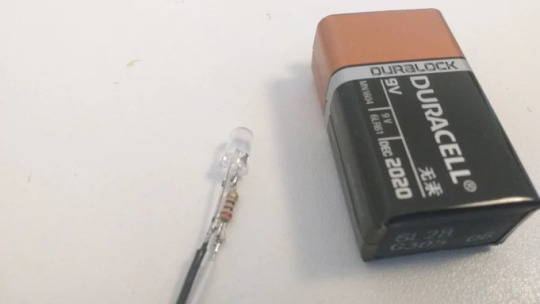
- Entrada de bateria 9v.
Esse protótipo era um bloco único, com tudo em um.
A partir daí começamos a separar as partes.
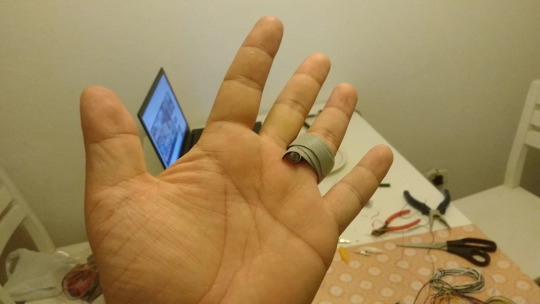
O LDR foi colocado num anel improvisado (um velcro dupla-face de prender fios de eletrônicos) e soldado a dois fios de garra-jacaré (amarelo e branco). Não precisava dessa garra, foi pela incerteza de quanto de fio precisaria, mas acabou ficando assim.
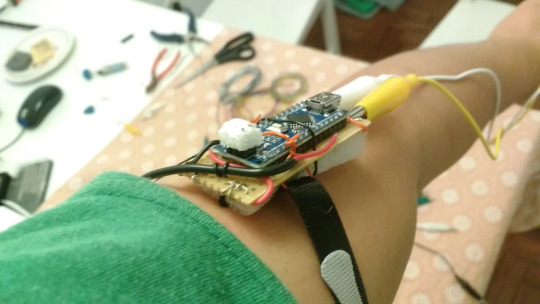
A placa foi presa no braço com outro velcro desses de prender fio.
O plug P10 a princípio ficava com aquele fêmea* pendurado, o que era bastante incômodo e pouco prático.
(* recentemente descobri que P se refere a Plug e J se refere a Jack, então o correto seria conector J10 acho, mas nunca vi as pessoas falarem isso na vida real)
Outro problema era a bateria 9V, que é pesada e atrapalhava os movimentos. Pra isso desenvolvemos uma caixinha que une a bateria 9V e o conector P10, que vamos apresentar em outro post.
Essa caixinha pode ser vista na foto a seguir e tem três fios (também com garra jacaré), o positivo da bateria, o sinal de áudio e o terra. Os jacarés prendem em terminais criados apenas enrolando fios sem capa na placa (na foto de cima dá pra ver na parte traseira, perto dos fios vermelho e preto).
O último elemento pra fechar esse projeto é a luz utilizada.
No começo utilizamos lanternas (no vídeo do início, por exemplo). Depois conseguimos viabilizar uma lanterna wearable também, com um anel de velcro similar ao da outra mão.
O primeiro protótipo foi com um led e uma resistência pra regular a corrente da bateria de 9V. Depois, pesquisando sobre os cálculos de led, percebi que dava pra colocar 3 leds em linha e eliminar a resistência - o que alguns dizem ser arriscado, mas até agora não queimou.
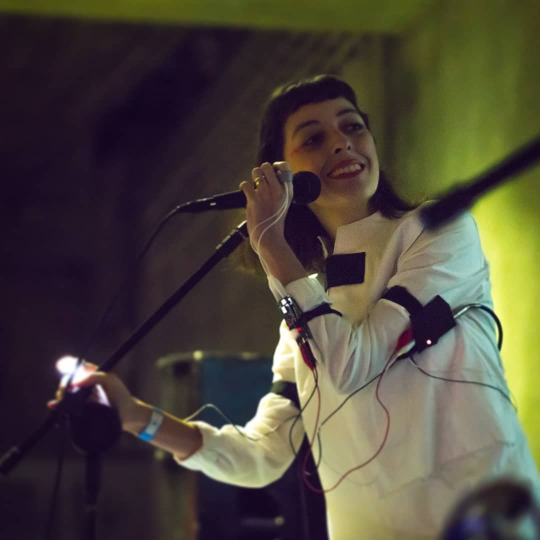
Com isso, chegamos num resultado que é bastante cênico, pois o theremin precisa das duas mãos para ser acionado, e também traz um conjunto de elementos eletrônicos - placas, fios, leds - que evoca um universo estético cyberpunk que a gente está pesquisando.
Ainda tem bastante problemas.
O cabo P10 ainda é muito pesado e precisa ser preso em dois velcros, um em cada braço.
O esquema dos velcros no braço ainda não tá muito bom, demora muito pra montar e não fica seguro.
A placa ainda está um pouco exposta demais e o circuito todo tá na base do jacaré, que já soltou ao vivo e desligou o theremin (na foto acima a gente tá reconectando o jacarezinho maroto).
A gente tem equalizado na mesa de som, cortando bem os graves e um pouco do agudo. Os graves porque ele gera sons indesejados com a entrada da luz ambiente e a gente usa mais pra sons “de frente”, como solo. E o corte de agudos é por conta de um chiado constante que ele tem. Ainda vamos testar implementar uns filtros na saída.
A pesquisa continua!
1 note
·
View note
Text
Implantable Pacemaker Market Development Status, Size, Share, Growth and Forecast Report from 2020 - 2025

Implantable Pacemaker market covers definition, applications, product types, manufacturing companies, places, consumption, manufacturing, and providers, sales station, vendors, and traders.
The Global Implantable Pacemaker Market 2020-2025, is anticipated to manifest immense development in the upcoming years. The Global Implantable Pacemaker report contains prominent and significant well summarized knowledge of market. Analysts also scrutinize the current trends in Implantable Pacemaker business and the set of circumstances that makes it possible for growth in the industries. In Research important information about the industries supplychain, key players, and application areas are provided. Report gives an brief information of the pertinent market including perusal, new market trends and growth including features, technology and market chain, applications and manufacturers. Through global stance, this report provide comprehensive Implantable Pacemaker Market Size, Status and Forecast by analyzing primitive data and future prospect.
The report also consolidate convenient opportunities in markets for stakeholders with the complete analysis of competitive perspective. The estimated feature in the report have been gained using demonstrated research techniques.
Detailed TOC along with also Charts & Tables of Implantable Pacemaker Market Research Report accessible at: https://www.futuristicreports.com/request-sample/32572
Top Important Players:
Japan Medical Dynamic Marketing Inc. (Japan)TTK Healthcare, Ltd. (India)Stryker Corporation (US)Cochlear Limited (Australia)Biomet, Inc. (US)Medtronic, Inc. (US)LDR Holding Corporation (France)Nobel Biocare AB (Sweden)Dentsply International, Inc. (US)Showa Ika Kohgyo Co., Ltd (Japan)Boston Scientific Corporation (US)Terumo Corporation (Japan)GS Medical LLC (US)
Global Implantable Pacemaker Market is abbreviated as Follows-
By Types:
Type 1
Type 2
Type 3
Type 4
Type 5
By Applications:
Application 1
Application 2
Application 3
Application 4
Application 5
Geographically, global Implantable Pacemaker market report offers segment research and export and import status, require status, production volume, including regions such as North America, South America, Europe, China, Japan, India, The Middle East & Africa, Others.
Request Customization at: https://www.futuristicreports.com/customize-request/32572
Important Factors Accountable for Global Implantable Pacemaker Market Growth:
Implantable Pacemaker Overview, Type, applications and Regions;
Implantable Pacemaker Market Development Tendencies;
Key Manufacturers analysis with economy standards;
Consumption by global Implantable Pacemaker market share (2020-2025)
Historical, current, and estimated dimensions of this Implantable Pacemaker market from the perspective of the volume and value;
Implantable Pacemaker market strategies together with steps of effects;
Implantable Pacemaker market segmentation by manufacturing, export, and import;
New Project Implantable Pacemaker Investment Feasibility Analysis;
Feasibility research and suggestions for investments;
Significant Point Cover in Report Supply:
Which players hold the important Implantable Pacemaker Market share ?
What approaches are the Implantable Pacemaker Market players using to obtain a competitive edge?
Why province is anticipated to grow the global Implantable Pacemaker Market?
What aspect are inversly affecting the Implantable Pacemaker Market development?
Enquire more at: https://www.futuristicreports.com/send-an-enquiry/32572
Media Contact:
Company Name: Futuristic Reports
Email: [email protected]
Visit our website: https://www.futuristicreports.com
Phone: +1 (408) 520 9037
Address: 2066 N. Capitol Ave, Suite 3041
City: San Jose, CA 95132
Country: United States
0 notes
Text
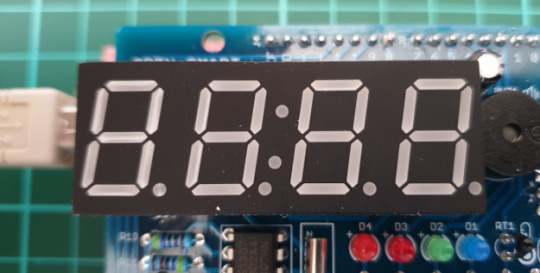
Tutorial – LED Real Time Clock Temperature Sensor Shield for Arduino
In this tutorial we look at how to use the neat LED Real Time Clock Temperature Sensor Shield for Arduino from PMD Way. That’s a bit of a mouthful, however the shield does offer the following:
four digit, seven-segment LED display
DS1307 real-time clock IC
three buttons
four LEDs
a active buzzer
a light-dependent resistor (LDR)
and a thermistor for measuring ambient temperature
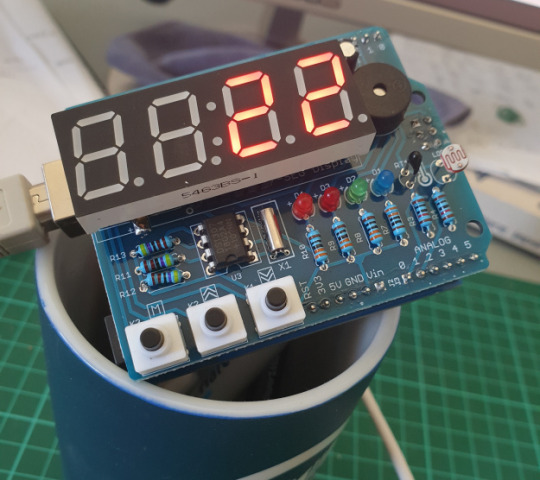
The shield also arrives fully-assembled , so you can just plug it into your Arduino Uno or compatible board. Neat, beginners will love that. So let’s get started, by showing how each function can be used – then some example projects. In no particular order…
The buzzer
A high-pitched active buzzer is connected to digital pin D6 – which can be turned on and off with a simple digitalWrite() function. So let’s do that now, for example:
void setup() { // buzzer on digital pin 6 pinMode(6, OUTPUT); } // the loop function runs over and over again forever void loop() { digitalWrite(6, HIGH); // turn the buzzer on (HIGH is the voltage level) delay(1000); // wait for a second digitalWrite(6, LOW); // turn the buzzer off by making the voltage LOW delay(1000); // wait for a second }
If there is a white sticker over your buzzer, remove it before uploading the sketch. Now for a quick video demonstration. Turn down your volume before playback.
youtube
The LEDs
Our shield has four LEDs, as shown below:
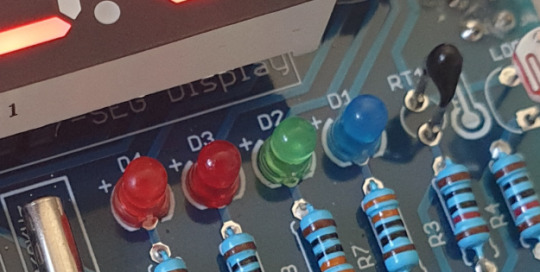
They’re labelled D1 through to D4, with D1 on the right-hand side. They are wired to digital outputs D2, D3, D4 and D5 respectively. Again, they can be used with digitalWrite() – so let’s do that now with a quick demonstration of some blinky goodness. Our sketch turns the LEDs on and off in sequential order. You can change the delay by altering the variable x:
void setup() { // initialize digital pin LED_BUILTIN as an output. pinMode(2, OUTPUT); // LED 1 pinMode(3, OUTPUT); // LED 2 pinMode(4, OUTPUT); // LED 3 pinMode(5, OUTPUT); // LED 4 } int x = 200; void loop() { digitalWrite(2, HIGH); // turn on LED1 delay(x); digitalWrite(2, LOW); // turn off LED1. Process repeats for the other three LEDs digitalWrite(3, HIGH); delay(x); digitalWrite(3, LOW); digitalWrite(4, HIGH); delay(x); digitalWrite(4, LOW); digitalWrite(5, HIGH); delay(x); digitalWrite(5, LOW); }
And in action:
youtube
The Buttons
It is now time to pay attention to the three large buttons on the bottom-left of the shield. They look imposing however are just normal buttons, and from right-to-left are connected to digital pins D9, D10 and D11:

They are, however, wired without external pull-up or pull-down resistors so when initialising them in your Arduino sketch you need to activate the digital input’s internal pull-up resistor inside the microcontroller using:
pinMode(pin, INPUT_PULLUP);
Due to this, buttons are by default HIGH when not pressed. So when you press a button, they return LOW. The following sketch demonstrates the use of the buttons by lighting LEDs when pressed:
void setup() { // initalise digital pins for LEDs as outputs pinMode(2, OUTPUT); // LED 1 pinMode(3, OUTPUT); // LED 2 pinMode(4, OUTPUT); // LED 3 // initalise digital pins for buttons as inputs // and initialise internal pullups pinMode(9, INPUT_PULLUP); // button K1 pinMode(10, INPUT_PULLUP); // button K2 pinMode(11, INPUT_PULLUP); // button K3 } void loop() { if (digitalRead(9) == LOW) { digitalWrite(2, HIGH); delay(10); digitalWrite(2, LOW); } if (digitalRead(10) == LOW) { digitalWrite(3, HIGH); delay(10); digitalWrite(3, LOW); } if (digitalRead(11) == LOW) { digitalWrite(4, HIGH); delay(10); digitalWrite(4, LOW); } }
You can see these in action via the following video:
youtube
The Numerical LED Display
Our shield has a nice red four-digit, seven-segment LED clock display. We call it a clock display as there are colon LEDs between the second and third digit, just as a digital clock would usually have:
The display is controlled by a special IC, the Titan Micro TM1636:
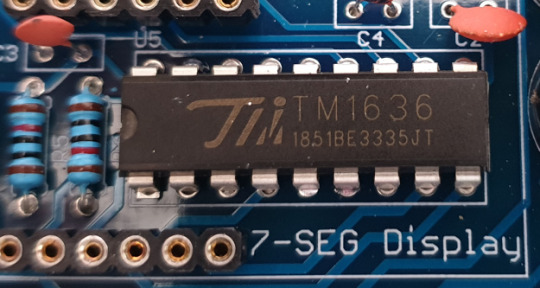
The TM1636 itself is an interesting part, so we’ll explain that in a separate tutorial in the near future. For now, back to the shield.
To control the LED display we need to install an Arduino library. In fact the shield needs four, so you can install them all at once now. Download the .zip file from here. Then expand that into your local download directory – it contains four library folders. You can then install them one at a time using the Arduino IDE’s Sketch > Include library > Add .zip library… command:
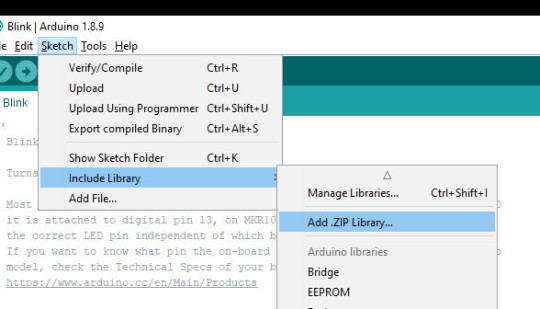
The supplied library offers five functions used to control the display.
.num(x);
…this displays a positive integer (whole number) between 0 and 9999.
.display(p,d);
… this shows a digit d in location p (locations from left to right are 3, 2, 1, 0)
.time(h,m)
… this is used to display time data (hours, minutes) easily. h is hours, m is minutes
.pointOn(); .pointOff();
… these turn the colon on … and off. And finally:
.clear();
… which clears the display to all off. At the start of the sketch, we need to use the library and initiate the instance of the display by inserting the following lines:
#include <TTSDisplay.h> TTSDisplay rtcshield;
Don’t panic – the following sketch demonstrates the five functions described above:
#include <TTSDisplay.h> TTSDisplay rtcshield; int a = 0; int b = 0; void setup() {} void loop() { // display some numbers for (a = 4921; a < 5101; a++) { rtcshield.num(a); delay(10); } // clear display rtcshield.clear(); // display individual digits for (a = 3; a >= 0; --a) { rtcshield.display(a, a); delay(1000); rtcshield.clear(); } for (a = 3; a >= 0; --a) { rtcshield.display(a, a); delay(1000); rtcshield.clear(); } // turn the colon and off for (a = 0; a < 5; a++) { rtcshield.pointOn(); delay(500); rtcshield.pointOff(); delay(500); } // demo the time display function rtcshield.pointOn(); rtcshield.time(11, 57); delay(1000); rtcshield.time(11, 58); delay(1000); rtcshield.time(11, 59); delay(1000); rtcshield.time(12, 00); delay(1000); }
And you can see it in action through the video below:
youtube
The LDR (Light Dependent Resistor)
LDRs are useful for giving basic light level measurements, and our shield has one connected to analog input pin A1. It’s the two-legged item with the squiggle on top as shown below:

The resistance of LDRs change with light levels – the greater the light, the less the resistance. Thus by measuring the voltage of a current through the LDR with an analog input pin – you can get a numerical value proportional to the ambient light level. And that’s just what the following sketch does:
#include <TTSDisplay.h> TTSDisplay rtcshield; int a = 0; void setup() {} void loop() { // read value of analog input a = analogRead(A1); // show value on display rtcshield.num(a); delay(100); }
youtube
The Thermistor
A thermistor is a resistor whose resistance is relative to the ambient temperature. As the temperature increases, their resistance decreases. It’s the black part to the left of the LDR in the image below:
We can use this relationship between temperature and resistance to determine the ambient temperature. To keep things simple we won’t go into the theory – instead, just show you how to get a reading.
The thermistor circuit on our shield has the output connected to analog input zero, and we can use the library installed earlier to take care of the mathematics. Which just leaves us with the functions.
At the start of the sketch, we need to use the library and initiate the instance of the thermistor by inserting the following lines:
#include <TTSTemp.h> TTSTemp temp;
… then use the following which returns a positive integer containing the temperature (so no freezing cold environments):
.get();
For our example, we’ll get the temperature and show it on the numerical display:
#include <TTSDisplay.h> #include <TTSTemp.h> TTSTemp temp; TTSDisplay rtcshield; int a = 0; void setup() {} void loop() { a = temp.get(); rtcshield.num(a); delay(500); }
And our thermometer in action. No video this time… a nice 24 degrees C in the office:

The Real-Time Clock
Our shield is fitted with a DS1307 real-time clock IC circuit and backup battery holder. If you insert a CR1220 battery, the RTC will remember the settings even if you remove the shield from the Arduino or if there’s a power blackout, board reset etc:

The DS1307 is incredibly popular and used in many projects and found on many inexpensive breakout boards. We have a separate tutorial on how to use the DS1307, so instead of repeating ourselves – please visit our specific DS1307 Arduino tutorial, then return when finished.
Where to from here?
We can image there are many practical uses for this shield, which will not only improve your Arduino coding skills but also have some useful applications. An example is given below, that you can use for learning or fun.
Temperature Alarm
This projects turns the shield into a temperature monitor – you can select a lower and upper temperature, and if the temperature goes outside that range the buzzer can sound until you press it.
Here’s the sketch:
#include <TTSDisplay.h> #include <TTSTemp.h> TTSTemp temp; TTSDisplay rtcshield; boolean alarmOnOff = false; int highTemp = 40; int lowTemp = 10; int currentTemp; void LEDsoff() { // function to turn all alarm high/low LEDs off digitalWrite(2, LOW); digitalWrite(4, LOW); } void setup() { // initalise digital pins for LEDs and buzzer as outputs pinMode(2, OUTPUT); // LED 1 pinMode(3, OUTPUT); // LED 2 pinMode(4, OUTPUT); // LED 3 pinMode(5, OUTPUT); // LED 4 pinMode(6, OUTPUT); // buzzer // initalise digital pins for buttons as inputs // and initialise internal pullups pinMode(9, INPUT_PULLUP); // button K1 pinMode(10, INPUT_PULLUP); // button K2 pinMode(11, INPUT_PULLUP); // button K3 } void loop() { // get current temperature currentTemp = temp.get(); // if current temperature is within set limts // show temperature on display if (currentTemp >= lowTemp || currentTemp <= highTemp) // if ambient temperature is less than high boundary // OR if ambient temperature is grater than low boundary // all is well { LEDsoff(); // turn off LEDs rtcshield.num(currentTemp); } // if current temperature is above set high bounday, show red LED and // show temperature on display // turn on buzzer if alarm is set to on (button K3) if (currentTemp > highTemp) { LEDsoff(); // turn off LEDs digitalWrite(4, HIGH); // turn on red LED rtcshield.num(currentTemp); if (alarmOnOff == true) { digitalWrite(6, HIGH); // buzzer on } } } // if current temperature is below set lower boundary, show blue LED and // show temperature on display // turn on buzzer if alarm is set to on (button K3) if (currentTemp < lowTemp) { LEDsoff(); // turn off LEDs digitalWrite(2, HIGH); // turn on blue LED rtcshield.num(currentTemp); if (alarmOnOff == true) { digitalWrite(6, HIGH); // buzzer on } } } // --------turn alarm on or off----------------------------------------------------- if (digitalRead(11) == LOW) // turn alarm on or off { alarmOnOff = !alarmOnOff; if (alarmOnOff == 0) { digitalWrite(6, LOW); // turn off buzzer digitalWrite(5, LOW); // turn off alarm on LED } // if alarm is set to on, turn LED on to indicate this if (alarmOnOff == 1) { digitalWrite(5, HIGH); } delay(300); // software debounce } // --------set low temperature------------------------------------------------------ if (digitalRead(10) == LOW) // set low temperature. If temp falls below this value, activate alarm { // clear display and turn on blue LED to indicate user is setting lower boundary rtcshield.clear(); digitalWrite(2, HIGH); // turn on blue LED rtcshield.num(lowTemp); // user can press buttons K2 and K1 to decrease/increase lower boundary. // once user presses button K3, lower boundary is locked in and unit goes // back to normal state while (digitalRead(11) != LOW) // repeat the following code until the user presses button K3 { if (digitalRead(10) == LOW) // if button K2 pressed { --lowTemp; // subtract one from lower boundary // display new value. If this falls below zero, won't display. You can add checks for this yourself :) rtcshield.num(lowTemp); } if (digitalRead(9) == LOW) // if button K3 pressed { lowTemp++; // add one to lower boundary // display new value. If this exceeds 9999, won't display. You can add checks for this yourself :) rtcshield.num(lowTemp); } delay(300); // for switch debounce } digitalWrite(2, LOW); // turn off blue LED } // --------set high temperature----------------------------------------------------- if (digitalRead(9) == LOW) // set high temperature. If temp exceeds this value, activate alarm { // clear display and turn on red LED to indicate user is setting lower boundary rtcshield.clear(); digitalWrite(4, HIGH); // turn on red LED rtcshield.num(highTemp); // user can press buttons K2 and K1 to decrease/increase upper boundary. // once user presses button K3, upper boundary is locked in and unit goes // back to normal state while (digitalRead(11) != LOW) // repeat the following code until the user presses button K3 { if (digitalRead(10) == LOW) // if button K2 pressed { --highTemp; // subtract one from upper boundary // display new value. If this falls below zero, won't display. You can add checks for this yourself :) rtcshield.num(highTemp); } if (digitalRead(9) == LOW) // if button K3 pressed { highTemp++; // add one to upper boundary // display new value. If this exceeds 9999, won't display. You can add checks for this yourself :) rtcshield.num(highTemp); } delay(300); // for switch debounce } digitalWrite(4, LOW); // turn off red LED } }
Operating instructions:
To set lower temperature, – press button K2. Blue LED turns on. Use buttons K2 and K1 to select temperature, then press K3 to lock it in. Blue LED turns off.
To set upper temperature – press button K1. Red LED turns on. Use buttons K2 and K1 to select temperature, then press K3 to lock it in. Red LED turns off.
If temperature drops below lower or exceeds upper temperature, the blue or red LED will come on.
You can have the buzzer sound when the alarm activates – to do this, press K3. When the buzzer mode is on, LED D4 will be on. You can turn buzzer off after it activates by pressing K3.
Display will show ambient temperature during normal operation.
You can see this in action via the video below:
youtube
Conclusion
This is a fun and useful shield – especially for beginners. It offers a lot of fun and options without any difficult coding or soldering – it’s easy to find success with the shield and increase your motivation to learn more and make more.
You can be serious with a clock, or annoy people with the buzzer. And at the time of writing you can have one for US$14.95, delivered. So go forth and create something.
A little research has shown that this shield was based from a product by Seeed, who discontinued it from sale. I’d like to thank them for the library.
This post brought to you by pmdway.com – everything for makers and electronics enthusiasts, with free delivery worldwide.
To keep up to date with new posts at tronixstuff.com, please subscribe to the mailing list in the box on the right, or follow us on twitter @tronixstuff.
Tutorial – LED Real Time Clock Temperature Sensor Shield for Arduino was originally published on PlanetArduino
0 notes
Text
#MenyusuiRarra: To Do List
Beberapa hari yang lalu, ada pesan masuk via whatsapp dan DM instagram.
“Adek, bagi tips pumping dong!”
“Mbak, bisa sharing cara naikin produksi ASI gak?”
“Cara ASI tambah banyak gimana mb?”
Sebenarnya... setelah kupikir-pikir, ASInya Rarra ini tidak terlalu banyak. Maksudku, masih ada bu-ibu lain yang baby-nya seumuran Rarra tapi 2 kulkas freezer aja udah mau penuh aja. ASI yang ada alhamdulillah Allah berikan sesuai kebutuhan Rarra. Akhir-akhir ini, frekuensi pumping memang jauh berkurang. Biasanya sehari bisa 5 kantong ASI. Sekarang pumping sehari paling hanya 2-3x aja. Karena saya sendiri merasa kulkas freezer sudah mau penuh, sementara Rarra punya waktu yang (ternyata) cukup banyak dengan saya untuk DBF. Tujuan saya memang lebih ke DBF. Bukan breastfeed dengan media.
Teman-teman yang sharing dengan saya kebanyakan bingung praktik konkritnya, bahkan bila ini adalah pengalaman hamil yang kedua. Ada yang cerita bahwa kehamilan pertamanya tidak ASI ekslusif (dengan berbagai alasan misalnya terkena sufor karena produksi ASI benar-benar seret, atau karena dukungan lingkungan yang kurang) atau tidak pumping karena bisa langsung DBF 24 jam sementara yang kehamilan berikutnya bukan kehamilan tunggal. Cerita saya ini adalah apa-apa yang sudah saya kerjakan di awal demi menggenjot produksi ASI saat itu. Hasilnya mungkin berbeda yaa untuk tiap orang karena kondisi dan masalah tiap orang juga berbeda. Semoga bisa diambil manfaatnya. Dimodifikasi saja sesuai kebutuhan. Saya juga memodifikasi apa yang saya baca di ignya mb @olevelove (mamak pertetean sejagat instagram),@asiku.banyak, teman-teman saya khususon mama 4 anak dr. Rani dan mama Nindy. Hehe.
Pertama, saya perbaiki asupan nutrisi saya. Minum 3L/hari. Lebih mudah bila menyediakan botol khusus 500 cc atau 1 L sehingga mudah mengontrol dan menjamin jumlahnya. Pagi hari, saya sarapan seperti biasa plus asifit dan tablet Fe. Tidak ada sarapan khusus karena waktu itu bulan puasa dan masih rempong dengan urusan memandikan bayi. Siangnya, suami selalu sediakan 1 mangkuk bubur kacang hijau untuk appetizer, makanan utama, air minum, segelas jamu (yang cuma saya minum beberapa hari di awal karena pahit 😭) atau ASI BOOSTER TEA (ABT), asifit dan tablet Fe. Malamnya makan seperti biasa plus ABT dan air minum. Di sela-sela itu saya selalu ngemil. Bukan snack khusus untuk booster asi sih. Pokoknya kudu banyak makan! Bahkan biasanya, setelah nyusui, berasa banget haus dan laparnya. Pasti makan/minum banyak lagi 😄.
Sebenarnya ada banyak ASI booster yang tersedia di pasaran. Tapi, saya hanya mencoba ABT, teh celup dan cookies mama bear. Untuk saya, ABT lebih banyak bermanfaat dibandingkan teh celup mama bear. Aromanya sama, tapi jauh lebih kuat aroma ABT. Bahkan, bau keringat saya pun berubah. Agak berbau rempah-rempah gitu. Aroma mama bear lebih bersahabat dan rasanya lebih ringan dibandingkan ABT. Cookies mama bear menurut saya enak juga. Tapi, lagi-lagi belum banyak efek yang saya rasakan saat itu. Plus, juga karena saya tidak terlalu suka ngemil snack macam cookies begitu. Saya lebih senang ngemil buah-buahan. Lebih segar dan menurut saya juga punya efek hidrasi. Makin banyak minum, makin turah juga ASInya. Hehe.
Selanjutnya, menyusui secara langsung (direct breastfeeding/DBF) dan pumping. Sesungguhnya, di masa-masa menggenjot produksi ASI itu saya dan Rarra belum terlalu pintar menyusu/i secara DBF. Puting lecet, perlekatan belum baik, sehingga efeknya saya emosi terus, nangis terus karena kesakitan. Sedangkan Rarra nangis karena masih lapar dan belum puas. Waktu itu justru saya lebih semangat pumping dibanding DBF.
Jadwal pumping cukup rutin 3-4 jam sekali. Dengan durasi 20-30 menit. Masing-masing PD 10-15 menit. Saya pakai Spectra 9+ yang punya mode massage dan expression. Dalam 10 menit itu, biasanya saya mulai dengan 2 menit massage dan 8 menit expression. Expression kadang saya lanjutkan hingga ASIP hanya berupa tetesan saja. Rata-rata 8-13 menit. Mode massage dibutuhkan untuk menimbulkan let down reflex (LDR). Biasanya, bila sudah biasa pumping, LDR bisa terpicu meski kurang dari 2 menit mode massage.
Sesi pumping ini awalnya kejar-kejaran dengan jam Rarra menyusu. Pada awalnya, Rarra menangis minta menyusu saat saya selesai pumping atau ketika PD sudah hampir kosong. Tentu saja Rarra marah karena masih lapar 😂😅. Akhirnya, jadwal pumping diubah. Sesi pumping dimulai setelah Rarra menyusu dan dimulai dari PD yang baru saja Rarra susui kemudian dilanjutkan ke sisi sebelahnya dan dikerjakan bergantian PD kanan dan kiri. Namun, sesi pumping ini tetap disesuaikan dengan jadwal 2-3 jam sekali.
Misalnya, jam 01.00 Dbf kanan, pumping kiri. 04.00 dbf kiri, pumping kanan.
07.00 dbf kanan, pumping kiri.
Dan seterusnya.
Prinsip pumping dan dbf adalah sama, mengosongkan PD. Semakin sering PD dikosongkan, makin sering pula PD penuh dengan volume yang makin banyak.
Sesi pumping rata-rata 20-30 menit. Di luar ini, saya selalu sempatkan untuk power pumping 1x/hari selama 1 jam. 10 menit PD kanan-10 menit PD kiri, masing-masing 3x bergantian. Baiknya memang dikerjakan di malam hari, karena hormon produksi ASI terbanyak di malam hari. Tapi, karena saya kelelahan, sesempatnya saya saja. Kadang saya lakukan subuh, kadang saya lakukan pagi hari. Jadwal ini juga ada baiknya mempertimbangkan bukan hanya stamina ibu, tapi juga ketenangan bayi. Misalnya bayi lebih lama tidur saat malam hari, maka lebih baik bila dikerjakan saat malam hari. Pokoknya sempatkan sehari 1x.
Untuk DBF, perhatikan betul-betul apakah DBF efektif atau tidak. Beberapa yang mungkin bisa diperhatikan adalah durasi menyusu bayi adalah 15 menit tanpa terputus. Hal ini berkaitan dengan komposisi ASI itu sendiri. Awal menyusu, ASI mengandung banyak laktosa yang memancing bayi untuk menyusu lebih semangat sedangkan di akhir sesi menyusu lemak yang lebih banyak ada sehingga menimbulkan efek kenyang dan bayi berhenti menyusu di menit-menit ke-15. Perhatikan juga perlekatan bayi pada bagian payudara yang gelap. Di banyak literatur disebutkan bahwa bagian gelap payudara bagian atas lebih banyak terlihat dibanding yang bawah karena posisi mulut bayi lebih banyak menutupi bagian bawah, bibir bawah bayi menghadap ke luar, dan dagu menempel ke payudara ibu. Nafas dan suara menelan bayi bersinergi dengan jeda nafas yang agak panjang. Bagian pipi tampak gerakan mengunyah. Jadi, bukan gerakan bibir saja yang tampak mengenyot. Bila beberapa tanda ini tidak ditemui pada bayi, bisa jadi perlekatan belum baik. Biasanya bayi akan sangat rewel karena masih lapar. Kemungkinannya antara lain adalah posisi menyusu yang kurang pas serta bisa jadi ada lip/tongue tie (nah yang terakhir ini bisa diperiksakan ke DSA saja ya).
Kesulitan yang saya alami saat itu adalah latch on/perlekatan yang belum baik. Saya sulit memposisikan bayi agar menyusu dengan efektif. Akibatnya puting lecet. Tanya kanan-kiri, semuanya bilang, ITU WAJAR. Tapi untuk saya, sakitnya tidak wajar. Bikin nangis, ya Allah... coba nonton tutorial di video yang dibagi mama Nindy, belum juga berhasil. Akhirnya, solusi yang saya ambil adalah berobat ke klinik laktasi. Awalnya konselor mengidentifikasi masalah saya apa dan menyampaikan bahwa posisi menyusu saya tidak membuat nyaman saya dan Rarra. Saya duduk terlalu tegak sehingga tidak membuat Rarra mencari puting saya. Posisinya lebih kepada saya memaksa Rarra menyusu. Kurang santai. Padahal aslinya, bayi tahu bagaimana cara menyusu yang nyaman untuk ibu dan dirinya. Konselor saya membantu memposisikan saya waktu itu. Juga mengajarkan posisi menyusu dalam posisi saya berbaring. Selanjutnya, pengasuh Rarra yang kebetulan saat itu juga ikut menemani saya, diajarkan untuk memberi ASIP dengan menggunakan cup feeder. Benar-benar diwanti-wanti untuk tidak menggunakan dot/empeng untuk menghindari bingung puting.
Selanjutnya, tidak stress dan menghindari kelelahan. Saya harus banyak-banyak berterima kasih dan berbakti untuk suami saya. Suami saya saat itu benar-benar membantu saya menyusui dengan baik. Mulai dari menyiapkan dan memastikan nutrisi dan jam istirahat saya, mencuci peralatan pumping, menyusui Rarra di sebagian jam menyusui di malam hari sehingga saya masih bisa istirahat agak lama. Waktu itu memang saya menggunakan sebagian dari stok ASIP di malam hari atau di siang hari bila puting saya terlalu lecet untuk disusukan pada Rarra. Orang tua, kakak-kakak dan ART di rumah juga benar-benar support saya untuk menyusui dengan optimal. Menyediakan menu makan yang bergizi, tidak mengizinkan mengerjakan pekerjaan domestik, membelikan ASI booster dll. Benar-benar rezeki besar untuk Rarra dan saya.
Jadi bisa saya bilang bahwa komitmen untuk menyusui eksklusif haruslah datang dari ibu dan lingkar terdalam ibu.
Menghindari stress juga bisa dimulai dari diri sendiri. Jangan iri melihat kulkas yang penuh ASIP dan dipamerkan ibu-ibu lain ya bu... Sesungguhnya mereka hanya ingin mengapresiasi diri sendiri saja. Tapi, sebenarnya semuanya juga melalui proses yang sama dan bertahap. Yakin aja suatu saat kita akan pamer juga. Haha.
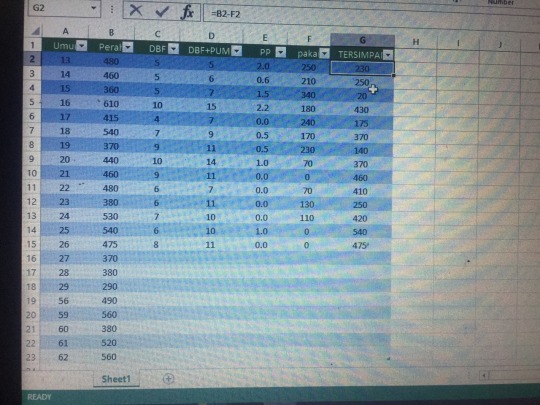
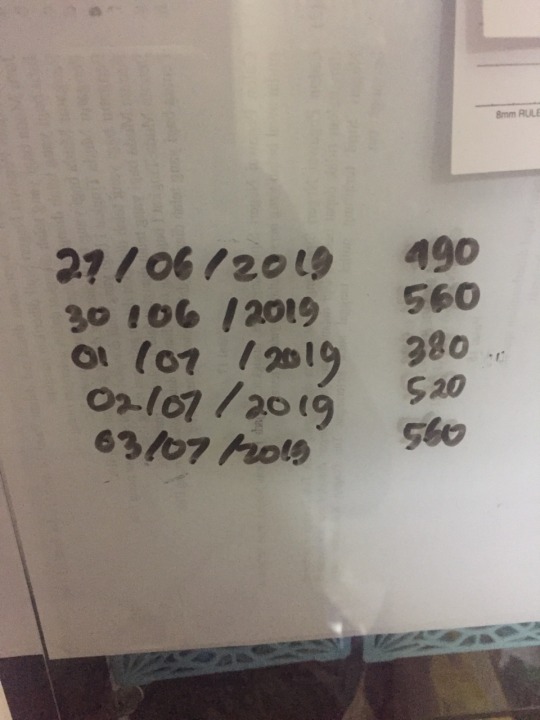
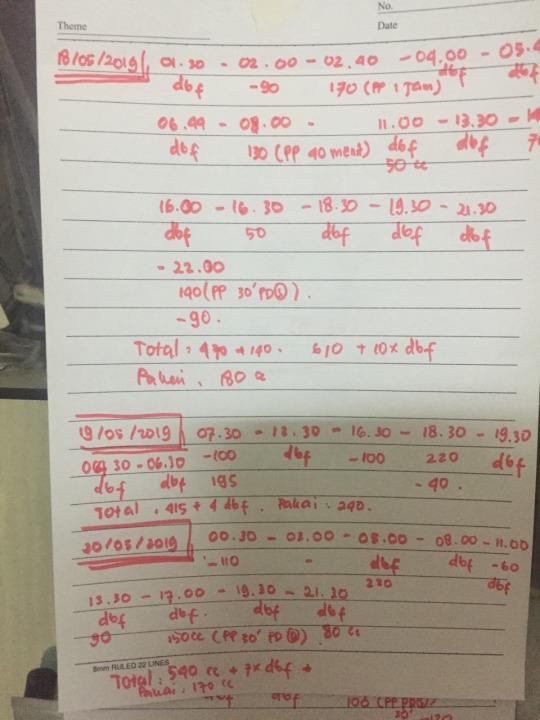
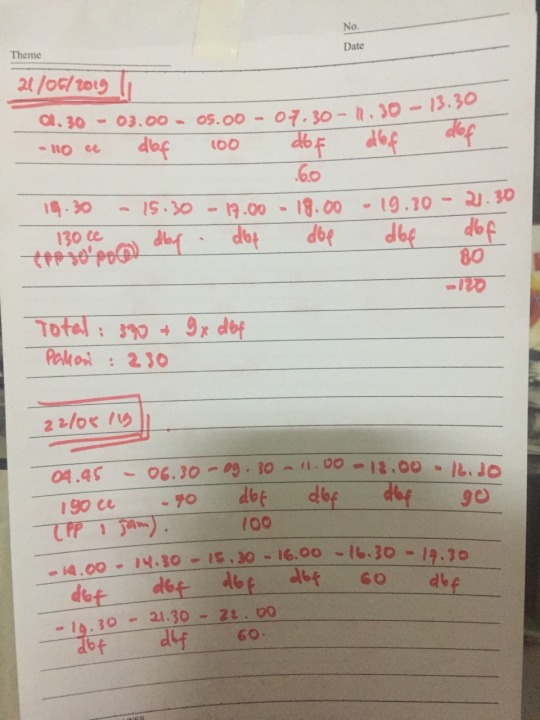
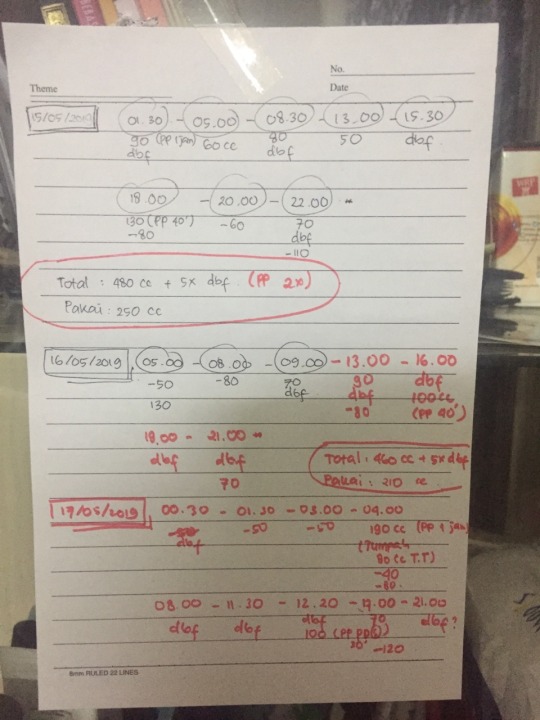
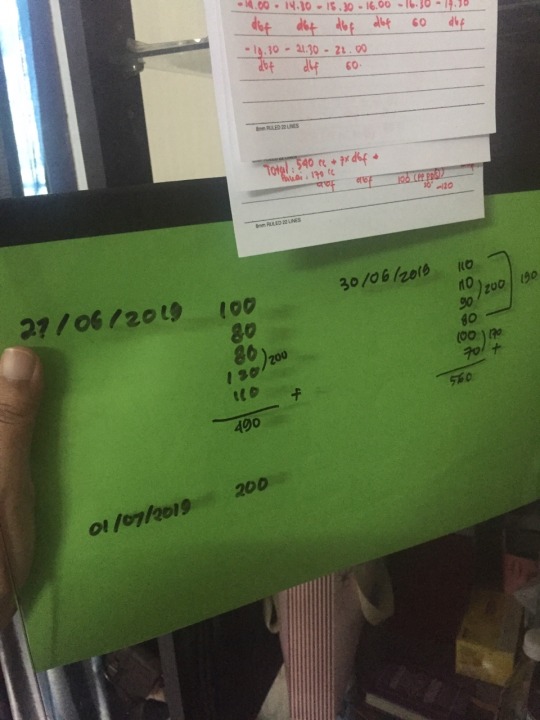
Terakhir dan termasuk tambahannya, untuk menambah semangat, setiap harinya hasil pumping dan frekuensi DBF saya catat setiap harinya. Target saya, hasil total pumping hari itu minimal sama dengan kemarin dan tidak defisit dibandingkan dengan pemakaian stok ASIP hari itu. Saya catat jam berapa saya dbf dan pumping beserta volume ASIP yang saya dapat maupun pakai. Besoknya saya jadikan patokan untuk dbf/pumping hari itu. Mungkin bisa dilihat di lampiran foto ya catatan-catatan saya.
Saya sadar kok, apa yang saya kerjakan gak sempurna. Tapi untuk saya ini sudah sesuai dengan kondisi saya maupun Rarra. Semoga semuanya mudah dipahami, bisa diadaptasi dan membantu teman-teman sekalian ya. InsyaAllah yang berikutnya tentang cara penyimpanan ASIP yaa.
Dokumentasi pribadi: sebagian catatan jumlah ASI perahan dan jadwal menyusui. Dimulai sejak usia kurang lebih 2 minggu.
0 notes
Photo

Arduino Based Smart Home Automation System
by Ma Naing | Ni Ni San Hlaing "Arduino Based Smart Home Automation System"
Published in International Journal of Trend in Scientific Research and Development (ijtsrd), ISSN: 2456-6470, Volume-3 | Issue-4 , June 2019,
URL: https://www.ijtsrd.com/papers/ijtsrd23719.pdf
Paper URL: https://www.ijtsrd.com/engineering/electronics-and-communication-engineering/23719/arduino-based-smart-home-automation-system/ma-naing
international journals in engineering, engineering journal, paper publication for engineering
This paper presents the design and prototype implementation of the automation system that can be used two Arduino Nano with sensors. To demonstrate the effectiveness of this system, the devices such as LDR, temperature sensor, smoke sensor and motion sensor have been integrated with the automation system. In addition, the GSM and RFID modules are also used for security system. The functions of the sensors are to monitor and control the light, the room temperature and alarms. The main goal of the security system is GSM which is used to send the SMS alerts to the owner. Two Arduino Nano control sensors and relays that monitor a defined location and take action based on specified parameters like ambient light, temperature, etc. The microcontroller will send SMS to the owner if the sensors detect an abnormality. In addition, door lock security is developed by RFID module. In this paper, the presents of GSM module security system make more secure and reliable.
0 notes
Text
Curative Radiation Therapy at Time of Progression Under Active Surveillance Compared With Up-front Radical Radiation Therapy for Prostate Cancer

Publication date: 1 March 2018
Source:International Journal of Radiation Oncology*Biology*Physics, Volume 100, Issue 3
Author(s): Alejandro Berlin, Ardalan E. Ahmad, Melvin L.K. Chua, Fabio Y. Moraes, Haiyan Jiang, Maria Komisarenko, Narhari Trimilshina, Hamid Raziee, Ali Hosni, Jure Murgic, Peter Chung, Robert G. Bristow, Antonio Finelli
PurposeTo describe and compare outcomes in men with initially presumed indolent prostate cancer receiving definitive radiation therapy after active surveillance (AS) versus those in a risk-matched cohort undergoing up-front radiation therapy.Methods and MaterialsMen prospectively enrolled in an AS program between 1992 and 2014 and subsequently undergoing curative radiation therapy (ie, image guided radiation therapy [IGRT] or low-dose-rate brachytherapy [LDR-BT]) were identified. Biochemical relapse–free rate (bRFR), metastasis-free rate (mFR), and overall survival (OS) were compared against a cohort of men treated up front, matched by age, clinical prognostic indices (risk group, prostate-specific antigen, cT category, Gleason score, percentage of involved biopsy cores), and radiation therapy modality.ResultsOf 1070 patients in the AS registry, 200 underwent definitive radiation therapy (143 IGRT and 57 LDR-BT) after a median of 32.9 (interquartile range [IQR] 20.6-59.8) months on surveillance. Main reasons for treatment were grade and volume upgrading (57.5% and 26%, respectively). Median follow-up after radiation therapy was 4.9 (IQR 3.1-7.5) years. At 5 years the bRFR, mFR, and OS were, respectively, 97%, 99%, and 98.5%. No patient died of prostate cancer. Adequate risk-matching was confirmed in an independent cohort comprising 359 patients receiving up-front IGRT (71%) or LDR-BT (29%) and followed for a median of 9 (IQR 3.1-7.5) years. There was no difference in the disease-specific outcomes (bRFR, mFR) between the 2 cohorts (Gray's P value of .257 and .934, respectively). In multivariate analyses, timing of radical radiation therapy (deferred vs up-front) was not correlated to biochemical relapse or metastases occurrence.ConclusionsCurative-intent radiation therapy (ie, dose-escalated IGRT or LDR-BT) after a period of AS renders excellent oncologic outcomes at 5 years. Deferring radical therapy after a period of AS does not seem to result in inferior oncologic outcomes compared with patients with similar risk characteristics undergoing up-front treatment.
http://ift.tt/2Em2nto
0 notes
Text
2019
1. Purple Mountains - Purple Mountains
Master songwriter David Berman returned after ten years of Nashville isolation with a stellar collection of songs that feature quotable lyrics at every turn. His pronoucement that "all I've been wanting is the end of all wanting" became crushingly more poignant following his suicide the night before he was due to start touring this amazing record.
2. Mango x Mathman - Casual Work
In a landmark release for Irish music, rapper Mango and producer Mathman distill modern Dublin City life down to its purest essence across tracks influenced by UK rave, garage, and grime.
3. Helado Negro - This Is How You Smile
A gorgeous, soothing synth-folk record that hangs on the loose concept of the author and his brother taking a stroll through their south Florida hometown and recounting tales of immigrant perseverance against the powerful.
4. Big Thief - U.F.O.F / Two Hands
2019 saw the Brooklyn indie quartet deliver the two best albums of their career. The first is a supernatural network of dream-like whispers that takes you on a journey reminiscent of Radiohead at their glacial best, while the second turns up the volume and cements Big Thief's position as one of the best indie bands around.
5. Jessica Pratt - Quiet Signs
San Francisco's Jessica Pratt further refines her take on early Joni Mitchell with another collection of understated, foggy folk songs that reveal rich worlds with repeated listens.
6. FKA twigs - MAGDALENE
twigs turns in a stunning performance as the second coming of Kate Bush on her strongest release yet - an astonishing album of boundary-breaking production and viscerally introspective songwriting.
7. Fontaines D.C. - Dogrel
The most lauded band to come out of Ireland in a very long time introduce themselves with a roiling post-punk stew packed full of The Fall, The Clash, Joy Division, The Smiths, The Pogues, James Joyce, and more.
8. Ethan Iverson Quartet with Tom Harrell - Common Practice (Live At The Village Vanguard 2017)
Gifted players perform great jazz gems gorgeously.
9. Green Diesel - Kojaque & Luka Palm
The latest temperature check on the Irish hip-hop scene reveals an enjoyably more international sound, top-tier production, and no let up in references to the chipper.
10. Lana Del Rey - Norman Fucking Rockwell
LDR takes classic period Joni Mitchell and successfully makes it her own by updating it for the modern world without losing any of the instantly classic Laurel Canyon sound.
0 notes
Last Seen Blogs

louisefox
A Gurl who appreciates Gurls.

lassuscorde
lassuscorde

justlikethemagic
My Life is Magic

iicaptainblog
ii captain

honsool
future’s gonna be okay