#legend of the phoenix mobile game
Text


✨️Bullshit~✨️
1. it's not free unless you want to be the loser at the bottom of the rankings and never progress in the story because the end chapter of every mini arc of 6 chapters needs a couple MILLION more in power and you only get power by using a massive amount of resources.
2. ads everywhere, in fact. want to get just a little more resources? watch an ad. your cat randomly decided to run away? watch an ad or pay real money to get it back. spent hours grinding to reach 'dailies', a reward? hey, why don't you double it by watching an ad?
sure, you can get 10 skip ad tickets per day... with the paid monthly subscription! so no. not free at all.
3. the game is an expert at pulling money from its users. new dresses that cost ingots (60 ingots for... 2 euro? if i remember right). 100 ingots = 1 brocade. 1 piece of dress = 4 to 36!!! brocades. and you vet 5 to 9 pieces of dress to get the whole set.
or the game just directly asks real money for imaginary dresses. when i stopped playing, they started promoting the 'celestial' collection according to zodiac signs. each dress can be directly bought... for over 30 euros! for that price, you can just buy a real dress.
plus events - repeating events, dress events, mini story events, 'holiday themed' events. each requires ingots, and there's never enough ingots.
plus the VIP levels where support won't even really help you unless you reach some vip level. you reach vip by spending money. and you have paywalled confidants you receive after reaching vip levels. VIP16 would literally cost you at least a hundred thousand euro. not kidding.
and the lifetime pass and monthly pass and daily top up rewards and special packs and 'vip rewards' packs that cost even more money and ranking booster packs and event limited timr packs and i'm not even kidding! these are all in the game!
4. the community was great despite the game, not because of it. it's honestly the only thing i miss, the girls were great. but yes, the game gives you so so SO MANY options to be mean. and obfuscate their wording so half the players don't even know they're picking the hurtful options.
help 'harvest' a friends' garden? congrats! you just stole from them. 'compare notes' in the academia? congrats! you just stole their points and it takes 8 hoirs to get more. or ruin someone's banquet. or any random actions that half the time you don't even know are hurting others.
5. the story isn't even that good. starts with yoir typical 'revenge' cliché plot, then that gets resolved and it just sort of.. goes in circles. then MC is sent to some foreign country or something?? i don't know i stopped paying attention, it got boring.
6. the game does NOT value its players. at all. i played for over a year, reached an embrassingly high VIP level and then they just moved us to a slow server. ping of over one second, and considering everyone had 40-50 partners at this point and you needed to beat ALL of them in every debate, FOUR TIMES PER DAY!... every single action felt like someone's pulling my teeth, every move painfully slow. and support was no help of couse. "i'll ask the devs to check, my lady", they just lied to me - it was obvious that we were moved to a slow server since multiple people reported the same and it happened right after a sneaky unannounced maintenance.
my phone can smoothly run genshin and this little dressup with nothing more that static images with some minimal animations is slower? no. just no.
they just judged that our server doesn't make them enough money.
oh and of course, they create a new server every couple weeks. to get more people. and then they merge them to 'get more fun' mess up rankings and force people to pay even more money to keep their place among competition that just doubled. fun, right? (no, it wasn't).
--
girls, if you ever want to try this game, i can only tell you this: don't.
this miserable excuse of a game isn't worth it and their scummy business practices and gachas are only meant to pull money from you. don't do that to yourself.
no matter how pretty the dresses are, they are just not worth the money or effort.
just buy yourself a real dress.
4 notes
·
View notes
Text

New outfit for my favorite mobile game (:
#art#artwork#art blog#illustration#character art#digital art#artists on tumblr#my art#original character#oc#mobile games#legend of the phoenix#lotp#character design#fashion#tea
3 notes
·
View notes

Text
The fantasy Chinese pack.


#chinese#fantasy#chinese fantasy#wei jie#ji kang#wei xiaobao#legend of the phoenix#chinese fantasy game#mobile game#ji shuye
2 notes
·
View notes
Text
Those girls from Legends of the Phoenix mobile game ad. How to force ads on you in a god honoring way.
1 note
·
View note
Text
Tag 10 people you would like to catch up with!
last song: padam padam - kylie minogue
last show: sucession s04e08
currently reading: pachinko by min jin lee (amazing read!)
current obsession: sims 2 as always, succession, stupid mobile game I've been playing called legend of the phoenix lol (the clothing is cute, come on!!)
@profesionalpartyguest tagged me and i was so happy because this was the first time someone tagged me! 💖
my tags are @shitysimp @sammysundog @simnostalgia @gutosimmer @f1shart @jinxxsims @microscotch @plumbtales @antisocialbunnysims @burnedspaghettidrama
7 notes
·
View notes
Text
video game headcanons
apollo: streams games like fnaf on the regular, streams meme games, is absolutely nerdy about them, camera on most of the time. klavier sometimes appears as a cameo causing the entire chat to spam the klavier emote. viewership goes way up whenever klavier appears even if its only for a second, to apollo's endless annoyance
klavier: pretends not to know about video games. secretly knows more retro game lore than apollo does because he spent his childhood playing games like legend of zelda, final fantasy, xenogears etc
phoenix: according to suekane he plays dragon's quest and final fantasy, presumably on the nes. knows nothing of modern consoles but plays the nes classics when he has time (played them a lot while disbarred). favorite game is probably super mario bros on the nes.
edgeworth: absolutely hopeless case with one notable exception. he has obtained original consoles with all the hardware and software needed to play every steel samurai licensed game ever made to make sure he doesn't miss anything canon.
kristoph: doesn't understand video games very well. apollo tried to explain it to him once. he didn't really get it but just smiled and nodded along anyway so apollo would think he understood what the hell a "pikmin" is. (if you wanna get meta, he is somehow able to give the ds tutorial flawlessly. this is because he knows he's in a video game, so he knows what the buttons do and what the touch screen is at least.)
trucy: loves pokemon and animal crossing and katamari and the sims
athena: loves to play those driving simulators in arcades
simon: could not play video games while in prison but greatly enjoyed playing both older and modern games of all kinds before prison. he had a huge backlog to catch up on after his release from prison, so everyone pitched in to get him some new consoles, a pc, and plenty of games. (he thanked them, but he does know what piracy is, after all)
maya: loves video games, mostly nintendo, and meme games. papa's burgeria. used to play flash games on nick's pc. currently more into mobile games when training in kh'urain as internet is spotty at times and she doesn't always have time to sit down and play a game.
gumshoe: pretty much only knows of games like donkey kong that he has played at the arcade. could never afford home consoles/pc so he doesn't know them.
ema: loves meme games and streams on twitch regularly. serious speedrunner of mario games.
wocky: smash bros melee kid
pearls: knows all of the undertale and deltarune lore
4 notes
·
View notes
Text
Getting to Know Me(me)
Found my original in my archives and thought it'd be fun to update this one! Original answers from 2015 >> New answers in 2023
Name: Kit
Age: 26 35
Persuasion: Homoromantic demisexual Queer
Location: USA Aotearoa
10 Facts:
1. I have 25 35+ tattoos
2. I'm a full-time writer
3. I am on Tumblr more than I should be (still true)
4. I can get through the entirety of 'Fifty Nifty United States' in one breath
5. I have multiple mobility aids and they all have names. Cane: Elvira, Walker: Christopher Walkin', Wheelchair: Wheelie Boy
6. My partner (Doom Them) and I are the penultimate example of queer domestic bliss
7. I met some of my best friends through Tumblr!
8. I can solve a Rubik’s Cube in under 3 minutes (still true)
9. I used to be a professional actress (Still true)
10. I have travelled to 17 20 countries
9 Fandoms:
1. Criminal Minds
2. Doctor Who
3. X-Files
4. Bones Critical Role
5. Fringe
6. Community Dimension 20
7. the L word Warehouse 13
8. Legend of the Seeker
9. SVU Xena
8 OTPS:
1. OTP: Blackbird (JJ x Emily - Criminal Minds)
2. OTP: Burning Up a Sun (Ten x Rose - Doctor Who)
3. OTP: How Long? (Olivia x Alex - SVU) OTP: I Thought We'd Get Lucky (Tara x Emily - Criminal Minds)
4. OTP: I want to Believe (Mulder x Scully - X-Files)
5: OTP: Fringe With Benefits (Peter x Olivia - Fringe) OTP: It'd Be With You (Thirteen x Yasmin - Doctor Who)
6. OTP: I think you’ll know (Callie x Arizona - Grey’s Anatomy) OTP: Science Wives (Sam x Janet - Stargate SG1)
7. OTP: Blood and Battle (Lagertha x Ragnar - Vikings) Let's Go Steal an OT3 (Parker x Eliot x Hardison - Leverage)
8. OTP: Oatmeal (Holt x Kevin - B99) OT3: Je T'Emily (JJ x Emily x Tara - Criminal Minds)
7 Books:
1. Harry Potter Series by JK Rowling Heartstopper by Alice Oseman
2. Hunger Games Series by Suzanne Collins Wonder Woman Graphic Novels (Greg Rucka, Gail Simone)
3. Anita Blake Series by Laurel K Hamilton Nevermoor Series by Jessica Townsend
4. The Missing Piece by Shel Silverstein
5. The Witches by Roald Dahl Tiny Beautiful Things by Sheryl Strayed
6. Trainspotting by Irvine Welsh Hitchhiker's Guide to the Galaxy by Douglas Adams
7. Bones Series by Kathy Reichs Gender Failure by Ivan E. Coyote & Rae Spoon
6 Foods:
1. Pizza
2. Protein Shakes Mac and cheese (Kraft blue box)
3. Hummus Strawberry Poptarts
4. Peanut butter and Jelly sandwiches
5. Cookies and Cream ice cream
6. Tacos
5 Things You Can’t Live Without:
1. Coffee
2. Netflix
3. My Phone
4. Music
5. Fanfiction
* No changes from 2015 to 2023
4 Life Goals:
1. Finish school for Forensic Anthropology Find joy and contentment in all I do
2. Study abroad Fly my friends to Aotearoa for a visit
3. Visit every continent
4. Publish a novel (<<did it!) Live authentically, without regret
3 Characters You Relate To:
1. Temperance Brennan Thirteenth Doctor
2. Emily Prentiss
3. Jean Grey / Phoenix Fox Mulder
2 Quotes:
1. Why waste your life being normal?
2. The entire poem of Invictus Be gay, do crime
1 Selfie (If you want):
2015 vs 2023


Not tagging anyone, this one was completely self-indulgent so I could have the update in my archive <3
#about me 2k23#about me 2k15#god I've been on this webbed site so long#my face#tag you're it#tag game
3 notes
·
View notes
Photo

So I have finally played my first Gundam video game and that happened to be SD Gundam Battle Alliance and I am really glad it was because playing this game give me the realization that there are good Gundam video games out there.
This game is really good fun. The combat is fun and fast paced, as it should be. There is a wealth different mobile suits from a lot of the different anime. I am going to list every mobile suit in the game because I can.
RX-78-2 Gundam, Guncannon, Guntank, GM, Zaku II Type F, Dom, Char’s Z’Gok & Char’s Gelgoog.
Gundam Ground Type, Gundam Ez8 & Gouf Custom.
Gundam Alex, GM Sniper II & Kampfer.
Full Armor Thunderbolt Gundam, Psycho Zaku & Gundam GP03S Stamen.
Zeta Gundam, Hyaku Shiki, Qubeley & The-O.
ZZ Gundam & Full Armor ZZ Gundam.
Nu Gundam, Sazabi & Hi-Nu Gundam.
Unicorn Gundam, Full Armor Unicorn Gundam, Banshee, Banshee Norn, Kshatriya, Sinanju & Narrative Gundam C-Packs.
Gundam F91, Crossbone Gundam X1, Crossbone Gundam X2 & V2 Assault Buster Gundam.
Turn A Gundam, Turn X, Burning Gundam, Master Gundam, Wing Gundam Zero & Gundam Epyon.
Gundam Double X, Freedom Gundam, Justice Gundam Providence Gundam & Gundam Astray Gold Frame Amatsu Mina.
Destiny Gundam, Strike Freedom Gundam, Infinite Justice Gundam, Legend Gundam, Gundam Astray Red Frame Kai & Gundam Astray Blue Frame Second Revise.
00 Raiser, Cherudim Gundam. Arios Gundam, Seravee Gundam, Gundam Exia Repair II, Arche Gundam, Reborns Gundam, 0 Gundam (Type A.C.D) & 00 QAN[T}.
Gundam AGE-FX, G-Self (Perfect Pack), Gundam Barbatos (6th Form), Gundam Barbatos Lupus, Gundam Barbatos Lupus Rex, Gundam Gusion Rebake Full City, Gundam Bael, Gundam Kimaris Vidar & Reginlaze Julia (Final Battle)
Musha Gundam, Knight Gundam, Command Gundam, Gundam Latreia, Liu Bei Unicorn Gundam, Cao Cao Wing Gundam, Sun Jian Gundam Astray & Phoenix Gundam.
So, yeah, there are a lot of mobile suit to play and collect in this game. Now, personally, I find that can be the one downside to this game as well. See, once you do the main story and the DLC stories, there isn’t much left to do. The only thing you really can do is replay story missions as chaos missions and yeah it’s just going after blueprints to mobile suit you may have some but not all of or just not have yet. Some people may find that fun but I personally have already become bored of it. But that is really the only negative thing I have for this game. I definitely recommend giving this a play.
4 notes
·
View notes
Text
Final Fantasy Record Keeper Labyrinth Nexus Campaign
The Labyrinth Nexus campaign just started in the Final Fantasy Record Keeper (FFRK) mobile game.
This campaign gives a set of time-limited missions that requires you to clear 3 Labyrinth Nexus fights in order to get all the rewards.
The Labyrinth Nexus fights are in the Labyrinth Dungeons. They’re quest level 650. The fights and their corresponding rewards are as follows:
deal at least 10% damage to Salamander - 1 mythril
deal at least 30% damage to Salamander - 1 Realm/Elemental x11 ticket
defeat Salamander - 1 Scroll of Honing
deal at least 10% damage to Kraken - 1 mythril
deal at least 30% damage to Kraken - 1 Realm/Elemental x11 ticket
defeat Kraken - 1 Scroll of Honing
deal at least 10% damage to Snow Giant - 1 mythril
deal at least 30% damage to Snow Giant - 1 Realm/Elemental x11 ticket
defeat Snow Giant - 1 Scroll of Honing
These enemies have 2 versions, 1 that’s weak to physical attacks and another that’s weak to magical attacks.
Snow Giant is weak to the fire element. Salamander is weak to the water element. Kraken is weak to the thunder element.
When these fights first showed up, I just ignored them since they were permanent content and I didn’t think I had enough firepower to defeat the aforementioned bosses.
Then this Labyrinth Nexus Campaign happened. At the very least, I wanted to get the mythril and tickets before the time-limited missions ended.
Since I only needed to deal at least 30% damage to these enemies for the tickets and mythril, I thought I should be able to manage this with my elemental teams. Well, hopefully anyway.
Of course, it’d be nice to get the Scrolls of Honing too. These can be used to hone certain Soul Breaks.
For instance, if you max hone an Awakened Arcane Soul Break, you’ll be able to use it twice per fight instead of just once. It takes a lot of resources to hone these Soul Breaks though.
While I’d love to get the Scrolls of Honing, really didn’t think I’d be able to beat these bosses, at least not yet. Would need a lot more top-tier relics to power up my teams and make these battles as easy as possible.
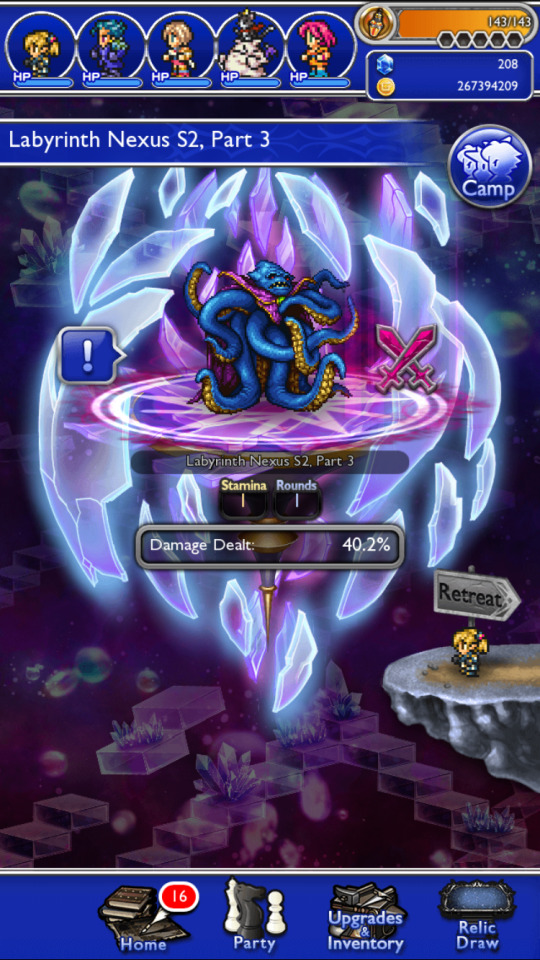
Labyrinth Nexus Season 2, Part 3 Dungeon
Kraken is the boss of the Labyrinth Nexus Season 2, Part 3 dungeon. Decided to try fighting the magical-weak version of Kraken since it felt like my magical thunder team was stronger than my physical one.
My team and their Soul Breaks were as follows:
Shantotto from Final Fantasy XI
True Arcane Soul Break (TASB) or Arcane Dyad Soul Break (ADSB), Salvation Scythe
Synchro Arcane Soul Break (SASB), Chain Thunder Play
Awakened Arcane Soul Break 1 (AASB1), Federation Demon
Ultra Soul Break (USB), A Thousand Suns
Limit Break Overstrike (LBO) or Limit Break Over Flow (LBOF), Ancient Magic Burst II
Chain Soul Break 1 (CSB1), Frightening Lightning
Legend Materia Relic 1 (LMR1), Master Caster
Desch from Final Fantasy III
USB, Roar of Duty
CSB, Lightning Embodied
Ashelia B'nargin Dalmasca from Final Fantasy XII
TASB, Apex Heaven’s Wrath
SASB2, Channeling Bolt
AASB, Northswain’s Bolt
USB1, Empyrean’s Edict
LMR2, Chosen Future
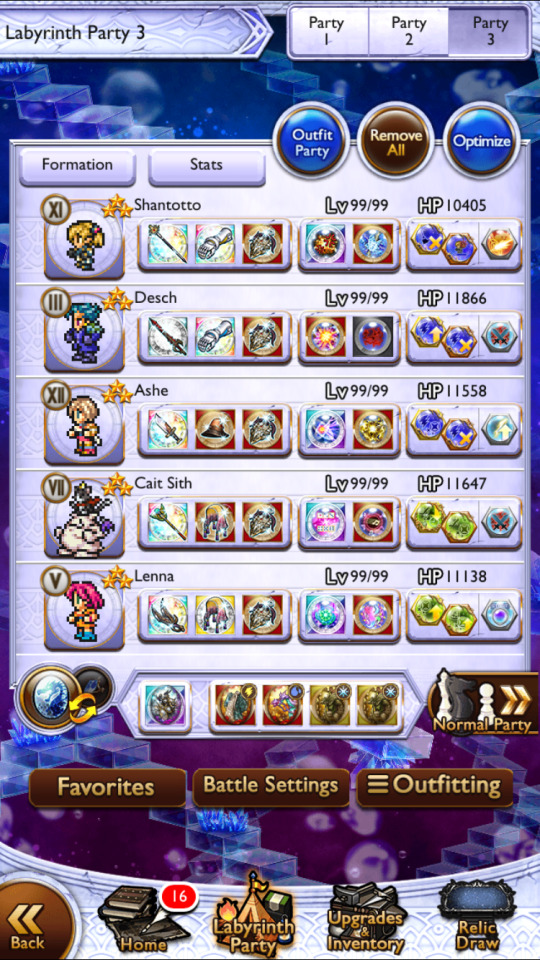
Cait Sith from Final Fantasy VII
Glint+ Soul Break (G+), Planetary Protector
AASB, Hit the Jackpot
SASB, Miraculous Luck
USB1, Danger Dice
USB2, Random Summon?
Super Soul Break 1 (SSB1), Moogle Dance
LMR, Divided Loyalties
LMR+, Hastening (Cait Sith)
Lenna Charlotte Tycoon from Final Fantasy V
SASB1, White Magic Mastery
AASB1, Champion of Life
AASB2, Spreading One’s Wings
G+1, Tycoon’s Protection
USB1, Moogle Boost
USB3, Essence of Water
USB4, Princesses’ Prayer
Burst Soul Break 1 (BSB1), Phoenix of Tycoon
Shantotto and Ashe were my main DPS. Lenna was my healer. Cait Sith was my support. Desch was my Chain holder. He was also responsible for lowering Kraken’s resistance to thunder.
Everyone was wearing White-Armored Echoes, an accessory that adds 500 additional HP and moderate resistance to all elements. Have everyone’s Hero Abilities except for Desch.
Have an Odin (Ultra Magic) as my main Magicite with the following passives: Blade Ward, Spell Ward, Lord’s Seal: Ice, Lord’s Seal: Earth, and Lord’s Seal: Lightning.
My sub Magicites were Ramuh with 2 Empower Lightnings, Leviathan with Health Boon and Healing Boon, Madeen with 2 Magic Boon, and Madeen with Health Boon and Fast Act.
I hate this fight. Kraken is so freaking tanky. He’s also really fast and he hits very hard and deals way too much damage.
The battle had barely begun when I had to restart because Kraken just kept on attacking without giving me the chance to set up and heal.
Already playing on speed 1 and yet it still feels way too fast. Can’t wait for the Wait Mode feature to be added to the Labyrinth Dungeons. Might make this fight more bearable.
As it was, had to restart multiple times before I finally managed to get past the first few turns without dying.
Really needed to be quick when it came to tapping on Soul Breaks and abilities and such otherwise Kraken was gonna end up killing everyone before I could cast a healing Soul Break.
Since my main goal was just to take off 30% of Kraken’s health, didn’t bother to be conservative with my abilities and Soul Breaks uses. Just used everything right away and tried to deal as much damage as possible.
At first, had my chars (except for Lenna who had Mako Might (lets a char begin a fight with 2 Soul Break bars) so I could use her AASB2 right away for the healing and buffs) build up their gauges.
As soon as they had 2, started casting Soul Breaks. Had Desch use his Chain then he was back to spamming Plasma Shock, an ability that has a chance to imperil lightning.
When Desch had enough bars and I didn’t need to recast the Chain, had him use his USB for more imperils.
Had Ashe and Shantotto use their TASBs then cast either their Awakenings or Syncs. Then I just had them spam their abilities.
Lenna focused on keeping everyone at max HP. She can also lower the Attack, Magic, Defense, and Resistance of all enemies via the Passionate Salsa ability. Some of her Soul Breaks can also reduce the delay of the actions of her allies.
Cait Sith is one of the top supports for magical-based teams. He enabled Ashe and Shantotto to deal even more damage. He can also heal so he helped Lenna keep everyone at full health.
His Hero Ability lowers the Defense and Resistance of all enemies aside from restoring a bit of the party’s HP. Also had Cait equipped with Allegro con Moto, an ability that reduces the offensive magic casting time of all allies for 3 turns. This helped my DPS move even faster.
Can’t remember for sure now exactly what happened, and I forgot to take a screenshot, but I actually managed to deal a total of 40.2% damage to Kraken. Wasn’t able to beat him but it’s fine.
At least I got the ticket and mythril. Don’t really want to do this fight again right now. Maybe I’ll revisit Kraken when they implement the Wait Mode feature here and if I can get more lightning relics that will make my team stronger.
Labyrinth Nexus Season 2, Part 1 Dungeon
Snow Giant is the boss of the Labyrinth Nexus Season 2, Part 1 dungeon. Fire is my strongest element. Both my physical and magical fire teams seem viable and stacked enough for this fight.
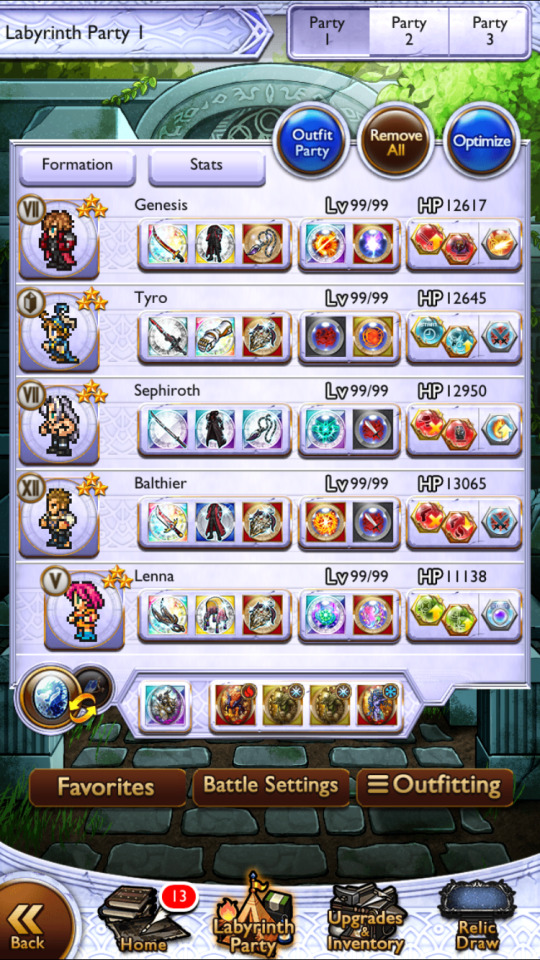
Decided to go against the physical-weak version of Snow Giant because I want to use Genesis Rhapsodos.
Currently, Genesis Rhapsodos from Crisis Core: Final Fantasy VII (#ad) is my absolute, most favorite Final Fantasy char. He’s the reason why I’m playing Final Fantasy Record Keeper.
Genesis is a physical fire DPS, and I have all of his relics so, of course, he was gonna be my main damage dealer for this Labyrinth Nexus quest.
Here’s a list of my team and their relics:
Genesis Rhapsodos from Crisis Core: Final Fantasy VII
True Arcane Soul Break (TASB) or Arcane Dyad Soul Break (ADSB), LOVELESS
Limit Break Overstrike (LBO) or Limit Break Over Flow (LBOF), Light of Doom
Synchro Arcane Soul Break (SASB), Purgatorial Wave
Awakened Arcane Soul Break (AASB), Genesis Rhapsody
Arcane Overstrike Soul Break (AOSB), SOLDIER’s Epic
Ultra Soul Break (USB), Apocalypse Genesis
Glint+ Soul Break 1 (G+1), Epic of Creation
Glint+ Soul Break 2 (G+2), Epic of Heroism
Glint Soul Break (G), Epic of Destruction
Legend Materia Relic (LMR), Fierce Opposition

Maxed Gen’s Crystal Waters. Completed his Record Board. Created his Hero Ability, Genesis Slash or Creation Laceration.
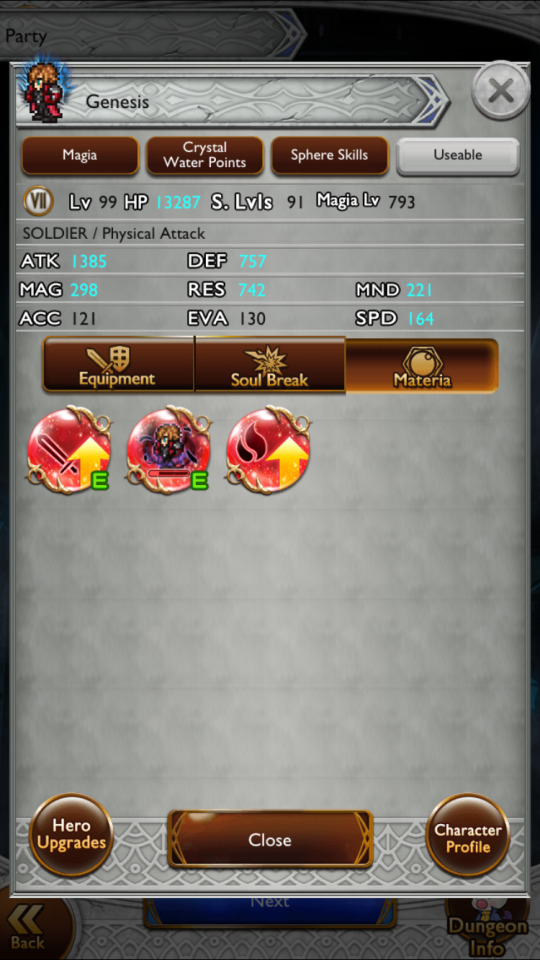
Gave him the best equipment and accessories and such that I have and that he could equip.

Currently, he has 931 Magia Points. So far, he has 100 points in fire attack, ice defense, dark defense, attack, defense, resistance, and HP.
Then he has 33 points in all the other elemental defenses. Someday, I hope for him to have 100 in all the stats. Getting Magia Points takes time though.
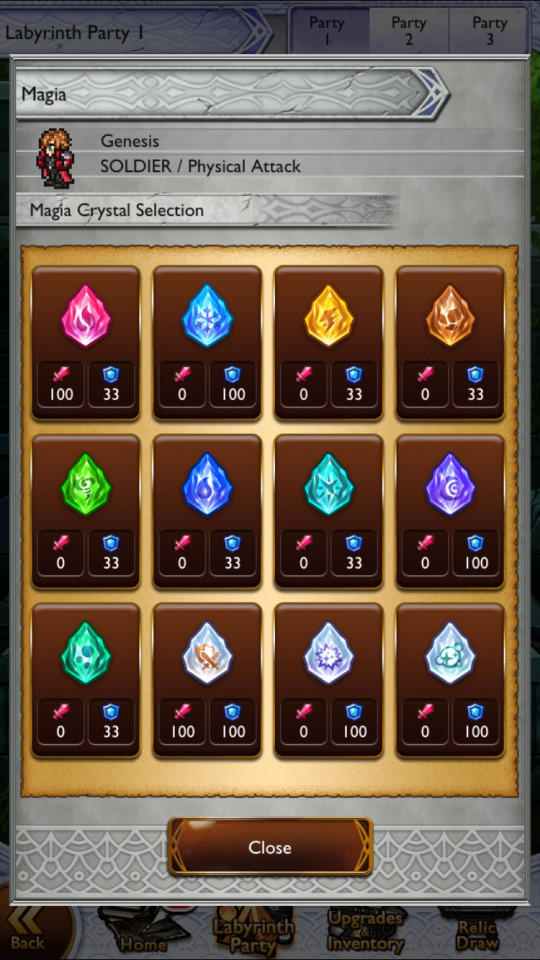
Not exactly farming for it but since I almost always use Gen for basically everything in this game, he’s always getting some Magia.
It’s just that you need to do several battles before you can even get 1 Magia point so, yeah, it’s pretty slow-going.
Tyro from Final Fantasy Record Keeper
AASB1, Fantasy Grimoire Vol. I
AOSB3, Triple Phase
AOSB1, Link of Light
USB4, Arbiter’s Tome
USB3, Divine Veil Grimoire
USB1, Warder’s Apocrypha
Overstrike Soul Break (OSB), Arbiter’s Apocrypha
G, Purifying Grimoire
BSB, Keeper’s Tome
Unique Soul Break, Sentinel’s Grimoire
LMR1, Archival Secrets
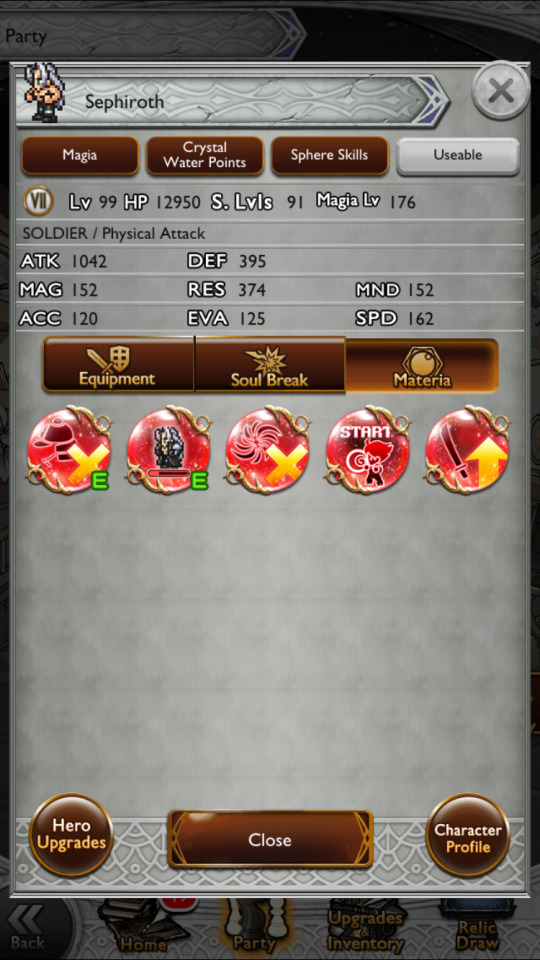
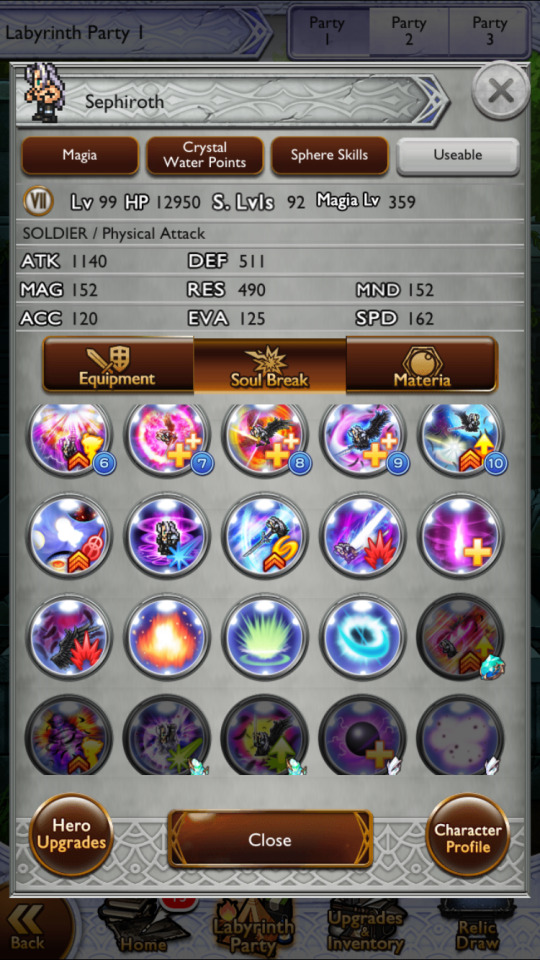
Sephiroth from Final Fantasy VII
TASB1, Sunburst or Supernova
TASB2, Jenova
LBO, Dark Illumination
SASB1, Demonic Lord
SASB2, Crimson Octaslash
AASB1, Stigma
AASB3, Flames of Nibelheim
AOSB1, Setting Sun
USB1, Heartless Angel
USB2, Zanshin
USB3, Crimson Lotus
G+1 Shimmer Flash
G+2, Fervent Shadow
BSB2, Octaslash
BSB1, Reunion
Super Soul Break (SSB), Transience
Unique Soul Break, Nibelheim Nightmare
Unique Soul Break, Hell’s Gate
LMR1, Fateful Secret
LMR2, Apocalyptic Hero
LMR3, Cruelest Cut

I’m only missing 6 of Sephiroth’s relics:
AOSB2, Purgatorial Flames
G, Jenova’s Might
OSB, Heaven’s Light
SSB1, Black Materia
Unique Soul Break, Shadow Flare
AASB2, Underworld Guardian
Five of those relics can be acquired from the The Record Lab using Anima Lenses. The only one that isn’t Lensable is his AASB2.
I hope someday Sephi’s second Awakening will also be added to the The Record Lab. It’s basically the only relic I’m missing for him so I’d like to have it even if it isn’t that good. Besides, more BDL options is always welcome.
If I can get Sephi’s AASB2, then I’ll probably buy the rest of his Lensable relics. Most, if not all, of those are outdated now which is why I haven’t bothered to buy them.
But if I could fully complete Seph, then I’ll get those relics even if I’ll never end up using them.
Sephiroth is primarily a physical dark elemental DPS but he recently got some fire tech.
Since obtaining most of his fire relics, I started adding him to my fire team as my secondary DPS. Naturally, Genesis is my main and primary DPS.
Most of the time, I run a mostly FF7-team consisting of Genesis, Sephiroth, Vincent Valentine (from Dirge of Cerberus: Final Fantasy VII and Final Fantasy VII), Aeris or Aerith Gainsborough (from Final Fantasy VII), and Balthier.
Aerith’s a healer and Vincent is another fire DPS with some utility. Depending on how he’s geared, he can deal either physical or magical damage.
I have his Chain Soul Break but I can’t use it for this team because it boosts magical DPS. Would have wanted to run Vincent for this fight as well but I couldn’t bring him since I needed to bring a support, not yet another DPS.
Balthier (Ffamran mied Bunansa) from Final Fantasy XII
Chain Soul Break 2 (CSB2), Incendiary Trap
AASB1, Untouchable Hellfire
AOSB, Tales of the Past
USB2, Edge of Treachery
G+2, Scarlet Sky Fluke
BSB2, Spark of Change
BSB1, Gatling Gun
LMR1, Leading Man
LMR2, A Pirate’s Life
Lenna Charlotte Tycoon from Final Fantasy V
SASB1, White Magic Mastery
AASB1, Champion of Life
AASB2, Spreading One’s Wings
G+1, Tycoon’s Protection
USB1, Moogle Boost
USB3, Essence of Water
USB4, Princesses’ Prayer
BSB1, Phoenix of Tycoon
Genesis and Sephiroth were my DPS. Lenna was my healer. Balthier was my Chain holder. He was also in charge of lowering the enemy’s resistance to the fire element. Tyro was my support.
Aside from Genesis, both Lenna and Seph have their Hero Abilities as well. Sephi also has his Hero Equipment. Too bad Gen’s Hero Equipment isn’t available yet. Balthier’s, Lenna’s, and Tyro’s aren’t available yet either.
My Odin (Ultra Attack) has the same passives as my Odin (Ultra Magic). My sub Magicites were Ifrit with 2 Empower Fire, Madeen with 2 Deadly Strikes, Madeen with Health Boon and Fast Act, and Shiva with Health Boon and Healing Boon.
It’s really too bad that I don’t have a Lord’s Seal: Fire yet. This would have further increased the fire damage of my chars. Also would have wanted a Lord’s Gauntlet: Physical Fire for Genesis, at least until his Hero Equipment shows up.
Unfortunately, to get those 2, I need to beat the physical-weak and water-weak version of Argent Odin (AOdin) or White Odin (WOdin).
I’ve already beaten a few WOdins which was how I got the Seals that I’ve already inherited on my main Odin Magicites but am in dire need of more water firepower so can’t do this particular AOdin fight yet.
Anyway, Snow Giant seems to be as fast as Kraken in that I needed to restart the quest multiple times before I could finally get past the first few turns without anyone or all my chars dying before I could heal them.
Had everyone except Lenna (who was once again equipped with Mako Might) build up their gauges first. Balthier used his Chain then spammed Burnt Offering (similar to Plasma Shock, excetp it imperils fire). If he had the gauges to spare, had him use his USB2 for more fire imperil.
Lenna focused on keeping everyone alive as usual. Tyro boosted the damage of my physical DPS with his AASB1 and USB4. Had him Entrust his spare gauges to Lenna so she can keep using her Soul Breaks to heal and speed up the party.
Tyro isn’t the best physical support out there but he’s the only one I have so have to make do with him. He does work well enough although I do wish I have some of the other top-tier physical supports so I can further boost Genesis’s damage output.
Had Genesis and Sephiroth use their BDL relics then just spammed their Hero Abilities, or Sync commands if I was using their Sync. IIRC, had them use their TASBs first then their Syncs. When that ran out, used their Awakenings. Also had Genesis use his Glint+1 and Glint+2.
Was very pleased when I managed to deal 30% damage to Snow Giant. Yay for another mythril and ticket.
My fire team did so well even without a better physical support, a Lord’s Seal: Fire and a Lord’s Gauntlet: Physical Fire.
In fact, they did so well that the fight wasn’t over yet. Since everyone was still alive, kept going.
Genesis and Sephiroth dealt so much damage that I actually started thinking that it might be possible for me to win my first Labyrinth Dungeon fight.
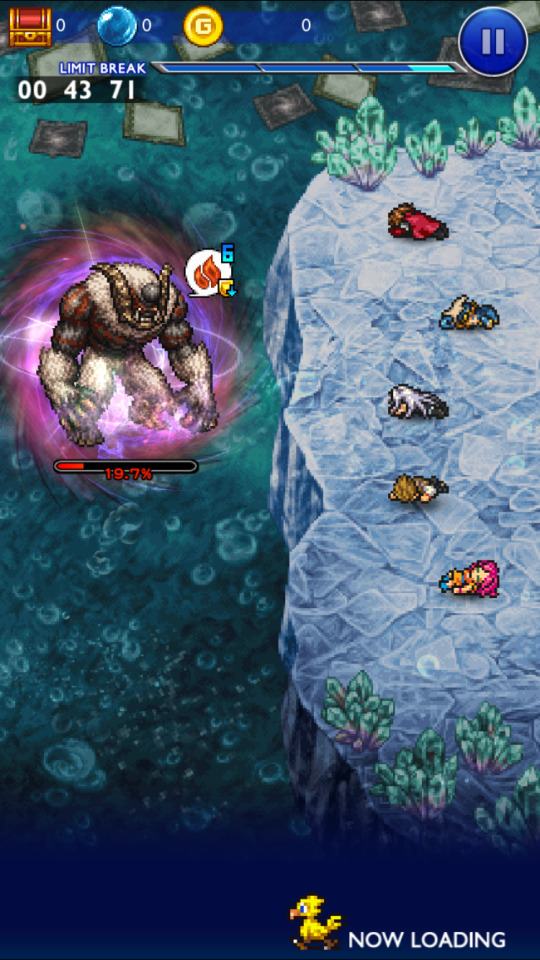
Alas, it wasn’t meant to be. A couple of mistakes combined with Snow Giant being annoying with his crappy mechanics and such cost me the win.
First, these Crystals showed up. IIRC, this happened a bit after I dealt 30% damage to Snow Giant.
Didn’t bother reading more details about Snow Giant and exactly what he does since my main goal was just to get the ticket and mythril but I did glance at the in-game description a little.
Apparently, multiple of these Crystals will show up then you need to deal at least 10k damage by using a Soul Break or Historia Crystal or Magicite. Then all the Crystals will detonate and will deal damage to Snow Giant.
However, Snow Giant can also get these Crystals to detonate. If he does, then a lot of damage will be dealt to your chars.
Got lucky in that when the first batch of Crystals showed up, was somehow able to get them to detonate by dealing the required 10k damage.
I think it was because I just summoned my Odin Magicite again or maybe it was because either Sephi or Gen had used one of their Soul Breaks.
Can’t remember for sure now but it was a very pleasant surprise when those Crystals suddenly exploded and dealt quite a bit of damage to Snow Giant. But then the Crystals spawned again soon afterwards.
Unfortunately, this time, I failed to deal the required 10k damage so it was Snow Giant who detonated the Crystals. My chars nearly died. Was able to heal them but things kinda started going downhill after that.
One mistake I can distinctly recall was accidentally tapping on Sephiroth’s LBO. This wouldn’t have been so bad if it actually dealt damage except it didn’t. It activated and did a grand total of 0 damage for all 5 of its hits.
Sephi’s LBO deals pure dark damage. Apparently, Snow Giant nulls everything except fire elemental damage.
If I was gonna use a Limit Break Overstrike, it should have been Genesis’s instead since that one deals pure fire damage and would have most likely hit for the max of 99999x5.
Ugh. Shouldn’t have bothered equipping some of Seph’s dark tech. After equipping all of the fire tech I have for him, he still had a few slots left so I added some of his dark Soul Breaks.
I thought I could use some of these as back up in case I needed more damage. If only I’d known Snow Giant was resistant to everything except fire. Sigh.
Was able to drop Snow Giant down to 19.7% HP before everyone in my party died. Argh! Feels so close to winning. Just a bit more and maybe I’d have been able to make it. Ah, well. It’s fine. At least I got the ticket and mythril.
Also, this really wasn’t bad at all considering I’m stuck using Tyro as my physical support and I’ve yet to beat water-weak Argent Odin for more buffs for my fire team. Maybe a couple more tries might get me the win.

But I don’t really feel like revisiting this fight again right now. It’s too annoying and frustrating. I could just try again once the Wait Mode feature gets added here and after I beat water-weak White Odin.
Heck, I could even just wait until Genesis’s Hero Equipment gets added to the game, and/or I get more fire tech and a better physical support than Tyro.
There’s no rush anyway unless we get another time-limited campaign or something.
Labyrinth Nexus Season 2, Part 2 Dungeon
Salamander is the boss of the Labyrinth Nexus Season 2, Part 2 dungeon. I was really dreading having to do this fight because, as aforementioned, my water teams really need more firepower.
I worried I might not even be able to deal the required 30% damage to get the mythril and ticket reward.
My physical water team seems way better than its magical counterpart so decided to take on the physical-weak version of Salamander.
My team and their relics were as follows:
Bartz Klauser from Final Fantasy V
Dual Awakening Soul Break 1 (DASB1), Awoken Rousing Winds
TASB2, Master of Wind
TASB3, Master of Fire
SASB3, Aqueous Bond
SASB2, Earthen Bond
SASB1, Ethereal Bond
AASB5, Flame Awakening
OSB, Hand of the Crystals
G+4, Blazing Power
G+3, Fluid Power
G+1, Quest of the Four
G2, Tetrad Beam
LMR1, Fragments of Grace
My physical water team is so bad that I had to resort to using Bartz. I have a lot of his BDL relics but the only water BDL relic that I have for him is his Sync 3. The rest all deal damage in a variety of other elements.
So have to go through a few hoops just to get him to work on this fight. Having his Hero Ability, which deals fire, water, wind, and earth damage, and the wording on some of his Soul Breaks makes this possible.
So first is I use his TASB3 (his TASB2 would work as well. It doesn’t really matter which one I use for this fight since neither will give him a water elemental infusion anyway). Then I cast his DASB1.
Bartz’s TASB3 will infuse him with fire. His DASB1 will overwrite that and infuse him with wind. So I have to use his G+3 to infuse him with water and overwrite the wind infusion.
Although his DASB1 infuses him with wind, it gives him Dual Awoken Spellblade Mode instead of Dual Awoken Wind Mode. This lets him use any Spellblade ability regardless of its element.
So with his Hero Ability, which is a Spellblade-type of ability, and with his G+3, he can deal water damage even after using his DASB1.
Once the effects of Bartz’s DASB1 run out, I can use his Sync 3 which will automatically infuse him with water.
If the effects of that run out and the fight is still going, then I have to resort to using his AASB5. This infuses him with fire but, similar to his DASB1, gives him Awoken Spellblade Mode so I just need to overwrite the fire infusion again.
Unfortunately, Glint+ Soul Breaks can only be used once so now I have to resort to using Bartz’s G2 to infuse him with water.
Glints need 1 Soul Break bar before they can be cast though so in order to use Bartz’s Awakening then Glint right away, he needs 3 bars.

Tyro from Final Fantasy Record Keeper
AASB1, Fantasy Grimoire Vol. I
AOSB3, Triple Phase
AOSB1, Link of Light
USB4, Arbiter’s Tome
USB3, Divine Veil Grimoire
USB1, Warder’s Apocrypha
Overstrike Soul Break (OSB), Arbiter’s Apocrypha
G, Purifying Grimoire
BSB, Keeper’s Tome
Unique Soul Break, Sentinel’s Grimoire
LMR1, Archival Secrets
Lenna Charlotte Tycoon from Final Fantasy V
SASB1, White Magic Mastery
AASB1, Champion of Life
AASB2, Spreading One’s Wings
G+1, Tycoon’s Protection
USB1, Moogle Boost
USB3, Essence of Water
USB4, Princesses’ Prayer
BSB1, Phoenix of Tycoon
Yuffie Kisaragi from Final Fantasy VII
CSB, Smoke Shell
AASB1, Sublime Doom
AOSB1, Freewheeling Bloodfest
USB2, Freewheeling Gauntlet
G+1, Ebb and Flow
G2, Stillwater Crag
G1, Freewheeling Reflection
LMR, Finders Keepers
Yuffie served as my Chain holder. She also imperiled water via the Aquatic Weakness ability. Too bad her USB2 doesn’t imperil water as well.
She also had to act as my third DPS with her Awakening since my water team is just that lacking.
Tidus from Final Fantasy X
CSB, A Fleeting Dream
TASB, Apex Blitz Ace
AASB1, Rising Dream
USB2, Quick Rush
USB1, Day to Remember
G+, Sphere Form
G, Ace Form
Yuffie’s Chain is way better than Tidus’s so opted to use hers over his. Tidus was better as a DPS anyway.
The only problem was that I’m missing another BDL relic for Tidus. If only I had even just one of his Syncs and/or his second Awakening.
For my main Magicite, used Odin (Ultra Attack) and for my sub Magicites, I used Leviathan with 2 Empower Water, Ifrit with Healing Boon and Health Boon, Madeen with Health Boon and Fast Act, and Madeen with 2 Deadly Strikes.
Water Elemental Banner
Since my water team was so bad, decided I’d better use the Realm/Elemental x11 tickets that I just got on the Water Elemental banner. Hopefully, I can get something that can help me deal even just 30% damage to Salamander.
Of course, what I really wanted was more of Bartz’s water tech and Tidus’s Sync 2 (he has 2 Syncs and the second is way better than the first) and/or AASB2. I’ll gladly take a second BDL Soul Break for a char I already have a BDL relic for though.
Would also love to be able to power up my magical water team. If I can just get more magical water BDL relics, I should be able to run a magical water team then I can use Cait Sith as my support instead of being stuck with Tyro.
Yeah, I know. None of the above is gonna happen. I’m more likely to get trash than anything good considering how bloated the pool is for this banner. Can only hope to somehow get lucky or for there to be a miracle or something. LOL.
Anyway, to my surprise and relief (was really dreading seeing only 1 gold and having that be nothing more than a useless 5-star item), I got 3 golds.
Then Dr. Mog actually showed up and turned 1 of them into a 7-star item. Hell, yes! Now just need to hope that this is a Sync.
Please be a Sync. And please be a Sync for a char whose Awakening I already have or whose Awakening I can buy from the The Record Lab.
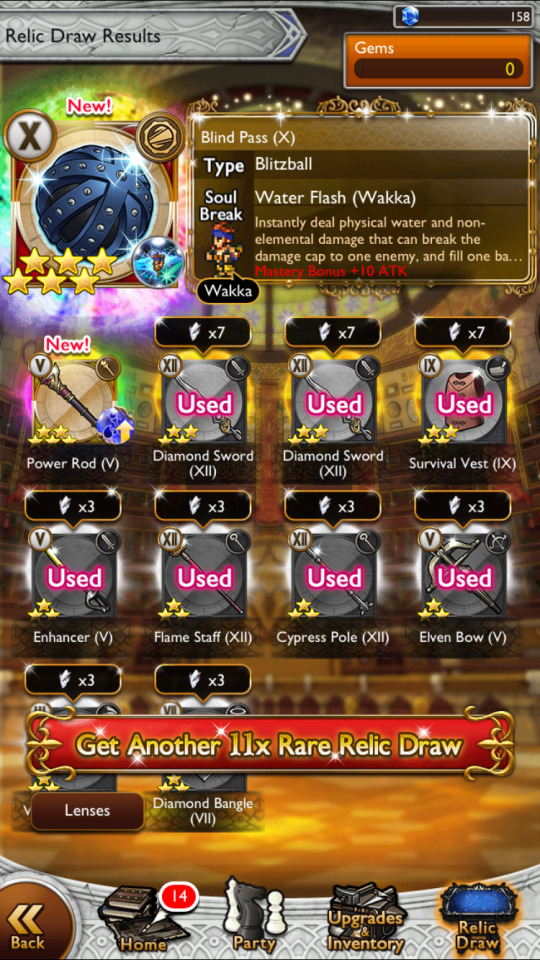
The 7-star item I got was this ball. When I saw this, I was so totally sure that I just got something that belongs to Wakka (from Final Fantasy X), which is unfortunate because I don’t have anything for him.
Hopefully, this is at least his Sync so maybe I can make him work somehow. If his Awakening is in the The Record Lab, then that’ll definitely make him usable.

The first gold I got was Tidus’s 5-star LMR2, Blitz Basics. It gives a chance to “reduce delay of the user’s actions for one turn when a water ability triggers”.
It’s new, it’s for Tidus, and he’s on my water team, but this doesn’t seem good compared to the ones that I already have equipped to him.
Right now, he’s got one that increases his water damage a bit and another that gives a chance to dualcast water abilities. Those seem way better than Blitz Basics so meh. Not gonna bother equipping this to Tidus.
The second gold I got was a dupe 6-star Ultra Soul Break that belongs to Kimahri Ronso (from Final Fantasy X). Ahh, if only this had been something new instead. Don’t even have a single BDL relic for Kimahri so can’t use him.
As for the 7-star item - well, like I said, I was so sure that this belongs to Wakka but when I got to the draw results screen, I was very pleasantly surprised to find out that I was wrong. But I’m so happy to be wrong because guess who actually owns this ball.
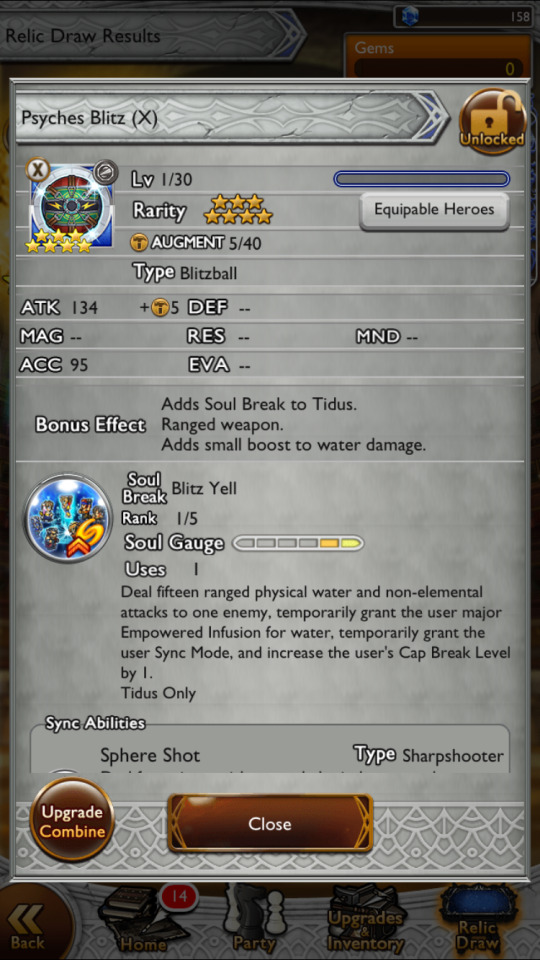
Yeah, that’s right. Just got Tidus’s SASB1, Blitz Yell. Hell, yes! So freaking happy to see this. Yes, his Sync 2’s better but having 1 of his Syncs is better than having none at all.
At least I finally have another BDL relic for Tidus. My chances of being able to deal 30% damage to Salamander have just gone up.

This was such an awesome pull that I should have stopped here. I could try the Salamander fight now and see how it goes.
But since I do need more water tech, decided to throw my 2 (the third ticket was the one you get every 15 days you log on to the game) remaining tickets here.
Unfortunately, those tickets didn’t give me anything as good or as useful as the one that gave me Tidus’s Sync.
The second ticket gave me 2 golds - Edge Geraldine’s (from Final Fantasy IV) 5-star BSB and Famed Mimic Gogo’s (from Final Fantasy V) 6-star LMR+. Both are new but meh.
Don’t have a single BDL relic for Edge and BSB’s are outdated by now so this isn’t getting used at all.
Gogo’s LMR+ is useful for the water imperil and, IIRC, I do have one of his Awakenings, but I can’t deny being disappointed at not seeing an Awakening or Sync on this pull.
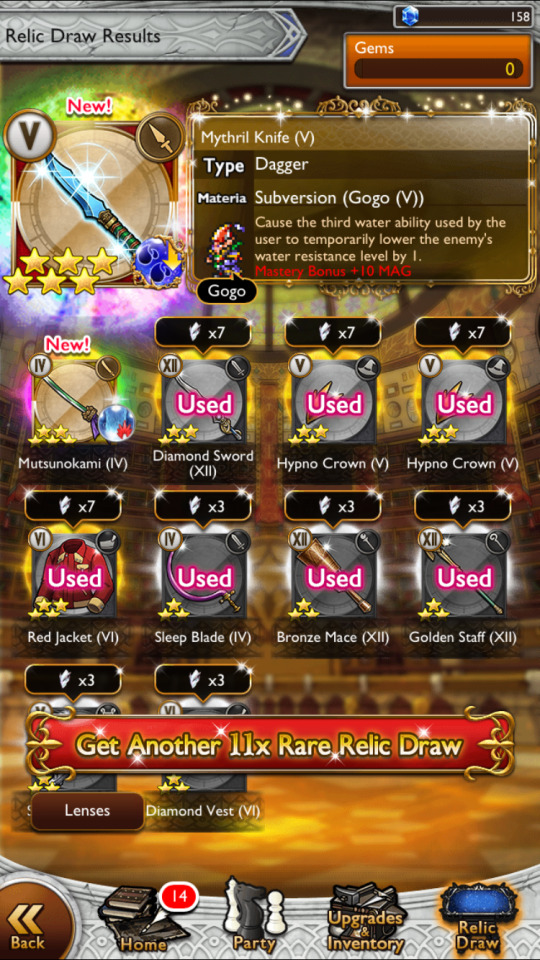
The third ticket gave me 2 golds - Gogo’s 5-star LMR and Wakka’s 6-star Limit Break Glint (LBG), Water Flash (Wakka). Both are new but also meh.
Ahh, if only I could get Gogo’s Sync to go with all these LMRs I keep getting for him. Sigh. As for Wakka, he’s useless until I can get a BDL relic for him.
What a waste of tickets. Ah, well. At least I got Tidus’s Sync.
Labyrinth Nexus Season 2, Part 2 Dungeon
So after equipping Tidus’s Sync, it was now time to try the Salamander fight. Just like Snow Giant and Kraken, Salamander is really freaking fast so had to restart a couple of times before I could get past the first few turns.
A few turns or so after I started dealing damage, Tidus, who was on slot 3 ended up getting hit with the Berserk debuff.
This prevented me from using any of his abilities or Soul Breaks so he just automatically used his regular attack which sucks and barely deals damage.
Had to restart the fight. IIRC, moved Yuffie to this slot so Tidus could keep on dealing damage alongside Bartz without being interrupted.
Had to restart the fight multiple times before I could get past this part. Yuffie getting Berserked for a bit was fine but couldn’t have her in this state forever since she needs to recast her Chain when the first one ends.
Also still needed her to keep on imperiling water. So I was trying to get Tyro to use Purifying Grimoire to remove the debuff. Also tried to time his USB1, which allows the party to avoid 1 debuff. Even equipped Ultra Cure (heals and esunas its target) on Lenna.
After finally being able to get past that annoying Berserk debuff, was able to keep going. Just when I was close to dealing 30% damage to the boss, my chars were suddenly hit with this attack that apparently paralyzed all of them.
No one could move, and I could do nothing but watch as Salamander kept on attacking and attacking until everyone died. Eff! Also, WTF just happened?
Tried again and again but the same thing kept happening. Since even Lenna couldn’t move, there was no way to Ultra Cure the status effect away.
Couldn’t use Tyro’s Purifying Grimoire either. Even his USB1 didn’t seem to be working, or maybe I just couldn’t get the timing right.
Was getting really annoyed and frustrated because I was so close to 30% already. Just needed to deal a little bit more damage to get the time-limited rewards.
So I decided to check out the AI for this battle. That was when I found out that on Phase 1, Turn 9, Salamander would inflict the Berserk debuff on whoever is on slot 3.
In order to instantly shrug off Berserk, a char needs to have at least 900 MND. Healers naturally have high MND since their healing output is based on said stat.
My Lenna has 1k+ MND so I put her on slot 3. Now I don’t need to worry about the Berserk debuff on that turn anymore.
On Phase 1, Turn 14, Salamander uses Labyrinth Maze Gate. Looks like this is the one that’s been hitting all my chars and preventing them from moving. Apparently, there’s no way to block this attack.
It deals damage and Interrupts, Paralyzes, and Slows everyone. It seems like the only way to deal with this is to get to Phase 2 of the fight before Salamander can use this attack. Phase 2 happens as soon as Salamander drops down to 70% HP.
Getting to Phase 2 was easier said than done though. I’ve lost count of how many times I’ve tried and tried this fight, only to be hit with Labyrinth Maze Gate.
I’m so close to getting Salamander down to 70% HP but just can’t seem to make it happen before that blasted Labyrinth Maze Gate hits my party. It’s so frustrating and annoying.
Just need a bit more damage. Just need a few more dualcasts of Bartz’s and Tidus’s offensive abilities to proc.
Kept on trying because I was so close to the required theshold that I didn’t want to just give up now, especially after I’ve already spent so much time on this.
After what felt like forever, I finally somehow managed to get past Phase 1 before being hit with Labyrinth Maze Gate. Hell, yes!

Ended up dying a few turns or so later. Only managed to get Salamander down to 60.3% HP. But I don’t care. I’m just glad I’m finally done with this fight.
Don’t want to do this again anytime soon. Will probably just wait for more powercreep before going back to this. At the very least, I could at least wait until I can get a Lord’s Seal: Water plus a bit lot more water tech.

Water Elemental Banner
Decided to throw the ticket I just got from dealing 39.7% damage to Salamander on the Water Elemental banner.
Was thinking to myself, this ticket better be worth it after the amount of trouble I had to go through just to get it. Considering my last 2 pulls though, was doubtful that I’d get anything good.
This draw gave me 2 golds. Was very pleased when Dr. Mog actually showed up and turned 1 of them into a 7-star item. Yay! Hopefully, this one will be new, good, and useful.
Ended up with this sword but I don’t recognize it. At least no Rank Up screen showed up so this should be new.

Got to the draw results screen and - OMFG! I did get something new, and it belongs to Tidus.
That’s right. I could hardly believe this but I just got his SASB2, Blitz Ace. Hell, yes! So freaking happy to see this.

I think I might actually have a shot at defeating physical and water-weak Argent Odin now. We’ll see, I guess.
Anyway, the other gold I got was nothing more than a dupe of Trey’s (from Final Fantasy Type-0) 5-star Glint Soul Break. Meh.
But it’s fine. The presence of Tidus’s Sync on this pull more than makes up for this useless dupe.

Conclusion
So what about you? Have you done any of these Labyrinth Nexus fights yet? How did it go? What team did you use? What do you think about these quests? Feel free to share your thoughts and opinions by leaving a comment below or by reblogging or replying to this post.
Notes:
screenshots are from my Final Fantasy Record Keeper game account
#final fantasy record keeper#final fantasy 7#featuring#genesis rhapsodos#sephiroth#yuffie kisaragi#cait sith#shantotto#tidus#lenna charlotte tycoon#balthier#and more#ffrk#mobile games#gacha games#games#ffrk banner pulls#ffrk ticket pulls#ffrk labyrinth nexus#ffrk event#ffrk fights#ffrk labyrinth dungeons
2 notes
·
View notes
Text

The Chaos was Him.
Shoot an arrow to the irreal realm, where the myths and fantastic prologue slight into his sight. He almost forgot the difference between pain and blessing, yet blood scratches to deliver refuge.
Harish. The short of his sinful name. Breathed with He/They pronouns to dying with thousand silence. So lost from celestial sparks that garnished the gracious rhymes, he changed. Spoke a word with ENTP-T ethics, yet Aries's moonlight cut away the words. Time passes, and we continue to enlighten the outermost village, explaining how the tendency to get understanding is in the meantime. The Phoenix is piping among the holocaust. Brought the chivalrous scripture to explain:
Constellation of His Favourite.
Movies.
Sci-Fi, Action, Thriller, Horror, Adventures, Crime, Detective, Dramas, K-drama, and Romance. Here a few movie/Netflix's Series also K-dramas he had watched and like:
Enola Holmes 1&2, The Queen's Gambit, Alice in Borderland, Wednesday, Elite, Stranger Things, The Rain, Anne with An E, Knives Out 1&2, One of Us is Lying, The 100, Peaky Blinders, and so many. Almost all of Lee Jongsuk, Park Seo Joon, Ji Chang Wook, Song Jong Ki and few famous korean actors and actresses dramas.
Music.
He is the big fan of BTS, DAY6, NewJeans, STAYC, Le Sserafim, almost all of YG Ent. Group, Taylor Swift, girl in red, NIKI, Neck Deep, LANY, Rex Orange Country, James Arthur, Chase Atlantic, The Weeknd, Megan Thee Stallion, Arash Buana, keshi, Coldplay, Dere, Last Child, Dewa19, Kahitna, and so many.
Books.
Historian Fiction, Romance, Fiction, Politic, and Law.
Game.
For Mobile Legends ID you can ask him through DM. He casually take on the roam, midlane, explane and goldlane position.
NOTICE.
1 note
·
View note
Text
Dynasty Legends:Warriors Unite
The 4th Anniversary Celebration of Dynasty Legends is open! Explore the Grotto Realm and challenge the Grotto Beast. Join this point-plunder war and experience the brand new Guild gameplay. Furthermore, you can join more events to win tons of gifts. Limited for anniversary. Come on!
【Game Features】
Intense Battle Mode
One Versus All! Smash your enemies like mowing grass on your mobile phone. Fast battle pace, control your heroes to cast their unique skills. Wipe out thousands of enemies with a single hit!
Various Game Modes
Real-time Co-op and PVP, intense battles. Evade, block and counter attack. Your enemies & allies are all over the world. Can you be the hero of all heroes?
Giant Boss fight. Hunt them down with your outstanding control! No one can hold you back even the demons!
9V9 real-time PVP, fight alongside your friends and dominate the arena.
Legendary Heroes
More than 50 heroes from ancient battlefields are waiting for your command. Every hero has their own way to fight, choose wisely! Awakening mode, a breakthrough of the hero's power!
Ultimate Game Experience
Designed for mobile phones. Smooth control, realistic hit reactions, stunning visual effects and high quality 3D graphics. It will take you back to the real ancient battlefield.
Customize Freely
Exquisite costumes and gorgeous wings for every hero. You're not only the strongest but also the coolest.
Contest of Champions
3V3 cross-server team battle is open! Build your strongest team and join the Contest of Champions to battle with other teams. The winner will be the leader of the campaign against Chiyou!
Mount Bloodline
Cultivate the mount via specific items and purify the mount bloodline to improve the attributes greatly and change the appearance of mount freely. A true hero deserves the best mount!
New Gameplay
The mysterious Grotto Realm is unlocked in Domain system. Heroes of all guilds, gather together to attack the Grotto Beast and plunder more points. The top players can win tons of rewards and be admired by other players. Come on and prove yourself!
Stratagem prevails all. New Feature: Stratagem is released!
New Officers
Feel the prowess of mighty Ma Chao! New officer Ultimate - Ma Chao arrives! He is prominent on the battlefield for his courage and invincibility.
Crane feather ripples the times of chaos! New Genius - Lu Su is updated! He is a chivalrous strategist and a master in both civil and martial affairs. He is well known for his great contribution for Eastern Wu.
New Divine Weapon Awakening
Phoenix soars, flame Blazes! Sun Shangxiang's Divine Weapon Awakening: Phoenix Presence has appeared!
New Spirit Pet
Grievance avenger rises from karma fire! New Spirit Pet: Yazi is here!
4th Anniversary Celebration
Join the related events Fireworks Greeting and Best Luck to win the 5-Star Units limited for the 4th anniversary. Don't miss the chance!
Facebook Fanpage: https://www.facebook.com/DynastyLegendsGame/
Customer Service: [email protected]
Read the full article
0 notes
Text


My character from legend of the phoenix mobile game! My guilty pleasure money sink.
#legend of the phoenix#lotp#mobile games#video games#art#artwork#art blog#my stuff#my art#my characters#oc#original character#game character#illustration#artists on instagram#artists on tumblr#digital art#character design#outfit design
1 note
·
View note
Text
Final Fantasy 1 Pixel Remastered Review
Hello everyone! Welcome to the Soupy Bowl!
Thank you for taking you time to look over my first post and my first review on this Tumblr page! I greatly appreciate it and without further ado! Let us get into the review!
-Final Fantasy 1 Pixel Remastered Review-
-Platforms Available: Steam, Mobile, Switch, and PlayStation-
-Reviewed on Mobile and Switch-
Now let us set the stage, Square at the time prior to the release of Final Fantasy wasn’t doing so hot, and for a while, they were prepared to close their doors and hang up their coats until eventually, they made one last ditch effort to make a successful game, creating a JRPG that essentially revolutionized the JRPG genre in general, to the point where if you say RPGs, you’d think of Final Fantasy or Dragon Quest. Now with the current day climate of RPGs, you have a lot of other games, Xenoblade, SaGa, Personas, Shin Megami Tensei, the list goes on and on and on! But for many, if you grew up around the 90’s and early 00’s you’ll most likely think of Final Fantasy or Dragon Quest.
On December 18, 1987, Final Fantasy 1 was released in Japan, followed by the North American release in May of 1990.
Now, for reviewing the game, I am the type of person that believes you should play the current version of the game, don’t stress yourself with all the crazy bugs and glitches in the original version of Final Fantasy, it can be bad.
-Examples being-
The intelligence stat does nothing.
Some Spells don’t work or will cause the opposite effect, like infamously Lock 2 which would lower evasion, instead INCREASES it.
Elemental Weapons are just regular weapons and don’t have their intended effects.
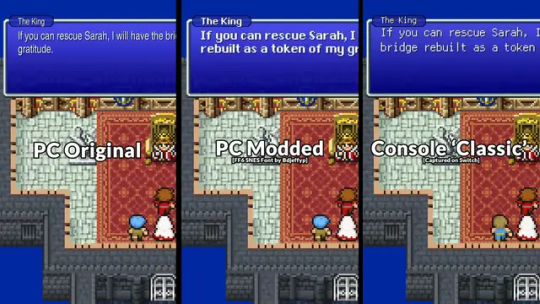
Those are some things that can get annoying, and this game doesn’t even have Phoenix Downs which are the items that help revive you in battle, now I recommend personal the Pixel Remastered versions for newcomers, especially on Switch and PlayStation as they include a Boost setting which can help you earn Gil and XP, at 0x,0.5x,1x,2x, or 4x gain. And as well they have the change of the classic font which is much better than the original modernized font.
Now enough of the chatter, let us get into my experience and the review for Final Fantasy 1 Pixel Remastered!
-Story-
SPOILER WARNING
Now this will be the easiest thing to summarize, the world is going into disarray as the four elemental crystals Earth, Wind, Fire, and Water have been captured by the four fiends, Tiamat, Kraken, Lich, and Marilith. To start off your journey you go first to save the princess of Cornelia from the rouge knight Garland, after defeating him, you are sent off to go off to restore the light into each Crystal and then travel back to the location where you fought Garland originally, as a time machine was there the whole time. Travel back and you eventually fight the fiends again, then head towards the main throne room and encounter…. GARLAND! Again? Well, he turns into Chaos and then you kill him. The world is saved, and your legends are passed down through time.
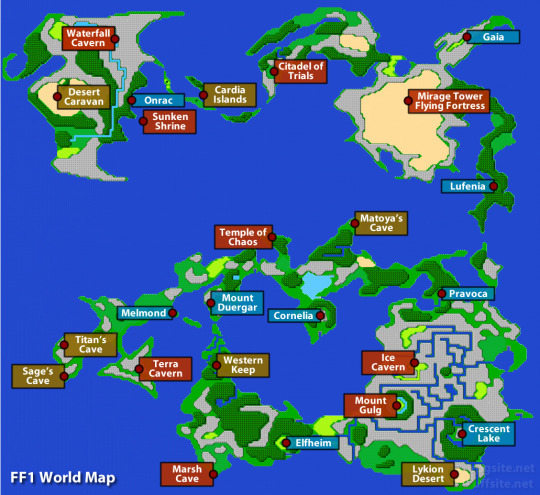
The story is simple, easy, and quick to bite on, the world is in trouble and now you got to save it, and most times you’re just helping townspeople to unlock the dungeon and fight the fiend, head to the next town and repeat!
Simple fetch quest, but nothing too crazy, you help towns folk and they help you to the next area, which for being an old game, you really don’t need a guide, especially with the pixel remaster and the better translation, townsfolks will tell you where to go and you won’t get lost easily, the Map keeps you in an inner circle of the continent until you eventually help dwarfs to explore the outer area of the continent!
-Gameplay-
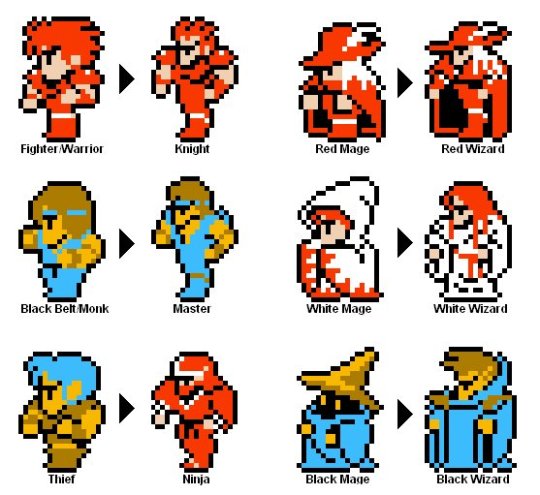
Now you have six classes, Fighter, Black Belt, Thief, Black Mage, White Mage, and Red Mage.
Fighter – Your standard warrior/knight, hard-hitting, can tank hits, and once they gain a class upgrade, they can cast low-level white magic. All around your main attacker.
Black Belt – The future monk class, they are a bit weaker and inaccurate in the beginning but stick with them, and they will be a hard hitter, best part is that they need no weapons, only armor to keep them well rounded.
Thief – Although its name is Thief, they cannot steal in this game, it wasn’t introduced until the third game, so for now all they can do is help you run away (but it’s not with the flee command), hit fast, and go first. But with their class upgrade, they will be able to use all weapons, wear all armor, and use black and white magic, low-leveled of course.
Black, and White Mage – Combining them together because they are nearly similar just working with a different magic, White Mage is your healer, while the Black Mage is your magic damage dealer, eventually they get their class upgrade and get their final tier magic which is Flare for Black Mages, and Holy for White Mages.
Red Mage – Red Mage is an interesting mage because they can use Black and White Magic, as well as use heavy armor and swords. Although they can’t learn the final levels of magic with their class upgrade, I’d say they’re an amazing class to pick.
My team was Warrior, Black Belt, Thief, and Red Mage for my playthrough, and I’d have to say it was fun, you’d have a pretty strong team physically and defensively, although magically my team was lacking as if I wanted to use any spells to heal my team I’d have to stop attacking with my red mage to heal, but it was a small minor problem.
Now this is a basic RPG, and that is ok, it was the first game, and you had the command of Attack, Defend, Magic (if you were a mage), Item, and Flee, basic but good, as it doesn’t take much to know how to play the game, you kill enemies, get Gil and XP and level up eventually. The only difference that does occur is some enemies are weaker than other elements so you might have to use different magic on them but nothing too brain-taxing.
Eventually, you see enemies being recycled and just recolored to show they got stronger, but you’ll be fine, this game does require some grind as some items eventually cost a lot of money, especially spells! And the power creep is normal but honestly, if you rush through the story, you might find some areas difficult due to the enemies buffing up in power, or some enemies hitting you with paralysis, or worst as some can petrify you and if they get your whole team then it’s an instant game over. But with the Pixel Remastered, you can put battles into auto so grinding sessions isn’t too difficult if you just want to gain levels.
But now away from the combat, let us go to the main areas you explore, the maps, from the world map to dungeons. Now the world map isn’t that huge as we stated before but exploring it can be fun, you get a boat, then an airship eventually (although it can’t go over mountains because of logic), although you can travel to your heart's content, it’s freeing and not too overwhelming. Also, the dungeon layouts are basic, usually just multiple floors with chests, enemies, and dead ends alike, only they don’t have any points to save in the game but with the Pixel Remastered, you have quick save so if you die you can save before tough battles and auto-saves help you a bunch.
-Personal Experiences-
With this playthrough of Final Fantasy 1, I already had a ton of RPGS under my belt, and for Final Fantasy I had 2 games under my belt before this game, so I knew what to do in a general aspect to traverse in this game. Grinding went easy but especially thanks to the Boost mechanic in the console releases of the Pixel Remastered, granted I only used 2x boost for XP and Gil when needed. Fighting through all the fiends and it has been normal, only having issues at Tiamat and then at the final boss Chaos. All around I enjoyed my experience of my time with Final Fantasy 1, it was the origin of the series, Cid being mentioned, the Airship, spells, Bahamut, and the classes. This was the beginning, and it’s sweet but not a starting point of Final Fantasy, try another Final Fantasy like X, because Final Fantasy 1 is a game you’d play to see how the series started, and if you enjoy it great, but there isn’t too much once you get into an hour of gameplay.
-Final Statements-
So Final Fantasy is a basic RPG, with some difficult points that could annoy you but as the starting point of the series, it had its appeal as it launched Final Fantasy to become the large series it is today, if you’re a diehard Final Fantasy fan or a fan of the RPGs in general and you want to see how the series became to be, please give this game a look, but on the Pixel Remastered, as I believe it is the best version you can get currently.
My Rating for the Final Fantasy 1 is 7/10
-Link to the Images Used-
Donaldson, A. (2023). Pixel Font Comparison. VG247. photograph. Retrieved August 1, 2023, from https://www.vg247.com/final-fantasy-1-6-pixel-remaster-console-definitive-status-frustrations.
Donaldson, A. (2021). FF1 World Map. RPGSite. photograph. Retrieved August 1, 2023, from https://www.rpgsite.net/feature/11518-final-fantasy-1-maps-world-dungeon-town-maps-for-ff1.
#anime and manga#final fantasy#writing#review#action adventure#rpg#jrpg#jrpg games#gaming#video games#videogame#playstation#pc games#games#nintendo switch#switch games#anime
1 note
·
View note
Text
Legend of the Phoenix Codes, 2023 April (DAILY!)
Legend of the Phoenix is an exciting mobile game that has won the hearts of players worldwide. It is an adventure game that allows players to take on the role of a powerful queen and lead their kingdom to victory. To make the gaming experience even more enjoyable, the developers have added usable codes that offer various rewards to the players. Redemption codes are a set of characters that can be used in-game to get different rewards such as items, gold coins, and other in-game resources. Check out our Legend of the Phoenix Codes guide without wasting time!
First, let's talk about what Legend of the Phoenix are. Legend of the Phoenix codes are a series of letters and numbers that can be redeemed for various in-game rewards such as gold, diamonds, stamina, skins, and even rare cosmetic items. The best part about Legend of the Phoenix codes is that they are completely free to use. All you need to do is enter the code in the designated field within the game, and the reward will be added to your account. These codes are a great way to get ahead in the game without having to spend real money on in-app purchases. While you are successful in these duels, you may also need free prizes. We have listed the Legend of the Phoenix gift codes you need in this guide.
Make sure you always stick to naguide for the latest and greatest code guides before proceeding with the rest of this guide. We have articles covering Doom Clash Codes, Astral Lord Origin Codes, Demian Saga Codes, and much more.
Legend of the Phoenix Codes
#LegendofthePhoenix
Read the full article
0 notes
Text
Alliance Rip Through ALGS Competition With One of the Least-Picked Characters in Apex Legends
Split Today, Round 2 of the ALGS got underway with a matchup between EMEA Region Groups A and B. Three legends have been consistent throughout the shifting meta, but one team shocked the competition by playing a character that receives very little attention from both the competitive and casual gaming communities.
Alliance ran the composition of Valkyrie, Seer and Rampart for all six games on day one of the EMEA Pro League, to great success. Using the Amped Modder, ALL won one game, racking up 26 total kills, ending their day in third place with 56 total points.
With the Season 16 changes overhauling the class system, many teams have picked up Catalyst, using her Dark Veil as an alternate rotation option to Bangalore’s Smoke Launcher. The ability to block the opponents’ line of sight helps keep teams safe while transitioning to safer grounds, but it crucially does not block bullets, a situation where Rampart shines. Using the Mobile Minigun “Sheila”, Alliance can to spam teams making their way into the ring, demonstrated against Pioneers in game 3 of World’s Edge.
Rampart currently sits as the second least-played legend, only holding a 1.4% global pick rate across all players. In comparison, Bangalore, a meta staple in both splits, sits at 7.4%, with a 50% pick rate in the recent Split One Playoffs across all participating teams. The Professional Soldier has already seen a lot of play in other regions, as teams in APAC-S have trended towards compositions involving Bangalore, Catalyst, or both legends.
The utility that Rampart offers to a team is more than just Sheila’s high damage. She’s able to poke squads and pick fights without wasting ammo and from the safety of Amped Cover, allowing Alliance to raise their evo shields and conserve resources while keeping an eye out for their next rotation. Valkyrie’s Skyward Dive allowed ALL to quickly set up a defensive perimeter in their matches, and deter any teams from pushing in on their position, allowing Rampart to freely farm damage without fear of retaliation if she goes down.
Oscar “Yuki” Jiang picked Rampart for all six games, singling out opponents with Sheila’s fast fire rate and damage from a relatively safe distance. Game 4 featured a fight against Phoenix Legacy, where despite getting EMPed before they dropped down, no members of ALL took more than 50 damage after engaging, thanks to Rampart’s massive damage output. This allowed them to quickly reset without any members going down for the game-winning push.
With their third-place finish, ALL ends day one with 18 league points. They will return on March 18, 1pm CT, for Groups B vs C. Fans can directly spectate Yuki’s Rampart on his Twitch channel, alongside his teammates, Hakis and Effect. Spectators can also keep up with the league standings on the PlayApex Twitch and ALGS YouTube channels.
Read the full article
0 notes
Last Seen Blogs

chocomilkshake
☄ ☄ ☄ ☄

bourbonhiigh
𝐄𝐓𝐄𝐑𝐍𝐀𝐋 𝐒𝐓𝐔𝐃 .

salieri173069
salieri 173069🔞

klik-mag-blog
Klik-Mag.com

paoolamoon
Pao🌙