#lining
Photo
summer binder picture tutorial
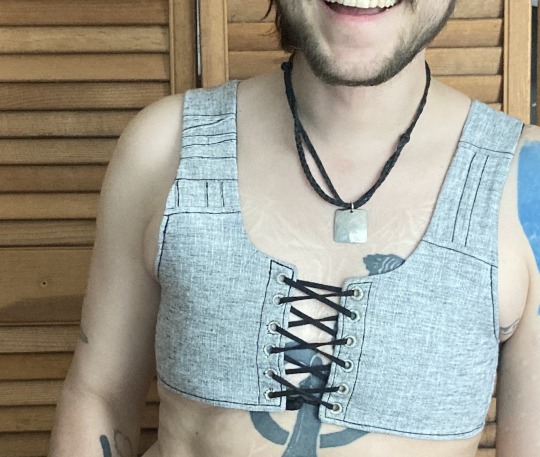
this is the third binder ive made for myself recently and the first one i’m writing up. it’s designed to do a few things: 1) allow me to put it on by myself without dislocating my shoulders 2) allow me to breathe well enough to partake in normal activity 3) be cool enough to wear throughout a muggy 90-100F summer 4) not constrict my ribs in a way that aggravates my lack of connective tissue and causes intense pain.
this has become necessary even though i had top surgery many years ago, because when i had it i was extremely skinny and since then i’ve increased in size by about 50%. this has been really fucking good for my health in every single way* except that when my chest is squishy or moves at all it’s So Goddamn Triggering for me. but also since ive had top surgery ive developed and/or been made away of a plethora of chronic conditions that make every single commercially available binding option medically impossible. unbound, my chest is pretty much what you’d expect for a chubby cis guy but venturing out into the world in just a tshirt no longer works for me
*anyone who badmouths weight gain or fat bodies in the notes WILL be blocked
under the cut are a bunch of process pictures and explanations of what they all mean:
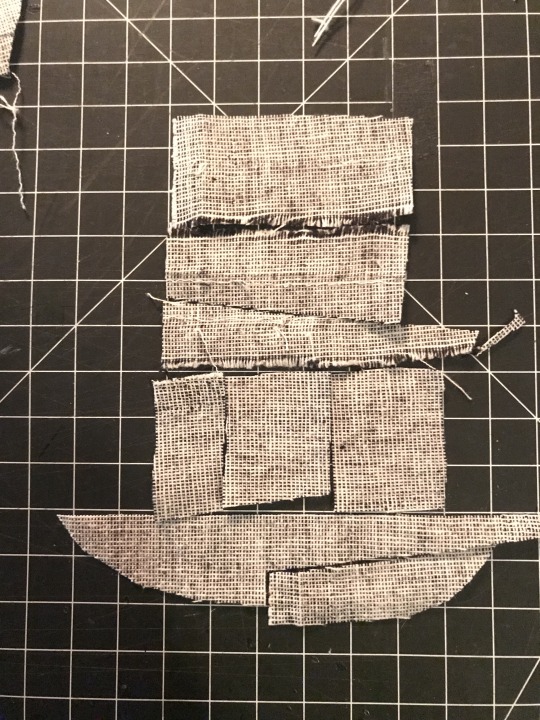
first i’ll give you a look at the pieces and measurements:
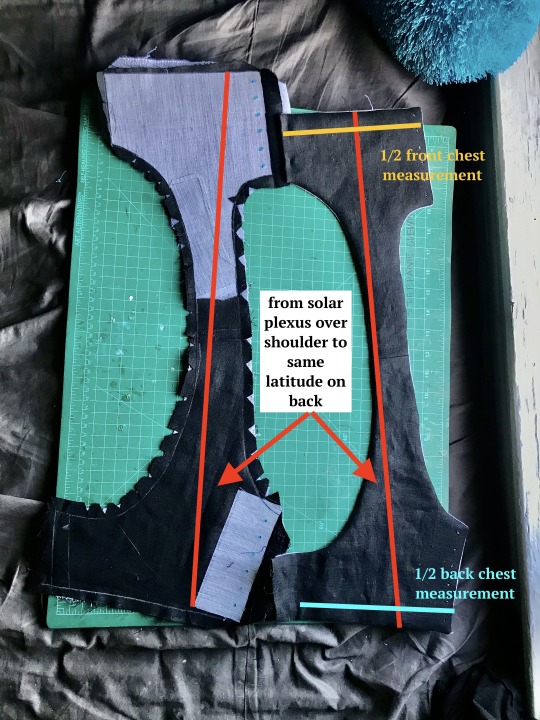
most of the seams are sewn in this picture and one half is turned inside out, allowing you to see both the finished dimensions (right) and the placement of the fusible horsehair canvas that gives this lil scrap of linen any structure at all (left)
to get your chest measurement, you’re gonna have to do some math:
first measure above and below what you want to bind. average these numbers. mine are something like 32 and 34, which average to 33. subtract a few inches--this is to allow the air movement between the laces at center front and back, critical in the summertime. i deleted 3 inches bc i like that number but you can go bigger if you want. the more inches you subtract here, the more youll be able to ratchet all your chest material down later, but at the same time you need to leave enough fabric for a sturdy garment. let’s say a range of 2-6 inches/5-15cm. by taking your measurements this way, you’re essentially measuring the chest you would like to have. that + the horsehair canvas work together to compress any squishy tissue/force anything that doesnt compress up and to the outside (basically into the armpit/lower shoulder--the chest might stick out but it will give a very puffed chest captain america pectoral silhouette)
you can also see how ive clipped my curves and pre-drilled my lacing holes. i used the marlin spike on my knife to open up the holes on the interfacing side, mainly as a way of marking them. this worked well bc the interfacing’s glue kept the linen from raveling
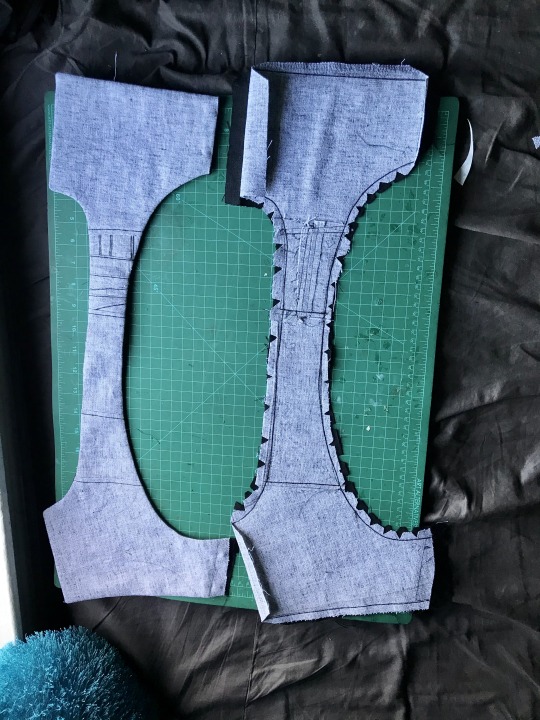
this is the same stage but looking at the non-interfaced grey linen/cotton blend (the black is some 100% linen from my cabbage stash). you can see ive broken the solar-plexus-to-back measurement up into a bunch of pieces to save on fabric but that’s not necessary. my original pattern was just two pieces (front and back) and chopping the straps into thirds on both sides was aesthetic
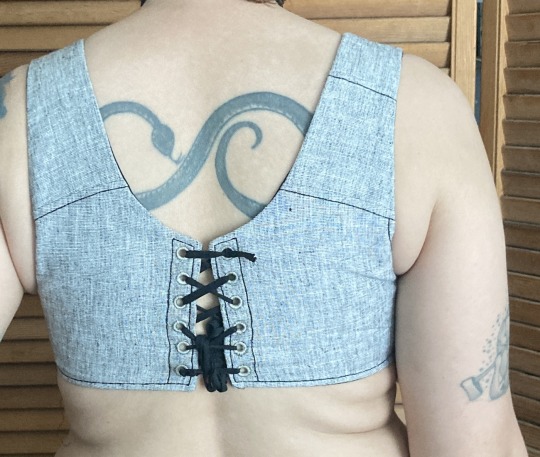
in the following picture you can really see how this is really just overgrown regency stays:
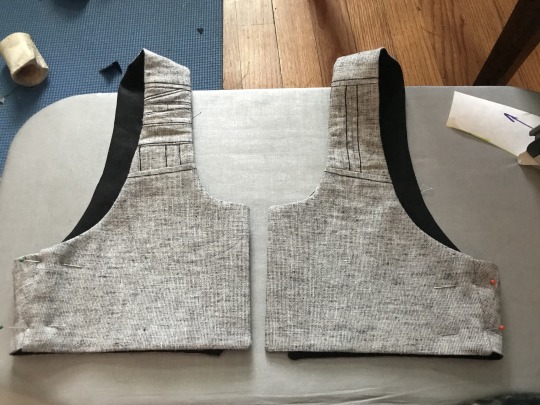
i thought about doing side lacing but didn’t think that would be comfortable for me. on the front, the side seam allowance was pressed inwards before turning to create a finished looking slot. on the back the side seam is left unfinished with an extra wide seam allowance, and is inserted into that slot.
here’s a closeup on it pinned in place (you can adjust the angle of the side seam and the fit during this pinning stage):
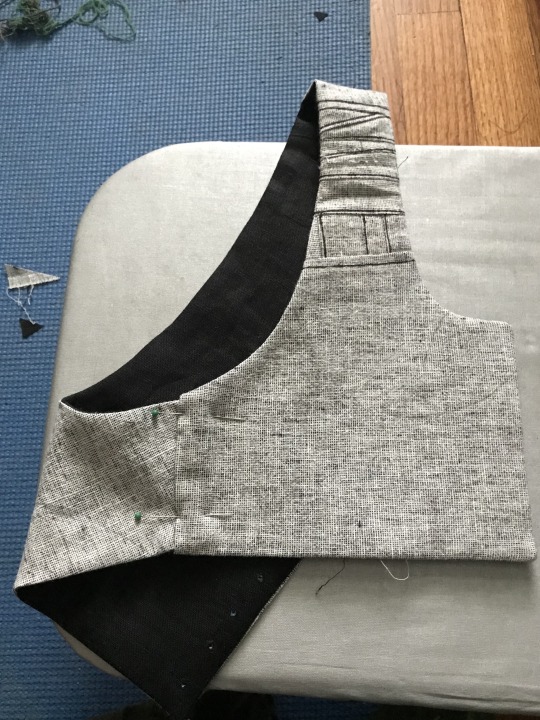
that side seam was just topstitched in place once i had the fit how i liked it, and the armhole was reinforced with more topstitching
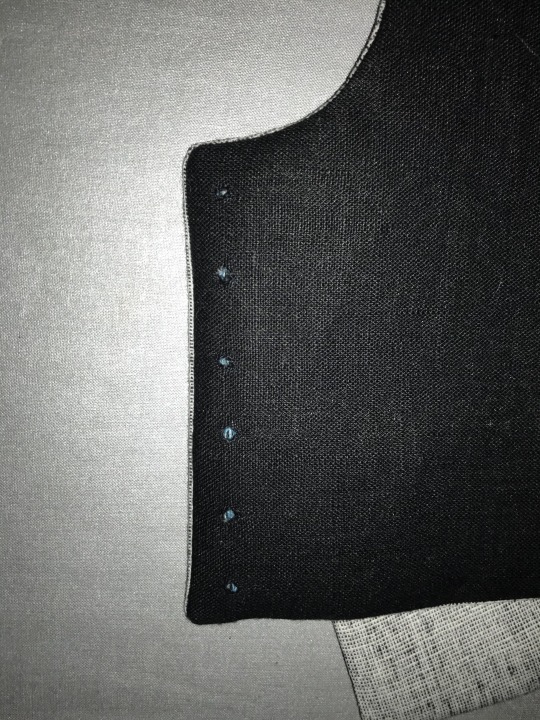
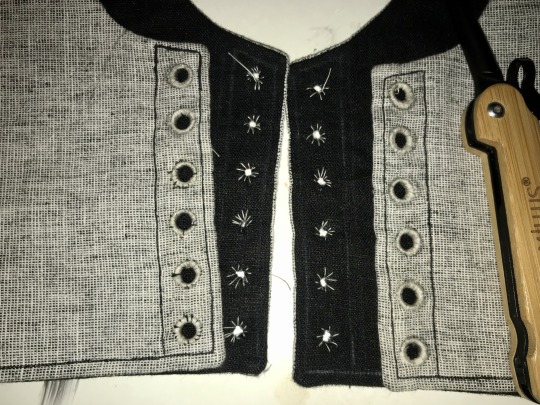
alright, time for eyelets: first, you can see how well the marking worked:
next, two rows of basted eyelets (left), one row of eyelets sewn with a doubled and waxed cotton thread (center right), and one row of eyelets opened and stainless steel rings placed (right).
next time i’m going to mark the eyelets same as i did above, but do this step differently--i’ll mark and baste the steel rings in place BEFORE widening the eyelets. this is bc i had a lot of problems keeping the eyelets on center
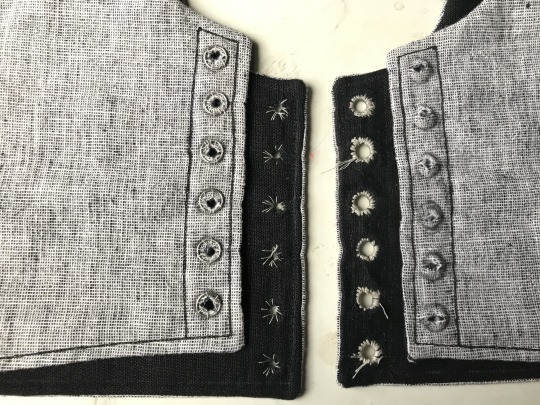
eyelets half done on this one! on the left are eyelets sewn with doubled and waxed cotton thread and on the right eyelets sewn with quadrupled and waxed thread. the center is basting again. i was able to force the holes back in line while sewing the eyelets but it was kinda annoying. adding a second picture that doesnt have great focus but hopefully shows how that process worked and shows the spike clearly

i ended up using this white cotton thread because it’s stronger than my black cotton thread (which the rest of it is sewn with). [eta: after this was first posted, i pressed the whole thing heavily, which effectively de-waxed the thread, and i dyed the whole thing a medium charcoal grey, the thread blends in perfectly on the lighter side and isn’t such a sore thumb on the darker side]
bonus: the piecing layout for that little piece of strap. the whole light gray half of the binder was made from 1/2 of one of the legs i cut off some linen suit pants to make slutty camping shorts last year and i really really didn’t want to break into any of the other three halves for this garment--i have Plans for it
overall the fit of this is incredible. it DOESNT hurt my ribs which every zip-up garment ive been able to find (and it is difficult) does due to really thick elastic at the base. it doesnt aggravate my sensory issues with the synthetic fibers that every commercial option is made of. i can walk up a hill or stairs, or go to pt, without getting too out of breath. i can eat with it tight, or loosen the front easily and without taking it off to make eating easier and less nausea-inducing. it is reversible!
best of all the lacing at the back gives the garment enough movement for me to get it on without dislocating, and the interfacing and steel rings give it structure once it’s on. the shaping comes only from fusible horsehair linen canvas and stainless steel rings like youd use for chainmail, there’s no boning at all, which makes it very quick to sew (except the eyelets, but metal grommets would be sturdy and quick provided theyre of good quality)
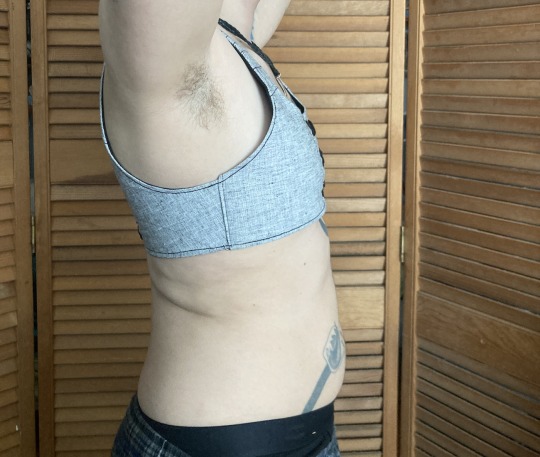
there’s a small amount of gaping on the outside of the shoulder strap, which i plan on fixing with a tiny tiny dart in the armpit, i want to add pockets to tuck the laces into, and i need a better lace for the back, but it’s completely wearable in time for the 90 weather next week which is all i wanted. i’ll do a reblog when it’s perfectly finished with an update on the fit but for now it is done enough
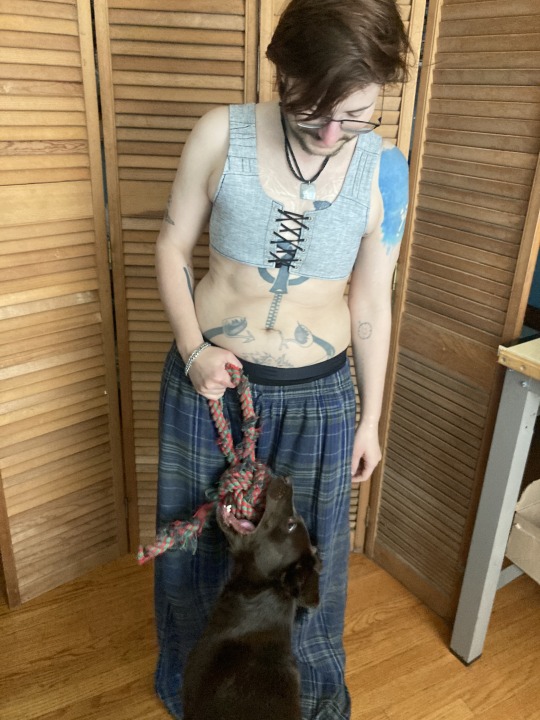
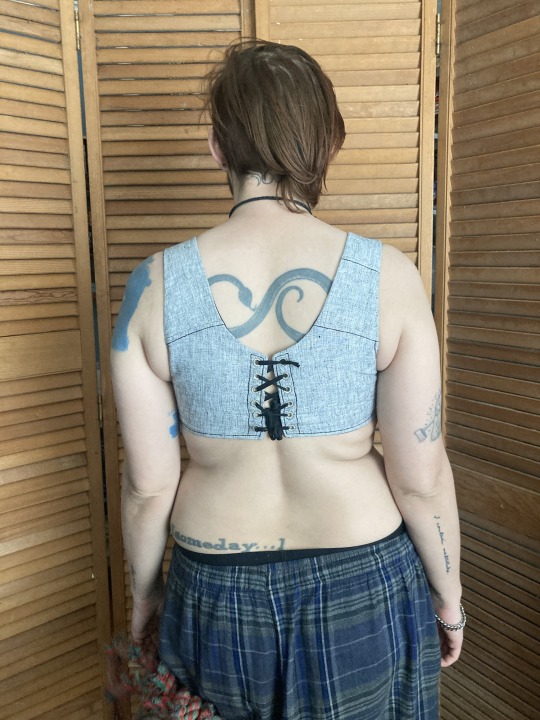
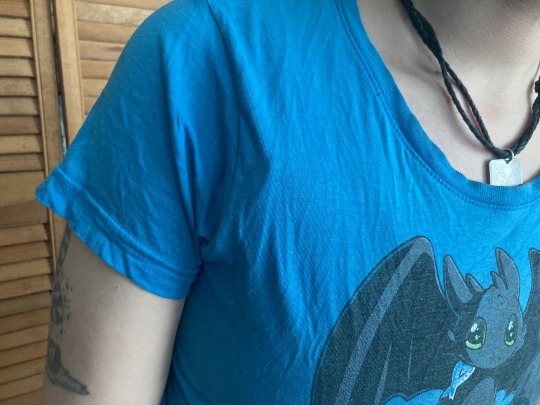
the little ridge where it doesnt lay flat against the shoulder is most visible with just a single t shirt over it. with a flannel or a sweater, it disappears, and by itself, it’s hidden in movement
eta: after dyeing this, i relaced it a bit looser in the back and that gape mainly disappeared. ive decided to leave it in instead of smoothing it with a dart because the loose fabric gives space for my chest to expand when breathing and shapes my silhouette in a way that emphasizes my shoulders
#sewing#trans#trans man#binding#body shaping#cotton#disability accommodations#physical#sensory#eyelets#fusible interfacing#historical fashion#regency#horsehair canvas#lacing#linen#lining#new build#drafted pattern#picture tutorial#piecing is contemporary too#stainless steel#stashbusting#stays#structured garment#treadle machine
1K notes
·
View notes
Photo
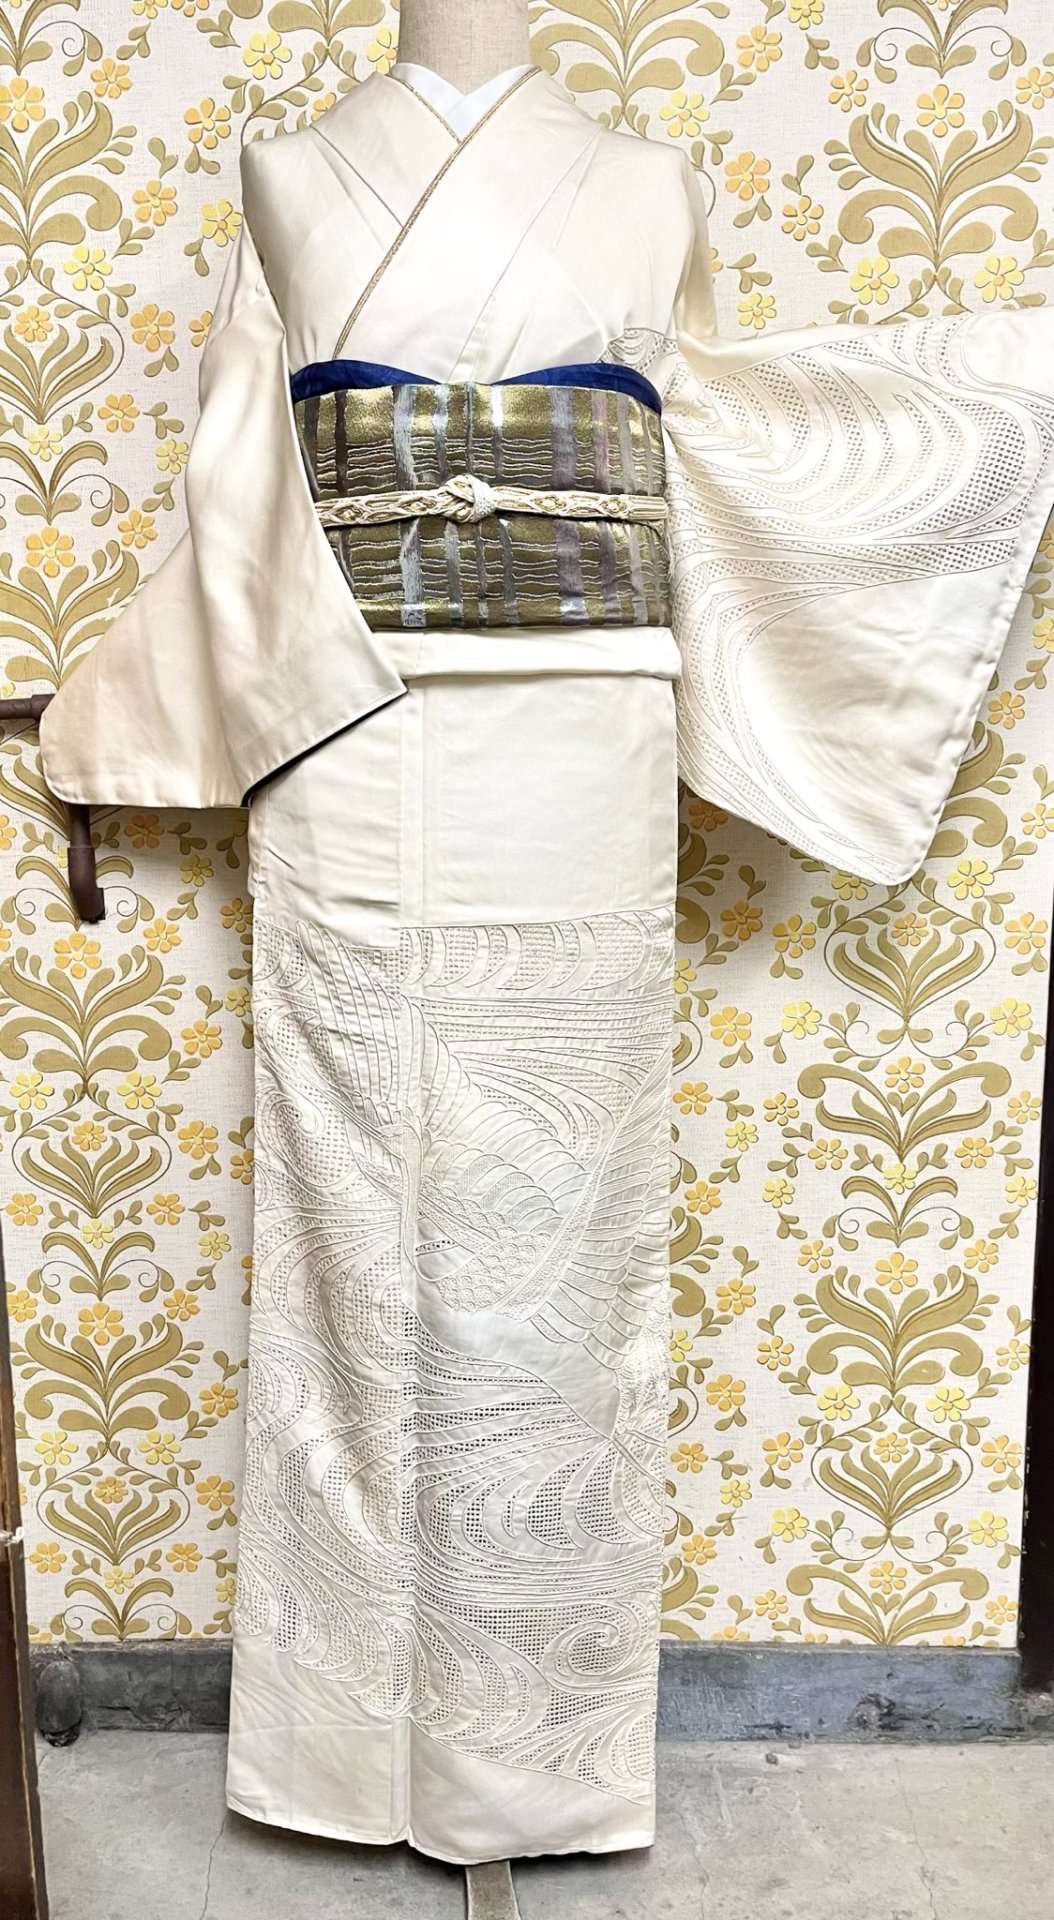
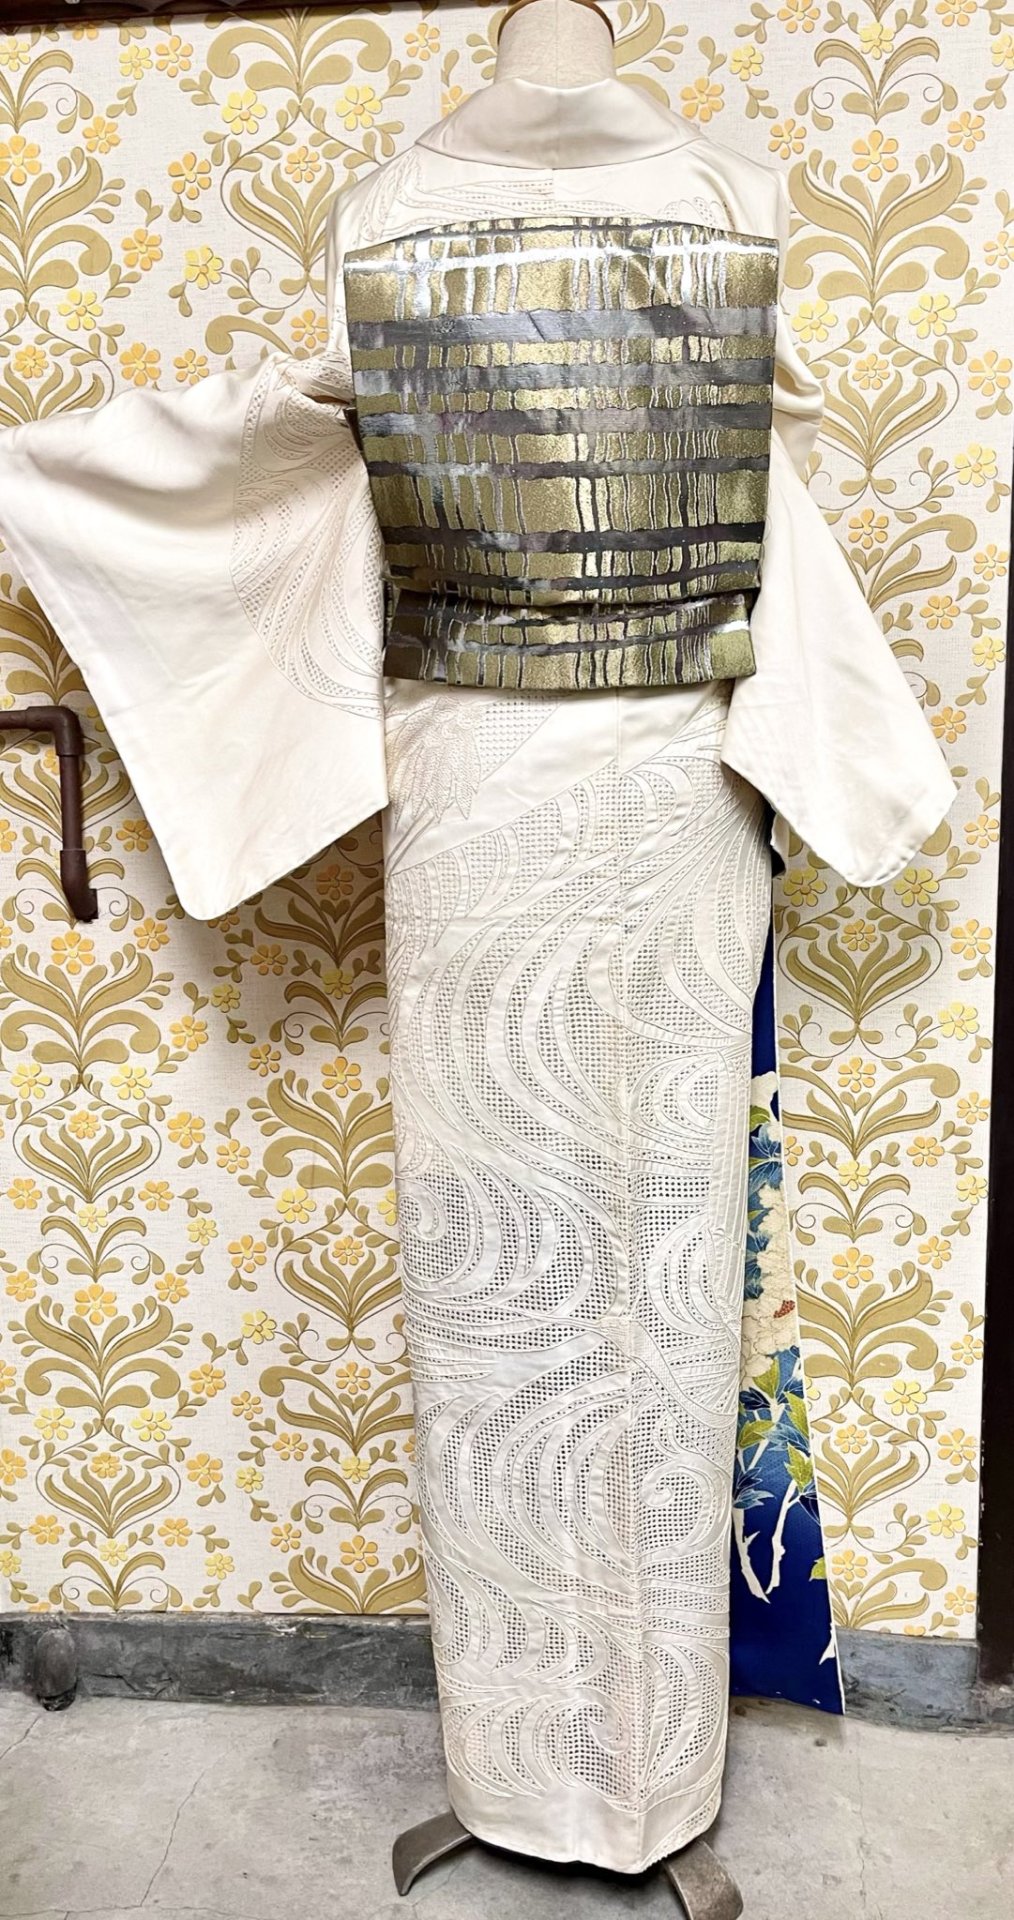
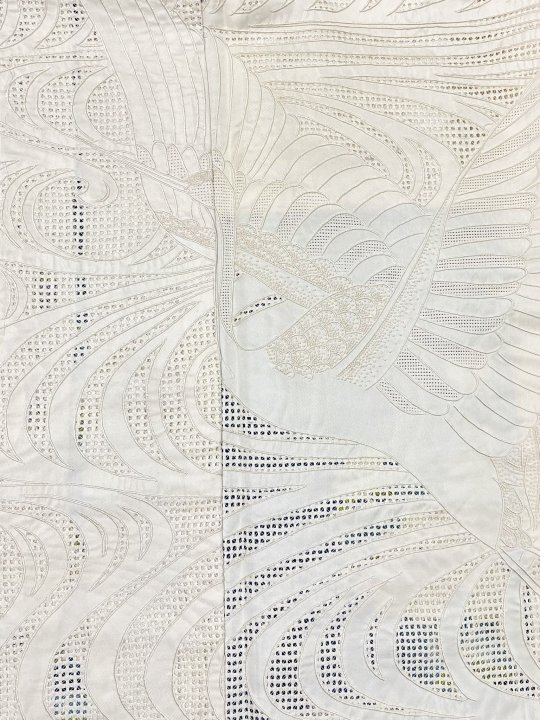

Unusual houmongi kimono, with soaring crane and swirling water pattern entirely done with open work and sagara embroidery.
On last picture, you can see the singular hakkake (lining). The style (heavily patterned and not matching the main kimono) and tailoring (non matching motifs between panels) of this lining make me think the cream kimono has been altered by reusing the fabric of a blue kimono.
Such details showing how garments were used and loved by past owners are always so cool!
#japan#fashion#kimono#obi#crane#tsuru#embroidery#sagara#hakkake#lining#tailoring#kimono tailoring#着物#帯
197 notes
·
View notes


Text

Lining SS24 shot at Paris Fashionweek
#lining#paris fashion week#chinese fashion#coats#black outfit#minimal outfit#monochrome outfit#ootdstyle#styledujour#minimalstreetstyle#hypebaestyle#street style#fashion photography#minimalstyle#sketchonista#street fashion#ootdinspiration#ootdshare#ootdfashion#outfit inspo#outfit inspiration#outfit ideas#style guide#style ideas#styleinspiration#daily wear#spring trends#spring outfit#fashion trends#photography fashion
11 notes
·
View notes
Photo

Burberry Prorsum Tartan
65 notes
·
View notes
Text

Lining F/W 2020 Menswear Paris Fashion Week
11 notes
·
View notes
Text

Happy 9th Fazbear birthday!!
Day 14 of drawing fnaf doodles till the fnaf movie comes out
#doodles#five nights at freddy's#fnaf#fnaf doodles#fnaf 1#freddy fazbear doodle#focy the pirate doodle#chica the chicken doodle#bonnie the bunny doodle#freddy Fazbear#bonnie fnaf#chica fnaf#foxy fnaf#freddy fnaf#fnaf 9th anniversary#happy fazbear birthday#traditional art#lining
22 notes
·
View notes
Text


Fuck around
Find out
#artyeen#sona#asta#demon#goat#baphomet#horns#teeth#dark#art#artwork#sketch#sketchbook#digital#ink#inks#lines#lining#black and white#witchy#vibes#metal#punk#goth
120 notes
·
View notes
Text

Just wanted to say... the lining for the top of the coat is ready! And there is a cool drippy pattern in the back, my artistic license. In general, I'm having such a hellish time, still. But! I also made another cuff that turned out right, so with that method I can redo the first. The shirt has half a zipper installed. Tonight, hopefully, I'll give it some ruffles. Baby steps.
The other thing giving me grief though is the pants. I would have made my own pants but there isn't time, and now I'm having such trouble finding the right cut in my size. By American sizes, I'm not considered an adult.
In fact, this coat I'm making is like a very mini replica, roughly a boys size L. 😆
9 notes
·
View notes
Text
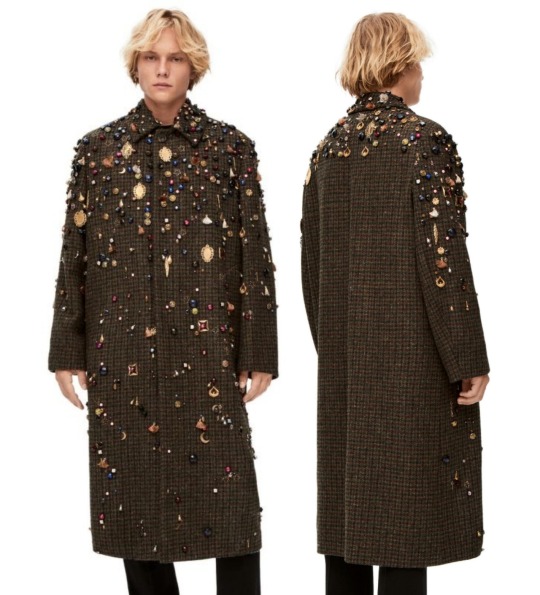

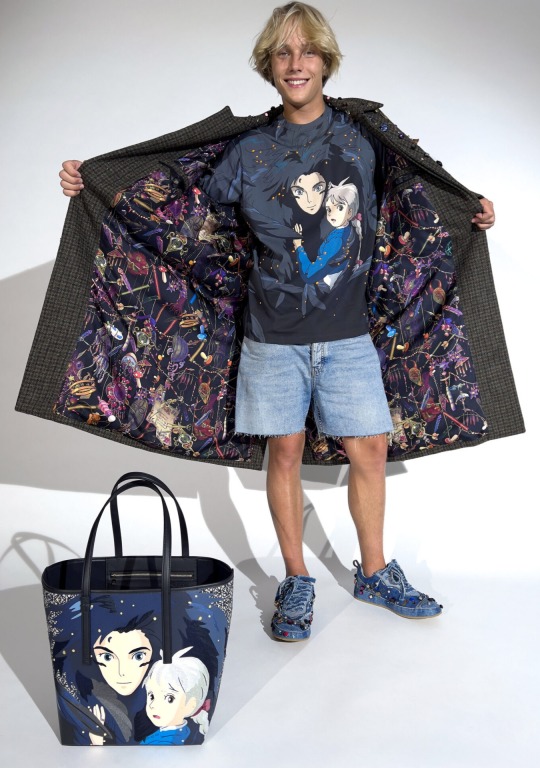
Embellished coat, LOEWE x Studio Ghibli, 2023
From the Howl's Moving Castle capsule collection.
'Single breasted coat in Harris tweed with all-over hand-sewn jewel embellishments in dégradé effect, rendering each piece with distinctive features. With sides pockets and internal pockets. Featuring Magical Room scenery print lining in silk.'
#loewe#studio ghibli#howl's moving castle#fashion#details#2023#jonathan anderson#surface decoration#harris tweed#coat#surface pattern#textiles#textile design#collaboration#fashion collaboration#collab#fashion collab#lining#pattern#surface pattern design#pattern design#print#printed textiles#anime
24 notes
·
View notes
Text
Hand and eye lining
24 notes
·
View notes
Photo
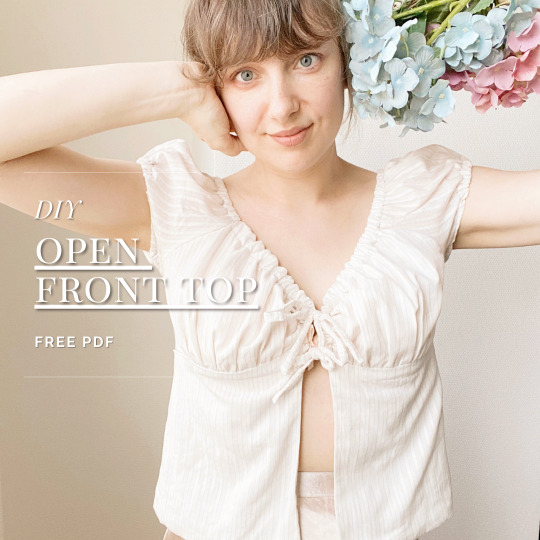
🌸 Sewing Tutorial: Open Front Tie Top with Lining 🌸
Looking for a trendy and versatile top to add to your wardrobe? Look no further! In our latest sewing tutorial, we're diving into the world of open front tie tops. This time, we're taking it up a notch by adding a lining for extra comfort and style.
But that's not all! I've also included a special tutorial on how to tie this top in a way that ensures it stays in place all day long. No more readjusting or worrying about wardrobe malfunctions!
To make things even easier for you, I’m providing a free printable PDF pattern for this top. In the first part of the video, I'll guide you through modifying the basic pattern to create this unique style. Then, in the second part, I'll walk you through the step-by-step process of sewing it together.
Our fabric choice? Silky cotton, perfect for the upcoming summer season. Plus, it's a great opportunity to use up those fabric scraps and reduce waste.
So, join me in this exciting tutorial and learn how to create your own open front tie top with lining. It's beginner-friendly, detailed, and packed with helpful sewing tips and tricks.
Stay tuned for more exciting sewing tutorials by subscribing to omy YouTube channel. Let's get sewing and create stylish pieces together!
youtube
#sewing tutorial#open front tie top#lining#diy fashion#sewing tips#sewing tricks#beginner friendly#silky cotton#summer style#modern fashion#modern sewing
17 notes
·
View notes
Text
LI-NING Off-White Yunyou @ SSENSE
29 notes
·
View notes
Text
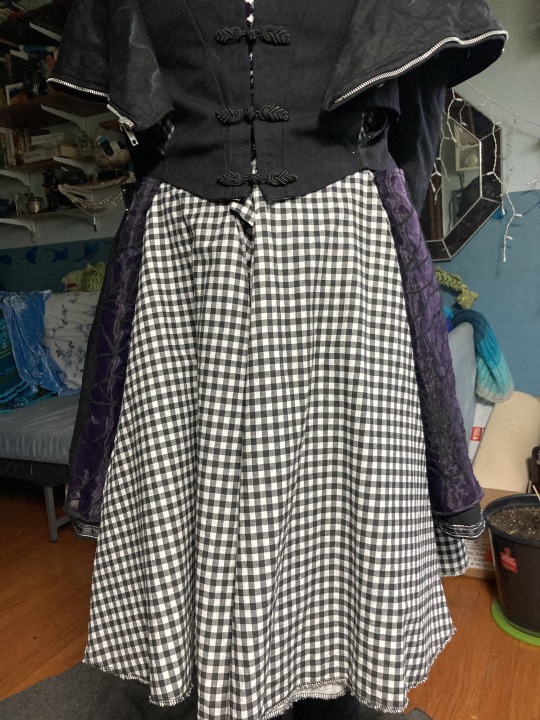

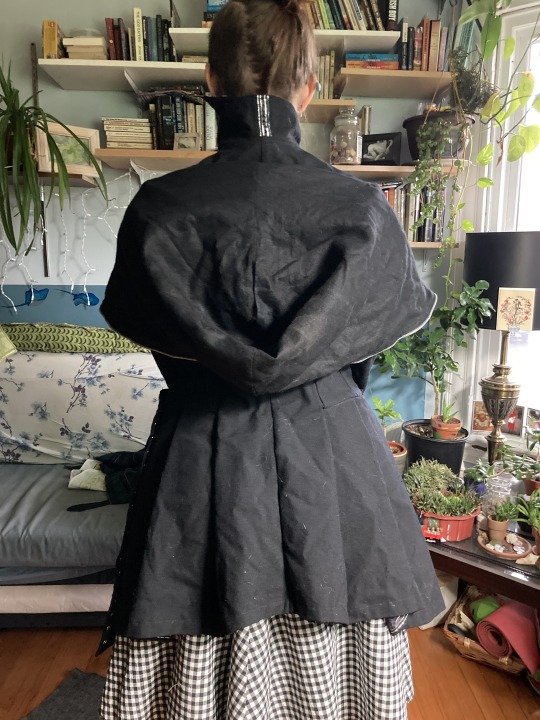


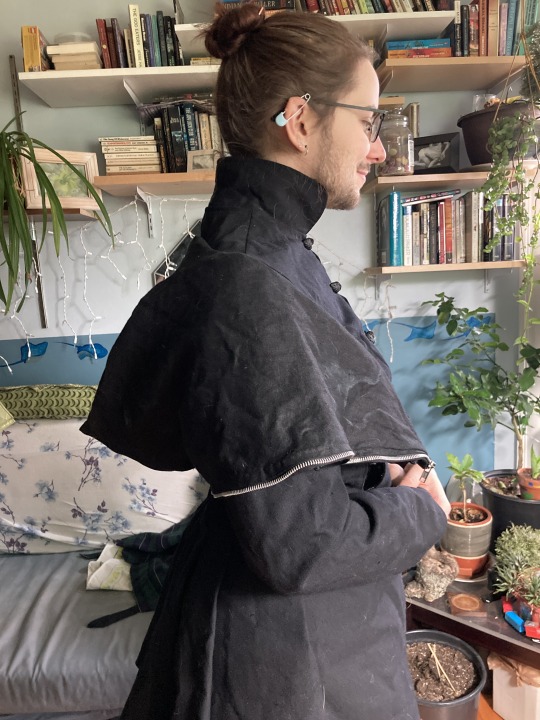

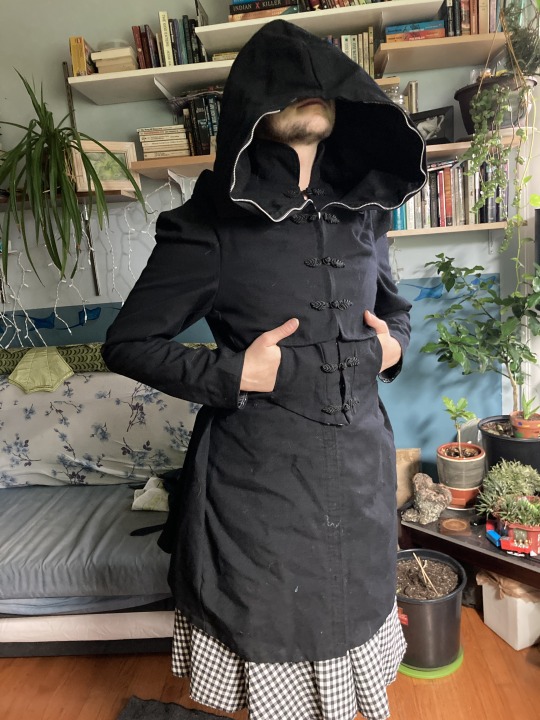


Look! AT! HIMMM!!!
this pattern is labeled 'sith frock coat' and i made it in about two weeks of incredibly late nights when i lived in new mexico that became very much like a fever dream. it was very ambitious for my skill level at the time--i think it was the first time i invested in nice fabric for my own clothes--and for the most part it came out very well. this pictures are a few years old but it still fits me decently well, so i may go back later and fix those things that didn't go well the first time
i biked as my main method of transportation at the time, and this was mainly made with that in mind. nm is a desert but it DOES rain, usually all at once, and i still had to be at work across town. also santa fe is up a mountain so it does get brisk, which is why i chose to use a wool herringbone (brisk yes, winter no. i lived there for 5 years and called the nov-feb months fall++ the whole time). this is why the back is higher than the front--i needed to keep my thighs dry--and the hood is large enough to fit over a bike helmet
it was made with a removable linen lining (not pictured) which turned out less well it terms of fit (tight in the shoulder) and also didnt quite do what i wanted, lining-wise. the slit my hands are resting in was made to access the pockets in the lining and are not actually pockets now--i'd like to add those
the idea of a fold back front skirt was better in theory than practice. i'd like to go in and fix it to be, well, fixed though i'll probably keep the snap tape down the front. or i may replace the snaps which are currently holding the fold back skirt with something more sturdy, like a zipper
overall it does great. like i said the hood fits over a bike helmet or any warm winter garment you could name and the wool herringbone, though not waterproof or treated i any way, does shed water and kept me 100% warm and 98% dry while i learned i was too disabled to hitchhike across iceland (thank fuck for public transit i'm jealous of europeans every day). i have great shoulder movement and even though it takes a moment to get it settled over other clothes, once on it's very comfortable. the black lining is a plainweave linen; the purple lining, inner tulle, and ribbons are synthetic but they don't typically touch my skin when i'm wearing this. where i am now, this is a great fall or spring jacket without the lining
this is the first pattern i ever flattened the princess seam on, and i'm very proud of how it turned out. if i recall correctly the base pattern was a vaguely steampunk costume coat pattern i got in the post-halloween stores. i used the pattern for the sleeves, bodice, and collar, though all were altered in some way, and drafted the hood and skirt myself
#sewing#sith frock coat#black on black#coat#new build#adapted pattern#drafted pattern#linen#lining#serger#wool
12 notes
·
View notes
Text

Lining SS24 shot at Paris Fashionweek
#lining#paris fashion week#cargostyle#grey outfit#monochrome#menswear#menstyle#highsnobiety#swag style#dailystyle#daily wear#sketchonista#fashion photography#minimalstyle#styledujour#minimalstreetstyle#hypebaestyle#street style#street fashion#ootdfashion#ootdinspiration#ootdstyle#outfit inspiration#outfit of the day#outfit#ootd#hooded#hoodies#fashion trends#fashion tips
10 notes
·
View notes
Last Seen Blogs


nootrimentco-blog
Melatonin

indotechgroup-in
Indotech Group

hanzotalon
the boy mayor of hanzotalon

rosefromtheashes
A Rose from the Ashes