#literally every single time i think about document storage i'm like
Text
Okay so this is definitely a dumb question but like,,,, what is the purpose of document storage? Is the purpose of the entire archive not to,,, store documents? The Archive is made of documents, right?? So,,,, are all of the documents in document storage and it's like a huge room where all the shelves are? Or... only the most fragile documents are in document storage?
I've been wondering about this for just. Too long. Please help
#tma#literally every single time i think about document storage i'm like#ah yes the room for storing documents. distinct from the reat of the archive where they... presumably also store documents#it doesn't seem like a big room i find it hard to believe ALL of the documents would be in there#unless i guess they might have those compact slidey shelves?
2 notes
·
View notes
Note
Hi! I think I remember you posting about "making" your own computer? I'm sorry to bother you with something like this, but was it difficult? Would you say you have to know a lot about how computers work to do it? Thanks!
Heck yeah!!! Oh man!! Gosh guys can I talk to you about building computers and how EVERYONE willing to do some basic googling is almost certainly capable of this I promise?
Welcome to:

Okay okay okay so let me spin you a li’l yarn: I was in optometry school in 2010-2011ish and I had been living up to now on prebuilts, mostly laptops, but DA2 was recently out and gosh darn it I wanted something I could play a proper game on. A friend of mine had a 10yo daughter who wanted to build a computer herself, and he told me if I’d buy the parts, he’d walk both of us through how to do it (what really happened was the 10yo built my first computer and I watched and brought drinks, so–no, I wouldn’t say you have to know a lot about how computers work to do it!).
The physical requirements are some basic manual dexterity & arm strength (you gotta be able to manipulate some tiny things and put some pressure on some connections) and you will most likely need to lift up to 15 pounds, although you can limit that if you go for smaller components. The ability to bend forward and twist and reach will also probably be necessary, although some careful planning can also likely mitigate that.
I think I have pictures of the actual build process somewhere, but regardless, it resulted in this bad boy that served me well for about nine years. I was shocked to see how easy it was to put together, honestly; if you can follow a Lego assembly book, you can put a computer together. With tools like PCPartPicker that have built-in compatibility checks to make sure all your pieces fit, it’s a piece of cake to put together a parts list that you can feel really good about. You just pick whether you want your motherboard to come with fancy lights or not (hint: rgb is unironically cool & i’ll fight anyone who says otherwise).
In the end, you’ll need a set of basic components. You’ll need:
A case to put all the pieces in
A motherboard, the circuit board of the computer that connects everything, basically the heart of the computer
A CPU, the brain of the computer that determines processing power, or basically how fast it can do math and direct traffic
a CPU cooling system, which can be either mechanical fans or liquid cooling, gotta keep that baby chill; may or may not come packaged with the CPU depending on what you get
A graphics card (aka GPU), the thing that makes video games look pretty (and what will probably be the single most expensive item in the build depending on how good you go)
RAM, a short-term memory processing component that comes in different amounts (4gb, 8gb, 16gb, 32gb, 64gb if you’re a madman) depending on how fast you need your short-term memory to work. Good RAM allows you to do things like open a bunch of Chrome tabs at once, run Photoshop at the same time you’re listening to youtube videos, or process the demand of loading up a host of enemies in Mass Effect. Most everyone these days can get by just fine with 16gb of RAM, which is what I have.
a hard drive (or the new, faster, more expensive version, a solid state drive) which functions as your long-term storage bins. This is where you save documents, images, and install your programs. These come in tons of sizes–the larger your files are, the more storage space you’ll want. I always put at least a terabyte of storage in my builds.
a power supply unit or PSU, which gives the electrical juice for everything to run
a monitor (the more hertz, the smoother the video will be - you’ll want either 60hz or 144hz depending on how much your number of frames-per-second matter to you)
a keyboard and mouse
speakers or headphones or both!
Optional addons:
RGB lighting for everything :O
an optical drive (aka something to put DVDs, Blurays, or other physical CD disks into)
fancy liquid cooling pipes
additional case fans; most cases come with adequate fans, but if you are using the computer in a room with poor ventilation or you find that certain components are running hot, you can install additional fans
coincidentally you can also get fans with RGB lighting too
cable extenders when you are going for a specific color scheme
So it can definitely all look overwhelming at first, but when you start to look at how everything is laid out, you’ll notice some trends. Look at these motherboards, for example.
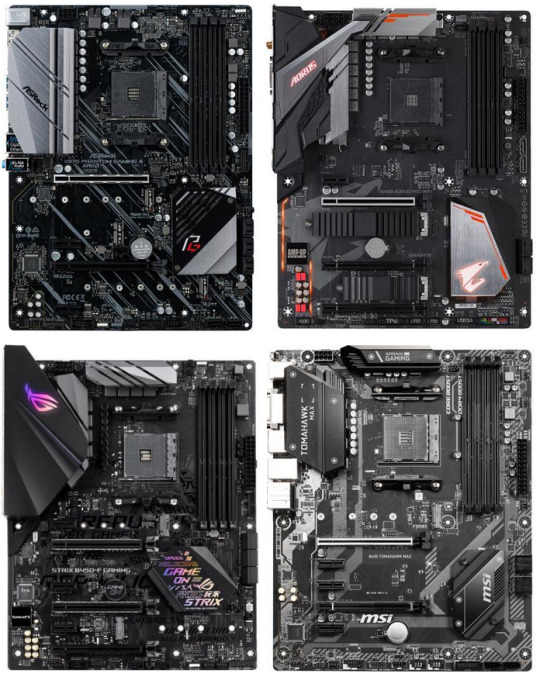
These are just four random motherboards I pulled off Newegg, a commonly used computer parts purchasing site. Sure, the colors are a bit different, but the layout between them…is all basically the same! Here, I’ll draw it out.
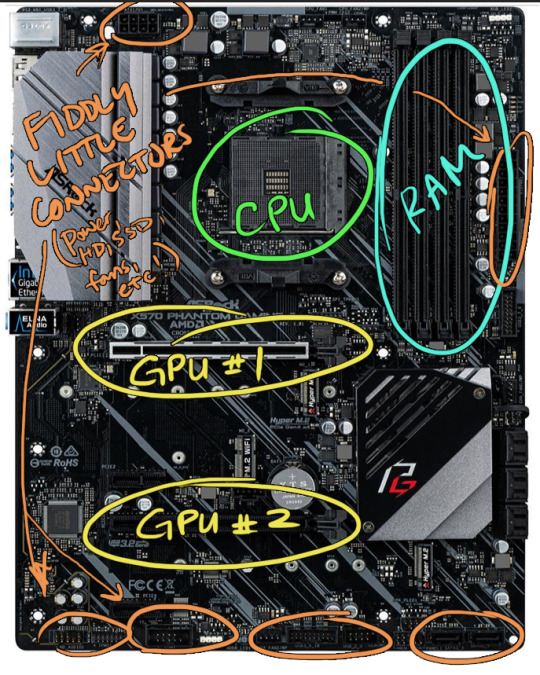
In just about every modern motherboard you buy, this will be the rough layout. Everything else is window dressing–what kind of GPU you get, what kind of CPU you get, whether your RAM lights up cool colors or not. Your motherboard will ALWAYS include a map that has extensive descriptions of what each connection does.
Much, much, much more under the jump!
Most of these you won’t even need!
There are always some compatibility things to consider–as I mentioned, PCPartPicker can help you figure out a lot of these–but the biggest one to care about is the CPU. There are two major companies that make CPUs, AMD and Intel. They both have pros and cons on the chips they make, but right now, AMD makes a family of CPUs called Ryzen that both outperform and are cheaper than Intel’s current leading brands, the i7 and i9 lines. Intel was king of the hill for a long time, though, and their CPUs are still really good quality, so some people still go with them over the cheaper alternatives for now. (There are some reports of black screens with the new Ryzen lines, but as I’ve never owned one, I can’t personally speak to how common that is.)
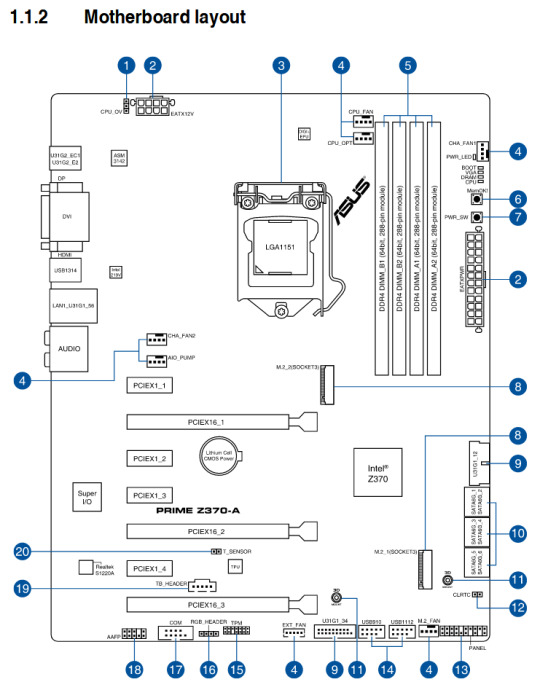
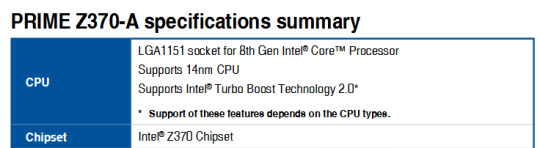
Regardless, once you pick which family of CPUs you want to go with, AMD or Intel, you just have to pick an Intel-friendly or AMD-friendly motherboard. This is always specified in the description of the motherboard. I own the Asus z370 motherboard, so here’s what it says in the description for CPU:
Anyway, once you’ve picked all your parts and had everything shipped to you, it’s literally just a plug-n-play, step by step until everything’s plugged in. Your motherboard manual will also include recommended order of installations, too, and often how to install them.
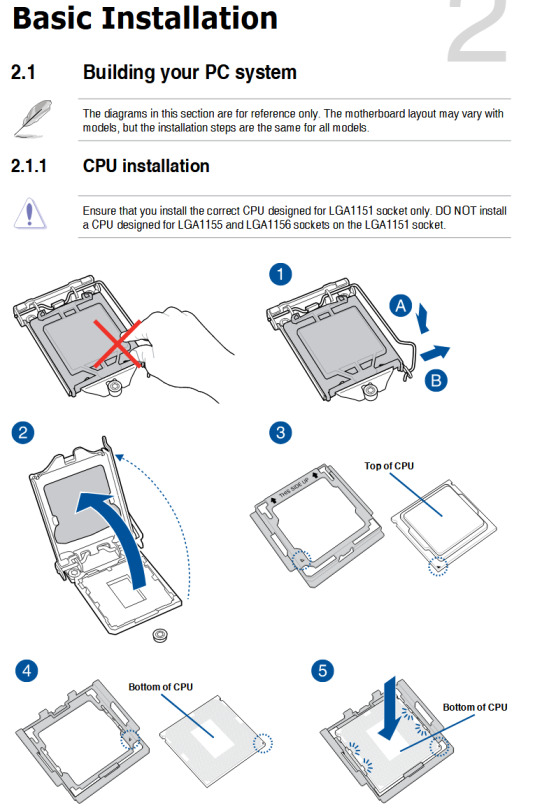
It helps to remember that the manufacturers of all these parts understand that they are expensive, and they really DON’T want to make them hard to install! Broken or difficult pieces during installation means that the customer is upset, and upset customers ask for refunds and lose brand loyalty.
It also helps to understand that a lot of these connections are based on certain standards–I didn’t realize until I was rebuilding my current machine that these holes set for screws really do work with just about everything you get, as long as it’s the same generation, because motherboard manufactures WANT you to have the flexibility to go any attachment brand you like and still be able to use their board to mount them.
So, you pick your case and open it up, and you put the motherboard down on top of all the little screw holes until they match, and then you screw all the screws down firmly.
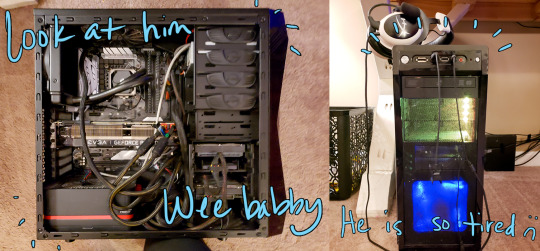
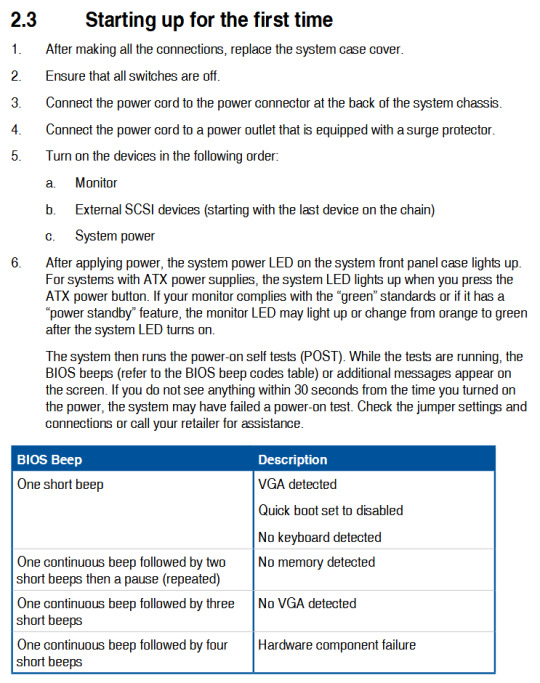
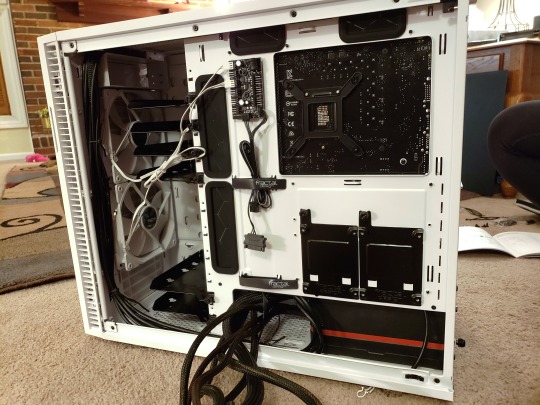
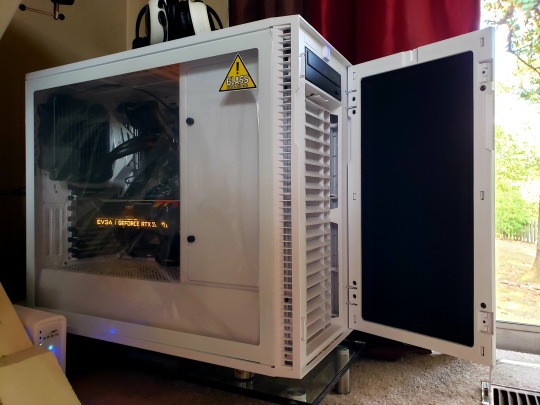
Old rig, partially disassembled:
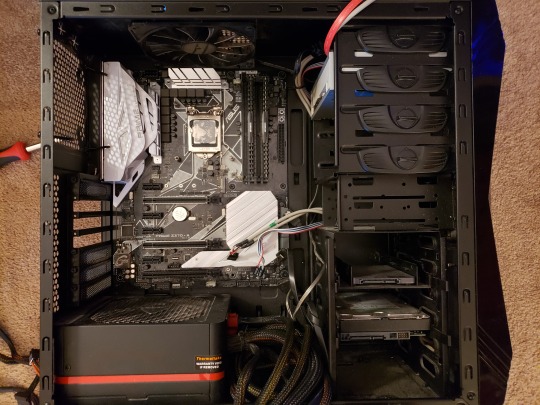
New, in approximately same state:
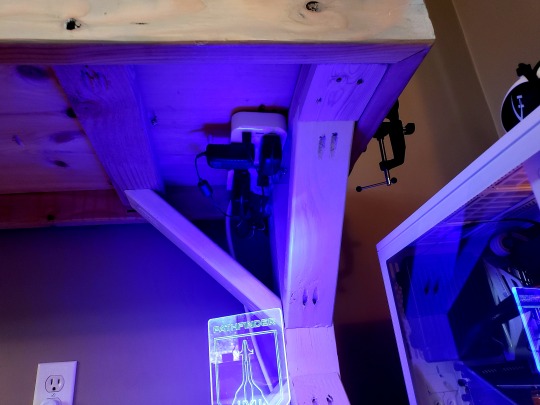
(One of the reasons I went with this larger white case than a smaller, slim case like my old one, is because this nicer case has what’s called “cable management;” that means there’s a built-in back area behind the motherboard where all my cables can be jammed without messing up the “aesthetic” of the glass window. My first build obviously did not have that, as seen in that first picture at the top of this post, so I had to just jam my cables wherever I could fit them so that the sides would close, haha.)
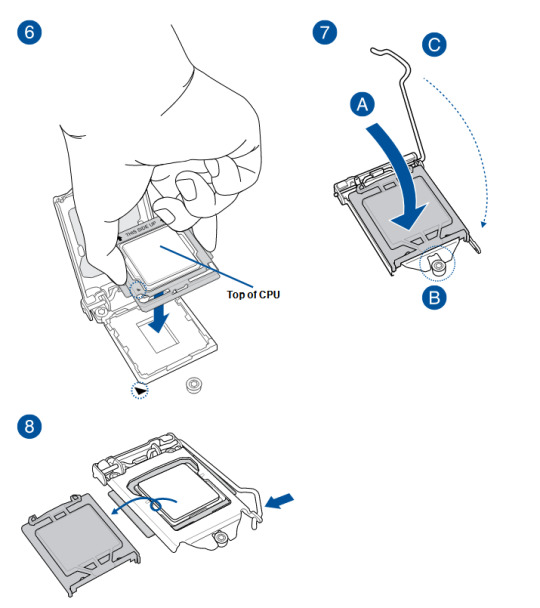
Anyway, you can see that the motherboard is just screwed in where it should be, and my CPU is already installed where it should be. I haven’t mounted the cooler for it yet because I needed to clean off the old thermal paste and install new thermal paste before doing so. My two sticks of RAM are also mounted in the top right in the motherboard’s recommended configuration & locations for two sticks (vs. one, vs. four).
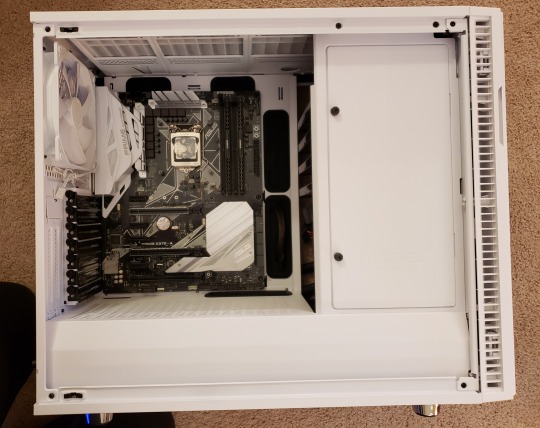
Then, with the cooler in place, it looked like this:
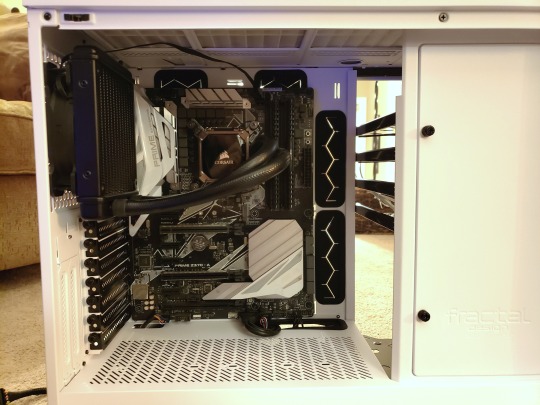
So the cooler I have is liquid cooling in a closed system (the thick black tubes running right to left) which is attached to a fan that mounts in place of the white fan on the left from the previous picture. It was as simple as unscrewing the old fan and putting the new one in its place. I think I even used the same screws. The fan is powered by that thin cable running along the top of the case that plugs into a little socket on the motherboard labeled “CPU Fan.” It was as simple as just finding the right plug; it doesn’t even have directionality, just a three-pin socket, so it doesn’t even matter which way you plug.
Already it’s looking like a proper computer! And because this case has cable management, I took a picture of what it currently looked like from the backside.
This case is cool because it has a neat set of connectors mounted on the back of this little hideaway to connect the case fans. I could have run the white fan cables through to the front of the motherboard for them to get power/marching orders, but it was cleaner aesthetically to attach them here in the back. Nothing wrong with connecting them on the front, though–that’s what I did in my original build!
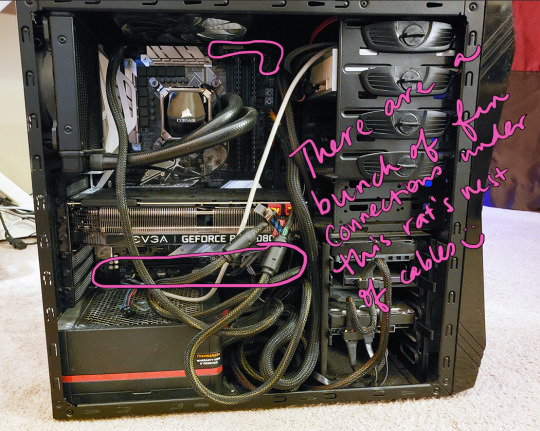
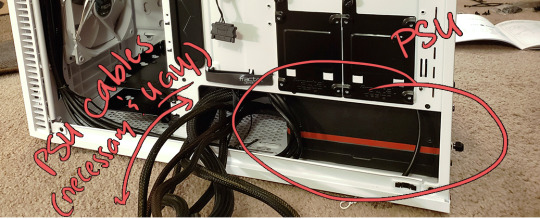
You also might have noticed I’ve mounted the PSU in that white case by now as well. It’s the large black and red box in the bottom corner, seen best from behind. The white case comes with what’s called a PSU shroud, which just means there’s a fancy white cover over it to keep the ~aesthetic~ when viewed from the front side.
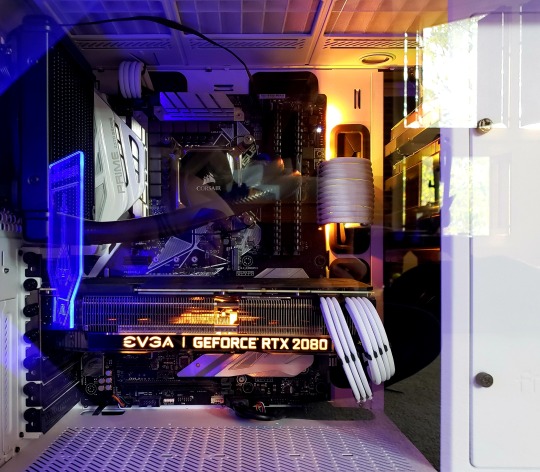
The next step is to mount the graphics card!
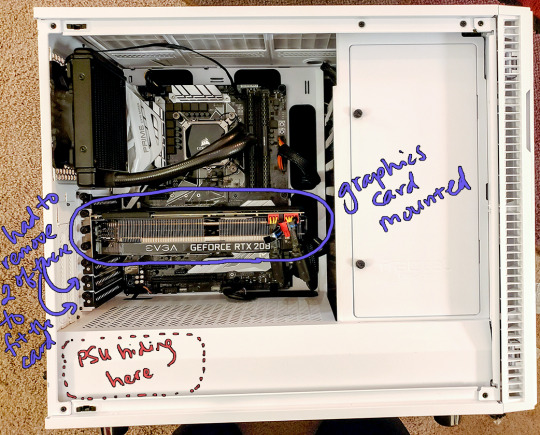
There’s instructions in your manual as to exactly how these mount, but it really and truly is just removing the dust cover brackets where you need to, and then a delicate plug & play, pushing that big guy in until you hear the click! (Click good, snap bad. Haha. I’ve changed out these cards several dozen times and never broken one, though!)
You can also see the ugly red-tipped cables plugged into the GPU and the motherboard, both on the right side. These come from the Power Supply Unit (they are all permanently connected in most brands, and look basically like a squid’s tentacles–once you have your items mounted onto the motherboard, you just look for the connector from the PSU with the right number of pins and plug it in!)
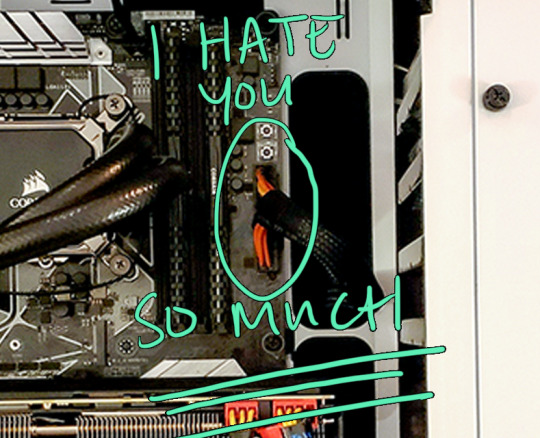
This guy is the worst. He is fat and hard to maneuver and always requires SO MUCH FORCE to click into this delicate bendy board and your heart will ALWAYS be in your throat as your fingers shake from how hard you’re having to push to sink it, and it will ALWAYS eventually go in but you’ll hate every second of the doing. I hate you, 24-pin EATX. I hate you so much.)
The next thing I did was mount my optical drive (because yes, I still own one), my hard drive, and my solid state drive.
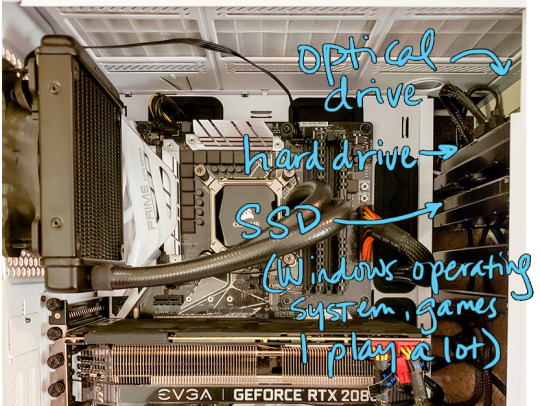
The hard drive and SSD both serve the same purpose (long-term data storage), but the SSD is much faster and uses newer technology. It’s also more expensive for the amount of storage you get, so I have a 256gb SSD that holds my operating system, my heavily-used programs like Firefox and Photoshop & Premiere, and one or two video games I play the most that I would like to load as fast as possible. This is the drive that can allow me to restart my whole system in less than five seconds.
The hard drive is 1.75 terabytes and holds everything else: fics, pictures, videos, music, other games, etc.They mount onto the racks with pre-drilled screws. The optical drive just slides into the socket snugly until it hits the back of the rack.
All of these use a standard connector called a SATA cable which runs between the back of the drive to a SATA socket on the motherboard. Most motherboards come with at LEAST six or seven of these connector slots, and some come with more. They look like this:
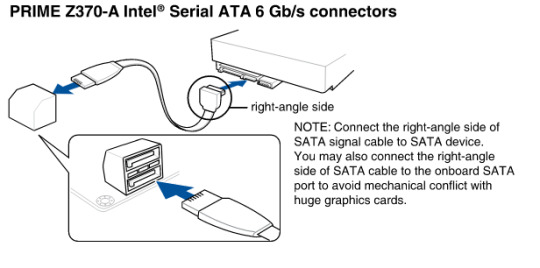
and are pretty universal. Any kind of extra storage or drive you want to add to your computer will probably connect with a SATA cable. I think my motherboard, my SSD & HD, and my case purchases all came with a pack of loose SATA cables of different lengths to be used for whatever I wanted.
The rack each drive is mounted to came installed with the case and pre-drilled with screw holes (and provided screws) for attaching either the HD or SSD in every slot. Because this case is all about aesthetic, it also comes with two vertical SSD mounts on the back of the case if you wanted to remove the right-side rack altogether, but as I mentioned, I have the optical drive, so I couldn’t go with that option.
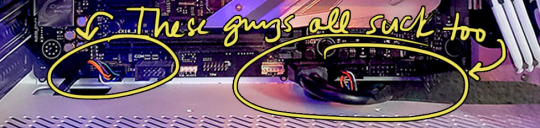
So now we have all the major pieces mounted! The last set of connections are a collection of small fiddly pieces that all plug in roughly the same area and do things like light up the case’s LED, provide that startup beep, connect the USB sockets on the case’s front to power, etc. This is by far the section that takes me the longest because I guarantee I will ALWAYS plug at least two into the wrong socket and not have a beep, or my audio won’t work or something until I go back and reconnect them.
The next thing was to plug in my monitors and…see what happened when we hit the power button! (Monitor connections just plug directly into your graphics card in the back of the case.) And here’s what happened!
youtube
So it turned out when I was connecting my SSD (which has my OS on it), I was pushing on the little connector while sitting on the back side of the case. I thought I had the thing in the socket, but what I’d actually done was jam the connector just under the lip of the motherboard (that is, not connected to anything at all, just hanging in open space). Once I realized, though, it was an easy fix!
The last thing I wanted to do to complete the clean white look I wanted was to replace those UGHLY red PSU cables with what are called “cable extenders.” I bought some white ones on Amazon; because most PSUs’ cables are permanently attached at the box, you plug your cable extenders into the other end and then feed them through the case, so that’s the only portion visible. The ugly PSU cables are still there at the other end of the white cables, just hidden in the cable management area behind the motherboard.
I spent some time fixing up the cables to curve exactly how I wanted them to, then picked my LED RGB colors and closed up the open side with the glass wall. All that was left was to plug in my mouse/keyboard/speakers/headphones/mic/webcam, etc., and we were done!
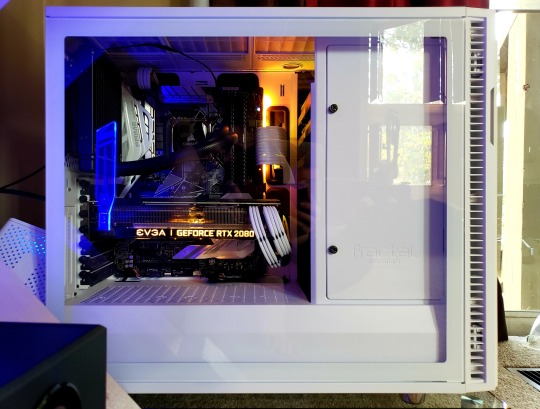
Ta-daaaa!
The first build I did, the one in the blue & black case, took us about two days due to some unexpected problems. First, we were trying to salvage an old CPU from my HP prebuilt to save a little money. Unfortunately, they used basically no thermal paste to connect it to its fan, and when we were trying to get the fan off, it actually tore the CPU out of its socket and bent a bunch of its pins. I ended up going to Best Buy or something and getting a replacement off the shelf.
The other issue I had was that I foolishly didn’t back up my files, and lost a bunch of them in the rebuild (including my Hawke’s original run through the DA2 game :( :( :( ) Always back up your files before ever going in and messing with your case!
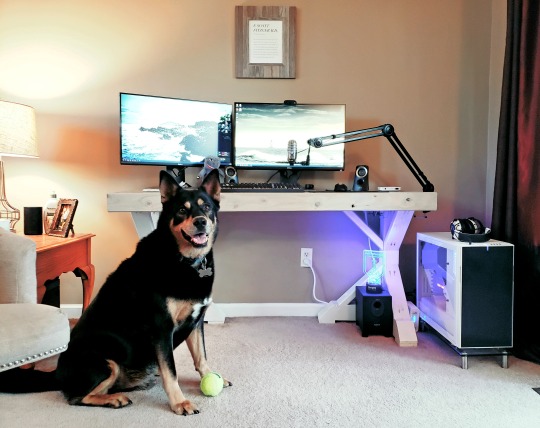
Over the years I replaced a bunch of components in it, which is why it lasted me so long, but the transfer into the new case only took me about three hours, and that was with a bunch of breaks throughout. I probably could have done it faster if I hadn’t wanted to savor it, haha. The cable management for the backless desk took a lot longer, though! (…and a LOT of zip ties.)
I do set my new build on a small glass stand (again, from Amazon) because Hamlet’s pretty sheddy and I wanted to keep airflow as good as possible. I’m limited on how many case fans I can install since I have the optical drive rack taking up a lot of space on the right, but I could install new fans on top if I wanted. My temperatures are great, though (I monitor with CoreTemp & GPUTemp, as well as my motherboard’s built-in temp monitoring software), so I don’t need to unless I decide I need more RGB.
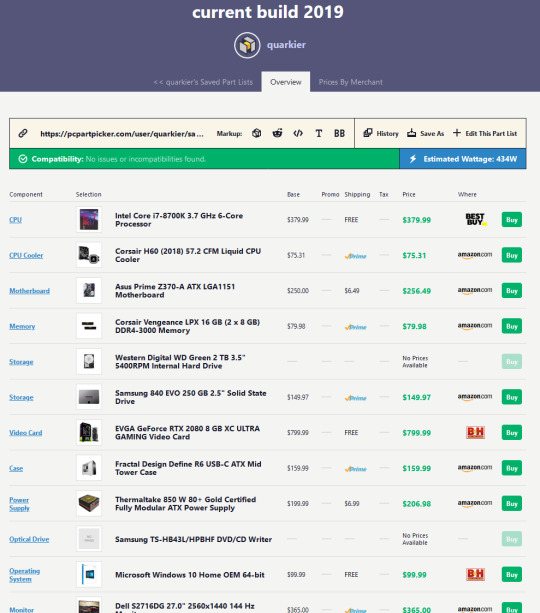
Anything I might want to add, I run through PCPartPicker to make sure it’ll fit what I already have. For example, my parts list looks like this (full view and complete parts list available at this link):
ANYWAY.
If you are patient, if you can fit small Lego-like pieces in labeled sockets, and you are a decent googler, you can build your own PC. It’s really, really hard to do serious damage to components nowadays, even if you plug something in wrong. There’s a bunch of resources, though, and I’d recommend the following places to start:
newegg.com - parts for sale, getcher parts here
pcpartpicker.com - put your list of components together, and it’ll flag any compatibility issues or known problems
https://www.reddit.com/r/buildapc/ - great starting point for new builders, tons of advice and how-to’s for every step of the process, and a decently responsive community to help troubleshoot any issues you might have
And I obviously love doing this kind of thing, so if there’s anything I can help with, I’m more than happy to try! Just let me know, and I hope this was helpful!
#anonymous#quark replies#quark's pc tag#long post for ts#very long post for ts#lots o videos and pictures for ts#a quest for fps
811 notes
·
View notes
Note
Big questions here. You don't have to answer them but if you do thanks I'm just curious as a writer myself.
Do you edit the grammar and spelling of your writings during the writing process or afterwards? And do you use a specific website e.g. Grammarly to help with any corrections you've missed?
Do you write up your writings in tumblr drafts, word, or something like that? And when you have new ideas for writings do you note them down, start up a quick draft or how do you remember new ideas?
omg no you’re totally fine i actually. really genuinely love being asked about my writing process and habits it’s so fun to me !!!! okay i feel chatty so this got rly long apologies 😭😭😭 i tried to bold keywords from your questions so you could pick out my answers more easily :D
ngl my grammar and spelling is like. pretty damn good like any mistakes i ever catch in my stories are never genuine spelling errors theyre literally just typos 😭 and as for grammar, the grammar issues i ever ever find are birthed from like. inconsistency w the preexisting sentence structure djfjsjfj bc i always always always reread and edit while i’m writing especially when i’m starting out w the fic, but the longer it gets, the more exhausting it becomes to reread the whole thing sjfkdkdkd
also sometimes i’ll stop writing a fic mid sentence that’s semi-long and when i come back, i just pick up from where i left off without. rereading the sentence 😖😖😖 whenever i reread my like published works and catch mistakes just know i thought about putting my head directly through a wall 😭😭😭
so!! i do edit it obsessively during, i proofread it after i’m done (even though i’m usually exhausted and honestly sick of the story at that point) and then i send it to a friend or multiple friends so they can beta it for me, then i make any changes as i see fit, proofread it on my own AGAIN usually very lazily, then i’m like “i cant bear to look at you anymore” and i just post it sjjjdkddj
i don’t use any sort of online tools to “help” me write apart from google docs and the built in suggestion feature they have! i hate grammarly, actually skfjskdkd it doesn’t know half as much as it thinks it does and its software fucked up so often when i used it that i was just like. “what the fuck are you talking about.” also, i think that in very specific occasions, general sentence rules can be slightly subverted in order to achieve some sort of goal, and i enjoy doing that from time to time, so it got annoying when grammarly was like being dumb or that hemingway website said shit like “this sentence is rly long and complex” like….yeah. i know. i did that on purpose.
i will never in my life trust tumblr to host any drafts of my work. never. ever. ….ever. i either make a google docs draft or a notes draft for like. actual longer ideas like scenes and more plotting and stuff!! if it’s a small little idea and i have a bunch for some reason, occasionally i’ll write the ideas down physically either onto paper or w my apple pencil onto my note taking app on my ipad sjfjskkd !!
but yeah tbh i was just talking to nova abt this the other day bc we were talking abt wips and our storage of them and. when i was trying to count how many wips i even have, i had to search in like. 3 different apps (technically 4 but that’s bc i already have lists on here in my drafts that i have elsewhere but it’s easier to find them here shfjsj) in different documents until i rounded up all the lil ideas like stray sheep 😭😭😭 so hopefully soon i can set aside time to sit down and compile every single wip, at least the idea and where i have more info stored, into one single google doc for my convenience !!!!
BUT YEAH THANK YOU SO MUCH FOR ASKING OMG I LOVE LOVE LOVE QUESTIONS LIKE THESE 🥺🥺🥺 if you or anyone else has any more writing process questions, totally feel free to ask!!!!
5 notes
·
View notes
Last Seen Blogs

telephone-wire-system-ff
Hotels offer accommodation as well turkey tourismdelight

justhilalzorlu
kimjisoo

kinyadayas
İsimsiz

rralph
Que Vacilon

111lexi
🫶🏼