#maxuino
Text
Max/Mspを触ってみる
2022/05/22(Sun.)
テクニカルサポートしている展覧会でMax/MspとArduinoを連携させる必要が出てきたので、Maxの勉強を始めました。学生の時からMaxの存在は知っていましたが勉強する余裕がなく、卒業後も勉強せずにここまで来ました。ただメディア・アート系の展示やイベントに関わるたびに別の人が組んだパッチを触る機会があり、触れると展示の自由度が高くなって良いなぁと思っていました。
そんなわけでMaxを勉強するため、まずは中安翌氏が公開されているレクチャー資料を参考にステップシーケンサーを作りました。このレクチャー資料で基本的なMaxの触り方を習得できました。
https://lecture.nakayasu.com/index_p=2645.html
▲資料を見ながら真似できました
またArduinoとMaxの連携にはシリアル通信で行えるようなので、シリアル通信の基本について下記URLを参考に勉強しました。ただ作例の多くはArduino側でセンシングして生成したデータをMax側で受信して画像や音声に変換するものが多く、Maxからの指令をArduinoに入れるものは少ない印象です。
https://qiita.com/hsgucci/items/eee5894e3651d0a8cb75
▲ブロッキング関数の説明がわかりやすかった
MaxとArduinoの相互通信にはMaxuinoというライブラリーを使うようです。田所淳さん(yoppa org)のサイトとdropcontrolさんの記事を参考になりそうです。Max5ごろの記事なのでインターフェースが変わっており、少し解読が必要そうですが、まずはmaxuinoを使ってみましょう。
https://yoppa.org/ssaw12/3759.html
https://qiita.com/dropcontrol/items/750ea3a330c9aef48f6a
http://neralt.com/maxuino-max-for-live-memo/
0 notes
Video
vimeo
Short Video of some testing with arduino mountains
#arduino#Max MSP#Maxuino#mountain#landscape#musical instruments#music and landscape#vacuum forming#vacuum print#brass band
1 note
·
View note
Video
test #mapping #maxuino #unity3d
0 notes
Photo


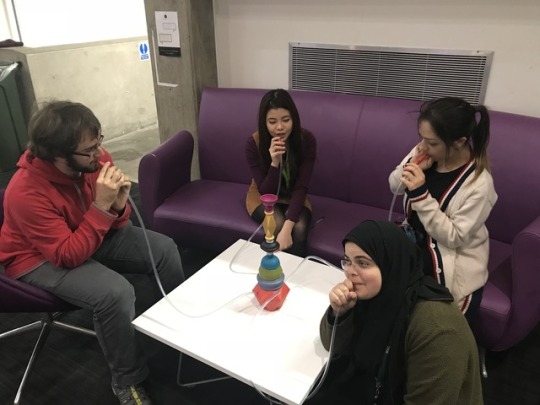
PG02: Cycle 2 Musical Shisha prototype result
After all our hard work, we managed to complete our first musical shisha prototype!!! We were all so happy and satisfied with the outcome but of course if we were given another chance, we would like to develop and improve the quality of the parts more. We would like to also experiment with various tones from different kinds of instruments to play with as this will attract more players to try out the product with their friends or family.
Above shows images of our product assembling and testing with a manual for the user journey.
0 notes
Text
ArduinoとMaxの連携設定
「maxuino」を使用して、ArduinoとMaxを連携することができます。
■ maxuinoのインストール
・ダウンロード
http://www.maxuino.org/downloads/
「maxuino_014」
・インストール(ver.7以降)
書類(documents) > Max 7 > Library にダウンロードした「maxuino_014」フォルダを移動する
・インストール(ver.6)
アプリケーション > Max 6.1 > Cycling '74 にダウンロードした「maxuino_014」フォルダを移動する
■ OSC-routeのインストール
<Apple-Silicon(ex.M1、M2)>
・ダウンロード
https://github.com/CNMAT/CNMAT-Externs/releases/tag/v1.0.4d
「CNMAT_Externals-Max-OSX-v1.0.4c-28-gd40ed277-Apple-Silicon.zip」
・インストール
書類(documents) > Max 8 > Library にダウンロードした「CNMAT-Externals」フォルダを移動する
<ver.7以降>
・インストール
Maxを起動し、File > Show Package Manager を開く
Serchから「CNMAT Externals」を検索し、「install」をクリック
<ver.6>
・ダウンロード
http://cnmat.berkeley.edu/downloads
「External objects for Max/MSP」
・インストール
アプリケーション > Max 6.1 > Cycling '74 にダウンロードした「CNMAT-Externals」フォルダを移動する
■ Arduinoの設定
・StandardFirmataを書き込む
ファイル > Examples > Firmata > StandardFirmata
1 note
·
View note
Photo

Yesterday I met with my Physical Computing Professor, Simone Jones, to talk about proximity sensors, projectors, and how the audience would be able to interact with the piece.
She suggested that instead of using proximity sensors to use pressure sensors. So we would be able to put pressure sensors on the floor, so when the audience walks around it changes the sound/projection. It would do the same thing as the proximity sensors, but she explained it would be a lot easier (it's a yes or no statement instead of variables) and cheaper (you can actually make pressure sensors with tin foil and springs). She was explaining, that we can hook up multiple pressure sensors around the room and we can even make the code read "if sensor 1 and sensor 2 are pressed simultaneously: ___ will happen". So it sounds a lot more feasible than proximity sensors and we can do more with them.
She then suggested using other MAX/MAXUINO or Ableton Live as a program for the video and sound. She is going to give me the contact information of one of her best programming students, as well as, an intermedia professor that has expertise with these programs. But, she said she is always happy to help us create this installation too!
She also offered a solution to our hidden projectors issue, in that, we can make a grid using plumbing tube and zip ties, hang it off the ceiling (from the pipes and vents) and use Mafer clamps to attach the projectors on the grid. That way, the Projectors will be out of site, close to the ceiling.
This weekend I'm going to play around with Arduino code and some homemade pressure sensors to see how I can work it out.
1 note
·
View note
Video
vimeo
Electromechanical Lithophone by Jay Harrison - performing Paul Simon's "You Can Call Me Al" at the Parabola Arts Centre as part of Cheltenham Music Festival 2016.
"Electromechanical Lithophone" is an interactive installation that explores the re-appropriation of a traditional musical instrument into a unique and subversive spatial paradigm.
The audience is invited to step inside an enclosure of 24 tone bars crafted from North Welsh Green Slate; the bars are arranged in a large circle and mounted on modules that enable autonomous musical performance. Participants can select a piece of pre-programmed music to experience from within the installation and are also encouraged to play the Lithophone in real time using an electronic keyboard.
The installation is designed to envelop the audience in the surrounding slate tones, providing a beautifully disorientating and complex sonic experience. The installation is considered universally site specific, the independent nature of each tone bar module means they can be positioned anywhere in a space. As such the installation is able to adapt to and exploit the unique physical and acoustic characteristics offered by the spaces within which it is exhibited. Consequently this forms an inseparable creative bond between the installation and each unique performance space it inhabits.
-
Radiopeck: Rotary solenoids and the programming side of things was implemented using Max MSP and Maxuino/standard firmata. I'm not overly proficient with code so Maxuino is really great because you can do most of the tricky stuff inside Max MSP (where I am much more comfortable). To that end the Max patch I made accepts standard MIDI files, as long as it doesn't exceed the 2 octave limit you just load in your file and you're good to go. If you would like some more information you can visit my website at the following address: https://www.jayharrisonaudio.co.uk/lithophone
0 notes
Link
0 notes
Text
Making a MIDI controller using Arduino and Max Msp
This is a project that I have done in class a few times and is always popular. It uses Maxuino. (which you can change later to serial object if you want something more permanent/easier)
I am providing a simple example to get started and then you can play around adding any sensors you want!
STEP 1- Download Maxuino from Maxuino.org.
You´ll get a folder called MAXUINO MASTER. Rename this just Maxuino and move this into your Library folder in Max 7 Documents.
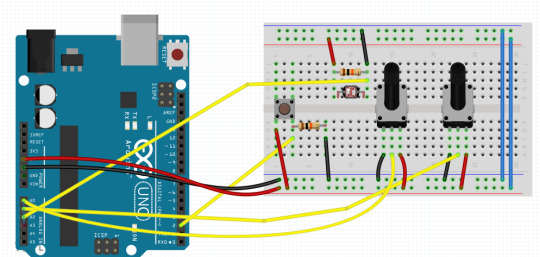
STEP 2 - Gather materials. For this you will need
- Arduino Uno
- Cables
- 3 pots
- LDR
- Some breadboard friendly buttons
STEP 3- Breadboard it!
Step 4 - Open up ARDUINO and open STANDARD FIRMATA.
Upload this to the board.
Close Arduino.
Step 5 - After this is breadboarded, open up Max and start a new patch.
Start with Maxuino and initialize the serial port.
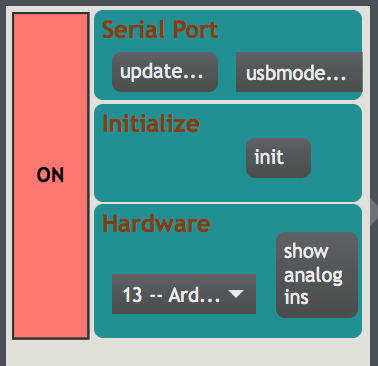
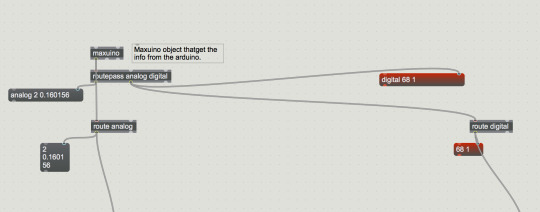
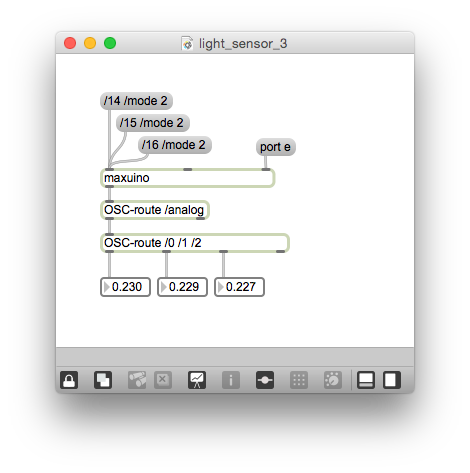
After you hit INIT, the right side should pop out showing all the pins on your Arduino. For this example, we are using 3 analog and 1 digital pin.

Numbers 14-19 on this picture are ANALOG pins. You can click SHOW ANALOG PINS in order to see which ones correspond to the rows.
Select AIN on the analog rows.
Select DIN on the corresponding pin row. (In this example it´s PIN 2)
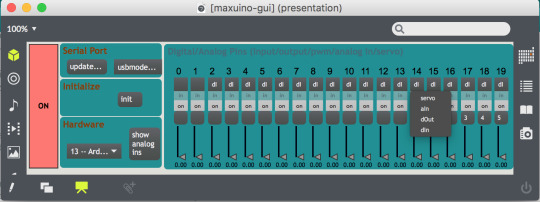
You can test if your sensors are being read if you see the sliders moving when you turn a pot or sensor and the slider goes up and down. If it is bouncing, check your wiring.
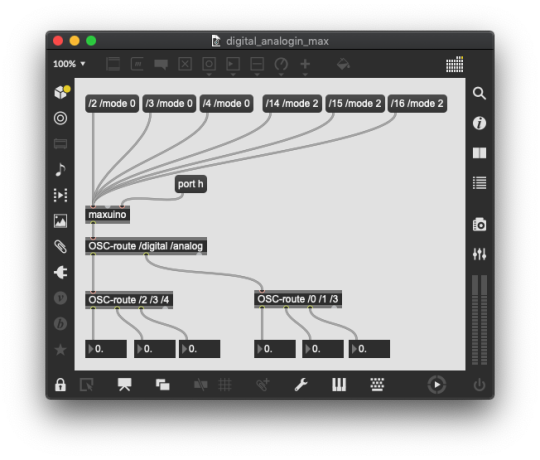
STEP 6 - Start Patching
For this I am including the patch in 2 shots. You can download the patch from github here.
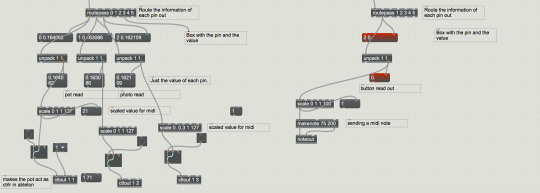
Note: I like to add messages to check the values of everything. This way you can see the values outputting so you can scale properly. You can play around with the scale values for whichever sensors you use. For this we are scaling 1- 127 to send MIDI info.
After this is done, assign your control outs to a midi bus, such as FROM MAX 1.
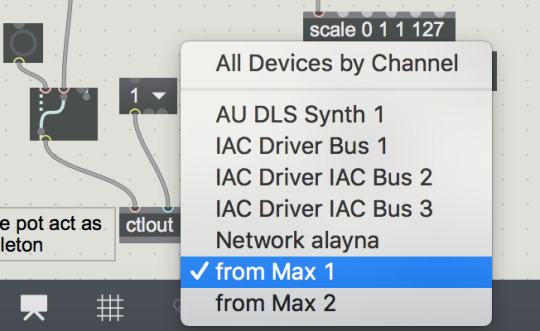
I add a gswitch object on this because it´s easy to turn off and on. Make sure this is ON when you assign it in ableton and OFF when you assign the other controllers. When you are finished, the gswitch will need to remain ON.
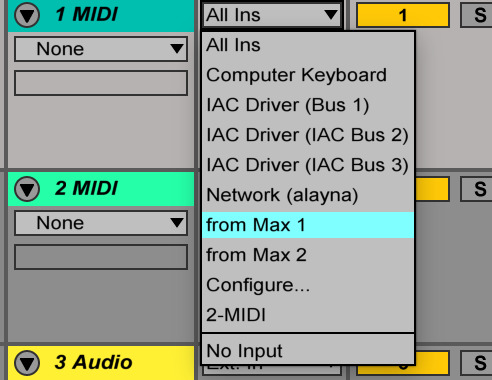
Step 7. open ABLETON (or whatever you use for midi. I use ableton)

Make sure your MIDI ports are on.
Go to ableton and go to MIDI map mode. Move the sensor you want to map.
The mapping should appear.

When done, go back to max, switch off the gswitch and go to another.
If you are using a button, you will only send the NOTE OUT from max, so this can be a trigger or used as a keyboard on a MIDI track.
That´s it!
Play around and build up your own custom MIDI Controller!
-Alayna
#arduino#MIDI#midicontroller#ableton#music#dj#numark#dj controller#midi controller#electronics#electronics music#max#max msp#ableton live#diy#maker#maker music#hacker#music hack
0 notes
Video
vimeo
Electromechanical Lithophone - Composition (Surround) from Jay Harrison on Vimeo.
Bespoke Electromechanical Instrument built as part of a dissertation undertaken on the Creative Music Technology degree course at Staffordshire University.
The instrument uses the Maxuino software protocol to interface Max/MSP with an Arduino. Without Maxuino and specifically the help of one of its lead developers, this project would not have been possible.
The instrument is designed in such a way so as to allow each note to be independently placed in a space, in this video the instrument is arranged in a 24 foot surround configuration. The audience is invited to experience the instrument from within the surround configuration, this offers a unique spatial dimension to the Lithophone intended to completely envelop the listener.
Contact: [email protected]
0 notes
Text
MaxuinoとFirmataでMAXとArduinoを繋ぐ
秋に発表するインスタレーション作品にできればスイッチかセンサーを利用したくてArduinoいじってみた。
http://neralt.com/maxuino-max-for-live-memo/
↑インストールはこの記事が役にたちました。
落ちている情報を拾い集めてArduinoをMAXとうまく連携させることはできたけど、ArduinoのAnalog inから入った可変抵抗の数値が反映できない。
試行錯誤した果てに、Arduino unoの場合、Maxパッチmaxuino-guiのDigital/Analog Pinsの13番以降がAnalog inとして機能するのがわかった。まだ、何ができるかわかんないけど、とりあえず次。
0 notes
Video
vimeo
Vac-formed mountain using maxuino
1 note
·
View note
Video
test#unity3d #maxuino #stepper
0 notes
Photo

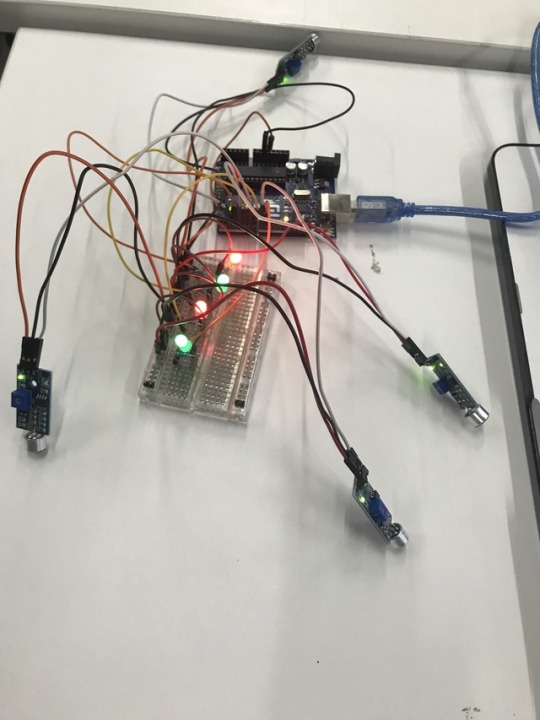
PG02: Cycle 2 Analog mic (left) VS Digital mic (right)
When I was working with Arduino coding to make sure the mics work, I used LEDs to clearly show that they can work separately for each of the tubes for the shisha inspired instrument. I’ve looked at the digital mic first but because it was only on and off with no fluctuation of tones, which clearly wasn’t the mic we should work with, as we wanted to be able to control the pitch and volume, so analog mic would be more compatible. Not to mention that Firmata and Maxuino only works better with analog mic than digital, until we figured out how to work with a digital mic due to the problems of the analog mic not being able to adjust sensitivity even with resistors.
#arduino#coding#firmata#maxuino#digitalmic#analogmic#fluctuatingtones#shisha#inspired#instrument#LEDs
0 notes
Video
The signal path is complete!
Maxuino is reciveing a signal from the arduino and Ive coded the conversion of voltage to numbers. I can then scale those numbers and map them to different control parameters of the patch.
Check it out!!!! (video is a sample video in Max)
1 note
·
View note

Last Seen Blogs

aotlart
Science demands we explode the sun!

azukilynn
Patchouli & Moonlight

bioncia
bioncia

wileycy1994
Best Tranny Reposts

hojeeda
l' hemlock