#mine [wb]
Text

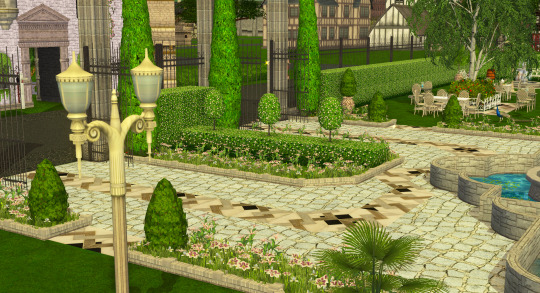
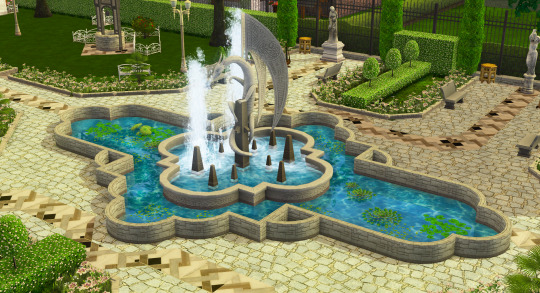
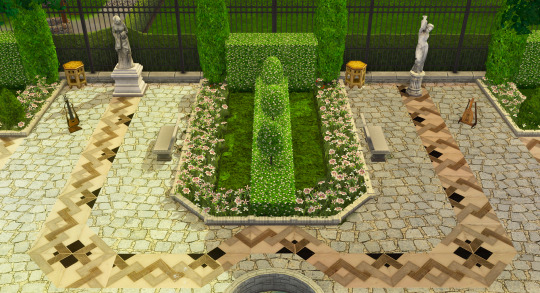


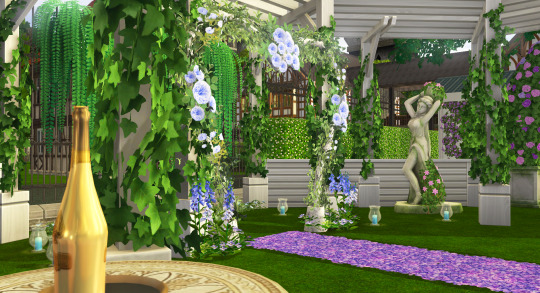

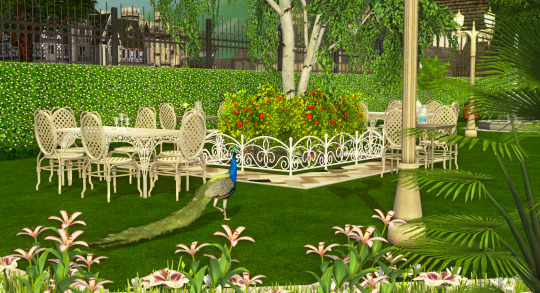

Welcome to Whitestone Gardens!
Before we see how the citizens of Wyvern's Bay like their new park, how about I give you guys a little tour? 😉
I've wanted to show off this lot since forever and I can't fracking believe there's a whole 3-year gap between the first WIP post and this one. (Actually, strike that, I can't believe there's a three-year gap between Moonfeather rotation 2 and Moonfeather rotation 3.) Where oh WHERE does the time flyyy? 😭
#sims 2#ts2#bacc#wyverns bay#sim scenery#wb scenery#wb gameplay#wyverns bay extras#whitestone gardens#moonfeather#moonfeather week 3#custom post effects mod#mine
180 notes
·
View notes
Text
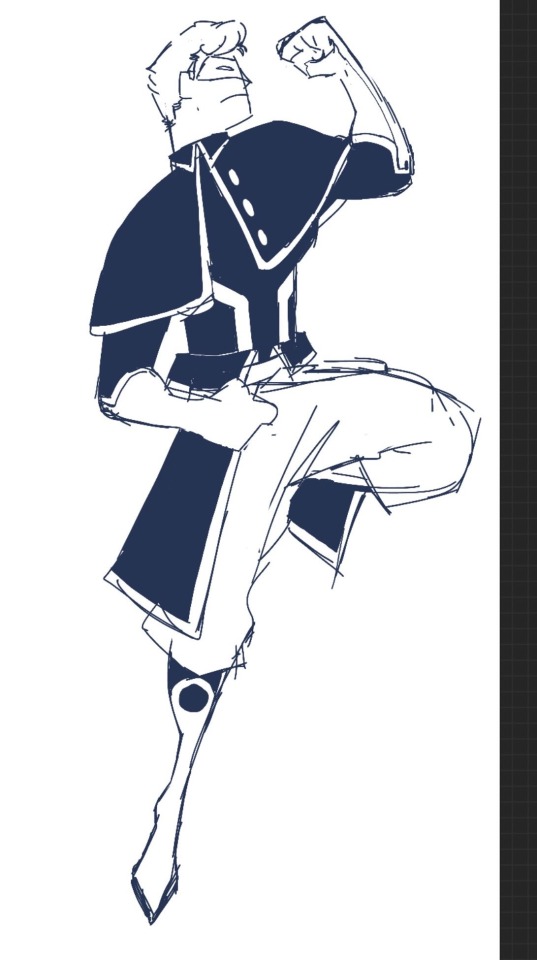
blah blah , old green lantern design for hal i did for an old au idea
#hal jordan#green lantern#dc#my art lol#mr hal#this is au is actually one of my favorite ideas ever but the execution is taking so fucking long#this is rlly old#this isnt the design im going with but it was one of my favorites i believe#i just keep posting old stuff because i haven’t had time to draw lately sorry#mr jordan i want you#unrelated but a buddy of mine sent me a video of the green lantern ride at WB world or whatever the park was called#and the guy voicing hal was josh keaton again and i just abt cried#i love josh keaton hal soooo much UGH i need to rewatch gltas again
383 notes
·
View notes
Note
This could apply to so many aus and just cannon in general but
Anytime Ace says anything bad about himself Luffy starts crying and gets irrationally upset (it’s half acting half real)
-
Ace: I don’t deserve to live
Luffy, already crying: *throws himself at Ace and hits him repeatedly* Don’t talk about my brother like that !!!!
Definitely it has happened more than once and will continue happening until Ace learns he's loved
53 notes
·
View notes
Text
"Canon Destiel in the revival would be so easy" not as in "systemic barriers to representation aren't real, lemme gaslight you about queer creatives' good faith and spread Disney's First Gay Character amnesia erasing the fact it's already canon" but as in "all they have to do is continue the queer story it already is, in the direction it was organically headed outside the censorship, as the one thread narratively demanding closure thanks to the trap our creatives set on corporate - and recent years' strides in tv representation, including their own in The Winchesters, have made it doubly absurd and volatile not to allow it this time or else WB is COOKED"
#this post: not as in ''it will for sure happen as explicitly as you want'' but ''WB will have an ABSOLUTE tirefire if they pull shit again''#it's a chess game like Misha Collins said and I LIVE for these power moves#this IS the fight in action -far above cynical consumerbrained demands for instant gratification- and I'm so proud to see it#it's underrated due for a reboot#destiel#spn meta#dean is bi#spn is queer#network fuckery#the winchesters#mine
9 notes
·
View notes
Text
wb stooop trying to make the flash happen. it isnt going to happen
49 notes
·
View notes
Text
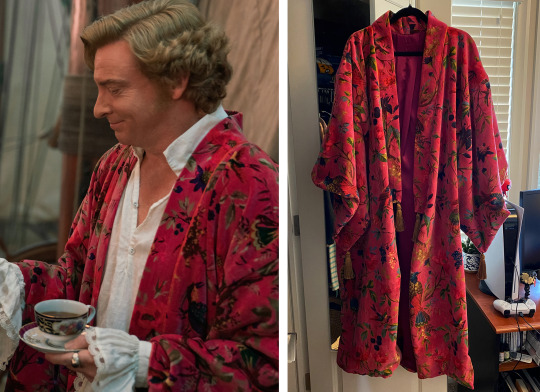
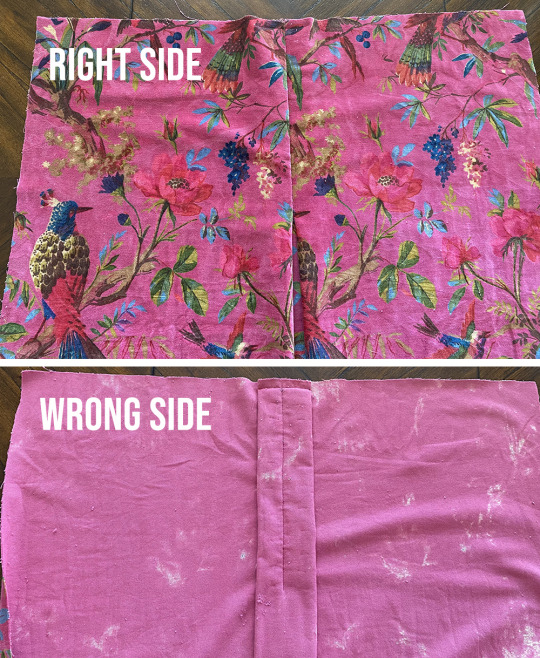
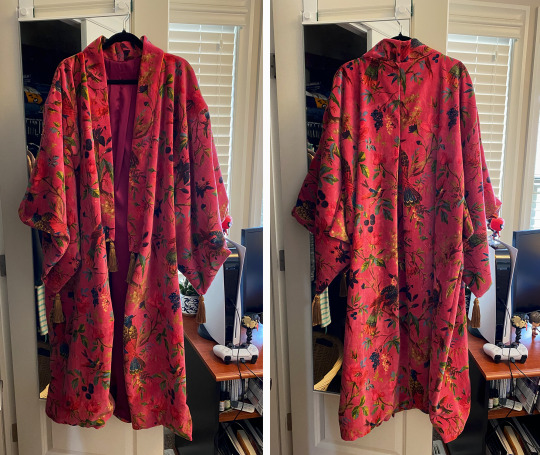
Tutorial for my OFMD Breakup™/Bird Robe
Disclaimer: I’m not a professional sewer or costumer, so any weird methods of execution are entirely due to my own (mis)adventures in sewing. Also all of the links for the fabric and research are in the replies bc I have no idea if tumblr is still ~suppressing~ posts with links.
The basic design for my Breakup Robe™ was based on
heathervanderstitch and
hannahgreenecostumes‘s instagram posts (two of the costume designers on OFMD) who said that their bird robe was a modified 1940′s kimono pattern with a box pleat in the back to give more movement at the bottom without being too baggy at the top. So I took that info and essentially worked backwards by comparing screenshots from the show and a bunch of online kimono patterns. (The most helpful ones were Ralph Pink’s free Satchi kimono pattern and The Tailoress’s Giselle Kimono).
--- 🦜 ---
I found a helpful starting place for pattern piece sizes was a twitter post from another fan (fiftyfathomkinit), however I ended up making my own modifications because I found her drafting slightly confusing (she includes armhole cutouts in her back panel which i could never figure out). I also adjusted the sizing to better fit my own measurements and I added an extra seam on the sleeves so one side of the pattern wouldn’t be upside down.
On a personal note, don’t be afraid of making mistakes! I didn’t realize I needed to adjust the pattern measurements until after I’d started making the lining - which was an oopsie on my part and could have saved me a little bit of money on fabric for my lining. You can get around this error by making a mockup in cheap fabric, or you can do it like me and start off with larger pieces and make them smaller as you adjust to your own fit.
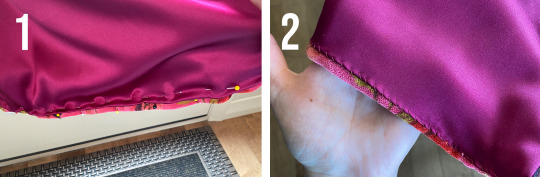
Speaking of the lining, the original robe has a fuchsia dupioni (coarse) silk lining and a hand dyed, block printed 100% cotton velvet outer shell. I found the velvet from (I believe) the same seller on Etsy. It’s a little pricey, but they also have a regular cotton version for those who want a cheaper option.
For the lining, I wanted silk to match the original, bc it breathes better than polyester satin, and I believe it’s longer lasting. But I wanted something softer than the dupioni, so I went with... literally the smoothest silk in the closest colour I could find at a local fabric store. (I literally just rubbed my fingers against every fuchsia silk they had). But you can go with whatever lining you’ll be most comfortable with (satin, cotton, etc).
I got tassels from that same fabric store and the thread and orange bias tape from Fabricland, but you can make your own tassels with yarn if you prefer.
I bought 5 yards of the bird velvet (bc they don’t do half yards) and 4.5 metres (5 yards) of the silk. I ended up using most of the silk and about 4.5 yards of the velvet.

--- 🦜 ---
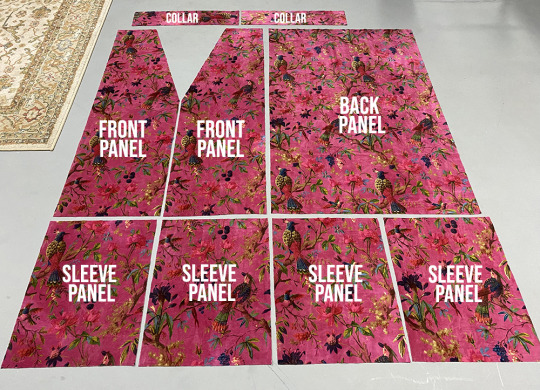
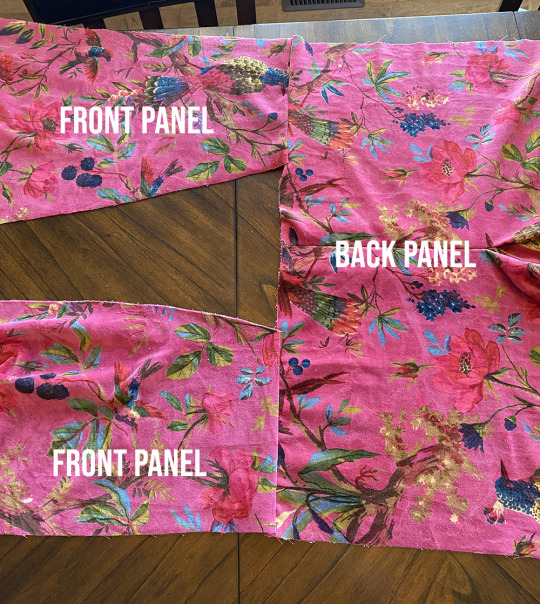
I started by making my own patterns from some super cheap brown wrapping paper with gridlines on the back, which I got from the dollar store. You could also probably just measure and cut your fabric directly, but having paper patterns made me feel better.
Your own measurements will vary (I’m 5′7″ and 120 lbs), but I wanted it to be quite oversized, with the sleeve shoulder seam hitting a little ways down my arm, and the overall length sitting just above my ankles, the same way it does in the show robe.

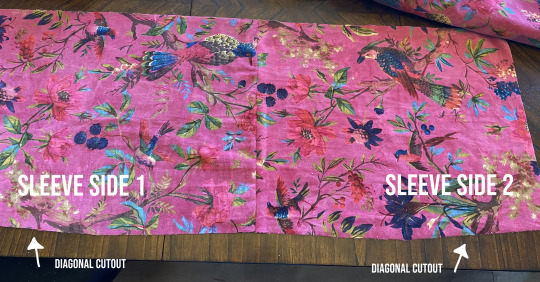
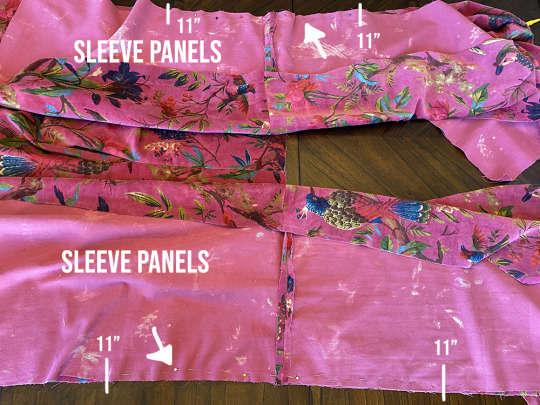
You can see in the above graphic I have a neck opening cut into the front panel that ends halfway down - this is how long I’m also making my collar. (Pro tip - cut the collar longer than you think you’ll need). Meanwhile, the sleeves have an 11″ x 1″ diagonal cut on the sides that will be attached to the main body of the robe, as used in a lot of kimonos.
Here are my pieces cut out (minus the sleeve diagonal bc I forgot to do it while I was cutting everything - but that was a very easy error to correct later):
--- 🦜 ---
For the inverted box pleat, based on screenshots and insta posts, I went with 3″ on either side of the centre point and guestimated that it ended a little lower than the armpit. So mine ended about 10″-11″ from the top of the back panel.
I basted some stitches along the three points (centre back, 3″ to the right and 3″ to left, so it was easier to keep both sides equal). Then I pulled the two sides of the fabric together so they met in the middle at the centre point of the back panel. I pinned them together, stitched the sides together by hand with a ladder stitch, and then machine stitched a line across the top of the panel at my ½” seam allowance.
I then machine stitched the sides together down the middle with a really small zigzag stitch to make sure it was extra secure.
I cut a 1″ x 7″ inch neck dip after doing the box pleat, which is probably not the proper way to do it, but it worked out for me!
I didn’t take a picture of it, but this graphic is an approximation of how you’d go about it:

--- 🦜 ---
To sew the actual robe, it requires very simple straight line sewing to connect all these rectangles.
Firstly, you’ll want to attach the front panels to the back panel at the shoulders (right sides together).

Next, you’ll want to sew across the top of the sleeve panels (right sides together). Make sure you’re matching the diagonal sleeve indents so that when you open up the sleeve panels, it looks like this:
Then you’ll open up your robe body so the right side is facing up:
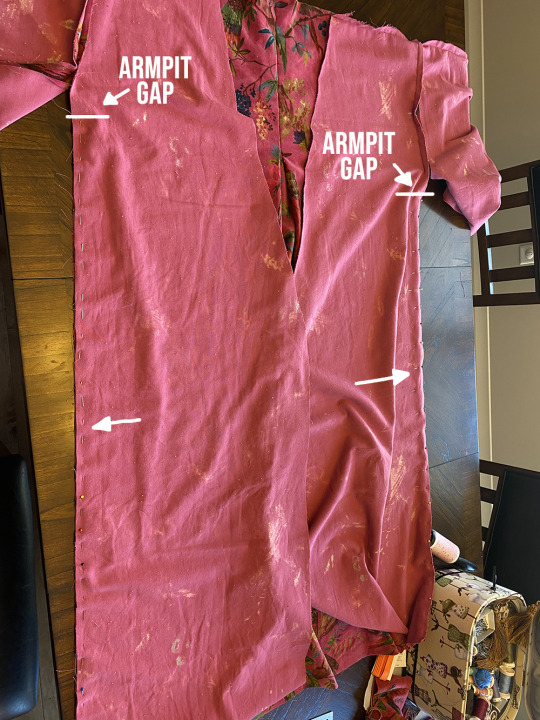
You’ll then attach the sewn sleeves to the front panels (right sides together), ensuring you’re matching the sleeve seam with the shoulder seam. Make sure you’re sewing the side of the sleeves with the diagonal cutout so when the garment is flipped right side out, the diagonal is next to your body. You’ll sew from the marked line to the marked line.
Next, you’ll want to sew the sides of the robe together to close it. However, this was a tricky part for me, because I had tried to sew the body and sleeves at the same time when I was doing my lining, but the armpits ended up bunched and slightly twisted around. So I tried getting around this issue by stopping about 1″ from the armpits, leaving a gap, while sewing the sides together. (You’ll close this gap at the very end of your project).
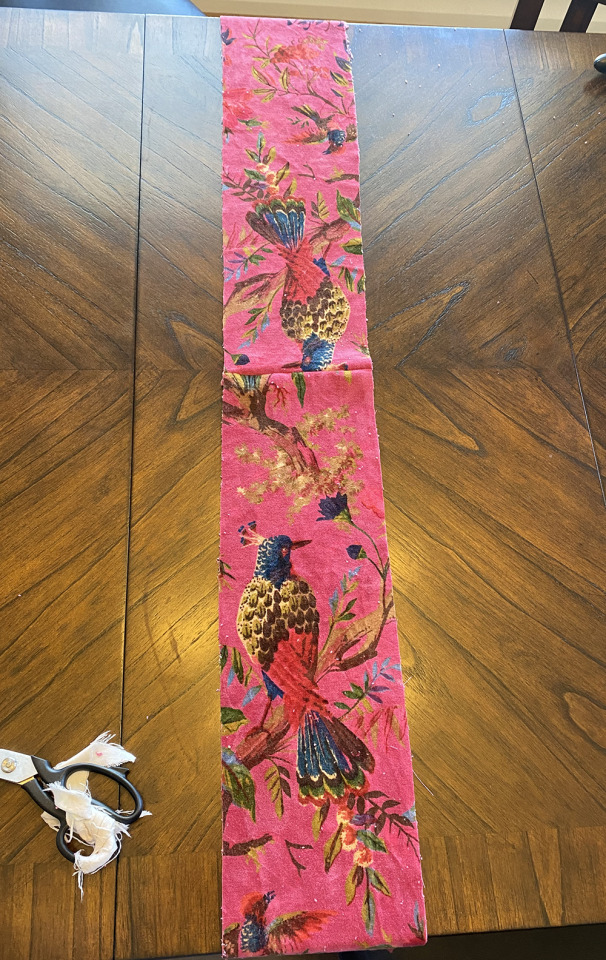
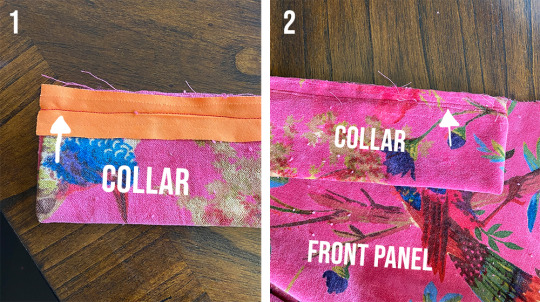
For the collar, attach both pieces together at one end, right sides together, to ensure the pattern isn’t upside down on one side. Once done, the right sides of the attached fabric should look like this:
Then, take the collar and fold lengthwise so the right sides are together. Sew a straight line across the two bottom ends. Then, flip the collar inside out so the wrong sides of the fabric are together and the bottom edges are nicely hemmed. It should look (more or less) like this:
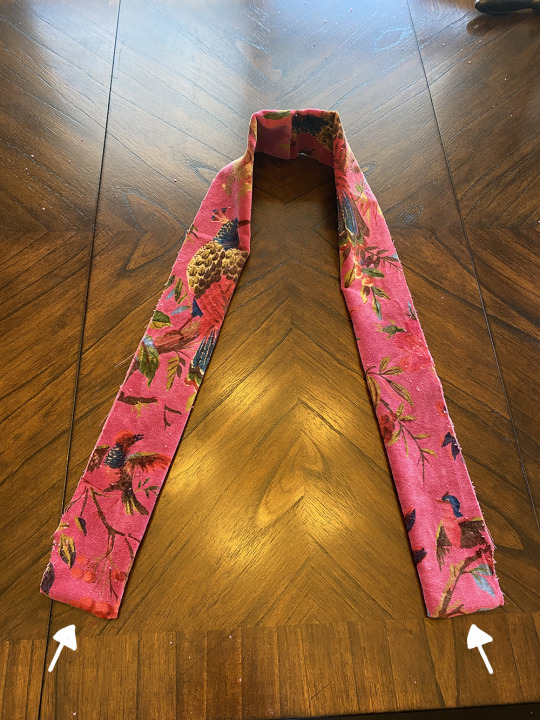
(Ignore the weird cuts on the bottom right and left hand corners - this was my first attempt with a collar that I realized was too short. [Pro tip - cut the collar pieces way longer than you’ll think you’ll need!] I forgot to take a pic of my second attempt, but you get the general idea of what it’s supposed to look like).
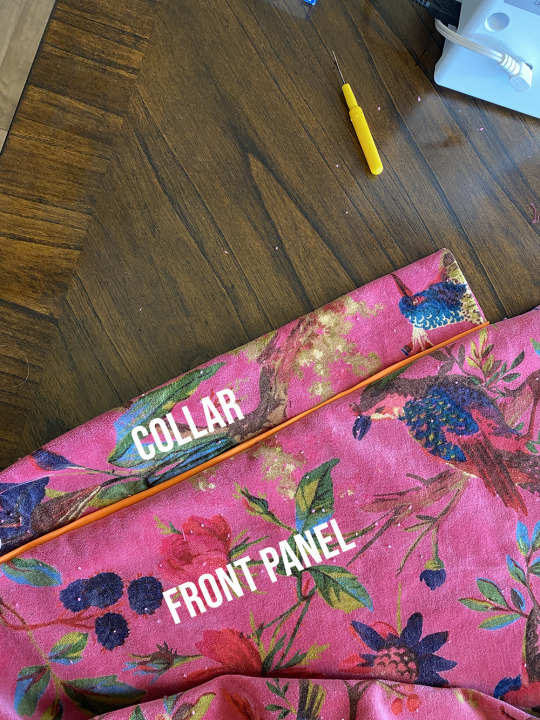
For the bias tape, this is probably not the proper way to go about it, but it was the only way my CFS brain could figure it out and it worked for me! (As the disclaimer said, I’m not a professional sewer - I’m more concerned with whether something works than whether it’s the 100% professional method of execution).
So, take your bias tape, open it up, and pin one edge against the raw edge of your collar. Sew these together a little bit lower than your seam allowance (1). Then you’ll want to fold the bias tape up so both edges are facing the sewn edge of your collar. Then pin and sew your collar, bias tape side down, to your robe (2). (When doing so, make sure to match the seam at the back of the neck on the collar with the middle of the back panel).
This way, when you attach the collar using your seam allowance, you’ll still be able to see a small amount of the bias tape peaking through around the collar when it lays flat against you, like so:
For the bias tape on the sleeves, I attached one edge of the bias tape to the right side of the fabric, stopping an inch past the 9″ marking on both sides of the sleeve. (I sewed this about 1/4″ from the edge).
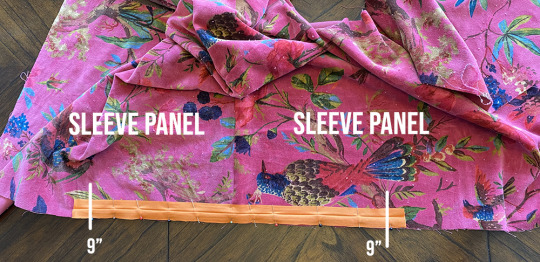
I then flipped each sleeve inside out (right sides together) and sewed it together, stopping about 1/2″-1″ away from the armpit (as previously mentioned) and at the 9″ measurement on the opposite side. For the side with the bias tap, I flipped the bottom part of the tape over onto the wrong side of the fabric and sewed it down as I was sewing the entire sleeve.

At this point, if you flip the entire robe inside out so the right side is facing outwards, it should look like this:
--- 🦜 ---
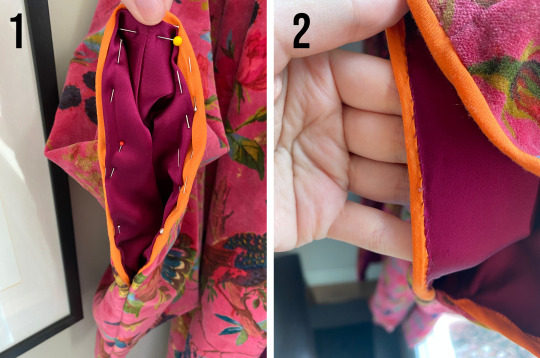
For the lining, follow the same steps as you did for the velvet (minus the collar). But when you do the box pleat, make sure the inverted side (the side you pull together) is on the wrong side of the fabric.
Once the lining is fully constructed, you’ll want to attach the lining to the velvet, right sides to right sides, along the collar and centre front.

Once you’ve sewn the lining and velvet together, flip your robe inside out so both right sides are showing.

As you can probably see in the photo, I already started the next step. Which is hemming the bottom of the robe. I’d recommend doing so while it’s hanging (either on a hanger, dress form, or another person), to ensure you don’t have any weird spots where the lining is pulling up on the velvet. I attached the lining and velvet by hand stitching.
For the sleeves, I folded the bias tape down onto the wrong side of the fabric, folded the lining under itself to make a nice little hem, and sewed both together. I did so by hand with a really simple stitch. (As with the bottom hem, make sure you’re only picking up the bias tape and lining so you don’t poke through to the other side).
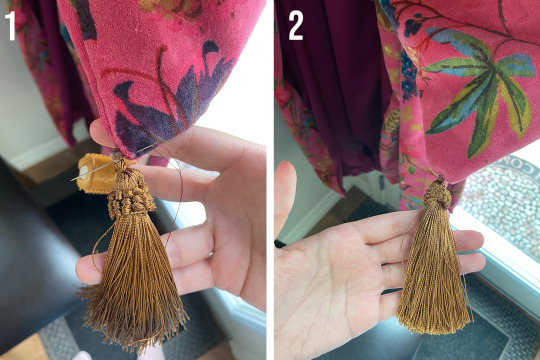
Then for the final touch - the tassels! Mine came with a large loop that I had to remove. I cut it off and then encased the shorn ends in hot glue to ensure the entire thing didn’t somehow unravel.

I let the glue harden and then attached the tassels by hand to the corners of the sleeves and collar.
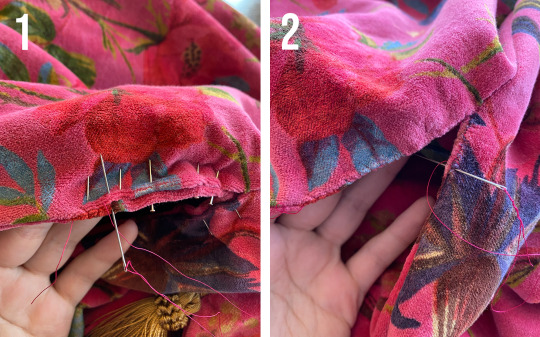
Now we’ll finally close those ~1″ gaps under the armpits. I did this with a very simple hand stitch, making sure I grabbed a bit of fabric from each side of the fold and pulled the thread taught.
--- 🦜 ---
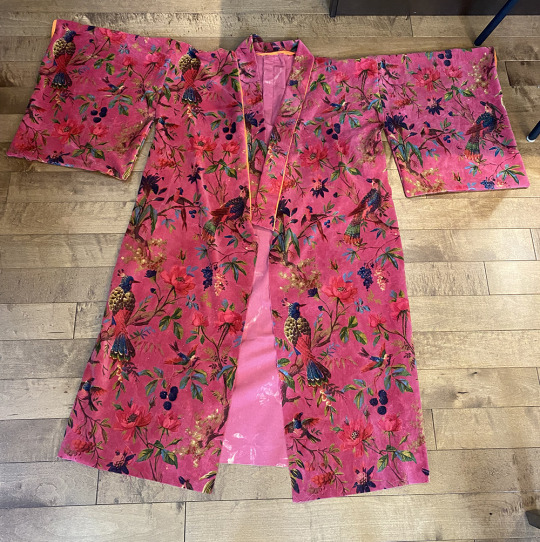
And voila, you should now be the proud owner of the infamous breakup/bird/wrap robe.
--- 🦜 ---
And that’s it! Hopefully this all makes sense and if anyone has any questions either send me an ask or add a reply to this post and I’ll do my best to answer!
On one final note, not to be That Person™, but this took quite a lot of work (both the robe and this post) and I’m a chronically ill freelancer who’s income was hit hard by COVID. So if anyone wants to throw some change at my KO-FI if you found this helpful, I’d be very much appreciated.
#sewing#our flag means death#text post#ofmd#ofmd costuming#ofmd cosplay#ofmd tutorial#long post#banyan robe#mine [wb]#bird banyan#seriously this post is quite long but i wanted to be thorough so I can save at least one person the headache i've been dealing with#namely the headache of trying to figure this whole thing out#also if anyone's curious the colour of this robe changes drastically depending on how it's photographed#which is why it looks red in some pictures and more pink in others#it's the exact same roll of fabric and it's WILD
485 notes
·
View notes
Photo


Gotham Knights ▸ [01/?]
↪ The Iceburg Lounge ☂
#gotham knights#gotham#gothamknightsedit#dc#dc comics#dcedit#dcuedit#dcmultiverse#video games#videogameedit#vg#vgedit#i haven't posted in a long time but i've been way too infatuated with this game#gaming#gamingedit#gamingscenery#wb montreal#mygifs*#mine*
147 notes
·
View notes
Text
Querida eu.
Estou numa jornada de aceitação. Não estou mais conseguindo aceitar migalhas de afeto, pois o meu coração está querendo tornar-se único e preenchido. Passei por muitas adversidades em minha vida e muitas das vezes, tive que passar por todas elas sozinha.
Às vezes, penso: "como é que eu consegui sobreviver a todas essas coisas? Como eu tive o culhão para aguentar sem me despedaçar completamente?" Como se houvesse respostas para as minhas perguntas e anseios.
Escrevo isso talvez, com muito orgulho e tristeza, pois foi tirado de mim a minha inocência. Doeu, e muito. Às vezes entro em estado de negação e raiva por não ter conseguido pedir ajuda. Eu não podia. Não estava no momento certo para isto.
Após três anos de relacionamento e 5 anos de término, vi ele com outra pessoa e não me surpreendi. Pude, por fim, aquietar a alma em paz. A mesma coisa com a segunda pessoa.
Talvez, seja porque eu amadureci ou eu aprendi a lidar que nem sempre, irei ganhar e que nem sempre, irei perder. A vida me faz questionar a cada minuto e isso é bom, pois estou aprendendo.
Consegui empregos novos, saí deles, estou fazendo um curso técnico, e hoje, irei fazer minha primeira tatuagem... Se der tudo certo. Olha como a minha vida deu uma virada de chave em tão pouco tempo.
É surreal.
Enfim, posso estar triste hoje ou amanhã, ou depois de amanhã... Mas espero, de coração, que não dure para sempre. Eu quero sair mais, ir para a faculdade, estudar, beijar na boca, viajar, transar, e o que mais a vida pode me proporcionar.
Às vezes, a paixão e os sentimentos podem ser efêmeros, mas não me cansaria de encontrá-los.
Não exatamente a paixão, mas sim, o amor. O amor a mim mesma.
Talvez, Frejat tivesse razão...
"procuro um amor, que seja bom pra mim. Vou procurar, eu vou até o fim."
Ressignifiquei essa frase como o amor por mim.
E é tão engraçado que não é cansativo, é bom...
Não preciso de relacionamento para me sentir completa.
Só preciso de mim.
Para que a Beatriz de 30, 40, 60 anos leia e entenda que foi duro a construção da autoestima.
Obrigada, querida eu. continue arrasando por aí!
Beatriz F.
#mine#textos#poecitas#meus textinhos#lardepoesias#arquivo poetico#mentesexpostas#novosautores#novosescritores#projetosautorais#wb
35 notes
·
View notes
Text
one of the worst diamond options that choices has ever made has to be the baby deer in wolf bride where if you don’t spend 20 diamonds to adopt it, the dialogue heavily implies that it’s going to die
#i'm diamond mining the spanish books and it reminded me of this#wolf bride#playchoices#choices wolf bride#choices wb
24 notes
·
View notes
Photo

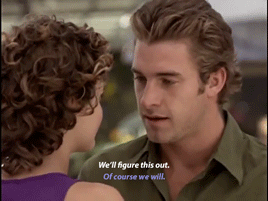


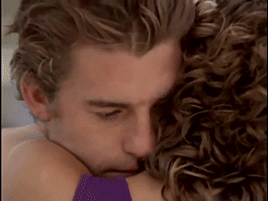

It’s only for a summer.
Felicity (1998-2002) - “The Biggest Deal There Is”
#felicity#felicity x ben#felicity porter#ben covington#keri russell#scott speedman#tv#90s tv#the wb#ben x felicity#my first gif set!#it's plain but I did it#didn't color it because it was looking weird#also no hd videos yay#mine#the background music for this scene is so beautiful
73 notes
·
View notes
Text


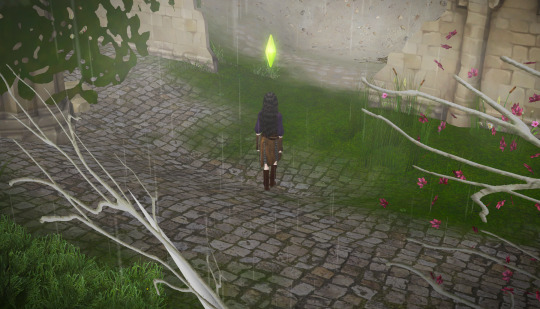

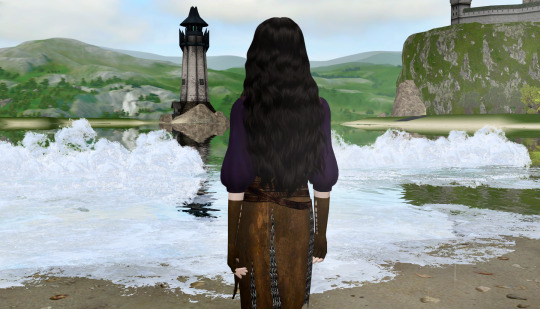
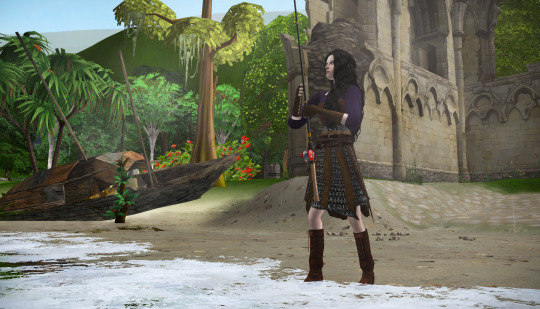
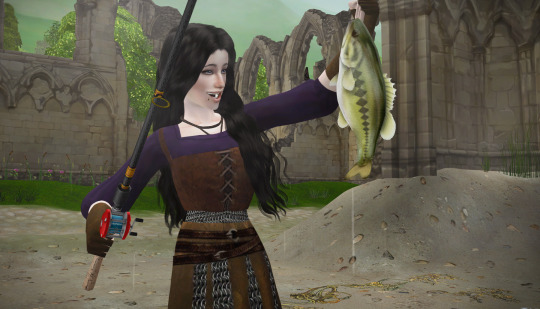
The bad weather followed Annika to the next location. Maybe it wasn't the evil warlock's fault at all and the weather was just shitty? Not that a little rain would stop her from doing what she set her mind to do!
Growing up, fishing used to be a Big Deal to Annika. It was one of the first activities she picked up when her family washed ashore the Bay, and although it was out of bare necessity at first, she's grown to genuinely enjoy it as an activity over the years. Her family didn't need to forage or hunt for food anymore (the Bay's markets were well-stocked and anything they couldn't find there, Gabriel would bring from the city), but there were days when Annika couldn't resist the nostalgic call of the waves.
Nor did she need to! The old temple ruins proved to be a great fishing spot, and they were just down the street from the Blackbirds' place.
#sims 2#ts2#sims#gameplay#bacc#wyverns bay#wb gameplay#sim scenery#wb scenery#forgotten ruins#blackbird#blackbird week 4#annika blackbird#mine
76 notes
·
View notes
Text
Anyway trolls are literally birds. To me.
#trolls#mine#wb#<- guy literally working on a phylogenetic tree for their dumbass ppt and failing#also i think bergens are an outgroup of trolls. however wtf are mt rageons and whatever#crimp? is
3 notes
·
View notes
Text


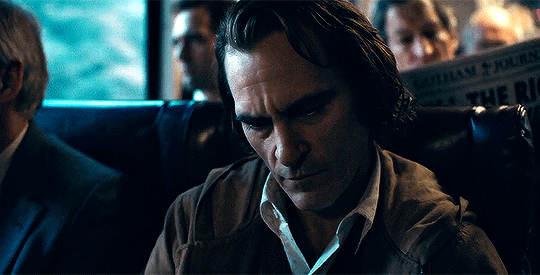
#jphoenixedit#joaquin phoenix#jokeredit#joker#joker 2019#joker2019#joker2019edit#arthur fleck#afleckedit#mine#mine.#the caption if i made one: o look das my dad#this is why im not making them#these are for my friends im not inflicting my humor upon theM#i completely forgot the name of the actor who plays dad here#their dad not my dad literally im team fuck thomas wayne always#bruce is my baby but i will hate on thomas forever always#if i remember correctly tho the thomas actors last name is cullen#WHICH when you consider rob pats most famous role--#and yknow rob pats bat is OBVIOUSLY little brother to arthur even if wb says no--#for the rbers if ur gonna be mean to me bc i decided to crossover two movies IN THE TAGS so theyre brothers bc thats my preferred reality#u can rb other ppls gifsets :) don't rb my shit if ur gonna be mean to me byeeeeeeeeeeeeeeeeeeeeeeeeeeeeeeeeeeeee
18 notes
·
View notes
Text
So thanks to seating arrangements, I ended up being able to see the third fantastic beasts movie from my seat on the plane. I was mostly focused on Pacific Rim on my screen, but I did take a few peeks, especially since the person watching it had the subtitles on. It looked like I would have hated a solid 90% of the movie. It had some ludicrously bad problems (even just from what snippets I peeked at, the cultural appropriation alone was off the fucking charts) and I have no regrets about ignoring its existence, but…I am so happy to see that they really did give Jacob his due as a character. He, at least, got the story and ending he deserved. He was always my real favorite character. For old time’s sake and the little part of me that will always love Fantastic Beasts and Where to Find Them, I’m glad about that. That’s good.
#nork rants#the accidental epic#also i think i could make a case that wb used my fic.#idk the whole ~necromancy in the water~ bit looked An Awful Lot Like Mine#plus *waves at the second film in general*#not gonna bother though#i’ve moved on
4 notes
·
View notes
Photo

— Work Bitch by Britney Spears
#britney spears#bspearsedit#britneyspearsedit#lyrics#lyricsedit#wb#britney jean album#2013#mine#edits
7 notes
·
View notes
Text
impulsively got a ticket for a play that’s tonight, bless my prof for telling me about it
6 notes
·
View notes
Last Seen Blogs

dontcallmestarfox
Let's Rock n'Roll!
nekirorgen
Nékir by Leukiel

monsterhightexts
✧ Monster High Texts ✧

planethustle
Planet Hustle
infinitoxfrio
Anomalía genética.