#moyou london
Text
instagram
#halloween#halloween nails#halloween nail art#norwich#MoYou london#MoYou Halloween stamping#Instagram
3 notes
·
View notes
Text
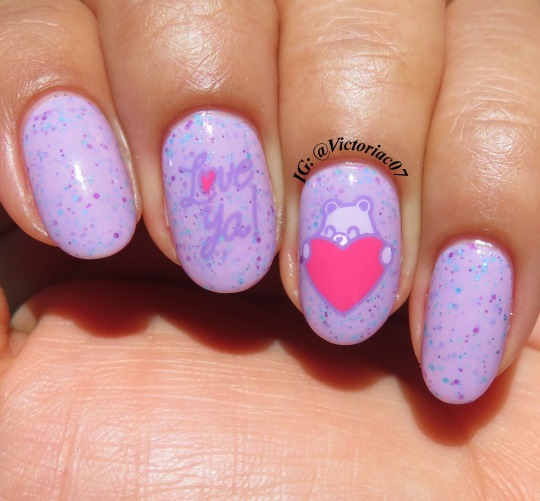
I need to do all the Care Bear manis..how adorable is this image?
Used in this mani:
Painted Polish - Blossom Buddies, Thirty & Flirty
Maniology - Lilac Mist
Moyou London - Pink!
Glisten & Glow Topcoat
Stamping Plate: Care Bears Unlock The Magic 06 from @moyou_london
#nails#nail polish#manicure#nail art#short nails#purple nails#lavender nails#glitter nails#crelly#glitter crelly#stamping#reverse stamping#stamping nail art#cute nails#simple nails#care bears#Care Bears nails#glisten & glow#painted polish#moyou london
19 notes
·
View notes
Text
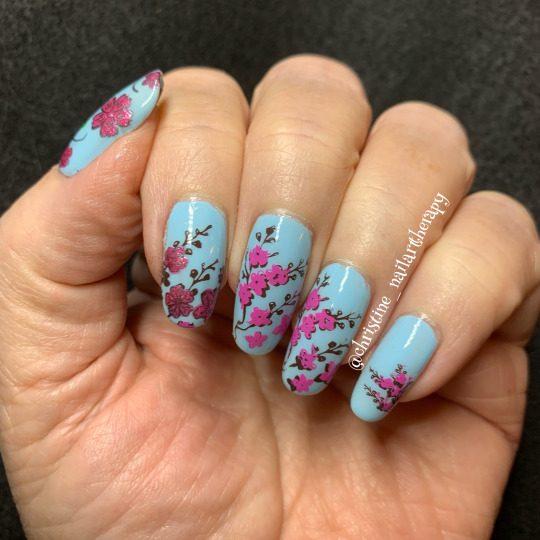

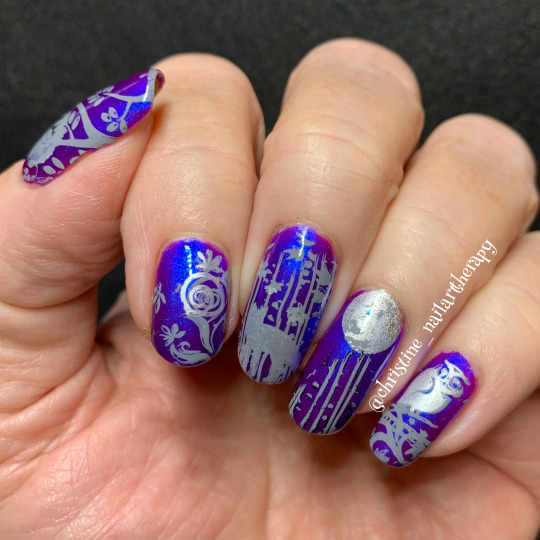
Christine’s Nail Art Therapy 💅🏻💅🏻💅🏻
Theme: Blooming Flowers ~ Cherry Blossoms 🌸
>>Featuring - El Corazon 423/278
>>Stamping Plates - MoYou London Suki 02, 12
>>Stamping Polishes - Painted Polish Stamped in Chocolate, Stamped in Pink 2.0
Zoya Azalea, Maniology Chroma
#notd#nailsofinstagram#naturalnails#nailstamping#nailsoftheday#nailart#supportindies#glamnailschallengemarch#sakura#cherryblossommani#cherryblossoms
10 notes
·
View notes
Photo

First mani of 2023! 💗🌹 Super simple and blingy 🤩 Used Prism Polish Sugared Rose for the base, which is a thermal so changes colour in warm and cold 😍 Then added AEngland The Holo Wizard Topcoat over it. Stamped from Moyou London Princess 19 #nails #nailart #nailsofinstagram #nailinspo #naildesign https://www.instagram.com/p/CncUcUKsJxt/?igshid=NGJjMDIxMWI=
11 notes
·
View notes
Text
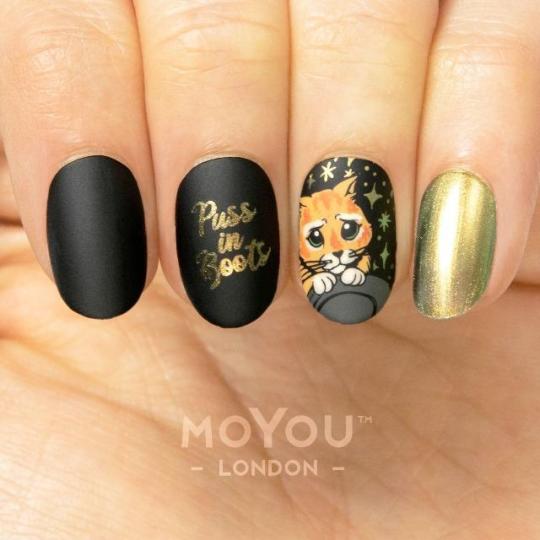
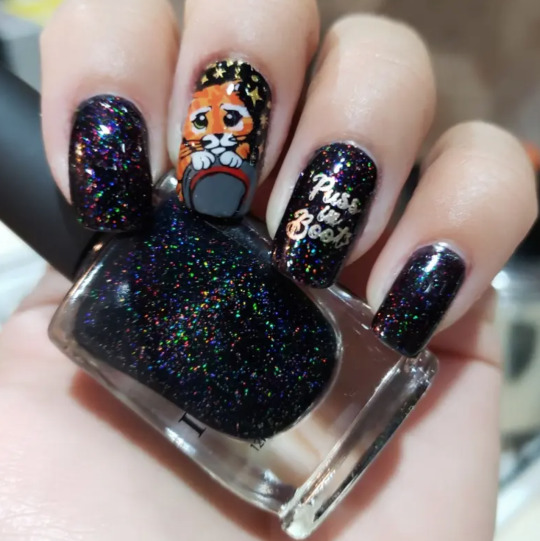
OMG! MoYou London has a collection of Shrek nail stamps and set #7 features Puss in Boots! I would love to get my nails done and use these stamps in his honor for when I go meet him at Universal! I looked at how long shipping takes and it looks like they may not make it in time. Maybe I'll just make it simple and stick to orange nail polish. Either way, I think Puss will still be thrilled.

5 notes
·
View notes
Text
Time for a random nail art thread because if I spend too long thinking about other things I'm going to lose it. (6/24/22)
Let's talk about Stamping.
SO... I have a new favorite tool. The Creative Shop stamper. If you've ever tried to do stamping on your nails and it hasn't worked very well, join the club. Clear stampers are easy to see placement on but often don't pick up well, especially at first. Moyou London's XL clear stamper is all right and does okay with a lot of polishes, but it's still nowhere near the Creative Shop for stickiness and pick-up-iness. The free ice cube stamper you get from Maniology works okay if you prep it with a quick swipe of acetone the first time, but can be difficult otherwise. The Born Pretty stamper I have will be reserved for french tips, it's garbage for stamping.
The Creative Shop's swiper card is also excellent, very flexible but not too flexible. By contrast, Maniology's card is okay, and Moyou London's is too stiff. The flexible card from TCS cleans the surface perfectly without taking polish out of the grooves.
I've thus far tried Maniology, MoYou London and Born Pretty stamping polishes. Of those, I prefer the Born Pretty polishes, with Maniology in second place and MoYou London a distant third. Some of their polishes are fine. A couple just don't work at all.
For stamping plates, if you have a good stamper, it doesn't matter so much where you get them. I have plates from Moyou London, Born Pretty, Maniology and the Creative Shop. I wouldn't use The Creative Shop plates with any other stamper because the lines are very very fine, but if you're doing an order, you might as well get both, because the lines are very detailed and they have some unique designs.
I find myself returning to my Moyou London plates the most, with Maniology a close second, mostly because they have highly specific plates for things like Pride manicures and gorgeous geometrics, but basically get stamping plates when you get other stamping supplies, and get them on sale. I spend up to about $4 per plate on them, only more if I need a very specific plate at a specific time. (they usually retail for about $8-10 per plate.) My exception is The Creative Shop, which is a Ukrainian company, and I pay full price there (don't use the coupon code) because they donate their profits to the cause in Ukraine.
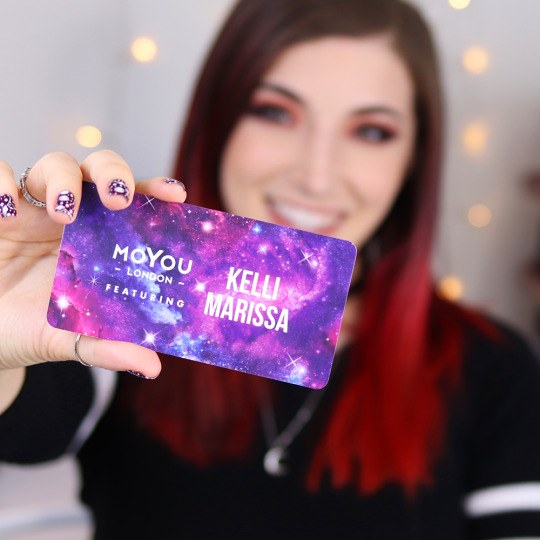
As for learning to stamp, I learned everything I know about it from two sources: My Simple Little Pleasures (Colette) and KelliMarissa on Youtube. With Colette, if there's a technique you want to learn, look for her long videos from her livestreams, where you can see the entire process in real time. Her tutorials skim through a lot of stuff, which is fine once you have the hang of it, but watching the real time tutorials can help when you're first starting out. This one, for example, shows stamping with a Moyou London stamper, polish and plate. The quick version is here. The advantage of the long version is that you get to see cleanup in real time, which is a vital thing to learn. Kelli also has a tutorial or two on cleanup.
I found it incredibly reassuring to know how much cleanup people do. I generally use Colette's method, latex on the tops of the fingers and scotch tape on the sides. My favorite latex for this is from Nailhoot because it isn't perfumed and is cheap. They also have a glitter-safe nail polish thinner that can fix clumpy/old polishes completely. (Like, bring them back from almost solid.)
But even with the best prep and the best technique, some cleanup is always needed. I've tried Holo Taco's cleanup brush, Born Pretty's cleanup brush and E.L.F.'s concealer brush and mostly I prefer the ELF brush because they all last about the same amount of time and it's cheap. The HT and BP brushes are slightly more precise when new. They all get a little fuzzy over time.

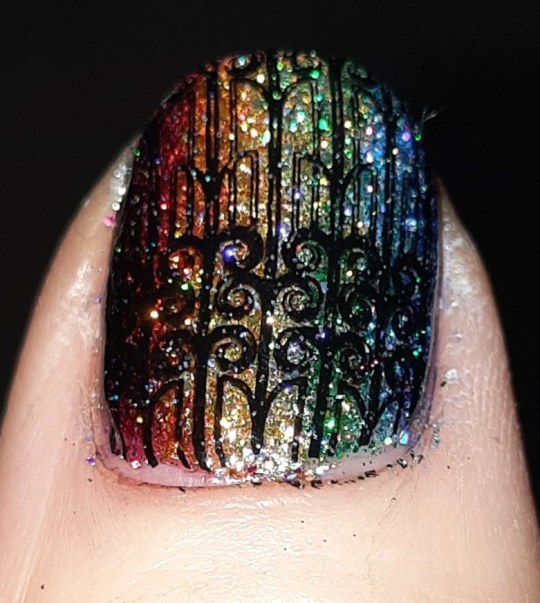
The left image shows the cuticle difference when cleanup is done. (two close-up images of the same thumb, rainbow glitter vertical gradient polish with a stamped art deco black design that looks like a wrought iron gate. The left image has cleaner cuticles than the right image.)
If you look closely, you can see where the lines of the stamping are a little incomplete. This was done with the Moyou stamper and Born Pretty polish. I'd see if I can do this exact stamp again at some point with the stamper from The Creative Store.
3 notes
·
View notes
Photo
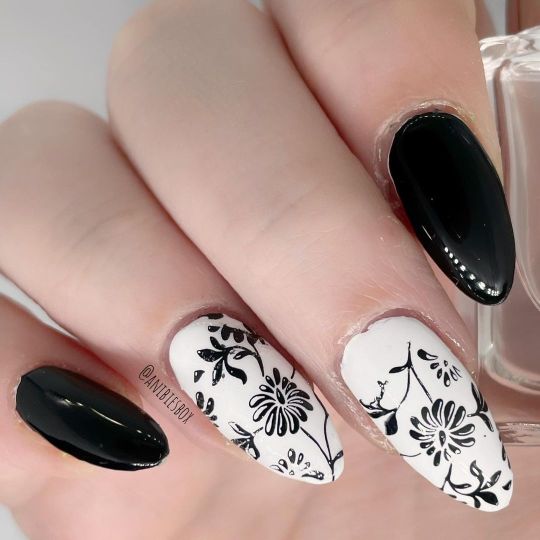
#maniswapcircle Diesen Monat war mein Partner @viperlovr und ich habe mir etwas blumiges ausgesucht. ————————————— Holo Taco - Not Milky White P2 - Color Victim eternal Moyou London - Top Coat Seche Vite - Dry Fast Top Coat ————————————— #nails #nailart #nailstoinspire #nails2inspire #nailspiration #nailpolish #naildesign #nailinspo #nailsfromgermany #p2 #p2cosmetics #holotaco #holotacocombo #stamping #stampingnailart #stampingnails #white #whitenails #blacknails #black #blacknwhite #blackandwhitenails #blackwhitenails #monochrome #monochromenails #flower #flowernails #elegant #elegantnails https://www.instagram.com/p/CeIsu_YMnNV/?igshid=NGJjMDIxMWI=
#maniswapcircle#nails#nailart#nailstoinspire#nails2inspire#nailspiration#nailpolish#naildesign#nailinspo#nailsfromgermany#p2#p2cosmetics#holotaco#holotacocombo#stamping#stampingnailart#stampingnails#white#whitenails#blacknails#black#blacknwhite#blackandwhitenails#blackwhitenails#monochrome#monochromenails#flower#flowernails#elegant#elegantnails
3 notes
·
View notes
Text
#1 grey paws
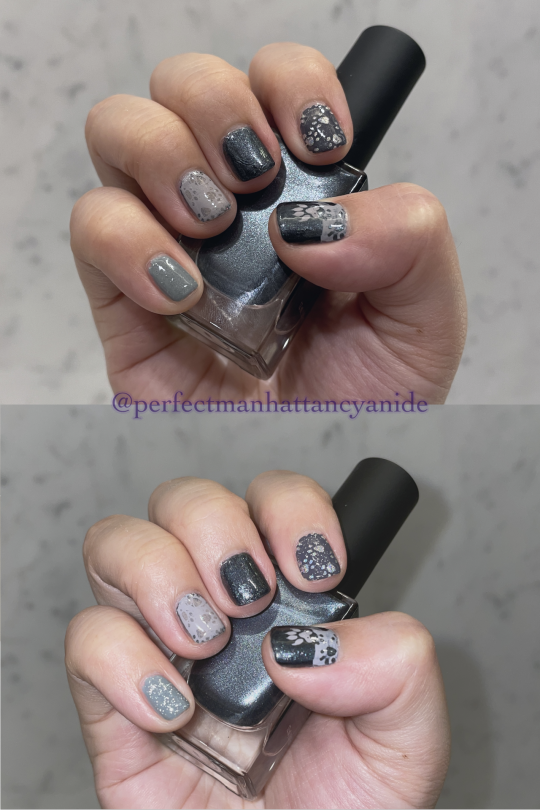
Right hand. Least favourite: ring finger.
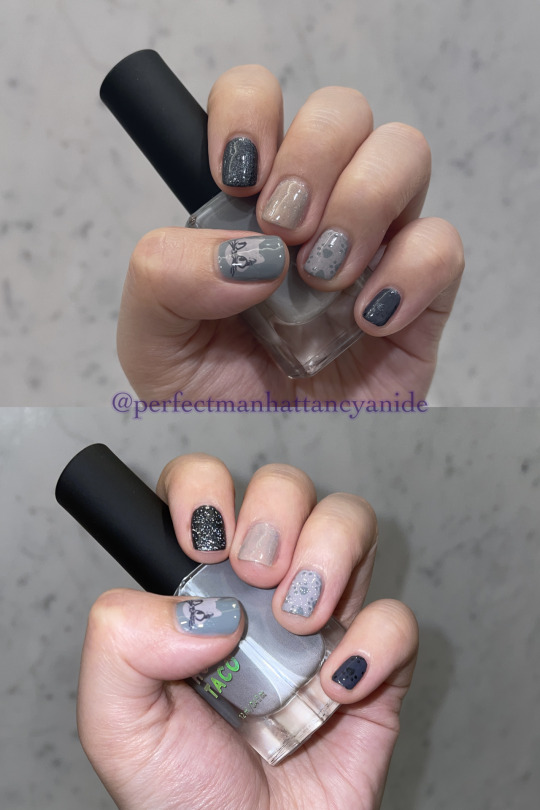
Left hand. Favourite: pinkie.

(from left to right)
CEO by ILNP
Ghosted by twinkled t
Smokey by twinkled t
Duct Tape Grey by Holo Taco
Circuit Breaker by Holo Taco
Greyt by Holo Taco
Reflective Taco by Holo Taco
(front)
Crazy Cat Lady 10 by MoYou London
1 note
·
View note
Text
Cat Eye Nail Design: The Best 9 Latest Trend in Manicures
If you're looking for a new and trendy cat eye nail design to show off at your next manicure appointment, look no further than cat eye nails! This style is the latest craze in the world of nail art, and it's sure to turn heads. In this article, we will teach you how to create this look using simple steps that anyone can follow. So get ready to take your nail game up a notch with cat eye nails!

Cat Eye Nail Design
Creating the perfect cat eye nail design look on your nails is easier than you might think. All you need is a little patience and some practice, and you'll be a pro in no time. Here cat eye nail design is the steps you'll need to follow to create this look cat eye nail designs:
Cat Eye Nails
- Begin by painting your nails with a base coat of your favorite color. Allow the base coat to dry completely before moving on to the next step.
- Next, take a piece of tape and place it across your nail horizontally, about halfway down the nail. This will serve as a guide for where to place the cat eye effect.
- Once the tape is in place, use a brush or dotting tool to apply a line of black or white polish along the edge of the tape. This will be the base of your cat eye design.
- Gently remove the tape and you should now have a perfect cat eye shape on your nail!
- To finish the look, apply a top coat of clear polish to seal in your cat eye nail design.
And that's it! You've now created a fabulous cat eye nail design that is sure to turn heads. Just remember to take your time and practice patience, and you'll be able to achieve this look in no time.
Cat Eye Nail Polish
Are you looking for a new way to amp up your nails? Cat eye nail polish is the perfect way to do just that! This unique style of polish creates a cool, 3D effect on your nails. Check out some of our favorite picks for cat eye nail polish below.
- Aila Cat Eye Nail Polish in shade "Electric Blue"
- Hit the Bottle Stamp polish in shade "Jellybean"
- MoYou London stamping polish in shade "Black Pearl"
To create the cat eye nail design effect, simply apply your chosen polish to a piece of plastic wrap, then press the wrap onto your nail. The key is to use a very thin layer of polish so that it will transfer easily to your nail. Once you've applied the polish to your nails, peel off the plastic wrap, and voila! You've got perfect short almond cat eye nails.
Magnetic Cat Eye Nails Gel Polish
If you're looking for a way to take your nail game up a notch, look no further than magnetic gel cat eye nails! This trendy new manicure is super simple to do at home with just a few basic supplies. Keep reading to learn how to create this mesmerizing look.
What You'll Need:
- A base coat of gel polish
- A top coat of gel polish
- A magnetic cat gel eye nail polish ( we love the shades "Mystic Night" and "Lunar Eclipse" from Born Pretty )
- A piece of plastic wrap
To create this look, start by painting your stick on nails with a base coat of gel polish. Once the base coat is dry, apply a thin layer of your magnetic gel cat eye nail polish to each nail. Then, take a piece of plastic wrap and press it onto your nails. The key is to use a very thin layer of polish so that it will transfer easily to your nails.
After a few minutes, gently peel off the plastic wrap and you should now have a perfect cat eye design on your nails! To finish the look, apply a top coat of gel polish. And that's it! You've just created a fabulous magnetic gel cat eye manicure that is sure to turn heads.
Cat Eye Nail Art
Cat eye nails are all the rage these days, and it's easy to see why. This chic nail design is perfect for any occasion, whether you're dressing up for a night out or simply want to add a touch of glamour to your everyday look. Plus, it's surprisingly easy to achieve with just a few simple supplies.
All you need is a base coat, black polish, and a top coat, along with a piece of tape or cat-eye sticker. First, apply your base coat and let it dry completely. Then, use the tape or sticker to create a straight line across the center of your nails. Next, paint your nails with black polish, making sure to get as close to the edge of the tape as possible.
Finally, remove the tape or sticker and seal your cat-eye design with a top coat. That's it! You've now created a fierce and fabulous cat eye nail design that is sure to turn heads wherever you go.

Cat Eye Gel Polish
There's something special about cat eye gel polish that just makes your nails look extra glam. Whether you're rocking a classic black cat eye or a more funky design, this trend is always in style. And the best part is that it's actually pretty easy to do at home.
All you need is a good quality gel polish and a cat eye nail design stamping plate. Just follow the instructions on the polish and you'll be rocking your new nails fake in no time. So go ahead and give it a try - your nails glue on will thank you!

Green Cat Eye Nail Design
Winter is the perfect time to rock a cat eye nail design. The green shade is perfect for getting into the holiday spirit, and the glittery accent adds a touch of glamour. Best of all, the cat eye design is surprisingly easy to achieve. All you need is a steady hand and a little emerald green nails pdf patience.
So if you're looking for a festive and stylish nail design, give the cat eye a try. You might just find that it's your new favorite winter look.


Red Cat Eye Nails
There's something about a cat eye nail design that just screams "sexy." Maybe it's the way the curved lines resemble a cat's pupils, or maybe it's the way the color pops against a nude nail.
Either way, there's no denying that this look is hot. And luckily, it's also fairly easy to achieve. All you need is red nail polish and a black striping brush. First, paint your nails cat eye with red polish. Then, use the black brush to create a triangular shape at the outer corner of each glue on nails.
Fill in the triangle, and you're done! Whether you're headed to a party or just want to feel like a glamour queen for a day, cat eye nails are the perfect way to turn up the heat.
Ombre Cat Eye Gel Nails
You don't need to be a witch to rock an ombre cat eye gel nails design. This trend is perfect for Halloween, or for any time you want to add a bit of drama to your look ombre nails. The key to this design is in the layering of ombre nails colors.
To get the perfect cat eye effect, start with a light base color. Then, apply a dark shade in the center of each nail, followed by a lighter shade around the edges.
Finally, finish with a clear top coat to seal in the design. With a little practice, you'll be able to create this spooky-chic look in no time!
Read the full article
0 notes
Photo
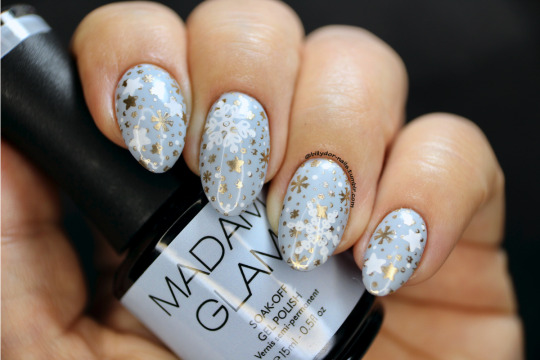
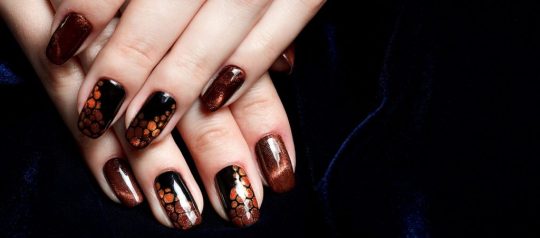
Day 8 of the 12 Days of Christmas Nail Art. Tomorrow’s manicure will be delayed until Wednesday because I’ve had no time to work on anything today. Tis the season for stressing and finishing last minute projects.
Products Used:
Madam Glam - Sleepy Eyes
Twinkled T - Glow Up, Liquid Gold
MoYou London stamping plate Noel 04
#12 Days of Christmas Nail Art#12 Days of Christmas#nailsnails#nails#nail art#gel polish#stamping#stamp manicure#double stamping#christmas#winter#madam glam#twinkled t#moyou london#nail designs#manicure
80 notes
·
View notes
Text
instagram
0 notes
Text
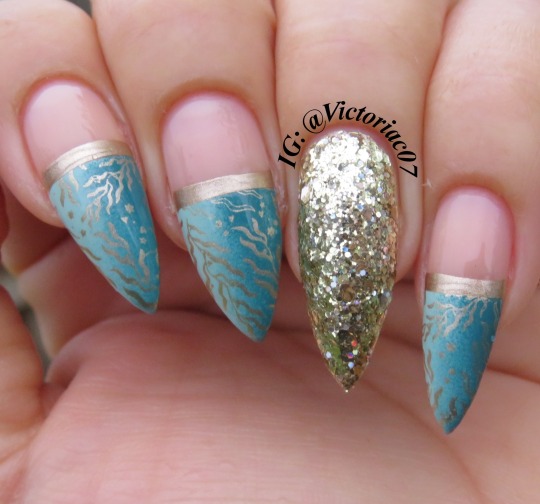
My favorite look for my long nails; I miss them. Not so patiently waiting for them to grow back.
Used in this mani:
Ella + Mila - Pure
Pop & Polished - Kingfisher, Aqua-mint
China Glaze - High Standards, Bring On The Bubbly
Glisten & Glow Topcoat
Stamping Plate: Care Bears Unlock The Magic 02 from @moyou_london
#nails#nail polish#manicure#nail art#stiletto nails#pointy nails#stamping#stamping nail art#glisten & glow#china glaze#pop and polished#moyou London#ella + mila#gradient nails#negative space nails#turquoise nails#whatsupnails
25 notes
·
View notes
Text
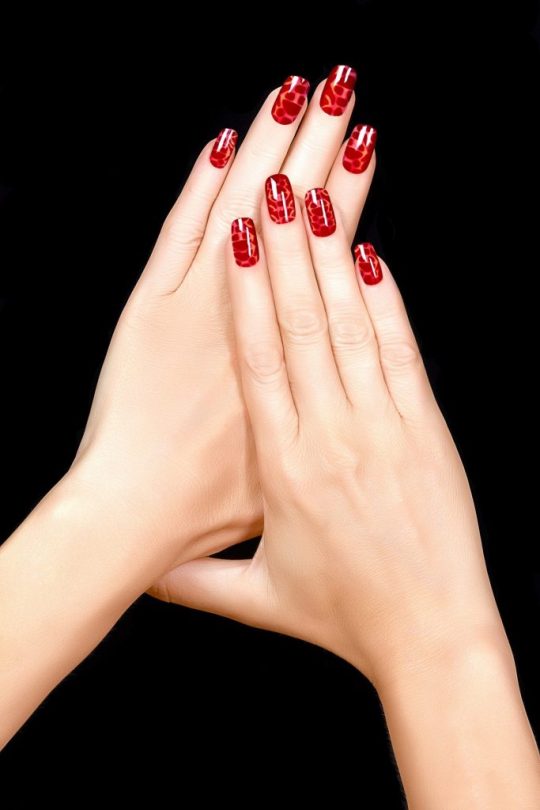
Polish choice inspired by @m4g0rtz
Polished for Days Goblins & Ghoulies
Stamping Plates: MoYou London Mother Nature 03, 04, 14, Kads Fashion 056
Stamping Polishes: Sassy Sauce Platinum, Copper, Twinkled T Icey, Moyra Gray

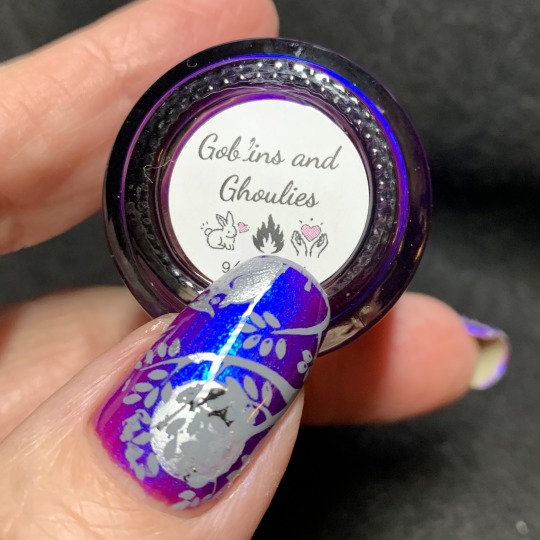
#notd#nailboarders#naturalnails#nailstamping#nailsoftheday#nailart#supportindies#untried#halloweenmani
13 notes
·
View notes
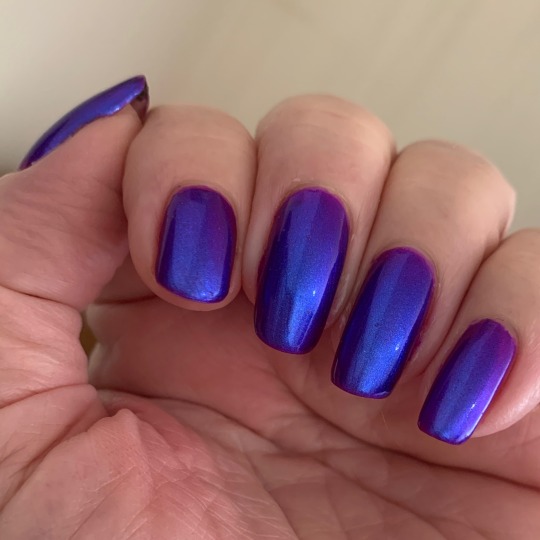
Photo

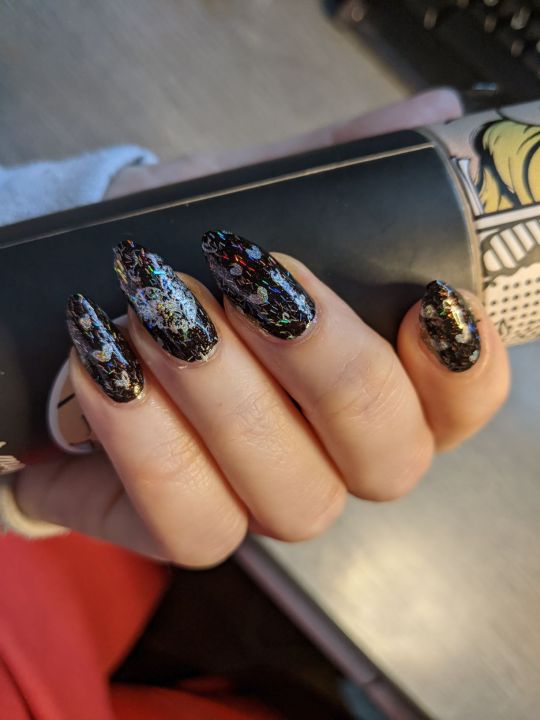

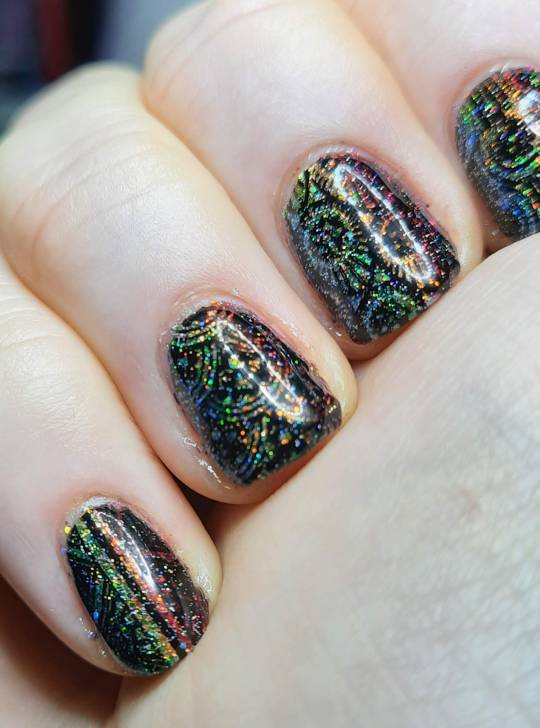
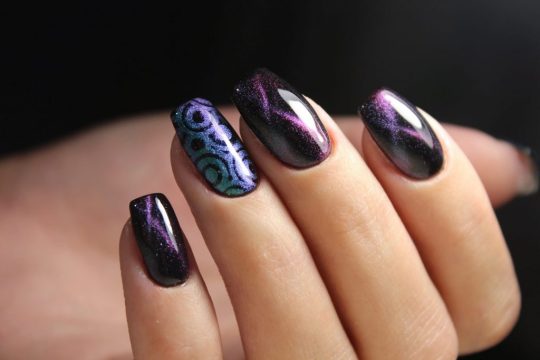
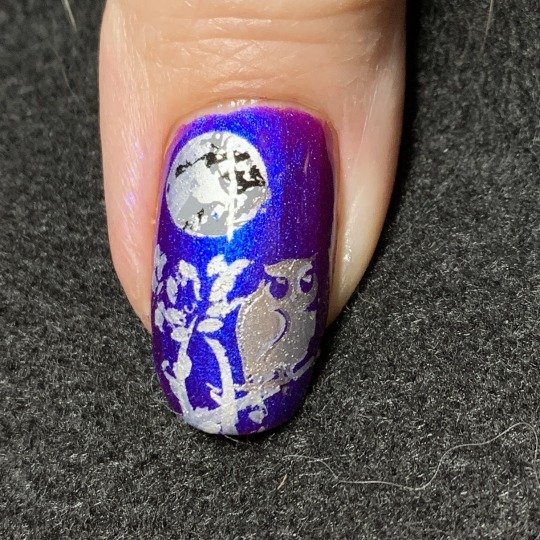
My latest manicure, using:
Holo Taco One Coat Black
77 Nail Lacquer The Coven of Requiem (from Polish Pickup)
Emily de Molly Holographic Silver Stamping Polish
Pamper Plates 044
MoYou London Mini Manicure Mat & Clear Rectangular Stamper
#my words#gifset or photoset#Loz nails#tinyjarofanchovies#holo taco#77 nail lacquer#emilydemolly#pamper plates#moyou london
14 notes
·
View notes
Text
Great Summer Look: Tiger Nails !
Moyou London Pro 04
Clear Jelly Stamper Original clear stamper and black stamping polish.
Essie Orange it Obvious
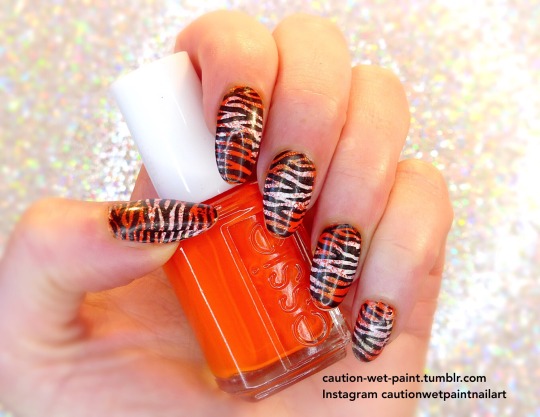
#nail art#stamping nail art#diy nails#clear jelly stamper#cjs#nailpornography#essie#moyoulondonstamping#moyou london#moyou pro collection#tiger nails#tigernails#summer look#summer nails#stunning nails#neon nails
27 notes
·
View notes
Photo

My new stampping plate! Watch the video reveal here :)
12 notes
·
View notes
Last Seen Blogs

artostattoo
Artos Tattoo

zipsunz
live laugh kelsey
monsterdex
Monster High Photography

ghostskrilla
Untitled

caramelblvd
lancaster