#my edit quality is decreasing
Text


Scruggly Watts
— Murdoch Mysteries 17.15
#murdoch mysteries#murdochmysteriesedit#murdoch mysteries spoilers#llewellyn watts#tvedit#canadian tv#periodedit#perioddramaedit#mmxvii#17x15#*edits#i swear my life the pixel quality decreases every episode... wot is this?????#the hottest thing a man can do is wear a henley top (+ suspenders)
136 notes
·
View notes
Text
I made a lil Yuki wallpaper for me

I think I did a pretty good job too! I’m also pretty into clipping stuff atm
#I absolutely adore the photo where Yuki is in nature looking back#it looks so nice#also clipping is fun#thank you to my dear friend for showing me the clipping button 🙏🏼#darn tumblr decreasing the quality!#a3! edit#a3! yuki#a3! thoughts#I love you Yuki#Yuki I love you
25 notes
·
View notes
Text

foolishLimpWrist
#noticed the video editing software i downloaded a while ago had a gif export option and wanted to gif this so i tried it#its not the best and i had to decrease the quality a lot to be able to actually upload it to tumblr but interesting learning experience :]#theres prob like 30 versions of this i've saved and deleted by now bc i was just trial and error-ing my way thru it lmaooo#so that is also part of the reason the quality is so shit XD#either way. not great but i didnt waste a couple hours on this for it to just rot on my harddrive ¯\_(ツ)_/¯#foolish gamers#fuck it. maintag#will it even show up bc of the first 5 tags thing. is that still a thing#whatever who care#my gifs#i may never use that tag again who knows
22 notes
·
View notes
Text
not gonna lie it’s hard to be like “yay artists standing up for themselves” when you see artists fighting against machine learning and artifical intelligence but you’re a translator who has been fighting (and losing) countless battles of artifical intelligence taking over your specific field of work while no one gives a shit
#like good for you for fighting back#but i wish this energy would've been there in 2016#and also i wish there was some nuance to the arguments ppl bring#because i've been forced to see AI as something completely neutral by advancements in my profession#meanwhile it's ACTIVELY taking away jobs in translation but no one cared! because now shit is cheap and big companies can get away with it#with outsourcing and proofreading and not hiring translators anymore#meanwhile AI is getting fed with thousands of post-edited texts that will eventually decrease quality in automated translations#WHICH WILL DIRECTLY IMPACT THE LANGUAGE WE SPEAK#and no one cares!!!!#i am . crying.#its all going downhill!#and the same thing is gonna happen to art AND WE TOLD YOU THIS#BUT NONE OF YALL LISTENED#because no one gives a shit about translators!!!!!!!!!#WE PREDICTED THIS EIGHT YEARS AGO#because it happened to us and it WILL happen to you!!!!#anyway rant over i'm done!
14 notes
·
View notes
Text
question, are other gifmakers/editors bothered by oversharpening, like do you sit there tweaking the settings for ages so it's okay? or is disliking oversharpened gifs and edits just my personal preference?
#are other cc's aware of what oversharpening looks like?#i'm just wondering because it's one of the things that most frequently decreases gif or edit quality to me#like i'll love the colouring and shot choice and whatever but the content just looks so fried it's a shame#also i am not shading anyone ot anything it's just a genuine question because i read a tutorial on oversharpening at the very beginning#of making gifs and perfecting the sharpening has always been such a huge part of my process since!#so i wondered if other ccs also have that 🥲
4 notes
·
View notes
Text
this does feel mean and i still have a lot of respect for the current vas (except sarah probably bc shes an nft bro last time i checked) but as someone who grew up with the show after the voice cast change, yeah the old pokemon vas are a hundred times better
#i prefer a few over the originals like brock. and i like dawn and goh's vas of course#but man its night and day. u can feel the quality decrease#i do feel like battle frontier was a rougher period and i can excuse it but sarah's just. all over the place to me#im not exactly expecting fine art from pokemon yknow but so many of the cast just sounds off#i feel like team rocket got it the most tho oh my god the originals were so good#ed stuart was just. the definitive james voice#current vas sound like theyve been trying to recapture the originals but just cant tbh#really tho its hysterical that sarah and zeno are paired together in jn bc whenever i watch a dub episode hes just so much better#and hasnt he like... only been a voice actor for 6 years? which is a lot but kinda smallcompared to how long sarahs been there#echoed voice#edit: wait no im an idiot hes been around for a while#like since 2008
6 notes
·
View notes
Text
i literally hate editing so bad it's insane. SO bad. I'm always like. what if i just post instead. BUT I KNOW IT CAN BE BETTER IF I CAN MAKE MYSELF DO IT.
#I like. I feel like i need someone to read it and just tell me 1) is the pacing fucked wl#2) does there need to be more Karting scenes/race scenes in general#3) at any point is there a decrease in the quality of writing or tonal shift that I should fix#But the problems are. 1) it's literally so much writing to get through and therefore don't want to ask someone else#2) I'm insecure and a hater and I only trust like 2 ppl with my writing#Idk I should probably give it a few days#And then come back to it#But I tried that with f1bb and then i just hated it MORE and didn't change anything and felt double bad#Ughrbdfbdjdk#Why is building relationships hard. Why is writing hard. Why is editing THEEEEEE WORST
5 notes
·
View notes
Text
Things I've learned from getting covid for the first time in 2023
I wear an N95 in public spaces and I've managed to dodge it for a long time, but I finally got covid for the first time (to my knowledge) in mid-late November 2023. It was a weird experience especially because I feel like it used to be something everyone was talking about and sharing info on, so getting it for the first time now (when people generally seem averse to talking about covid) I found I needed to seek out a lot of info because I wasn't sure what to do. I put so much effort into prevention, I knew less about what to do when you have it. I'm experiencing a rebound right now so I'm currently isolating.
So, I'm making a post in the hopes that if you get covid (it's pretty goddamn hard to avoid right now) this info will be helpful for you. It's a couple things I already knew and several things I learned. One part of it is based on my experience in Minnesota but some other states may have similar programs.
--------
The World Health Organization states you should isolate for 10 days from first having symptoms plus 3 days after the end of symptoms.
--------
At the time of my writing this post, in Minnesota, we have a test to treat program where you can call, report the result of your rapid test (no photo necessary) and be prescribed paxlovid over the phone to pick up from your pharmacy or have delivered to you. It is free and you do not need to have insurance. I found it by googling "Minnesota Test to Treat Covid"
--------
Paxlovid decreases the risk of hospitalization and death, but it's also been shown to decrease the risk of Long Covid. Long Covid can occur even from mild or asymptomatic infections.
--------
Covid rebound commonly occurs 2-8 days after apparent recovery. While many people associate Paxlovid with covid rebound, researchers say there is no strong evidence that Paxlovid causes covid rebound, and rebounds occur in infections that were not treated with Paxlovid as well. I knew rebounds could happen but did not know it could take 8 days. I had mine on day 7 and was completely surprised by it.
--------
If you start experiencing new symptoms or test positive again, the CDC states that you should start your isolation period again at day zero. Covid rebound is still contagious. Personally I'd suggest wearing a high quality respirator around folks for an additional 8-9 days after you start to test negative in case of a rebound.
--------
Positive results on a rapid test can be very faint, but even a very faint line is positive result. Make sure to look at your rapid test result under strong lighting. Also, false negatives are not uncommon. If you have symptoms but test negative taking multiple tests and trying different brands if you have them are not bad ideas. My ihealth tests picked up my covid, my binax now tests did not.
--------
EDIT: I'd highly suggest spending time with friends online if you can, I previously had a link to the NAMI warmline directory in this post but I've since been informed that NAMI is very much funded by pharmaceutical companies and lobbies for policies that take autonomy away from disabled folks, so I've taken that off of here! Sorry, I had no idea, the People's CDC listed them as a resource so I just assumed they were legit! Feel free to reply/reblog this with other warmlines/support resources if you know of them! And please reblog this version!
--------
I know that there is so much we can't control as individuals right now, and that's frightening. All we can do is try our best to reduce harm and to care for each other. I hope this info will be able to help folks.
#covid#covid 19#harm reduction#apparently only 16% of Americans even got their booster#it's wild out there#which makes sense because our public health messaging has been super unhelpful and intentionally shifted the burden#of infection control onto individuals to avoid us holding them accountable because it's politically and economically inconvenient to them
9K notes
·
View notes
Text
gif tutorial
i was asked to make a tutorial for this set i made, so let's get right into it!

first things first, i downloaded the music videos from youtube in 1080p using 4k video downloader. unfortunately, the quality of youtube videos always seems... not great, to put it simply. plus these music videos are from the 90s, so they've been upscaled to 1080p after the fact. all of this works against us, but i've definitely worked with videos of lesser quality than these, so at least there's that!
when i gif, i import video frames to layers rather than screencapping. this comes down to personal preference. after everything has loaded, i group all my layers together and set the frame delay to 0.05. i then cropped my gif to 540x500.
the next step in my process is sharpening. i did play around with my settings a bit given the quality of the footage and the dimensions of the gif. i compared both @hellboys low-quality video gif tutorial to my regular sharpening action and my vivid sharpening action and in this case, i preferred my normal vivid sharpening action. i used this tutorial to create the action for myself, and you can find other sharpening tutorials here. this action converts my frames to video timeline and applies sharpening.
once my gif is sharpened and i'm in timeline, i begin coloring. i wanted to simplify the amount of colors used in these gifs, again because of the video quality -- i knew it wasn't going to have the crispness i would normally like for my gifs. here are my coloring adjustment layers and their settings (not pictured: my first layer is a brightness/contrast layer set to screen) (explanation in alt text):


all of these layers and their settings will vary depending on your footage and its coloring (and obviously, feel free to make the gradient map whatever colors you like if you aren't going for this exact look).
pretty basic coloring, especially with just slapping a gradient map on top (my beloved), but at this point, i still didn't like the quality of the gif, so i added a couple textures/overlays.


i put the left one down first and set the blending mode to soft light and the opacity to 8%. depending on what look you're going for, you could increase or decrease the opacity or play around with different blending modes. i like using this texture with lower quality footage because even when it's sized up a bit, it adds some crispness and makes things feel more defined. for the second texture, i set it to overlay and 75% opacity. we love and respect film grain in this house.
now for the typography! sometimes i really enjoy typography and other times it's the bane of my existence for the sole reason of just how many fonts i have installed. anyway, here are the settings i used for this set:

make sure the color of your font is white and then set the blending mode to either difference or exclusion. i can almost never see a difference between the two, but for this set, i used exclusion. below are the blending options (double click on your text layer to bring up this menu or right click and select blending options).


now we have to add the warp effect. with your text tool still selected, click this icon at the top of your screen:

from the dropdown menu, select twist. these were my settings, but feel free to play around with different warp options and their settings. the ones i use most often are flag, fish, and twist.

this last step is completely optional, but it's an effect i use in most of my sets with typography. duplicate your text layer (select the layer and ctrl+j), turn off the layer effects (click the eye icon next to effects), and set the blending mode to normal. right click on the layer and select rasterize type. right click on the layer icon itself and choose select pixels.

at this point, you should see the moving black and white dotted line showing that only your text is selected. then go to edit > stroke. here are the settings i almost exclusively use.

this is what your text should look like now:

using ctrl+T, move the layer off the canvas so you can't see any of the text anymore. you should be left with only your outline. click anywhere on your canvas to de-select the text we just moved. use ctrl+T again as well as your arrow keys to nudge the outline over to the left 2px and up 2px. this is personal preference as far as the positioning, but i almost never move it any other way. you can leave it like this, which i sometimes do, or you can set the blending mode to soft light like i did for a more subtle effect.
and that's it! rinse and repeat for each gif in your set or use a different warp effect on each gif to switch it up! if you have any questions about this tutorial or would like me to make one for anything else, please feel free to ask any time!

#gif tutorial#my tutorials#gifmakerresource#completeresources#dailyresources#chaoticresources#userdavid#coloring tutorial#typography tutorial#tutorial#photoshop tutorial
169 notes
·
View notes
Text
MXTX Interview with Risa Wataya for Subaru Magazine P.6
Creative Process:
Risa: "Mo Dao Zu Shi" has not only sweet scenes but also painful scenes. After scenes of brutality, violence, and death, the characters might carefreely chat about nothing and everything, or there might be some lovey-dovey scenes. This is like treating readers with alternating pleasure and torture. Did you do this intentionally during your creative process?
Moxiang: If I only write about sad, painful story elements, my readers will inevitably leg it. From the other perspective, joy and happiness are comparatively fleeting emotions. If I only write joyful, happy stuff, I would not be able to touch and move my readers to any significant depth. Therefore, I paid special attention to balancing both sides during my creative process.
Kuohao: If you keep the same kind of tone throughout the story, the evocative effect will inevitably decrease. Readers will eventually become bored of it. But if you time it right, readers (listeners in the case of audio drama)'s emotions will go up and down along with the flow of the story. The pacing and structure of "Mo Dao Zu Shi" are incredibly well-timed. As a result, the audio drama script was not changed in any significant way and stayed loyal to the source materials' strength.
Risa: Do you feel pain when you write sad parts, and joy when you write happy parts?
Moxiang: In the case of "Mo Dao Zu Shi", I put myself in the position of an observer when writing sad parts, and focus on the development of the narrative. In the happy parts, I put myself among the characters and indulge in their shared joy.
Risa: That's so clever of you. There are so many 'torturous' (*) parts in the novel, so I thought perhaps it was very difficult. When reading "Mo Dao Zu Shi," I feel that there's a vast world populated by many people in Ms. Moxiang's mind. Where does Ms. Moxiang's immense imagination come from?
(*: literally 'reverse/mistreat/torture.' It's a modern Chinese slang denoting sad story elements designed to 'emotionally damage' the readers. Please check the note for the same word in part 3 of this translation)
Moxiang: If we are speaking of imagination, I feel that it's important to visit many places and meet vastly different people. In other words, step out of the house a bit more. But in terms of building characters, observing people is of great importance, even more important is... to dig deep into your own heart.
Before, when I was a young child, I read stories by Alexandre Dumas, Hugo, Balzac, and other world-famous authors. A writer staying in his room alone, talking to himself, laughing, and crying. A friend visiting him saw him in this state and became worried: "Is your mind alright?" But when the friend was about to leave, the author said: "Don't worry about me. I'm just writing a story."
Risa: The excitement of unraveling mysteries starting from the introduction of the story is a pleasure when reading Ms. Moxiang's novel. The introduction carries details that, sometimes later on, become a key point in the second half of the story in unimaginable ways. There's also a feeling of picking up hints and information purposefully left behind by the author. Is this a careful deliberation on your part during the writing process?
Moxiang: As I said, I only start to truly write once I have completed the outline of the story. About 80% of the story is planned. 20% is inspiration that came up during the writing. I think that the story structure is immensely important.
..
Translator’s Note: In this part is a section concerning the audio drama by Mimi. Risa talked mostly to Kuohao. Moxiang only chimed in at the last bit to say the production quality was very high and she was very happy with it. So, for now, I’m not including that part here. Once I have completed the translation, I will reorganize everything into a single file, proofread, edit, and host it on google drive so that it can be shared with the community.
..
Before writing "Mo Dao Zu Shi"
Risa: Ms. Moxiang, please tell us how you started writing stories. What kind of stories did you write when you first started?
Moxiang: The first time I started writing stories was probably while I was in elementary school. Along the way to my school was a bookstore selling books as big as a hand. I love buying the ghost story magazines there. Because of this influence, I remember writing lots of horror stories while in elementary school. Although most of them were just short parts and scenes and weren't complete stories. The first story I completed was 'Tian Shi' (lit. Celestial Master), a schoolyard romance story, during my secondary school. Even though it was just a WIP draft, it still got some of my classmates really riled up. "I also want to be a character in this story." "I want to be in the same team as this heroine." I got a lot of requests like this.
Risa: Woa, I so want to read that story!
Moxiang: the heroine, the heroine's childhood male friend (let's call him A), and a male classmate that suddenly appears (let's call him B). This story is about these three. The thing I remember most about this story is: when I asked my classmates, who were my first readers, for their opinions (I still keep the draft now. Even though now it's old and yellow); around that time, I wrote a romance between the heroine and B, but the result from all of my readers was: everyone liked A instead! I was so shocked! Everyone commented: "B's love is so whatever! (*) We want to see A and heroine together!" (laugh). I could not understand it at the time, but now that I think about it, A certainly does have a charm of his own. Even though I wrote without any kind of plans or forethought at the time, after that, I started to realize: "The main character must be a person I love the most and has the most charm." At the time, I looked at my classmates' excitement and admiration for my story and felt so happy. As a result, my old notes are filled with old, incomplete stories. If I have a chance in the future, I would like to complete them.
(*: Northeastern Mandarin slang 爱咋样咋样. A combination of Heibei-Shandong and Jiao-Liao Mandarin. It means 'whatever' / 'don't care'/ 'indifferent')
Risa: To be honest, I have the same experience as Ms. Moxiang. I drew manga while in secondary school. My classmate said after reading: "I hope you can continue to draw." I was overjoyed. Perhaps it is because of this kind of experience that I became a novelist.
Moxiang: Me too. From the start, I also wanted to become a Manhua artist! Perhaps this is normal for people who want to become novelists. Because I never had the chance to learn how to draw, the result is that I chose to become a novelist.
Risa: A, I feel the same! Ms. Moxiang, where do you get your ideas?
Moxiang: To put it simply, it starts from 'fulfilling a personal desire.' For example, if it's a detective or mystery story, then I want to fulfill my curiosity and solve puzzles. If it's a romance story, then I want to love and be loved. If it's a survival story, then I want to see survival in extreme conditions. To fulfill these desires, I think of how to best tell stories. To write a great story, one must have a foundation of intense desire. Of course, the amalgamation of multiple desires also works. In fact, 'desire' is a 'thread.' The story is the pursuit of this 'thread' to the very end. Once you have found a strong desire, disregard everything else, the story starts there.
Risa: So that's how it is.
Moxiang: I think that each author has different ideas. I personally build the characters first. Their personality, their destiny, and their emotions. Once a character with irresistible charisma appears and makes people fall in love with him (her), then they will surely love his (her) story too. Therefore, build the characters first, then weave the story. That is my process. Until now, I've only produced three novels. So I still find the process of structuring a story to be complicated. In terms of the structure and pacing of stories, I strongly recommend Robert McKee's "Story"! You can learn the theory of writing craft.
To Be Continued
Translator: Sythe / NPD Khanh
210 notes
·
View notes
Text
2/2 I've been asking Covid cautious community members why they are masking in 2024? These are just some of the answers. All answers are anonymous for privacy reasons and some have been edited for clarity/spacing reasons. It's never too late to start wearing a respirator regularly if you aren't doing so now. Why do you mask?
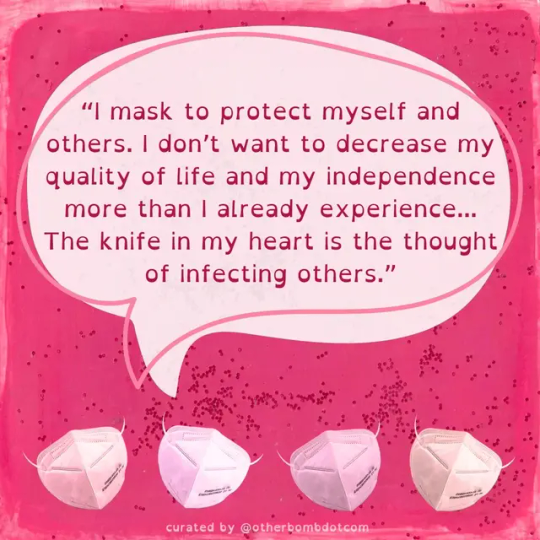
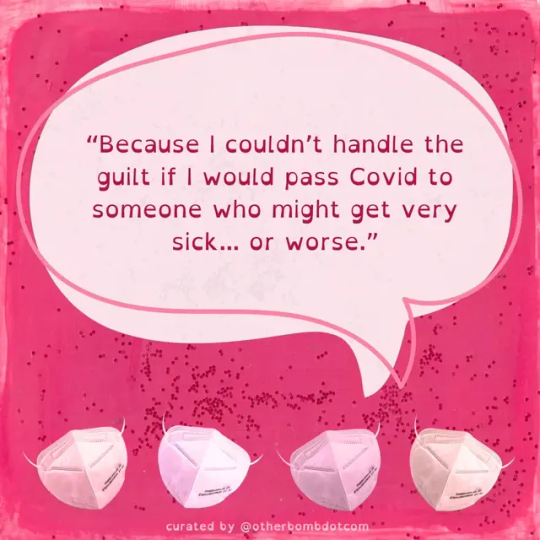
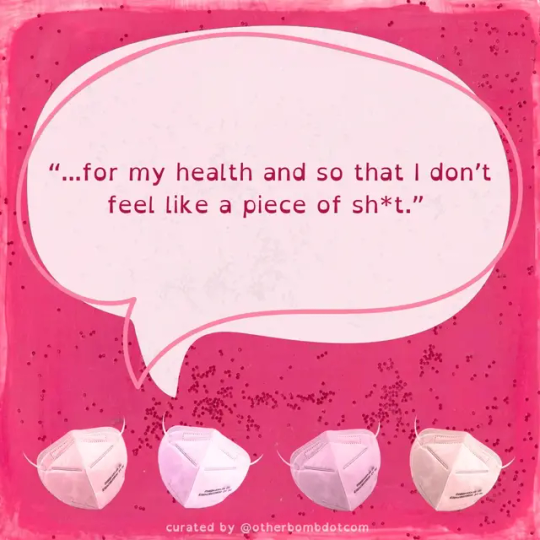
Image Description-
Slide 1: A hot pink background with a spray of red glitter. Four N95 respirators line the bottom edge. A speech bubble is coming from one. Text reads, “I mask to protect myself and others. I don’t want to decrease my quality of life and my independence more than I already experience... The knife in my heart is the thought of infecting others.”
Slide 2: Same background. Text reads, “Because I couldn’t handle the guilt if I would pass Covid to someone who might get very sick... or worse.”
Slide 3: Same background. Text reads, “...for my health and so that I don’t feel like a piece of sh*t.”
#covid isn't over#still coviding#wear a mask#keep masks in healthcare#mask up#covid 19#we keep us safe#community care#covid is class war#why do you mask#alt txt
45 notes
·
View notes
Text


Not to get controversial or anything, but I believe that Melami can beat Goku. Wait what’s that? You need my reasoning? Well I uhh *a Q rushes past* Wait what the hell? Did you see that? That was so weird…
Rain Codes memes, Yakou Edition. Ngl, I’m a bit concerned that my memes have been decreasing in quality lately. I think I’m lacking more Tumblr and Vivia images, and since I don’t have TikTok I can’t easily access images from that site, either. Maybe it’s in everyone’s best interests if I don’t heavily prioritize my efforts in finding Rain Code memes anymore. Then again I’ve built most of my account through memes, so, I’ll think about it.
That’s all I have to say. Have a nice day! 👋😄
#master detective archives: rain code#rain code#yakou furio#worshipper rain code#halara nightmare#yomi hellsmile#makoto kagutsuchi#shinigami rain code#yuma kokohead#aphex logan#desuhiko thunderbolt#seth burroughs#fubuki clockford#melami goldmine
64 notes
·
View notes
Text
Post-Processing Guide: Image Quality
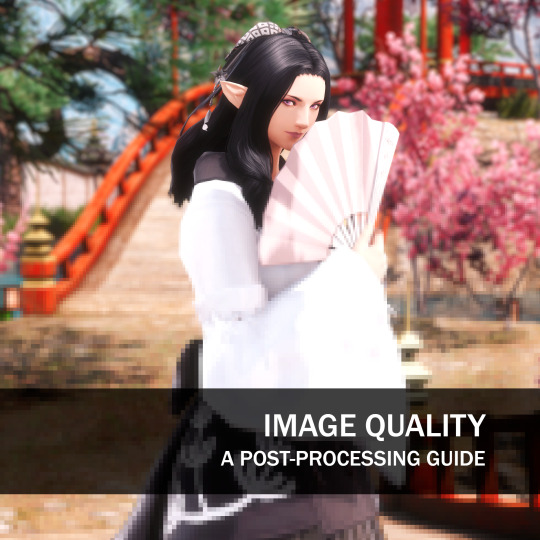
So you went and took that perfect screenshot! Now it's time to share it around, but you noticed a certain graininess, a certain fuzziness when posting it on Twitter or Eorzea Collection.
So what's going on? Well, let's understand some concepts related to digital images: namely formats, how they influence images in simple operations like crop and resize, and how to prevent loss of quality.
Resolution
This is the easiest concept to explain; the higher the number of pixels, the more detail the image will have. For example, a screenshot taken at standard 2K resolution (2048 x 1090) will have 2,211,840 pixels, while a 4K (4096 x 2160) will pack more details at 8,847,360 pixels.
That also affects file sizes, if you ever hear me crying about the size of my screenshots folder.
There's a myriad of resolutions and formats out there; for more information, check out this Wikipedia entry about display resolutions.

Digital Image Formats
There are many different digital image formats, but the 2 most common for XIV photography are JPEG and PNG - each with its own advantages and disadvantages.
PNG is a lossless format, meaning no data is lost when the image is saved. This results in higher-quality images, but also files that are larger.
JPEG is a lossy format, meaning some data is lost when the image is saved. This data loss can result in artifacts, such as blockiness and color banding. However, JPEG files are smaller than other formats.
The issue with JPEG is that its data loss is cumulative: Each time that you edit and save the file, a little bit of information is lost. Also, depending on the chosen compression level, the loss is quite noticeable. The image below shows how much noise (wrong data) is actually introduced by each compression level:

Crop and Resize
When you crop an image, you are removing pixels from the edges, often to give focus to a specific subject. In this scenario, the loss of information is irrelevant.
But when resizing- often to decrease the size of the image to better adapt it to a target site- you're losing detail, and the chosen interpolation algorithm may influence how much of the original image is used to help determine the result. Here's an example with a 20% resize, using raw pixel mapping on the left and linear sampling on the right. Notice the antialiased result that creates a much better effect:

Keep in mind that different programs may present the interpolation options in different ways. For example, this is how GIMP displays its options when resizing:

So with all that said, how should we proceed to preserve as much as possible of the original data?
How to Prevent Loss of Quality
Use a high-resolution image. The higher the resolution, the more detail the image will have, and the less likely you are to lose considerable quality when cropping or resizing. Nya Nya has an excellent guide about resolution upscale (a method that allows you to take a 4K screenshot on a 2K native resolution, for example) here. I highly recommend a read!
Use a lossless image format. Lossless formats, such as PNG, do not lose any data when the image is saved. This will help to prevent loss of quality when cropping or resizing.
Keep resizing to a minimum. The more you resize an image, the more likely you are to introduce artifacts or jitter. If you need a close-up, for example, take a close-up screenshot and resize it a little bit instead of cropping around a small area in a larger full-body image.
When scaling down, use interpolation methods that take more data from the original image into consideration, like Linear or Cubic, instead of raw interpolation.
Resize and save images in the expected resolution of a target site. For example, Eorzea Collection uses 339x570 for its vertical shot; cropping and resizing your image to this resolution will prevent artifacts from being introduced by the site's own resizing algorithm.
TL;DR: Keep the resolution high, the changes to a minimum, and save as PNG.
Let me know if you have any questions!
252 notes
·
View notes
Text
so you want to use OBS
hello! i’ve decided to compile information on my OBS setup and some resources that have helped me along the way. this is mostly for personal reference, but maybe others can make use of this information!
some notes before i get into it:
i use OBS for both offline recording and (twitch) streaming. any footage i record is edited using DaVinci Resolve 18, which is free.
most of my OBS captures are of video games (through a USB capture card, specifically elgato), and the occasional screen/application capture (like clip studio paint, and sometimes PC games).
as such, the information here is reflective of these experiences. this post is not comprehensive to all of OBS’s features- this is just an overview of the settings and configurations that are most relevant to me.
with that out of the way, all the information will be under the cut!
Basic Setup
file format:
how to change: settings -> output -> recording -> recording format -> press “apply” once finished!
I save most of my recordings as .mkv files- it supports multi-track audio! i prefer .mkv over .mp4 because if your power goes out, you still have a recording to work with.
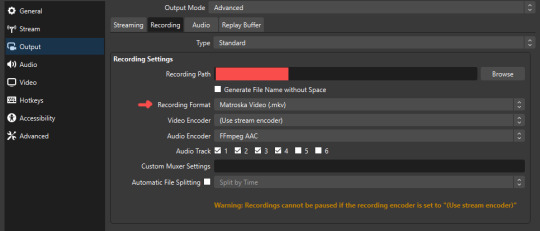
.mkv files can be read by DaVinci Resolve without an issue- but for Adobe software, they'll need to be remuxed to .mp4 within OBS! (file -> remux recordings -> press the … to select a file -> press the “remux” button)
video resolution and framerate:
how to change: settings -> video -> output (scaled) resolution
my obs canvas is @ 1920 x 1080p (16:9)
i switch between 720p and 1080p as needed! if you're concerned about space, you can probably just go for 720p. i also record at 30 fps, simply because that’s what my capture card supports.
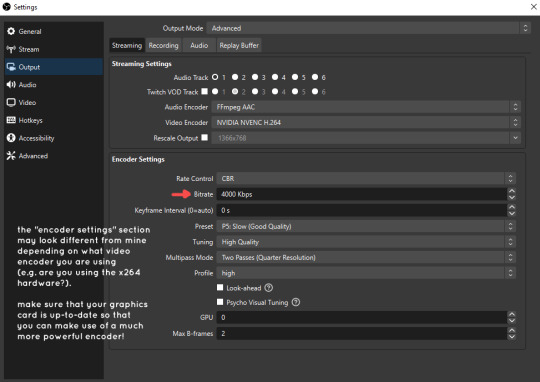
video bitrate:
how to change: settings -> output -> encoder settings (located in both the streaming and recording tab) -> press “apply” once finished!
bitrate is a bit of a doozy to explain, but the most important thing to know is that bitrate affects your video’s quality. lower numbers = lower quality, while higher numbers = higher quality.
generally speaking, you'll want higher bitrate when you're recording things with high depth of information (e.g. you’d want a higher bitrate for something fast-paced like splatoon, compared to a slower-paced game like animal crossing).
my video bitrate is either set to 3000 or 4000 kbps! and here's some of my other (related) settings while i'm at it:
you can put your bitrate at much higher values than me if you're a stickler for quality- but keep in mind that a higher bitrate means:
bigger file size
more information to upload (when streaming)
your computer will need to encode more
i’d recommend reading twitch’s guidelines on encoding, bitrate, resolution, and framerate to get an idea of what values to pick. for people who are doing offline recording or streaming on a different platform, i suggest googling the appropriate resources!
multi-track audio:
this is mostly applicable to anyone looking to do video editing!
multi-track audio basically allows you to separate your audio sources (e.g. discord, game audio, and your own microphone) into different tracks.
this is an immensely helpful tool because it lets you adjust audio levels in post-production (editing). some examples of how this can be used:
increasing someones microphone volume if they speak too softly
increasing/decreasing game audio
muting swear words/sensitive information
completely muting voice call + microphone if you want to upload a no commentary video
and more!
to set this up, take a look at your audio mixer panel, and press the ⚙ icon. this will bring up advanced audio properties.
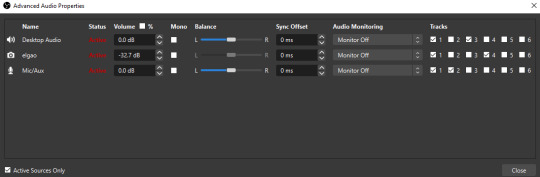
by checkmarking a track box, it puts the audio on that track. to make the above screenshot easier to digest:
track 1 consists of ALL three audio sources- desktop, elgato, and microphone.
track 2 only has the microphone audio.
track 3 only has desktop audio (i use this for voice calls)
track 4 only has the elgato capture card audio (game audio). the volume has also been lowered so that any speaking voices can be heard clearly.
tracks 5 and 6 are unused.
you might be wondering, “why do all three of these have 1 checked off?” this is what i call the universal audio track. i recommend having a universal audio track for a few reasons:
when you stream from OBS onto twitch/youtube- you have to select ONE audio track.
it’s also a nice backup in case you didn’t separate your audio correctly.
if for whatever reason you need to move around your individual audio tracks in editing, the universal track acts as a nice reference point.
mark off your audio tracks for each audio source as you see fit! once you’re finished with the advanced audio properties, go to settings > output.
for the streaming tab, you’ll want to have the number of your universal audio track selected. in my case, that will be audio track 1.
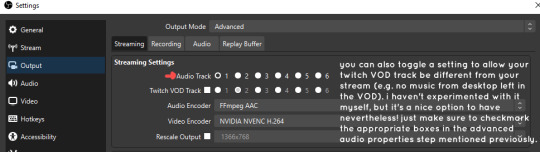
for the recording tab, checkmark all the audio tracks that are applicable to you (in my case, audio tracks 1, 2, 3, and 4). by default, only audio track 1 is selected.
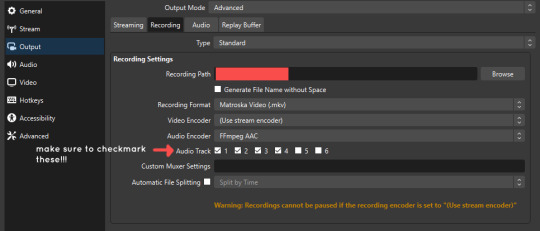
if you don’t check off the additional audio tracks in the output > recordings section, you will not have access to those audio tracks in editing, and you won’t be able to edit your audio tracks independently of each other. so don’t forget to do this! 👍
custom browser docks
custom browser docks are a great tool for when you’re streaming and want to have access to your twitch chat and/or activity feed! (or if you wanted to have some other web browser on OBS).
to create one, go to docks -> custom browser docks.
you’ll be given a table interface that asks you to put the dock name and URL. for streamers who want to have chat and alerts available, do the following:
on twitch’s homepage, go to the upper right and click your icon
then, click creator dashboard
once you’re on your dashboard, go to stream manager
click the vertical “...” on my chat OR activity feed.
press “pop-out chat” OR “pop-out activity feed”
copy and paste the link into the table back into OBS
press apply once you’re done
click and drag the docks around at your leisure to put them where you like!
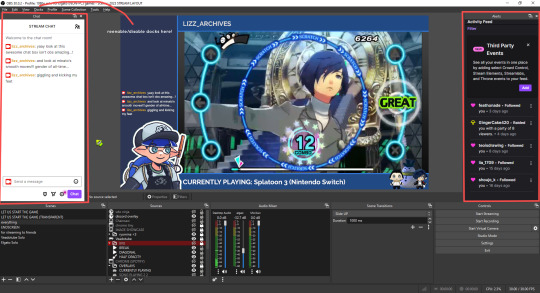
if you ever decide you don’t want to have something on your OBS dock (or want to bring something back), go to the toolbar, click “docks,” and click the appropriate dock!
third party things
a section of optional things that you may enjoy having.
streamlabs alerts
this is basically for anyone who streams and wants to have their chat and/or follower notifications visualized on screen!
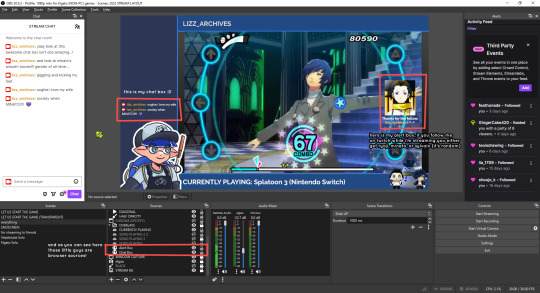
streamlab alerts can be added to OBS by adding a browser source into your scene, and the specifics can be customized on streamlabs itself. it’s pretty self-explanatory, so i’ll just leave a link to streamlabs website, where you can log in using the streaming platform of your choice: https://streamlabs.com/
discord overlay
this is a browser source that can be set up to show people who are in a server's voice chat and who speaks. i recommend this to people who make multiplayer content- it can help viewers distinguish who is who but also it can be helpful in editing.
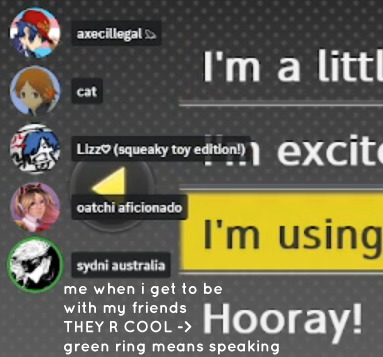
to set this up, go to https://streamkit.discord.com/overlay, click “install for OBS,” and after logging in with discord, go to “voice widget” and click the server and voice channel you want.
you are able to apply CSS if you'd like more control over the visuals, but the standard layout tends to work fine for me! a search of “discord overlay css” on youtube can help you get more information.
veadotube mini
this is a pngtuber software that a friend recommended to me! no webcam is required- mouth opening and closing is based on your microphone input!
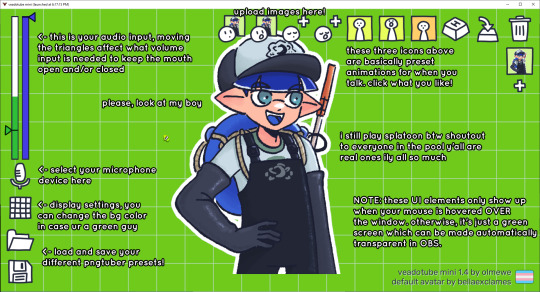
you can download it here (it’s pay what you want!): https://olmewe.itch.io/veadotube-mini
for a proper tutorial on how to use it, i recommend checking out the app's documentation, which you can read here: https://veado.tube/help/
source record
have you ever wanted to stream something with a chat overlay/layout, but wanted your recording to ONLY be the gameplay? or maybe you wanted to record BOTH your gameplay AND your webcam so that you can have a crisp zoom-in on your webcam!
source record is a third party plugin that can help you with that!
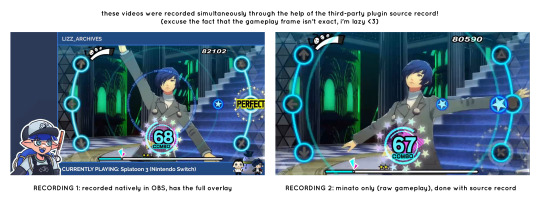
the general gist of source record involves applying the “source record” filter on either a scene or source, and customizing the encoding settings accordingly. the exact details of how to set it up is beyond the scope of this post, so I'll just direct people to this video instead (it was very helpful to me):
youtube
⚠ a quick note about source record: this plugin can be intense for your computer. be sure to do test recordings and the like to see what your computer can handle (and see if the recordings come out the way you like). it took me a few tests before i settled onto something i liked!
you can download and install source record here: https://obsproject.com/forum/resources/source-record.1285/
vdo.ninja
have you ever wanted to do a collaborative video or stream where you feature someone else’s video on your stream? or maybe you’re doing a multi-person streaming event! vdo.ninja is the perfect tool for you!
vdo.ninja turns your OBS virtual camera into a browser source link- which your collaborator can add on their stream! this is a new tool that i’ve added to my arsenal recently- since my friend and i are planning to stream a side order challenge together! i’ve still got to iron it out a bit more, but i like what i’ve used of it so far.
try it out for yourself at their website here (with documentation and demos available on the homepage!): https://vdo.ninja/ (no downloads required!)
ok! i’m set up! what now?
and with that, that’s all of the settings and tools that i thought would be worth mentioning! while most of my setup was written with video games in mind, some of these plugins and setups may be applicable to other types of videos (e.g. tabletop gaming with a physical camera)!
now that i’ve outlined all these settings, i have one more thing i have to say: regardless of what you're using OBS for, do a test recording before doing anything “official” with it. this recording can be as short as 30 seconds. it’s a good habit to develop that can make sure your streams/recordings turn out the way you want them to!
here are the kinds of things i like to check! it’s not an exhaustive list, but this can be a starting point:
video:
does my video look the way i want it to (and can my computer handle that)?
can my computer handle the load of encoding? - OBS will note in the bottom if the encoding is overloaded. if it can’t handle it, turn down your bitrate or adjust other encoding settings (e.g. i had to toggle psycho visual tuning OFF because it was causing lag)
this is especially the case if you're recording PC games- you don’t want to have slowdown on either your game or the recording!
audio:
are my audio sources (e.g. desktop audio and microphone) correct? - if you plug/unplug devices a lot, be sure to check this (settings -> audio).
are any of my audio sources muted? - make sure you don’t have anything on 🔇 if you don’t want it to be muted! otherwise the audio will be lost forever… (i lost my friend’s VC audio once… it was sad)
are my audio tracks separated properly? - requires you to boot up your editing software, but it's worth doing! for the test recording, just have something from all your sources playing at once, and see if your editor has things separated into tracks.
can i hear the voices clearly? or does the music and/or game overpower them?
if for whatever reason your OBS crashes, or you want more information on anything “critical” or “warning” worthy in your set-up, you can go to help > log files > upload current log file > analyze. crash logs currently can’t be analyzed by the log analyzer- but they’re a valuable tool when asking for help on the OBS forums!
and that’s all! for real, this time. i hope that some of these tools and settings can help anyone wanting to get more out of OBS. there’s definitely other things i didn’t touch upon (e.g. audio filters for noise compression, suppression, etc.), so i suggest doing your own research and trying things out!
happy recording/streaming, and thanks for reading! ✨
#lizzy speaks#this was a fun little write up!! i've been slowly getting some of my friends into video making teehee and its SO FUN!!!#(digital) video is like one of my other passions next to art. everyone say thank you splatoon for getting me back into it again <3#i've been using obs since like 2018 so i wanted to share some of the things i learned for funsies... i really love video...#but also i like having reference posts like this in the case people have questions they want to ask me...#because i don't always remember what video tutorials i watched and it's nice to document that somewhere...#warning to anyone who reads it this is like 2.1k words. i do want to stress that this isn't comprehensive but there's still a lot of info#that i wanted to put for this post...! that said topics like designing your own stream layout + assets for it are NOT in the scope of this#post and nor is this a beginner's guide to obs (i wrote this with the assumption that you know how to record and/or stream and that-#people already have an idea of how to use scenes and the different types of sources obs can use).#i hope everyone's had a lovely march 5th! i would love to look at the fanart but im still not done with reload...#but im hoping to finish it by the end of the month!!! yipee!!!#Youtube
44 notes
·
View notes
Text
Hey, I know a load of us are broke so you can't donate, but even sharing this would mean a lot to me.
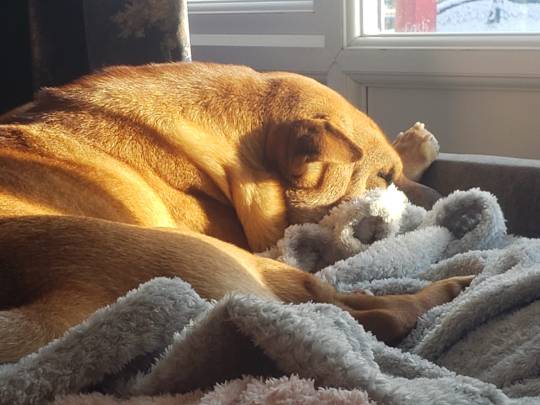
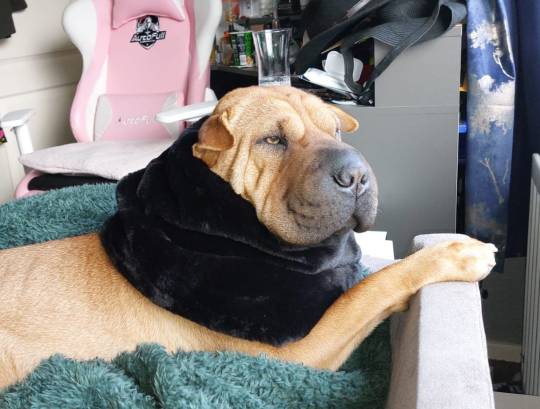
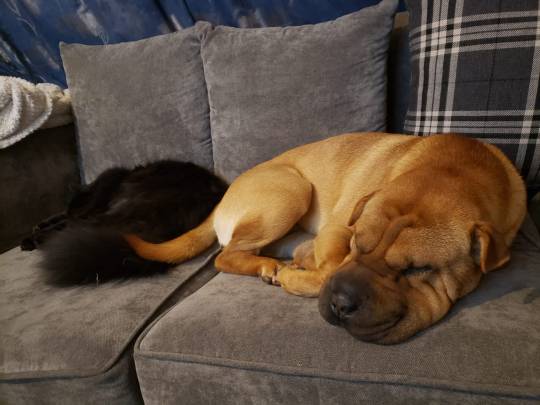
Our puppy Yenn (yes, she's named after The Witcher, they're my fiancée's favourite games) needs multiple surgeries to improve her quality of life (and hopefully her lifespan) and the insurance is refusing to pay out.
We've nearly lost her to pneumonia three times this year, and the most urgent surgery (BOA, to fix her throat,) should dramatically decrease the chances of that happening again. The total for future surgeries is going to be between £5400 and £7000, but if we can get her throat sorted, which will be £2650-£4150, the chances of her making it through so that we can save for the others are much greater. (We're trying to get her booked in for the initial investigation, which is part of the price listed above, so that we can get a more accurate estimate for how much it will cost.) (EDIT: the investigation is on Monday. Fingers crossed it goes well.)
Yenn is just over a year old and an absolute sweetheart. It's been difficult to find ways to train her due to her health issues, but honestly she's trained herself. You can set food down and leave the room and she won't touch it, and she would do anything for my fiancée. I've never seen a dog as devoted to her mum.
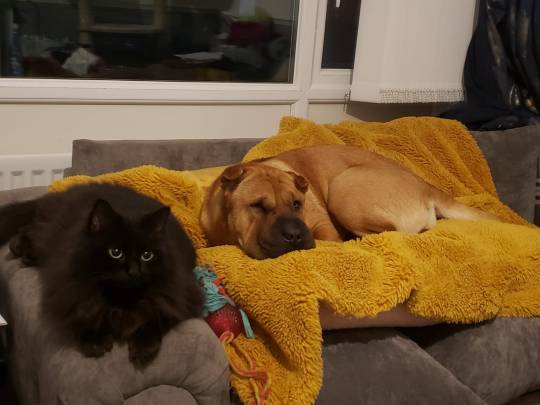
Her favourite activities are people watching out of the window, playing with her mum or other dogs, and cuddling with our cat Pip. She's a wonderful girl and she deserves to grow up.
This gofundme was set up by my fiancée's friend (Lyyka is the name she goes by online), not either of us, so if you have any questions it's best to message me here.
If you read this far, thank you! Here's some photos as a reward, and thanks again for the shares.


62 notes
·
View notes
Note
how did u do the train scene in ur recent post? i've been trying to achieve but i have no clue how :(
hey!! i can explain, don't worry. it's really not as hard as it seems :)
first you want to find your vehicle:
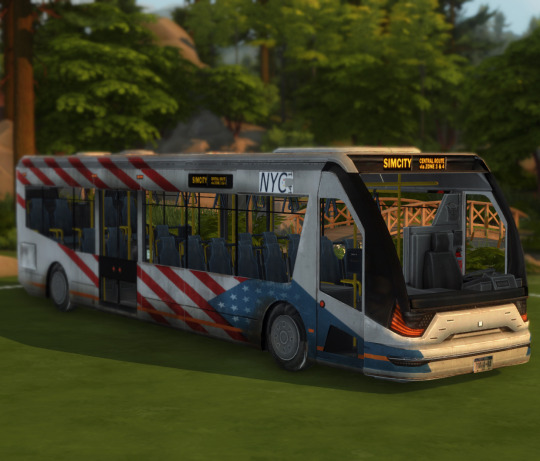
i used this city bus because it has a high quality interior.
next you're going to pose your sim. if you don't already, i would highly suggest using wonderful whims to pose your sims because it comes with a positioning tool which is EXTREMELY helpful. especially for shots like these.
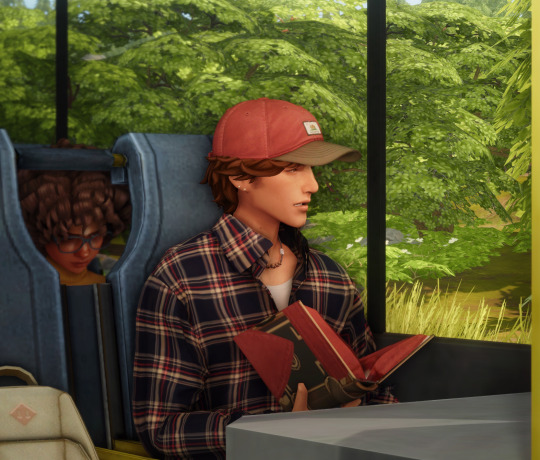
this was my image after posing, positioning and before any editing (keep in mind i use relight so that was doing a lot of heavy lifting!)
open your screenshot in photoshop and make necessary edits.
when you're satisfied with your image, head over to the left side bar that houses photoshops tools. locate the "blur tool" and click the drop down. you should see something like this:
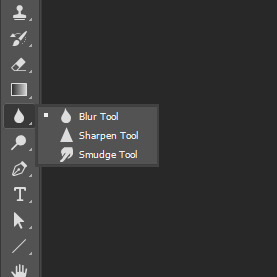
from there you'll click the smudge tool and start editing the window to create the illusion of motion. you can drag and pull it as much as you'd like. if you need to increase or decrease your brush size, hold shift and press your bracket keys (left to decrease size & right to increase size)
when you've completed those steps to your satisfaction you'll hopefully have an image that looks somewhat like this:

and that's it!! i hope this helps and is coherent (im sleep deprived 😭) i cant wait to see what you create <3
38 notes
·
View notes
Last Seen Blogs
cyphiosa
lolita
xenosagaepisodeone
real organic human experience

coevrbattant-blog
juucitaxx

loquesemeocurraescribo
I love you.

sparrowchannel-posts
SPARROWCHANNEL