#newios
Text
#iOS16Features#iPhone14Rumors#AppleEventDate#AppleAnnouncementTime#WWDC23Schedule#NewiPhoneReleaseDate#NewiOSReleaseDate#AppleUpdatesList#AppleNewsUpdates#AppleReleaseNotes#iOS16#iPhone14#AppleEvent#AppleAnnouncement#WWDC23#NewiPhone#NewiOS#AppleUpdates#AppleNews#AppleRelease#technews#news#blog#apple
0 notes
Photo
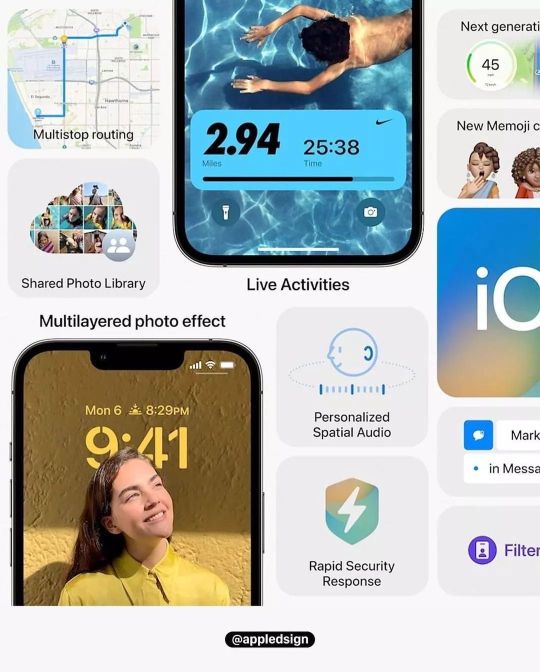
Posted @withregram • @techdsigns iOS 16 has just been announced and it’s absolutely jam-packed with exciting new features. We finally have upgrades to the Lockscreen, Live Widgets and Notifications! But this is just the tip of the iceberg! What are you mostly excited about in iOS 16? . Did you like it❓❓ Comment your thoughts🔽🔽 Tag a friend who loves it!! DM for Buisness/Shoutouts!! --------------------- 📷@appledsign --------------------- Follow @techdsigns Follow @techdsigns Follow @techdsigns Follow @techdsigns --------------------- #apple #techfornia #techdsigns #colonialtech #ios16 #wwdc2022 #ios2022 #iphone2022 #refinedsign #ios15 #wwdc #ios #ios2021 #newios #iphoneios #iphoneos2021 #iphoneos15 #appleios #iphone13 #iphone13pro #iphone13promax #apple2022 #iosconcept #appleiosconcept #iphone #iphone13mini #appleevent #iphone14 #iphone14pro #iphone14promax https://www.instagram.com/p/CeoBsbCOei4/?igshid=NGJjMDIxMWI=
#apple#techfornia#techdsigns#colonialtech#ios16#wwdc2022#ios2022#iphone2022#refinedsign#ios15#wwdc#ios#ios2021#newios#iphoneios#iphoneos2021#iphoneos15#appleios#iphone13#iphone13pro#iphone13promax#apple2022#iosconcept#appleiosconcept#iphone#iphone13mini#appleevent#iphone14#iphone14pro#iphone14promax
0 notes
Photo

In the latest iOS 15.4 release, @apple adds 123 new emojis. Face ID while wearing a mask (iPhone 12 and newer) is also included in the latest version, as well as other improvements. #apple #applenews #appleemoji #emoji #emojis #newemojis #newemoji #emoticon #emoticons #emoticones #emojiedits #appleios #ios #iosupdate #ios15 #newios #appleupdates #updates #update #techupdates #techupdate #faceid #iphone #appleiphone #release #releases #software #softwareupdate #applesoftware https://www.instagram.com/p/CbIPyl2KsjA/?utm_medium=tumblr
#apple#applenews#appleemoji#emoji#emojis#newemojis#newemoji#emoticon#emoticons#emoticones#emojiedits#appleios#ios#iosupdate#ios15#newios#appleupdates#updates#update#techupdates#techupdate#faceid#iphone#appleiphone#release#releases#software#softwareupdate#applesoftware
0 notes
Photo

#appleios #ios #apple #ios14 #newios #refinedsign #appleos #ios13 #appleiphone #ios2020 #homescreen #iphone #technology #iphone11 #iphoneconcept #shotoniphone #tech #appleiphone11pro #ipados #techupdates #iphone11pro #technews #appleios14 #smartphone #appleevent #listview #ipadpro #applecommunity #applewatchseries5 #phone https://www.instagram.com/p/B-IANUVgs39/?igshid=1mce27uqcvgcs
#appleios#ios#apple#ios14#newios#refinedsign#appleos#ios13#appleiphone#ios2020#homescreen#iphone#technology#iphone11#iphoneconcept#shotoniphone#tech#appleiphone11pro#ipados#techupdates#iphone11pro#technews#appleios14#smartphone#appleevent#listview#ipadpro#applecommunity#applewatchseries5#phone
0 notes
Photo

Hello 👋 new friend 😻 #iOS11 . . . . . #iOS #Apple #controlCenter #TheCure #LadyGaga #Beautiful #NewiOS #Happy #Summer . #love #gay #photooftheday #gayig #bestoftheday #gaystagram #happy #hotboy #smile #nexttopgay #gayboy #scruff #instagay #guyswithbeards #mcm #instafit #fitfam #bestoftheday
#ios#beautiful#gayboy#photooftheday#gayig#fitfam#thecure#hotboy#newios#happy#smile#instafit#bestoftheday#nexttopgay#instagay#gaystagram#ladygaga#summer#mcm#ios11#guyswithbeards#scruff#love#apple#controlcenter#gay
1 note
·
View note
Text
FloraBall2022 Intro
Nerio walks in with a dark purple tuxedo and a dark yellow bowtie along with a star-like mask. He had an invitation in his hands.
Nerio: "Seems like a nice place and best of all... its just me." Nerio brings out a bag from his claws. "Now where did I put my snacks-" He opens the bags and finds a certian blue gremlin munching on his poffins.
Lexi: "Newio!" Lexi floats up and hugs Nerio.
Nerio: "Oh you got to be kiddin me-" Nerio pulls out a mask and a bow from his claws and puts them on Lexi. The mask and bow dont look good together at all. The bow's neon green and the mask is orange and yellow. "Just put these on for the time being and you can tag along for a bit."
[Nerio and Lexi has made it into the Flora Ball!]
2 notes
·
View notes
Video
#Repost @phonewarsarena ・・・ IOS 14 Beta 6 first look🤩 Check the stories for secret features! Are you installing the beta version or are you waiting for the final #ios14 version?🤔 Tag an Apple fan👇📲 . . ⭐⭐️Follow @PhoneWarsArena for more⭐️⭐️ ⭐⭐️Follow @PhoneWarsArena for more⭐⭐️ ⭐️⭐️Follow @PhoneWarsArena for more⭐️⭐ . . . Credit: @cinquetacche . . . #ios14 #newiphone #ios14beta #ios14beta6 #iphone12promax #iphoneconcept #appleart #iphoneart #applefan #androidui #applewatch #homepod #teamiphone #iphone12 #newios #iphonelover #iphone2020 https://www.instagram.com/p/CEozVozABic/?igshid=o96bwfyjl032
#repost#ios14#newiphone#ios14beta#ios14beta6#iphone12promax#iphoneconcept#appleart#iphoneart#applefan#androidui#applewatch#homepod#teamiphone#iphone12#newios#iphonelover#iphone2020
0 notes
Video
iOS 14 presenting a redesigned new experience with Widgets, the App Library, Picture in Picture, improved Siri capabilities, Translate app, a better Messages app and many more features! Which feature you most excited for? _________ Source: @apple _________ 👍Like ❤️ Share Follow 😉👍🔥🔥➖➖➖➖➖➖➖➖➖➖➖➖➖➖➖➖➖ Tech Update || Tech News 🙌 Follow and Support ❣️ || Share Your Friend and Tech Lovers 😍 || ➖➖➖➖➖➖➖➖➖➖➖➖➖➖➖➖➖ ⚠️ Follow @tech__great ⚠️⠀ ⚠️ Follow @tech__great ⚠️⠀ ⚠️ Follow @tech__great ⚠️⠀ ➖➖➖➖➖➖➖➖➖➖➖➖➖➖➖➖➖ Follow to More ➖➖➖➖➖➖➖➖➖➖➖➖➖➖➖➖➖ .🌀🌀🌀🌀🌀🌀 Hashtags 🌀🌀🌀🌀🌀🌀🌀 #ios #ios14 #newios #ios2020 #apple #widgets #applewidgets #iphoneos #refinedsign #techgreat (at New York, New York) https://www.instagram.com/p/CB7JToYF9uP/?igshid=n0ql49ihtkf6
0 notes
Video
#repost @appledsign ・・・ List view in iOS 14 live! Can you imagine seeing this on your iPhone in the coming months? ________ Source: @appleleaker2020 ________ #ios #ios14 #newios #appleios #iphone #iphoneios #appleos #listview #refinedsign (at Ilford, Redbridge, United Kingdom) https://www.instagram.com/p/B93nvYfAf8U/?igshid=17zqc8azz66aw
0 notes
Photo

iOS 12 Beta 10 - Hail to the X Baby :) Ein Rekordergebnis im Geekbench 4 Test https://youtu.be/yKwKXJ49-48 #ios12 #beta10 #ios12beta10 #x #Apple #ios #beta #iphone #iPhoneX #iphone5s #Apple #meapplecat #deutsch #newios #rekord #record #geekbench
#ios12#beta10#ios12beta10#x#apple#ios#beta#iphone#iphonex#iphone5s#meapplecat#deutsch#newios#rekord#record#geekbench
0 notes
Text
Generic Pipeline Multithreading (Or Why I’m Excited About Go 1.18)
A tutorial and use case for Generics in Go. A matching video tutorial is coming soon!
Table of Contents
Prerequisites
Why I Use Go
Concept Behind this Library
Implementation (Skip here for the good stuff)
Testing and Usage
Notes for the Reader
Thank You
1) Prerequisites
You'll need a good understanding of the Go programming language, and more specifically knowledge of channels and goroutines. You'll need access to the go 1.18 toolset either through the beta, or installing the upgrade upon its production release.
Heres some links if you'd like to catch up before proceding:
(Go language homepage)
(Go 1.18 beta install link/blogpost)
2) Why I Use Go
Go relatively easy to understand and well documented
Go has a fantastic standard library
Go has interop with C (Double edged sword)
Go has a huge professional and enthusiast community
3) Concept Behind this Library
A common practice to multithread certain tasks in go is to create pipelines (link) using channels and goroutines to divy up the work between cpu cores. In this guide, I'll show how you can use the upcoming generics feature to implement generic pipelines in only two functions (and a few types).
This will result in a very basic and unsafe library. I'm releasing it to the public so feel free to use it but I would make some edits for production use.
4) Implementation
Project Initialization
Lets begin by creating a directory for our project called "pipes" and perform the standard initialization:
go mod init pipes
Make sure you're using the 1.18beta or later toolchain. I have mine aliased to "beta" for easy access. (Ex: beta mod init PACKAGE_NAME)
Now we'll create a file I'm calling "Pipelines.go" with the standard "package main" at the top. We will not need any imports here.
Types
Box: a type containing a bool and an any.
type Box[T any] struct { Final bool Data T }
This is our first use of generics! This is the most basic usage possible. The constraint "any" is really an alias for "Interface{}", and we could define our own interfaces to use as type constraints if we wanted to.
Proc: (short for process) a function taking an in and out channel of Box[T]
type Proc[T any] func(in, out chan Box[T])
I was most confused here. I wasn't sure where to put the type constraint "[T any]", and as a rule of thumb it should always go after your new identifier ("Proc" in this case). If you put the constraint after "func" the compiler produces an error that is hard to decipher; so be warned.
IO: a pair of channels of Box[T], one for in, one for out
type IO[T any] struct { In,Out chan Box[T] }
This is necessary to facilitate initialization of our pipeline.
Pipe: a set of one IO and one Proc
type Pipe[T any] struct { IO IO[T] Proc Proc[T] }
We're finally getting to the good stuff. You can probably deduce where we're heading from here. We can stop to take note that Pipe[T] can take any type, but IO and Proc will always have the same type. You could set up multiple constraints on the same type if you liked.
Pipeline: a slice of Pipes and an entry channel to said Pipes
type Pipeline[T any] struct { Entry chan Box[T] Pipes []Pipe[T] }
The tricky part here is certainly the "[]Pipe[T]" slice with square brackets meaning very different things on both ends of our type. It's easy to miss where to put what, and the compiler isn't the smartest in reporting these errors yet.
Functions
Attach: attach a given function of type Proc to a given Pipeline
func Attach[T any](pl *Pipeline[T], proc Proc[T], bSize int) chan Box[T] { // If there are no pipes yet, this "entry" is also the // pipeline's "Entry" var newEntry chan Box[T] length := len(pl.Pipes) if (length == 0) { newEntry = make(chan Box[T], bSize) pl.Entry = newEntry } else { newEntry = pl.Pipes[length - 1].IO.Out } // We must always construct a new exit newExit := make(chan Box[T], bSize) newIO := IO[T]{ In: newEntry, Out: newExit, } newPipe := Pipe[T]{ IO: newIO, Proc: proc, } // Note that this functions with zero length slices as well pl.Pipes = append(pl.Pipes, newPipe) // Return the exit so we can grab results return newExit }
This is the meat of our library. Now we can freely assemble arbitrarily large pipelines with arbitrarily large and varying buffer sizes between processes. We need one more function before we can submit any Boxs to our pipes!
Flow: Iterate through a pipeline's pipes and initialize goroutines with their functions
func Flow[T any](pl *Pipeline[T]) { for _, pipe := range pl.Pipes { go pipe.Proc(pipe.IO.In, pipe.IO.Out) } }
Now we can use our pipelines. Once we call Flow on a Pipeline, we can start pushing Boxs full of our values through the processes. It is up to the user to ensure their "Proc" properly handles IO and doesn't deadlock.
5) Testing and Usage
Using the library is pretty straight forward. We'll walk through usage by setting up a test.
Lets create a file "Pipelines_test.go" in our working directory with the classic "package main" top line.
pacakge main import ( "testing" "math/rand" )
We'll need packages "testing" and "math/rand" from the standard library. Save the file here and execute the commmand "go mod tidy" in your terminal to update the module file.
Your data type
type MyData struct { Original, Answer int }
Your data type can be anything, but here we're using two integers, "Original" and "Answer" so we can compare results to inputs.
Your Proc functions:
func Increment(in, out Box[MyData]) { final := false for { select { box := <- in: /* Start custom proc area */ box.Answer += 1 /* End custom proc area */ final = box.Final out <- box if final { return } } } }
This is a template for all Proc functions. The only part we should be changing is the "custom proc area" I designated with comments in the above slice of code. I'm going to leave it as an excersize to the reader to set up our other Proc functions.
Test:
func TestLibrary(*testing.T) { pl := new(Pipeline[MyData]) Attach(pl, Increment, 2) Attach(pl, Decrement, 2) Attach(pl, Increement, 2) Attach(pl, Square, 2) exit := Attach(pl, Increment, 2) Flow(pl) // Now we make a bunch of random values and // shove them down the pipes test_count := 4096 * 32 go func(){ final := false for i := 1; i <= test_count; i++ { if i == test_count { final = true } random_int := rand.Intn(16) pl.Entry <- Box[MyData]{ Final:final, Data:MyData{ Origin:random_int, Answer:random_int, }, } } return }() // And we wait for returns here for { select { case box := <- exit: println("Box recieved:", "\n\tOrigin:",box.Data.Origin, "\n\tAnswer:",box.Data.Answer) if box.Final { return } } } }
The most complicated part here isn't necessarily using the library, but remembering to generate fake values within a goroutine so we can receive all the values on our main thread. If you run "go test pipes" in your current directory, you should now see test results. I'll post a link containing my prototype files for this tutorial so you can download and compare against your own. I've used cleaner naming conventions in this article, but the architecture is exactly the same.
6) Notes for the Reader
Please note that although I'm releasing these files publicly, they are very "unsafe" in the sense that the compiler will not throw an error if you incorrectly use these functions and types. It's up to you the developer to either program that safety in, or just "do the right thing". I hope you are as excited as I am about the future of generics in Go!
Here's a link to the project I prototyped this tutorial with (link)
7) Thank You
I learned much writing this tutorial/guide and I hope you find it useful. I'm launching a start to finish application development tutorial (Game/GUI oriented) in Go, and maybe tutorials for other things like CSS (stylesheets) or Blender (application). If that sounds cool to you, please consider supporting me on Patreon or through Venmo.
(Patreon)
(Venmo: @mewmellow_cat)
If you'd like to hire me I'm looking for remote full-time employment with a salary of at least $75k/yr, please send me an email at [email protected]
1 note
·
View note
Photo

Posted @withregram • @techdsigns iOS 16 has just been announced and it’s absolutely jam-packed with exciting new features. We finally have upgrades to the Lockscreen, Live Widgets and Notifications! But this is just the tip of the iceberg! What are you mostly excited about in iOS 16? . Did you like it❓❓ Comment your thoughts🔽🔽 Tag a friend who loves it!! DM for Buisness/Shoutouts!! --------------------- 📷@appledsign --------------------- Follow @techdsigns Follow @techdsigns Follow @techdsigns Follow @techdsigns --------------------- #apple #techfornia #techdsigns #colonialtech #ios16 #wwdc2022 #ios2022 #iphone2022 #refinedsign #ios15 #wwdc #ios #ios2021 #newios #iphoneios #iphoneos2021 #iphoneos15 #appleios #iphone13 #iphone13pro #iphone13promax #apple2022 #iosconcept #appleiosconcept #iphone #iphone13mini #appleevent #iphone14 #iphone14pro #iphone14promax https://www.instagram.com/p/CeoBjpguy0r/?igshid=NGJjMDIxMWI=
#apple#techfornia#techdsigns#colonialtech#ios16#wwdc2022#ios2022#iphone2022#refinedsign#ios15#wwdc#ios#ios2021#newios#iphoneios#iphoneos2021#iphoneos15#appleios#iphone13#iphone13pro#iphone13promax#apple2022#iosconcept#appleiosconcept#iphone#iphone13mini#appleevent#iphone14#iphone14pro#iphone14promax
0 notes
Photo

مفهوم تصوري لـ iOS 14 لما ستبدو عليه الويدجيت widget على الشاشة الرئيسية https://ift.tt/36AzeWO
كانت الكثير من الشائعات تدور حول أن آبل تُفكّر في جلب أدوات الويدجيت widget إلى شاشة التطبيقات الرئيسيّة في إصدار مستقبلي من iOS. يُمكن أن يصل ذلك في أقرب وقت إلى iOS 14، والذي من المُتوقّع أن يتم الكشف عنه في أواخر شهر يونيو خلال مُؤتمر المُطورين العالمي لآبل.
على خلاف العديد من المفاهيم التصوريّة التي شاهدناها سابقًا لهذه الميزة، إلا أن المصمّم Aleksey Bondarev أبدع في تنفيذ وعرض الويدجيت على بعض التطبيقات الموجودة في الشاشة الرئيسيّة لهاتف iPhone.
شارك Bondarev هذا العمل على حسابه في Dribble وأيضًا على انستقرام.
خلال هذه المفهوم شاهدنا عرضًا متنوعًا لكيفيّة استخدام الويدجيت بشكل أفقي وعمودي وحتى تكبير حجم التطبيق وجعله أكثر تفاعليّة.
View this post on Instagram
Hey Instagrammers! Recently, a lot of thoughts around widgets for new iOS. Can we see it in #iOS14? Some applications are so simple and can display all the basic information before opening. I find this an interesting addition to the main screen, but I also think it will be a little difficult for developers. What widgets would you like to use?
As always – work files with widgets is attached in my dribbble account. So if you want you can play around and take a closer look at solutions. #ioswidget #newios #iphonewidget #ioswidgets
A post shared by Aleksey Bondarev (@myinterface) on May 25, 2020 at 11:35pm PDT
The post مفهوم تصوري لـ iOS 14 لما ستبدو عليه الويدجيت widget على الشاشة الرئيسية appeared first on عالم آبل.
0 notes
Text
Hey Instagrammers!
Recently, a lot of thoughts around widgets for new iOS. Can we see it in #iOS14?
Some applications are so simple and can display all the basic information before opening. I find this an interesting addition to the main screen, but I also think it will be a little difficult for developers.
What widgets would you like to use? 🧐
As always - work files with widgets is attached in my dribbble account. So if you want you can play around and take a closer look at solutions.
#ioswidget #newios #iphonewidget #ioswidgets
0 notes
Text
Which devices will iOS 11 come to? Probably the Full List of Devices to Receive in iOS 11 Update | AppleClick.net
Which devices will iOS 11 come to? Probably the Full List of Devices to Receive in iOS 11 Update Apple has officially announced this year’s WWDC 2017 event to introduce other software-based field innovations, particularly iOS 11 update. The company announced that WWDC 2017 will start on... Source : http://www.appleclick.net/devices-will-ios-11-come-probably-full-list-devices-receive-ios-11-update/ #Ios11, #Ios11Update, #NewIos
0 notes
Last Seen Blogs

meruko-macaron
めるこ

kara-mcfadden
The Beauty Of Chaos

theotherendcomics
The Other End

whyamitalking
I don't have anything to say.

ragazzastronzxa
ragazzastronzxa