#node tutorial
Text


I'm really doin it this time I'm gonna learn Blender!!! I'm gonna do it right!!
#i have some old ass gamedev dot tv courses I got in a humble bundle#and they are BEGINNER beginner which is weirdly hard to find with blender tutorials#if i try to make that goddamn donut again im gonna shout#the lectures JUST started talking abt geometry nodes and the next series is about uv mapping lets GOOOO
7 notes
·
View notes
Text

eldritch abominations for the modern man
#soda offers you a can#okay im following a tutorial obviously but i think i sort of understand what im doing here#like i made the grayscale control myself and got it to work :)#and im definitely getting the hang of mixRBG nodes#not that this isn't absolutely terrifying to look at though
5 notes
·
View notes
Text

WOOOOOO LOOK MA I BLENDERED MY FIRST BLUNDER
#stupid donut tutorial (ends up learning a lot and is actually proud of myself)#im gonna try the animation another time#but rn im just trying to understand like. modeling and texturing and nodes n stuff#blender
11 notes
·
View notes
Text

shoutout to amphetamines for giving me the ability to be stupid at super speed so I can speedrun glitch my way through learning new things before I get discouraged by the concept of failure
#‘woah that’s so cool how did you learn how to do that’#buddy. pal. listen to me.#I can’t stand the blender video tutorials and nobody fucking writes them down#I don’t want to listen to someone talk instructions at me#I want to read the instructions on how to build the ikea furniture and make it myself okay#so there is now concept of me ‘learning’ how to do anything#I just fuck around and find out#I connect random nodes until something works or explodes#I don’t remember what any of the nodes do#I have pictures of node trees telling me what they make so I can recreate it#SPECIFICALLY because I know I will forget how to make something#I know nothing#the instructions aren’t even in a language I speak and yet I made your fucking Swedish table bitch
24 notes
·
View notes
Photo


Burger On The Grill
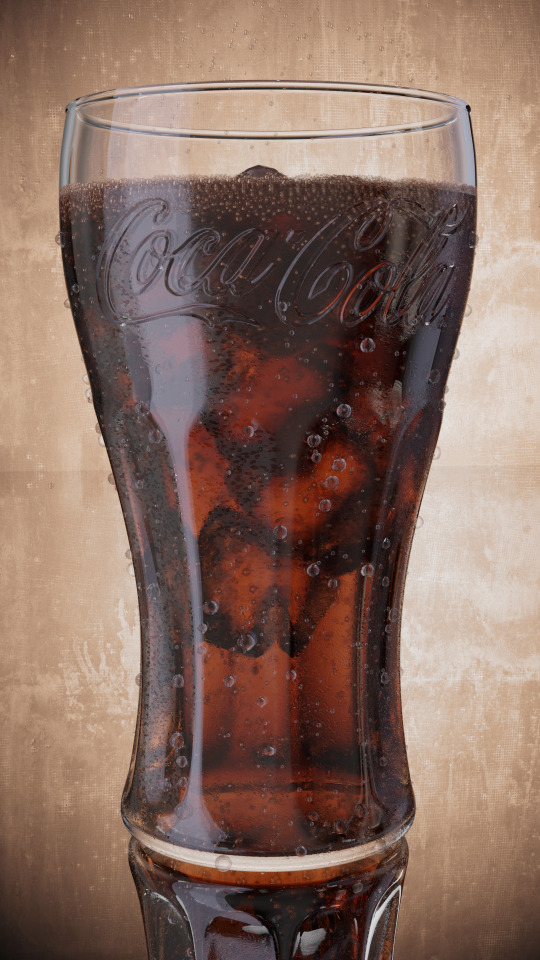
Part 16: Pouring a Drink--Condensation
After completing the donut tutorial by BlenderGuru, I was challenged to create something similar by myself, so I made a burger. I will make that burger into a meal with a soda and fries.
In the last parts, I showed how to make carbonation foam and fizzy bubbles. Now, I'll reveal how to add condensation to the outside of the glass.
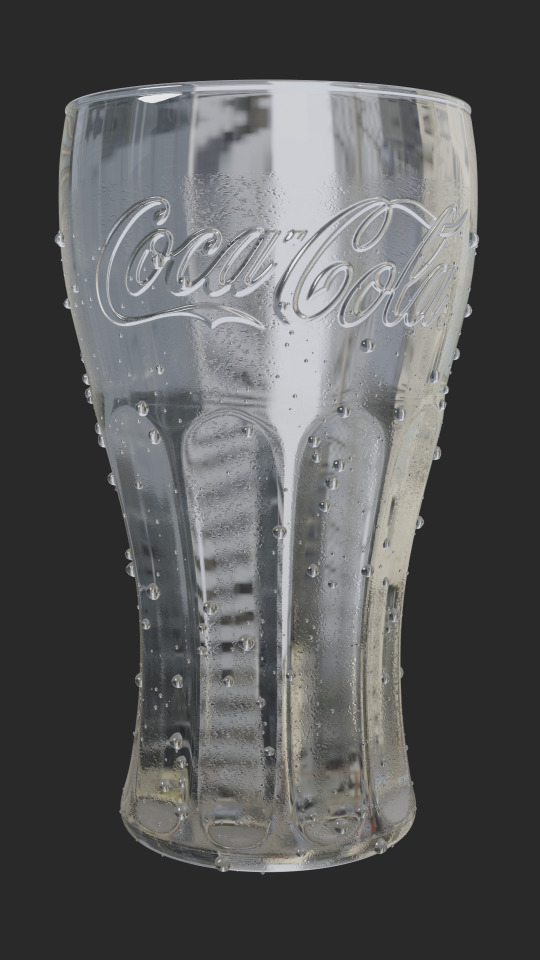
Adding Droplets
In a previous part, I showed how to add dewdrops to tomato slices by creating metaball instances with geometry nodes, a method that is shown in this tutorial by Weil Labed. This method was problematic from the start, requiring multiple workarounds.
In Blender 3.3, metaball instances may show up in the render preview window but disappear in the actual render. Using Eevee, you can go to View and select Viewport Render Image; however, the resolution may be less than what you'd get from an actual render. Since we are using Cycles as the render engine, I had to move on from metaballs.
Joey Carlino offers an alternative method of generating water droplets with geometry nodes by converting Points to Volume and Volume to Mesh.
Water Droplets with Geometry Nodes by Joey Carlino
Start by creating a duplicate of the soda glass. Add a geometry nodes modifier with these nodes and values.
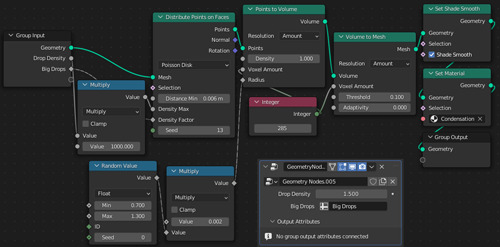
In weight paint mode, paint the entire glass blue and then paint warm colors where you want your droplets. Under Object Properties > Vertex Groups, name this weight paint “Big Drops.”
Repeat the process a second time, adding smaller droplets. Increasing the voxel amount will yield better resolution on a smaller scale. Create another weight paint vertex group named “Small Drops.”
I used the same node setup but with these values:
• Drop Density Multiplier: 6000
• Distribute Points of Faces > Distance Min: 0.002m; Seed: 9
• Random Value > Min: 0.13; Max: 0.35
• Volume to Mesh > Voxel Amount: 1000
There are now water droplets on the glass, but at a glance, they can be easily mistaken for carbonation bubbles. How can we get a more integrated effect?
Painting Drip Trails
Blender Guru combines image textures with a particle system that instances a collection of droplets.
How to Make a Rainy Window by Blender Guru
I liked how some of these droplets had trails behind them. This is a good method if you have the water rolling down a flat surface; however, with a complex curving surface, like we have on our glass, the trails would stick out unnaturally as instances.
Jonathan Kron demonstrates a method that solves this problem, using instanced particles in combination with dynamic paint to create trails in the roughness of the texture of the container.
Realistic Condensation by Jonathan Kron
It turns out that dynamic paint works just as well with geometry nodes as it does with the particle system.
Let's make some drip trails for the big droplets!
With the Big Droplets selected, go to Physics Properties and add Dynamic Paint with these settings:
• Type: Brush
• Paint: Mesh Volume + Proximity
• Distance: 0.001
With the Glass selected, add Dynamic Paint with these settings:
• Type: Canvas
• Format: Vertex
• Frame End: 19
• Drip: Checked
• Weights > Gravity: -1
• Output > Wetmap Layer: Click + sign
If you run the animation now, you’ll notice the trails being painted up are a bit messy and out of sync with the droplets. To fix this, add a Subdivision Surface Modifier to the glass set at 2 and drag it above the Dynamic Paint in the modifier stack.
On the Dynamic Paint canvas, under Cache, click Bake. This will produce an attribute called “dp_wetmap” which can be dragged into the Shader Editor of the Glass to drive the texture.

Adding subdivisions to the glass helps to get a cleaner wetmap, but at the cost of nearly maxing out my graphics card. To prevent failed renders, it is necessary to reduce the load.
Our wetmap is operating as vertex color, which is intrinsically tied to the vertices of the highly-subdivided mesh. In this form, the wetmap cannot be transferred to a lower poly mesh. How can we get around this problem?
The answer is baking. We can bake this wetmap to an image texture which can be used on a simpler mesh.
Converting vertex painting to texture maps by Taylor Hokanson
Connect the color sockets between the wetmap attribute and a diffuse shader. Add an image texture node and create a new 4K image with a black background and no alpha channel. Add a UV map node and connect it to the vector input of the image texture node.
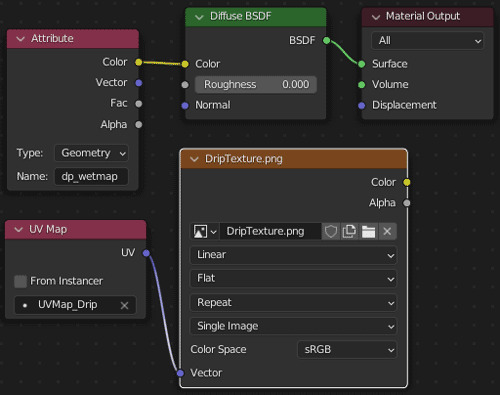
Create a new UV map named "Drip" to be referenced by this UV map node. Since we already have a UV map for the Coca Cola logo, we will be working with multiple UV maps.
Texturing with Multiple UV Maps by The Observatory
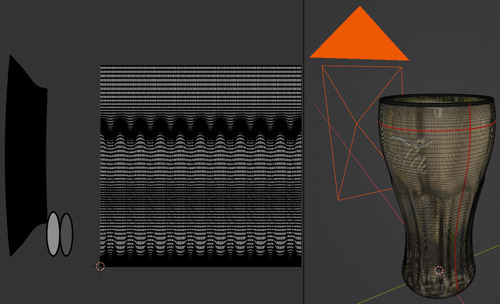
Go to Object Data Properties > UV Maps and click the + sign to create a new UV map. Open the new black image in the UV Editor, mark seams in discreet areas, unwrap the UVs and position and size the islands to maximize the area taken up by the drip trails.
Go back to the Shader Editor and select the name of the new UV map in the UV map node. Make sure the image texture node is selected. Then, go to Render Properties > Bake. Set the Bake Type of Diffuse and make sure only the Color Contribution is checked under Influence. Bake and save your image to the hard drive as "DripTexture."
Now, we need to transfer the "Drip" UV map from the high-poly subdivided glass ("source" object) to the low-poly unsubdivided glass ("target" object).
Go to Object Data Properties > UV Maps on the source object and make sure the UV Map for the drip texture is active. For the target object, click the + sign to add a new UV map and make sure it is active. Select the target object and then the source object. Go to Object > Link/Transfer Data > Copy UV Maps. The new UV map of the unsubdivided glass object will be replaced by a copy of the drip texture UV map from subdivided glass object.
Set up the following nodes for the low-poly unsubdivided glass.
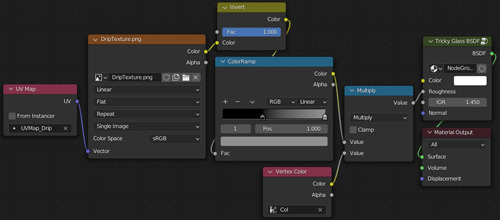
Feed a UV Map node referencing "Drip" into the Vector socket of an Image Texture node referencing "DripTexture." Invert the color and add a Color Ramp to decrease the maximum brightness.
Using vertex paint, paint the entire glass black. Paint white on the outside of the glass below the level of the liquid, creating a soft transition at the level line. Add a Color Attribute node and reference the vertex paint which needs to be named "Col" to avoid render problems.
Feed the Color sockets of the ColorRamp and Color Attribute nodes into a Math node set to Multiply. Feed the result into the Roughness socket of the Tricky Glass Shader.
This effect looks good on a metal can, but increasing the roughness on a glass material makes it difficult to see the details on inside the glass, the ice cubes and carbonation bubbles we worked so hard on.
Adding an Image Texture
To add more spaces where the roughness is lower and further integrate the droplets to the glass, I decided to add another image texture.
Blender Guru uses multiple materials and adds a condensation texture to his coffee glass.
Condensation by Blender Guru
Create a new UV map for the Glass and name it “Condensation.” In the UV Editor, bring up the Condensation Image Texture in the background.
Mark seams around the base and the fill level of the glass. Choose a discreet place to mark a seam down the side of the glass. Select the glass and UV > Unwrap. You might notice that the result is somewhat curved, causing the texture to stretch along the glass.
To fix this, we need to use a different unwrapping method.
Add a camera and change the lens type to Orthographic. Name the camera “UV Cylinder Projection.” With the camera selected, go to View > Cameras > Set Active Object as Camera. Position the camera to face the vertical seam through the glass as shown in the image below.
Drag the UV islands outside of the Condensation Image Texture. Then, select only the island where you want the texture to appear on the outside of the glass.
Go to UV > Cylinder Projection. Set the Direction to View of Equator. That island should now fill the whole square of the image texture, maximizing resolution without stretching the texture.
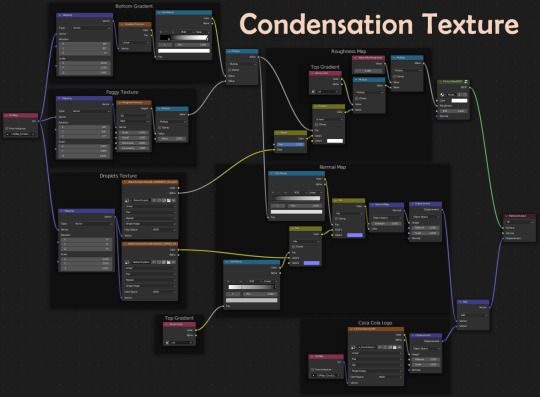
In the Shader Editor, drag in the Alpha Masked and Normal textures for the Condensation. Feed a UV Map node into the Vector input and use a Mapping node to scale them. The Normal texture will drive the Displacement while the Alpha Masked texture will contribute to the Roughness of the Glass Shader. Use a Vertex Color to control where the condensation appears on the glass.
Reference Condensation Texture Shader Nodes at the top of this post.
The Foggy Texture creates some randomness in the application of the condensation and the Bottom Gradient decreases the amount of condensation as you move down the glass and away from the ice.
Combining Effects
Pulling it all together requires an even more complicated node tree, but essentially all that is left is to add the Wetmap Drip Texture frames and feed it into what we already have.
Reference Condensation + Drip Trails Shader Nodes at the top of this post.
Organizing node trees into frames is a good way to communicate your process to your future self and to others. Whole segments can easily be copied from one material to another.
Finally, we have completed our soda!
Follow me to keep watch for the next part! Now that we have our burger and our soda, we can start to set up our burger meal scene.
Review the previous part.
See overview for links to all parts of this tutorial series!
See more of my work: Check out my archive.
Join me on my journey: Follow me on tumblr.
Support my creative profession: Buy me a coffee on KoFi.
#blender#tutorial#soda#glass#condensation#texturing#water drops#droplets#geometry nodes#coca cola#3d art#art process#food art#3d artist#art#digital art#3d render#blender3d#blendercommunity#blendertutorial
7 notes
·
View notes
Text
#blender#3d#ryan#king#art#procedural#tutorial#zackx1#material#terrain#scene#Christmas#Project#learn#nodes#shader#editor#texture#maps#great#success#snow
2 notes
·
View notes
Text
ough I really oughta just pay for an Actual blender course instead of trying to teach myself via youtube tutorials and messing around bc holy adhd, batman
#I wanna MODEL I wanna SCULPT I wanna RIG and ANIMATE I wanna make MATERIALS I wanna figure out GEO NODES#and like. tutorials are nice and all but a lot of the time they don't generally explain /why/ things work#or what /exactly/ different tools do and are good for#I should probably try to focus on one aspect at a time. try to master modeling then sculpting then materials etc.#bc like ok I wanted to make a self-portrait kinda thing before the end of the month but things've been busy with my dad's fiance moving in#and also I've been in Minecraft hyperfixation mode for 2-3 weeks now with no sign of it letting up anytime soon#so I was spending more time gaming than learning blender#BUT a couple days ago I figured I could use that to my advantage and just. model my Minecraft skin#it's just cubes it couldn't be THAT hard right#*cue several hours of trying to figure out various ways of making materials bc I can't quite get them looking the way I want*#I did also make it a bit more interesting by making some stuff 3d and not just painted onto the cubes#I wanna try a couple more things before I post it tho#anyway point is I keep getting distracted and only really learning how to copy stuff#and sometimes not even that bc it doesn't work with the newest version or they skip a step that's obvious to THEM but not absolute beginners#I think part of it is I wanna share these Absolutely Perfect Finished projects when really I should be focusing on /making/ the project#I should start posting wips or something. make Yet Another sideblog for all my blender stuff#get distracted learning just enough html and css to make it look cool even though nobody looks at desktop versions of blogs anymore
1 note
·
View note
Text
Node Wrangler Shortcuts: A Definitive Guide
Node Wrangler is a powerful add-on for Blender that can help you to work with nodes more efficiently. It provides a variety of shortcuts and tools that can save you time and make your workflow more streamlined.
Here are some of the key benefits of using Node Wrangler shortcuts:
Increased speed and efficiency: Node Wrangler shortcuts can help you to navigate through your node trees more quickly…

View On WordPress
0 notes
Text
youtube
#youtube#video#codeonedigest#microservices#microservice#nodejs tutorial#nodejs express#node js development company#node js#nodejs#node#node js training#node js express#node js development services#node js application#redis cache#redis#docker image#dockerhub#docker container#docker tutorial#docker course
0 notes
Video
youtube
DIY ESP-01 Temperature Monitoring Using Wi-Fi, MQTT, and Node-Red | #sma...
#youtube#🌐 Dive into the world of IoT with our latest project tutorial! Learn to build a sophisticated ESP-01 Temperature Logger using Node-Red for
1 note
·
View note
Text
Create WebPage Scrapper Using Node js and Express
Creating a web scraper using Node.js and Express allows developers to extract data from websites efficiently. In this tutorial, we’ll explore the development process of a web scraper using Node.js and Express, enabling users to retrieve specific data from web pages.
0 notes
Video
youtube
OpenStack 3 Node Cluster on Ubuntu Installing and Configuring Cinder Blo...
#youtube#🎥 Explore the world of OpenStack with our step-by-step tutorial! In this video we'll guide you through the process of setting up a 3 Node C
0 notes
Text
w. why was the blender donut guy doing nfts.....
#man. sure sucks that his tutorials are just so good#this doesn't help my already terrible opinion of blender#not that he's responsible for the software or anything#but just... by proxy. idea association.#he's like a blender ambassador to me#maaan i just wanted to learn abt geometry nodes for work....
1 note
·
View note
Text
i want to sink my teeth into 3d again so badly but im literally at the point where everything feels so different i might just have to watch fuckign tutorials again and i know i'll get bored of them because it'll rehash stuff i already now
#like basic shit again. i have a notebook that's got blender hotkeys and stuff written down that'll save me some time#where the tutorials for 'fell off the boat and want to get back into it again i know basics of how you compose these things#but i have forgotten workflow and am unfamiliar with tools' tutorials#likei could easily fiddle in the blender nodes for rendering so fuckign much. check out these shaders (they have no use in engines lmaooo)
1 note
·
View note
Video
youtube
Upload a File or Multiple Files to a NodeJS Express Server | NodeJS Tuto...
0 notes
Photo

did the isometric bedroom tutorial and spent Way too long tweaking things 😔
#originally I wanted to just make a bookshelf and use geometry nodes and/or the array modifier to make a toy robot display#but the robot isn't even part of the tutorial and I eventually decided it would be better to just finish this#so I could move on to something slightly more advanced#than to keep agonizing over the details on what's supposed to be a quick project#Blender tag
1 note
·
View note
Last Seen Blogs
koveckbrom
When the memories begin to fade

kansasguy8586
Untitled

gemmoconnor
gemm o'connor


justsomewritingprompts
Fun Writing Prompts