#not me using every tutorial i found on usergif
Photo
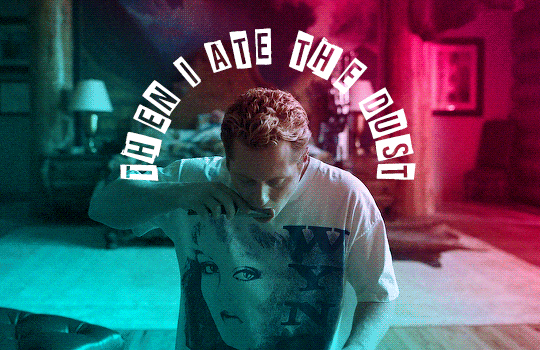

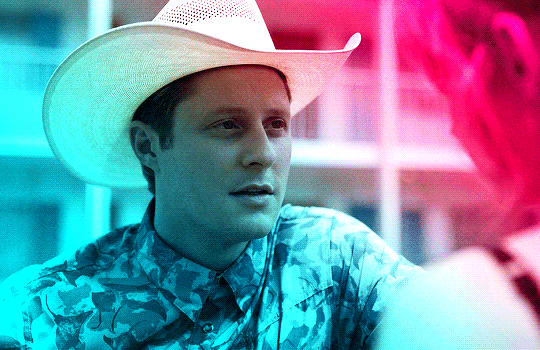

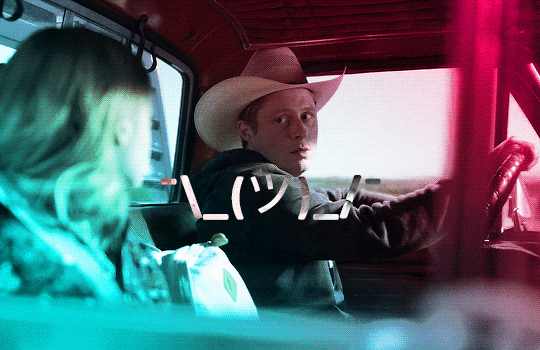


Billy Tillerson - Best Lines | Outer Range Season 1
#billy tillerson#outer range#outerrangeedit#userbbelcher#usersource#usergif#usersteen#usermbg#tvfilmsource#smallscreensource#chewieblog#noah reid#outer range: s1#not me using every tutorial i found on usergif#bless anyone who takes the time to make them#typography
247 notes
·
View notes
Text
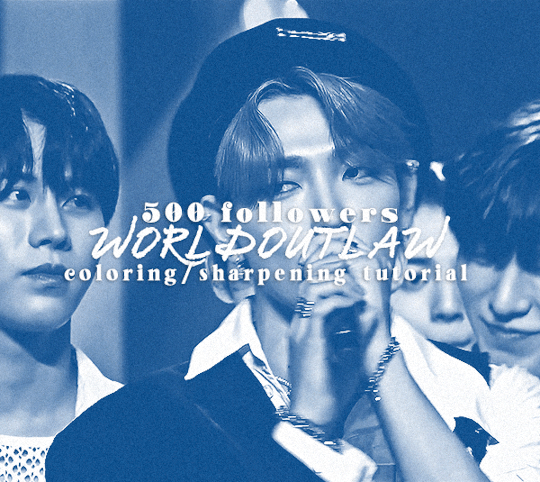
hi! it's theo aka user worldoutlaw and for 500 followers i wanted to share my coloring/sharpening process !
i've been getting a few notes recently complimenting my coloring and sharpening lately (ty all so much they make me smile every time) and i thought some people might be curious in my process so here we are ! :3
this is just coloring and sharpening so if you're looking for a general gif tutorial i suggest you check out usergif! now without futher ado let's start (color coded for my fellow adhders/neurodivergents who find reading hard)
i do most of my process through actions; of which i have several for different gif dimensions ie 540 width (typically for fancams where i keep the width of the file the same but change the height), 540 height (which i use the most for gifs like the above), and 850 height which i use for my sets that have side by side gifs like my pinned
actions make the beginning of making a gif a lot faster and especially save time when you're rushing to make comeback gifs lmao
after i've converted to the video timeline and selected all of my frames and converted them to a smart object, i apply userdramas's camera raw filter action which can help gifs look higher quality and create the illusion of skin texture when there isn't any
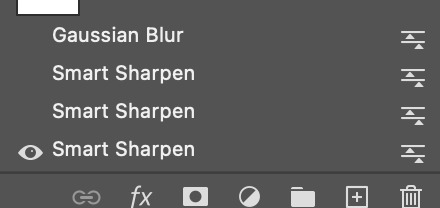
after this i convert the layer into a smart object again and apply my sharpening as follows (partly from anyataylorjoy's action pack)

smart sharpen 1:
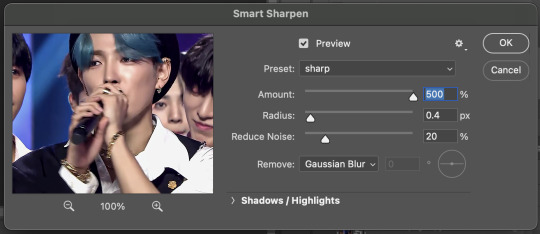
smart sharpen 2:
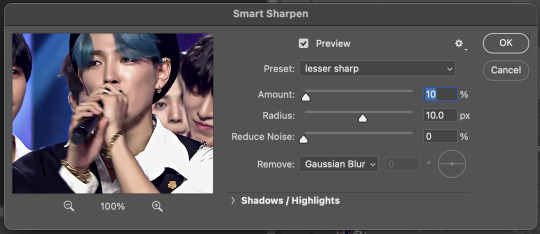
smart sharpen 3: (this one is optional)
smart sharpen 2 duplicated
gaussian blur:
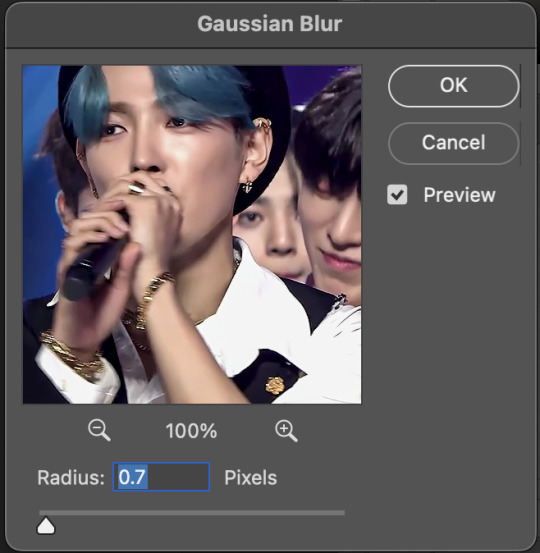
and i click this button on the far right to change the opacity of the blur (usually i set it around 10-30)
it may look funky but noise at the end will always fix it :p
after i sharpen i start on coloring!
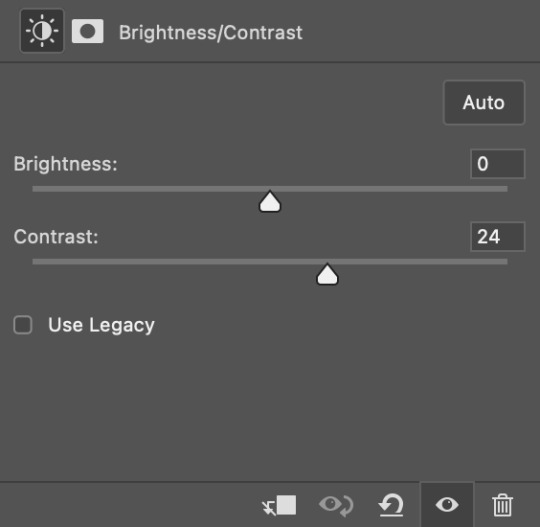
my coloring process starts with editing values with curves, brightness & contrast, and sometimes levels

this helps to achieve the high contrast look i really like on my gifs and below are my settings for this specific set
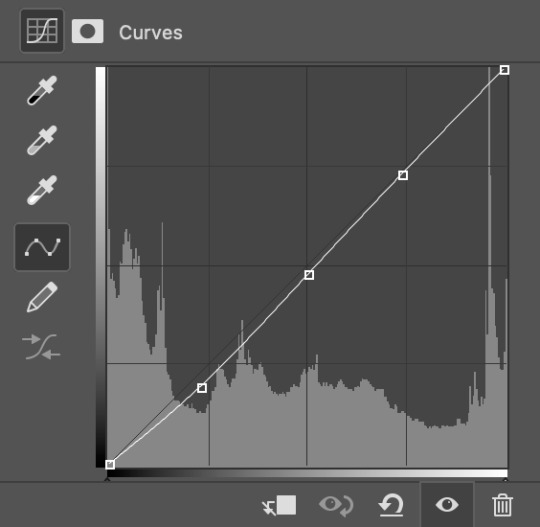
i find that the marker in the center of the curves graph can often help darken skin tones if the subject appears too light
after i have my values down i move on to the actual colors
i start with adding a selective color layer; adjusting the red values, followed by yellow, then black, white, and any other colors i would want prominent in the gif
for example, with this set i wanted the blues to look really nice so i increased the cyans and decreased the yellows to my liking
changing the black values adds to the dimension i like in my gifs; these are my settings
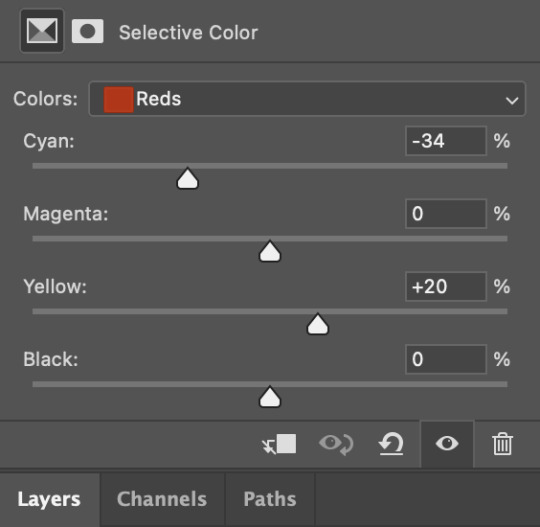

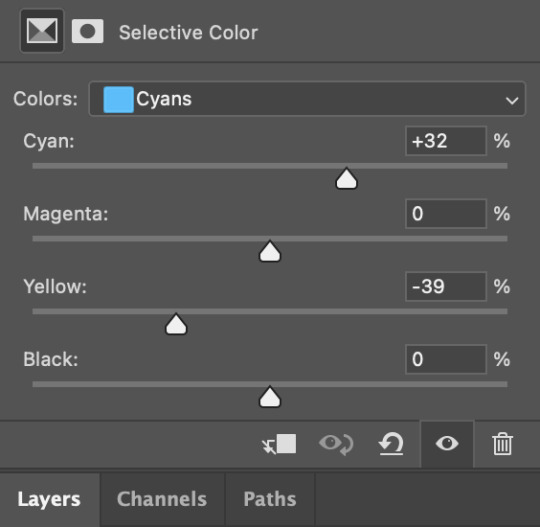
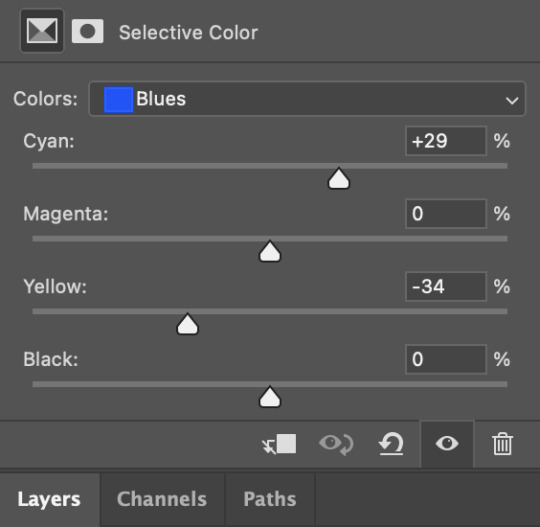
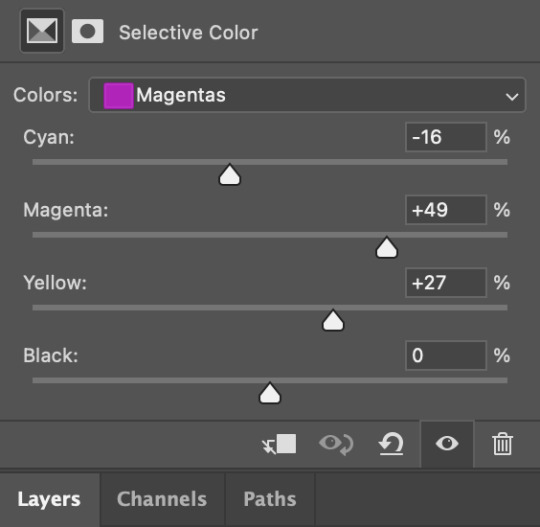

forgot magenta whoops
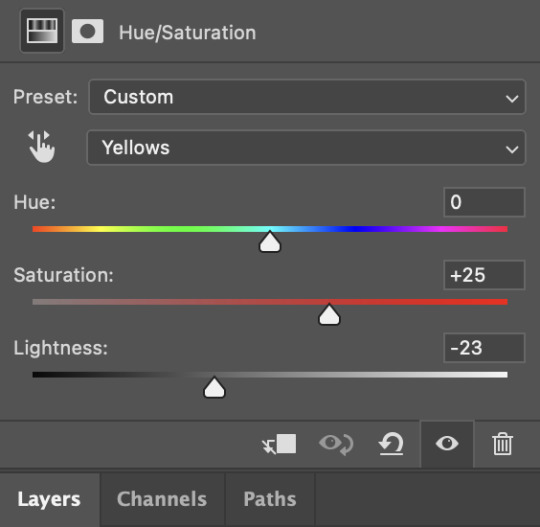
next i add a hue/sat layer where i mess with the red and yellow values which often adds extra help to skin tones (i also recently started using hue/sat on colors like the blues here)


now these gifs didn't need it thankfully, but if needed i will also do color balance and channel mixer layers
after all my coloring and sharpening is done and i'm satisfied with how a gif looks i will convert all layers to a smart object and add noise (typically 1.5-3)
then the gif is done and i save it! these are my save settings
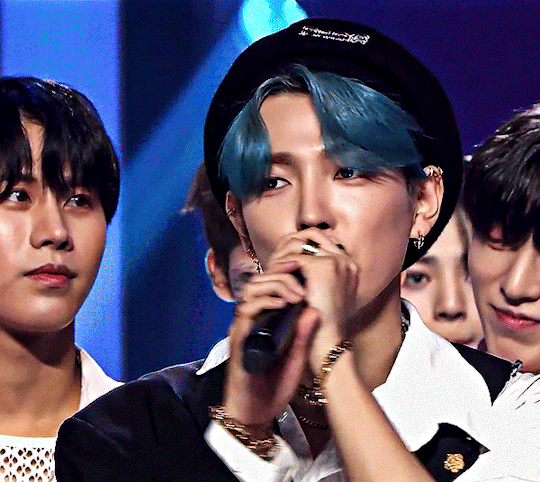
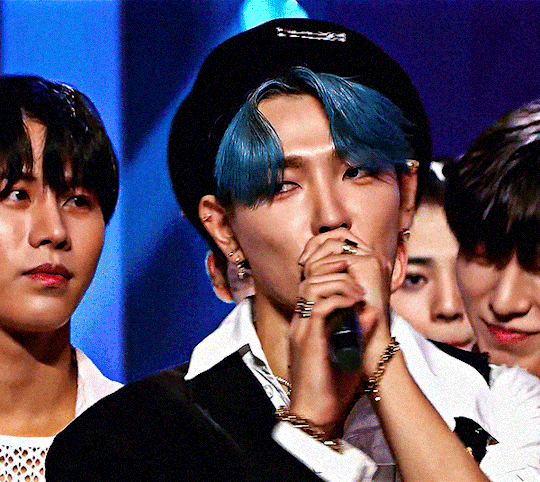
and that's how i turn this

into this!
hope y'all enjoyed and found this helpful and thank you again for 500<3333
some tags for fun and also to thank my supportive lovely mutuals @solojihyo @twiceland @97chwe @jeonwonwoo @sanchelinz @applejongho @hwanswerland @kyubins @minchanz @seonghwasblr @get-lit @jjongho @userwoosan @strhwaberries @dqmeron (ty for looking over this for me 🫶)
#theo.txt#*gifs#*tutorials#this was a relatively easy file to use but#hope it got the point across<3#i dont wanna tag too many people but if you weren't tagged still know i appreaciate you very very much#coloring tutorial#sharpening tutorial#gif tutorial#giffing tutorial#sharpen tutorial#color tutorial
85 notes
·
View notes
Note
Hi, this is Dani (aka @5racha) and I just saw your "event 12: loss" gif set (which is a spoiler for me but i don't care) and I absolutely love the fact you can do black and white with the gold showing. Is there a tutorial out there how to gif black and white with a colour? I mean, an easier way than to just colour each frame individually. Do you have one or is there one? I've been wondering about that for a while now and your gif set is looking absolutely incredible.
ah hello!! thank you for liking my set ;u; <3 fair warning, i notably love talking about this kind of thing and i am incredibly longwinded so i'll get the direct answers out of the way first and then i'll ramble at you about my own gif process for a bit
here is a color isolation tutorial (found via @usergif, who have many such good things). i havent specifically used this one but it's good and im basically about to rephrase it for many words
and basically.... there are ways to do it and sometimes it can be genuinely quite easy (hue/saturation is your friend!) but if your scene is problematic (lots of movement, the color youre trying to isolate is a skintone, low contrast between colors etc) it's still going to be really hard, and in the end some things Will be an every-frame or close to it kind of deal if youre still determined to do it
my eclipse prefects set basically demonstrates -- the blue ones were really really easy, since you just have to desaturate all colors except blue. the reds, because some of the backgrounds also contained red and because it's a skintone you then need to readjust, is much harder. you can kind of tell by the curtains in the first gif how this might cause a problem
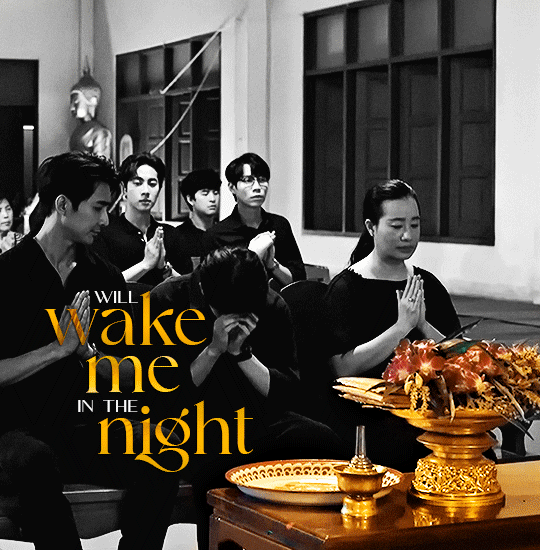
and now im going to talk your ear off trying to explain applying that to the gaipa set in. far too many words. sorry
this set, being that the color is "yellow", is one of these problem children, some more than others -- for example, i tried to do the first one like this but gave up (check out the cool gray spots near his temple and his collarbone :'D)

the middle two were problematic using keyframes too, but a bit easier because they have less movement and the backgrounds are also darker, so ill try and show you, in case it helps??
here is the base coloring (ignore the orange skin, i knew i wasnt keeping this and also moonlight chicken is kind of like that)
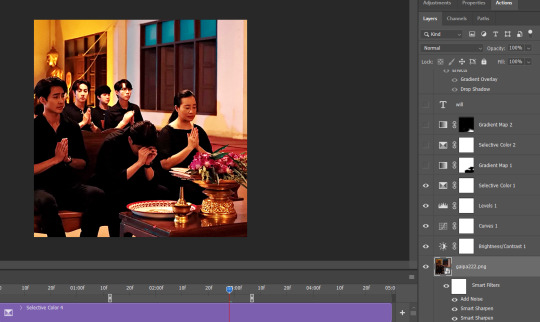
then, the bw layer is added (i use gradient maps for grayscale usually), and then i crop out the section i wanted to stay colored using the ps pen tool -> path -> selection and then use that to apply a layer mask. you can also kind of handpaint this sort of thing if that's easier for you
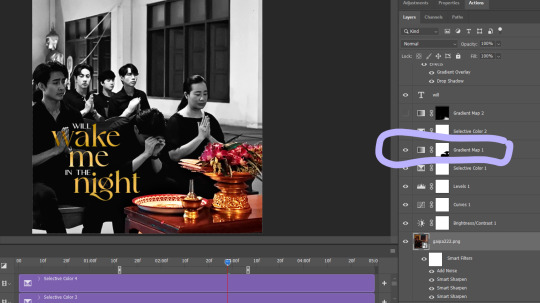
the next couple layers up are color adjustments for this section, to make the yellow that already exists at base brighter & tone down the red. i have four more layers at the very top to do this and adjust the colors golder & more vibrant.
now then the actual trick is in keeping the layer mask on the correct part of the gif. so if i just did the layer mask on the b/w layer like that and didnt keyframe, because this gif moves itd stop working - it isnt Super movement, so it's not actually that big of a difference, but you can see (no keyframes on the right:)

the gray creeps onto the vase, the table, and the upper part of the flowers. if you overcorrect in the other direction, the skin of the woman right behind the flowers will become visible. so ! problem solving: keyframes

that's how it looks like - you start at the beginning of the gif with your layer mask selected, then click the stopwatch next to 'layer mask position'. then i usually use the move tool and arrow keys just to shift it along with movement of the object, and you press the yellow diamond at each point you do so
this is not foolproof and im still sort of new at it, so it can sometimes look odd. case in point if youve spent as long staring at this gif as i have you probably noticed the keyframe movement (it kind of jumps.....) but i decided i could live with that. sometimes you just have to figure out where your standards for 'looks bad' are, too OTL
gif 3 is like this too -- the only notable difference is that, instead of just desaturating the colors i didnt want i covered over them with a gold gradient map layer


so, basically, all of these gifs do originally have yellow in them, but i bass boosted the shit out of it and also colored over it in some places, and i used keyframes to fix movement
i hope this is at least interesting & that you can get use out of the tutorial, hehe. thank you for asking! enjoy finishing moonlight chicken, my belovedest of series
#ro's ps adventures#rowan asks#long post#this is too much. i know. you can basically just take the link hehe#i enjoyed talking about it though !
2 notes
·
View notes
Note
Hi. I really love your gifs🧡🧡🧡 they are really beautiful
And I want to ask you(no pressure): what are your recommendations for people who start make gifs? Where to start and what to learn first?
hi!!!!!!
thanks so much, love! so here's my most important advice (which is applicable to anything creative): don't be afraid to be bad at it. it's so easy to be overwhelmed and frustrated when creating something, especially something like gifmaking that requires a lot of experimentation and software, but as long as you're having fun with it, you should keep doing it. my first gifs were objectively terrible, but getting more and more experience and getting exposure to other peoples processes will lead you to your own style and process :)
as far as recommendations: start simple. get comfortable creating the gif in photoshop, and then you can start experimenting with different coloring styles/text/blending/etc.
i'll link the tutorials i used to find my process, which is a bit of a mixture of a bunch of tutorials and things ive found i like as i created:
i got my downloads through rarbg (may she rest in peace) but this tutorial has other resources for t*rrenting and downloading the actual media
i used this tutorial to screencap the scenes i want to use using mpv on mac
i usde this tutorial for creating the actual gif using DICOM files in photoshop
i used this tutorial for sharpening the gif
and i use anything i can find for coloring gifs, but @usergif has a ton of tutorials you can reference as you figure out what you like. when it comes to coloring (which is the probably the most individualized part of gifmaking) you really have to just fuck around and find out because every scene, movie, tv show, and video is different.
you'll notice that the tutorials ive linked are all pretty comprehensive, and i kind of pick and chose what works for me best, and i recommend you do the same! getting started can be very intimidating, but there are so many resources out there that are so incredibly helpful.
this is a very broad summary of my process, but if you have any questions or want a more detailed tutorial, i am happy to help!!
#corinne answers#buddiearemydads#im sorry if this is like really overwhelming i can break it down more if you need me to :))
6 notes
·
View notes
Note
1, 14 and 28 💜💜💜
How did you get into graphics / gif making: I think it was after I saw one of those countdown for birthdays that used to happen every year. In 2018 it had one for Harry and I thought it would be nice to make my own edit with one of the prompts so my first ever gifset theme was my favorite hslot18 outfit, the pink suit he wore in london.
14. Colours I like: I'm a big fan of blues tbh, which is a problem as a gifmaker because everything too cyan gets grainy as hell so i have to suck it up and not do too much on that. Orange is quite nice too I found lately, it's just hard for me to manipulate it because it messes with the skin color too much and i go insane
28. Advice for any beginner graphic / gif makers: Don't try to do a whole lot right at the beginning. Try to master one thing at a time, get comfortable doing a certain thing then go ahead and try something more complex. Also follow the great resources accounts on this website, there are so many and they help out with tutorials, tips, inspiration and even support your creations. It makes beginning to gif/graphic so much easier with some guidance. my go to would for sure be @usergif & @clubgif, there's a great amount of resources on both of these blogs and pretty organized pages for you to navigate with specific things you're looking for.
4 notes
·
View notes
Last Seen Blogs

jandaz3ra
Untitled

kloveractivities
Activity Pages for Age Regressors

anthilldump
Untitled

scrcmall
无标题
airam-satierf
You will like this