#online tutorial
Text
#Learning Management System#LMS#Learning Management Software#Online Education#Software Training#Online Tutorial#IT Tutorial#Online Course#Online Training#Online Learning
2 notes
·
View notes
Note
Can you tell me how to make an Instagram moodboard? I’ve asked several people and they try to avoid it for some reason, I’ve searched up and all I can find is about the app, I just wanna make my friend a gift 😭
I've gone through the exact same thing, and the ones that did help said they used a PSD (which is photoshop, which is something i cannot afford) so I had to break down and design my own. I actually use Canva for this (it's free so no hassle!)
Kind of obvious but get yourself a Canva account
On the top of the website next to your profile, it'll say "create design" in purple. Hit that and it'll have a list of templates. Search or scroll to find the photo collage option (the dimensions are 20 x 25)
Now that your blank template is loaded, You want to go to the side bar and click the "elements" tab and search for 'frame'. Hit the circle one and add it to the template
Shrink and move in the corner like so...

make it a little smaller if you need to. I shrink it so the width and height are equal at 5
5. Search in elements again for 'line'. This will be your border. I'm having a lot of trouble finding the original line I used earlier in my designs so use whatever you can find. The one I got for this one is from a past design that I copied and pasted on to this current one.
!!EDIT!!: search 'line' in elements and choose the first one under "lines & shapes" (the one underlined). (its a little chunky but its the only one i could find)
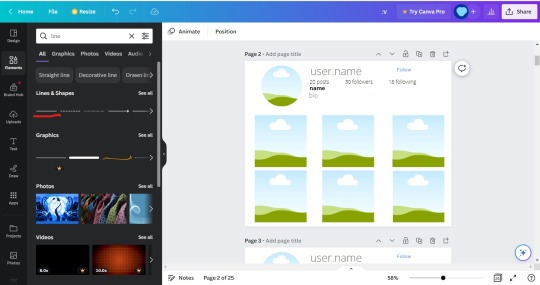
Add it. you might want to move the circle frame further up so it doesnt get in the way and adjust it later. Change the color to a light grey and stretch it until your liking. Don't stretch it all the way across though. leave space on either so it basically ends up like this or longer depending on how you want it (use my designs for reference):

(the line is a little tricky to use and maneuver so give it time and you'll get it ^^)
6. Search for more frames and look for a square frame. Add six of these below your border line. It should look like this,

7. Feel free to fix the sizes on the frames and move them around (mine right now looks a little wonky).
8. Go to the text tab, and hit the "add the subheading" (the middle option). Change the color to a light grey color and the font to 'Open Sans Light'. Type your username (Or if you're using this as a blank template like me, write something like "user.name") Make it a little bigger (even stretch it) and add it next to your circle frame.
9. Add the smallest option to your template (the one that reads "add a little bodytext"), change the font to Open Sans Light, and write your number of posts, followers, and following. I add spaces in between them so they're farther apart (I'm doing 12 spaces in between). Now shrink it to the size you are comfortable with and move it so it's underneath but alined with your username (but measurements for mine for w&h are 12.9 and 0.7)
10. Add the smallest option again and you're going to want to aline it below your posts, follower count, etc. Change it to the same font as before ("Open Sans Light"), change the color to black and bold it. Type your display name, or again, if you using this as a blank template, I just wrote 'name' in my text. Shrink the text box so the width and height is around 1.9 and 0.8.
11. Add more text (still the littlest option) and change the color to light grey. This will be your bio. You can either write a bio or just keep it written as "bio". Aline this under your display name. It should look like this now,

12. Start adding your images. This is the fun part. Luckily, with Canva, it's easy to add images because you just copy and paste them to the template (or you can upload them from your files). So go onto google (or wherever you get your images) and copy/download the image and paste it (Ctrl v).
(But!! before you add any images, I'd recommend duplicating the page so you'll always have a blank version if you want to make more. That way, you won't be constantly remaking this template. So when you feel like making another, just duplicate the blank template)
13. Drag them and hover them over the frame and it'll be inside the frame now. Do that until your frames are filled up. If you need to crop them or the frame is covering an essential part of the image, either double click the image and you'll be able to move it around or you can click the image in the frame and look at the top and they'll be a "crop image" option in between the "edit image" and "flip" options
14. For the sake of this tutorial, I will show how it should look so I'll add my images...

I decided to make a green one, your's doesn't have to look like this. In fact, make it however you want! Rather it be for aesthetics or for a more realistic approach.
15. When you're done with your mockup, hit the share button in the corner, go to download, choose your file type (I always choose PNG), select what file you want to download (make sure you don't hit "download all") then hit download. Your instagram moodboard should be in your recently downloaded now.
And that's all! I hope this was helpful and that your friend likes your gift!
#asks#anon#anon ask#anonymous#instagram#instagram moodboard#aesthetic#instagram au#insta#instagram mockup#tutorial#online tutorial#instagram template#template#moodboards#social media au
42 notes
·
View notes
Text
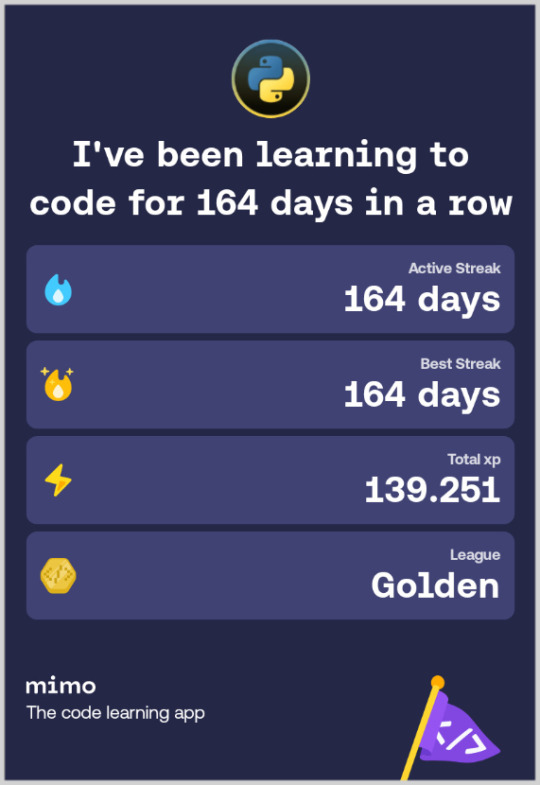
Post #159: MIMO, Online coding website, app and community, programming and script languages: Python, SQL, Web Development, JavaScript, HTML, 2023.
#coding#programming#programmieren#coding for kids#education#learning#online tutorial#online coding#python tutorial#studying#teaching#mimo
4 notes
·
View notes
Text
HTML 101: The Ultimate Beginner's Guide to Writing, Learning & Using HTML

HTML serves as the backbone of every web page, allowing us to structure content with paragraphs, headings, images, links, forms, and more. If you're eager to delve into web development or explore the world of coding, mastering HTML is a fantastic starting point.
Join us on webtutor.dev as we unveil the ultimate guide to HTML for beginners. In this comprehensive tutorial, we'll demystify HTML, explore its diverse applications, and equip you with the skills to write your own HTML code. From essential elements to crucial attributes, we'll cover it all.
Get ready to embark on your HTML journey with webtutor.dev – your go-to resource for empowering web development education. Let us dive in and unlock the potential of HTML together.
Join us now on webtutor.dev!
What is HTML?
First published by Tim Berners-Lee in 1989, HTML is now used by 94% of all websites, and probably all the ones you visit. But what is it, exactly?
HTML, short for HyperText Markup Language, is the backbone of the web. It is a markup language that structures the content of web pages. HTML utilizes tags to define the elements and their attributes, such as headings, paragraphs, images, links, lists, forms, and more. These tags instruct web browsers on how to display and render the content to users. With HTML, developers can create interactive and visually appealing web pages. It plays a vital role in creating a seamless browsing experience by allowing users to navigate through hyperlinks and access information across different websites. HTML is the foundation upon which websites are built, providing the structure and organization for displaying text, multimedia, and interactive elements. By learning HTML, individuals can gain the skills to create and customize web pages, making their mark in the digital landscape.
Is HTML a programming language?
No, HTML (Hypertext Markup Language) is not considered a programming language. It is a markup language used for structuring the content and presenting information on web pages. HTML provides a set of tags that define the structure and semantics of the content, such as headings, paragraphs, links, images, and more.
While HTML is essential for web development, it primarily focuses on the presentation and organization of data rather than the logic and functionality found in programming languages. To add interactivity and dynamic behavior to web pages, programming languages like JavaScript are commonly used in conjunction with HTML.
What is HTML Used for?
HTML (Hypertext Markup Language) is used for creating and structuring the content of web pages. It provides a set of tags that define the elements and their layout within a web page. Here are some of the key uses of HTML:
Web page structure: HTML is used to define the structure of a web page, including headings, paragraphs, lists, tables, forms, and other elements. It allows you to organize and present content in a hierarchical manner.
Text formatting: HTML provides tags for formatting text, such as bold, italic, underline, headings of different levels, and more. These tags help in emphasizing and styling specific parts of the content.
HTML Hyperlinks: HTML enables the creation of hyperlinks, allowing you to connect different web pages together or link to external resources. Links are defined using the <a> tag and provide navigation within a website or to other websites.
Images and media: HTML allows you to embed images, videos, audio files, and other media elements into web pages. It provides tags like <img>, <video>, and <audio> for adding visual and multimedia content.
Forms and user input: HTML provides form elements, such as text fields, checkboxes, radio buttons, dropdown menus, and buttons, allowing users to enter and submit data. Form data can be processed using server-side technologies.
Semantic markup: HTML includes semantic elements that provide meaning and structure to the content. Examples of semantic elements are <header>, <nav>, <article>, <section>, <footer>, which help define the purpose and role of specific parts of a web page.
Accessibility: HTML supports accessibility features, such as providing alternative text for images, using proper heading structure, using semantic elements, and other attributes that make web content more accessible to users with disabilities.
Overall, HTML serves as the foundation of web development, providing the structure and presentation of content on the World Wide Web. It is often complemented by other technologies like CSS (Cascading Style Sheets) for styling and JavaScript for interactivity and dynamic behavior.
How to Write HTML?
<!DOCTYPE html><html><head><title>My Page</title></head><body><h1>Hello, World!</h1></body></html>
Explanation:
<!DOCTYPE html>: Specifies the HTML version.
<html>: Opening tag for the HTML document.
<head>: Contains metadata about the page.
<title>: Sets the title of the page displayed in the browser's title bar or tab.
<body>: Contains the visible content of the page.
<h1>: Defines a heading level 1.
Hello, World!: The actual content to be displayed.
Please note that this example is a very basic HTML structure, and for more complex pages, additional tags and attributes would be required.
How to Create an HTML File
To create an HTML file, you can follow these steps:
Open a text editor: Open a text editor of your choice, such as Notepad (Windows), TextEdit (Mac), Sublime Text, Visual Studio Code, or any other editor that allows you to create plain text files.
Start with the HTML doctype: At the beginning of your file, add the HTML doctype declaration, which tells the browser that the file is an HTML document. Use the following line:
<!DOCTYPE html>
Create the HTML structure: After the doctype declaration, add the opening and closing <html> tags to enclose the entire HTML document.
Add the head section: Inside the <html> tags, include the <head> section. This is where you define metadata and include any external resources like stylesheets or scripts. For now, let's add a <title> element to set the title of your page:
<head>
<title>My First HTML Page</title>
</head>
Create the body: Within the <html> tags, include the <body> section. This is where you place the visible content of your web page. You can add various HTML tags here to structure and format your content. For example, let's add a heading and a paragraph:
<body>
<h1>Welcome to My Page</h1>
<p>This is my first HTML file.</p>
</body>
Save the file: Save the file with an .html extension, such as myfile.html. Choose a suitable location on your computer to save the file.
Open the HTML file in a browser: Double-click on the HTML file you just saved. It will open in your default web browser, and you will see the content displayed according to the HTML tags you added.
Congratulations! You have created an HTML file. You can now edit the file in your text editor, add more HTML elements, styles, scripts, and save the changes to see them reflected in the browser.
Common HTML Attributes
<input type="text" name="username" placeholder="Enter your username" required>
<img src="image.jpg" alt="Image description">
<a href="https://example.com" target="_blank">Link to Example</a>
<div id="container" class="box">
<button onclick="myFunction()">Click me</button>
<table border="1">
<form action="submit.php" method="POST">
<select name="color">
<option value="red">Red</option>
<option value="blue">Blue</option>
</select>
Explanation:
<input>: Attributes like type define the input type (text, checkbox, etc.), name sets the input's name for form submission, placeholder provides a hint to the user, and required specifies that the input is mandatory.
<img>: src specifies the image source URL, and alt provides alternative text for the image (useful for accessibility).
<a>: href sets the hyperlink URL, and target="_blank" opens the link in a new tab or window.
<div>: id assigns an identifier to the element, and class adds a CSS class for styling or JavaScript targeting.
<button>: onclick triggers a JavaScript function when the button is clicked.
<table>: border adds a border to the table.
<form>: action specifies the form submission URL, and method sets the HTTP method (GET or POST).
<select>: name assigns the name for the selection input, and <option> defines the selectable options within the dropdown menu.
These are just a few examples, and there are many more HTML attributes available for different elements, each serving specific purposes.
#learn to code for free#coding course online#Online Web Tutorial#learn coding for free#online tutorial#learn code#learn code for free#introduction to coding#learn html#programming training courses#best way to learn coding#how long does it take to learn coding#learn coding for beginners#best online platform for learning coding#best place to learn to code online
4 notes
·
View notes
Text
youtube
A simple, neat and elegant solution :)
#foryou#foryoupage#inspiration#crochet#idea#handwork#fyp#art#handmade#crafts#tutorial#online tutorial#facebook#youtube#instagram#tiktok#crocheting#crochetaddict#knowledge sharing#Youtube
0 notes
Text
Pointers in C++ are simple to learn but very useful for building programs. Learn these to manipulate memory in C++:
Pointer Arithmetic
Array of Pointers
Passing Pointers to Functions
Return Pointer from Functions
Source: Tutorialspoint
0 notes
Text
Unraveling the Web of Knowledge: Navigating the Digital Landscape with W3Schools
In the vast and ever-evolving realm of web development, one name has consistently stood out as a beacon of knowledge and guidance: W3schools. As the digital landscape continues to expand, the demand for skilled web developers has skyrocketed. In this article, we'll explore the significance of W3Schools and how it has become a go-to resource for individuals seeking to master the intricacies of web development.
W3Schools, founded in 1998, has grown to become one of the most comprehensive online learning platforms for web technologies. It caters to beginners and seasoned developers alike, offering a plethora of tutorials, references, and interactive exercises. The platform covers a wide array of topics, including HTML, CSS, JavaScript, SQL, Python, and more. Whether you're a novice looking to build a foundational understanding or an experienced coder aiming to expand your skill set, W3Schools has something to offer.
One of the key strengths of W3Schools is its hands-on approach to learning. The platform provides an interactive coding environment directly within the browser, allowing users to practice what they learn in real-time. This practical approach not only solidifies theoretical concepts but also accelerates the learning process. Users can experiment with code snippets, observe the results, and gain a deeper understanding of how different technologies interact.
W3Schools is renowned for its user-friendly interface and clear, concise explanations. Complex topics are broken down into digestible segments, making it easy for learners to grasp intricate concepts without feeling overwhelmed. The step-by-step tutorials guide users through the learning process, fostering a sense of achievement at every stage. The platform's commitment to simplicity ensures that individuals from various backgrounds can navigate the world of web development with confidence.
Another notable feature of W3Schools is its up-to-date content. In the fast-paced world of technology, staying current is crucial. W3Schools consistently updates its tutorials to reflect the latest industry standards and best practices. This commitment to relevancy ensures that users are equipped with the most current knowledge, empowering them to stay ahead in the competitive field of web development.
Beyond individual learning, W3Schools serves as a valuable resource for the global web development community. Its forums provide a platform for users to seek assistance, share insights, and engage in discussions with like-minded individuals. The sense of community fosters collaboration and contributes to the overall growth of knowledge within the field.
As technology continues to advance, the demand for web development skills shows no signs of slowing down. W3Schools, with its user-centric approach, comprehensive content, and commitment to staying current, remains a trusted companion for those embarking on their web development journey. Whether you're a student looking to enter the industry or a professional aiming to upskill, W3Schools offers a roadmap to success in the ever-expanding digital landscape.
In conclusion, W3Schools has solidified its position as a cornerstone in the world of web development education. Its user-friendly interface, hands-on learning approach, and commitment to staying current make it an invaluable resource for anyone seeking to navigate the complexities of web technologies. As the digital landscape continues to evolve, W3Schools stands as a beacon, guiding individuals toward mastery in the dynamic and exciting field of web development.
1 note
·
View note
Text
Best code learning websites, learn to code for beginners, learn online coding
Best code learning websites for how long it takes to learn to code, it really depends on your goals, dedication, and the complexity of the language. HTML is relatively simple and you can get a good grasp of its basics in a few weeks if you dedicate a few hours each day. However, mastery and fluency might take a few months of consistent practice.Online Tutorials and Courses: Websites like Codecademy, freeCodeCamp, and W3Schools offer free tutorials on HTML. They provide interactive lessons that guide you through the basics and more advanced concepts. There are many free tutorials on YouTube covering HTML for beginners.
The time it takes to learn coding can vary depending on several factors, including the programming language you choose, the how long to learn coding complexity of the projects you want to work on, and your prior experience with technology. However, many people can acquire basic coding skills in a few months with consistent effort.Learning to code for free is very much possible with the resources available online. Many platforms offer free courses and tutorials. While paid courses might offer more comprehensive content and support, you can definitely start and make significant progress without spending any money.
Coding teaches you how to break down complex problems into smaller, more manageable parts and develop logical solutions. Critical Thinking: Programming encourages logical thinking and improves your ability to analyze and solve problems. Coding allows you to create something from scratch, whether it's a website, app, or game. It's a way to express creativity through technology. In today's technology-driven world, coding is a valuable skill that is in high demand across various industries.
Coding enables you to automate repetitive tasks, making processes more efficient. Career Opportunities: Knowing learn coding for beginnershow to code opens up a wide range of career opportunities in fields such as software development, data science, web development, and more. Start with Basics: Begin with a beginner-friendly language like Python.
This hands-on experience is crucial for learning. Books and Documentation: Read coding books and explore documentation. Understanding how to use documentation is a vital skill for programmers. Participate in online coding communities like Stack Overflow or Reddit. Engaging with others can provide support and insights.
Best Code Learning Websites best coding language to learn firstOffers interactive coding lessons for various programming languages. Provides courses from universities and organizations worldwide. Similar to Coursera, edX offers a wide range of courses from universities and institutions. Focuses on project-based learning and offers nanodegree programs.
A nonprofit organization that provides free coding lessons and projects. Offers introductory coding courses in an interactive and beginner-friendly manner. A great resource for web development, offering tutorials on HTML, CSS, JavaScript, and more.
0 notes
Text
Embracing the Power of Online Classes and Tutorials: Revolutionizing Education
Education has undergone a remarkable transformation in the digital era, with online classes and tutorials emerging as game-changers in the learning landscape. These innovative platforms have revolutionized traditional classroom settings, empowering students to access knowledge and expertise from any location with just a few clicks. This article explores the transformative benefits and potential challenges associated with online classes and tutorials, shedding light on how they are reshaping education as we know it.
Unprecedented Convenience and Flexibility
One of the key advantages of online classes and tutorials lies in their unmatched convenience and flexibility. Gone are the days of rigid schedules and time-consuming commutes. Students now have the freedom to engage in high-quality educational content at their own pace and convenience, eliminating geographical barriers. Whether it's a professional seeking to enhance skills, a stay-at-home parent pursuing higher education, or a student in need of additional support, online classes and tutorials provide the flexibility to accommodate diverse lifestyles and commitments.
Access to Global Expertise
The digital realm has eliminated the constraints of distance, granting students access to a wealth of expertise from around the world. Online classes and tutorials enable students to learn from renowned teachers and experts who might otherwise be inaccessible due to geographical limitations. By engaging with these knowledgeable individuals, students gain exposure to diverse perspectives and specialized insights. Interactive features such as live video sessions, discussion forums, and personalized feedback create an engaging learning environment that encourages active participation.
Tailored Learning Experiences
Online classes and tutorials cater to individual learning styles and preferences. With an extensive range of courses and subjects available, students can choose topics of personal interest and delve deeper into challenging areas. Adaptive learning technologies and data analytics further enhance the learning experience by tracking progress, identifying strengths and weaknesses, and offering personalized learning paths. This personalized approach empowers students to take ownership of their education, boosting their confidence and motivation.
Cost-Effectiveness
Traditional education often comes with a hefty price tag, including tuition fees, textbooks, transportation, and accommodation expenses. In contrast, online classes and tutorials offer a more cost-effective alternative. Course fees tend to be lower, and students save money by eliminating commuting and housing costs. Moreover, digital resources and open educational materials provide access to a wealth of information at little to no cost. This affordability makes education more accessible, particularly for individuals from disadvantaged backgrounds or regions with limited educational resources.
Overcoming Challenges
While online classes and tutorials bring numerous benefits, they also present certain challenges. Technical difficulties, such as internet connectivity issues or software glitches, can disrupt the learning experience. Furthermore, the lack of face-to-face interaction with teachers and peers may hinder effective communication and collaboration. However, continuous technological advancements and the growing familiarity with online platforms are mitigating these challenges as institutions and students adapt and develop strategies to ensure seamless virtual learning experiences.
The Vital Role of Teachers in Online Education
In the realm of online education, teachers play a pivotal role as facilitators of learning. Their ability to engage students, provide guidance, and create a supportive virtual environment is paramount. Teachers must adapt their teaching methods to the digital format, utilizing multimedia resources, interactive tools, and innovative assessment techniques. Professional development programs are essential to equip teachers with the necessary skills and pedagogical approaches required to thrive in online teaching environments. Collaboration among educators and ongoing evaluation of best practices are key to enhancing the quality of online education.
Online classes and tutorials have ushered in a new era of education, offering unmatched convenience, access to global expertise, personalized learning experiences, and cost-effectiveness. Despite potential challenges, the integration of digital technologies in education continues to reshape the learning landscape.
0 notes
Text
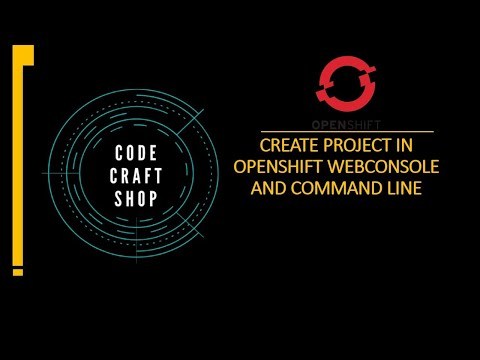
Create project in openshift webconsole and command line tool
To create a project in OpenShift, you can use either the web console or the command-line interface (CLI).
Create Project using Web Console:
Login to the OpenShift web console.
In the top navigation menu, click on the “Projects” dropdown menu and select “Create Project”.
Enter a name for your project and an optional display name and description.
Select an optional project template and click…
View On WordPress
#openshift openshift4 redhatopenshift openshiftonline openshiftcluster openshiftproject openshift login web console command line tool#command line tool#container platform#creating#kubernetes#online learning#online tutorial#openshift#openshift 4#openshift cli#openshift connector#OpenShift development#openshift docker#openshift login#openshift tutorial#openshift webconsole command line tool openshift4 red hat openshift#openshift4#project#red hat openshift#redhat openshift online#web application openshift online#webonsole
0 notes
Text
#Learning Management Software#LMS#Learning Management System#Online Education#Software Training#Online Tutorial#IT Tutorial#Online Course#Online Training#Online Learning
2 notes
·
View notes
Text
Sitting Pretty
Sitting Pretty
I practiced in a mirror
how to stand & not pose
how to sit casually
how to get up
<>
the mirror wasn’t big enough
for a sense of what I was doing
the cellphone video
was somewhat better
<>
but I spent so much time
getting it set up
at the right angle
with the right lighting
there was no time left
to practice anything
but attitude
<>
I was told by
online…
View On WordPress

#227 Rules For Monks#body language#chairs#classroom#gender#grade school#office chairs#online tutorial#Ontario#pandemic#photographs#sekhiyas#Toronto#transit
1 note
·
View note
Text
Programmieren online lernen ...

www.pixabay.com
Some good sources for the beginning ...
FreeCodeCamp
Codecademy
Super-Code
TeamTreeHouse
Levelup-Video
Entwicklerheld
My favourite online programming portals ...
SoloLearn ...

I like SoloLearn for Android and on the web ...
Udemy ...
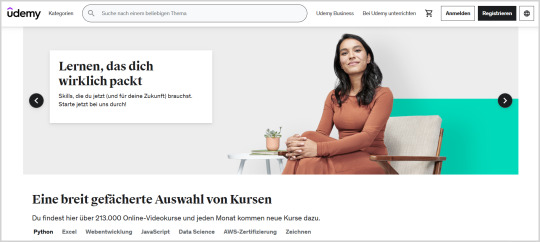
One of the best online platform with many tutorials ...
Programmieren-Starten ...

A very motivating online offer for new programming skills ...
Codemy ...
John Elder is a great tutor to learn a programming language ...
Programmieren lernen – die besten Quellen für den Einstieg (t3n.de)
Post #111: t3n, Kathrin Stoll, Programmieren lernen - die besten Quellen für den Einstieg, 2023.
2 notes
·
View notes
Text
Comprehensive HTML Tutorial for Beginners: From Zero to Hero
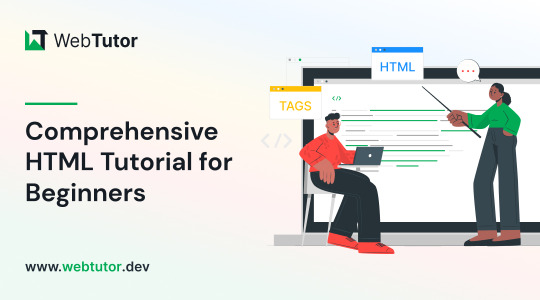
Welcome to WebTutor.dev, your go-to resource for learning HTML online! In this tutorial, we'll cover the fundamentals of HTML (Hypertext Markup Language) with clear explanations and practical examples. Let's dive right in!
Lesson 1: Getting Started with HTML
HTML is the backbone of any web page. It provides the structure and content of a webpage by using tags and elements. Here's a simple example of an HTML document:
<!DOCTYPE html>
<html>
<head>
<title>My First Web Page</title>
</head>
<body>
<h1>Welcome to WebTutor.dev!</h1>
<p>This is a paragraph of text.</p>
</body>
</html>
Let's break it down:
<!DOCTYPE html>: This declaration specifies that the document is an HTML5 document.
<html>: The root element of an HTML page.
<head>: Contains meta information about the webpage, such as the title.
<title>: Sets the title displayed in the browser's title bar.
<body>: The main content of the webpage.
<h1>: A heading element, in this case, the main heading of the page.
<p>: A paragraph element containing text.
Lesson 2: Structuring Content with HTML Tags
HTML offers a wide range of tags to structure and organize content. Here are some commonly used tags:
<h1> to <h6>: Headings of different levels, with <h1> being the highest.
<p>: Paragraphs of text.
<a href="https://www.example.com">Link</a>: Creates a hyperlink to another webpage.
<img src="image.jpg" alt="Description">: Inserts an image into the webpage.
<ul> and <ol>: Unordered and ordered lists, respectively.
<li>: List items inside <ul> or <ol>.
Lesson 3: Adding Styling and Formatting
HTML alone provides the structure of a webpage, but CSS (Cascading Style Sheets) is used to add visual styling and formatting. Here's an example of applying CSS to HTML:
Example
<!DOCTYPE html>
<html>
<head>
<title>Styling Example</title>
<style>
h1 {
color: blue;
font-size: 24px;
}
p {
font-family: Arial, sans-serif;
}
</style>
</head>
<body>
<h1>Welcome to WebTutor.dev!</h1>
<p>This is a styled paragraph of text.</p>
</body>
</html>
In this example, we've added a <style> block within the <head> section. We then define CSS rules to style the <h1> and <p> elements accordingly.
Lesson 4: Building Forms with HTML
HTML forms enable user interaction on webpages. Here's an example of a simple form:
<!DOCTYPE html>
<html>
<head>
<title>Form Example</title>
</head>
<body>
<h1>Sign Up</h1>
<form>
<label for="name">Name:</label>
<input type="text" id="name" name="name" required>
<br>
<label for="email">Email:</label>
<input type="email" id="email" name="email" required>
<br>
<input type="submit" value="Submit">
</form>
</body>
</html>
In this form example, we have input fields for name and email, along with a submit button. The required attribute ensures that the user must provide information in these fields before submitting the form.
Congratulations! You've completed the introductory tutorial on HTML. By understanding these core concepts and practicing with more examples, you'll be well on your way to building impressive webpages. We encourage you to explore more topics such as advanced HTML elements, responsive design, and integrating HTML with other technologies. Visit WebTutor.dev for further tutorials, resources, and community support to enhance your HTML skills. Happy coding!
#HTML Tutorial for Beginners#learning HTML online#fundamentals of HTML#learn to code for free#coding course online#Online Web Tutorial#learn coding for free#online tutorial#learn code#learn code for free#learn online coding#best online platform for learning coding#best place to learn to code online#Learn Free HTML code#HTML introduction#Learn HTML#Free HTML Tutorial#html tutorial#free online HTML editor
0 notes
Text
Skills That You Can Learn From Online Tuition Jobs

Teaching is undoubtedly one of the best part-time jobs available today. Teaching is one of the oldest and most popular part-time jobs. Hence, online tutoring jobs have great potential to earn you a steady income from home. Everyone from students to retired professionals can take up online tutoring jobs depending on their skills and interest. Online teachers ability to communicate effectively through the screens. The best online teaching jobs are those where you can work part-time as an online tutor instead of a permanent teacher. Your job is to edit the work of academic teachers, tutors, and teachers. This means checking the grammar and punctuation in written material. Chegg India offers the best part-time online training jobs from home in India. A website is an e-learning portal that connects students and teachers in an online medium. 5 Skills You'll Learn With Online Training-Communication, Patience, Enhanced teaching skills, Positivity, and Time management.
Simple Steps to Start Online Teaching from Home:
You should have a computer that runs smoothly. You should have a laptop that has enough memory, internet connectivity, and good video output. You should also have a Wi-Fi connection so that you don't run out of data while teaching. Use social media websites like Facebook and Instagram to tell the world about your services. You can create a separate account for this or use your account. The most important factor to consider when doing online tuition jobs is to make an excellent presentation Just like in a classroom, you must be able to communicate your knowledge easily. Also, you must make sure that you are in a proper environment with adequate lighting and with minimal noise. There are many skills you can learn from them. India is gradually adopting online teaching and learning methods.
0 notes
Last Seen Blogs

penguinspo
things that inspire me !

thewoofer
The Critical Reel

talesanura
talesanura

jovialbluebirdcomputer
Untitled

ivanarachelle
Ivana Rachelle