#open up a spice rack... cayenne LOTS of garlic powder
Text
i think i deserve to eat............ fried egg.
#now usually fry an egg? little salt & pepper.#but when have been driinking? gotta be extra FLAVOR and extra FAT#sometimes that would be bacon... ihave no bacon#so that means add whatever the fuck i have in the fridge#butter? mayo? soy sauce?#open up a spice rack... cayenne LOTS of garlic powder#maybe sprinkle on chicken buillon powder bcos why not!#it'll be a Very Egg#disgusting but perfect for drinking with#food blogging#alcohol cw
7 notes
·
View notes
Photo

From Family, Familia, ‘Ohana, uncertain chapter, Buck POV. Hawaii 5-0/911 crossover, navy seal Buck, Buddie, McDanno
Warnings: First draft.

Listening to Danny swear, arms windmilling in agitation as he and Steve discussed the situation, Buck found himself drawn into the food truck. The spice rack was in disarray and several of the containers had spilled open in a fine, colorful powder that had coated the padded mats that covered the floor. Buck grinned at the cushiness of the mats underneath his feet--he’d gotten one similar for Bobby last Christmas as they were designed if you spent a lot of time on your feet to make it easier on your joints. Kamekona was a big guy so the extra padding probably went a long way on the long days he worked.
Bending down, Buck picked up the containers that still had their lids on and carefully placed them on the counter. The one that was labeled ‘special recipe’ caught his attention and he twisted the lid off, bringing it to his nose to take a sniff. There was a bit of heat in this stuff, the color a grainy mix of orange, tan and red with some black flecks that were definitely pepper. Taking another sniff, he wetted his pinky and stuck it in the mix before putting it on his tongue.
Flavor exploded and he closed his eyes to try and analyze it like a spice-sommelier. He’d seen that fancy chef do this at the one cooking class he’d taken on that Groupon date from hell. There was a lot of heat and he rolled the spices around his tongue.
“Sweet paprika and a bit of the smoky stuff,” he muttered to himself. “Cayenne.... and onion and garlic powders.”
“What else?” Was the gravely inquiry from behind him that made him jump, almost dropping the open container. Kamekona had somehow snuck up behind him, leaning against the counter with a calculating look on his face as he watched Buck. “What else do you get from it?”
Nervously closing the lid, Buck licked his lips and the sting of the spicy dip he’d taken made him blush. “Mustard powder and.... chipotle?”
“And?” One of the bushy, caterpillar eyebrows inched upward. “What gives it the sweetness?”
“Brown sugar,” Buck said confidently, rolling his eyes. “It adds texture too. And of course salt and pepper.”
A grin split the big man’s face. “Yo Steve—your puppy’s pretty good.”
The bitten off swear was the only warning before Danny tried to force his way past Kamekona who was blocking the door. “Move it—we got a case to investigate and the kid needs to come with us.”

From Ch 3, Eddie POV. Still warnings for first draft. Also Eddie needs a hug
He hadn’t slept near enough. Despite the fatigue and the heaviness in his eyes, he downed a few cup of coffee after only a few disturbed hours of laying in bed hardly sleeping and mostly just rolling around worrying about Buck. Christopher had been his usual cheerful self but seemed to realize his dad wasn’t at his best and had gone to bed with hardly any complaint, his features drooping in tiredness that he seemed to catch from Eddie.
Cleaning up the kitchen after putting Chris down, the restlessness and worry ate at him. He’d only picked at his own dinner, tasting none of it and hardly able to swallow the few bites he’d taken to try and convince his son that it was just another weekday night. Shoving the leftovers into Tupperware, the chill of opening and closing the fridge made his skin pimple at the chill which seemed to cut through him despite the otherwise warm evening air coming in through the open windows.
He didn’t have a shift until tomorrow night and Christopher would be picked up by Carla after school and spend the night with Pepa. Christopher was taken care of and sleeping away while his father rambled around the house at loose ends, half heartedly completing the daily chores.
Wiping down the counter, he finished the last cleaning task. The kitchen was clean but he knew he wouldn’t sleep if he laid down and he was too restless still to try and watch a movie or read something. His phone was charging on the counter, screen dark.
There’d been no updates from Athena nor messages from Buck.
Which wasn’t a surprise given how they’d hardly exchanged more than a handful of words in the last six weeks. No texts. No Snapchats. No calls. The constant exchange of touch, of words—both verbal and nonverbal—since he’d first met Buck had been cut off cruelly with the filing of the lawsuit and they’d never recovered. Eddie had said things he didn’t mean that in the moment had been awful. Buck had told secrets that had been private, just between them, to others. Both of them had done things, said things they regretted.
Eddie hated all of this—what had become of their friendship that had been the closest relationship he’d had... in longer than he’d want to admit.
The silence.
The uncomfortable, painful, ongoing silences.
Not knowing what to say. The fear of more pain. The anger that had burned through him until it’d suddenly gone out only to be replaced by the staggering weight of anxiety that felt like it was burying him alive.
But he’d still been able to lay eyes on Buck and reassure himself that his best friend was still physically with him even in the deafening silence between them. That breath still stirred in Buck’s chest. That Buck wasn’t bleeding out somewhere. That all Buck’s limbs were still attached and working...
Now, however, Buck.... wasn’t here. The cop had said he was fine—if only physically. That Buck wasn’t in trouble.
Eddie just didn’t know if he could believe the other man’s word.
Rubbing his face with both hands, Eddie spent a moment in the middle of the kitchen trying to pull himself together.
#buddie#family familia ohana#911/hawaii 5-0 crossover#navy seal Evan “Buck” Buckley#first draft#wip wednesday#I’ve tried to post this like five times and it keeps getting erased#gah#mcdanno
19 notes
·
View notes
Text
Bored of sandwiches for lunch? Try these grab-and-go savoury cheese muffins to change things up a bit. They’re not only delicious but quick to make and healthy too. Flecks of tart apple marry well with salty cheese and there’s also a few spices to liven things up.
Apple and cheese is a classic combination which people have enjoyed for years. They go together like tea and biscuits or strawberries and cream. In other words, neither item is quite as good on its own as it is with the other. The crisp sweetness and tartness of apples cuts through the creamy umami saltiness of cheese. This has to be one of my favourite pairings.
Savoury Cheese and Apple Muffins
When I’m dashing off to work, I sometimes find making a packed lunch a real pain. These grab-and-go savoury cheese muffins avoid that pain. OK, you have to prepare and bake a batch of them, but you can do this at your leisure and they will last for 3-4 days. And really, they don’t take very long to make.
Slightly more work is needed with these savoury cheese muffins than normal ones because you need to grate both the apple and the cheese. But this only takes a couple of extra minutes. It’s fine to leave the skin on the apples, but if you really prefer it otherwise, just peel them before grating.
Don’t think these cheese and apple muffins are only good for lunch though. I’ve been known to have them for an easy grab-and-go breakfast. They also make a great accompaniment to soup for a simple supper. And, of course, they are just perfect for a healthy snack when the need arises. It’s hard to think of eating outdoors right now, but don’t forget these savoury muffins when you plan your next summer picnic.
They’re particularly delicious eaten warm from the oven. I’m also rather partial to them in sandwich form with a little butter and some cress. But if you can’t face eating the same thing several days running, don’t panic. These cheesy apple muffins freeze really well. Just pack them into a suitable sized container and pop them in the freezer. They will be fine for up to three months.
Don’t Over Mix
Like most muffin recipes, these savoury cheese muffins don’t require much effort. It’s a simple process of mixing the wet ingredients into the dry. The real key to a good muffin is not to over mix. You just need to combine the ingredients with as few stirs as possible. This helps to give a lovely light texture. Use a knife or a fork to stir the mixture rather than a spoon, which is my top tip for preventing it being over mixed.
#gallery-0-4 { margin: auto; } #gallery-0-4 .gallery-item { float: left; margin-top: 10px; text-align: center; width: 50%; } #gallery-0-4 img { border: 2px solid #cfcfcf; } #gallery-0-4 .gallery-caption { margin-left: 0; } /* see gallery_shortcode() in wp-includes/media.php */
Divide the batter between 12 muffin holes and top with the reserved cheese.
Bake for about 25 minutes or until risen and golden.
As soon as you’ve combined the ingredients into a batter, spoon into muffin holes and bake.
Do I Need To Use Paper Muffin Cases
The simple answer to this is no. Just grease your muffin holes with oil or butter before filling with the cheese and apple mixture. I use silicone moulds as the muffins come out really easily.
Ingredients for Savoury Cheese Muffins
What Sort of Cheese Can I Use?
I used mature cheddar cheese as I usually have some stored in my fridge. It’s also easy to get hold of and relative cheap. But most well flavoured hard cheeses would work in these savoury cheese muffins. Red Leicester, Gruyère or Double Gloucester, for example, would all be good.
Does it Matter What Apples I Use?
When it comes to the apple, it’s best to use a tart flavoursome one where possible. A large cooking apple is ideal. I used windfalls as I have a load of them knocking around in the garden at the moment. But the most important thing is to use what you have to hand. The beauty of these savoury cheese and apple muffins is that you shouldn’t need to go on a shopping trip to buy anything.
Do I Have to Use Quinoa Flour?
I’ve added quinoa flour to this recipe to give a bit of extra nutrition. Quinoa is very good for that. But if you don’t have any or are unable to find any, just use 100% wholemeal spelt flour instead. Spelt creates a lovely light textured muffin and as regular readers know, it’s my favourite baking flour. However, a half wholemeal, half plain flour mix is probably the next best thing.
Can I Use Powdered Mustard?
You can use either ready made mustard or powdered. If you use the ready made, add it along with the eggs. If you use powdered, add it along with the other dry ingredients.
Where Do I Get Sour Milk?
If you’re lucky, you might get naturally occurring sour milk. Leave your milk in the fridge long enough and it will either go off or go sour. You’ll know the difference. Raw milk is great for this and when I had access to it, I used sour milk a lot in my baking. Having said that, it’s really easy to create a cheat’s version. Just add a tsp of lemon juice to 200ml milk. Stir and leave for five minutes to thicken.
Alternative Muffin Flavours
Swap 1 tsp smoked paprika for the cayenne or use ¼ tsp freshly ground black pepper instead.
Add finely shredded cabbage along with the apple. Or have a go at these cabbage & cheddar muffins with carrot and garlic.
You can swap the apple for sweetcorn. Or follow my recipe for chilli corn chocolate muffins.
Add a handful of snipped chives to the mix instead of the apple.
Swap grated carrots or beetroot for the apple. Or try my recipe for beetroot, carrot & goat’s cheese muffins.
Add a handful of chopped walnuts for a bit of crunch and extra flavour. Or try my recipe for beetroot muffins with walnuts and goat’s cheese.
Forget savoury and go for these sweet apple chocolate chip muffins made with cream cheese.
Keep in Touch
Thanks for visiting Tin and Thyme. If you make these savoury cheese muffins with apple, I’d love to hear about it in the comments below. Do share photos on social media too and use the hashtag #tinandthyme, so I can spot them.
For more delicious and nutritious recipes, follow me on Twitter, Facebook, Instagram or Pinterest.
Cheese and Apple Savoury Muffins. PIN IT.
Savoury Cheese Muffins with Apple – The Recipe
Savoury Cheese Muffins with Apple

Delicious but quick to make and healthy too. Flecks of tart apple marry well with salty cheese and there’s a few spices in there to keep things interesting.
200 g wholemeal spelt flour
50 g quinoa flour ((or just use more spelt))
2 tsp baking powder
½ tsp bicarbonate of soda
½ tsp fine sea salt
½ tsp cayenne pepper
100 g mature cheddar cheese – grated ((reserve 20g for the top))
1 large flavoursome apple or two smaller ones – cored and grated
2 large eggs
1 tsp English mustard
4 tbsp rapeseed or sunflower oil
200 ml kefir or sour milk
Pre-heat your oven to 180℃ (350℉, Gas 4).
Place all the dry ingredients into a large bowl and give them a quick whisk. This will make sure everything is evenly mixed and there are no lumps. Alternatively sieve the dry ingredients into the bowl.
Stir in the grated cheese and apple.
Make a well in the centre and add the wet ingredients, ie the eggs, mustard, oil and kefir or sour milk.
Stir with a knife or fork from the inside out until everything is just combined. Try not to over mix.
Divide the mixture between 12 greased or lined muffin cases. Top with the reserved grated cheese.
Bake on the middle shelf of the oven for about 25 minutes or until the muffins are well risen and golden on top.
Allow to cool for a few minutes, then turn out onto a wire rack to cool completely. Alternatively devour whilst still warm.
If you don’t have any natural sour milk, you can easily make some. Just add a tsp of lemon juice to 200ml milk. Stir and leave for five minutes to thicken.
You can use either ready made mustard or powdered. If you use the ready made, add it along with the eggs. If you use powdered, whisk it with the other dry ingredients.
Sharing
I’m sharing this recipe for savoury cheese and apple muffins with Recipes Made Easy for #CookBlogShare. It also goes to Jo’s Kitchen Larder and Apply to Face Blog for #BakingCrumbs.
Savoury Cheese Muffins with Apple Bored of sandwiches for lunch? Try these grab-and-go savoury cheese muffins to change things up a bit.
0 notes
Text
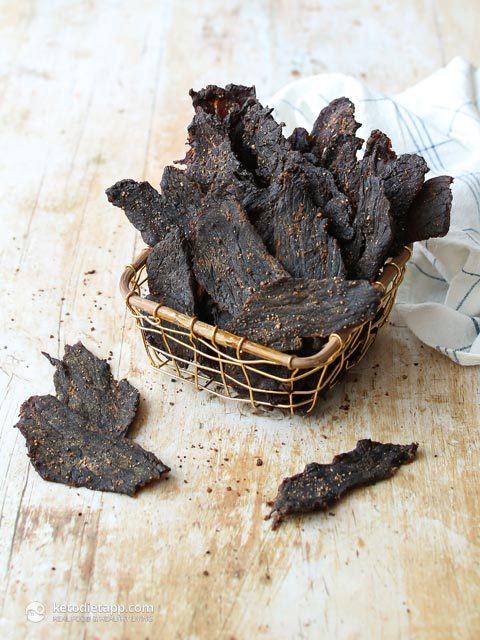
The Best Low-Carb Homemade Beef Jerky
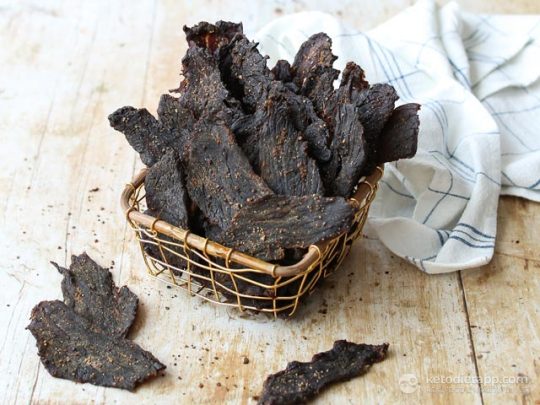
Have you ever tried making your own beef jerky? It's a healthy snack that is high in protein and almost zero-carb. Making jerky at home is really easy and you won't even need a dehydrator. All you need is an oven!
I love making low-carb jerky because it's a fantastic travel-friendly snack — it lasts for months without refrigeration. Dehydration (removing water from food) helps preserve it, and using salt adds another level of protection.
I keep some jerky at hand when I travel, or just in case I get hungry and have no time to cook. It's also ideal for camping and even makes a great edible gift.
Why Make Your Own Jerky?
Most jerky products contain sugar, MSGs, caramel colouring and starches. Although there are a few sugar-free products that are made with simple whole foods and organic meat, they can be really pricey. Homemade jerky is not just delicious, it's a lot less expensive and you have complete control over what's going into it.
How to Make the Best Homemade Jerky
It's really simple — you just need to follow the following steps:
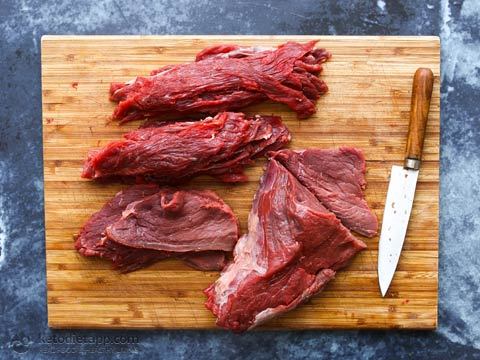
Use lean meat cuts and part-freeze them to make them easy to slice.
Using a sharp knife, slice as thin as you can.
Marinate the sliced meat (ideally overnight).
Dehydrate on oven racks with a tray positioned in the bottom part to collect the juices, and leave the oven door slightly open using a wooden spoon so that the meat dehydrates rather than cooks.
When done, leave at room temperature to cool down and dry out.
Store in a sealed jar at room temperature for months.
Tweaks & Substitutions
This homemade jerky recipe is so versatile! You can skip the sweetener, add herbs or sub any of the spices with your favourites. To make the marinade, I used coconut aminos but feel free to swap it with tamari sauce (fermented gluten-free soy sauce) if you can tolerate it. If you can't eat beef or simply want to try other equally delicious options, try lean pork such as tenderloin, chicken, turkey or duck breasts (without the skin). The options are endless! Just remember to use lean cuts as excess fat would slow down the dehydration process.
Compared to most recipes you'll find online, mine uses less marinade, just enough to add flavour without wasting ingredients. In fact, I found that using less marinade that is more concentrated makes the jerky more flavourful.
If you don't like your jerky too hard or chewy, make sure to cut it against the grain, or try this Soft & Tender Beef Jerky made with ground meat that also includes a quick video tutorial.
Now let's make some jerky — I hope you like it as much as I do!
Preparation time
Hands-on: 20 minutes Overall: 12 hours
Nutritional values (per serving, 57 g/ 2 oz)
Total Carbs 2.8 grams Fiber 0.5 grams Net Carbs 2.4 grams Protein 30.2 grams Fat 7.7 grams of which Saturated 2.8 grams Energy 209 kcal Magnesium 44 mg (11% RDA) Potassium 522 mg (26% EMR)
Macronutrient ratio: Calories from carbs (5%), protein (61%), fat (34%)
Ingredients (makes about 450 g/ 1 lb jerky)
1.1 kg lean beef such as skirt, flank, brisket, top round or sirloin (2.5 lbs) - the leaner the meat, the better
1/2 cup coconut aminos or tamari sauce (120 ml/ 4 fl oz)
2 tbsp fish sauce or more coconut aminos (30 ml)
1 tbsp coconut vinegar or apple cider vinegar (15 ml)
2 tsp onion powder
2 tsp garlic powder
1 tsp smoked paprika
1 tbsp coarse black pepper
1-2 tsp smoked sea salt or plain sea salt (I used 2 tsp)
2 tbsp brown sugar substitute such as Sukrin Gold or just use Erythritol or Swerve (20 g/ 0.7 oz)
Optional: 1 tbsp chile pepper flakes or 1/2 tsp cayenne pepper
Instructions
Before you slice the meat, place it in the freezer for 1 to 2 hours. The aim is to part-freeze it so that it's easy to slice really thin.
Once ready, use a sharp knife and slice the meat into long strips as thin as you can. I slice mine to less than 1/2 cm (1/4 inch). You can also ask you butcher to slice it for you.
Note: Slice the jerky to your preference. Slicing the meat against the grain will result in jerky that is easier to chew as it will break more easily as you chew it. If you slice it with the grain, it will be more chewy and harder to break apart.
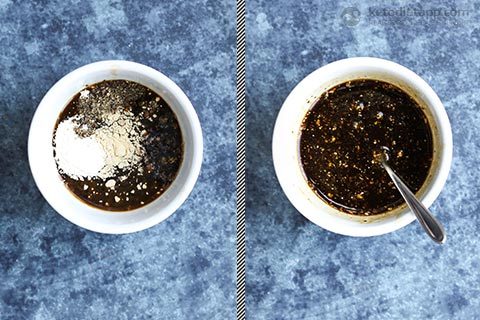
Prepare the marinade by mixing the coconut aminos, fish sauce, coconut vinegar, onion powder, garlic powder, smoked paprika, freshly ground coarse black pepper, smoked salt and brown sugar substitute. Optionally, add chile flakes or cayenne pepper if you want to add some heat.
Use a baking tray deep enough to fit all the meat. Brush the bottom of the tray with some marinade. Place the first layer of the meat slices inside the tray and brush the tops with the marinade.
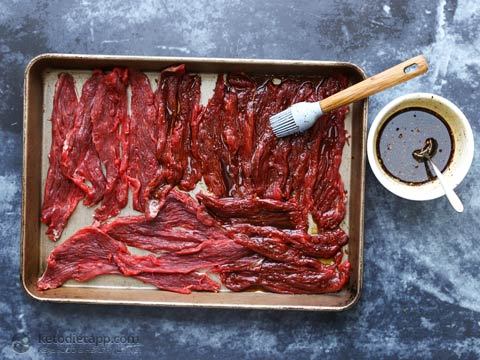
Place another meat layer on top and brush again with more marinade.
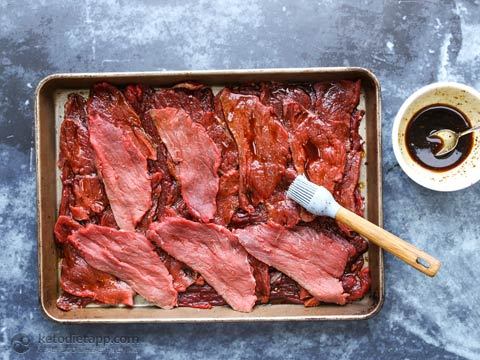
Repeat until all of the slices are in the tray. Cover with a cling film. Place in the fridge for 8 hours to marinate, or ideally overnight.
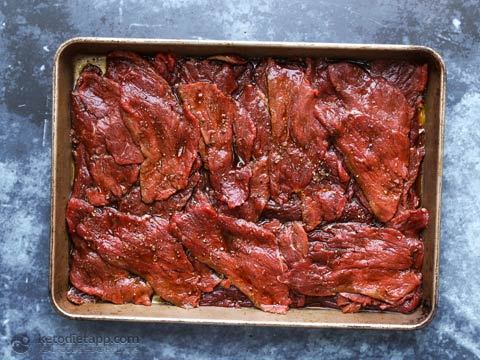
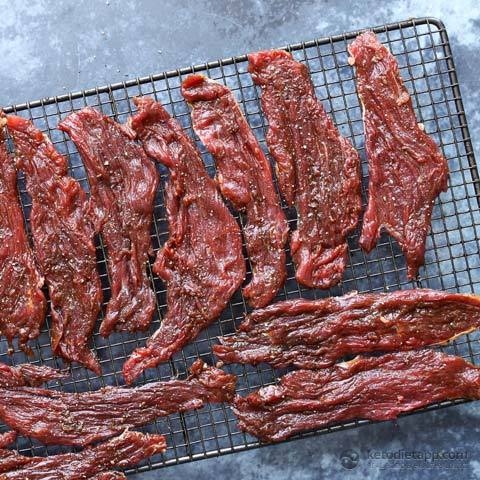
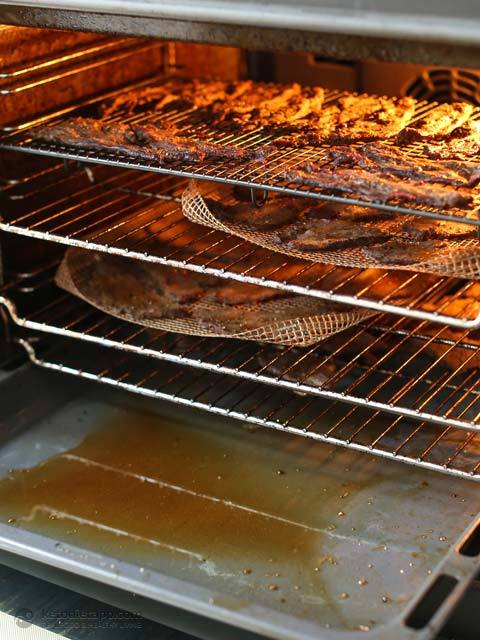
When the meat is ready, preheat the oven to 70 °C/ 160 °F (fan assisted), or 90 °C/ 195 °F (conventional). Lay the slices on clean racks (or a heatproof wire rack or a mesh net tray) and transfer into the top part of the oven.
Note: Keeping the oven door slightly open will help dehydrating the meat without cooking it. A wooden spoon or a crunched can inserted in the top of the door work best. Thanks to The Art of Manliness for this great tip!
Place a baking tray in the bottom section of your oven ready to collect all of the juices dripping from the meat (otherwise your oven will get really messy).
Dehydrate for 3 to 4 hours. The exact time depends on the thickness and position of the racks. The top rack will dehydrate faster than any racks below as the juices will drip down.
The jerky is done when it’s dry and it snaps when you bend it. Remove the jerky from the oven and let it cool down. You can leave it out for up to 24 hours. The longer you leave it, the drier it will get.
Storage: Properly dehydrated jerky is travel-friendly. Keep it in a sealed jar or a Ziploc bag at room temperature for 3-4 months.
https://ift.tt/2HHUXSn
0 notes
Link
Ribs. Just like baseball and the 4th of July, smoked ribs are an American institution. Nothing beats a backyard barbecuing session with smoked ribs amongst friends and family. Thankfully, smoking ribs is an easy task, even if you don't have an expensive smoker. With a beautifully-smoked rack of ribs, you'll have your guests begging for seconds and your secret recipe.
[Edit]Steps
[Edit]Trimming the Ribs and Making the Rub
Select your cut of meat. Food safety is important when cooking raw meat, so find a fresh pink rack of ribs at your local grocery store. Many people choose to smoke with St. Louis style (spare) ribs, which come from near the belly on the pig.[1] They are substantial and tasty — very easy to cook. If you like, you can also select baby-back ribs, which come from the back side, near the loin.
Since baby back ribs are a little less substantial, they're harder to smoke while still keeping them juicy and tender. Adjust this recipe if you do decide to use baby back ribs; the cooking time will lower significantly.
While you can smoke prime rib or standing rib roast, that cut contains more meat than spare and baby back ribs do, so you'll need to follow slightly different instructions to cook it properly.
Remove the thick, sinewy membrane on the back of the ribs. With a fingernail or a knife, work your way under the light membrane on the back of the ribs. Grab a hold of the loosened membrane with a paper towel and pry it from the ribs. Much of it should come off in one fell swoop. Discard.
Spot-check the ribs for any substantial bits of fat and remove. With a sharp knife, remove any excess fat that's still clinging to your ribs. Although a little fat is fine and will probably render off during the cooking process, eating a chewy hunk of fat when you're expecting a tender morsel of meat is not the most pleasant experience. A little bit of extra preparation during this step will make the eating experience a lot nicer in the end.
Make your rub. A dry rub is a spice mix that coats the rack of ribs and provides complementary flavor to the meat's natural taste. Dry rubs can be made any number of ways (dehydration, spice-mixing, etc.) and using any number of recipes.[2] Explore different recipes and variations to suit your own tastes, or use this very basic dry rub[3] as a springboard for your own invention:
1/4 cup brown sugar
1/4 cup paprika
3 tablespoons black pepper
3 tablespoons coarse salt
2 teaspoons garlic powder
2 teaspoons onion powder
2 teaspoon celery seeds
1 teaspoon cayenne pepper
Apply your rub generously over the entire rack of ribs, coating it evenly. Don't be stingy with your dry rub. Even if you're planning on smothering your ribs with a wet sauce later on in the cooking process, it helps to have the ribs nice and coated early on in the process, when the bulk of the cooking happens. Use 1-2 tablespoons of dry rub at least per pound of meat.
Let your ribs come to room temperature while you set up. After applying the rub, let the meat start to soak up some of the delicious spices you've acquainted it with. (Meat, meet spice; spice, meet meat.) This does two things in particular:
It allows the dry rub to start penetrating the meat, permeating it with flavor.
It allows for a juicier rack of ribs. When salt hits meat, it brings moisture out to the surface. If you apply your rub and cook right away, the moisture brought out to the surface will leave your precious pork. If you apply your rub and let the meat rest, however, the moisture journeys back into the meat through a process called osmosis.[4] This process produces consistently juicier meat.
[Edit]Smoking the Ribs
Start your smoker. If you have a smoker, heat it to about 225° F (107° C) along the cooking surface, and validate it with a standard cooking thermometer. It may be hotter in the core of the fire, but ensure that the surface is set as close to 225° as possible.
To get your fire going, you may use charcoal and any sort of a variety of wood. Some people prefer different types of wood for different types of flavor, so find what works for you.
If you don't have a smoker, improvise. Use a gas grill set on 225° F as your improvised smoker. First, set a pan of water 3/4 full underneath the grate on which you'll be cooking your ribs. This helps with cooking and helps keep the temperature down.[5] Next, make a smoker pouch by wrapping wood chips in aluminum foil and then puncturing the foil several times with a knife to let the smoke escape. Place this at the bottom of the grill but not directly underneath the ribs.
Remember to soak your wood chips for at least 30 minutes prior to creating your smoker pouch. Wet chips will release their signature smoke better and longer than dried-out chips.
Choose from any number of wood chips for smoking. Choose from among applewood, cedar, hickory, maple, mesquite, oak, pecan, and many more.[6]
Smoke your ribs at 225° F for 3 hours. It normally takes about 6 hours to fully smoke a rack of ribs, so if you want to just smoke them, leave them in there for about 6 hours, giving them a liquid spray (apple juice, beer, even water) about every hour. Otherwise, this is only the first step of the process. During these first 3 hours, what you're really trying to do is imbue your meat with some smoky flavor and get the cooking process started.
[Edit]Finishing the Process
Remove the ribs from your smoker or grill and baste generously with barbecue sauce. You can use any store-bough barbecue sauce you'd like, or you can decide to make your own. Whatever you decide, slather the barbecue sauce onto the meat-side of your ribs generously.
Wrap your rack in aluminum foil and add some liquid. Many people choose to add beer to their ribs — flavorful beer, not light or watery beer — but if you don't want to use beer, you can also add a bit of apple juice instead.
Seal up the ribs and the accompanying liquid as airtight as possible while still leaving room for the meat to breathe. Ideally, you don't want moisture leaking out of your aluminum foil enclosure, so make sure it's wrapped securely.
Cook your ribs at 225° F for approximately 2 hours. This part of the cooking process begins to break down the collagen present in the ribs, leaving you with ribs that are fall-off-the-bone delicious.
Remove the aluminum foil, baste the ribs (if necessary) with barbecue sauce, and cook uncovered for 30 minutes to an hour. Check on the ribs after 30 minutes, though they may need longer. (Remember though, you can always cook meat longer, but you can't take doneness away.) This final stint in the oven will firm your ribs up and should leave them ready to be devoured.
Enjoy. Enjoy your ribs next to some corn on the cob and coleslaw for a heart dish that screams summer.
[Edit]Video
[Edit]Tips
Try to avoid keeping the smoker door open too long. This and any sort of wind while you are cooking may cool the smoker off or even exterminate your fire.
[Edit]Related wikiHows
Smoke Meat
[Edit]References
[Edit]Quick Summary
↑ http://www.chow.com/food-news/138593/st-louis-style-ribs-vs-baby-back-ribs/
↑ http://www.southernliving.com/food/how-to/barbecue-dry-rub-recipes-00400000046318/
↑ http://www.epicurious.com/recipes/food/views/Basic-Barbecue-Rub-242244
↑ http://www.steamykitchen.com/163-how-to-turn-cheap-choice-steaks-into-gucci-prime-steaks.html
↑ http://www.theblackpeppercorn.com/2012/03/smoked-ribs-using-the-3-2-1-method/
↑ http://www.smoking-meat.com/barbecue-woods
0 notes
Text
Backpacking food hacks for hiking
It’s hard enough to decide what to eat when you’re staring into the fridge at home, let alone when you’re peering into a backpack full of hastily thrown together food. That’s why meal planning before heading into the outdoors can make life a little more enjoyable. Learn about:
• Backpacking meal planning: Tips for planning, how much food to bring, and ways to keep the weight down.
• Packing and storing food: Find out where store it in your backpack, along with animal safety and ways to reduce waste on the trail.
• Backpacking food hacks: Ideas to take things up a notch on the trail.
Backpacking meal planning
As you plan your meals, think about how much time you’ll have to cook and to clean up each day based on your trip itinerary. Meals that require lots of prep and ingredients are more suited to trips where you spend hours lounging in camp, instead of on journeys with long, hard days hiking or paddling.
For big days when you’re on the move a lot, bring snacks you can eat on the go for sustained energy. On any trip (even if you’re only out for a few hours) carry some extra food in case of emergency.
what to wear on a hike and still look cute
http://www.savvyhiking.com/what-to-wear-on-a-hike-and-still-look-cute
How much food do you need for backpacking?
The short answer: it depends. The intensity and amount of activity is the biggest factor to keep in mind. Another factor is age – an active, young person burns food faster than someone who’s older. The outside temperature will also influence food consumption as the body uses energy to keep warm. All these variables make it difficult to recommend precise quantities, but participating in outdoor activities can mean burning in the range of 3200–4500 calories per day.
To keep organized and make sure they’ll have enough calories for their trip, many people create a backpacking meal planning spreadsheet. Calories, servings and the weight of the food are some things to include on this type of tool.
Experiment with online backpacking calorie calculators and shorter day trips to see what works for you, and remember that packing way too much food just means you’re carrying excess weight.
Backpacking food and weight
On longer trips, the weight of each day’s food becomes critical since you’ll be carrying it with you. One thing to consider is the calories-for-weight that different foods offer. Freeze-dried or dehydrated foods have a low moisture content, are lightweight, and have a virtually indefinite shelf life. Because freeze-dried meals are odour-free until opened, they’re also less likely to attract insects and animals.
You can buy prepackaged freeze-dried camping meals at your local MEC store, and today’s options are huge. Try everything from Pad Thai and huevos rancheros, and find meals for vegan, gluten-free or soy-free preferences (along with others). Another option that can save you some bucks is to make your own dehydrated foods. Check out backpacking cookbooks for DIY meal ideas and advice.
best cold weather hiking pants
http://www.savvyhiking.com/best-cold-weather-hiking-pants-gearing-up-for-a-winter-wonderland-hike
Backpacking food storage
A few smaller bags are easier to pack and access than one gigantic sack. Heavy-duty freezer bags with zip closures packed inside lightweight dry bags or stuff sacks are useful for storing food. Before you pack up your food, remove any surplus packaging that’ll add unnecessary weight or be difficult to dispose of on the trail. But remember to keep any cooking directions you might need.
When you’re putting food in your backpack, pack it above and away from your stove fuel. Your stove fuel doesn’t have to actually leak for your food to be ruined. Fuel fumes alone can permeate everything in an enclosed space. For this reason, we recommend double-bagging your fuel (a combo of plastic bags and nylon stuff sacks works well), and storing it in an outside pocket or well away from any food.
Wild animals and food
At night, you need to store your food securely away from animals like bears, mice or chipmunks. Some tips:
• Never eat food in your tent, even in the daytime. Crumbs and scents can attract animals later (waking up to a hole chewed in your tent is not fun).
• A bear canister keeps food and other smelly toiletries secure. You can carry them in your backpack, and you don’t need to hang them at night.
• A waterproof stuff sack makes a good food bag to hang away from bears in a tree or from a bear pole. Remember to bring enough rope and practice your bear hang technique before you go.
• Some backcountry sites provide metal food lockers, but they can fill up so be prepared with another option.
Backpacking food hacks
When you’ve been hiking all day, plain ramen noodles can taste perfectly fine. However, if you’ve got a little more time and a bit more equipment, you can turn dehydrated food into mouth-watering meals.
Gear to get gourmet on the trail
You can cook most outdoor meals on a single-burner stove with one or two pots. But if you’re aiming for something a little more gourmet, you can get there with just few extra pieces of equipment.
hiking shoes for wide feet
http://www.savvyhiking.com/finding-the-best-hiking-shoes-for-wide-feet-women
• A stove that simmers: Some stoves are designed to crank. That’s excellent if you’re melting snow, but not great for making fluffy pancakes. Look for a stove that’s designed to burn at low output. Bear in mind that simmering generally extends cooking times, so make sure you pack enough fuel.
• Backcountry ovens: You can make all kinds of great things in a portable oven, from apple crumble to fresh bread or crusty pizza.
• A good knife: Pair it with a roll-up plastic cutting board to keep the dirt out of whatever you’re chopping.
• Portable plastic spatula: True, a chunk of bark can work for flipping the pancakes. But a plastic spatula is pretty nice and some models double as pasta strainers.
• A hand-powered blender: Maybe not if you’re lightweight backpacking, but if you’re on a short trip or paddling, it adds a whole new level of entertainment to meals.
• Good coffee: Handheld espresso makers, French press, pour-over coffee makers… all are excellent options when you’re kilometres from your usual barista.
best hiking socks to prevent blisters
http://www.savvyhiking.com/beginners-guide-to-picking-the-best-hiking-socks-to-prevent-blisters
Spice things up
If you find freeze-dried or dehydrated meals a little bland, you can add heaps of flavour to your meals (and only a few hundred grams to your pack) with a backcountry spice rack that includes:
• Salt and pepper
• Sun-dried tomatoes
• Oregano and basil
• Cayenne pepper
• Olive oil, soy sauce, hot sauce, balsamic vinegar, and bouillon cubes
• Garlic cloves or garlic powder
• Dried mushrooms
Tasty trail mix ideas
Graduate beyond basic GORP. Add some flash to your backcountry snacks and try:
• Dried wasabi peas instead of nuts
• Dried papaya or mango instead of apricots
• Smoked salmon instead of jerky
• Chocolate-covered espresso beans instead of M&Ms
youtube
0 notes
Text
Find The Way To Cook Great Food
Have you ever wanted the recipe for a delicious meal you have had in a restaurant? Do you want to make those dishes at home? By taking notes from the following advice, you can find out how to create all your favorite dishes, and a whole lot of new ones, to cover all occasions. Cooking can be an enjoyable activity for anyone.
This trick can save you a ton of work and it can be used immediately. Mix one tablespoon of starch and two tablespoons of water. Thicken your sauce by stirring the mixture into the simmering liquid. Adding the cornstarch mixture slowly and continuing to stir helps you judge the proper thickness of your sauce.
Consider freezing your meat a bit so that it will be easier to slice. This is the perfect technique when you are making Thai or Chinese food. By doing this, the meat becomes much easier to slice as the meat fibers are less likely to tear. For even cooking, let the strips of meat thaw completely before you start to cook.
If you are cooking an important meal for a significant person, such as a boss or a date, you should not serve a dish you've never attempted to cook before. Don't attempt cooking experiments or recipes you've never tried before. This will ensure that your cooking experience is stress-free.
It is possible to do a lot of preparation beforehand in order to speed up the cooking process and make it easier. Look at your recipe and decide which steps you can do in advance without worry of food spoilage. The majority of preparation can be done the day before the cooking begins. This will enable you to enjoy the process of creating dishes that ordinarily would be a real task.
If your burgers seem to be sticking to the surface of your grill, it may be hard to take them off without breaking them. You should brush a thin layer of vegetable oil over the grill before you begin cooking. This will keep the food from becoming stuck to the grill surface.
Whenever you are adding seasoning to a recipe, add it slowly over time rather than dumping it all at once. It is easier to add more seasoning to taste than to take some away, and you'll more evenly divide your ingredients.
Get the freshest garlic you can when making a dish that you must add garlic to. Fresh garlic has a sweeter taste than old garlic. Fresh garlic is very firm to the touch and has an intact, taut skin. The individual cloves are also plump and firm, not shriveled and shrunken.

After Thanksgiving or any other time you cook turkey, save the leftovers. Cut up the meat instead, put it in a container, and freeze it. The turkey can stay fresh for weeks this way.
Having a clean and organized kitchen is essential to cooking a great meal or dessert. Having all your kitchen tools handy and organized will help you turn out a good meal. Unorganized cooking stations may mean you lose money and valuable food that is better suited to eating.
If you're cooking mac and cheese, always follow the instructions on the box exactly as they're written. The macaroni will be perfect and delicious because the great looking cheese is melted on top of the noodles. A regular serving spoon is a perfectly good way to serve your macaroni and cheese. Another great tip is to spice things up a bit with some black pepper.
When you are cooking, don't be afraid to be creative. You need not follow a recipe exactly. Experimenting fearlessly with cooking, adding a new ingredient, cutting one out, and changing amounts is how great new recipes are born. Sometimes that's the best sort of cooking!
Good cutting utensils are imperative to own for maximizing functionality in the kitchen. Sharp utensils are safer and will save you a lot of time. More injuries, cuts and serious accidents happen as a result of blunt utensils than freshly sharpened ones.
Check to make sure your meat is cooked thoroughly by using a meat thermometer. The temperatures that meat should reach, when being cooked to be eaten, varies between different types of meat. Since bacteria is all around us, especially on meat, it is important that you cook your meat thoroughly to kill off this bacteria and therefore prevent you from getting sick.
If you are preparing a recipe with an unfamiliar fruit or vegetable, enhance your skills as a chef by taking a moment to educate yourself about it. You may be pleasantly surprised about the versatility of new food once you do a bit of research on it. You can have much more fun when cooking if you do some prep work and research ahead of time.
An efficient stackable cooling rack can be a real asset in the kitchen. When you bake cookies or other things you need to cook your cookies can take a lot of area. Cooling racks that stack will allow you to use the space in your kitchen as efficiently as possible. Using vertical space will allow you to have open space in your kitchen while the cookies are cooling.
You can use some spices after food has already finished cooking. You can use garlic powder, cayenne, or salt and pepper for seasonings. A lot of people have different preferences in taste when choosing spices. You can take the guesswork out of spices by making them available during mealtime, so your guests can customize their food to their tastes. Each person can personalize their own dish.
When you can tell that time for cooking will be in short supply the next day, do some of your dinner prep work a day in advance. Pre-assembling lasagna or chopping vegetables for stir-fry to keep in your fridge may save you a lot of stress and time when you make a meal for your family.
After taking in the preceding advice, you may be a little closer to becoming an expert chef! Use your imagination to make some delicious meals when you are cooking and using new recipes. The amount of creativity and variety in cooking is nearly limitless because of the many foods from many cultures.
0 notes
Last Seen Blogs

auroralover
saturn lover

myrrziik
your_love_is_shit

maxx899
Senza titolo

uintuva
What?

capraiaso
Untitled