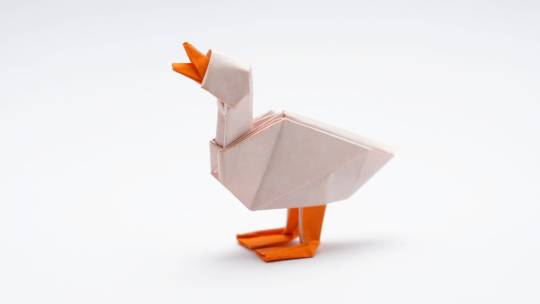
#origami tutorial
Text
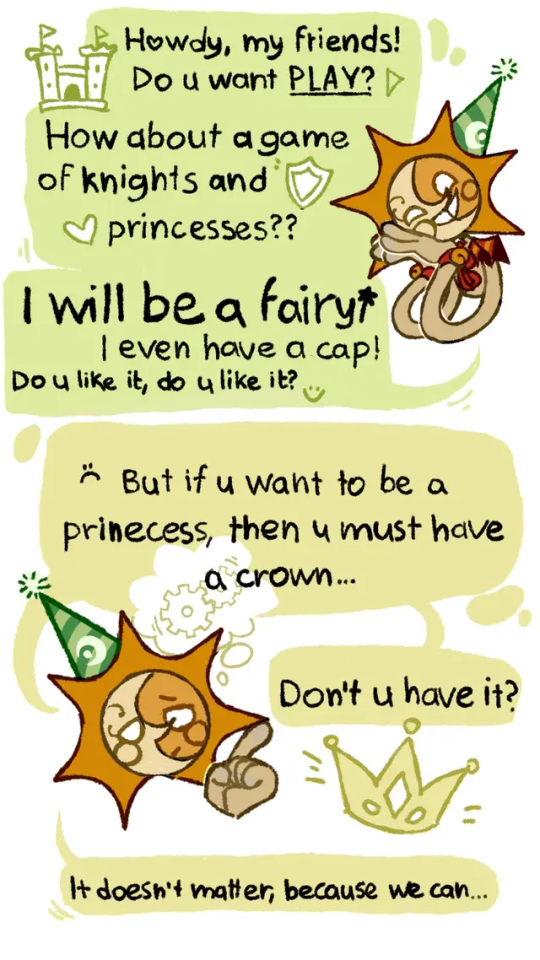
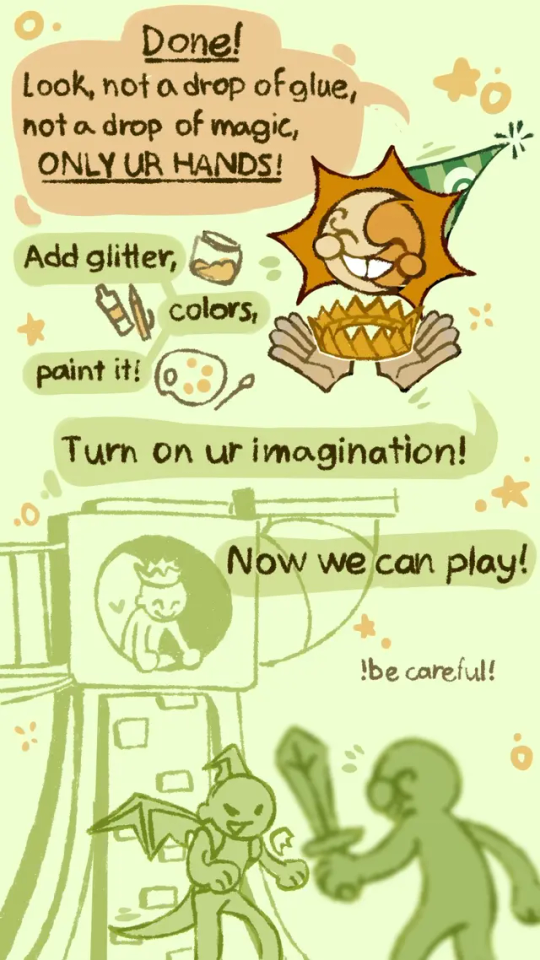
Some old childish shit (I love that and I love Sun so much, someone please treat me like this)
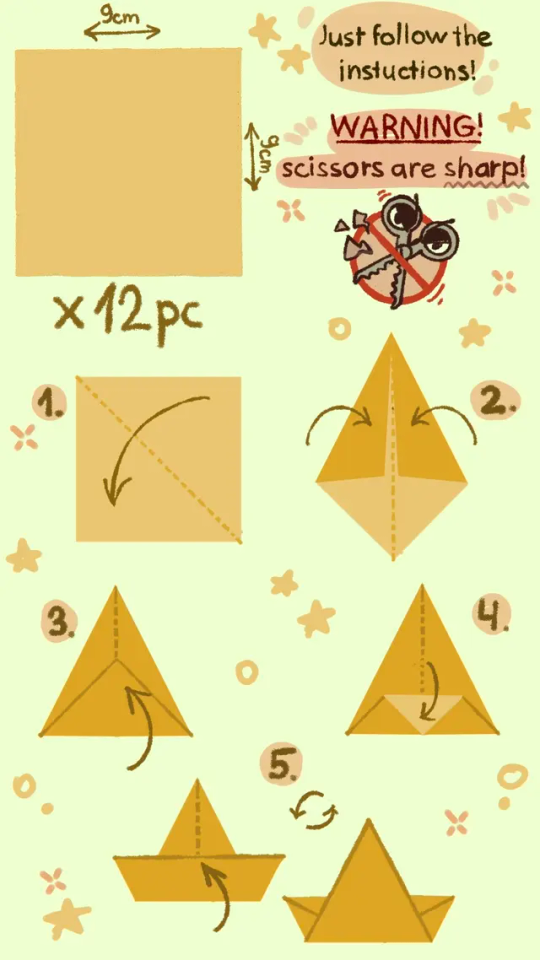
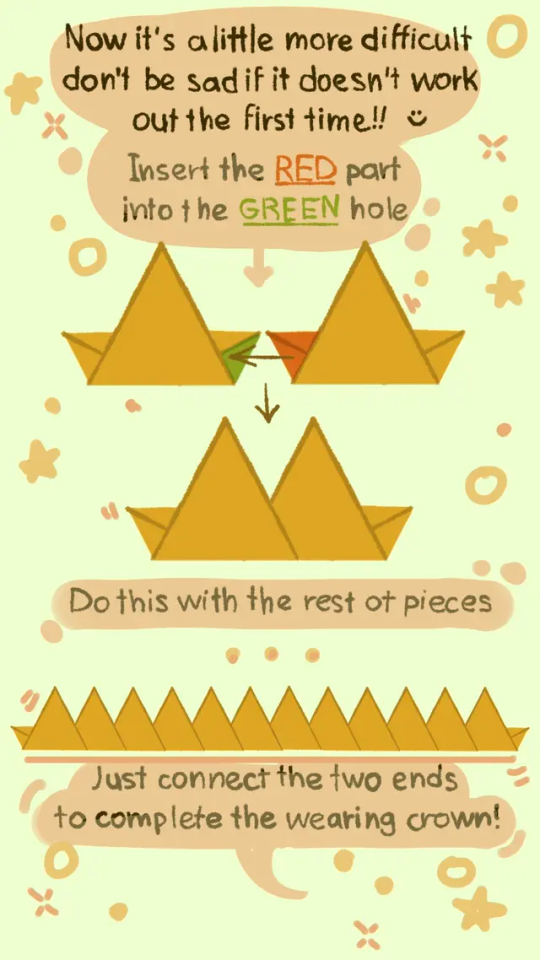
Paper crown tutorial 👑:P
#please treat me like this I'm begging u#hur hur hur hur hur#sundrop#sun#fnaf 9#fnaf 9 security breach#sun fnaf#sun fanart#fanart#tutorial#origami#origami tutorial#crown#paper craft#paper crown#so much tags
2K notes
·
View notes
Text
hello @vflower-official and bunny fans on tumblr dot com.
(music for company) today i will be showing you how to make a paper bnuuy!!1!1!
step 0:
You will need a square piece of paper, so if you only have rectangles, make a diagonal across your paper so the top side aligns with the side like this, and cut off the excess (you can use it to make smaller bnuuys). if you do have a square, skip this step.
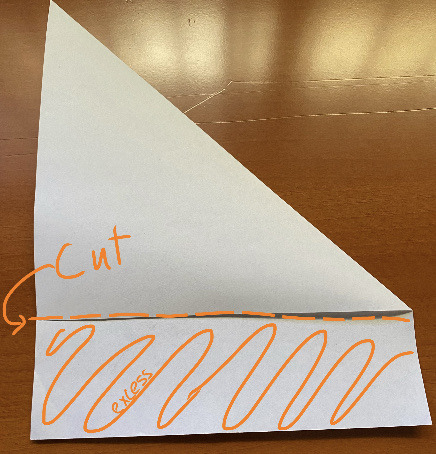
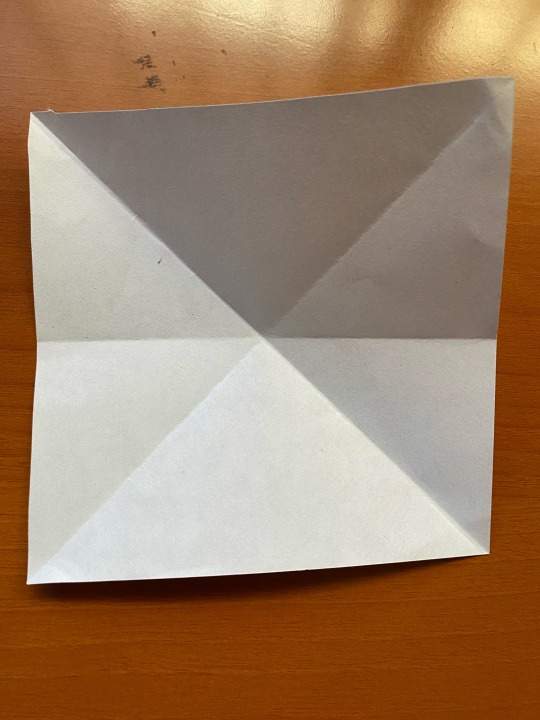
step 1:
make these 3 folds (2 diagonal, 1 in half)
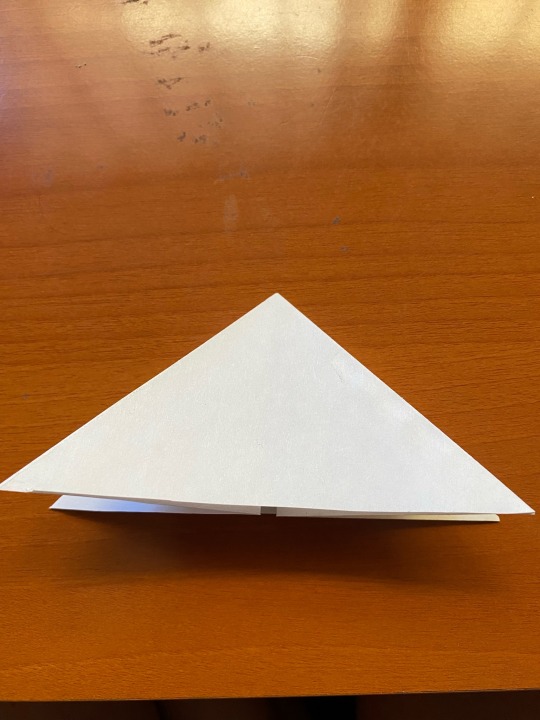
step 2:
make the sides with the half fold touch in order to get this triangle, and then fold it flat.

step 3:
fold one layer of the free/bottom corners of the triangle towards the tip.


step 4:
take the corners of your new rhombus and fold them to the center.
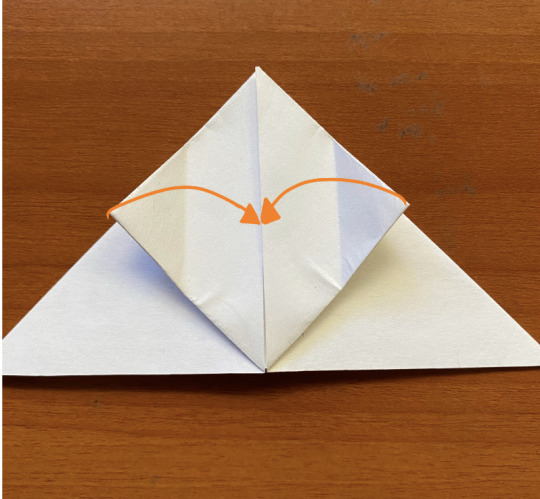
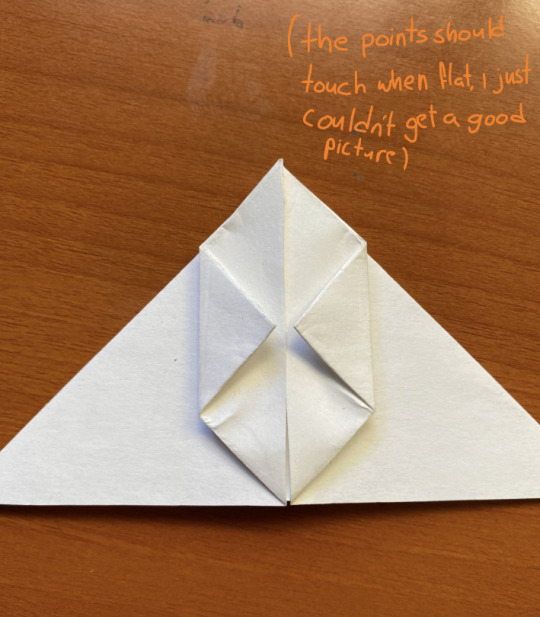
step 5
put the upper corners inside the little slot the last fold made, then just stuff them in there however you can, do try to make it look clean
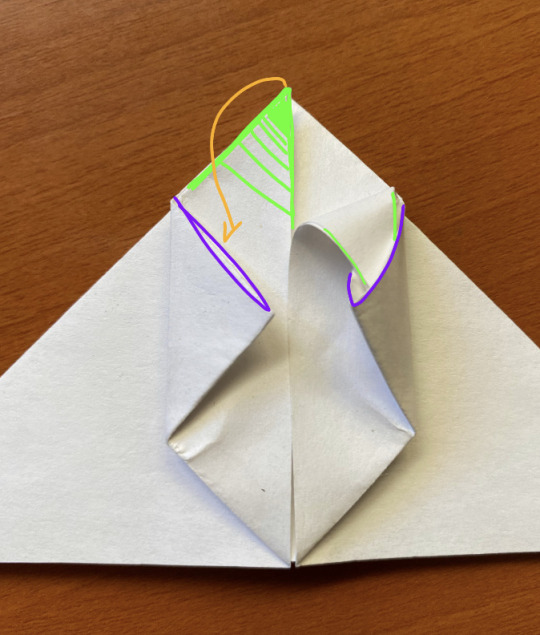

Would you look at that! You just finished the bottom part of the bunny, big proud.
50 notes
·
View notes
Text
GATITO de PAPEL saltador de origami
GATITO de PAPEL saltador de origami
#origami #papiroflexia #Carton #manualidades #hechoamano #handmade #carton #cardboard #paper #Bricolaje #Casero #paperfolding #origamicraft #origamifun #origamilove #origamicrane #origamitutorial #paperartist #Gato #Cat
En este vídeo tutorial se muestra, de manera sencilla, cómo hacer un un gatito de papel saltador, simplemente con una hoja de papel cuadrada. Presiona el gatito deslizando hacia abajo y saltará. Diviértete haciendo multitud de gatitos saltadores de diversos colores.
Material Origami AQUÍ
Gato de papel saltando de origami
Vídeo de Hello Origami Material Origami AQUÍ

View On WordPress
#bricolaje#cardboard#cartón#Caser#Cat#gato#handmade#hecho a mano#manualidades#origami#origami craft#origami crane#origami fun#origami love#origami tutorial#paper#paper artist#paper folding#papiroflexia
1 note
·
View note
Text
#asmr relax#asmr#oddly satisfying#diy#tutorial#do it yourself#tutorials#crafts#diy ideas#diy projects#easy diy#origami#video tutorial#craft#diy videos
106K notes
·
View notes
Text
➩ Tutorial on a Paper Star 🌱
#tutorial#paper stars#paper star#star#papercraft#paper art#origami#aesthetic#greencore#green aesthetic#handmade#diy#crafts#starcore#design#art#goblincore#goblin aesthetic#green#green goblin#fairycore
1K notes
·
View notes
Text
how to make origami ninja stars out of sticky notes
520 notes
·
View notes
Note
The way I wanna learn so many silly hobbies!! Like I wanna be able to walk on my hands and contort and speak fictional languages, just so I can entertain people with a mystery bag of talents
But alas I am poor
no i know right. but. you do know that you don't have to pay to learn how to walk on your hands, right? or speak fictional languages? you should probably pay for a contortionist coach tho yeah
#many many hobbies... Dont need to be payed for#you can learn languages and skills#got printing paper? origami. got a pencil? fun fonts#birdwatching? go outside! there are online guides!#there are so many youtube guides and tutorials and tips and tricks and ideas-#Dont Trick Yourself Into Thinking You Can't Do Anything Without Paying First#this is why i hoard gift cards tbh#so that if there's a time where i really want to do something that requires Materials#i can buy what i need without paying#but seriously though. you can do a lot w/o needing money to get it done#can you do a handstand? you're halfway to walking on your hands already if yes#and if no - there are so many handstand tutorials!#rambles from the bog#juggling? get some eggs or small rocks or pet toys if you have em!#tape up crumpled paper balls!#DONT LET THE CAPITALISM LIFESTYLE FOOL YOU! MONEY IS NOT ALWAYS NECESSARY!#THE WORLD IS SO MUCH BIGGER THAN THAT#AND THERE ARE SO MANY KIND PEOPLE POSTING TUTORIALS AND GUIDES AND LINKS AND ALL! FOR! FREE!
32 notes
·
View notes
Text
The disparity between Nintendo’s promotion of Pikmin vs their promotion of totk is honestly killing me. Sure they probably don’t need to promote totk all that hard since it was so highly anticipated, but seeing the Pikmin plushes, official Pikmin merchandise collabs, Pikmin-themed Nintendo online rewards, Pikmin posts on NoA social media, Pikmin on the official Nintendo magazine cover, and even a Pikmin-themed Christmas commercial compared to… 2 totk posts in the last month even after it’s been nominated for a goty award is funnier than it has any right to be. The totk amiibo figures that everyone was hyped for when the game first came out released on November 2nd and they made like one announcement about it. I only found out they existed because I went into GameStop last week and there was a pile of Ganondorfs beside the register. If someone told January 2023 me which game would get multiple sold out merch lines + a weekly manga and which one would be overshadowed by the release of splatoon 3 amiibo I would not have believed them
#bluebird.txt#salt of the kingdom#<- not really but just to be safe#pikmin#I have to wonder what’s going on at Nintendo re t0tk bc I would have thought they’d be capitalizing harder on their biggest moneymaker#even the zelda lore YouTubers are barely talking about it anymore#but it’s also bc Pikmin solos#anyways I’m gonna go use the official Pikmin origami tutorial to make myself some origami Pikmin to keep me company during my botw replay
42 notes
·
View notes
Text
trying to read sewing patterns reminds me a lot of trying to read origami diagrams
#oh the things we had to do before we had video tutorials#to be clear I was good at origami#I am not good at sewing because I have just started
16 notes
·
View notes
Text
How I fold my curved origami
Lots of people are asking how can you make curved origami, so here's a little explanatory post!
First off, credit where credit is due, most of the curved origami I've posted is either directly following or inspired by the work of Ekaterina Lukasheva (instagram). I would definitely recommend checking out her book on curved origami if you're interested in the subject, as part of the following post is also inspired by it.
1. Useful basic terms to know:
Crease pattern (CP): This is what the patterns marking the creases necessary to fold the model are called. A good CP will have the valley folds (paper folded like this -> V) and mountain fold (paper folded like this -> ^) contrasted in some way, either by using different types of line or different colors.
Molecule: When a pattern is repeated, the repeated unit is called a molecule.
2. Materials needed
A crease pattern to follow: There are a ton in Lukasheva's book! I've also made one myself, and there are of course plenty you can find online for free, like this one, or this more simple version with only one molecule. If you're just starting, I recommend trying out just one molecule first, and with a model you have a photo of, so that you know what results to expect.
Once you've got your pattern you only really need two more thing: paper, and some kind of sharp tool to mark the creases from your pattern onto that paper. Standard printer paper works fine! Feel free to experiment with other types if you like, I have a mix I like to use here, and here are what it looks like with just scraps of paper. Definitely no need to buy specialty paper if you're starting out.
For the sharp tool, I prefer to use an empty mechanical pencil (i prefer ones with a metal tip for easy cleaning, but a plastic one will work perfectly fine if you use clean paper). These are easy enough to obtain but if you don't have one a simple toothpick will also do the job, although you might have to replace it if it cracks.
These are the only essentials in my opinion, but more tools can be used as you progress, like a spray bottle with water which will make the paper keep its shape on its own, small clothespins to keep the paper in place for more complex models, or curved rulers to invent your own pattern. Again Lukasheva's book is quite useful for suggestion on what materials to get, but no need to rush and buy it all to start!
3. How to actually do it
To get the pattern on the paper you actually plan to fold, you can either directly print it (a good reason to use printer paper), or if you don't have a printer place your paper on your computer screen and trace it. If you'd like to fold another paper than the one you have the pattern on, you can place your patterned paper on top of the one you intend to fold, and follow the creases with your sharp tool. They will be transferred onto your end goal paper and you can trace them again with your tool to reinforce them. Check out the first clip in this video for an example of this process. If you mess up while tracing, don't worry too much; you can always go over the line again.
Once you have your pattern on your paper of choice, it's time to reinforce those creases. This is a crucial step to ensure sharp creases and will drastically simplify the folding process. To do this, look at your pattern and verify which creases are valley folds and which are mountain fold. Then, take your sharp tool and mark them in the direction you want the paper to go. Since you are always marking valleys with your tool, switch your paper to the other side when you want to make mountain folds. This is especially important if you have colored your paper and want a specific side to be viewed. If you've marked the wrong side, simply switch your paper to the other side and mark it the right way; creases on printer paper are pretty easy to reverse. Don't hesitate to be quite forceful during this step, again we want those creases to be sharp.
Once that is done the folding can start! For this step, lightly push the sides of the paper together as if you were making it smaller. It should naturally follow the curves you've marked. Your job is now to go over those creases and reinforce them as you would with folding a straight crease: use your nails or the tips of your fingers to progressively sharpen them. I find it easier to work from the sides to the center, in several passes folding the paper sharper and sharper.
You can see an example of this process here. As you can see I am reinforcing the curves by pushing the waves towards each other, making the mountain folds go up and the valley folds go down. Like plate tectonics!
A useful part of the folding process is understanding paper tension. In this video you can see I am holding the paper in my right hand in a way that holds it together: I am pinching a mountain fold with two fingers on the bottom, and holding another one with my thumb on the top. This makes it easier to go with my left hand and fix the valley fold in the spiral in the bottom by simply pushing down on it; you can see it snapping into place automatically. The more creases you are trying to hold together at the same time, the harder it is; this is why it's useful to start will simple models.
A final folding example in this video: here too I am holding the paper with my right hand, and pinching with my left. Pinching with only your fingers makes a softer gesture, and helps at the beginning of the process to avoid sharp creases where you don't want them. Using one nail (or a ruler if you have short nails) alongside a curve will help sharpening your curves without pinching with both your nails and risk making a straight line accidentally.
I find that folding the mountain folds (like the blue curve in the last example) is easier for me. For the other half of the curves, simply turn the paper over and the valley folds become mountains!
You can also sharpen your creases with the tool you use to mark them down on the paper like in this video. This is especially useful for the center of spirals which are otherwise hard to get precisely with only your fingers.
Mostly this process involves a lot of back and forth! Don't be worried about sharpening the same line several times, or having to push it down the right way more than once. It is also useful to look at a photo reference of the model you are folding to know what results to expect; how sharp the creases should be, or which creases are valleys or mountains if you get confused.
Once you're satisfied with your model, you can either leave it as is if you like to stretch it and scrunch it, or you can let it set a bit for it to keep its shape. For this, simply lay your model on a flat surface, and place some books or whatever heavy objects you have on each side, squeezing it as much as you can like in this photo (no need to put a book on top of it in addition to the sides if you're afraid about squashing it). You can then leave it overnight to keep its shape! This will work even better if you lightly spray it with water before leaving it.
And that's it! please tell me if you've used this to make some curved origami, or if you'd like more clarifications. Enjoy your folds and see ya!
#going to tag these tutorial type posts#tutorial#they'll be in my pinned post so people wondering can find them more easily than by traipsing around my wip tag#origami#curved origami
41 notes
·
View notes
Photo


Fold an Elaborate Origami Menagerie with DIY Instructions from Jo Nakashima
692 notes
·
View notes
Text


Kaleidoscope
Snowflake instructions.
#Origami#Papiroflexia#Paper craft#recycled paper#for this and the previous model if you follow the tutorial video I would say that the side where you fold the outer edges-#in a valley fold to make the octagon should be the white side
16 notes
·
View notes
Text

this is my actual number one tip of all time for people with disorders or disabilities that make cooking and/or washing dishes difficult. if you learned how to make a little tray out of paper in elementary school then you know how to make a disposable baking pan out of aluminum foil. i use this all the time for stuff like mini quiches and jalapeño poppers and pizza rolls. you can also just put things on flat foil but if you want a little more control. a little more order. then you can do this
[ID: a photo of a makeshift baking tray with raised sides, made out of aluminum foil. end ID]
#ok to rb#i was going to link a tutorial to make this but i cant find one that uses the same method as me??#so maybe i’ll make my own tutorial later idk#the folding/unfolding of origami is not ideal for foil my method is simpler#and obviously there are disabilities and disorders that prevent doing this as well#but it will work for a lot pf people#just not everyone
49 notes
·
View notes
Text
#diy#tutorial#do it yourself#tutorials#crafts#diy ideas#diy projects#easy diy#diy decor ideas#video tutorial#home improvement#craft#decoration#decor diy#decor#home decor#diy decor#diy videos#origami#paper crafts
512 notes
·
View notes
Text
bimonthly request to everyone struggling w energy/executive dysfunction/etc but wanting to create things: try origami. im so serious.
#'i hate my art style' -> HAH. there is no style in origami there r only fixed directions#'i struggle with long-term projects' -> a crane is super quick and easy to make and if u get pretty paper it looks like a decorative piece#'i dont want to think too much' -> after the initial cost of watching a tutorial the rest becomes muscle memory for certain designs#'it's too difficult' -> there are varying levels of complexity in designs online and u can easily find simple pieces that still look pretty#and lastly#people find little paper craft gifts adorable#and u get the dopamine hit of 'i made a thing' with a comparably low input cost#this is coming from the bitch who cant draw or write without nearly screaming from how much she hates her lack of skill#origami is accessible to my piece of shit meanie brain
16 notes
·
View notes
Video
youtube


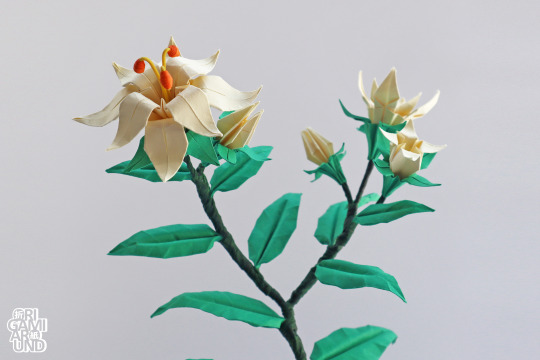


Cream colored lily flower tutorial is finished and available on my YT channel
◽️🔷◽️🔹▫️🔹▫️🔷◽️🔹▫️🔹▫️
origamiaround @
youtube
instagram
facebook
pinterest
deviantart
patreon
ko-fi
tiktok
100 notes
·
View notes
Last Seen Blogs

itsdetachable
quod absurdem est
sophieinkrose
Hi! I'm Sophie Forecaster

theagencynz
Theagency
develop-your-villain
OC prompts
bamababygirl7
Bamababygirl7