#passthru
Text
sidewip whoops

#dont worry. its mostly something i intend to fuck aorund on as a palate-cleanser between SWRD editing passthrus.#because....... i am insane#harebrained thought#hare posts
2 notes
·
View notes
Text
i figured out how to record myself while i play on my vr headset
#also the dice is rolling all the way down#bc i play in bed with the table tilted#even tho its not really visible sonce the passthru makes everything looks black around the table#vr stuff
1 note
·
View note
Quote
去年あたりからのAIの進歩は目覚ましく、特に、絵を描いたり文字列を書いたりする生成系AIというものがものすごい。
子供の寝かしつけ用に物語を書いてくれと言えば感動的な文章を応えてくれるし、昔書いた小説の補完をしてくれと言えば独自の追加設定を交えて応えてくれる。
こういうふうにmp4動画ファイルを変換をしたいのだけど、ffmpegのコマンドラインをどう書けばいいの?と聞けばちゃんと答えてくれる。まぁ、よくできてる。
聞くところによると、プログラムを書いたりスクリプトを書いたりもしてくれるらしい。
であれば、フリーソフトの作者に要望を伝えてプログラムを作ってもらうよりも、AIに要望を伝えて使った方が速いし確実だしワガママも聞いてくれるのではないか?という気がしてきた。そうなれば、実際に試してみるしかない。目指すべきはマウスふるふるの主要機能部分を簡易に実現するPowerShellスクリプトに相当するものを書いてもらうことだ。
まずは、ChatGPT(3.5)に聞いてみることにする。
質問:マウスカーソルを50秒に1回、1ピクセル左右に揺らすPowershellスクリプトを書いてください。
[ChatGPT] 以下は、PowerShellでマウスカーソルを50秒に1回、1ピクセル左右に揺らすスクリプトです。
Add-Type -TypeDefinition @"
using System;
using System.Runtime.InteropServices;
public class MouseMove
{
[DllImport("user32.dll")]
public static extern bool GetCursorPos(out POINT lpPoint);
[DllImport("user32.dll")]
public static extern bool SetCursorPos(int X, int Y);
[StructLayout(LayoutKind.Sequential)]
public struct POINT
{
public int X;
public int Y;
}
}
"@
function ShakeMouseCursor {
$interval = 50 # カーソルを揺らす間隔(ミリ秒)
$distance = 1 # カーソルを揺らす距離(ピクセル)
while ($true) {
[Mousemove.POINT]$currentPos = $null
[Mousemove]::GetCursorPos([ref]$currentPos)
$newX = $currentPos.X + $distance
# カーソルの座標を設定(左右に揺らす)
[Mousemove]::SetCursorPos($newX, $currentPos.Y)
# 一定時間待機
Start-Sleep -Milliseconds $interval
}
}
# マウスカーソルの揺らしを開始
ShakeMouseCursor
上記のスクリプトは、ShakeMouseCursor関数を定義し、その中でマウスカーソルを揺らす処理を繰り返します。$interval変数はカーソルを揺らす間隔(ミリ秒)を、$distance変数はカーソルを揺らす距離(ピクセル)を指定します。
スクリプトを実行すると、カーソルが50秒に1回、1ピクセル左右に揺れるようになります。プログラムを停止するには、PowerShellウィンドウを閉じるか、Ctrl+Cキーを押してください。
なんだか、それっぽいものが出力された。
ただ、注意すべきは、マウスカーソルの「揺れ方」である。50秒に一度、マウスが右側に1ピクセル移動する。画面右端に到達すると、そこで止まってしまうだろう。
以上のことから分かるのは、
指示の出し方を工夫する必要がある。プロンプターとしての能力向上が必要。一般の開発で言うなら、詳細設計書をきちんとかけるスキルが必要。
出力されたスクリプトが意図通りかの検証は必要。今回の場合、PowerShellの知識や実際に動かしたときの脳内シミュレートは必須。一般の開発で言うなら、コードレビューのスキルが必要。
1つのAIだけで試すのでは心もとないので、次はBing AIに聞いてみることにする。
質問:マウスカーソルを50秒に1回、1ピクセル左右に揺らすPowershellスクリプトを書いてください。
[Bing] Powershellスクリプトでマウスカーソルを50秒に1回、1ピクセル左右に揺らすという要望ですね。
以下のコードを試してみてください。このコードは、無限ループでマウスカーソルの現在位置を取得し、それに1ピクセル分のランダムな値を加えて新しい位置に移動させます。50秒ごとに繰り返されます。
# マウスカーソルの位置を取得・設定する関数
function Get-MousePosition {
$signature = @'
[DllImport("user32.dll")]
public static extern bool GetCursorPos(out POINT lpPoint);
[StructLayout(LayoutKind.Sequential)]
public struct POINT {
public int X;
public int Y;
}
'@
$type = Add-Type -MemberDefinition $signature -Name "Win32Point" -Namespace Win32Functions -PassThru
$point = New-Object $type::POINT
$null = $type::GetCursorPos([ref]$point)
$point
}
function Set-MousePosition {
param(
[Parameter(Mandatory=$true)]
[int]$X,
[Parameter(Mandatory=$true)]
[int]$Y
)
$signature = @'
[DllImport("user32.dll")]
public static extern bool SetCursorPos(int X, int Y);
'@
$type = Add-Type -MemberDefinition $signature -Name "Win32Point" -Namespace Win32Functions -PassThru
$null = $type::SetCursorPos($X, $Y)
}
# 無限ループでマウスカーソルを揺らす
while ($true) {
# 現在のマウスカーソルの位置を取得
$pos = Get-MousePosition
# 1ピクセル分のランダムな値を生成
$randX = Get-Random -Minimum -1 -Maximum 2
$randY = Get-Random -Minimum -1 -Maximum 2
# 新しいマウスカーソルの位置を計算
$newX = $pos.X + $randX
$newY = $pos.Y + $randY
# マウスカーソルを移動させる
Set-MousePosition -X $newX -Y $newY
# 50秒待機する
Start-Sleep -Seconds 50
}
ChatGPTが出力したスクリプトと比べ、マウスの揺れ方にランダム性(左1ピクセル~右2ピクセル、上1ピクセル~下2ピクセル)があり、おそらく需要は満たせそうな気がする。さすがPowerShellのおひざ元のマイクロソフトのAIだ。
しかしながら、こちらの要望は「左右に揺らす」であり、上下に揺らしてしまっているのは蛇足だ。こちらの与えた要望を拡大解釈してしまっている。ただし、文字列生成系AIは、単に言われた事だけをするのではなく、「拡大解釈もする」ということは、創造的な観点からは良い評価が与えられることもある。
あと、インデントしてくれないのは気持ち悪い。人間が作ったスクリプトなら、コードレビューで突き返すことになるだろう。
INASOFT 管理人のひとこと - 2023/ 6/19 22:51 フリーソフト作者に要望を伝えるよりもAIにスクリプト書いてとお願いした方が確実か説の検証
24 notes
·
View notes
Text
okay! this took a bit to type out, but here we are!
disclaimer: my way might not work for you and that’s okay! there’s no right or wrong to make gifs, so long as you enjoy the way you make them then that’s all that counts. this is only a detailed look into my own personal process and things i’ve learned along the way. i'm also an idiot who sometimes doesn't know what he's talking about, so if something doesn't make sense let me know so i can fix it!
but these are some of the things i'll be going into a little more detail than before:
tools
importing & converting to smart object
smart filters
coloring (lighting, basic, and gradient)
exporting
tools
there are a few things i use in the process, some new and some old. whether you want to use them is entirely optional, given that it can be a lot to take in at once.
photoshop 2024
if you use an older version of photoshop, then i think the layout is similar to newer versions. though iirc some older versions don’t have the timeline function so you might have to look that up yourself since i’m not familiar with any ps version without it.
handbrake
i only use handbrake if the recorded video is super long. usually i try to record each scenery shot (4-8 seconds at a time) or an entire cutscene so i don’t have to use handbrake to trim the video. if i do, then i have the settings set to export as super hq with 60 fps, deselecting align a/v start and passthru common metadata. the rest i leave alone.
vapoursynth
this is really useful and makes coloring easier imo. you can download it from the official site, but i found a portable version (i have the 200722 one) for windows here. i’m not sure how to set it up for mac users, and, truthfully, to this day i still don’t know how to use it entirely. i just followed a tutorial i i found on youtube and only changed the amount for the denoise filter and turned off the sharpen filter since i do that in photoshop itself. so it’s trial and error, and i’m erroring a lot sometimes ajdkjasvjdas. it’s also where i crop the video to my preferred dimensions, unless you choose to crop in ps.
jsfiddle code playground
if you want to have the text in the tumblr post be a gradient, then type whatever you want in the first box on the bottom right, change the color from red to your starting color of choice, then the same of the green for the ending color. hit run, copy the code, and paste it inside the text post while in html mode. ngl, i stared at the site for like ten minutes before i figured out how to use it asjdjasdasd
nvidia shadowplay
i use shadowplay since it comes with my laptop’s gpu, set to record in 1080p60. i’ve seen other giffers use obs for recording, but i don’t have any experience with it. there are scenepacks and gameplay walkthroughs on many sites, which you can use as long as you have the uploaders permission and credit them as they ask! please don't steal their videos!
reshade
i’ve started using reshade recently to tone out the blue tint of the game and sharpen it up a bit more. it makes a big difference and helps with coloring if you start out with near neutral colors.
the effects i use are:
• deband
• clarity
• sharpcontrast
• emphasize
• amd fidelityfx contrast adaptive sharpening
• fxaa
• prod_80_04_colorisolation
• adaptivetonemapper
i'm pretty sure some of these are redundant, but i’m too lazy to go back and see which ones i don’t need lol. but it’s all personally preference with how you want the game to look, and there are many effects to choose from.
importing & converting to smart object:
my preferred method is the video frames to layers, which is: file > import > video frames to layers, and then select the video. if you use vapoursynth, then there might be duplicates frames (or at least there are for me) so when the popup window appears i check the box to limit the frames to how ever many duplicates there are of each frame. usually in my case, it’s three.
after the video has been imported, i select all frames in the timeline and change the frame delay to either 0.03-0.04 depending on how fast or slow i want the gif to be. for converting to smart object, i recorded my own action set to save time by clicking on a couple of buttons, but the process is: select all layers currently > convert frame animation > convert to smart object.
let me know if you want the action set! it saves a lot of time in the process
smart filters
i don't think sharpening before or after coloring matters, but definitely do not sharpen before cropping if you haven't done already.
vapoursynth combined with the in game reshade sharpening effects doesn’t require as much sharpening as i normally use. just note that it varies from scene to scene, and whatever you're giffing. these are just the settings i used for the pirates’ cove set.:
smart sharpen #1: 500% with a radius of 0.2 px
smart sharpen #2: 10% and 10 px radius
gaussian blur: 0.7 px at 30% opacity
add noise: 1% uniform at 30% opacity

on to the coloring, which i'm breaking this up into three sections: lighting, basic coloring, and gradient coloring, with a brief description and the result after each section.
something to note is that all coloring is personal preference, and how you want your gifs to look. if you're just starting your giffing journey, here's a site i bookmarked that explains pretty well the adjustment layers and what they do if you have questions for how they work. but i'd be more than happy to answer any that you guys have!
lighting:
brightness/contrast:
with this, i’ve found that changing the blending mode to screen brightens it up well enough without having to move any on the sliders. if it’s too bright, then lowering the opacity should do the trick.
curves:
before, i used the white and black point with the eyedropper tool, but now i’ve started using the auto function that can be found in the four horizontal bars in the top right of the adjustment properties. i choose the find dark & light colors options and check the enhance brightness and contrast box. if it’s too bright or tinted too much one color, then i fiddle with the rgb curves individually to get it as neutral as i can.
levels:
with levels there’s not much to adjust other than moving the sliders for the shadows and midtones to give it a little more contrast.

basic coloring:
selective color #1:
for the first selective color set to absolute, i use it for the white/black colors to make them as white and black as possible. increasing the black can make it too dark, so i limit the increase by two or three. sometimes i change neutral if it needs it, after all the coloring is done if it still looks too much of one color that the other adjustment layers can’t fix. i don’t know exactly what the difference is between absolute and relative is, i just remember it being part of a tutorial i read and have been doing it ever since.
color balance:
i only change this as minimally as possible, usually one for cyan, one for magenta, and one for blue for all tones. sometimes i increase it more, but it all depends on how you want it.
selective color #2:
the last selective color i use it for all the other colors, set to relative, usually for reds, yellows, and blues. if there are people in the gif, then i focus mostly on skin tones, bringing out reds and yellows to make it look as natural as possible. a hue/saturation layer can be useful to even out darker skin tones by lowering the saturation for red or yellow.
with scenery, i boost whatever dominate color pops up while lowering the other colors by adding in a lot of white if the lighting is bright, or adding black for dim scenes. again, if it needs it, adding in an optional hue/saturation layer, but this time to lower the saturation for less prominent colors.

gradient coloring:
if you’re satisfied with the coloring of your gif, then this step can be skipped!
i’ve recently fallen in love with using gradient fills. there are several preset gradients available, but if you search around online there are other gradients available to download and use. or you can make your own gradient of your colors of choice.
for me, i often use blue/pink or blue/purple gradient fills. the blue/pink preset is the one i used in this case.
gradient fill:
after adding the gradient fill and choosing the colors, i change the blending to soft light and lower the opacity anywhere from 30%-50%. with darker skin tones it might be tricky as it would involve more tweaking of the settings until it looks nice.
gradient map:
i follow it up with a gradient map to help with the sharpness (i think? i’ve forgotten exactly) set to soft light again with varying opacity given how dark the scene is.
vibrancy
this is completely optional here, but i like the colors cranked to the max, boosted to 80% or slightly lower. some minor adjustments might have to be made after this, usually with it being too red or possibly yellow.
exposure
the final adjustment layer to top it all off is exposure. i like my gifs to have a matte-ish look, so i change the offset anywhere from +0.0010 to +0.0030. if the gif is still a little on the dark side, increasing the exposure helps.
the gradient coloring takes the longest to get the colors to look good, but i love my colors so much and the end result is so worth it.

logo:
this is optional of course, but since there's quite a few people out there who love to steal gifs, it's probably a good idea to put your logo on the gif to help deter them. mine's simple and uses either the font code bold or moon. i have it saved as a png so that i can go to file > place embedded and resize it to my liking before moving it to the bottom right corner.
but for me those are too many steps to do for each gif, especially if i’ve been working on them for hours. so i open up an old psd with the same dimensions and duplicate the logo layer for each gif to save time.
exporting:
under file > save for web (legacy) the window for it should pop up. i don't usually mess around too much with the settings here, keeping it at selective diffusion and changing the matte to none.
sometimes the size will be too large for tumblr's limit since i like bright colors, and depending on how many frames are in each gif, most of them end up on the large side. i have to fight photoshop sometimes to make it work by either trimming a few frames or messing slighting with the lighting. occasionally i end up having to go back and reimport the videos to divide the frames equally if i don't want to trim any off. it’s a pain, and it’s something i should honestly try to plan out before that point lmao.
but if you're satisfied with how it looks, save, and you're good to post!
7 notes
·
View notes
Text
SM2 PRO J2534 VCI support Passthru Diagnostic and PCMFlash 67 modules
SM2 PRO J2534 VCI is one cheap J2534 adapter that support almost oem diagnostic programmer as GM GDS2,VAS ODIS,VIDA DICE 2014D also PCMFLASH ECU tunning

15 notes
·
View notes
Photo

Philly Passthru 2023 #infrastructure #graffiti #philadelphia #philly #phillygraff #streetArt #urban #urbanArt #urbanDecay (at Philadelphia, Pennsylvania) https://www.instagram.com/p/CpnXaNEOYgm/?igshid=NGJjMDIxMWI=
2 notes
·
View notes

Text
made a great deal
found an Apex 210 ribbon mic, broken jangly ribbon and reeking of cigarette smoke for $40 a couple months ago….
It already had the inner wire mesh layers and any pop filtering fabric removed, and it was missing some screws and had the ribbon screws stripped by the previous owner.
Disassembled it all, washed it, and retensioned the ribbon the day i got it, and it worked but sounded a bit harsh in the highs; likely sounded as good as it ever had up to that point…
The gig bag for this mic smelled disgusting even after multiple washes with TSP substitute and various soap and detergent, so I let that go and replaced it with a padded wine bottle bag but it just isn’t padded enough. Not sure where to find a better padded bag or box that would stow the mic vertically!
Today i got replacement strain relief gland based spirals and they just happen to fit this body, so I added a Neutrik XLR connector and Star quad mic wire with braided shielding to that. Along with some foam and PVC card samples, i was able to deaden the gnarly body resonance that was making the harsh high frequency response. I cut the PVC card samples to make a front and rear rounded-E-shaped wall divider to slot between the magnets and the cup piece of metal that forms the bottom half of the mic. All told, I spent about $10 on the parts used here and wound up with a $50 ribbon mic that performs much better than if I had instantly gone off spending $100 on changing the ribbon thickness and output transformer. I still may give that a shot, but this is suddenly a lot closer to the sound of the AEA R84, whose neodymium magnet and (2”x5mm/2-micron thick) ribbon geometry these Chinese made long ribbons imitate. It is still less sensitive than an RCA type 74b mi-1036G strapped for 250-Ohm output; I believe this Apex output transformer was <200-Ohm impedance from the factory.
This cheap simple change works for any of the yoke-mounted made in China ribbon microphones that may need this, such as the Apex 210 or the improved version model 205, Nady RSM2, Alctron HRM-2, ShinyBox 23, t.Bone R500, SM MC-04, Cascade VinJet, ShinyBox 46, Nady RSM1, Golden Age Project R1 and others may have nearly the same motor and maybe some of the same shortcomings.
Here’s a good article on the subject: http://recordinghacks.com/2008/11/01/chinese-ribbon-microphone-designs/
A note on this PVC card sample stock I used, I have no real clue what I have. It came from a reuse place and they were a steel ring of samples of various colors of this stuff. It doesn’t really bend well and snaps after about 30°. The inside of this stuff is like a closed cell foam while the front and back look the same and form a more solid layer of plastic. Maybe sheets of this stuff were heat pressed from PVC. It’s 1.5-2mm thick and definitely wasn’t meant for this. You could use anything that will fit and stay and where you could fasten two halves with an overlap so that it stays put as a divider between the body and the ribbon motor. I used Ukraine 🇺🇦 colors with yellow on the front side :D
The strain relief was like a PG9 size iirc. Where the original pinch lock passthru strain relief had straight sides, the threads on the new strain relief grab and thread in juuust right, too! Much more like the AEA strain relief, to boot
Further mod ideas:
Replace the yoke with a shockmount like the GAP RSM
Unscrew the yoke flat piece from the piece that threads onto the mic stand and use a post style shockmount more like the one used in the RCA type 44 yoke
Or, replace the thumbscrew thread holes in the frame of the ribbon motor with a threaded insert shockmount bushing
stick some silicone damping instead of the foam
maybe improve sensitivity by using a higher turns ratio transformer
could sew more padding in to the bottle bag
high impedance input circuit or mic pre to pair with these types of things (i already have lots of 150-2200-Ohm inputs, some of which can change)
add a Crown Royal type cloth velvety bag both to pad the mic in the wine bottle bag AND to make the ideal 360° pop filter! They can even be stuffed with some foam and fitted with some fur on the outside to resist wind buffeting, it’s really great for that because it can enclose and keep wind off of the bottom and yoke of the mic as well, even if it is no Rycote zeppelin and dead cat. they even sell some raincoats for the dead cats that don’t make noise as they are hit by raindrops! i just don’t usually do it in the rain
0 notes
Text
iCloud Private Relay, and an Upstream Provider
"When iCloud Private Relay is on, the traffic leaving your device is encrypted and sent through two separate internet relays. This prevents websites from seeing your IP address and exact location while preventing network providers from collecting your browsing activity in Safari."
That's all fine and well, except in particular fields & industries, it's imperative that all the stops are pulled to prevent end users from bypassing firewalls, filters, and so on.
At the time, I had raised tickets with our upstream provider to have the DNS Server return a NXDOMAIN response when the iCloud Private Relay URLs are sought, as per Apple's best practice and documentation.
Unfortunately, they were not able to achieve this, and short of putting a PiHole into a live, production environment with the sole purpose of stopping Private Relay (which I didn't really want to do), another (although not ideal) solution was used.
The block was implemented on the local Windows DNS servers, rather than upstream. The block applies to all networks that use those DNS servers.
The block is server based, and does not replicate across as part of ADDS, so the block must be implemented on all DNS servers.
The command used to implement the block is a powershell command, and must be performed as an Administrator.
The command is:
Add-DnsServerQueryResolutionPolicy -Name "iCloudPrivateRelayBlock" -Action DENY -Fqdn "EQ,*.mask.icloud.com,*.mask-h2.icloud.com" -PassThru
To unblock Private Relay, run the following Powershell command (as an Administrator) on any applicable Windows DNS servers:
Remove-DnsServerQueryResolutionPolicy -Name “iCloudPrivateRelayBlock”
When prompted, type “Y” for Yes.
Sources:
Edit - Jan 23 2024:
Just a quick edit to say that these steps do not return an 'nxdomain' response for the affected URLs, but rather a 'serv_fail' response, which, while not recommended by Apple, is the next best thing that I could achieve at the time.
0 notes
Text
youtube
Best practices for setting up Cisco Meraki Client VPN for Windows 10. This will ensure your windows 10 users can always connect to the VPN without issues. Assume UDP Encapsulation Registry Edit Microsoft Link: https://docs.microsoft.com/en-us/trou... PowerShell Script: Set-ItemProperty -Path "HKLM:SYSTEM\CurrentControlSet\Services\PolicyAgent" -Name "AssumeUDPEncapsulationContextOnSendRule" -Value 2 PowerShell Script to mass deploy Client VPN Add-VpnConnection -Name "FRIENDLY NAME" -ServerAddress "MERAKI-HOST-NAME" -TunnelType L2tp -AuthenticationMethod Pap -AllUserConnection -L2tpPsk "MERAKI-SECRET-KEY" -IdleDisconnectSeconds "14400" -Force -PassThru Additional Cisco Meraki Client VPN Videos Setting up Cisco Meraki Client VPN (on Meraki MX): • Cisco Meraki Client VPN Setup
0 notes
Link
Newest 2023.03 MB STAR sd C4/C5/C6 software xentry DAS install or upgrade online xentry 2023.03 passthru version for openport 2.
0 notes
Text
MaxiSys MS908S Pro for Benz ECU Online Programming
Some customers are asking for tools to do online ecu programming for Benz, Autel MaxiSys MS908S Pro and MaxiFlashPro J2534 are recommended to do this task.

Note: The programming function can only be applied through connection with Autel J2534 programming device, which serves as a PassThru interface to establish communication with and transfer data to the vehicle’s ECU.

Available programming operations vary by the test vehicle, and only the available operations display in the menu.
Ensure that Autel MS908S Pro is connected to the Internet before applying the ECU programming function, so that the tablet is able to access the manufacturer’s server for update service.
How to use ECU programming on MaxiSys MS908S Pro
General procedure:
Selecting the programming function opens a menu of operation options that varies by make and model. Selecting a menu option either shows a programming interface or opens another menu of additional choices. Follow all screen instructions while performing the programming operations. How and what information is presented on the screen varies according to the type of operation being performed.
Autel MaxiSys MS908S Pro II User Manual
Free download with no password
0 notes
Text
MaxiSys MS908S Pro for Benz ECU Online Programming
Some customers are asking for tools to do online ecu programming for Benz, Autel MaxiSys MS908S Pro and MaxiFlashPro J2534 are recommended to do this task.

Note: The programming function can only be applied through connection with Autel J2534 programming device, which serves as a PassThru interface to establish communication with and transfer data to the vehicle’s ECU.

Available programming operations vary by the test vehicle, and only the available operations display in the menu.
Ensure that Autel MS908S Pro is connected to the Internet before applying the ECU programming function, so that the tablet is able to access the manufacturer’s server for update service.

How to use ECU programming on MaxiSys MS908S Pro
General procedure:
Selecting the programming function opens a menu of operation options that varies by make and model. Selecting a menu option either shows a programming interface or opens another menu of additional choices. Follow all screen instructions while performing the programming operations. How and what information is presented on the screen varies according to the type of operation being performed.
Autel MaxiSys MS908S Pro II User Manual
Free download with no password
0 notes
Text
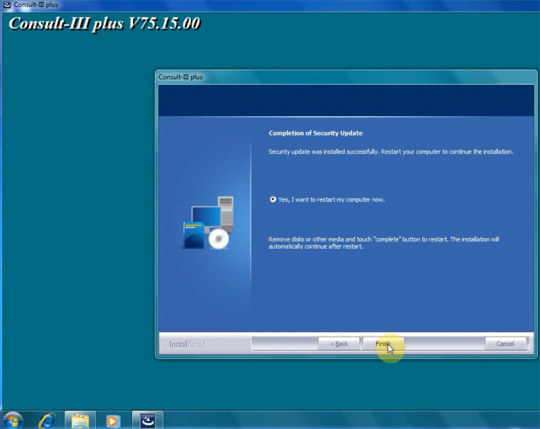
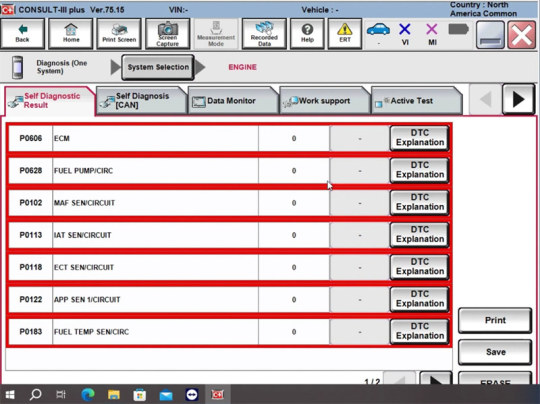
How to Diagnose Nissan Godiag J2534 V2.3 with Godiag J2534 V2.3 and Consult III Plus V75.15.00?
Godiag GD101 J2534 Passthru Cable with the newest driver V2.3 can work with Consult III Plus V75.15.00 to diagnose Nissan vehicles. It has been tested on a Nissan engine ECU by eobdtool.co.uk engineer.
1.Free download godiag j2534 driver+ patch+ Nissan Consult III PLUS V75.15.00
Godiag J2534 Driver V2.3
GODIAG Nissan patch
Nissan Consult III PLUS V75.15.00
Software version: V75.15
Operating system: Windows XP and Windows 7/8/10 operating system. Cannot work on VISTA O/S.
Multi-languages available: English, Chinese, Finnish, French, German, Greek, Italian, Japanese, Portuguese, Russian, Spanish, Turkish, Thai, Czech, Polish, Hungarian
Compatible devices: Godiag GD101 J2534, Nissan Consult III Plus, PCMTUNER, VXDIAG VCX SE, Openport 2.0, etc J2534 device
2.Install Godiag J2534 V2.3 driver:
Run godiag j2534 v2.3 program
Select language, destination location, components, start menu folder, and additional tasks
Then install it
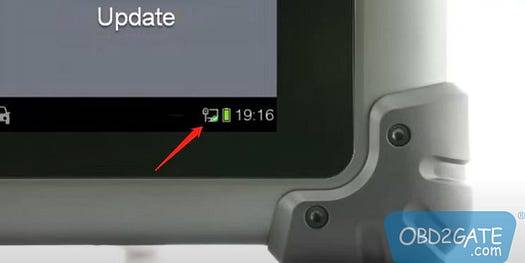
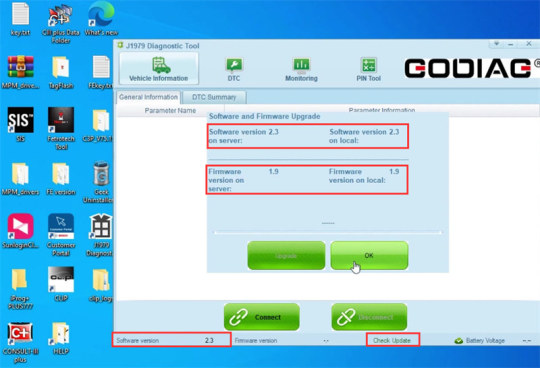
After installation, launch J1979 diagnostic tool, and click “Check update” to check if the software and firmware versions are the newest.
Now the software version is 2.3 and the firmware version is 1.9.


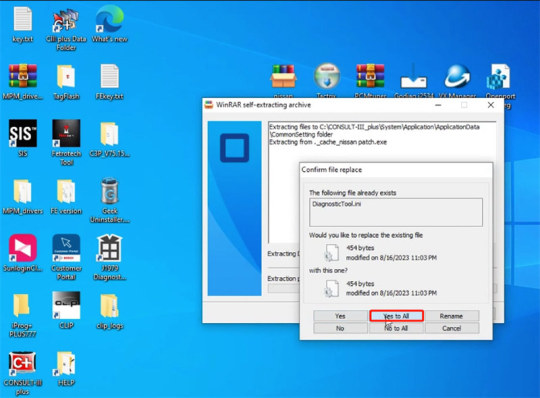
3.Run Nissan patch.exe on the desktop
Extract files to C:\CONSULT-III_plus\System\Application\Data\CommonSetting folder
Click “Yes to All”
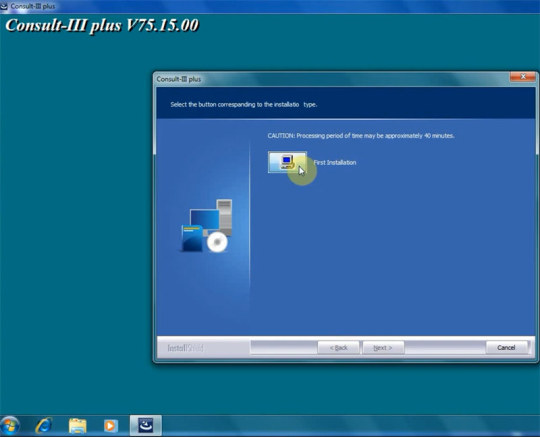
4.Install Nissan Consult III Plus V75.15.00
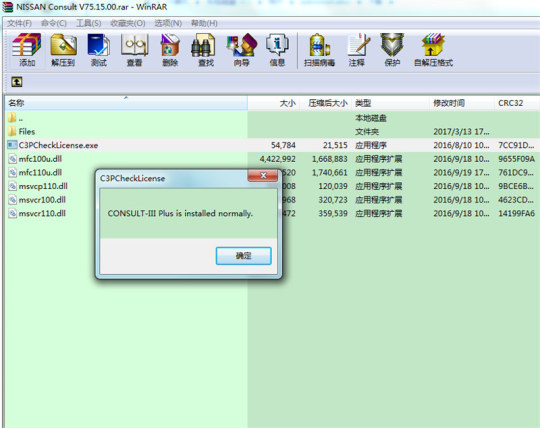
Extract Nissan Consult V75.15.00 folder
There are two folders inside: C3P License and C3P_V75.15.00.

Open “C3P_V75.15.00” folder
Run “setup.exe” application

Install necessary components for consult iii plus

Click “First installation”
Accept the license agreement
Select your area
Select your country
Select your language
Select suitable units
Select a suitable unit: nissan, infiniti, datsun
Select copying file
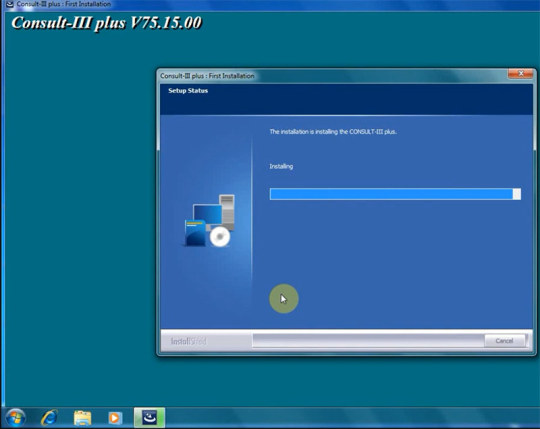
Installing consult iii plus
Installing components
Installed Nissan consult-iii plus software successfully
4.Install Consult-III Plus patch
Open “C3P License” folder on the desktop
Open “C3PCheckLicense” application
Consult- III Plus is installed normally
Click on “Patch” to patch Consult III Plus
Patch ok

Step 4: Diagnose Nissan engine ECU
Connect Godiag GD101 J2534 Cable to Nissan ECU and computer
Open CONSULT III plus V75.15.00 on the desktop
It identifies the device serial No. and status.
Select Diagnosis (One System)>> ENGINE
Click “Close” when it appears “if some ECUs are not detected, turn ignition on and touch close”


Diagnose ECU successfully

0 notes
Text
OWASP Top 10 Web Hacking p2 : TryHackMe OWASP Task 5
Task 5 hỏi về lỗi Command Injection của đoạn code sau :
<?php
if (isset($_GET["conmandString"])) { $conmand_string = $_GET["conmandString"];
try {
passthru($conmand_string);
} catch (Error $error) {
echo "<p class=mt-3><b>$error</b></p>"
}
}
?>
Command Injection là một lỗ hổng bảo mật xảy ra khi ứng dụng cho phép người dùng nhập dữ liệu và truyền nó trực tiếp vào một lệnh hệ thống mà không kiểm…

View On WordPress
0 notes
Last Seen Blogs

winterzon
zon van de winter

bigmusclemonkey
Untitled

queen-fries
Jenna

healthyaudit-blog
Healthy Audit

fortnite-softaim-free-dowmm
👑 fortnite softaim free download (free PC) 8VR%