#php pdo
Text
In this tutorial, I will explain how you can easily connect your DigitalOcean Managed MySQL Database to PHP.
0 notes
Text
how to connect multiples database using PDO in PHP

In this tutorial, we will explore how to connect multiple databases using PDO (PHP Data Objects) in PHP. Whether you are working on a project that requires data retrieval from multiple databases or you simply want to integrate different databases within your application, PDO provides a flexible and efficient solution.
PDO is a PHP extension that provides a consistent interface for accessing different database systems. By utilizing PDO, you can connect to various databases such as MySQL, PostgreSQL, SQLite, and more, using the same set of methods and functions.
Watch this tutorial now to master the art of integrating multiple databases using PDO in PHP and enhance your web development skills! PHP FOR TECH.
Website: https://www.phpfortech.com
2 notes
·
View notes
Text
اسکریپت سیستم ثبت اطلاعات اعضا با استفاده از PHP Data Object (PDO)
اسکریپت سیستم ثبت اطلاعات اعضا با استفاده از PHP Data Object (PDO)
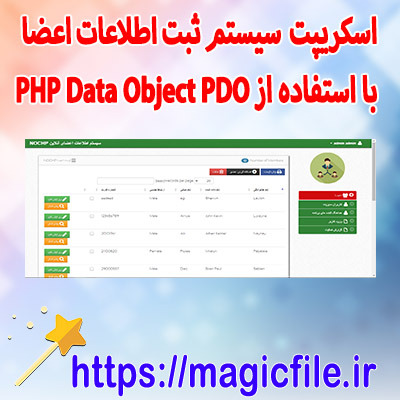
برای دانلود به لینک زیر بروید
برای دانلود اینجا کلیک فرمایید ( اسکریپت سیستم ثبت اطلاعات اعضا با استفاده از PHP Data Object (PDO) )
لینک کوتاه : https://magicfile.ir/?p=3755
0 notes
Text
Build 13 Projects with PHP MySQL Bootstrap and PDO
Build 13 Projects with PHP MySQL Bootstrap and PDO
Build Amazing Projects with PHP MySQL Bootstrap and PDO and Take your Web Development Skills to the Next Level
View On WordPress
0 notes
Text
it course in chennai
How do I connect an HTML web page to a database?
Connecting an HTML web page to a database typically involves using server-side technologies to handle database interactions. HTML alone cannot directly interact with databases; you need a programming language on the server side to handle the communication. Here is a basic outline of the steps involved:
Choose a Server-Side Language:
You need a server-side scripting language to interact with the database. Common choices include PHP, Node.js, Python (Django or Flask), Ruby on Rails, etc. Choose the language that you are comfortable with or that fits your project requirements.
Set Up a Database:
You need a database to store and retrieve data. Common databases include MySQL, PostgreSQL, MongoDB, etc. Install and configure the database server according to your chosen technology.
Create a Database Connection:
In your server-side code, establish a connection to the database using the appropriate library or module for your chosen language. This usually involves providing connection details such as database host, username, password, and database name.
Write Server-Side Code:
Create server-side code to handle database operations. This includes handling user requests, querying the database, and sending the results back to the client. For example, if you’re using PHP, you might use the MySQLi or PDO extension to interact with a MySQL database.
Example (PHP with MySQLi):
php
Copy code
<?php
$servername = “your_database_host”;
$username = “your_username”;
$password = “your_password”;
$dbname = “your_database_name”;
// Create connection
$conn = new mysqli($servername, $username, $password, $dbname);
// Check connection
if ($conn->connect_error) {
die(“Connection failed: “ . $conn->connect_error);
}
// Perform database operations here…
// Close connection
$conn->close();
?>
Handle HTML Form Submissions:
If your web page involves user input, create HTML forms that submit data to the server. Use JavaScript or other technologies to enhance user interactions if needed.
Send Data Between Frontend and Backend:
Use AJAX or other methods to send data between the HTML page (frontend) and the server-side code (backend). This allows dynamic updates without reloading the entire page.
Remember, security is crucial when dealing with databases. Use parameterized queries or prepared statements to prevent SQL injection attacks, validate user input, and implement proper authentication and authorization mechanisms.
It course in chennai
It institute in chennai
it coaching centre in chennai
best it course institute in chennai
it training institute in chennai with placement
it course institute in chennai
It courses in chennai
best it institute in chennai
top it training institute in chennai
Software training institute in chennai

0 notes
Text
PHP for Beginners Crash Course 2024: Master PDO & MySQL
As a seasoned developer with years of experience in PHP programming, I recently delved into the “PHP for Beginners Crash Course 2024.” This comprehensive guide is tailored to equip aspiring programmers with the essential skills needed to kickstart their journey in PHP development. The course structure simplifies complex concepts, making it ideal for individuals new to coding.
From understanding…
View On WordPress
0 notes
Text
Securing Your Laravel App: Latest Best Practices and Threat Protection
In the ever-evolving world of web development, Laravel has emerged as one of the most popular PHP frameworks. Its elegant syntax, robust features, and vibrant community make it a top choice for many developers. However, as with any technology, ensuring the security of your Laravel application is paramount. In this blog post, we will delve into the latest best practices for securing your Laravel app and protecting it against threats.

Why Security Matters in Laravel Development
Before we dive into the specifics, let’s take a moment to understand why security is so crucial in Laravel development. As the digital landscape expands, so does the potential for security breaches. These breaches can lead to data loss, unauthorized access, and even severe financial implications. Therefore, whether you’re a seasoned Laravel developer or a business looking to hire a Laravel developer, understanding and implementing security best practices is non-negotiable.
Laravel Security Best Practices
1. Keep Your Laravel Version Updated
One of the simplest yet most effective ways to secure your Laravel app is by keeping your Laravel version updated. Each new version of Laravel comes with security patches and updates that fix known vulnerabilities.
2. Use HTTPS
Using HTTPS instead of HTTP ensures that all communication between your server and your users is encrypted. This encryption makes it much harder for attackers to access sensitive information.
3. Validate and Sanitize Data
Always validate and sanitize data coming from users or third-party sources. Laravel provides several ways to validate data, including form request validation, manual validation, and even validation rules.
4. Use Laravel’s Built-In Authentication
Laravel comes with built-in authentication scaffolding, which provides a secure way to handle user authentication. Using this feature can save you from the potential security risks of building your own authentication system.
5. Limit and Monitor Access
Implement role-based access control (RBAC) to limit who can access what resources in your application. Also, monitor your application for any unusual activity.
Threat Protection in Laravel
Protecting your Laravel app from threats involves being aware of the common types of attacks and knowing how to prevent them. Here are a few threats you should be aware of:
1. SQL Injection
SQL injection involves an attacker manipulating your SQL queries to gain unauthorized access or make unauthorized changes to your database. Laravel’s Eloquent ORM uses PDO parameter binding, which protects your application from SQL injection.
2. Cross-Site Scripting (XSS)
XSS attacks involve an attacker injecting malicious scripts into your web pages, which are then run by your users’ browsers. Laravel’s Blade templating engine automatically escapes output, protecting your application from XSS attacks.
3. Cross-Site Request Forgery (CSRF)
CSRF attacks trick your users into performing actions without their knowledge or consent. Laravel includes built-in protection against CSRF attacks.
Conclusion
Securing your Laravel application involves a combination of staying updated with the latest Laravel version, using built-in Laravel features, and being aware of common threats. Whether you’re a Laravel developer or a Laravel development company, following these best practices will go a long way in ensuring the security of your Laravel application.
Remember, security is not a one-time task but an ongoing process. Stay vigilant, stay updated, and most importantly, stay secure.
FAQs on Securing Your Laravel App: Latest Best Practices and Threat Protection**
Q: Why is securing my Laravel app important?
- A: Securing your Laravel app is crucial to protect sensitive data, prevent unauthorized access, and safeguard against potential cyber threats. It ensures the integrity and reliability of your application.
Q: What are the latest best practices for securing a Laravel app?
- A: Some best practices include keeping Laravel and its dependencies up-to-date, implementing strong authentication mechanisms, securing sensitive routes, using HTTPS, and regularly auditing and monitoring your application for potential vulnerabilities.
Q: How can I keep my Laravel framework and dependencies updated?
- A: Use Composer to manage your project dependencies and regularly update Laravel by running `composer update`. Stay informed about security releases and apply them promptly.
Q: What authentication mechanisms should I use to secure my Laravel app?
- A: Laravel provides built-in authentication features. Implement multi-factor authentication (MFA), use strong password policies, and consider OAuth or social media logins for additional security layers.
Q: How do I secure sensitive data in my Laravel app?
- A: Employ encryption for sensitive data using Laravel's encryption features. Avoid storing sensitive information in plain text and utilize secure methods like Laravel's Eloquent ORM for database operations.
Q: Is HTTPS necessary for my Laravel app?
- A: Yes, using HTTPS is crucial. It encrypts data in transit, preventing eavesdropping and man-in-the-middle attacks. Obtain an SSL certificate and configure your Laravel app to use HTTPS.
Q: How can I protect against common web application security threats?
- A: Implement input validation, use Laravel's built-in protection against Cross-Site Scripting (XSS) and Cross-Site Request Forgery (CSRF), and sanitize user inputs to prevent SQL injection.
Q: Should I use Laravel's built-in security features or implement additional security packages?
- A: Laravel offers robust security features, but depending on your specific requirements, you may consider additional security packages like Laravel Security Package or Laravel Fortify for enhanced protection.
Q: How can I monitor my Laravel app for security vulnerabilities?
- A: Regularly conduct security audits, use security scanning tools, and implement logging and monitoring solutions to detect and respond to any suspicious activities or potential threats.
Q: What steps can I take to recover my Laravel app in case of a security breach?
- A: Have a well-defined incident response plan, regularly back up your data, and ensure you can quickly restore your application to a secure state. Additionally, notify users of any security incidents and prompt them to update passwords if necessary.
0 notes
Text
Ilyen az én formám
Délután valamikor írni akartam arról (elvileg fogok is), hogy megjelent az új FreshRSS (web alapú RSS olvasó).
Mivel nekem is van egy ilyen telepítésem, gondoltam frissítem (mert eddig slendrián voltam.. de működött).
Átolvasom azt a kevés frissítési útmutatót ami van. Azt mondja alverzióról alverzióra tessék frissíteni, úgy biztonságos.
Engedelmeskedtem (ezúttal!), csináltam mentést is.
Vagy 5 verzióval voltam lemaradva. Az utolsó előtti verzióra frissítéskor eltűntek az oldalak és a csoportok. Gondoltam, valami update scriptet kellene keresni, amit elfelejtett megemlíteni a dokumentáció. Nem találtam, a logokban SQL PDO hibát viszont igen.
Gugliztam, de semmire sem mentem. Volt egy 2015-ös hibajegy, ami régi MySQL verzióm (5.5) le nem futó dolgok miatt született. De ez nekem nem járja, mert relatív friss MariaDB van.
Így gondoltam, lehet megint nem figyeltem vagy nincs dokumentálva, hogy bizonyos PHP (al/bugfix)verzióval nem megy a program.
Gondoltam, akkor frissítek PHP-t. De az eredeti PHP alapot még Ansible-lel csináltam, ami.. egy picit elavult már. Régebben, amikor még nem volt se build szerverem, se CR-em, a szerveren készítettem a Docker konténereket. De azóta lett build szerver meg Jenkins meg minden egyéb.
Szóval megcsináltam a build pipeline-t, hogy mindig legyen naprakész PHP 8.1, 8.2 és 8.3. Nincs is ezekkel baj.
De a FreshRSS egyik új PHP verzióval sem akart jó lenni, ugyanazt a hibát dobta.
Egy inkonzisztens(nek tűnő) adatbázisra nem engedünk rá még scripteket, hogy tovább rontsák a dolgokat. De gondoltam, üsse kavics, meglátjuk mi fog történni, max előhúzom a mentést.
Így ráengedtem a feed aktualizáló scriptet.
Mi történt? Minden helyrerázódott és elkezdett működni.
Aminek nagyon örülök, mert így nem kellett visszatenni se a régi verziót, se a DB-t.
Viszont eltartott egy darabig mire erre rájöttem. Tök sok időt spórolt volna a jó dokumentáció.
0 notes
Text
PHP Pdo Veritabanı Bağlantısı ve Veri Kontrolü (Bu veri var mı yoksa ekle)
http://dlvr.it/T131fp
0 notes
Text
How To Use PHP To Create Dynamic Websites
PHP is a server-side scripting language that is commonly used to create dynamic websites. It is a popular choice for web development because it is easy to learn and use, and it is free and open-source.
To create a dynamic website with PHP, you will need to:
Install PHP on your web server.
Create a database to store your dynamic content.
Write PHP code to interact with the database and generate dynamic HTML pages.
Here is a simple example of how to use PHP to create a dynamic website:
PHP<?php // Connect to the database. $db = new PDO('mysql:host=localhost;dbname=my_database', 'root', ''); // Get the current date and time. $date = date('Y-m-d'); $time = date('H:i:s'); // Get the latest news articles from the database. $sql = 'SELECT * FROM news_articles ORDER BY published_at DESC'; $result = $db->query($sql); // Start generating the HTML for the web page. ?> <!DOCTYPE html> <html> <head> <title>My Dynamic Website</title> </head> <body> <h1>My Dynamic Website</h1> <h2>Latest News Articles</h2> <ul> <?php foreach ($result as $article): ?> <li> <h3><a href="<?php echo $article['url']; ?>"><?php echo $article['title']; ?></a></h3> <p><?php echo $article['excerpt']; ?></p> <p>Published on <?php echo $article['published_at']; ?></p> </li> <?php endforeach; ?> </ul> <h2>Current Date and Time</h2> <p>The current date and time is: <?php echo $date . ' ' . $time; ?></p> </body> </html> <?php // Close the database connection. $db = null; ?>
This code will connect to the database, get the latest news articles, and generate a dynamic HTML web page with the list of articles and the current date and time.
You can use PHP to create all sorts of dynamic websites, from simple blogs and news websites to complex e-commerce websites and social networking platforms.
Here are some tips for creating dynamic websites with PHP:
Use a database to store your dynamic content. This will make it easier to manage and update your content.
Use PHP functions to interact with the database and generate dynamic HTML pages.
Use PHP sessions to track user activity and preferences.
Use PHP cookies to store user data on the user's computer.
Use PHP security features to protect your website from attacks.
If you want to learn PHP from scratch must checkout e-Tuitions to learn PHP Language online, They can teach you PHP Language and other coding language also they have some of the best teachers for there students and most important thing you can also Book Free Demo for any class just goo and get your free demo.
0 notes
Text
دانلود اسکریپت سیستم مدیریت دانشجویی آنلاین در PHP/PDO
دانلود اسکریپت سیستم مدیریت دانشجویی آنلاین در PHP/PDO

برای دانلود به لینک زیر بروید
برای دانلود اینجا کلیک فرمایید ( دانلود اسکریپت سیستم مدیریت دانشجویی آنلاین در PHP/PDO )
لینک کوتاه : https://magicfile.ir/?p=3696
0 notes
Text
Use Laravel’s Illuminate Database Query Builder With WordPress
I’ve been working on Smolblog, a social web blogging app. To help me get to a minimally viable product sooner, I’ve been building it on top of WordPress. However, WordPress is built exclusively for the MySQL database, and I eventually want Smolblog to work with many different databases, especially SQLite. This means, for my own code, I need to abstract the database away.
The first pass I had at this was to simply have Query objects and services to handle those. This would effectively abstract away the entire data layer, making it completely system-agnostic. It wouldn’t even need to be a traditional database. But as I built this system out, I was making more and more assumptions about what the database and data code would look like. And while the database code was all abstracted away, I still had to write it. A lot of it. And every line I wrote using $wpdb was another line I’d have to rewrite someday.
I’ve been looking at other frameworks to use, and Laravel is by far the strongest contender. Their approach to dependency injection and services seems to line up well with how I’ve organically built Smolblog to this point. So when I found out that their database abstraction layer also included a way to use the library without taking on the entire Laravel framework, I decided to make “someday” today.
Prerequisites
Composer: While you can use this library without using Composer, it’s very much not recommended. That being said, if you’re using this in a plugin for general use or otherwise don’t have control over your entire WordPress environment, be sure to use Mozart or some other tool to isolate the namespaces of your dependencies.
Populated database constants: Some of the more modern WordPress setups use a connection string or other way to connect to MySQL. I didn’t find a way to get that information out of the $wpdb constant, so this code relies on having DB_HOST and other constants from wp-config.php defined.
PDO::MySQL: Illuminate DB uses PDO to handle databases, so you’ll need to make sure your PHP server has the PDO::MySQL extension installed. I’m using the official PHP image, so I needed to add these two lines to my Dockerfile:
RUN docker-php-ext-install pdo_mysql RUN docker-php-ext-enable pdo_mysql
Step 1: Dependency Injection
We’re going to use dependency injection to separate creating the database connection from using the database connection. This way the database connection can change without as much code changing.
The documentation for Laravel’s query builder involves calling their DB facade, a global class that calls a singleton instance. Digging through the documentation and code, it looks like the underlying class conforms to the Illuminate\Database\ConnectionInterface interface. So that’s what we’ll use in our service’s constructor:
use Illuminate\Database\ConnectionInterface; class ContentEventStream implements Listener { public function __construct( private ConnectionInterface $db, ) { } }
Inside the service, we’ll follow the documentation, replacing any use of the DB facade with our $db object:
$this->db->table('content_events')->insert(['column' => 'value']);
Step 2: Connection Factory
Now that we know what we need, we need to create it.
The README for the Illuminate Database package has good starting instructions. We’ll combine those with data from wp-config.php and $wpdb:
use Illuminate\Database\Capsule\Manager; use Illuminate\Database\ConnectionInterface; function getLaravelConnection(): ConnectionInterface { global $wpdb; $capsule = new Manager(); $capsule->addConnection( [ 'driver' => 'mysql', 'host' => DB_HOST, 'database' => DB_NAME, 'username' => DB_USER, 'password' => DB_PASSWORD, 'charset' => DB_CHARSET, 'prefix' => $wpdb->prefix, ] ); return $capsule->getConnection(); }
(As mentioned, we’re pulling the connection information straight from configuration. If you know how to get it from $wpdb, let me know!)
The prefix property on the connection works much the same way as WordPress' table prefix. Since we’re using the connection object to also build our queries, it will add the prefix to our queries automatically. Using this property will also use the correct tables for blogs in multisite, so data from one blog doesn’t leak into another.
For Smolblog, I only want one set of tables regardless of multisite. I also want to prefix the Smolblog-specific tables, mostly so they’re all in one place when I’m scrolling. So my prefix property looks like this:
$capsule->addConnection( [ // ... 'prefix' => $wpdb->base_prefix . 'sb_', ] );
Because I don’t want a global object or the Eloquent ORM, I can ignore the rest of the setup from the project README.
Finally, we’ll want to store this created object somewhere central. Smolblog uses a simple dependency injection container, so we’ll store it there. The first time a service that needs a database connection is created, the container will run this function and provide the object.
(Honestly, the container probably deserves a blog post of its own; you can look at the source code in the meantime.)
Step 3: Update the Schema
We have our code to build queries. We have our connection to the database. The only thing we need now is the actual tables for the database.
Here is where we can use WordPress to its full extent. We will be using the dbDelta function in particular. This will tie into WordPress' existing system for updating the database structure alongside WordPress itself.
Some plugins tie this migration code to an activation hook, but we want to be able to modify the tables even after the plugin is activated. So our process will look like this:
Loop through the different tables we will need.
Check the blog options for a schema version.
If the version matches what we have in code, we’re up-to-date. Skip to the next table.
Pass the new table schema to dbDelta and let it do its thing.
Save the schema version to blog options.
Rinse and repeat for each table.
At this point, I should bring up some of the caveats with the dbDelta function. The comments on the WordPress documentation are invaluable here, especially as they point out a few things that need to be consistent with our schemas.
Because there’s so many things that need to be consistent, we’ll isolate the unique parts of our table schemas to two things:
A name. Because every table needs one. We will declare it without the prefix.
The fields excluding the primary key. We can have UNIQUE indexes on other fields for a similar effect, but every table will have an auto-incrementing id field.
A series of values keyed to short strings? That sounds like an array! Here’s part of what Smolblog’s schema array looks like:
class DatabaseHelper { public const SCHEMA = [ 'content_events' => <<<EOF event_uuid varchar(40) NOT NULL UNIQUE, event_time varchar(30) NOT NULL, content_uuid varchar(40) NOT NULL, site_uuid varchar(40) NOT NULL, user_uuid varchar(40) NOT NULL, event_type varchar(255) NOT NULL, payload text, EOF, 'notes' => <<<EOF content_uuid varchar(40) NOT NULL UNIQUE, markdown text NOT NULL, html text, EOF, ]; public static function update_schema(): void { foreach ( self::SCHEMA as $table => $fields ) { self::table_delta( $table, $fields ); } } //... }
A brief aside: Smolblog uses UUIDs for its unique identifiers, and they’re stored here as full strings in fields ending with _uuid. I ran into trouble storing them as bytes, and something in WordPress would frequently mess with my queries when I had fields named things like user_id and site_id. I’m noting this here in case you run into the same things I did.
When WordPress loads the plugin, it will call the update_schema function declared here. That function loops through the array, extracts the table name and fields, and passes them to this function:
public static function table_delta( string $table, string $fields ): void { global $wpdb; $table_name = $wpdb->base_prefix . 'sb_' . $table; $charset_collate = $wpdb->get_charset_collate(); $sql = "CREATE TABLE $table_name ( id bigint(20) NOT NULL AUTO_INCREMENT, $fields PRIMARY KEY (id) ) $charset_collate;"; if ( md5( $sql ) === get_option( $table . '_schemaver', '' ) ) { return; } require_once ABSPATH . 'wp-admin/includes/upgrade.php'; dbDelta( $sql ); update_option( $table . '_schemaver', md5( $sql ) ); }
This function takes care of the boilerplate we talked about earlier and runs the steps:
It creates the table name using the same pattern as before: the base prefix plus sb_.
It creates a CREATE TABLE SQL statement using the table name and fields. (It’s okay to build a SQL query this way because all of the data is coming from constants inside the PHP file; none of it is coming from form data or other untrusted sources.)
It takes the MD5 hash of the SQL statement and compares that to the saved option for this table. The hash will change when the code changes, so this is a quick way to keep our code and database in-sync.
If the database needs to be updated, it requires the correct file from WordPress Core and runs the dbDelta function.
Finally, it saves the MD5 hash to the blog options so we know what version the database is on.
By calculating the version using the hash of the actual SQL, we don’t have to worry about whether some other version number has been updated. This may or may not be the approach you want to take in a production application, but it has proven very useful in development. This is the same idea as using the filemtime function as the “version number” of static CSS and JavaScript in your theme.
So there we have it. We’ve used the connection information in WordPress to hook up a Laravel database connection. And at some point in the future, it’ll be that much easier to let Smolblog work with SQLite which will in turn let Smolblog work on even more web hosts. And you can use this to do whatever you want! Maybe you just wanted to transfer some skills from Laravel to WordPress. Maybe you’re just in it for the academic challenge.
One thing you can do with this is unit-test your services using an in-memory SQLite database… and I’ll leave you with that.
final class DatabaseServiceUnitTest extends \PHPUnit\Framework\TestCase { private \Illuminate\Database\Connection $db; private DatabaseService $subject; protected function setUp(): void { $manager = new \Illuminate\Database\Capsule\Manager(); $manager->addConnection([ 'driver' => 'sqlite', 'database' => ':memory:', 'prefix' => '', ]); $manager->getConnection()->getSchemaBuilder()->create( 'content_events', function(\Illuminate\Database\Schema\Blueprint $table) { $table->uuid('event_uuid')->primary(); $table->dateTimeTz('event_time'); $table->text('payload'); } ); $this->db = $manager->getConnection(); $this->subject = new DatabaseService(db: $this->db); } public function testItPersistsAContentEvent() { $event = new class() extends ContentEvent { public function __construct() { parent::__construct( id: Identifier::fromString('8289a96d-e8c7-4c6a-8d6e-143436c59ec2'), timestamp: new \DateTimeImmutable('2022-02-22 02:02:02+00:00'), ); } public function getPayload(): array { return ['one' => 'two', 'three' => 'four']; } }; $this->subject->onContentEvent($event); $expected = [ 'event_uuid' => '8289a96d-e8c7-4c6a-8d6e-143436c59ec2', 'event_time' => '2022-02-22T02:02:02.000+00:00', 'payload' => '{"one":"two","three":"four"}', ]; $this->assertEquals((object)$expected, $table->first()); $this->assertEquals(1, $table->count()); } }
1 note
·
View note
Text
Filling a PHP array dynamically means that instead of hardcoding the values, you're adding values to the array based on some logic, external input, or data sources. Here's a basic overview and some examples:
1. Create an Empty Array
You can create an empty array using the 'array()' function or the '[]' shorthand.
$dynamicArray = array();
// OR
$dynamicArray = [];
2. Add Elements to the Array
You can add elements to an array in various ways:
Append to the array:
$dynamicArray[] = 'value1';
$dynamicArray[] = 'value2';
Add with a specific key:
$dynamicArray['key1'] = 'value1';
$dynamicArray['key2'] = 'value2';
3. Dynamically Filling the Array
Here's how you can fill an array based on various scenarios:
From a database (using PDO for this example)
$stmt = $pdo->query("SELECT value FROM some_table");
while ($row = $stmt->fetch()) {
$dynamicArray[] = $row['value'];
}
From a form (using POST method as an example):
if (isset($_POST['inputName'])) {
$dynamicArray[] = $_POST['inputName'];
}
Based on some logic:
for ($i = 0; $i < 10; $i++) {
if ($i % 2 == 0) {
$dynamicArray[] = $i;
}
}
This would fill $dynamicArray with even numbers between 0 and 9.
4. Tips and Best Practices
Sanitize external input: Always sanitize and validate data, especially when it's coming from external sources like user input, to ensure security.
Use associative arrays wisely: If you're using string keys, ensure they're unique to avoid overwriting values.
Check existing values: When adding to an array, you may want to check if a value already exists to avoid duplicates.
if (!in_array($value, $dynamicArray)) {
$dynamicArray[] = $value;
}
Using these methods and principles, you can effectively and dynamically fill a PHP array based on any set of conditions or data sources.
#PHPDevelopment#DynamicArrays#WebDevelopment#ProgrammingTips#DataHandling#PHPArrays#BackEndDevelopment#CodingBestPractices#WebProgramming#DatabaseIntegration#vinhjacker#mageplaza
0 notes
Text
Build Complete 2023 CMS Blog in PHP MySQL Bootstrap & PDO Build Amazing Content Management System(CMS) with Full Admin Panel in PHP MySQL Bootstrap and PDO https://courseunity.com/free-courses/build-complete-2023-cms-blog-in-php-mysql-bootstrap-pdo/?feed_id=2281&_unique_id=64c1334ac2a99
#udemycourse #udemycourses #onlinecourses #onlineclasses #udemy #udemyfree #onlinelearningcourse #onlinecertification #courseunity
0 notes
Last Seen Blogs

worldofjoshuaa
World Of Joshua 🎞

loganzgreat
one day I'll cosplay

praeterx
Praeterx

maviedavant
Ma Vie D’avant

stevenewing
Steven Ewing