#pottery101
Photo

Made my first pinch pot @kirsty_iredale_potter ‘s lovely studio this morning! #Pottery101 (at Topanga, California) https://www.instagram.com/p/CeHO8z5v3jA/?igshid=NGJjMDIxMWI=
0 notes
Text
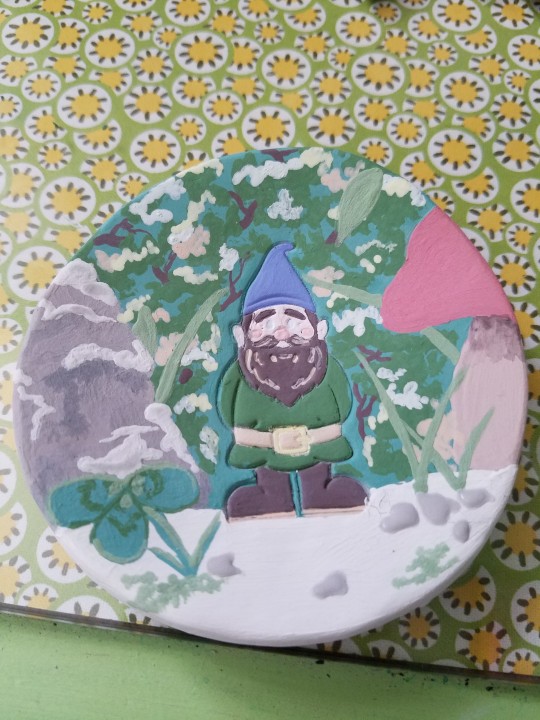
Just a quick update on this guy! He's done!
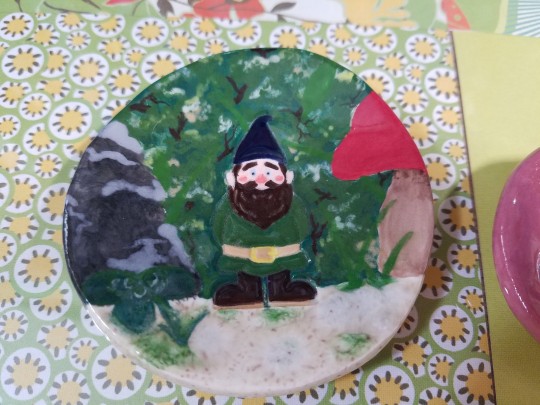
This is the final result. I did some touch-ups of the background and the clover, I also fixed some shrinkage issues in the glaze on the gnome himself. I then clear glazed everything but the speckled ground. The clear deepened the colors, also smoothed out the background a bit. I'm extremely happy with the result given all the experimentation and the fact this was my first detailed project for a customer. Speaking of, my customer was thrilled! So glad this guy has a loving home❤. Looking forward to some more projects like this in the future.
Any Ideas, want a piece, hit me up here, on Instagram or Facebook @moonburncreations!
#pottery#ceramics#moonburncreations#homedecor#etsyshop#handmade#bathroomdecor#gnome#ceramicglazing#ringdish#ceramicplate#spoonrest#teaspoonrest#teabagrest#pottery101#ceramics101
1 note
·
View note
Text
How to mix ceramic marbled clay?//Pottery101 via /r/Ceramics
How to mix ceramic marbled clay?//Pottery101
https://youtube.com/watch?v=y2ujraPRzlE&feature=share
Submitted January 26, 2021 at 02:03PM by AmberPottery101
via reddit https://ift.tt/2KQA6jH
0 notes
Text
I have acquired some rock hard clay! Joy... This is a 25lb block. Dry. Solid rock. I have 3 of these to try to rehydrate. I started with one already and had some fair success and did so quite simply.
I've done my fair share of research on how to rehydrate clay, asked some seasoned potters, and such. Much involved drilling holes, or putting it in a bucket to turn to mush.
I wanted something that wouldn't require TOTALLY reprocessing the clay. So on a whim I poured some water in the bag with one of the rocks. Dug a couple divots in the top and added some water. The divots were maybe a half inch deep, if that. I then tied that bad boy shut TIGHT! All the water went to the corners of the bag which is not optimal...I put it in a small tote and squished it to one side so the water level was most of the way up the side of the clay. Added some other items to keep it mushed.
I let it sit a few days, cracked it open today, flipped it while still in the bag, divots are now down. The clay that was at the bottom? Now viable, albeit wet, clay. After about 20 minutes out the 3/4 inch slab was dry enough to roll and form.
One of 5 pieces I was able to get out of my slab. These are drying and will go into a bisque fire so I can get a feel for how this stuff faired. This clay is actually pretty infamous, it's been floating around my parent's house for probably 20 years, my mom claiming she threw it in the back yard ages ago because it was dry. Well due to flooding it was found! And now I'm the proud owner of some age old, brand new, clay that happens to be low fire and the brand I use!
#pottery#ceramics#moonburncreations#dried clay tutorial#ceramics101#pottery101#rehydratingclay101#ceramicshowto#potteryhowto#itworkedforme
0 notes
Photo
When you don’t roll a large enough slab to cut out TWO dinner plates, you cut one plate and TWO wind chimes!🤣 This is just the chimes, I’ve had NO luck with the dinner plates so I moved it and didn’t want to touch it again to take a photo. My mom has been bugging me to cut some leaves for chimes for ages! This one’s for you Mom! #ceramic #pottery #ceramicsofinstagram #potteryofinstagram #moonburncreations #etsy #etsyshop #etsysellersofinstagram #etsysmallbusiness #handmade #handmadeceramics #handmadepottery #ceramics101 #pottery101 #potteryhowto #ceramicshowto #makingpottery #makingceramics https://www.instagram.com/p/CSceyver40J/?utm_medium=tumblr
#ceramic#pottery#ceramicsofinstagram#potteryofinstagram#moonburncreations#etsy#etsyshop#etsysellersofinstagram#etsysmallbusiness#handmade#handmadeceramics#handmadepottery#ceramics101#pottery101#potteryhowto#ceramicshowto#makingpottery#makingceramics
0 notes
Photo

The stars have aligned and I've acquired a small pottery wheel! After 3 disasters I made this tiny thing! Seasoned potters, please don't be offended by my meager attempt. But, for someone who has never touched a wheel I'm thrilled! It's small and slightly off kilter, and I love it anyway. Big thanks to all those who share their throwing videos, without you I would have been totally lost! It is definitely a learning curve! #throwingpottery #potterywheel #thrownpot #ceramics #pottery #handmade #potteryofinstagram #ceramicsofinstagram #moonburncreations #ceramics101 #pottery101 #firstsuccessfulpot! https://www.instagram.com/p/CRHUcKXDoip/?utm_medium=tumblr
#throwingpottery#potterywheel#thrownpot#ceramics#pottery#handmade#potteryofinstagram#ceramicsofinstagram#moonburncreations#ceramics101#pottery101#firstsuccessfulpot
0 notes
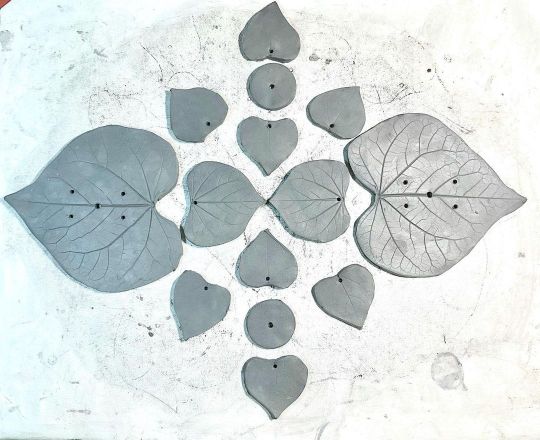
Photo

Ground ivy leaves making impressions. An in process of one of my latest pieces. Once I finish photos and listings it will be available in my shop. Happy 4th to anyone who celebrates! Be safe out there. #ceramic #pottery #ceramicsofinstagram #potteryofinstagram #moonburncreations #etsy #etsyshop #etsysellersofinstagram #etsysmallbusiness #shopsmall #womanownedbusiness #handmade #handmadeceramics #handmadepottery #ceramics101 #pottery101 #potteryhowto #ceramicshowto #makingpottery #makingceramics #leafdish #leafimprints #leafdesign #groundivy https://www.instagram.com/p/CQ6xbumDWwR/?utm_medium=tumblr
#ceramic#pottery#ceramicsofinstagram#potteryofinstagram#moonburncreations#etsy#etsyshop#etsysellersofinstagram#etsysmallbusiness#shopsmall#womanownedbusiness#handmade#handmadeceramics#handmadepottery#ceramics101#pottery101#potteryhowto#ceramicshowto#makingpottery#makingceramics#leafdish#leafimprints#leafdesign#groundivy
0 notes
Text
It has been a while since I've told a story on here. As you can see in previous posts, I have been up to stuff, but nothing particularly "story" worthy in my opinion, until now.
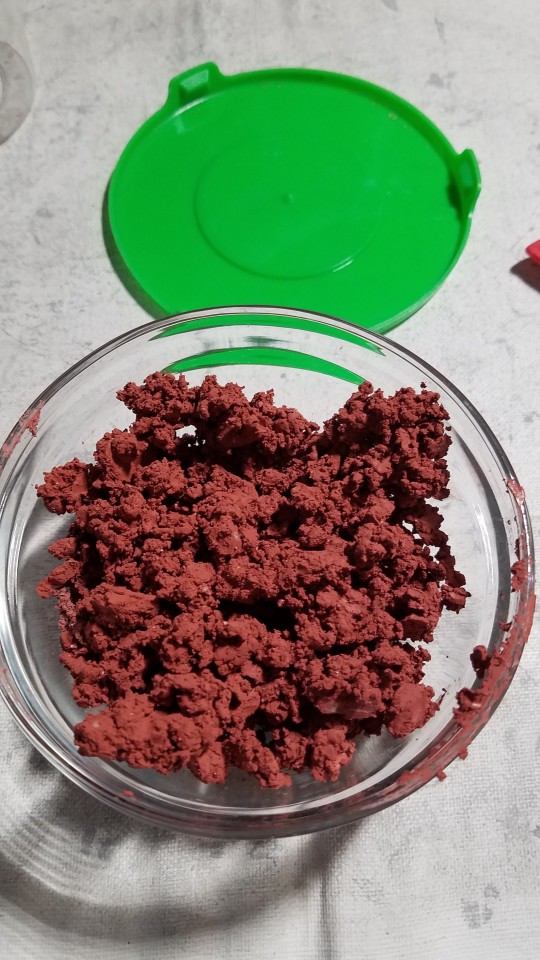
Let me start with my issue (not personally, those are too many to list), my ceramic issue, glaze to be specific. I picked up some new glaze recently, however it is from a small joint that doesn't sell glaze often so their new stock is usually rather old... In particular the colors and glaze types I'm into tend to not be so popular in this shop. SO, the "new" glaze I bought was dried out. Like barren desert, rock hard.
Like any semi-sane, logical, person, I stabbed some holes in that rock and added water! (Bad move! I'll explain later.) Well I stabbed and stirred, and stabbed and stirred, to no avail. It was just too dried out!
At this point I considered throwing them in a blender with water and crossing my fingers that I didn't die. But, I was talked out of this plan...
So on to some brainstorming. An electronic cheese grater came up. I tried it. AND IT WORKED SWIMMINGLY! For one whole minute. Then it got too clogged up to continue, and only a quarter of the jar had been grated. I wasn't cleaning the ENTIRE machine 3 more times to get it to work so the grater went out the window. This is however, where me saying adding water was a bad idea! If the glaze would have been dry I could have grated to my hearts content, but that dang water!
The next idea was an OLD coffee grinder. Coffee beans, hard glaze, what's the diff? Am I right? Kinda right actually. The coffee grinder did the job surprisingly well enough. Again, it would have been so much easier if it were dry, I did have a pasty caking issue. I had to keep scraping down the sides like dough in a stand mixer.

This is what the coffee grinder looked like after a wipe down and rinse of the lid. This will be the biggest hurdle, because I have more dry colors to rehydrate. I'm going to let it dry completely and then use a toothpick and q-tip to get it out of the nooks and crannies. I still totally suggest doing this with as dry of glaze as possible to prevent clogging and caking. Also! Definitely use a coffee grinder YOU WON'T USE ON EDIBLES EVER AGAIN! The leftover residue could be very unsafe if it got into your morning brew or whatever other food you may use a coffee grinder for. Have a designated GLAZE grinder!
This is the result. Hopefully, a texture much easier to rehydrate. I'm considering leaving it totally dry and whizzing it through the grinder again to get it as fine as possible. But we'll see.
As always, these are just my slightly hair brained ways of dealing with issues I come across in my ceramic pottery dabblings. Please, if anyone can suggest better ways drop a comment!! I can use all the help I can get. But, if there isn't a better way, here's one that works pretty well for a novice, or someone stuck for time and supplies. Hope this helps.
#pottery#ceramics#moonburncreations#ceramics101#pottery101#ceramicglazeproblems#ceramicglazehacks#potteryglazehack#potteryglazeproblem#ceramicglaze#potteryglaze
0 notes
Photo
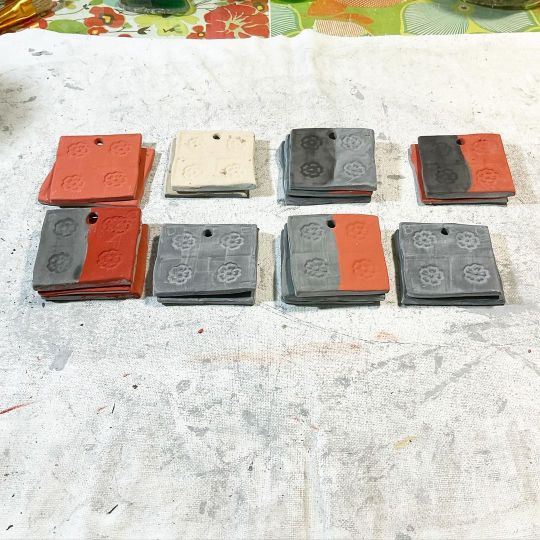
Piles of tiles on #testtiletuesday It is Tuesday right?! I hope so, or this would be a silly # Using the 8 @maycocolors on picture 3 I made 56 color combos😱! 40 #testtiles total! IF I can get them all to fit in my tiny kiln I will be firing them tomorrow. I am SO excited to see what comes out! This will be a huge door opened because my other glazes did not lend themselves to layering, because most were underglazes. But this could open whole new worlds of colors for my pieces and I can’t even express my feelings about that other than 😬 #glazing #maycoglaze #mayco #maycocolors #56combos #cermaics #ceramics101 #pottery #pottery101 #pilesoftiles #colorexperiment https://www.instagram.com/p/CQtplBuj2hp/?utm_medium=tumblr
#testtiletuesday#testtiles#glazing#maycoglaze#mayco#maycocolors#56combos#cermaics#ceramics101#pottery#pottery101#pilesoftiles#colorexperiment
0 notes
Text
I came across an interesting bit of info recently while working on a commission piece. I was dabbling with using and also layering different styles of glaze on the same piece. The results were surprising to say the least!
Some background info, I'm a novice! It has only been 4 years since I began playing with ceramics on and off, mostly off. Life got in they way more often than I would have preferred and I just didn't work on clay for about a year at one point. I started with an Amaco Velvet Underglaze set of 12, 2 ounce colors. (It seems my original set is not available anymore, but they do have new sets, 4 total) I purchased a set with your basic primaries, and those colors that may be used most. Later, when I started with clay again I purchased some Duncan specialty glazes. I now use a mix of the two brands, namely Amaco Velvet Underglazes and Duncan Crystal, Courtyard, Artisan, Designer, Envision, Cover-coat, and Concepts. As a result of availability nearby I have ended up with A LOT of Duncan colors, which sadly I just found out Duncan Ceramics is no more, as the company was bought out by Mayco and only a handful of their original colors will continue to be available.
But, to continue, I decided to try using Amaco AND Duncan glazes together on one piece, I have only done this minimally in the past and ONLY with the Velvets and Cover-coats, which are both matte underglazes. This time I tried the Concepts (a gloss underglaze) and Courtyard textured types with the matte underglazes. On the piece I was using them more specifically for their color variation so I didn't have to mix my own. I have found making mixes can be hit or miss, you either waste glaze by making too much so you can do multiple layers of the exact color, or you mix too little to do enough layers and end up with an inconsistent color. I have avoided making mixes recently UNLESS I make a color I plan to use often and make a large amount.
Here is the piece before being fired, wet on the left and dry on the right:

If you look at the rock and ground you can see where the majority of my different types of glaze layering occurred. The light shade of the ground is Duncan Artisan Cactus Sand, small rocks and highlights on the large rock are Duncan Concepts Light Gray, the moss on the ground is Amaco Velvet Dark Green. The miscellaneous bright green grass and leaves are Duncan Concepts Bright Kelp.
The D. Cactus Sand, D. Bright Kelp, and D. Light Gray are gloss when fired. And the A. Velvets are VERY matte, so I was unsure if they would play well together when fired. It's usually recommended that they're not used on top of one another.
ANYWAY, here is the result of doing just that!
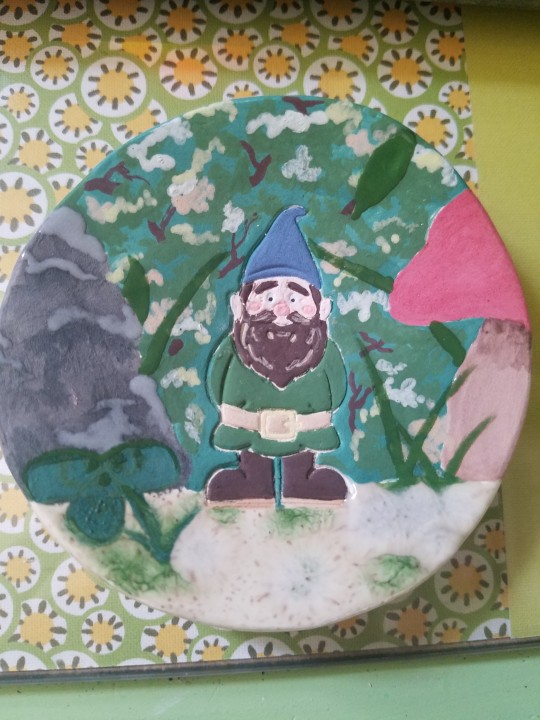
This is after firing, notice the D. Light Gray and A. Bright Green have melted into the D. Cactus Sand. The D. Bright Kelp did the same thing where it covered the D. Cactus Sand. The green veining is rather cool in my opinion, and the D. Light Gray causing the speckles in the D. Cactus Sand to starburst was a pretty neat result, as well. I absolutely LOVE the texture the ground has! The melting into each other has created a pattern I would not have been able to create otherwise!
So, in conclusion PLAY WITH YOUR GLAZES! Maybe don't do it on a customer piece in case the results are devastating, BUT I only did this because it was for a friend who told me to go nuts! So I was🤪 Test tiles are king when experimenting with such things, but don't listen to the "Golden rules" of ceramics or maybe the suggestions of manufacturers of mixing types of glaze. NOW as a disclaimer I would suggest doing research before mixing to make sure chemical make ups of the glaze combos are compatible and would not be DANGEROUS. But layering matte and gloss, or textured and not, could make for AWESOME results. So go make test tiles, do research, experiment, and enjoy! Also, DOCUMENT what you're doing, so if you have a COOL result you can duplicate! There is absolutely nothing worse than having a cool result and forgetting how you achieved it😭 Have fun learn from MY, or other's, mistakes AND successes!
#pottery#ceramics#moonburncreations#homedecor#handmade#etsyshop#bathroomdecor#pottery101#potteryhowto#ceramics101#ceramicshowto#glazeexperiments#glazing#firing#kilnfired#firingresults#glazemixing
0 notes
Last Seen Blogs


naiku-art
Texture Abuse Ahoy

sstan-hoe
𝐛𝐞𝐚𝐮𝐭𝐢𝐟𝐮𝐥 𝐠𝐢𝐫𝐥

calaisedinburgh-blog
Calais - Life in "The Jungle"

technovamp-cc
Sims 4 cc creator 💚 She/Her 🏳️🌈