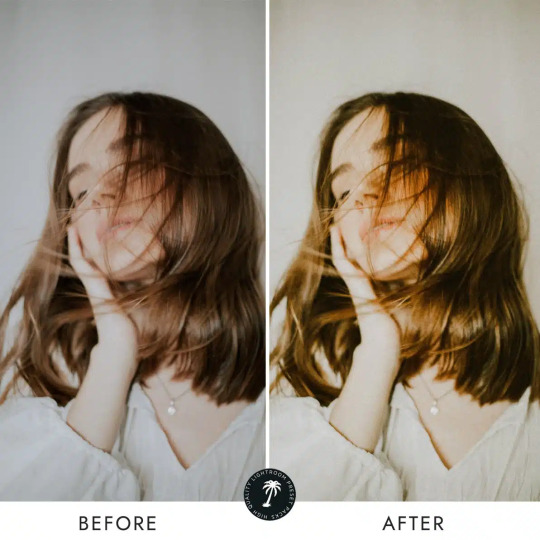
#preset: vibrant film
Text

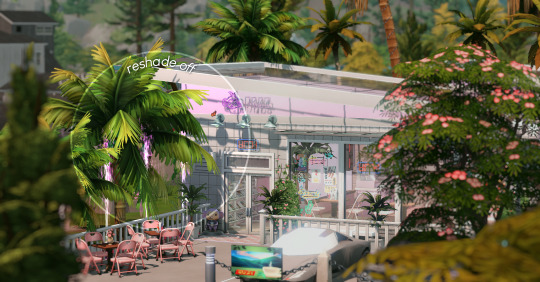
Solar Eclipse — 5 reshade/gshade presets
download (sfs) ♡
more details and previews under the cut
phantasma — inspired by retro aesthetic.
[ hazy and vivid with a magenta hue; works well under different lightings ]

corsair — inspired by fuji film.
[ vibrant and saturated with a cyan undertone; best for day time shot especially sky and ocean]

mystic — inspired by vintage film.
[ muted and serene with a moody atmosphere; works well in most settings ]
solaris — bright and natural vibes.
[ light and radiant with gentle translucence; works well under different lightings ]

nova — a gameplay friendly preset.
[ slightly enhanced contrast and saturation, removes green tint; for gameplay ]
**hotkeys are provided to toggle adof & mxao off. This preset is not the best for pretty screenshots but for gameplay.**

more preview here
for reshade users, you need to grab the gshade shaders for them to look the same as my screenshots
i highly recommend you to use sunblind & better in-game lighting mod (dark saturated light rooms) for better results
do whatever you want as long as you don't claim them as your own
feel free to tag me if you use them! i'd like to see it
61 notes
·
View notes
Photo

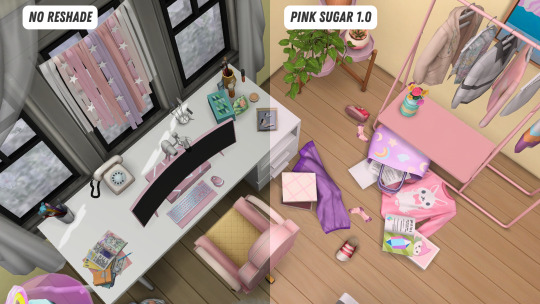

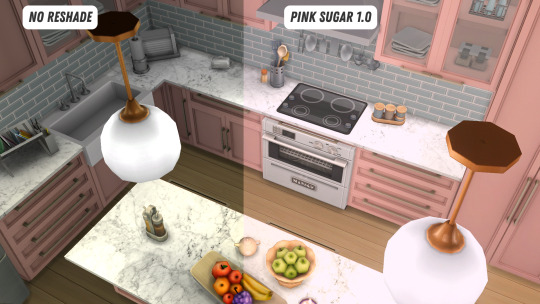

My preset PINK SUGAR for gshade/reshade
Hey everybody!
I originally created this preset in June 22. I didn't like it that much so I left in my WIP folder for many months until December.
It was right before New Years Eve when I decided to give this preset a shot again.
And here we are!
This preset was also (just like Milky Pastels) designed for not so dull yet still smooth gameplay so that everyone can have a colorful cas/gameplay even with an older PC/laptop.
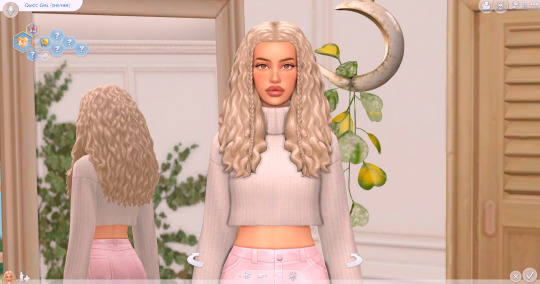
It works for CAS too!
UI is super clean and visible with this preset.
This one is more warmer, vibrant and playful than milky pastels.
Disclaimers:
-All of the outside pictures were taken in Copperdale on a sunny summer day around 10 am
-Don't forget to disable edge smoothing in game
-This preset is not designed for "professional" picture taking in game with blurry backgrounds etc. - there are no DoF/depth shaders used!
- For both CAS and GamePlay *(you can disable quint_MXAO for gameplay if you want to have normal UI without shadows but it's not necessary)
- Shaders used are listed as a last screenshot (you must have all of them for this preset to work properly)
- BONUS: if you don't want it to be grainy/film like just tick FilmGrain2 shader off.
- It also works with reshade (huge thanks to BlondeSimmer for testing it!)
- If you want your pictures exactly like mine above, I also used these mods:
NoGlo by Luumia
NoBlu by Luumia
Render CAS lighting by Luumia
-Do not re-upload
-Do not claim as your own
-You can tag my simstagram @simdriella so I can have a look at your creations with my preset! <3
Thank you for all your support! I really appreciate it!
DOWNLOAD
77 notes
·
View notes
Text
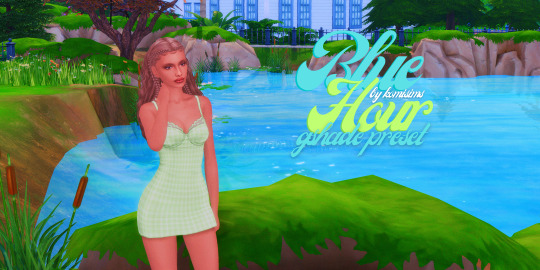

Blue Hour Gshade Preset
my first gshade preset; it's a very blue based vibrant shader with also chromatic elements and film noise that gives it a bit of a retro look. i thoroughly enjoyed making this and i hope to bring you all more gshade in the future. [ DOWNLOAD ]
6 notes
·
View notes
Note
How do you make your gifs have high quality? Do you use any presets or have any tips? Your edits are amazing, it would be AMAZING if you could share. <3
Ah thank you anon!! 🥰🥰
My tips are basically the same any other creator will give you tbh for good and crispy gifs your source material should be 1080p MINIMUM , I cannot stress that enough. For film search for files between 5-10gb for good results, but if you have space in your drives for even bigger files then go with these, sometimes files under 3-4gb are compressed as fuck and will only give you a headache when you try to color and The Pixels™ will inevitably show themselves. For tv anything under 1gb will be questionable, good streaming services rips are over 1gb for sure.
There is however good files not compressed for film under 3gb sometimes and they are encoded as x265 so if you don't have much space but still want to gif in quality get these downloads, in their name usually they say if they are 264 or 265 so look up for that. So in short:
Under 3gb encoded in 264: shit
Under 3gb encoded in 265: good!
If you need a place for downloads come of anon and I'll link you a trusted place for gifmakers only.
Okay enough on the files 😂 for doing the actual gifs I either screencap or use an external tool to trim an specific scene I want to gif. For screencaps I recommend mpv or mpv.net, both are open source programs and work really well and gifs will look the best imo. For trimming videos I use ffmpeg on my computer's CMD but it's not very user friendly if you don't know how to use ffmpeg well, I know people recommend handbrake though so there's that option and then use video frames to layers.
For sharpening I use 3 different settings depending on my source material:
Animation: I use a smart sharpen with 500 0.3, if it's ghibli or anime I'll lower the opacity of the sharpen around 80-85%
Tv/Film: a good source (files over 3gb) will only need a 500 0.3 sharpen sometimes. If I want it to look a bit more crispy I add another sharpen of 100 1. For not so good sources I apply a 500 0.4 sharpen and I lower its opacity to 80-85%
Youtube videos/music videos: first, YouTube is a bitch on quality so there's that, but if you can't find the thing you want to gif elsewhere (like our lord and savior Vimeo or the ShareMania forum) for YouTube I get my videos using Jdownloader, it will download the biggest file possible and more often than not it's the best quality possible. If the video even being 1080p looks kinda shit I use Topaz to denoise and clean my gif and then I apply a 500 0.4 lowered to 85% smart sharpen (gif making for kpop taught me many things lately 😂) and it looks like it was a video from a good source! There's also avisynth and vapoursynth but I don't use them, if you wanna check that out you can Google and lots of tutorials will show up, mostly from kpop creators.
After that, it's all coloring tbh. Know that shit files won't be able to handle vibrant coloring very well so be careful with that. If it's too bad I try to bring up the darks more to no make it too visible but you will always get pixelated stuff with bad quality source.
My saving settings vary between adaptive/diffusion and adaptive/pattern, if I'm working on animation or too heavily colored sets (like with gradients) I'll go with pattern, if not it's diffusion.
Okie I think that covers everything 🙈 if you ever need more help with gif making you can message me again and I'll gladly help!
You can also join the @pscentral server on discord where there's ton of gif makers (from beginners to well established ones) that will always be there to help and always give good feedback ☺️
33 notes
·
View notes
Link
Kindred Presets - The True Colors "PROSET" True Colors just keep on shining through with this brand new, innovative “proset” in partnership with Charla Storey. Created with Charla’s Portra 400 images in mind, True Colors brings beautiful, vibrant color to life in your digital and film imagery alike. This tool was specifically made because of Charlas incredible love of color. Skin tones and greens are just…heavenly! Built unlike any other tool, the marriage of a profile and preset, your Kindred “Prosets” allow you full control over your edits from top to bottom. They are extra versatile in that they can be used on digital images and films scans alike. Basically, we are obsessed, and we think you will be too! TRUE COLORS part of the storey collection This product is compatible with Adobe LR Classic version 10 or higher, LR, CC, and ACR 13 or higher.
0 notes
Text
Top Photo Editing Apps for Android and Mac: Enhance Your Creativity
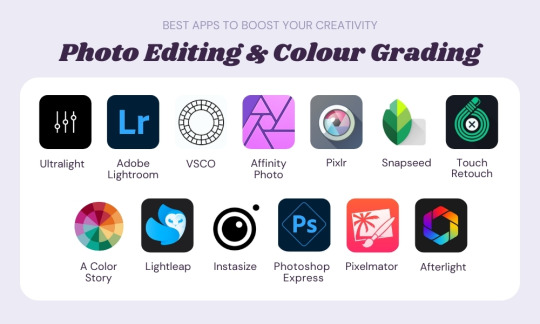
In today's digital age, photo editing has become an integral part of our lives. Whether you're a professional photographer or just an enthusiast capturing moments on your smartphone, having the right tools to enhance and manipulate your photos can take your creativity to new heights. With the plethora of photo editing apps available, it can be overwhelming to choose the best ones for your needs. Fear not, as we've curated a list of the top photo editing apps for both Android and Mac platforms, including the highly acclaimed Remini Pro APK.
1. Adobe Lightroom
Adobe Lightroom is a powerhouse when it comes to photo editing. Available on both Android and Mac platforms, Lightroom offers a wide range of editing tools and presets to enhance your photos. Its intuitive interface makes it easy to use, whether you're a beginner or a seasoned pro. With features like selective editing, HDR support, and cloud storage integration, Lightroom is a must-have for anyone serious about photo editing.
2. Snapseed
Developed by Google, Snapseed is a versatile photo editing app available for both Android and Mac. It offers a comprehensive set of editing tools, including selective editing, curves, and filters, allowing you to fine-tune your photos to perfection. Snapseed's non-destructive editing capabilities mean you can experiment with different edits without worrying about losing the original quality of your photos.
3. VSCO
VSCO is not just a photo editing app; it's also a vibrant community of photographers and creatives. Available on Android and Mac platforms, VSCO offers a range of preset filters inspired by film photography, giving your photos a unique aesthetic. With its advanced editing tools and social features, VSCO is perfect for those looking to elevate their photos and connect with like-minded individuals.
4. Adobe Photoshop Express
Adobe Photoshop Express brings the power of Photoshop to your Android and Mac devices in a simplified package. With features like one-touch adjustments, blemish removal, and collage creation, Photoshop Express is perfect for quick edits on the go. Its integration with Adobe Creative Cloud allows for seamless syncing of edits across devices, making it a convenient choice for busy photographers.
5. Remini Pro APK
Remini Pro APK has gained widespread popularity for its revolutionary AI-powered photo enhancement capabilities. Available exclusively for Android devices, Remini uses advanced algorithms to enhance old and low-quality photos, bringing them back to life with stunning clarity and detail. Whether you're restoring old family photos or improving selfies, Remini Pro APK is a game-changer in the world of photo editing.
Conclusion
With the abundance of photo editing apps available, finding the right ones for your needs can be challenging. Whether you're looking for professional-grade editing tools or simple yet effective filters, the apps mentioned above have you covered. From Adobe Lightroom's robust features to Remini Pro APK's groundbreaking AI technology, these apps will help you unleash your creativity and transform your photos into masterpieces. So why wait? Download these apps today and take your photography to the next level!
0 notes
Text
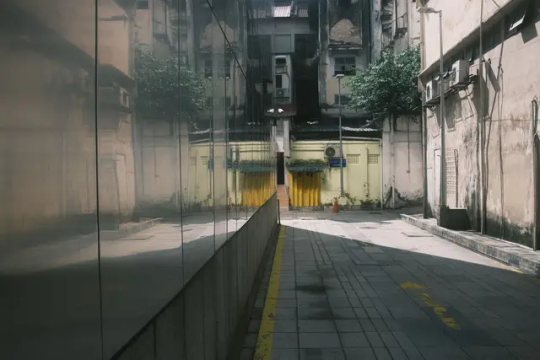
Reala Ace Film Recipe For Fujifilm X-Trans IV - Street Edition
A Japanese film simulation recipe with vibrant tonality, perfectly suited for a variety of scenes for the 4th generation Fujifilm Cameras
IvanYolo
Introducing the latest addition to Fujifilm recipes lineup – Reala Ace film recipe. Originally tailored for the Fujifilm GFX100 II and X100VI, this 20th film simulation meticulously blends faithful color reproduction with a distinctive hard tonality, ensuring its versatility across various subjects and shooting scenarios. Drawing inspiration from the beloved Fujicolor Superia Reala 100, the REALA ACE film simulation has quickly become a favorite among Fujifilm enthusiasts.If you find yourself still using a 4th generation Fujifilm camera, fear not. The Reala Ace film simulation offers a compelling recipe to replicate the sought-after aesthetic. It provides a bridge between the nostalgia of classic film and the convenience of digital photography.
About The Reala Ace Film Recipe
By using the Classic Negative film simulation as a base, Reala Ace is tweaked to imitate the Reala Ace film stock. This lets older Fujifilm cameras enjoy the unique tones of this film recipe. It's worth noting that the original REALA ACE film simulation on the GFX100 II and Fujifilm X100VI was designed to complement the capabilities of larger sensors found in newer Fujifilm models. So, if you're rocking an older Fujifilm camera, exploring this Reala Ace film recipe might be an excellent starting point to capture the essence of this innovative film simulation. Dive into the world of nuanced color and bold tonality with Reala Ace film recipe on your trusted Fujifilm gear.After conducting thorough research and analyzing the Fujicolor Reala Ace 100 film stock sample photos on Lomography, I observed subtle differences resulting from changing light conditions, but the tonality has been fine-tuned to suit a broad range of scenes. Interestingly, I've developed a comparable recipe, the papurudorimu recipe, which produces a tone remarkably similar to the observed results. What stands out to me in this Reala Ace film recipe is the resemblance in certain tones to the actual film stock.Now, turning our attention to the Reala Ace film recipe tailored for the Fujifilm X-Trans IV, there's a deliberate adjustment in the white balance shift, creating a more subdued and nuanced effect. This modification aims to enhance the overall visual experience, offering a unique tonal balance that complements the characteristics of the X-Trans IV sensor.Please note that when using the Reala Ace film recipe, the tonality may appear slightly muted due to the Highlight & Shadow adjusted to -0.5. However, this also means that the recipe is versatile and can perform well under various lighting conditions, making it a great option for any photographer.
Reala Ace Film Recipe: Great For All Scenes
The Reala Ace film recipe is the ultimate solution for all your photography needs if you are looking to shoot SOOC JPEG. Whether you're capturing lively street scenes, stunning portraits, or breathtaking landscapes, this recipe has got you covered. Its ease of use makes shooting a breeze, while its high-quality output ensures that your images stand out from the rest.It is imperative to shoot under ideal lighting conditions. The ideal conditions are most prevalent during the daytime when the sun illuminates the foreground while casting shadows on the background. This enhances and fully exploits the film recipe's unique attributes. If you are unsatisfied with the REALA ACE film simulation on your Fujifilm cameras, you might want to experiment with custom settings. Give it a try and see if it meets your preferences.Debates among the street photography community page on Facebook argue that when it comes to street photography, the usage of filters or presets can compromise the authenticity and rawness of the captured moment. However, I do not adhere to any strict rules or limitations when it comes to my approach to street photography. As long as it's not overly tweaked or adjusted till it looks weird, it's fine. So have fun and enjoy shooting, peeps!
Reala Ace Film Recipe Custom Settings
Film Simulation
Classic Negative
Highlight
0
Shadow
-0.5
Color
-0.5
WB / Color Temperature
Auto Ambience Priority, -1 Red & +2 Blue
Exposure Compensation
-1/3 to +2/3
ISO
Auto up to ISO 6400
Clarity
-1
Sharpness
0
Noise Reduction
0
Grain Effect / Grain Size
Weak / Small
Color Chrome Effect / FX Blue
Strong / Strong
Dynamic Range
400
Reala Ace Sample Photos
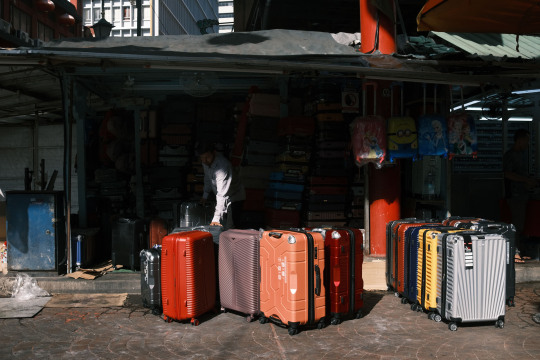
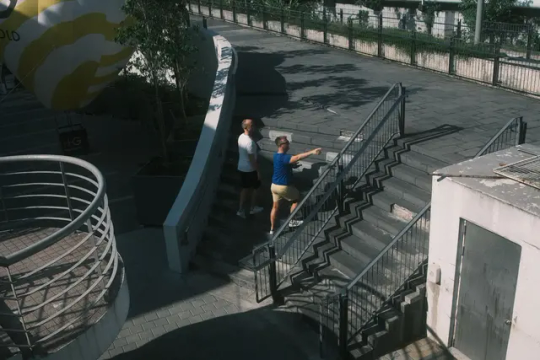
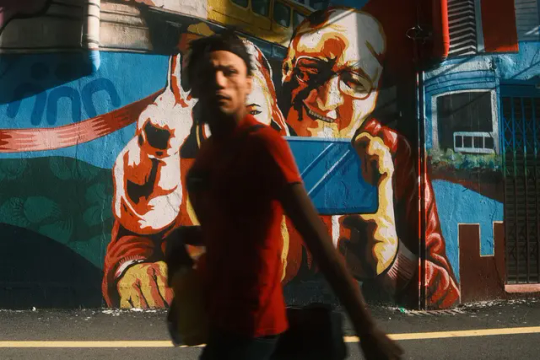
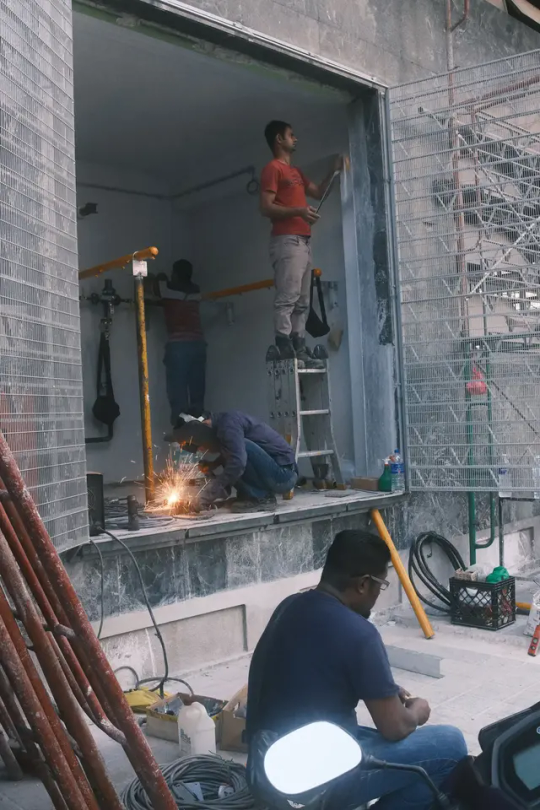
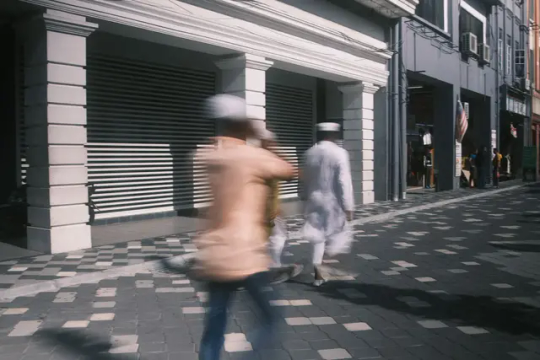
During my recent street photography session in Kuala Lumpur, I had the pleasure of testing out the Fujifilm X-T4 with the incredible SIRUI Sniper 23mm f1.2 lens. From the hustle and bustle of the city to the everyday moments of local life, I was able to capture stunning shots that truly showcase the beauty of this vibrant destination.
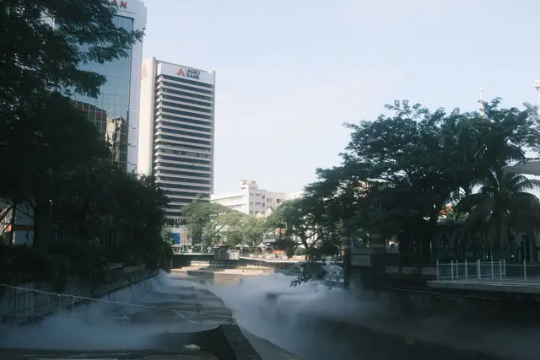
Fujifilm X-T4 // SIRUI Sniper 23mm f1.2 - Kuala Lumpur, February 2024

Fujifilm X-T4 // SIRUI Sniper 23mm f1.2 - Kuala Lumpur, February 2024
Fujifilm X-T4 // SIRUI Sniper 23mm f1.2 - Kuala Lumpur, February 2024
Fujifilm X-T4 // SIRUI Sniper 23mm f1.2 - Kuala Lumpur, February 2024
Fujifilm X-T4 // SIRUI Sniper 23mm f1.2 - Kuala Lumpur, February 2024
Fujifilm X-T4 // SIRUI Sniper 23mm f1.2 - Kuala Lumpur, February 2024
Fujifilm X-T4 // SIRUI Sniper 23mm f1.2 - Kuala Lumpur, February 2024
Fujifilm X-T4 // SIRUI Sniper 23mm f1.2 - Kuala Lumpur, February 2024

Fujifilm X-T4 // SIRUI Sniper 23mm f1.2 - Kuala Lumpur, February 2024

Fujifilm X-T4 // SIRUI Sniper 23mm f1.2 - Kuala Lumpur, February 2024
Fujifilm X-T4 // SIRUI Sniper 23mm f1.2 - Kuala Lumpur, February 2024
* This post contains affiliate links and I may receive a commission if you purchase through these links.
Looking for more Fujifilm SOOC Recipes?
Select a Fujifilm recipe
Arkham Dark
Boudoir Chrome
Carbon Obscura
Cine Obscura
Classy Glow
Cine 2046
Cine Matte
Cira 800 Film
Dark Diary
Dark Matter
Downtown Bloom
Ethereal Street
Fujicolor Pro 400H Film ( Street Version)
Fujicolor Pro 400H Film (
Read the full article
0 notes
Text
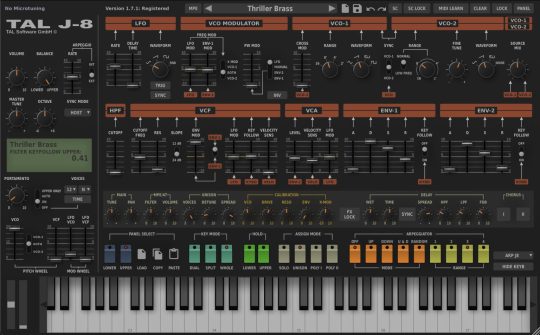
Download Togu Audio Line – TAL-U-NO-LX-V2
Introduction:
Experience the nostalgic warmth of classic analog synthesizers combined with modern flexibility and convenience with the TAL-U-NO-LX-V2 by Togu Audio Line. This powerful virtual synthesizer faithfully emulates the iconic sound of the Roland Juno-60, a legendary analog synth that shaped the music of the '80s and beyond. TAL-U-NO-LX-V2 not only captures the essence of the original hardware but also enhances it with contemporary features, making it an indispensable tool for producers, musicians, and sound designers.
Capturing the Vintage Vibe:
TAL-U-NO-LX-V2 is meticulously crafted to replicate the sonic character of the Juno-60, renowned for its lush pads, dreamy strings, and rich analog tones. From vibrant leads to velvety basses, this virtual instrument delivers the unmistakable warmth and expressiveness that defined an era of electronic music. The attention to detail in emulating the Juno-60's architecture ensures an authentic and nostalgic experience for users, whether they are seasoned synth enthusiasts or newcomers to the world of analog synthesis.
Modern Features, Timeless Sound:
While paying homage to its analog predecessor, TAL-U-NO-LX-V2 goes beyond mere emulation, offering a range of modern features that elevate its capabilities. The addition of polyphonic mode, unison, and arpeggiator opens up new creative possibilities, allowing users to explore contemporary soundscapes while still retaining the vintage charm. The interface is intuitive and user-friendly, making it easy for musicians to dive into the world of analog synthesis without any steep learning curves.
User-Friendly Interface:
TAL-U-NO-LX-V2 boasts a sleek and intuitive interface that mirrors the layout of the original Juno-60, ensuring a seamless transition for users familiar with the iconic hardware synth. The controls are logically laid out, making sound shaping and tweaking a breeze. The inclusion of tooltips provides helpful information on each parameter, empowering users to understand and experiment with the synthesizer's vast sonic palette effortlessly.
Expanded Sonic Palette:
Beyond its faithful emulation of the Juno-60, TAL-U-NO-LX-V2 introduces additional features that enhance its sonic versatility. The expanded modulation matrix allows users to route various parameters to LFOs, envelopes, and more, enabling dynamic and evolving soundscapes. With an extended range of presets, users can explore a wide spectrum of sounds, from classic analog tones to cutting-edge, experimental textures.
Integration with Modern Workflows:
TAL-U-NO-LX-V2 seamlessly integrates with modern digital audio workstations (DAWs), offering both VST and AU plugin formats. Whether you're working on a film score, electronic dance music, or any genre that demands expressive and emotive synth sounds, TAL-U-NO-LX-V2 complements your workflow, bringing the iconic Juno-60 sound directly to your production environment.
Conclusion:
Togu Audio Line's TAL-U-NO-LX-V2 is more than just a virtual synthesizer; it's a gateway to the golden era of analog synthesis, reimagined for the modern age. With its authentic Juno-60 emulation, intuitive interface, and expanded feature set, this virtual instrument stands as a testament to Togu Audio Line's commitment to delivering exceptional tools for music creators. Whether you're a seasoned professional or an aspiring artist, TAL-U-NO-LX-V2 invites you to explore the timeless magic of vintage synthesis while embracing the possibilities of the future. Elevate your sound with the warmth, character, and versatility of TAL-U-NO-LX-V2.
#kalaplugin#softwer#vst#70s#star wars#welcome home#wally darling#trigun maximum#the owl house#the mandalorian
0 notes
Text
Effortless Editing with Lightroom Information
Effortless Editing with Lightroom is an online course that teach how to use Adobe Lightroom for post-processing and editing photos efficiently and effectively.
How to Effortlessly Edit Your Photos in Less Than 15 Minutes (Even if You Have Hundreds of Photos to Edit)
What if you knew you could edit hundreds of photos in minutes, not hours… would you find the task less daunting?
My name is Josh Dunlop, and here’s something few people know… You can edit your photos in Lightroom, 10x better than you can imagine now, just by following a simple process.
Pictures so striking and vibrant that others might accuse you of outsourcing your processing to a professional. You don’t need a PhD in computer science, and you don’t need expensive training.
And I’m going to prove it to you.
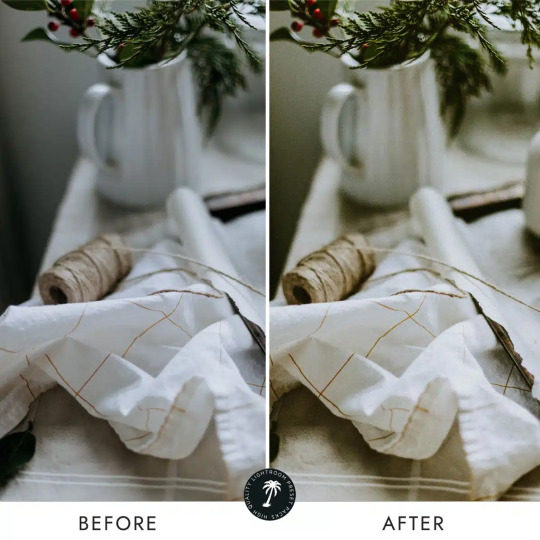
Take a look at this…
I took this picture before discovering what I’m about to share with you.
As you can see, it’s a decent picture, and I was OK at editing, but it won’t win any awards.
Now look at this…
I edited this picture just a couple of days later. Same photo, same computer, same software…
How I Became a Great Photo Editor…
When I first started with Adobe Lightroom, I was a lousy editor.
I was reluctant to process my photos in the first place, and I had a ton of preconceived ideas about what processing my photos meant…
I thought it had to take hours to go through a single photoshoot. But the reality is there’s a quick and easy way to edit photos fast.
I thought that the file management system in Lightroom was complicated and broken. The truth is it’s rather simple, once you have the right “roadmap”.
I thought it was almost unethical to edit my photos. But it turns out I was letting them down by not processing the raw files properly.
I started with old-school film photography, so editing my photos always felt like cheating. But the truth is, great photographers like Ansel Adams understood the power of processing their photos better than anyone.
It wasn’t until I attended a private closed-door workshop with Lightroom Master, Casey Kiernan (a co-instructor of mine) that I was finally able to master Lightroom editing.
I took everything I learned from that workshop (and everything I’ve learned in the years since then) to transform my portfolio and produce the images that you now see on this page.
The process is simple, and so much faster than I thought it could be… And by learning how to edit my photos, my portfolio took a quantum leap forward.
What You’ll Learn In This Course?
The exact workflow we use 100% of the time – (It’s a myth that you have to start at the top and end at the bottom!)
The best way to fix skin blemishes in just a few clicks
How to add life and detail to your raw files by using your histogram and sliders
Why most photographers skip the lens correction… and how you can use this tool to your advantage
The fastest way to edit all your photos at once
The lazy man’s way to create panoramas without exporting to Photoshop or cropping
How to save more time by creating and using your own presets
Where and how to crop and straighten for maximum results (because YES, cropping is OK!)
How to use a ‘surgeon’s scalpel’ to change individual colours
The do’s and don’ts of vignetting and dehazing
5 simple edits I never skip (and you shouldn’t either)
The hidden preview for your sharpening sliders that professionals always use
The only background blur tool you’ll ever need and how to make it easy to use
How to transform the perspective of your photo with the click of a button
And much, much more…
More courses from the same author: Josh Dunlop
0 notes
Text
Reviving the Golden Age: Unveiling the Magic of Vintage Film Presets
Introduction:
In today's fast-paced digital era, where instant gratification reigns supreme, sometimes we yearn for a touch of nostalgia – a glimpse into the past that transports us to an era of class, elegance, and artistic finesse. Enter vintage film presets, the modern-day alchemy that allows us to recreate the timeless charm and soulful aesthetics of vintage photography effortlessly. In this blog, we will delve into the captivating world of vintage film presets, unraveling their secret power to transport our digital photographs back in time.
1. Setting the Stage: What are Vintage Film Presets?
When digital meets analogue, something truly enchanting is born. Vintage film presets, in simple terms, are a set of digital filters designed to emulate the look and feel of classic film stocks. By mimicking the unique characteristics of past photographic emulsions and processing techniques, these presets add an exquisite cinematic touch to your images. From warm sepia tones reminiscent of the 1920s to vibrant hues inspired by 1960s Kodachrome, the possibilities are endless.
2. Unlocking Timeless Beauty: The Features of Vintage Film Presets
Vintage film presets offer a plethora of features that contribute to their undeniable allure. From subtle grain, authentic film grain patterns, delicate color toning, to precisely crafted grain intensity, each of these features plays a crucial role in recreating the essence of vintage photography. By experimenting with different presets, photographers can evoke the nostalgia and evoke emotions associated with specific film eras.
3. Elevating Creativity: How Vintage Film Presets Enhance Image Editing
One of the most remarkable aspects of vintage film presets is their transformative power. By applying them to your digital photographs, you can instantly transport your images into different eras and evoke a range of emotions. Whether you're aiming for a classic black and white look resembling the Silver Gelatin prints of the mid-1900s or a dreamy, faded aesthetic inspired by early Polaroid film, vintage film presets allow for effortless storytelling potential and amplify your creative expression.
4. Unlocking Inspiration: Exploring Iconic Film Stocks and Their Presets
To embark on a voyage through the world of vintage film presets, it's important to familiarize yourself with iconic film stocks and their presets. Whether it's the renowned Portra, Tri-X, or Velvia, every film stock has its unique visual signature that holds a special place in photographic history. Understanding the characteristics and aesthetic of these presets can help guide your artistic vision and enable you to create breathtaking, retro-inspired masterpieces.
5. Preserving History: The Importance of Vintage Film Presets
Vintage film presets not only provide a window to the past but also help preserve the rich history and artistry of analogue photography. By incorporating elements of vintage film into our digital workflows, we pay homage to the pioneers of photography and ensure that their legacy lives on in the art we create today.
Conclusion:
Vintage film presets empower photographers to tap into the magic of past eras, infusing their digital photographs with a renewed sense of nostalgia and artistic grandeur. With their ability to evoke emotions, tell stories, and pay tribute to the pioneers of photography, these presets have undoubtedly become an essential tool for both amateurs and professionals seeking to restore the allure of vintage aesthetics in the digital age. So, dare to step back in time and let the invigorating charm of vintage film presets breathe life into your images, capturing the essence of a bygone era for future generations to cherish.
0 notes
Text
Mastering Photo Editing: Tips and Tricks for Lightroom and Photoshop
As a photographer, capturing a great shot is just the first step toward creating a stunning image. Post-processing is equally important to bring out the full potential of your photo. In this guest post, we'll explore some tips and tricks for photo editing in Lightroom and Photoshop to enhance your images and take your skills to the next level.
Understanding Color Grading
Colour grading is the process of altering the colours in your image to create a specific look or feel. You can adjust the hue, saturation, and luminance of individual colors or color ranges in Lightroom and Photoshop to create a more cohesive and polished look. Experiment with different color combinations to find the right balance for your image. https://clippingpathproject.com/
Mastering Exposure
Exposure refers to the amount of light that reaches your camera sensor. Getting the right exposure is crucial to creating a well-exposed image that captures the essence of the moment. In Lightroom and Photoshop, you can adjust the exposure, highlights, shadows, and contrast to balance out the lighting in your photo and create a more vibrant and dynamic image.
Retouching Techniques
Retouching is the process of removing blemishes or imperfections from your image. In Lightroom and Photoshop, there are many tools and techniques to help you retouch your images, including spot healing, cloning, and patch tools. Use these tools to remove unwanted objects or distractions in your photo, creating a cleaner and more professional look.
Sharpening and Noise Reduction
Sharpening and noise reduction are important techniques to bring out the details in your image. In Lightroom and Photoshop, you can adjust the sharpness and noise reduction settings to reduce the noise in your image and create a sharper and clearer photo.
Using Presets and Actions
Presets and actions are pre-made settings and adjustments that you can apply to your images in Lightroom and Photoshop. They can save you a lot of time and effort when editing your photos, allowing you to quickly achieve a specific look or style. Experiment with different presets and actions to find the ones that work best for your images.
Clipping Path Project
Advanced Techniques for Photo Editing
Beyond the basic techniques we've covered, there are many advanced techniques in Lightroom and Photoshop that can take your photo editing skills to the next level. For example, you can use the selective color adjustment tool to adjust the colors of specific areas in your image. You can also use the curves adjustment tool to fine-tune the brightness and contrast of your image. Additionally, you can use layer masks in Photoshop to apply different edits to specific areas of your image, creating a more customized and unique look.
Using Third-Party Plugins
In addition to the built-in tools and functions in Lightroom and Photoshop, there are also many third-party plugins that can expand your editing capabilities. For example, the Nik Collection by DxO is a popular plugin that includes a suite of tools for advanced color grading and black-and-white conversion. Similarly, the VSCO Film pack includes presets that mimic the look of different film types, allowing you to achieve a more vintage and filmic look in your images. https://clippingpathproject.com/
Staying Organized in Lightroom
As you edit and work with more photos in Lightroom, it's important to stay organized to avoid getting overwhelmed. You can use Lightroom's organisational tools, such as keywords, tags, and collections, to keep track of your photos and easily find the ones you need. Additionally, you can use Lightroom's batch editing capabilities to apply the same edits to multiple photos at once, saving you time and effort.
Conclusion
Photo editing is a crucial aspect of photography that can help you bring out the full potential of your images.
1 note
·
View note
Text
Find The Best Lightroom Presets For Instagram
Pixmellow offers lightroom presets for Instagram, and it is specially designed to make your photographs look like shiny, vibrant cinematic films. That is the best option for your Instagram feed. Our presets are flexible and work well on editorials, weddings, portraits, etc.
0 notes
Text
Vsco app for android

VSCO APP FOR ANDROID HOW TO
VSCO APP FOR ANDROID SKIN
VSCO APP FOR ANDROID FULL
If you love to spend hours looking at vision or mood boards, then this is the feature that will astonish you over and over again. Perfect collections sorted by content such as nature scenes or portraiture which allow the user to showcase its creation and impel interaction on the platform. Once you click on the post, details like its caption and filter used will be readily available below the picture.ĭiscover is the platform where the real magic happens. Here you can scroll to see posts from your friends and followers, as well as repost them to your profile. The Feed section is very similar to other photo-sharing apps. The borders tool offers various border styles, which offer a clean edge to the snap and make it more attractive and eye-catching.
VSCO APP FOR ANDROID FULL
The Split Tone has a full set of colors on both shadows and highlights through which you adjust the tint of your photos as you want. This offers the cinematic effect and pops out the subject efficiently in your picture. This tool is used to add the shaded edges to the snap corner.
VSCO APP FOR ANDROID SKIN
This is a unique option offered by VOSCO which helps you to enhance the Skin texture of your snap and makes it more stunning and eye-charming. This can be adjusted just by swiping the slider and make it in the way you want. The Highlights & Shadows option lets the user get the details from both regions. This helps you to enhance the look of your snap even if it is taken in a dark mode. The exposure is used to modify the exposure of the images. Through VSCO recipes feature you can collage your edited snaps in a different style, but the feature is only available for our premium members. The genres include Warm, Featured, Cool, Black & White, Vibrant, Portrait, Urban, and Vibrant. There is a massive collection of presets available in diverse styles. The inbuilt automated image scanning algorithm offers the presets based on your images. VSCO Presets allow users to improve their photos instantly. Let’s discuss the features possessed by the VSCO app. The VSCOCam has a superfluity of features, which help you to edit your images and make them eye-catchy. You can explore more premium features by login to it. The application has a marvelous collection of film effects that offer a cinematic view to your click. VSCOCam is featured with a wide variety of filters and presets, which helps you to make your photo a more lovely and eye-catchy one. The app is the perfect way to discover like-minded friends simply by following them. Same like Instagram the app also has its platform where you can edit and post your photos. VSCO App is the photo editor and sharing platform, which is commonly known as VSCO Cam, produced by Visual Supply Company.
VSCO APP FOR ANDROID HOW TO
3 How to Download and install VSCO App?.
0 notes
Link
Mastin Labs Adventure Everyday Lightroom Desktop Presets Capture Iconic Film Looks with Ease Easily achieve iconic film looks with Mastin Labs Adventure Everyday that has defined generations of photography, from the vivid landscapes of travel journals to the timeless black-and-white narratives of yesteryears. Experience the vibrant colors, nostalgic warmth, and distinct grain that shaped the photographic artistry of the past. Included looks Ektar 100:Vibrant for landscapes and outdoor brilliance. Gold 200: Nostalgic warmth for everyday moments and golden memories. Tri-X 400: Timeless for evocative black-and-white narratives. Ideal for weddings, candids, and remembering moments past 18 AI & Specialty Tools (Mastin Magic Toolkit™) 4 RAW images with tutorial Mastin 3-Step Workflow™ "The Mastin Labs Adventure Everyday pack is BY FAR my favorite. It makes my heart sing, and I couldn't be happier!" - Rachel Ashcraft Mastin Labs Adventure Everyday Presets for Lightroom are ideal for tropical landscapes, road trips off the beaten path, and authentic moments with your friends. With the streamlined Mastin 3-Step Workflow™ and end-to-end support from our team, you can finally ditch hours of editing and get back to the moments you live for. System requirements for Mastin Labs Adventure Everyday: Minimum software version for: Lightroom Classic 12, Lightroom CC 6, Adobe Camera RAW 14.4 Minimum OS version for: macOS Big Sur (version 11.0), Windows 10 (64-bit, version 20H2) Cameras and files: Mastin Labs Adventure Everyday Lightroom presets are compatible with all camera brands and raw formats. 18 AI & Specialty Tools (Mastin Magic Toolkit™) Yes, it’s all included. No separate purchase is needed. AI Tools of Mastin Labs Adventure Everyday Fewer steps. More precision. Zero learning curve. Spotlight: Create balance and make your image pop by brightening your subject and darkening the background. Light & Airy Assist: Brighten and soften less-than-ideal scenes without losing detail, to boost your light & airy look. Dark & Moody Assist: Transform your photos from neutral to moody with deeper shadows and muted highlights. Skysave: Recover overexposed sky, even through branches and windows, without affecting the rest of your photo. Skin Smoothing: Smooth and soften skin blemishes faster than ever using Lightroom’s powerful AI targeting technology. Specialty Tools Standard tools to correct the trickiest photos. Orange Reduction: A lifesaver for mixed light, extra warm sunsets, and spray tans that won’t quit. Strobe Soften: Open up a whole new world of film emulation in the studio by optimizing the micro-contrast of each film look for studio strobe and flash photography. Dynamic Noise Reduction: Apply just the right amount of noise reduction to give our images a clean look without losing fine detail. Lens Correction: Fix vignetting and distortion, minimize color fringing, and remove chromatic aberration to instantly improve every image. Auto Transform: Tired of crooked buildings? Clean up your photos by correcting vertical and horizontal lines. Film Inspired Tools Make it feel just like the film. 6 Tone Profiles: Inspired by the Fuji Frontier film scanner, these tone profiles correct contrast while preserving the look of the film. 2 Grain Settings: While our presets start grain-free, you can complete your look with 35mm or medium-format grain. Bonus Tutorials and Education of Mastin Labs Adventure Everyday We're here for you after your purchase, too. Included in your pack are 4 RAW images and a step-by-step tutorial. Explore More from Mastin Labs Check out these other amazing presets from Mastin Labs: Mastin Labs | Founder PLUS+ Lightroom Desktop Presets Mastin Labs – Vintage Slide Film Lightroom Desktop Presets
0 notes
Text
Adobe premiere pro 2.0 file empty

#Adobe premiere pro 2.0 file empty how to#
#Adobe premiere pro 2.0 file empty pro#
#Adobe premiere pro 2.0 file empty software#
#Adobe premiere pro 2.0 file empty pro#
Also sets Adjustment Layer to Screen mode”.ĭownload these Premiere Pro CC 2018 presets now – they’re free!ĭownload Jarle’s Premiere Pro Presets Version 3.0Ĭomplete list of effects presets in version 4. Apple ProRes and Sony XAVC Intra codecs are both fully color managed and GPU accelerated. With Rec.2100 HLG color space support in Premiere Pro, broadcasters can work with more vibrant and dynamic content. HDR offers wider color and light ranges that are closer to real life. For example, the “Blooming Highlights” preset says “ Use on Adjustment Layer. Keys out the highlights and blurs them. 2100 HLG (Hybrid Log Gamma) in Premiere Pro. OpenEXR can support multiple layers of imagery, but Photoshop cant read or save layered. Access all the capabilities of OpenEXR from within Adobe Photoshop, After Effects, and Premiere Pro using ProEXR.
#Adobe premiere pro 2.0 file empty how to#
Most of the presets have tool tips so when you hover over them you’ll get info about how to use them. OpenEXR is the visual effects industry-standard floating point file format and the best format to use when working with 32-bit HDR imagery. In addition, there are LOG to LIN presets for Alexa, Canon Cinestyle for DSLRs and for Sony F3, some scaling tools for HD to SD, 1080 to 720 etc., and some useful Compositing tools like Dynamic Garbage Matte, and some cool Miscellaneous presets. Now there are 106 presets in total! Most presets from earlier are still included. You’ll get lots of Color Grading presets, including several “Looks” presets for Bleach Bypass, Teal & Orange, Sepia, Color Negative, Cross Process and many more. All presets using obsolete effects have been replaced by new ones using the new effects. I’ve included the Deadpool presets for Handheld Camera, more Audio presets, and more compositing tools. Now, you can download version 4.0 for Premiere Pro CC 2018, with even more cool and useful presets. The 1.0, 2.0, and 3.0 versions of my presets have been downloaded more than 375,000 times, and are used daily by documentary film editors, wedding video makers, students, broadcast companies, and even Hollywood. Books on Premiere Pro and After Effects.Workshop: Build a Motion Graphics package for your company.First launched in 2003, Adobe Premiere Pro is a successor of Adobe Premiere (first launched in 1991). and published as part of the Adobe Creative Cloud licensing program.
#Adobe premiere pro 2.0 file empty software#
Let me create Motion Graphics Templates for your company Adobe Premiere Pro is a timeline-based video editing software application developed by Adobe Inc.
Motion Graphic Templates for Premiere Pro.
Workshop: Build a Motion Graphics package for your company (EN).
Create Lottie animations for apps and the web in After Effects.
Premiere Pro and After Effects Training (EN).
Workshop: Lag Videografikk-pakke til din bedrift.
Kurs i lydmiks og lydfiksing in Adobe Audition.
Lær å lage Lottie-animasjoner for apper og web i After Effects.
After Effects kurs for viderekomne (NO).
0 notes
Text
Saints Row Review (Xbox Series S)

Our Saints Row Review welcomes us to Santo Ileso, a vibrant fictional city in the heart of the American Southwest. In a world rife with crime, where lawless factions fight for power, a group of young friends embark on their own criminal venture, as they rise to the top in their bid to become Self Made. Experience the biggest and best Saints Row playground ever created; the unique sprawling world of Santo Ileso is the backdrop for a wild, larger-than-life sandbox of thrilling side hustles, criminal ventures, and blockbuster missions, as you shoot, drive, and wingsuit your way to the top.
Saints Row Review Pros:
- Decent graphics.
- 59.8GB download size.
- 1000 Gamerscore.
- HDR support.
- Controller settings - Invert axis and sensitivity sliders along with rebinding buttons.
- Co-op settings - open to all/invite/friends only, friendly fire, Co-op pranking, and HQ customisation.
- Tutorial frequency can be set to off/low/default and high.
- Accessibility options - vehicle speed limit slider, automatic QTE, no time limits, timed objective difficulty slider, customize controller dead zones on the sticks and set toggles, high contrast mode, motion blur, camera shake, takedown cameras, full caps, reticle settings, mini-map size slider, GPS arrow setup, enemy health bars, blood and gore, brutal takedown, Colourblind mode, and force underwear.
- Five difficulties - Tourist, hustler, entrepreneur, sensei, and boss.
- In-game cutscenes.
- Character creator - choose from 8 Boss presets or go custom with body, skin, hair, head, face, tattoos, and personality options.
- Wouldn't be a Saints Row game without the ability to change chest size, dick size, and then if you want underwear or not. Oh and nipples, full nipple settings section.
- Can skip the cutscenes.
- The opening tutorial section will teach the basics of combat.
- It runs at a fast pace.
- Perform melee takedowns for health.
- Pop up of kills and feats like headshots and double kills, drifting, driving in the wrong lane, and many more.
- Shooting feels good with a powerful aim assist and button to auto-target explosive elements like barrels and fireworks.
- Excellent voice work.
- End of mission breakdown.
- Full gun customisation from color to patterns, metallic effect sliders, gloss sliders, and surface options.
- Unlock abilities/buffs on guns by doing set gun objectives.
- Dumpsters act like loot chests giving rewards and loot when searched.
- Enemies can drop cash.
- A mobile phone is your gateway to skills, missions, camera mode, styling, and more.
- Side hustles are optional side missions.
- In vehicles, you can side swipe to knock cars or blow them up.
- Over-the-top physics.
- Michael Bay levels of over-the-top explosions.
- Play how you want.
- The map shows points of interest, side jobs, and everything in between.
- Challenges through your phone can be done to open new opportunities and events.
- The wanted app is a hitman-style set of missions where you have to take a target out.
- The radio station wheel allows you to quickly change between the genres.
- Weapon wheel.
- Save and load when you want.
- The garage is where you store your cars and set favorites.
- Unlock new activities and services as you progress like picking up cargo in helicopters or leaning out car windows and shooting people.
- Brilliant action movie-style set pieces.
- A lot of Easter eggs and nods to other games and film franchises.
- Jimrobs Garage is unlocked through the story and opens up chop shop (steal cars) activities and car customisation.
- Every car type has a special upgrade to earn.
- Such an awesome main character, sassy and channeling Ab Fab with attitude.
- The whole lost your job skit was so relatable, funny, and well-paced.
- The story is all about how you and your mates create a crew and take over the town from the rival gangs.
- Friends can be called upon to help you and doing their unique missions can have them using different weapons and gear.
- Buy new perk slots with in-game cash, you have minor, major, and elite level perks.
- Unlock and use fast travel points.
- Cool short intro animation when entering shops and activities.
- Find and photograph Collectibles to decorate the home base. In the app, you get a clue on its location and a silhouette of the item.
- The Empire table - this is where you build new criminal ventures within the town.
- You generate money from your businesses.
- When exiting a car you can opt to jump on the roof and shoot.
- Threat activities are done to increase your venture/business earnings.
Saints Row Review Cons:
- For all the accessibility settings there is no way to turn off any of the swearings.
- Few instances of robotic-looking animations especially in cutscenes.
- The drifting model is insane.
- Using the phone gets a bit fiddly with so many menus.
- Not always clear where to go to do things.
- It does feel like they chucked everything Saints Row related into it and saw what stuck especially with the side missions and collectibles.
- The Ai can bug out and go crazy, running you over or somehow jumping into you.
- Brutal takedowns have to be charged up which is quite annoying.
- Physics goes absolutely mental at times especially when towing cargo.
- Fast travel points are far and few between.
- A lot of swearing.
- Everything ends up in just a series of gunfights and maybe a bit of driving to the next gun fight.
Related Post: Cursed To Golf Review (PlayStation 5)

Saints Row:
Official website.
Developer: Volition
Publisher: Deep Silver
Store Links -
Xbox
Read the full article
0 notes
Last Seen Blogs


dating-testsieger-blog
Dating Testsieger
fakebloood
Fake Blood

gucciking-hes
Crisp trepidation❤️

lauraej
Infinite Abyss