#purely for gifmaking purposes
Text
Welcome weebs and friends
What is this blog?
Inspired by similar blogs, the purpose of this account is to ask Tumblr which anime they have seen or not using polls.
Posting a mix of top rated anime + YOUR suggestions ✨ Read more below the cut
Check tags on this post for easy access/filtering !
I will start with the Top 100 anime as listed on Anilist, ranked by average score, and working my way down. From that list I will exclude movies (there's a blog for that!), specials, music, and OVA when relevant.
Alongside that, I will take requests via ask ! Just check in the top 100 first :)
Disclaimer : this blog has a purely informative purpose, and I do not endorse in any way the content of featured animes. Watch at your own discretion.
Content
To avoid being redundant, multiple seasons of the same anime will be grouped into a single poll, with one option for each season/named arc. I will not include animes that are still airing, and wait for later.
Each post will contain a poll with the following options :
I've never heard of this anime
No (I have not seen this anime)
Up to season [number / name of season]
Partially (for 1-season animes)
Yes (I completed this anime)
When I feel this is necessary, I will include content warning for the show. You are strongly encouraged to do your own research before watching anything, see below.
Tags will include various things such as dates, name in various languages, AL rating, genre... idk I'll see! I love tagging so feel free to send requests
FAQ
Can I recommend multiple animes ? Yes ! I would prefer if you send one ask for each though, it makes it easier for me to manage.
How do I know if something was submitted already ? I have a Kanban board with all the backlog, you can have a look there
What is your pp/header ? They're both from The Apothecary Diaries ! I'll change from time to time with stuff I watch and like
Can you recommend me something to watch ? Yes I'd love to !!!! Send me an ask or a DM, it might take a bit of time though
Furthermore
To know more about content warnings, you can ask in the comments, or use this crow-sourced website doesthedogdie.com. Keep in mind that you may encounter spoilers. Stay safe uwu
Shameless self-promo : check out my manga/anime sideblog @lost-in-mangaverse ! I don't post much there don't worry
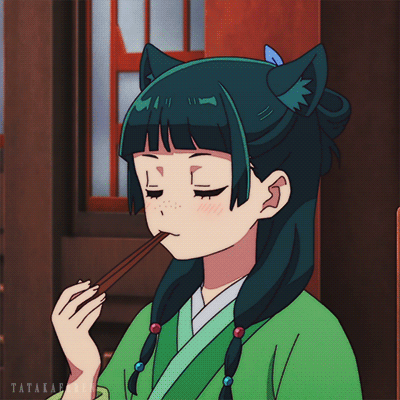
Profile picture by @tatakaeeren ! Support your local gifmakers 💖
Like this blog ? Check out @haveyoureadthismanga-poll @haveyouplayedthisgame-poll @haveyouplayedthisgame-poll, and find many more in the post below !
#poll blog#anime#current rate: 2 polls/day#haveyouseenthisanime poll#submission#■■■■■■■■■■■■■■■■■ 'not a poll' tags: ■■■■■■■■■■■■■■■■■#not a poll#recommendation#poll results#■■■■■■■■■■■■■■■■ release date tags: ■■■■■■■■■■■■■■■■■#70s#80s#90s#2000s#2010s#2020s#■■■■■■■■■■■■■■■■■ watch % tags: ■■■■■■■■■■■■■■■■■■#0-25%#25-50%#50-75%#75-100%#■■■■■■■■■■■■■■■■■ Misc. tags: ■■■■■■■■■■■■■■■■■■#ongoing#completed#hiatus#11-13 ep#22-24 ep#25-50 ep#50+ ep#100+ ep
32 notes
·
View notes
Text
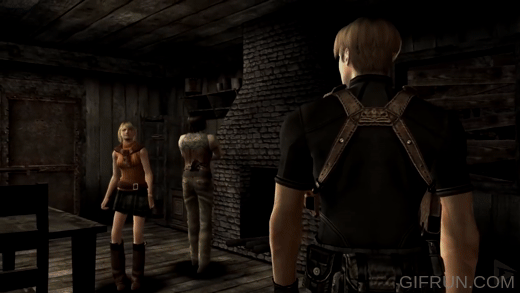
Why the remake cabin kicks the OG’s ass -an analysis 🔎
Basically it has to do with a lot of elements. Sound, cinematic framing, how well written the entire segment is in general. All that sweet jazz. Also sorry in advance, I had to gifmaker some shitty gifs because I needed examples 😭💀
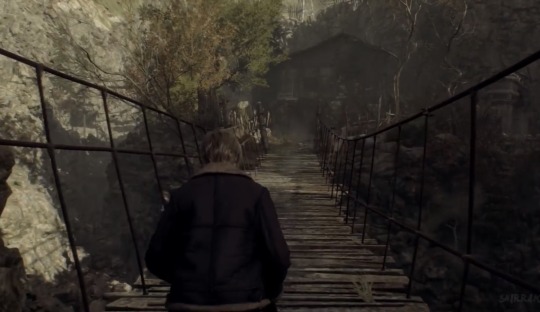
So I read up on a lot of filmmaking for this post about what makes a good set piece. At the start, the game already sets it up by subconsciously familiarizing the player with the cabin; making it one of the first areas we pass by. There’s something about how you see it in its position; in between the trees, sort of in the same center as the bridge, very by itself. Clearly it’s important. Later, the Saddler mindfuck scene at the church actually shows us why the villagers are on the chase. And it's all tied to how well realized the cult theme is in the entire story. It puts a slightly more sinister spin on the villagers' motivation compared to the og where it sometimes feels like they're purely used as obstacles.
And yes there’s actually PAYOFF this time. No more "vamanos" and the villagers just leave. Or for Luis to ask "so what now?". This time the villagers' condition gets woven into new exposition and a new goal; the Plaga ordeal inside the characters. And the end scene defines Luis role. A great set piece should have a well written purpose to advance the plot forward. And we actually experience first hand the whole hive mind thing instead of getting a 5 min Saddler monologue about it.
Talking about the technical stuff in scenes too. Like listen to the music and audio during the run up towards and after Luis closes the door, the music become this muffled droning as soon as the door is shut. It indicates that you've entered a different space that's more confined and sheltered from the outside w/o immediately breaking the ambient tension. Not necessarily an upgrade from the og but in the og, the escalating music stops because the payoff is seeing Luis. Whilst the remake still likes to remind you that you're still in a weird situation.
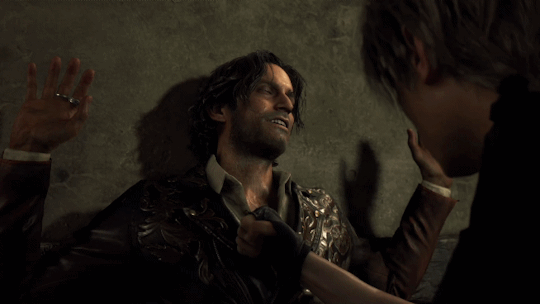
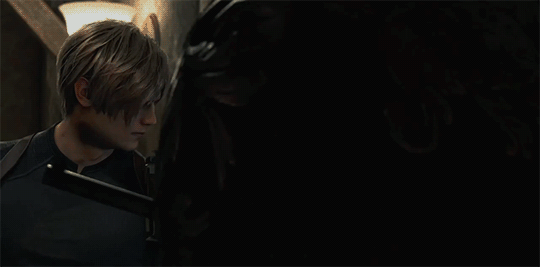
I also talked before how the camera loves to follow characters. In this shot you follow Leon forward and then you’re backing up behind Luis in this continuous camera movement. And see how tight the camera sticks behind Leon’s shoulder? He takes up like 75% of the frame at one point, with the camera subtly zooming in even though Luis is the focus. There’s a visceral feel in the confrontation, how its putting pressure on Luis just by how the scene is directed.

And the sound during that is like auditory storytelling. I know my audio doesn’t quite do it justice because it’s been compressed to shit so y’all might want to seek out the actual scene. But when Luis hits the wall here, the strings fade out and the sound of the rain is brought forward. Audio-wise, it’s like it’s bringing our focus to the presence of Luis and Ashley. It's also just ASMR af.
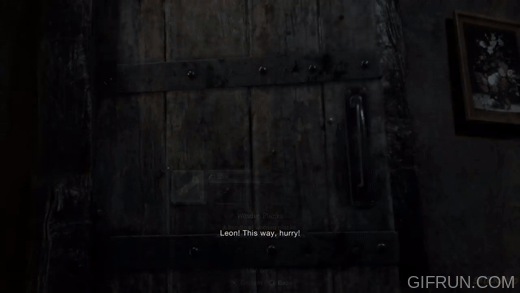
Another example of the fluid camera transition from earlier is when Ashley hides. The camera leads away from her and it follows that same “leading away” movement when it transition cuts to the window with Leon going into frame. Like look how seamless it tells action w/o having to do a lot of harsh cuts unlike the gif of the og below. The remake tends to show multiple activities either within the same shot or following a visual style so that it's easy to digest.
And holy shit, the way the music just disappears when our dudes take position here is so FUCKING GOOD. Because all you hear is the echo of the cult chanting and the ASMR patter of rain. I think of the silence as equivalent to taking a deep breath. And it’s funny because the sound effect when the scene transitions to the player is just this very intense and layered sound of exhaling. The way the camera also pulls back in the cutscene so that there’s no break from scene to gameplay just makes it so immersive.
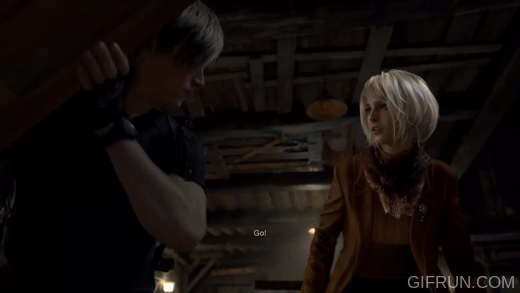
Also those two shots we get from Leon and Luis’ perspectives before the gameplay is kinda interesting too. Very “Main Character POV” angle because the camera is positioned at the guys’ eye level, as if we the audience are directly in front of them. At that moment we sort of take the place of the characters as the player. The “it’s game time” line is so hype because it actually does feel like it’s being said to us.
I think the writing for the fight itself is way better than in the og. There's a real rhythm to how the conflict happens; a somewhat story structure. The setup, the moment things go to shit, the resolution. The setup happens in the cutscenes and as you're battling the early wave of villagers. The Plaga baddies I see as the first climax, because they only start conveniently popping up around the time you're scrambling to get the new boards. You get them up and there's your sort of downtime, the 'falling action' before things ramp up again.
There’s a clear transition to "the moment things go to shit" phase; it's all the elements working together in the entire segment. You get a visual cue which is the ladder, an auditory cue of the noise upstairs, and then you get the in-game cue from Luis. And the musical cue is particularly what the remake does best. Like often when it wants to change up the pace during a certain part, they'll simplify the track but make it a bit deeper to build up this new adrenaline.
And every big set piece needs constrasty elements to show different perspectives. I believe just the simple imagery of seeing the mob outside as you're constantly having to kick the ladder is so effective because it shows scale. It makes us actually feel that the problem is as big as it is. It's a smart show of perspective especially after starting the fight in a confined area. This part of it was kind of weird in the og. Even though there's a mob, you could always stare out some window and it'll just be a void there (probably due to the graphical limitations).
But before you even trigger the Bull Head dude's cutscene, like again, you already hear an auditory cue of him. Also his addition makes the scene a true "everything is going to shit" moment. You kinda need that enemy as a standout variety. Like the og is iconic but it's very straightforward with the ambience and the enemy encounter. In the remake, everything is an escalating bombardment to the senses. Especially on the first playthrough, at this point you're on your last leg, no heal, no shotgun/rifle ammo left, the cult chanting is overwhelmingly loud now. It's funny but also apt that when Ashley saves the guys, she's enveloped in this holy light. Even the camera angle that's positioned lower looking up visually puts her in a higher position than the audience.
#this post took me out man. it’s also just way longer than my last analysis 💀#resident evil 4 remake#resident evil 4#re4r#leon kennedy#re4 remake#luis serra#ashley graham re4#re4 analysis#re4make
76 notes
·
View notes
Note
i've been wanting to say something for a while now but i didn't want to be a killjoy bc i know everyone on this site wants to be witty and whatnot but as someone working in the industry as a colorist, everytime i see yall making jokes about how shitty the color grading is on a show/movie you're giffing it just shows me and others in my field how little we're appreciated/how much our hard work is overlooked in favor of the pretty actors on the screen, like clients aren't already giving us hell everyday for post-production work. i appreciate it's sometimes difficult to "color correct" a scene for giffing purposes but ig i'd just like to remind people that at the end of the day, gifmaking is still transformative work, as in, there's an entire team of artists who spent blood sweat and tears shooting, editing, color grading, etc the content some of ya'll profit off of (tho making money out of gifs is an entirely different convo i won't be bringing up here lol) only to be insulted "jokingly" about it. you wouldn't make edits of an illustrator's original work and say "the colors they used are shit" or "the art style sucks? doesn't suit the character at all". i'm not singling you out dev, but since you're the one i often see in the tags making these comments (esp recently), i just felt like i had to say something.
I apologise for hurting anyone's feelings. Truly I do. I would never degrade anyones work. But given half the scenes I've giffed recently have been pure sepia where there is 0 colour except yellow, dark as hell or blue. any insults, even the joking ones, of which ive made like 2 or 3, are directed right at hollywood in general since afaik you don’t get to decide the tones or themes, thats the people above you and as i’ve said if colourists were just left alone to do their job they are experienced in we would have amazing shit. but hollywood seems to recently lean into the the darker and more yellow the better. Which has been increasing since game of thrones and the last season where you couldnt even see the last battle it was that dark.
Also colouring is just personal taste? someone might like overly blue gifs, or sepia ones idk. I don't actually know what to say to this so I'll just....... go back to not talking on dash because every time I do someone yells at me specifically even if its about other people.
I've never said anyone's work is shit tho. and i reblog and praise packs that don't even put colouring on them so idk. I've called the executives and hollywood bosses shit i think but thats more to do with how they treat their employees/people in general.
#rpt#rpc#rph#sorry but it feels very singling me out when im the only one ever getting shit for this#or anything else#back to not talking just posting packs and reblogging
4 notes
·
View notes
Photo


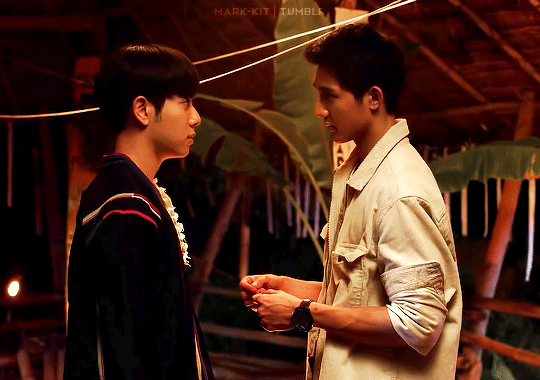
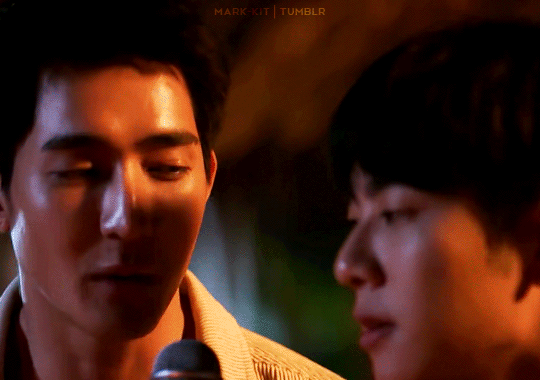

1000 STARS | EPISODE 3
Let me teach you how to smile.
#a tale of thousand stars#atots#earth pirapat#mix sahaphap#phupha x tian#1000 stars#*#they are insane for being like this already#how i wish this show wasn't shot at night#purely for gifmaking purposes#2k
2K notes
·
View notes
Text
a mini tutorial on color correction !
from the original stage:
to this coloring ^^
please note: this guide will be very text heavy ! if you have any additional questions please feel free to ask me ! also every gifmaker has their own coloring style so everything i did for this gif was purely based on what i wanted to do for the coloring ! you can implement color correction into your own personal style ^^
1.) first identify what exactly you’d like to fix !
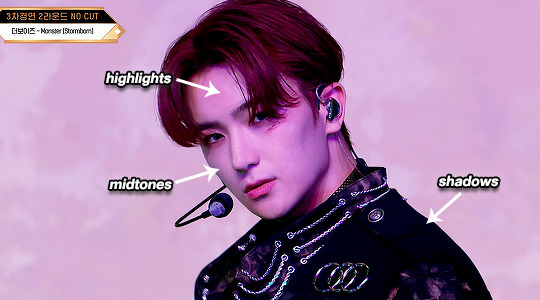
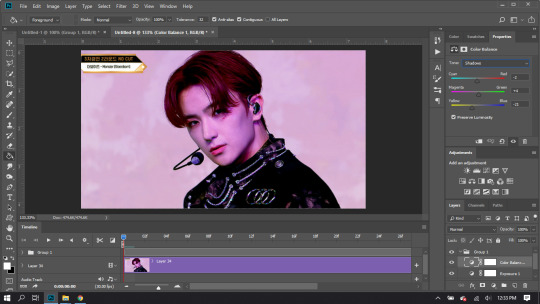
you’ll notice here i have pointed out shadows, midtones and highlights on the original video ! by identifying what you’d like to fix you can isolate these various aspects in photoshop in order to fix them ! i’ll be starting with the color balance adjustment layer :o ! you’ll notice that everything is saturated in purple lighting (magentas)
2.) color balance is your bestie !
so you can probably see that purple lighting is the point of contention here (lol) with that in mind you can go to color balance and select either shadows, midtones, or highlights to start color correcting ! there’s really no set way to do this i usually just move the sliders around and eyeball it until i think it looks okay (or until i h8 it and i just wanna give up LMAO)
- i started with shadows here ! bc the shadows had a more blue and purple tone i moved the sliders to the contrasting color (more yellow and green) to balance out these
- you’ll notice i changed the most in midtones... skintones are usually warmer tones (reds and yellows) so increasing those in color balance in midtones will reintroduce some normal skintone colors you may need in order to fix saturated lighting

- for highlights, i think this is just personal preference, but i really like cool tones for highlights ! bc i like natural white light (similar to outdoor lighting) i tend to lean highlights over to cyans... but a note: this might overexpose and wash out the gif so adjust accordingly ! here i added purple and yellow highlights as well

3.) hue/saturation is your bestie too
i don’t have a visual for this but in the hue/saturation adjustment layer you can isolate certain colors and adjust those colors individually ! for example in this gif i selected magentas in the drop down menu, then using the “hue” slider, adjusted magentas over to red tones ! (this is bc natural skintones are again more red than purple) and i usually do this color isolation in most my colorings ! you can select for cool tones and adjust them all to one color quite easily with the hue slider ^^ bc i have a deep rooted h8red for yellow tones i usually use hue/sat to adjust them over to orange / red tones !
4.) selective color is my bestie PLS
selective color is another way to isolate and adjust a specific group of colors ! for this coloring, bc there was so much magenta i lowered the magenta slider and increased the yellow slider in the “reds” tab (for skintone purposes ^^)

now you’ll notice that the magentas have almost all been adjusted over to red ! with that the purple lighting is gone ! what i did from here were additional adjustments: color balance - to correct highlights bc you can see that the highlights are too red ! by leaning over to cyans in color balance for highlights the lighting becomes more neutral than pink / red
then a hue/sat adjustment to turn down the saturation of the reds... reds look much more saturated on mobile than they appear on my desktop so usually i turn down saturation of reds by about -10 in hue/sat and then:

and that’s about it ! :o i usually turn down contrast and fix lighting as needed but for color correcting this is usually my process ! things are always a bit different for each gifmaker but i hope this was a little bit helpful for anyone looking to color correct some bad stage lighting ! if you read all of this thanks a bunch ^^ and i wish you a wonderful rest of your week :] if you have any other questions feel free to dm me or send an ask :o !
#resources#photoshop#gif resources#photoshop tutorial#color correction#not tbz#jess.text#feel free to rb and share if you'd like ^^#it's kind of long omg#i love how i wrote this as if i know what i'm doing#fun fact: i do not !
366 notes
·
View notes
Photo

(unofficially titled: how to change the grey wall)
As a thank you for reaching 2.5k followers, I thought it was about time to stop being lazy and do a gif tutorial as it has been frequently requested. Hopefully, this will help anyone who wants to start making gifs as well as anyone who wants to understand how to create colourings!
What You Will Need:
- Photoshop (I use CC)
- A source video
What Will Be Covered:
- How to get the video
- Timing, Resizing & Cropping
- Sharpening
- Colouring (and how to achieve extra af colours)
- Subtitles
- Saving your gif
This is going to be very thorough and informative (to the best of my ability) so all the information on how to make gifs is below the cut! As a disclaimer, you can use any version of photoshop for this.
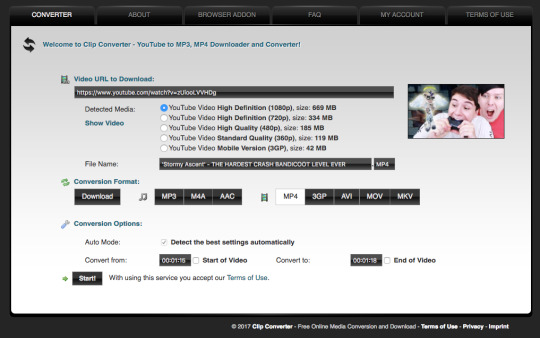
1. Getting the Video.
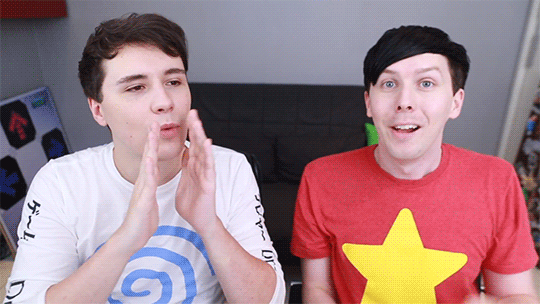
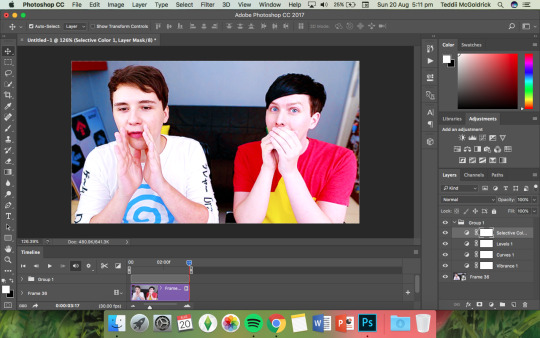
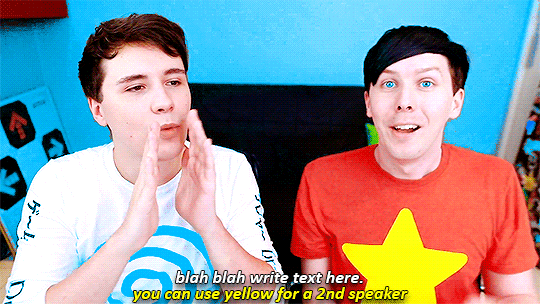
For this tutorial, I’ll be using a random clip from Dan & Phil’s crash bandicoot video. There are a lot of different methods to download a youtube video but I prefer using clipconverter. When downloading a video, you want to get the highest quality available (always try to get at least 720p). I used the download settings shown below:
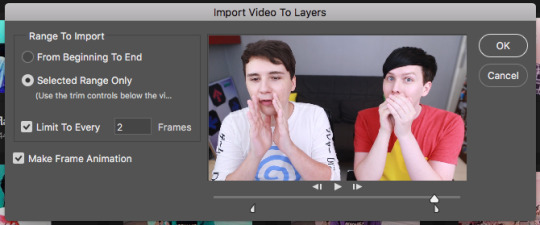
Once it’s downloaded, open up photoshop and import the video. To do this, go to File > Import > Video frames to layers. I use the settings shown below. (I had to trim the video slightly to only include the part I wanted)
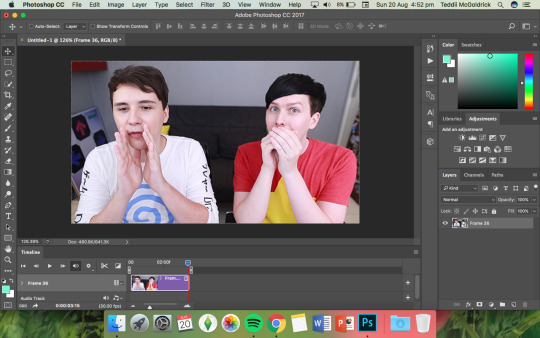
Now that your video is imported, make sure your workspace looks similar to mine (the timeline section is the most important thing for gif making. you can add it from the window menu).

2. Timing, Resizing & Cropping.
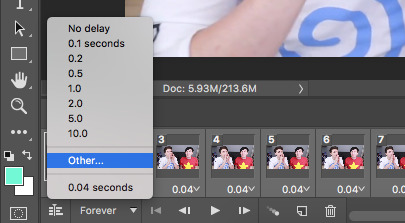
Timing is super important in making sure your gifs aren’t too fast or too slow. To alter the frame rate, select all your frames (shown at the bottom of your workspace) and then click on where it says 0.04 change the speed to 0.09.
After that, we have to change the image size since it’s currently way too big for tumblr. To do this, go to Image > Image size and change it to the settings shown below. 540px is the current optimised sizing for tumblr although 268px is used when making gifs that will be displayed in two columns like this.

Cropping is an optional step that I sometimes do as a way to make the file size smaller/for the aesthetic. Youtube videos have a default ratio of 16:9 and to alter the ratio you just use the crop tool and change it to what you desire. side note: I often use the cinematic ratio of 2.35:1 (i used it in this tutorial’s header).
3. Sharpening.
Sharpening your gifs is essential to making them look clean and crisp. Below is the difference between what our current gif looks like with and without it:
Without:
With:

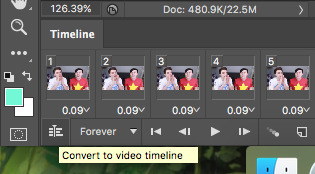
As you can see, the second gif is way more crisp and defined. I use this action to sharpen my gifs (Full details on how to use it can be found in the link.) Once the action is finished, I then convert the frames into a video timeline by pressing the button in the bottom left:
I then select all the layers, right click, and convert to smart object. Now your workspace should look like this:
4. Colouring.
Colouring is by far my favourite part about gifmaking and the reason why I made this tute (questions about colour have always filled up my inbox so I hope this answers some of them). I’m going to show you how to make the same bright blue colouring that I used for the header!
I’d like to start by saying that I never took art or design classes so my knowledge on why adjustment layers do what they do is very minimal. I pretty much learnt how to colour by playing around in Photoshop so this is just a disclaimer about how there is probably an easier/proper/more informative way to do this.
I didn’t particularly know how to explain half the settings so some will be accompanied by screenshots while others will just have descriptions (I really hope it makes sense because heck, my colouring method is chaotic).
Firstly, we want to make a new group to put the adjustments in so to do this you go to Layers > New Group... and make sure the mode is set to pass through.
To create colourings, I use the following adjustments:
- Vibrance
- Curve
- Levels
- Brightness/Contrast
- Selective Colour
- Hue/Saturation
- Colour Balance (occasionally)
Vibrance: I almost always make the vibrance +100 (I don’t alter saturation)
Curves: how you make a curve will differ with every video but for this gif I set my curves to this

Levels: it does a similar job to curves tbh
Brightness/Contrast: I chose not to alter it for this tute.
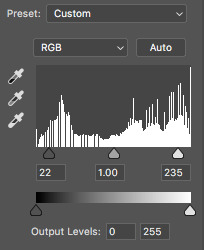
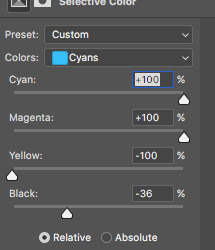
Selective Colour: now this is where A LOT of adjustment is going to happen. I found this section the hardest to explain so I apologise in advance. I tend to heavily alter cyan and blue.
Since we have the ability to alter red, yellow, green, cyan, blue, magenta, white, neutral, and black, I’ll write the specific adjustments I used instead of adding a lot of pictures to this already massive post. But this is what selective colour looks like:
Reds: Cyan -34, Magenta +5, Yellow +8, Black - 7
Yellows: Cyan - 37, Magenta -31, Yellow +35, Black +14
Cyans: Cyan +100, Magenta +100, Yellow -100, Black -36
Blues: Cyan +100, Magenta -65, Yellow -100, Black -26
Now this is what it should look like after adding all those adjustments:
Yes, it is slightly blue but not THAT blue. We then have to add a second selective colour layer with these settings:
Cyans: Cyan +100, Magenta +15, Yellow -100, Black - 8
Blues: Cyan +100, Magenta -21, Yellow -100, Black +15
Blacks: Cyan 0, Magenta 0, Yellow 0, Black +20
(more selective colours will be added later because I’m extra)
Hue/Saturation: This a neat adjustment where you can turn one colour into a completely different colour. For this gif, I chose only to adjust the colour blue with these settings:
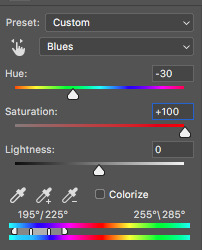
Now you’re probably confused at why it looks so noisy but don’t worry! We’re going to fix that (this is where it gets kinda tedious. Feel free not to use the hue/sat adjustment if you want to make your gifs quickly. I wanted to make this tutorial super in depth hence why it’s about to get problematic)
Selective Colour (Again): You now have to create a 3rd selective colour layer and place it under the hue/sat layer before using these settings:
Magentas: Cyan +100, Magenta -100, Yellow +100, Black +79
Cyans: Cyan +100, Magenta +100, Yellow +5, Black 0
Blues: Cyan +100, Magenta -16, Yellow +100, Black -47
Your gif should now look like this:

Some noise will still remain and we’re going to fix that by erasing some of the adjustment layers! You may notice that the far right behind Phil looks messy so, with the erasure tool, erase that area on the hue/sat layer.
There is also some noise/unwanted colour on the lounge and Phil’s hair so I did the following:
I erased the area of the lounge on selective colour 1, 3 and hue/sat and I erased Phil’s hair on selective colour 1,2,3 and hue/saturation.
Now your layers should look something like this:

And that’s it for the colouring! Erasing the messy bits isn’t always necessary although in this particular case I had to. Protip: If you don’t want to make a colouring from scratch you could always use a pre-made psd!
5. Subtitles.
This gif doesn’t require subtitles but for the purpose of this tutorial, I’ll teach you how to do them since they’re an essential aspect of gifmaking! Every gifmaker has an individual preference on how to make their subtitles so this will be just an insight on how I do mine.
To make subs, select the text tool and create a textbox in the bottom part of the gif. I use the font Calibri (download it here if you’re a mac user) in bold italic size 18pt. If text takes up two lines use the settings shown below:
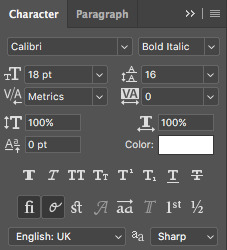
The main colour used for subtitles is pure white and the alternative/2nd speaker colour is yellow (I use the hex code #ffff00).
Now that we have the text you may notice how it doesn’t stand out. To fix this, right click on the text layer, select Blending options... and use these settings for stroke and drop shadow:


Now your gif should look like this:

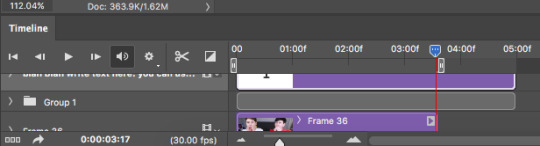
You may notice that your text layer lasts longer in the video timeline than the actual frames. To fix this, make sure you drag the text layer to the start of the timeline and adjust the grey things above the text layer (I’m stumped at the proper word for them) so that the video ends at the last frame (shown below):
6. Saving your Gif.
Now that we are done with making a gif, it’s time to save!
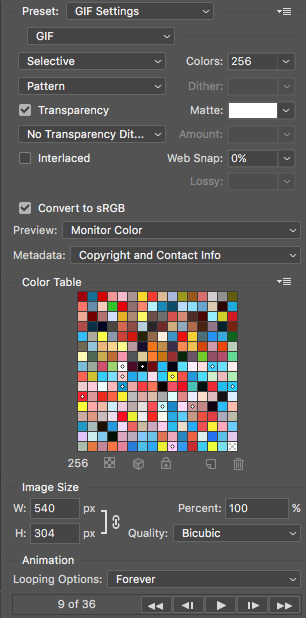
To do so I use the shortcut command + option + shift + s (for mac) or you can go File > Export > Save for Web (Legacy) (for CC) or File > Save for Web (other versions)
My #1 tip for saving a gif is to make sure it’s under 3mb! Tumblr only supports gifs under 3mb so as long as it’s 2.999mb or less you’re fine. Fortunately, our gif ends up at 2.721mb but if you ever do go over, I suggest deleting a few frames or cropping it to a smaller ratio.
Copy my settings when saving:
And we’re done! You should now have a gif that looks like this:
Final Notes:
I hope this tutorial has made some kind of sense and helped you understand the basics of gifmaking and colouring. If you did find this useful and made some hella bright dnp gifs, feel free to tag me in them. I track #scifiphan and will be delighted to reblog them! If you have any questions feel free to send me an ask or a private message (I’ll always respond).
Please like/reblog this tutorial if you found this helpful!
#i actually really like this colouring heck#i created it as i was making it and now i wanna make gifs using this psd#i hope this makes sense#i suck sm at explaining things#this is super long#and the colouring part probs confuses u all#but enjoy#teddii's discourse#gif tutorial#phandom#gifmaking#photoshop#photoshop tutorials#chaoticresources#itsphotoshop#this took me ages to write rip#idk what else to tag it as#validate me lmao
380 notes
·
View notes
Note
Hii! Can you believe I can't remember the last time I talked to you and if I sent you a message meanwhile?? My mind is a mess these days haha I've been so busy, I can't even function 😅 anyways how are you? I heard about the thing w gifmakers and twt and it really sucks :( it's pure stealing and it makes me mad but aNYWAYS I still have to think about what I'm gonna do as your gift 👀 for /scientific/ purposes, do you have a fav pic of your bias? Or a fav style? Hope you have a nice day!! - sss ✨
djsjf no ur good angel!!! i’m doing ok ! i’m kinda in the midst of trying to make and queue gifsets for when i’m on vacation so balancing that with school is kinda stressful but eh whatever also ye the thing abt twt rlly annoys me :/ eSPECIAlly the people who think it’s actually ok to repost gifs n say ‘they only takes 5 minutes to make’ like,,,,,bruh if all of my gifsets would take 5 mins to make i’d actually post regular content during the week lmfao (guess this means i should probs change up my watermark again 😪 fun times) + do u mean my svt bias or can it be anyone? (it’s probably svt isnt it sjsjfjf)
#just sayin....i have this one pic of miss yerim that makes me wanna sob every time i open up my photos djjsjf#asks#sss ✨ anon
0 notes
Last Seen Blogs

crazyanon01
Just a lover of furries.

thorrnapplesims-ccfinds
Sims 4 CC Finds

billknobs
Untitled
pretendtofly
close our eyes, pretend to fly
karmacologne-blog
KARMA KÖLN